

Evo VEGA 3000 Series, VEGA 3000 M, VEGA 3000 C, VEGA 3000 C&P User Manual
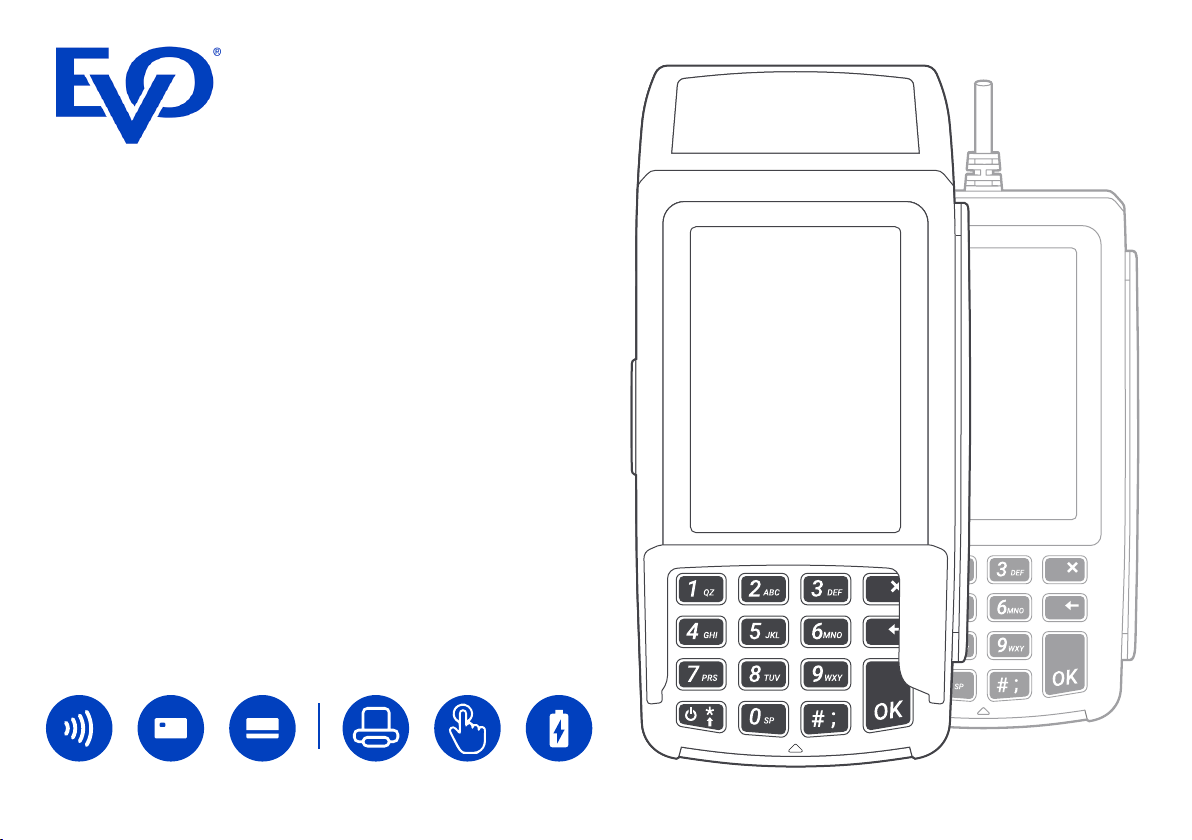
VEGA 3000
User Guide
Guide Version 4.0.2
Mobile Payment Terminal
•
Countertop (VEGA 3000 C)
•
Countertop & PIN Pad
(VEGA 3000 C&P)
•
Mobile (VEGA 3000 M)
C’less MSRICC Touch
Printer Battery
screen

Content
Important notes 3
Description of VEGA 3000 C/M terminal 4
Description of VEGA 3000 C&P 5
ECR integration 5
LAN and power connection (VEGA 3000 C, C&P) 6
PIN Pad connection 6
Power connection (VEGA 3000 M) 7
Printer 8
Idle screen 10
General guidelines for using the terminal 11
Functions of the terminal 12
Sale transaction 13
Sale with contactless card 14
Under CVM limit 14
Over CVM limit 15
Sale with a chip card 16
Sale with magstripe 17
Sale with DCC 18
Sale with tip 19
MOTO or Manual PAN entry 20
Merchant receipt print error 21
Pre-authorization 22
Finish-authorization 22
Reprint receipt 22
Reverse the last transaction 22
Refund 23
Handshake 23
Version info 23
User settings 24
Administration 25
Close shift 25
Print shift totals 25
Close Batch 25
Subtotal 25
Transaction Journaling 26
Network settings 27
Software update 27
Terminal 27
Reference 28
Pairing with POS 28
Receipt description 29
Technical specications 30
VEGA 3000 C/M/P Full Guide
2

Important notes
Transport the appliance only in its original packaging (to
protect it against knocks and bumps).
In the event of an emergency (e.g., damaged housing,
damaged power supply cable, penetration of liquids or
foreign objects),
immediately switch off the appliance and disconnect it
from the mains.
CAUTION: There is a risk of explosion if the battery is replaced by an incorrect type. Dispose of used batteries
according to the instructions.
Appliances may be repaired only by authorized technicians.
Unauthorized opening of the housing or inexpert repairs
can not only result in considerable personal danger but
will also invalidate your warranty and liability protection.
Location
Do not expose your terminal to a direct or indirect effect
of high temperatures, as this may damage the equipment.
Make sure that no foreign matter or uid gets into the
terminal.
Terminal VEGA should not be placed in close proximity of
sources of vibration or oscillation.
Place the device on aat solid surface, and at an appropriate distance from the wiring or asocket outlet when using
AC supply. Determine the distance according to the length
of the connecting power supply cable.
Temperature / Working conditions
Near proximity of mobile phones, network adapters or
other sources of electromagnetic radiation can cause
failure or malfunction of the device. Therefore maintain
asafe distance between the terminal and the sources of
electromagnetic elds.
Protect the terminal against moisture and dust, as this
may result in ashorter life of the equipment.
The terminal should be operated in adry environment
where working temperature is in the range of +0 to +50 °C
If an appliance is brought into the service area from
a colder environment, condensation may occur. The
appliance must be absolutely dry before activation. This
requires an acclimatization time of at least two hours.
Ensure that the nominal voltage of the external power
supply corresponds to the local mains voltage.
To completely separate the appliance from the mains
voltage, switch off the appliance and disconnect it from
the mains and remove the battery where relevant.
Ensure that no foreign objects (e.g., paper clips) or
liquids enter the appliance’s housing. This may result in
electric shock or short circuit.
Protect the appliance from vibrations, dust, moisture
and heat.
Maintenance of the terminal
Always turn off the system before cleaning.
Read the product manual for detailed information about
cleaning and maintenance.
The unit can be cleaned with adamp cloth or antistatic
cloth. Do not use any chemicals.
Never use petrol or other solvents.
Otherwise, you may damage the plastic housing of the
device.
LCD Display
If the display element is damaged and the liquid crystal
solution leaks out onto your hands or clothing, please
wash your hands or clothing immediately under running
water for at least 15 minutes, using soap or alcohol. If the
liquid comes into contact with your eyes, seek immediate
medical care.
Guarantee
Any unprofessional intervention into the terminal or net-
work sources or in the event of improper use will void
the warranty.
The payment terminal uses aLAN, Wi-Fi or GPRS connec-
tion (dependent on the terminal type). Therefore use it in
areas with undisturbed and sucient quality of the signal.
VEGA 3000 C/M/P Full Guide
3
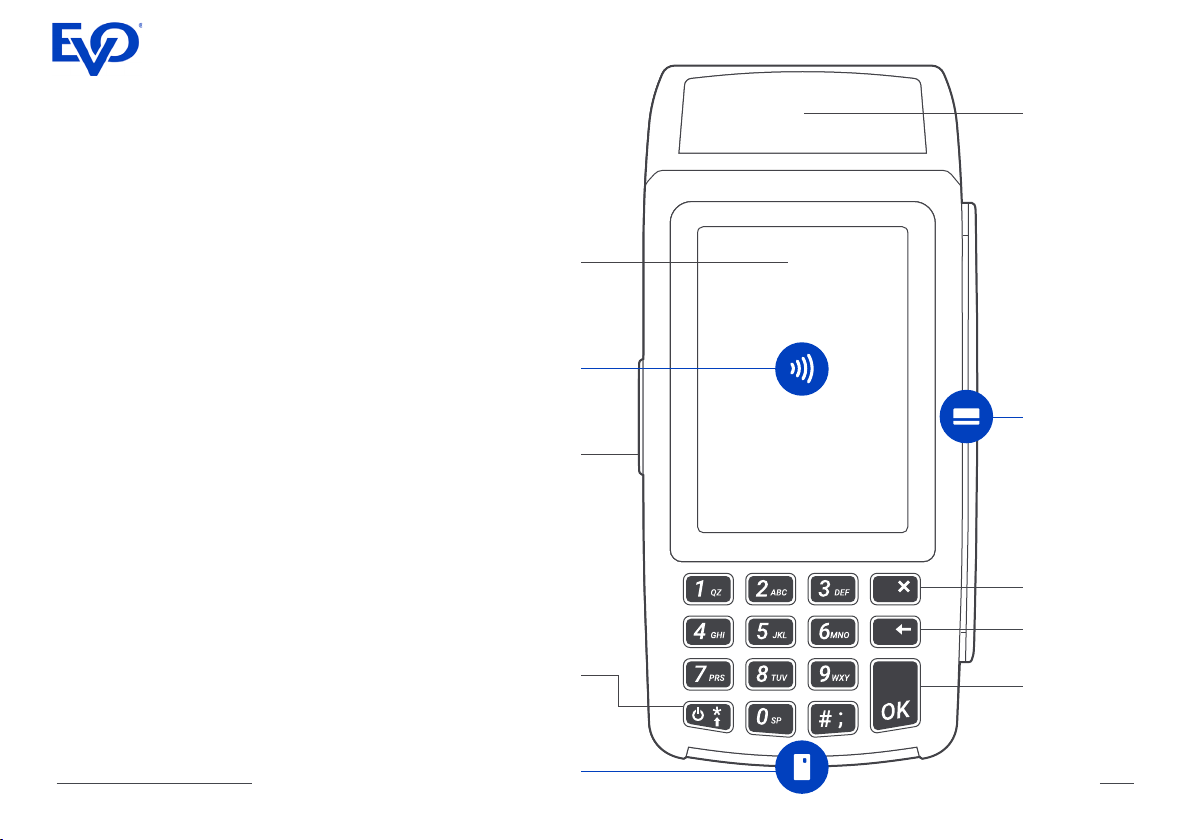
Description of VEGA 3000 C/M terminal
Terminal VEGA 3000 C/M is used for elec-
tronic acceptance of payment cards. It is
certied according to the international EMV
specications. An integral part of the terminal
is areader of a contactless, chip and magnetic cards. It is also provided with akeyboard,
adisplay and athermal printer.
Colour
touch
screen
Printer
Data transmission between the terminal
and the central authorisation server is via
LAN, GPRS or WiFi connection (depending
on terminal type and conguration). The
transmitted data is encrypted to comply with
security standards.
Terminal Vega 3000 C is acountertop solu-
tion designed to be used at a xed place. It
does not contain the battery and must be
connected to power all the time. The terminal
can be connected to the internet via LAN or
WiFi.
Terminal Vega 3000 M is amobile solution
designed for wireless mobile usage. It is powered by the internal battery and connected to
the internet via GPRS or WiFi.
VEGA 3000 C/M/P Full Guide
Contactless
card
reader
Power
socket
(VEGA 3000M)
Power
button
Chip
card
reader
Magnetic
stripe card
reader
Cancel
button
Correction
button
OK
button
4
Description of VEGA 3000 C&P
Vega 3000 C can be integrated with Vega
3000 P which then serves as PIN Pad. In
this conguration, Vega 3000 C is used as a
device for a merchant (entering amount, controlling the payment and printing) and Vega
3000 P as a device for cardholder (showing
amount to pay, reading card and PIN).
ECR integration
Vega 3000 P can be integrated with an ECR.
In this conguration, the ECR controls the ter-
minal, provides the printer for receipt printing
and internet connection. Vega 3000 P serves
as a device for cardholder (showing amount
to pay, reading card and PIN), the merchant
uses ECR to enter the amount, control the
payment and print.
Vega 3000 C can be also integrated with ECR
and receive transaction commands directly
from ECR. In case of Vega 3000 C integration the print of receipt can be done by either
terminal of ECR (depends on conguration).
Please refer to the provider of your ECR for
details and how to integrate with the terminal.
VEGA 3000 C/M/P Full Guide
Contactless
stripe card
card
reader
Magnetic
reader
Chip
card
reader
5
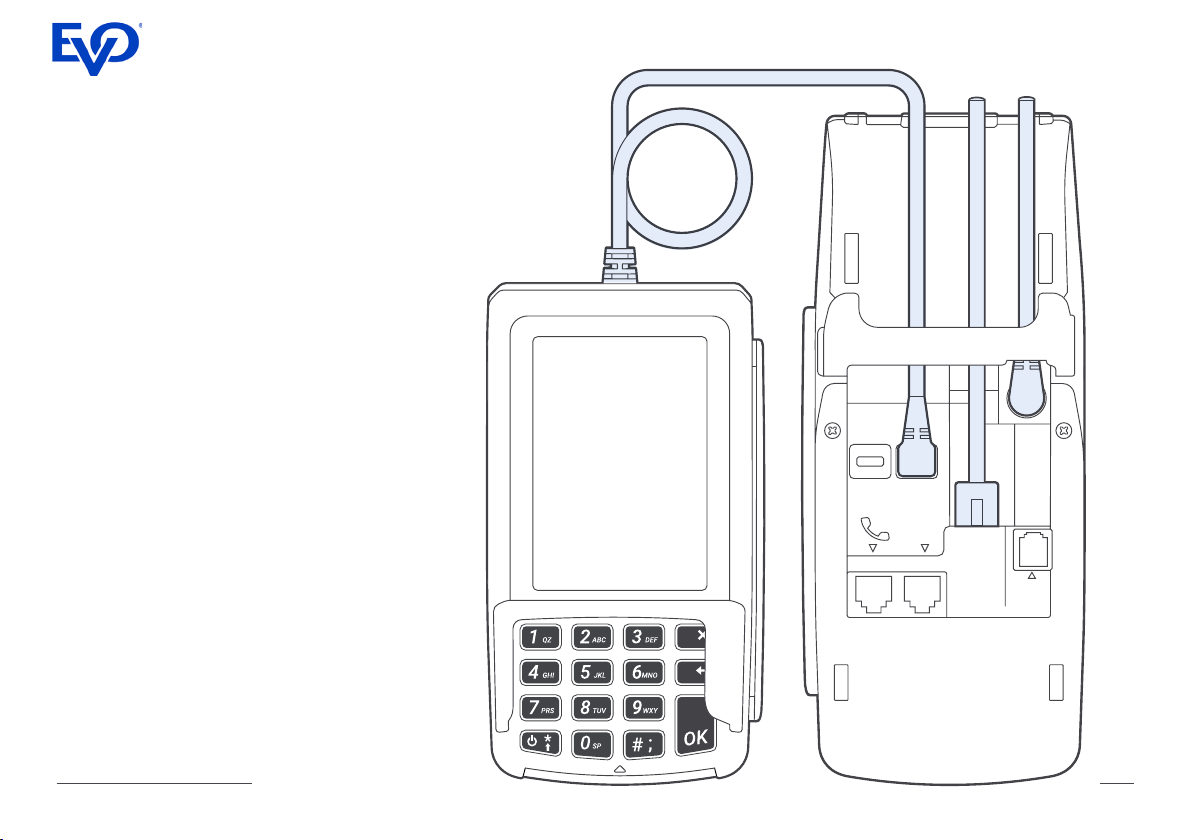
LAN and power connection
(VEGA 3000 C, VEGA 3000 C&P)
Terminal can be connected to the internet via LAN
or WiFi. If LAN connection is required, connect LAN
cable as shown on the picture.
Vega 3000C does not contain a battery and must
be connected to power all the time. Plug terminal
to power using enclosed DC adapter.
Power ON
The terminal is switched ON automatically after
connection to power. The terminal boot takes
approx 1 minute.
PIN Pad connection
Connect PIN Pad to VEGA 3000 C through second
USB slot (USB 2) as shown on the picture.
USB1
USB2
COM2
LAN
cable
LAN
Power
cable
COM1
VEGA 3000 C/M/P Full Guide
6
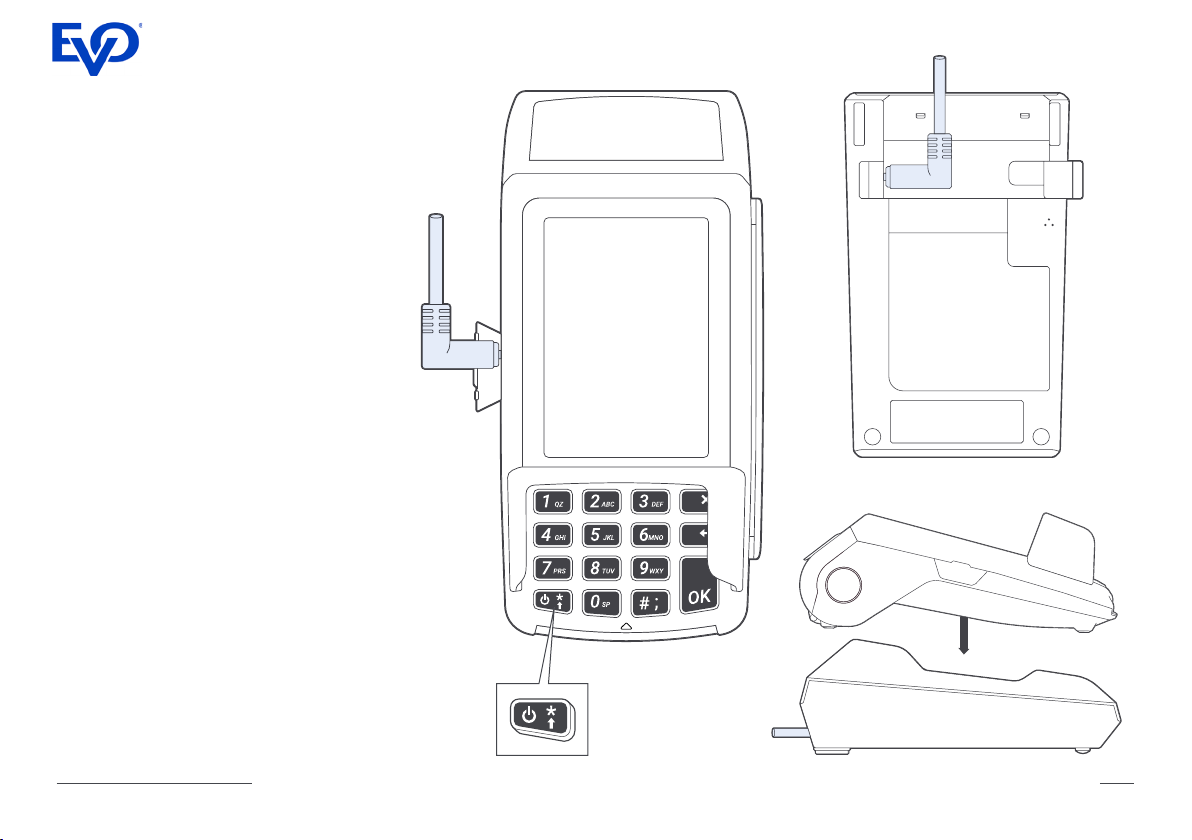
Power connection
(VEGA 3000 M)
Power
cable
Terminal VEGA 3000 M contains a battery
and can be operated without being permanently connected to power. If the battery level
is low it must be connected to power and
recharged. Plug the terminal to power using
the enclosed DC adapter as shown on the
left picture.
Using Charging Cradle/Base
To simplify handling the terminal the Charging
cradle/base can be used. Connect cradle to
the power using the enclosed DC adapter
as shown on the top right picture and insert
terminal into it as shown on the bottom right
picture.
Power ON
The terminal is switched on by long (>3 sec)
pressing of the “Power” button located on
the bottom left of the keyboard. The terminal
takes approximately 1 minute to start.
The terminal is switched off by pressing the
power button and selecting "Shutdown".
Power
cable
VEGA 3000 C/M/P Full Guide
7
Printer
The thermal printer is used to print receipts
for transactions and other information at
a print speed of up to 100 mm/second
(about 18 rows/sec.)
The new Easy-Click technology makes the
process of inserting anew paper roll into the
printer simpler and faster.
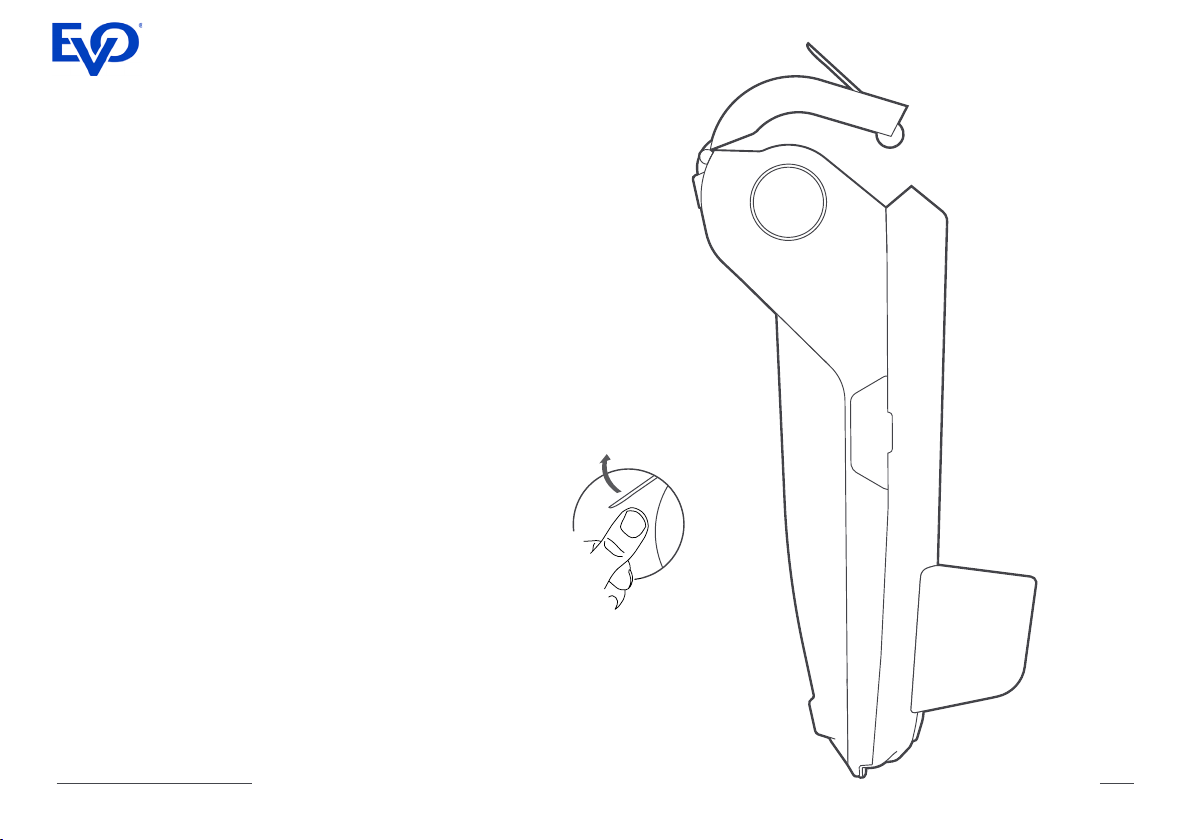
Printer roll replacement
1 Ensure that the leading edge of the paper
is at and smooth, free of any adhesive tape
used to prevent the paper to unwind during
transport etc.
2 Open the back cover of the terminal. Grasp
by nails the protruding section pulling it gently
towards the display. The printer cover will
partially open.
3 Put the paper exactly in the space of the
feed roller in such away that the loose end
of the roll unwinds along the inner edges upwards. See picture on next page. Unroll some
of the paper to form an overlap and using
Grasp by nails
the protruding
section
VEGA 3000 C/M/P Full Guide
8
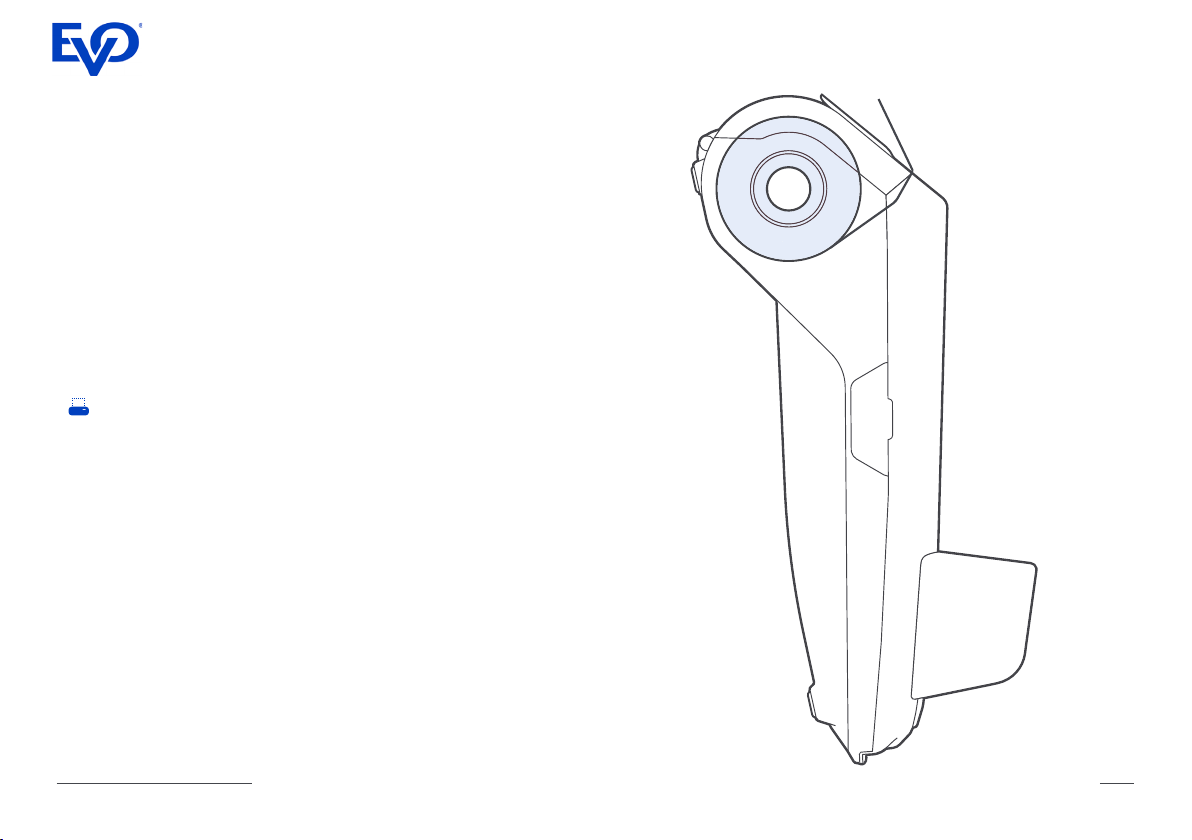
both thumbs simultaneously snap the back
cover of the terminal back into its position.
• The standard roll size:
VEGA 3000 C
width 57 mm × 50 mm diameter (max.)
VEGA 3000 M
width 57 mm × 40 mm diameter (max.)
• The approaching end of the roll is signalled
by an end-of-roll colouring
• Empty paper roll tray is indicated by an icon
on the screen
Using other than recommended rolls may
result in damage to the printer and may void
any warranty.
VEGA 3000 C/M/P Full Guide
9
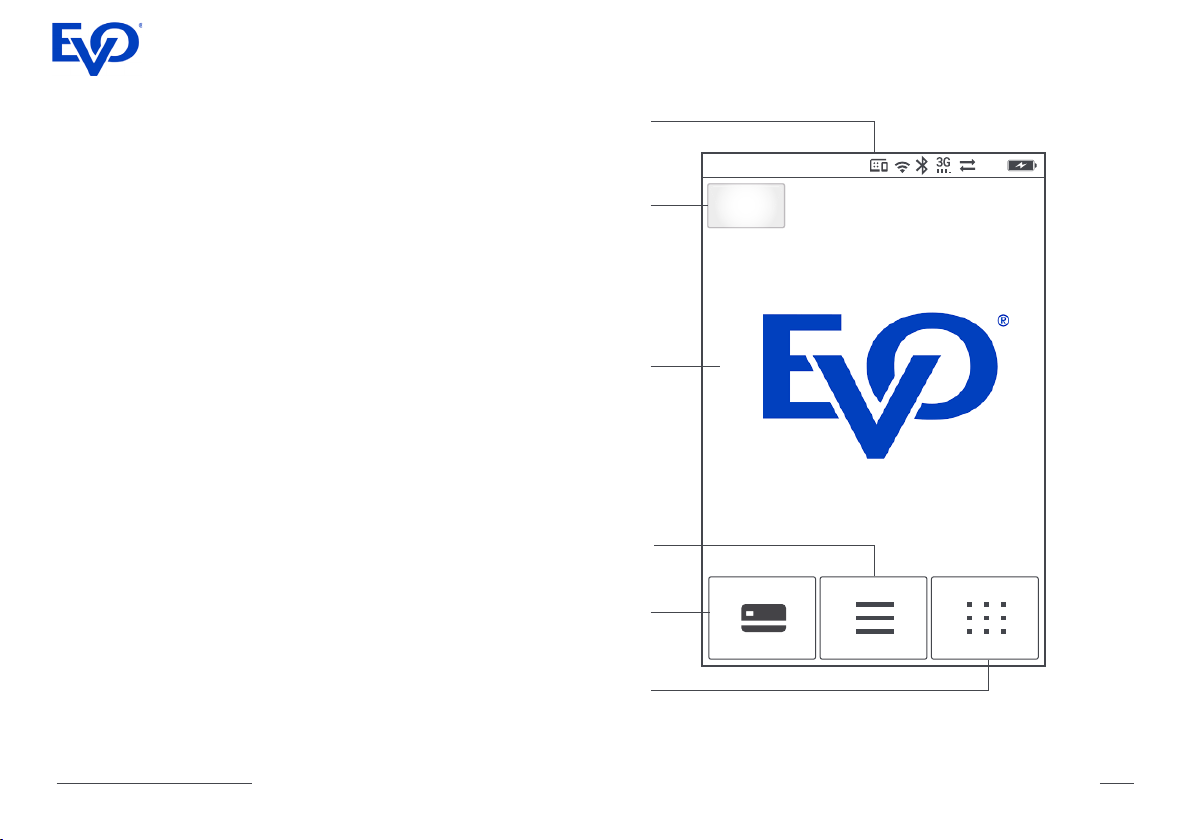
Idle screen
After the terminal is switched on, the display
shows the initial screen where there are three
symbols, representing Sale function, Menu
and Quick Menu.
Castles Vega 3000 C/M terminal com-
municates with the user via a 3.5-inch
touch LCD display with a resolution of
320 × 480 pixels.
Status
bar
29/04/16 13:14:15 95%
Contactless
indicator
Introductory
graphics
Menu
Quick
pay
VEGA 3000 C/M/P Full Guide
Quick
menu
10
 Loading...