

Evo Scan16 User Manual

FCC STATEMENT
This device complies with part 74, Subpart H of the FCC rules. Operation is subject to the following two
conditions: (1)This device may not cause harmful interference and (2) This device must accept any
interference received, including interference that may cause undesired operation
Notice : The changes or modifications not expressly approved by the party responsible for compliance could
void the user’s authority to operate the equipment.
IMPORTANT NOTE: To comply with the FCC RF exposure compliance requirements, no change to the
antenna or the device is permitted. Any change to the antenna or the device could result in the device
exceeding the RF exposure requirements and void user’s authority to operate the device.

Special Projects Evo True Wireless Fitness Transmitter
Ansr Audio Scan16 Professional UHF Receiver
Table of Contents
1. Introduction
2
2. Safety
2
3. Environment
2
4. Wireless Note
2
5. Quick Start Guide
3
6. Product Description
6.1 AW-25 and SP-25 Scan16 Receiver
6.2 AW-25R and SP-25R Scan16 Receiver
6.3 Evo True Wireless Fitness Transmitter
4
6
8
7. Setting Up
7.1 Connecting the receiver to power
7.2 Connecting the receiver to a mixer or amplifier
7.3 Charging the Evo
7.4 Channel Setup: Auto or Manual
7.5 Evo transmitter channel set
9
9
10
11
11
8. Basic Connections
8.1 Connecting to a sound system
8.2 Rackmounting
12
12
13
9. System Features
14
10. System Specifications
14
11. Troubleshooting
15
12. Warranty
15
Page

1. Introduction
Thank you for purchasing the Scan16 Professional Wireless Microphone System featuring the Evo
True Wireless Fitness Transmitter (for brevity, noted in this manual as 'Evo'). This Patent Pending PLL
synthesized wireless microphone system operates in an FCC approved UHF band frequency with 16
selectable channels. Please read this instruction manual carefully before operating the system. This
manual covers the function and operation of the wireless microphone system.
2. Safety
While the Evo transmitter is water resistant, the receiver is not. Please observe these safety
precautions.
Do not spill liquid on the receiver and do not drop either unit.
Do not place the units near heat sources such as radiators, amplifiers, or etc.
Do not expose it to direct sunlight, extremely dusty conditions, excessive moisture, or vibration.
3. Environment
Do not throw used electronics into a fire or garbage bin with domestic rubbish. Be sure to dispose
of used batteries in accordance with local waste disposal rules.
When disposing the equipment, remove the batteries, separate the case, circuit boards, and
cables, and dispose of all components in accordance with local waste disposal rules. But really, we
know you will not throw this away, we just are required to include a statement on the environment.
4. Wireless Notes
Before setting up, make sure that the transmitter and receiver are tuned to the same frequency.
Do not use two transmitters tuned to the same frequency.
Always operate your system with a fully charged battery.
Set the MIC/LINE switch on the rear of receiver to adjust receiver output level to match input level
requirements of an audio mixer or amplifier.
While checking sound, move the transmitter around the area where you use the system to look for
dead spots (receiver loses the signal). If you find any dead spots, change the receiver position. If it
does not work, avoid such places.
To avoid interference from signal reflections, do not put the receiver too near significant metal
objects and avoid obstructions between transmitter and receiver. Try to maintain a 'line of sight'
with the receiver.
Avoid the interference from TV, radio, other wireless appliances and etc..
Wireless systems depend on fully charged batteries. Low batteries will seriously degrade
performance. Be certain to allow charge time prior to use.
Be certain that the receiver antennas are exposed and in 'line of sight' with the transmitter.
2

5. Quick Start Guide
Fully charge the Evo transmitter by connecting the charging adapter to the supplied wall plug
transformer. Leave your Evo transmitter powered OFF while charging. Green LED will turn off
when charged. Replace charging adapter cover before use.
NOTICE – The supplied charger is designed specifically for use with the Evo True
Wireless system. Use of any other charger may cause system damage and will void
your warranty. DO NOT connect to the built-in DC OUT port on the AW-25 or SP-25
receiver.
Make audio output and power connections as described in Section 7.
If connecting to a mixer MIC input, set the receiver volume to the one o'clock position. If
connecting to a mixer LINE input, set the receiver volume to MAX position. Be sure to keep
the mixer output turned down until ready to test.
Turn on receiver by pressing the POWER button for 2 seconds.
Select operating channel:
Auto scan selection: Press SET for 5 seconds to search for the next interference-free
channel. Channel display will stop flashing when channel is locked in.
Manual selection: Press SET for 1 second, channel display will flash. Press the up/down
arrows to select channel. Press SET quickly to lock channel in.
Turn on your Evo transmitter and select the matching channel. Note the below table describing
the channels! Note that position 0 indicates channel 16. See Section 7 for details. Also –
be sure to watch the receiver RF meter for activity as you select the transmitter channel, as
described in the next step. If the RF meter lights fully on one switch position, you have likely
found the correct channel.
Evo Transmitter Switch Actual Channel Evo Transmitter Switch Actual Channel
1 1 9 9
2 2 A 10
3 3 B 11
4 4 C 12
5 5 D 13
6 6 E 14
7 7 F 15
8 8 0 16
After selecting the transmitter and receiver to the same frequency, the RF meter on the AW-25
front panel will display signal strength. For this, more is better.
Slowly raise your mixer volume to test. The yellow dot on the mic indicates the speak side.
If setting up additional systems, leave the first transmitter on when using Auto Scan selection –
this way, the second receiver will 'see' the first transmitter and avoid that channel. Follow
similarly if setting up additional systems.
Go forth and be truly wireless!
3
6. Product Description
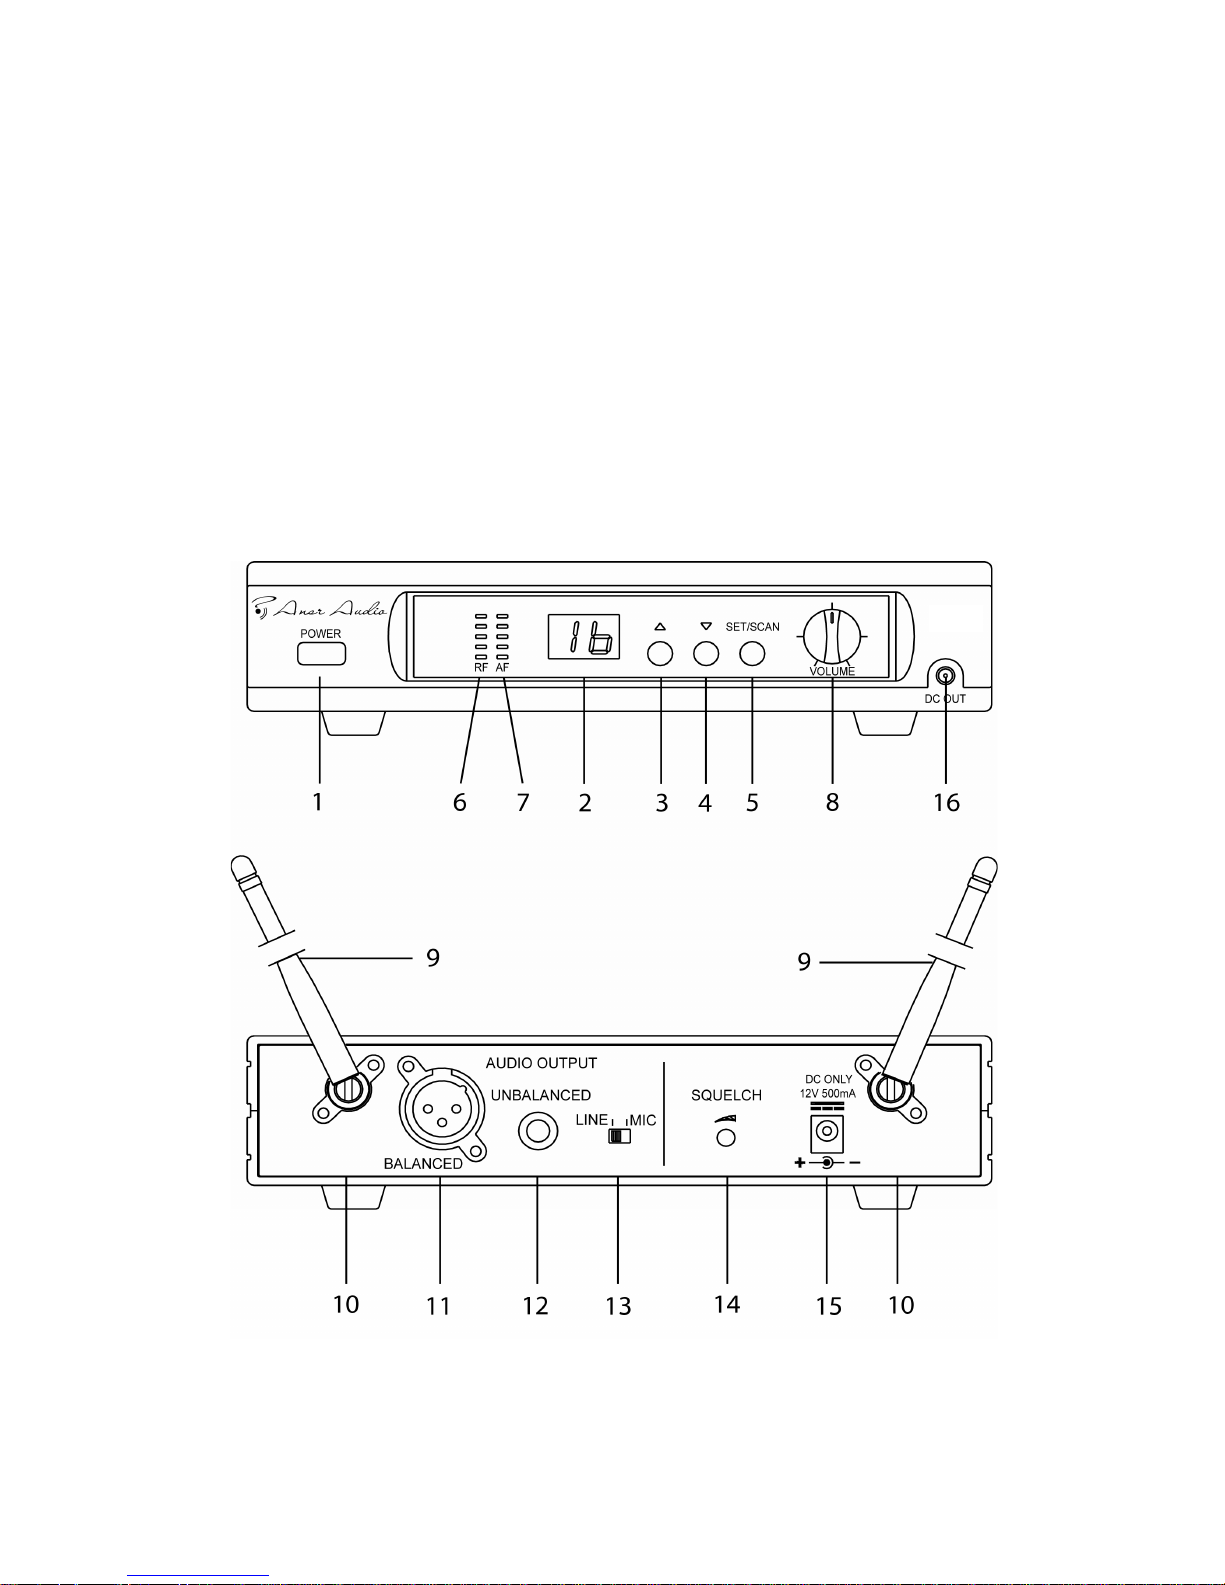
6.1 AW-25 and SP-25 Receiver
The AW-25 and SP-25 receiver is designed for use only with Ansr Audio / Special Projects 16channel selectable channel transmitters. The receiver operates in UHF 682-697 MHz
frequency band with PLL synthesized control.
Newer systems include the AW-25R or SP-25R receiver. Function is the same, see details in
Section 6.2. Both are included here for ease of reference.
AW-25
4
 Loading...