

Page 1
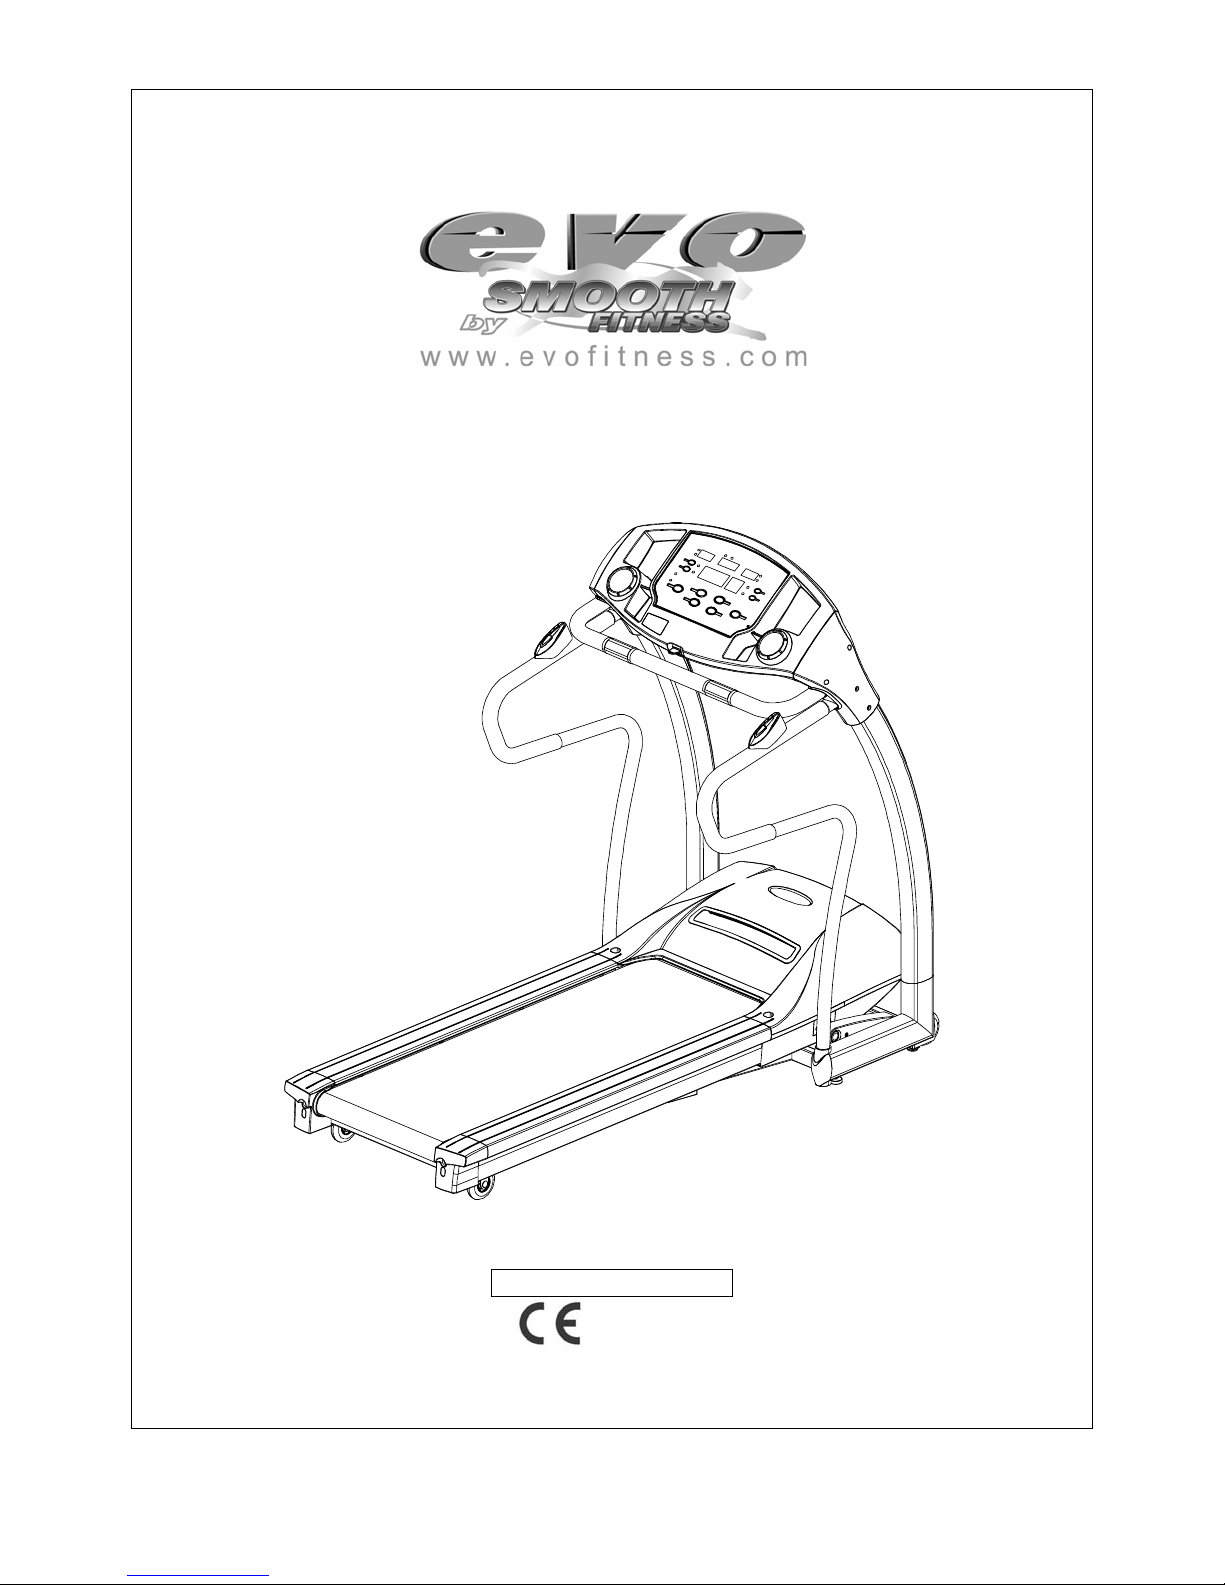
Revised 2-21-06 USER’S MANUAL
EVO1 MOTORIZED TREADMILL
USER WEIGHT LIMITATION: 400lbs (181 kgs)
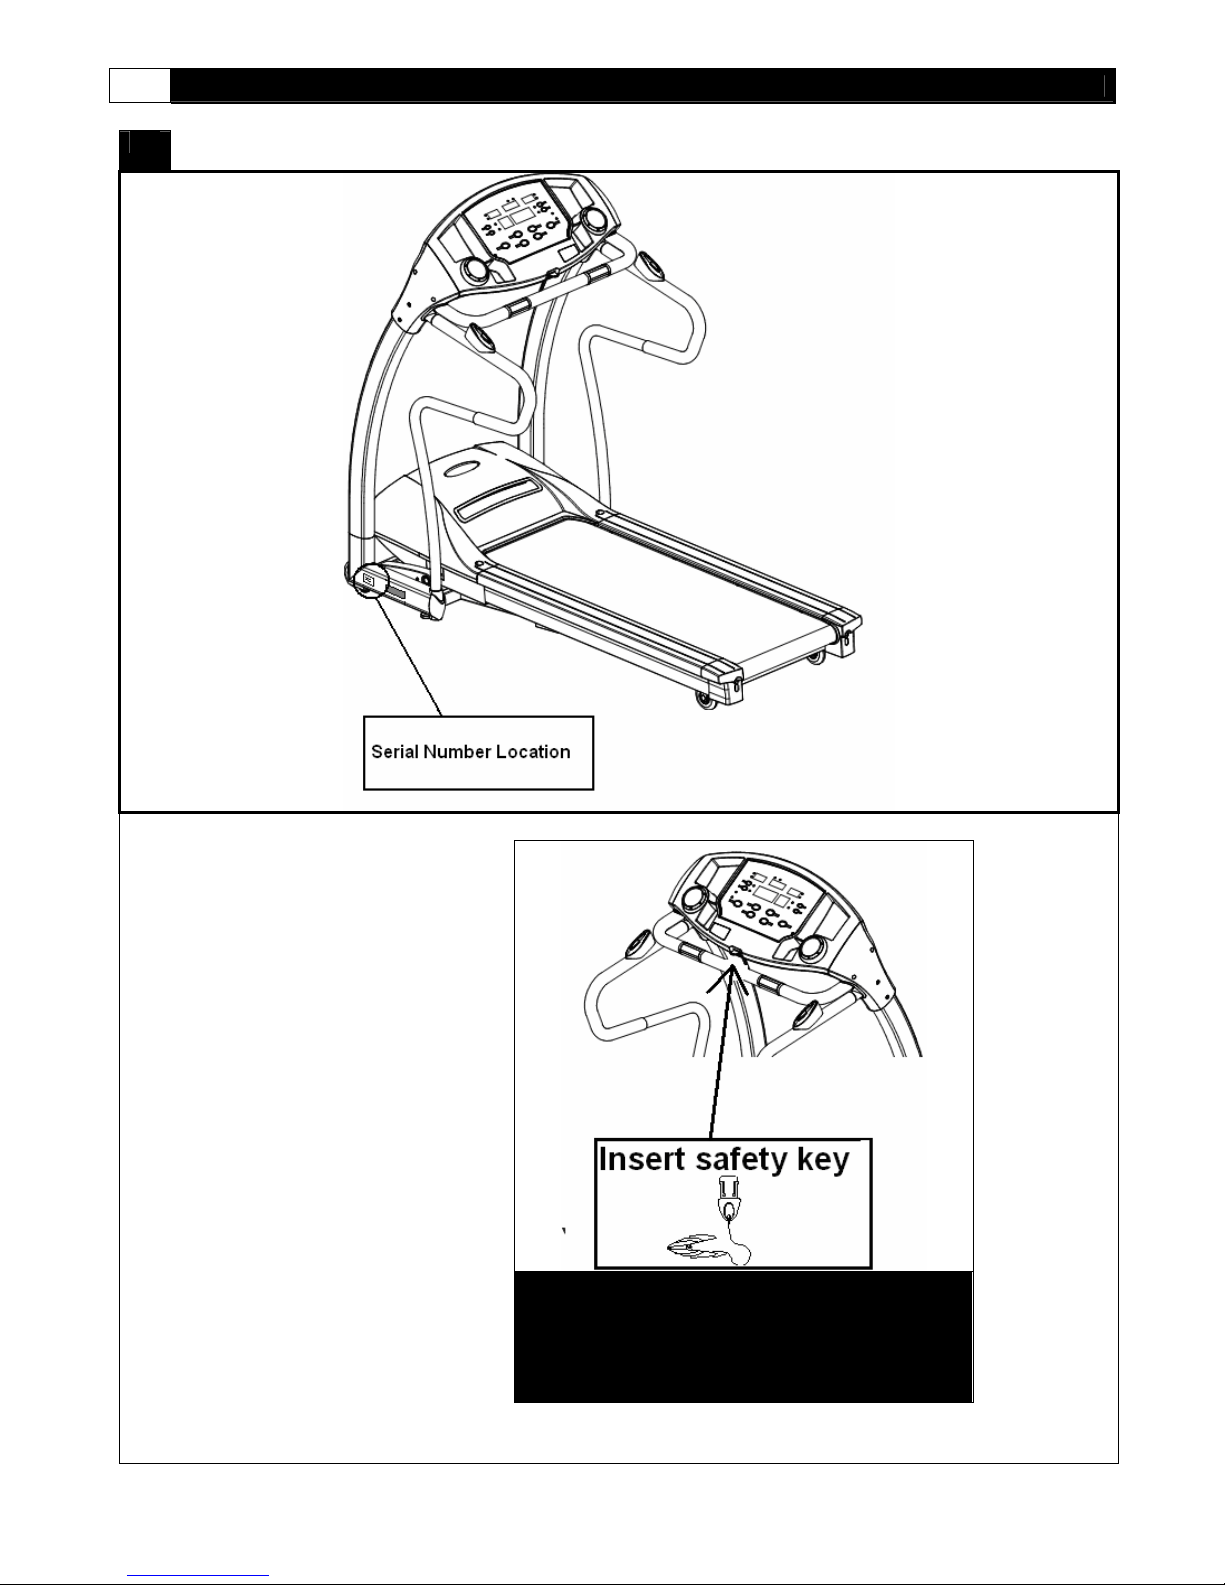
SERIAL NUMBER (found on frame):
Page 2

2 EVO1 TREADMILL
For future service or rela te d questions:
Please staple your receipt and/or write in the name and phone number of the retail store where you purchased your treadmill.
Name: _____________________ __ _______ Phone Number: ___________________ Receipt: ____________ __________
Precautions:
WARNING: To reduce the risk of burns, fire, electric shock, or injury to persons, read the following important precautions and
information before operating the treadmill. It is the responsibility of the owner to ensure that all users of this treadmill are
adequately informed of all warnings and precautions.
PRECAUTIONS
• Use the treadmill only as described in this manual.
• Place on a level surface, with 6 feet (2 m) of clearance behin d it. Do not place the treadmill on any surface that blocks air
openings. To protect the floor or carpet from damage, place a mat under the treadmill.
• When choosing a location for the treadmill be sure that the location and position permit access to a plug.
• Keep the treadmill indoo rs, away from moisture and dust. Do not put the treadmill in a garage or covered patio, or near
water.
• Do not operate the treadmill where aerosol product s are used or where oxyge n is being a dm ini st er ed.
• Keep children under the age of 12 and pets away from the treadmill at all times.
• The treadmill should not be used by persons weighing more than 400lbs (181 kgs. )
• Never allow more than one person on the treadmill at a time. Wear appropriate exercise clothing when using the treadmill.
Do not wear loose clothing that could become caught in the treadmill. Athletic support clothes are recommended for both
men and women. Always wear athletic shoes. Never use the treadmill with bare feet, wearing only stockings, or in
sandals.
• When connecting the power cord, plug the power cord into a grounded circuit. No other appliance should be on the same
circuit.
• Always straddle the belt and allow it to start moving before stepping onto th e belt.
• Always examine your treadmill before using to ensure all parts are in working order.
• Allow the belt to fully stop before dismounting.
• Never insert any object or body parts into any opening.
• Follow the safety information in regards to plugging in your treadmill.
• Keep the power cord away from the incline wheels and do not run the power cord underneath your treadmill. Do not
operate the treadmill with a damaged or frayed power cord.
• Always unplug the treadmill before cleaning and/or servicing. Service to your treadmill should only be performed by an
authorized service representative, unless authorized and/or instructed by the manufacturer. Failure to follow these
instructions will void the treadmill warranty.
• Never leave the treadmill unattended while it is running.
• This equipment is Class B (Home Use Only).
Page 3
www.evofitness.com
3
Power Requirements:
IMPROPER CONNECTION OF THE EQUIPMENT GROUNDING CONNECTOR CAN RESULT IN THE RISK OF AN ELECTRIC
SHOCK. CHECK WITH A QUALIFIED ELECTRICIAN OR SERVICE MAN IF YOU ARE IN DOUBT AS TO WHETHER THE
PRODUCT IS PROPERLY GROUNDED. DO NOT MODIFY THE PLUG PROVIDED WITH THE PRODUCT, IF IT WILL NOT FIT
THE OUTLET; HAVE A PROPER OUTLET INSTALLED BY A QUALIFIED ELECTRICIAN.
This treadmill can be seriously damaged by sudden voltage changes in your home’s electrical power. Voltage spikes, surges and
noise interference can result from weather conditions or from other appliances being turned on or off. To reduce the possibility of
treadmill damage, always use a surge protector (not included) with your treadmill.
Surge protectors can be purchased at most hardware stores. The manufacturer recommends a single outlet surge protector with a
UL 1449 rating as a Transient Voltage Surge Suppressor (TVSS) with a UL suppressed voltage rating of 400V or less and an
electrical rating 110VAC, 15 amps.
This treadmill must be gro unded to reduce the risk of electrical shock. Grounding provides a path of least resistance for electric
current, should the tre admill malfunction. This treadmill is equipped with an electrical cord that has an equi pment-grounding
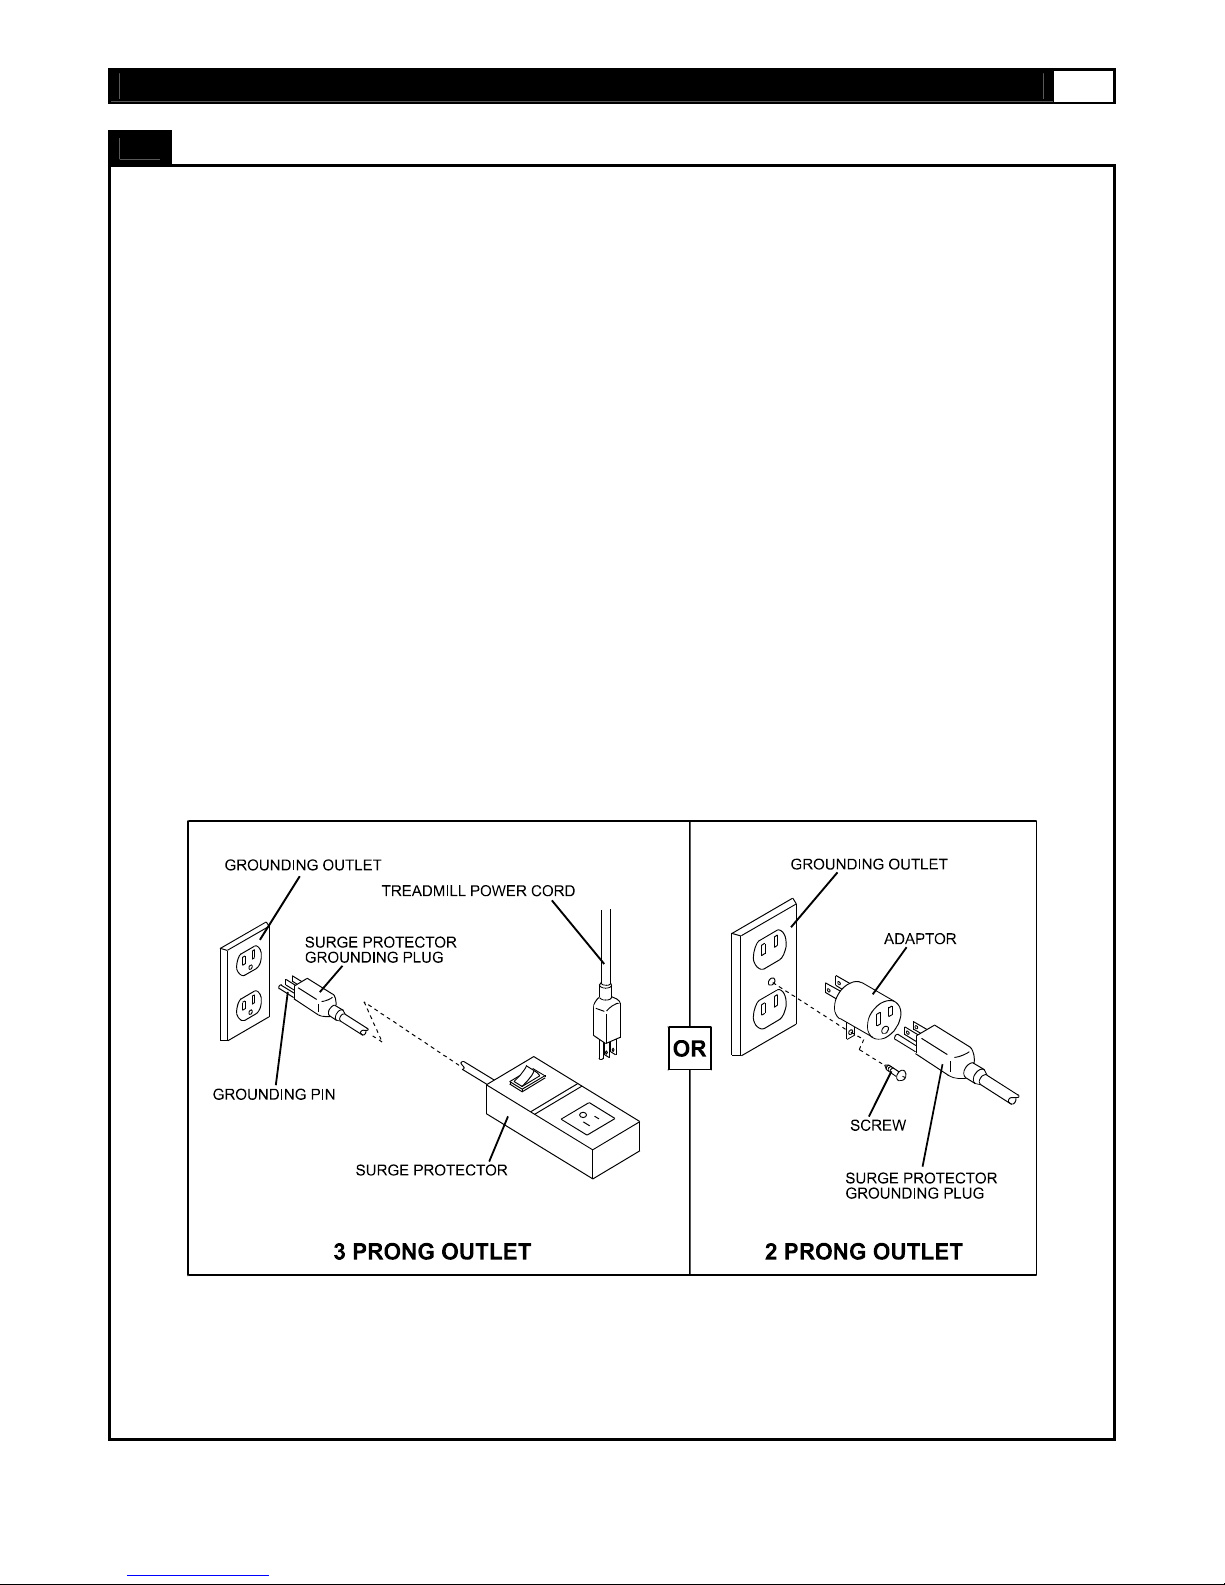
conductor and a grounding plug. Always plug the power cord into a surge protector, and plug the surge protector into an
appropriate outlet that is properly installed and grounded in accordance with all local codes and ordinances.
This product is for use on a nominal 110-volt circuit, and has a grounding plug that looks like the plug illustrated in the drawing
below.
GFCI outlets and GFCI Circuit Breakers are NOT recommended for use on this product. GFCI outlets and GFCI Circuit Breakers
may cause this equipment to improperly function.
POWER REQUIREMENTS
Page 4

4 EVO1 TREADMILL
Before You Begin
Open the boxes:
Open the boxes of your new equipment. Inventory all parts included in the boxes, and compare them to the
Supplied Components and Supplied Hardware lists on pages 5-6 for a full count of the parts included. If you
are missing any parts or have any questions contact us directly at 888-800-1167
*Assembly instructions begin on page 10.
Gather your tools:
Before you begin, make sure that you have gathered all the necessary tools you may require to assemble the
unit properly. Having all of the necessary equipment at hand will save time and make the assembly quick
and hassle-free.
Clear your work area:
Make sure that you have cleared away a large enough space to properly assemble the unit. Make sure the
space is free from anything that may cause injury during assembly. After the unit is fully assembled, make
sure there is a comfortable amount of free area around the unit for unobstructed operation.
Invite a friend:
Some of the assembly steps may require heavy lifting. It is recommended that you obtain the assistance of
another person when assembling this product.
User Weight Limitation:
Please note that there is a weight limitation for this product. If you weigh more than 400LB (Approx. 181
Kg) it is not recommended that you use this product. Serious injury may occur if the user’s weight exceeds
the limit shown here. This product is not intended to support users whose weight exceeds this limit.
Care and maintenance:
The safety level can be maintained only if it is examined for damage and wear.
Replace any defective components immediately and stop all use of the equipment until repaired.
Always take care when mounting the equipment. Straddle the equipment by placing your feet on the
straddle rails. Dismount from the equipment only after all parts have stopped.
Always check the wear and tear components like pulley, belts, etc.…To prevent injury.
There is an emergency stop, in the form of a SAFETY KEY, to prevent injury; you can stop the treadmill
immediately by actuating the emergency stop for emergency dismount.
Page 5
www.evofitness.com
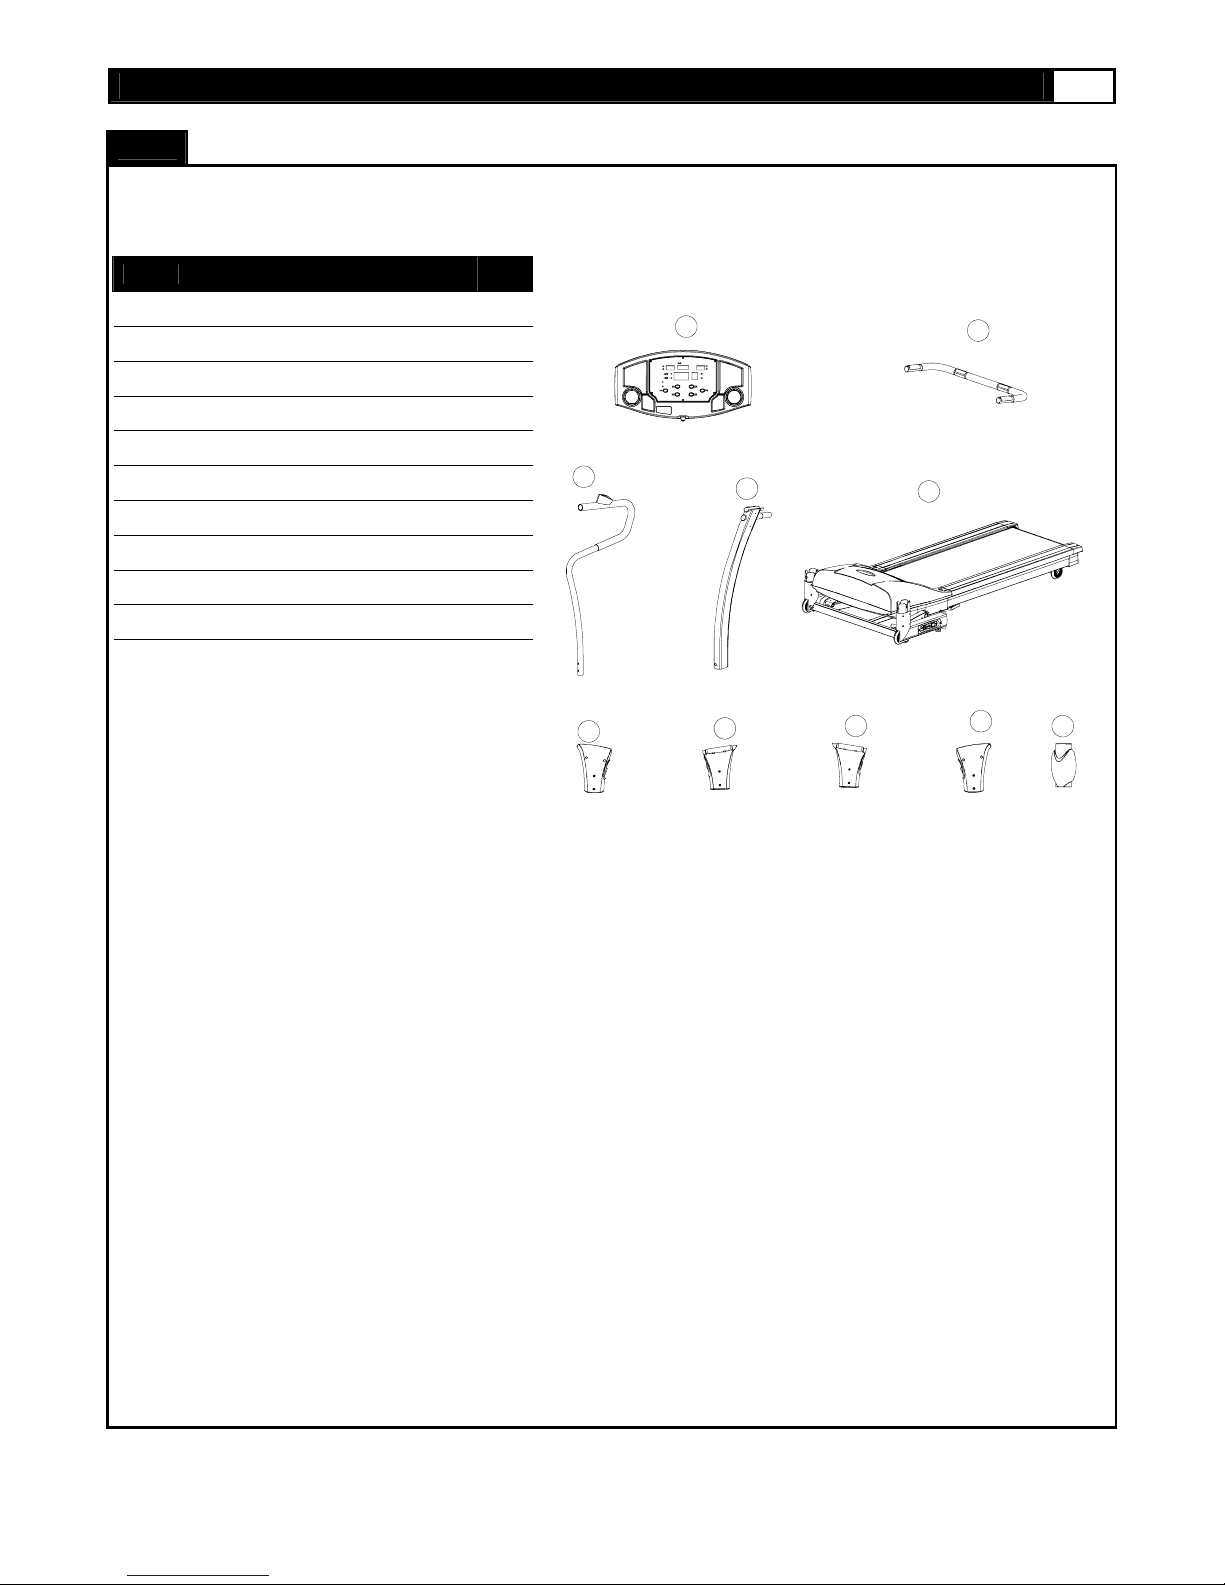
This list identifies the major components you will use to assemble this product. Component A, B, and E are already partially
assembled
SUPLIED COMPONE NTS
5
No. Description Qty.
A
Computer
B Front Handlebar Assembly 1
C Handlebar 2
D Upright Assembly 2
E Main Frame Assembly 1
202 Handlebar Lower Cover 2
302 Upright Cover-LL 1
303 Upright Cover -LR 1
304 Upright Cover -RL 1
305 Upright Cover -RR 1
1
C
302
A
D
303
304
B
E
305
202
Page 6
6 EVO1 TREADMILL
Supplied Hardware
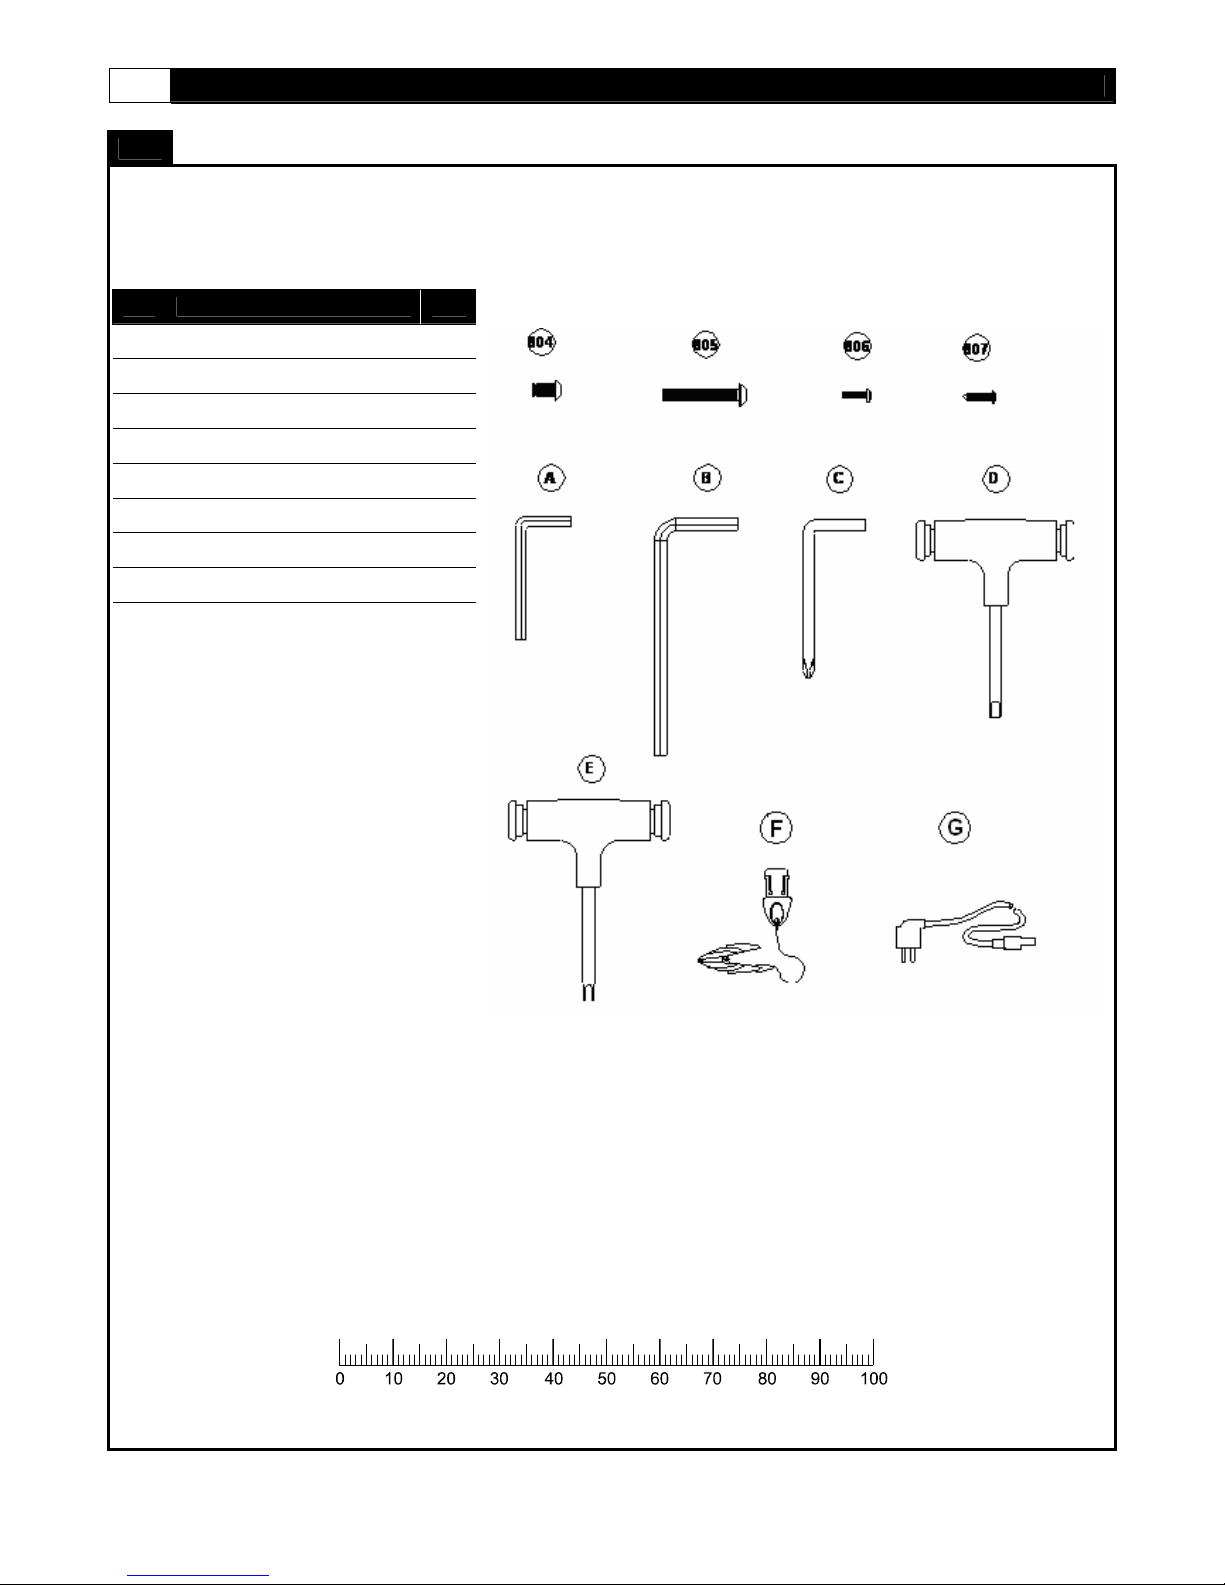
This list identifies the hardware you will use to assemble the product. To help distinguish between the
various types of screws and bolts, use the scale below to measure them and compare them to the sizes listed.
No. Description Qty.
804
M8 x 15mm Bolt
805 M8 x 50mm Bolt 8
806 #8 x 19mm Screw 8
807 #8 x 19mm Screw 8
A 5mm Wrench 1
B 8mm Wrench 1
C Wrench 1
D 5mm Allen Wrench 1
6mm Allen Wrench
E
F Safety Key 1
2
1
G Power Cord 1
MILLIMETERS
Page 7
www.evofitness.com
7
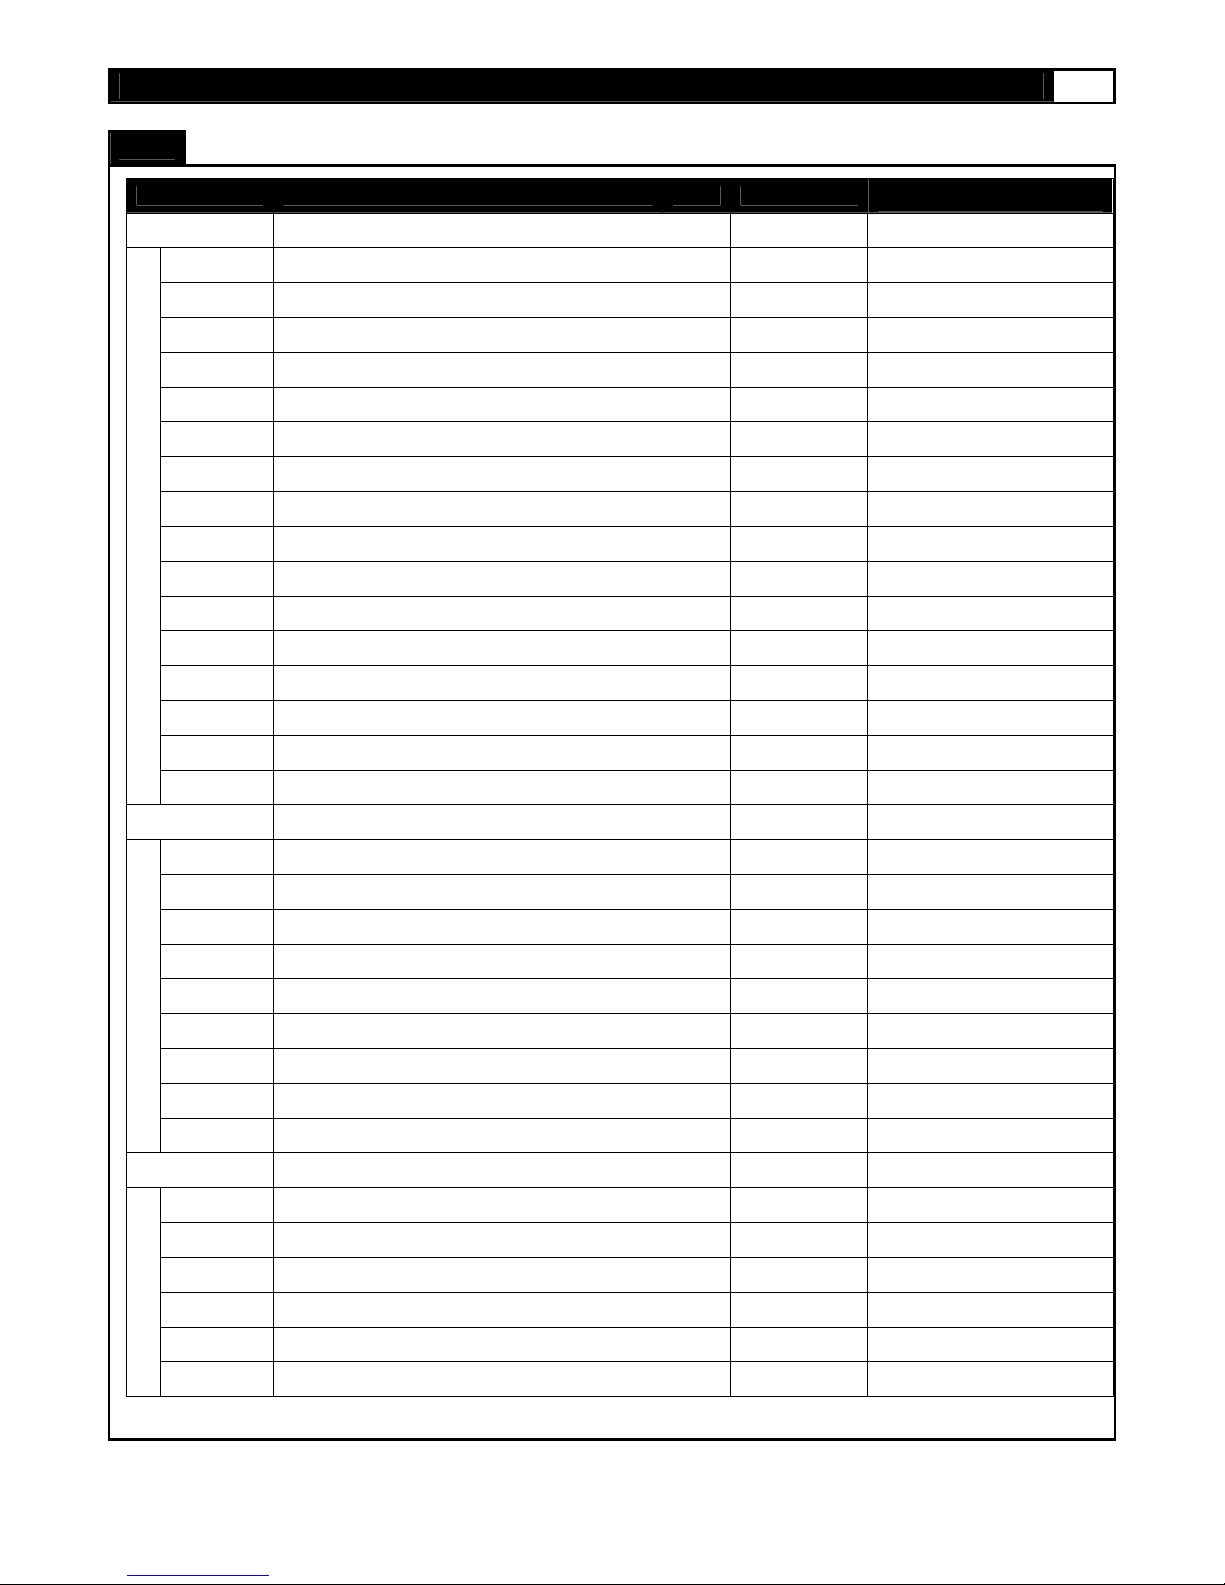
PARTS LIST
No. Description Qty.
EVO1-100
EVO1-101
EVO1-102
EVO1-103
EVO1-104
EVO1-105
EVO1-106
EVO1-107
EVO1-108
EVO1-109
EVO1-110
EVO1-111
EVO1-112
EVO1-113
EVO1-114
EVO1-115
EVO1-116
EVO1-200
EVO1-201
EVO1-202
EVO1-203
EVO1-204
EVO1-205
EVO1-206
EVO1-207
EVO1-208
EVO1-209
EVO1-300
EVO1-301
EVO1-302
EVO1-303
EVO1-304
EVO1-305
EVO1-306
Console Assembly
Overlay
Computer Insert
Console PC Board
Console Housing - Upper
Console Housing - Bottom
Safety key Base
Safety Key
Safety Key Wire - Upper
Computer Wire - Upper
Computer Ground Wire
Hand Pulse Wire - Upper
E – Prom
Motion Contro l Board
Motion Control Board Wire
Motion Contro l Sensor Wire
Water Bottle Holder
Handle Bar Upright
Handle Bar Upright Rear End Cap
Handle Bar Upright Foam Grip
Front Handle Bar
Front Handle Bar Foam Grip-Short
Front Handle Bar Foam Grip-Long
Hand Pulse Set
Motion Control
Motion Control Base
Upright
Upright Cover –LL
Upright Cover –LR
Upright Cover -RL
Upright Cover -RR
Safety Key Wire - Middle
1 EVO1-101
1 EVO1-102
1 EVO1-103
1 EVO1-104
1 EVO1-105
1 EVO1-106
1 EVO1-107
1 EVO1-108
1 EVO1-109
1 EVO1-110
2 EVO1-111
1 EVO1-112
1 EVO1-113
1 EVO1-114
2 EVO1-115
2 EVO1-116
2 EVO1-201
2 EVO1-202
2 EVO1-203
1 EVO1-204
1 EVO1-205
2 EVO1-206
2 EVO1-207
2 EVO1-208
2 EVO1-209
2 EVO1-301
1 EVO1-302
1 EVO1-303
1 EVO1-304
1 EVO1-305
1 EVO1-306
Part Number
Page 8
8 EVO1 TREADMILL
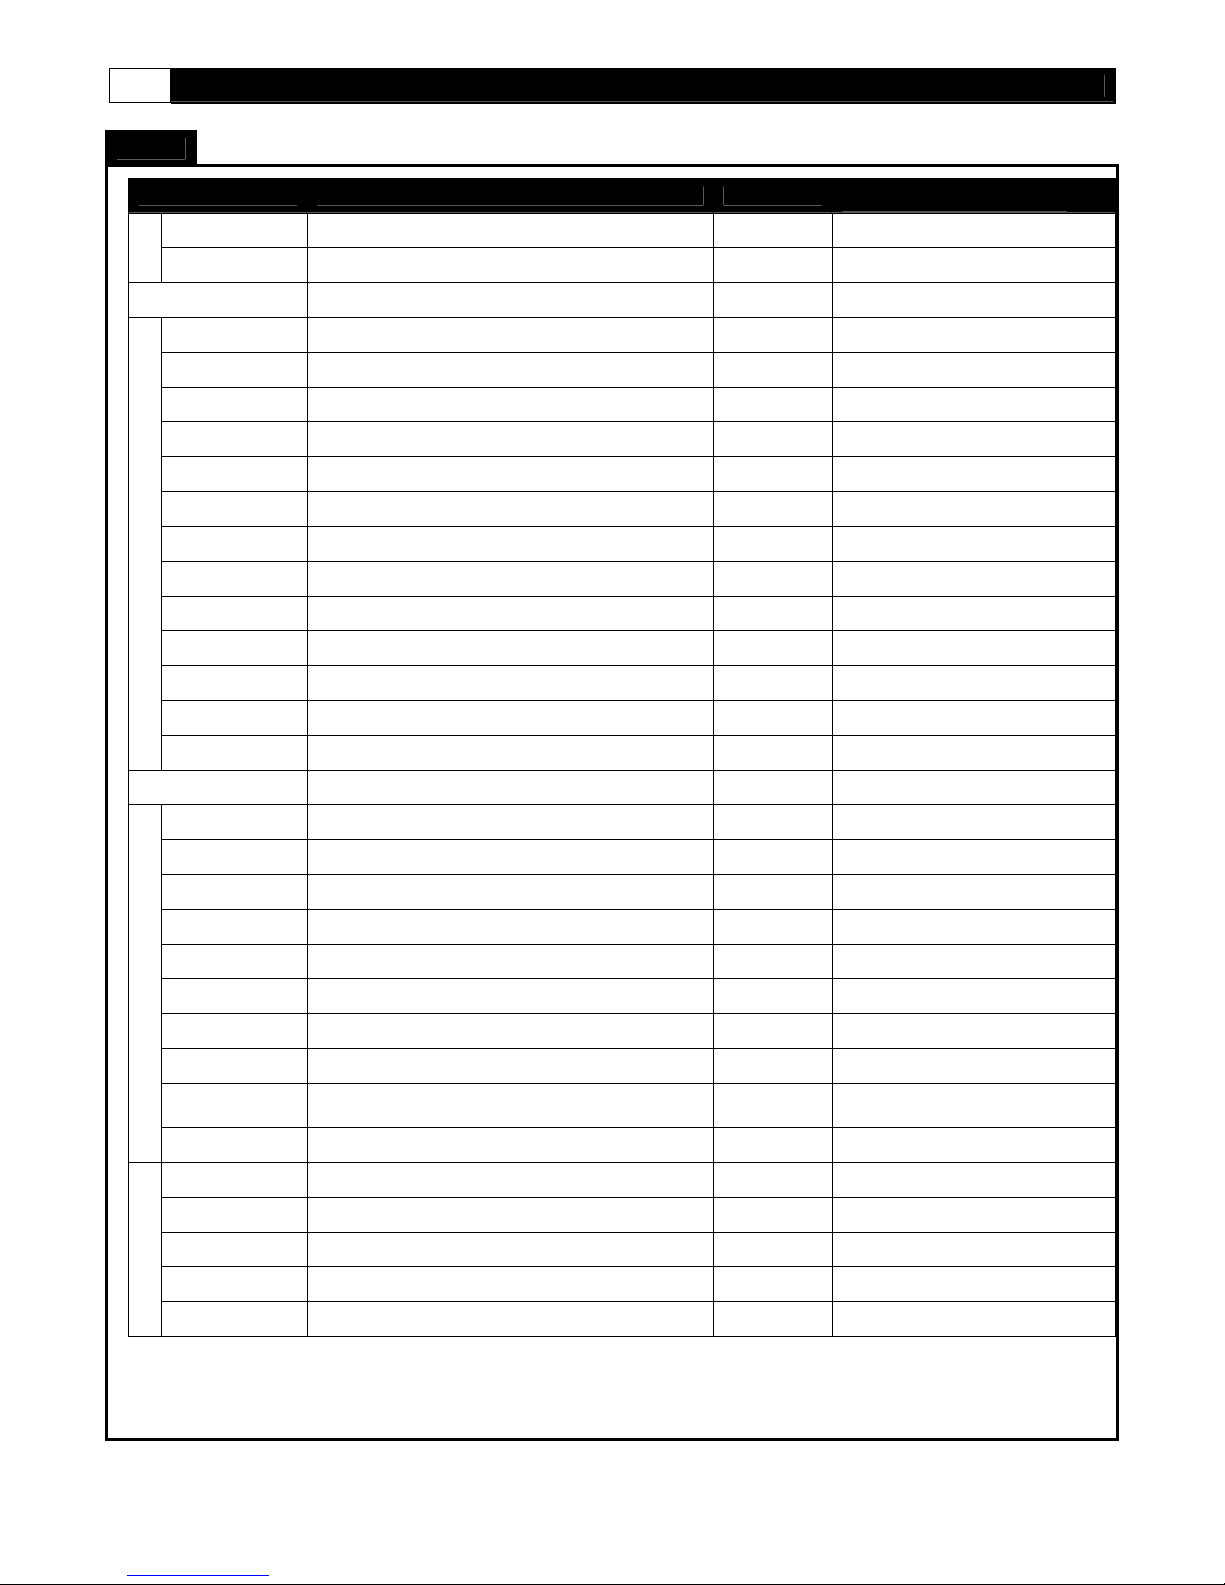
PARTS LIST
No. Description Qty.
EVO1-307
EVO1-308
EVO1-400
EVO1-401
EVO1-402
EVO1-403
EVO1-404
EVO1-405
EVO1-406
EVO1-407
EVO1-412
EVO1-413
EVO1-414
EVO1-415
EVO1-416
EVO1-417
EVO1-500
EVO1-501
EVO1-502
EVO1-503
EVO1-504
EVO1-506
EVO1-507
EVO1-508
EVO1-509
ELEVATION SUPPORT TUBE COVER –
EVO1-510
EVO1-511
EVO1-512
EVO1-513
EVO1-514
EVO1-515
EVO1-516
Computer Wire - Upper
Motion Cont rol Sensor Wire - Middle
Base Frame
Safety Key Wire - Lower
Computer Wire -Lower
Power Switch Plate Cover
Power Switch Plate
Power Breaker
Power Switch
Fix Bolt Sets
Front Caster
Rubber Cushion
Level Adjuster
Base Frame End Cap
Cushion
Motor Hood
Elevation Moto r
Elevation Gear Sleeve
Driving Motor
Driving Belt
Motor Control Board
Elevation Control Board
Elevation Support Tube
LEFT
MOTOR BOTTOM COVER
DECK FRAME SIDE COVER - LEFT
PLASTIC CLAMP - TOP
PLASTIC CLAMP - BOTTOM
ELEVATION SUPPORT
ELEVATION SUPPORT CAP
Part Number
1 EVO1-307
2 EVO1-308
1 EVO1-401
1 EVO1-402
1 EVO1-403
1 EVO1-404
1 EVO1-405
1 EVO1-406
1 EVO1-407
2 EVO1-412
2 EVO1-413
2 EVO1-414
2 EVO1-415
2 EVO1-416
2 EVO1-417
1 EVO1-501
1 EVO1-502
1 EVO1-503
1 EVO1-504
1 EVO1-506
1 EVO1-507
1 EVO1-508
1 EVO1-509
1 EVO1-510
1 EVO1-511
1 EVO1-512
2 EVO1-513
2 EVO1-514
2 EVO1-515
2 EVO1-516
Page 9
www.evofitness.com
9
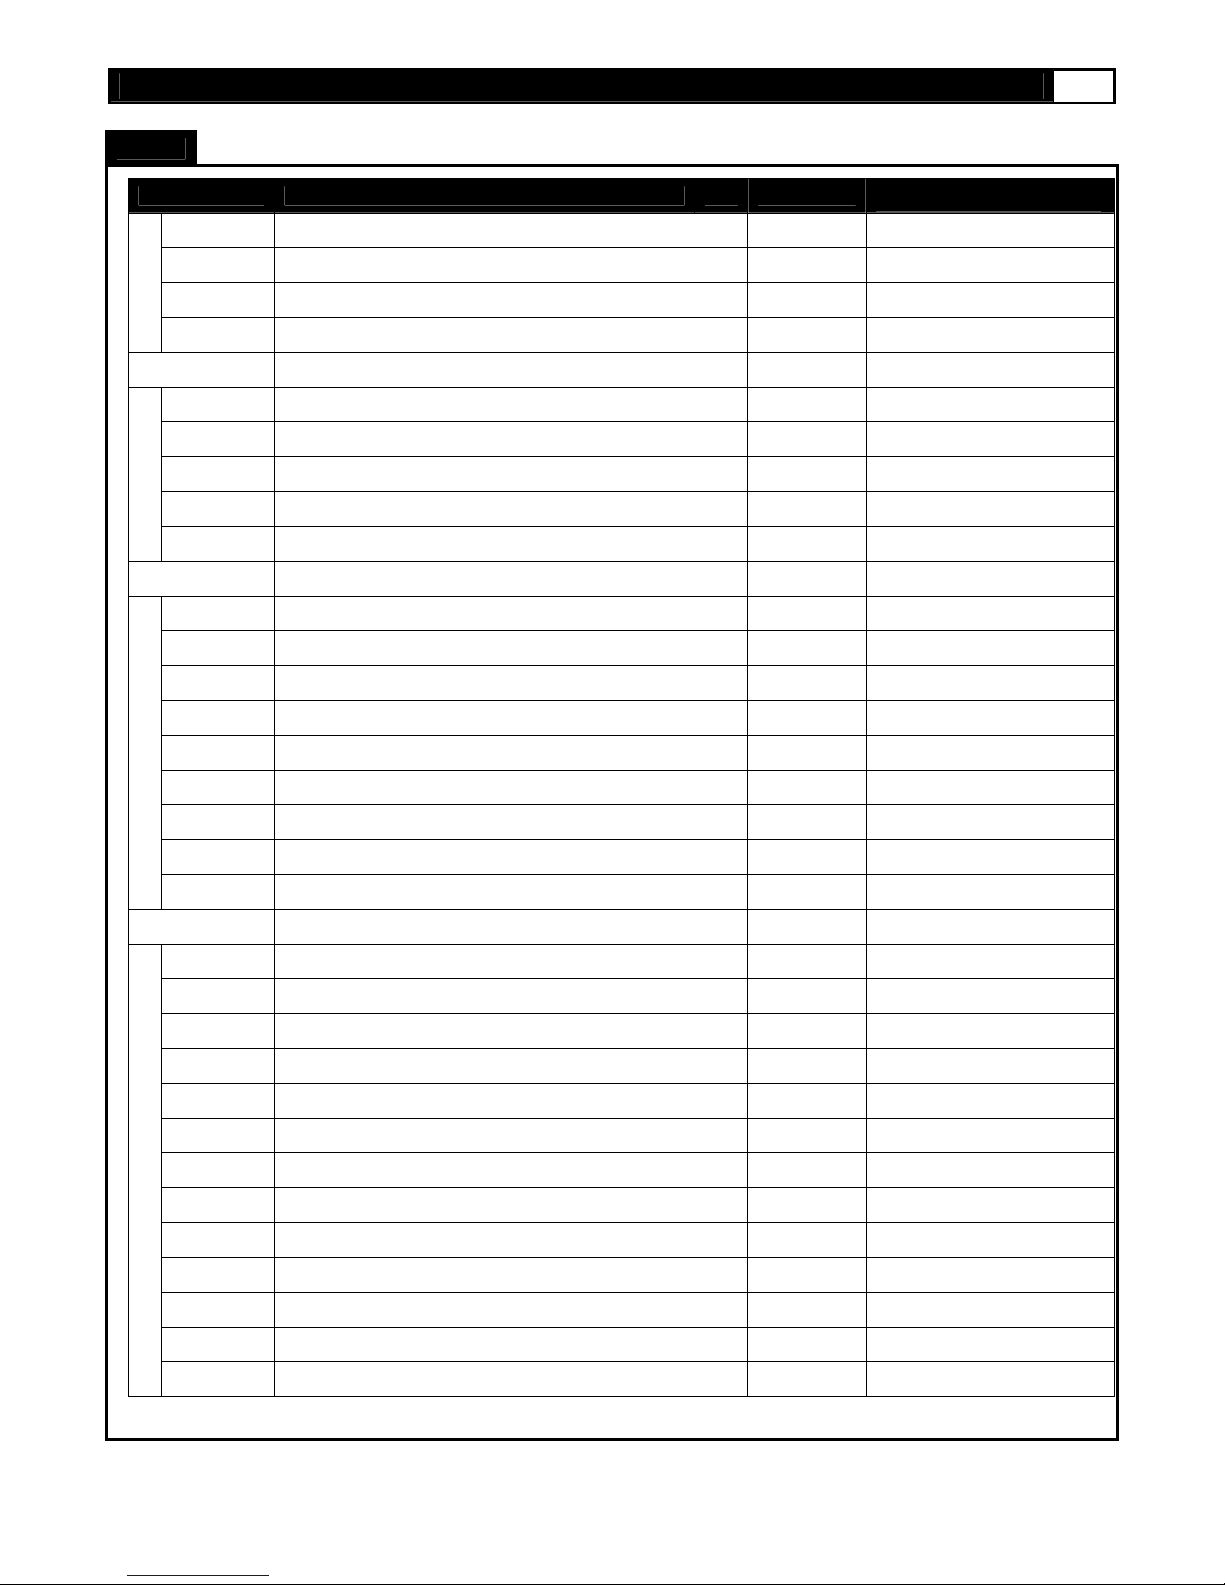
PARTS LIST
No. Description Qty.
DECK RUBBER CUSHION
Rear Vent Cover
DECK FRAME SIDE COVER - Right
RUNNING BELT
SIDE RAIL
SIDE RAIL END CAP - LEFT
SIDE RAIL END CAP - Right
RUNNING DECK
DECK FRAME
Front Roller Shaft
Front Roller Tube
Roller Bearing 6202
Rear Roller Shaft
Rear Roller Tube
RUNNING DECK SUPPORT TUBE
DECK FRAME - REAR
Rear Caster
#6 × 12mm Screws
#4 × 6mm Screws
#8 × 12mm Screws
M8 x 15mm Bolt
M8 x 50mm Bolt
#8 x 19mm Screw
#8 x 19mm Screw
M5 × 10mm Screws
#8 × 16 Screws
C Fixed
M10 × 30mm Bolts
Bearing
Washer
EVO1-517
EVO1-518
EVO1-519
EVO1-520
EVO1-600
EVO1-601
EVO1-602
EVO1-603
EVO1-604
EVO1-605
EVO1-700
EVO1-701
EVO1-702
EVO1-703
EVO1-704
EVO1-705
EVO1-706
EVO1-707
EVO1-708
EVO1-413
EVO1-800
EVO1-801
EVO1-802
EVO1-803
EVO1-804
EVO1-805
EVO1-806
EVO1-807
EVO1-808
EVO1-809
EVO1-810
EVO1-811
EVO1-812
EVO1-813
ELEVATION SUPPORT TUBE COVER - Right
2 EVO1-517
1 EVO1-518
1 EVO1-519
1 EVO1-520
1 EVO1-601
2 EVO1-602
1 EVO1-603
1 EVO1-604
1 EVO1-605
1 EVO1-701
1 EVO1-702
1 EVO1-703
4 EVO1-704
1 EVO1-705
1 EVO1-706
1 EVO1-707
1 EVO1-708
2 EVO1-413
1
12
12
8 EVO1-803
2 EVO1-804
8 EVO1-805
13 EVO1-806
9 EVO1-807
3 EVO1-808
36 EVO1-809
1 EVO1-810
1 EVO1-811
1 EVO1-812
8 EVO1-813
Part Number
EVO1-801
EVO1-802
Page 10
10 EVO1 TREADMILL
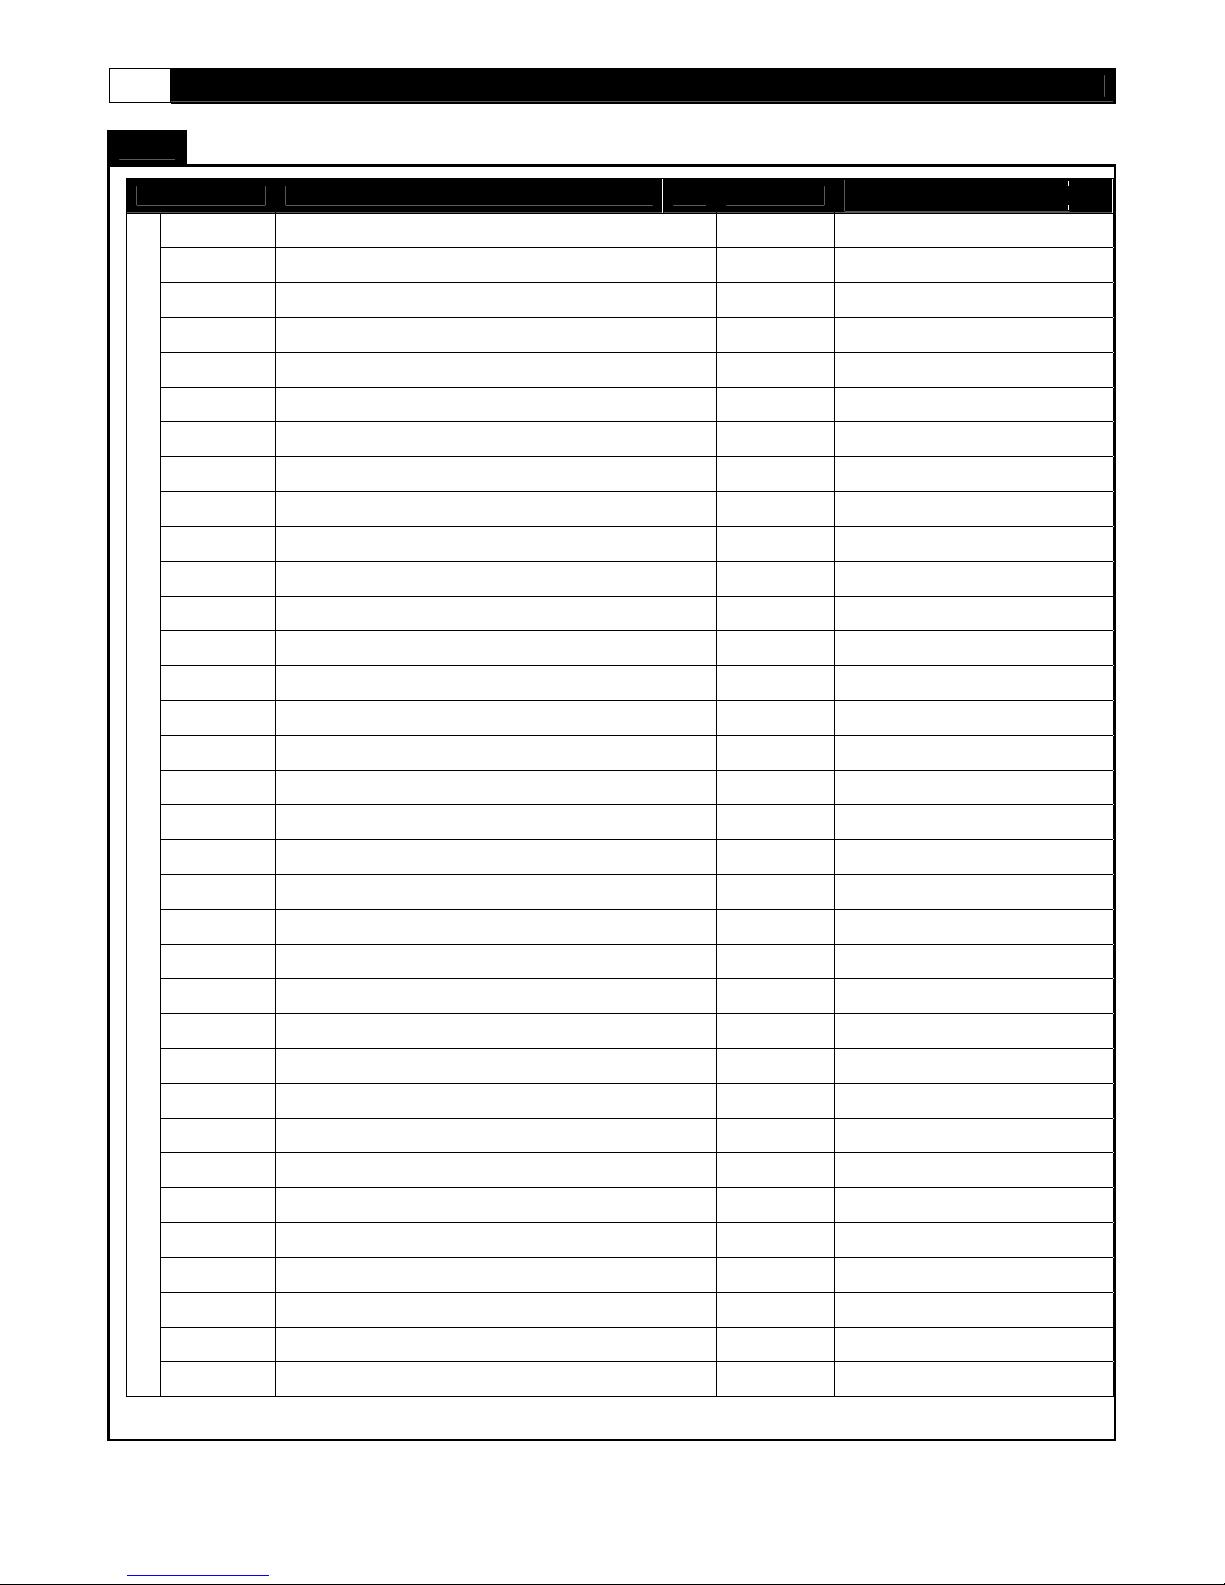
PARTS LIST
No. Description Qty.
EVO1-814
EVO1-815
EVO1-816
EVO1-817
EVO1-818
EVO1-819
EVO1-820
EVO1-821
EVO1-822
EVO1-823
EVO1-824
EVO1-825
EVO1-826
EVO1-827
EVO1-828
EVO1-829
EVO1-830
EVO1-831
EVO1-832
EVO1-833
EVO1-834
EVO1-835
EVO1-836
EVO1-837
EVO1-838
EVO1-839
EVO1-840
EVO1-841
EVO1-842
Nylon Nut
M8 x 35mm Axle
M14 × 90 Screws
Bearing
M10 × 35mm Screws
#8 × 10mm Screws
#8 × 50mm Screws
M10 × 63mm Bolts
Fixed Block
M8 × 120mm Bolts
Plate Washer
Spring
Nylon Nut
M8 × 20mm Screws
Spring Washer
Washer
M10 × 136mm Screws
M10 × 90mm Screws
M8 × 25mm Screws
Hexagon Nut
M6 × 70mm Bolts
Washer
M10 x 40mm Axle
C Fixed 2 EVO1-837
M10 × 43mm Bolts
Cushion Pad 8 EVO1-839
M10 × 40mm Screws
M6 × 10mm Screws
M10 × 52mm Screws
7 EVO1-814
1 EVO1-815
2 EVO1-816
4 EVO1-817
10 EVO1-818
7 EVO1-819
2 EVO1-820
1 EVO1-821
8 EVO1-822
1 EVO1-823
2 EVO1-824
1 EVO1-825
1 EVO1-826
6 EVO1-827
10 EVO1-828
2 EVO1-829
1 EVO1-830
1 EVO1-831
8 EVO1-832
8 EVO1-833
3 EVO1-834
3 EVO1-835
1 EVO1-836
2 EVO1-838
1 EVO1-840
2 EVO1-841
1 EVO1-842
Part Number
Page 11
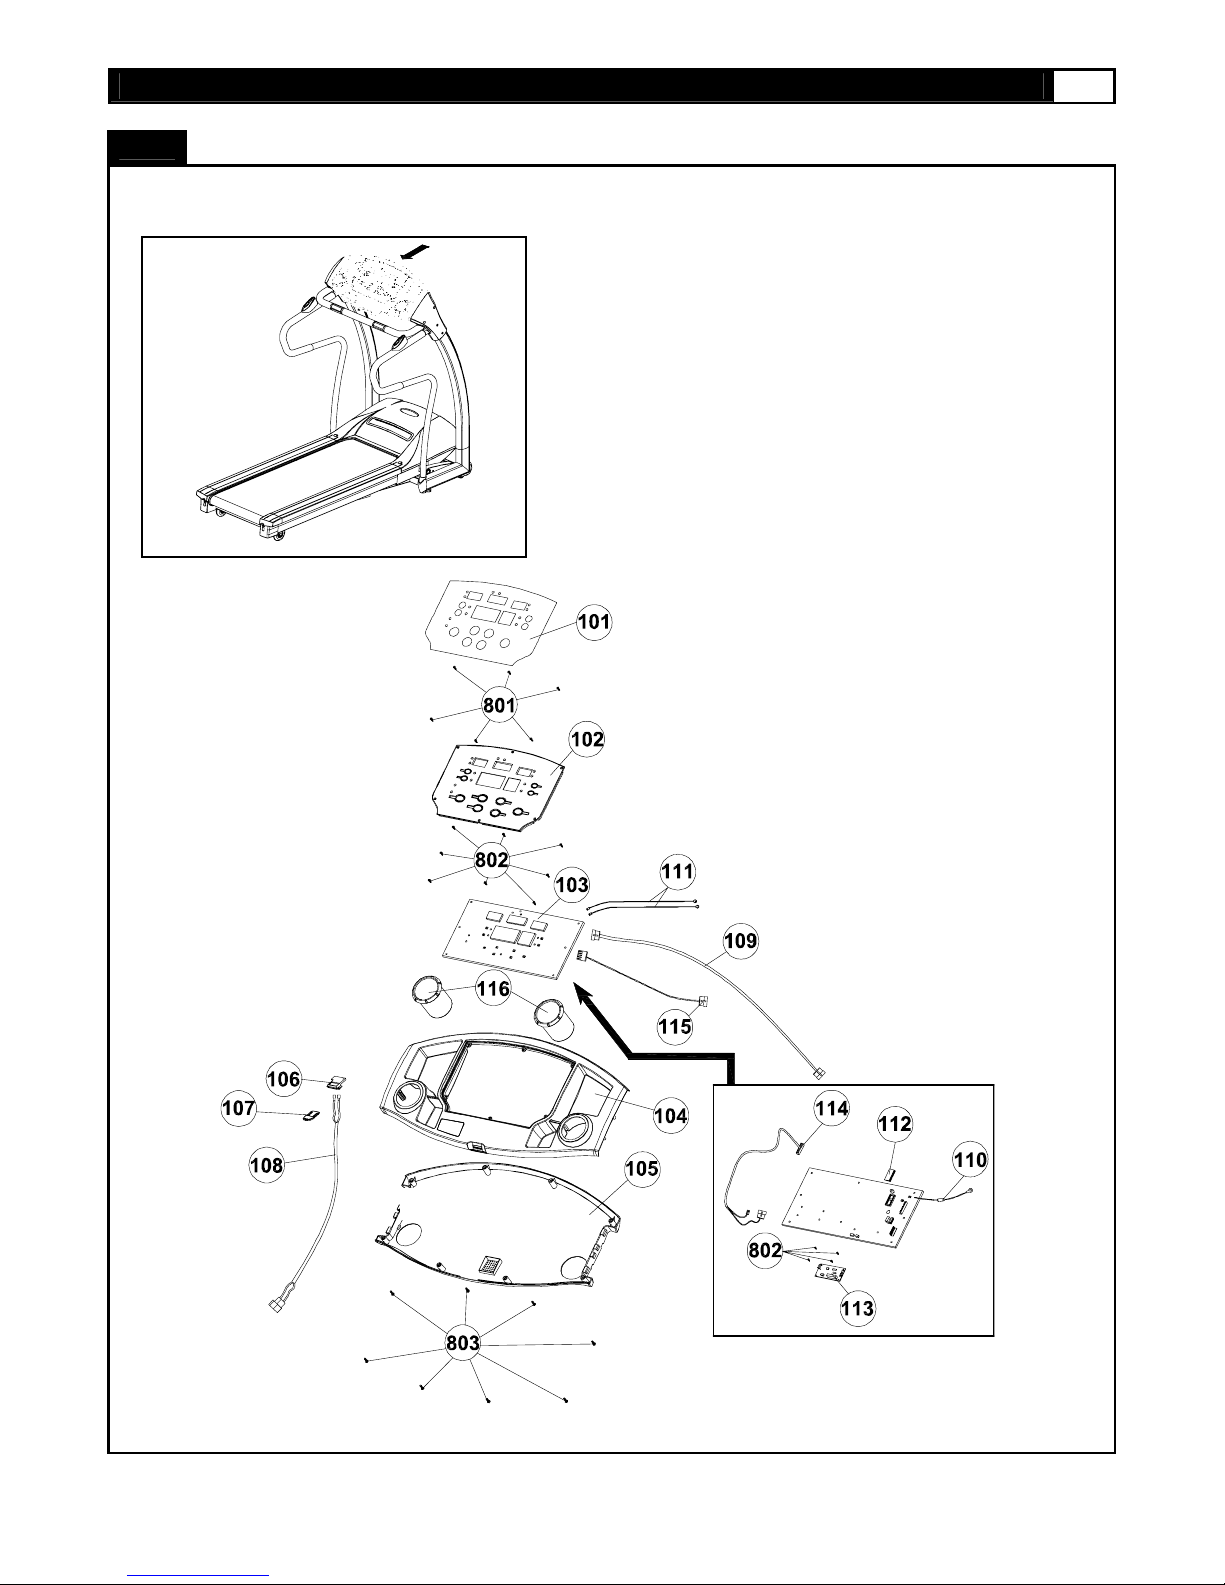
MOST OF THE PARTS SHOW N HE R E HA V E B E EN PRE-ASSEMBLED.
PARTS LIST
www.evofitness.com
11
Page 12
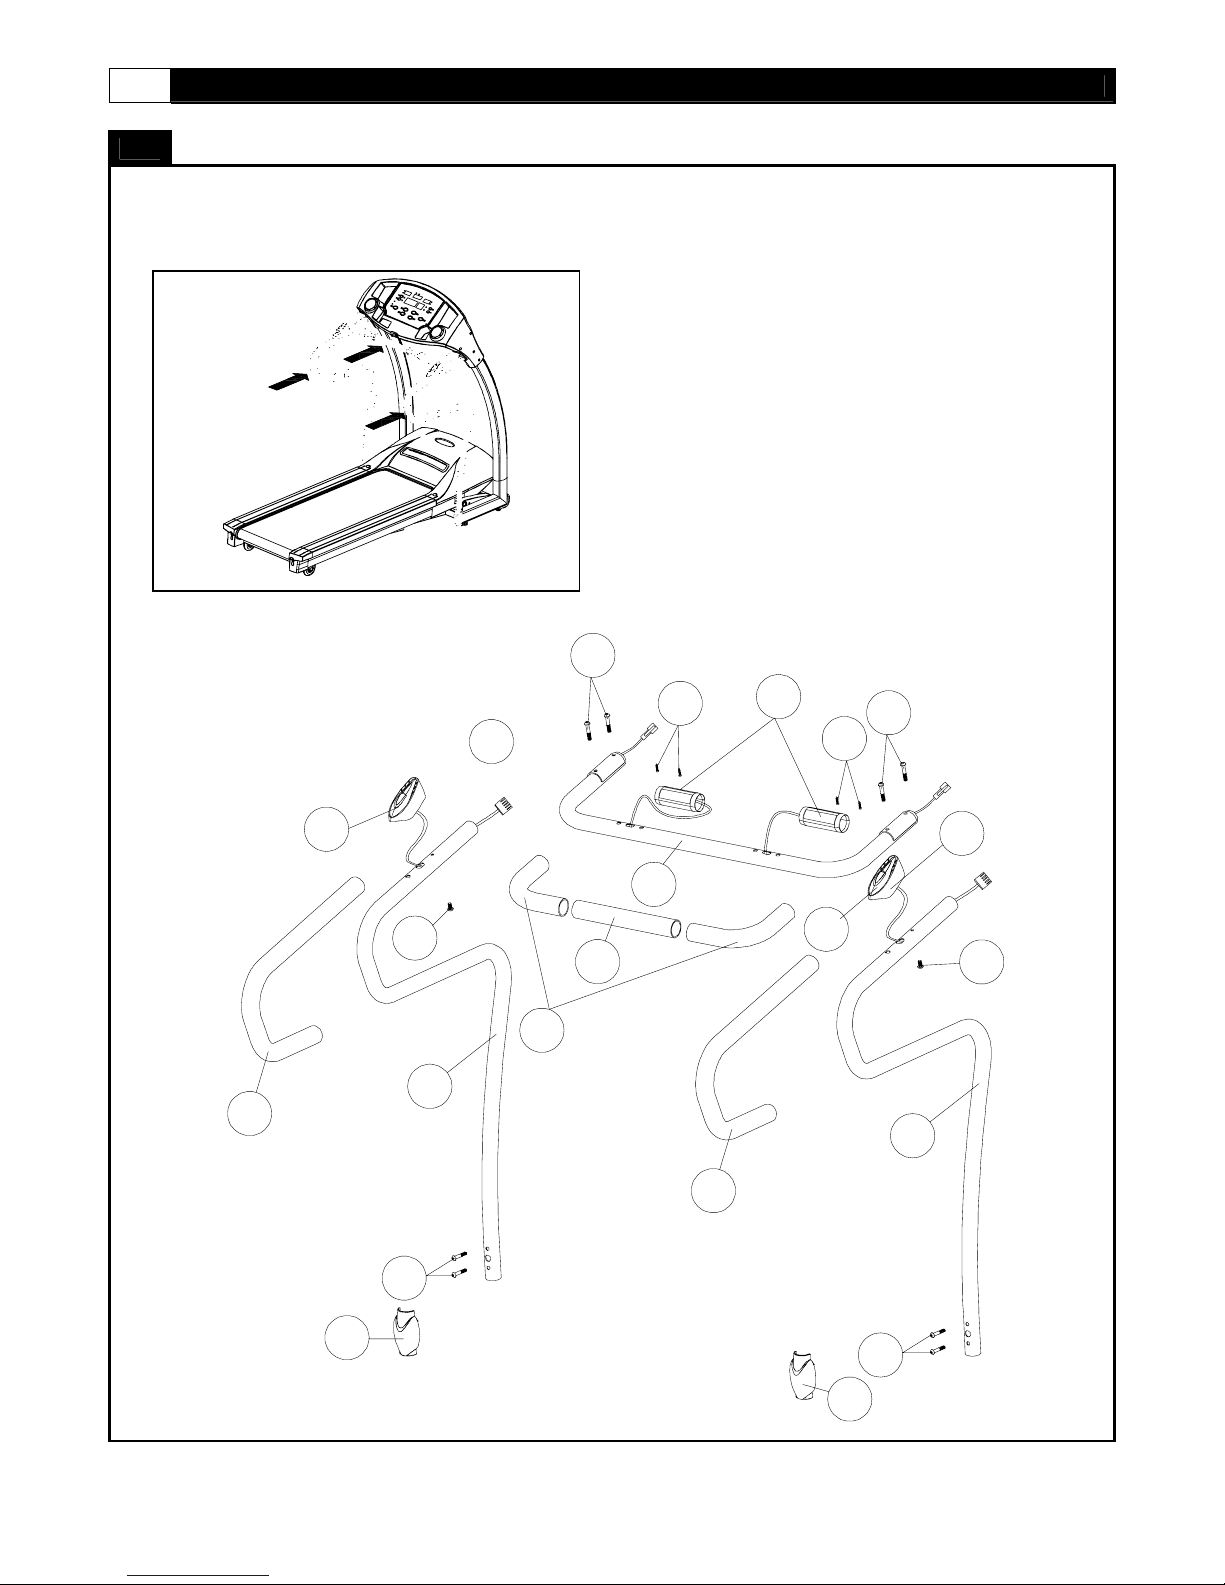
12 EVO1 TREADMILL
MOST OF THE PARTS SHOWN HERE HAVE ALREADY BEEN PRE-ASSEMBLED.
PARTS DIAGR AM
805
203
209
804
201
208
206
205
801
204
207
805
801
209
208
804
201
203
805
202
805
202
Page 13
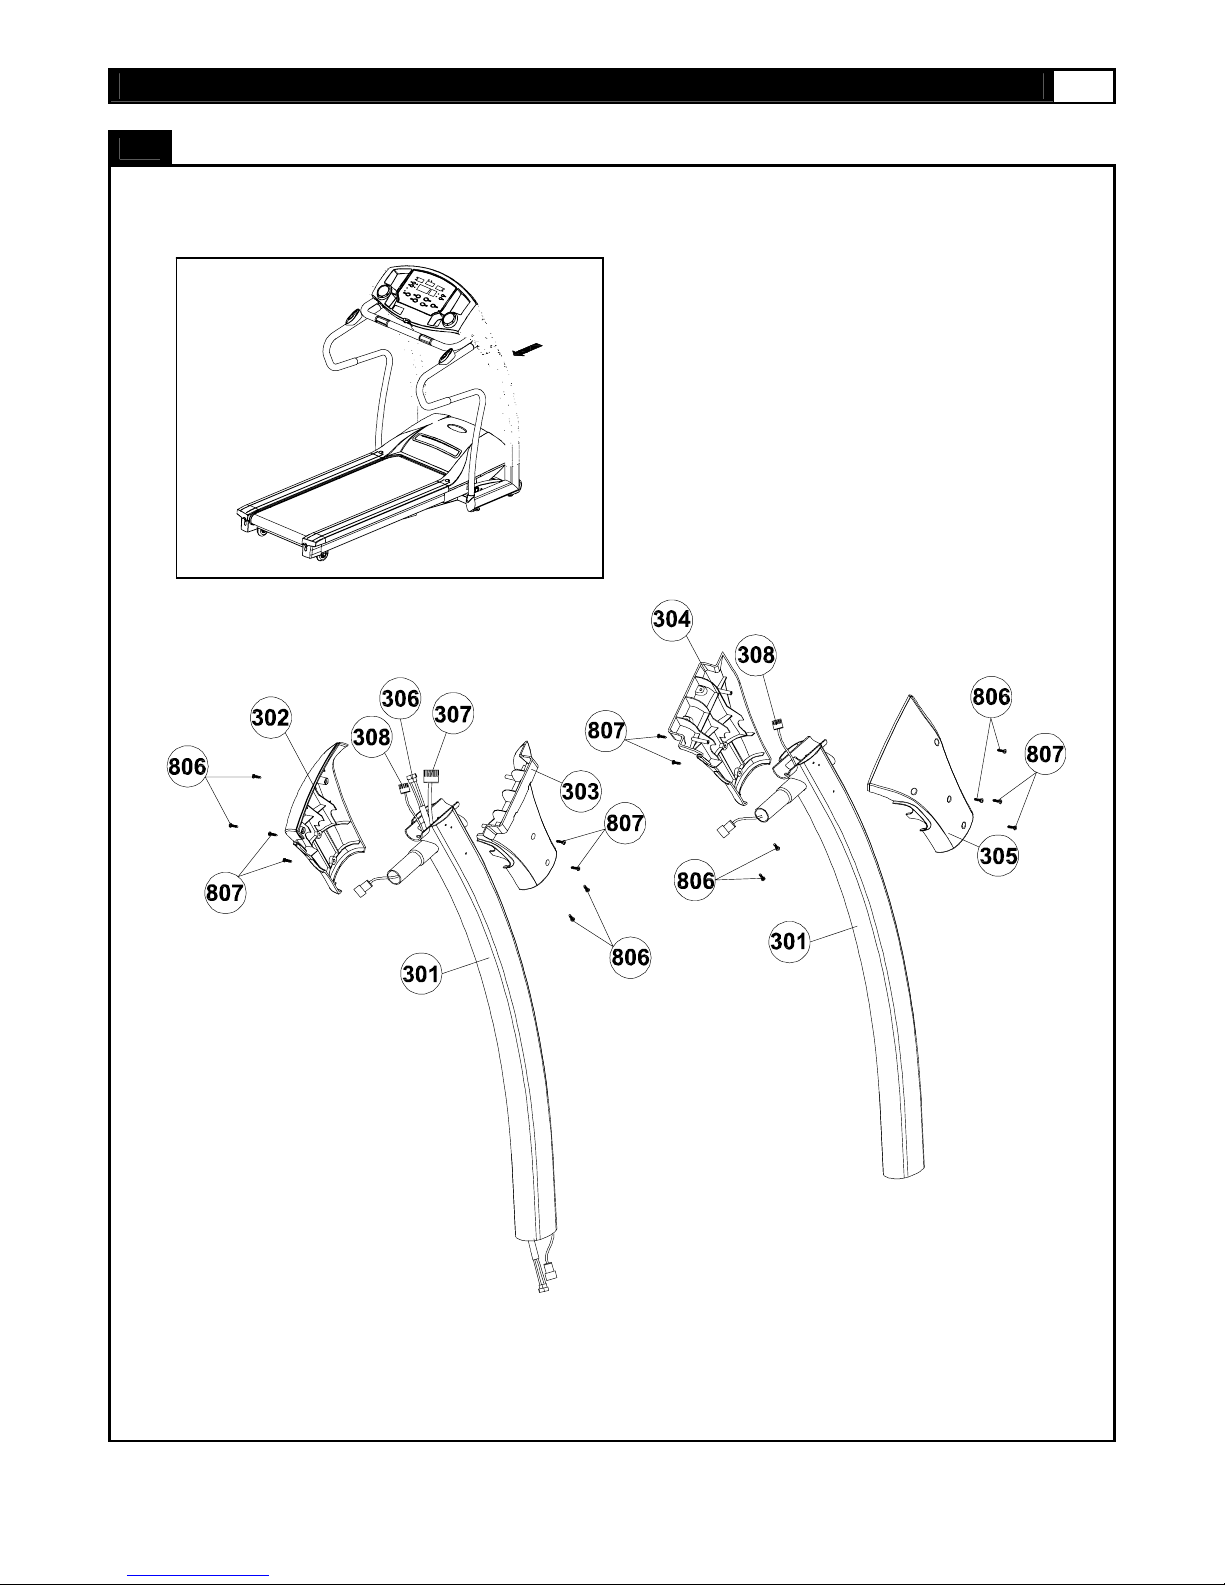
MOST OF THE PARTS SHOWN HERE HAVE ALREADY BEEN PRE-ASSEMBLED.
PARTS DIAGR AM
www.evofitness.com
13
Page 14
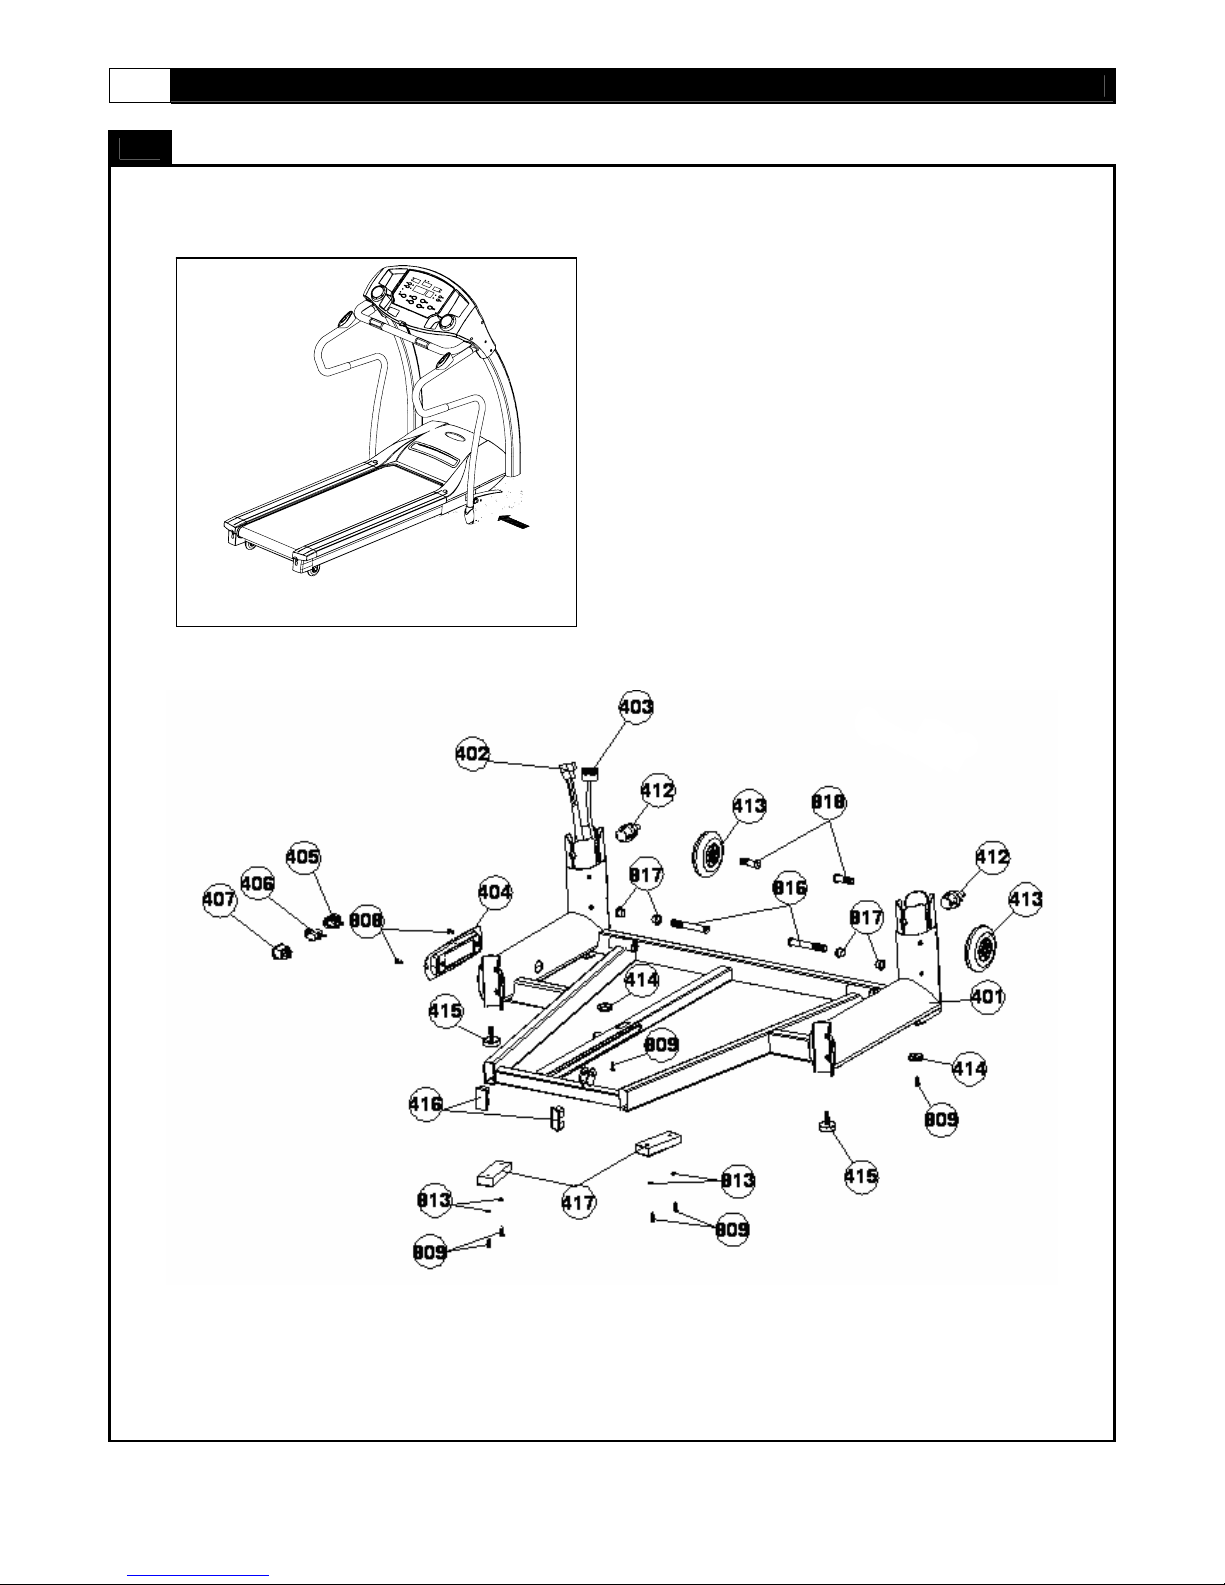
14 EVO1 TREADMILL
MOST OF THE PARTS SHOWN HERE HAVE ALREADY BEEN PRE-ASSEMBLED.
PARTS DIAGR AM
Page 15
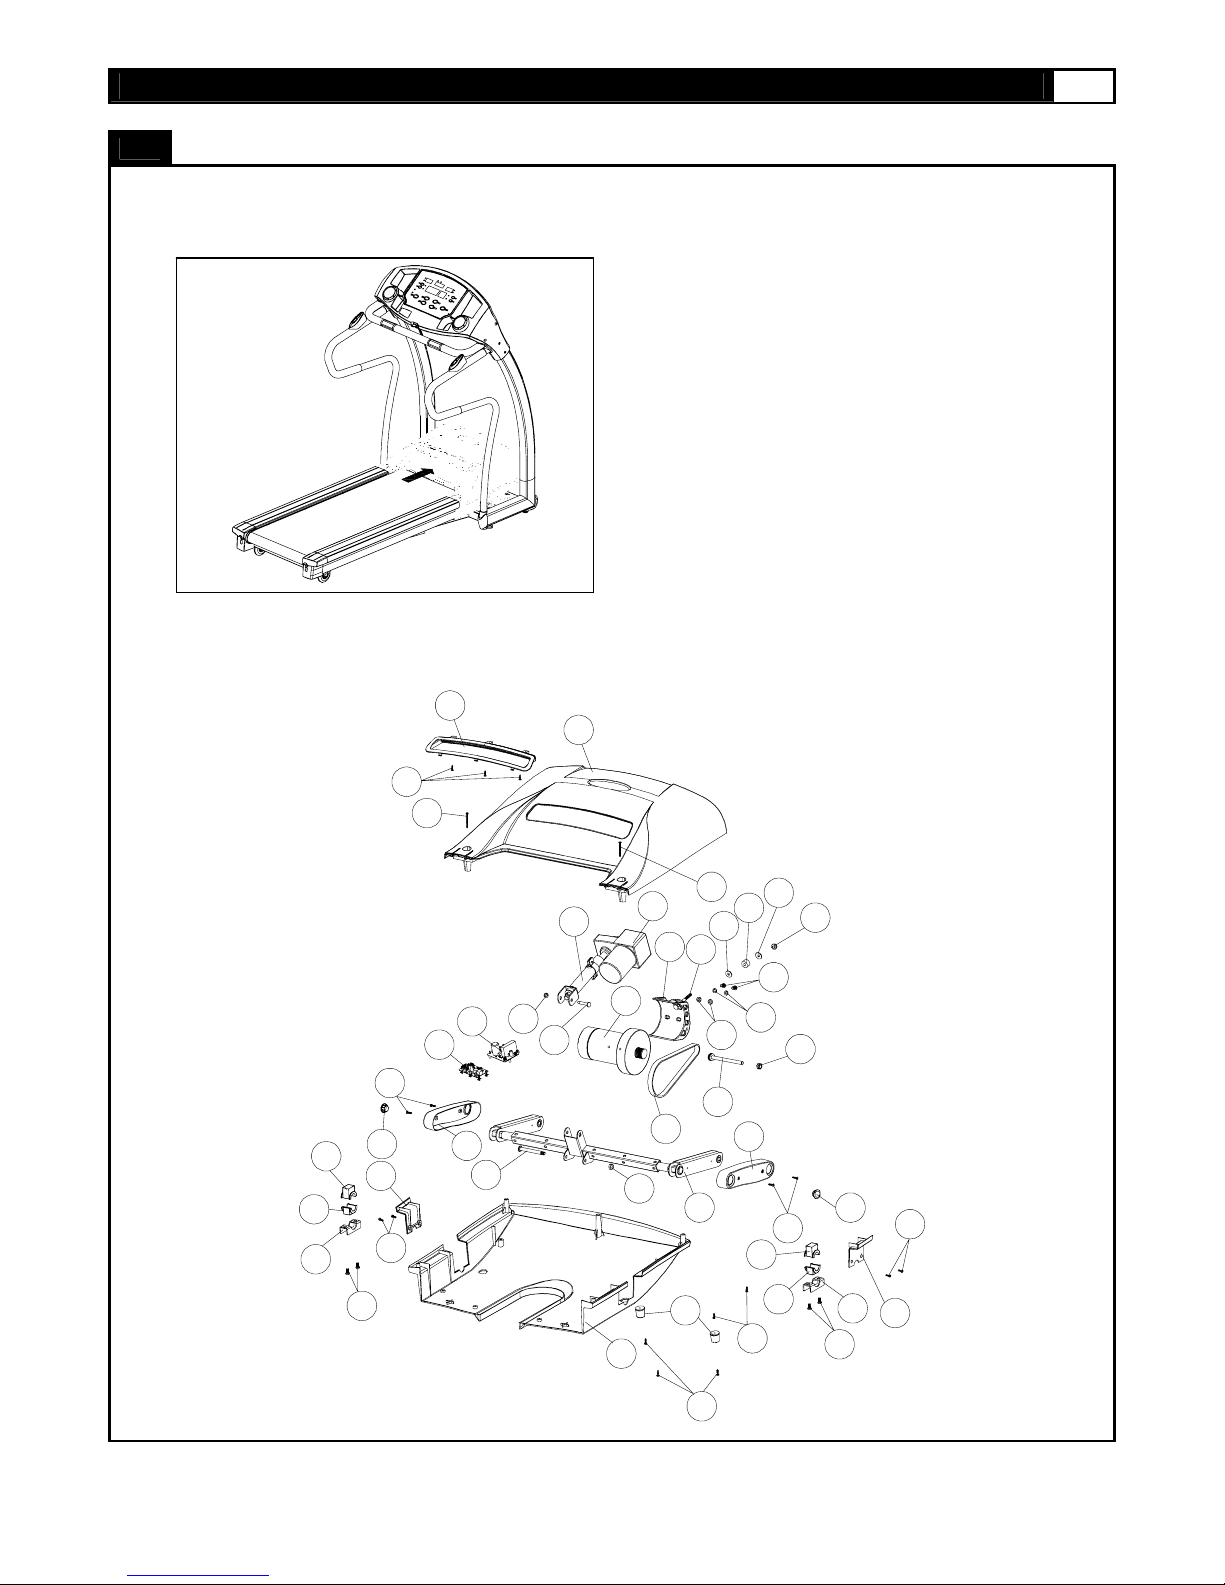
MOST OF THE PARTS SHOWN HERE HAVE ALREADY BEEN PRE-ASSEMBLED.
PARTS DIAGR AM
518
501
www.evofitness.com
15
514
515
513
827
809
516
512
819
819
820
508
507
510
831
814
821
503
504
511
814
502
505
506
517
823
509
820
829
830
824
825
519
806
828
513
824
827
514
809
814
826
827
516
515
819
520
809
Page 16
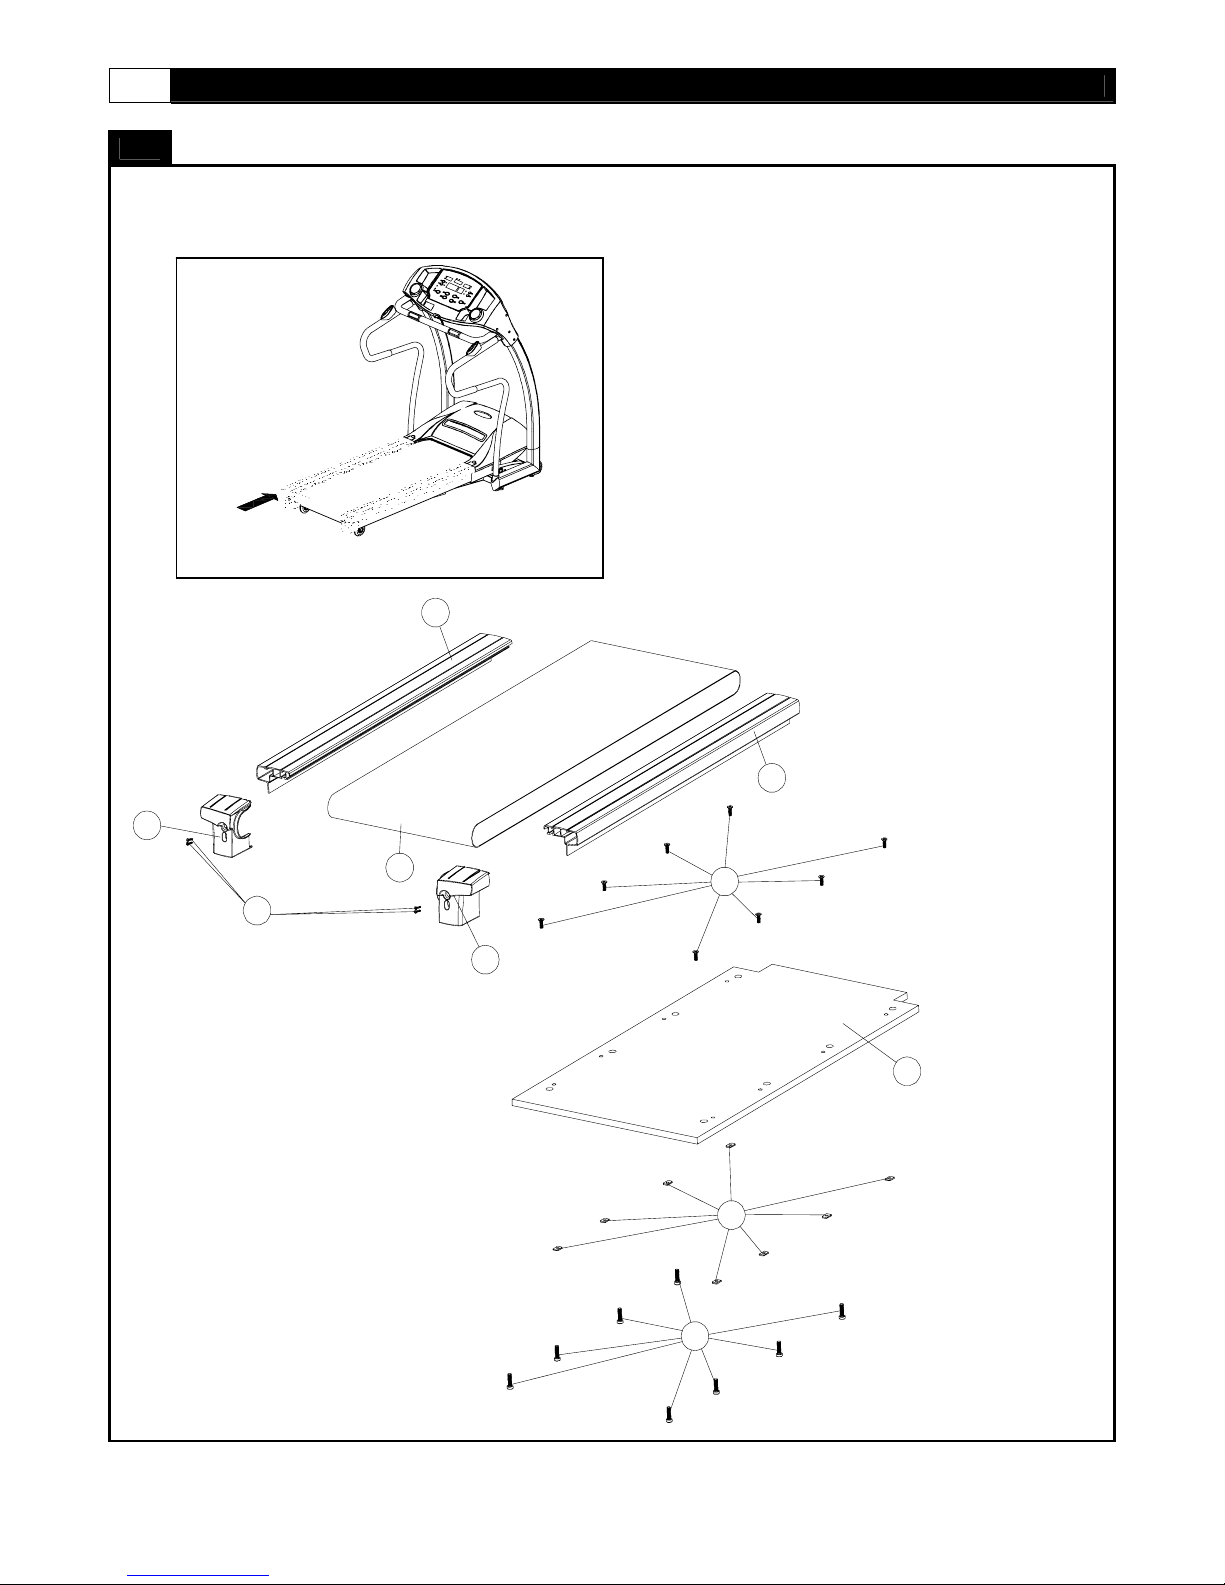
16 EVO1 TREADMILL
5
MOST OF THE PARTS SHOWN HERE HAVE ALREADY BEEN PRE-ASSEMBLED.
PARTS DIAGR AM
602
603
809
601
602
832
604
60
822
818
Page 17
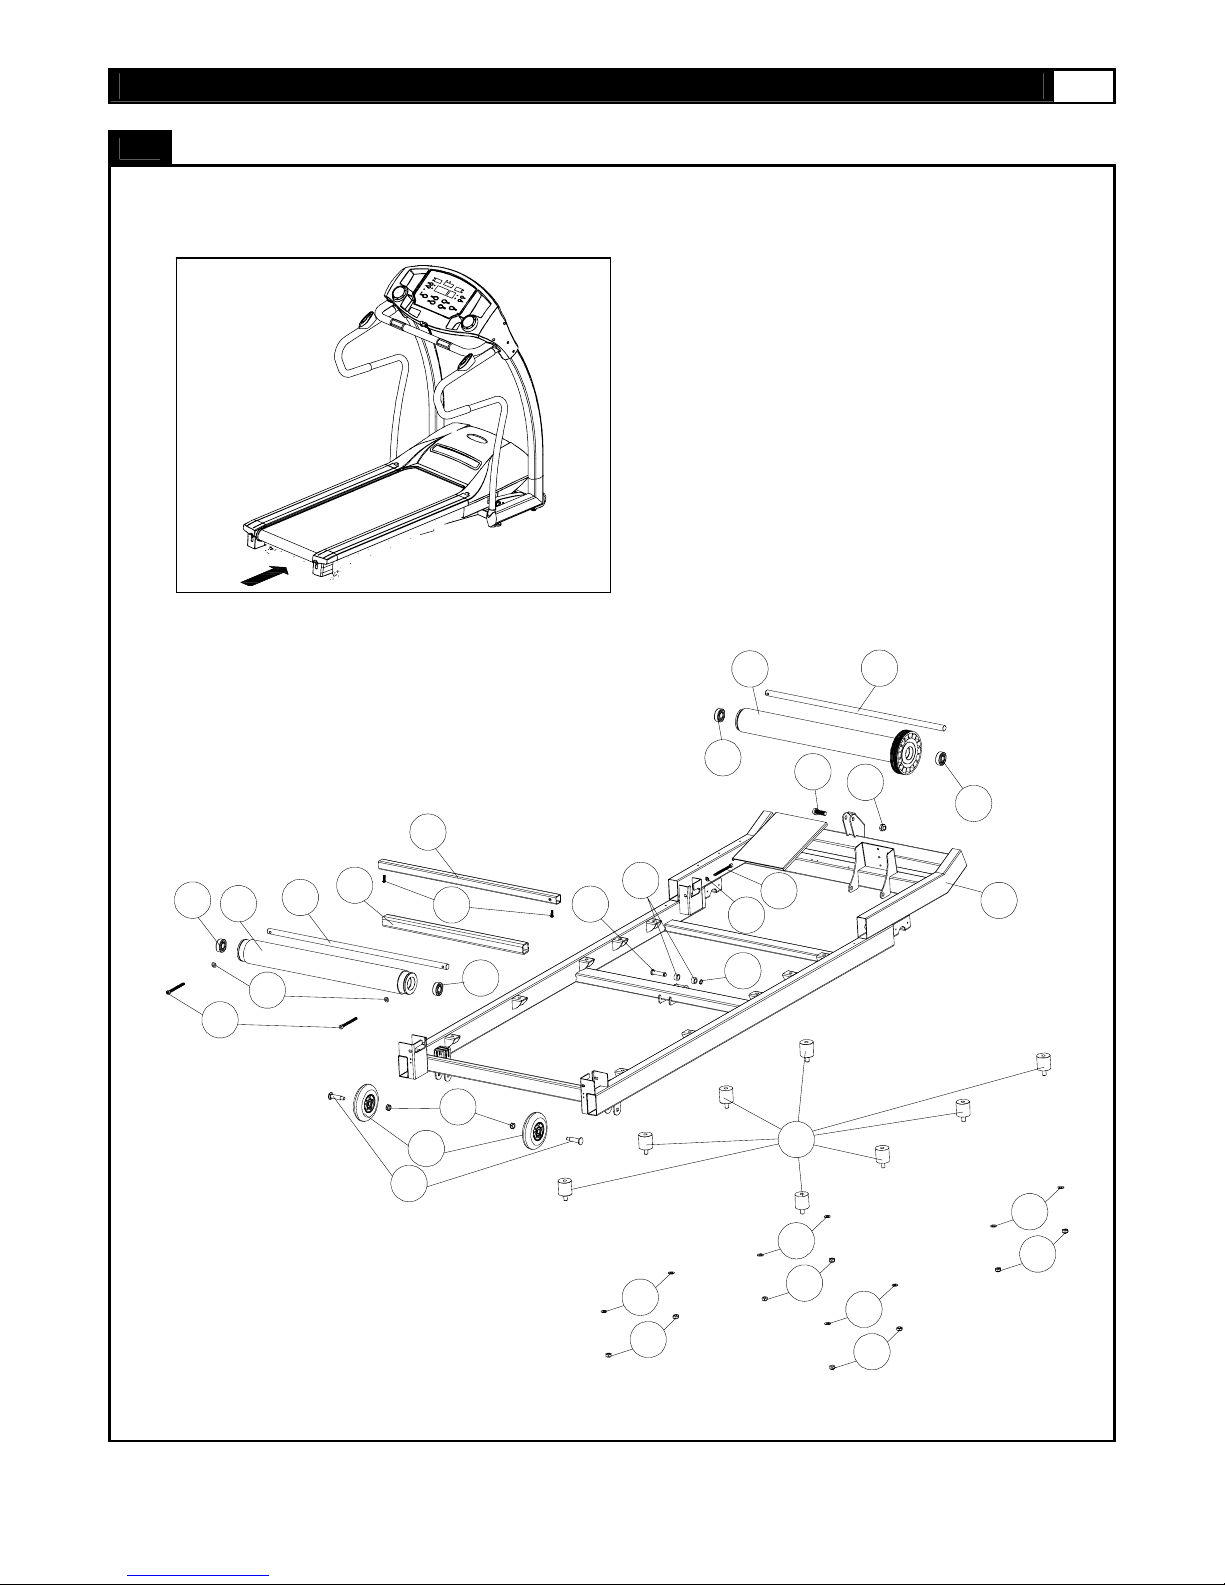
MOST OF THE PARTS SHOWN HERE HAVE ALREADY BEEN PRE-ASSEMBLED.
PARTS DIAGR AM
703
707
704
www.evofitness.com
702
840
814
704
17
704
834
706
835
705
708
413
838
841
814
704
836
422
828
833
835
837
834
839
828
833
701
828
833
828
833
Page 18
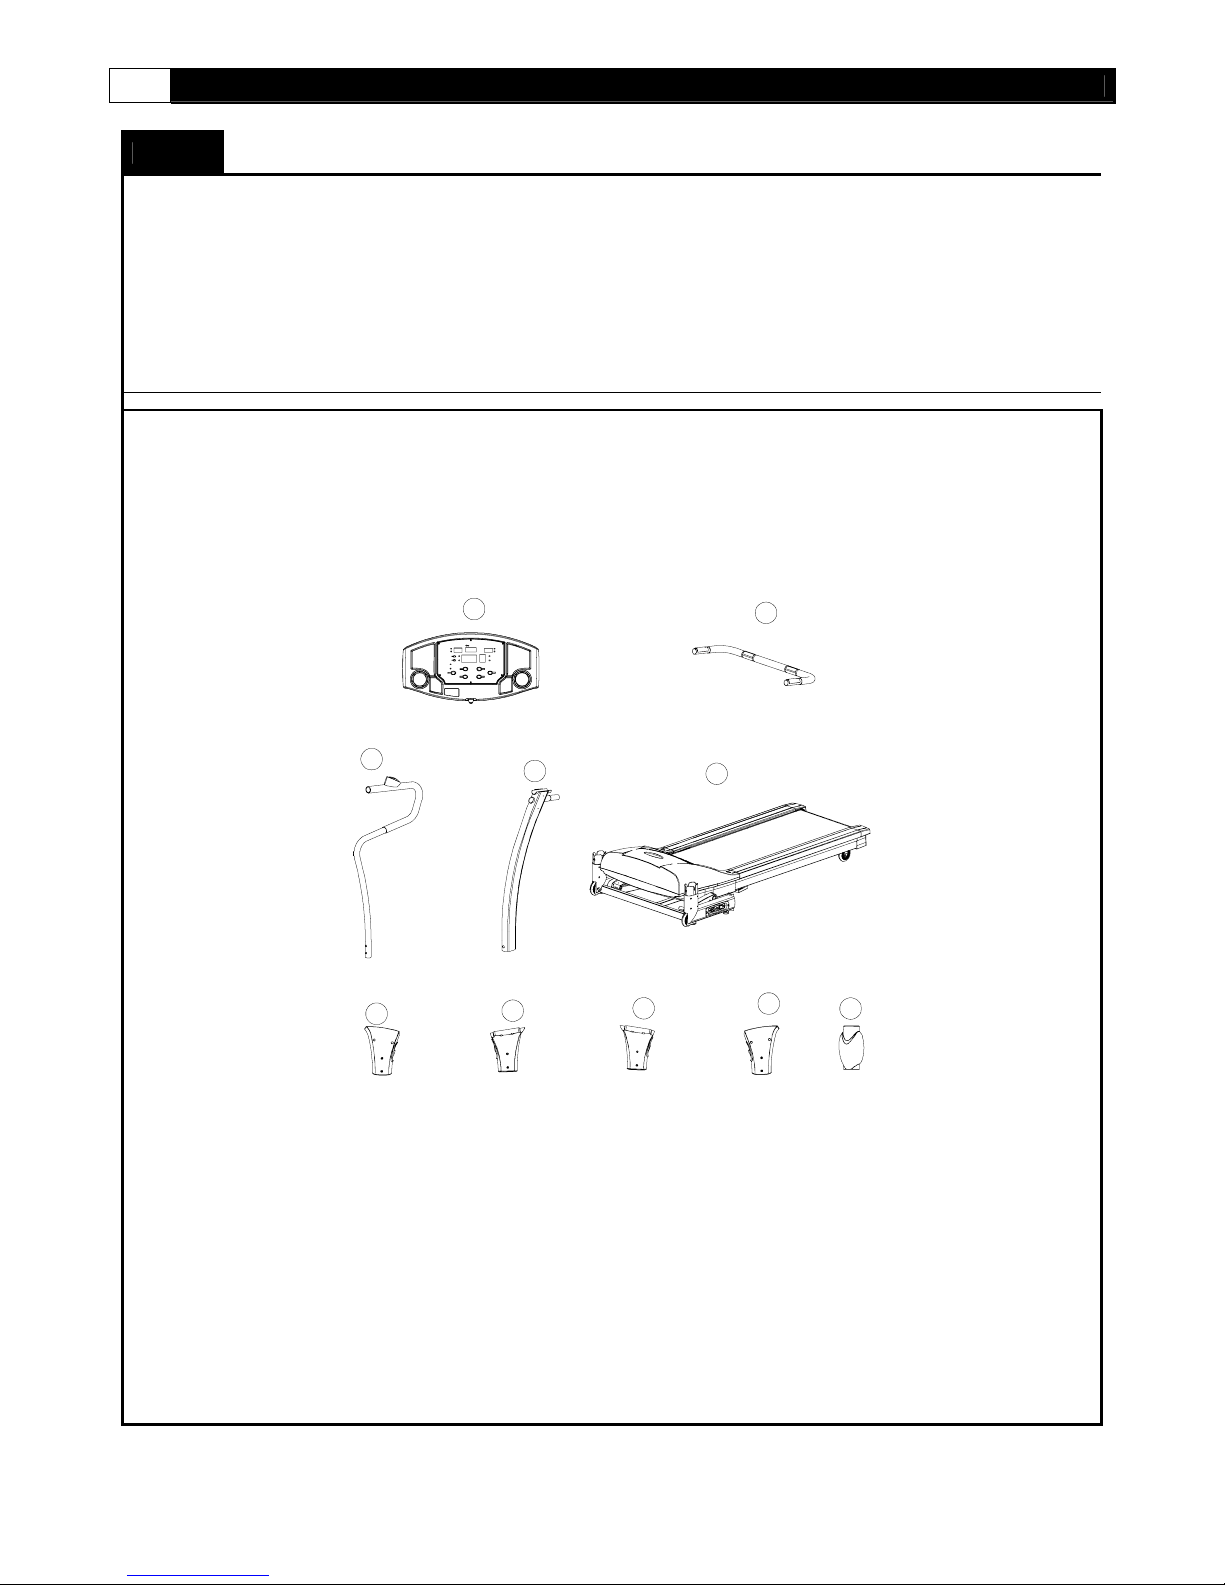
18 EVO1 TREADMILL
ASSEMBLY
STEP 1: Unpacking and Inventory
A) Remove your treadmill from the carton and place it on the floor in an open area.
B) Remove the treadmill and all the components and hardware from the box.
C) Check the quantities of all components and hardware with the component and hardware lists on pages 5-6
D) After verifying inventory if there are any missing parts please contact smooth fitness at 1-888-800-1167
A
B
C
302
303
D
304
E
305
202
Page 19
www.evofitness.com
19
ASSEMBLY
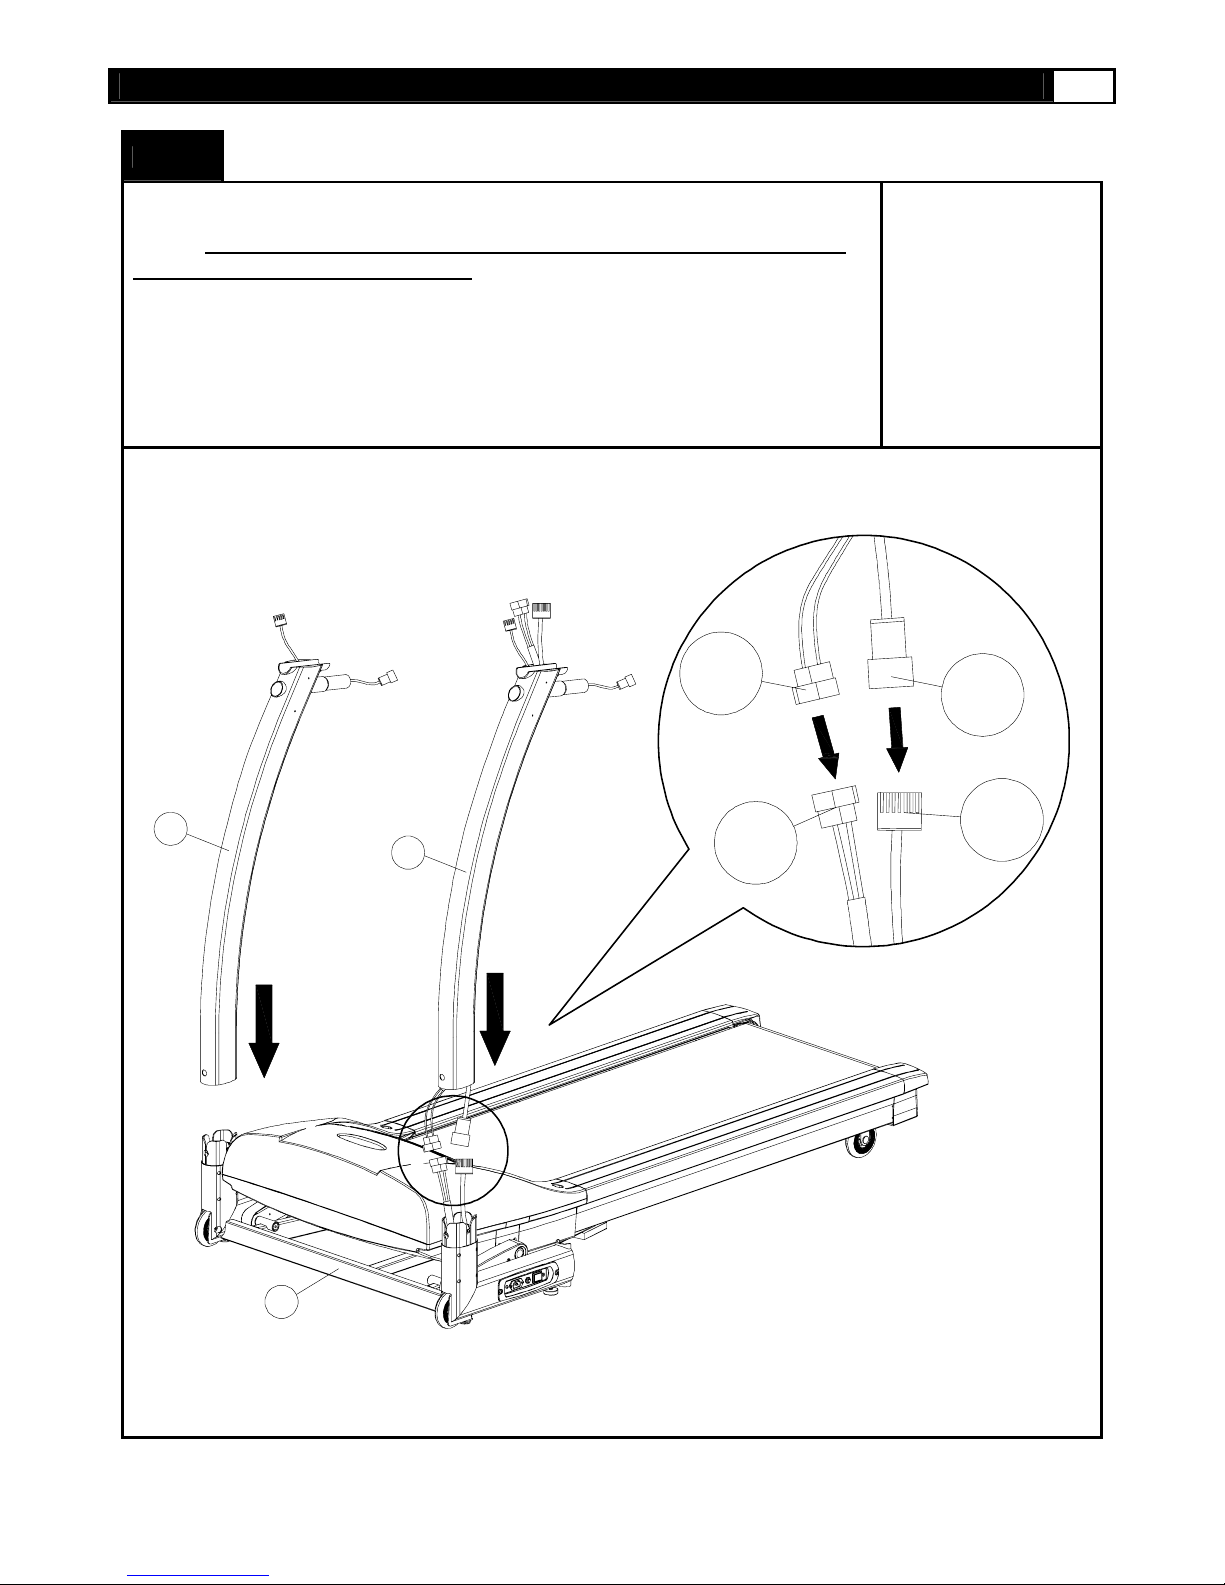
STEP 2: Assemble Upright Frame
NOTE: Make sure all wires are recessed into the frame. DO NOT trap or pinch
DO NOT tighten bolts until STEP 9)
A) Connect the Lower and middle section wires as seen below (306 to 402)(307 to
403)
B) Insert any extra cable length into the Left Upright (301).
C) Insert the Left and Right Uprights (301) into the Base Frame (401).
306
307
301
301
401
402
403
Page 20
20 EVO1 TREADMILL
ASSEMBLY
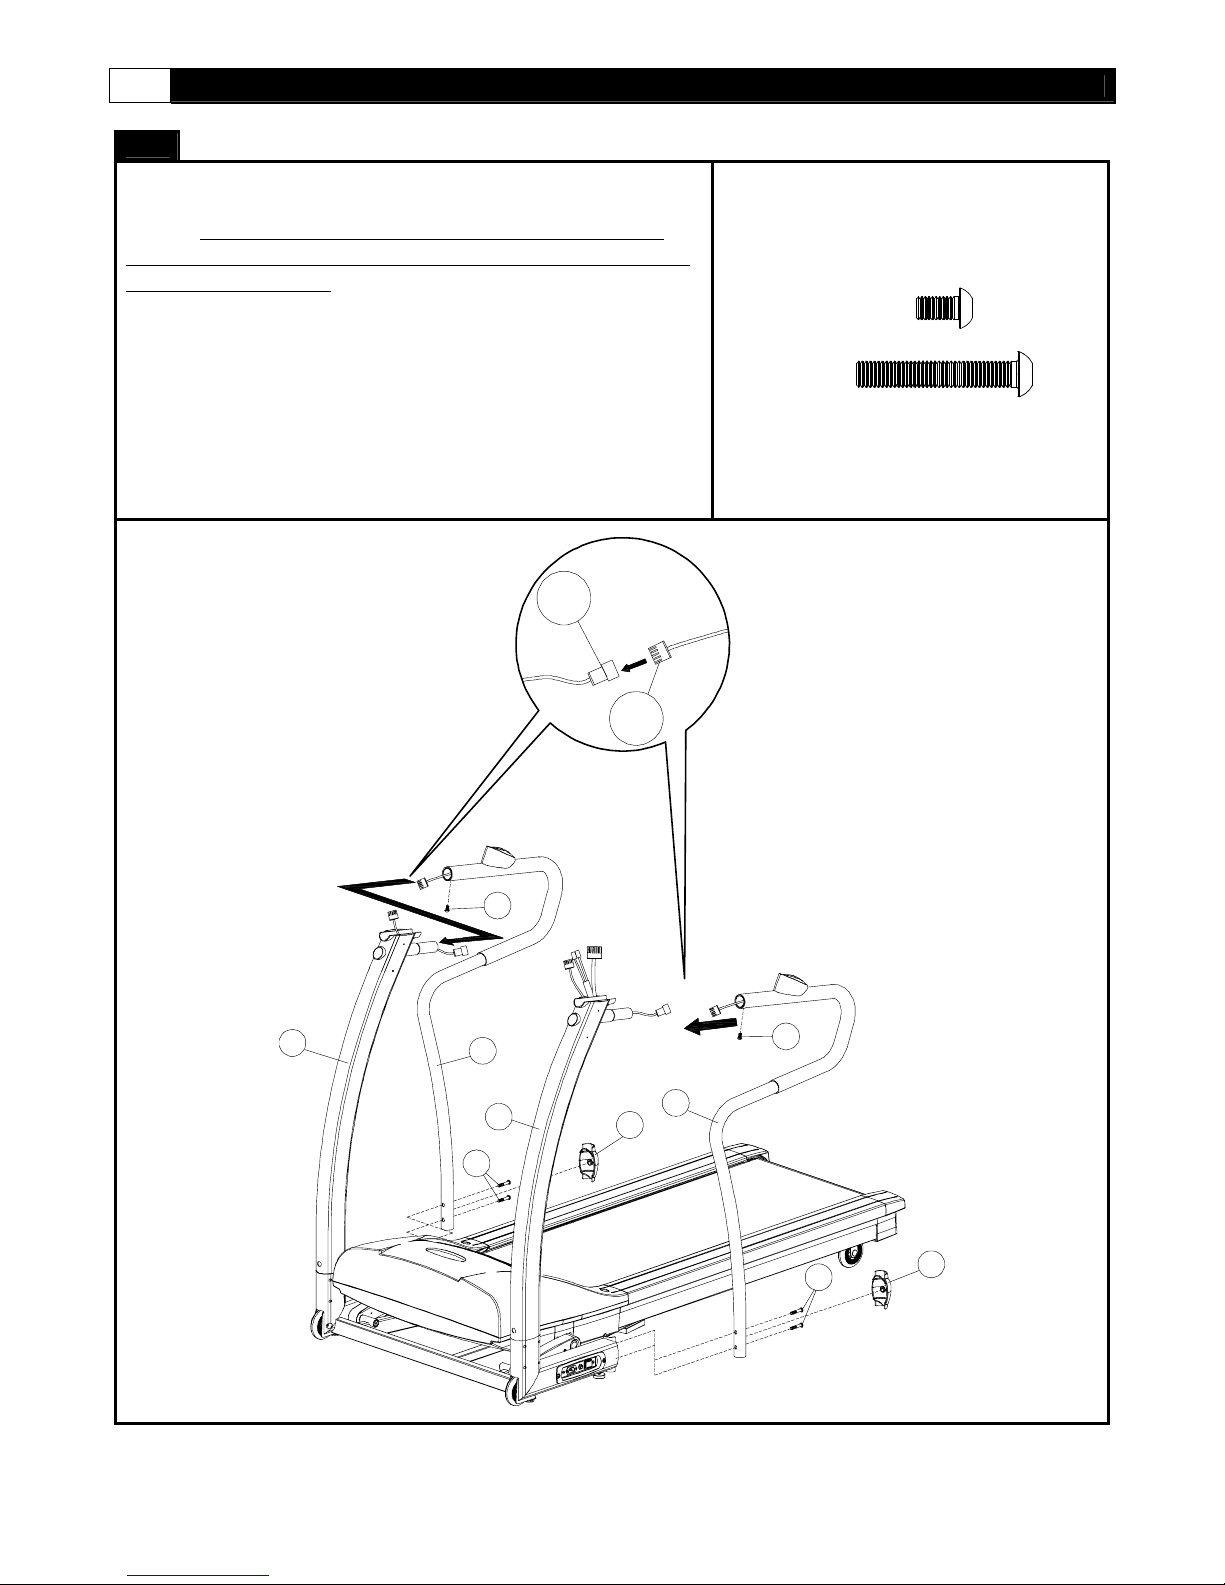
STEP 3: Assemble The Side Handlebars
NOTE: Side rails are interchangeable for use on both right
and left sides. Make sure all wires are recessed into the frame.
DO NOT trap or pinch
A) Connect the Left Motion Control lower wire to the middle
wire. (208 to 308). As Shown in the diagram below.
B) Insert the Left Handlebar (201) into the Upright Tube. Use
one M8x15mm bolt (804) to secure the upp er portion. Use
two M8x50mm bo lts to secure the lower portion to the base
frame.
C) Repeat the above process for the Right side.
308
804
805
X2
X4
301
805
201
804
301
208
202
201
804
805
202
Page 21
ASSEMBLY
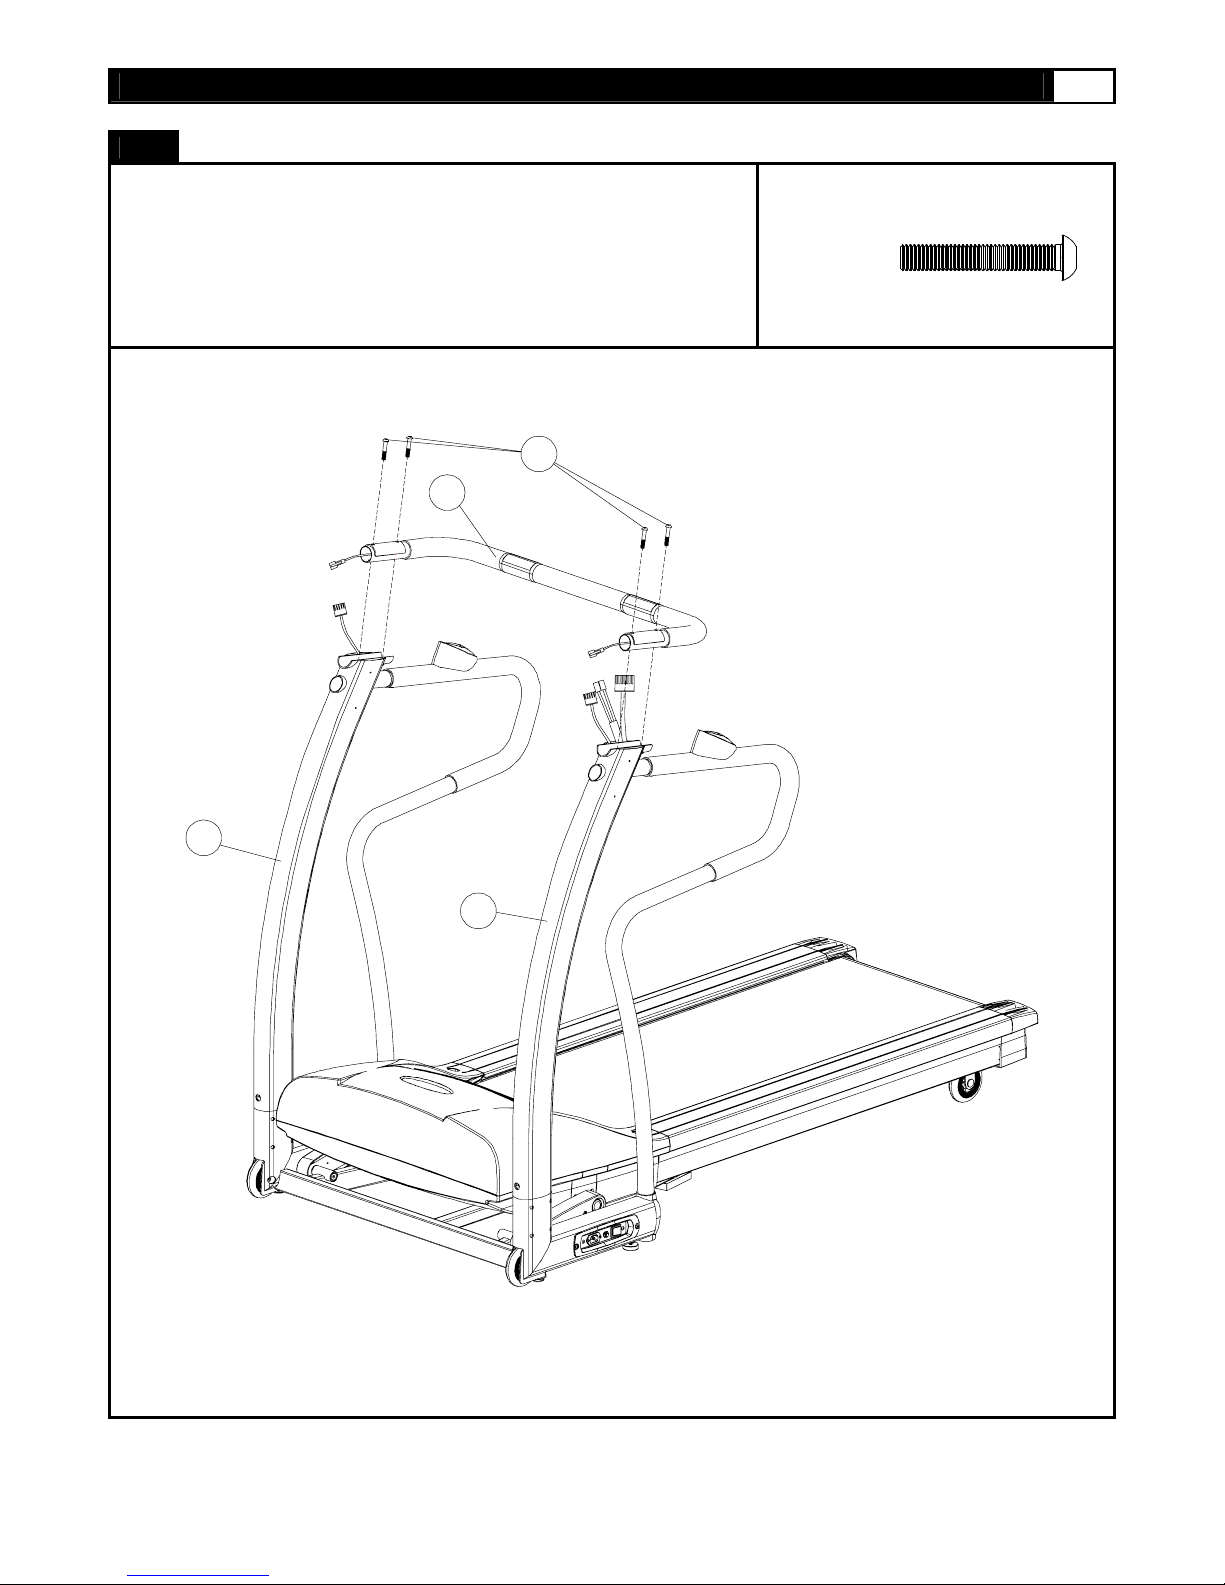
STEP 4:Assemble Front Handlebar
A) Place the front handlebar (204) on top of the left and right uprights
(301)
B) Now secure the front handle bar with 4 M8x50mm bolts (805).
C) Tighten all handlebar hardware.
805
204
www.evofitness.com
805
X4
21
301
301
Page 22
22 EVO1 TREADMILL
ASSEMBLY
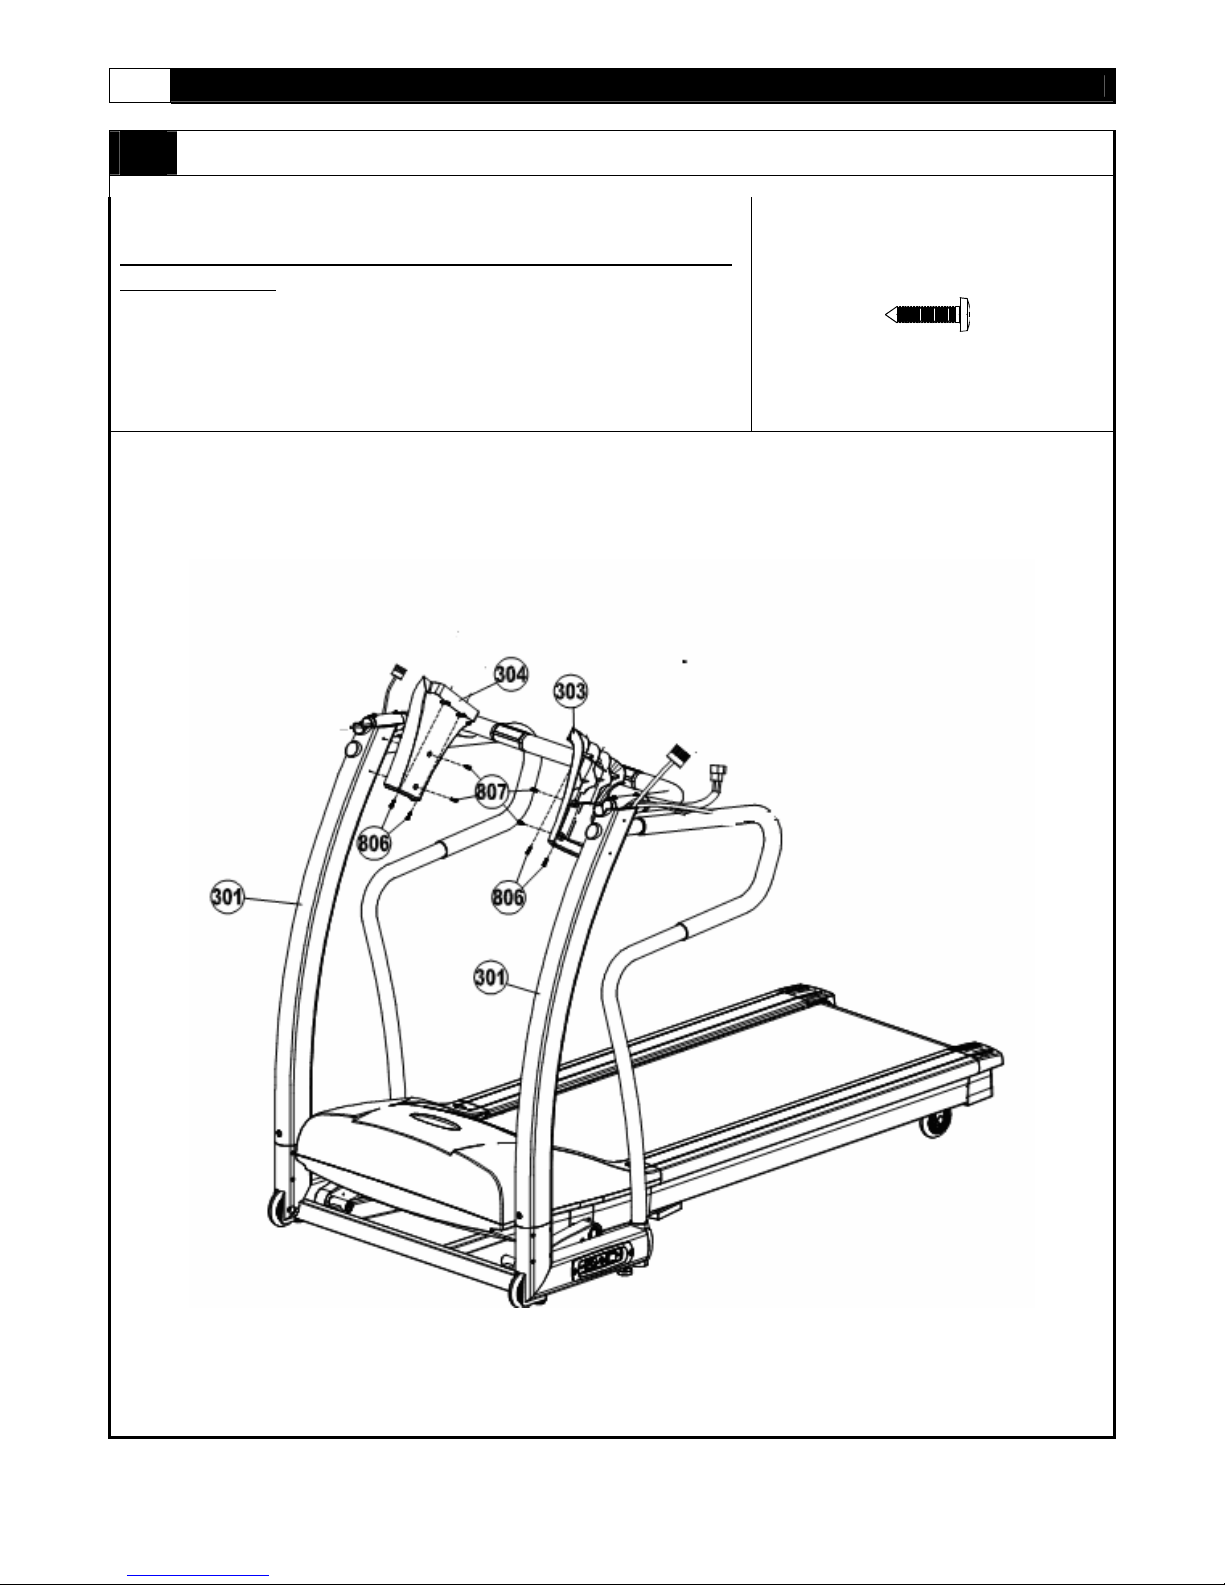
Step 5: Attaching the Upright Covers
NOTE: Be careful not to damage the wires when securing the
Upright Covers.
A) Attach the Right Upright Cover (304) to the right upright (303)
B) Secure the Right Upright Cover with 2 #8x19mm Metal Screws
(807).
C) Repeat the above process for the left side
807
x4
Page 23
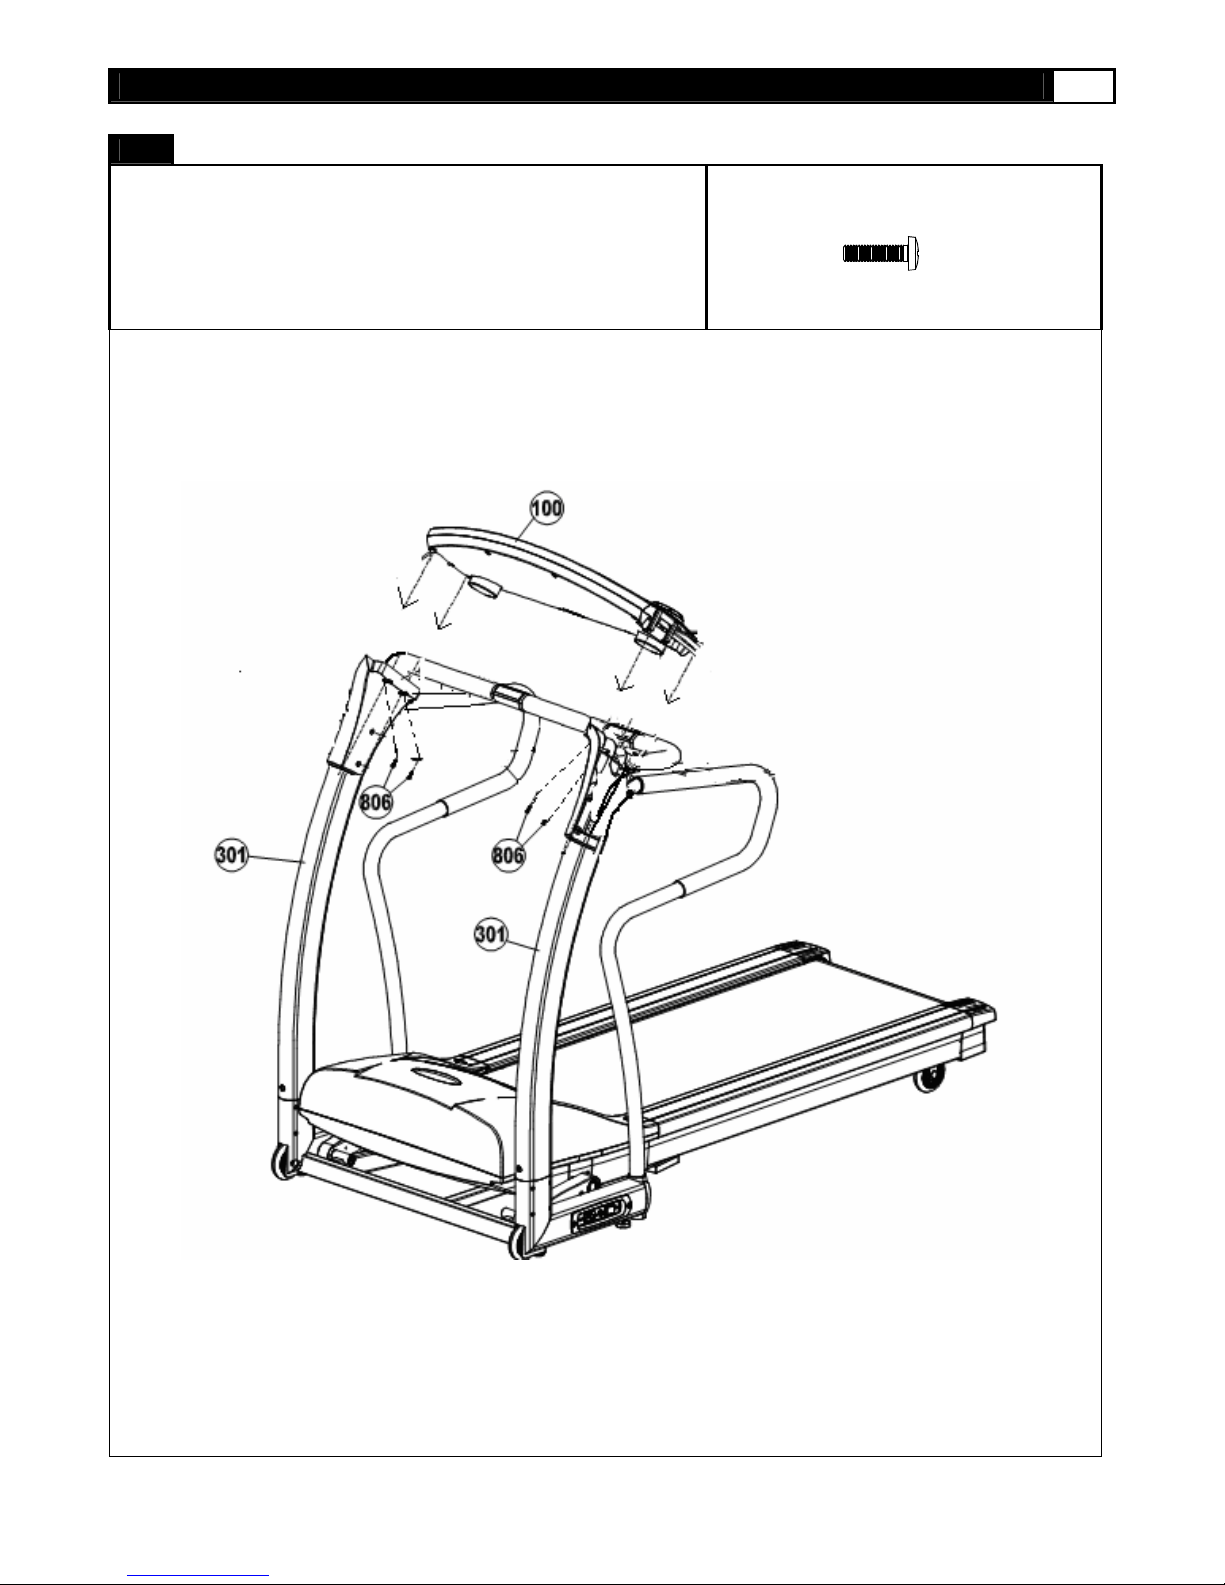
ASSEMBLY
STEP 6: Attach the Computer
A) Lower the Console onto the Left and Right Upright Covers.
B) Secure with four #8 x 19mm Screws (806)
806
www.evofitness.com
X4
23
Page 24
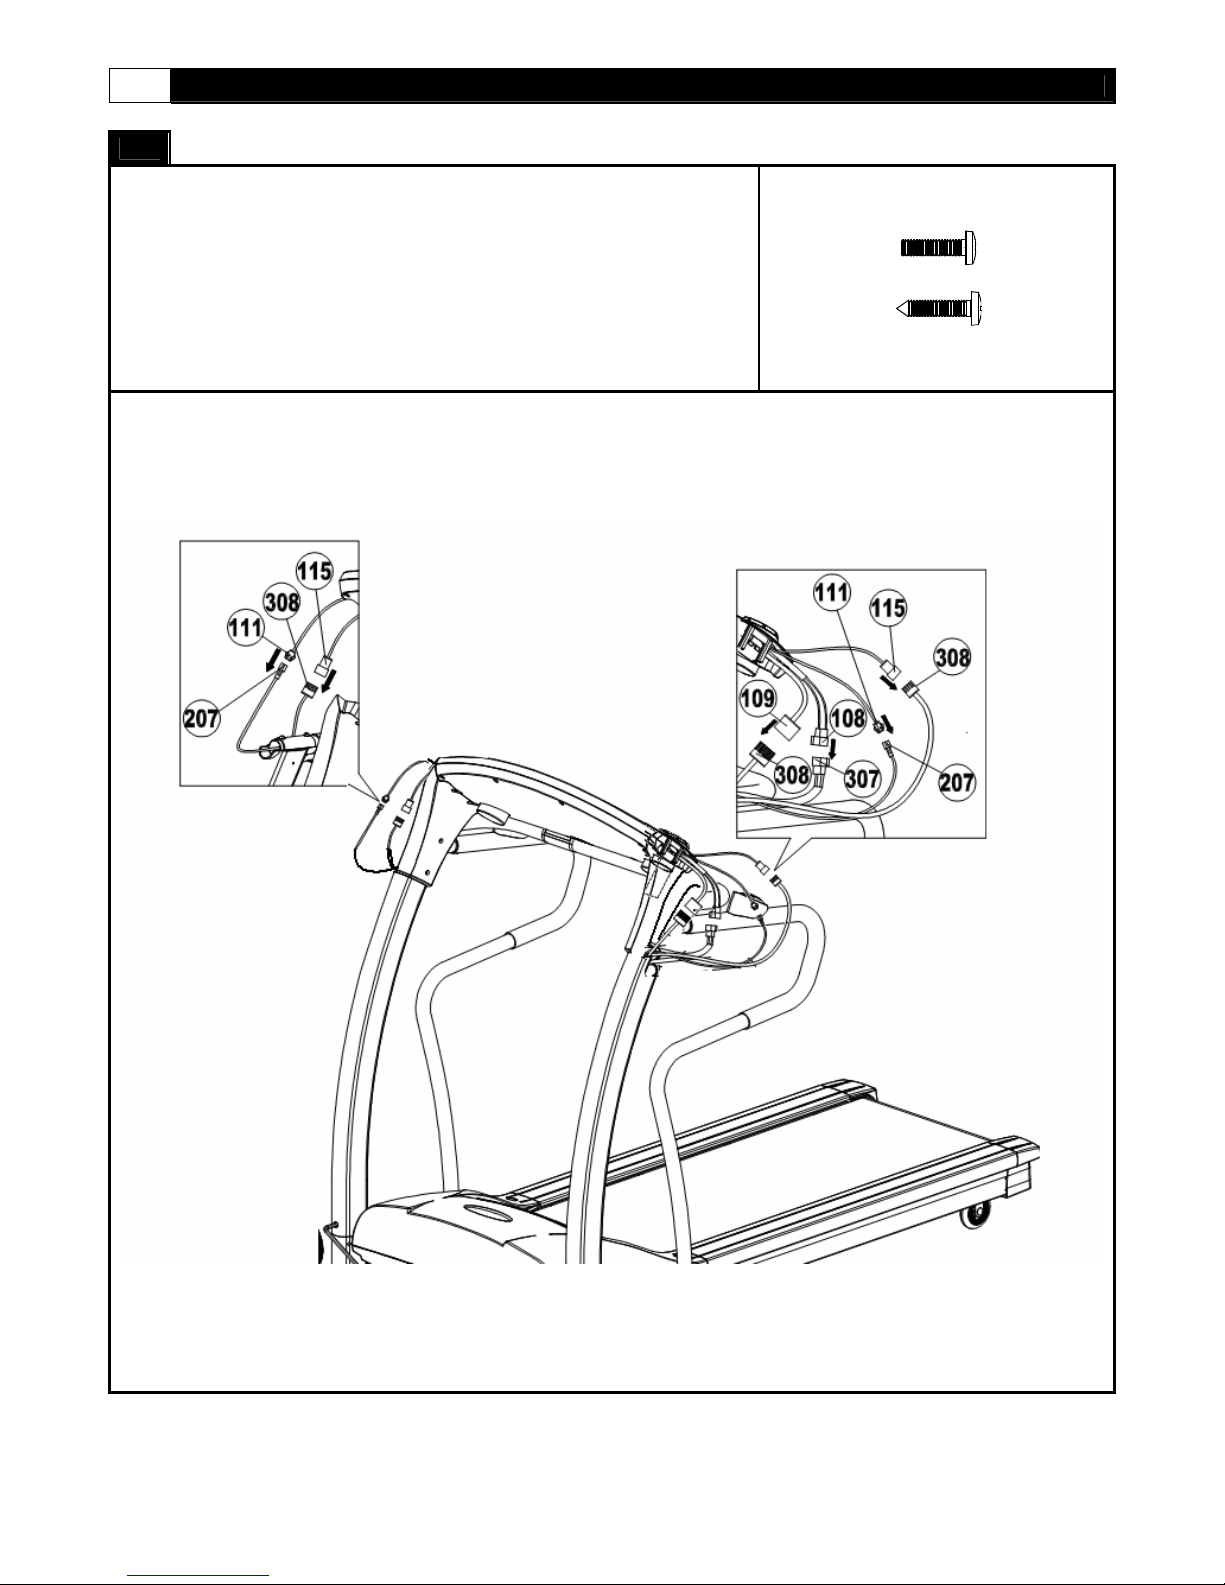
24 EVO1 TREADMILL
ASSEMBLY
STEP 7:Connect Computer Cables
A) Make all the necessary computer connections as pictured below.
The connectors are specially designed to only connect with the
matching connectors.
B) Before proceeding to the next steps recheck that all the cables are
firmly connected
806
807
X4
x4
Page 25
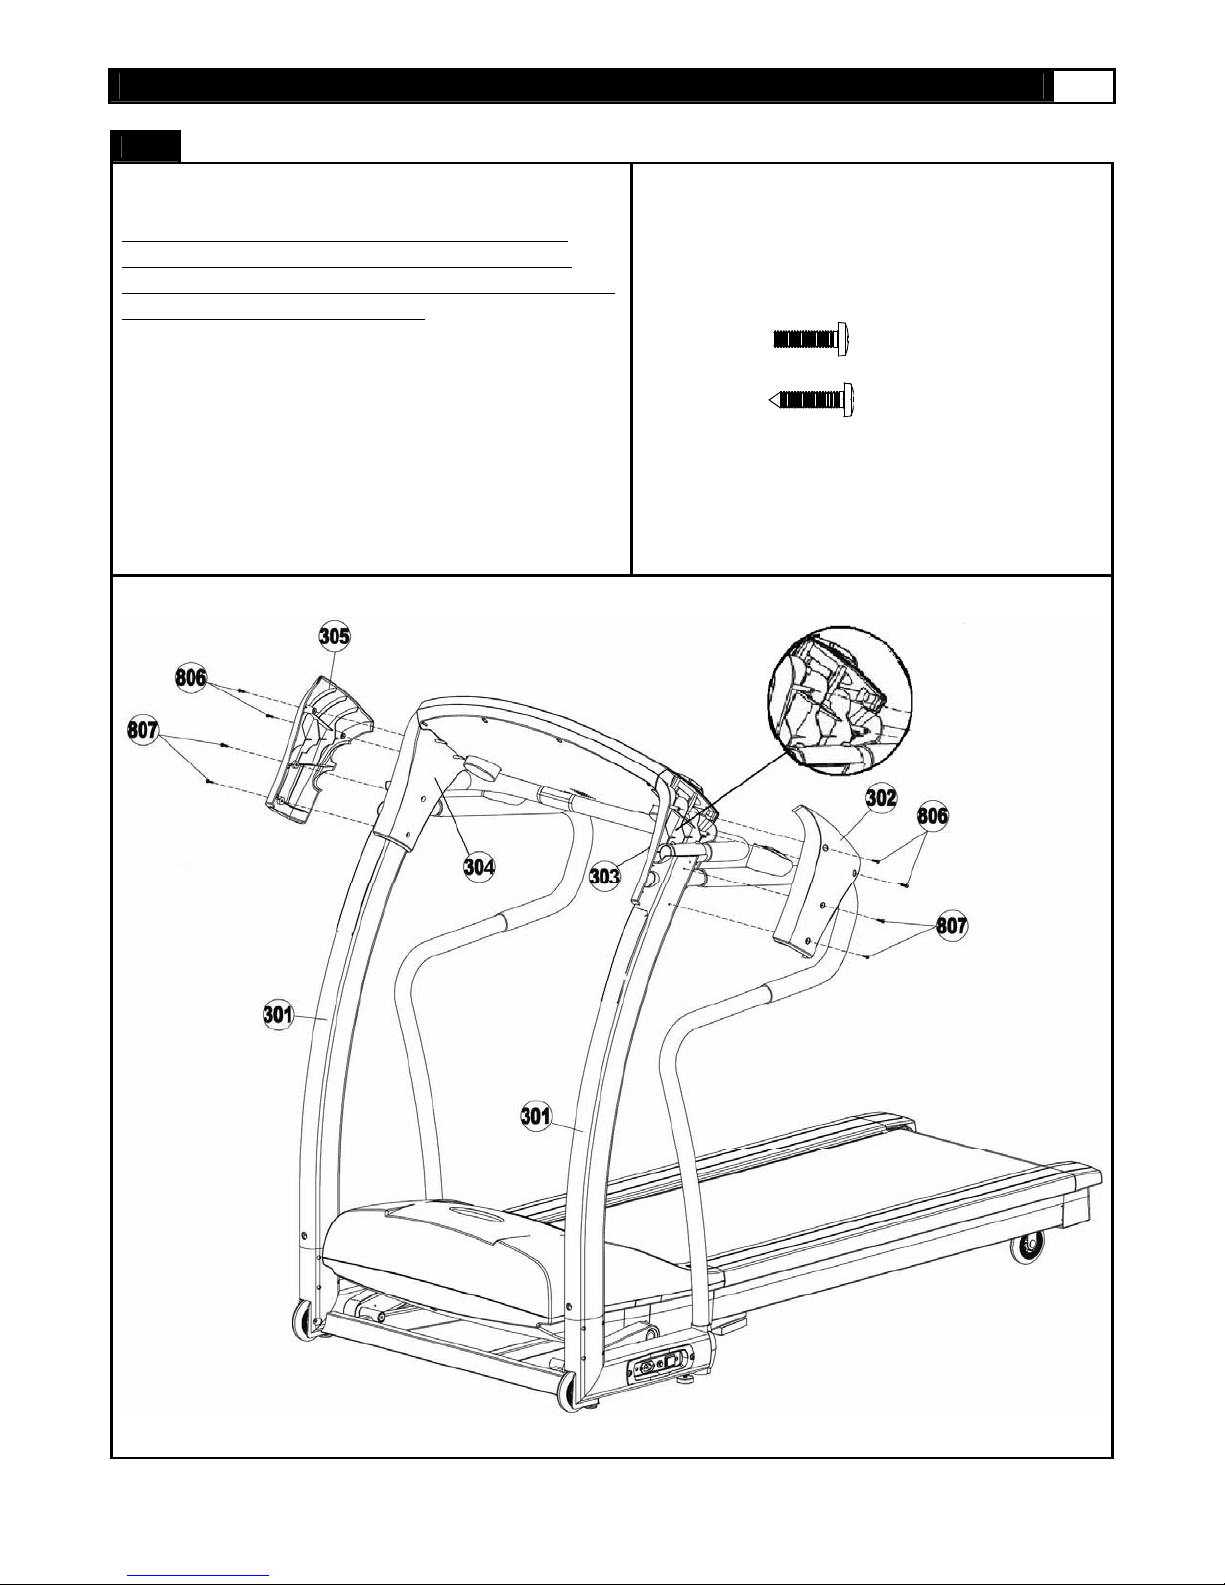
ASSEMBLY
STEP 8: Attach the Outside Upright Covers
Note: CAREFULLY FOLD THE COMPUTER
CABLES AND TUCK THEM BETWEEN THE
PLASTIC RIDGES OF PARTS 303 AND 304 SO
THEY WILL NO BE PINCHED
A) Attach the Upright Cover (305) to the right side
Upright Tube (301)
B) Secure using two #8 x 19mm Screws (806) into the
console.
C) Then secure using two #8 x 19mm Metal Screws
(807) into the Upright Tube
D) Repeat this process for the left side
806
807
x4
X4
www.evofitness.com
25
Page 26
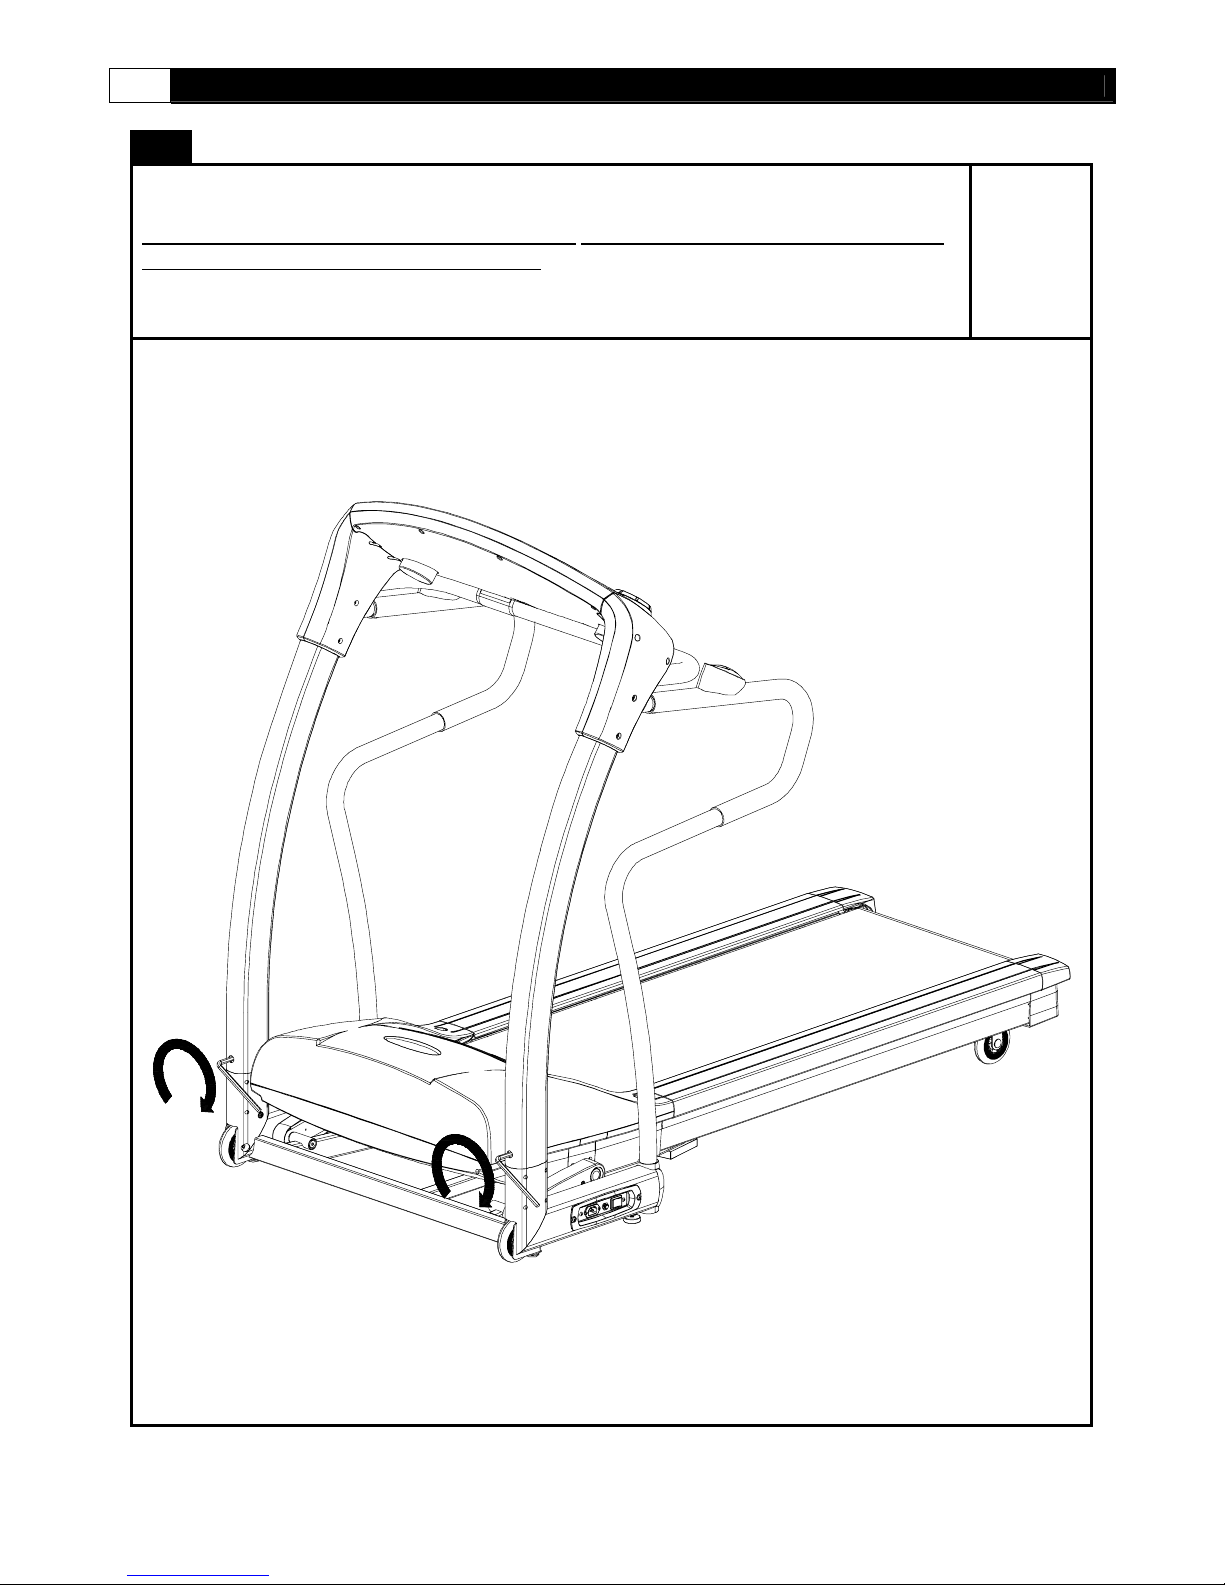
26 EVO1 TREADMILL
ASSEMBLY
STEP 9: Securing of the Upright Tubes
NOTE: ONLY TURN BOLTS CLOCKWISE. The Allen Bolt Sets (412) have been
pre-assembled in the Base Frame (401)
Secure The Upright Tubes by tightening the Allen Bolt (412), located in the Upright Tube, clockwise.
Page 27
www.evofitness.com
27
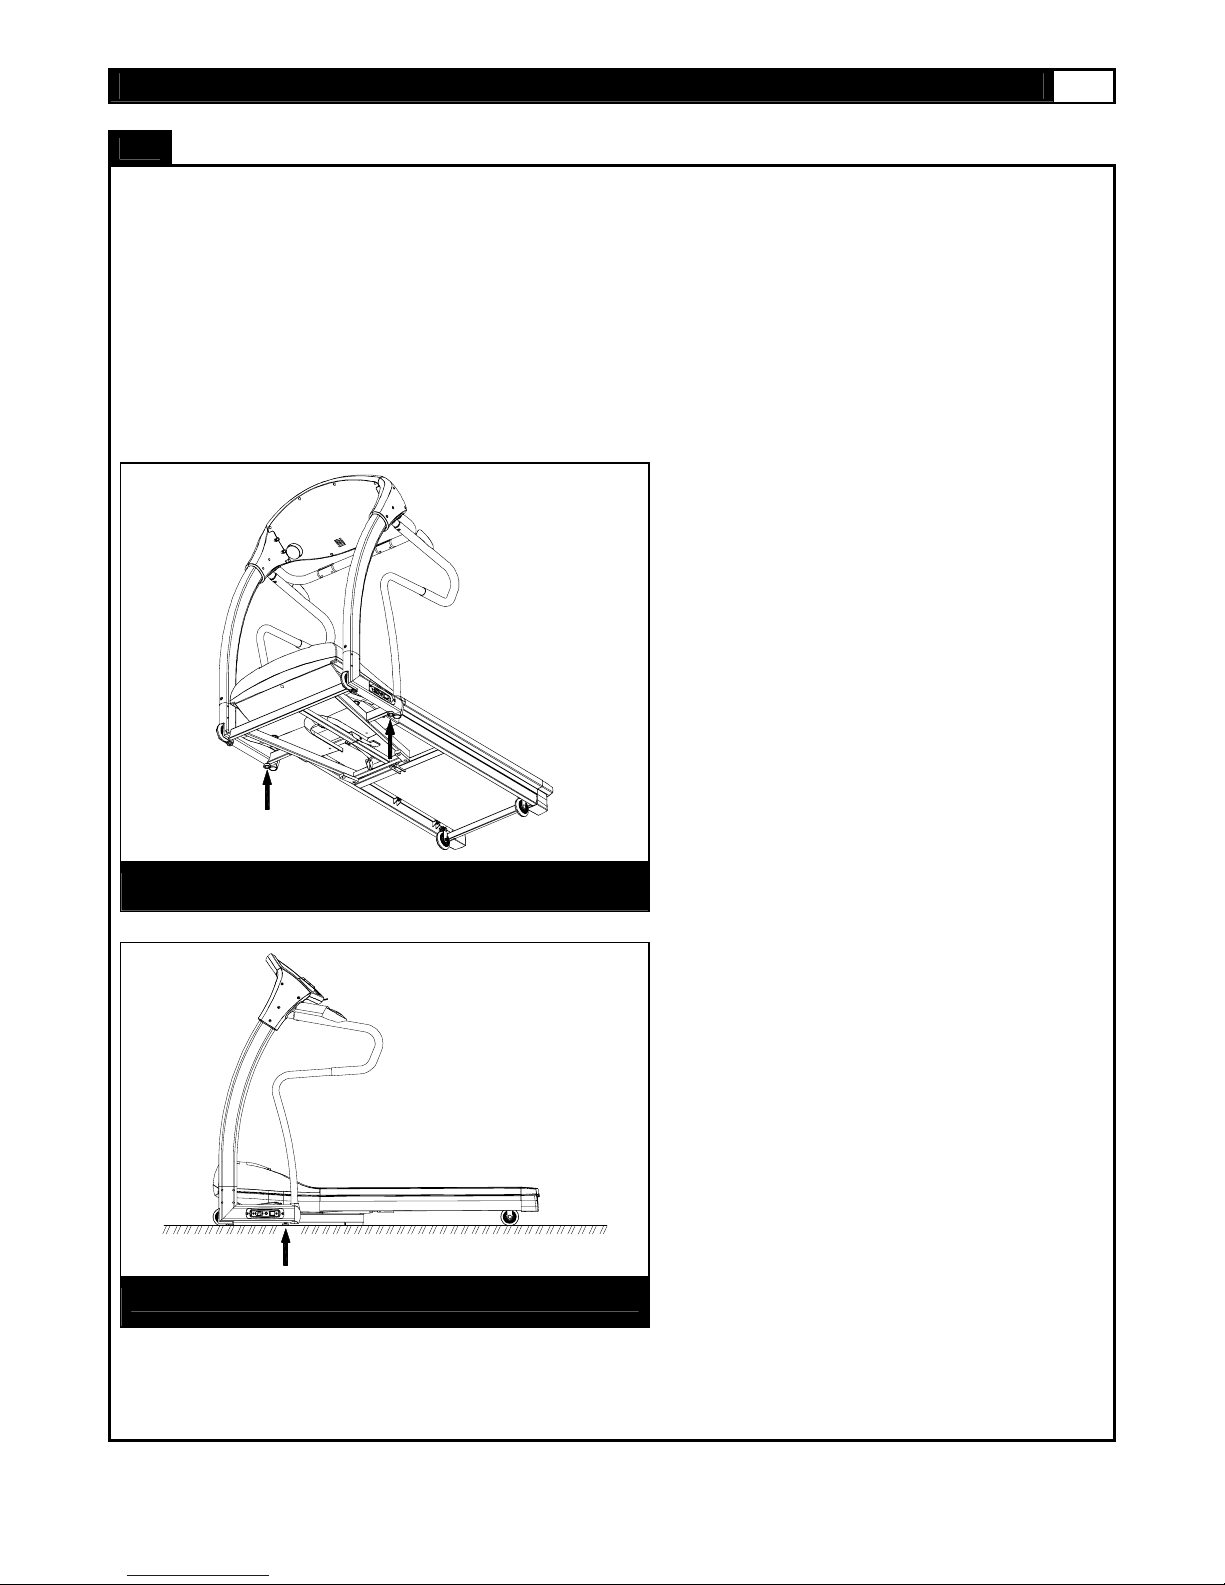
FOLLOW THESE INSTRUCTIONS TO LEVEL YOUR TREADMILL:
An uneven floor or improper stabilizer level may cause the treadmill to wobble during use as well as the incline adjustment to
function incorrectly . Please follow the procedure described below to make sure t he treadmill stabilizer is adjusted correctly prior to
use. You may need the assistance of another person to perform this adjustment.
First locate the two adjustable stabilizers under the base frame. Then simply rotate them in or out to adjust the level of
the treadmill. When properly adjusted the treadmill should sit firmly on both stabilizers and all cushions.
STABILIZER ADJUSTMENT
Locate the two adjustable stabilizers under the b ase frame.
Treadmill should sit firmly on both stabilizers and all cushions.
Page 28
28 EVO1 TREADMILL
Features
The safety key must be inserted for the
treadmill to function. The safety key clip
should be worn at all times when the
treadmill is in use. This safety feature is
designed to prevent injury.
Page 29
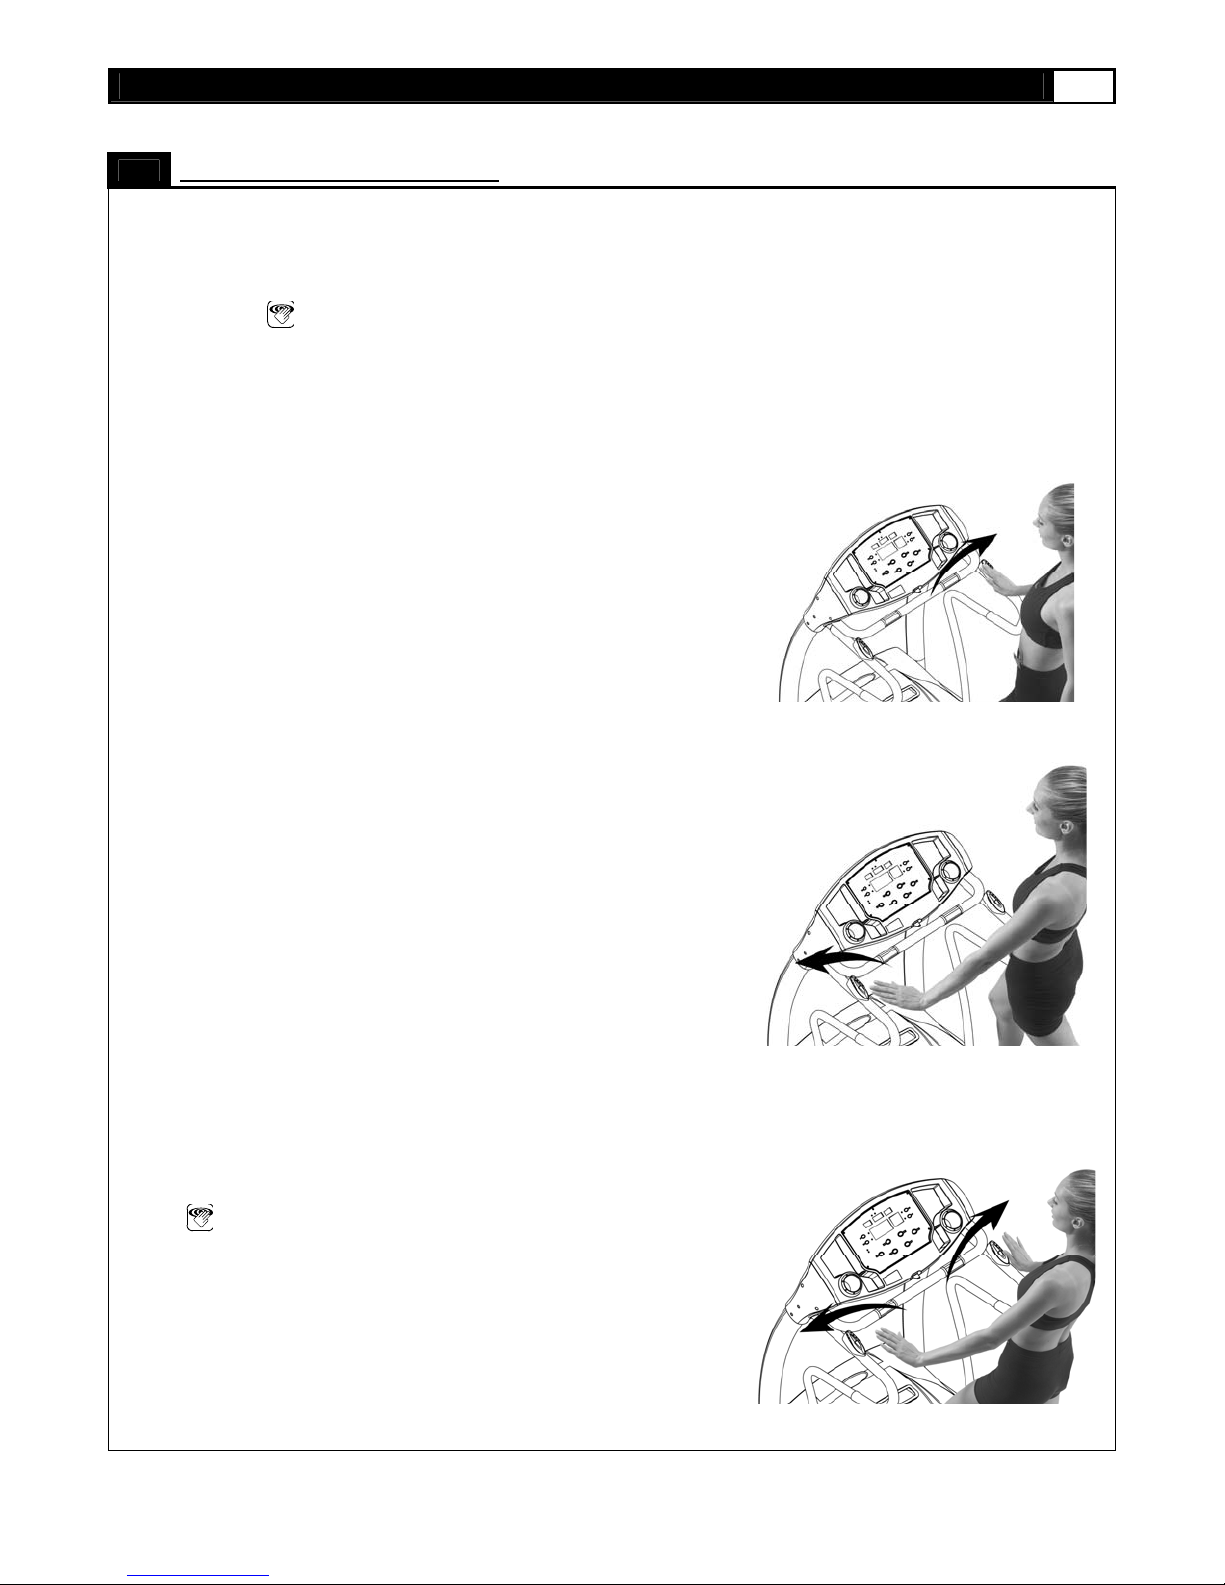
MOTION CONTROL:
Walking belt speed can be increased, decreased or stopped using the Motion
Control sensors on the handlebars. To do this follow the instructions below:
MOTION CONTROL OPERATION
1. Press the button on the console to switch the motion control
function on and off:
• When the LED light is ON the MOTION CONTROL is active.
• When the LED light is OFF the MOTION CONTROL is inactive.
2. After switching on the MOTION CONTROL wave your right hand
approximately 6 inches above the motion sensor on the right handle
bar to increase the speed. The sensor will sound one short BEEP
per scan and speed up by 0.1 MPH per BEEP. Holding your right
hand approximately 6 inches above the right sensor constantly
results in the sensor sounding one long BEEP per second and
speeding up by 0.5 MPH per second.
www.evofitness.com
29
3. Wave you left hand approximately 6 inches above the motion sensor
on the left handle bar to decrease the speed. The sensor will sound
one short BEEP per scan and decrease speed by 0.1 MPH. Holding
your left hand approximat ely 6 inches above the left sensor
constantly results in the sensor sounding one long BEEP per second
and decreasing speed by 0.5 MPH p er second.
4. Wave both hands approximately 6 inches above both motion
sensors at the same time. The sensor will sound two short BEEP
sounds then stop the belt.
• Always switch off the motion control function by pressing the
MOTION CONTROL button on the console before turning
off the power to the treadmill.
2. Use right sensor to speed up.
3. Use left sensor to slow down.
4. Use both sensors to stop belt.
Page 30
30 EVO1 TREADMILL
HOW TO MAINTAIN THE MOMENTUM EVO1 TREADMILL:
Proper maintenance is very important to ensure your treadmill is always in top working condition. Improper maintenance could
cause damage or shorten the life of your treadmi ll an d excee d the LIM I TED WARRAN TY co vera ge .
BELT ADJUSTMENT:
ALL BELT ADJUSTMENTS ARE CONSIDERED MAINTENIANCE, AND ARE THE RESPONSIBILITY OF THE END USER.
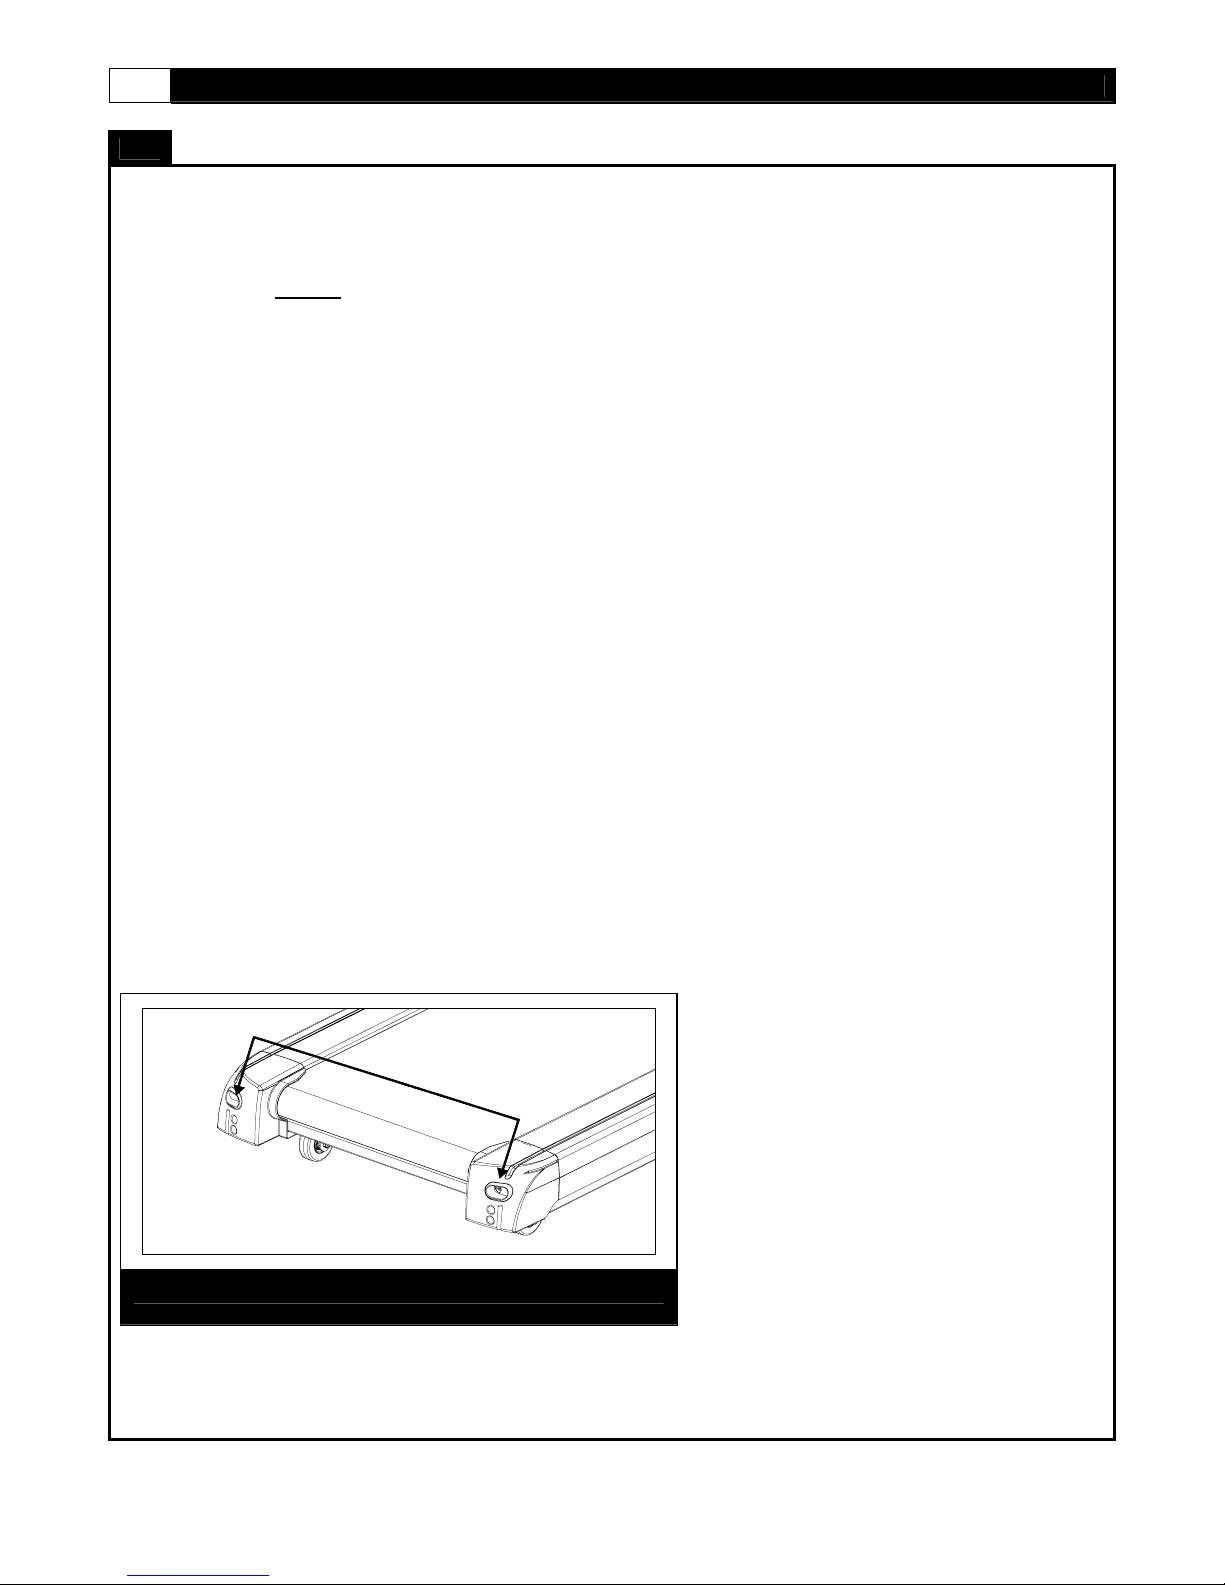
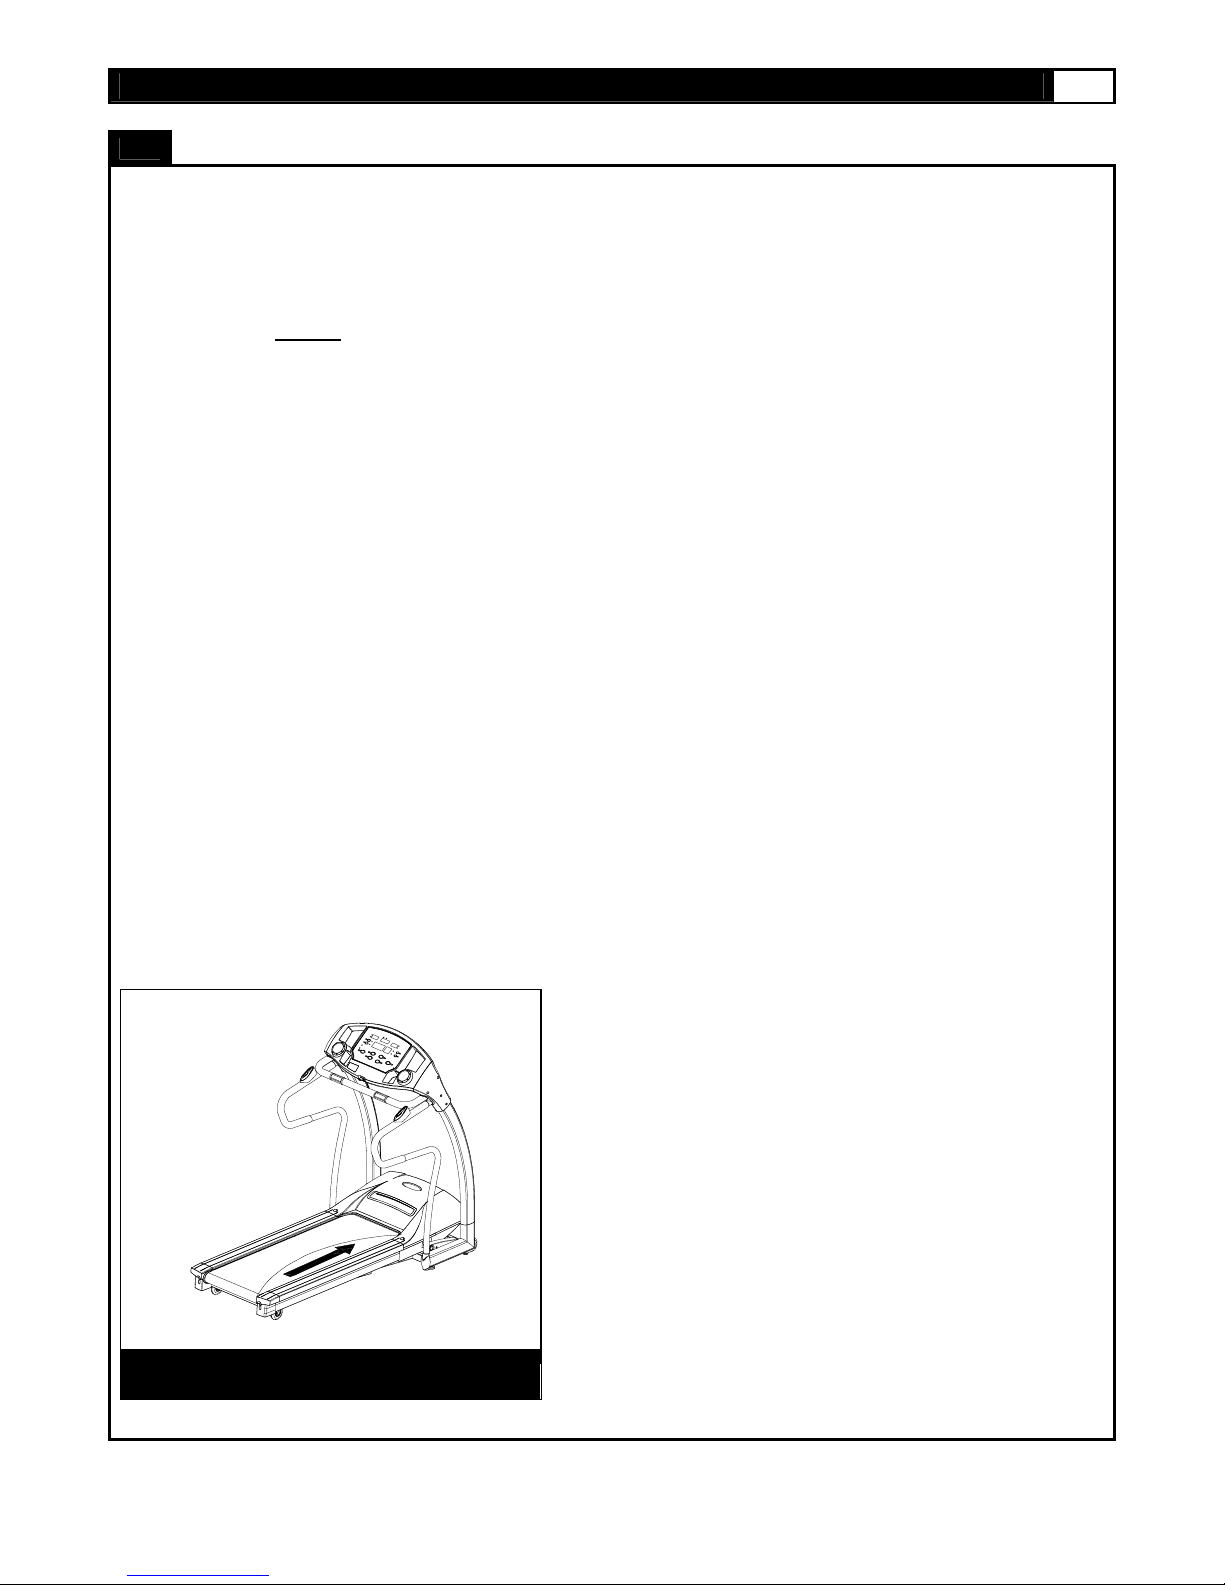
Belt adjustment and tension performs two functions : adjus tment for tension and centering. The running belt has been adjusted
properly at the factory. However transportation, uneven flooring or other unpredicted reasons could cause the belt to shift off center
resulting in the belt rubb ing on the plastic side rail or end caps and possibly causing damage to the equipment. To adjust the belt
back to it’s proper position please follow the directions below:
MAINTAINENCE
• Important: DO NOT
away and keep it out of direct sunlight.
• Inspect and tighten all parts of the treadmill regular ly. Replace any damaged or worn parts immediately.
• Walking belt has shifted to the left: First unplug the power cord from the surge protector. Using the hex key provided,
turn the left rear roller adjustment bolt 1/4 turn in the clockwise direction. Plug the power cord back into the surge
protector and run the tre admill at 2.5 mph. You should see the belt start to correct itself, moving back towards the center.
Repeat the above procedure until the walking belt is centered. It may be necessa ry to set walking belt tension once you
have completed this procedure if the belt feels like it is slippi ng while walkin g. Refer below to the "Walking belt slipping"
instructions.
• Walking belt has shifted to the right: First unplug the power cord from the surge protector. Using the hex key provided,
turn the right rear roller adjustment bolt 1/4 turn in the clockwise direction. Plug the power cord back into the surge
protector and run the tre admill at 2.5 mph. You should see the belt start to correct itself, moving back towards the center.
Repeat the above procedure until the walking belt is centered. It may be necessa ry to set walking belt tension once you
have completed this procedure if the belt feels like it is slippi ng while walkin g. Refer below to the "Walking belt slipping"
instructions.
• Walking belt is slipping: First unplug the power cord from the surge protector. Using the hex key provided, turn both the
left and right rear roll er adjustment bolts the equal amounts, 1/2 turn in the clockwise direction. Plug the power cord back
into the surge protector and run the treadmill at 2. 5 mph. You should now walk on t he belt to determine if the belt is still
slipping. Repeat the above procedure until the walking belt is not slipping. The tension should be just tight enough not to
slip. If proper tension cannot be achieved within four attempts please contact Smooth Fitness Technical Support. Belt
centering may be necessary once you have completed the tensioning procedure.
WARNING! Do not over tighten rollers! This will cause premature roller bearing failure!
use abrasives or solvents to clean the treadm il l. To preve nt dam a ge to the computer, keep liquids
Right and left tension bolts are located at the rear of the treadmill.
Page 31
www.evofitness.com
31
CLEANING:
Routine cleaning of your treadmill will extend the product's life.
DECK LUBRICATION:
The walking belt has been pre-lubricated at the facto ry. However, it is recommended that the running deck be checked periodically
for lubrication to ensure optimal treadmill performance. Your treadmill should not have to be lubricated usually within the first 400
hours of use.
Every 2 months of operation lift the sides of the walking belt and feel the top surface of the running deck as far as you can reach. If
you feel signs of silicone, no further lubrication is required. If it feels dry to the touch, follow the instructions below.
. To purchase lubricant Kit please contact Smooth Fitness 1-888-800-1167
To apply lubricant under the walking belt:
MAINTAINENCE
• Warning: To prevent electrical shock, be sure the power to the treadmill is OFF and the power cord is unplugged from the
wall electrical outlet before attempting any cleaning or maintenance.
• Important: DO NOT
away and keep it out of direct sunlight.
• After each workout: Wipe off the console and other treadmill surfaces with a clean, water dampened soft cloth to
remove excess perspiration.
• Weekly: Use of a treadmill mat is recommended for ease of cleaning. Dirt from your shoes contacts the belt and
eventually makes it to underneat h th e treadmill. Vacuum underneath treadmill once a week.
1. Position the walking belt so that the seam is located on top and in center of the walking board.
2. Insert the spray nozzle into the spray head of the lubricant can.
3. While lifting the side of the walking belt, position t he spray nozzle between the walking belt and the board approximately 6"
from the front of the treadmill and as far to the center as possible. Apply the silicon e spr ay to the walking board, moving
from the front of the treadmill to the rear. Repeat this on the other side of the belt. Spray approximately 1/4 bottle
(supplied with treadmill) each time.
4. Allow the silicone to "set" for 1 minute before using the treadmill.
use abrasives or solvents to clean the treadmill. To prevent damage to the computer, keep liquids
Spray lubricant from front to back.
Page 32
32 EVO1 TREADMILL
Warning:
Before using this product, please consult your personal physician for a complete physical examination. Frequent and strenuous
exercise should be approved by your doctor first. If any discomfort should result from your use of this product, stop exercising and
consult your doctor. Proper usage of this produ ct i s essent ia l. Please re ad you r manu a l carefu lly before exercising.
Please keep all children away from the equipment during use and when equipment is unattended.
Always wear appropriate clothing, including athletic shoes, when exercising. Do not wear loose clothing that could become caught
during exercising.
Make sure that all bolts and nuts are tightene d when equ ipment is in use. Periodic maintenance is required on all exer c ise
equipment to keep it in good condition.
Before beginning:
How you begin your exercise program depends on your physical condition. If you have been inactive for several years, or are
severely overweight, you must start slowly and increase your time gradually, a few minutes per week.
Initially you may be able to exercise only for a few minutes in your target zone. However, your aerobic fitness will improve over the
next six to eight weeks. Don’t be discouraged if it takes longer. It’s important to work at your own pace. Ultimately, you’ll be able
to exercise continuously for 30 minutes. And the better your aerobic fitness, the harder you will have to work to stay in your target
zone. But remember these essentials:
IMPORTANT STEPS
• Contact your physician before starting a workout or training program. Have your doctor review your training and diet
programs to advise you of a workout routine you should adopt.
• Begin your training prog ram slowly with realistic goals that have been set by you and your doctor.
• Supplement your program with some type of aerobi c exerc ise such a s walkin g, jogg in g, sw immi ng , dancin g an d/ o r
bicycling. Monitor your pulse frequently. If you do not have an electronic heart rate monitor, have your physician show
you the proper way to manually check your pulse by using your wrist or neck. Establish your target heart rate based on
your age and condition.
• Drink plenty of fluids during the course of your routine. You must rep lace the water content lost from excessive exercising
to avoid dehydration. Avo id drinking large amounts of col d liquids. Fluids should be at room temperature when
consumed.
Page 33
www.evofitness.com
33
Finding your pulse:
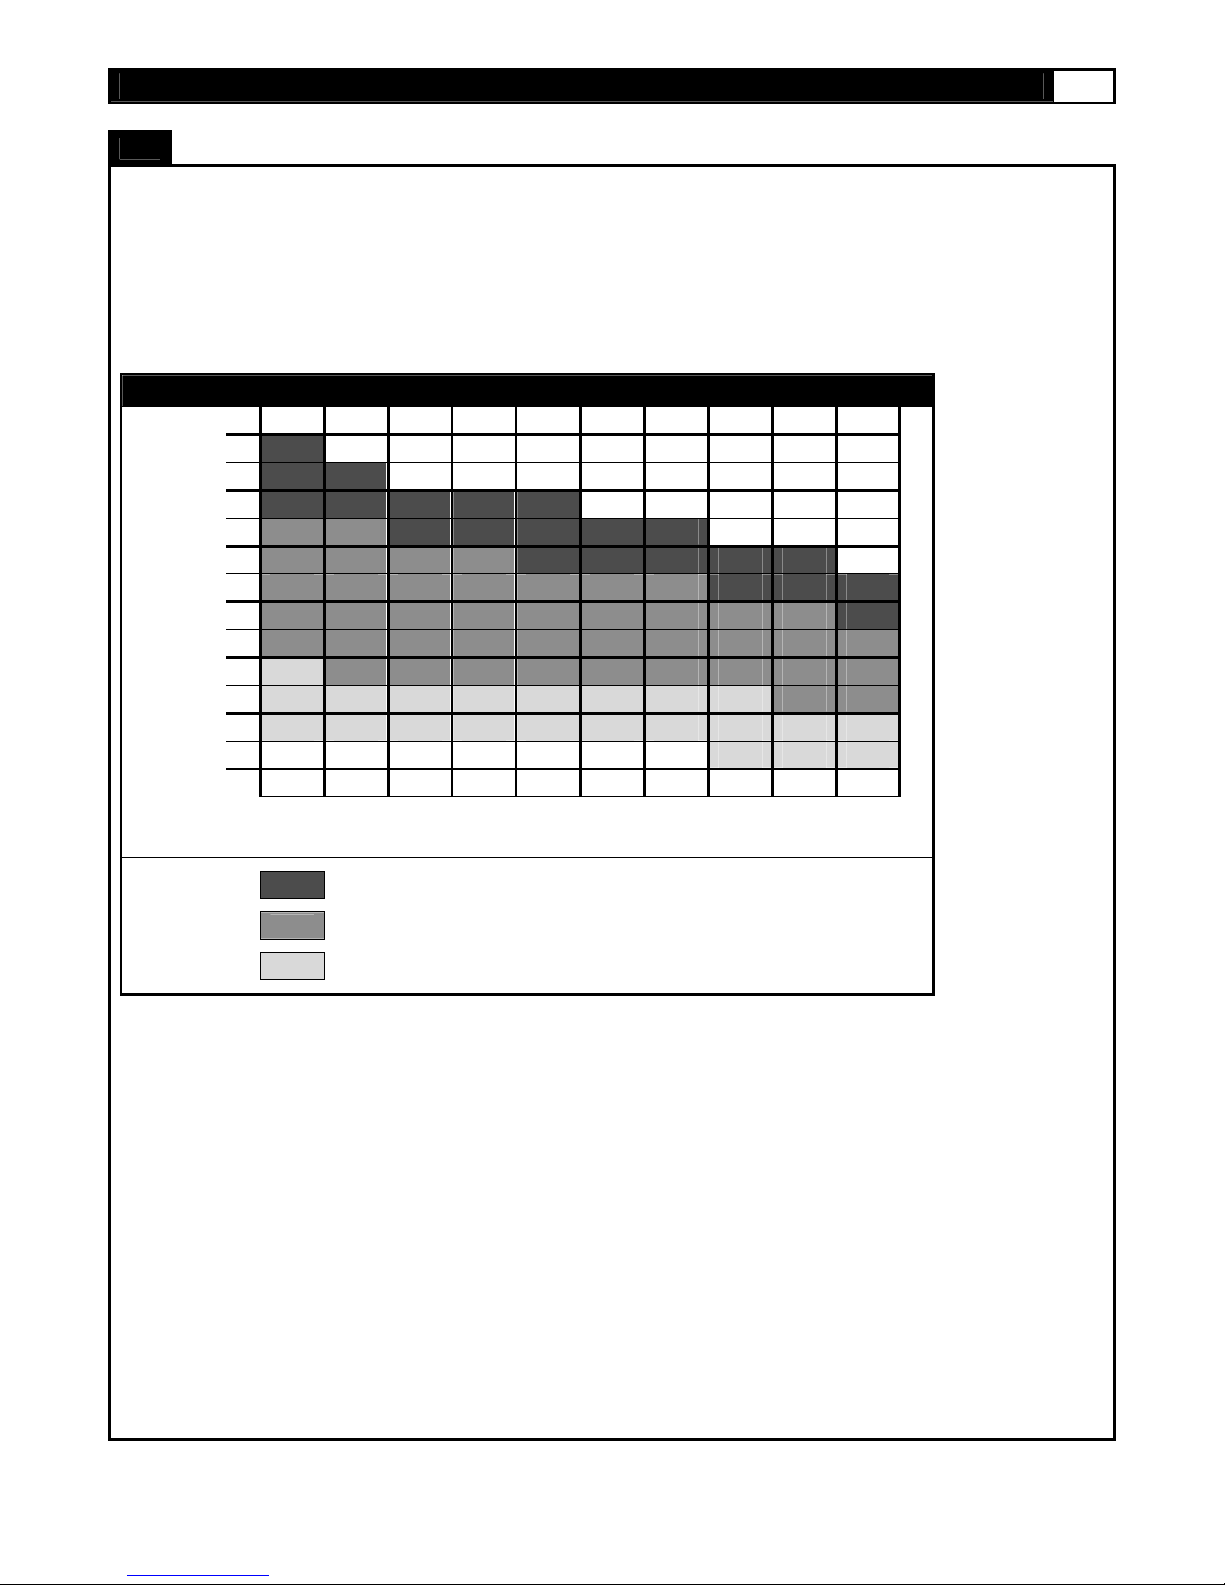
To make sure your heart is beating in its target zone, you’ll need to know how to monitor your heart rate. The easiest way is to feel
the pulse in the carotid a rtery on either side of your neck, between the windpipe and the large neck muscles. Count the number of
beats in ten seconds, a nd then multiply that number by six. This gives you the number of beats per minute.
How fast should your heart beat during aerobic exercise? Fast enough to reach an d stay in its “target zone,” a range of beats per
minute that is largely determined by your age and physical condition. To determine your target zone, con sult the chart we have
provided.
TARGET HEART RATE
FIND YOUR TARGET HEART RATE
200
180
160
140
120
100
80
YOUR HEART RATE in beats per minute
YOUR AGE in years
20 25 30 35 40 45 50 55 60 65 70
Aerobic exercise:
Is any sustained activity that sends oxygen to your muscles via your heart and lungs. It will improve the fitness of your lungs and
heart: your body’s most important muscle. Aerobic fitness is promoted by any activity that uses your large muscle groups - arms,
legs or buttocks, for example. Your heart beats quickly and you breathe deeply. An aerobic exercise should be part of your entire
exercise routine.
ADVANCED: Sports, athletic conditioning or interval training
FITNESS: Optimal training, aerobic or cardiovascular
HEALTH: Beginner, low intensity with long duration produces fat burning
Page 34
34 EVO1 TREADMILL
Targeted muscle groups:
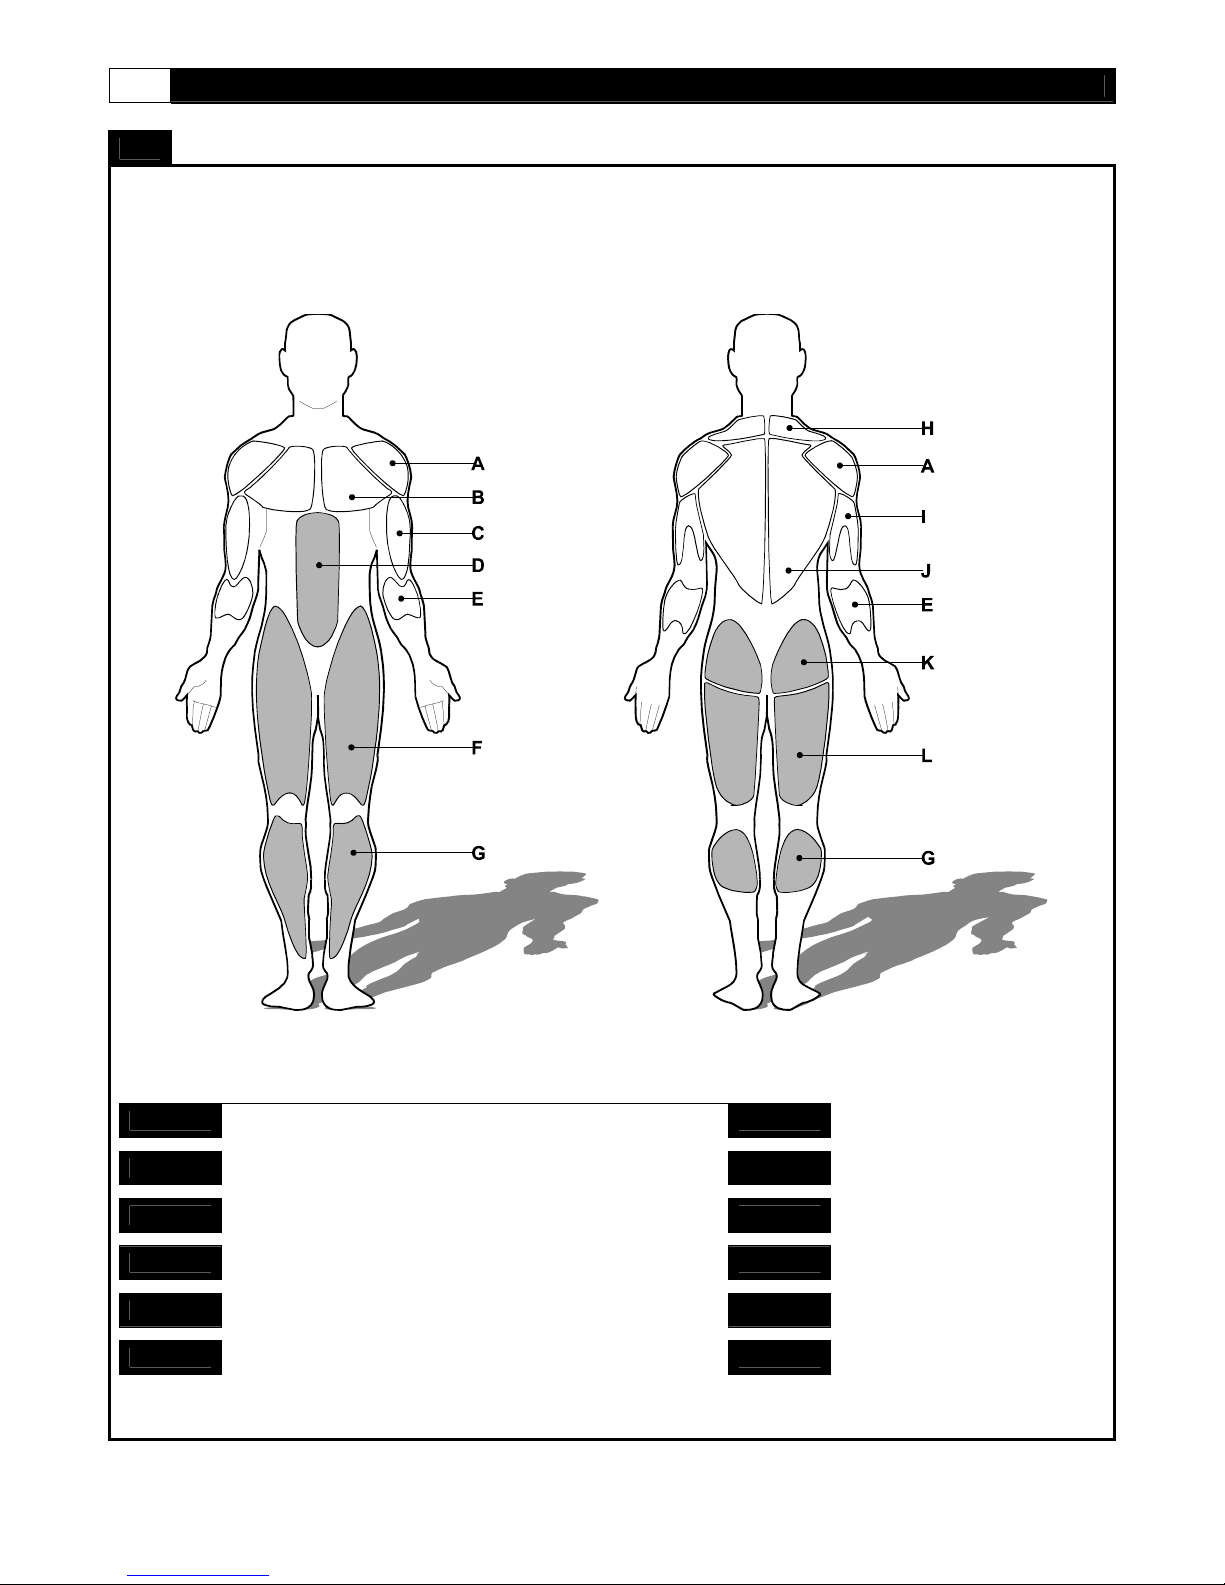
The exercise routine that is performed on this product will develop primarily lower body muscle groups. These muscle groups are
shown in gray color on the chart below.
MUSCLE CHART
MUSCLE GROUPS
A Shoulder muscles Calf muscles G
B Pectoral muscles Trapezius muscles H
C Bicep muscle Tricep muscles I
D Abdominal muscles Back muscles J
E Forearm muscles Gluteal muscles K
F Quadricep muscles Hamstring muscles L
Page 35
www.evofitness.com
35
Warm up and cool down:
A successful exercise p rogram consists of a warm -up, aerobic exercise, and a cool-down. Do the entire program at least two and
preferably three times a week, resting for a day between workouts. After several months, you can increase your workouts to four or
five times per week.
Warming up is an important part of your workout, and should begin every session. It prepares your body for more strenuous
exercise by heating up and stretching out your muscles, increasing your circulation and pulse rate, and delivering more oxygen to
your muscles. At the end of your workout, repeat these exercises to reduce sore muscle problems. We suggest the warm-up and
cool-down exercises on the following pages:
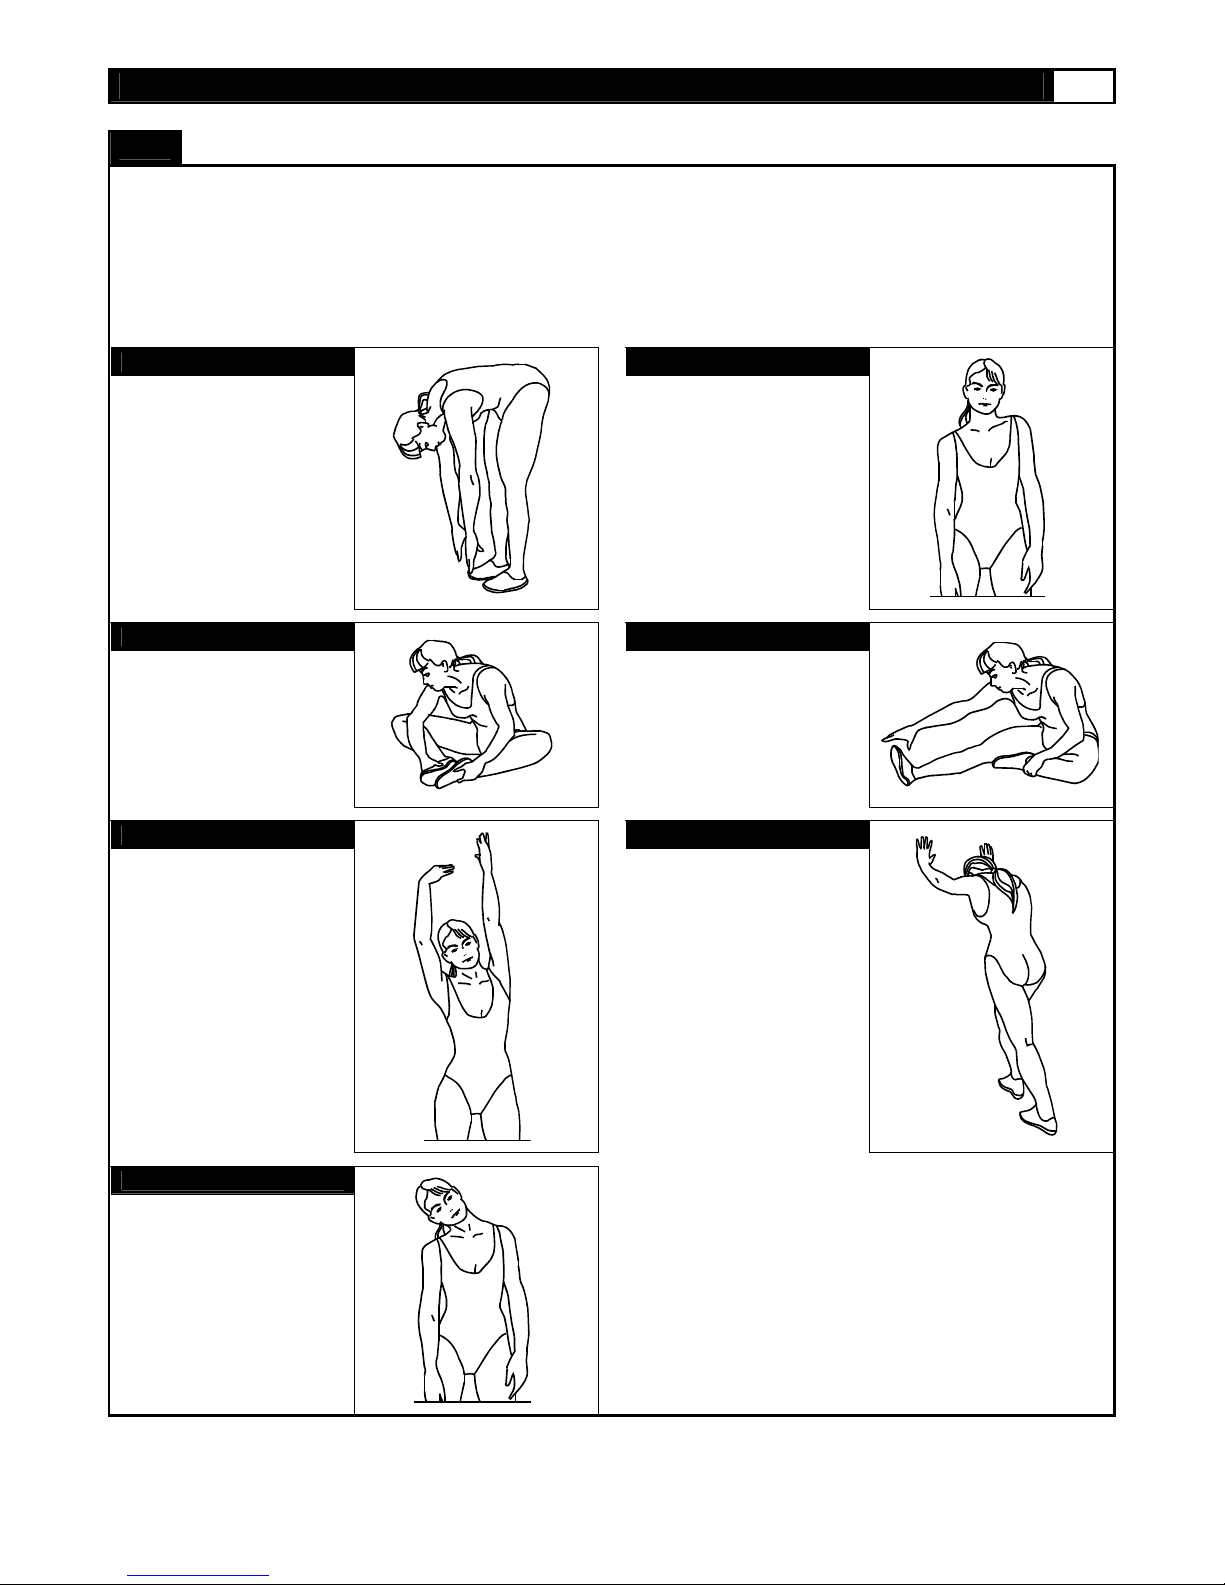
Toe Touch:
Slowly bend forward from
your waist, letting your back
and shoulders relax as you
stretch toward your toes.
Reach down as far as you
can and hold for 15 counts.
STRETCHING ROUTINE
Shoulder Lift:
Lift your right shoulder up
toward your ear for one
count. Then lift your left
shoulder up for one count as
you lower your right
shoulder.
Inner Thigh Stretch:
Sit with the soles of your feet
together with your knees
pointing outward. Pull your
feet as close into your groin
as possible. Gently push
your knees towards the floor.
Hold for 15 counts.
Side Stretch:
Open your arms to the side
and continue lifting them until
they are over your head.
Reach your right arm as far
upward toward the ceiling as
you can for one count. Feel
the stretch up your right side.
Repeat this action with your
left arm.
Head Roll:
Rotate your head to the right
for one count, feeling the
stretch up the left side of your
neck. Next, rotate your head
back for one count, stretching
your chin to the ceiling and
letting your mouth open.
Rotate your head to the left
for one count, and final ly,
drop your head to your chest
for one count.
Hamstring Stretch:
Sit with your right leg
extended. Rest the sole of
your left foot against your
right inner thigh. Stretch
toward your toe as far as
possible. Hold for 15 counts.
Relax and then repeat with
left leg extended.
Calf-Achilles Stretch:
Lean against a wall with your
left leg in front of the right
and your arms forward. Keep
your right leg straight and the
left foot on the floor; then
bend the left leg and lean
forward by moving your hips
toward the wall. Hold, and
then repeat on the other side
for 15 counts.
Page 36
36 EVO1 TREADMILL
Troubleshooting
NOTE: Do not touch any internal electric wires without consulting the manufacturer.
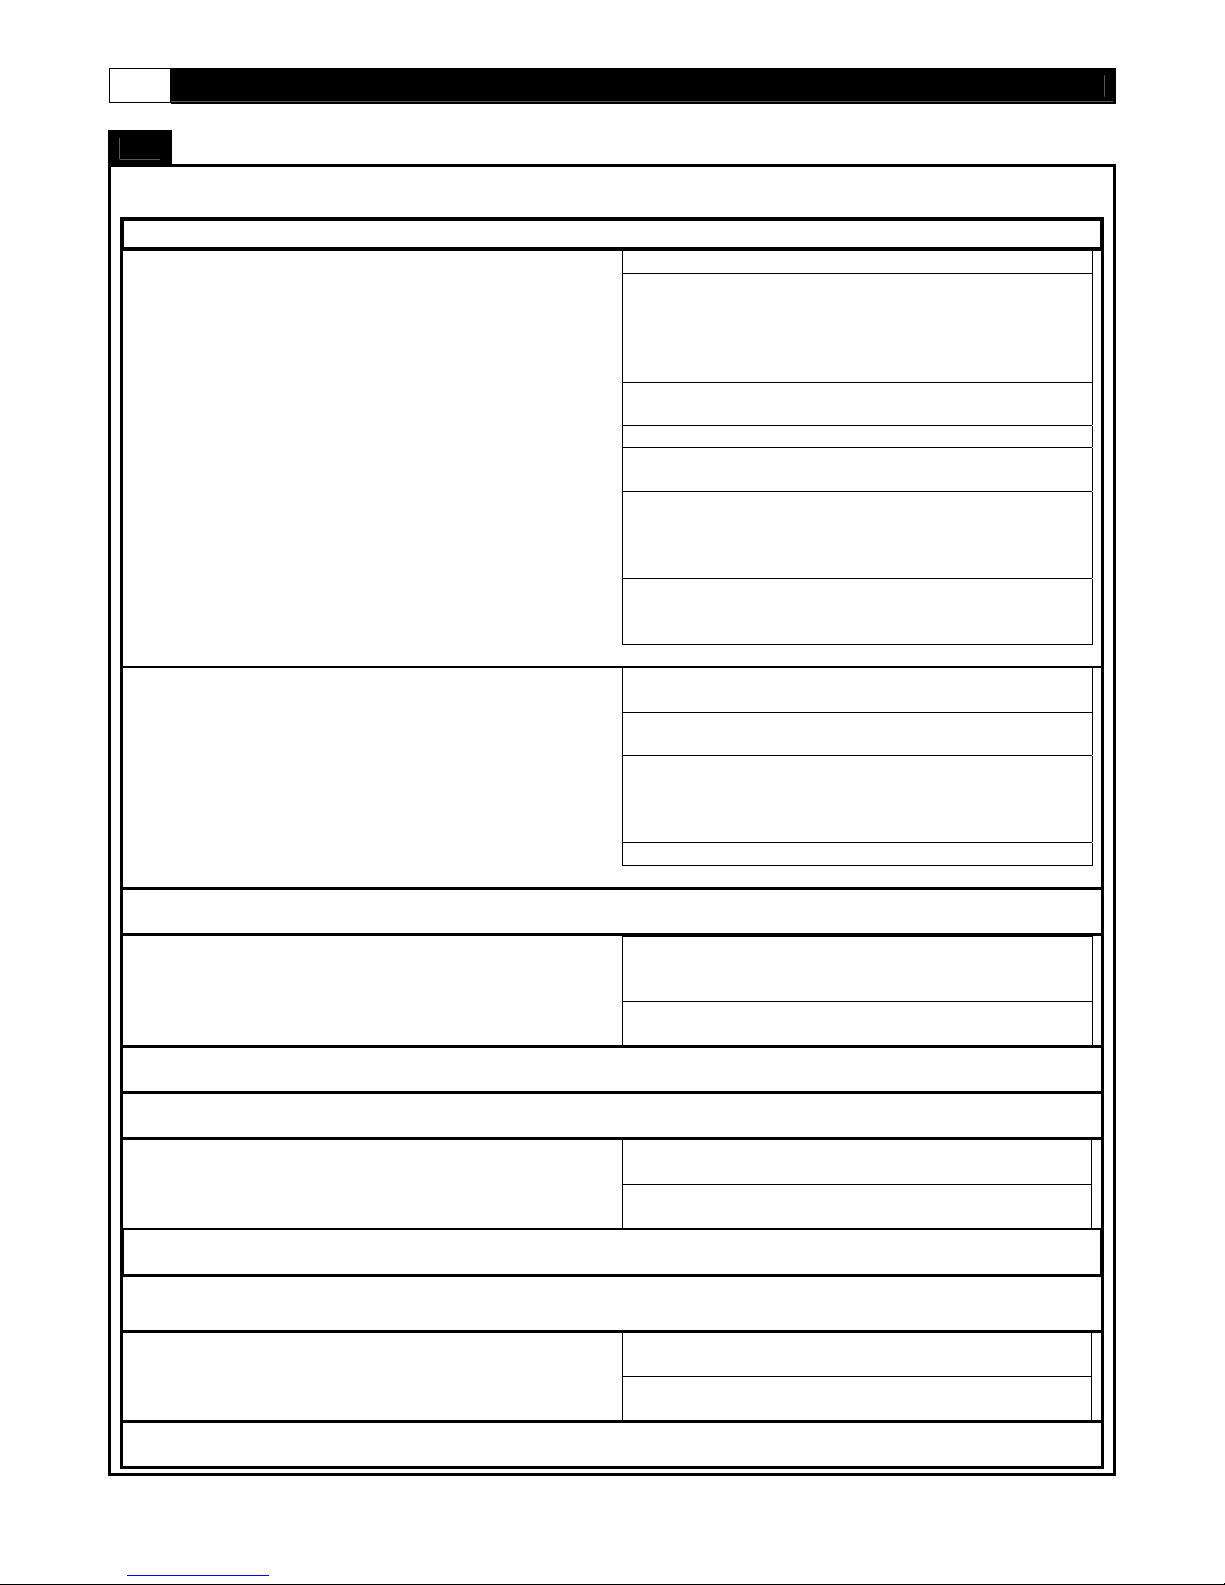
TROUBLESHOOTING
Symptom Resolution
Treadmill will not power up
Treadmill stops operation during use
Treadmill will not incline(Power fold models only) Check for proper positioning of spring knob for
Treadmill will not unfold
Treadmill running belt moves slower than speed
displayed on computer
Treadmill running belt moves slower than speed
displayed on computer
Running belt is not centered
Running belt is slipping or hesitating while in use Tension running belt (See process in owners
Treadmill running belt moves slower than speed
displayed on computer
Check the following:
Make sure the power cord is plugged into a
surge protector, the s urge protect or is
plugged into a properly grounded outlet and
the surge protector is turned on (refer to the
Power Requirements section in this manual).
Equipment circuit breaker is in the reset
position
Equipment power switch is in the on position
Safety key is properly inserted into the
computer console
Wall outlet is properly functioning with correct
voltage (Have an electr ician check for
inadequate voltage at the outlet refer to the
Power Requirements section in this manual)
House circuit breaker is reset and is the
proper size. (refer to the Power
Requirements section in this manual)
Safety key is properly inserted into the
computer console
Equipment circuit breaker is in the reset
position
House circuit breaker is reset, meets proper
requirements and if worn replaced by an
electrician. (refer to the Power Requirements
section in this manual)
Program time has expired
folding(See procedure in owners manual)
Power Fold only
Check for proper positioning of spring knob
for folding(See procedure in owners manual)
Manual Fold only
Folding locking lever is depressed
Metric/English conversion (See owners manual
for Metric/English conversion process)
Metric/English conversion (See owners manual
for Metric/English conversion process)
Treadmill is properly leveled(See procedure
in owners manual)
Center running belt (See Centering
procedure in owners manual)
manual)
Metric/English conversion (See owners manual
for Metric/English conversion process)
Running belt is not centered
Running belt is slipping or hesitating while in use Tension running belt (See process in owners
Treadmill is properly leveled(See procedure
in owners manual)
Center running belt (See Centering
procedure in owners manual)
manual)
Page 37
Smooth Fitness
112 Gaither Drive
Mt. Laurel, NJ 08054
Toll Free Customer Service:
1.888.800.1167
www.evofitness.com
Website:
Copyright © 2005 Greenmaster Industrial Corp. All rights reserved.
 Loading...