

Page 1
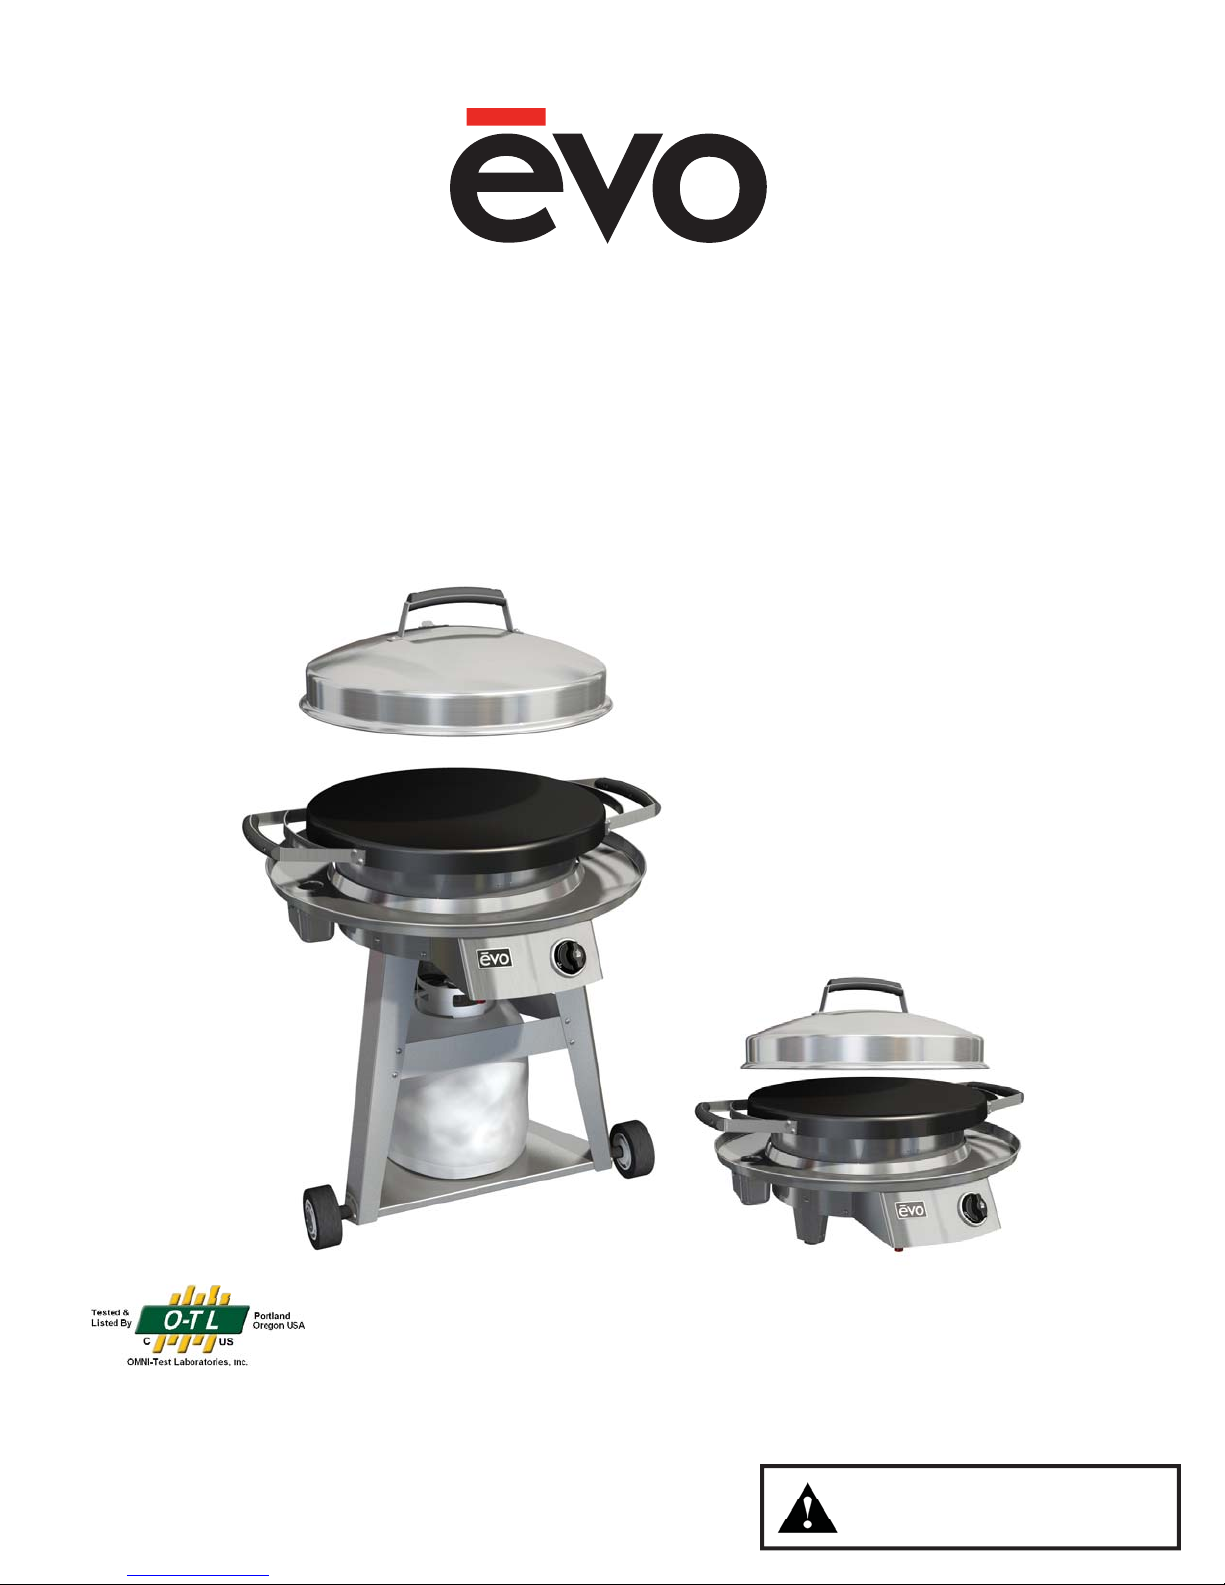
Companion Classic Series
the natural way to cookthe natural way to cook
®
®
Owner’s Manual
Certifi cation: ANSI Z21.58-2002/CGA 1.6B-2002
Part #: Residential models: 10-0091-NG, 10-0091-LP, 10-0093-NG, 10-0093-LP
Report# 141-S-02-5
Copyright © 2013
1
For Outdoor
Use Only
Some parts may contain sharp edges
as especially noted in this manual.
Wear protective gloves as necessary.
Page 2
Warnings
FOR YOUR SAFETY
1. Do not store or use gasoline or other
fl ammable vapors and liquids in the
vicinity of this or any other appliance.
2. An LP Tank not connected for use
shall not be stored in the vicinity of
this or any other appliance.
WARNING
This symbol identifi es the most important safety messaging in this
manual. When you see this symbol, be alert to the possibility of
serious bodily injury if the instructions are not followed.
Be sure to read and carefully follow all of the messages.
FOR YOUR SAFETY
If You Smell Gas:
1. Shut off gas to appliance.
2. Extinguish any open fl ame.
3. Remove grill cooking surface.
4. If odor continues, immediately
call your gas supplier or your fi re
department.
WARNING
It is the responsibility of the assembler/owner to assemble, install
and maintain gas grill. Do not let children operate or play near
your grill. Failure to follow these instructions could result
in serious personal injury and/or property damage.
WARNING
Grill is for outdoor use only. Grill should be operated in a well-
ventilated space. Never operate in an enclosed space, garage
or building. Do not install or use grill within 24” of combustible
materials from back and sides of grill. Grill shall not be located
under unprotected overhead (enclosed carport, garage, porch,
patio) made of combustible construction.
2
Page 3

EVO RESIDENTIAL LIMITED WARRANTY TERMS
Evo, Incorporated warrants to the original residential consumer-purchaser that the Evo grill shall be free from rust-through
on all metal surfaces and shall be free from defects in materials and workmanship under normal and reasonable use from
the original date of purchase. Evo promises to replace, at its determination, any product or component that is defective
and covered under this warranty for as long as you, the registered original consumer-purchaser, owns the grill. This is your
sole and exclusive remedy. This warranty is for the benefi t of the original consumer-purchaser and is non-transferable. This
warranty is subject to the limitations, exclusions and other provisions listed below.
Limitations Involving Materials and Components:
Warranty does not apply to normal wear and tear, which are expected over the course of ownership. The materials and
components listed below are covered according to the following schedule from the original date of purchase:
• One Year – electrical and electronic components [including, but not limited to, electronic displays, overlay and membrane
switches, temperature sensors (RTD and K-Value Thermal Couple), hot surface igniters, computers,
transformers, heater elements, relays, igniters, ignition controllers, wiring, switches, encoders, outlets and
plugs
• One Year – gas components [including, but not limited to, gas regulator, gas hoses, manifold assemblies]
• One Year – accessories and repair parts
The Warranty Registration Card (or online warranty registration form available at www.evoamerica.com/content/
residential-warranty-registration) must be completed and returned/submitted to Evo, Incorporated within 30 days
from the date of purchase. The original purchase invoice or payment record must be retained and produced upon
request if claims are made under this warranty. To receive a replacement Warranty Registration Card, write or call
the address listed at the bottom of this page. Warranties are void if the original serial numbers have been removed,
altered, or cannot be readily determined.
THIS WARRANTY APPLIES ONLY TO PRODUCTS PURCHASED AND LOCATED WITHIN THE UNITED
STATES OR CANADA.
WHAT IS NOT COVERED BY THIS WARRANTY
1. Conditions and damages resulting from any of the following:
a. Improper or inadequate installation, delivery, use, storage or maintenance
b. Any repair not authorized in writing by Evo, Inc., any modifi cations, misapplications, or unreasonable use
c. Improper setting of any control
d. Harsh environmental conditions, including, but not limited to, continual seawater spray, high pressure water, and direct
contact with corrosive chemicals and materials
e. Excessive or inadequate electrical, or gas supply
f. Accidents, natural disasters, acts of God
g. Conditions covered by the purchaser’s insurance
h. Cleaning supplies and fi lters
2. Products purchased or utilized for commercial use without the express authorization of Evo, Incorporated for such use
3. Labor not pre-authorized by Evo, Incorporated, and labor not performed by an authorized Evo service agency or
representative
4. Pre-authorized warranty labor performed outside of normal business hours, and at overtime and premium rates
5. The cost of service or a service call to:
a. Identify or correct installation errors
b. Transport the product or component for service to/from the manufacturer or service center
c. Instruct the user of the proper use of the product
6. The cost for any inconvenience, personal injury or property damage due to failure of the product, and cost of damage arising
out of the transportation of the product which is covered under different terms with the carrier
7. Natural variations in color and fi nishes that are inherent to the material and unavoidable (and therefore not defects)
ALL IMPLIED WARRANTIES, INCLUDING THE IMPLIED WARRANTIES OF MERCHANTABILITY, SUITABILITY,
QUALITY AND/OR FITNESS FOR A PARTICULAR PURPOSE, ARE LIMITED IN DURATION TO THE
EXPRESS WARRANTY PERIODS SPECIFIED ABOVE FOR THE PARTS DESCRIBED THEREIN. EVO,
INCORPORATED MAKES NO OTHER WARRANTY AND WILL NOT BE LIABLE FOR ANY DIRECT OR
INDIRECT, CONSEQUENTIAL OR INCIDENTAL DAMAGES. Some states do not allow limitations on how long an
implied warranty lasts, so the above limitation may not apply to you. Neither Evo manufacturer representatives and dealers,
nor the retail establishment selling this product has any authority to make any warranties or to promise remedies in addition
to or inconsistent with those stated above. The maximum liability to Evo, Incorporated in any event, shall not exceed the
purchase price of the product paid by the original consumer-purchaser. Some states do not allow the exclusion or limitation
of incidental or consequential damages, so the above limitations or exclusions may not apply to you. This warranty gives you
specifi c legal rights, and you may also have other rights which vary from state to state.
3
Page 4

Table Of Contents Assembly Note
Warnings .............................................................................2
Limited Warranty .................................................................3
Table Of Contents ................................................................4
Assembly Note ....................................................................4
Notes ...................................................................................5
Safety Reminders ................................................................6
Consumer Service ...............................................................6
Before Setting Up Your Grill................................................. 6
Know Y our Grill .................................................................... 7
Exploded View ..................................................................... 7
Installing Cook Surface & Hood...........................................8
Cook Surface To Burner Unit ...............................................8
Hood Handle & Hood Support .............................................8
Resting Hood On Drip Pan ..................................................8
Installation and Storage of LP Tank .....................................9
Removing Leg Support ........................................................ 9
Installing Vinyl Tank Sleeve ................................................. 9
Connecting Regulator To Tank Valve ...................................10
Removal & Storage Of LP Gas Tank ................................... 10
Installing Natural Gas Connection To Grill ...........................11
General Specifi cations For Piping ....................................... 11
Gas Line Piping ................................................................... 11
Installing Natural Gas Hose ................................................. 12
Checking Gas Connection To Grill ....................................... 13
Checking For Gas Leaks .....................................................13
Grill Maintenance, Cooking Techniques, and Recipes ........14
The Evo Companion Series Wheeled Cart is
shipped either a partially assembled or fully
assembled. These instructions do not include
installation of partially assembled units.
4
Page 5

Notes
To Installer or Person Assembling Grill:
Leave these instructions with consumer.
To Consumer:
Keep these instructions for future reference.
Complete Now For Future Reference
Serial # _____________________________
Date of Purchase ______________________
Place of Purchase _____________________
5
Page 6
Safety Reminders
SAFETY PRECAUTIONS
• Installation of grill must conform with local codes, or in ab-
sence of local codes, with National Fuel Gas Code, NFPA
54 / ANSI Z223.1-latest edition. Handling of LP tanks
must conform to NFPA / ANSI 58-latest edition.
• Do not install or use grill within 36” of combustible materi-
als from back and sides of grill. Grill shall not be located
under unprotected overhead (enclosed carport, garage,
porch, patio) made of combustible construction.
WARNING
Carefully follow instruction in assembly manual and this
booklet for proper assembly and gas leak testing of your
grill. Do not use grill until leak checked. If leak is detected
at anytime, it must be stopped and corrected before using
grill further.
• Grill must not have any obstructions in the venturi-orifi ce
air inlet area.
• Visually inspect hose before each use of grill. If there is
excessive abrasion or wear, or if the hose is cut, it must
be replaced prior to grill operation.
• Only use valve/hose/regulator that was supplied by Evo
with the purchase of your grill.
• Follow lighting and control instructions as described in the
Use & Care section of this manual.
• VERY IMPORTANT: Never attempt to place any other
cooking utensils (skillets, pots, pans) directly on the burners. Only the Evo cooking grill surface is to be placed
over the burners. Only use grill with the supplied grill
cooking surface. Buildup of non-ignited gas under other
utensils is very dangerous.
WARNING
• Grill is for outdoor use only. Grill should be operated
in a well-ventilated space. Never operate in enclosed
space, garage or building. Your grill is not intended to be
installed in or on recreational vehicles and/or boats.
• Valve/hose/regulator supplied with grill must be used.
Replacement valve/hose/regulator must be those supplied
by Evo.
• Carefully follow instructions in assembly manual for attaching regulator to LP tank.
• Purging: Do not release liquid propane (LP) fuel into
atmosphere. This is a dangerous practice. If it is necessary to remove fuel from LP gas tank, please call local fi re
department for assistance.
Consumer Service
• If you have questions or comments concerning the care
and use of your grill, or if you need warranty parts, call
1-866-626-1802 or send a fax to 503-213-5869. To order
non-warranty replacement parts or accessories, call
1-800-626-1802 or send a fax to 503-213-5869.
Please know your Grill Serial Number and Date of
Purchase before calling.
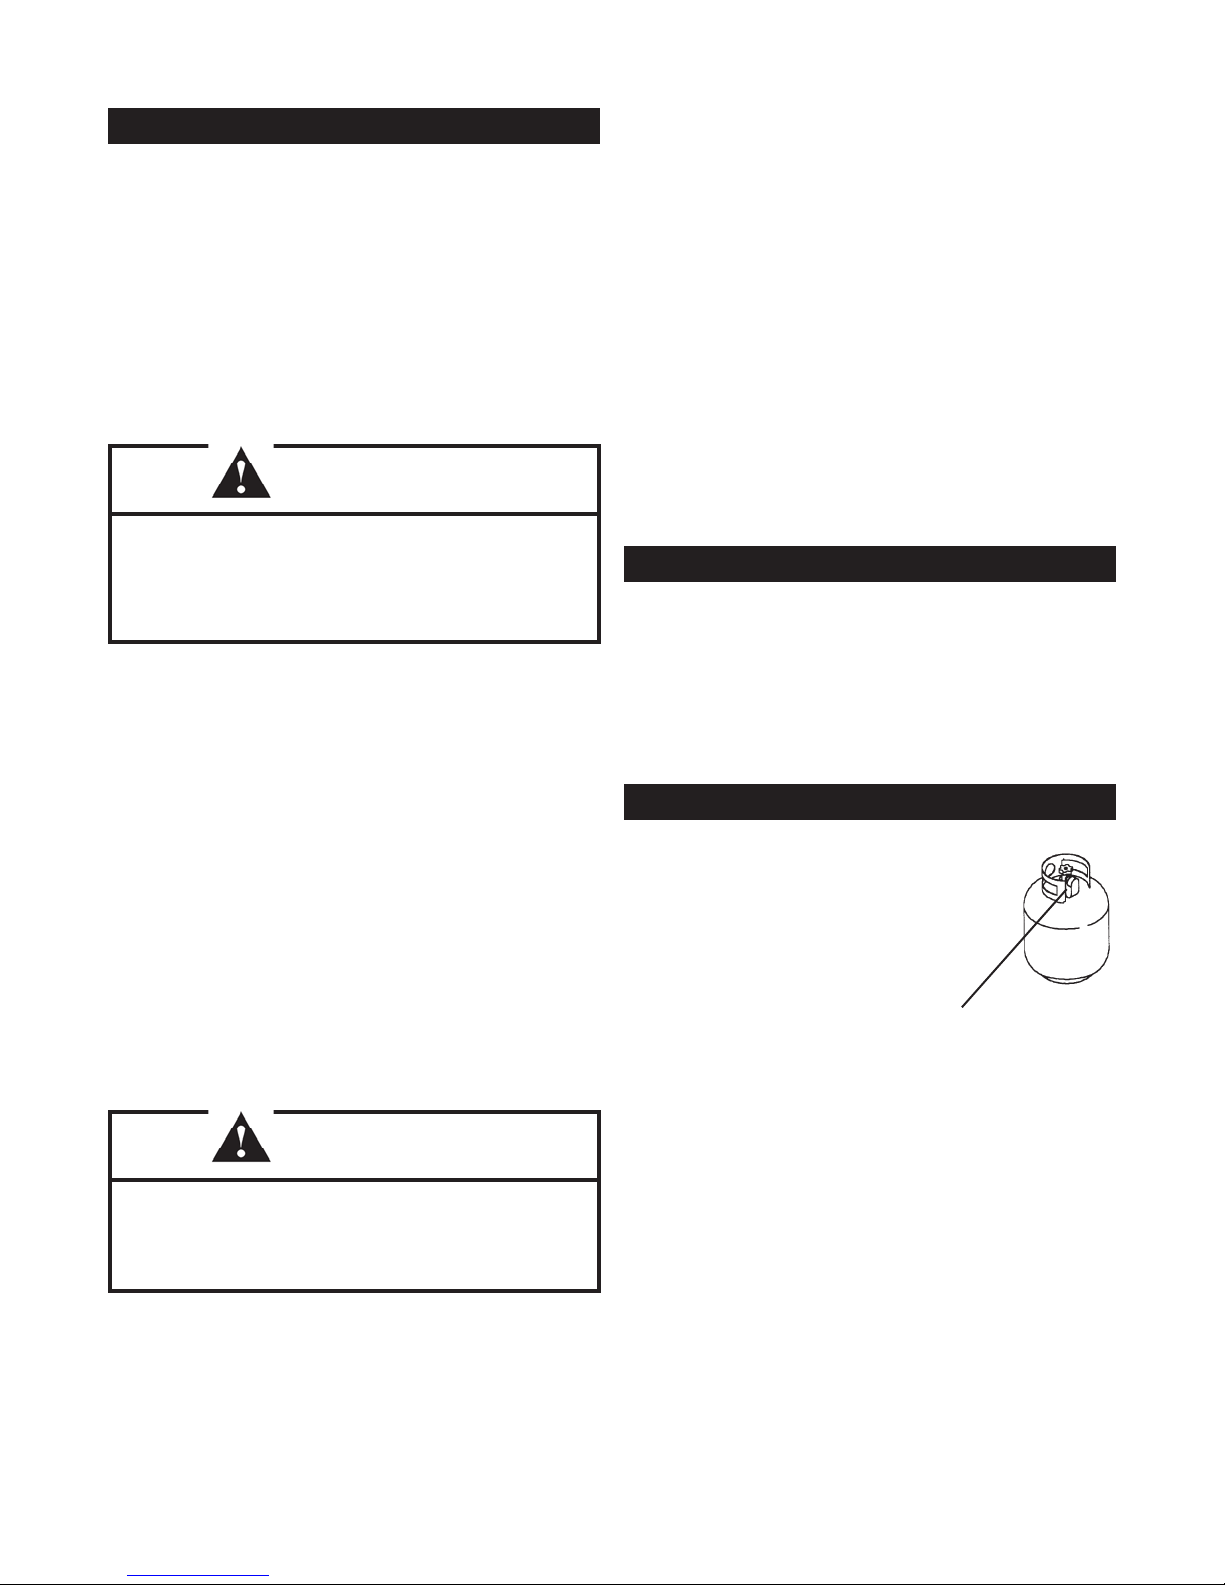
Before Setting Up Your Grill
You may fi ll an LP gas tank pur-
chased from a local supplier prior
to assembly. The tank must also
have the Safety Cap installed (see
diagram) on the tank valve when
not in use. Also see your Use &
Care Manual.
Safety Cap
Installed
If your grill is to be used with a Natural Gas Connection,
you must use the Natural Gas Hose Assembly supplied
with your Evo grill, or an Evo approved Natural Gas Hose
Assembly as shown and described in this manual.
Do not attempt to put other cooking utensils (skillets, pots,
pans) directly on the burners.
When grill is not in use, turn off both control knobs and turn
tank off.
• Grill cooking area should be kept clear and free from
combustible materials, gasoline and other fl ammable
vapors and liquids. Do not obstruct fl ow of combustion
and ventilation air. Keep ventilation openings of LP gas
tank enclosure free and clear from debris. Visually check
burner fl ames on regular basis.
6
Page 7
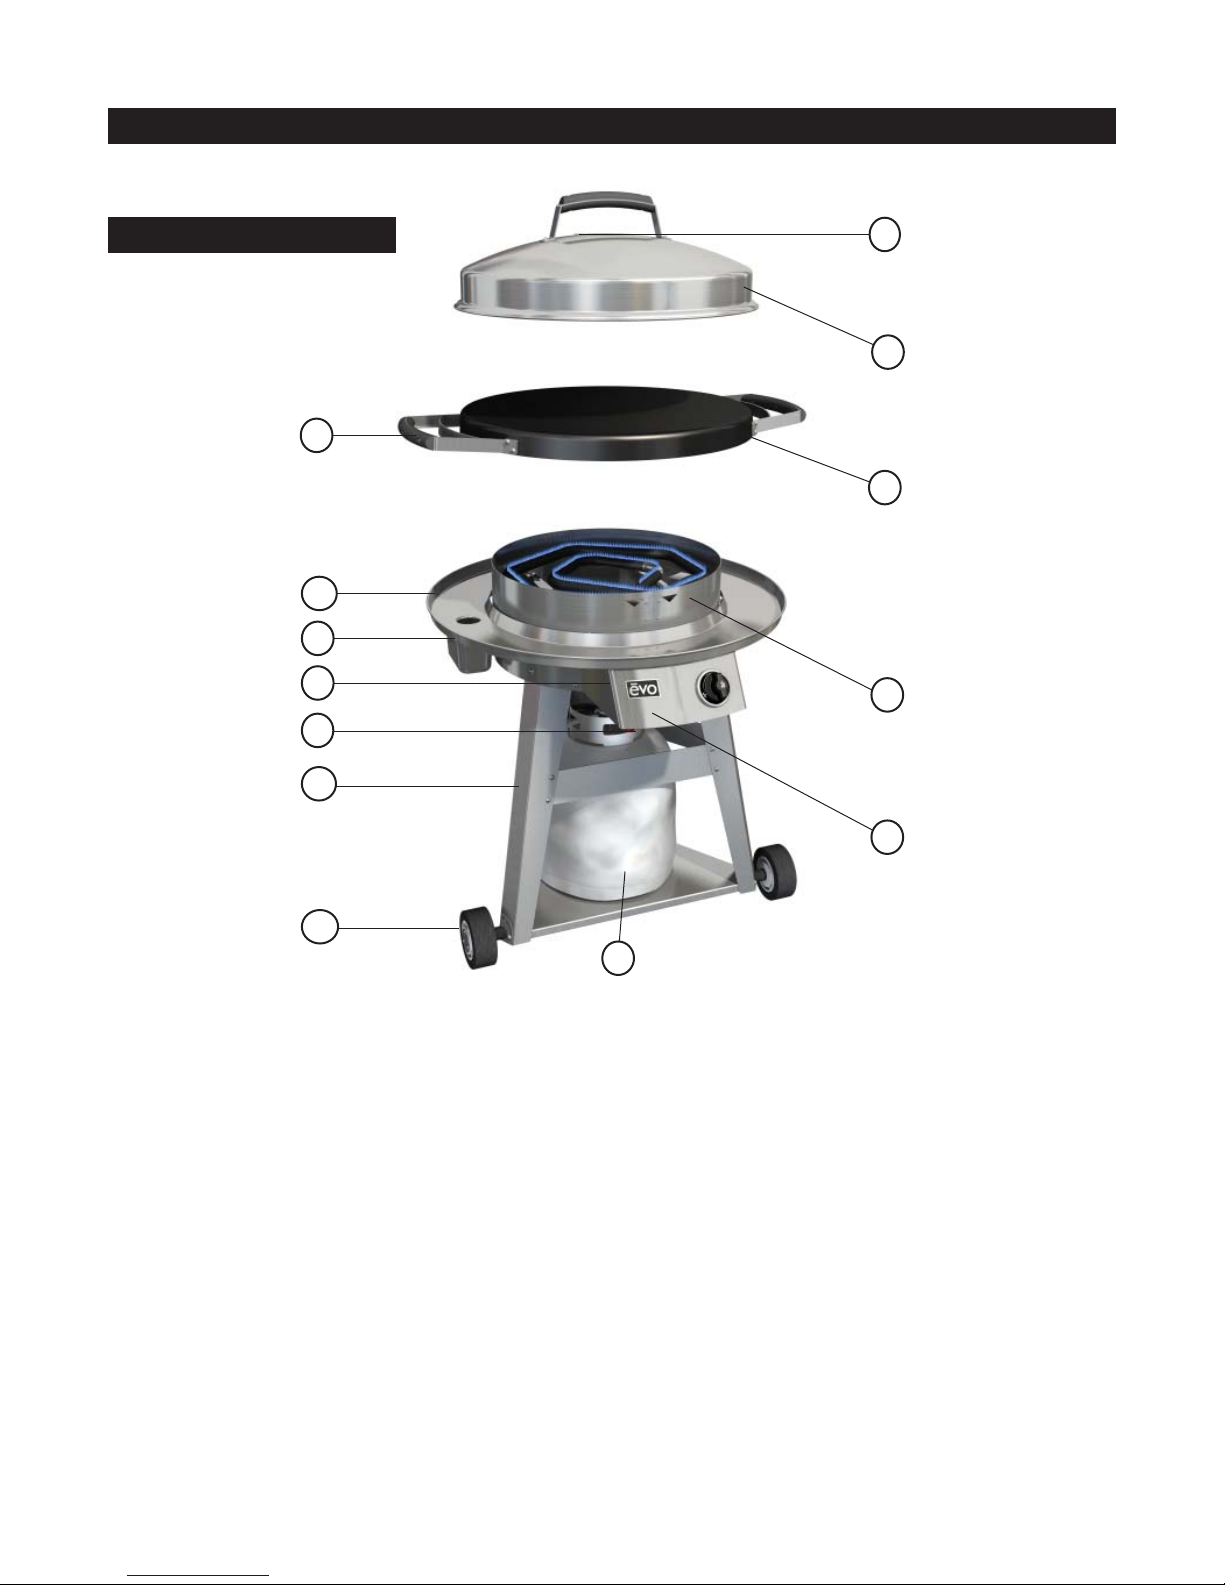
Know Your Grill
Exploded View
Shown: Evo Companion Series
Classic Wheeled Cart
Note that the Companion Series
Classic Tabletop Grill includes all
features except for 7,8, and 14.
13
12
11
10
9
8
6
5
4
3
7
1 - Control panel and burner control knob. Right side of panel
contains serial number, certifi cation number and safety in-
structions. Left side of panel contains lighting instructions.
2 - Burner control knob for controlled temperature across the
whole cooking surface from center, to outside edge.
3 - Burner Unit contains all elements of the upper portion of
the Evo Companion Grill, including the control panel, burner,
drip pan, and cook surface.
4 - Black oil-seasoned 25” circular cook surface with 460sq.
inches of cooking area with temperatures from 250 to 650
degrees F.
5 - Hood made from stainless steel fi ts over cook surface.
6- Hood vent for releasing cooking vapors while baking,
steaming, or smoking.
7 - Solid rubber wheels mounted on stainless steel axle
and nylon bearings provide durable transport for your grill.
1
14
8 - Wheeled cart allows the Evo Companion Grill to be easily
wheeled on a patio or deck.
9 - Electronic igniter under left side of control panel for onetouch ignition of gas burner.
10 - Burner lighting and ignition instruction sticker located on
left side of control panel.
11 - Stainless steel spill over tray slides into place under
clean-out hole in circular drip pan.
12 - Drip pan surrounds entire cooking surface made from
stainless steel with separate removable spill over tray.
13 - Cook surface handles allow easy placement and removal of cook surface from burner unit.
14 - Vinyl tank sleeve fi ts over propane tank on LP models.
LP tank not included.
7
Page 8
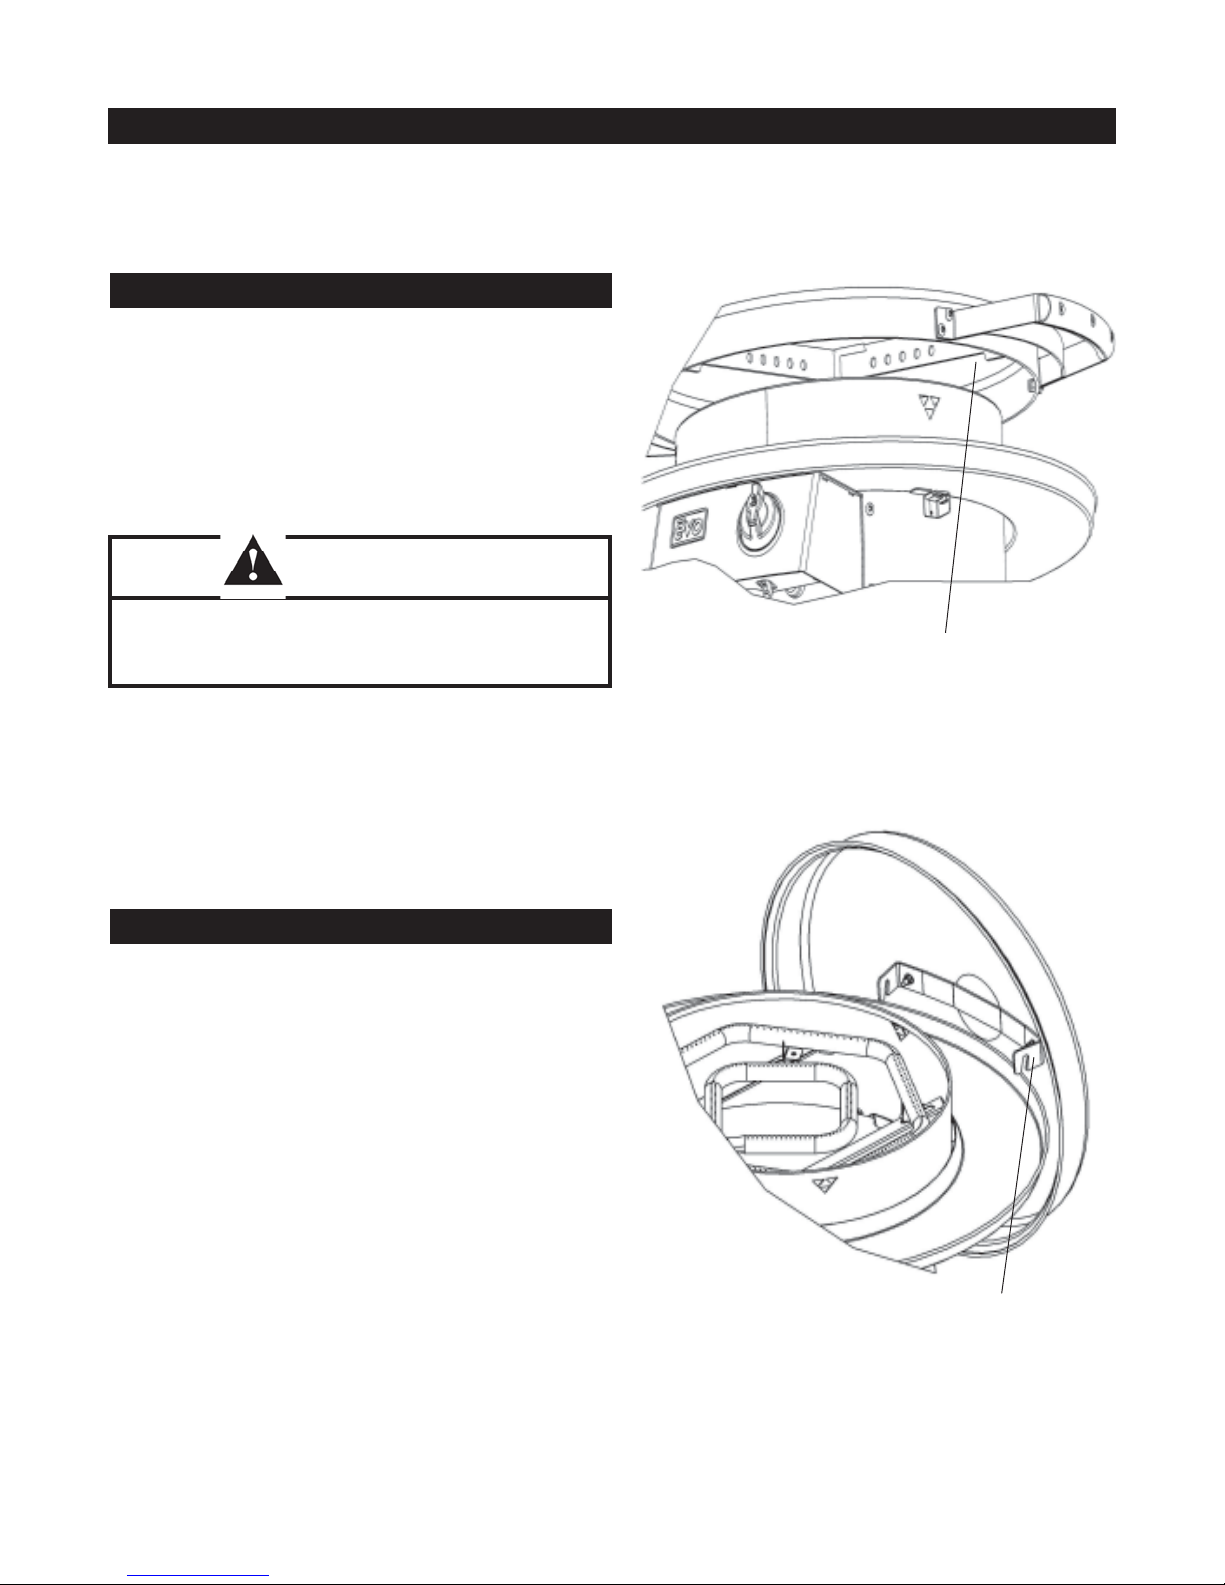
Installing Cook Surface & Hood
Cook Surface To Burner Unit
1. Install cook surface to burner unit by centering locating
tab over burner skirt.
2. Tab Step must be positioned to outside of burner skirt to
allow cooking surface to be centered.
Gently move cooking surface right to left
and front to back to locate tabs to skirt.
WARNING
Never attempt to install cook surface when burners are
ignited. Failure to follow these instructions could result in
serious personal injury and property damage.
Cook Surface Tab Step
Resting Hood On Drip Pan
1. The Evo Companion hood can be removed from the cook
surface and temporally mounted to the drip pan between
cooking operations. To make this possible, there is a
hook mounted to the underside of the hood fastened by
the same screws that secure the hood handle.
2. Firmly grasp the hood handle and locate the hood hook
notches to the outside edge of the drip pan. Allow the
hood to rest freely on the drip pan.
3. To remove the hood from the drip pan, lift the hood hook
from the drip pan and place back on the cook surface.
8
Hood Hook
Page 9
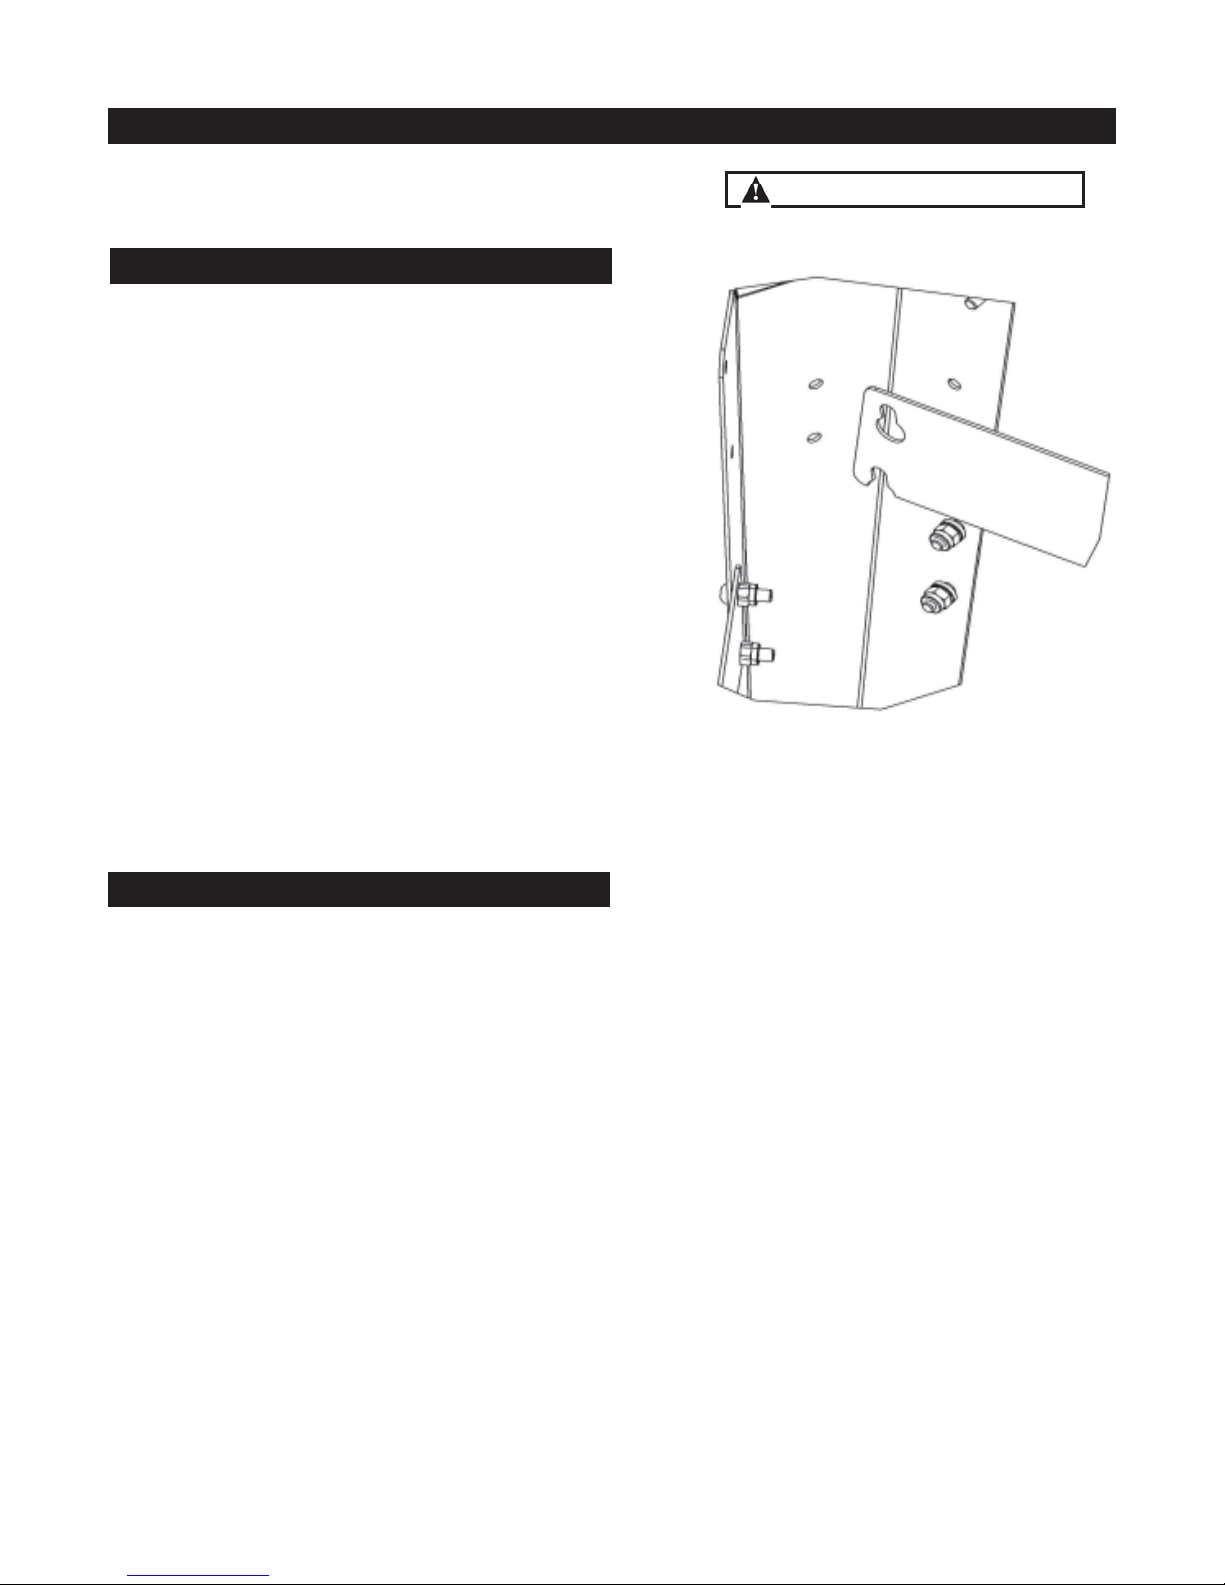
Installation and Storage of LP Tank
Removing Leg Support
Propane (LP) Models Only
1. From right side of grill, grasp removable leg support
at each end and lift upward. Once the leg support is
disengaged from the keyway fasteners, lift leg support
outward.
The keyway fasteners are tensioned with a spring
that secures the removable leg support to the right
and rear legs.
2. Tilt removable leg support to one side and remove from
leg frame.
3. Reverse the removal process to install the keyway leg
support for exchanging LP tanks.
Some parts may contain sharp edges.
Wear protective gloves as necessary.
Installing Vinyl Tank Sleeve
Propane (LP) Models Only
Use Standard 20lb LP Tank
1. Fit vinyl tank cover over LP tank and place tank inside
wheeled cart, fi tting LP tank ring inside ring of Evo lower
rack.
LP tanks have a circular ring welded to the bottom of the
tank. In some instances, this ring can become bent and
not uniformly round. Because this circular ring of the LP
tank fi ts into the corresponding ring of the Evo lower rack,
it may be necessary to bend the LP ring back to its original
position.
9
Page 10
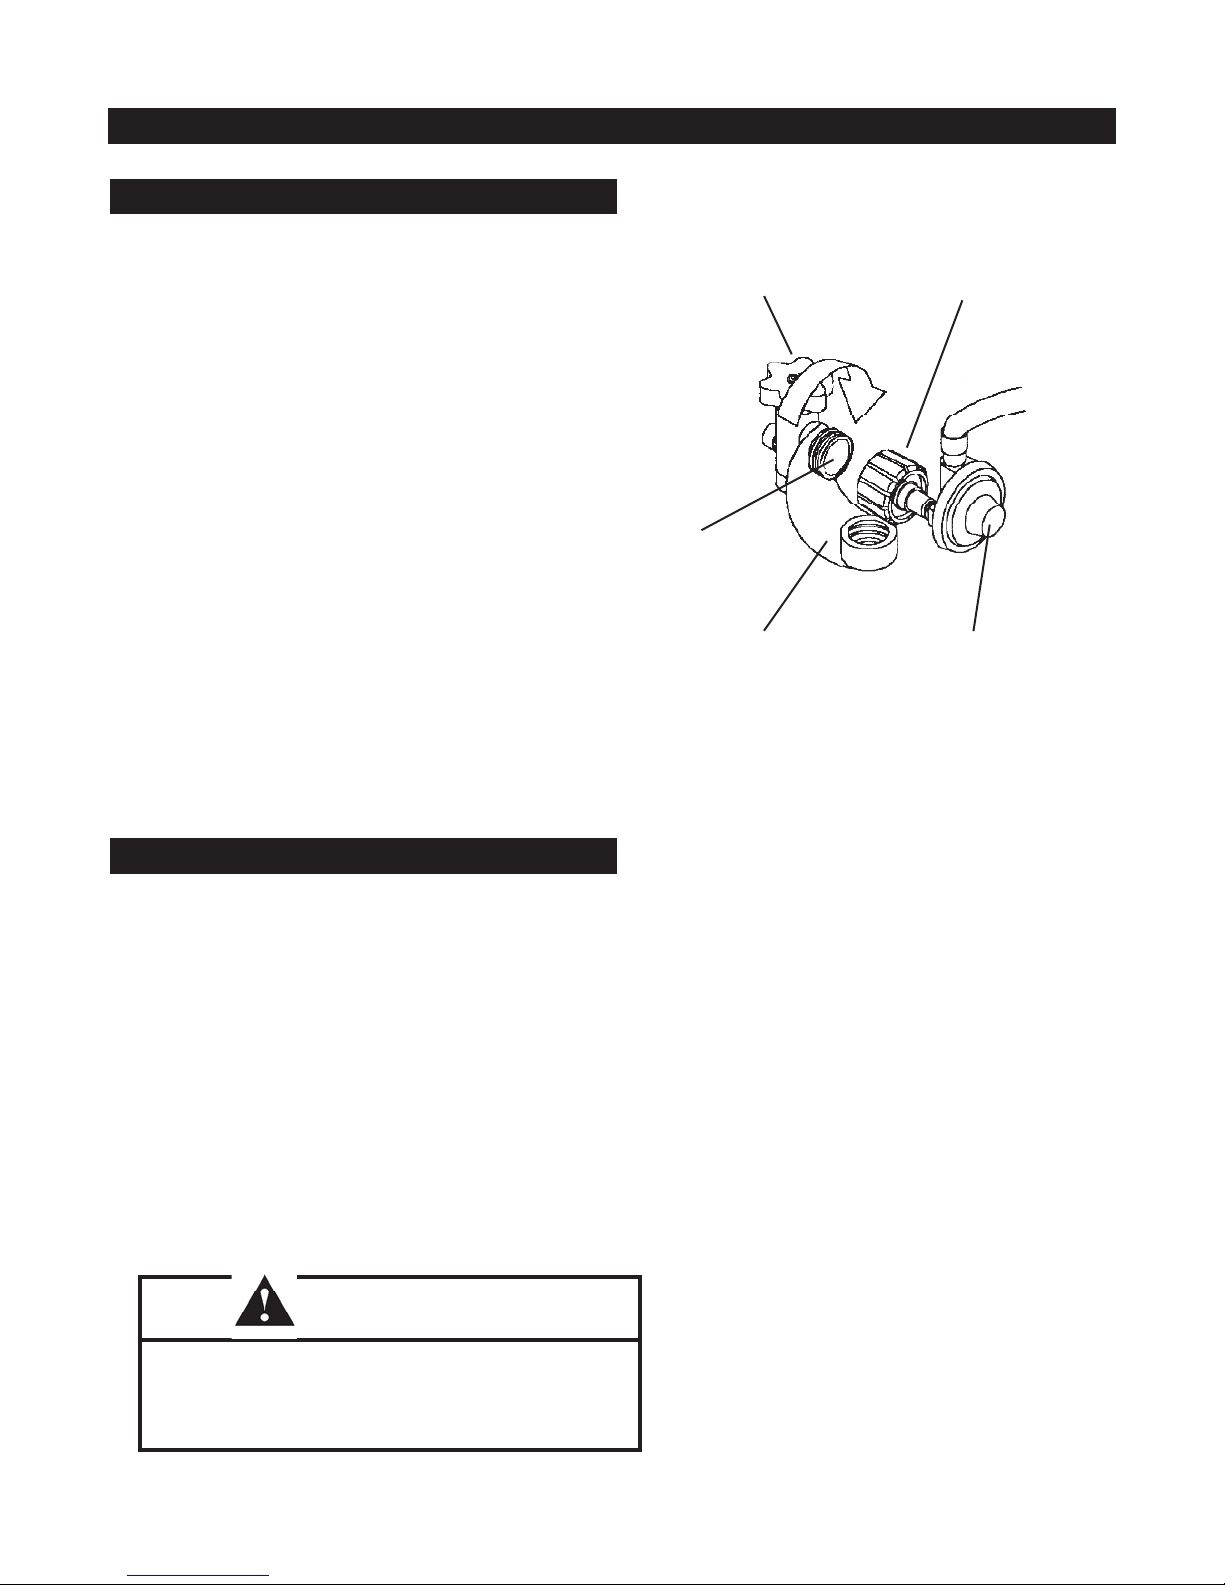
Installation and Storage of LP Tank
Connecting Regulator To Tank Valve
Refer to the diagram at the right and complete the fol-
lowing steps:
1. Be sure both grill burner valves are in the Off position.
2. Make sure the gas tank valve handwheel is in the closed
position. Turn clockwise ( left to right ) to a full stop.
3. Remove the protective cap from the gas tank valve.
4. Hold regulator in one hand and position the plastic cou-
pling nut on the tank valve outlet threads using care to
engage the center of the coupling nut to the center of the
tank valve outlet. When completing this procedure, take
care to not cross-thread the connection.
5. Turn the coupling nut clockwise (left to right) and tighten
to a full stop.
In the connection process, the regulator will seal on
the back-check feature in the tank valve resulting in a
slight resistance. The connection requires about onehalf to three-quarters additional turn to complete the
connection. Tighten by hand only - do not use tools.
If you cannot make the connection, disconnect the
regulator and repeat steps 4 and 5.
Coupling NutHandwheel
Valve
Outlet
RegulatorCap & Strap
Removal & Storage Of LP Gas Tank
Never store LP gas tank indoors. When grill is stored
indoors, shut tank valve off and disconnect tank from
grill and remove to an outdoor location. Tank must
be stored outdoors in well-ventilated area, away from
and out of the reach of children.
1. Remove right-side leg support to gain access to LP tank.
For instructions on removing leg support, refer to page 9.
2. Loosen coupling nut located on regulator and tank valve
by turning counterclockwise using hands only - do not use
tools. Next loosen thumb screws securing tank to lower
rack and remove tank. Install safety cap over tank valve
coupling.
3. Reinstall leg support.
WARNING
NEVER store tank in enclosed area. Safety relief valve on
tank could activate releasing gas and causing a fi re. All
spare tanks must have safety caps installed in tank outlet.
Spare tanks should never be stored near the grill.
10
Page 11
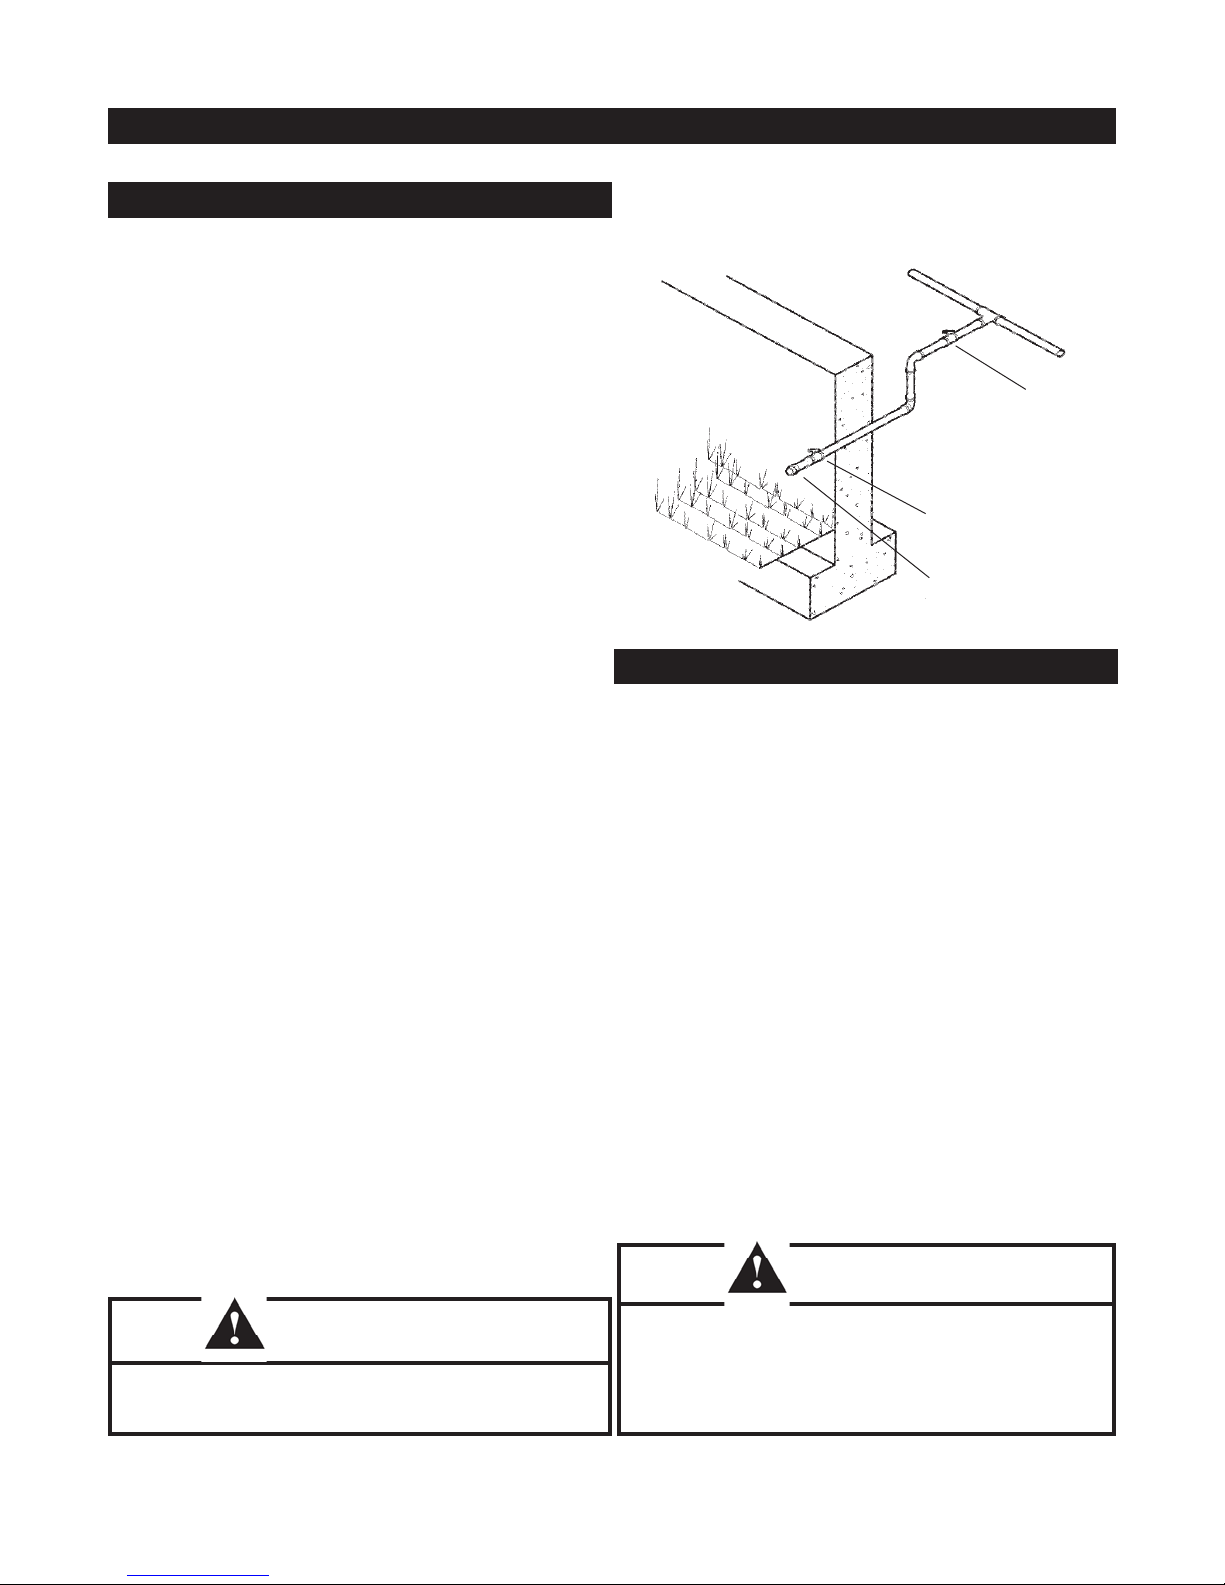
Installing Natural Gas Connection To Grill
General Specifi cations For Piping
Note: Contact your local city inspection depart-
ment for building codes regarding the installation of
Natural Gas connection and outdoor gas appliances.
In the absence of Local Codes, you must conform to
the latest edition of ANSI Z223.1.
WE RECOMMEND NATURAL GAS PIPING
INSTALLATION BE DONE BY A PROFESSIONAL.
1. This grill is designed to operate at 7 inches water column
pressure ( .2526 psi ).
2. A manual shut-off valve must be installed outdoors, im-
mediately ahead of the quick disconnect.
3. An additional manual shut-off valve indoors should be
installed in the branch fuel line in an accessible location
near the supply line.
4. The quick disconnect connects to a 3/8 inch NPT thread
from the gas source. The quick disconnect fi tting is a
hand-operated device that automatically shuts off the fl ow
of gas from the source when the grill is disconnected.
5. The quick disconnect fi tting can be installed horizontally,
or pointing downward. Installing the fi tting with the open
end pointing upward can result in collecting water and
debris.
6. The dust covers ( supplied plastic plugs ) help keep the
open ends of the quick disconnect fi tting clean while
disconnected.
7. Pipe compound should be used which is resistant to the
action of natural gas when connections are fi rst made.
8. The outdoor connector must be fi rmly attached to rigid,
permanent foundation.
Test All Pipe Fitting Connections
All connections and joints must be thoroughly tested
for leaks in accordance with Local Codes and all listed
procedures in the latest edition of ANSI Z223.1
Gas Main Supply
Outside Wall
Inside Wall
Shut Off
Valve #2
Quick Discon-
nect
Shut Off
Valve #1
Gas Line Piping
1. If the length of the line required does not exceed 50 feet,
use 5/8 inch O.D. tube. One size larger should be used
for lengths greater than 50 feet.
2. Gas piping may be copper tubing, type K or L polyethylene plastic tube, with minimum wall thickness of .062
inch, or standard weight ( schedule 40 ) steel or wrought
iron.
3. Copper tubing must be tin-lined if the gas contains more
than 0.3 grams of hydrogen sulfi de per 100 cubic feet of
gas.
4. Plastic tubing is suitable only for outdoor underground
use.
5. Gas piping in contact with earth, or any other material
which my corrode the piping, must be protected against
corrosion in an approved manner.
6. Underground piping must have a minimum of 18 inches
ground cover.
WARNING
Do not route the natural gas hose under a deck or patio.
The hose must be visible.
11
DANGER
Do not use an open fl ame to check for gas leaks. Be sure
there are no sparks or open fl ames in the area while you
check for gas leaks. Flames and sparks will result in a fi re
or explosion which can cause serious bodily injury or death,
and damage to property.
Page 12
Installing Natural Gas Connection To Grill
Installing Natural Gas Hose
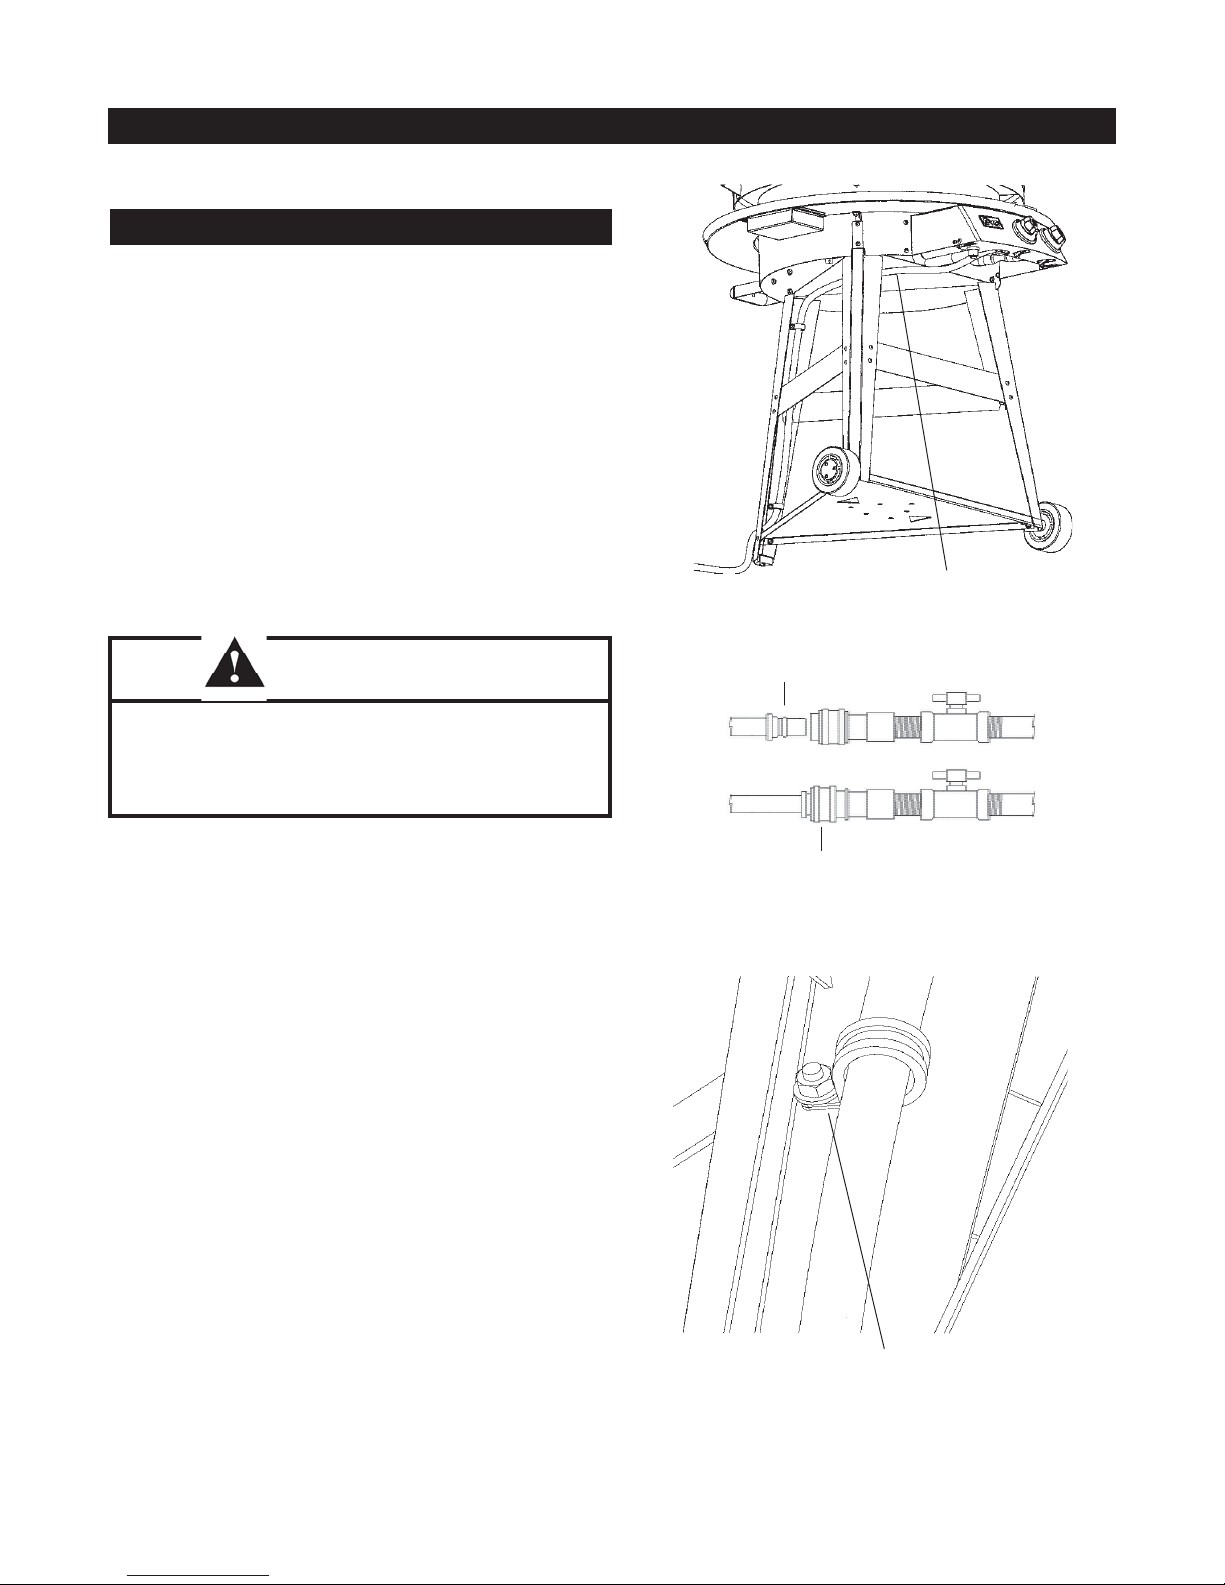
Your natural gas grill is shipped with the natural gas
quick-disconnect hose preinstalled to the control mani-
fold. To complete assembly, the hose must be routed
under the heat shield and through the rear leg.
DANGER
Natural gas hose must be routed under heat shield.
Failure to locate natural gas hose under heat shield will result
in a fi re or explosion which can cause serious bodily injury or
death, and damage to property.
Hose routed under
heat shield.
Gas Coupling Disconnected
Refer to the diagram at the right and complete the
following steps:
1. Remove the natural gas hose from its shipping bag and
route hose under the heat shield.
Remove protective cap from the quick-disconnect
hose end, and route hose through hole in rear leg.
Reinstall protective cap onto quick-disconnect hose
end.
2. Position hose clamp (70) as shown in illustration at two
locations on rear leg.
3. Make sure hose runs evenly from the control panel, under heat shield, and outward through rear leg.
4. Using two hose clamps as shown in illustration, secure
using fasteners provided with clamps; screw (71), lockwasher (72), and hex nut (73).
Gas Coupling Connected
Use Phillips Screw (71),
Lockwasher (72),
& Hex Nut (73)
provided with clamp
12
Page 13
Checking Gas Connection To Grill
Checking For Gas Leaks
DANGER
Do not use an open fl ame to check for gas leaks. Be
sure that are no sparks or open fl ames in the area while
you check for gas leaks. Flames and sparks will result
in a fi re or explosion which can cause serious bodily
injury or death and damage to property.
Note: All factory-made connections have been
thoroughly checked for gas leaks. The burners and
ignition system has been fl ame tested. As a safety
precaution, we recommend you recheck all fi ttings
for leaks before using your Evo grill. Shipping and
handling may loosen or damage a gas fi tting.
TO PREFORM A LEAK CHECK YOU WILL NEED A
SOLUTION OF SOAP AND WATER AND A BRUSH OR
RAG TO WET ALL GAS CONNECTIONS.
1. Slide back the collar of the quick disconnect. Push the
male fi tting of the hose into the quick disconnect and
maintain pressure while releasing the collar.
3. If fi tting does not engage and lock, repeat procedure.
Gas will not fl ow unless the quick disconnect is properly
engaged.
WARNING
You should check for gas leaks every time you discon-
nect and reconnect a gas fi tting.
WARNING
Preform leak checks even if your grill was dealer or
store assembled.
4. Turn on gas supply and check for leaks by wetting the
connections with the soap and water solution and watching for bubbles. If bubbles appear, or if a bubble grows,
there is a leak.
Note: Since some leak test solutions, including soap
and water, may be slightly corrosive, all connections
should be rinsed with water after checking for leaks.
CHECK THE FOLLOWING CONNECTIONS:
1. HOSE TO MANIFOLD CONNECTION
WARNING: If there is a leak where the hose con-
nects to the manifold then retighten the fi tting with
a wrench and recheck for leaks with soap and water.
If leak continues after retightening the fi tting, tun off
gas. DO NOT OPERATE GRILL. Contact your local
dealer or Evo Customer Service using the contact
information provided with your manual.
2. VALVES TO MANIFOLD CONNECTIONS.
3. HOSE TO QUICK DISCONNECT CONNECTION.
WARNING
Do not ignite burners when leak testing.
13
Page 14

Grill Maintenance, Cooking Techniques, and Recipes
Cook Surface And Grill Maintenance For The Evo Companion Elite Flattop Grill
Cooking Techniques
Stove Top Cooking and Heat Zones
You can use Evo’s cook surface similar to the burners on your kitchen stove top. Adjust Evo’s burner to control the temperatures of the cook surface. The Evo Companion circular grill top is heated by a single burner that provides edge-to-edge
heat from a setting of low to high across the complete cook surface. Because the cook surface is made of heavy steel with a
ceramic coating, it takes 5-8 minutes from a cold start to completely heat the surface. With a preheated cook surface, you will
have to wait momentarily before the cook surface adjusts to the selected temperature.
Oiling the Cook Surface
A squirt bottle fi lled with cooking oil is perfect for applying an even, thin coat of oil on the cook surface. Another way to oil the
cook surface is with an inexpensive terry cloth cotton towel or paper towel that has been doused with cooking oil. When the
cook surface is hot, hold the oiled towel with a pair of tongs to prevent being burned. Having cooking oil readily available allows you to oil the grill easily and quickly at any time.
Cooking Meats
Meats are perfect to sear, roast or braise on the grill. Searing and Roasting techniques are described in more detail below.
Braising requires a tightly covered pot or pan placed on the grill surface. Braise as you would for a stove-top braising recipe,
adjust the burner to control the cook surface temperature. Meats can also be sliced and put on skewers, added to a stir-fry
or used in hot sandwiches. Veal and Pork are often made into cutlets or scallopini. Create small slices that have been lightly
fl attened with a meat mallet, seasoned and then dusted with fl our. Scaloppine and cutlets are usually seared in butter until
golden brown and served with a sauce or lemon juice and fresh parsley.
Cooking Poultry
Boneless cuts that have been fl attened to an even thickness with a meat mallet cook more evenly and more quickly. Poultry
that has been prepared in this way can then be marinated, breaded or rubbed with spices before searing on the grill. Poultry
can also be roasted, braised, sautéed, fried or poached on the Evo grill. Roast as you would in your kitchen oven placing the
roast in a roasting pan with a rack and using the hood to contain the heat from the grill. To sauté, slice the meat into thin strips
and sauté, turning with a spatula directly on the cook surface. Use pots and pans for stove-top cooking techniques. Fill a pot
with oil for frying or with stock for poaching. Use a tightly covered pot or pan to braise. Small game birds such as quail are
small enough that they can be sear cooked all the way through without having to use the hood to create an oven. In the case
of duck breast, it is best to sear the skin side of the duck breast fi rst and to continue cooking until the skin becomes crispy and
much of the fat has been rendered away. This way the duck meat won’t get over cooked before the skin is crispy.
Cooking Fish
Lean fi sh such as Flounder, Sole, Sea Bass, Cod, Monk Fish and Red Snapper are usually purchased in the form of fi llets.
Fillets of fi sh are ideal to cook on the Evo grill because they are fl at and will cook quickly and effi ciently. Because lean fi sh
tends to fl ake apart easily, using Evo’s fl at top grill makes handling and cooking fi sh much easier than open-fl ame grills. For
additional fl avor and texture, you can also lightly dust the seasoned fi llets with fl our or use a breading mixture before searing.
Fatty Fish such as Swordfi sh, Tuna, Sturgeon, Striped Bass, and Salmon are usually purchased in steaks or fi llets. Marinate
them, rub them with spices, or simply season with salt and pepper. Sear the fi sh on a lightly oiled hot cook surface till golden
brown and cooked to your desired doneness.
Searing
Sear cooking is the most common cooking technique used on the Evo fl attop grill. Searing is done by placing food directly onto
the hot cook surface and allowing that food item to develop a fl avorful “seared” or browned exterior. Searing imparts fl avor to
food and also helps seal in natural juices. Searing can be done with vegetables, meats, fi sh, poultry, etc. One nice feature of
the Evo grill is its slightly convex, or crowned cooking surface. The convex shape allows fats to fl ow away from the center of
the cook surface, and hence adjunct food items, and into a drip pan. This minimizes fl avors from mixing on the cook surface
and also helps cut down on fat in your food. Once the food is seared on one side, fl ip to sear the other side and allow it to
fi nish cooking. Some foods take longer to cook and will require that you reduce the cook surface temperature to fi nish cooking
without over cooking the exterior. With foods that take longer to cook you can also adjust one of the two heat zones to a lower
temperature and move food to the lower temperature zone after it has been seared over the high temperature zone. The
14
Page 15

lower temperature will allow the food to continue cooking while retaining a perfectly browned exterior. For nonstick cooking it
is essential that the cook surface be hot and lightly oiled before searing, and that you allow the food to sear before you attempt
to move it with your spatula or tongs. Overall, cooking on Evo’s fl attop cook surface does not involve the same charring of food
that is typically done with an open-fl ame grill. Cooking with the Evo grill involves a controlled “sear” that develops perfectly
browned foods.
Using Marinades and Spice Rubs
When using spice rubs and marinades it is important to be aware of the sugar content in the recipes. If a marinade is high in
sugar you will fi nd that when placed on a hot cook surface, the sugars will “caramelize” on the cook surface: similar to what
will happen to a pan on your stovetop. Caramelized sugars are sticky and will eventually burn off, however to ensure easy
cleanup, it’s encouraged that you use oil based marinades that are low in sugars. Your cook surface will be easier to clean and
you will achieve a better quality sear on your meats, poultry, fi sh and vegetables.
Stir-Fry
Stir-Fry is best done with very high heat and very quickly, so it’s important to keep the food moving throughout the cooking
process. Use two spatulas to stir-fry food on the hot cook surface. The two spatula method allows you to scoop the food from
both sides at the same time and toss it together. Meats are usually cooked separately from the vegetables and then combined. This allows the meats to brown more effi ciently before mixing with the vegetables.
Toasting
Toast bread, croutons, bagels etc. Simply place the item to be toasted directly on the heated grill surface until it is browned.
Flip the item over to toast the other side. If you are making breakfast, you can toast bread, bagels or English muffi ns while
directly alongside preparing eggs, bacon, hash browns, and pancakes. No pots or pans are required, and you can cook everything at the same time. You can also toast nuts, seeds, dried peppers and spices on Evo’s cook-surface.
Smoking
By placing wood chips such as alder, mesquite or apple wood directly on Evo’s hot cook surface and covering the surface
with Evo’s hood, you can quickly convert your Evo grill into a smoker. Depending on the size of the wood chips, you may
want to use the method of placing the chips into a metal container such as folded aluminum foil. At a minimum, make sure the
cook surface is hot enough to get the chips smoking. A higher temperature setting produces more smoke and will consume
the wood chips more quickly. Once the chips begin to smoke, place the food directly on the cook surface, or for indirect heat,
you can use a wire rack to locate foods above the cook surface. Using a wire rack keeps food slightly off the surface allowing
smoke and air to circulate. When placing Evo’s hood over the food and wood chips you create “hot smoke,” since the food is
being cooked and smoked simultaneously. Placing the chips onto one area of the cook surface and food onto another area
allows you to control the smoke while cooking several food items simultaneously. Items that take longer to cook, such as pork
ribs, require you add more chips as the old chips burn out. When smoking ribs or other fatty foods, you may want to fashion
an aluminum foil pan underneath to speed up the cleaning process. You may also like to try using cedar planks on the cook
surface which provides an excellent rich smoke for smoking fi sh such as salmon.
Steaming
The process of steaming on the Evo grill involves applying small amounts of water directly to the hot cook surface while you
are cooking and containing the water as it turns to steam. You can use Evo’s hood if you intend to steam everything on the
cook surface, or to set up individual steam areas we recommend using a pot cover. As an example, you may want to individually steam vegetables, while simultaneously searing salmon.
Roasting and Baking
You can roast meats and vegetables under Evo’s hood. Meats are usually seared on all sides before roasting. Searing creates
a nice presentation and adds fl avor. When roasting, place the seared meats, fi sh, poultry or vegetables either on a baking
rack placed on the cook surface or directly on the cook surface. We recommend a stainless steel baking rack designed for
cooling cookies and cakes. Baking racks are relatively inexpensive and can be found in the cookware department of most supermarkets or kitchen supply stores. A baking rack is useful because it keeps the bottom-side of foods above the cook surface
and allows uniform cooking. Placing food directly on the cook-surface works best for smaller cuts of meat or foods that are
only roasted for a few minutes.
Making Flatbreads, Crepes and Tortillas
Flatbreads, crepes and tortillas are easy to make and are a great accompaniment to many foods. The cook surface is ideal for
these items because it provides even heat over the entire surface.
Enjoy a social cooking experience with Evo!
15
 Loading...