

Page 1
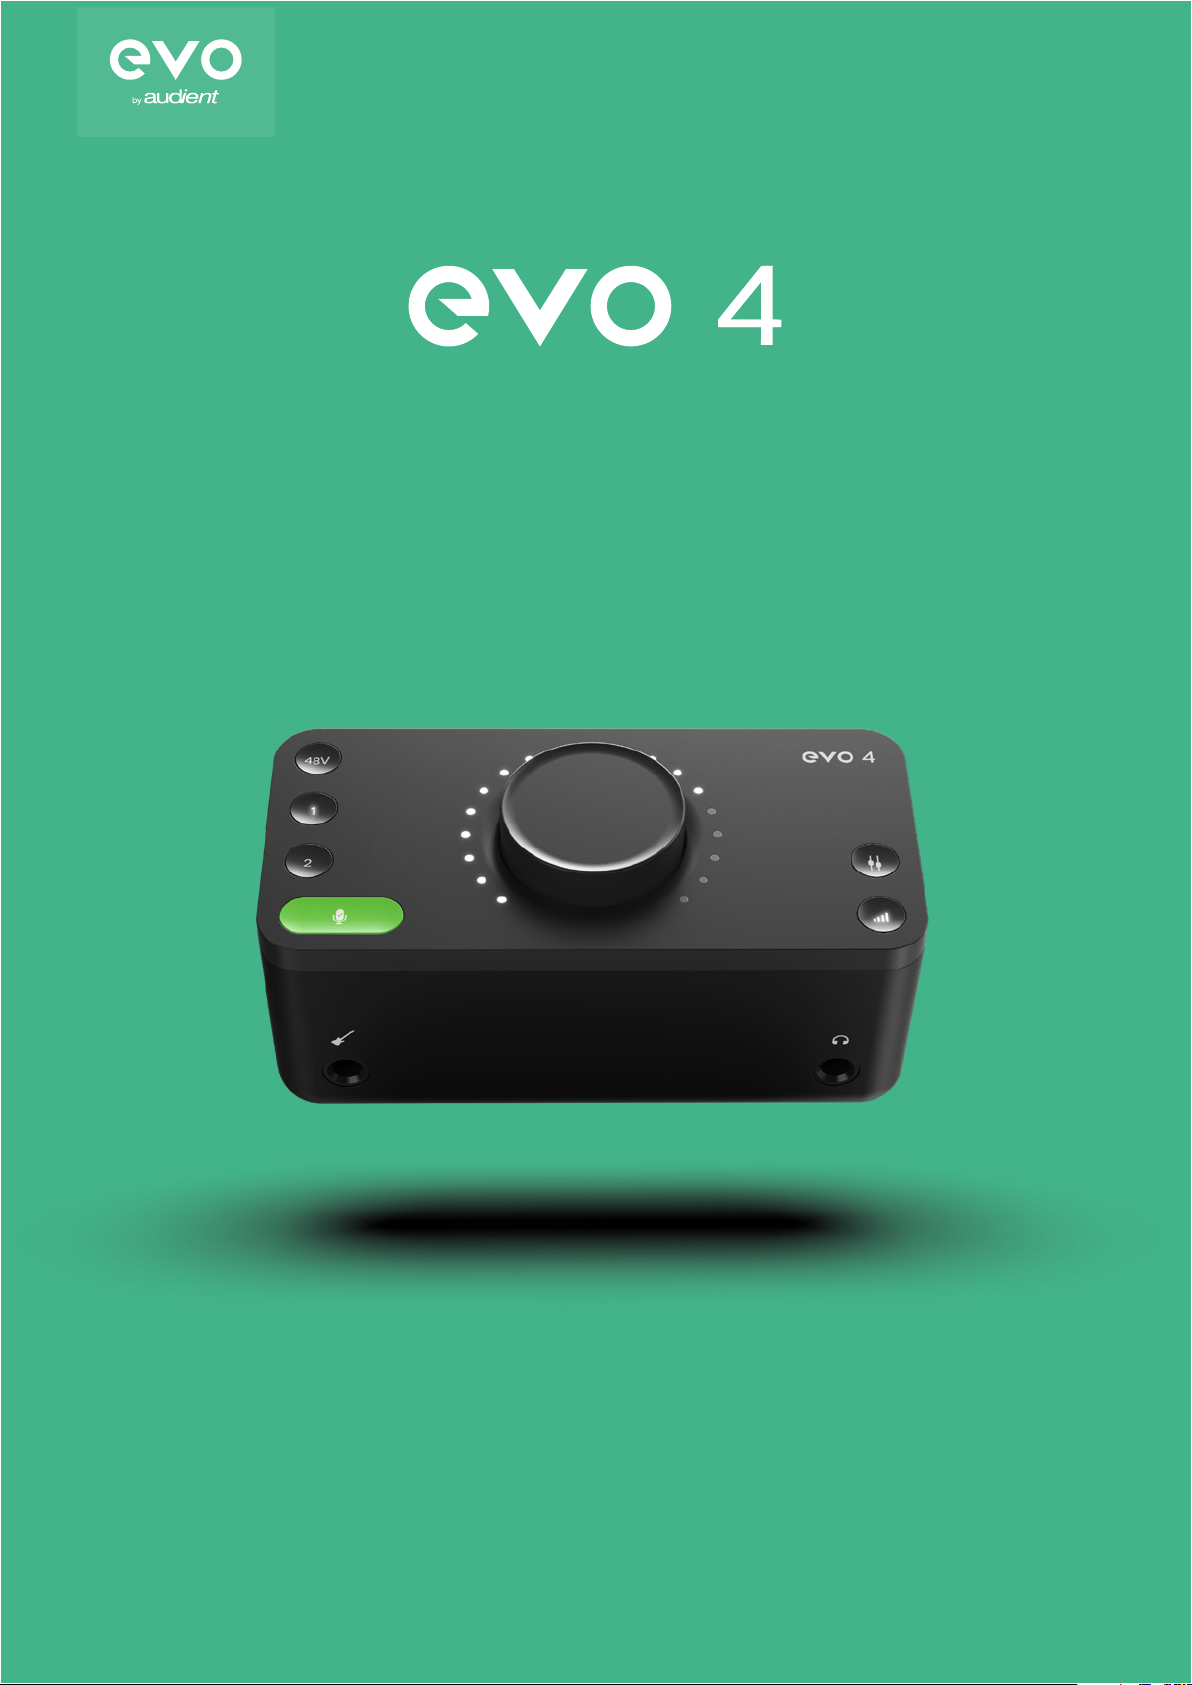
2in/2out Audio Interface
User Manual 2.0
Page 2
WELCOME
Welcome to your new EVO 4 audio interface. EVO 4 has been designed
to remove the technical barriers creatives face when exploring the often
intimidating world of audio and make recording simple for everyone.
EVO 4 includes two High-Performance EVO Preamps with innovative
Smartgain technology, a JFET Instrument Input, pristine converters and
a powerful headphone amplier.
We hope you enjoy using EVO 4 and it helps you in your creative
endeavours, whatever they may be!
Work smarter not harder.
EVO makes recording easy
WELCOME WELCOME
Page 3

01 Overview
07 Software Features
Smartgain
Channels 1 + 2
Monitor Mix + Pan
Phantom Power
Volume Knob
Output Volume
02 Safety Instructions
03 Declaration of Conformities
04 Installation/Setup
Show Loopback Source
Quit
About EVO
Visit EVO Knowledge Base
Check for Updates
Set ASIO Buer Size
Set Sample Rate
08 Audio Loop-back
Using Audio Loop-back on Mac
Using Audio Loop-back on Windows
09 Specications
05 Registration with ARC
06 Hardware Features
Stereo Linking
Phantom Power
Instrument Input
Monitor Mix
Volume Control
Muting
10 Firmware Update Procedure
11 Getting Started / Basic Setup
12 Warranty Information
Warranty Statement
Warranty Limitations
CONTENTS CONTENTS
Page 4
OVERVIEW
OVERVIEW
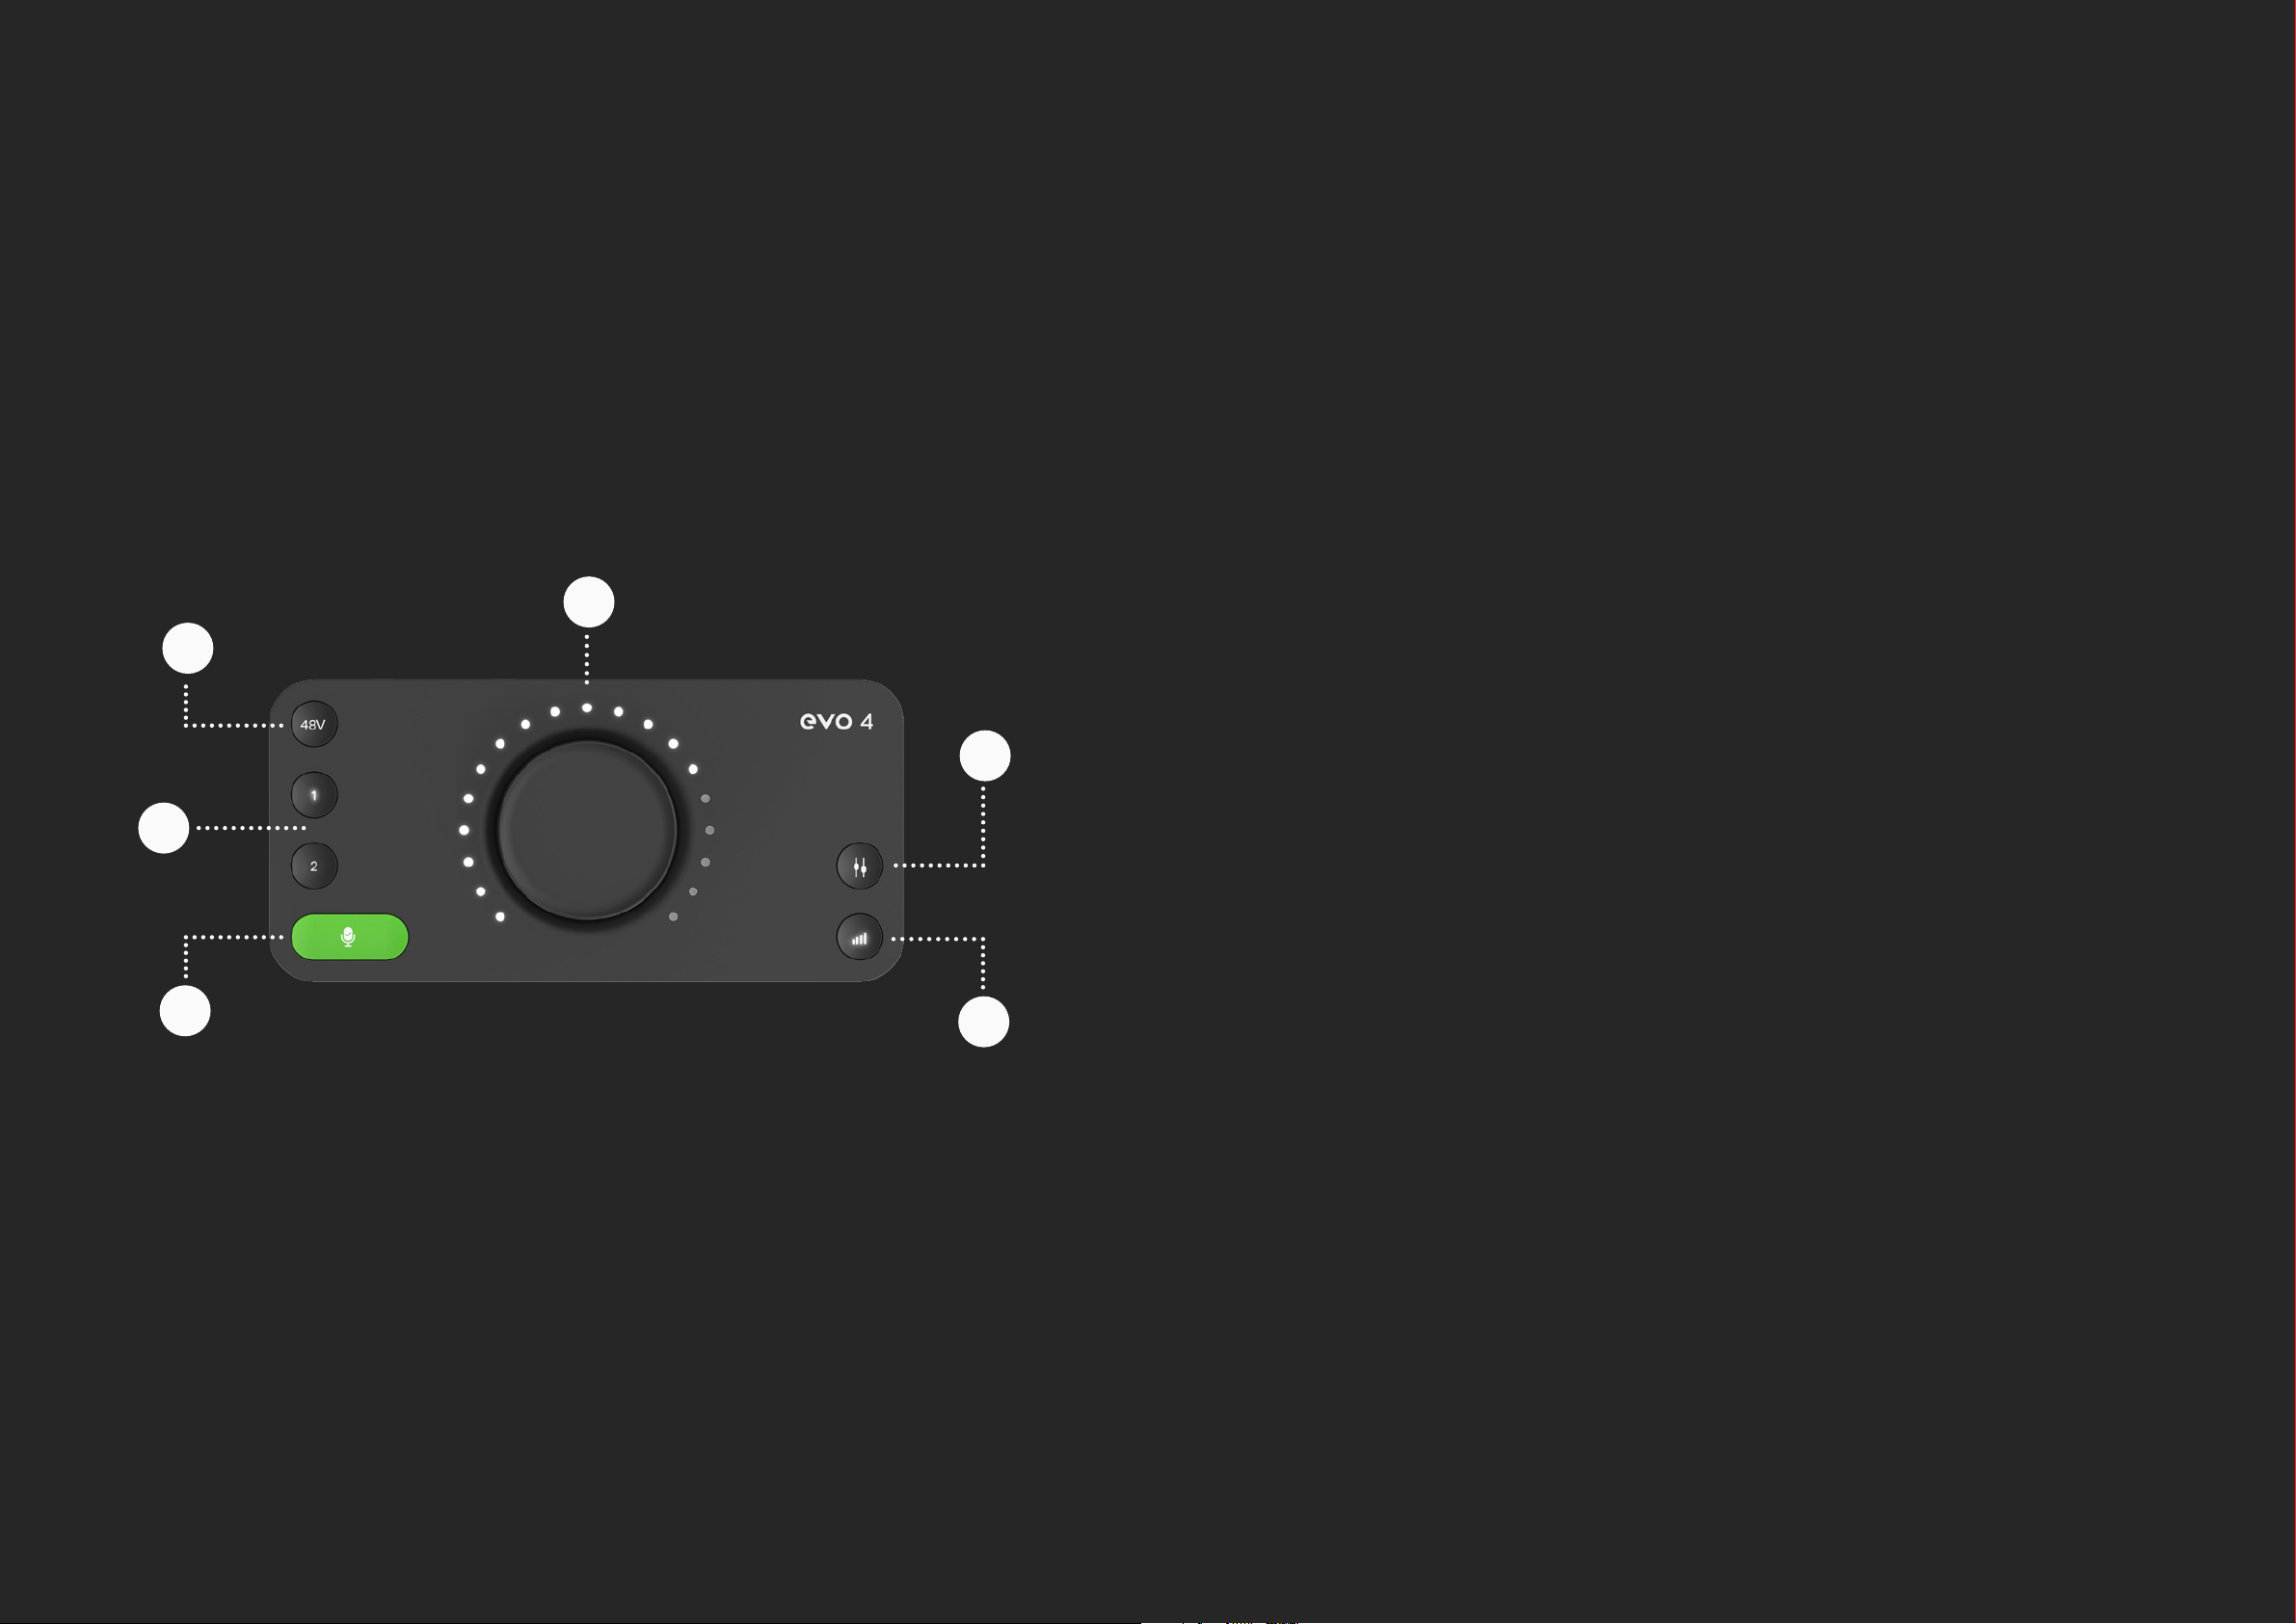
01 Smartgain
Just start playing or singing and Smartgain mode will automatically set
the level of your microphones perfectly.
02 Channels 1 + 2
Control the level of inputs, link to Smartgain or hold each button to mute.
2
4
1
5
03 Monitor Mix + Monitor Pan
Blend between your outputs and inputs - ideal for minimising latency
when recording. Use Monitor Pan to pan your inputs left or right to create
the ideal headphone balance.
3
04 True Phantom Power Over USB
Give your microphones the power they need to perform to their best - all
over bus power.
6
05 Volume Knob
Control your speakers, headphones and channels all from one knob.
06 Output Volume Button
Set the levels of your headphones or speakers.
OVERVIEW OVERVIEW
Page 5

IMPORTANT SAFETY INFORMATION
01 Read these instructions
02 Keep these instructions
03 Heed all warnings
Please read all of these instructions and save them for later reference
before connecting the USB cable and powering up EVO 4.
EVO 4 itself does not operate with any high voltage mains supply
inside the unit but appropriate safety measures should still be adhered
to prevent electrical shock and re hazards.
In the event of a unit failure, do not attempt to open the EVO 4 yourself.
Please contact Audient support so that a suitable method of
repair or replacement can be recommended.
support.audient.com
Consult a qualied technician if you suspect diculties.
04 Follow all instructions
05 Do not use this equipments near water
06 Clean only with a dry cloth
07 Do not install near any heat sources such as radioators, heat
registers, stoves, or other equipment (including ampliers) that
08 Protect cables from being walked on or pinched particularly
produce heat
at convenience receptacles, and the point where they exit
09 Only use attachements/accessories specied by the manufacturer
1 0 Switch o your computer and unplug this equipment during
from the equipment
Do not attempt to tamper with the unit whilst connected or
disconnected - HAZARDOUS TO HEALTH
11 Refer all servicing to qualied service personnel. Servicing is
lightning storms or when unused for long periods of time
required when the equipment has been damaged in any way, liquid
has been spilled or objects have fallen into the equipment, the
equipment has been exposed to rain or moisture, does not operate
normally or has been dropped
WARNING
To reduce risk of re or electric shock,
do not expose this apparatus to rain or moisture
No user servicable parts inside
Please refer servicing to qualied service personnel
SAFETY
SAFETY
Page 6
DECLARATION OF CONFORMITIES
This apparatus has been tested and found to comply with the limits of
a class-A digital device, pursuant to Part 15B of the FCC Rules. These
limits are designed to provide reasonable protection against harmful
interference in a residential installation.
We, EVO by Audient, Aspect House, Herriard, Hampshire, RG25 2PN, UK, 01256 381944,
declare under our sole responsibility that the product EVO 4 complies with Part 15 of
FCC Rules.
This equipment generates, uses and can radiate radio frequency
energy and if not installed and used in accordance with the
instructions, may cause harmful interference to radio communications.
If this equipment does cause harmful interference to radio or television
reception, which can be determined by turning the equipment o and
on, the user is encouraged to try to correct the interference by one or
more of the following measures:
Increase the seperation between the
equipment and reciever
01
Re-orient or relocate the recieving
antenna
02
01 This device may not cause harmful interfer
02 This device must accept any interference recieved,
including interference that may cause undesired
operation
We, EVO by Audient, declare that the product, the EVO 4, to which this declaration
relates, is in material conformity with the appropriate CE standards and directives for
an audio product designed for consumer use.
EVO by Audient has conformed where applicable, to the European Union’s Directive
2002/95/EC on Restrictions of Hazardous Substances (RoHS) as well as the following
sections of California law which refer to RoHS, namely sections 25214.10, 25214.10.2,
and 58012, Health and Safety Code; Section 42475.2, Public Resources
Under an environment with electrostatic discharge, the device may cease to output
sound (EUT could not operate properly). This requires the user reset the device by
unplugging & re-connecting to host computer.
ence
03
Connect the equipment into an
outlet on a dierent circuit from that
to which the reciever is connected
DECLARATION DECLARATION
04
Consult the dealer or an experienced
radio/TV technician for help
Page 7
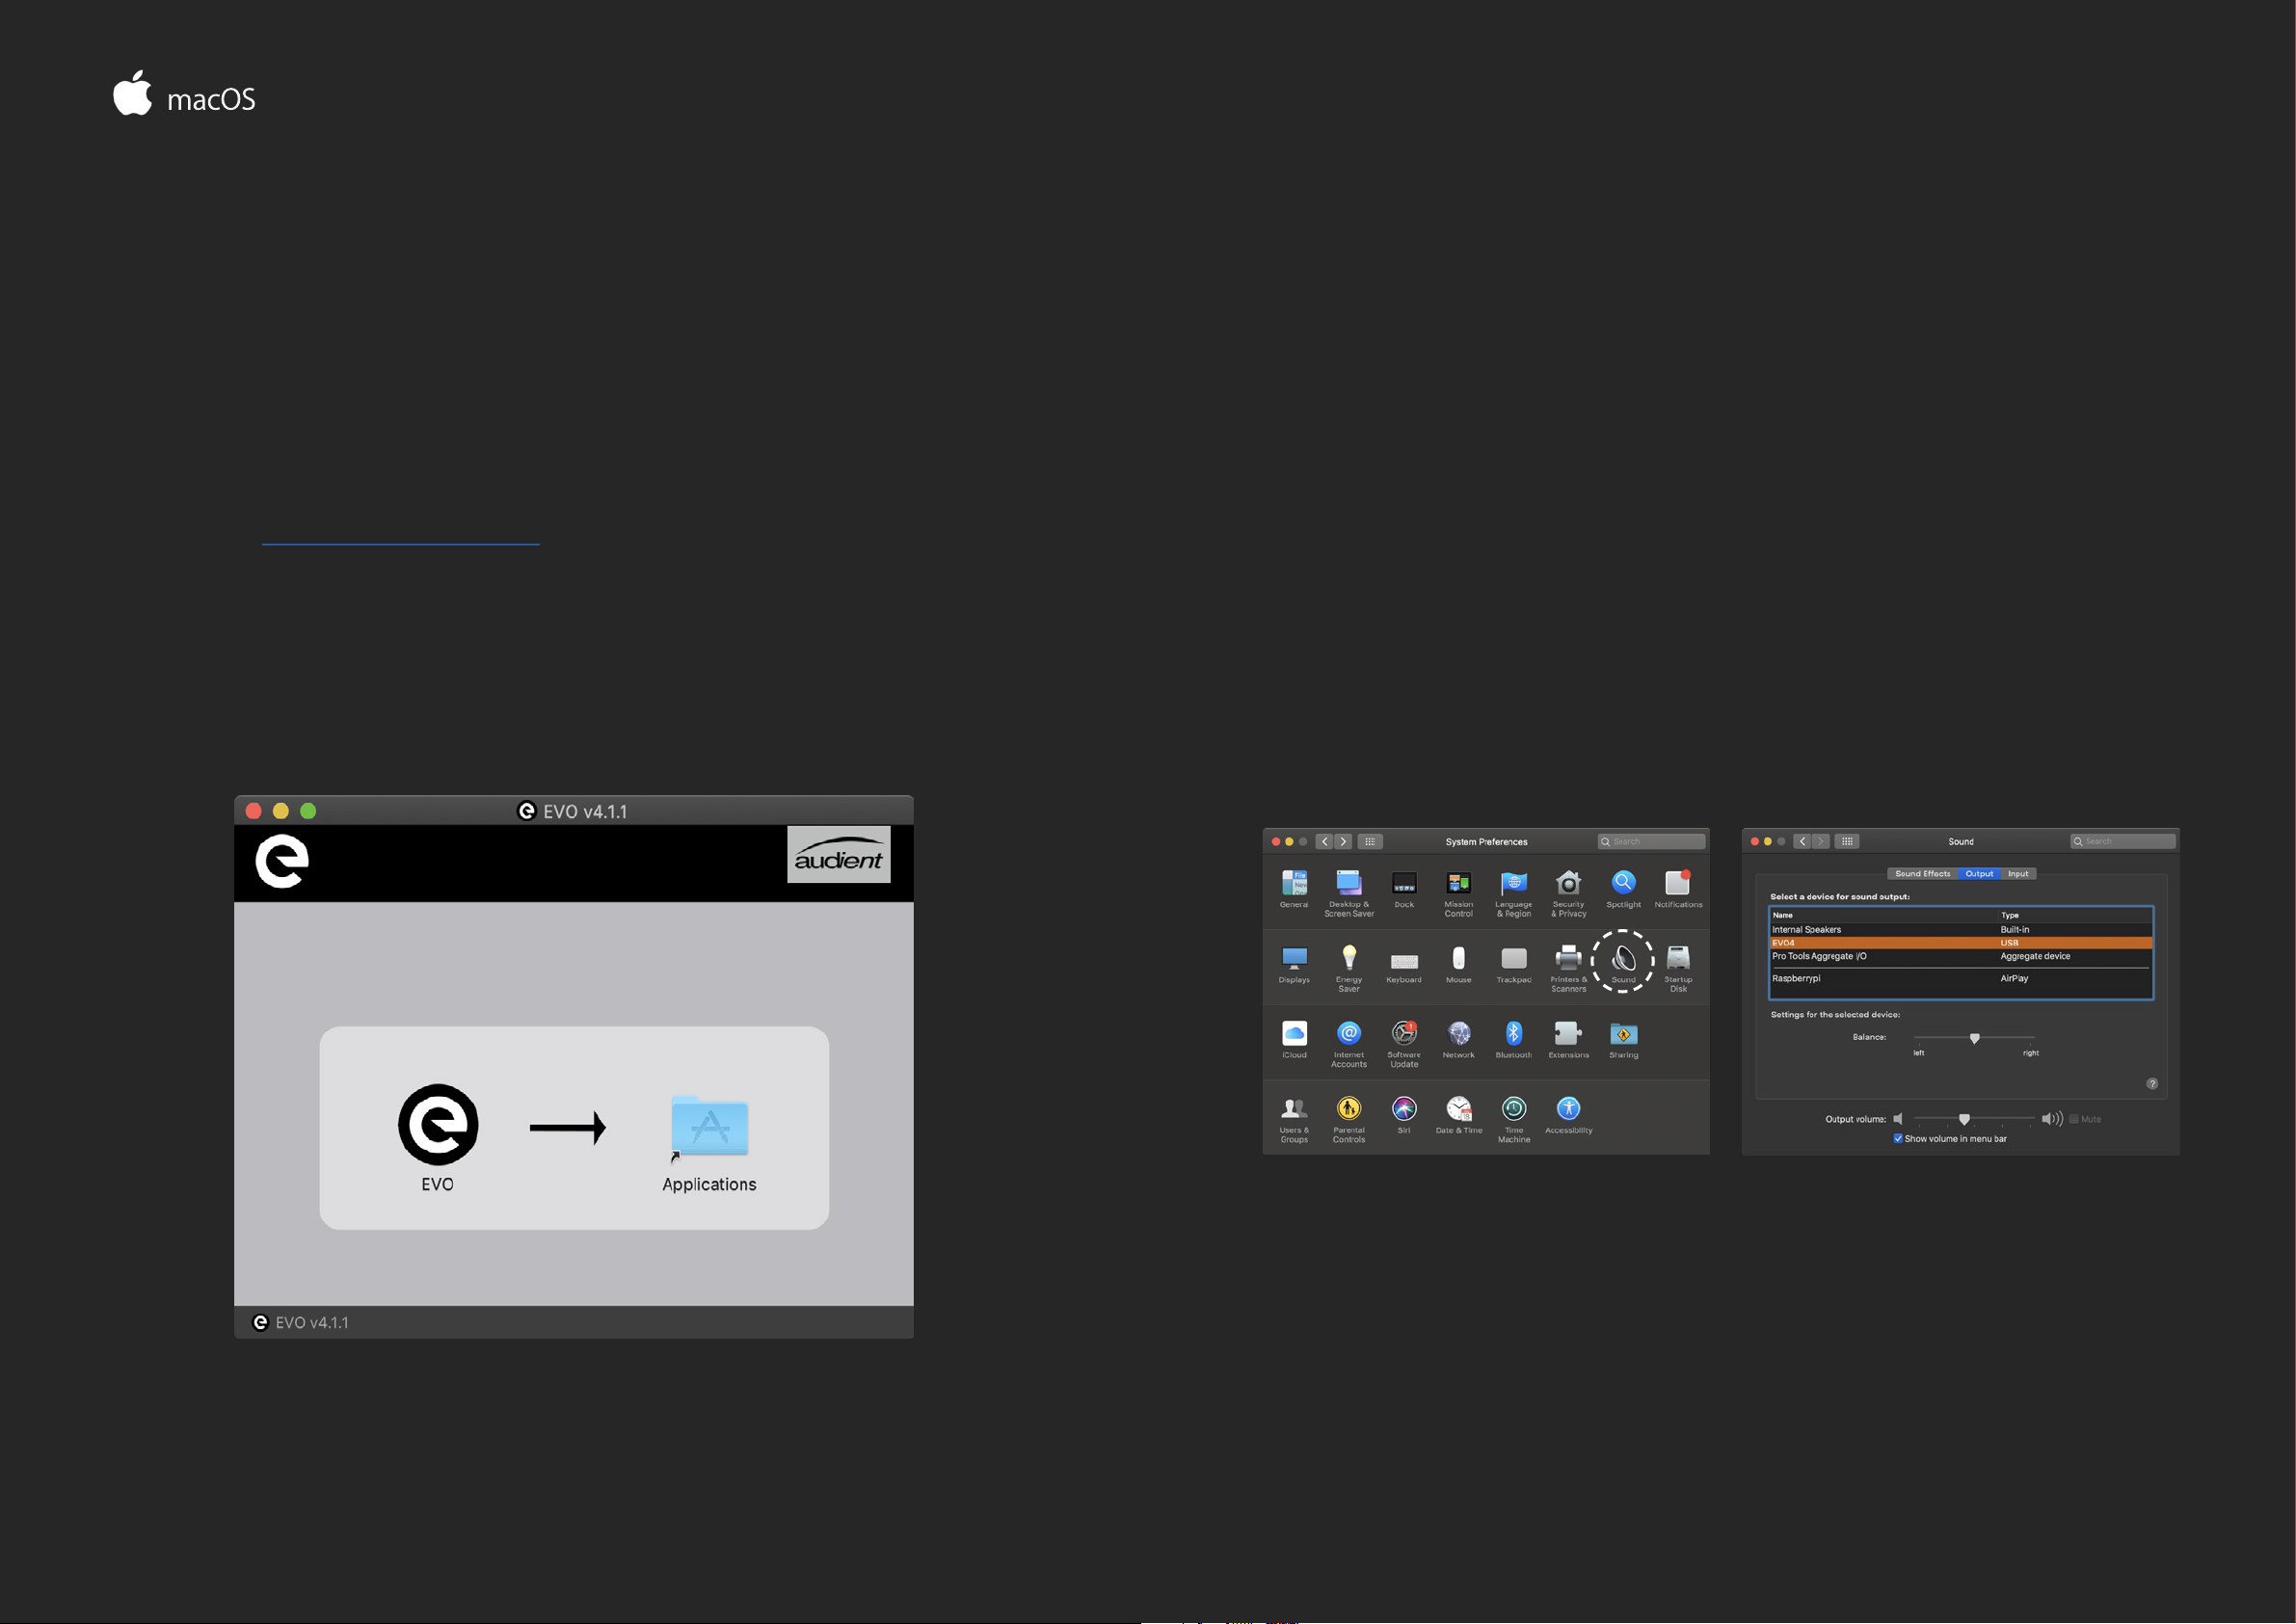
INSTALLATION / SETUP
On macOS, EVO 4 will work straight away without needing to install
any drivers. However, we do recommend installing the EVO
application which gives you control over Audio Loop-back and lets
you update your rmware.
Head to the EVO 4 downloads page to download the latest version
of the application. Once downloaded, simply open the .dmg le and
then drag and drop the EVO application into your applications
folder.
Carefully unpack your EVO 4 and connect it to a USB port on your
Mac. If your computer doesn’t have rectangular USB-A ports then you
may need to use an adaptor, dongle or third party cable.
You can then set EVO 4 as your main outputs by going to System
Preferences > Sound and then selecting the EVO 4 as your device for
Input and Output
System Preferences > Sound Select EVO 4 as input / output
INSTALLATION / SETUP MAC OS
Page 8
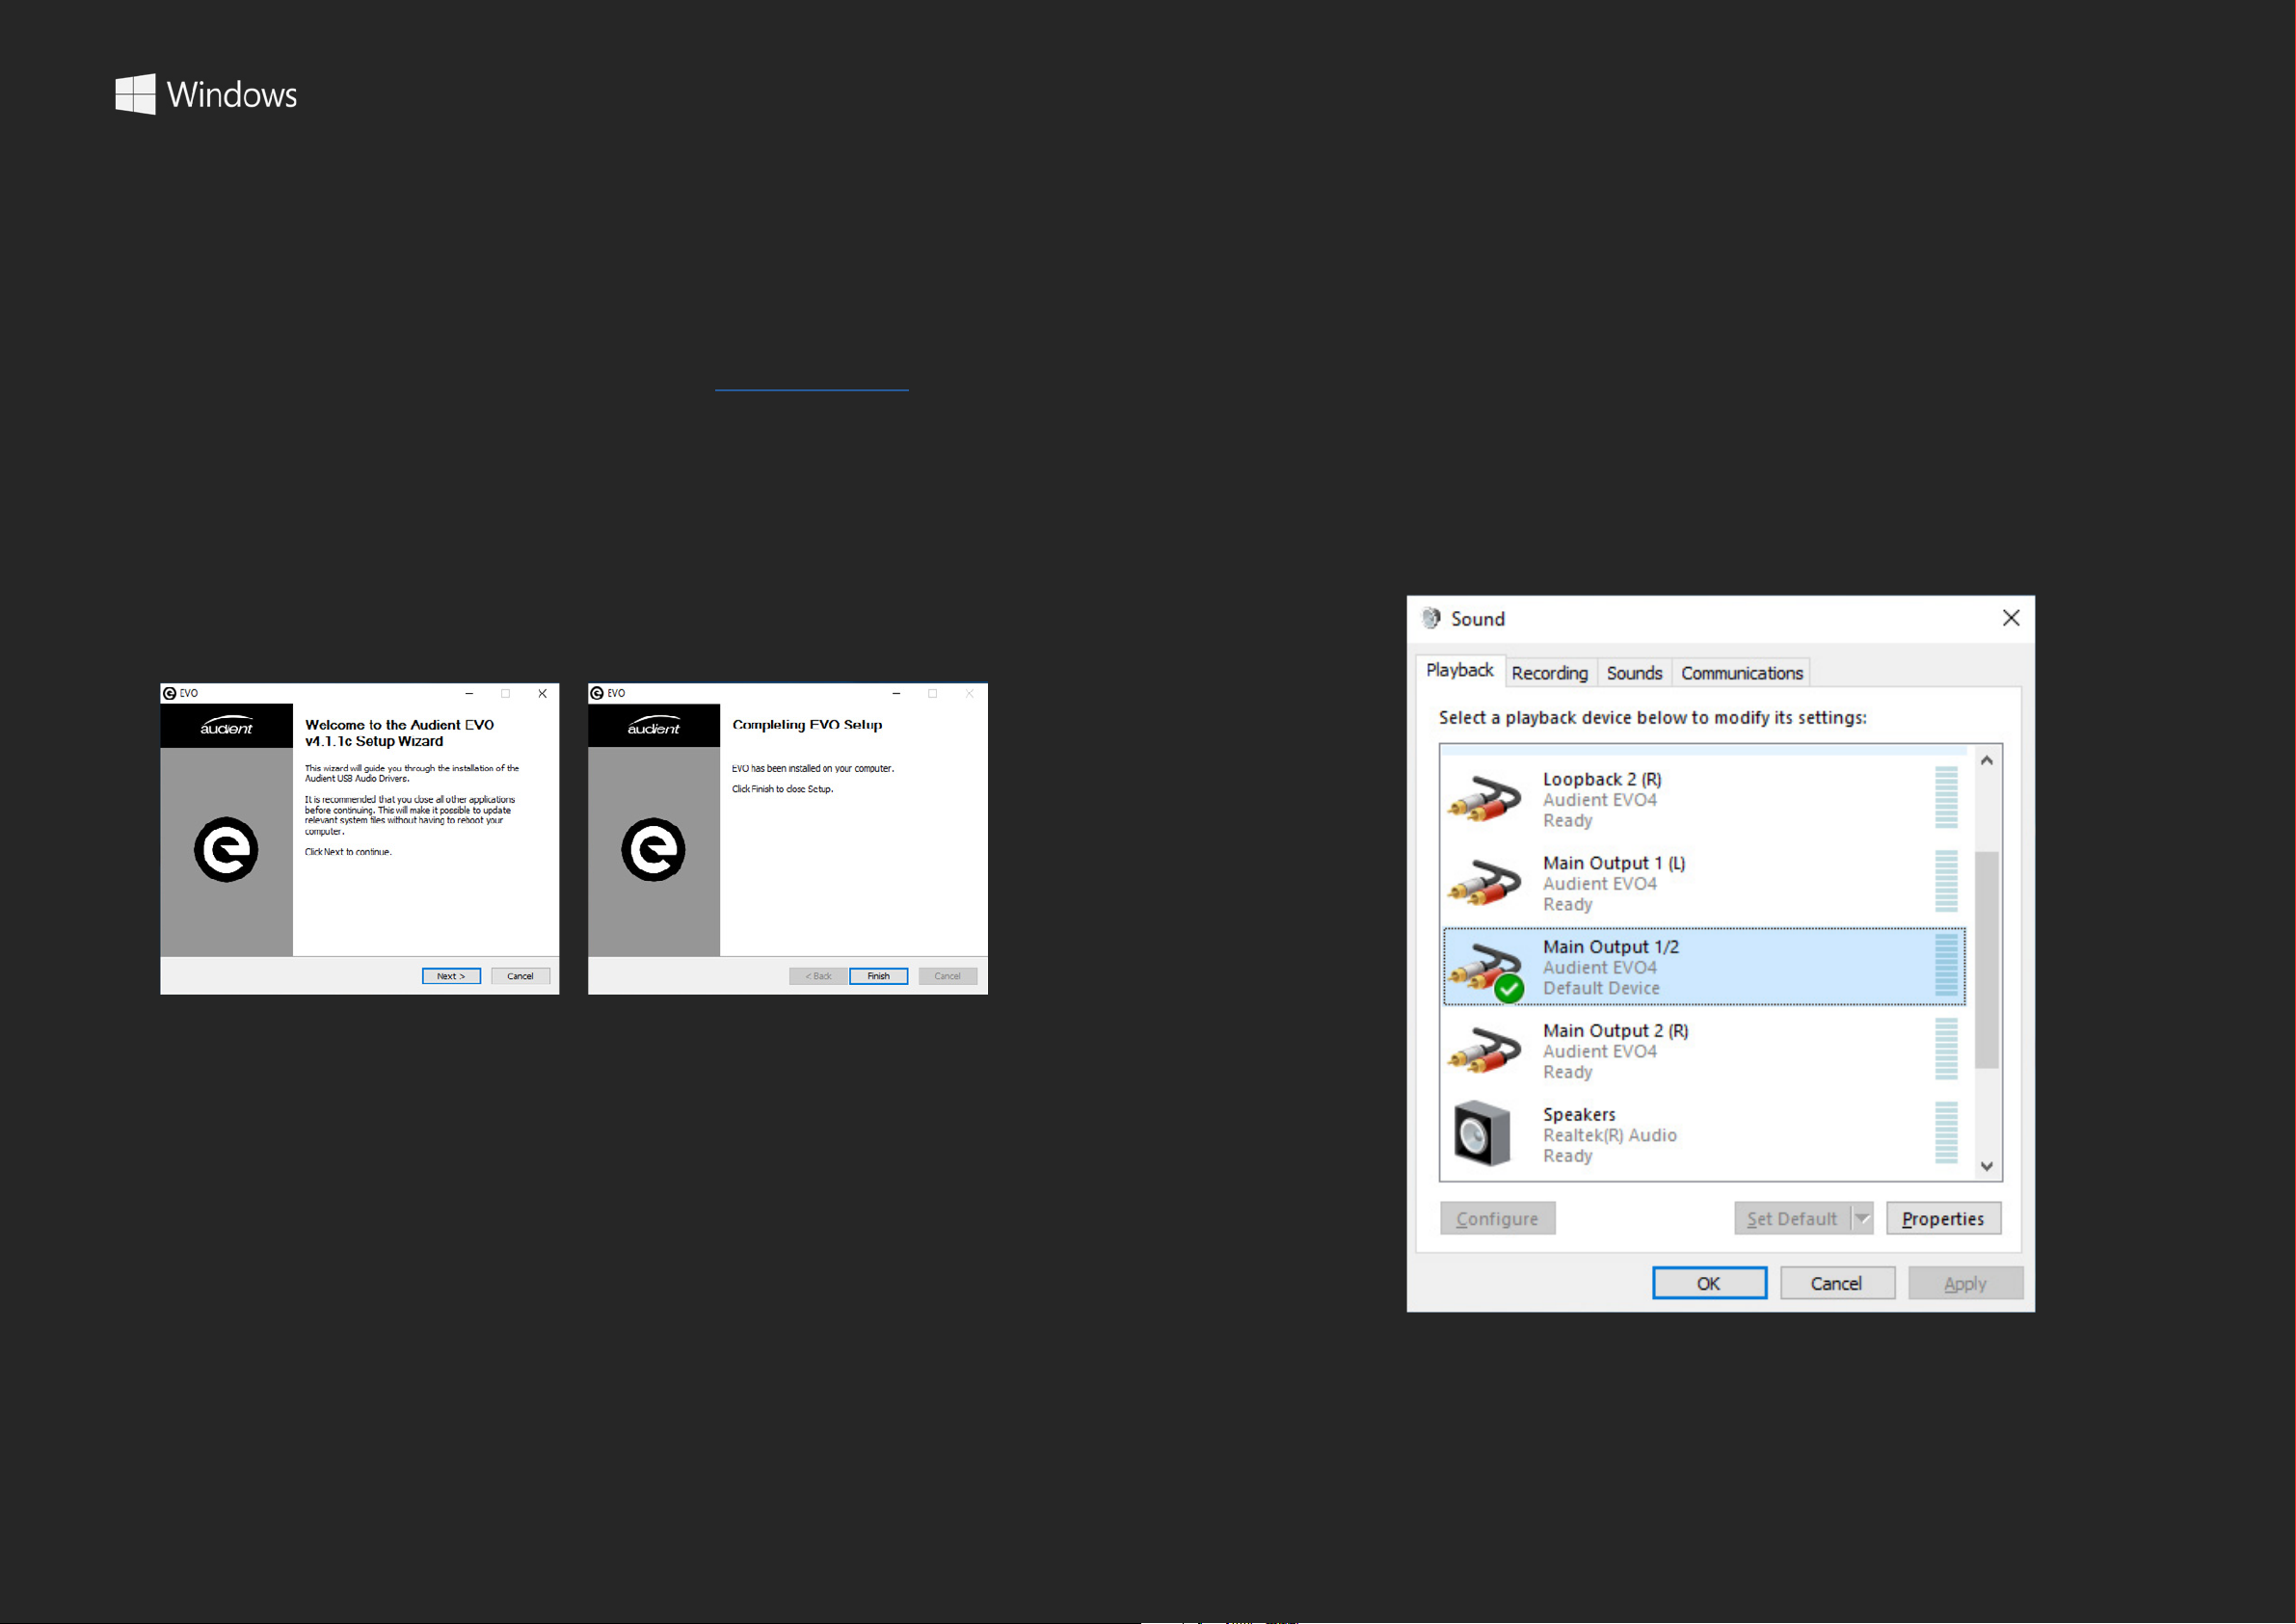
INSTALLATION / SETUP
EVO 4 will require drivers on Windows so that the computer and EVO 4
will work together. You can download these from the downloads page
on the EVO 4 page.
Once downloaded, run the .exe le to start the installation process.
Follow the instructions on screen to complete the installer. This process
may take a little while so please be patient.
For more advanced settings such as changing your sample rate or
buer size, please read the Software features section, found later in
this manual.
Control Panel > Hardware and Sound > Sound
Once complete, click nish. Now carefully unpack your EVO 4 and
connect it to the computer using the included USB cable.
To set the EVO 4 as your default sound device, go to Control Panel >
Hardware and Sound > Sound. Now select the Playback tab.
In the list of devices, nd EVO 4 Main Output 1+2, click on it and select
Set Default Device.
INSTALLATION / SETUP WINDOWS
Page 9
INSTALLATION / SETUP
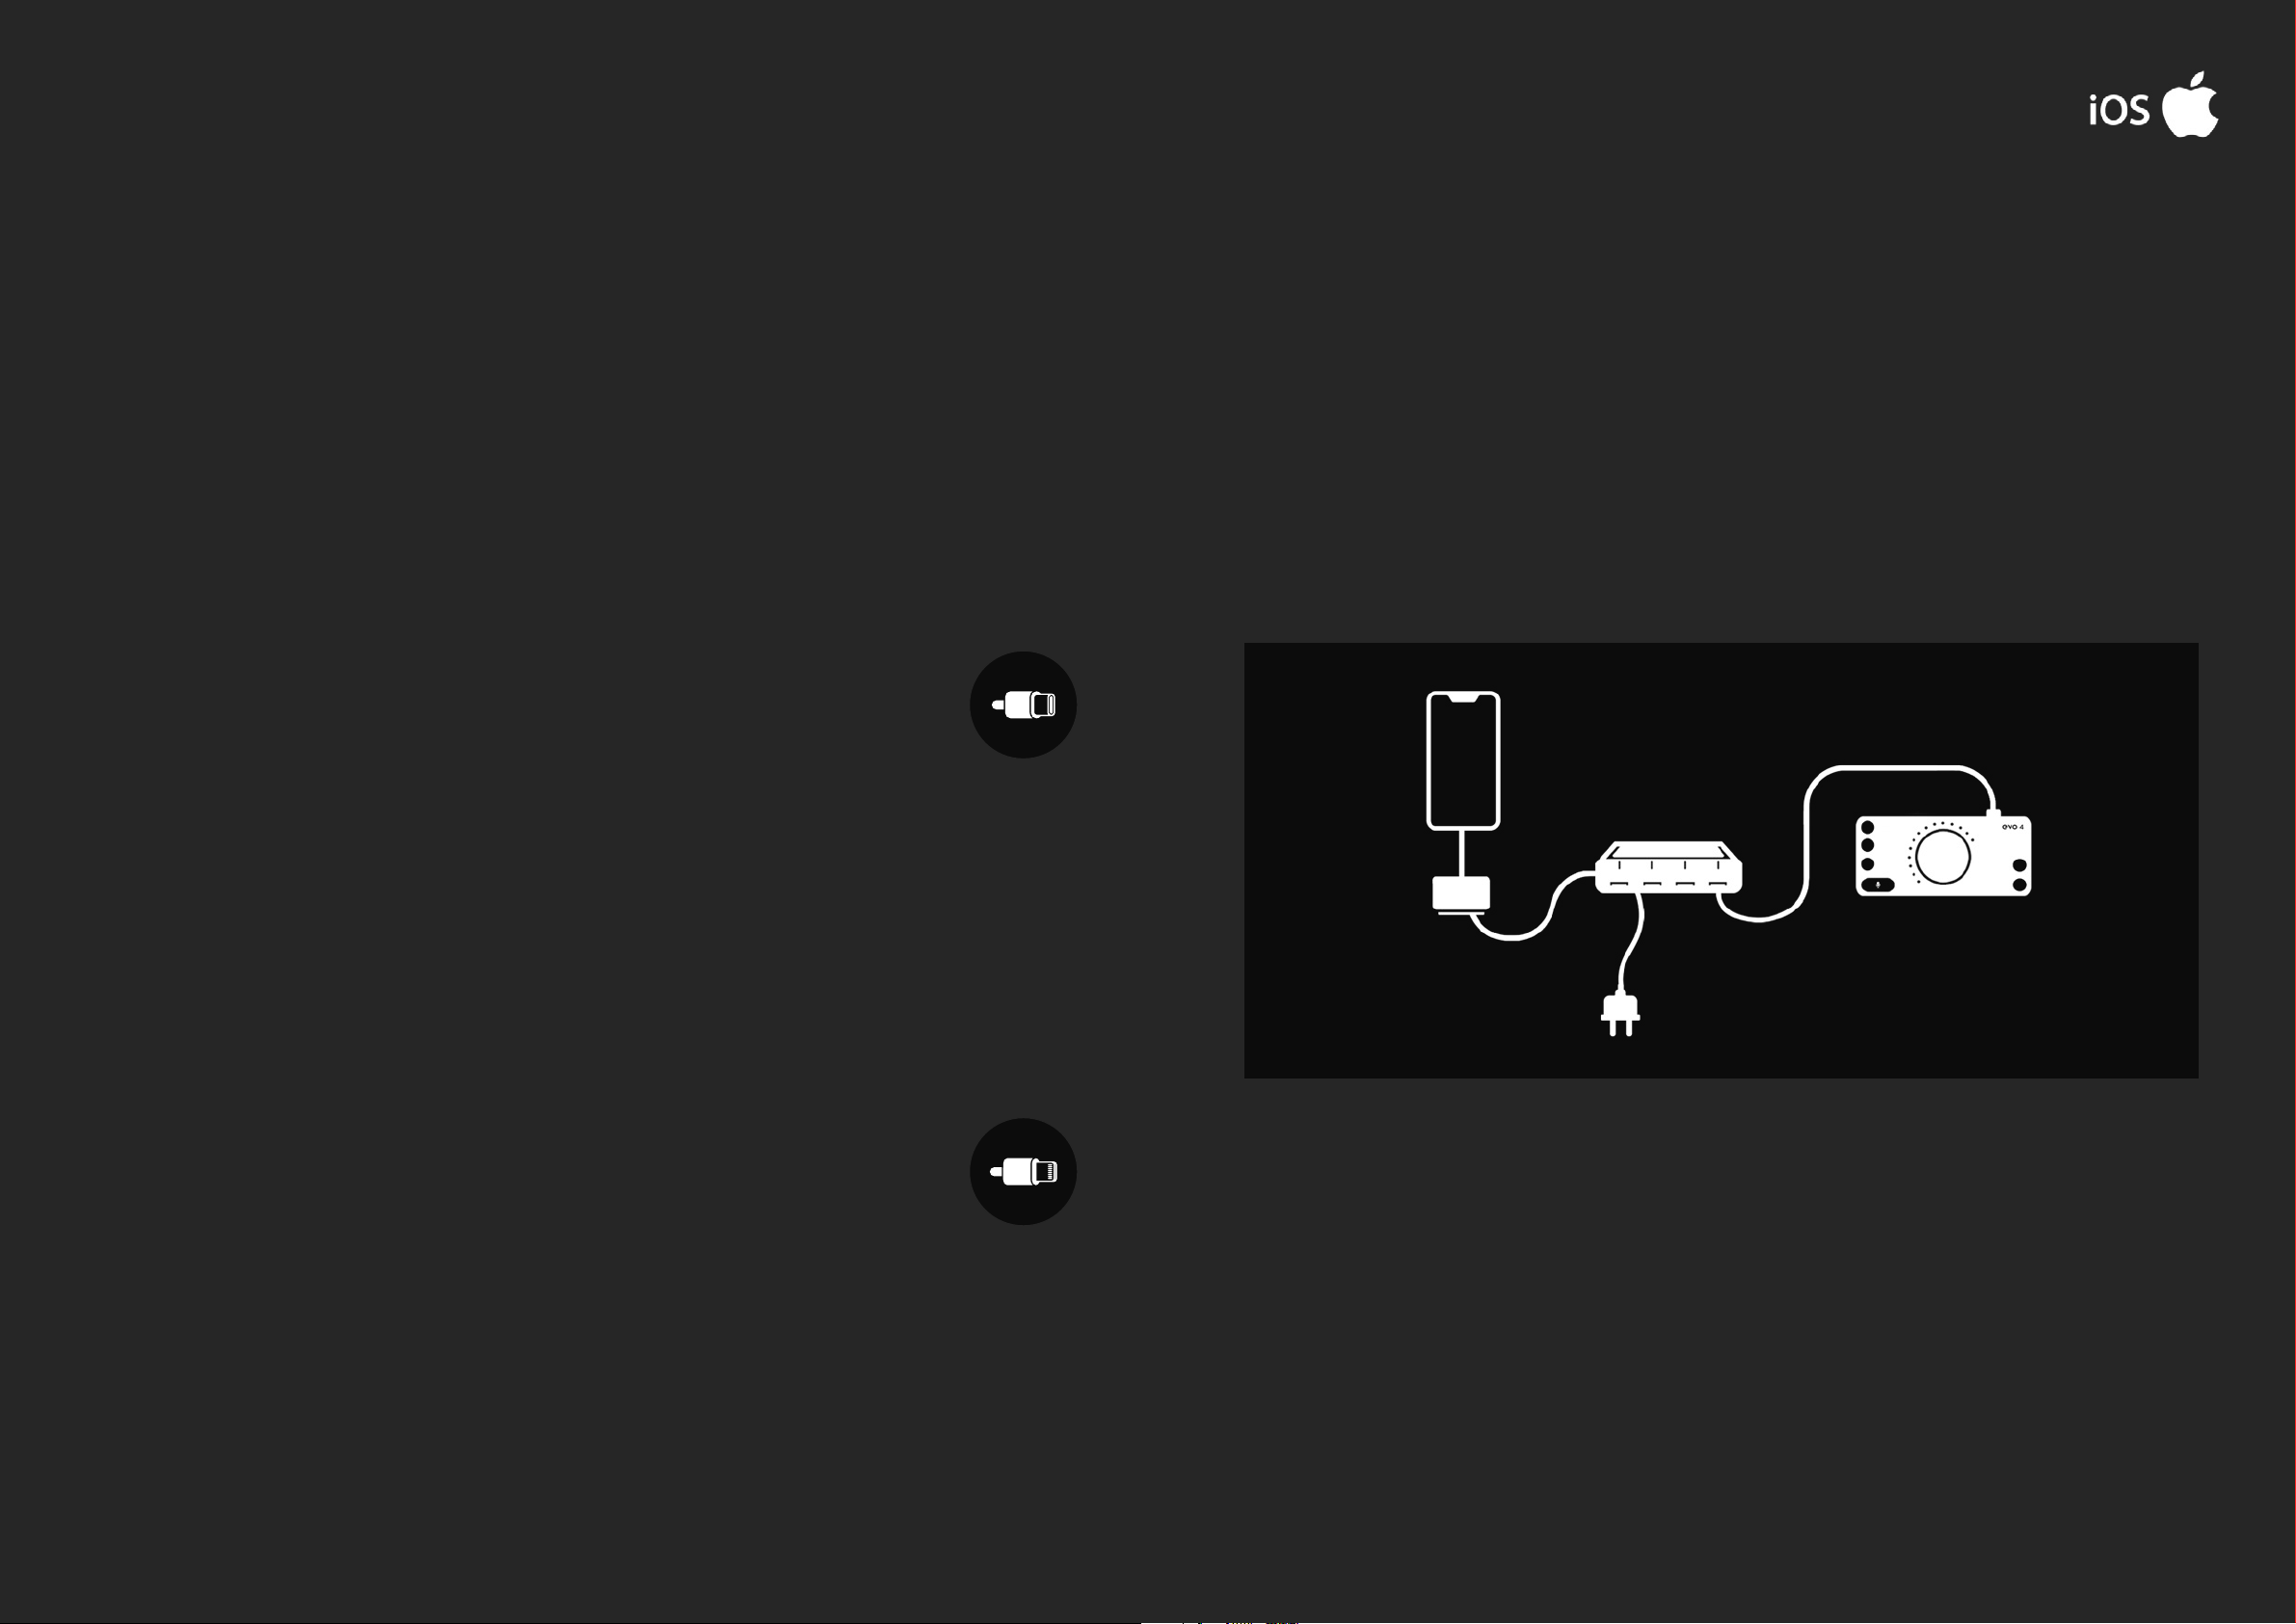
EVO 4 will also work on iOS and iPadOS devices allowing you to record
The Active USB hub is required as the lightning port cannot provide
enough bus power for the EVO 4 to work correctly and the hub will
provide the correct power via the USB cable.
and create while on the go. The Setup will dier slightly depending
on what iOS device you are using.
iPAD PRO WITH USBC PORT
To use EVO 4 with an iPad Pro, simply connect it using a USB-C to USB-C
cable (not included). The USB-C port on iPad Pro will provide full USB
bus power for the EVO 4 meaning you do not need any external power
source.
Once connected, the iPad will automatically use EVO 4 as the sound
device.
First connect the Camera connection kit to the iPad. Now plug the
USB hub into the USB port on the camera connection kit.
Plug the USB hub into a mains power socket and nally connect
EVO 4 to one of the ports on the USB hub.
USB Cable
USB Hub
Camera
Connection Kit
iPAD, iPAD AIR, iPHONE WITH LIGHTNING PORT
In order to connect EVO 4 to a iOS device with a lightning port you will
need the following:
01 Apple Camera Connection Kit
02 An Active USB Hub
INSTALLATION / SETUP IOS
Mains
Once connected, the iOS device will automatically use EVO 4 as the sound
device. For details on how to setup EVO 4 in recording applications such
Cubasis or Auria Pro, please refer to the developers documentation.
For details on how to setup EVO 4 in recording applications such Cubasis
or Auria Pro, please refer to the developers documentation.
Page 10

REGISTRATION WITH AUDIENT ARC
Compatible with all major audio software, EVO 4 comes bundled with a
collection of professional software and services, giving you everything
you need to start recording.
Go to audient.com/ARC and select register your product, then enter
your details to create an account.
You will then receive a verication email to your inbox - double check
your spam and junk folders if you cannot see this. Once you’ve veried
your account, register your EVO 4 by entering the serial number and the
unique 4 digit PIN found on the underside of EVO 4.
Once you have registered the product, you can now select from a wide
array of oers and promotions, giving you easy access to powerful
creative tools straight away.
REGISTRATION REGISTRATION
Page 11
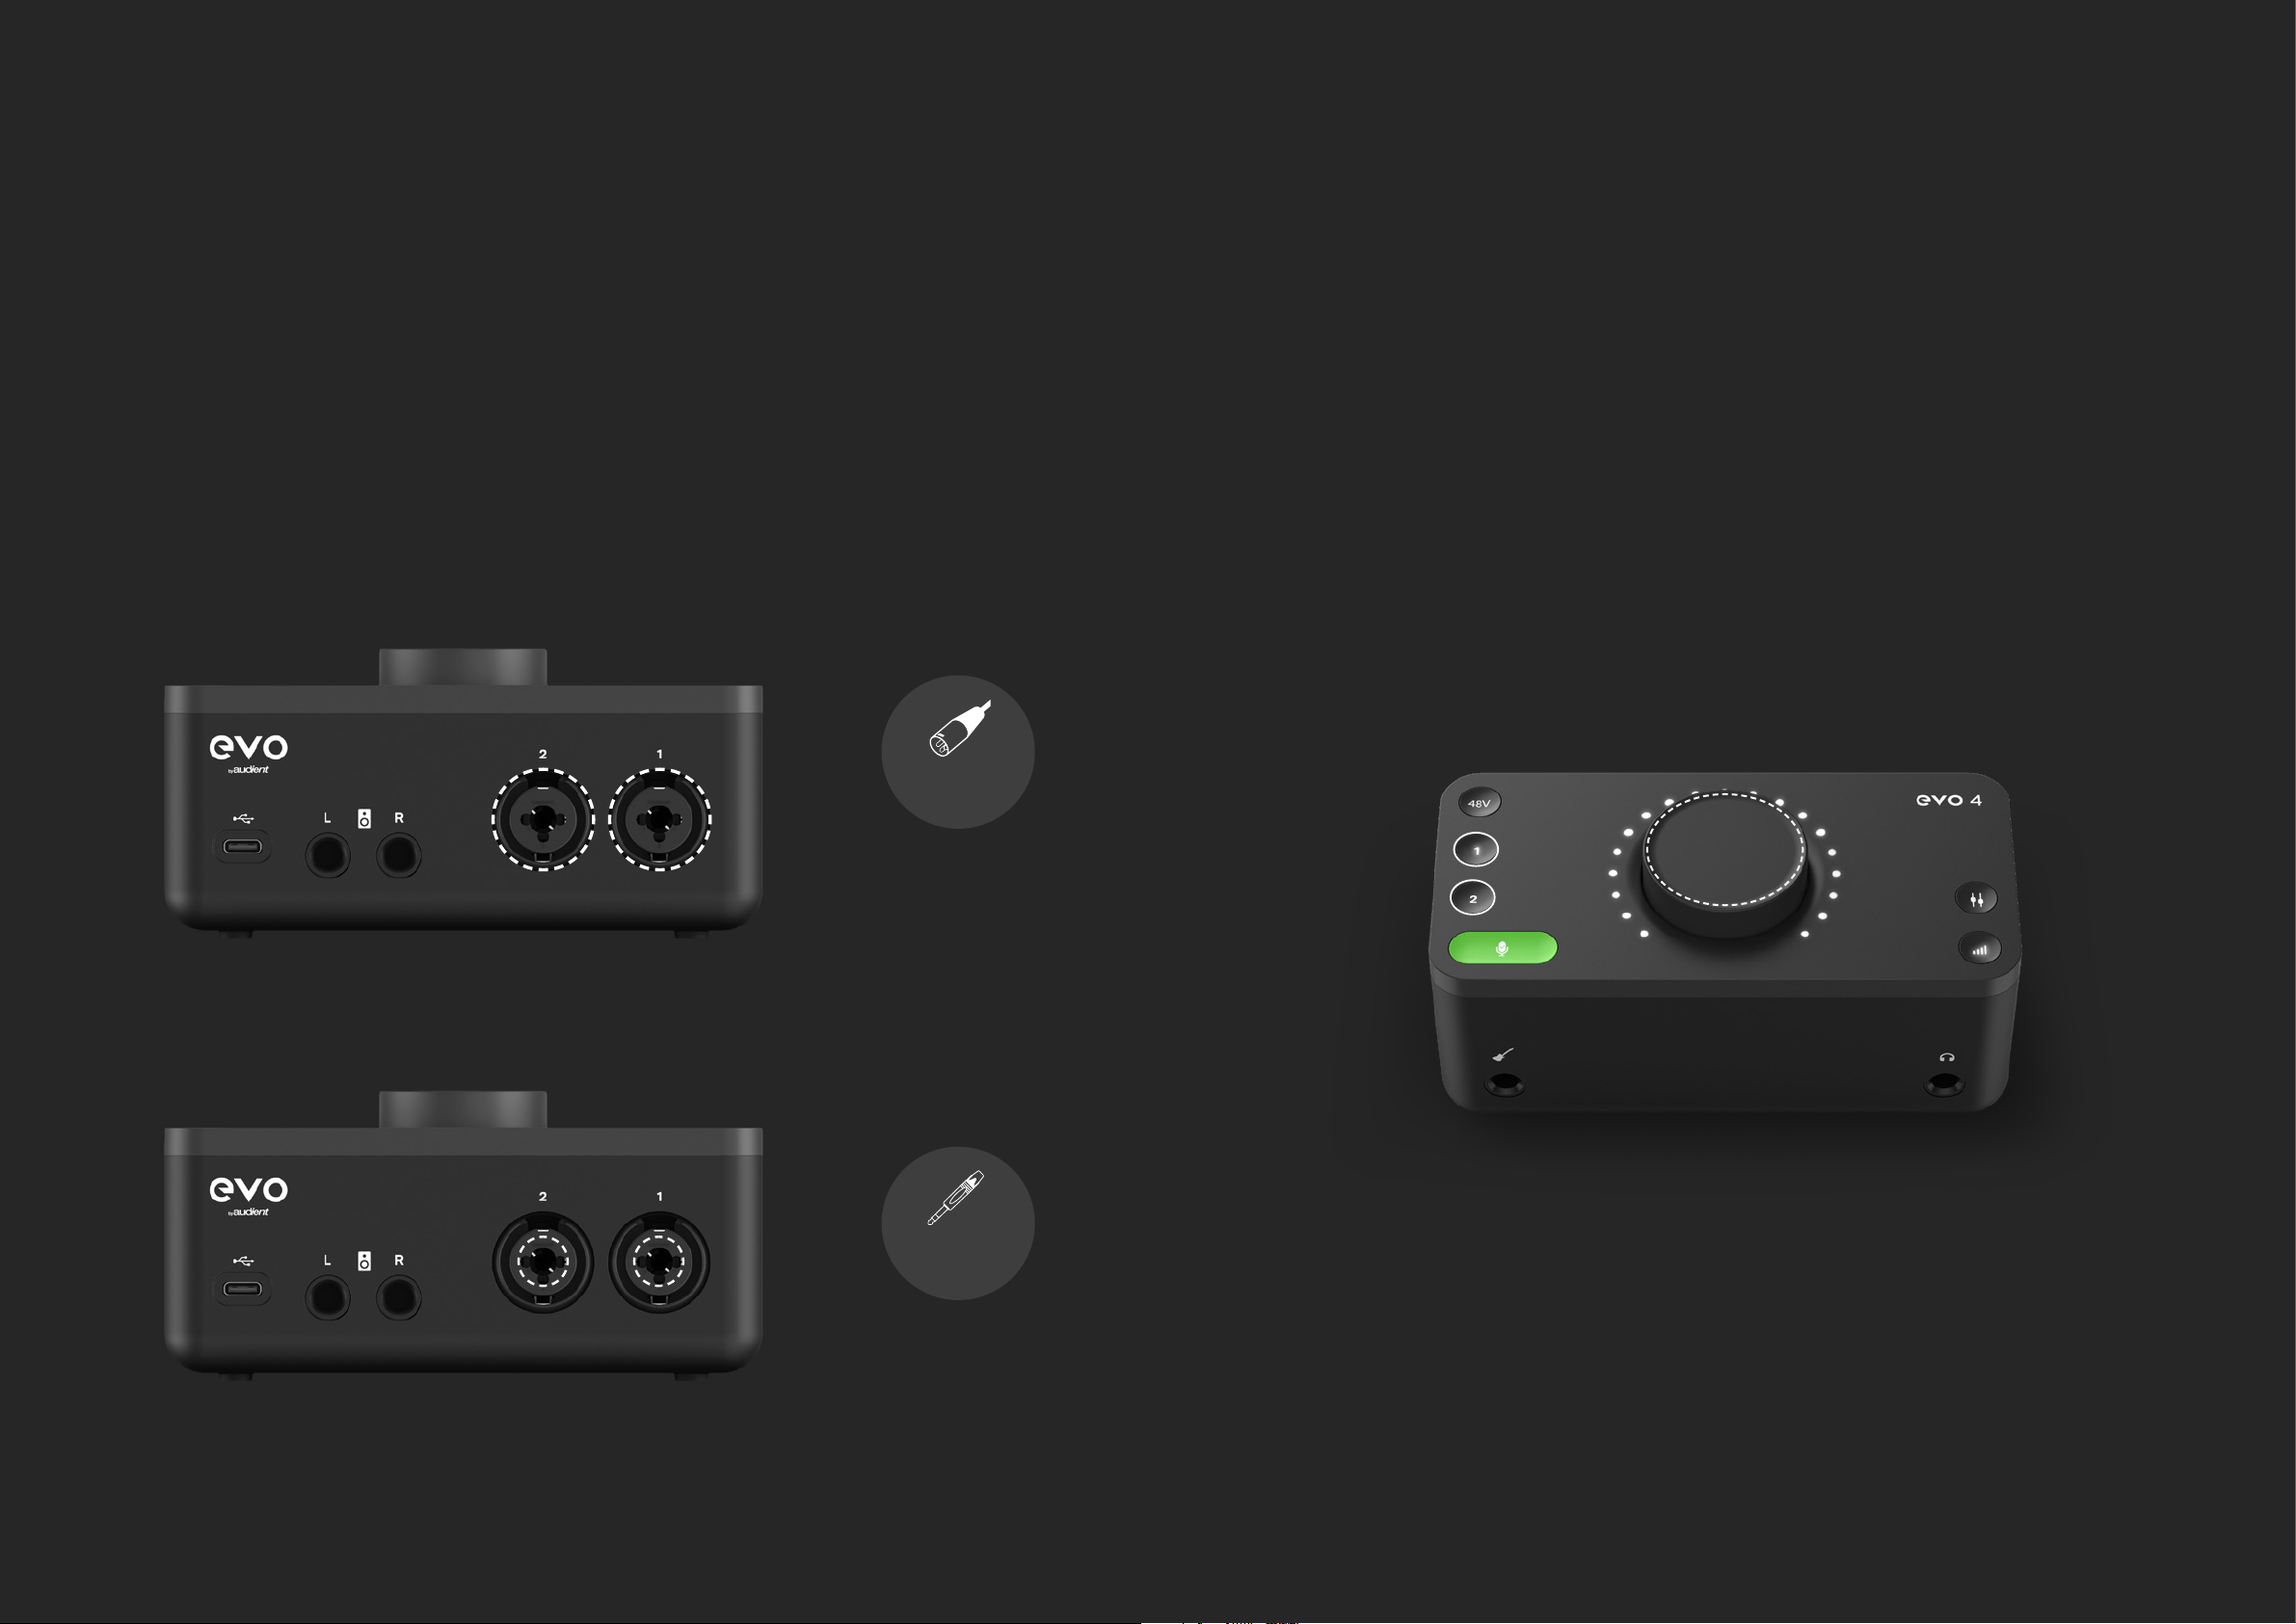
HARDWARE FEATURES
Mic Pre’s and Line Level Inputs
To connect a line-level device, use a ¼” TRS jack which will connect to the
centre of the Combi connector. The Line input automatically reduces your
EVO 4 includes two high-quality Mic Pre-amps, available through the two
Combi connections found on the rear of EVO 4.
To connect a microphone, use an XLR cable which has three pins.
XLR Cable
Connection
signal level slightly to minimise the chance of overloading the input and
causing distortion. The line inputs are ideal for connecting up devices like
keyboards and drum machines.
EVO 4 can lower the signal level by 8 decibels and boost it by up to 50
decibels allowing you to get the perfect recording level, this is known as the
Gain.
Volume Knob
TRS Jack
Connection
You can manually control this by pressing one of the Input buttons and
then turning the Volume Knob. The meters will light up to show you the
approximate gain level.
HARDWARE HARDWARE
Page 12
HARDWARE FEATURES
Mic Pre’s and Line Level Inputs
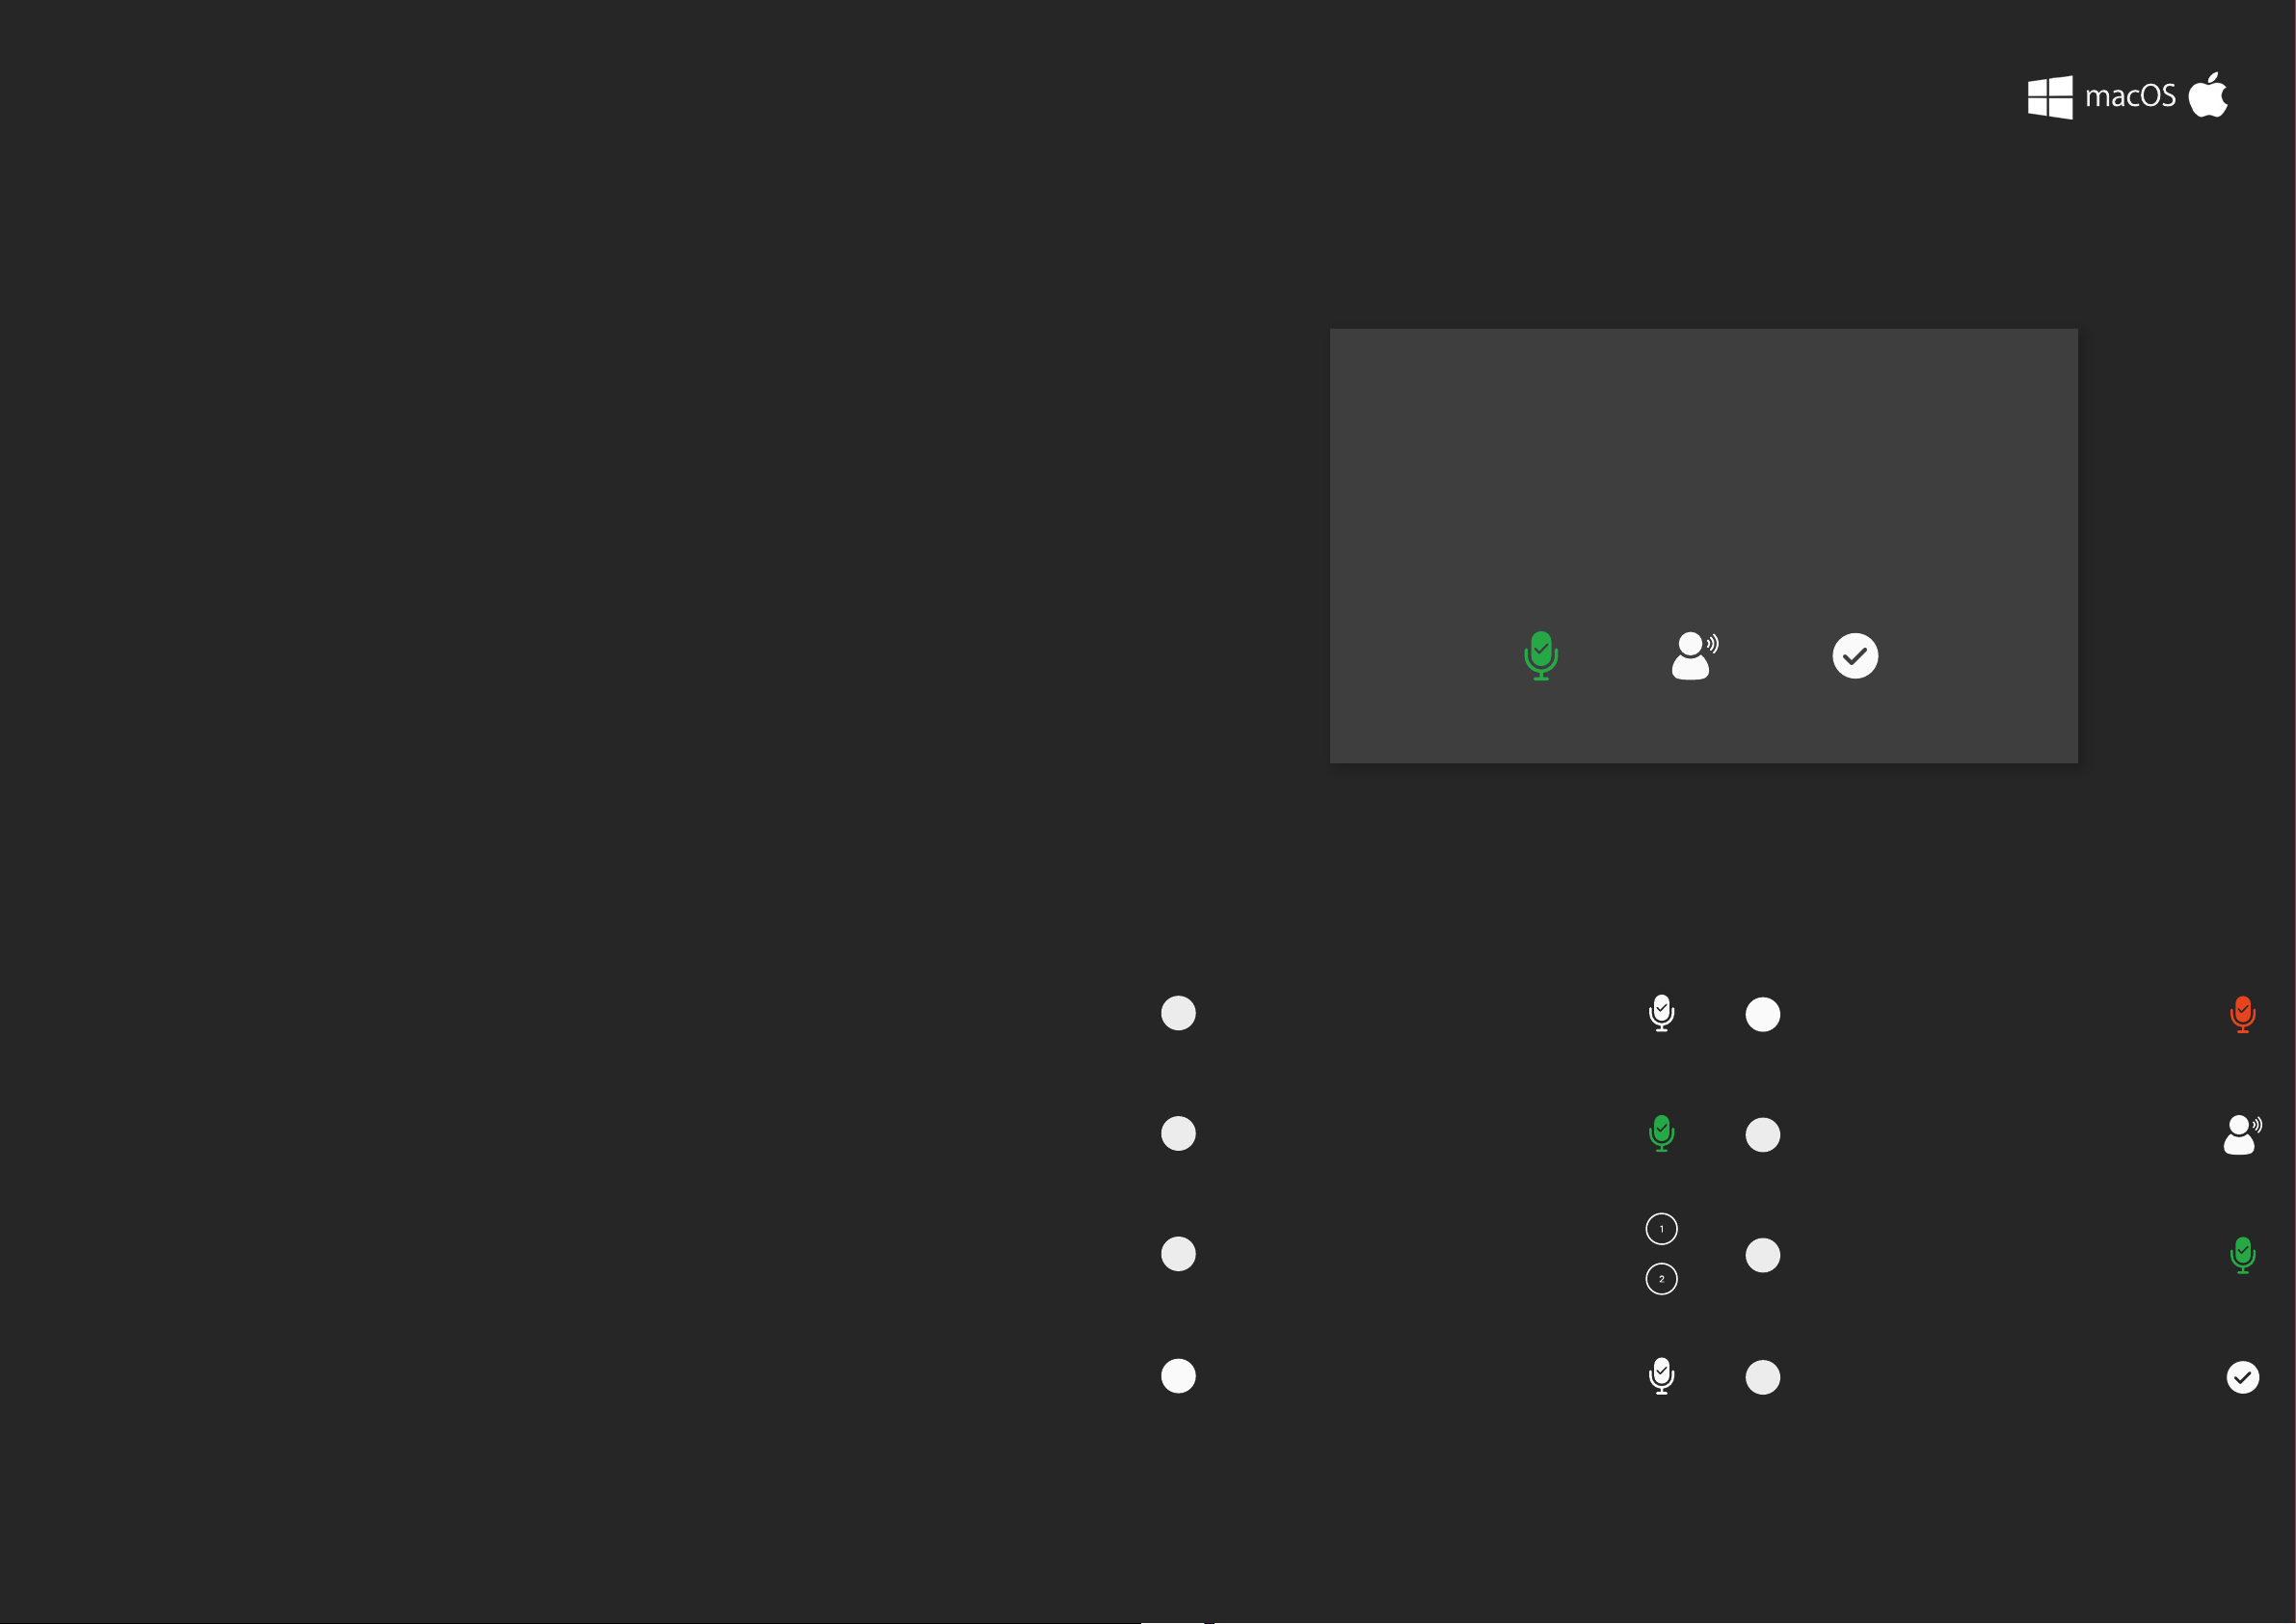
The EVO 4 Smartgain feature can help you take the guesswork out of
setting your gain levels and give you perfect levels quickly and easily.
For a guide on setting up Smartgain, see the page opposite.
Smartgain
EVO 4’s most exciting and game changing feature is
‘Smartgain’. Start playing or singing and Smartgain mode
will automatically set the level of your microphones.
Once Smartgain has set the gain level, you can make small adjustments
by pressing one of the input buttons and then turning the volume
controls.
1
Press the Smartgain button to begin
The Smartgain LED will illuminate green
and the input channel LEDs (1 & 2) will
2
begin to ash (indicating a channel
must be selected)
Press one or more of the input channel
3
buttons to select the channels to be
adjusted
Activate Play Record
Setup
The Smartgain LED will start ashing
5
6
7
red and the volume wheel LED’s will
illuminate indicating that Smartgain
Mode is now listening
Start playing or performing into the
microphone
Smartgain Mode will dial in the
correct levels and when complete
the Smartgain button will ash green
twice to indicate it has been successful
Press the Smartgain button again to
4
begin the process
8
HARDWARE HARDWARE
You are now ready to start recording
Page 13
Stereo Linking
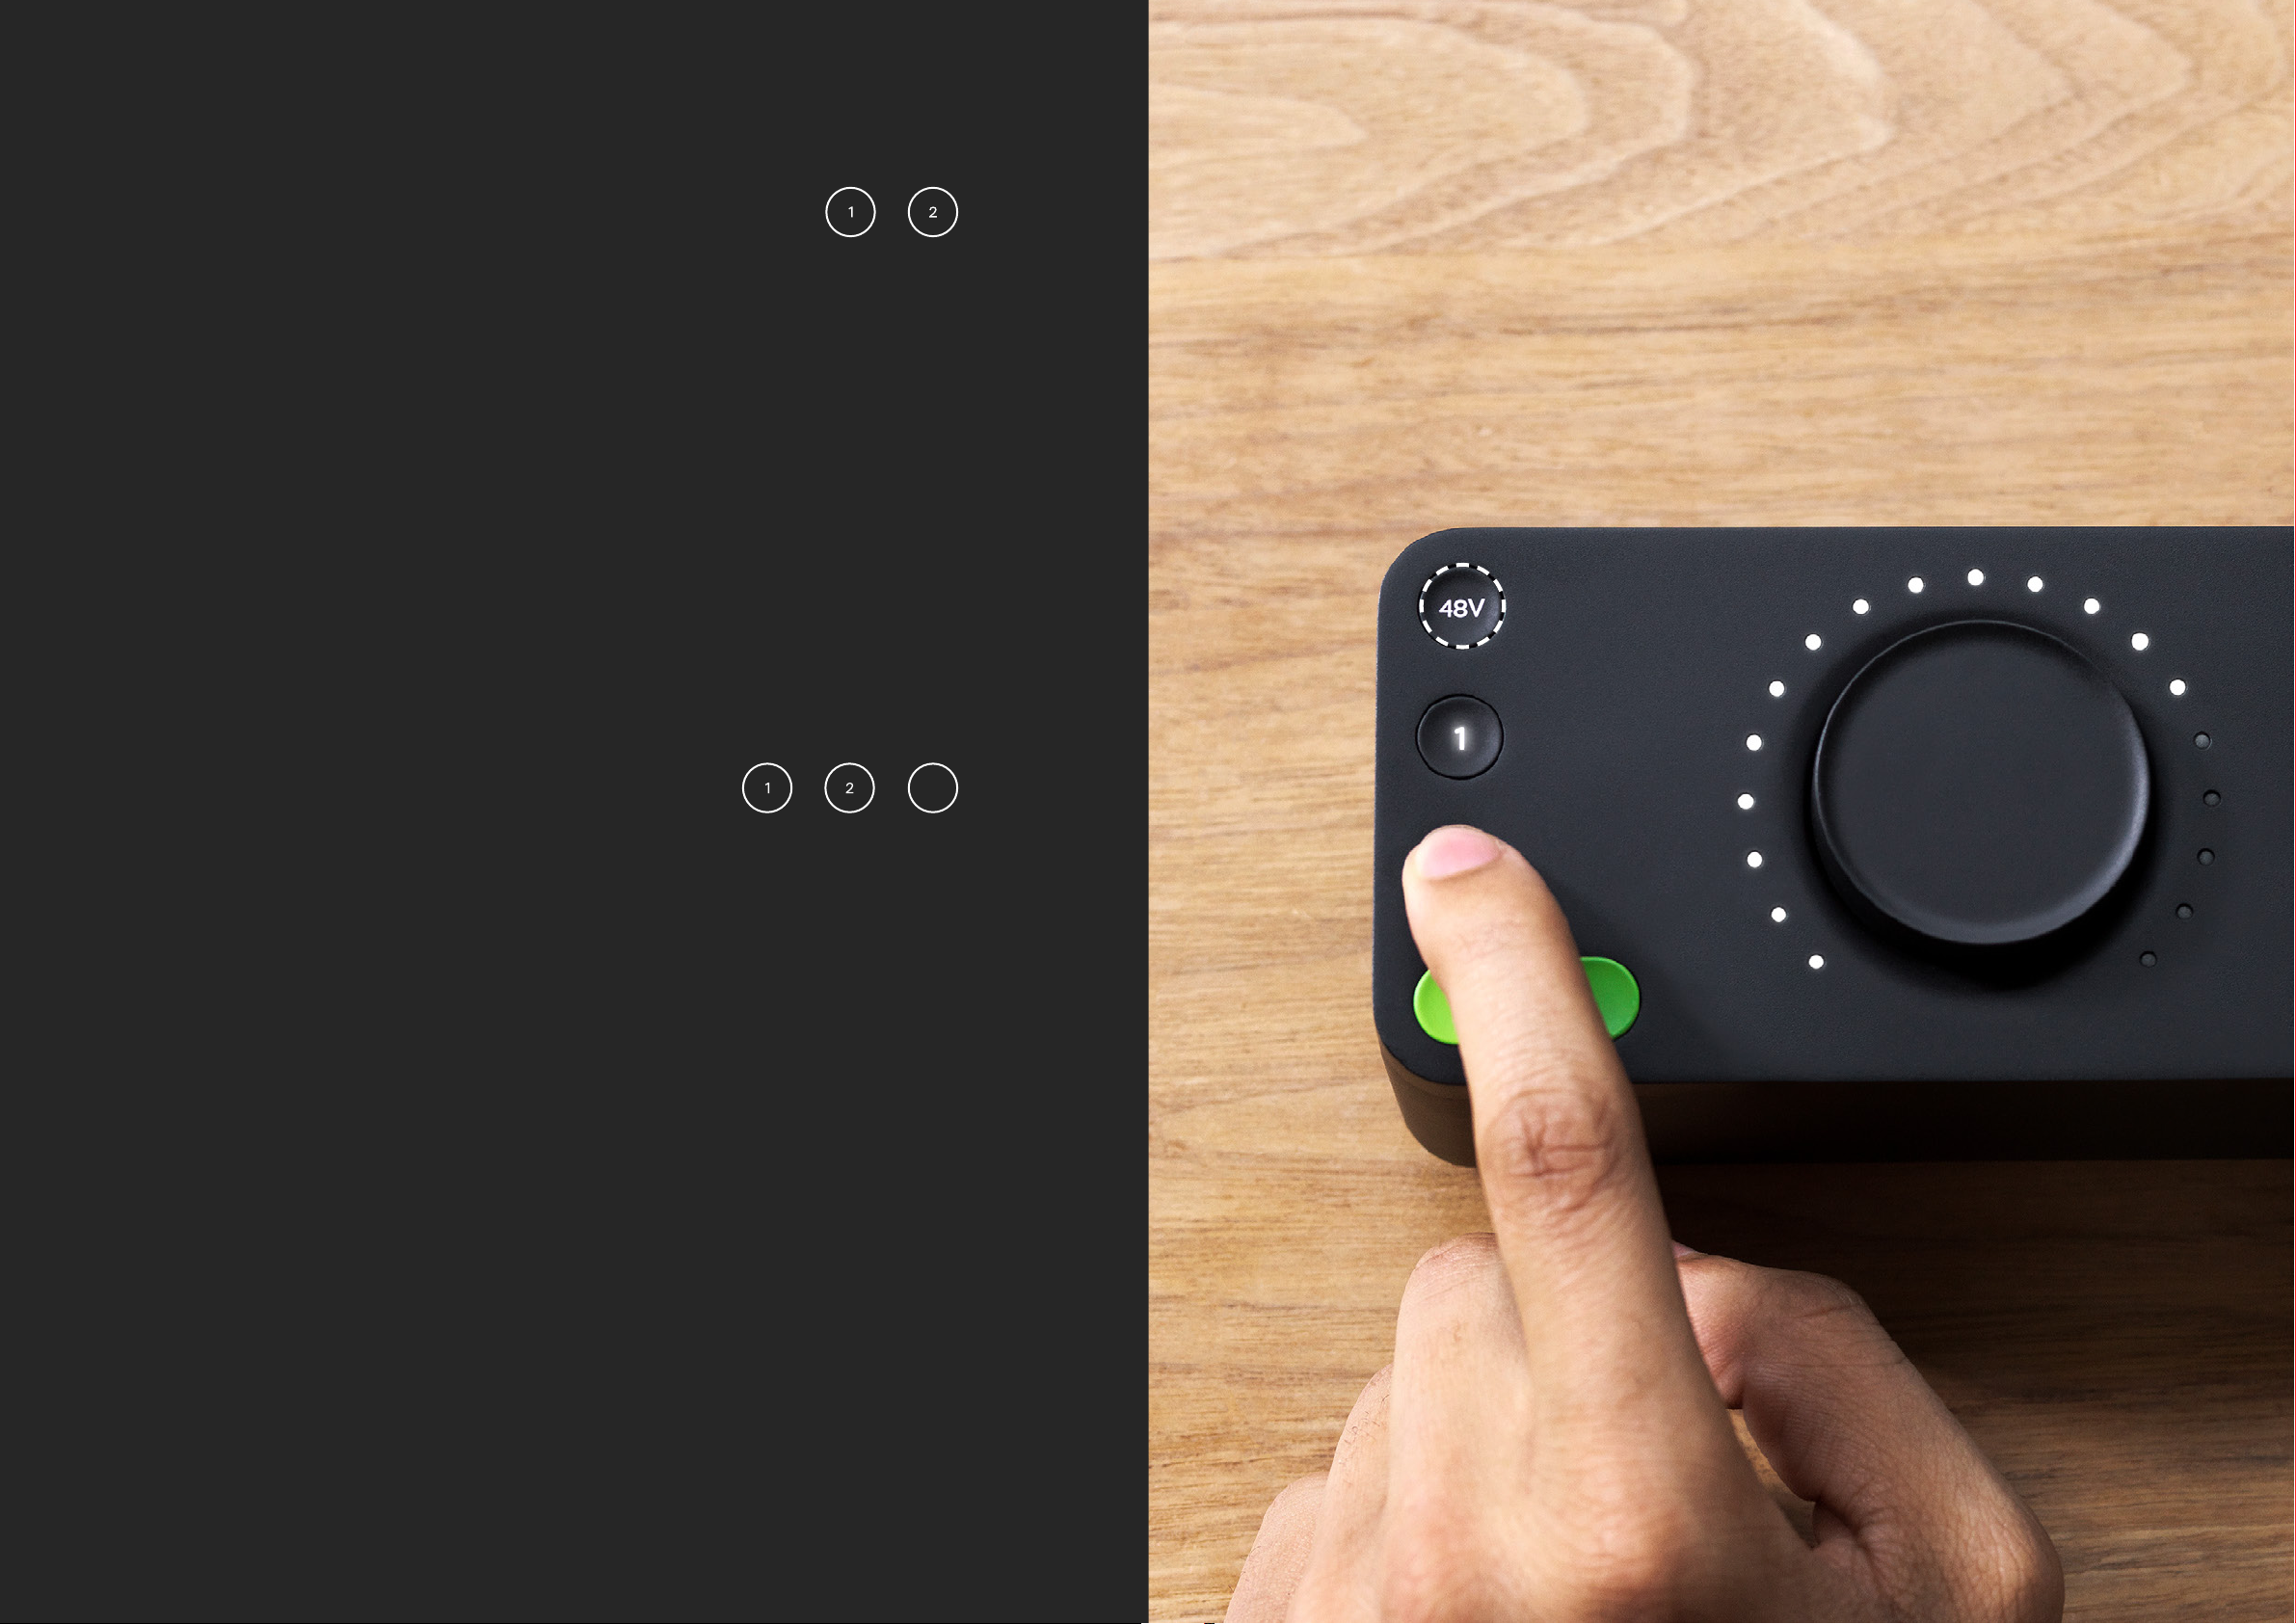
The two inputs of EVO 4 can be stereo linked, which allows you to match the
gain for both left and right channels at the same level.
This would be used when recording an instrument using two microphones,
such as a piano or guitar, or if inputting a stereo line signal like a synth or DJ
decks.
To do this, press down the 1 and 2 buttons at the same time.
Phantom Power
Some microphones will require phantom power in order to function. This
is 48 volts of power that is sent via the XLR cable and this powers up the
microphone and allows it to work.
Microphones that require phantom power are typically condenser
microphones. In rare cases, microphones can be damaged by providing
phantom power to them so we’d recommend checking the documentation
for your microphone to see if you need to provide phantom power or not.
To enable phantom power on EVO 4, simply press the channel button you
wish to use phantom power on and then press the 48v button. This will
then remain lit red to remind you that you have phantom power on.
48V
HARDWARE HARDWARE
Page 14
Instrument Input
Headphone Output
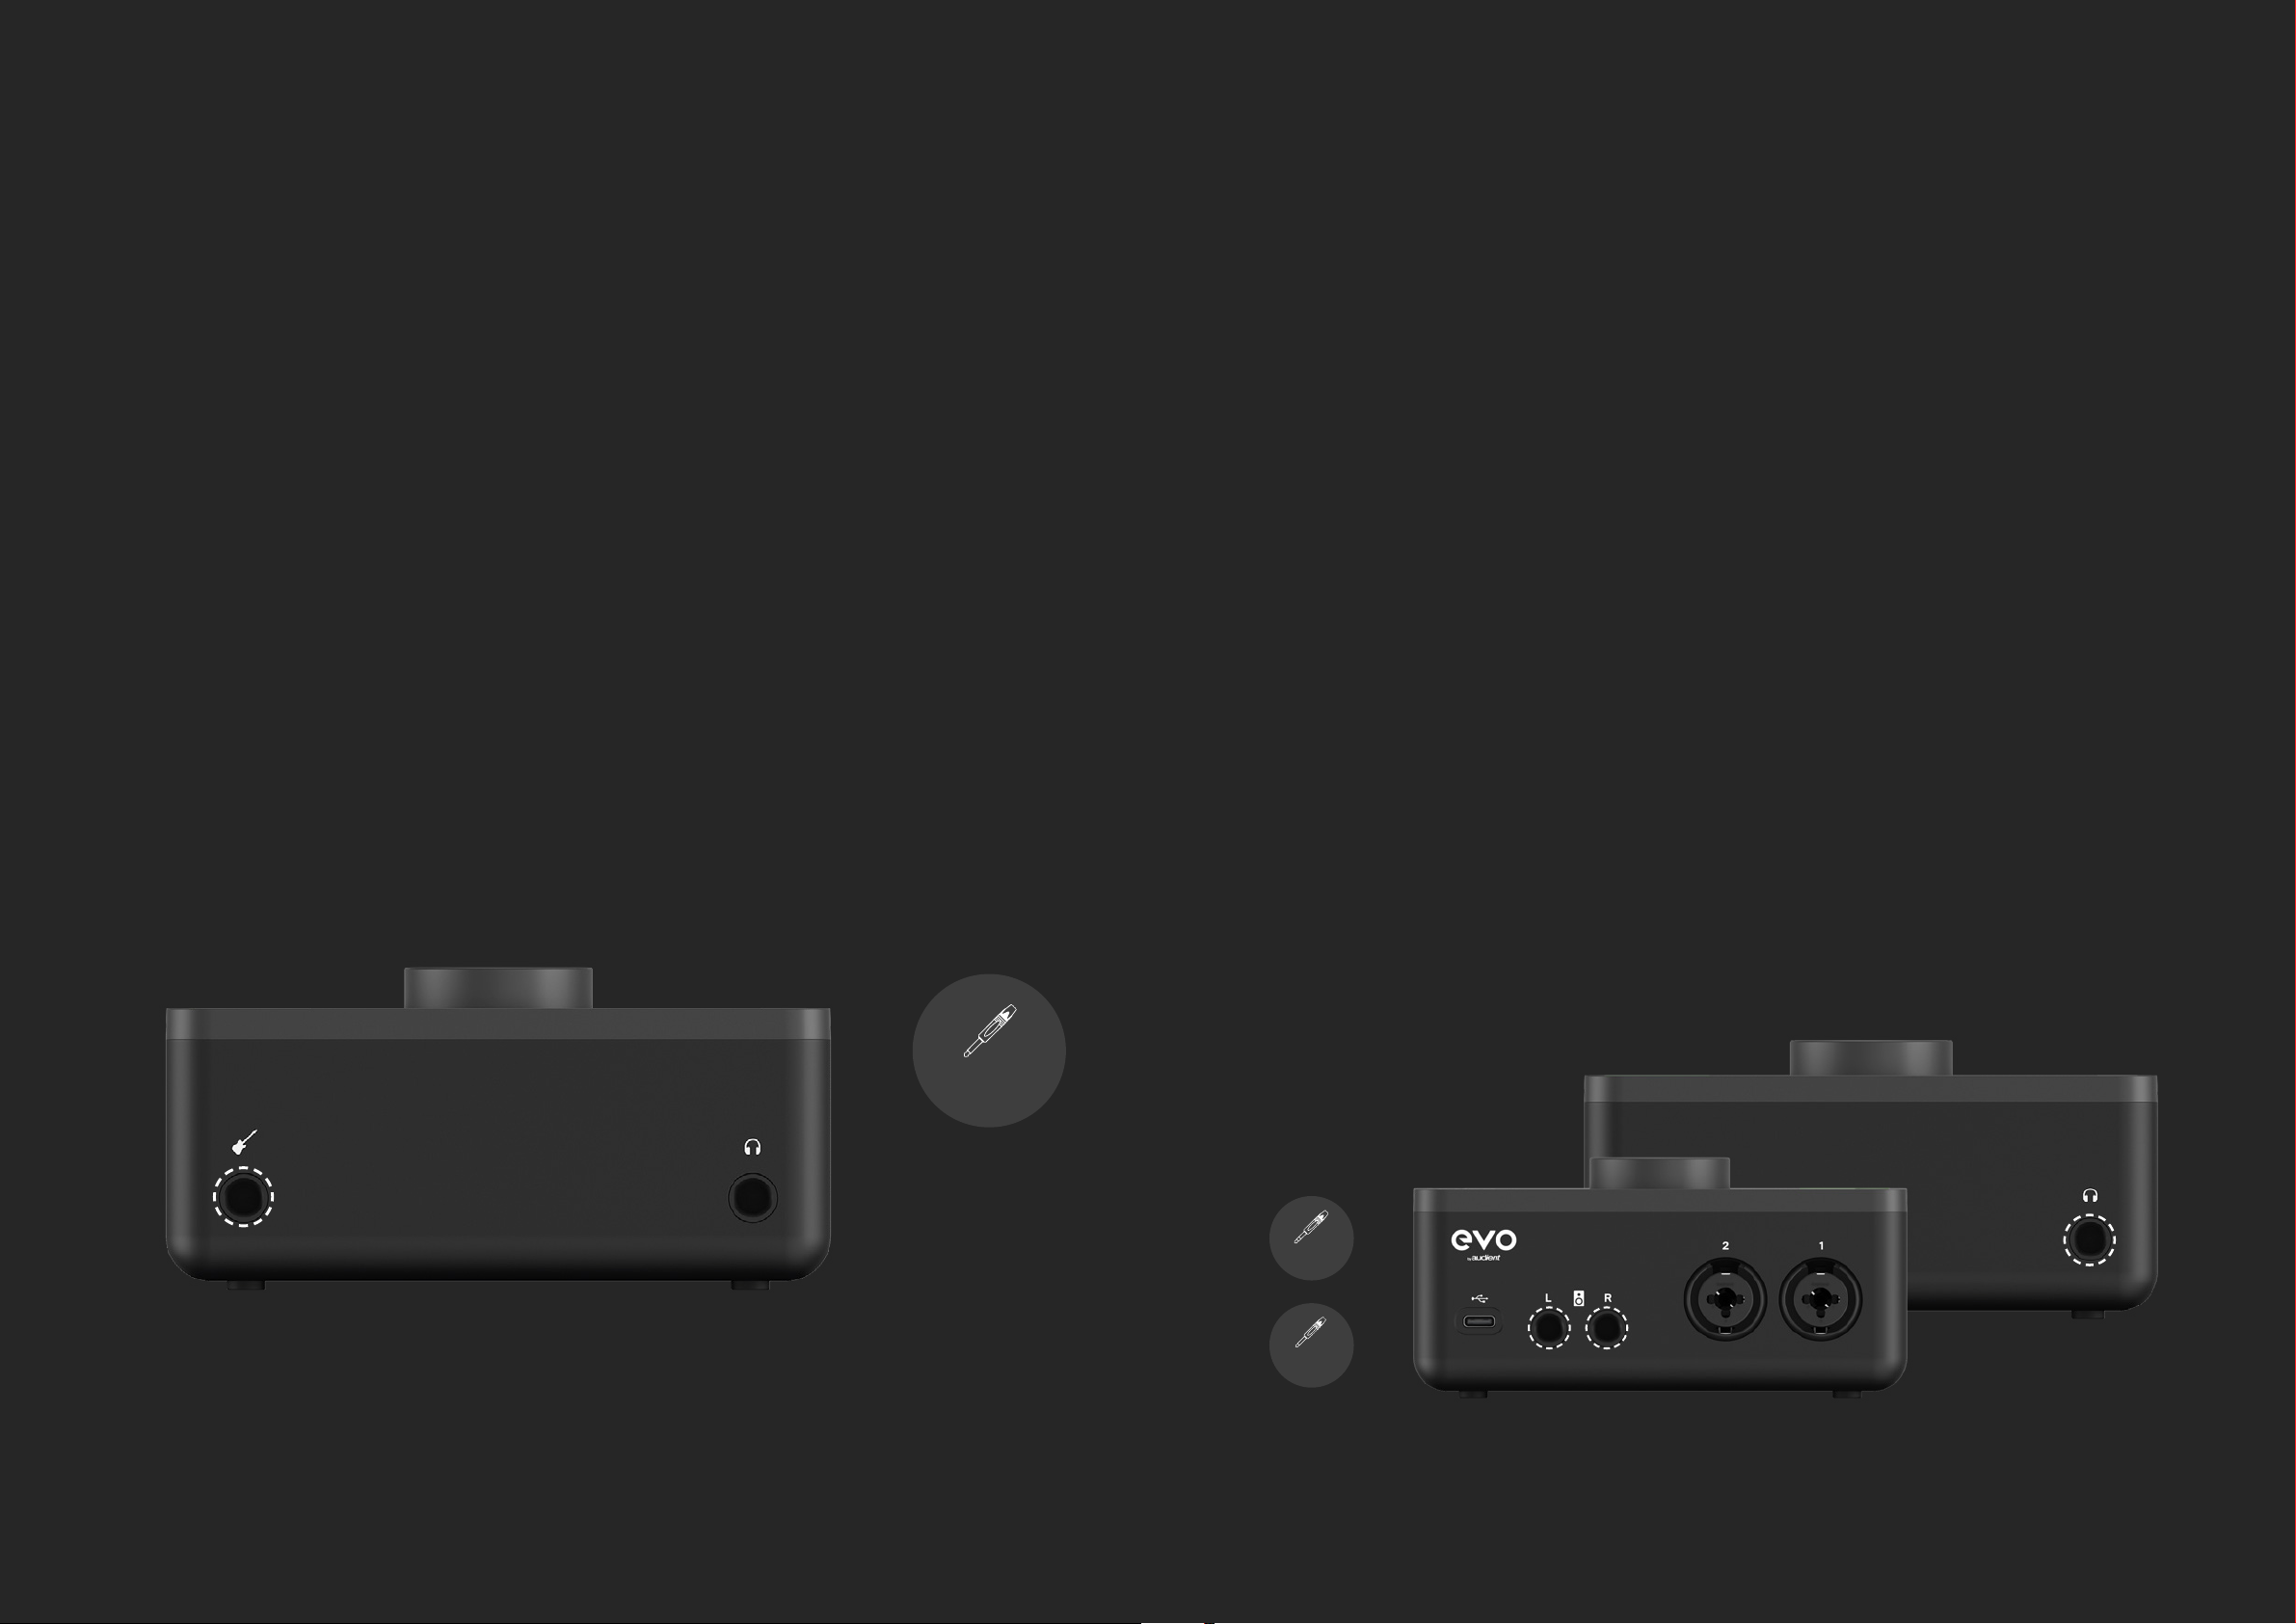
EVO 4 includes a dedicated instrument to directly connect instruments
such as guitars and basses. The Instrument input is sometimes also known
as a DI (Direct Injection) and provides a high input impedance, which
gives you the best tone from your instruments.
The DI port is found on the front of EVO 4 and accepts an unbalanced
TS 1/4” jack, just like the ones you’d plug into a guitar amp.
When a guitar jack is plugged into the Instrument input, the signal is sent
to Input channel 1 and overrides what is currently connected to the
Mic/Line input for channel 1.
You would then simply set your gain as you would with the Mic/Line
inputs, either using Smartgain or the Volume Knob.
On the front of EVO 4, you’ll nd the headphone output. EVO 4 includes a
powerful headphone amplier allowing you to drive almost any headphone
to a good level.
When a headphone jack is connected to this output, EVO 4 will automatically
mute the Monitor Outputs for you to make life easier for you when moving
between Speaker and Headphone monitoring.
Monitor Outputs
EVO 4 gives you a pair of high-quality outputs to connect up your monitors or
speakers. These outputs are at line level, perfect for sending audio to a pair of
active monitors, although passive monitors can also be used if you have an
DI Port
TS 1/4”
Jack
amplier for them.
The Monitor outputs are balanced and designed for use with TRS 1/4” jacks.
However, unbalanced TS 1/4” jacks can be used to feed unbalanced monitors.
TRS Jack
TS 1/4” Jack
Headphone
Output
Monitor Outputs
HARDWARE HARDWARE
Page 15

Monitor Mix
When recording, you’ll want to listen to yourself so you can be sure
everything is sounding good. Some recording software will playback the
audio you are recording.
However, this is usually a little bit delayed from the original audio due to
the computer having to spend time processing the audio. This is known as
latency and can make playing in time dicult.
When you are listening to the inputs on EVO 4 using the Monitor Mix function,
you’ll be hearing the Inputs directly which means there’s almost no delay!
Monitor Mix allows you to control what you’re listening to on the outputs of
EVO 4. You can choose between listening to your Inputs, the Playback from
your computer, or a blend of both. To set this, press the Monitor mix button
and then turn the knob. An LED on the meter ring will illuminate to show your
Press and hold the Monitor Mix button to enter Monitor Pan mode, now turn
the Knob to pan your inputs from the centre to the left and right channels.
Volume Control
This is pretty simple, just tap the volume control button to adjust your output
volume using the knob. The meter ring will illuminate to show you the relative
volume level you are currently using.
The Volume control applies to both the monitor outputs and headphone
outputs.
current Monitor Mix setting.
Turn the dial clockwise to hear more of your computer playback or
anticlockwise to hear more of your inputs.
Monitor Pan
EVO 4 gives you even more control of your monitoring with the Monitor Pan
function. This can be used to provide separation between two dierent
instruments for better monitoring.
But this feature is incredibly useful when recording a stereo source (such as
two microphones on a piano, or a stereo synth) as it allows you to accurately
Muting
EVO 4 allows you to Mute both the outputs and the two inputs. Simply press
and hold either one of the channel buttons or the output volume button to
quickly mute them.
The button will then ash to indicate it is muted. To unmute it, simply press
and hold it again.
This is useful to quickly mute a microphone during a podcast or to mute the
sound to your speakers to quickly take a phone call for example.
monitor the signal in full stereo as you’d hear it in real life, allowing you to
make better mic placement choices.
HARDWARE HARDWARE
Page 16
SOFTWARE FEATURES
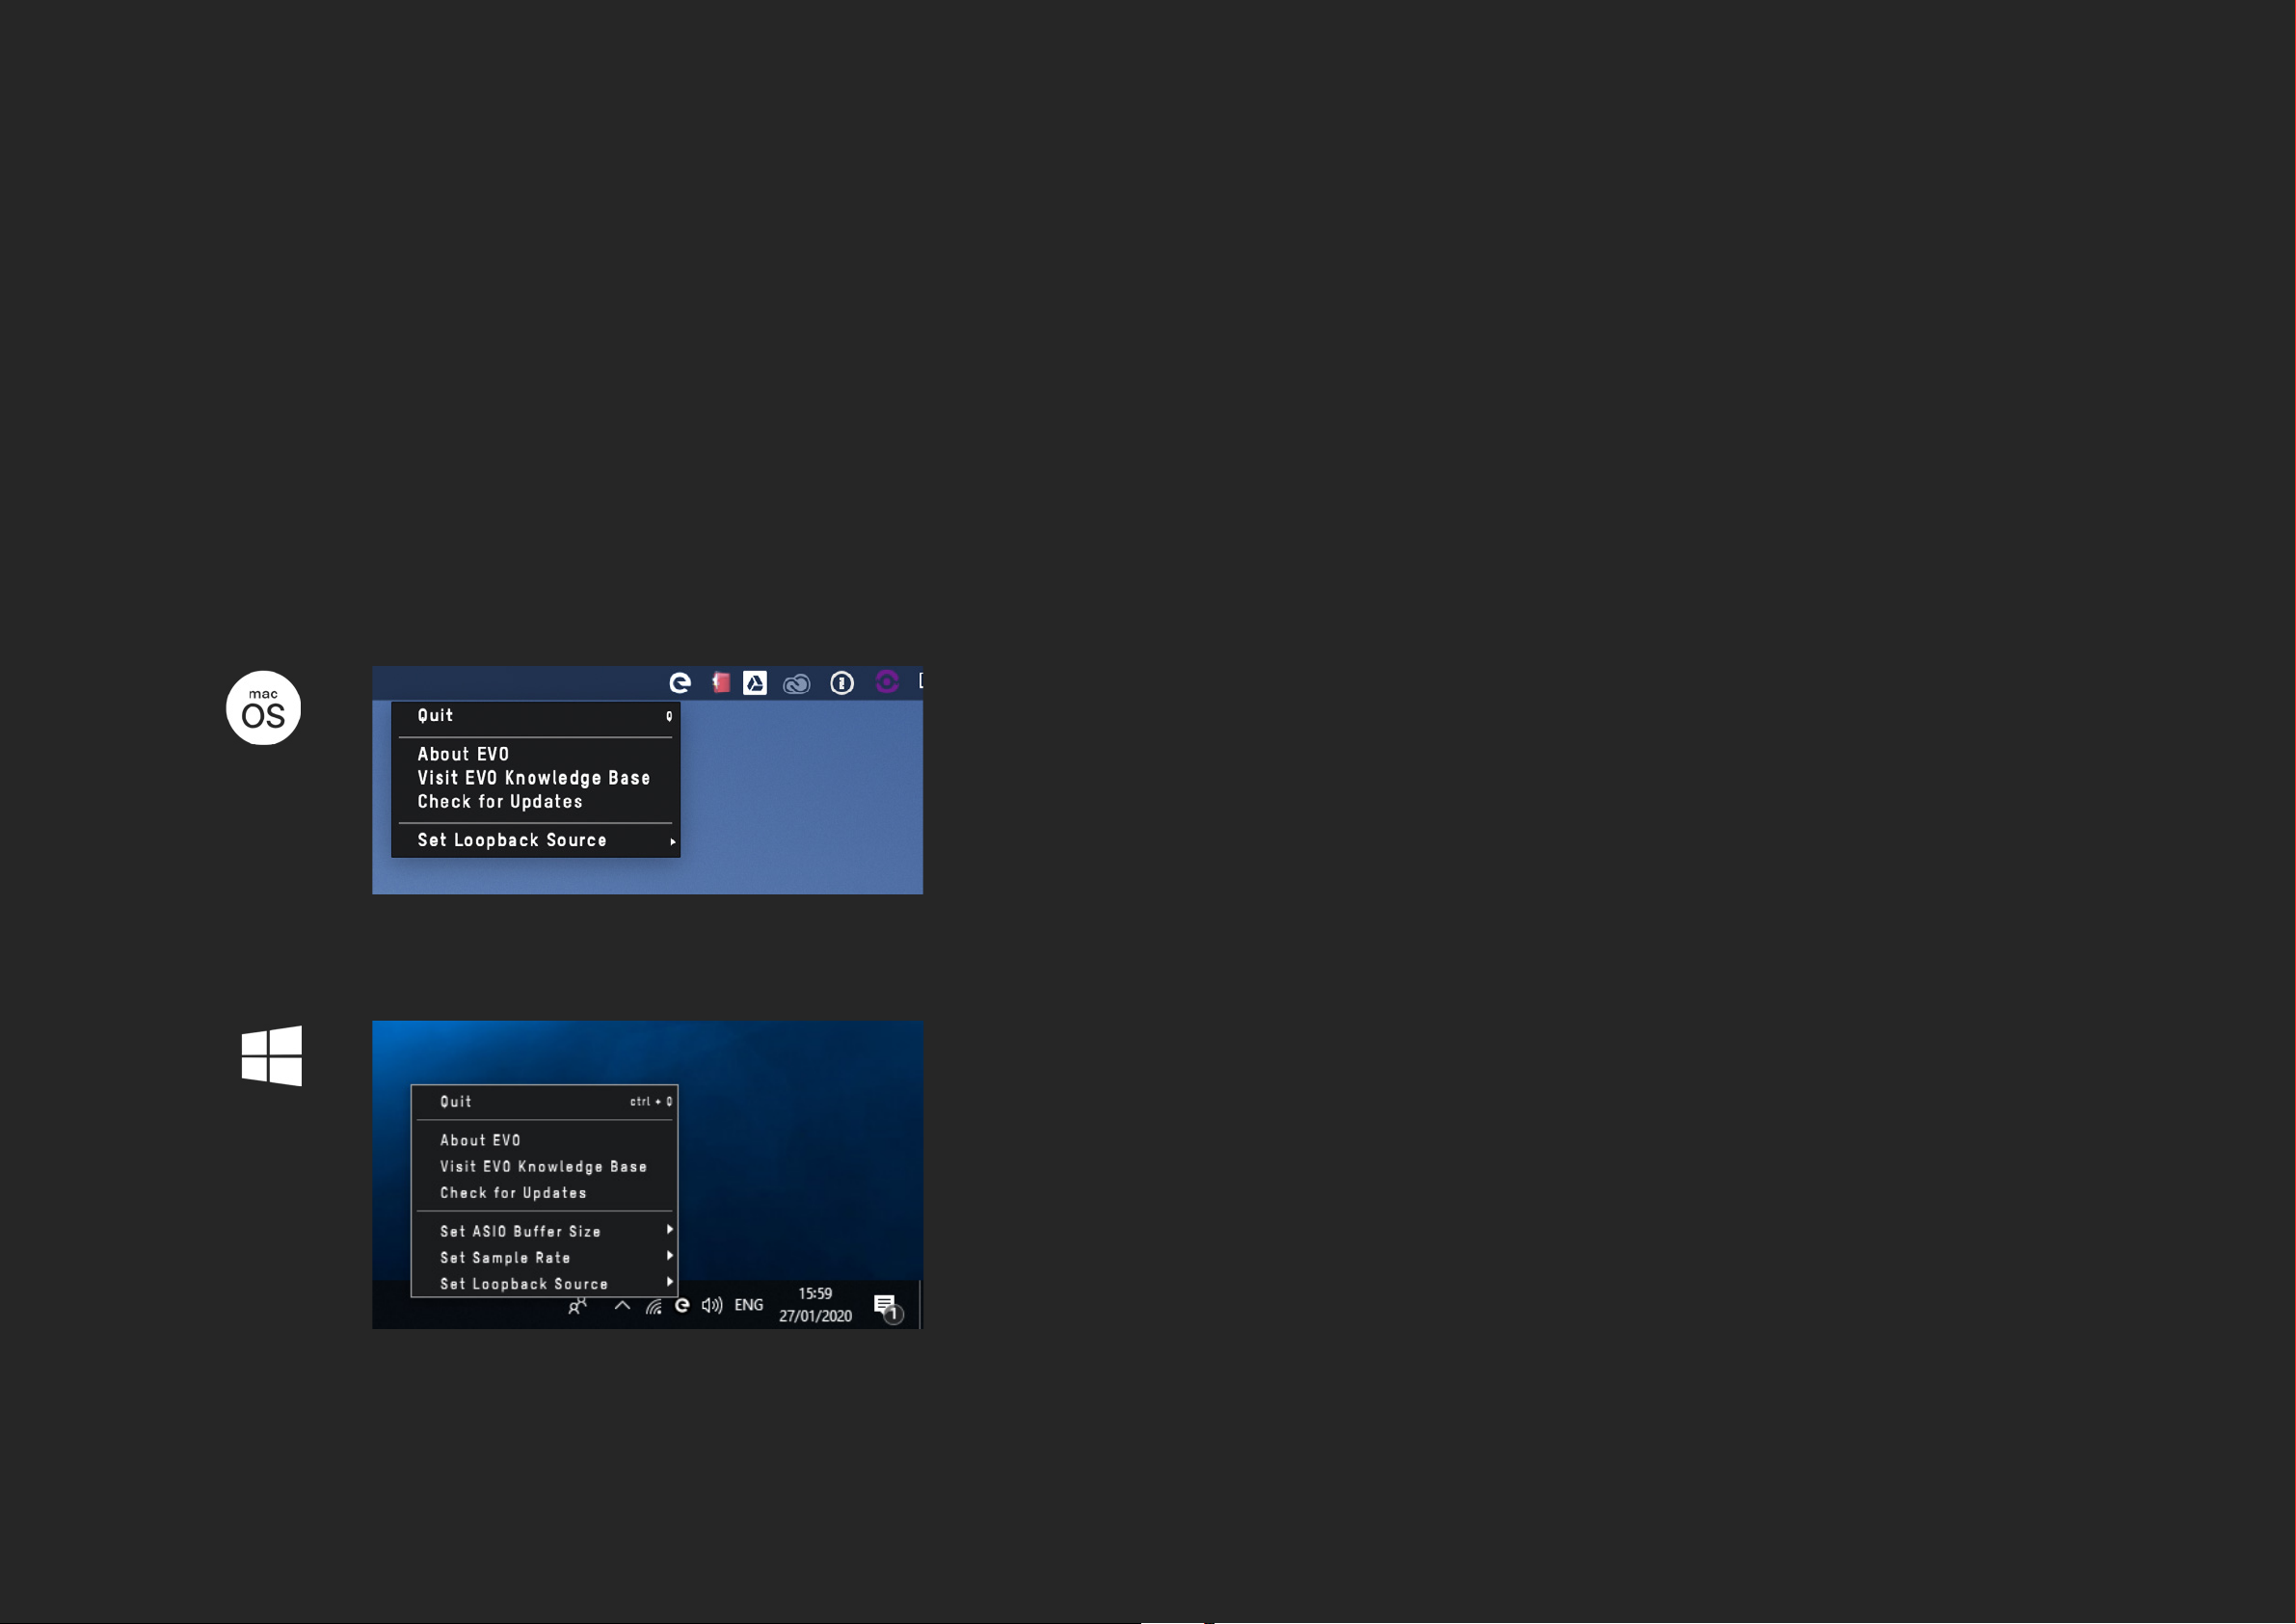
EVO 4 includes a small application allowing you to make quick simple
changes from your computer. The EVO application is available for both
macOS and Windows.
The EVO application will run in the menu bar on Mac and in the system
tray of Windows.
Set Audio Loop-back Source
This allows you to choose the source of your Audio Loop-back, either from the Main
Monitor Output or the dedicated Audio Loop-back send channels. Main Monitor
Outputs simply allows you to record what you are listening to through main outputs.
Audio Loop-back send allows you to loopback a dierent signal to the one you are
listening to, uses of this feature are covered later in the manual.
Quit
This fully quits the application and stops it from running in the background.
About EVO
This opens up a small dialogue box letting you know the version of the application
running amongst other information.
Visit EVO Knowledge Base
Links directly to our support site where you’ll nd setup guides, FAQ’s and other tips to
get the most out of EVO 4.
Check for Updates
Occasionally we will release a rmware update for EVO 4 to help ensure compatibility
with future computers or to add functionality. Clicking this will check if you’re EVO 4 is
up to date and if there are any updates available, you’ll be prompted to install them.
The full rmware update procedure is covered on page 40-41.
Set ASIO buffer size
This allows you to adjust the buer size used by the ASIO driver which in turn controls
how hard your computer has to work to process the audio.
*Windows Only
Set Sample Rate
This allows you to select between 44.1kHz, 48kHz, 88.2kHz and 96kHz as your
sample rate. Ensure that this matches what you are using in your recording
software if possible.
*Windows Only
SOFTWARE SOFTWARE
Page 17
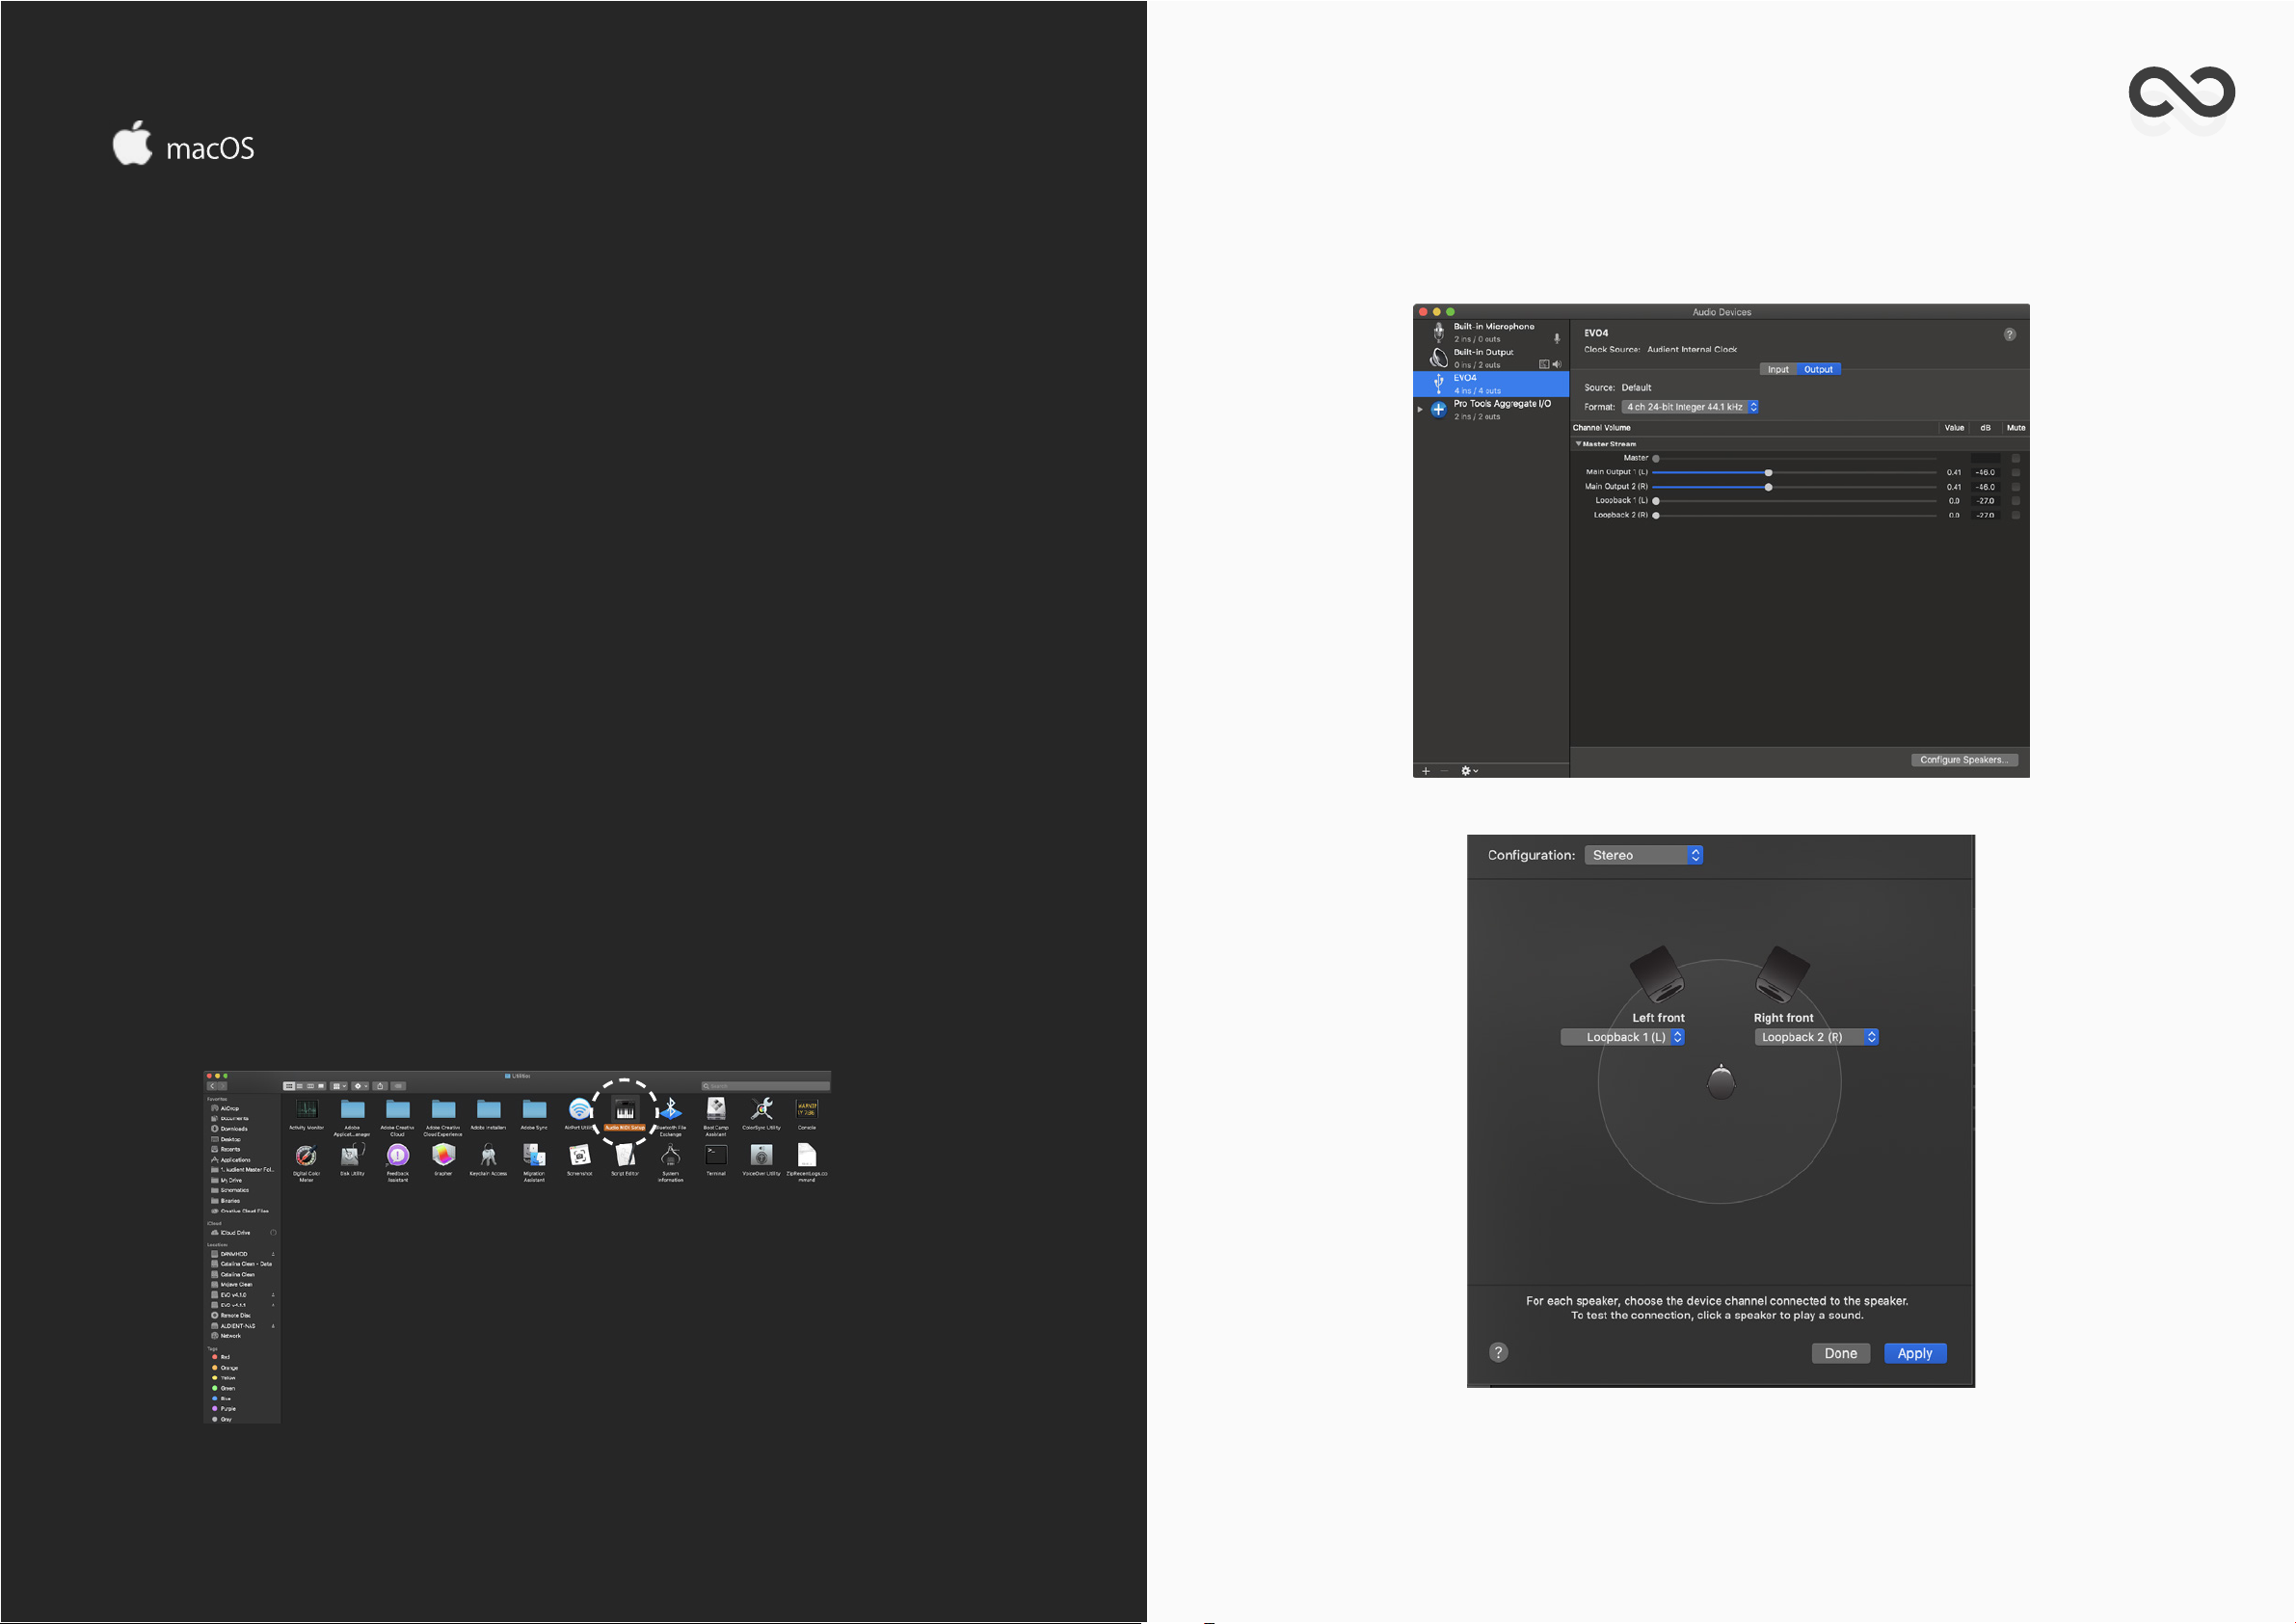
AUDIO LOOP-BACK
Using Audio Loop-back Channels on Mac
The rst step of using Audio Loop-back is setting up your computer to
output sound to the Audio Loop-back outputs of EVO 4. On some software, you can change this in the software itself in the settings. For details
on how this is done, we’d recommend contacting the developer of your
software or reading through its manual.
Otherwise, for software that doesn’t allow you to set the output channel,
such as web browsers or video call services, you may need to adjust your
output setting in the Mac Audio MIDI setup.
Congure Speakers
To open the Audio MIDI setup go to nder and click:
Applications > Utilities > audiomidisetup.app
Then select EVO 4 from the list of devices and select Congure Speakers.
Applications > Utilities > audiomidisetup.app
AUDIO LOOP-BACK AUDIO LOOP-BACK
Page 18
AUDIO LOOP-BACK
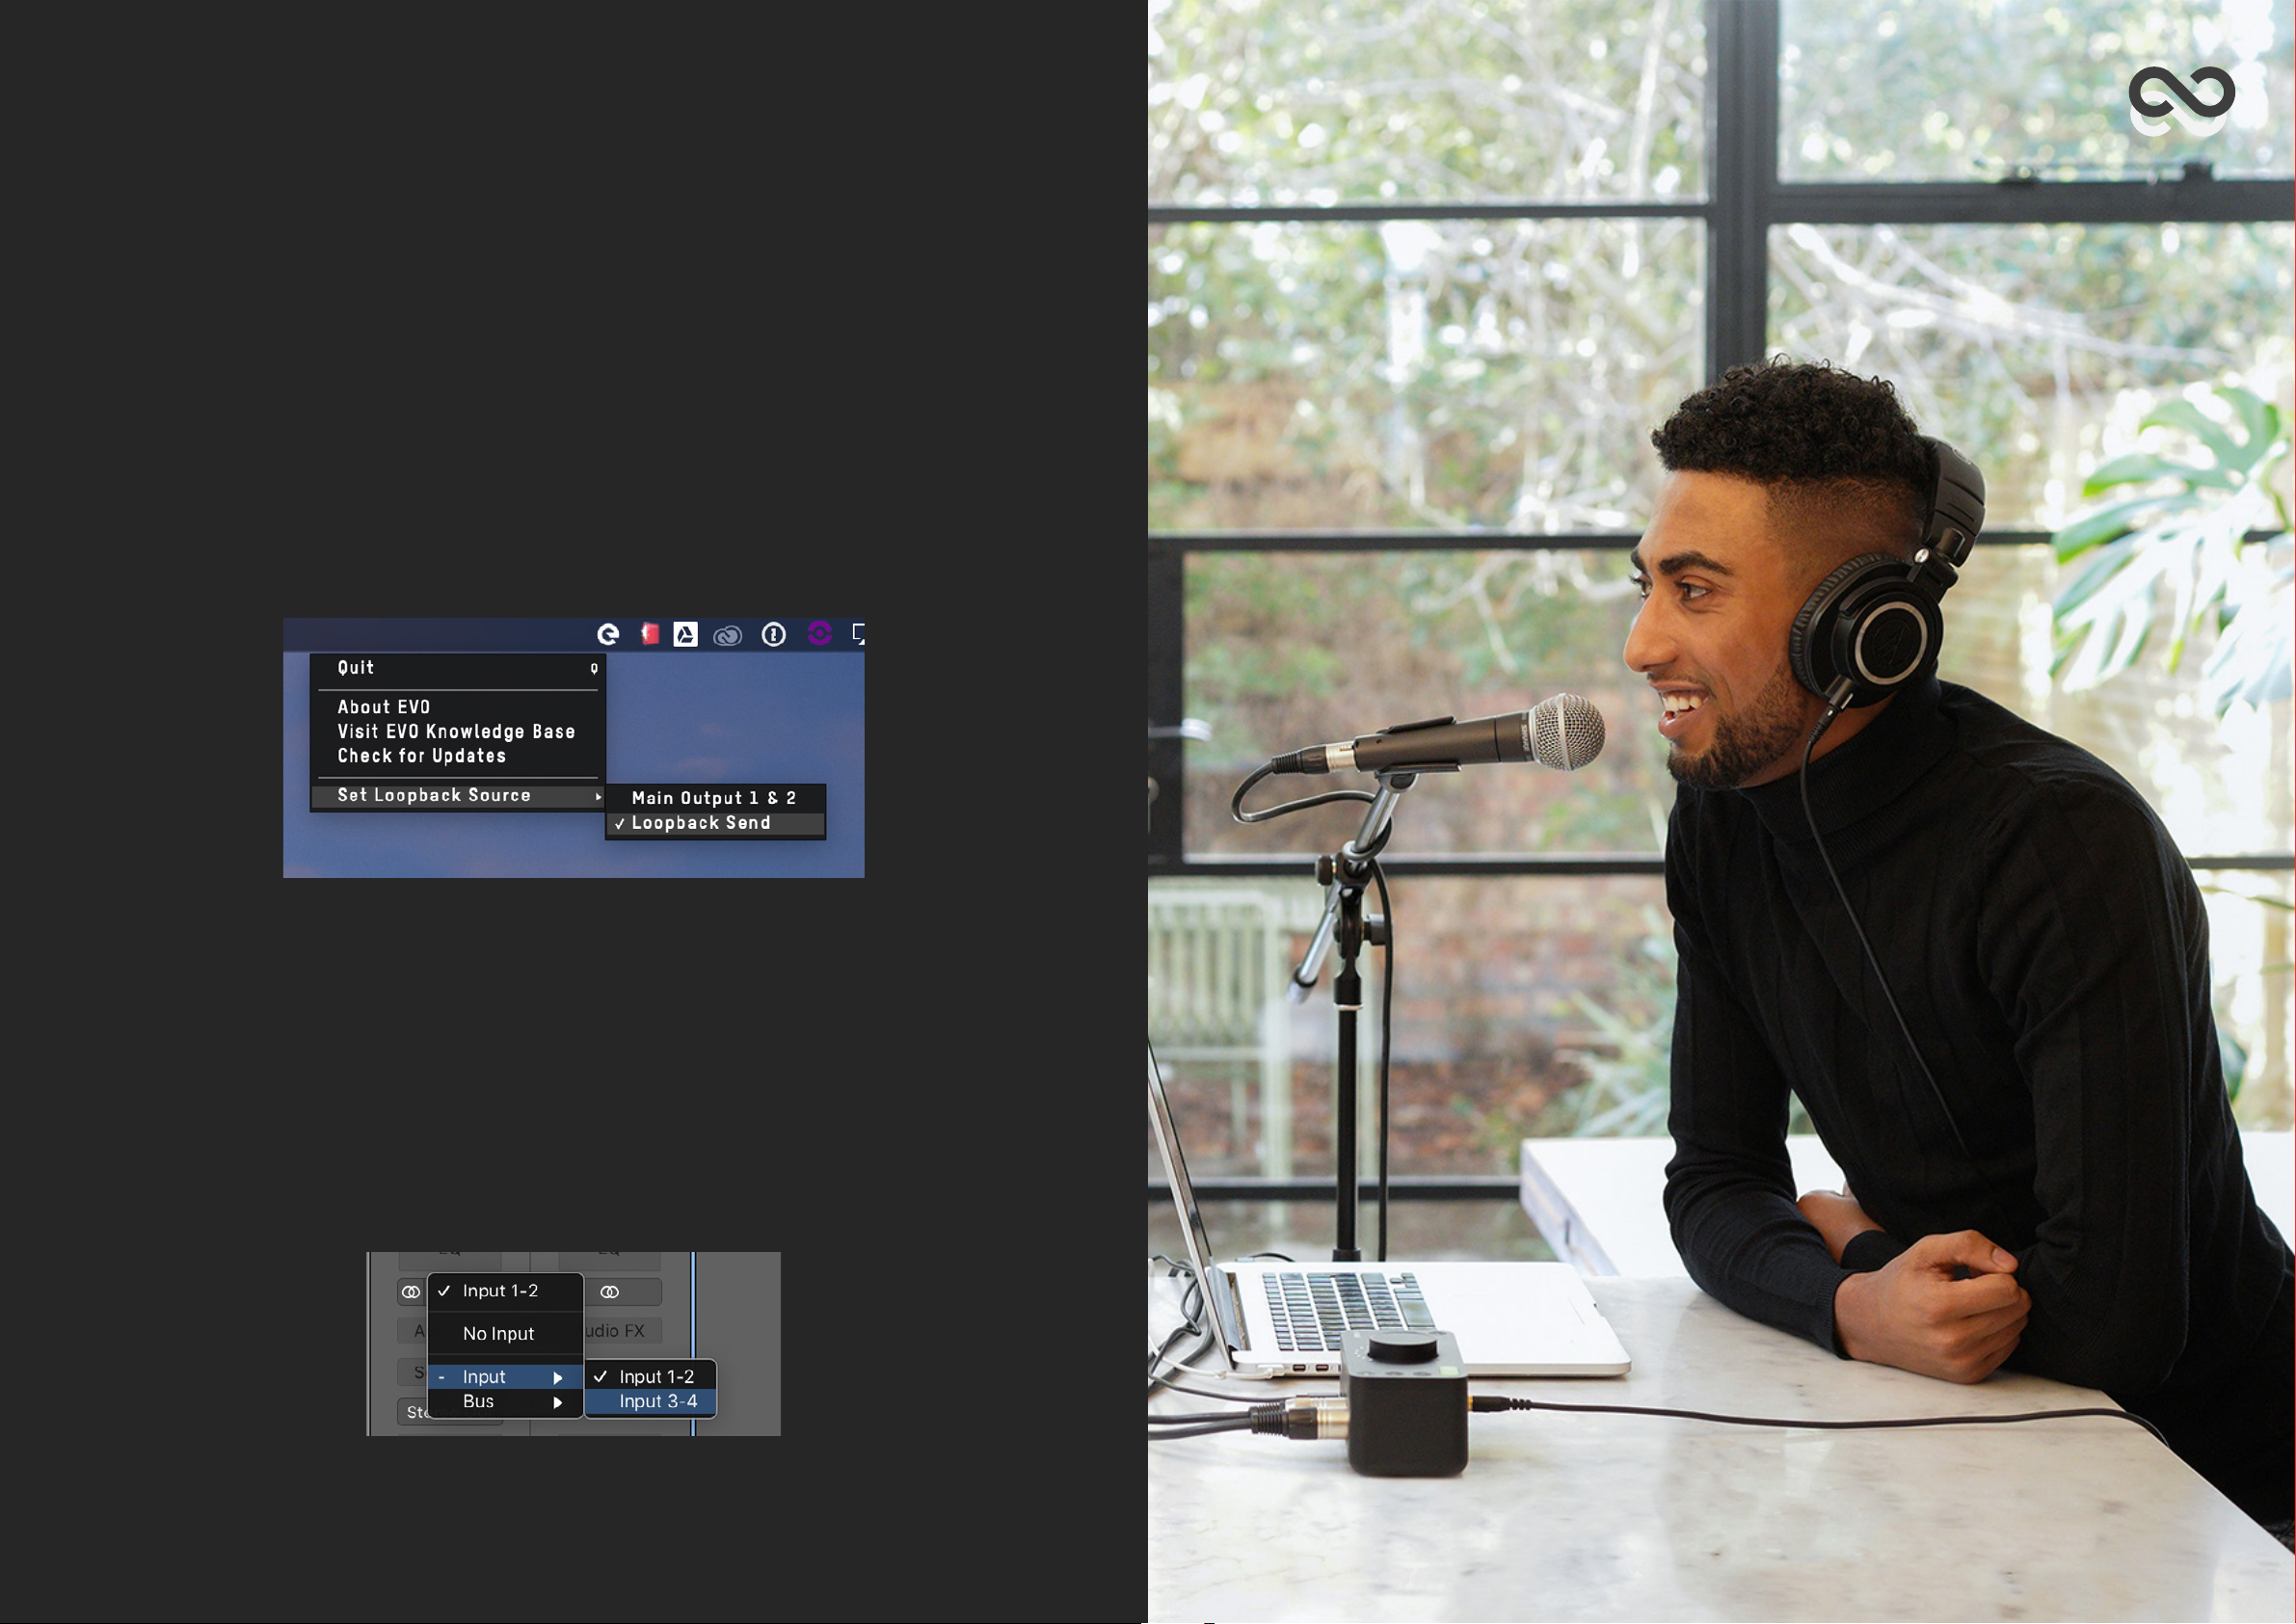
Now simply set your left and right output to Audio Loop-back 1 (L) and
Audio Loop-back 2 (R). Now any audio played back from your Mac will be
sent through the Audio Loop-back Output Channel, ready to be recorded
or streamed.
We need to tell EVO 4 to send the Audio Loop-back outputs to the
Audio Loop-back Inputs. To do this, we go to the EVO app menu in the
menu bar and click Set Audio Loop-back Source. Now select Audio Loopback Send as your Audio Loop-back source.
Now that the Audio Loop-back output is set up, you need to open the
software you will be using to capture or stream the audio and set your
audio input to the Audio Loop-back inputs.
Depending on your software, this may appear as Audio Loop-back 1+2 or
just as Input 3+4. So you can hear yourself, make sure you setup your
recording or streaming software to monitor the inputs.
AUDIO LOOP-BACK
Page 19
AUDIO LOOP-BACK
Using Audio Loop-back Channels on Windows
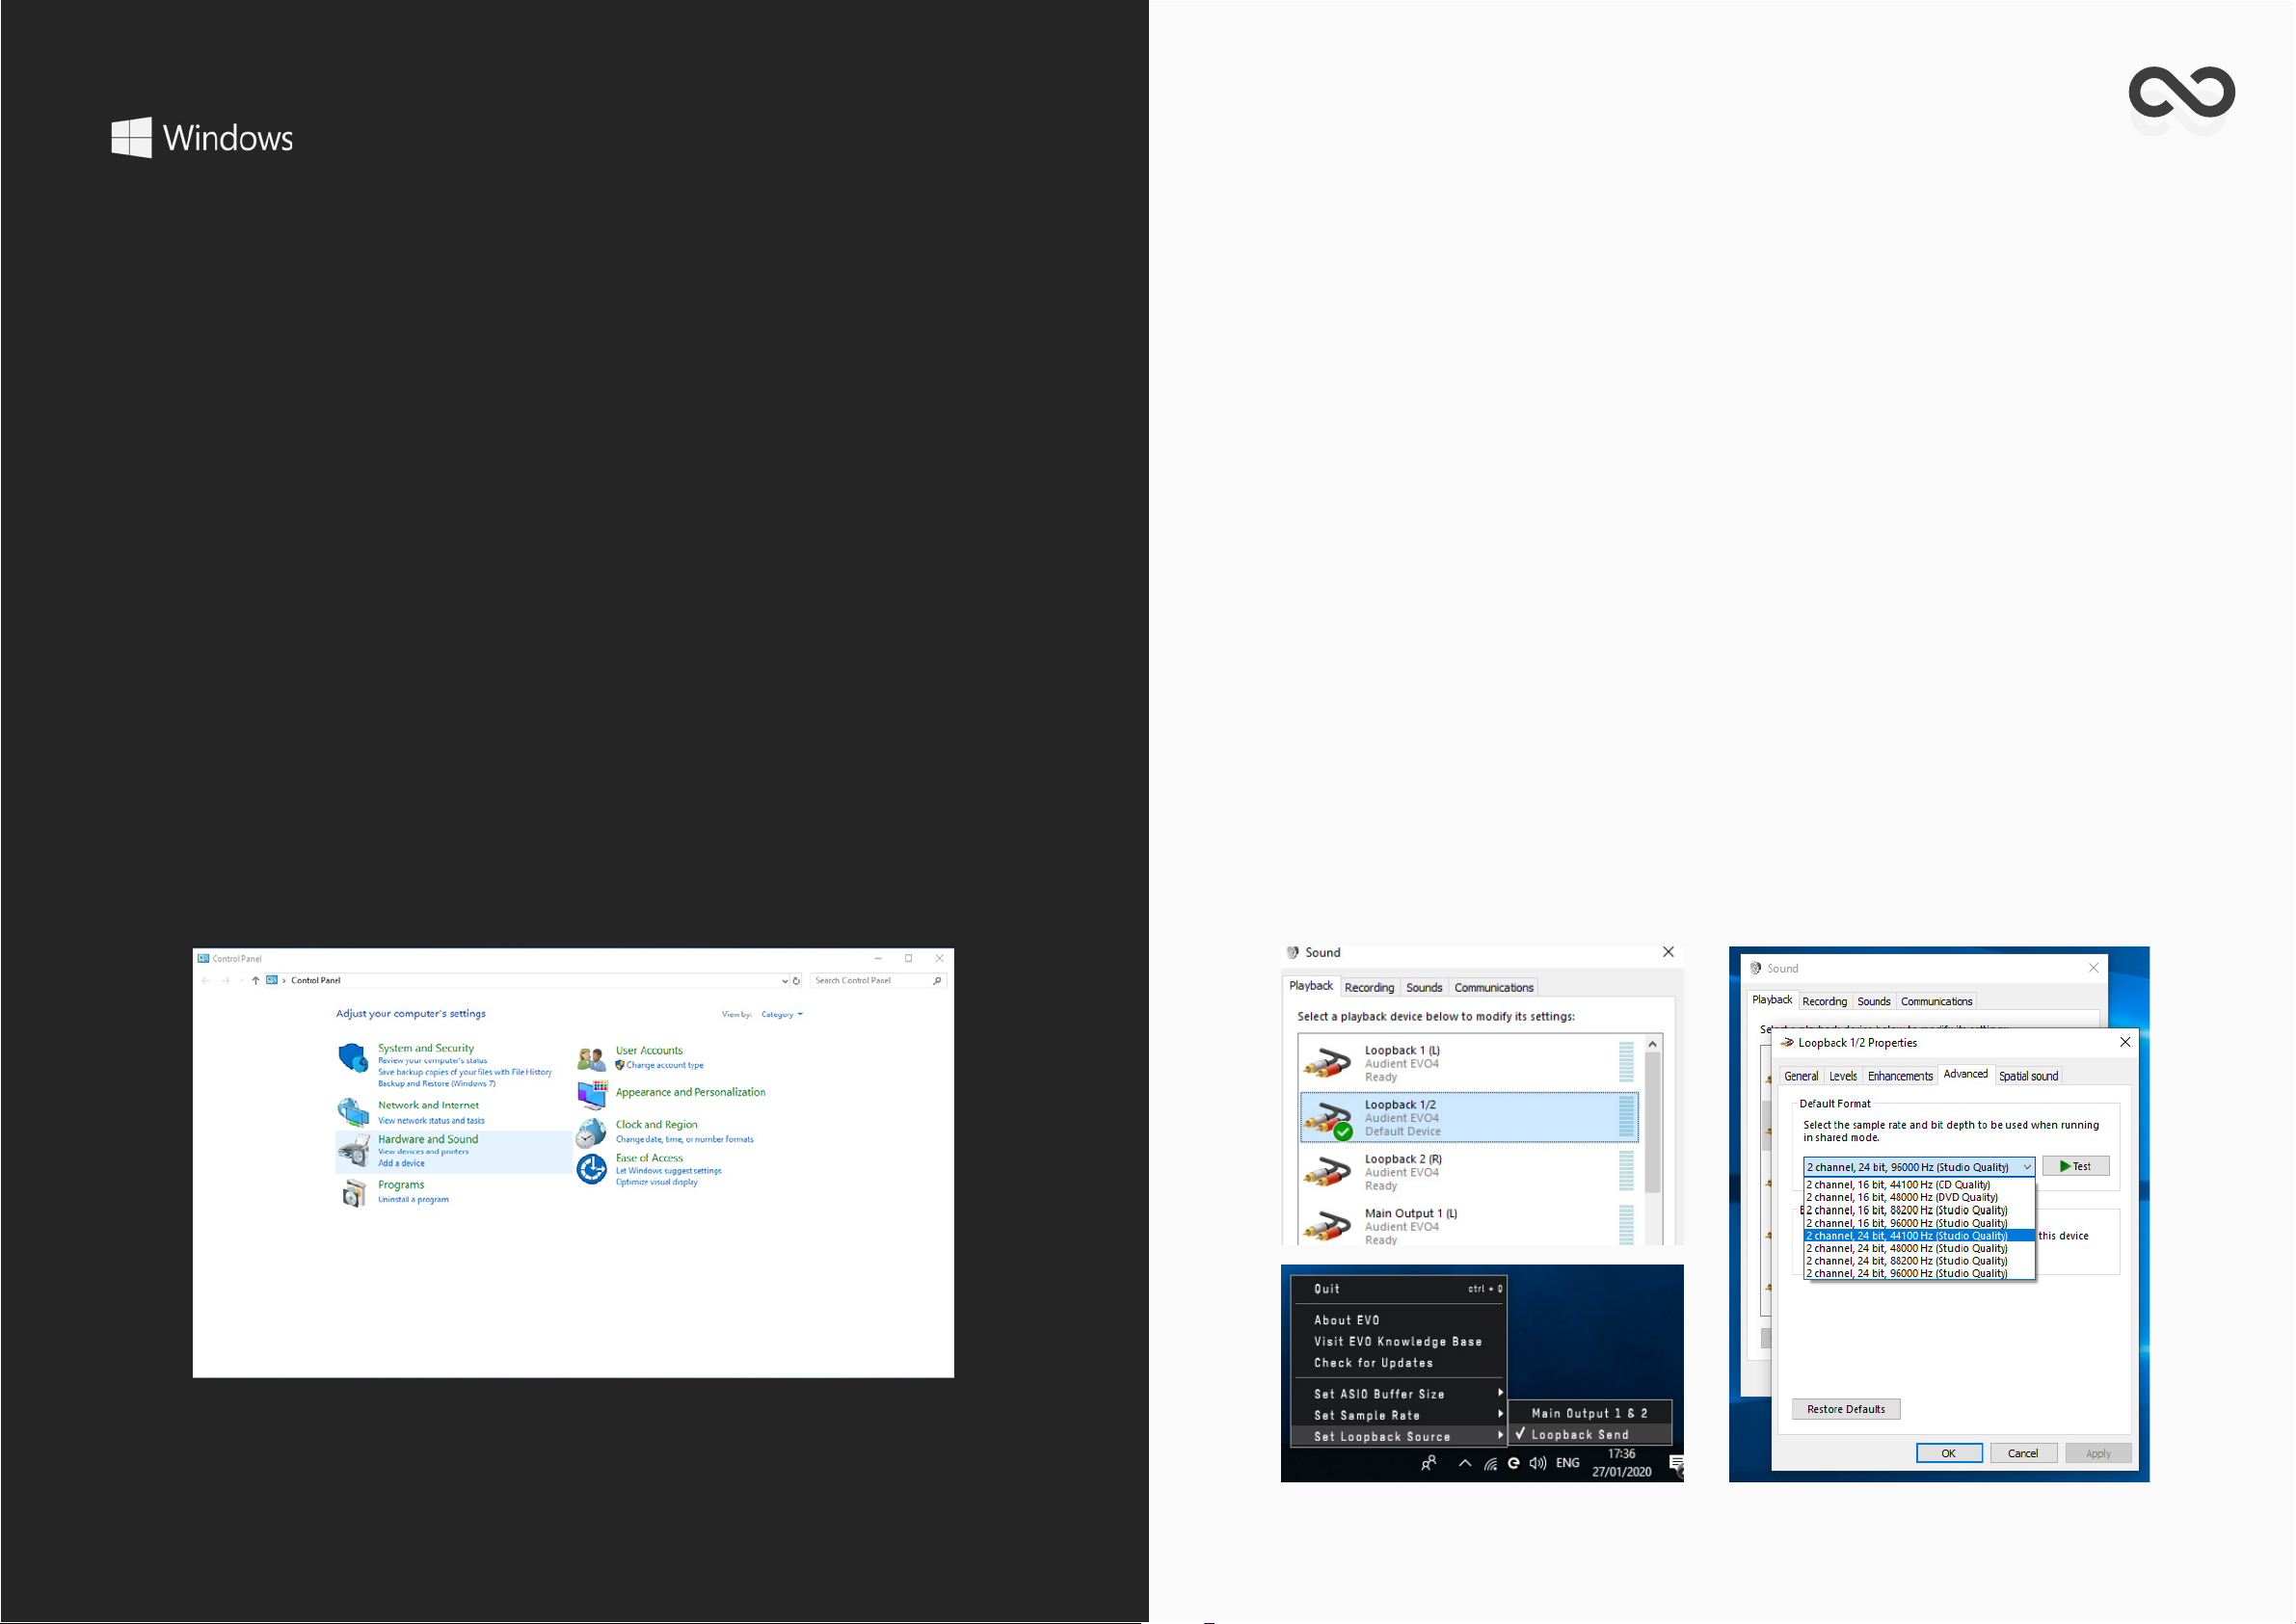
In the list of output devices, nd Audio Loop-back 1+2, select it and then click
“Set Default Device” Applications will then default to sending audio to the
Audio Loop-back output.*
We need to tell EVO 4 to send the Audio Loop-back outputs to the Audio
As with macOS, the rst step of using Audio Loop-back is setting up your computer
to output sound to the Audio Loop-back outputs of EVO 4. On some software, you
can change this in the software itself in the settings. For details on how this is done,
we’d recommend contacting the developer of your software or reading through it’s
manual.
Otherwise, for software that doesn’t allow you to set the output channel, such as
web browsers or video call services, you will need to adjust your output
setting in the Windows Sound Settings.
This can be adjusted by going to Control Panel > Hardware and Sound > Sound.
Now select the Playback tab.
Loop-back Inputs. To do this, we go to the EVO app menu in the menu bar
and click Set Audio Loop-back Source. Now select Audio Loop-back Send
as your Audio Loop-back source.** When Sending Audio between programs,
it’s important to match the sample rates of the Audio Loop-back Outputs to
the sample rate of the software you are using to record or stream.
This can be done by double-clicking on the Audio Loop-back Outputs in the
Control Panel and navigating to the Advanced settings. Now simply use the
drop-down menu to select the sample rate to ensure this matches your Re-
cording/Streaming Software.
Finally open up your recording or streaming software and select Audio
Loop-back 1+2 as your Input. So you can hear yourself, make sure you setup
your recording or streaming software to monitor the inputs.***
*
*****
AUDIO LOOP-BACK AUDIO LOOP-BACK
Page 20

SPECIFICATIONS
MICROPHONE PREAMPLIFIER:
Mic Gain: -8 to +50 dB
Line Gain: -18 to +40 dB
Phantom Power: 48v +/-4v @ 10mA/Channel
CMRR: >85dB @ 1kHz
Maximum Input Level: +16dBu
Input Impedance (Mic): >3kΩ Balanced
Input Impedance (Line): >10kΩ Balanced
Frequency Response: +/-0.5dB 10Hz to 40kHz
Crosstalk: <-105dBu @ 1kHz & 10kHz
THD+N @ 0dBu (1kHz): <0.0015%
SNR: 100dB
Mic EIN: <-128dBu
XLR:
Pin 2 (Hot), Pin 3 (Cold) & Pin 1 (Shield)
DAC OUTPUTS:
Maximum Output Level: +11dBu
Digital Reference Level: 0dBFS = +11dBu
Output Impedance: <100Ω Balanced
Frequency Response: +/-0.5dB 10Hz to Fs/2
Crosstalk: <-110dBu @ 1kHz
THD+N @ -1dBFS (1kHz): <0.0015%
Dynamic Range: 113dB A-weighted
1/4” Jack: TIP (Hot), RING (Cold) & SLEEVE (Shield)
1/4” Jack:
D.I:
(measured to insert send)
D.I Gain: -14 to +44 dB
Input Impedance: +10dBu
Frequency Response 1MegΩ Unbalanced
THD+N @ 0dBu (1kHz): <0.3%
SNR:
1/4” JACK:
TIP (Hot), RING (Cold) & SLEEVE (Shield)
100dB
TIP (Hot) & SLEEVE (Shield)
HEADPHONE OUTPUT:
(measured to insert send)
Maximum Output Level: +11dBu
Digital Reference Level: 0dBFS = +11dBu
Output Impedance: <50Ω Balanced
Frequency Response: +/-0.5dB 10Hz to Fs/2
Crosstalk: -110dBu @ 1kHz
THD+N @ -1dBFS (1kHz): <0.0015%
Dynamic Range: 113dB A-weighted
Max Level Into 30ohms: +0.5dBu, 0.0025% THD+N, 1.16Vpk Power: 45mW
Max Level Into 60ohms: +4.22dBu, 0.0015% THD+N, 1.78Vpk Power: 52mW
Max Level Into 600ohms: +10.1dBu, 0.0018% THD+N, 3.52Vpk Power: 20mW
1/4” Jack: TIP (Hot), RING (Cold) & SLEEVE (Shield)
SPECIFICATIONSSPECIFICATIONS
Page 21

USB 2.0 HIGH SPEED
DAW Playback Latency @ 32 Sample Buer for Software Instrument Playback:
No. Of Input Channels 2 Analogue
No. Of Output Channels 2 Digital
Connector: USB Type-C
Included Cables: 1m USB 2.0 Type-C to USB Type-A
DSP Mixer Roundtrip (in to out) Latency:
44.1 kHz
48.0 kHz
88.2 kHz
96.0 kHz
0.594ms
0.552ms
0.302ms
0.281ms
44.1 kHz ~2.5ms
96.0 kHz ~2ms
DAW Roundtrip Software Monitoring Latency @ 32 Sample Buer (in to out):
44.1 kHz 5ms
96.0 kHz 4.1ms
Note for latency figures:
Performance may vary as stability at these low buer sizes is dependant on many
factors including CPU load, operating system and performance of other drivers.
WEIGHTS & DIMS:
Weights: Unit:
Packaged:
Dimentions: Unit:
Packaged:
SPECIFICATIONSSPECIFICATIONS
360g
600g
140mm (w) x 67mm (h) x 67mm (d)
172mm (w) x 88mm (h) x 97.5mm (d)
Page 22
FIRMWARE UPDATE PROCEDURE
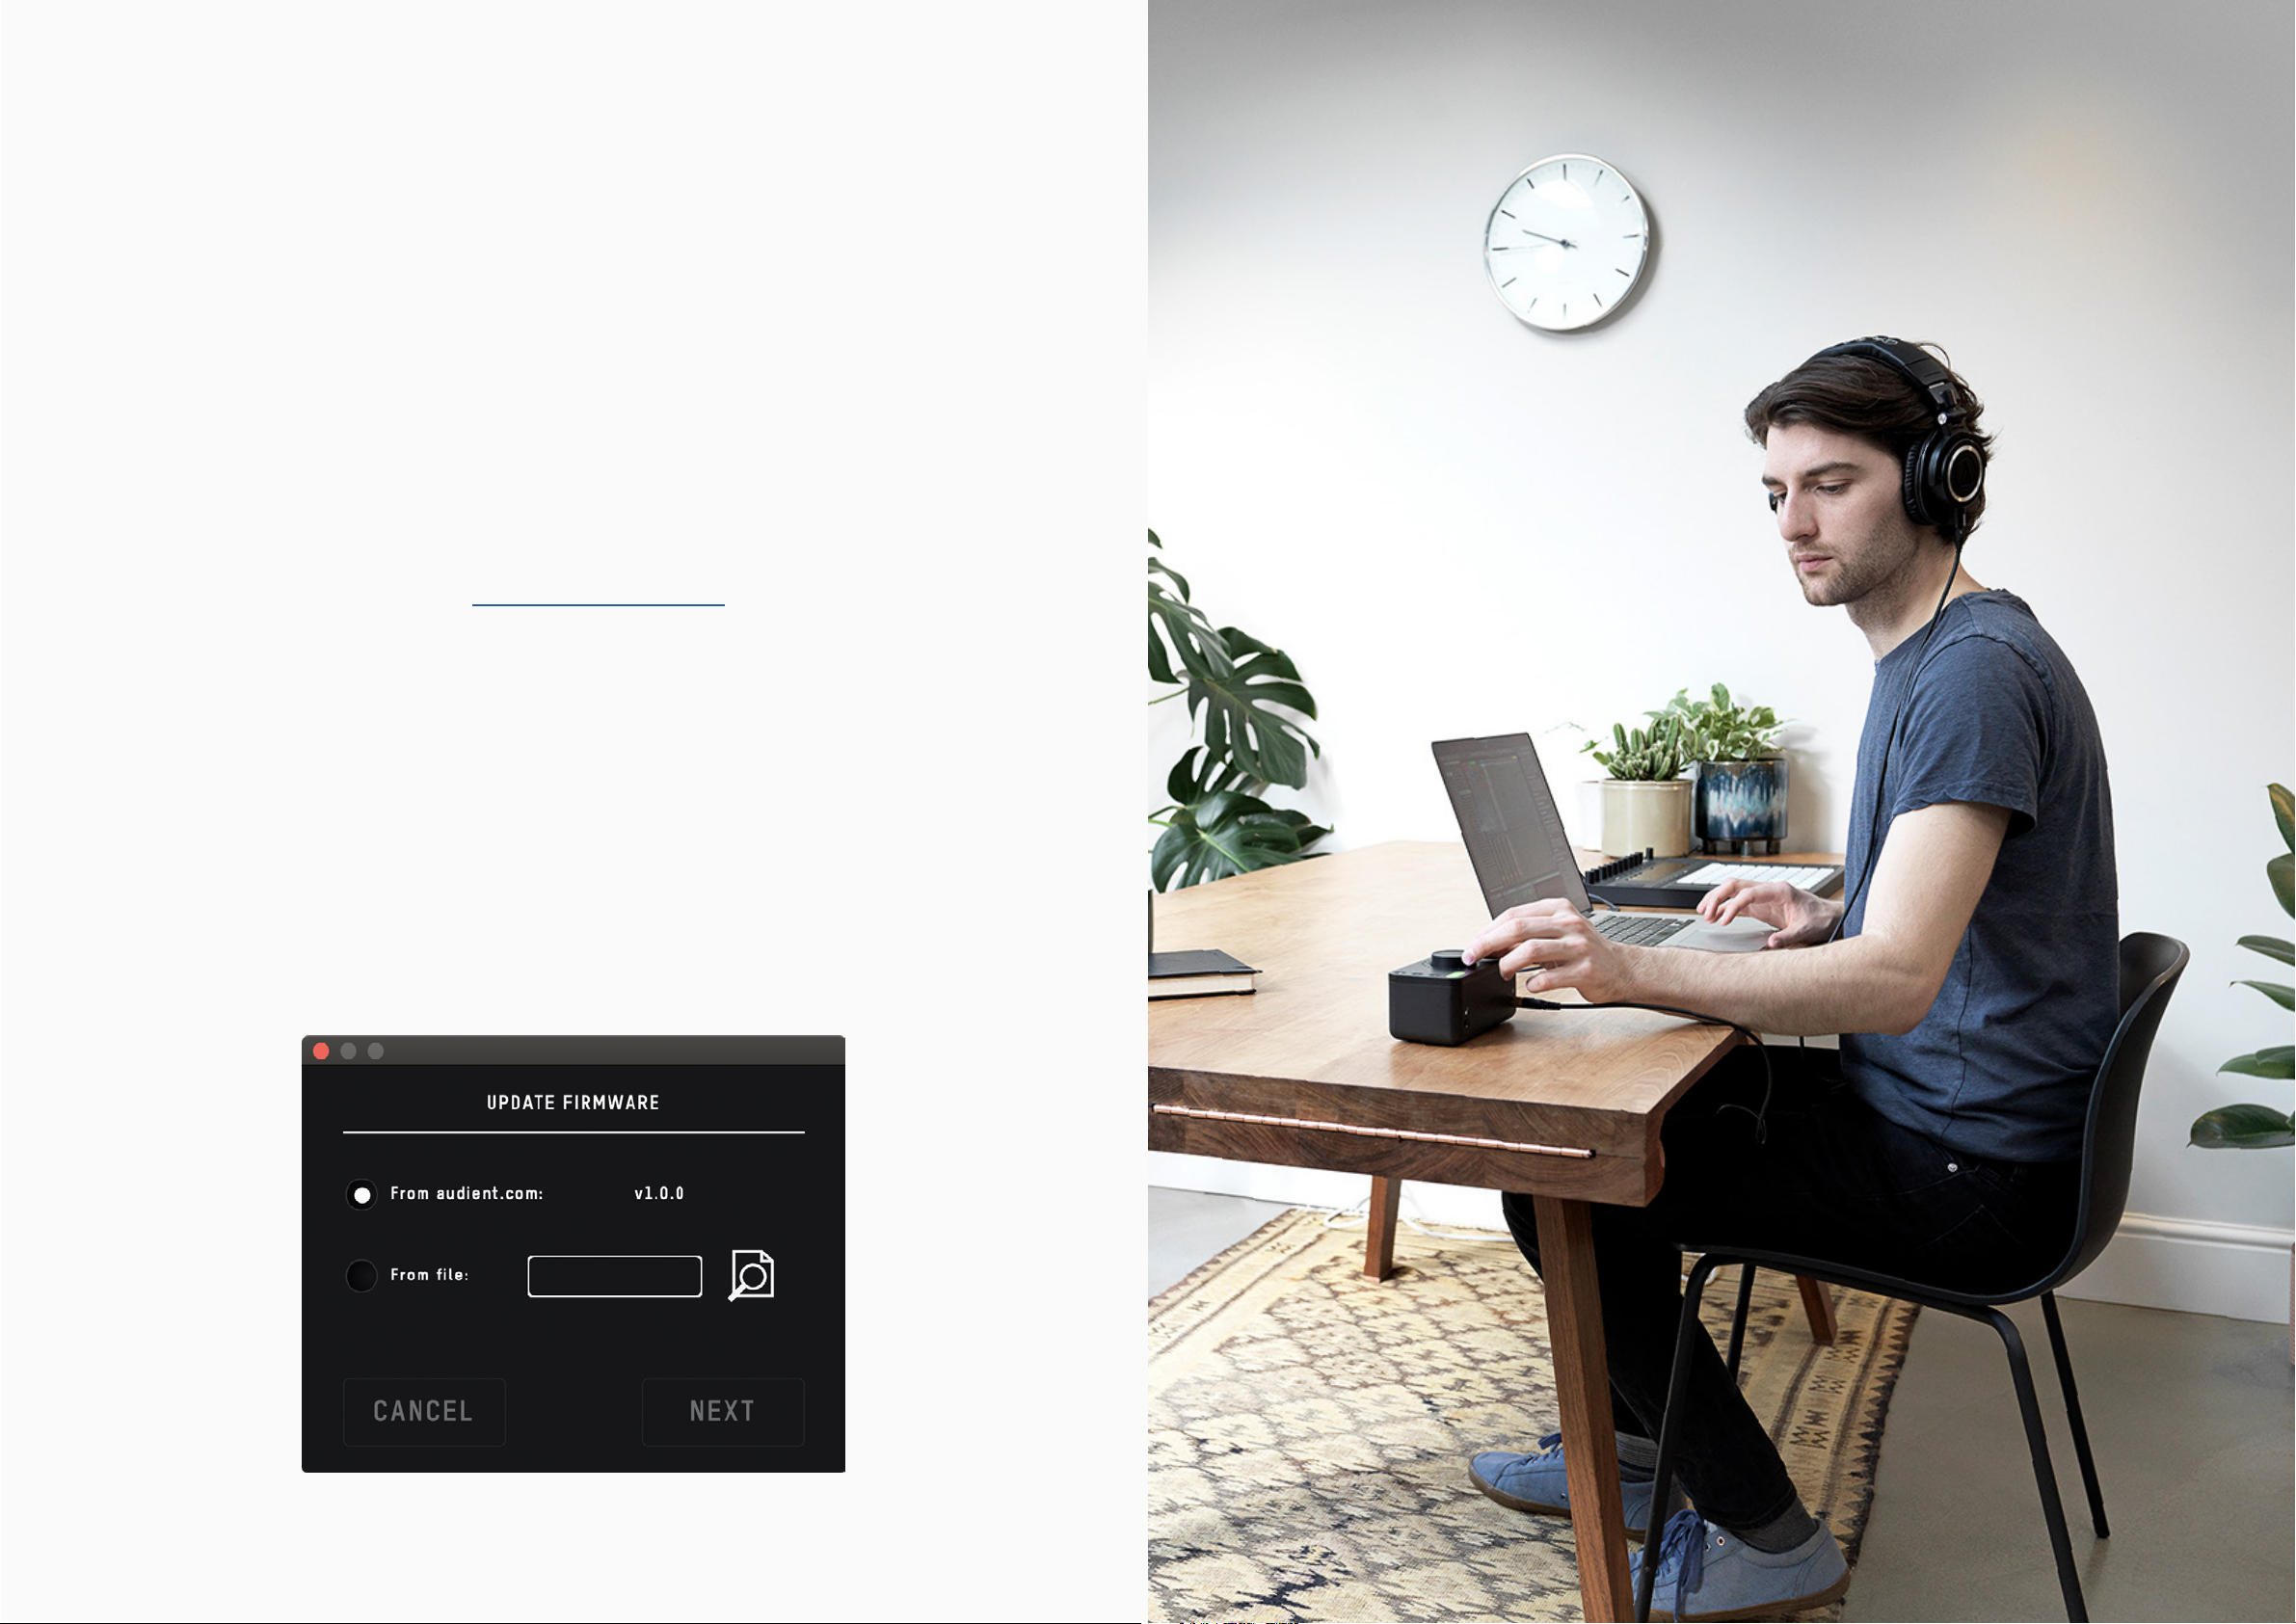
To update your rmware, go to the EVO Application menu and select Check
for Updates.
Provided you have an internet connection, the EVO app will now check with
our update service to see if there are any new rmware updates for your
EVO 4.
If you do not have an internet connection to check the rmware, please
contact our support team at support.audient.com who’ll be happy to
assist you.
If a rmware update is available, you’ll be prompted to install it directly
from our update service. This should take no longer than a minute or so. We
recommended that all speakers are switched o before updating.
During the update procedure, the unit will restart multiple times. Once
complete, reboot the EVO 4 by removing the USB cable, waiting a couple of
seconds and reconnecting it.
FIRMWARE UPDATE FIRMWARE UPDATE
Page 23

WARRANTY INFORMATION
Warranty Statement
The Audient warranty period for any product purchased is 12 months from the
date of the original purchase.
The warranty is not transferable to a second user.
Audient products are built using the latest manufacturing technology, tested to
the highest possible standards and by using premium components this should
result in providing you with reliable performance for many years.
The warranty is return to base, meaning the unit must be returned, carriage
paid, to the Dealer you purchased the unit from or the exclusive territory
Distributor responsible for the country in which you purchased the product.
Whilst this warranty is provided by Audient, the warranty obligations are fullled
by the exclusive territory Distributor responsible for the country in which you
purchased the product.
The Dealer will advise you of the appropriate procedure for resolving the
warranty issue.
In every case it will be necessary to provide a copy of the original invoice or
Dealer purchase receipt to the Distributor.
In the event that you are unable to provide proof of purchase directly then you
should contact the Dealer from whom you purchased the product and attempt
to obtain proof of purchase from them. The Dealer | Distributor will then advise
the procedure to follow.
This limited warranty is oered solely to products purchased from an Authorised
Audient Dealer (dened as a Dealer which has purchased the product directly
Some of the products returned under warranty are found not to exhibit any
fault at all when they are retested at our Service Centre’s so it’s always useful to
contact our Support team rst to try to avoid inconvenience to you at
[email protected]
If you suspect that your unit is suering from a component or manufacturing
defect during the warranty period please contact either Audient support or the
dealer that you purchased the Audient product from.
In the event of a component or manufacturing defect becoming evident
during the warranty period, Audient will ensure that the product is repaired free
of charge or replaced.
from Audient in the UK, or one of our Authorised Distributors outside the UK).
Please note that if you purchased the product from outside of your country of
residence you must return the unit to the original point of purchase for repair.
The Audient warranty term is additional to any statutory rights in the country of
purchase or as oered by the dealer at the time of purchase.
What is meant by a Manufacturing Defect?
We dene this as a defect in the performance or specication of the product
as described and published by Audient.
A Manufacturing Defect does not include damage caused by post-purchase
shipping, storage or careless handling, nor damage caused by misuse.
WARRANTY
WARRANTY
Page 24

WARRANTY INFORMATION
Warranty Limitations
This warranty does not cover damage resulting from accident or misuse.
The warranty is void unless repairs are carried out by an authorised service centre.
The warranty is void if the unit has been modied other than at the manufacturer’s
instruction.
The warranty does not cover components which have a limited life, and which are
expected to be periodically replaced for optimal performance.
We do not warrant that the unit shall operate in any other way than as described
in this manual.
For further details please contact: [email protected]
WARRANTY
 Loading...