

EverFocus ELUX16x2 Quick Installation Manual
ELUX16x2
16CH, H.264, 1080p FHD Hybrid DVR
Quick Installation Guide
Copyright © EverFocus Electronics Corp.
Release Date: March, 2017
All the images including product pictures or screen shots in this document are for example only.
The images may vary depending on the product and software version. Information contained in
this document is subject to change without notice.
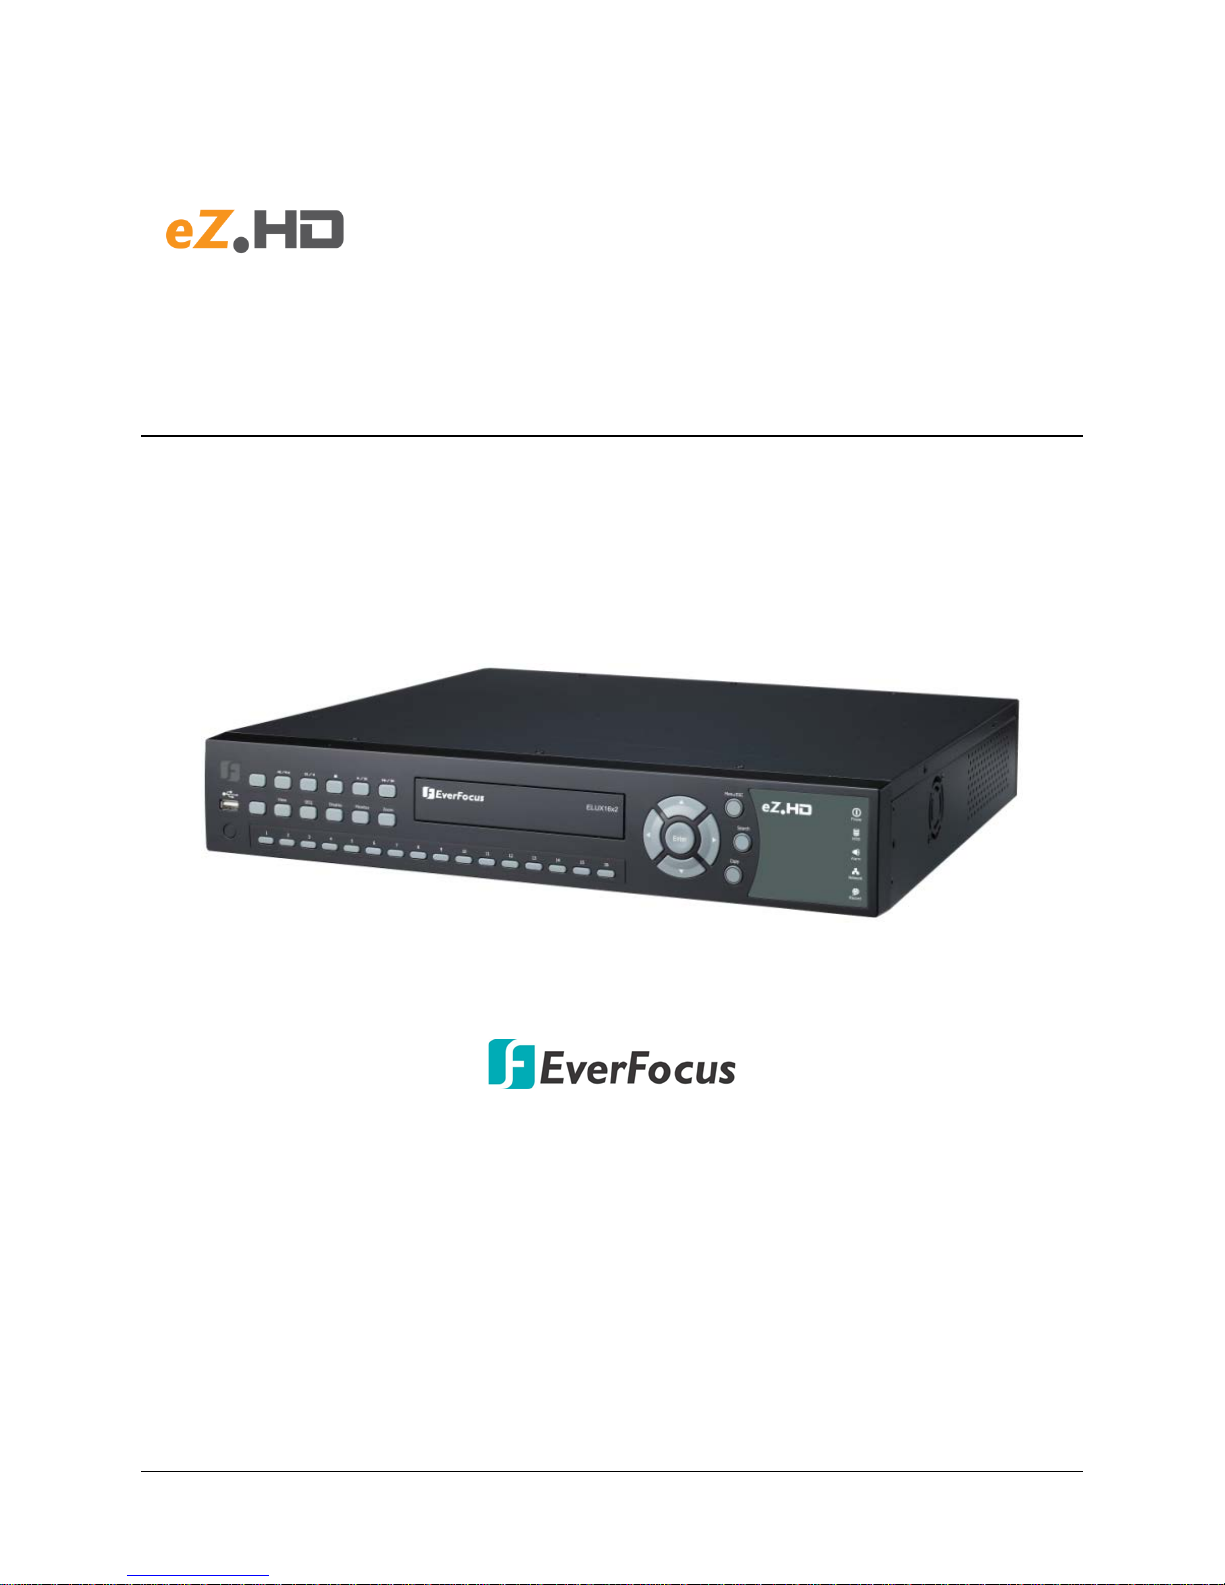
ELUX16x2 FHD Hybrid DVR
1
6
2
4
5
7
8
9 15
16
10
11
12
13
14
3
1. Overview
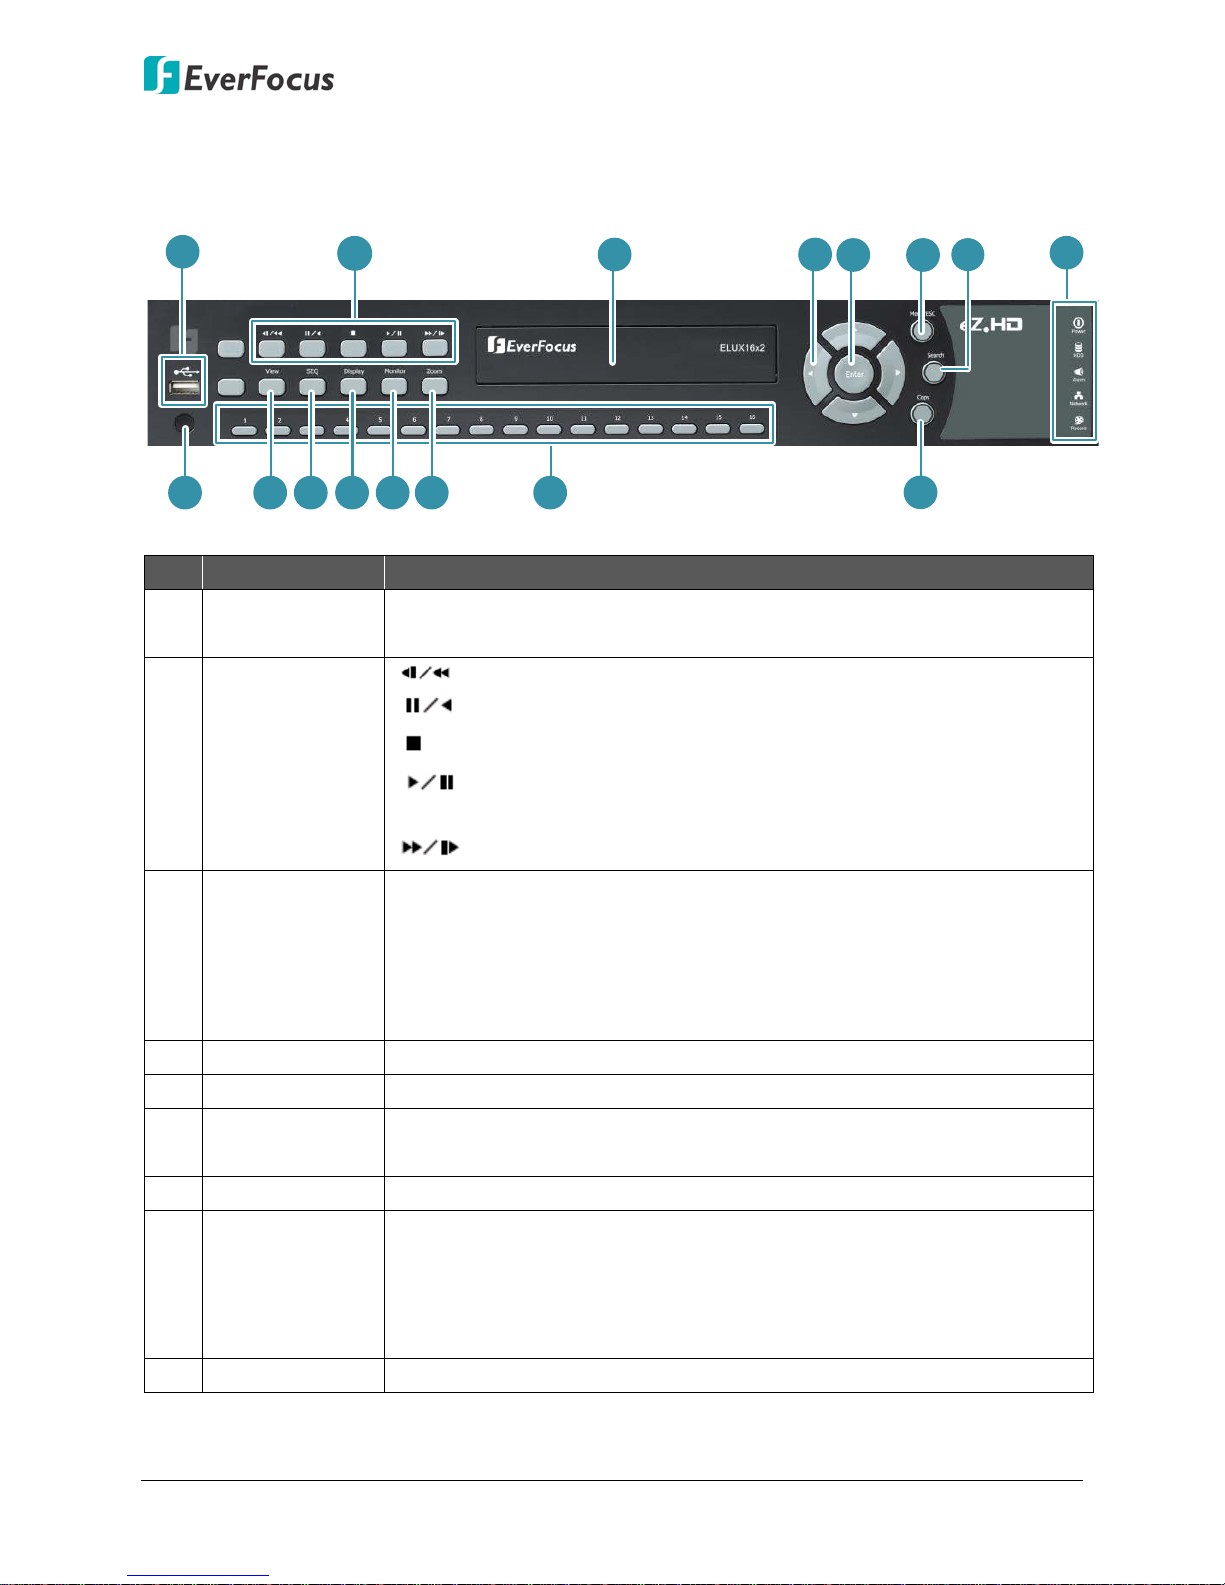
1.1 Front Panel
No. Name Description
1 USB2.0 Port
The USB2.0 port for connecting to a mouse, external storage device or
EKB200 keyboard.
: In Playback mode, press to play in fast reverse.
: In Playback mode, press to pause / play in reverse.
2 Control Buttons
: In Playback mode, press to exit playback mode.
: Press to enter Playback mode. In Playback mode, press to
pause / resume playback.
: In Playback mode, press to play in fast forward.
Use the DVD Burner for archiving the recordings from the DVR. It’s
highly recommended to use a DVD+R with 4x or higher speed disc for
recording. To open the DVD tray, please refer to 4.7 Archiving the
Recordings or Log Data to the USB or DVD in the User’s Manual. To
3
DVD Burner
(optional)
close the tray, just gently push it and it will be automatically closed.
4 Arrow Buttons Use these arrow buttons to change the Menu settings.
5 Enter Press to enter.
6 Menu / ESC
In Live mode, press to enter the Main OSD Setup Menu. In Setup
mode, press to exit or return to the previous setup menu.
7 Search Press to enter the Search Setup menu.
Power: Indicates the power is on.
HDD: Indicates the internal Hard Disk is activating.
8 LED Indicator
Alarm: Indicates an alarm input is triggered.
Network: Indicates the network is connected.
Record: Indicates the DVR is recording.
9 IR Receiver Receive signals from IR remote control.
1
ELUX16x2 FHD Hybrid DVR
CVBS
1
8
2
3
5
7
11
1
14
12
6
1
10
9
4
RS485
+ -
13
10 View
11 SEQ
12 Display
In Live mode, press to switch to the layout type for displaying the
channel feeds.
Press to enter the automatic sequence mode. This will show each
channel feed in sequence. Press again to exit sequence mode.
Press to cycle between the info display types (channel and status bar
info).
13 Monitor In Live mode, press to switch between Main and Call Monitor.
14 Zoom
Channel
15
Buttons
In Live mode, press to zoom the display of a channel. Press the
Menu/ESC button to exit Zoom mode.
Select the full screen channel in live mode.
Select the full screen channel in playback.
16 Copy Press to enter the Copy Menu.
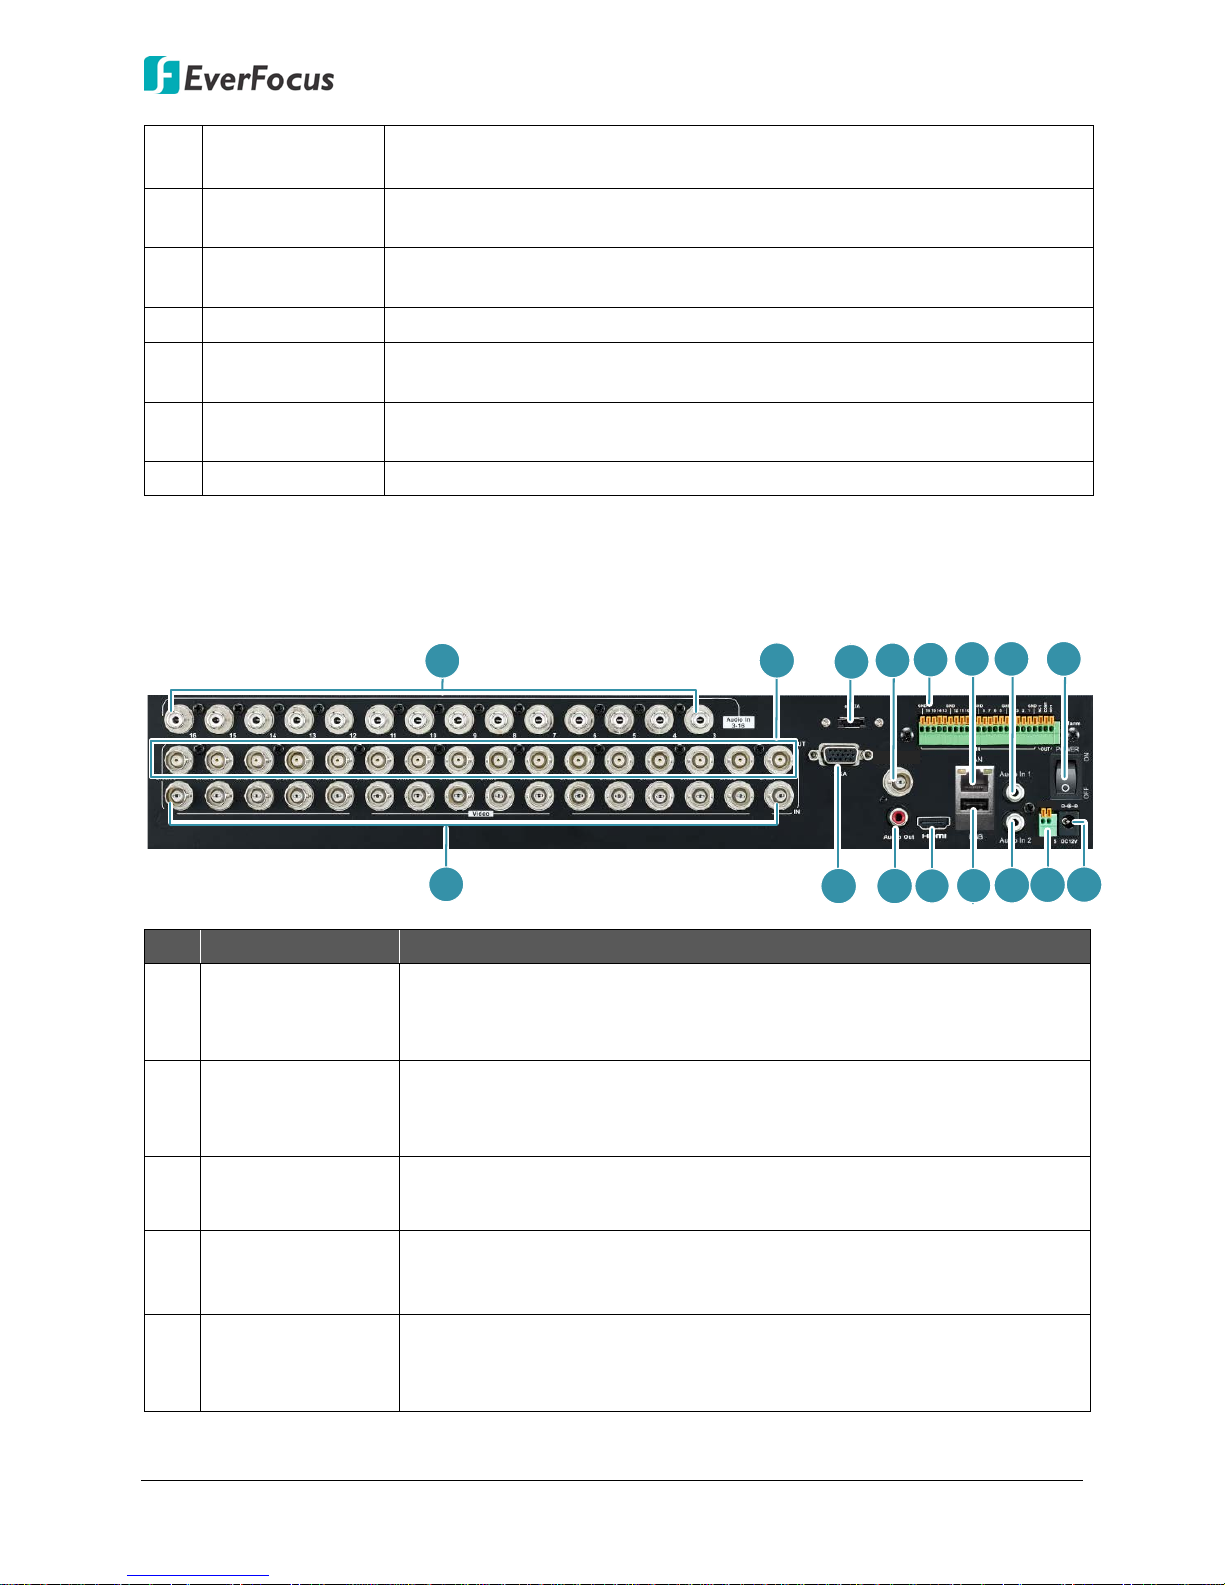
1.2 Rear Panel
No. Name Description
Audio Input 1~16
1
(RCA)
Loop Video
2
Output 1~16
3 eSATA Port
4 CVBS Port (BNC)
5 Alarm Input /Out
Connects to the audio input devices such as microphones. Note that
the microphone with a (built-in) amplifier and external power supply
is required.
You can also optionally connect the monitors to each Loop Video
Output to display the video of the corresponding channel. Please
refer to 3.1 Monitor Connection.
Connects to an external eSATA storage device, please set up an RAID
array of the eSATA device before using.
This can be used as a Call monitor output. Connects to the monitor
using a BNC cable (see 2.3.1 Monitor Connection).
Connects up to 16 alarm inputs and 1 alarm output devices. You can
also connect to the radio-controlled clock for time synchronization.
Please refer to 2.3.2 Alarm I/O.
2

ELUX16x2 FHD Hybrid DVR
6 Ethernet (LAN) Connects to the Network.
7 Power Switch Press to turn on or off the power.
Connects to analog HD / SD cameras using coaxial cables.
Note:
1. The DVR can automatically configure itself as NTSC or PAL. To
do this, connect a camera to any channel of the DVR. The DVR
will detect the first connected camera format (NTSC or PAL)
8 Video Input 1~16
and then automatically configure itself to the detected format
from the first connected camera. For example, if the format of
the first connected camera is NTSC, the DVR will configure
itself to NTSC format.
2. All video inputs are compatible with all resolution types of
cameras, such as 1080p, 720p, 960H and D1 cameras (HD-CVI /
HD-SDI cameras are not supported).
9 VGA Port
Audio Output
10
(RCA)
11 HDMI Port
12 USB2.0 Port
13 RS-485 Port Connects to the RS-485 device (EKB500) or PTZ camera.
14 Power Port Connects to the 12VDC 8A power using the supplied Power Adaptor.
This can be used as a Main monitor output. Connects to the monitor
using a VGA cable (see 2.3.1 Monitor Connection).
Connects to the audio output devices, such as speakers. Note that
the speaker with a (built-in) amplifier and external power supply are
required.
This can be used as a Main monitor output. Connects to the monitor
using a HDMI cable (see 2.3.1 Monitor Connection).
The USB2.0 port for connecting to a mouse, external storage device
or EKB200 keyboard.
3
ELUX16x2 FHD Hybrid DVR
PTZ Cameras
Tip: You can also bring
up the camera OSD
through Preset 95.
CVBS
RS485
+ -
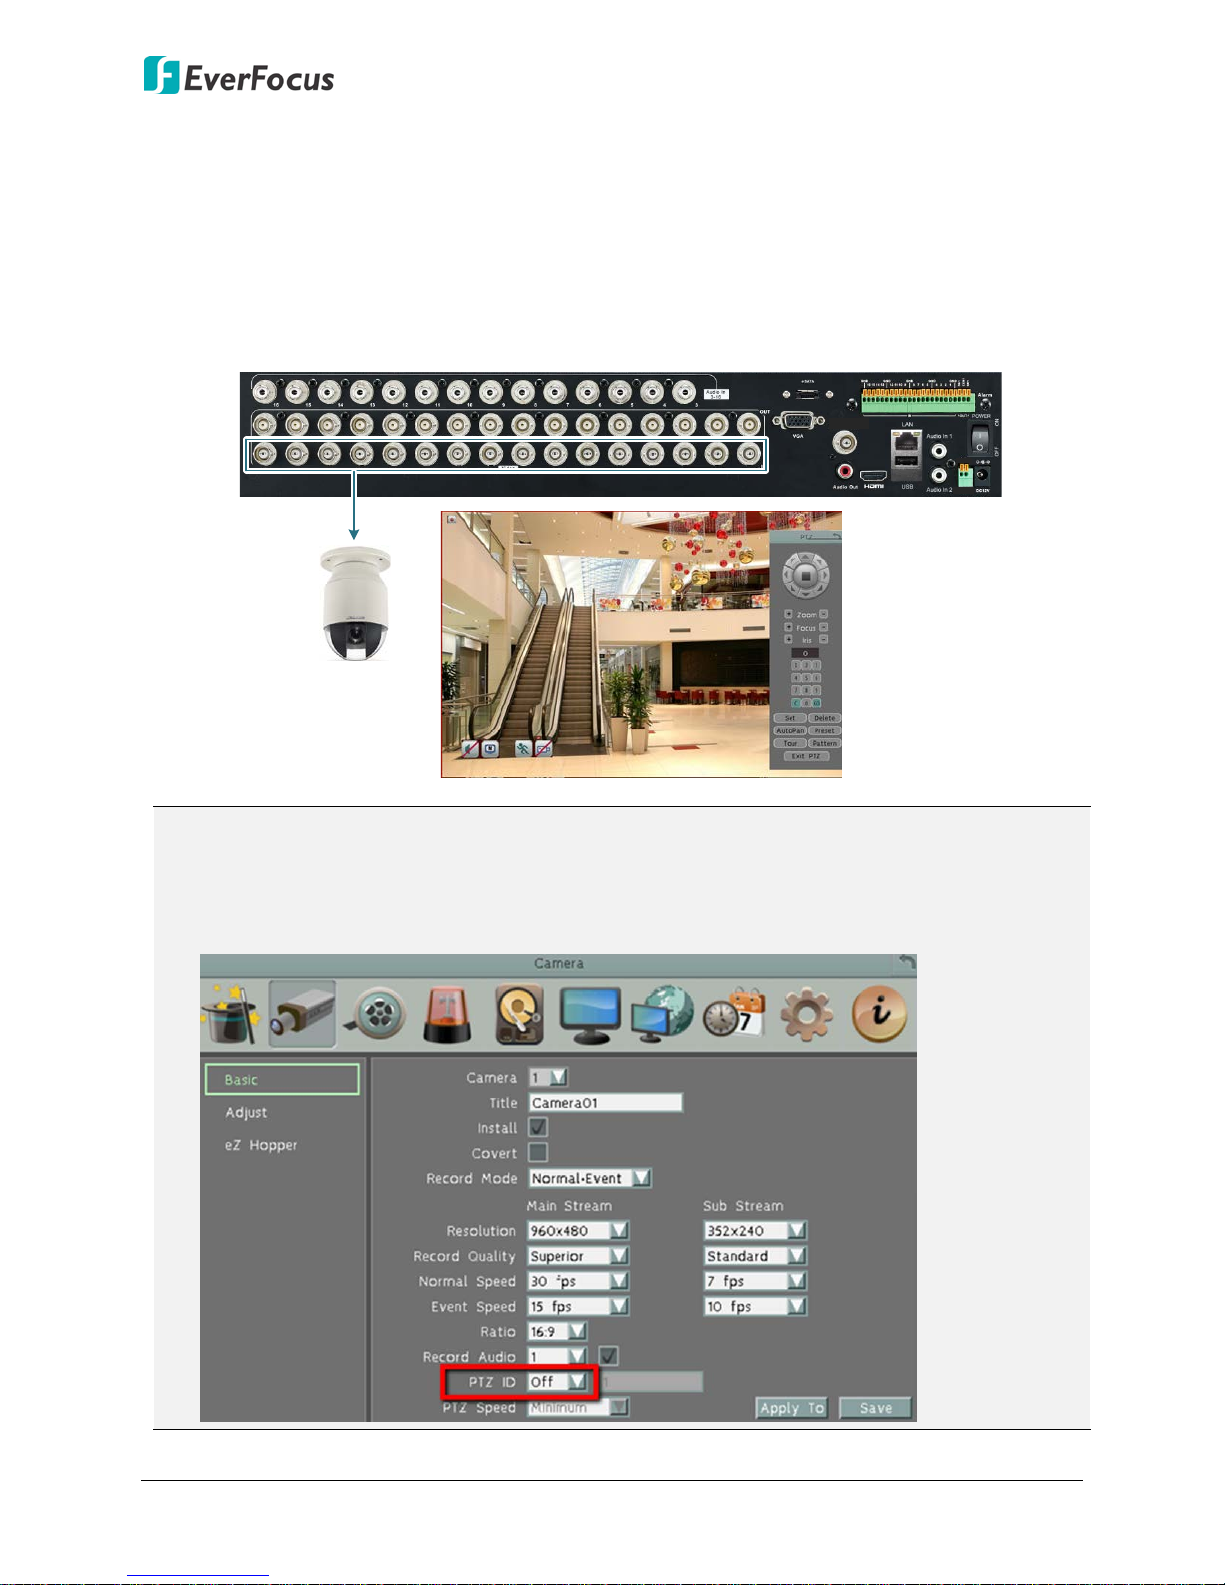
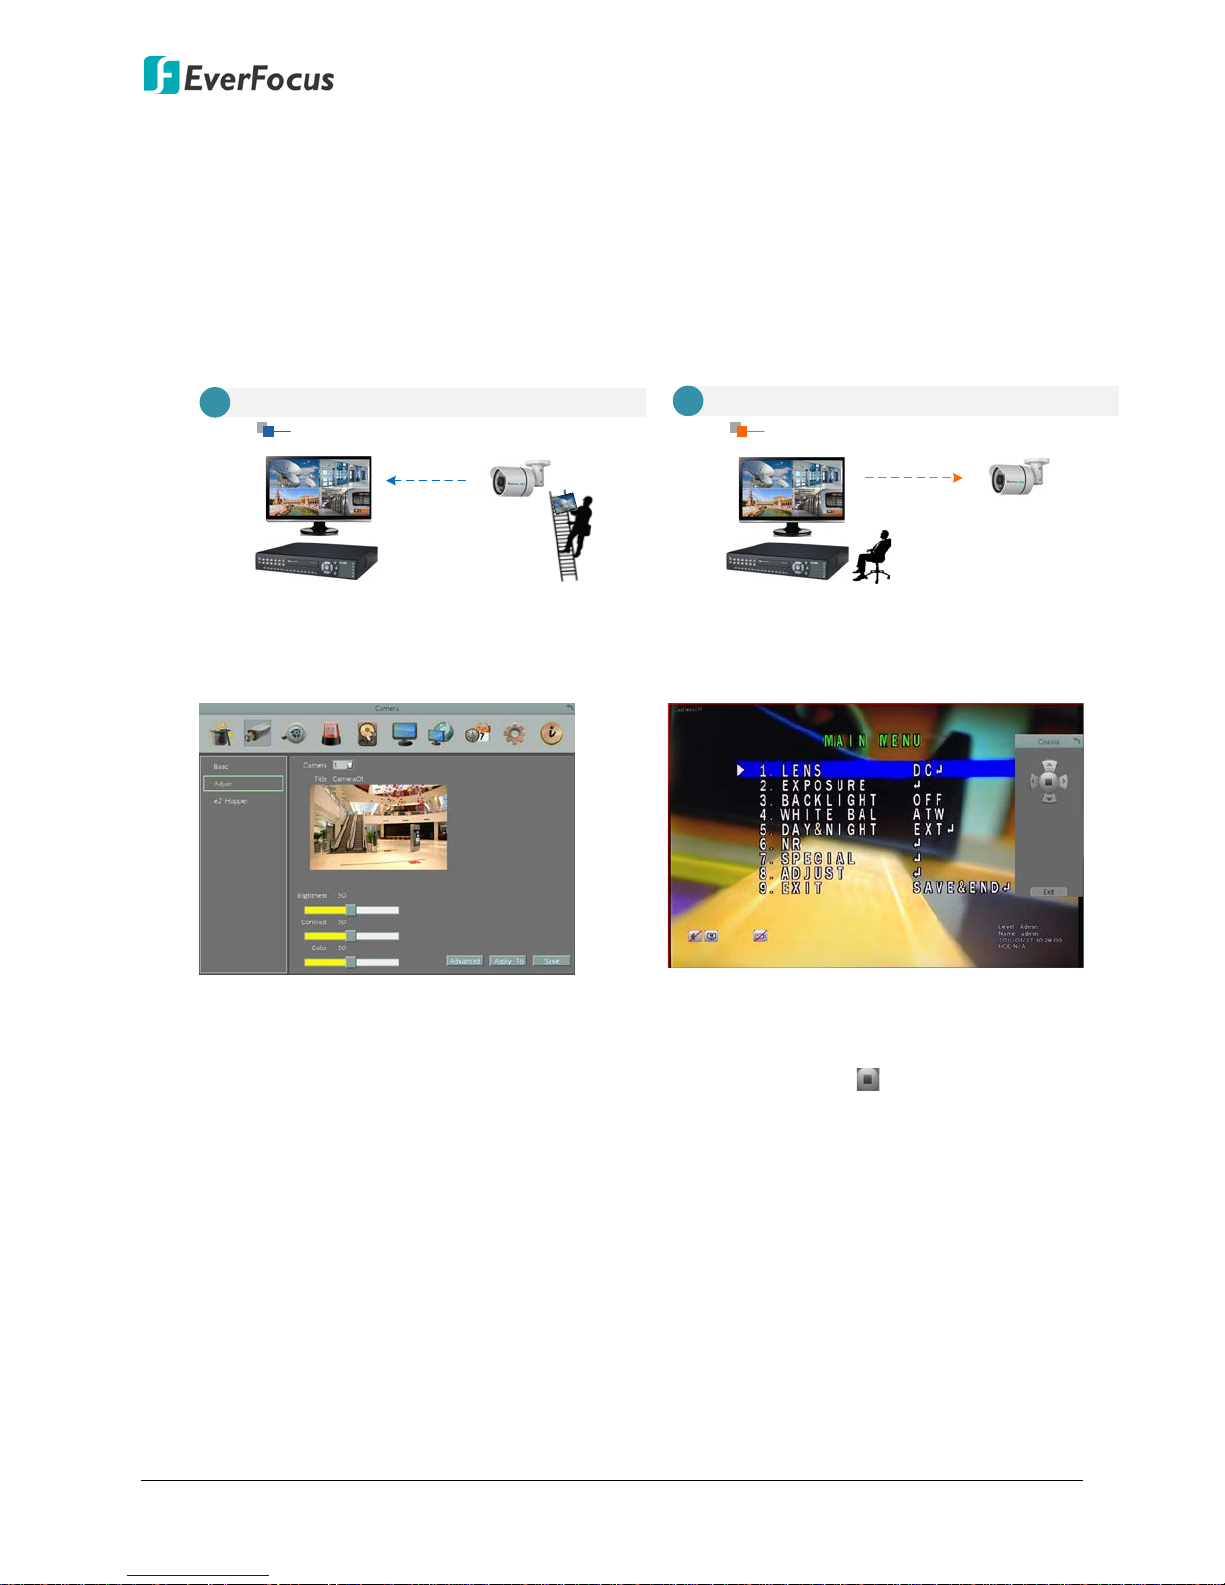
1.3 eZ. Controller Function Description
eZ.Controller: Easily control PTZ camera from DVR using only coaxial cable.
eZ.Controller allows users to control PTZ camera from DVR using only a coaxial cable without
the need of a RS-485 cable between the PTZ camera and the DVR. Users can easily operate
Zoom, Focus, Iris, Direction, Auto Pan, Preset, Tour and Pattern functions to the PTZ camera
through DVR.
Note:
1. The eZ.Controller function for PTZ control is only supported for EverFocus AHD (1080p,
720p) PTZ cameras.
2. After connecting the PTZ camera to the DVR through the coaxial cable, you will have to go
to the OSD Menu to turn the PTZ ID function off (System < Camera < Basic).
4
ELUX16x2 FHD Hybrid DVR
Traditional Way to Control Camera OSD
Control Camera OSD at Camera End
A
Camera EndDVR End
Use eZ.Controller to Control Camera OSD
Camera OSD Control Directly at DVR End
DVR End
Camera End
B
eZ.Controller: Easily control eZ.HD camera’s OSD at the DVR end.
Traditionally, the CCTV installer needs to take a portable monitor to connect to the
camera for controlling the camera OSD at the camera installation site as the Diagram A
below. It will take extra effort, time and people to adjust the camera.
Now, EverFocus’ eZ.Controller allows users to control the camera OSD simply on the
monitor at the DVR end as illustrated in Diagram B.
How to Control eZ.HD Camera’s OSD at the DVR End?
1. On the DVR’s OSD setting menu, go
to System > Camera > Adjust. Select
a camera you want to adjust.
2. Click the Advanced button, and the
camera live view with the Coaxial
Panel will be displayed.
3. To display the OSD menu, click the
4. You can use the direction buttons on
5. To exit the camera OSD setting, click
Enter button on the Coaxial Panel.
the Coaxial Panel to control the
camera’s OSD setting menu.
Exit to return to the Adjust setting
page.
5
ELUX16x2 FHD Hybrid DVR
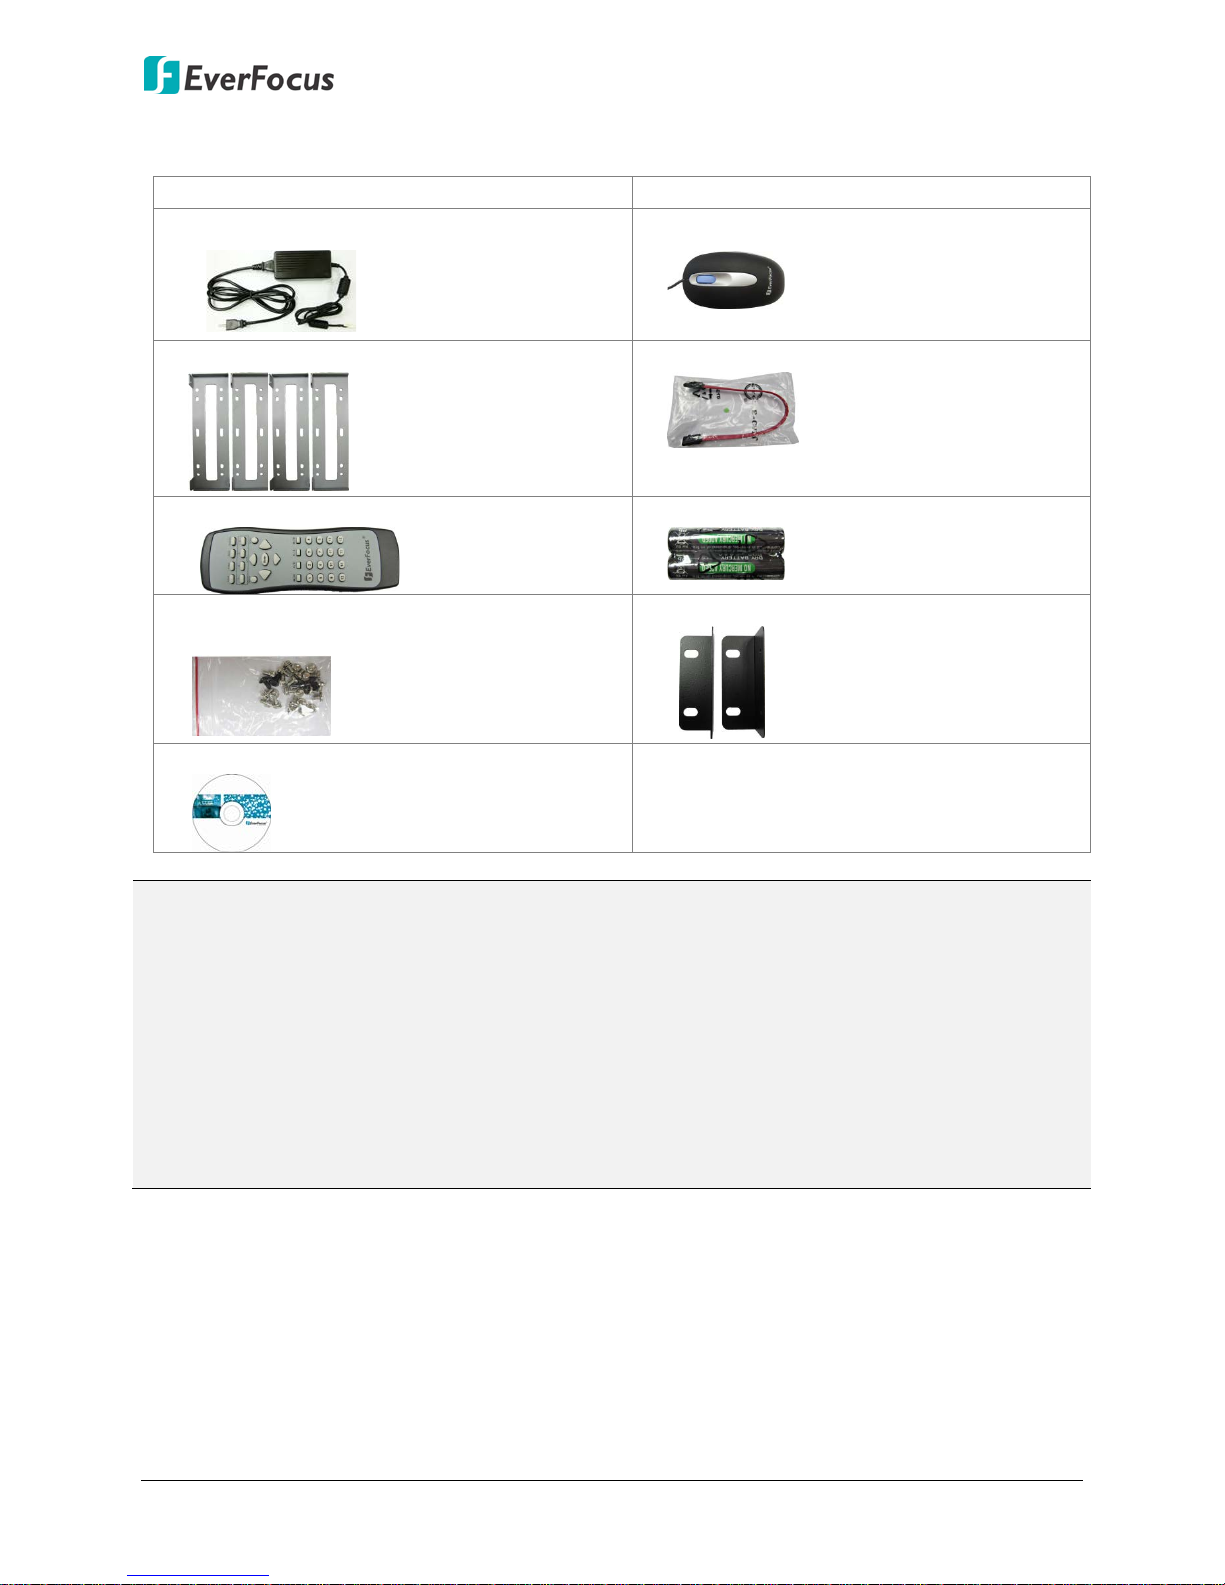
1.4 Packing List
• DVR x 1 • QIG x 1
• 12VDC 8A Power Adaptor x 1
• Mouse x 1
• HDD Bracket x 4
• SATA Cable x 4
• IR Remote Control x 1
• AAA Battery x 2 (Please see Note 4.)
• Sliver Screw x 24, Washer Head Screw x 12,
• Rack Ear x 2
M3 (φ6.8) Screw x 4
• CD x 1 (Please see Note 3.)
Note:
1. Equipment configurations and supplied accessories vary by country. Please consult your
local EverFocus office or agents for more information. Please also keep the shipping carton
for possible future use.
2. Contact the shipper if any items appear to have been damaged in the shipping process.
3. The CD contains the IP Utility software, EFPlayer, User Manual and Quick Installation Guide.
4. Risk of explosion if battery is replaced by an incorrect type. Dispose of used batteries
according to the instructions.
a. Use only two AAA dry cell batteries.
b. Do not dispose of the batteries in a fire as it may explode.
6
ELUX16x2 FHD Hybrid DVR
1.5 Optional Accessories
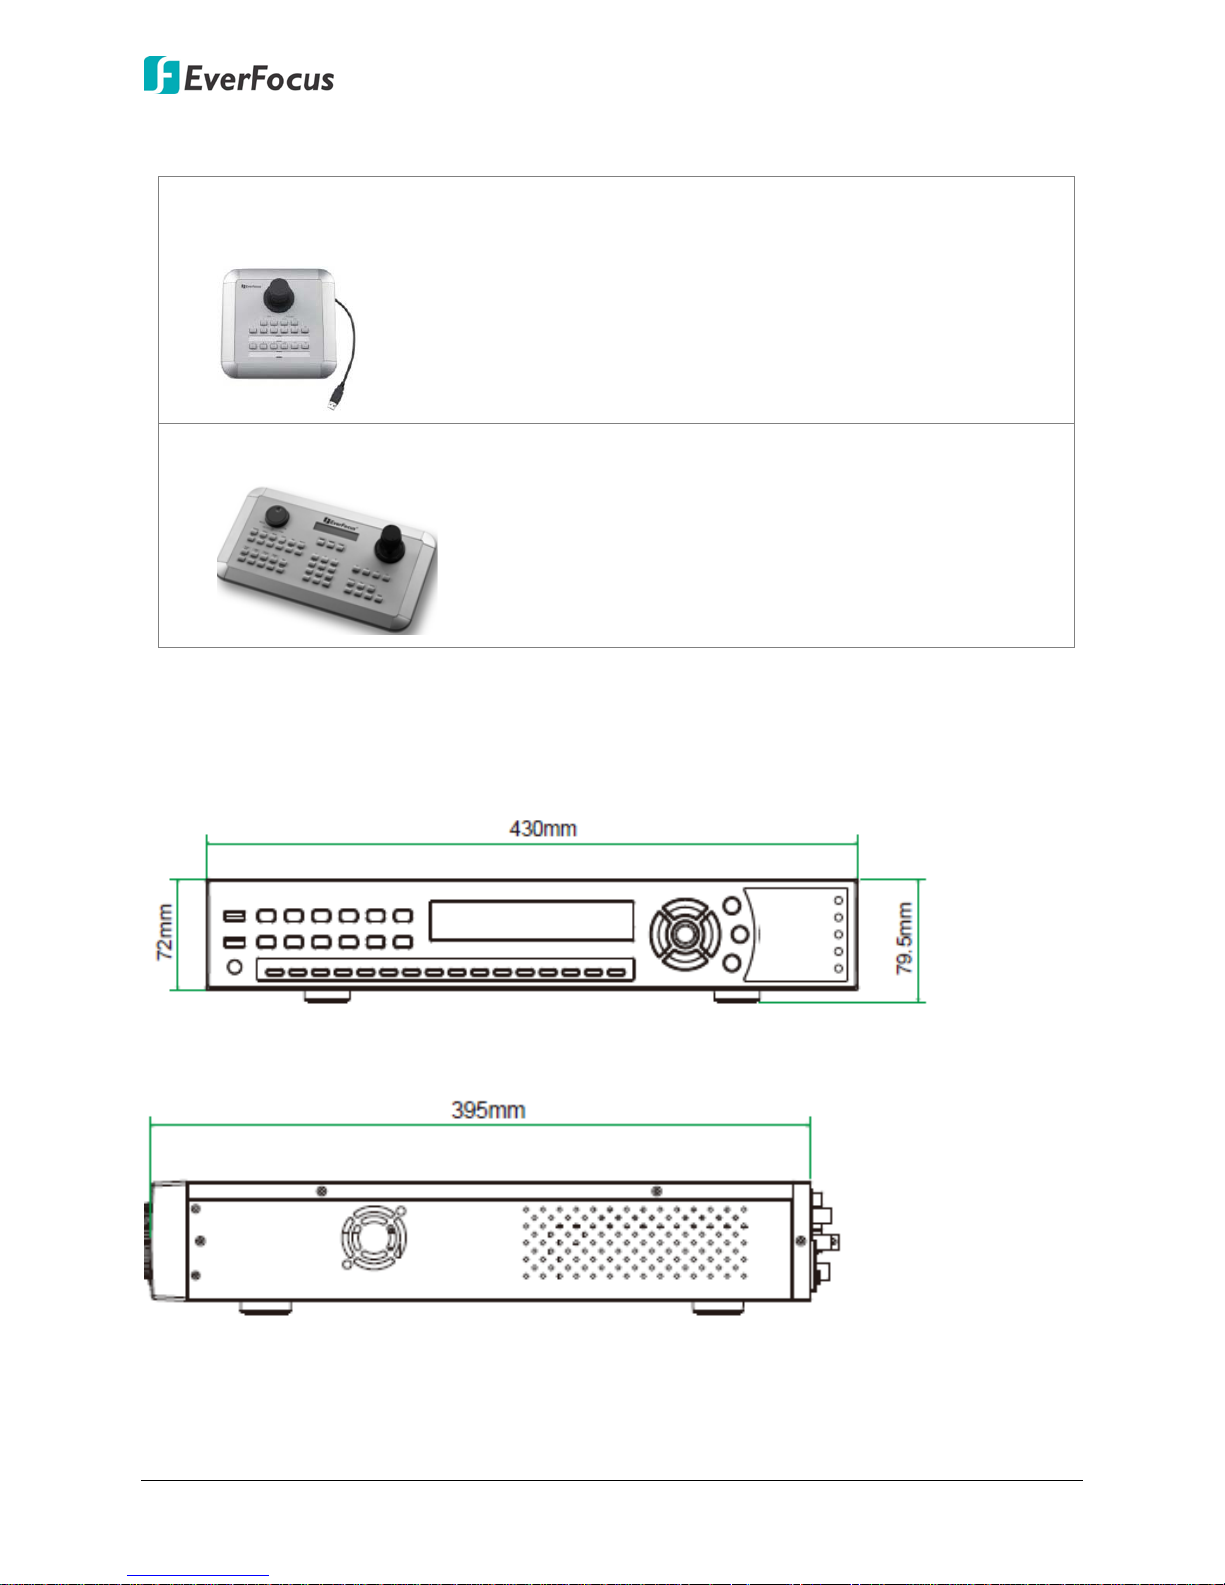
• EKB200 (USB controller keyboard: connect to the PC or DVR to control the PTZ cameras
connected to the DVR). Please refer to 6.9.6 EKB200 Setting in the User Manual of the
EKB200 Keyboard.
• EKB500 (RS-485 keyboard: connect to the RS-485 port to control the PTZ cameras
connected to the DVR). Please refer to User Manual of the EKB500 Keyboard.
1.6 Dimensions
Front View
Side View
7
 Loading...