

EverFocus EHD630s Operating Instructions Manual
EVERFOCUS
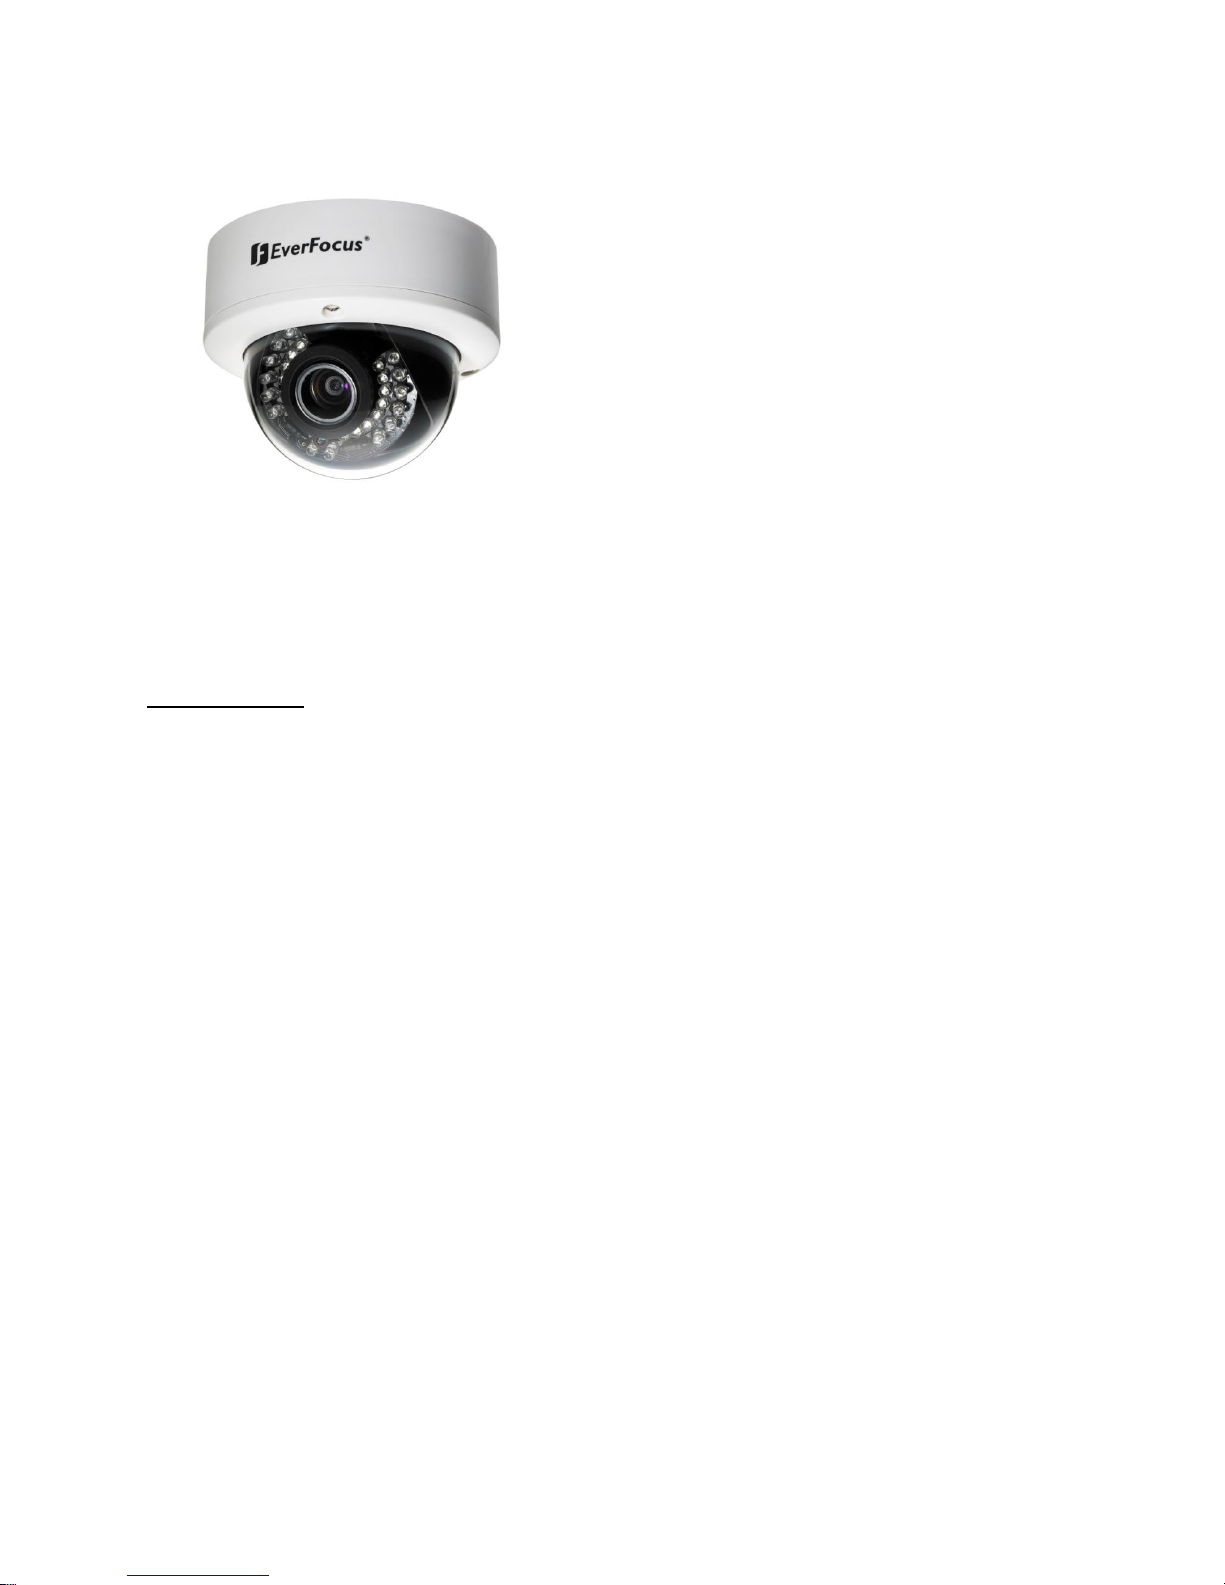
Model No. EHD630s
700TVL Super Low Light
D-WDR & 3-Axis Gimbal Mechanism
Vandal Proof & Weather Resistant
Outdoor IR Dome Camera
Operating Instructions
Please read this manual first to ensure correct installation and operation. This manual should be retained for
future reference. The information in this manual was current when published. The manufacturer reserves the right
to revise and improve its products. All specifications are therefore subject to change without notice.
PRECAUTIONS
1. Do not install the camera near electric or magnetic fields.
Install the camera away from TV/radio transmitters, magnets, electric motors, transformers and audio
speakers, because the electromagnetic fields generated by these devices may distort the video image or
otherwise interfere with camera functions.
2. Never disassemble the camera beyond the recommendations in this manual, nor apply materials to it
other than those recommended herein.
Improper disassembly or introduction of corrosive materials may result in equipment failure or other damage.
3. Try to avoid pointing the camera toward the sun.
In some circumstances, direct sunlight may cause permanent damage to the sensor and/or internal circuits.
It may also create unbalanced illumination that may be beyond the camera’s ability to compensate.
4. Keep the power cable away from water and other liquids. Never touch the power cable with wet
hands.
Touching a wet power cable with your hands or touching the power cable with wet hands may result in
electric shock.
5. Never install the camera in areas exposed to oil, gas or solvents.
Oil, gas or solvents may cause equipment failure, electric shock or, in extreme cases, fire.
6. Cleaning
For cameras with interchangeable lenses, do not touch the surface of the sensor directly with your hands.
Use lens tissue or a cotton tipped applicator and ethanol to clean the sensor and the camera lens. Use a
damp soft cloth to remove any dirt from the camera body. Do not use complex solvents, or corrosive or
abrasive agents to clean any part of the camera.

1
7. Do not operate the camera beyond the specified temperature, humidity and power source levels.
This camera is suitable for indoor operation only.
Use the camera at temperatures between -10°C~50°C (14°F~122°F) and humidity levels between 20%~
80%. This device is not rated as submersible. The input power source should be 12VDC or 24VAC. Be sure
to connect the polarity (+ / -) and power properly. Incorrect polarity or too high a voltage will likely
cause damage to the camera, and such damage is not covered by the warranty. The use of a properly
fused or “Class 2 Limited Power Source” power supply is highly recommended.
8. Mounting
Select a solid mounting surface that will support the weight of the camera and any additional loading from
wind, snow, ice or other factors. Securely attach the camera to the mounting surface using screws and
anchors that will properly support the camera. If necessary, (e.g. when mounting the camera to a drop ceiling,
or unsupported ceiling) use a safety wire to provide additional support for the camera.
1. INTRODUCTION
The EverFocus Polestar III-series EHD630s dome camera features amazing 700TVL color low light sensitivity of
0.03 lux, delivered by a 1/3” Sony EXview HAD CCD II 960H sensor. It also features the added benefits of
advanced Effio-S DSP technology to enhance image quality. This camera also utilizes technologies like 3DNR (to
reduce recording file sizes and thus conserve DVR HDD space), Digital Slow Shutter (to “see” in very low light by
enabling super-high light sensitivity of up to 0.00006 lux), Digital Wide Dynamic Range, Day/Night mode
switching, Digital Image Stabilizer, a 3-Axis gimbal mechanism, Privacy Masking, Motion Detection, 256x Digital
Zoom, Mirroring, and much more!
1.1 FEATURES
700TVL superior image quality with Sony 1/3” EXview HAD CCD II 960H sensor.
Starlight super-high sensitivity of 0.00006Lux/F=1.2 is achieved by Digital Slow Shutter (Sens-Up 512x).
The Sony Effio-S platform performs advanced camera functions and delivers excellent picture quality.
Varifocal DC Iris Lens 2.8~10mm.
Supports 3D & 2D Noise Reduction.
High sensitivity, low smear, high anti-blooming and high S/N ratio for high-performance video.
30 IR LEDs with a range of up to 15m (50ft)
Easy-to-use OSD Setup Menu.
D-WDR functions enabled by Sony Extended ATR technology handle tough backlight conditions.
Built-in Back Light Compensation (BLC), High Light Compensation (HLC), Auto Electronic Shutter (AES),
Auto Gain Control (AGC) and Auto White Balance (AWB).
Digital Image Stabilization.
Digital Zoom.
Built-in Motion Detection and Privacy Mask advanced surveillance functions.
3-Axis Gimbal Mechanism enables flexible view perspective.
Weather Resistant IP66, Vandal Proof for outdoor usage.

2
1.2 PACKAGE CONTENTS
1 x EHD630s Camera with pigtail
1 x EHD630s User Manual
1 x Accessory pack with screws
1 x Mounting template
1 x Lens-cleaning cloth
1.3 SPECIFICATIONS
Pickup Device
1/3" Sony 960H EXview HAD CCD II
Video Format
NTSC
PAL
Picture Elements
1020(H)x508(V)
1020(H)x596(V)
Horizontal Resolution
700TVL
Sensitivity
0.03Lux/F1.2; 0.00006Lux/Sens-up 512x
S/N Ratio
Over 52dB (AGC off)
Video Output
1.0Vp-p Composite, 75Ω ; BNC
Gamma Correction
0.45
Lens Type
Vari-Focal DC IRIS Lens 2.8~10mm/F1.2
High Light
Compensation
ON / OFF / AUTO
CLIP: 0~255 / SCALE: 0~15
Auto Electronic Shutter
1/60(50) ~1/100,000sec.
Auto Gain Control
0~200 Levels adjustable
Auto White Balance
ATW / AWB / 3200K / 6300K / ANTI CR / PUSH LOCK /
MANUAL
Sync. Mode
Internal
Day & Night Mode
External / Auto / Color / B&W
IR LED
30 units IR LED
IR Configuration
IR On < 2 Lux / IR Off > 5 Lux
IR Wavelength
850nm
IR Range
15m/50ft.
OSD Menu
OSD Control (English / Trad. Chinese / Simpl. Chinese)
DNR
3DNR: OFF / ON / MIDLOW / MID / MIDHIGH / HIGH
2DNR: OFF / ON / MIDLOW / MID / MIDHIGH / HIGH
D-WDR(Extended
ATR)
OFF / BLC / WDR
Digital Slow Shutter
Sens-Up ~ 512x
Digital Image Stabiliz.
Yes
Digital Zoom
Yes
Mirror
Normal / Vertical / Mirror / Rotate
Motion Detection
On / Off for 24 x16 Detection Zone Blocks
Privacy Mask
On / Off for 8 Zones Programmable, Mosaic
Power Source
12VDC / 24VAC
Power Consumption
IR Off: 12VDC = 2.5W / 24VAC = 4W
IR On: 12VAC = 6W / 24VAC = 7.5W
Operating Temperature
-10˚C~50˚C / 14˚F~122˚F
Optional: Heater for minimum temp. of -40˚C / -40˚F
Dimensions (O.D.xH)
140mm (O.D.) x 112mm (H) / 5.5” x 4.4”
Weight
1000 g / 2.2 lbs
Certifications
CE / FCC
Accessory Options
Wall Bracket: BA-611 / Ceiling Bracket: BA-613 /
Thread Metal Flexible Conduit Fittings BA-614 /
Connection Box for Adapter: BA-615

3
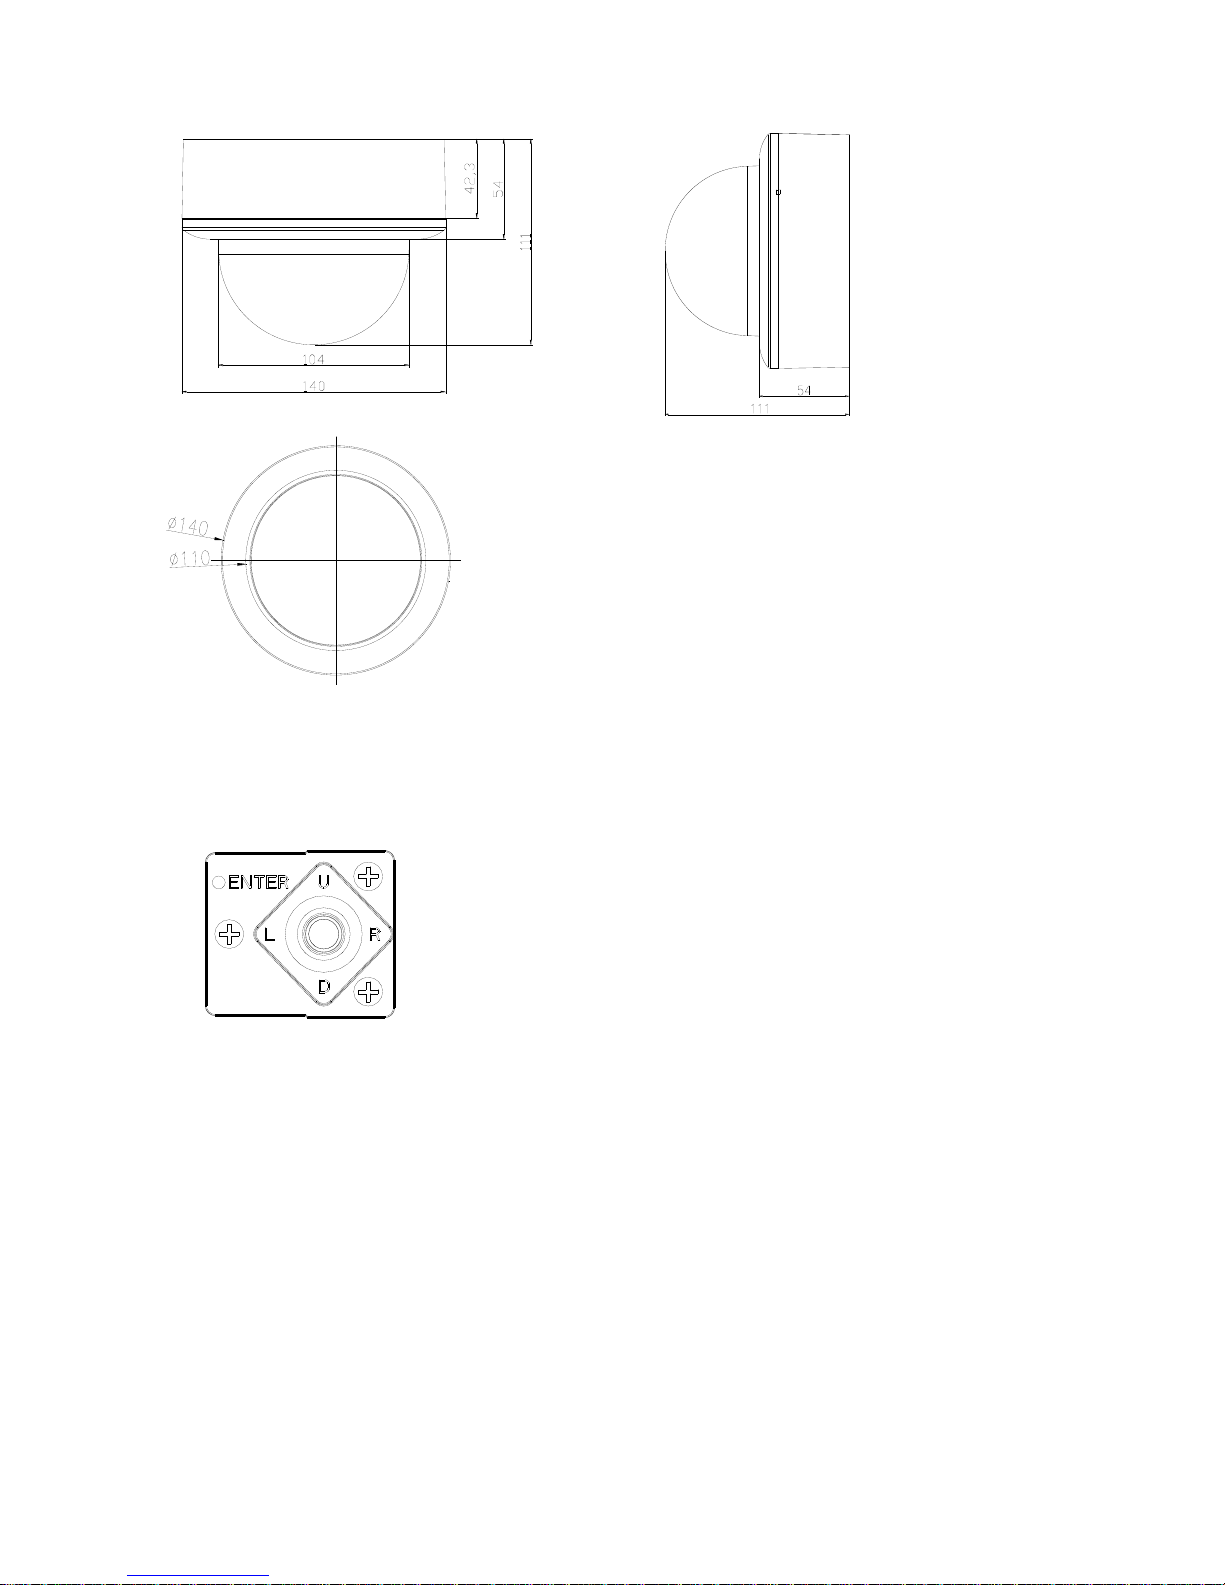
2. CAMERA OVERVIEW
2.1 Description of Camera Parts
①. FAR/NEAR Adjuster
Use this to adjust the lens to focus near or far.
②. WIDE/TELE Adjuster
Use this to adjust the lens angle for wide or telescope (zoom) view.
③. OSD Control Buttons
ENTER button
UP & DOWN button
LEFT & RIGHT button
④. VIDEO Connector
This output can be connected to a video monitor or similar device (75Ω).
⑤. Primary Power Input Terminal
Connect the power supply here – 12VDC or 24VAC.
⑥. Secondary Power Input Terminal (DC/AC version only)
The 12VDC power supply can also be connected here.
⑦. Secondary VIDEO Connector (DC/AC version only)
This is an RCA output.
4
2.2 Dimensions
3. On-Screen Display (OSD) Controls
3.1 OSD Control Stick
① ENTER
Press this button (by pressing straight down on the stick) to display the OSD’s main
menu on the monitor you have connected directly or indirectly to the camera’s video
connector. Also press this button to confirm changes and to open the submenus
when they’re available and selected. (Menu items with a “<┘” symbol at the end
contain submenus. For adjusting submenu items, select the desired menu item with
the and buttons and press the ENTER button to open the desired submenu.
Use the and buttons to toggle between value options.)
② R (RIGHT)
Press this button (by pressing the control stick to the right) to move the on-screen
cursor to the right to select items or to adjust the level/intensity of a selected function.
The level/intensity increases when this button is pressed.

5
③ L (LEFT)
Press this button (by pressing the control stick to the left) to move the cursor to the
left to select items or to adjust the level/intensity of a selected function. The
level/intensity decreases when this button is pressed.
④ D (DOWN)
Press this button (by pressing the control stick in the “down” direction) to scroll the
on-screen cursor downwards between menu items.
⑤ U (UP)
Press this button (by pressing the control stick in the “up” direction) to scroll the
on-screen cursor upwards between menu items.
3.2 OSD Operation
PLEASE NOTE:
The OSD display shown in the image above is for reference only. The actual version will
look different, but will have the same wording and format.
1. Open the OSD menu
Press the ENTER button to open the OSD’s main menu on your screen.
2. Scroll with the cursor buttons to select menu items
Use the and buttons to move the cursor up and down to scroll to the desired
menu items.
3. Toggle between the right-hand options (modes) of each menu item
Use the and buttons to change the modes of menu items and to access the
submenus of those modes (to adjust the parameters or values of submenu items –
where applicable). Menu items with a “<┘” symbol at the end contain submenus. (If
the right-hand menu title is “SET”, it means that there are no modes to choose from,
only a settings submenu for the left-hand main menu item.)
** MAIN MENU **
LENS
AUTO<┘
EXPOSURE
SET<┘
WDR
OFF
WHITE BALANCE
ATW<┘
2DNR & 3DNR
SET<┘
DAY/NIGHT
AUTO<┘
IMAGE
SET<┘
EFFECT
SET<┘
SYSTEM
SET<┘
EXIT<┘
 Loading...