

EverFocus ED710, ED730 User Manual
ED710 & ED730
Ultra 720+ Series Day/Night Indoor Dome Camera
User’s Manual
Copyright © EverFocus Electronics Corp,
Release Date: January, 2014

2
Precautions
1. Do not install the camera near electric or magnetic fields. Install the camera away from
TV/radio transmitters, magnets, electric motors, transformers and audio speakers since the
electromagnetic fields generated from these devices may distort the video image or
otherwise interfere with camera operation.
2. Never disassemble the camera beyond the recommendations in this manual nor introduce
materials other than those recommended herein. Improper disassembly or introduction of
corrosive materials may result in equipment failure or other damage.
3. Try to avoid facing the camera toward the sun. In some circumstances, direct sunlight may
cause permanent damage to the sensor and/or internal circuits, as well as creating
unbalanced illumination beyond the capability of the camera to compensate.
4. Keep the power cable away from water and other liquids and never touch the power cord
with wet hands. Touching a wet power cord with your hands or touching the power cord
with wet hands may result in electric shock.
5. Never install the camera in areas exposed to oil, gas or solvents. Oil, gas or solvents may
result in equipment failure, electric shock or, in extreme cases, fire.
6. Cleaning. For cameras with interchangeable lenses, do not touch the surface of the sensor
directly with the hands. Use lens tissue or a cotton tipped applicator and ethanol to clean
the sensor and the camera lens. Use a damp soft cloth to remove any dirt from the camera
body. Please do not use complex solvents, corrosive or abrasive agents for cleaning of any
part of the camera.
7. Do not operate the camera beyond the specified temperature, humidity or power source
ratings. This camera is suitable for indoor operation only. Use the camera at temperatures
within -10°C~50°C (14°F~122°F) and humidity between 20%~ 80%; this device is not rated as
submersible. The input power source is 12VDC or 24VAC. Be sure to connect the proper + / -
polarity and voltage, as incorrect polarity or too high a voltage will likely cause the camera
to fail, and such damage is not covered by the warranty.
8. Mounting. Use care in selecting a solid mounting surface which will support the weight of
the camera plus any wind, snow, ice or other loading, and securely attach the camera to the
mounting surface using screws and anchors which will properly support the camera. If
necessary (e.g. when mounting to drop ceilings) use a safety wire to provide additional
support for the camera.
3
Safety Notice
Federal Communication Commission Interference Statement
This equipment has been tested and found to comply with the limits for a Class A digital device,
pursuant to Part 15 of the FCC Rules. These limits are designed to provide reasonable protection
against harmful interference in a residential installation. This equipment generates uses and
can radiate radio frequency energy and, if not installed and used in accordance with the
instructions, may cause harmful interference to radio communications. However, there is no
guarantee that interference will not occur in a particular installation. If this equipment does
cause harmful interference to radio or television reception, which can be determined by turning
the equipment off and on, the user is encouraged to try to correct the interference by one of the
following measures:
- Reorient or relocate the receiving antenna.
- Increase the separation between the equipment and receiver.
- Connect the equipment into an outlet on a circuit different from that to which the receiver
is connected.
- Consult the dealer or an experienced radio/TV technician for help.
FCC Caution: Any changes or modifications not expressly approved by the party responsible for
compliance could void the user's authority to operate this equipment.
This device complies with Part 15 of the FCC Rules. Operation is subject to the following two
conditions: (1) This device may not cause harmful interference, and (2) this device must accept
any interference received, including interference that may cause undesired operation.

4
Contents
1. INTRODUCTION .................................................................................... 5
1.1 PACKING LIST..................................................................................................... 5
1.2 FEATURES ......................................................................................................... 6
2. CABLE DESCRIPTION.......................................................................... 6
3. INSTALLATION ..................................................................................... 7
3.1 INSTALLATION AND ADJUSTMENT .......................................................................... 7
4. CONFIGURATION IN THE OSD MENU ............................................... 13
5. SPECIFICATIONS ............................................................................... 16

ED710/730 Ultra 720+ TVL Dome Camera
5
1. Introduction
Get incredible performance in bright light or low light, and the resolution listed in the specs from
the actual camera you install. To take full advantage of the amazing resolution available from this
advanced imaging technology, the EverFocus Ultra Series ED710/730 uses a vari-focal lens together
with SONY EXview HAD 960H CCD II to produce in excess of 720 horizontal TV lines of resolution
from each and Ultra Series 720+ camera we deliver.
The EverFocus Ultra Series cameras are combined with a useable native low light sensitivity of 0.05
lux without using digital slow shutter. The cameras truly provides color without compromise: over
720TVL resolution, Digital Wide Dynamic Range for clear color images in the most challenging of
bright or unbalanced scene lighting conditions. Moreover, the ED730 features 18 LEDs with range of
30m / 100 feet or more; it also provides true day/night IR enhanced images in low light with
guaranteed ZERO ghosting.
The EverFocus Ultra Series cameras support both NTSC and PAL scanning systems. The cameras are
equipped with 3 Axis rotation design, allowing wall or ceiling mounting. Your choice of vari-focal
2.8~12mm DC iris lens for easily adjustable field of view; dual voltage operation and a full suite of
OSD Menu and DSP functions controllable at the camera (DNR to save DVR HDD space, privacy
masking, mirroring, and much more) This is the camera that you have been waiting for to create
analog CCTV systems that produce astounding image clarity in a wide range of indoor applications
at the widest range of light levels.
Model
Image Sensor and Lens
TVL
IR LEDs
Day / Night
ED710
1/3” Sony Exview HAD II 960H CCD
2.8-12mm DC Iris
720+
No
Auto
ED730
Yes (18 LEDs)
True Day/Night
1.1 Packing List
Dome Camera x 1
Screw x 3
User Manual x 1
Screw Driver x 1
Test Lead x 1
Plastic Anchor x 3
DC Power Pigtail Cable x 1
Quick Installation Guide x 1
Template Plate x 1
ED710/730 Ultra 720+ TVL Dome Camera
6
1.2 Features
Ultra resolution of over 720 horizontal TV lines for astounding image quality
Exview HAD CCD II delivers amazing ultra high sensitivity of 0.05 lux – very low
light sensitivity without DSS low light boost - Zero Ghosting guaranteed
Vari-focal 2.8~12mm DC iris lens to capture the desired field of view
18 IR LEDs for 30m/100ft. range -depending on scene IR reflectivity (for ED730)
Provides 2D- Noise Reduction to improve picture clarity while enabling DVRs to improve
disk storage utilization
Adaptive Tone Curve Reproduction (ATR)/Digital Wide Dynamic Range expansion to
deliver properly exposed images despite unbalanced lighting in the scene
Easy to use OSD setup menu
Compact size for discreet sureillance
The flexible angle viewing with its 3 Axis rotation design allows wall or ceiling mounting
Easy lock installation by screwing the base plate to the surface and then locking the
camera to the base plate without mounting screws
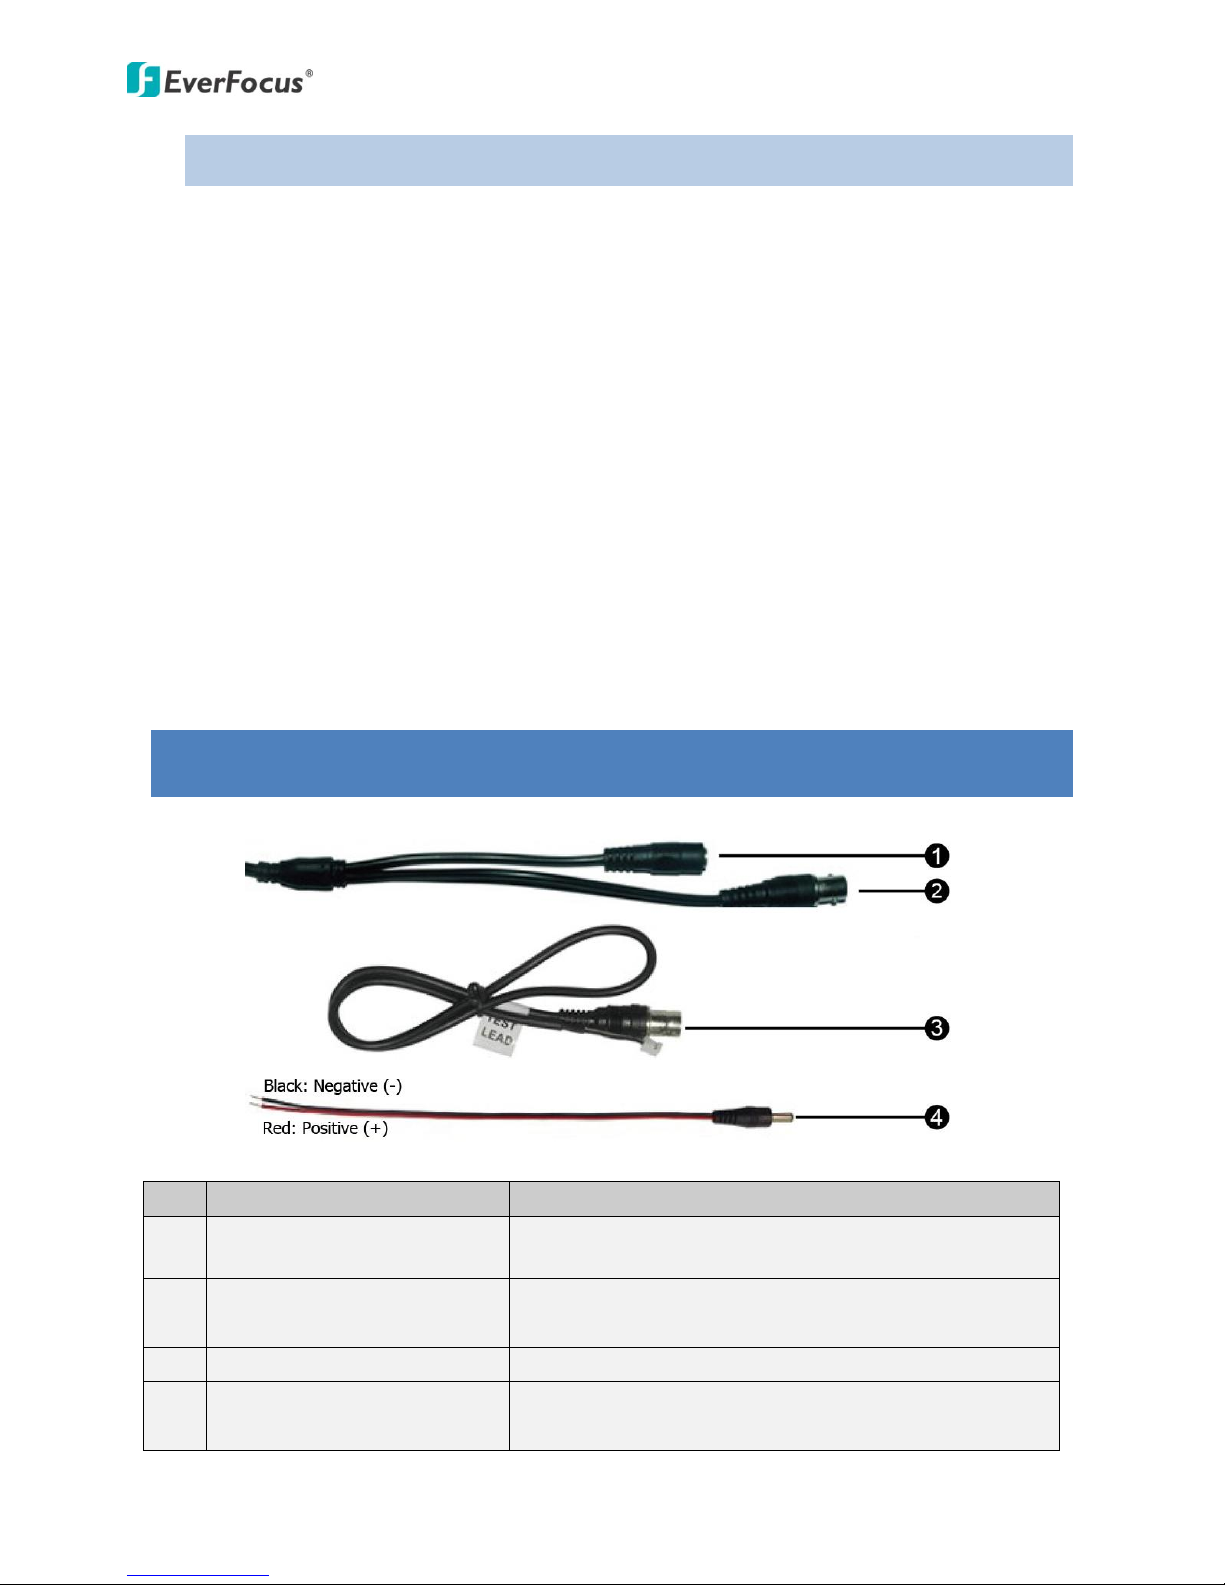
2. Cable Description
No.
Name
Descriptions
1
Power Cable
Connects to a 12VDC or 24VAC power source.
2
Video Output
Connects to a DVR or monitor, using a 75 Ohm BNC-type
coaxial cable.
3
Test Lead
Connects to a monitor for setting image aim and focus.
4
DC Power Pigtail Cable
Optional power pigtail cable. The red wire is positive (+);
while the black wire is negative (-).
 Loading...