

Page 1
EASY DECISION
INSTALLATION, OPERATION
& MAINTENANCE INSTRUCTIONS
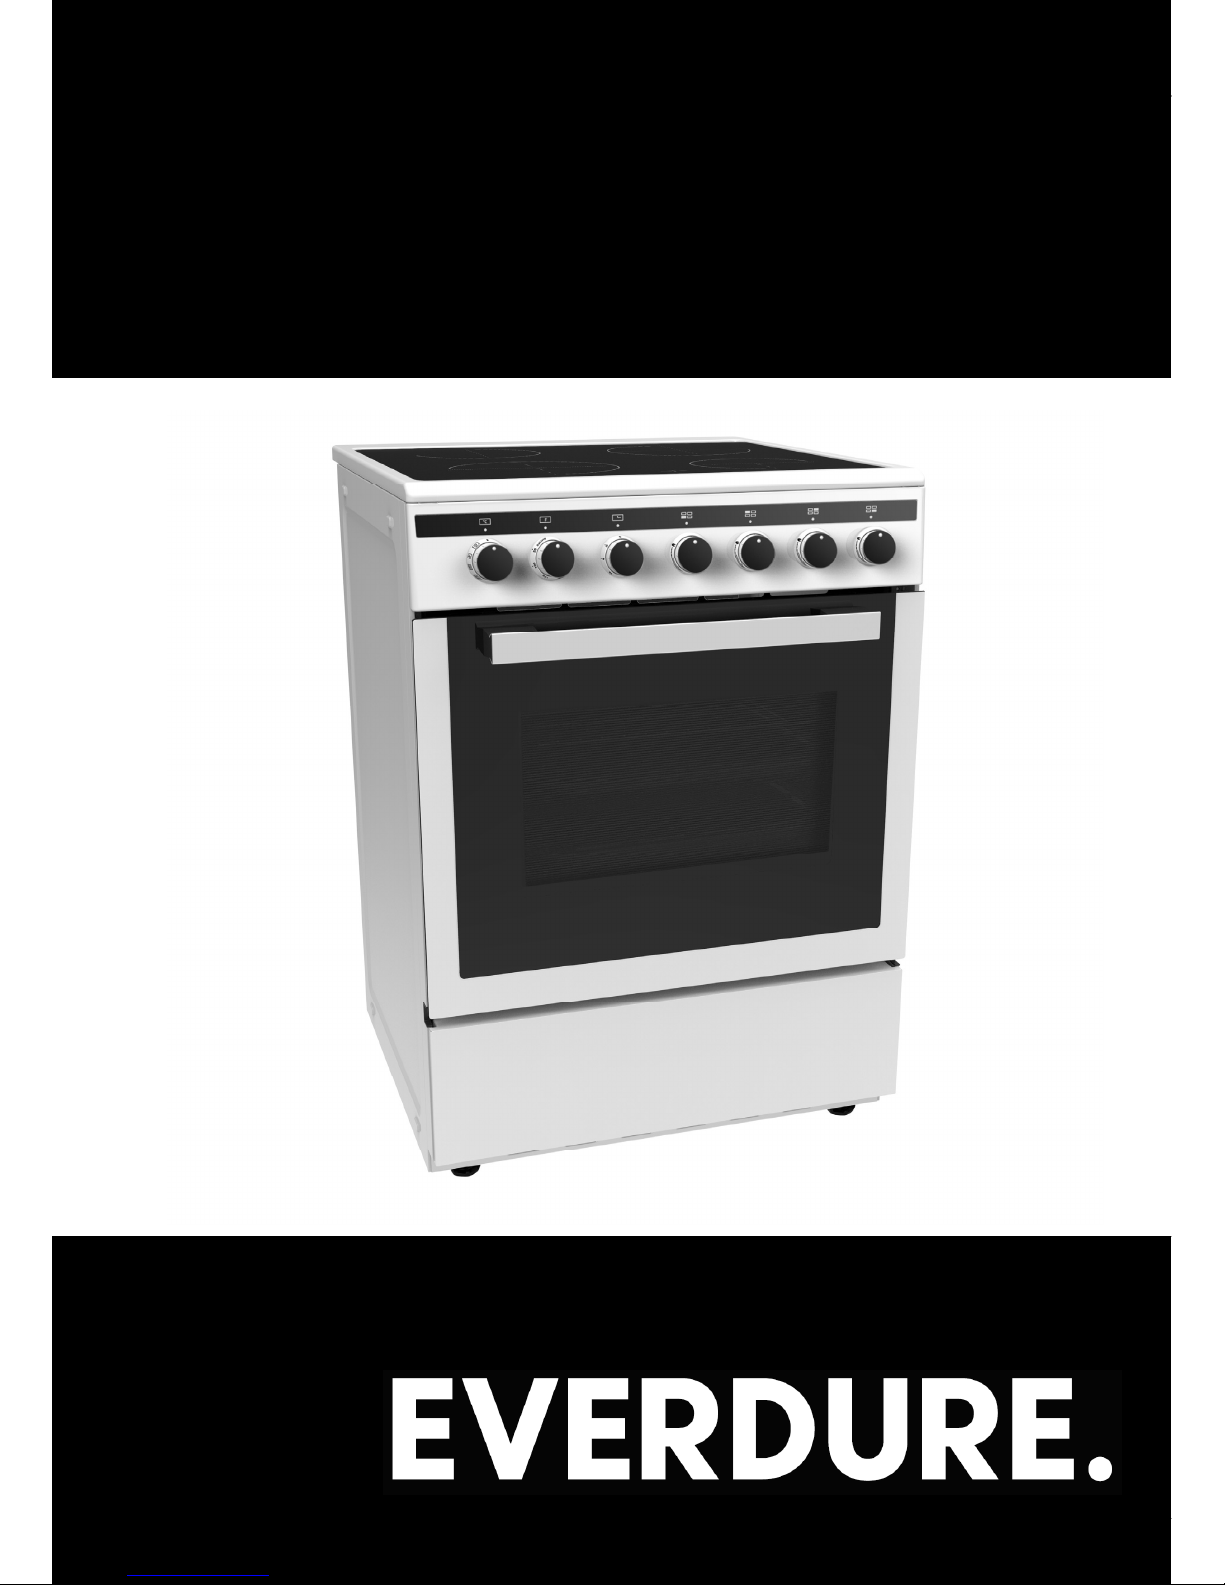
FOR EVERDURE FREESTANDING ELECTRIC OVENS WITH CERAMIC COOKTOP
Models Included:
OBES61
INSTALLATION, OPERATION AND MAINTENANCE INSTRUCTIONS FOR
UFCW661
Page 2

EASY DECISION
EVERDURE FREESTANDING ELECTRIC OVEN RANGE
UFCW661 FREESTANDING ELECTRIC OVENS WITH CERAMIC COOKTOP
CONTENTS
SECTION PAGE NO.
Important Safety Instructions ………….. 3
Appliance Details ………………………… 4
Electrical Connections ………………..…. 5-6
Installation ………………………………… 6-7
Operating Instructions …………………… 8-12
Cooking Guides ..….………………….……. 13-15
Cleaning …………………………………….. 16
Troubleshooting ………………………….... 17
Transportation …………………………….... 17
Wiring Diagram …………….………………. 18
CONGRATULATIONS
Welcome to the Everdure Kitchen Community and thank you for choosing one of our many
fantastic cooking appliances. We are confident that you will now be able to meet your cooking
needs. Before you use the oven we strongly recommend that you read though the whole user
manual which provides the description of this product and the proper use of its functions.
To avoid the ever-present risks involved with using an electrical appliance it is vital that the
oven is installed correctly and that you read the safety instructions carefully to avoid misuse
and hazards.
It is important that you retain these instructions and your proof of purchase along with any
other important documents about this product for future reference. Due to continual product
development, Everdure reserves the right to alter specifications or appearances without notice.
2
Page 3

EASY DECISION
IMPORTANT SAFETY INSTRUCTIONS
IMPORTANT: Read the assembly instruction section and safety precautions of this booklet carefully before
removing the contents of this carton.
1. This appliance is not intended for use by persons (including children) with reduced physical, sensory or mental capabilities, or lack of experience or
knowledge, unless they have been given supervision or instruction concerning the use of the appliance by a person responsible for their safety.
Children should be supervised to insure that they do not play with the appliance.
2. After removing the packaging, make sure to check if there is any damage to the appliance. If there is any damage, never attempt to use the
appliance and immediately contact your Authorised Service Centre. As packaging materials can be dangerous to children, they need to be collected
immediately and put out of reach.
3. In certain circumstances electrical appliances may be a safety hazard. Check the conformity of voltage and power settings, which are specified on
the information sticker attached to the appliance and/or packaging, with the usage conditions available.
4. Do not place heavy objects in or on these appliances, or use for storage, or let children play or swing from the doors. These appliances are designed for
cooking food only. Use flat based, stable cooking pots only. Do not exceed 20kg on cooktop.
5. This appliance is designed for domestic household use only and for the cooking of domestic food products. Use as a commercial appliance will void the
warranty. It should not to be used in a marine environment or outdoors and must be fully built in. Do not use the appliances until fully installed.
6. For single phase installation (220-240V), the minimum cross sectional area is 4 mm² (3G4mm²). If a 3 phase installation is required, the installer must
supply the cables as recommended in this manual (no cables are supplied with this appliance). The minimum cross sectional area for 3 phase installation s
2.5mm² (5G2.5mm²).
7. For New Zealand: If this cooking range is to be connected to a new or upgraded electrical installation, then it must be connected by a supply cord fitted
with:
- An appropriate rated plug that is compatible with the socket-outlet fitted to the final sub-circuit in the fixed wiring that supplies this cooker.
- An appropriate rated installation male connector that is compatible with the installed female connector fitted to the final sub-circuit in the fixed
wiring that supplies the cooker.
8. If the electrical supply cord is damaged, either when being installed or after installation, it must be replaced by the manufacturer or similarly qualified
persons in order to prevent a safety hazard.
9. WARNING – Ensure the appliance is switched off before relacing the lamp to avoid the possibility or electric shock. The appliance must be electrically
isolated before any maintenance can be performed. The electrical connection must be accessible after installation. If the electrical supply is restricted,
means of all-pole disconnection must be accessible and incorporated in the fixed wiring in accordance with the wiring rules.
10. Electrical connection must be made as per local wiring rules and regulations. Do not disconnect the appliance with wet hands or bare feet, and do not
disconnect the power cord with extreme force.
11. For ovens, the appliance needs sufficient air circulation while it is operating. Carefully read the part of this manual, where installation procedures are
explained, and make sure the relevant conditions are satisfied.
12. Ensure that the kitchen is well ventilated or mechanical ventilation is in use while cooking in this appliance.
13. Do not store or use flammable materials or aerosols near the oven. Items made from aluminium, plastic or plastic film should also be kept away from the
appliance, as they may fuse to the surface.
14. Never line the oven bottom with aluminium foil, as the consequent accumulation of heat could compromise the cooking and even damage the enamel.
15. WARNING – Accessible parts will become hot when in use. To avoid burns young children should be kept away. During use the appliance becomes hot.
Care should be taken to avoid touching the heating elements inside the oven. Use heat resistant cooking gloves where-ever possible when moving food
and cooking utensils in and out of the oven.
16. Cleaning may only be commenced on the appliance once it has cooled down and turned off. Do not use a steam jet or any other high pressure cleaning
equipment to clean the appliance.
17. Wash all accessories in hot soapy water or in a dishwasher, wipe dry with a paper or cloth towel. If you use your oven for an extended period of time,
condensation may form. Dry it using a soft dry cloth.
18. When the appliance is not being used, the knobs and buttons must be kept in the ‘OFF’ position.
19. Where this appliance is installed in a caravan, it shall NOT be used as a space heater.
20. Do not modify this appliance. This appliance is not intended to be operated by means of external timer or separate remote control system.
21. Do not use harsh abrasive cleaners or sharp metal scrapers to clean the oven door glass as they can scratch the surface, which may result in the glass
shattering. Clean the glass using warm damp cloth and dry it with a soft cloth.
22. All cabinetry and materials used in the installation must be able to withstand a minimum temperature of 50°C above the ambient temperature of the
room it is located in, whilst in use. Certain types of vinyl or laminate kitchen furniture are particularly prone to heat damage or discolouration at
temperatures below the guidelines given above. Any damage caused by the appliance being installed without adhering to the temperature limits set out
above will be the liability of the owner.
23. Damage can occur to bench tops if pots and pans are allowed to overlap any nearby bench tops. This can result in heat being transferred to the bench
top. Ensure correct sized cookware is used. Cast iron and cast aluminium cookware with damaged bases may scratch the cooktop surface if they are
dragged across it. Pans should be lifted on and off the cooktop surface and not dragged. Cooking zones should not be switched on without cookware
placed on it. Also the cookware should not be empty for any length of time.
24. If any cracking is noticed on the ceramic cooktop, turn the appliance off immediately and call your Authorised Service Centre.
25. If this appliance is installed on a base, measures must be taken to prevent the appliance from slipping from the base.
26. The appliance must be installed and put in operation by an authorised technician under the conditions provided by the manufacturer in this manual. The
manufacturer cannot be held responsible for any damage that might occur due to faulty installation.
27. The values indicated in the cooking guide sections are values obtained in a laboratory environment according to relevant standards. These values may
vary according to the usage and environmental conditions of the product.
28. When you first run your oven, a certain smell will emanate from the insulation materials and the heater elements. For this reason, before using your oven,
run it empty at maximum temperature for 45 minutes. At the same time, you need to ventilate the environment in which the oven is installed.
29. Do not leave the cooker while cooking with solid or liquid oils. There may be flaming up on conditions of extreme heating. Never pour water onto the
flames occurring from oil. Immediately turn the cooker off and cover the saucepan or fry pan with a lid or fire blanket in order to smother the flame.
30. Do not leave anything on the door when they are open; you may unbalance the product or break the griller door.
3
Page 4

EASY DECISION
APPLIANCE DETAILS
ELECTRICAL DETAILS UFCW661:
Rated Voltage: 220-240V / 380-415V ~3N, 50 Hz
Max Rated Inputs: 9000W (3000W for oven, 6000W for cooktop).
This information can be found on the rating plate (data label) affixed to the rear of the appliance.
HOTPLATE RATING
165mm hilight x 2 (RF, LR) 1200W each
200mm hilight x 2 (RR, LF) 1800W each
OVEN RATING
Top element 950W
Bottom element 1100W
Grilling element 2000W
Rear turbo element 2000W
Fan motor 33W
Lamp 25W
SIZES:
The appliance is supplied with one wire shelf and one oven tray. Each shelf and tray comes with a built-in
safety feature to help minimise them being accidentally pulled fully out. This comes in the way as a
“step”, positioned at the rear of the shelf or tray.
To fit them into the oven, push the shelf or tray part way into the oven at an angle, then fully insert. To
remove, repeat the process in reverse.
Relevant Sizes: DEPTH (mm) WIDTH (mm) HEIGHT (mm)
External Oven size 600 600 900 (885-915)
4
Page 5
EASY DECISION
ELECTRICAL CONNECTIONS
LOCAL AUTHORITY REQUIREMENTS
Installation is only permitted by an authorized person, and carried out according to instructions
provided by the manufacturer. Incorrect installation might cause harm and damage which the
manufacturer accepts no responsibility.
ELECTRICAL INSTALLATION
Before carrying out the connection to the power supply, the voltage rating of the appliance (stamped on
the appliance identification plate) must be checked for correspondence to the available mains supply
voltage, and the mains electric wiring should be capable of handling the oven’s power rating (also indicated
on the identification plate).
NOTE: For connections to the mains power supply, never use adapters, reductions or multiple power points
as these may overheat and catch fire.
A circuit breaker with a contact opening of at least 3 mm must be
installed inside the supply circuit.
After having installed the appliance, the switched outlet must always be in an accessible position.
The electrical safety of this appliance can only be guaranteed if the cooker is correctly and efficiently
earthed. The manufacturer declines all responsibility for damage resulting from a system which has not been
earthed.
WARNING: It is essential to use specific soft wire or specific groupware bought from the manufacturer or
maintenance department to replace if the electrical soft wire has been broken.
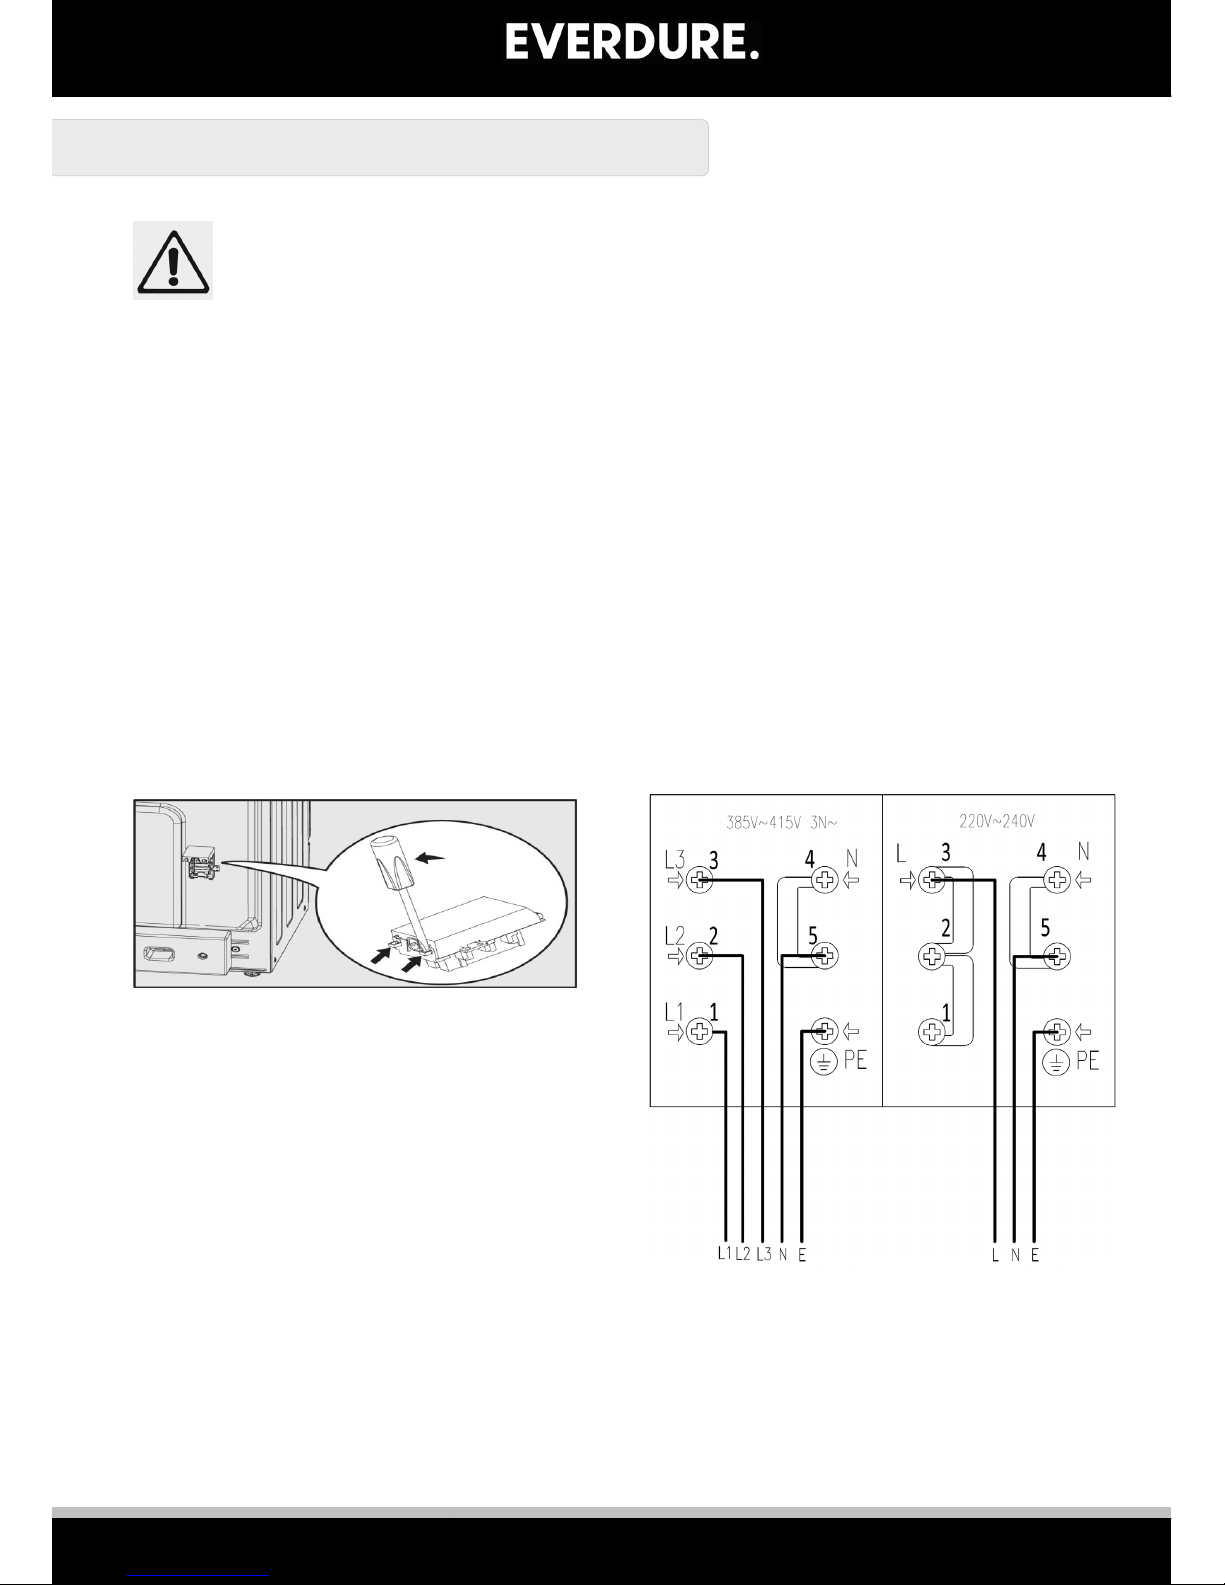
IMPORTANT: The following figure shows the connection details and minimum diameters of supply cables that must be
used for a three phase connections:
For
sin
gle
pha
se
con
nec
tio
ns, if shortcut circuit bridges are not installed
properly, some cooking zones do not operate.
These ovens must be connected to a 220-240V 50Hz
power supply or a 380-415V 3 phase 50Hz power
supply. They are earthed via the supply cord. The
earthing cable must be connected via the screw with
the earthing mark.
The switched outlet must be connected to a suitable
earth wiring, in conformity to current safety
regulations.
The cooking appliance must be connected to a switched outlet. It should not be located above the
appliance and no more than 1.25m away from it. The power supply cord must not touch against any hot
surfaces and must be placed so that its temperature does not exceed 75 °C at any point along its length.
The mains terminal block is located at the rear of the oven and the terminals are accessible by removing the
terminal block cover with a screwdriver.
If the mains supply cable is damaged during or after installation, it must be replaced by a licensed
electrician with a cable supplied by the Authorised Service Centre.
5
Page 6
EASY DECISION
OVEN LAMP REPLACEMENT
The appliance must first be disconnected from the power outlet or turned off at your isolation
switch.
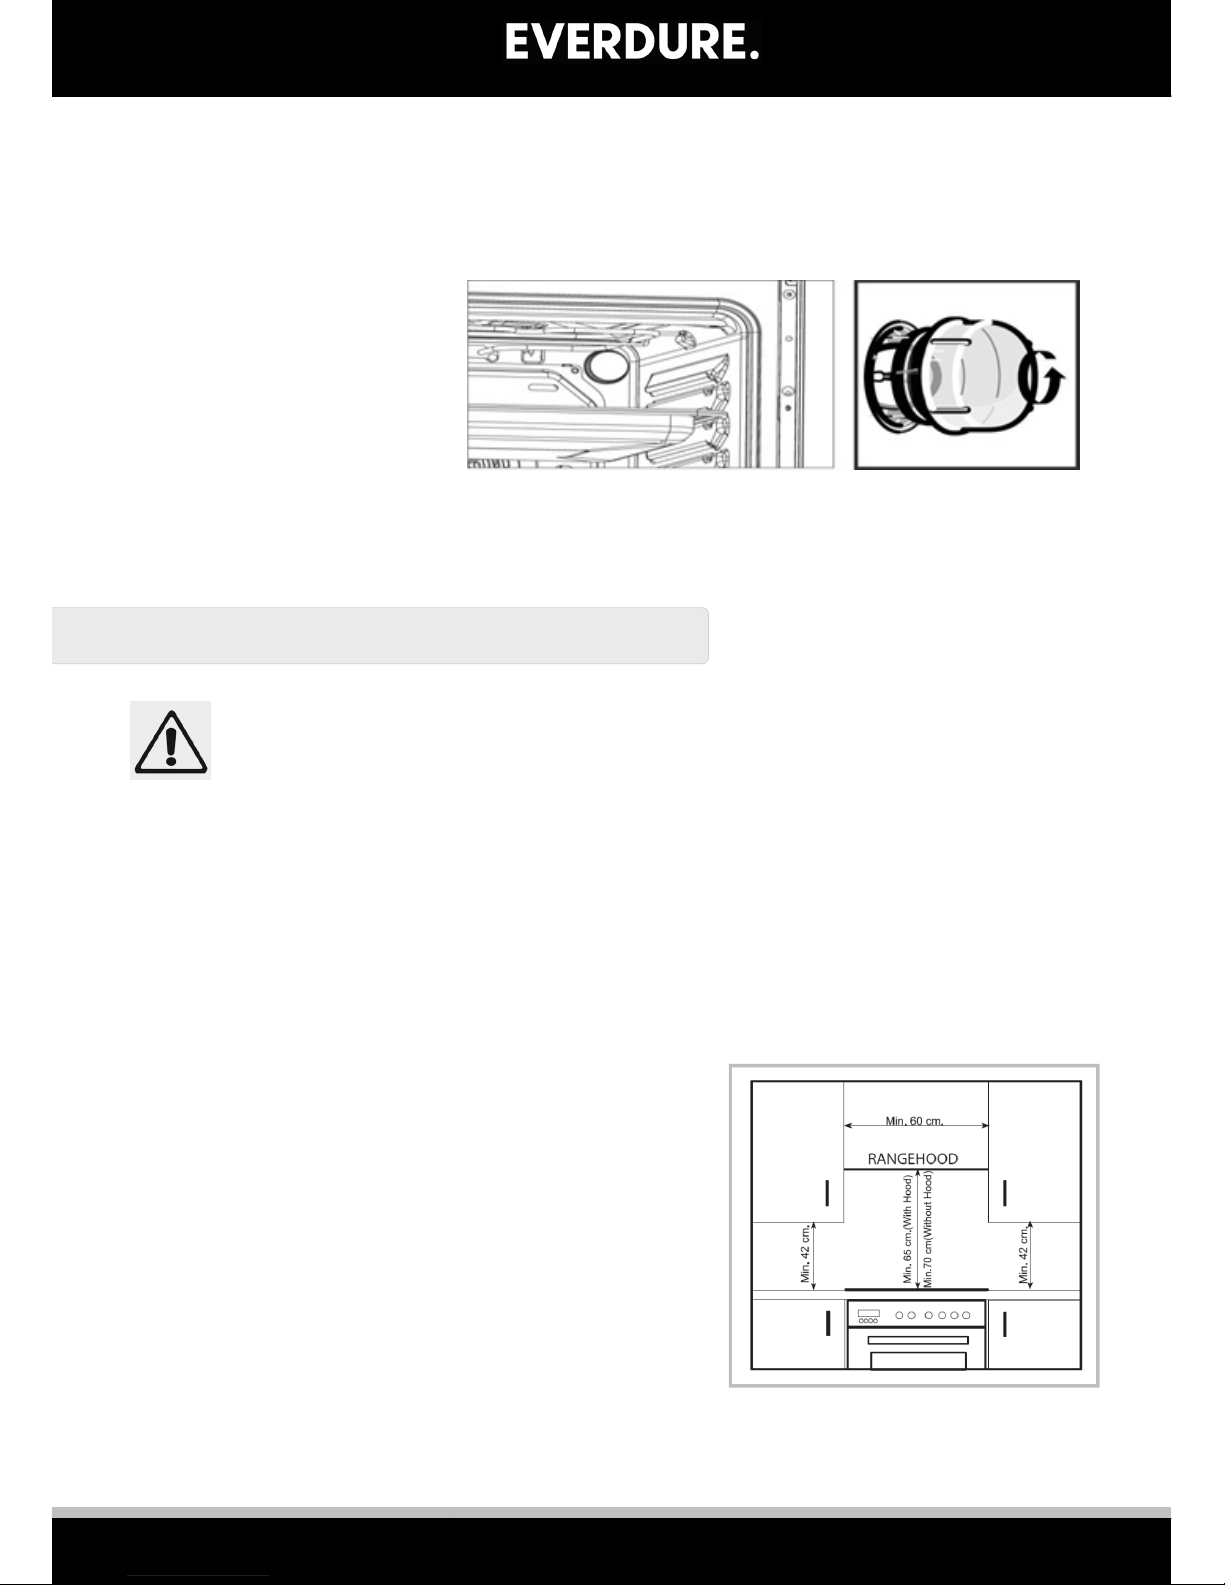
Unscrew the glass cover attached to the lamp holder; anti-clockwise.
Unscrew the lamp and replace it with another high-temperature lamp with the following
characteristics:
Type: Halogen E14
Voltage: AC220V-240V
Wattage: 25W
Temperature rating: 300°C
Remount the glass cover and reconnect the appliance to the power outlet or turn on at your
isolation switch.
NOTE: Should you experience any difficulty please contact your nearest Authorised Service Centre.
INSTALLATION
The adjacent furniture must be able to withstand a minimum temperature rise of 50°C above the
ambient temperature of the room it is located in, during periods of use. The power supply to the
appliance must be switched off before any adjustments or maintenance work is done on it.
PREPARATION FOR INSTALLATION AND USE
Manufactured with best quality parts and materials, this modern, functional and practical oven with
cooktop will meet your needs in all respects. Make sure to read the manual to obtain successful results so
as not to experience any problems in the future. The information given below contains rules that are
necessary for correct positioning and service operations. They should be read without fail, especially by
the technician who will position the appliance.
INSTALLATION OF COOKER
The cooker can be placed close to other furniture on condition that in the area where the cooker
is set up, the furniture’s height does not exceed the height of the cooktops. Cabinets installed
beside the cooker that are higher than the cooktop must be
at least 20cm from the edge of the hobs.
Do not place the cooker near a refrigerator or close to doors
where people opening or closing the door cold come in
contact with cooking vessels on the cooktop.
When choosing a place for the cooker, attention should be
paid that there are no flammable or combustible materials in
the close vicinity, such as curtains, oil, cloth etc. which quickly
catch fire.
The wall behind the appliance must be made from a fireproof
material.
Rangehoods must be installed at least 650mm above the
appliance. Any wall cabinets directly above the appliance
must be at least 700mm above the hobs.
Furniture surrounding the cooker must be made of materials resistant to temperatures 50 C° above the
ambient temperature or more.
6
Page 7
EASY DECISION
The cooker is designed to fit between kitchen cabinets spaced over 600 mm apart. The space
either side of the cooker needs only be sufficient to allow withdrawal of the cooker for servicing.
It can be used with cabinets on one side or both sides as well as in a corner setting. It can also
be used free-standing.
FEET
The feet are packed inside the oven cavity. Fix by angling the cooker slightly and screwing into
the 4 corners of the base panel. Adjust the cooker to the appropriate height, then fit the cooker
into place. The cooker should be level and stable when installed, otherwise adjust the height of
the appropriate foot.
ANTI-TILT KIT
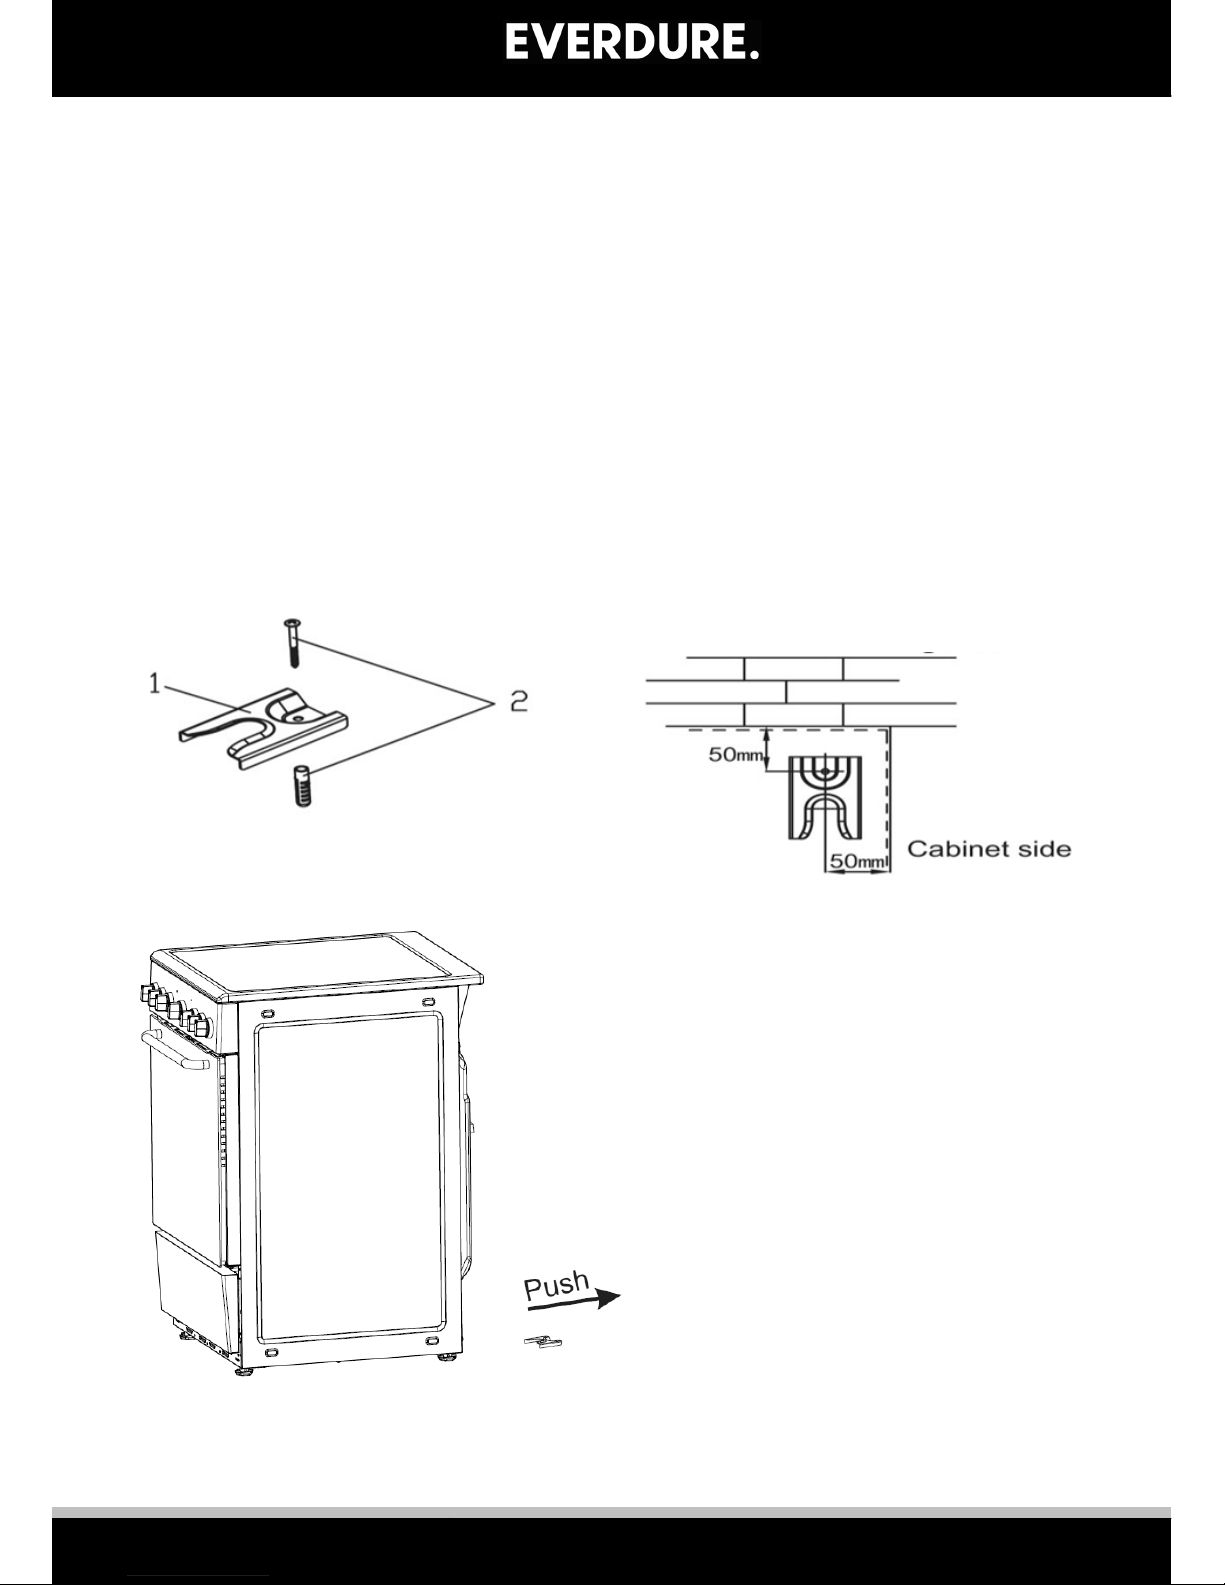
To stop the cooker from being accidentally toppled over, an anti-tilt bracket must be fitted.
First take the anti-tilt bracket, screw and plastic plug (as per figure 1). Fix the anti-tilt bracket to the floor
50mm in from the rear wall and 50mm from the side wall or cabinet (as per figure 2). Push the appliance
into position so that the appropriate foot slides into the bracket (as per figure 3), fixing it in place so the
appliance cannot tilt away from either wall.
Figure 1
Figure 2
Figure 3
7
7
Page 8
EASY DECISION
OPERATING INSTRUCTIONS
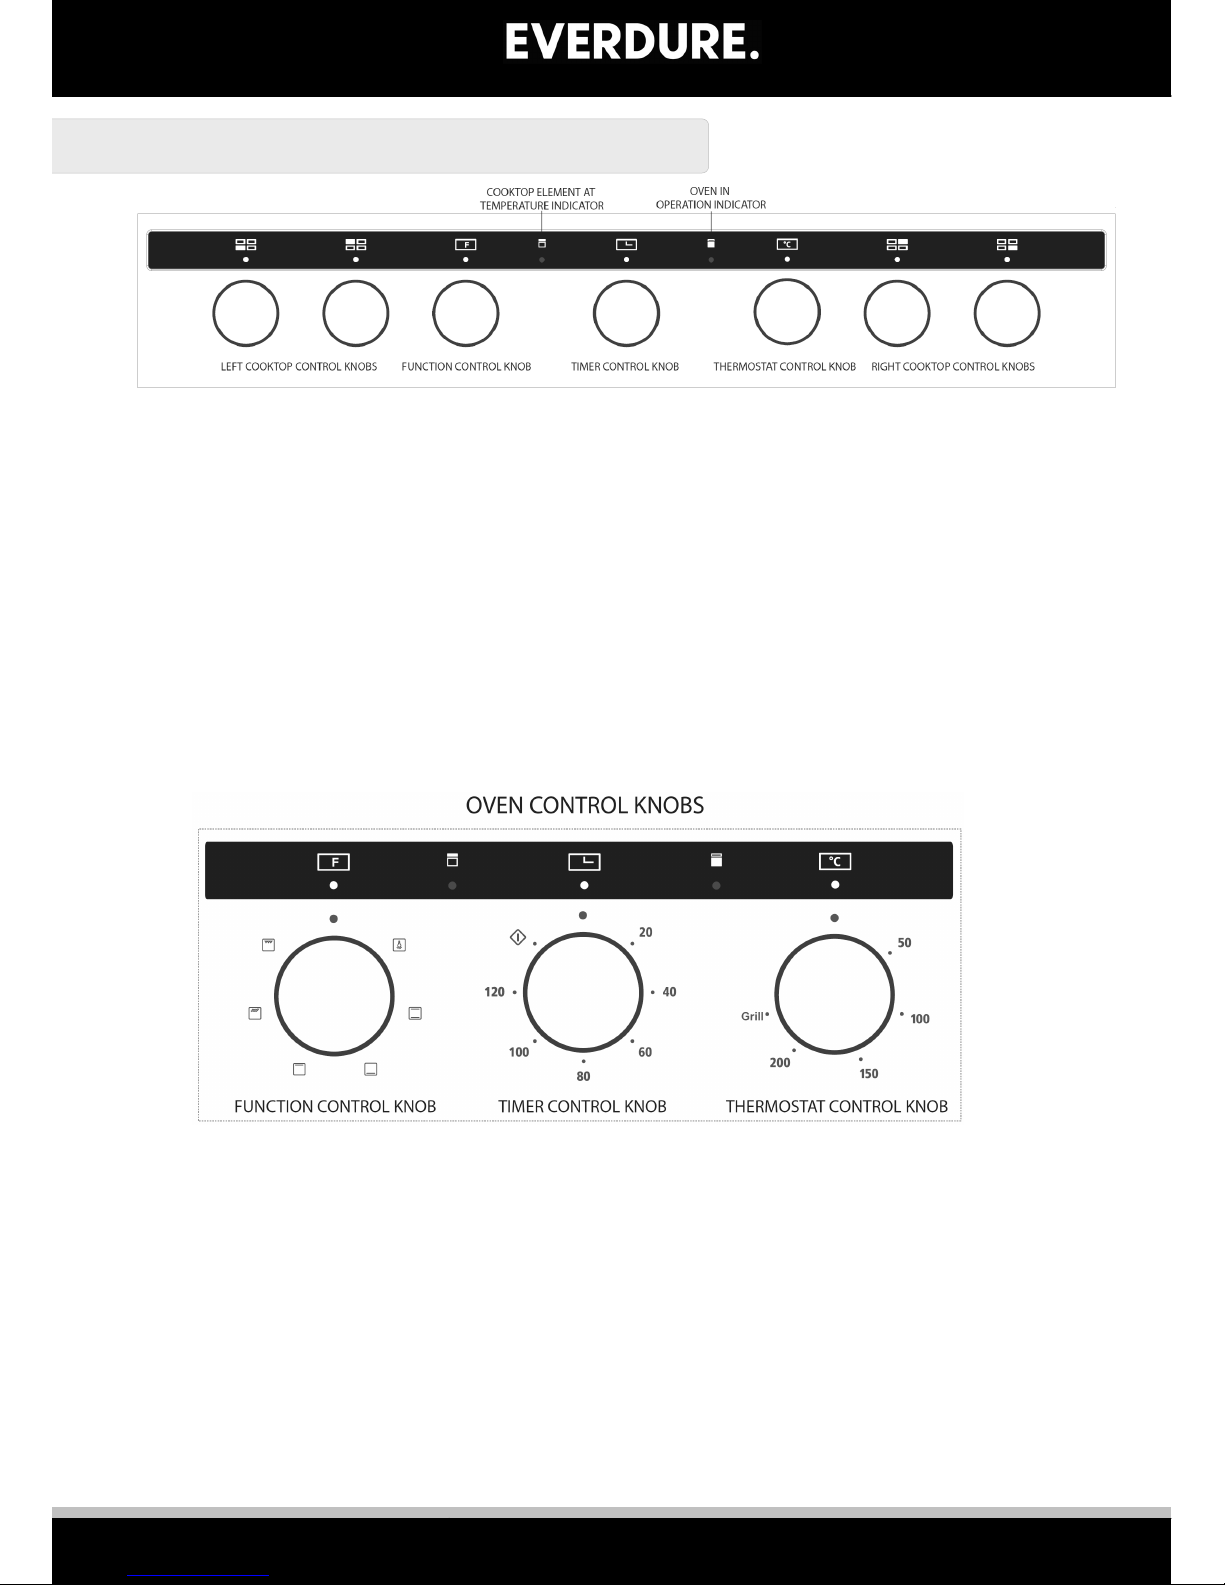
Note: The control knob decals are printed on the bezels at the base of each control knob.
When you first run your oven a certain smell will be emanated arising from the insulation materials and the
heater elements. For this reason, before using your oven, run it empty at maximum temperature for 45
minutes. At the same time you need to properly ventilate the kitchen or environment in which the oven is
installed.
In order to cook in your oven, the oven function and temperature setting control knob needs to be
adjusted. The oven timer needs to be set to either fully anti-clockwise (one stop past off) for manual, or
set with a period of time between 0-120 minutes, otherwise the bottom oven will not operate.
Turn your appliance off when it is not in use.
Protect your appliance from atmospheric effects. Do not leave it under the effects of the sun, rain, snow,
dust etc.
USING THE OVEN
Note: The control knob decals are printed on the bezels at the base of each control knob.
Choose an oven function with the oven function control knob (off at the top, with 9 other functions).
Chose an oven temperature setting using the thermostat control knob. The temperature ranges from 0⁰C
(top) to >200⁰C (rotated fully clockwise), depending on the function.
Place the food into the oven.
Set the timer to either manual (rotate the timer control knob fully anti-clockwise) or set up a timer function
(rotate the timer control knob clockwise to the desired setting).
All of the above settings can be adjusted at any time during the cooking process.
If a timer function has been set, once the time runs out, a buzzer will sound and the oven will turn off.
If a timer function was not set, the cooking process can be stopped by turning the timer control knob to the
top position.
Note: Turn all control knobs to point up when cooking has finished.
8
Page 9
EASY DECISION
USING THE COOKTOP HOT PLATES
Note: The control knob decals are printed on the bezels at the base of each control knob.
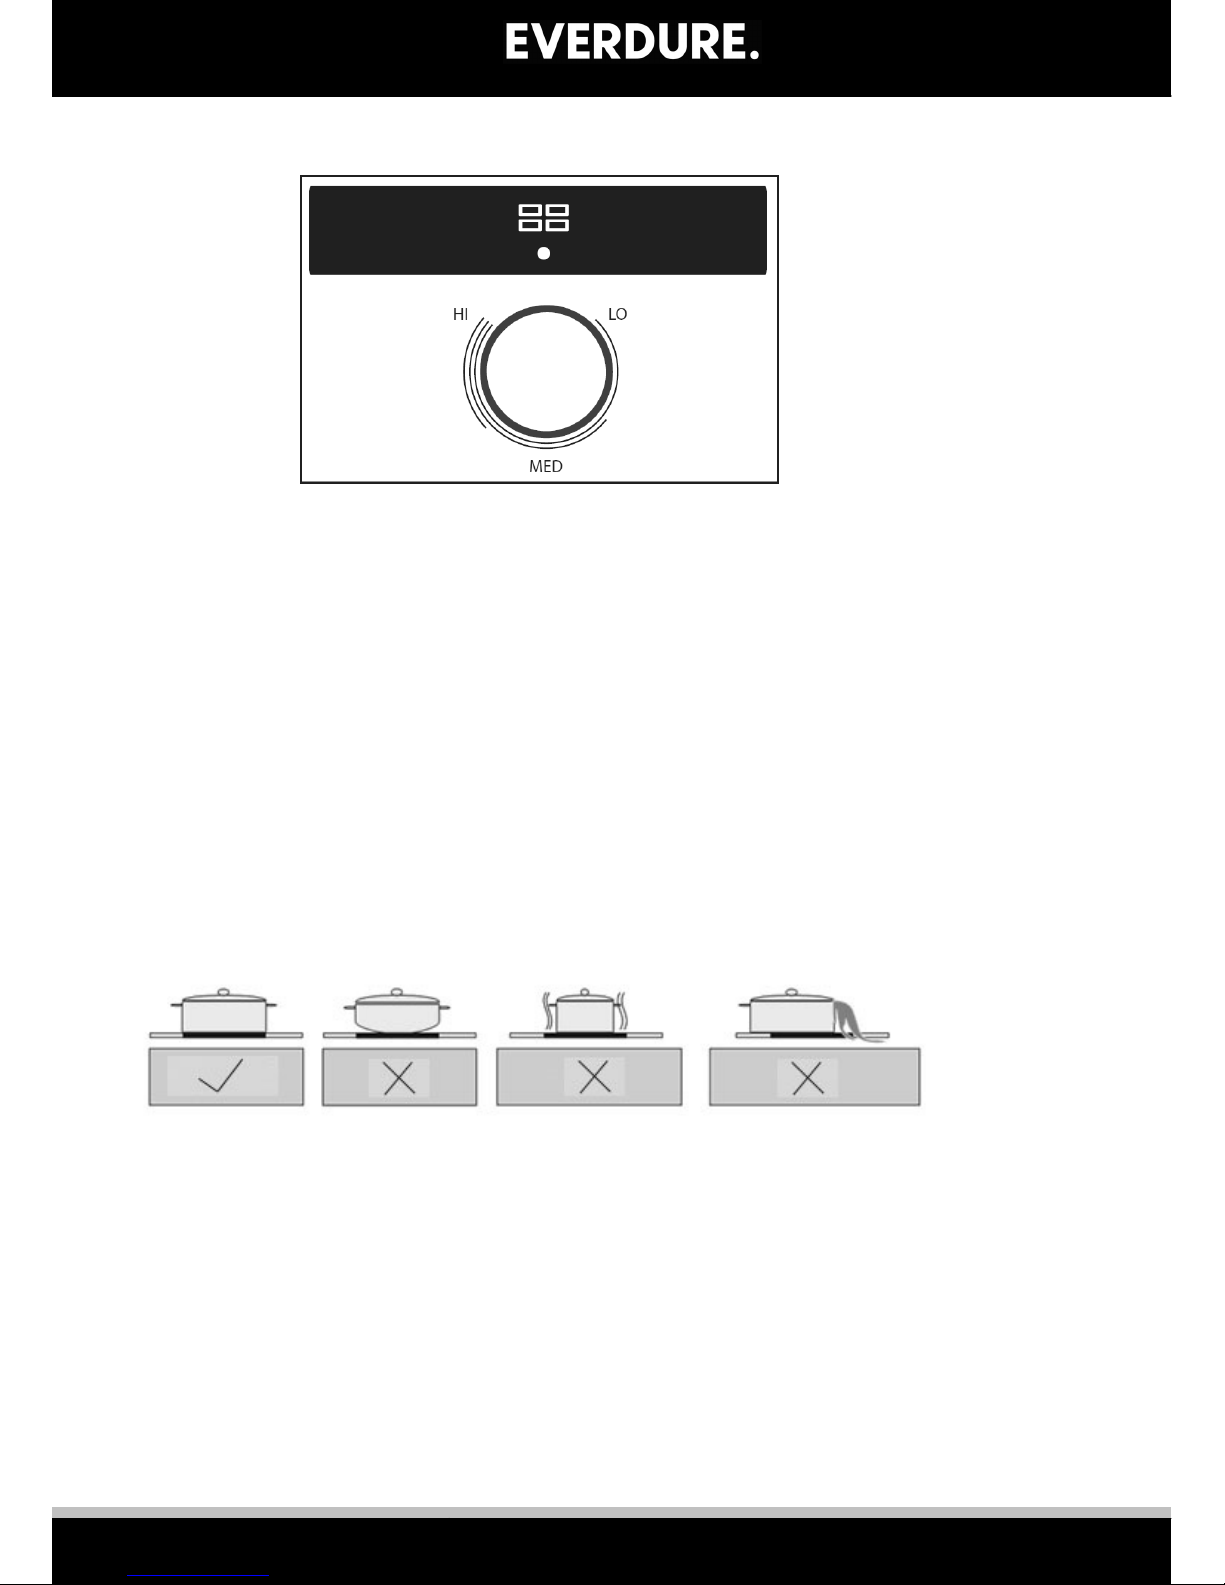
The cooktop elements of the appliance are each controlled via a knob on the control panel. Each
element is represented by a filled in rectangle on the decal just above the control knob.
LO : Heat maintenance position.
MED : Heating in low temperature position.
HI : Cooking, frying and boiling position.
Position the control knob so the indicator is pointing upwards (off). Rotate the control knob
clockwise to increase the heat delivered from the element. Rotate the control knob anti-clockwise
to reduce the heat delivered from the element.
When an element is turned off, the residual heat indicator turns on (these are positioned centre
front of the ceramic cooktop, one for each element). This will turn off after the glass above the
element cools down. Do not touch the glass around the elements during or after cooking until
the residual heat indicator turns off, as the glass will remain hot for some time.
Pans with flat base are highly recommended. Also, the size of the pans must be in line with the
size of cooktop elements for most efficient usage. Always centre the pans on the elements.
Using small sized pans on the large sized heating elements will cause heat loss and so energy will
be wasted.
After using any cooktop element, please make sure that it is switched off.
Do not let children come too close while the cooktop is hot or in operation.
Clean the cooktop with a warm, damp, wet cloth after use, but ensure the hotplates are off and
not too hot. If there is excessive spillage, you can clean the cooktop with a warm, damp, slightly
soapy cloth (e.g. dishcloth). Do not use abrasive cleaners or metal scrapers to clean glass, as
scratches in the glass can cause it to break.
Never fill a pan more than 1/3 full of oil. Always dry food before frying.
Never use gauze, metal pan diffusers or stands over the hobs, as they can cause the elements to
overheat. Do not use trivets not supplied by Everdure for use with this appliance. Never place
aluminium foil on the glass while it is hot.
9
Page 10
EASY DECISION
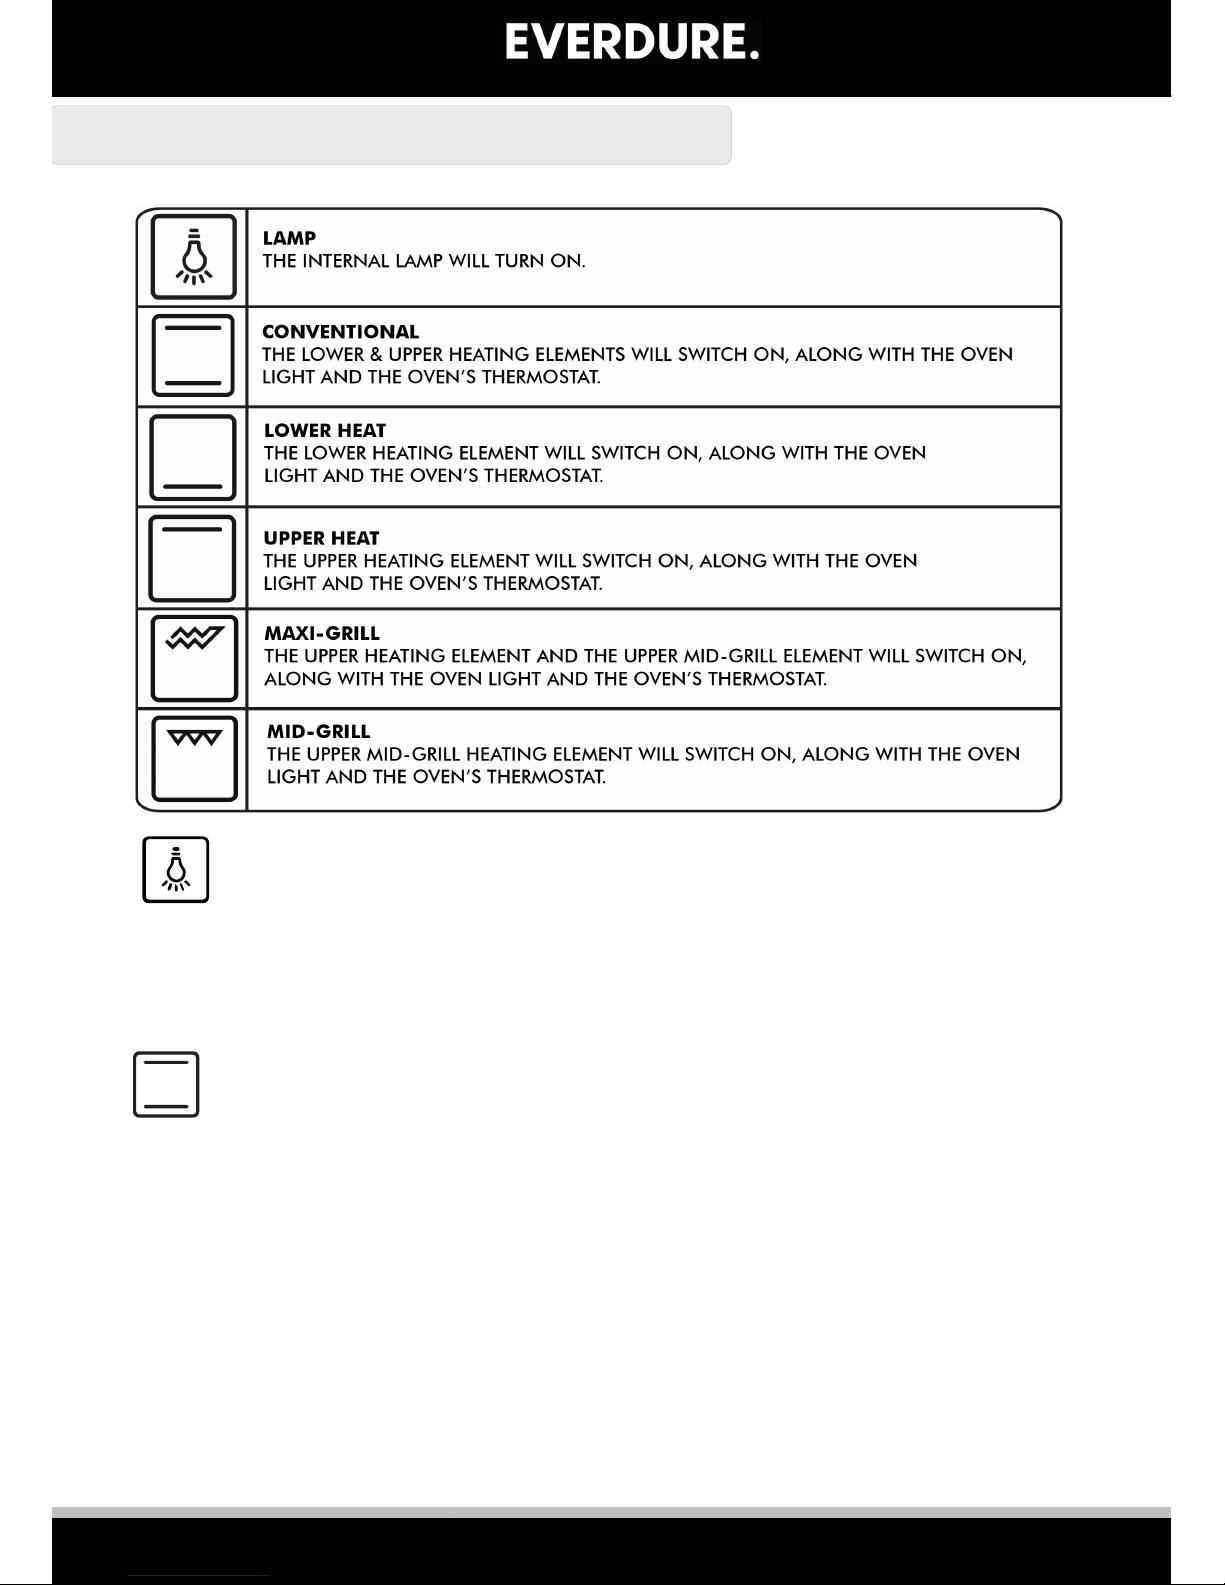
OVEN FUNCTION CHART
Note: There are 5 rack positions inside the oven.
Light Only Function
When the function control knob is in any position other than the “off” position, the oven light will comes
on.
This function allows the light to be on without any elements working & can be used during cleaning.
Conventional Cooking Function
This function allows heat to radiate evenly from the lower and upper elements into the oven ensuring
even cooking of both sides of the food. Adjust the function control knob so it indicates the Conventional
Cooking function symbol. Adjust the thermostat control knob of your oven to a temperature
recommended on the cooking table for the cooking operation you wish to perform. Preheating of the top
oven for about 10 minutes is recommended. Place food in a suitable container, then place into oven and
cook for the recommended time. This function is preferred for making cakes (cupcakes, other cakes and
sponges), biscuits, pastry, baked pasta (e.g.: lasagne), casseroles and moist dishes, roasts and oven chips.
Ideally use the wire grill shelf to cook on this function and use the lowest shelf/rack position.
After cooking, turn off the oven function control. Take the cooked food out of the oven and place it on a
safe heatproof surface. As the oven will be hot, work near with caution and keep children away from the
cooling oven.
NOTE: The oven door must be kept closed during this function. Set timer control to Manual or set a time.
10
Page 11
EASY DECISION
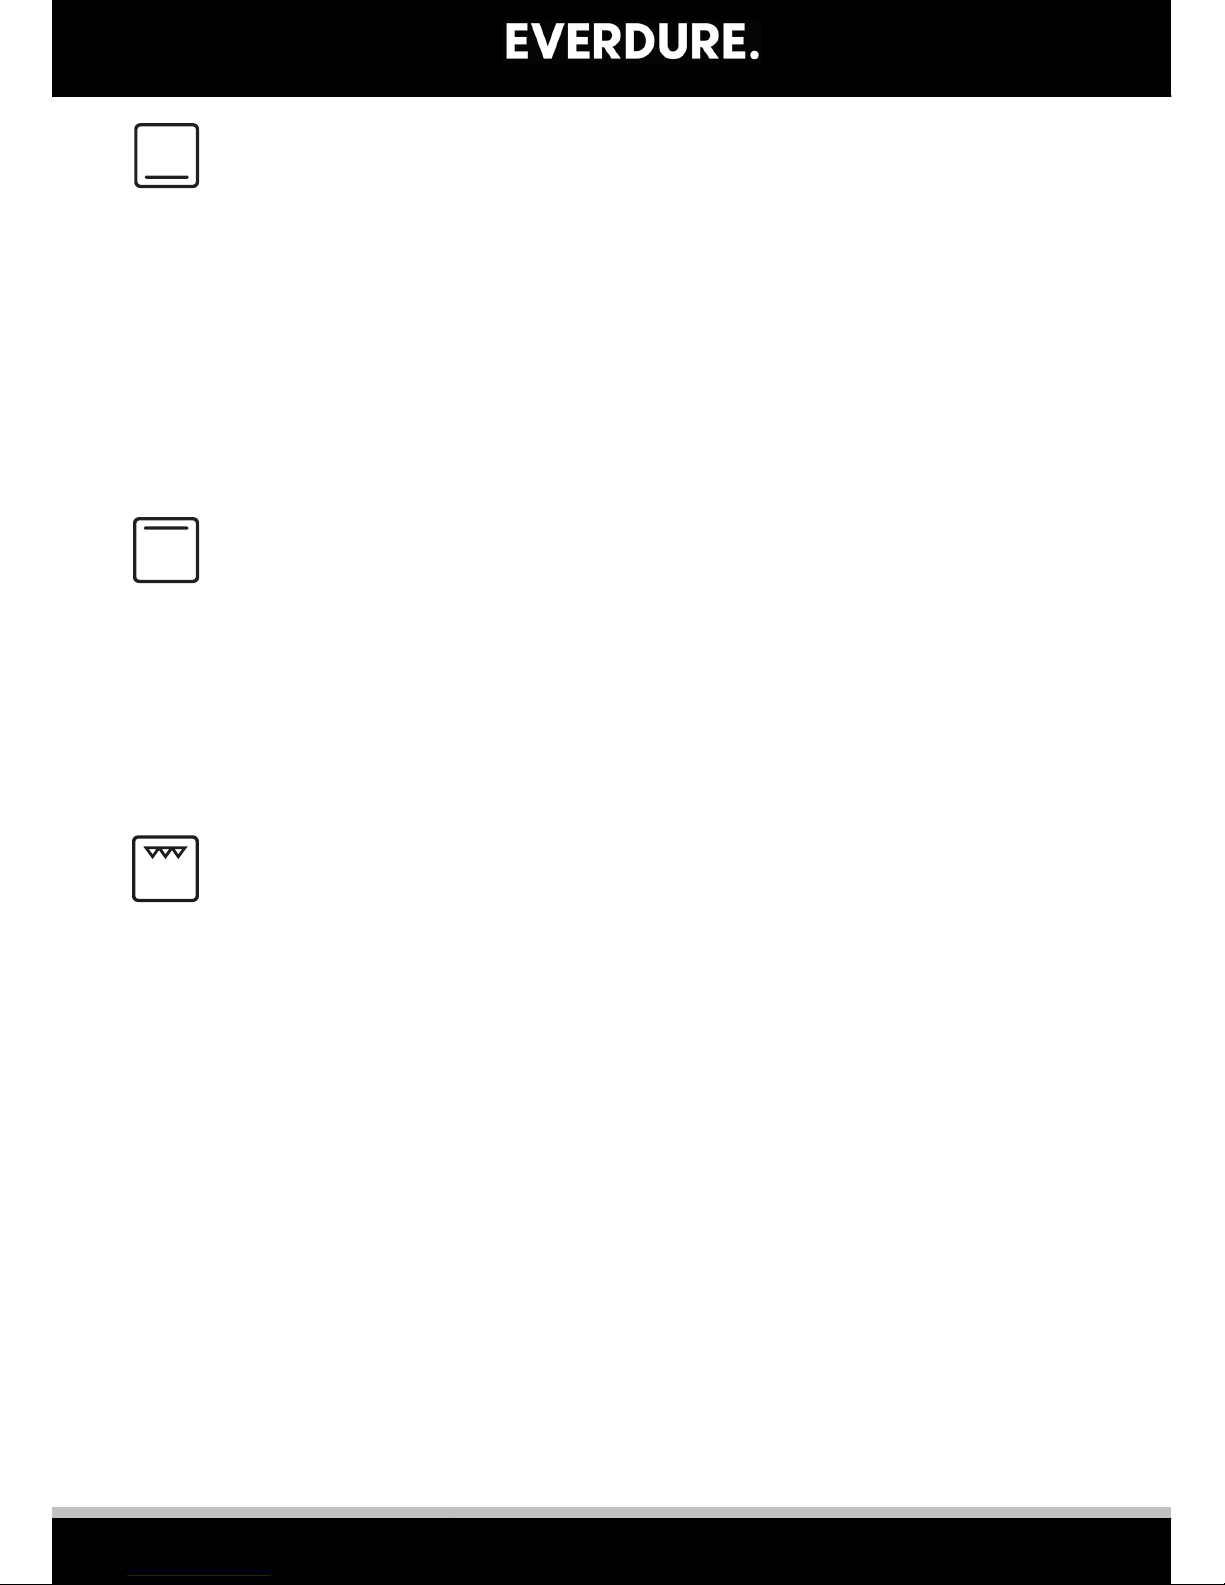
Lower Heat Function
On this function the lower heating element will come on. This function is recommended for finishing off
the cooking of food (in baking dishes or trays) which is already superficially well-cooked and golden on
the top but still soft inside. Adjust the function control knob so it indicates the Lower Heating function
symbol. Adjust the thermostat control knob of your oven to the appropriate temperature. Preheating of
the oven for about 10 minutes is recommended. Place food in a suitable container, then place into oven
and cook. This is an ideal function for delicate cooking such as quiches, cheesecakes and custards were
limited top browning of the food is required. After cooking, turn off the oven function control. Take the
cooked food out of the oven and place it on a safe heatproof surface. As the oven will be hot, work near
with caution and keep children away from the cooling oven.
NOTE: The oven door must be kept closed during this function. Set timer control to Manual or set a time.
Upper Heat Function
On this function the upper heating element will come on. This function is ideal for keeping cooked
food warm prior to serving and for warming plates. It is also used to brown the top of dishes such
as cheese bakes or the crumb topping on fruit crumbles. Adjust the function control knob so it
indicates the Upper Heat function symbol. Adjust the thermostat control knob of your oven to a
suitable temperature. Preheating of the oven for about 10 minutes is recommended. Place food in
a suitable container, then place into oven
After cooking, turn off the oven function control. Take the cooked food out of the oven and place
it on a safe heatproof surface. As the oven will be hot, work near with caution and keep children
away from the cooling oven.
NOTE: The oven door must be kept closed during this function. Set timer control to Manual or set a time.
Mid-Grill Function
This function is used for grilling with the top grilling element coming on. Adjust the function control knob
so it indicates the Mid-Grill Function symbol. Adjust the thermostat control knob of your oven to a
suitable temperature. After a preheating period of 10 minutes, put your food into the oven. For grills,
put the food on the grill rack and sit into the tray. Place the tray at one of the highest positions. Placing
the rack within the oven tray provided will ensure that any marinade, fat or oil dropping from the food will
be collected.
This setting is ideal for toasting bread, cheese melts and melting cheese topped dishes and finishing off a
dish to lightly brown on the surface. Also used for herb and garlic bread.
After cooking, turn off the function control knob. Take the cooked food out of the oven and place it on a
safe heatproof surface. As the grill will be hot, work near with caution and keep children away from the
cooling oven.
NOTE: The oven door must be kept closed during this function. Set timer control to Manual or set a time.
11
Page 12

EASY DECISION
Maxi-Grill Function
This function is used for faster grilling and for grills with a lot of food. Adjust the function control knob so
it indicates the Maxi-Grill Function symbol. After a preheating period of 10 minutes (ideally include the
tray and grill rack in the pre-heat when cooking meat, fish or poultry), place your food into the oven by
placing onto the grill rack, which is sitting in the tray. Placing the rack within the oven tray provided will
ensure that any marinade, fat or oil dropping from the food will be collected. Position the tray on the
highest position. On this function both the upper heating element and the top grilling element are
activated.
The higher grill temperature and function is ideal for cooking and browning meat (such as lamb or pork
chops and cutlets), chicken and seafood (such as fish fillets, cutlets, tuna steaks or Atlantic salmon). This
setting is also good for browning fruit crumbles or crumb topped dishes although the wire rack will need
to be moved to the next shelf position down.
After cooking, turn off the function control knob. Take the cooked food out of the oven and place it on a
safe heatproof surface. As the grill will be hot, work near with caution and keep children away from the
cooling oven.
NOTE: The oven door must be kept closed during this function. Set timer control to Manual or set a time.
NOTE: When an oven element is operating, the lower indicator between the left most oven control
knobs will be lit.
12
Page 13
EASY DECISION
COOKING GUIDES
NOTE: Rack positions are numbered from 1 at the bottom to 5 at the top.
For optimum cooking keep edges of baking dishes and pans at least 4cm from the sides of the
oven. This allows free heat circulation and ensures even cooking.
Where possible remove large cuts of meat 1kg or over from the fridge 1 hour prior to cooking.
Allow, to stand covered and away from direct sun/heat. This process will take the “chill” of the
fridge away from the food and assist in more even cooking.
Cooking Pizza
For the best results when cooking pizza use the Lower and Upper Heat Element function (Convection) and
the lowest oven shelf position.
Preheat the oven for at least 10 minutes.
Use a non-stick pizza pan, ideally one with holes in the base specifically for pizza cooking.
Do not open the oven door frequently while the pizza is cooking.
If the pizza has a lot of toppings (three of four), it is recommended that the mozzarella cheese be
placed on top halfway through the cooking process. Remember the best pizzas are made with a
less is best method when choosing the topping ingredients.
Check the base is crispy by lifting the pizza pan from the oven with a heatproof glove and lifting
the pizza with an oven slide to look at the pizza base. Return to oven if further cooking is required.
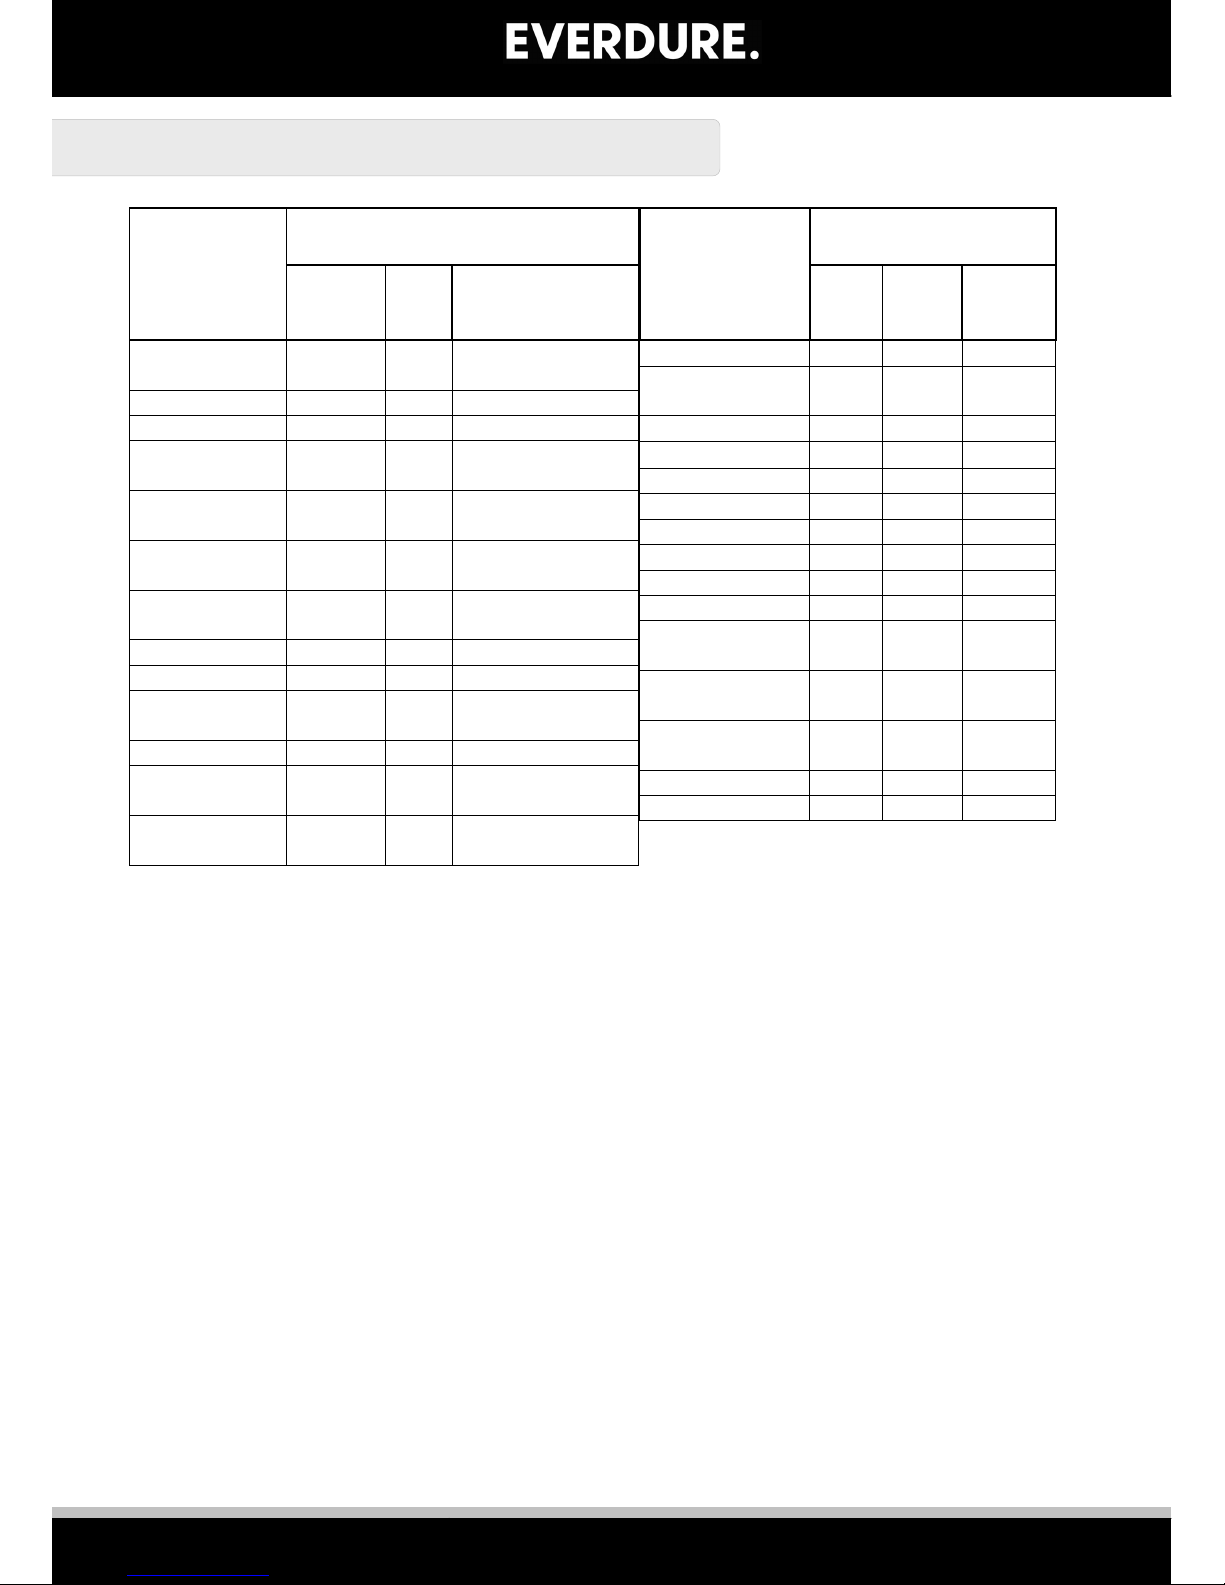
FOOD
LOWER-UPPER HEAT– (Conventional)
Temp. (°c)
Rack
pos.
Cooking Period (min)
Roast Pork 230 + 190 middle
20 + 45/50 min per
kilo
Roast Chicken 190 - 200 middle 50-60 min per kilo
Roast Beef - rare 190-200 middle 15-20 mins per 500g
Roast Beef medium 190-200 middle
25 mins per 500g
Roast Beef - well
done 190-200 middle
30 mins per 500g
Roast Lamb medium 190-200 middle
20 mins per 500g
Roast Lamb - well
done 190-200 middle
30 mins per 500g
Roast Turkey 180 middle 40-45 mins per kilo
Roast Duck 180-200 middle 30-35 mins per 500g
Roast Veal – well
done 180 middle
30 mins per 500g
Baked whole fish 180 middle 15-20 min per kilo
Casserole/ moist
dishes 180 middle
60-80 mins
Roast Pumpkin 220 middle
20-40 mins depends
on size of pieces
FOOD
LOWER-UPPER HEAT –
(Conventional)
Temp.
(°c)
Rack
pos.
Cooking
Period
(min)
Scones Plain or fruit 220 middle 10-15
Cake - Butter cake
(deep) 180 middle 40
Cake - Sponge 180 middle 25-30
Cake – Cup cakes 180 middle 10-15
Cookies – Choc chip 180 middle 15-20
Biscuits - Anzac 180 middle 15-20
Brownie 180 middle 30-40
Banana Loaf 180 middle 40-50
Pavlova 110 middle 90
Meringues - Hard 110 middle 90
Pastry (pre-rolled
frozen)
190-
200 middle 20-30
Pastry - Savoury
homemade
180-
200 middle 20-30
Pastry –Sweet
homemade
180-
190 middle 20-30
Pizza - home made 220 low 10-15
Chips - Oven baked 220 middle 30-40
13
13
Page 14

EASY DECISION
Grilling
Cooking times may vary according to the nature of the foods, their homogeneity and their volume. When
cooking a certain food for the first time, it is advisable to choose the lowest temperature and then
increase temperature as required.
When using the griller functions on the top oven – adjust the shelf position as required for the best
results.
As a guide the grill functions have an average temperature of 200C when the top oven door is closed
during grilling.
Roasting Meat, Cooking Chicken and Fish
Ideally, meat should be at least 1Kg or more when roasting in order to prevent it from drying out.
When cooking white meat, poultry and fish, use temperature settings (180°C-220°C).
For red meat that should be well done on the outside while tender and juicy on the inside, it is a
good idea to start with a high temperature setting (200°C-220°C) for a short time, then turn the
oven down afterwards and finish off.
When larger cuts of meat, poultry or fish have finished cooking, ideally remove the food from the
oven and cover with foil and stand for 10-20 minutes (depending on size). This will help retain the
juices when the meat is carved.
When cooking large whole fish 1kg or larger it is recommended that the flesh be scored or slashed
2-3 times on either side to assist in more even cooking. To do this cut into the thick fish flesh
behind the head through to the bone. These scored areas also allow you to check easily to see if
the fish is cooked.
It is a good idea to either measure the inside of your oven for width and either write this down in a
book you may have with you when shopping or you can cut a piece of string the oven width. This
makes it easier to know if your fish will fit into the oven. Looks can be deceiving and the fish looks
so much better whole with its head and tail. If it doesn’t fit you will probably need to remove the
head prior to baking.
Cakes and Baking
Organize the oven shelves while the oven is cold and before preparing a recipe. When baking follow the
directions in the recipe however if in doubt, as a general rule, the food (e.g. cake) is positioned on a shelf
that will have the top of the cake surface as near to the centre of the oven as possible. However when
using the top oven the only position for cakes and baking is on the shelf position 1.
Preheat oven before preparing the cake or baked items as some baked food should not sit waiting
for the oven to reach the required temperature. For best results the baked food should go
straight into the preheated oven at the correct temperature.
Use kitchen baking paper to line cake tins and baking trays for cookies and roast vegetables such
as pumpkin.
When making cakes have eggs at room temperature.
When making sponge cakes don’t tap the beaters on the side of the bowl when the beating is
complete as this will knock out precious air you have just spent time adding. Remove the beaters
from the hand mixer and tap them over the edge of your open palm to knock any remaining cake
mix into the bowl below.
14
Page 15

EASY DECISION
Pavlova and Meringues
Eggs should be at room temperature.
Ensure that the bowl and beaters to be used are super clean and have no grease, oil or fat on
them as this will retard the beating and peak forming process.
It is a good idea to crack the eggs to be used one at a time over a small bowl to separate the egg
yolks and whites. That way if a yolk does break it will not end up in your main bowl of egg whites.
When making pavlova or meringues don’t tap the beaters on the side of the bowl when the
beating is complete as this will knock out precious air you have just spent time adding. Remove
the beaters from the hand mixer and tap them over the edge of your open palm to knock any
remaining mix into the bowl below.
Line baking trays with kitchen baking paper.
When they are cooked, remove the tray from the oven and use a very flat spatula to loosen the
food from the baking paper. Return the Pavlova or meringues to the oven and allow to stand
overnight or until the oven is cold for best results.
Think about using the remaining egg yolks to make homemade mayonnaise.
15
Page 16
EASY DECISION
CLEANING
NOTE: Cleaning and maintenance operations must only be carried out when the oven and
cooktop are cool.
The appliance should be isolated from your mains supply before commencing any cleaning
process.
Before starting to clean your oven or cooktop, be sure that all control knobs are off and your appliance is
cooled off.
Do not use cleaning materials containing particles that might scratch the enamelled and painted parts of
your oven. Use cream cleaners or liquid cleaners, which do not contain particles. As these cleaners may
damage the surfaces, do not use caustic creams, abrasive cleaning powders, rough wire wool or hard
tools. Before using the cleaning materials check whether they are appropriate and recommended for use
by the manufacturer on your oven. In the event of any excess liquids spilling over your oven surface
during cleaning, clean up immediately so as to prevent possible damage to the enamel or metal surface.
Do not use steam cleaners for cleaning the oven.
CLEANING THE OVEN
You will obtain best results if you clean
the oven interior while the oven is slightly
warm. Wipe the oven with a soft cloth
that had been dampened in soapy water
after each use, then wipe it with a wet
cloth once more and then dry it. It may
be required to use a liquid cleaning
material from time to time and completely
clean the oven. Do not clean with dry and
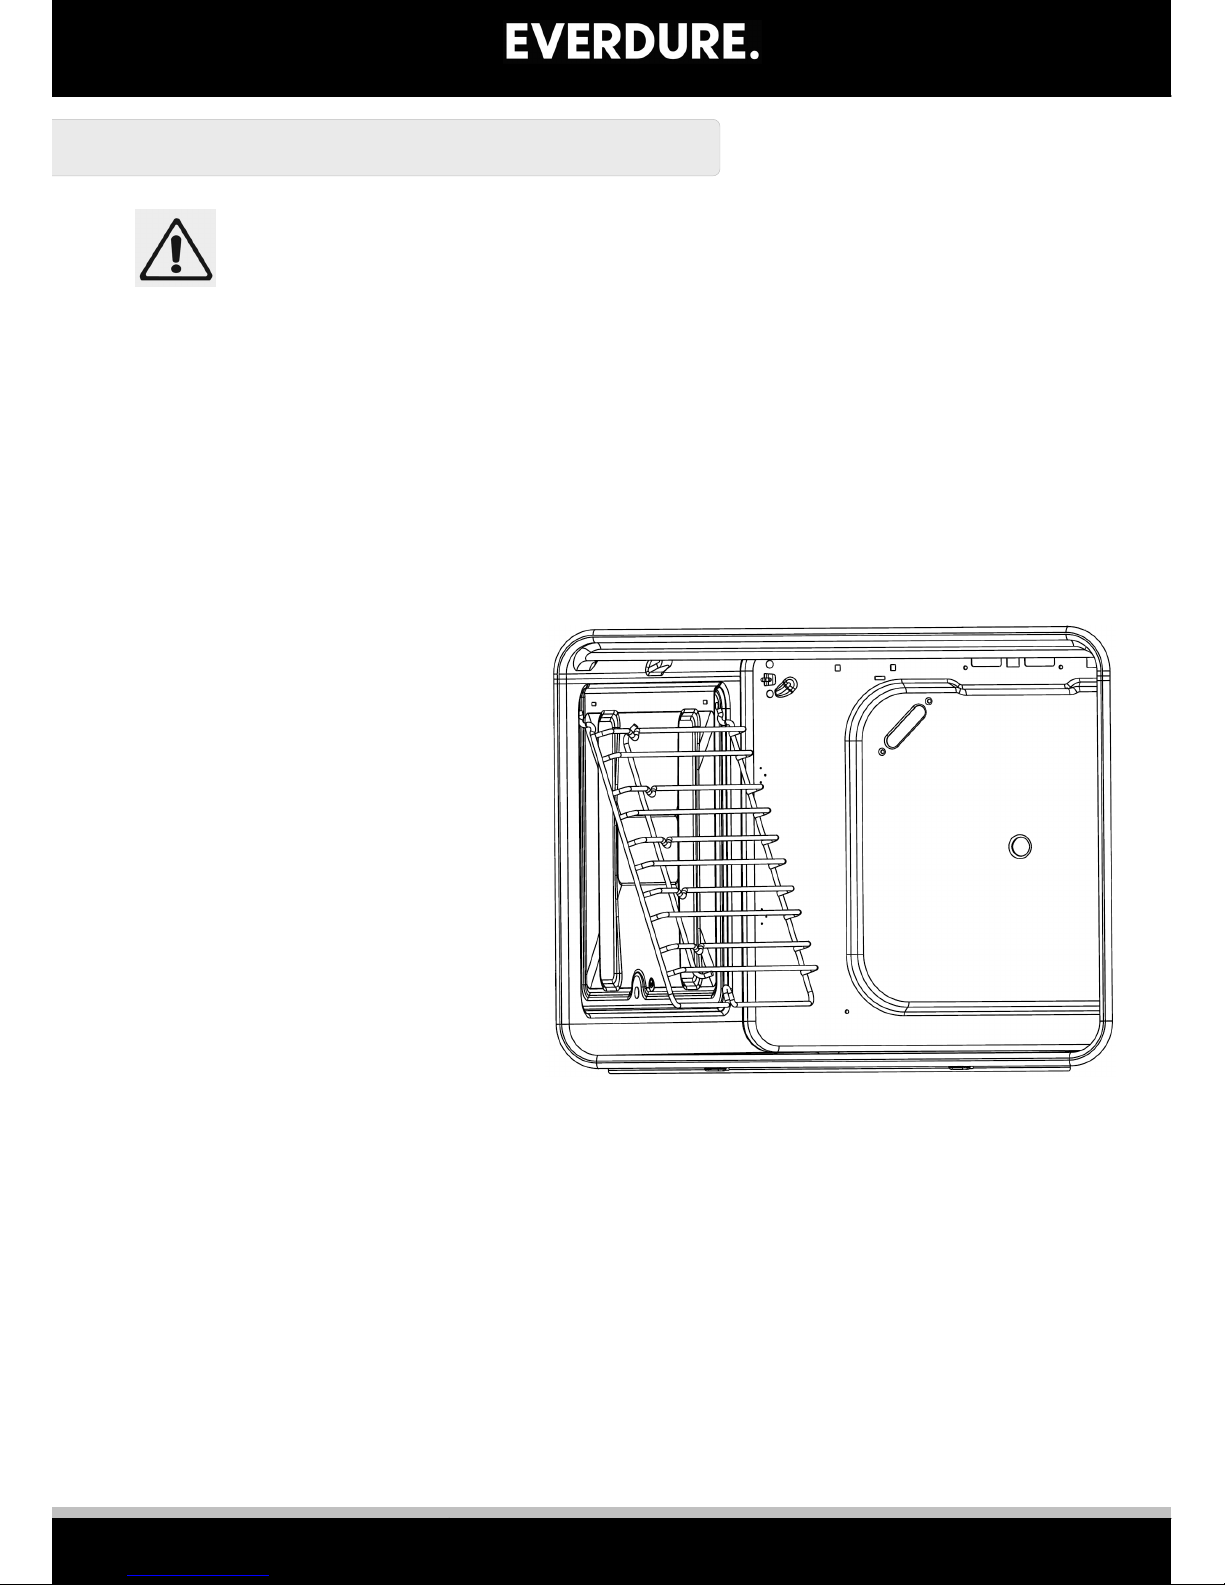
powder cleansers. To remove the side
shelf supports, undo the screw at the
bottom of the support and remove. Angle
the support up and then pull the hooks at
the top of the supports out of the holes.
To replace, repeat these operations in
reverse.
CLEANING THE COOKTOP
Any residues that are left on the cooktop surface from cleaning agents may damage it. You should
remove any residues with water and a little washing up.
Abrasive cleaners or sharp objects will damage the cooktop surface. The cooktop should be cleaned
using water and a little washing up liquid.
Although it is easier to clean some deposits whilst the cooktop surface is still warm, you should take extra
care not to burn yourself. It is recommended to only clean the cooktop when cold.
AFTER EACH USE
Wipe the appliance over with a damp cloth and a little washing up liquid.
Dry the appliance by rubbing the surface with a clean cloth.
For non-stainless steel cooktop surfaces, a mild, non abrasive cream cleaner may only be used.
16
Page 17

EASY DECISION
TROUBLESHOOTING
If the oven does not operate:
The oven may be off at your switched outlet.
The timer may not be set to the manual function or have the timer set to function.
If the interior lighting lamp does not light:
The lamp may be defective. If defective, you can change it following the instructions within this
manual.
Cooking (if lower or upper part does not cook equally):
Control the shelf locations, cooking period and heat values according to the manual.
Unit smoking when first used:
This is a result of protective oils being removed and is to be expected with a first use.
Condensation build-up on the oven door:
Clean off with dry soft cloth.
If you still have any problems with your product, please call your Authorised Service Centre.
TRANSPORTATION
Keep the original carton of the product and use these if the item needs to be transported. Follow the
transport signs on the carton.
Tape cardboard or paper onto the inside face of the glass as it will be prone to damage from the trays.
Use cardboard covers for the wire grill and trays in your oven. Also tape the oven’s covers to the side
walls. Always add protection around the ceramic cookplate.
If the original carton is unavailable, take measures to protect the external surfaces (glass and painted
surfaces) of oven against possible blows, as well as the above.
17
Page 18
EASY DECISION
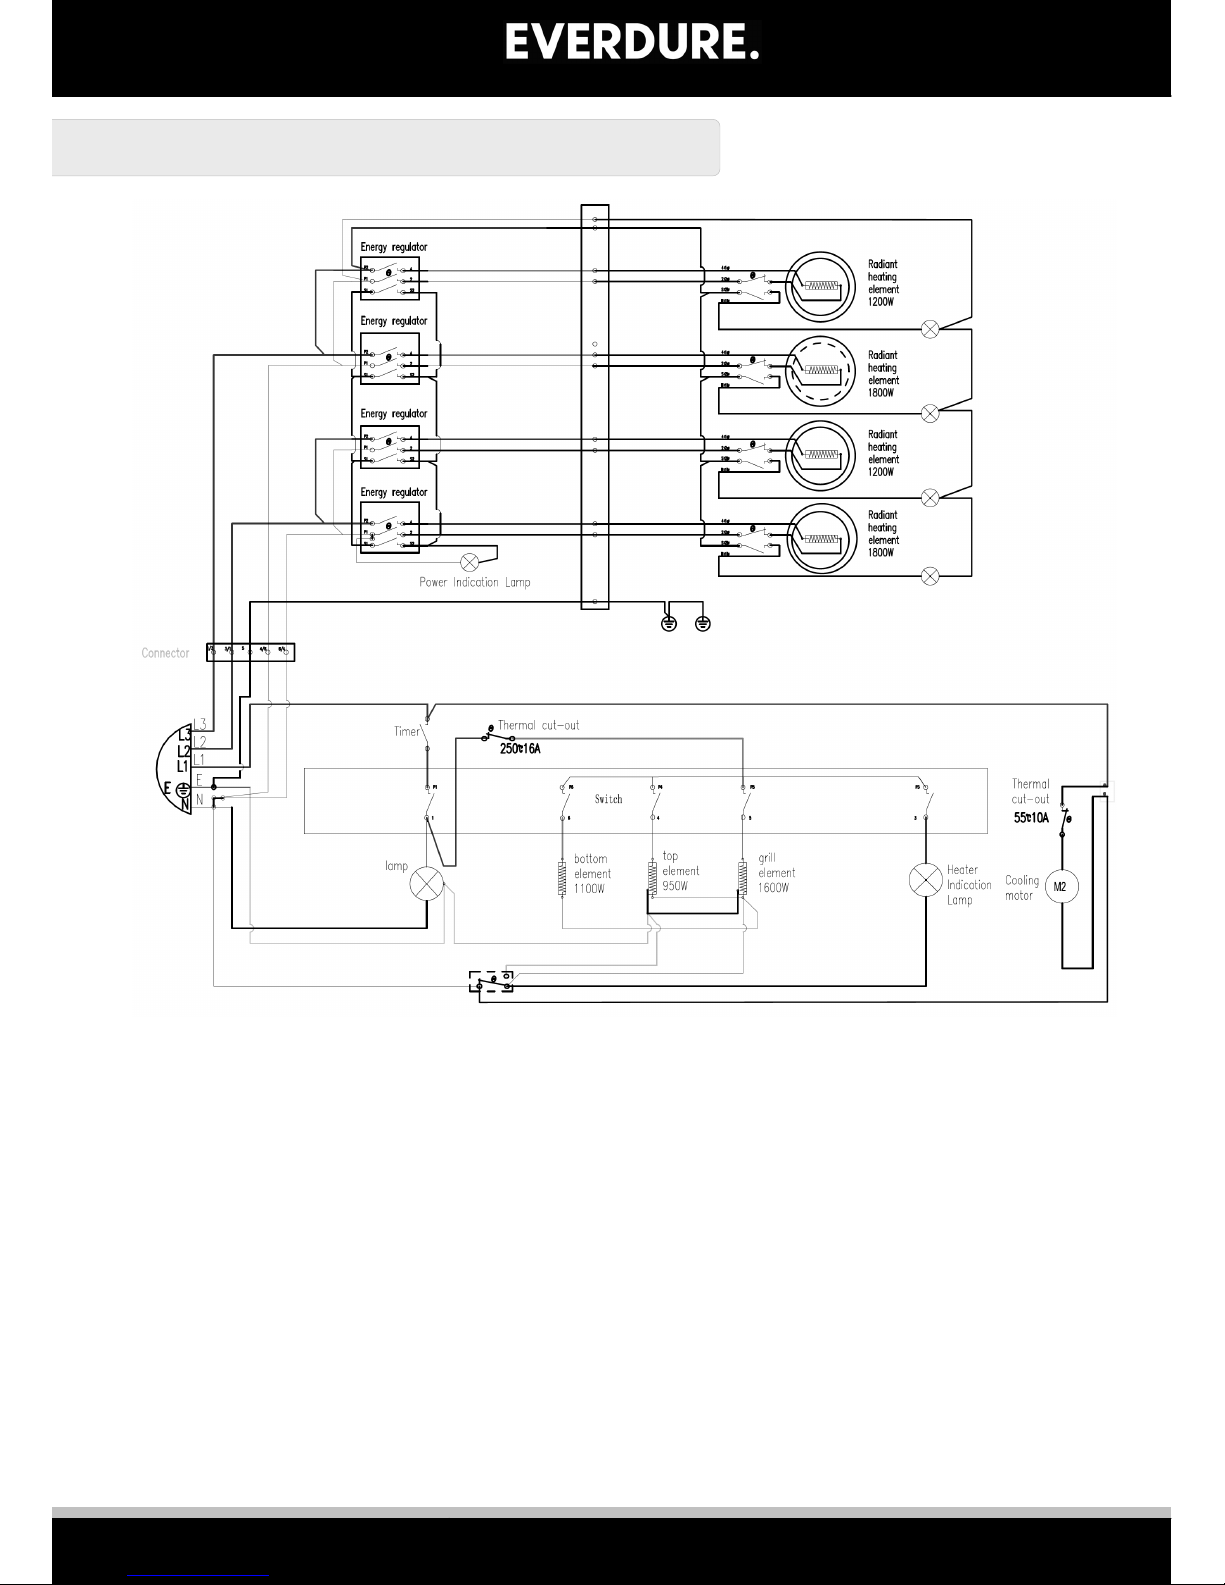
WIRING DIAGRAM
18
Page 19

EASY DECISION
19
Page 20

EASY DECISION
A division of Shriro Australia Pty Ltd
104 Vanessa Street, Kingsgrove NSW 2208
AUSTRALIA: 1300 355 541
www.everdure.com
NEW ZEALAND: (09) 415 6000
www.everdure.co.nz
IM Ref: UFCW661 09/2017/20FC
FOR INDOOR USE ONLY
 Loading...