

Page 1
1
Operating and maintenance instructions for
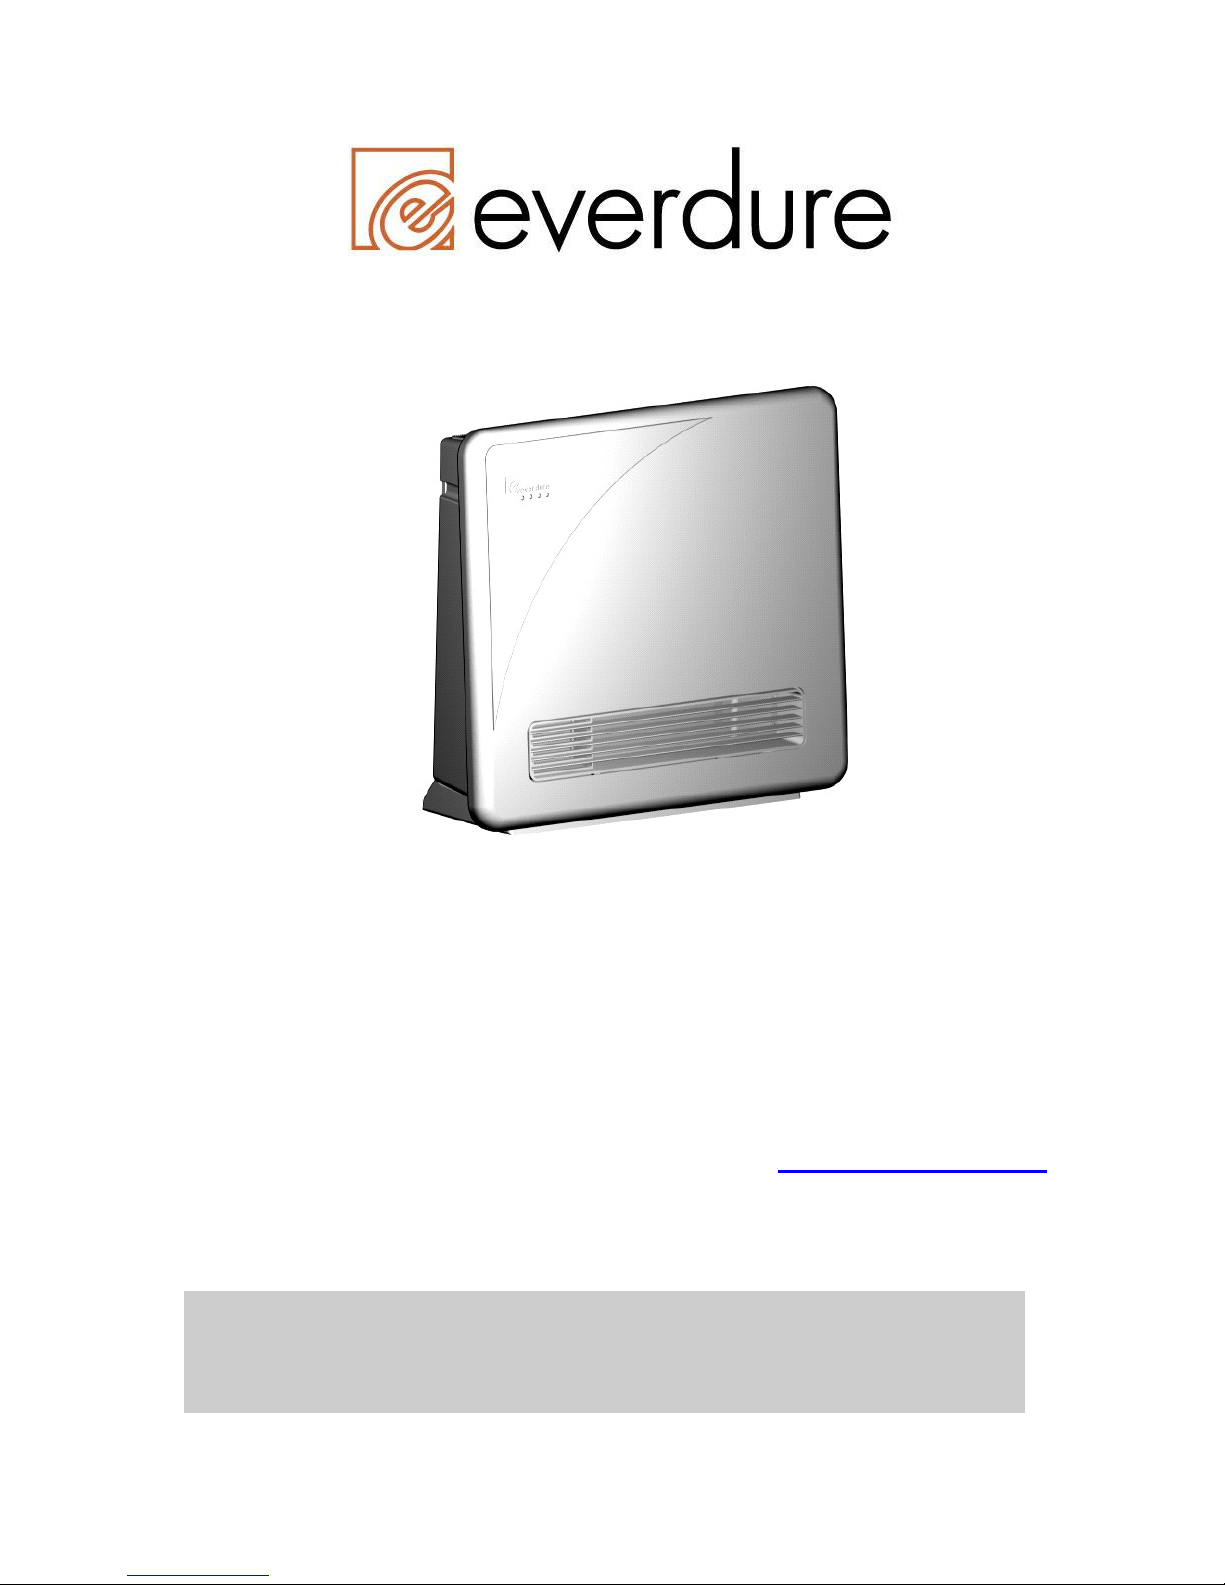
Everdure Lumina Series II
Australian made by:
Everdure
A Division of Shriro Australia Pty Limited
101 Sheffield Road, Welshpool, Western Australia, 6106
SHRIRO AUSTRALIA PTY. LIMITED
23-27 CHAPLIN DRIVE, LANE COVE, NSW 2066
Telephone: 1300 766 066
FOR PEACE OF MIND AND THE HIGHEST LEVEL OF AFTER SALES
SERVICE, REGISTER YOUR PRODUCT ON: www.everdure.com -
(Refer to the Everdure Product Warranty Registration Form on this
manual)
EVB 0480
IMPORTANT
PLEASE READ THESE INSTRUCTIONS CAREFULLY
BEFORE USING YOUR NEW EVERDURE HEATER
Page 2

2
The Everdure Convection gas space heaters are described as thermostatically controlled, portable, flueless
convection heaters for use with Natural gas.
The heater is supplied with an approved flexible hose.
A label is attached to the rear of the heater stating the type of gas for which it has been manufactured and
adjusted.
The heater shall be installed in accordance with the manufacturer’s instructions, local gas fitting regulations,
uniform building regulations, municipal building codes, the AGA installation code for gas burning
appliances and equipment and any other relevant statutory regulations.
The heater is intended to be installed as a free standing portable heater, its portability being restricted by the
number of gas outlet points being provided.
The heater must NOT
be BUILT IN. Do not install the heater in a bedroom or a bathroom.
Special room ventilation may apply in your particular state. If in doubt, contact your local gas authority.
Locations where strong draughts occur should be avoided as they may cause unsatisfactory operation of the
heater.
The heater should be installed at least 1 metre from flammable materials, e.g. curtains, and to be 200mm
clear of all walls.
The minimum room size for this appliance is 60 m3.
This appliance has been fully function tested prior to packaging. The appliance will give off a slight
smell, as it burns off lubricants used in the manufacturing process.
This appliance is not intended for fireplace insert.
No adjustment is required or available to the user.
No installation is required apart from connection to gas and electrical supplies. Please note, if an
extension lead has to be used, only use an approved lead purchased from your local electrical
supplier. The use of extension leads is not recommended.
After unpacking the heater, check for any damage. If any damage is found, please contact your
supplier.
EVERDURE MODEL LUMINA SERIES II
GENERAL REQUIREMENTS
NOTE
Page 3

3
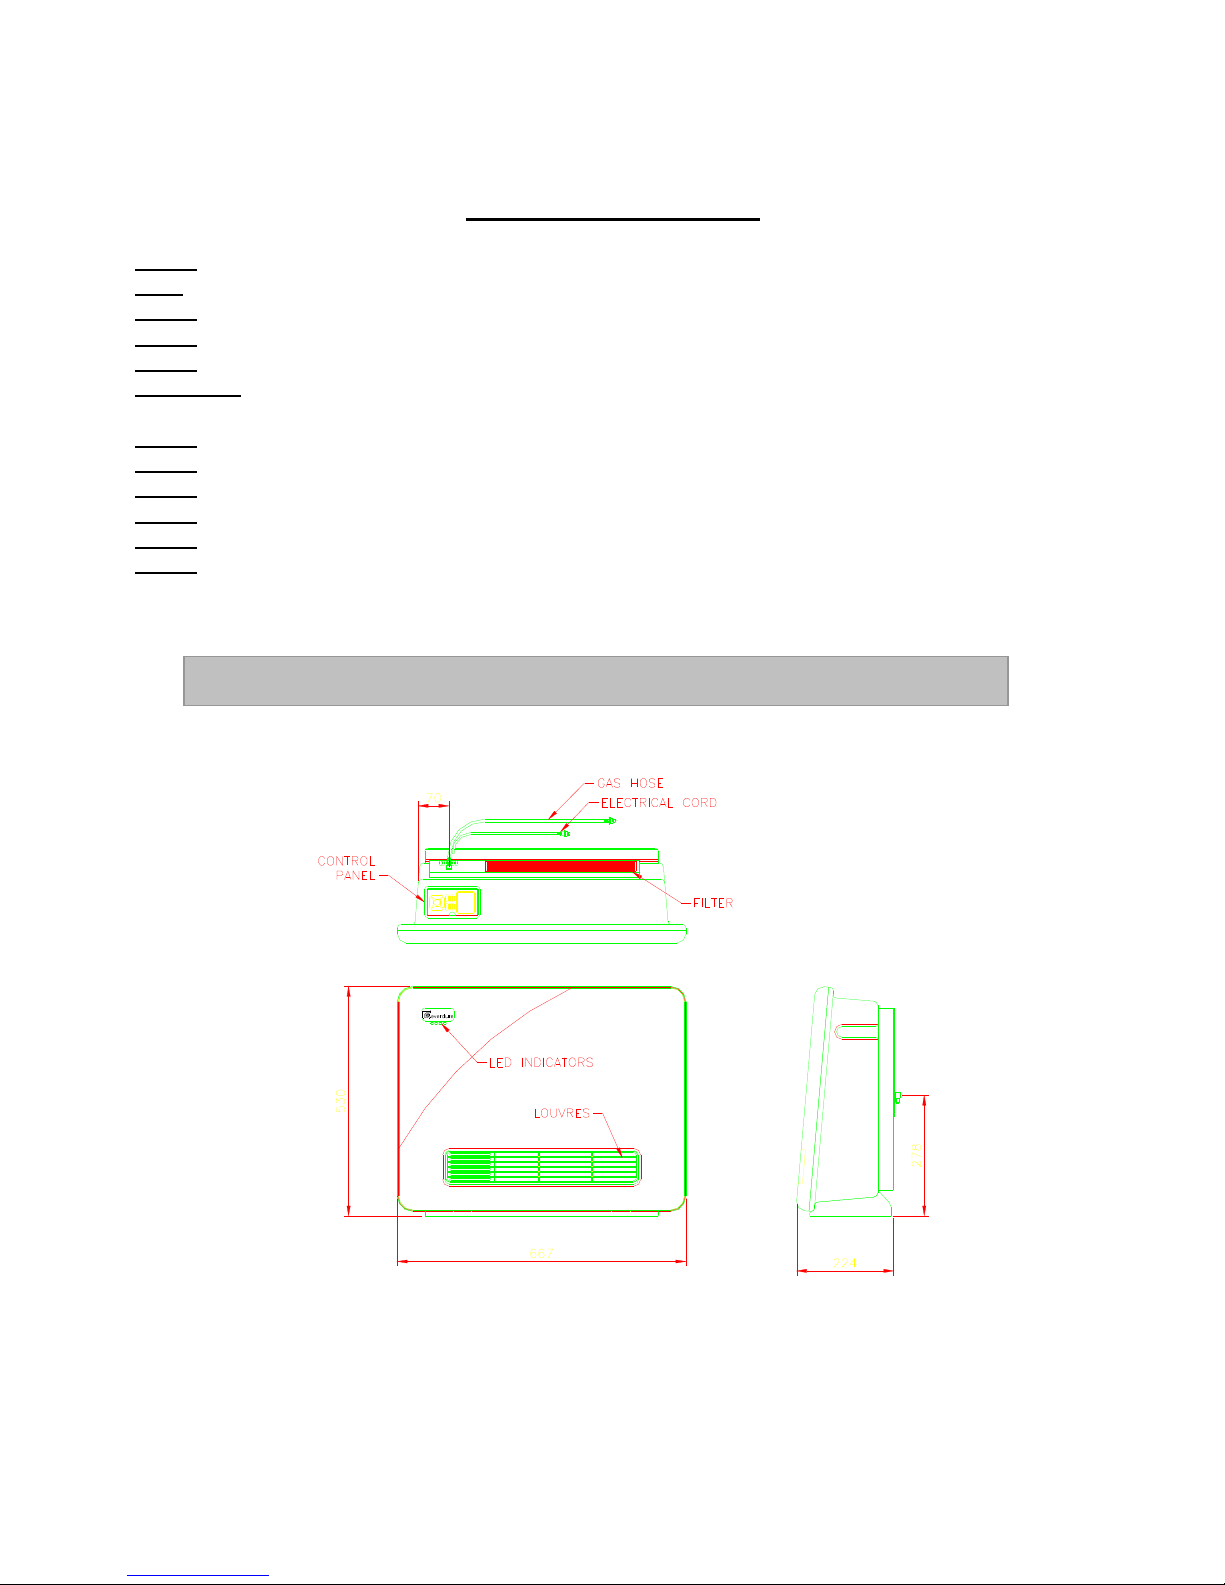
The Data Label, as shown below, is located on the rear panel of the heater.
EVERDURE CONVECTION HEATER MODEL LUMINA SERIES II
Gas Type N.G.
Nom Gc Mj/Hr 24
Burner Pressure Hi kPa 0.82
Main Burner Injector mm 2.30
Turn down Injector mm 2.0
A.G.A. Cert. No 6789
GAS SUPPLY
Your heater is fitted with a flexible hose and bayonet coupling which enables you to connect or disconnect it
from the gas supply.
Note: If your heater has been disconnected for some time, there will be air in the flexible hose. It will
therefore take a little longer to ignite when you first turn it on.
TO CONNECT
Insert the coupling end into the wall socket firmly and rotate the knurled section clockwise to it’s locked
position.
TO DISCONNECT
Apply firm forward pressure to the knurled area, rotate anti clockwise and pull towards you. The hose
should now come away from the wall socket. Gas is automatically isolated when the hose is disconnected.
ELECTRICAL SUPPLY
Your heater is fitted with a power supply lead, which should be connected to a standard domestic socket. If
the supply lead is damaged, it must be replaced by the manufacturer, its service agent or similarly qualified
persons in order to avoid a hazard.
CONTROLS
The controls are located on the top left hand side of the heater. The control buttons are designed to be easy
to read and use for operation. When first connecting the heater to the power supply, or after a power failure,
the reset button requires pressing until the heater beeps. When the ‘ON’ button is pressed, the heater
conducts a self-check before the heater is ignited. Please note, there is a slight delay before the ignition
sequence takes place.
DESCRIPTION OF OPERATION
Your new convection space heater is thermostatically controlled. Operating the heater has been made easy
with an easy to read display and easy press buttons. The heater will modulate between high and low heat
DATA LABEL
IMPORTANT INFORMATION
Page 4

4
settings whilst operating, depending on the heat setting and the temperature of the room.
SLEEP TIMER
The heater can be switched off automatically using the Sleep Timer.
POWER FAILURE
Your Everdure heater will not operate in the event of a power failure. Should the power fail while the
heater is operating, the heater will stop running. When the power is re-established, it will be necessary to
press the reset button before operating the heater.
PROGRAM
The heater can be programmed to switch ON automatically and also to switch OFF. The heater can be
programmed for two separate ON/OFF times. For more details see the program section of this booklet.
SAFETY FEATURES
The heater has many safety features designed for safe operation of the heater. A child lock is fitted to
prevent children from operating the heater. A tilt switch is fitted which will stop the heater operating if it
receives a knock or if it is knocked over. An over-temperature sensor is located on the inside of the heater
and detects if the heater is operating at a temperature which is unsafe for operation. If the unit becomes too
hot due to a blockage or a fan problem, the heater will stop operating and reverts to a reset mode. The unit
is also fitted with an ODS system, which will shut the unit down if oxygen levels are too low in the room
which causes Flame Failure.
FAN MODE
The heater has a fan mode, which enables it to be operated so that it only circulates the room air. This
function is recommended for warmer temperatures when heat is not required.
LEDS
The heater has 4 LED lights on the front of the heater, which indicates how the heater is operating. The
green LED, which is located on the right hand side, indicates that there is power to the heater. The orange
LED next to the green indicates that the heater is on Hi. The red LED next to the orange LED indicates that
the heater is on Low. The Yellow LED indicates that there is a fault with the heater. If the fault light is
displayed, check the screen for further details, and refer to the fault finding section in this booklet.
Page 5
5
Important Warnings
Do not spray aerosols in the vicinity of the heater while operating.
Keep combustible materials away from heater. See page 2 for details.
Do not sit on or lean against the heater.
Do not place any obstructions in front of the heater. See page 2 for details.
Do not allow children to place items into the louvre section of the heater.
This heater is not intended for use by young children or infirm persons unless they have been adequately
supervised by a responsible person to ensure that they can use the heater safely.
Do not allow children to play unsupervised near the heater whilst the heater is operating.
Do not place any articles onto the heater. This includes clothing (dry or wet) and containers of water, etc.
Do not allow anybody to lay down or sleep in front of the heater, especially near the louvres.
Do not turn off the heater by pulling the plug from the wall or switching off the power at the wall.
Do not connect to an LP gas cylinder located indoors.
Do not operate the heater in a room smaller than 60 m3. See warning label on page 11.
HEATER DIMENSIONS AND FEATURES
Page 6

6
P1 BUTTON:
Press this button to
set a program time
P2 BUTTON:
Press this button
to set a second
program time
HOURS BUTTON:
Press this button to
set the hours on the
time and for
programming.
MINUTES BUTTON:
Press this button to set
the minutes on the
time and for
programming.
SLEEP BUTTON:
Press this button to
set the sleep timer.
FAN BUTTON:
Press this button to use
the heater in fan only
mode.
TEMP + BUTTON:
Press this button to
adjust the temperature
to a higher level.
OFF BUTTON:
Press this button to
turn the unit off and to
set the child lock.
ON BUTTON:
Press this button to
turn the heater on.
RESET BUTTON:
Press this button to
reset the unit after a
fault has occurred.
Also used after the
heater is plugged in
and has been switched
on at the power
TEMP – BUTTON:
Press this button to adjust the
temperature to a lower level.
CONTROL PANEL FUNCTIONS
LCD DISPLAY:
Displays the
current settings
Page 7

7
°C
AM
1. Insert the 23AE Alkaline Battery supplied, into the remote control unit.
2. Set up heater as below and press ‘P2’ on the heater control panel. P2 will appear on the LCD screen.
3. Press & hold down the ‘FAN’ button on the control panel until LRN
appears on the LCD screen. Release button.
4. Press any button on the remote control unit.
5. Press the ‘OFF’ button on the heater control panel.
Your new Everdure Lumina heater is know functional with your remote control. The remote control is also
supplied with a remote control holder. The holder can be attached to the unit or any other area of the room
by placing the double sided tape supplied onto the holder and then to the position desired. Alternatively, the
remote can be left loose and placed in an accessible area.
SETTING UP HEATER
1) Turning the heater on after connecting to power supply.
The green LED will light up to indicate power is now supplied to the
heater. The heater will give a loud beep and show ‘Press Reset’ on
the screen when the electricity is connected. Press and hold the
‘Reset’ button until the default screen is shown (see Fig.1). The time
shows 12:00am and a default temperature of 18°C is displayed.
2) Setting the Current time
Set the current time by pressing the ‘Hour’ and ‘Minute’ buttons
until the desired time is displayed. Figure 2 shows the time changed.
3) Setting the desired temperature
Set the desired temperature by pressing the ‘Temp +’ or ‘Temp –‘
buttons until the desired room temperature is set.
Figure 3 shows the temperature adjusted to 21°C.
HEATER OPERATION INSTRUCTIONS
Fig. 1
Fig. 2
Fig. 3
REMOTE CONTROL PROGRAMING INSTRUCTION
°C
PM
°C
PM
Page 8

8
TURNING HEATER ON AND OFF
4) Starting the heater.
After the time and desired temperatures have been set, the heater can be started by pushing the ‘ON’ button.
When this is done, the orange LED will light up next to the green LED, to indicate that the heater is now
working in the high mode. After a short delay, the heater will ignite (internally) and the fan will start to run.
Warmed air should be felt almost immediately.
Warning: Please ensure that no obstacles or combustible materials are placed in front of the hot air
discharge. Ensure that nobody will be sleeping in front of the heater. Also ensure that the filter located at the
back of the heater, is not restricted from air flow. See page 2 for details of appliance clearances.
5) Heater running.
While the heater is running, it will switch from high to low and back again, as the ambient room
temperature approaches the desired temperature. This will be indicated by the LEDs lit changing (orange
for high, red for low), and the speed of the fan changing. No changes would be viewed on the control panel
LCD display.
6) Changing desired temperature.
The desired temperature can be adjusted while the heater is running by pressing the ‘Temp +’ or ‘Temp –‘
buttons until the desired room temperature is set, as with the initial setting up in point 3.
7) Turning the heater off
To stop the heater, push the ‘OFF’ button. This will turn off the gas supply inside the heater, and be
indicated by the red or orange LEDs turning off (leaving only the green LED on). The fan will continue to
run for 2 minutes to allow the heater to cool down. No changes would be viewed on the control panel LCD
display.
EXTRA HEATER FUNCTIONS
8) Child Lock.
To activate the child lock, press and hold the ‘Off’ button for
3 seconds. The display will show a key icon in the bottom
right hand corner (see Fig 8). The heater cannot be operated
while the child lock is activated, as all of the buttons are
inoperative.
To turn off the child lock, press and hold down the ‘Off’
button for 3 seconds.
Please note: the child lock cannot be enabled or disabled,
whilst the heater is running.
Fig. 8
PM
Page 9

9
9) Setting program times.
The heater can be programmed to switch ON and OFF automatically, twice per day. This function is
particularly useful when you want the heater to turn ON before you wake up and turn OFF as you leave for
work. It can be set for the second time to turn ON before arriving home and turn OFF after going to sleep.
To set Program 1, press the ‘P1’ button. The display will show P1 and ON (see Fig.9a). Press the ‘Hour’
and ‘Minute’ buttons to set the ON time. Press the ‘P1’ button. The display will show P1 and OFF (see
Fig.9b). Press the ‘Hour’ and ‘Minute’ buttons to set the OFF time. Then press the ‘P1’ button. The
display will revert back to the current time with P1 also displayed (see Fig.9c). The program will begin
operation at the set times. The heater will operate at the temperature that is set on the display.
Note: The heater can be operated manually with the program set.
The set program will remain a default setting until changed or deleted. To change the program settings,
repeat the above steps. To delete the program setting, press and hold
the ‘P1’ button for 3 seconds.
To set Program 2, press the ‘P2’ button. P2 will be displayed. Follow
the above steps to set the program. When programs P1 & P2 are set,
the P1 & P2 icons will be displayed (see Fig.9d).
10) Fan mode.
Fan mode is used when you want to have the fan operating without the heater heating the room. This
function is useful for summer as it operates in a similar fashion to an overhead fan.
With the heater plugged in, but not running, press the ‘Fan’ button. The default setting is on Hi fan (see
Fig. 10a). Press the ‘Fan’ button a second time to switch to LOW fan (see Fig. 10b). Please note, whilst
the heater is operating in fan mode, the temperature will not be displayed, and the burner will not ignite. To
switch the fan mode OFF, press the ‘Fan’ button again.
Fig. 9a Fig. 9b
Fig. 9c
Fig. 9d
Fig. 10a Fig. 10b
P1 ON
°C
P1
AM
°C
OFF
AM
°C
P1
PM
°C
P1 P2
PM
PM
PM
Page 10

10
11) Sleep Timer
The sleep timer is used to automatically turn OFF the heater after a pre-determined amount of time. This
function will only operate whilst the heater is running. Please note: this function does not operate with the
fan mode.
To set the sleep timer, press the ‘Sleep’ button. The display will show sleep timer, and a sleep timer clock,
which indicates 30 minutes until the heater switches OFF (see Fig.11a). To change the amount of time,
press the ‘Sleep’ button. Each press of the button will display the following: 0:30, 1:00 (see Fig 11b), 1:30,
2:00, 2:30 and 3:00.
The unit will countdown in real time until it reaches 0:00 and the unit switches OFF.
To cancel the sleep timer, press and hold the sleep button for 3 seconds. The sleep timer display will turn off
and the heater will continue to work as normal.
°C
PM
SLEEP TIMER SLEEP TIMER
PM
°C
1) Heater Tilted
This message is displayed due to the heater either being bumped or
knocked over completely. When this happens the heater will stop running,
but the fan will continue to run for a period of 2 minutes, to allow the
heater to cool down. To restart the heater, make sure that the unit is in the
upright position and press the ‘Reset’ button until ‘press reset’ is no
longer displayed. Press the ‘On’ button to restart the heater.
2) Filter Block
This message is displayed when either the filter is blocked, or the filter has
been obstructed. If the heater is running when this happens, it will turn off.
Before pressing the reset button, check the filter located at the rear of the
heater for obstruction. If there is nothing obstructing the heater, check the
filter for an excessive build up of lint. For details on cleaning the filter, see
the cleaning filter section of this booklet on page 12.
After cleaning the filter or removing the obstruction, press the ‘Reset’
button. Allow 10 minutes before restarting the unit. To start the unit, press
the ‘On’ button. If the heater still displays the message, see the
faultfinding section of this booklet.
The fan will continue to run after the unit has switched OFF for a period
of 2 minutes, to allow the heater to cool down.
Fig. 11a Fig. 11b
CONTROL PANEL FAULT MESSAGES
Fig. f1
Fig. f2
HEATER
PRESS RESET
PM
TILTED
FILTER
BLOCK
PRESS RESET
PM
Page 11

11
3) Flame Failure
This message is displayed when the heater has failed to ignite. Press the
‘Reset’ button, and then press the ‘On’ button to restart the heater. If the
heater fails to ignite and the same message appears, see the fault finding
section of this booklet.
4) Overheated
This message is displayed when the heater has turned off automatically
due to the internal components of the heater having reached a
temperature that is higher than the normal operating temperature. See the
fault finding section of this booklet for further information.
The fan will continue to run after the unit has switched OFF for a period
of 2 minutes, to allow the heater to cool down.
WARNING
Fig. f3
Fig. f4
FAIL
FLAME
PRESS RESET
PM
PRESS RESET
HEATED
OVER
PM
Page 12

12
FAULT FINDING
Symptom
Cause
Power
indicator
not on
Burner
won’t
ignite
Fault
light
showing
Heater
stops
while
operating
Room
not
warming
up
Gas
Smell
Remedy
No Power
Plug heater in
Air in gas hose
Repeat ignition
sequence
Gas leak
Contact Everdure
or service centre
Blocked air
filter
Clean air filter or
remove obstruction.
See page 10 for
further information.
Front Louvre
blocked
Remove obstruction
Child lock
Turn off child lock
Cut in Power
Re-ignite heater
when power is on
Room
oversized
Speak to sales
person at place of
purchase
Overheated
See page 11 for
further information
Program set
Cancel program
No Gas supply
Check hose is
plugged in
Heater Tilted
Press Reset. See
page 10 for further
information
HEATER OPERATION
As the heater heats up or cools down, expansion or contraction takes place and the occasional ‘click’ may be
heard. This is quite normal. If there is a fault with the heater which continues and cannot be rectified by
consulting the fault finding chart, contact your nearest EVERDURE service centre or contact Everdure on
1300 766 066 from anywhere in Australia.
Page 13

13
CLEANING
The Everdure Lumina Series II convection heater only requires a small amount of cleaning to keep the
heater operating at safe and efficient levels.
IMPORTANT DISCONNECT GAS AND ELECTRICAL SUPPLIES BEFORE CLEANING ANY
SURFACES
The outer surface of the heater should only be cleaned or dusted with a damp cloth. Never use harsh or
abrasive cleaners or cloths when cleaning the heater.
The filter attached to the back of the appliance will require regular cleaning to keep the heater running at
optimum performance. This area needs particular attention and should be gently vacuumed out from time to
time. The frequency depends on the environment that the heater is used in. The more furnishings and
carpets that are in close proximity to it, the more frequent the cleaning. A check should be made weekly
and when dust and fluff become apparent, it should be gently vacuumed out.
SERVICING
Servicing shall be carried out only by an authorised person. Everdure recommends that the Lumina Series II
convection heater be serviced every 12 months to ensure the heater continues to operate at optimum
condition. This is part of general maintenance and any costs incurred are not covered by warranty.
If the unit fails to ignite after following these instructions, contact your nearest authorised EVERDURE
service centre or:
SHRIRO AUSTRALIA PTY. LIMITED
EVERDURE DIVISION
101 SHEFFIELD ROAD, WELSHPOOL, WESTERN AUSTRALIA, 6106
SHRIRO AUSTRALIA PTY. LIMITED
23-27 CHAPLIN DRIVE, LANE COVE, NSW 2066
TELEPHONE: 1300 766 066
E-MAIL: e-helpdesk@shriro.com.au
IMPORTANT
PLEASE READ THESE INSTRUCTIONS CAREFULLY
BEFORE USING YOUR NEW EVERDURE HEATER
Page 14

14
WARRANTY
1. The warranty on an Everdure Lumina Series II Convection Heaters covers constructional defects, faulty
materials and/ or faulty workmanship for a period of 5 years for the combustion chamber and burner,
and 3 years for all other components after the date of purchase. Replacement or repairs under warranty
are made free of charge provided, if necessary, the heater is delivered to our service department or
authorised service centre and freight charges both ways are paid for by the owner. No liability will be
accepted for loss or damage in transit.
2. The purchaser MUST produce proof of date of purchase together with this warranty certificate when
making a claim.
3. All installation work must be carried out by an authorised person, and must conform to the standard as
laid down by the local governing body authority and must follow the manufacturer’s installation
instructions.
4. Damage or expense incurred as a result of incorrect or unauthorised installation, accident, interference
by unauthorised persons or misuse, is NOT covered by this warranty.
5. Any claim under this warranty must be made direct to Shriro Australia Pty Limited - Everdure Division,
or their authorised service centre.
6. This warranty does not exclude any condition or warranty implied by the Trade Protection Act 1974 or
relevant State laws.
FOR FUTURE REFERENCE PLEASE DOCUMENT THE FOLLOWING DETAILS
AS SOON AS POSSIBLE AFTER PURCHASE
(Do not send this page to Shriro Australia Pty Limited)
PURCHASED FROM:.....................................................................................................
NAME: .............................................................................................................................
ADDRESS: .........................................................................................................................
DATE OF PURCHASE: ....................................................................................................
SERIAL NUMBER: .............................................................................................................
MODEL: ............................................................................................................................
GAS TYPE: .......................................................................................................................
Page 15

15
Everdure Product Warranty Registration
Thank you for choosing an Everdure product. We are confident that it will give you
excellent service and satisfaction. Registering your purchased product will allow us to
contact you in the unlikely event of a service issue or if you are making a claim under
the terms of our warranty. It also lets us keep in touch with you about the product you
have purchased, and any new products or services we may introduce. We encourage
you to register so we are able to offer you the best possible level of after sales service.
Please take a few minutes to fill in and return this form to the following address:
EVERDURE PRODUCT REGISTRATION
LOCKED BAG 2008
LANE COVE
NSW 2066
* Required information
This product warranty registration can also be completed on-line at: www.everdure.com
Surname*
Address*
Suburb*
Postcode*
State*
Phone No.
Email*
Mobile No.
FOR PEACE OF MIND AND THE HIGHEST LEVEL OF AFTER
SALES SERVICE, REGISTER YOUR EVERDURE PRODUCTS
Page 16

16
I would like to be informed about product updates for your Everdure products? (Please tick)
I would like to be informed about new products from Everdure? (Please tick)
PRIVACY POLICY
Privacy policy: Everdure is committed to protecting your personal privacy. Your personal information that you have provided in this form (e.g. name,
street address, e-mail address and telephone/mobile number) is used solely by Everdure for the express purpose for which it was collected (e.g. to
respond to your enquiry regarding your product). Your personal information will be processed by Everdure in accordance to the guidelines and
requirements of the Privacy Laws of Australia (Privacy Act 1998).
For a full copy of Everdure’s Privacy Policy, please visit www.everdure.com or e-mail everdure@shriro.com.au or call 1300 766 066.
* Required information
FOR PEACE OF MIND AND THE HIGHEST LEVEL OF AFTER
Date of Purchase
In which suburb was the product purchased?
From which store was the product purchased?
Serial No.*
(refer to your product)
Product Name or Model Number*
(refer to your receipt/product packaging/instruction manual)
FOR PEACE OF MIND AND THE HIGHEST LEVEL OF AFTER
SALES SERVICE, REGISTER YOUR EVERDURE PRODUCTS
 Loading...