

Page 1

Page 2

Copyright 2017, Eventide Inc.
P/N 141291, Rev 4
Eventide is a registered trademark of Eventide Inc.
AAX and Pro Tools are trademarks of Avid Technology. Names and logos are used with permission.
Audio Units is a trademark of Apple, Inc.
VST is a trademark of Steinberg Media Technologies GmbH.
All other trademarks contained herein are the property of their respective owners.
Eventide Inc.
One Alsan Way
Little Ferry, NJ 07643
201-641-1200
www.eventide.com
I
Page 3

Contents
1 Physion Introduction 1
2 About This Manual 1
3 Registration, Activation, and Installation 1
3.1 Registering Your Plug-in . . . . . . . . . . . . . . . . . . . . . . . . . . . . . . . . . . . . . 1
3.2 Activating Your License . . . . . . . . . . . . . . . . . . . . . . . . . . . . . . . . . . . . . 2
3.3 Installing Your Plug-In . . . . . . . . . . . . . . . . . . . . . . . . . . . . . . . . . . . . . . 2
3.4 Moving or Removing an Activation . . . . . . . . . . . . . . . . . . . . . . . . . . . . . . . 2
4 Physion Overview 3
5 Structural Split Processing 4
5.1 Source Type . . . . . . . . . . . . . . . . . . . . . . . . . . . . . . . . . . . . . . . . . . . . 4
5.2 Focus . . . . . . . . . . . . . . . . . . . . . . . . . . . . . . . . . . . . . . . . . . . . . . . 4
5.3 Smoothing . . . . . . . . . . . . . . . . . . . . . . . . . . . . . . . . . . . . . . . . . . . . . 5
5.4 Trans Decay . . . . . . . . . . . . . . . . . . . . . . . . . . . . . . . . . . . . . . . . . . . . 5
5.5 Structural Split On/Off . . . . . . . . . . . . . . . . . . . . . . . . . . . . . . . . . . . . . 5
5.6 Waveform Viewer . . . . . . . . . . . . . . . . . . . . . . . . . . . . . . . . . . . . . . . . . 5
6 Transient Processing 6
6.1 Transient Effects . . . . . . . . . . . . . . . . . . . . . . . . . . . . . . . . . . . . . . . . . 6
6.1.1 Transient Delay . . . . . . . . . . . . . . . . . . . . . . . . . . . . . . . . . . . . . . 6
6.1.2 Transient Tap Delay . . . . . . . . . . . . . . . . . . . . . . . . . . . . . . . . . . . 6
6.1.3 Transient Dynamics . . . . . . . . . . . . . . . . . . . . . . . . . . . . . . . . . . . 7
6.1.4 Transient Phaser . . . . . . . . . . . . . . . . . . . . . . . . . . . . . . . . . . . . . 7
6.1.5 Transient Reverb . . . . . . . . . . . . . . . . . . . . . . . . . . . . . . . . . . . . . 8
6.1.6 Transient Gate+EQ . . . . . . . . . . . . . . . . . . . . . . . . . . . . . . . . . . . 8
6.2 Transient Effects On/Off . . . . . . . . . . . . . . . . . . . . . . . . . . . . . . . . . . . . . 9
6.3 Transient Gain . . . . . . . . . . . . . . . . . . . . . . . . . . . . . . . . . . . . . . . . . . 9
6.4 Transient Solo . . . . . . . . . . . . . . . . . . . . . . . . . . . . . . . . . . . . . . . . . . . 9
6.5 Transient Output Meter . . . . . . . . . . . . . . . . . . . . . . . . . . . . . . . . . . . . . 9
7 Tonal Processing 10
7.1 Tonal Effects . . . . . . . . . . . . . . . . . . . . . . . . . . . . . . . . . . . . . . . . . . . 10
7.1.1 Tonal Delay . . . . . . . . . . . . . . . . . . . . . . . . . . . . . . . . . . . . . . . . 10
7.1.2 Tonal Compressor . . . . . . . . . . . . . . . . . . . . . . . . . . . . . . . . . . . . 10
7.1.3 Tonal Pitch . . . . . . . . . . . . . . . . . . . . . . . . . . . . . . . . . . . . . . . . 11
7.1.4 Tonal Chorus . . . . . . . . . . . . . . . . . . . . . . . . . . . . . . . . . . . . . . . 11
7.1.5 Tonal Reverb . . . . . . . . . . . . . . . . . . . . . . . . . . . . . . . . . . . . . . . 12
7.1.6 Tonal Tremelo . . . . . . . . . . . . . . . . . . . . . . . . . . . . . . . . . . . . . . 12
7.1.7 Tonal EQ . . . . . . . . . . . . . . . . . . . . . . . . . . . . . . . . . . . . . . . . . 13
7.2 Tonal Effects On/Off . . . . . . . . . . . . . . . . . . . . . . . . . . . . . . . . . . . . . . . 13
7.3 Tonal Gain . . . . . . . . . . . . . . . . . . . . . . . . . . . . . . . . . . . . . . . . . . . . 13
7.4 Tonal Solo . . . . . . . . . . . . . . . . . . . . . . . . . . . . . . . . . . . . . . . . . . . . . 13
7.5 Tonal Output Meter . . . . . . . . . . . . . . . . . . . . . . . . . . . . . . . . . . . . . . . 14
8 Preset Bar 15
8.1 Global Mix . . . . . . . . . . . . . . . . . . . . . . . . . . . . . . . . . . . . . . . . . . . . 15
8.2 Global Gain . . . . . . . . . . . . . . . . . . . . . . . . . . . . . . . . . . . . . . . . . . . . 15
8.3 Saving and Recalling Plug-In Settings . . . . . . . . . . . . . . . . . . . . . . . . . . . . . 15
8.4 Compare . . . . . . . . . . . . . . . . . . . . . . . . . . . . . . . . . . . . . . . . . . . . . . 15
8.5 Info . . . . . . . . . . . . . . . . . . . . . . . . . . . . . . . . . . . . . . . . . . . . . . . . 15
8.6 Source Lock . . . . . . . . . . . . . . . . . . . . . . . . . . . . . . . . . . . . . . . . . . . . 15
9 Conclusion 16
II
Page 4

1 Physion Introduction
An entirely new type of effect, Physion separates the incoming audio signal into two parts based on the
signal’s structure, in this case Transient content and Tonal content. These two independent streams are
processed individually with custom Eventide effects, and then combined in (close to) real time. Because
the Transient and Tonal structures of the signal are processed separately, Physion lends itself to some
very useful and interesting mixing and sound design purposes that haven’t before been possible.
Physion features:
• New Structural Split technology, which allows for complete separation of Transient or Tonal audio
content.
• 6 custom Eventide effects on the Transient stream.
• 7 custom Eventide effects on the Tonal stream.
• Handy post-Structural Split Waveform Viewer
• Preset bar for easily saving and recalling presets
2 About This Manual
While we’re confident you’ll be able to use your new plug-in without reading this manual, we urge you
to have a quick look. There are several unique features and interesting options presented in Physion
and a cursory glance will illuminate any features you may overlook. We’ll try to keep it all relevant and
highlight any tips or cool tricks for you. We also won’t cover much at all about the operation of your
plug-in host or the macOS or Windows environments, as their owner’s manuals or online help should
provide you with the answers you need. We’ve made every attempt to integrate the standard controls
and features from the major plug-in hosts into our plug-ins so that you don’t have to learn anything
new. If you find the need to get more information from us than this manual can provide, please visit our
support forum available via our website (http://www.eventideaudio.com).
Note that you can access this manual directly from the plug-in by clicking the ”INFO” button in the
preset bar.
3 Registration, Activation, and Installation
Eventide uses PACE’s ilok.com licensing system, with or without an iLok hardware dongle, to license
our plug-in products. Each license provides two activations which can reside on either your computer or
on an iLok license dongle. Once you’ve purchased your plug-in, you’ll need to register it on Eventide’s
website, activate your license, and install the plug-in on to your computer.
3.1 Registering Your Plug-in
When you purchase an Eventide Native plug-in, you’ll receive a Serial Number and License Key. The
Serial Number will be two letters followed by 6 numbers. The Serial Number will start with FI (i.e.
FI-######). The License Key will be 3 sets of 4 characters, a letter or a number, each; like XXXXXXXX-XXXX.
Once you’ve received these codes, you can register your plug-in on the Eventide website. To do so, please
log in to http://www.eventideaudio.com, navigate to My Account in the top right corner, and select
Register a New Product. Then, fill out the form by selecting Native Plug-in (VST, AU, AAX) in the
Product Category field, select Physion in the Product list, and enter your Serial Number, License Key,
and ilok.com account name. If you don’t yet have an ilok.com account, you can create one for free at
http://www.ilok.com. Once you’ve done so, press Register.
Once you’ve entered this information and pressed the Register button, Eventide will send the applicable
plug-in license to your ilok.com account, which you will need to activate to your computer or iLok
dongle.
1
Page 5

3.2 Activating Your License
To activate and manage your plug-in licenses you’ll need to install PACE’s iLok License Manager software
which you can download from http://www.ilok.com. If you don’t have this software installed, please
download and install it now.
Once you have installed and launched iLok License Manager you should be able to log in to your account
by clicking the large Sign In button in the upper left hand corner of the application. Once you have,
you should be able to see available licenses by choosing the Available tab at the top of the iLok License
Manager application. If you have successfully registered your plugin, your Physion license will be available
in this list. Please activate this license by dragging it to either your computer or iLok dongle listed on
the left. When you do so, you will be asked to confirm the activation, and you will be able to see it by
clicking on the location you have chosen. At this point your license is activated.
3.3 Installing Your Plug-In
You should have been given a link to the Eventide Native plug-in installer when you purchased your
plug-in, but if you haven’t, you can find downloads for all of Eventide’s Native Plug-Ins at http://
www.eventideaudio.com/products/plugins. Please download and launch the correct installer for your
system.
Once you’ve launched the plug-in installer, it will take you through several pages of options. We have
tried to choose defaults for these options which will best serve the majority of users, but it is worth a
minute to make sure you understand these options before clicking through to the next page. Once you
have followed through the installer, your plug-ins and presets should be in your chosen locations, and
you can hit finish to end the installer application.
Note that if you are using the VST format in a Windows DAW, it is possible that you need to add the
file paths where you chose to install Physion to the DAW’s VST preferences.
At this point, you should be ready to use your Physion Plug-In.
3.4 Moving or Removing an Activation
If at any point, you decide to move your plug-in activation, you can do so in iLok license manager. To
move an activation between an iLok dongle and your computer, simply plug in the iLok, locate the license
in its current location, and drag it to its new location. To deactivate a license, find it in its location,
right click on it, and choose deactivate.
Remember that each Eventide Native Plug-In License comes with two activations, which can be used on
either a computer or iLok dongle, meaning you can use Physion in two locations at the same time.
2
Page 6
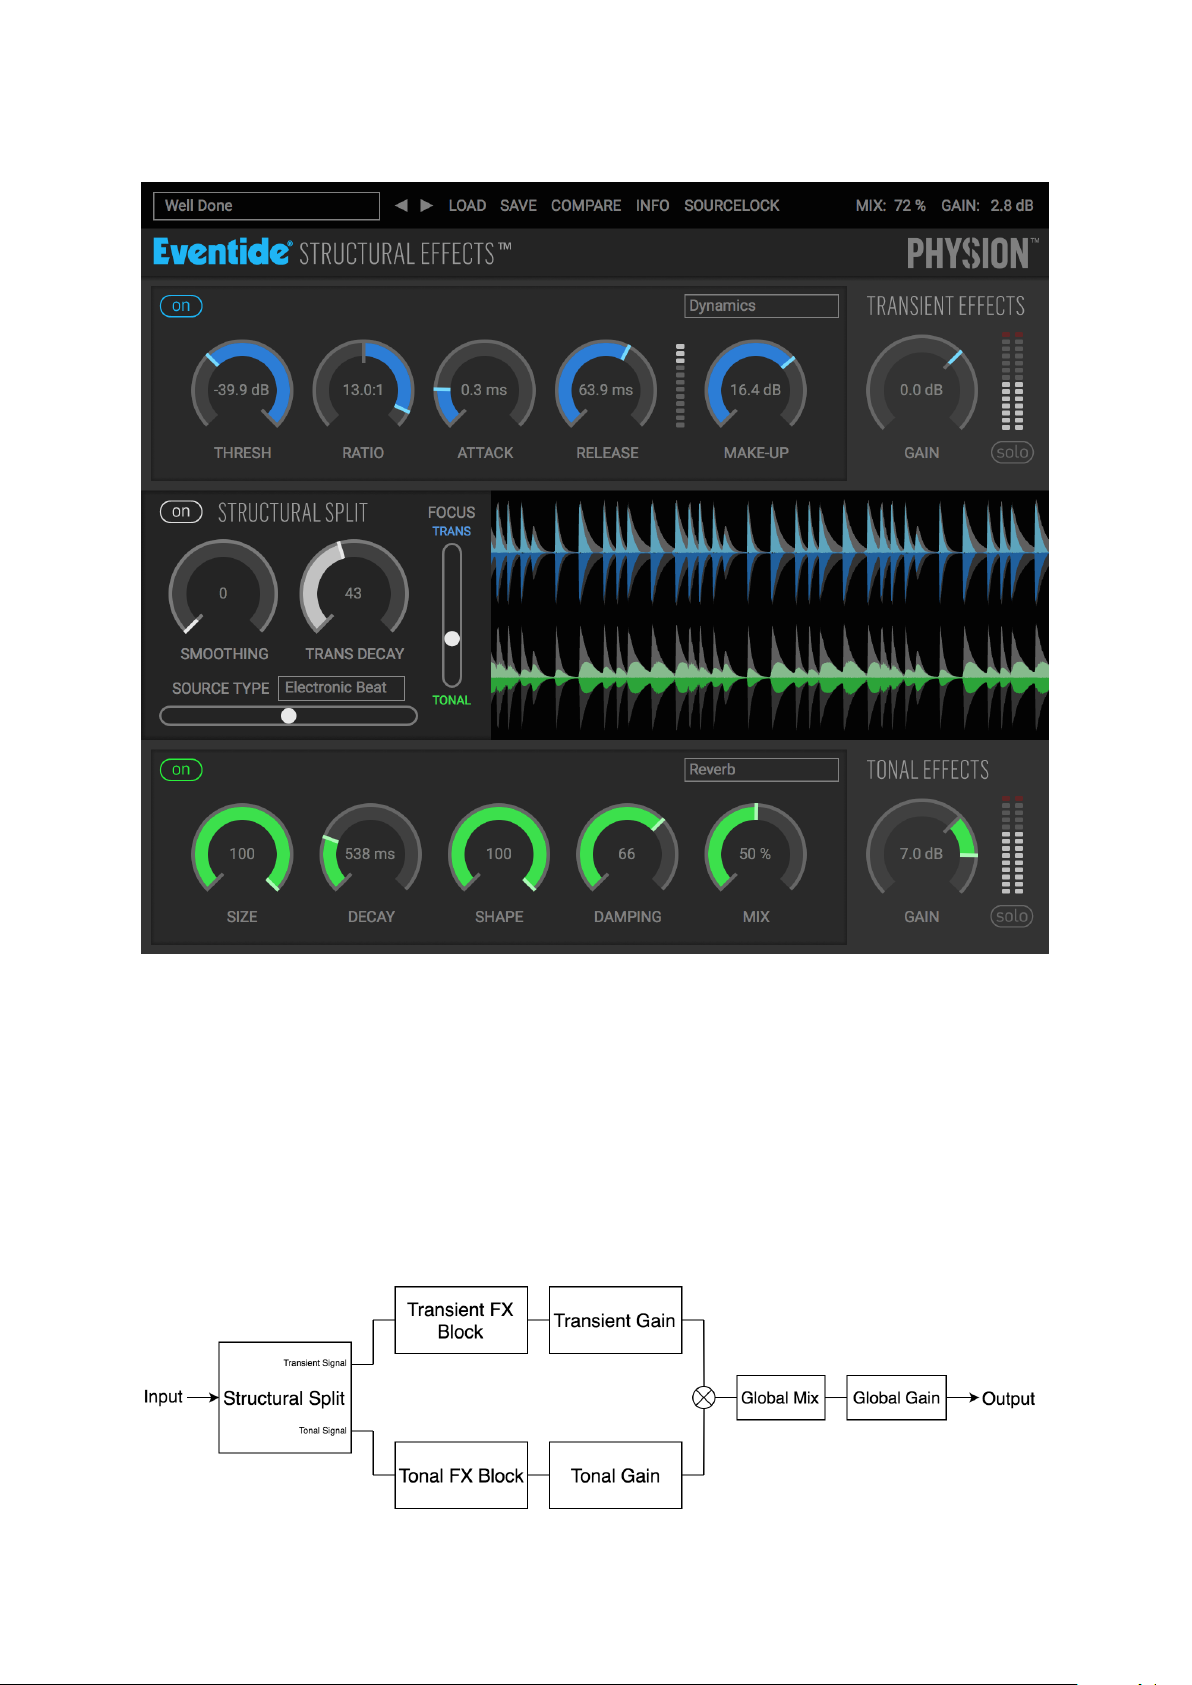
4 Physion Overview
Figure 1: Physion Plug-in
The Physion user interface is divided into four main horizontal sections, each serving a unique purpose.
However, it should be noted that the most important section to set first is the Structural Split section,
as this controls the flexibility and efficiency of the splitting algorithm. The four sections are:
• The Preset Bar, which lets you choose from Factory and User Presets
• The Transient Effects section, which applies effects to the Transient content of your signal
• The Structural Split section, which performs the separation magic
• The Tonal Effects section, which applies effects to the Tonal content of your signal
Figure 2: Physion Signal Flow
3
Page 7

Additionally, keep in mind that the following features apply to all Physion controls:
- Values can be changed by dragging up or down, or by typing into the corresponding text box
- Double clicking or Opt + clicking on any control will revert it to its default value
- Cmd + dragging on any control will result in more precise range of motion
- All controls are automatable
5 Structural Split Processing
The Structural Split Controls allow for user specific tuning of the Transient / Tonal separation via four
control parameters: Source Type, Focus, Trans Decay, and Smoothing.
The Structural Split is a completely complementary division of the audio. The individual Transient and
Tonal audio streams automatically mix back together in Physion to perfectly reconstruct the input signal
(until you start doing all the fun stuff by effecting them differently!), so remember, you will not hear any
change in audio as you move these parameters unless you solo an individual Transient or Tonal channel,
change the Transient / Tonal gains, or apply a unique Transient or Tonal effect. It is recommended that
for optimizing the Split, you bypass both Transient / Tonal FX and solo each audio stream as you set
the Split parameters.
Even if you do not apply any of the above suggestions to hear the separation, you’ll still be able to
see Transient / Tonal split in the the Waveform Viewer to the right of the Structural Split Controls.
This viewer displays the resulting input Transient / Tonal Split, with each colored-coded waveform, blue
Transient and green Tonal, visually overlaid atop the gray original signal waveform.
Figure 3: Structural Split Section
5.1 Source Type
This combo horizontal slider / menu box includes ”coarse” algorithmic tunings for different audio sources
as suggestions for the separation task, so it’s generally best to match the Source Type to the audio you’re
wanting to process through Physion. But, by all means, don’t let these suggestions deter you from being
adventurous in trying different tunings on different source material.
These coarse Source Type tunings essentially scale the internal algorithm parameters used by the Focus
Control to split the input audio. Tunings for higher polyphony or complexity (full drums, electronic beat,
piano, guitar, vocal) tend to split best on source material that has higher polyphony or complexity.
5.2 Focus
True to its name, this vertical slider control ”focuses” the sonic energy towards either the Transient or
Tonal audio channel, with extreme settings pushing all the energy into either Transient (top of slider)
or Tonal (bottom of slider). However, the real separation magic occurs in the middle settings, where
Focus sets the main transition region or decision point where audio splits (in time and frequency) into
the separate Transient and Tonal streams.
4
Page 8

Pushing more energy into the Transient channel will create musical auto-swelling in the Tonal channel.
Alternatively, pushing more energy into the Tonal Channel will trim the Transient audio into staccato
transients devoid of tonal resonance. You can also use Focus to morph audio signals between two parallel
effects. But instead of a simple cross fade, the audio transitions through the ”Split Domain”.
5.3 Smoothing
The Smoothing control is a fine tuning control used to slow down the fastest transitions (in time and
frequency) in both directions between Transient and Tonal. Basically, this controls how fast a piece of
Transient or Tonal audio can switch to the other stream. This is primarily used to smooth out any
artifacts that you may encounter with difficult source signals. It can however be musically useful in
creating softer Transient attacks.
5.4 Trans Decay
An extension of Smoothing (but only in one direction), the Transient Decay control limits how quickly
audio is allowed to transition (in time and frequency) from Transient to Tonal, thus increasing the decay
on the Transients. Larger values of Trans Decay limit the transition rate substantially. This control
could equally be named Tonal Swell, as larger values will also increase the auto-swell period in the Tonal
Channel.
Not only is this useful for smoothing out artifacts, but as a musical tool at larger values allows for precision
control of auto-swelling the Tonal side of the audio, or conversely the ”muted” or ”choked” staccato sound
of the Transients. As an example, by soloing the Tonal channel and using Focus and Trans Decay you
can turn struck or plucked string instruments into beautiful bowed sounding pads.
5.5 Structural Split On/Off
The Structural Split On/Off Button turns the Structural Split process on and off. When off, it renders the
Transient / Tonal Split into a simple volume crossfader between two parallel effect channels. Essentially,
for your convenience, we allow Physion to become a simple parallel effects processor. When the Structural
Split section is off, Focus becomes the pre-effect mixer for the parallel effects processor (all other Split
controls do not function). For example, an equal Focus (middle of slider) simply divides the input audio
volume by half into each channel before the audio hits the effects.
5.6 Waveform Viewer
Directly to the right of the Structural Split Controls, the Waveform viewer displays the resulting post
Structural Split waveforms, with the Transient audio in the top blue viewer and the Tonal audio in the
bottom green viewer. All waveforms are displayed pre-Effect and pre-Gain.
Each split signal is visually overlaid atop the original input audio in gray, highlighting the unique three
dimensional (time, frequency, and signal magnitude) nature of the split. In other words, we’re not just
applying time domain dynamics processing here to pull out the attacks of signals.
For stereo Physion instantiations, stereo waveforms will appear with the left channel magnitude in the
positive direction and right channel magnitude in the negative direction.
5
Page 9

6 Transient Processing
6.1 Transient Effects
Post Structural Split, the Transient signal is independently processed through a selectable Effect Block.
The effect is selected with the dropdown menu in the upper right-hand corner of the Effect Block. The
Transient Effect choices are:
6.1.1 Transient Delay
A standard Delay echo effect with Tempo Sync capability and low and high cut filtering.
Figure 4: Transient Delay
Controls:
• Tempo Sync Mode - toggles between session synced ( symbol), manually synced ( symbol),
and free-running ( symbol) delay time.
• Tempo Sync BPM - sets the BPM when in manually synced Tempo Sync Mode, and displays
the session BPM when in session synced Tempo Sync Mode.
• Warp - controls whether changing delay time causes a tape echo type glide (Warp on) or crossfade
(Warp off).
• Time - amount of delay, up to 4 seconds.
• Feedback - amount of delay output that is fed back into delay. Going above 100% allows for
self-oscillation.
• Low Cut - amount of low frequency rolloff. Low Cut is in the feedback path.
• High Cut - amount of high frequency rolloff. High Cut is in the feedback path.
• Mix - amount of delayed signal to dry signal.
6.1.2 Transient Tap Delay
A multi-tap delay-line with Tempo Sync capability. Useful for rhythmic delays, wacky comb filtering,
volume swells, or unique reverberant sounds.
Figure 5: Transient Tap Delay
Controls:
• Tempo Sync Mode - toggles between session synced ( symbol), manually synced ( symbol),
and free-running ( symbol) delay time.
6
Page 10

• Tempo Sync BPM - sets the BPM when in manually synced Tempo Sync Mode, and displays
the session BPM when in session synced Tempo Sync Mode.
• Length - total time over which the taps are spaced, up to 4 seconds.
• Taps - the number of delay taps, up to 32 taps.
• Taper - controls the fade of the taps over the delay length. More negative values will increasingly
give a fade-up over the taps, and more positive values will give a fade-down over the taps.
• Spread - rhythmic spacing of the taps over the delay length. More negative values will group taps
towards the beginning, while positive values will group taps more towards the end of the delay
length.
• Mix - amount of delayed signal to dry signal.
6.1.3 Transient Dynamics
A combined Compressor/Limiter and Expander/Gate (function is determined by Ratio control).
Figure 6: Transient Dynamics
Controls:
• Threshold - the gain crossover point. In Compression mode, signals above this level will trigger
gain reduction, while in Expansion mode signals below this level will have gain reduction applied.
• Ratio - how much gain reduction occurs. If turned left of center, the effect functions as an Ex-
pander/Gate. If turned right of center, the effect functions as a Compressor/Limiter.
• Attack - how fast the dynamics processor reacts to change in input level.
• Release - how fast the dynamics processor responds to a decrease in input level.
• Meter - displays the amount of gain reduction being applied.
• Make-Up - controls the output level, post Compression/Limiting or Expansion/Gating.
6.1.4 Transient Phaser
A classic multi-stage allpass based Phaser effect, which can be controlled via LFO or Envelope.
Figure 7: Transient Phaser
Controls:
• LFO/Envelope Toggle - controls whether the Phaser is driven by an LFO, or by the envelope of
the Transient Effects section input.
7
Page 11

• Tempo Sync Mode - toggles between session synced ( symbol), manually synced ( symbol),
and free-running ( symbol) LFO rate. Only available in LFO mode.
• Tempo Sync BPM - sets the BPM when in manually synced Tempo Sync Mode and displays the
session BPM in session synced Tempo Sync Mode. Only available in LFO mode.
• Release - how quickly the envelope follower decays. Only available in Envelope mode.
• Rate - the speed of the LFO. Only available in LFO mode.
• Poles - the number of allpass stages in the phaser. A higher number of poles results in a deeper,
more intense sound.
• Feedback - amount of output from the phaser that is fed back into its input.
• Base - the starting point of the phaser, i.e. the point from which the modulation sweeps from.
Lower values will allow the phaser to sweep down to lower frequencies.
• Depth - how far the modulation can sweep. Higher values will allow the phaser to sweep up to
higher frequencies.
6.1.5 Transient Reverb
A room Reverb designed with high echo density, imparting a fast and smooth build-up of reflections.
This pairs nicely with transient sounds to create a sense of space without obvious echo slap back.
Figure 8: Transient Reverb
Controls:
• Size - the perceived ”size” of the reverberant space.
• Decay - how long it takes the reverberated sound to decay to a level of -60dB (up to 10 secs).
• Low Damping - amount of low frequency filtering in the reverberant tail.
• High Damping - amount of high frequency filtering in the reverberant tail.
• Mix - amount of wet signal to dry signal.
6.1.6 Transient Gate+EQ
A Gate followed by a 3-band overdrive-able EQ.
Figure 9: Transient Gate and EQ
Controls:
• Gate Threshold - the level at which the Gate opens.
8
Page 12

• Low Gain - sets the gain for the low-frequency band (200Hz low shelf with Q of 0.5).
• Mid Frequency - sets the frequency of the of mid-frequency filter (peak filter with Q of 0.707).
• Mid Gain - sets the gain of the mid-frequency filter (peak filter with Q of 0.707).
• High Gain - sets the gain of the high-frequency filter (5kHz high shelf with Q of 0.5).
6.2 Transient Effects On/Off
Located in the Effect Block, this button turns the entire Transient Effect Block on or off, regardless of
which effect is selected (i.e. if ”Off” the Effect Block will remain off even when switching effects).
6.3 Transient Gain
Amount of gain in dB (-96 to +18) applied to the Transient audio post-Effects. This can be used to bring
all the Transients up or down. Using this in conjunction with the Tonal Gain alone can lead to dead
simple parallel compression effects to easily increase or decrease the ”punch” and ”body” of percussive
audio.
6.4 Transient Solo
Pressing the Transient Solo button will mute the Tonal Channel, effectively the same as turning the Tonal
Gain all the way down.
6.5 Transient Output Meter
Displays the output level of the Transient audio stream, post Effect and Gain. Clipping is indicated by
the red clip light, which can be cleared by clicking it.
9
Page 13

7 Tonal Processing
7.1 Tonal Effects
Post Structural Split, the Tonal signal is independently processed through a selectable Effect Block. The
effect is selected with the dropdown menu in the upper right-hand corner of the Effect Block. The Tonal
Effect choices are:
7.1.1 Tonal Delay
A standard Delay echo effect with Tempo Sync capability, modulation, and low and high cut filtering.
Figure 10: Tonal Delay
Controls:
• Tempo Sync Mode - toggles between session synced ( symbol), manually synced ( symbol) ,
and free-running ( symbol) delay time.
• Tempo Sync BPM - sets the BPM when in manually synced Tempo Sync Mode, and displays
the session BPM when in session synced Tempo Sync Mode.
• Modulation - adds random voice chorusing to the delay tap. Warp Off results in crossfading
modulation, and Warp On results in regular delay line modulation.
• Warp - controls whether changing delay time causes a tape echo type glide (Warp on) or crossfading
(Warp off).
• Time - amount of delay, up to 4 seconds.
• Feedback - amount of delay output that is fed back into delay. Going above 100% allows for
self-oscillation.
• Low Cut - amount of low-frequency rolloff. Low Cut is in the feedback path.
• High Cut - amount of high-frequency rolloff. High Cut is in the feedback path.
• Mix - amount of delayed signal to dry signal.
7.1.2 Tonal Compressor
A standard Compressor/Limiter.
Controls:
Figure 11: Tonal Compressor
10
Page 14

• Threshold - the level above which gain reduction takes place.
• Ratio - how much gain reduction occurs.
• Attack - how fast the Compressor/Limiter reacts to change in input level.
• Release - how fast the Compressor/Limiter responds to a decrease in input level.
• Meter - displays the amount of gain reduction.
• Make-Up - controls the effect’s output level, post Compression/Limiting.
7.1.3 Tonal Pitch
A 3-voice Pitch Shifter with +/- 1 octave shift per voice and an overall fine tuning control. Useful for
retuning drums, creating harmonies, or micropitch chorusing/double-tracking all without transient slap
back or smearing (assuming Focus isn’t all the way Tonal).
Figure 12: Tonal Pitch
Controls:
• Interval 1 - the amount of shift for Voice 1 (+/- 1 octave).
• Pitch Meter - displays the pitch of the Tonal audio, post Interval 1 and Fine Tune shift amount.
This is useful for dialing in the pitch you desire, based on source material.
• Pitch Meter Toggle - turns the Pitch meter on/off.
• Interval 2 - the amount of shift for Voice 2 (+/- 1 octave).
• Interval 2 Enable - turns Voice 2 on/off.
• Interval 3 - the amount of shift for Voice 3 (+/- 1 octave).
• Interval 3 Enable - turns Voice 3 on/off.
• Fine Tune - overall fine tuning of the whole pitch shifter (applied to all voices).
• Mix - amount of processed signal to dry signal.
7.1.4 Tonal Chorus
A deep multi-voiced Chorus with randomized modulation. Structural Split separation of Transients allows
this chorus to go deep and wide on Tonal audio without transient slap or smearing.
Controls:
Figure 13: Tonal Chorus
11
Page 15

• Speed - adjust the modulation speed of the chorused voices.
• Depth - how deep the chorus sounds. Larger values will result in a broader, more sweeping sound.
• Size - the spread of the chorused voices.
• Tone - filtering of the chorused signal. Turning clockwise increases high-shelf filtering, while turning
counter-clockwise increases low-shelf filtering.
• Mix - amount of processed signal to dry signal.
7.1.5 Tonal Reverb
A large space Reverb designed with lower echo density (compared to Transient Reverb) and targeted high
modal density with little to no modulation to avoid a chorusing sound on the tails. The allows the tonal
audio to breath in the space, yet evolve into dense pad-like reverberant tails.
Figure 14: Tonal Reverb
Controls:
• Size - the perceived ”size” of the reverberant space.
• Decay - how long it takes the reverberated sound to decay to a level of -60dB (up to 100 secs).
• Shape - the perceived ”shape” of the reverberant space.
• Damping - amount of high frequency filtering.
• Mix - amount of wet signal to dry signal.
7.1.6 Tonal Tremelo
A standard Tremolo Effect which is driven by an LFO in (optional) combination with the Envelope of
the plug-in’s input.
Figure 15: Tonal Tremolo
Controls:
• Tempo Sync Mode - toggles between session synced ( symbol), manually synced ( symbol) ,
and free-running ( symbol) LFO rate.
• Tempo Sync BPM - sets the BPM when in manually synced Tempo Sync Mode, and displays
the session BPM when in session synced Tempo Sync Mode.
• Envelope Modulation Destination - these two toggle switches select what parameters the plug-
in input should modulate.
12
Page 16

• Rate - the speed of the LFO.
• Waveform - selects the waveform type for the LFO.
• Envelope Sensitivity - controls how much the Envelope of the plug-in’s input will modulate
Rate and/or Depth (depending on what is selected in Envelope Modulation Destination). This is
in addition to the already set Rate and/or Depth values. Positive Sensitivity values will modulate
Depth and/or Rate up from their current values, while negative Sensitivity values perform an Inverse
Envelope effect, where Depth and/or Rate will be modulated down from their current values. Note
that you might need to set Depth and Rate appropriately to hear this effect, as these controls are
still bounded by their minimum and maximum.
• Spread - controls the stereo spread of the Tremolo. This effectively pushes the LFO of the right
channel out of phase with the left channel LFO, until they are fully out of phase (180 degrees). At
maximum, the Tremolo becomes an Auto-Panner. Note that this control is not available in mono
instances of Physion.
• Depth - the amount of Tremolo effect applied to the signal.
7.1.7 Tonal EQ
A 3-band overdrive-able EQ.
Figure 16: Tonal EQ
Controls:
• Low Gain - sets the gain for the low-frequency band (200Hz low shelf with Q of 0.5).
• Mid Frequency - sets the frequency of the of mid-frequency filter (peak filter).
• Mid Frequency - sets the Q of the of mid-frequency filter (peak filter).
• Mid Gain - sets the gain of the mid-frequency filter (peak filter).
• High Gain - sets the gain of the high-frequency filter (5kHz high shelf with Q of 0.5).
7.2 Tonal Effects On/Off
Located in the Effect Block, this button turns the entire Tonal Effect Block on or off, regardless of which
effect is selected (i.e. if ”Off” the Effect Block will remain off even when switching effects).
7.3 Tonal Gain
Amount of Gain in dB (-96 to +18) we apply to the Tonal audio post Effects. Using this in conjunction
with the Transient Gain alone can lead to dead simple parallel compression effects to easily increase or
decrease the ”punch” and ”body” of percussive audio.
7.4 Tonal Solo
Pressing the Tonal Solo button will mute the Transient Channel, effectively the same as turning the
Transient Gain all the way down.
13
Page 17

7.5 Tonal Output Meter
Displays the output level of the Tonal audio stream, post Effect and Gain. Clipping is indicated by the
red clip light, which can be cleared by clicking it.
14
Page 18

8 Preset Bar
The Preset Bar is used for loading and saving Physion Presets, as well as controlling the Global Mix and
Gain of Physion.
Figure 17: Preset Bar
8.1 Global Mix
Controls the Global Wet/Dry mix of the entire plug-in.
8.2 Global Gain
Controls the overall Gain (-24 dB to +18 dB) of the entire plugin-in.
8.3 Saving and Recalling Plug-In Settings
When Physion is installed, a library of settings is placed into the
<user>/Documents/Eventide/Physion/Presets folder. These presets have a .tide extension and can be
saved or loaded from the Physion preset bar in any supported DAW.
In many DAWs there is an additional generic preset bar that saves DAW-specific presets to a separate
location. We recommend saving your presets using the Eventide preset bar to ensure that your presets
will be accessible from any DAW. You can also create sub-folders inside the Physion Preset Folders, if
you wish
8.4 Compare
Compare becomes illuminated when a preset has changed. Clicking Compare toggles between the unaltered preset and the adjusted state of the preset.
8.5 Info
The INFO button enables easy access to documentation from the preset bar. Clicking on it opens this
user guide in your default PDF viewer. This user guide is located along with your presets in your
<user>/Documents/Eventide/Physion folder.
8.6 Source Lock
This locks the Structural Split Source Type (see Structural Split Processing section for more detail)
during Preset loading. Locking the Source Type ensures that the splitting algorithm stays optimized as
you try different Presets on the same source material.
15
Page 19

9 Conclusion
We hope you enjoy the Eventide Physion plug-in and put it to good use in all of your mixes and sound
design projects. Please be sure to check over Eventide’s other Native Plug-In offerings for more unique
and interesting effects.
16
 Loading...