

Page 1

Eventide H9000 User’s Manual
Software Version 1.0
Part No: 141242
©2017 Eventide Inc., One Alsan Way, Little Ferry, NJ, 07643 USA
Page 2

2
Table of Contents
INTRODUCTION ........................................................................................................................................ 4
A NOTE ON THE USER INTERFACE ........................................................................................................................ 4
WHAT’S IN THE BOX ............................................................................................................................................... 4
H9000 FEATURES ................................................................................................................................................... 5
TERMINOLOGY .......................................................................................................................................................... 6
PRESETS ...................................................................................................................................................... 8
H9000 HARDWARE .............................................................................................................................. 10
STANDARD FRONT PANEL ................................................................................................................................... 10
REAR PANEL .......................................................................................................................................................... 14
OPERATING THE H9000 ..................................................................................................................... 18
A NOTE ON “LATCHING” SOFT KEYS: ................................................................................................................ 18
THINGS TO KNOW ABOUT SIGNAL ROUTING .................................................................................................... 19
SESSIONS ................................................................................................................................................................. 20
FX CHAINS .............................................................................................................................................................. 23
Direct I/O ................................................................................................................................................................. 26
The FX Chain Preset Browser .......................................................................................................................... 27
Mix ............................................................................................................................................................................... 28
Levels .......................................................................................................................................................................... 29
ALGORITHMS .......................................................................................................................................................... 30
Algorithms Overview .......................................................................................................................................... 30
Algorithm Selection Screen .............................................................................................................................. 35
PARAMETERS ......................................................................................................................................................... 39
Editing Parameters in an Algorithm ........................................................................................................... 40
Functions .................................................................................................................................................................. 44
METERS ................................................................................................................................................................... 47
SAVING AND IMPORTING DATA ........................................................................................................................... 50
Saving......................................................................................................................................................................... 50
Importing Data ...................................................................................................................................................... 52
SCENES .................................................................................................................................................................... 53
Overview ................................................................................................................................................................... 53
Trigger Source Options ...................................................................................................................................... 54
Working with Scenes .......................................................................................................................................... 55
SETUP ........................................................................................................................................................ 59
INFO ......................................................................................................................................................................... 60
NAME ....................................................................................................................................................................... 61
CLOCK ...................................................................................................................................................................... 62
TEMPO ..................................................................................................................................................................... 64
PREFERENCES ........................................................................................................................................................ 66
PEDALS .................................................................................................................................................................... 68
ANALOG REFS ........................................................................................................................................................ 70
NETWORK ............................................................................................................................................................... 71
Ethernet Setup ....................................................................................................................................................... 71
Wireless Setup ........................................................................................................................................................ 72
Creating a Local Access Point ......................................................................................................................... 73
SOFTWARE UPDATE .............................................................................................................................................. 74
Page 3

3
USING THE H9000 AS A COMPUTER AUDIO INTERFACE ........................................................ 76
USING THE H9000 WITH OS X .......................................................................................................................... 76
Using the H9000 With Your Existing Computer Audio Interface ................................................... 76
APPENDICES ........................................................................................................................................... 78
APPENDIX A: SIGNAL FLOW ................................................................................................................................ 78
APPENDIX B: STARTUP SEQUENCES .................................................................................................................. 80
APPENDIX C: WORD CLOCK TERMINATION IN THE H9000.......................................................................... 81
APPENDIX D: H9000 MIDI FUNCTIONALITY .................................................................................................. 82
APPENDIX E: H9000 PRESETS ........................................................................................................................... 83
APPENDIX F: H9000 ALGORITHMS ................................................................................................................ 103
SAFETY INFORMATION ..................................................................................................................... 139
LIMITED WARRANTY ........................................................................................................................ 140
Page 4

4
Introduction
Congratulations on your purchase of the Eventide H9000, the new flagship
processor in the Eventide product line.
The H9000 is designed to be an incredibly versatile tool, allowing you to process a
large number of channels using the latest digital and networked audio formats, and
offering the great sounding effects you have always loved from Eventide.
The H9000 is available in two basic models:
The H9000 Standard: Full set of front panel controls and a color display.
The H9000R: Blank front panel. Requires Emote remote control software.
Both versions of the H9000 accept a range of expansion boards that support
industry standard protocols for digital and networked audio I/O.
A Note on the User Interface
The standard H9000 comes with a front-panel color display and a large complement
of hardware controls, allowing you to navigate the device with ease. However, we
highly encourage you to download and use the full-featured control app/plug-in
“Emote”, available as a free download at www.eventideaudio.com/emote. Emote is
required to control the blank front panel model, H9000R.
Emote is available as a stand-alone program for Windows and OS X computers, as
well as a plug-in for VST, AU and Pro Tools. Emote gives you control of all features
and settings of your H9000, allowing you to craft your effects extremely quickly and
intuitively. Think of Emote as your artistic partner, letting you dig deeper into the
creative potential of the H9000.
What’s In The Box
Your H9000/H9000R comes with the following contents:
H9000/H9000R 2RU Rack Mount processor
Rack Mount Screws
User’s Manual
Registration/Warranty Card
Wireless Network (WIFI) Dongle
Power Cable
USB Cable
Page 5

5
H9000 Features
The H9000 is designed to be easy to use while still giving you a large amount of power,
control and versatility through the implementation of the following features:
Multiple Quad ARM Processors
The H9000 uses multiple cutting-edge effects processors, allowing it to process a large
number of I/O channels and up to 16 separate effects algorithms simultaneously.
Flexible and Adaptable Effects Structure
Your H9000 can utilize up to 4 separate FX Chains, with each chain containing up to 4
separate processing algorithms. The FX Chains can be routed in series, parallel, and
more.
Large Complement of Analog and Digital Input / Output
Multiple formats and connector types allow you to easily integrate the H9000 into a
variety of setups.
Expandable I/O
Three option card slots allow you to integrate your H9000 into the latest digital audio and
networked audio environments. We are always developing new option cards, ensuring
that your processor is as future-proof as possible in the always-evolving world of digital
and networked audio formats.
Full Front Panel Control
While we offer the extremely useful Emote control app, the standard H9000 also provides
intuitive front panel control using a large color display, context sensitive soft keys, and a
large complement of physical navigation controls.
Network Connectivity
Connect the H9000 to your Local Area Network for quick and easy software updates, as
well as full control through our Emote software.
Computer Audio Interfacing
USB 2.0 allows you to interface your H9000 with your audio software as a standard
audio interface with 16 channels of I/O. Send, process, and return 16 separate channels of
individual DAW tracks.
Easy Sharing of FX Chains and Sessions
The H9000 uses standard, “off-the-shelf” USB thumb drives to save and import your
custom effects settings, making it easy to back up, carry, and share your creative efforts.
Page 6

6
Terminology
In order to get the most out of your H9000, please familiarize yourself with the four
main terms below which represent the “hierarchy” used in the product:
Algorithm
Parameters
FX Chain
Session
Algorithm
Over many years, Eventide has created a vast library of audio processing routines,
which exist as effects processing “modules”. Some of these are simple, such as a low
pass filter, a limiter, a compressor, etc., while others are more complex, such as an
FFT or a reverb network.
An Algorithm in the H9000 is a combination of some of these modules, and of certain
variable values associated with the modules that make up that algorithm. The
designer of the algorithm might choose to set some variables of some modules to a
specific value that cannot be changed by the user, while at the same time allowing
that user to change the values of other variables.
Simply put, the algorithms are the H9000’s “secret sauce”, with specific effects
parameters that are adjustable by you, the user.
Parameters
Parameters are the individual adjustments you can make within an effects algorithm
which customize that effect. On the H9000, when you navigate to a specific
algorithm you are presented with that algorithm’s specific parameters, which you
can easily adjust.
A parameter might control one variable of one underlying processing module, or it
may control several variables of several modules. Some parameters may be
adjustable, whereas for others the designer may choose to set some of the
underlying variables to a fixed value and not “bring them out” to the user of the
effect.
For example, a reverb algorithm would present you with settings such as reverb
time, room size, decay time, etc. In contrast, a guitar amp emulator might offer
parameters such as gain amount, low/mid/high EQ, etc.
Page 7

7
FX Chain
The H9000 allows you to chain up to 4 separate algorithms together into a custom
FX Chain. The FX Chain is fed by an audio input, then the audio is routed through up
to 4 algorithms, and then finally to an audio output.
You are free to decide which algorithms are included in the FX Chain, the order they
process the audio in, and even determine aspects such as separate parallel and
series audio paths.
Sessions
A Session is the highest level on the H9000 hierarchy. It saves the entire state of the
product at any given moment, including:
The currently loaded FX Chains (up to all 4)
The current settings for the parameters within the FX Chains
The current input/output assignments to and from the FX Chains
The current state of the assorted global settings
The standard H9000’s front panel contains dedicated hardware buttons for all four
of the above modes, making it quick and easy to access any level of the hierarchy at
the touch of a button.
Page 8

8
Presets
The term “preset” is perhaps overused in our industry, so we would like to clarify
how this term is used by the H9000. The H9000 supports 3 types of presets, each
corresponding to the top 3 levels of the hierarchy. You can save and load:
Algorithm Presets
An algorithm preset contains:
Algorithm-related parameter values
General parameter values related to the algorithm container (mix,
mute/bypass, input/output gains)
Mappings of parameters to external controllers and Functions (can be
excluded at load time)
Assorted metadata (Name and ID are the most relevant to the user)
FX Chain Presets
An FX Chain presets contains:
Everything contained within an algorithm preset, for all the algorithms
present in the FX chain
General parameter values related to the entire FX chain container (mix,
mute/bypass, input/output gains)
Additional mappings of these general FX Chain parameters to MIDI
controllers
All routing information internal to the FX Chain (from the FX chain inputs,
to/between algorithm containers, to the FX chain outputs). No Physical I/O
information is included.
Function values, as well as mappings of the actual Function knobs to external
controllers
Metadata (Name and ID are the most relevant to the user)
Page 9

9
Sessions
Sessions contain:
Everything contained within an FX chain preset, for all the FX chains present
on the device
Routing information external to each FX chain, including:
o Physical I/O in and out of each FX chain container
o Direct I/O connections made between Physical I/O
Additional input/output gain settings for each I/O channel routed to/from
the FX chain
All the settings found in the Setup mode (these can be excluded by category
when loading)
All the Scene Maps found in Scenes mode, along with current active map
index
LED meter mappings
The state of Global Mute/Bypass
Metadata (Name and ID are the most relevant to the user)
Page 10
10
H9000 Hardware
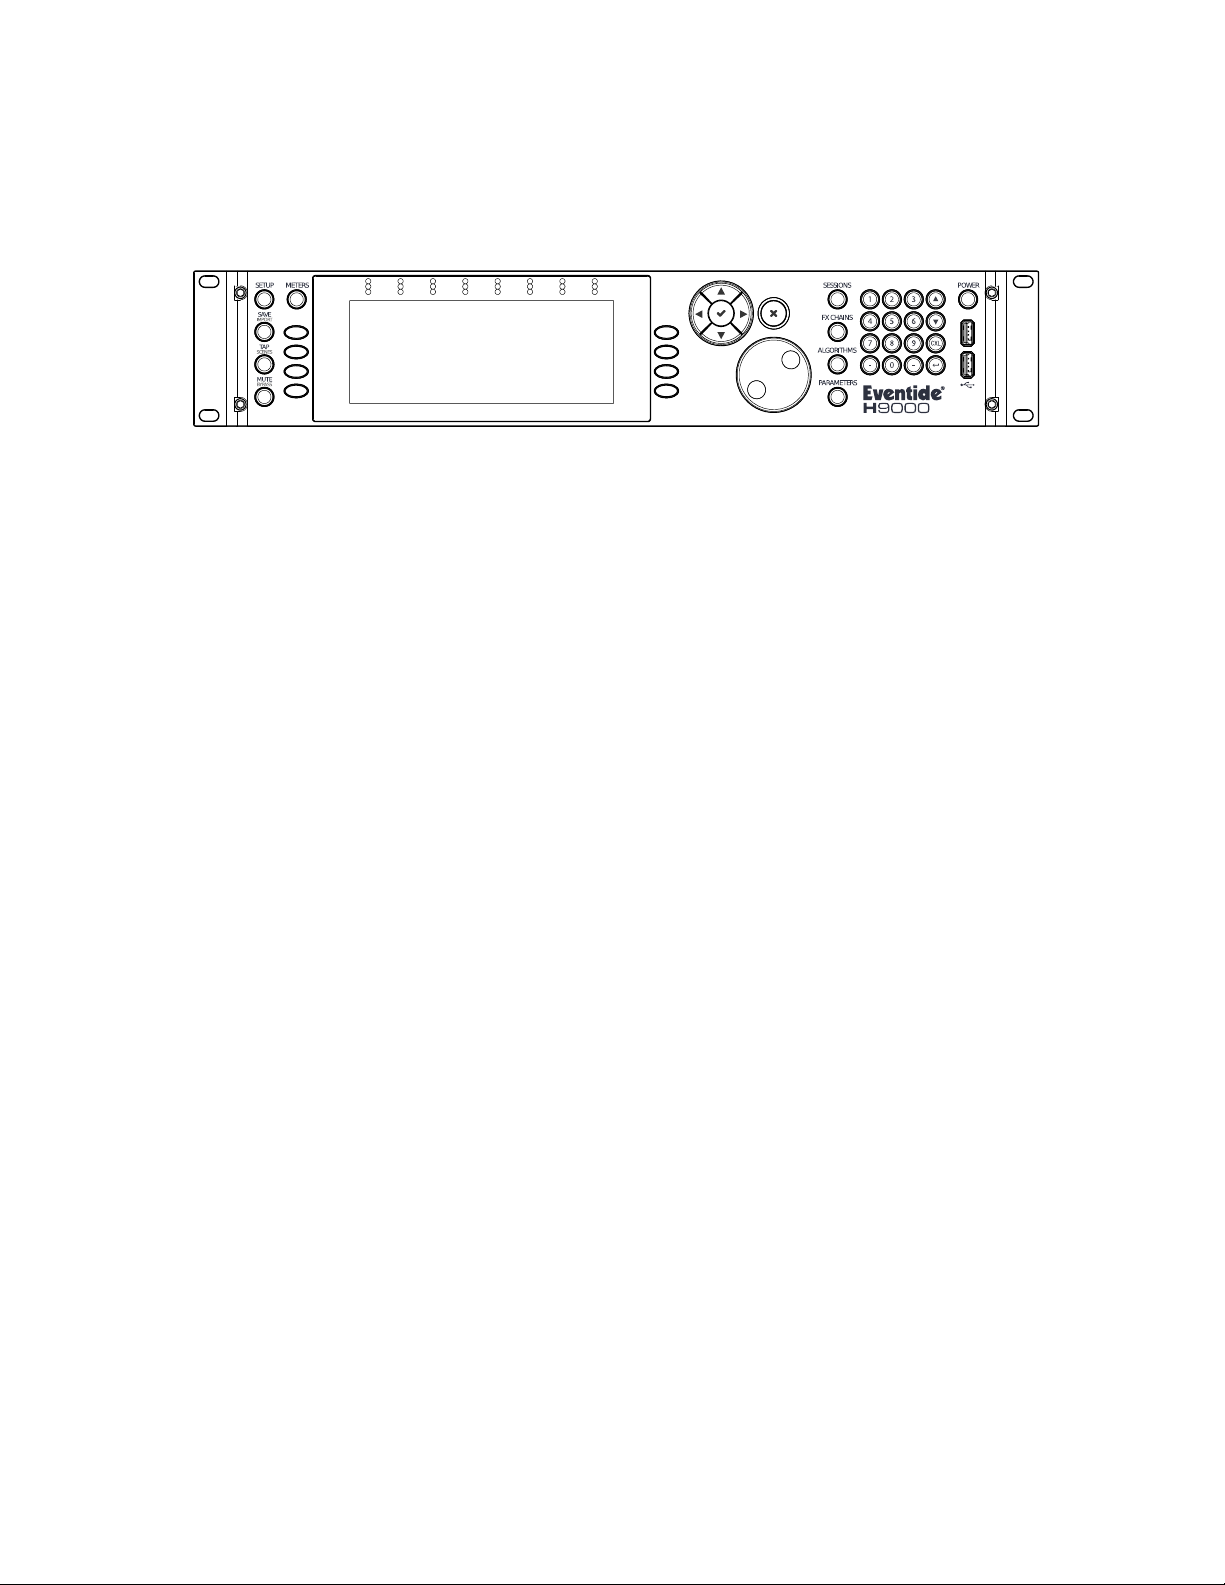
Standard Front Panel
The H9000 has a full set of front panel controls, allowing for quick and easy control
of all of its features.
Note that the color display on the front panel is not a touchscreen. However, eight
dedicated “soft keys” are available, with their specific function always tied to a
specific, context sensitive adjustment located adjacent to them on the screen.
By using the soft keys in conjunction with the large cursor diamond and jog wheel,
all adjustments to the H9000 are readily available.
If you prefer to install the H9000 in a location where working with the front panel is
not practical or convenient, note that all adjustments can also be made using our
Emote software.
The H9000 front panel contains the following controls; please refer to the relevant
sections of the user’s manual for further details on each function.
Setup
Press the Setup button to enter the setup menu, where you can configure assorted
preferences for your device.
Save/Import
Press the Save/Import button to save the different types of presets to internal
memory, as well as optionally saving to an attached USB drive.
Long-press the Save/Import button to import saved presets into the H9000. See the
section “Saving and Importing” for more details.
Tap/Scenes
Press the Tap button multiple times to set a tempo (measured in beats per minute,
or “BPM”). This tempo setting will be used as a sync reference for time based effects
such as digital delay.
Page 11

11
The Tap button’s inset LED illuminates in time with the tempo you have set, giving a
visual indication of the tempo itself. Note that if you’re not a fan of constant
flashing, this can be disabled in the Setup menu.)
Long-press the tap/scenes button in order to create a scene; a naming screen will
come up to allow you to create a name for the scene.
See the section “Creating Scenes” for more details.
Mute/Bypass
Press the Mute/Bypass button in order to mute the audio output of the H9000.
Long-press the Mute/Bypass button in order to bypass any and all processing while
still preserving the flow of audio through the I/O connectors and FX chains.
When either Global Mute or Global Bypass is activated, an indicator will show in the
upper right hand corner until deactivated.
Meters
Press the Meters button to switch the display to a full-fledged meter bridge. A wide
variety of metering choices are available.
Soft Keys
These 8 unlabeled buttons (four on either side of the display) allow you to quickly
navigate the H9000’s front panel user interface. The soft keys correspond to
different functions that are displayed adjacently, and are always context sensitive to
the currently displayed screen.
Color Display
The H9000’s large color display allows you to both view and control all aspects of
the product while working with its front panel controls.
8-Channel Meters
These 3-segment hardware meters display metering information for the H9000 and
are active at all times.
Cursor Diamond
Page 12

12
Use the 4 keys of the cursor diamond to navigate up, down, left and right. The color
display will always highlight the object that you have navigated to with the cursor
diamond.
Enter (√)
Press the Enter (check mark) button to confirm or complete an action that you are
currently performing; for example, if you have used the cursor diamond to highlight
an object, pressing the Enter button will select that object. The color display offers a
pop-up window to let you know when the Enter button can be used.
Cancel (X)
Press the Cancel (X) button to “cancel out of” an action. As with the Enter button, the
color display offers a pop-up window to let you know when the Cancel button can be
used.
Jog Wheel
The large, heavily weighted jog wheel is used to both navigate around the display, as
well as adjust a currently highlighted setting. For example, if adjusting a room size
parameter in a reverb algorithm, you can spin the wheel to comfortably adjust the
specific parameter value.
Mode Buttons
The H9000 has 4 dedicated Mode buttons that let you switch to any of the editing
modes with a single touch:
Sessions
FX Chains
Algorithms
Parameters
The mode button illuminates to remind you which mode you are currently in, at any
given time.
Power
Press the latching power button to turn the H9000 on or off.
Page 13

13
USB Ports
The front panel USB ports provide three separate functions:
Connect a standard USB thumb drive or hard drive to either of the front/rear
panel USB ports to save or import any H9000 presets you have created.
Attach the included USB Wi-Fi dongle to connect the H9000 to a local area
network
Connect a class-compliant USB MIDI controller for real-time adjustment of
assorted H9000 functions
Number Pad
Use the buttons on the number pad to type in a custom name, for any naming screen
you are presented with.
The number buttons operate “vintage mobile phone” style, where each button cycles
through multiple letters and also offers special characters such as “.” and “-“.
Up/Down Arrows
The up/down arrows act as modifier keys for the number pad when naming an
object, allowing you to switch between upper and lower case characters as well as
enter in different symbols.
You can also use the arrow keys to fine-tune parameter values, as well as scroll
through list items.
Cancel (CXL)
Press the CXL button to cancel (delete) a character you have typed when creating a
custom name.
Long press the CXL button to clear the entire text field.
Back
Press the back arrow to move the cursor backwards within a naming field, allowing
you to make corrections to an existing name you are typing.
Page 14
14
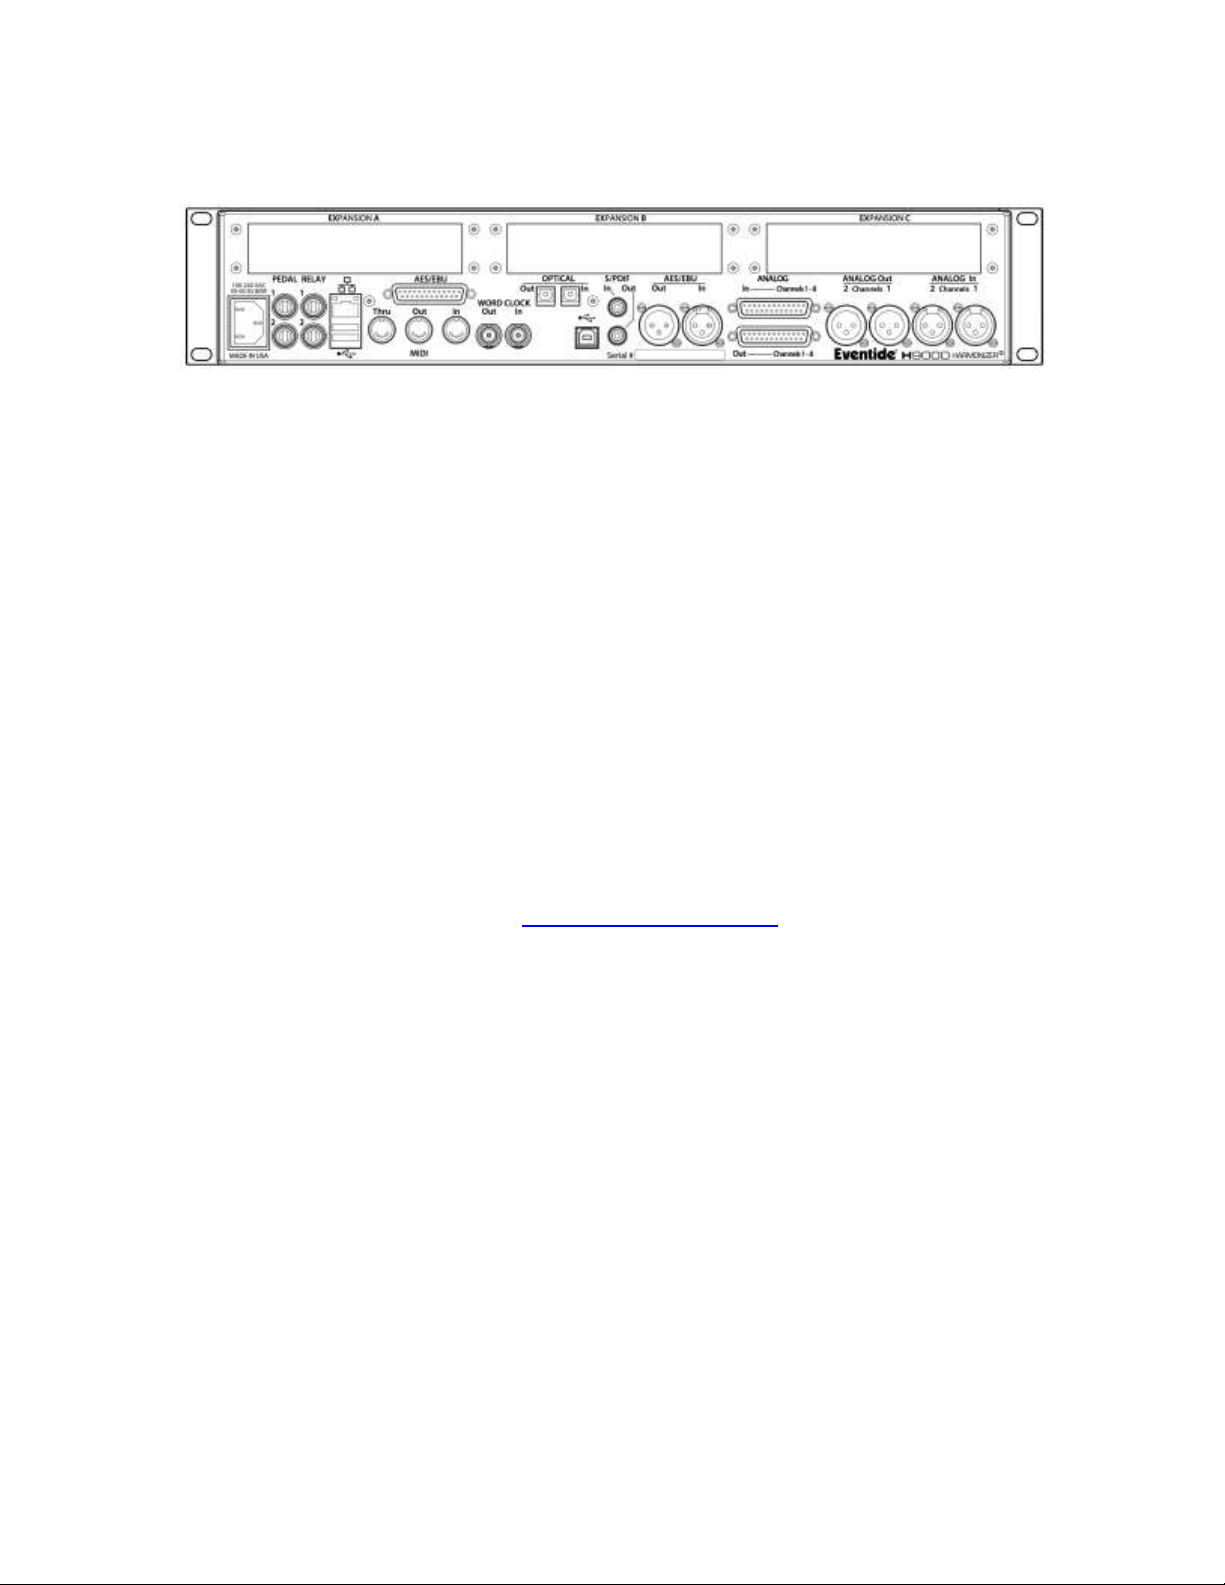
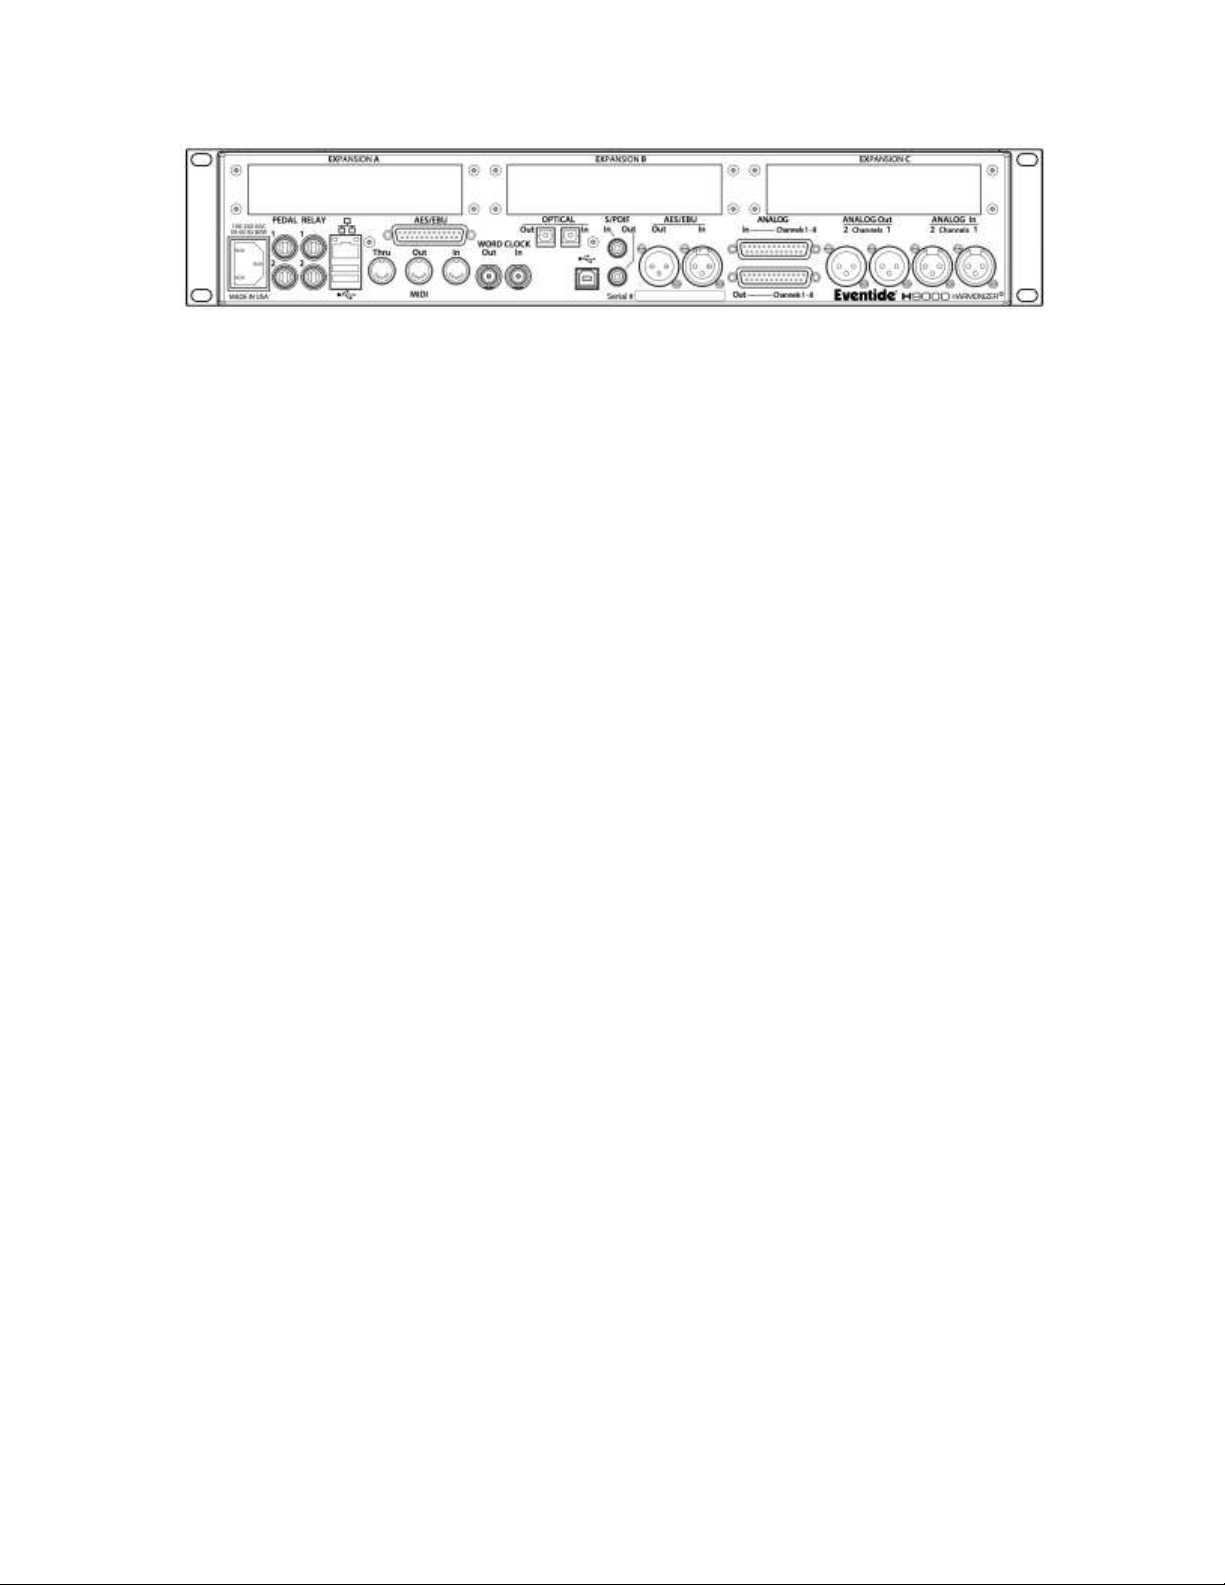
Rear Panel
The H9000’s rear panel offers a wide variety of audio and data connections,
allowing it to be used in many different environments and workflows.
Power Connector
Connect your H9000 to your power source using a standard IEC power cable. The
H9000’s power supply is designed to work with a wide variety of international
voltages; your unit will ship with a power cable designed to work in your territory.
Pedal (x2)
The H9000 allows you to connect 2 separate foot pedals, which you can then assign
to different functions of the processor. This ability is useful in a live performance
situation.
Relay (x2)
The dual ¼” relay connectors allow H9000 actions to be completed using standard
relay signals.
Note: In the current 1.0 Firmware, the relay connectors on the H9000 are not yet
operational. Please check back at www.eventideaudio.com for details of a future
software update that will enable their operation.
Ethernet Connector
The H9000’standard RJ-45 connector allows you to connect it to your Local Area
Network (LAN).
Once connected, you can view and control the H9000’s operations using Emote.
Additionally, if your LAN has Internet access, your H9000 can connect to Eventide’s
servers to install software/firmware updates.
Page 15

15
USB A Connector
The rear panel USB ports provide the exact same functions as the front panel ports:
Connect a standard USB thumb drive or hard drive to either of the rear panel
USB ports to save or import any H9000 presets you have created.
Attach the included USB Wi-Fi dongle to connect the H9000 to a local area
network
Connect a class-compliant USB MIDI controller
USB B Connector
Connect the H9000 to your Mac or PC, allowing you to use it as a 16-input, 16output computer audio interface.
AES/EBU Connector
This connector allows you to feed the H9000 with 8 channels of AES-EBU digital
audio, and also allows the unit to output 8 channels, all on the same single DSUB
connector.
AES/EBU 2-channel Input
This XLR input accepts a standard 2-channel AES/EBU digital audio signal.
AES/EBU 2-channel Output
This connector outputs 2 channels of audio in the AES/EBU digital audio format at
whatever sample rate the system is currently set to.
S/PDIF Input
This input accepts a standard 2-channel S/P DIF digital audio signal.
S/PDIF Output
This connector outputs 2 channels of audio in the S/P DIF digital audio format at
whatever sample rate the system is currently set to.
Note: The H9000’s digital audio connectors support the following sample rates:
44.1kHz
48kHz
88.2kHz
96kHz
Page 16
16
Analog Input 8-channel
This connector feeds the H9000 with 8 channels of balanced analog audio input.
Analog Output 8-channel
This connector outputs 8 channels of balanced analog audio.
Note: You can adjust the operating level of the 8-channel analog inputs and outputs
in the Setup menu, between +4dBu and -10dBv. Levels can be set independently for
each stereo pair of analog inputs and outputs.
Analog Input 2-Channel
These dual balanced XLR connectors accept two channels of balanced analog audio.
Analog Output 2-Channel
These balanced XLR connectors output two channels of balanced analog audio.
MIDI Input
The MIDI input allows you to control various H9000 parameters with incoming
MIDI messages, using MIDI controller hardware or MIDI software of your choosing.
The MIDI input also allows you to synchronize the H9000’s time-based effects to an
incoming MIDI clock signal.
MIDI Output
The MIDI Out connector outputs a MIDI clock signal, allowing you to synchronize
other equipment with the internal tempo set for your unit.
MIDI THRU
The MIDI THRU connector accepts any incoming MIDI signals and outputs a
mirrored duplicate of those signals. This allows you to daisy chain multiple MIDI
devices when you do not have enough MIDI ports on your standalone MIDI
interface.
Word Clock Input
This connector allows the H9000 to slave its digital system clock to an incoming
word clock signal. It is compatible with word clock signals ranging in sample rate
from 44.1kHz to 96kHz.
Page 17

17
Work Clock Output
This connector outputs the H9000’s digital clock signal at the unit’s currently
configured sample rate.
Optical Input
The H9000’s optical input accepts an 8-channel ADAT signal.
Optical Output
The optical output sends 8 channels of ADAT format digital audio.
Note: The ADAT optical connectors only support sample rates of 44.1kHz and
48kHz; they are not operational when the H9000 is set to run at higher sample rates
of 88.2kHz or 96kHz.
Page 18

18
Operating the H9000
In this next section, we will show you how to navigate around the H9000 front
panel, perform common operations, and operate the unit in general.
This section is divided into the following areas:
Sessions
FX Chains
Algorithms
Parameters
Meters
A Note on “Latching” Soft Keys:
The H9000 UI has context-sensitive “soft keys” on the left and right sides of the
display.
There are two different types of soft keys on the H9000:
“Normal” soft keys: These execute their labeled action when pressed
“Latching” soft keys: When pressed, they change the front panel display to a
different state. Think of the latching soft keys as a quick and easy way to
access “sub-menus” or alternate screens on the H9000
Latching soft keys are visually distinguished by a small triangular “flag” in the top
corner of the key.
In this user’s manual, any time you are presented with a list of soft key functions,
latching soft keys will be distinguished with an underline.
Page 19

19
Things to Know About Signal Routing
There are a few general “rules” about signal routing in the H9000 which are useful
to keep in mind.
● You can only use one of the following digital audio protocols at any given
time:
○ AES3 (aka AES/EBU) over the DB25 connector
○ AES3 (aka AES/EBU) over the XLR connector
○ S/PDIF over the optical connector
○ S/PDIF over the RCA connector
○ ADAT over the optical connector
● When using S/PDIF over the optical ADAT connectors, you can only work at
sample rates of 44.1kHz and 48kHz. 88.2kHz and 96kHz are not supported.
● FX Chains support 8 inputs and 8 outputs. However, the eight outputs of an
FX Chain can be “multed” to an arbitrary number of physical Input/Output
channels, computer audio interface channels, etc.
Page 20
20
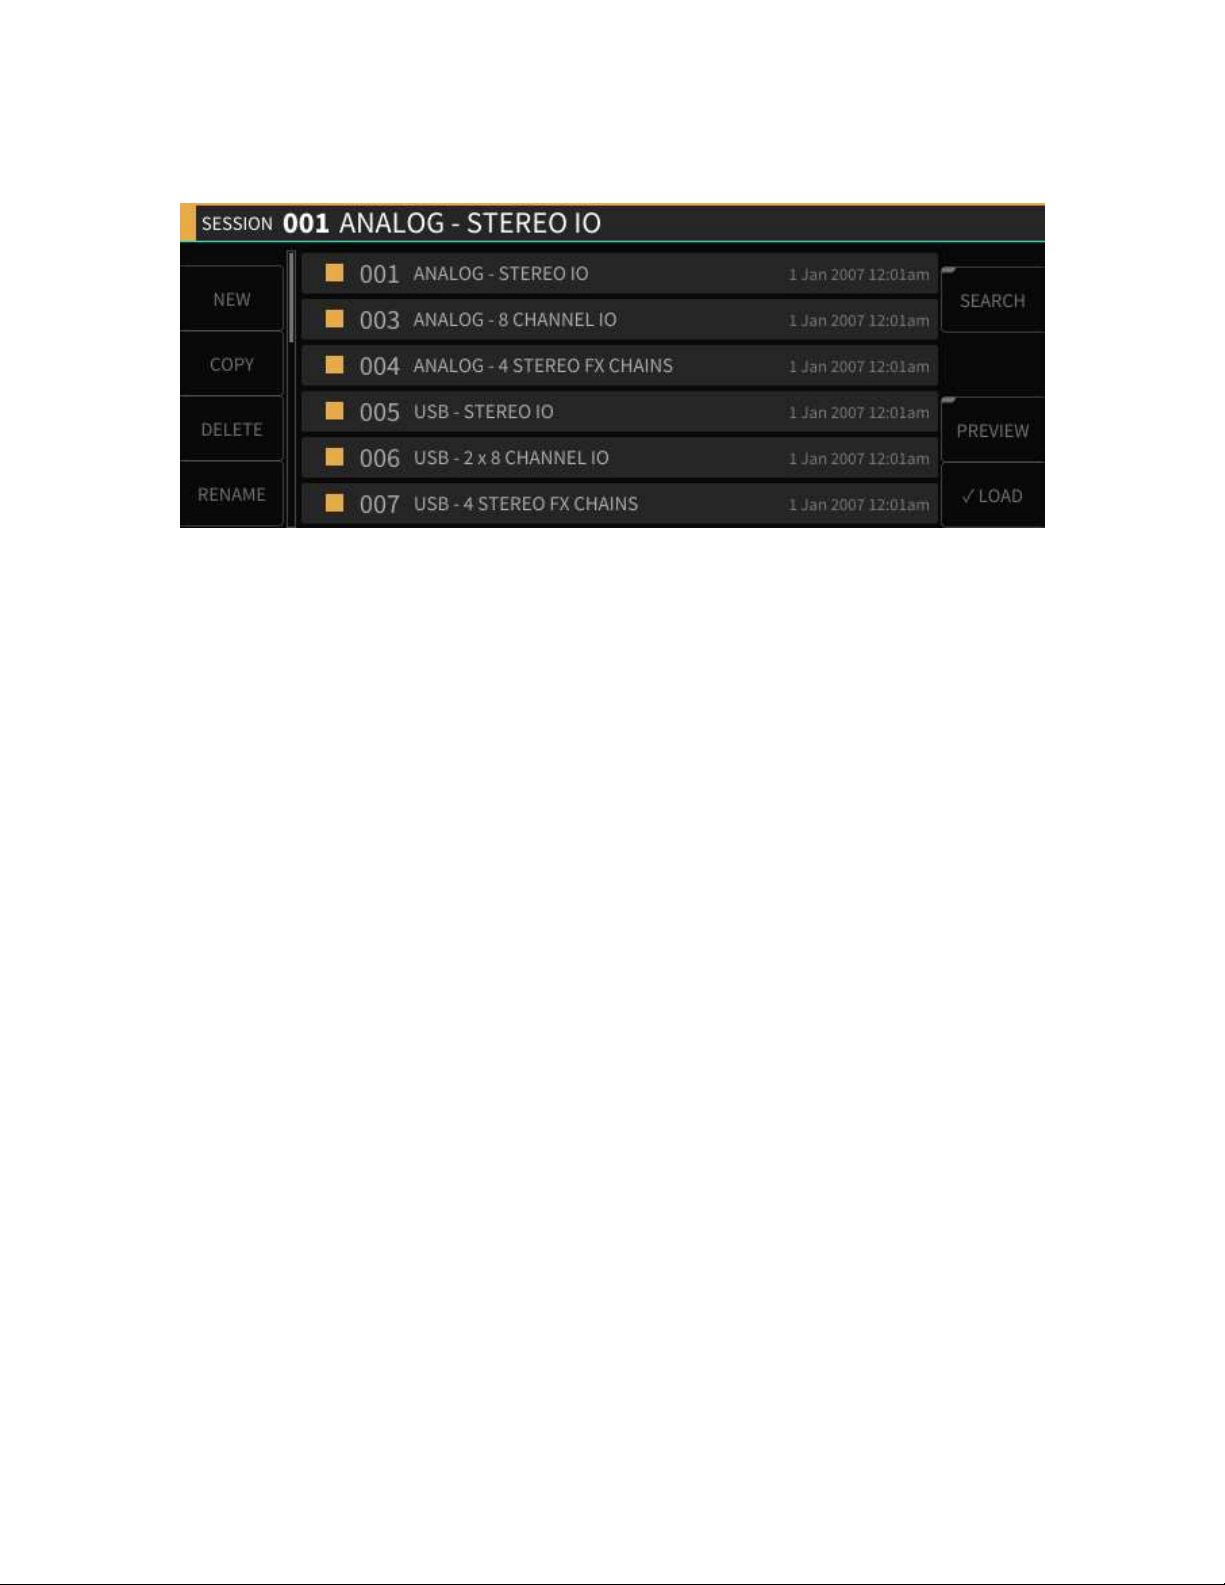
Sessions
A Session is the “big picture” for the H9000, a snapshot of the current state of all settings
on the unit.
To load a session, press the front panel Sessions button; the button will illuminate as a
reminder you are currently working with the sessions screen.
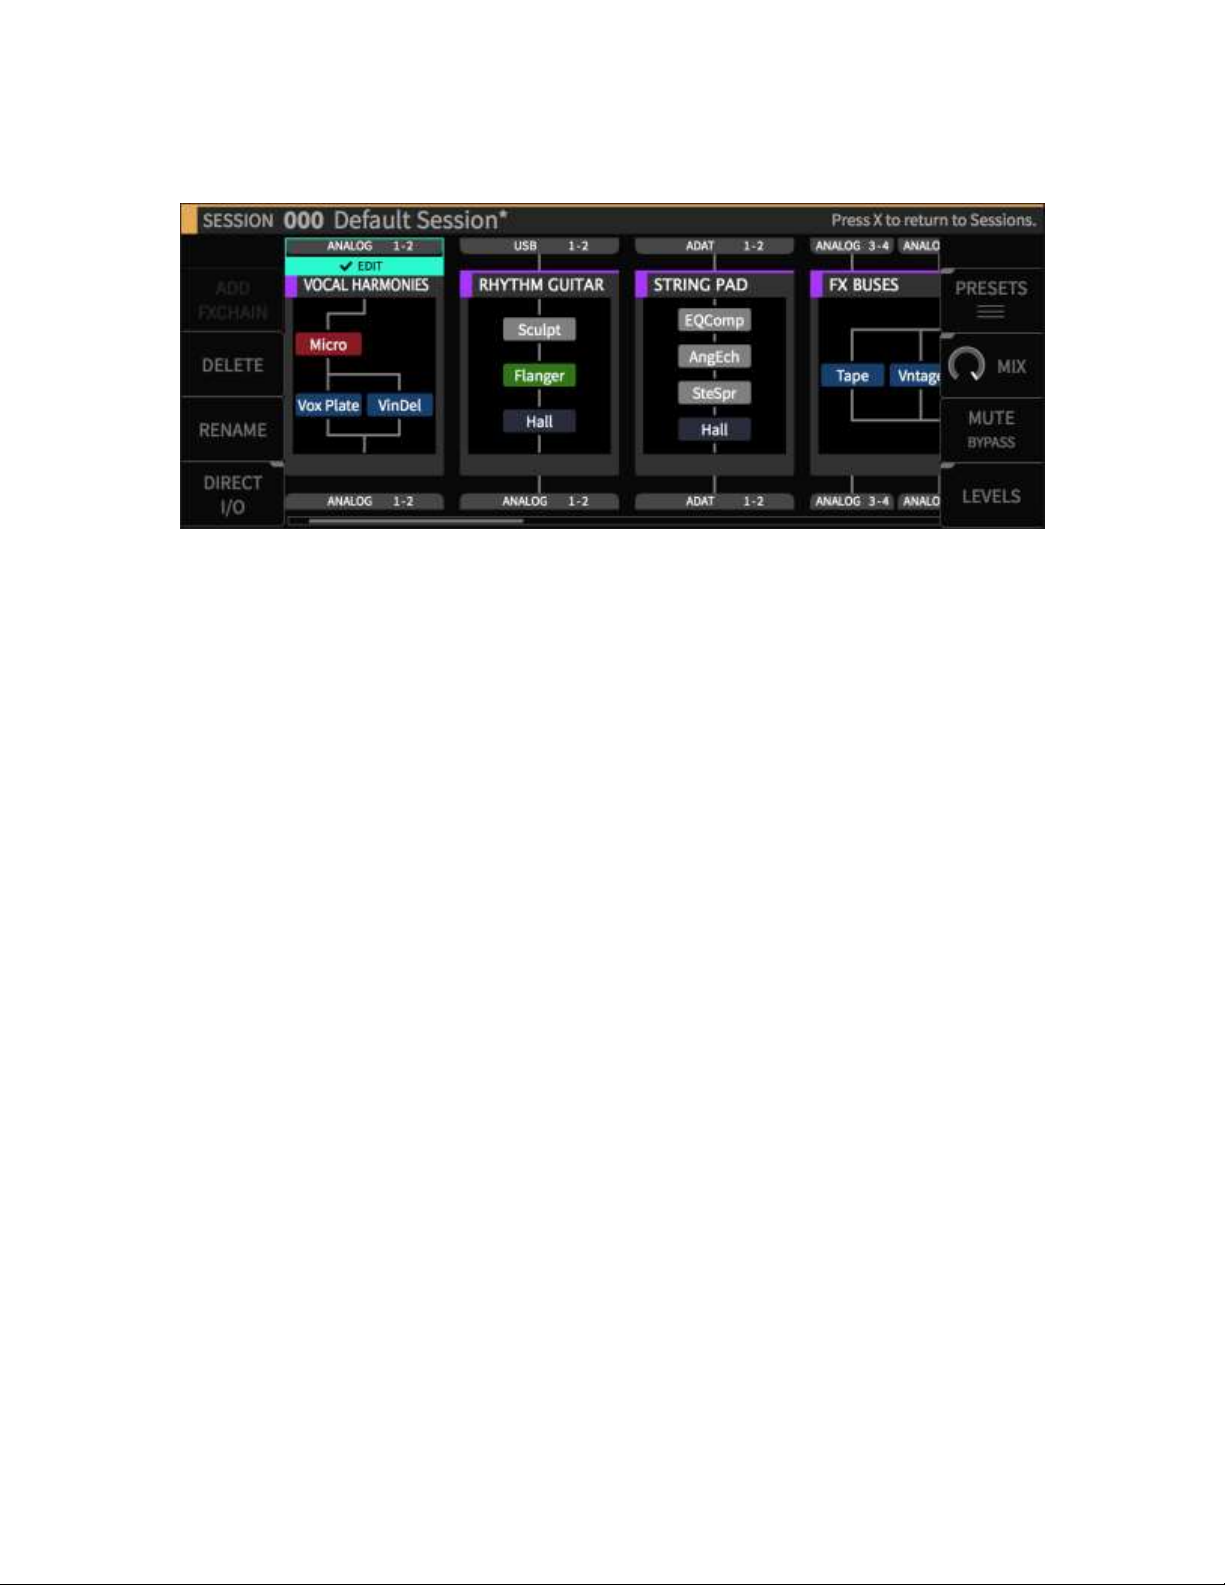
The screen will switch to the Sessions view, presenting you with a numbered list of
sessions available for loading. The presently loaded session is displayed in the title bar at
the top of the screen.
There are several different ways to navigate through the list of sessions:
Press the cursor up/down buttons or rotate the wheel to scroll through the list one
entry at a time;
Press the cursor left/right buttons to navigate through the Sessions list one page at
a time.
The session you have currently navigated will highlight in green.
Press the Enter button to load the highlighted session.
The chosen session will load and you will automatically be taken to the FX
CHAINS screen where you can edit the session’s FX Chains.
Page 21

21
Session Screen Soft Keys
The 8 Session soft keys offer additional session-related functions:
New
Copy
Delete
Rename
Search
Preview
Load
New
Press the New soft key to create a new session.
If you have made changes to the currently loaded session, you will be prompted to
save your changes; press the Yes or No soft key.
You will then see the Create New Session screen; press the Create New Session soft
key (or the Cancel soft key if you wish to cancel out of the operation).
The new session you have created will be titled “Default Session” and will contain a
single default FX Chain.
Copy
Press the Copy soft key to make a copy of the currently highlighted session.
The naming screen will appear, allowing you to create a new name for the copy of
the session. In this sense, it is similar to the “Save As” function on a word processor
application, where you can save a copy of a currently loaded document under a
different name.
Delete
Press the Delete soft key to delete the currently highlighted session in the list. You
will be prompted with a confirmation screen; press either the Cancel or OK soft keys.
Note that you cannot delete sessions that are part of the “Factory Sessions” group of
presets. These sessions are meant to always be available on the H9000 and never be
removed.
Rename
Press the Rename soft key to rename a currently highlighted session. You will then
be presented with the naming screen where you can enter in a new name for your
session.
Page 22

22
Note that you cannot rename sessions that are part of the “Factory Sessions” group
of Session presets. If you attempt to do so, you will be presented with the option of
creating a new user session, which you can then rename.
Load
Press the Load soft key to load the currently highlighted session. This soft key
duplicates the function of pressing the Enter key when a session is highlighted.
Search
Press the latching Search soft key to bring up the search screen, where you can use
the keypad to type in a keyword. Sessions containing the letters you type will
appear in the filtered list of available sessions.
As you type additional characters, the list of sessions will further refine your search.
Preview
Press the latching Preview soft key to get a visual representation of the layout of the
session, such as:
The number of FX chains
The Algorithms in each FX Chain
Physical Inputs and Outputs
Since loading a session is not an immediate operation, the Preview function offers a
quicker way to see what the session contains before you actually load it.
Page 23
23
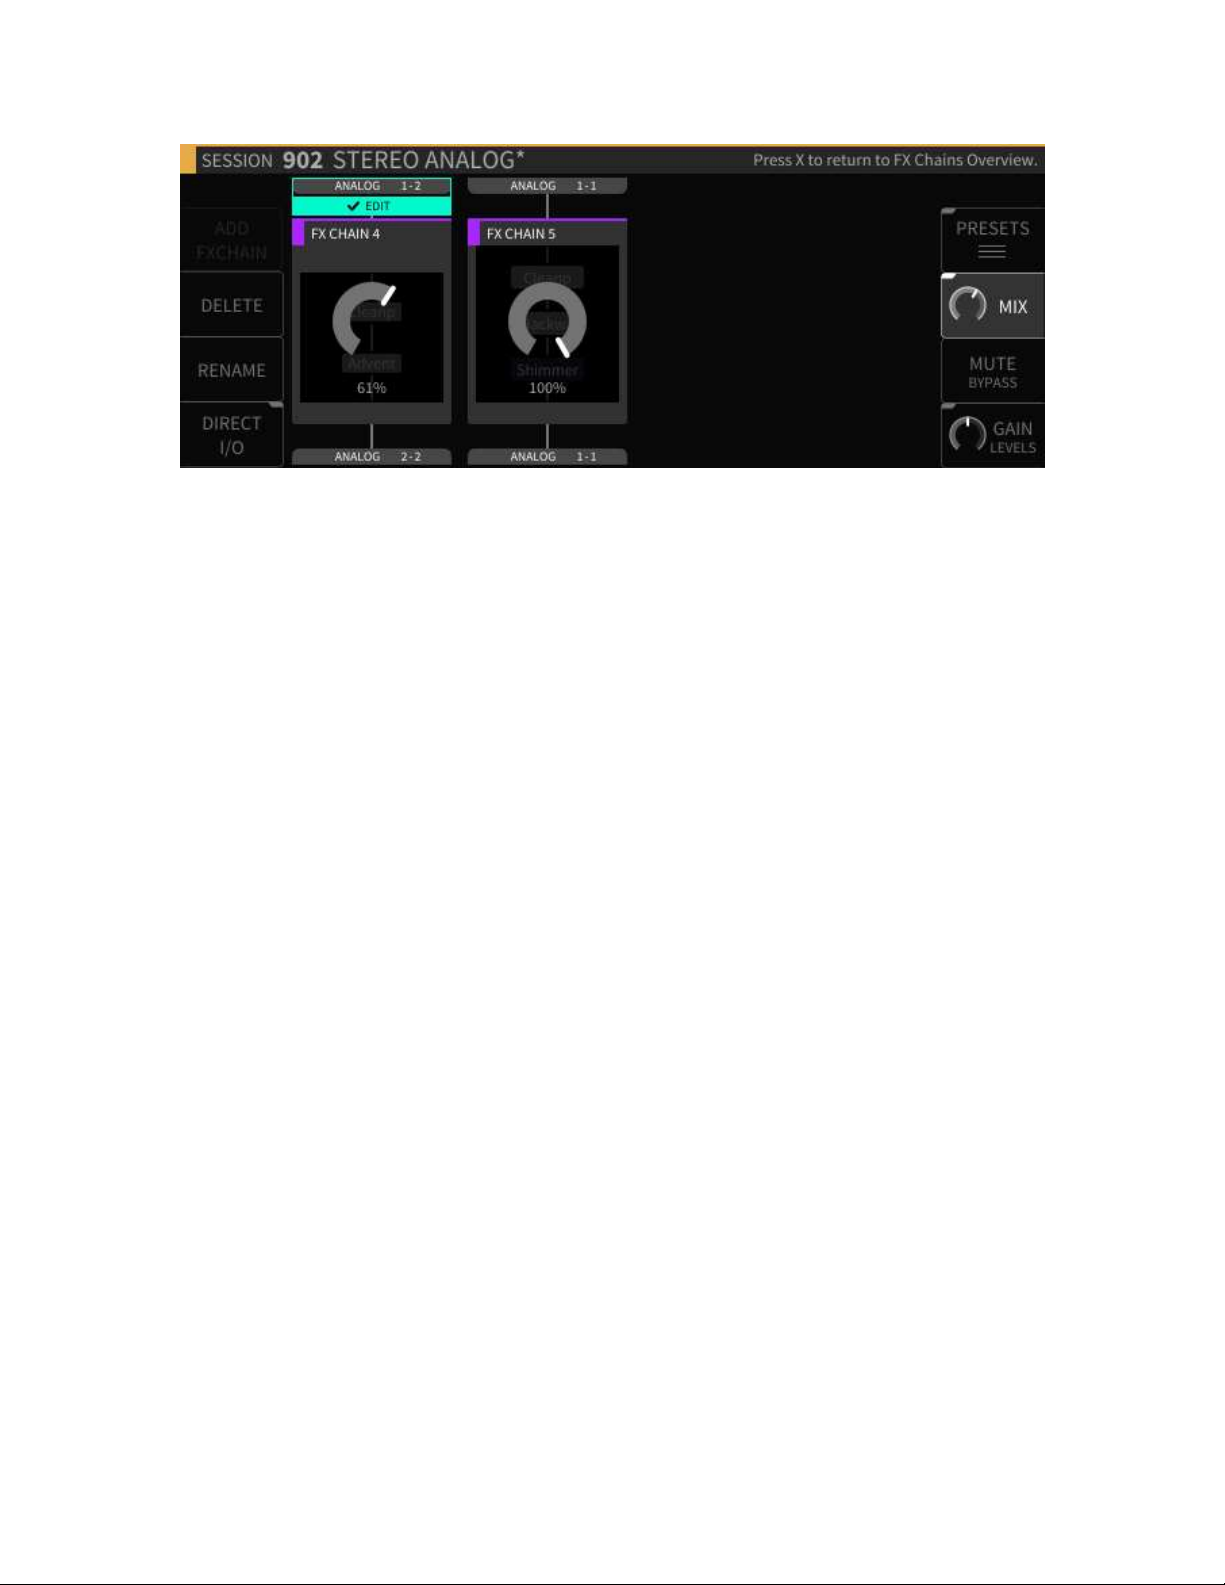
FX Chains
Press the front panel FX Chain button to switch the display to the FX Chains screen,
where you can view and edit the various FX Chains of the currently loaded session.
Press the cursor left/right buttons or use the wheel to highlight the different FX
Chains in the currently loaded session;
Press the cursor up/down buttons to move through the signal chain blocks in the
currently highlighted FX Chains Block: An FX Chain is comprised of:
Audio inputs
The algorithms contained in the FX Chain
Audio outputs
Configuring the Audio Input/Output of your FX Chain
Use the cursor buttons to highlight the Edit block of the FX Chain’s audio input
section; you will then be presented with choices for selecting both the physical input
connector, and then separately the channel number of your selected input
connector.
Use the wheel to scroll through the available choices. When you have found your
desired audio input, highlight the Connect block and press the Enter key.
Your chosen input source will now be routed to the input of the FX Chain and the
display will show a connecting line to show that the connection has been made.
To assign an output to the FX Chain, follow the same procedure using the Edit block
located at the bottom of the FX Chain display.
Note: You cannot select an Output that has been previously assigned to another FX
Chain.
Page 24
24
Replacing the Algorithm Used in an FX Chain
The middle section of the FX Chain block shows the Algorithm(s) that make up the
current FX Chain. To replace the current FX Chain with a different FX Chain preset:
• Highlight the latching Replace soft key to initiate the replacement process.
You will be presented with a list of available FX Chain presets.
• Navigate to the FX Chain preset you wish to use as a replacement then press
the Replace soft key.
• Press the Enter key to insert the chosen preset into the FX Chain as a
replacement for the previous one.
At any time, you can press the Exit button to back out of the current screen state and
return to the previous state. Pressing the Exit button a final time will exit the
FX Chains screen and return you to the Sessions screen.
Note: You can always return to the Sessions screen by pressing the Exit button once
for each iteration of menus you have entered. In other words, if you’re in too deep
and need to reset, press the Exit button a couple of times to go back home.
FX Chain Soft Keys
The FX Chain screen contains 8 soft keys that offer the following functions:
Add
Delete
Rename
Direct I/O
Mix
Mute/Bypass
Levels
Page 25

25
Add: Press the Add soft key to add a new FX Chain to the currently loaded session.
You can have up to four FX Chains in your H9000. The H9000 will prompt you to
select an I/O configuration for the FX Chain, which will be routed automatically
upon creation.
Delete: Press the Delete soft key to delete the currently highlighted FX Chain. Note
that you cannot delete the FX Chain if it is currently the only one loaded in the
session.
Rename: Press the Rename soft key to bring up the naming screen, where you can
rename the currently highlighted FX Chain container in the session.
Note that the name of the FX Chain container is distinct from the name of the FX
Chain preset loaded into it; this can be useful for distinguishing an FX Chain’s
purpose (e.g. Guitar 1, Guitar 2) if the same preset is loaded into multiple containers.
Mute/Bypass
Press the Mute/Bypass soft key to mute the currently highlighted FX Chain. Press it
again to unmute the FX Chain.
When muted, a red “Mute” label will appear at the bottom of the FX Chain block.
Long-press the Mute/Bypass soft key to bypass the currently highlighted FX Chain.
Long-press it again to un-bypass the FX Chain.
When bypassed, a red “Bypass” label will appear at the bottom of the FX Chain block.
Page 26
26
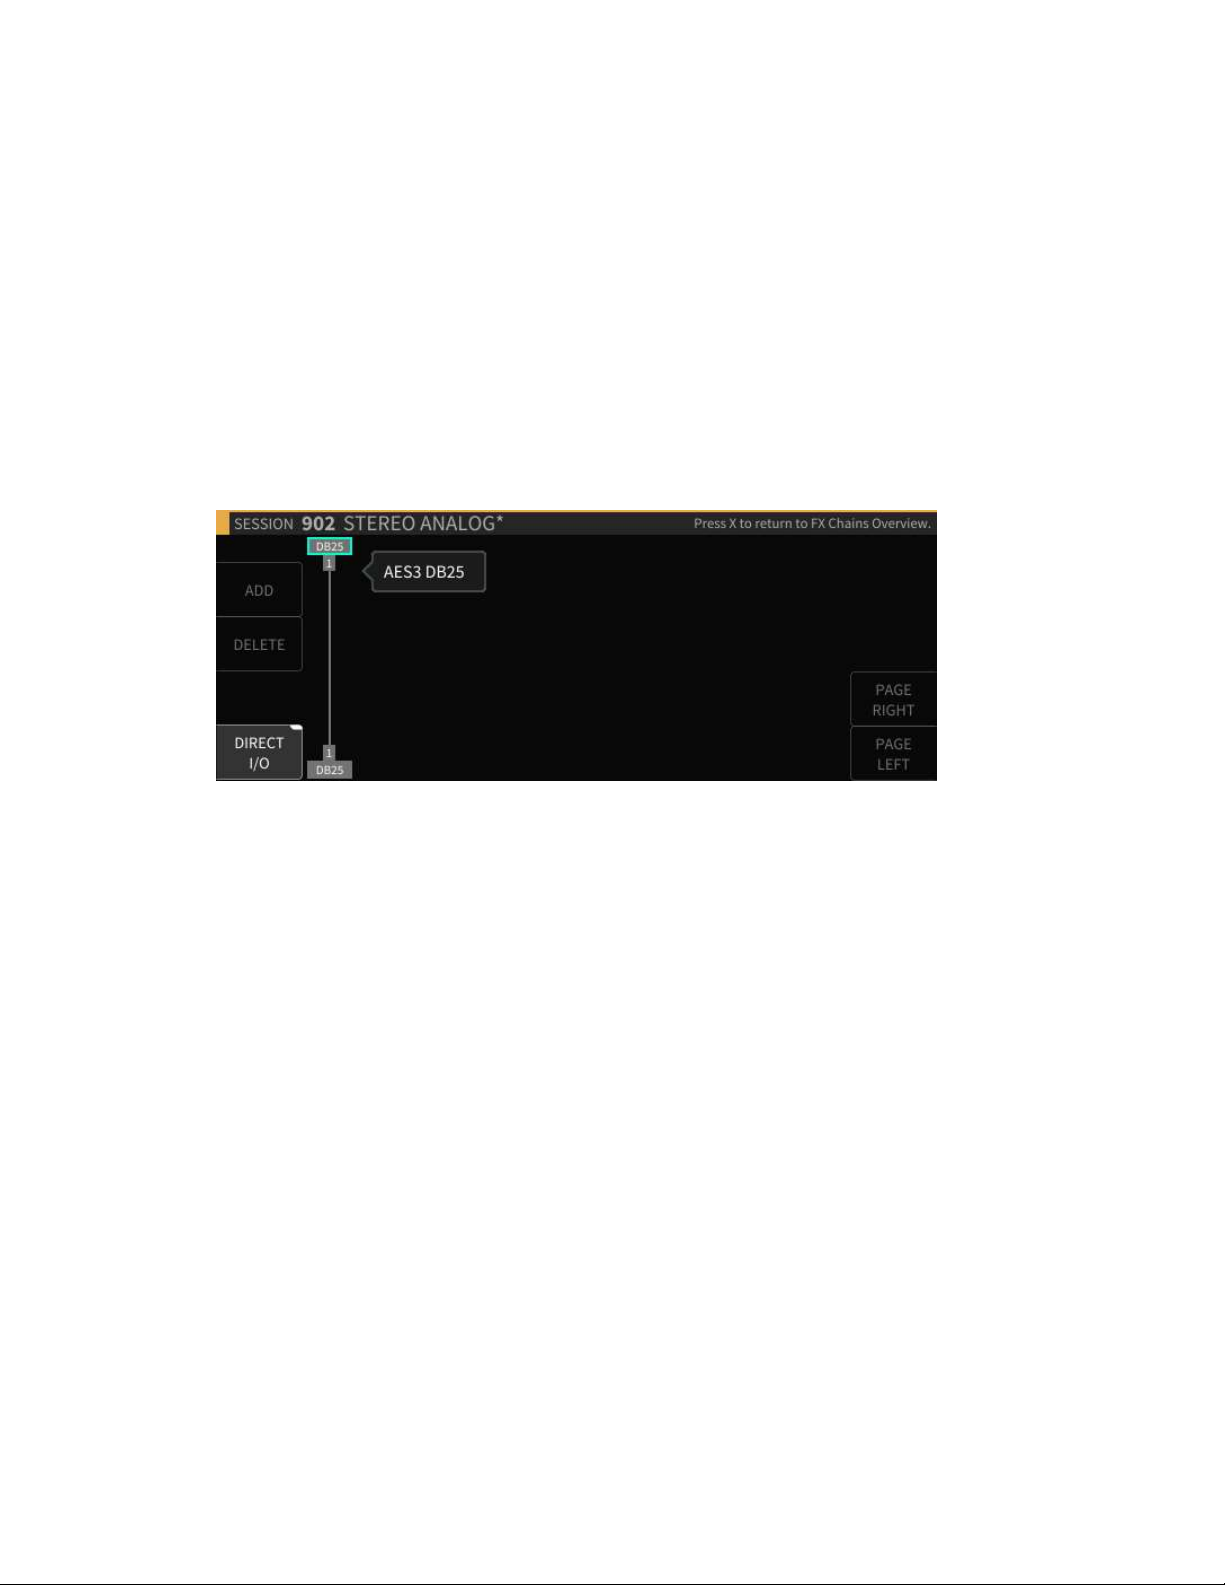
Direct I/O
Press the latching Direct I/O soft key to create a “Direct I/O” Signal Chain. This is not
an FX Chain, but rather a direct audio pathway between a physical audio input and
audio output.
Direct I/O allows you to take advantage of your H9000 as a network attached I/O
box, making the H9000’s pristine analog converters available for highest quality
analog I/O.
Even at times when you do not require any of the external processing the H9000 can
provide, the 8 analog input and outputs, along with their different routing options,
allows the H9000 to work as a network-attached patch bay.
In the Direct I/O screen, use the cursor keys to highlight the input/output you wish
to assign, then use the wheel to select the physical input /output you wish to use in
your direct I/O pathway.
Four additional soft keys are available in the Direct I/O screen:
Add: Press the Add soft key to add another direct I/O pathway within the
Direct I/O screen.
Delete: Press the Delete soft key to delete a Direct I/O pathway that you have
highlighted.
Page Left/Right: Press the Page Left/Right soft keys to navigate among the
different direct I/O pathways you have created, when there are more of them
than fit on the screen at one time.
Note: Direct I/O assignments are saved with Sessions, not with FX Chains.
Page 27
27
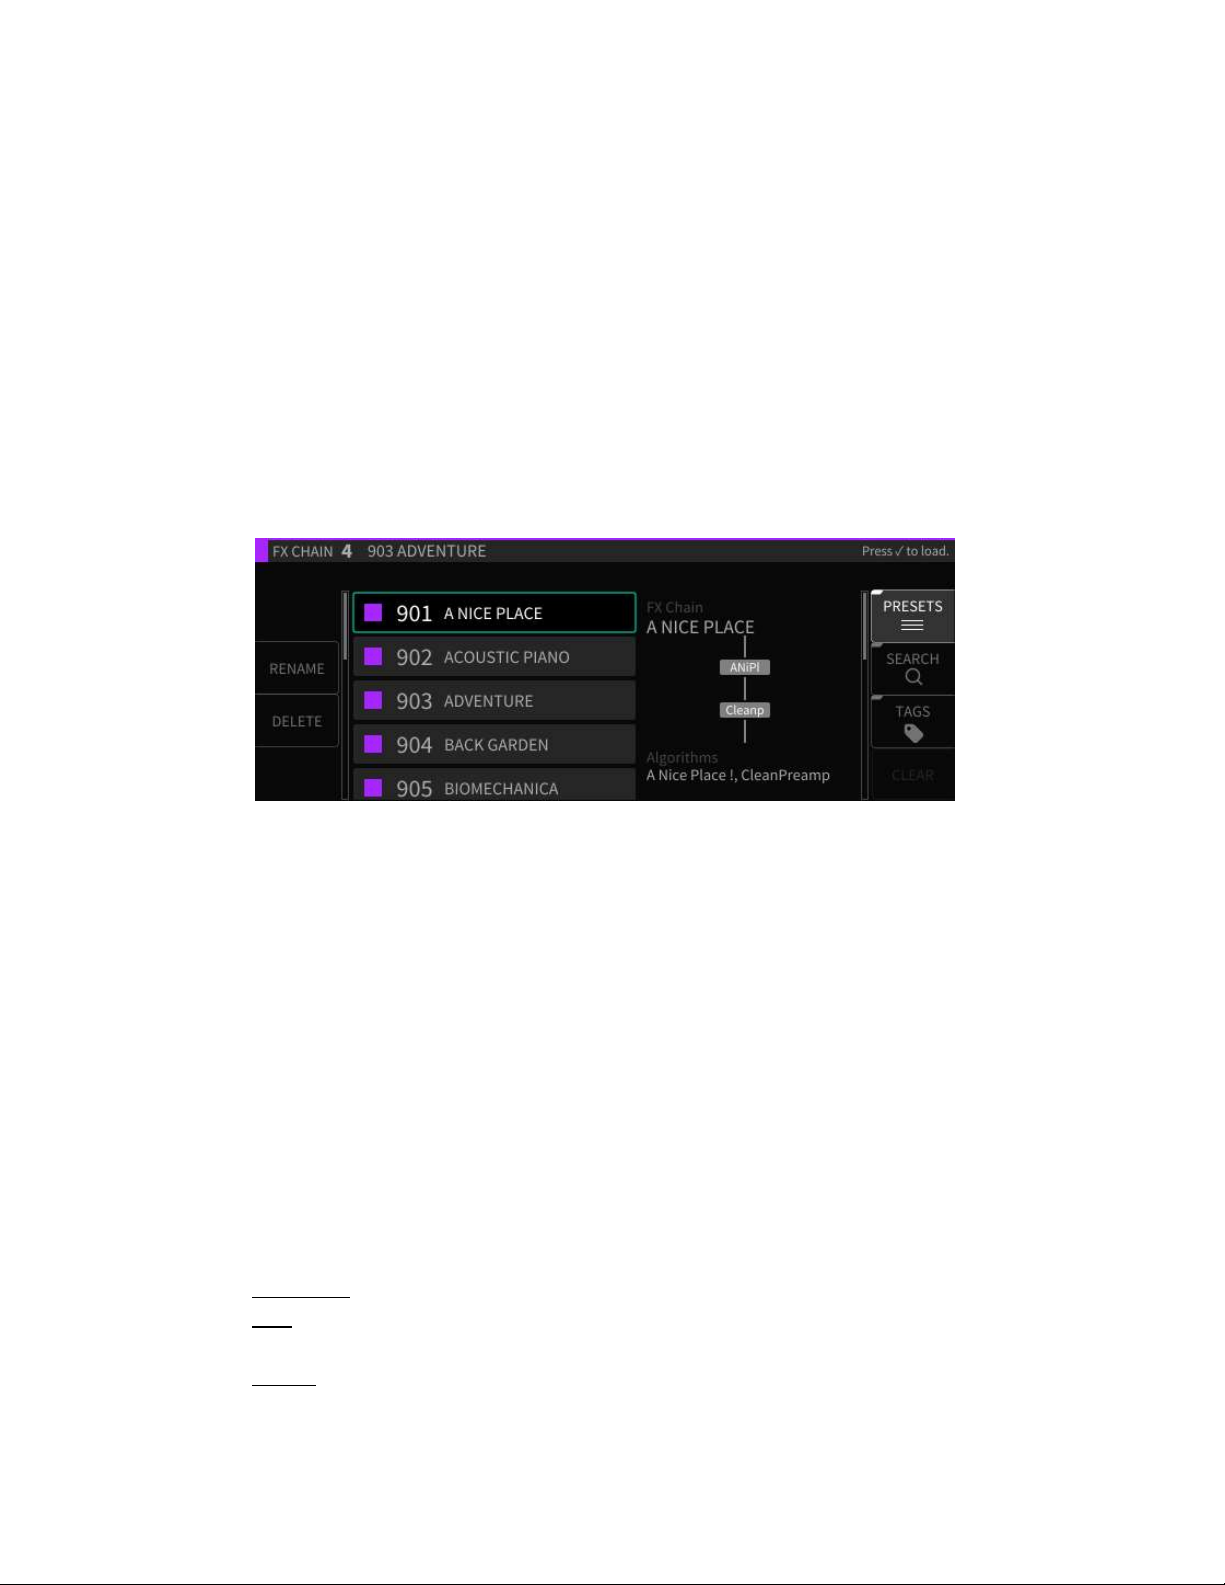
The FX Chain Preset Browser
Press the Presets soft key to enter the FX Chain preset browser.
Navigate to the FX Chain you wish to load and press Enter (√).
Rename
Press the Rename soft key to rename the currently highlighted FX Chain. Note that
factory FX Chains cannot be renamed.
Delete
Press the Delete soft key to delete the currently highlighted FX Chain preset. Note
that factory FX Chains cannot be deleted.
Search
Press the latching Search soft key to bring up the virtual keypad, where you can
enter in letters and numbers to search for a specific FX Chain or algorithm name. As
you enter in more characters, the algorithm list is filtered to show only FX Chains
that contain the characters you are typing.
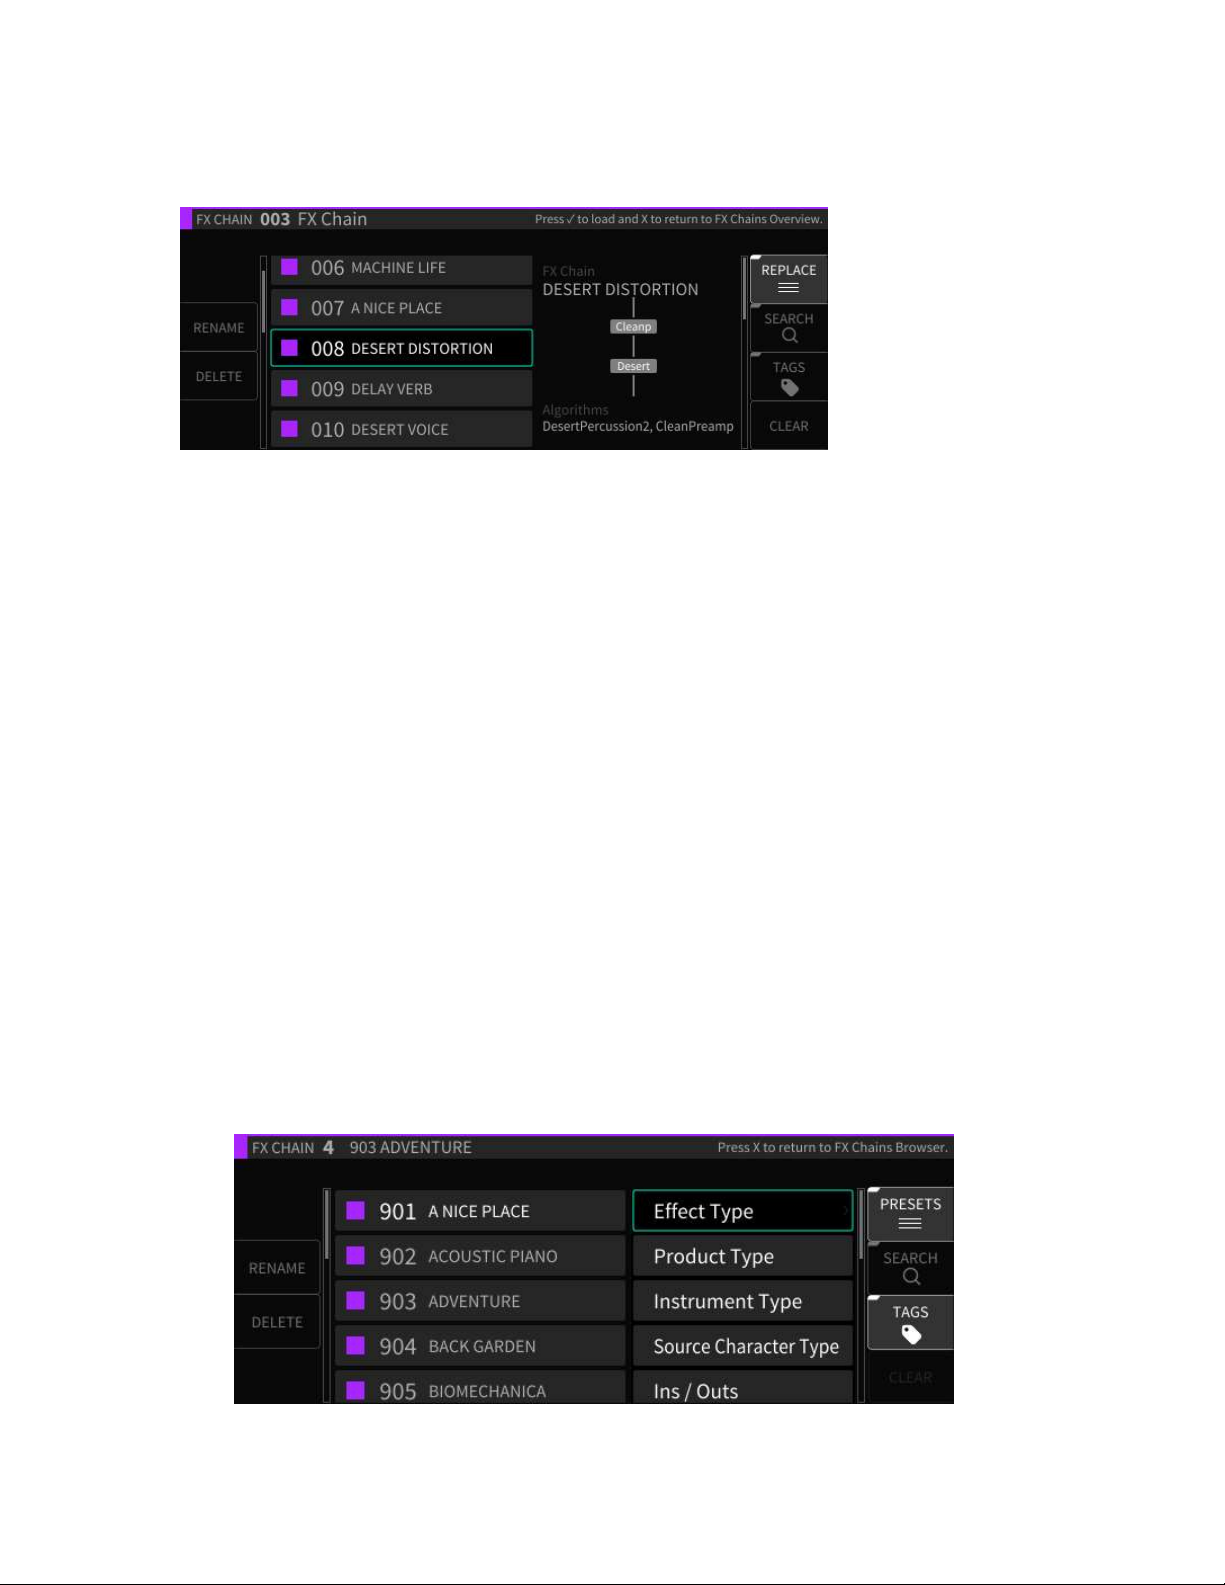
Tags
Press the latching Tags soft key to switch the right-hand side of the display to the
Tags screen. You will be presented with a list of tag categories, which you can use
the cursor keys and enter key to select.
Page 28

28
The following tag categories are included:
Effect Type
Product Type
Instrument Type
Source Character Type
Inputs/Outputs
Once you have selected a specific tag category, you will be presented with a menu of
specific tags within that category. Use the cursor and enter keys to select a specific tag; it
will be added to the current tag list and be shown above the tag list.
Note that you can select as many tags at once as you like. As you add tags, the master list
of FX Chains will be filtered to only show presets that correspond to the tag(s) you have
selected.
Also note that many of the algorithms on the H9000 will carry multiple tags – for
example, Blackhole will fall under the tags of Product Type H9 as well as Effect Type
Reverb. In this way, you can reach the same algorithm in a number of different ways.
This powerful feature is a great way to narrow down the H9000’s vast list of FX Chain
presets to a more manageable selection that is appropriate to the task at hand.
Clear
Press the Clear soft key to clear all currently loaded tags, and return the master list of FX
Chains to its complete state.
Mix
Press the latching Mix soft key to adjust the mix levels of the FX Chains present in the
currently loaded session.
The display will switch to the Mix screen, showing level controls for each FX Chain. Use
the cursor keys to navigate to the FX Chain for which you wish to adjust the level, then
use the wheel to adjust its mix level.
Page 29
29
Levels
Short press the latching Gain/Levels soft key to adjust the output gain levels of the
FX Chains present in the currently loaded session.
Similar to the Mix mode, the display will show level controls for each FX Chain. Use
the cursor keys to navigate to the FX Chain for which you wish to adjust the level,
and use the wheel to adjust its output gain.
Long-press the latching Gain/Levels soft key to show signal levels for the audio
inputs/outputs of the currently highlighted FX Chain. The levels screen contains its
own set of soft keys, as follows:
Clear Clip
Press the Clear Clip soft key to clear any overloads that are displayed on the I/O
meters.
Group
Press the latching Group soft key to group together the inputs or outputs of the
selected FX Chain input or output level.
When the latching soft key is illuminated, adjusting the level of either fader will
adjust the level of both equally.
Page 30
30
Algorithms
In the H9000, each FX Chain can contain up to four separate signal-processing
Algorithms. The Algorithms screen is where you work with these specific
algorithms; you can navigate to it by either:
Pressing the Algorithms button on the front panel, or;
Highlighting the Edit button in the center portion of an FX Chain block, then
pressing the Enter button.
The screen will switch to the Algorithms display and the front panel Algorithms
button will illuminate.
Algorithms Overview
The Algorithms overview screen displays the specific algorithms that make up the
currently highlighted FX Chain.
The display shows the different algorithms present, their routing within the FX
Chain, and the audio inputs/outputs that feed the FX Chain.
Rotate the wheel to navigate to the different objects in the FX Chain, which include:
Algorithm processing blocks
Input and Output blocks
When viewing the Algorithms overview screen, pressing the Enter button works
contextually for whatever specific object you have highlighted:
Algorithm: When the Edit label is highlighted, pressing Enter takes you to the
Parameters page (see Parameters section for more details)
Page 31

31
I/O Label: Pressing Enter takes you to the editor screen for the audio
inputs/outputs
Configuring Audio I/O For an Algorithm
To configure the audio I/O on the Algorithms Overview screen:
Use the cursor keys to highlight the audio input or output block you wish to
configure.
Note that you can then use the cursor keys to highlight only the audio I/O
category (Analog, Digital, Card Slot), then cursor over to the channel number
and adjust it separately.
This type of fine-tuned I/O control is particularly important when an option
card slot is populated with a networked audio option card, which can have
dozens of I/O channels per slot.
Use the wheel to cycle through the available input or output assignments.
Press the Edit soft key to allow for finer control configuring audio I/O for the
selected algorithm.
Algorithm Screen Soft Keys
The algorithms Overview screen contains eight Soft Keys:
Add Algorithm
Delete
Move
Expert Router
Presets
Mix
Mute/Bypass
Gain
Page 32

32
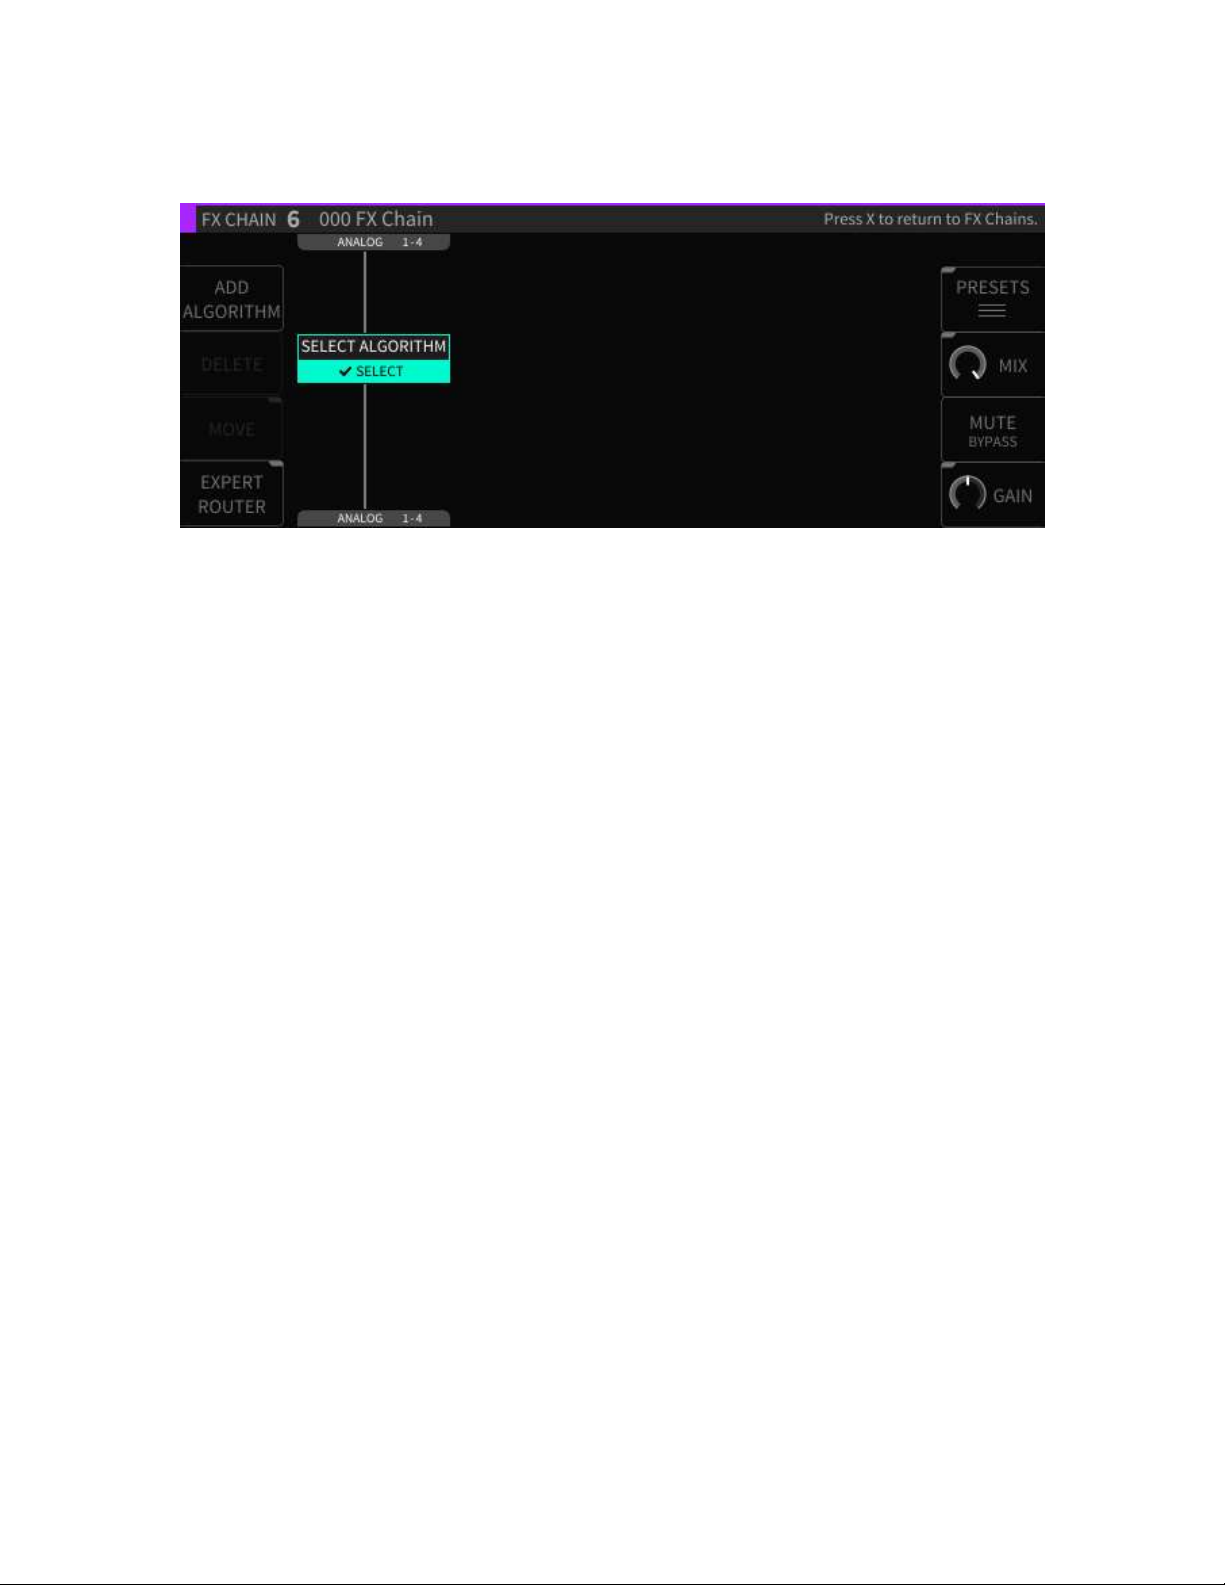
Add Algorithm:
Press the Add Algorithm soft key to add a new algorithm to the currently
selected FX Chain. A new algorithm block will appear labeled “Select
Algorithm”.
Use the cursor keys to highlight the “Select Algorithm” block and press the
Enter (√) key.
Use the navigation controls to select an Algorithm. Each entry contains
helpful info (number of inputs and outputs, a description of the algorithm,
tips on its use, etc.).
Delete
Press the Delete soft key to remove the highlighted algorithm from the FX Chain.
Move
Press the Move soft key to change the location of the algorithm within the FX Chain.
You can move an algorithm in an FX Chain to be above or below any other algorithm
in series, or next to another algorithm in parallel.
Page 33

33
Mix
Press the latching Mix soft key to change the display to a set of mixing controls,
where you can control the relative level of each Algorithm within the FX Chain.
Use the cursor keys to navigate to the Algorithm you wish to adjust the mix level for,
then rotate the wheel to adjust its mix level.
Gain
Press the latching Gain soft key to change the display to a set of gain controls, where
you can control the output level of each Algorithm within the FX Chain.
Note: The difference between the Gain control and Mix control is that Gain
determines the overall signal presence of an algorithm in an FX Chain, whereas Mix
controls the overall Wet/Dry mix of an individual algorithm and its signal.
Mute/Bypass
Press the Mute/Bypass soft key to mute the audio output of the currently
highlighted Algorithm. A red “Mute” label will appear at the bottom of the Algorithm
block when muted.
Press the Mute/Bypass soft key again to unmute the audio output.
Page 34

34
Long-press the Mute/Bypass soft key to bypass the currently highlighted Algorithm.
A red “Bypass” label will appear at the bottom of the Algorithm block when muted.
Long-press the Mute/Bypass soft key again to un-bypass the audio output.
Expert Router
Press the latching Expert Router soft key to enter the “Expert Routing” mode. The
display switches to a graphical routing matrix, where you can view and edit a highlevel detailed overview of:
All of the algorithms present in the current FX Chains.
Their audio I/O assignments.
Their signal routing configuration.
Note: The H9000 allows not only serial routing of algorithms, but also parallel and
mixed serial/parallel routing as well. The expert page is where you can view and
control this aspect of the routing.
To make adjustments in the Expert screen:
Use the cursor keys to highlight the aspect of the block diagram you wish to
adjust (audio I/O block, routing, Algorithm).
Use the wheel to adjust a highlighted audio I/O routing.
Use the Move soft key to adjust a routing pathway when it is highlighted
Page 35

35
Algorithm Selection Screen
The Algorithm Selection Screen shows a list of the different algorithms available on the
H9000. To the right of the list is a description that shows information for the currently
highlighted algorithm, including:
Algorithm Name
The specific Eventide product the Algorithm is sourced from
Numbers of Inputs and Outputs available in the Algorithm
A description of the algorithm and tips on its use
Note that the description field will usually contain more text than can fit on the display;
in this case, use the cursor keys to highlight the description field, then rotate the wheel to
view the remaining description text.
For a quick overview of the thousands of H9000 algorithms, refer to the Appendix H9000
Algorithms located at the end of this document.
Algorithm Presets
Some Algorithms also contains Presets, which are variations of each Algorithm with
their parameters configured for different sounds. For a quick overview, refer to the
Appendix H9000 Presets located at the end of this document.
Press the latching Presets soft key to shows/hide the Presets contained within each
Algorithm. This approach makes it easier to navigate all of the H9000’s unique
Algorithms, without having to wade through all of the presets contained within some of
the Algorithms.
Page 36

36
The Algorithm Presets screen contains numerous following soft keys, as detailed below:
Sort Options
Press the Sort Options soft key to select which way the Algorithm presets are sorted,
including:
By ID Ascending
By ID Descending
By Name
By Recently Used
By Most Used
Use the cursor up/down keys to navigate to the sort option you wish to use, and then
press the Enter key.
Jump to Loaded
Press this soft key to jump to the algorithm that is currently loaded in the FX Chain.
Search
Press the latching Search soft key to bring up the virtual keypad, where you can
enter in letters and numbers to search for a specific Algorithm name. As you enter in
more characters, the list is filtered to show only algorithms that contain the
characters you have typed.
Tags
Press the latching Tags soft key to switch the right-hand side of the display to the
Tags screen. You will be presented with a list of Tag categories, which you can use
the cursor keys and enter key to select.
Tag categories are:
Effect Type
Product Type
Instrument Type
Source Character Type
Ins/Outs
Once you have selected a specific tag category, you will be presented with a menu of
tags within that category.
Use the cursor keys and Enter key to select a specific tag; it will then be added to the
current tag list and be shown above the tag list. Note that you can select as many
tags at once as you like.
Page 37

37
As you add tags, the master list of algorithms will be filtered to only show presets
that contain text matching the tag(s) you have selected. This powerful feature is a
great way to narrow down the H9000’s vast list of presets to a more manageable
selection, one that is appropriate for the task at hand.
Clear
Press the Clear soft key to clear all currently loaded tags and return the master list
of Algorithms to its complete state.
More
Press the More soft key repeatedly to switch the soft keys above it to alternate
functions. These additional soft keys include:
Jump to Last
Press this soft key to jump to the algorithm most recently viewed in the list.
Jump to Loaded
Press this soft key to jump to the algorithm that is currently loaded in the FX Chain.
Bank Up/Bank Down
Press these two soft keys to quickly jump to the next/previous bank of algorithms.
Rename
Press the Rename soft key to rename the currently highlighted Algorithm. Note that
factory Algorithms are saved permanently in internal memory and cannot be
renamed.
Delete
Press the Delete soft key to delete the currently highlighted Algorithm. Note that
factory Algorithms are saved permanently in internal memory and cannot be
deleted.
Note: As seen in the list of Algorithms located in the appendix, the H9000 algorithms
are organized into different banks, each one representing different categories of
effects. Each bank begins with a new 3-digit number (100, 200, etc.).
Replace
Highlight an algorithm in the list, then press the latching Replace soft key. The
screen will switch to the currently highlighted FX Chain, and you will be presented
with the option of replacing its currently loaded Algorithm with the one you had just
highlighted.
Press the latching Replace soft key again at any time to exit the replacement process.
Page 38

38
Note: Certain algorithms will not work when the H9000 is running at a sample rate
of 88.2kHz or 96kHz. These algorithms will appear with a red “stop sign” icon in the
Algorithm list, and will not load if selected.
If you switch to a higher sample rate with one of these algorithms already loaded,
the user interface will indicate which algorithms are invalid, allowing you to delete
or replace them. For already loaded algorithms, they will appear in the Algorithms
mode view with a red strike-through over the container.
Page 39

39
Parameters
On the H9000, each Algorithm contains a set of parameters; you adjust these
parameters to adjust the sound of the Algorithm you have selected.
For example, a reverb Algorithm contains parameters for settings such as room size,
decay time, pre-delay, and so on. The Parameters screen allows you to view and
adjust these parameters.
To switch to the Parameters screen:
When the Edit label is highlighted, press the Enter key when an algorithm is
highlighted; you will be taken to the Parameters screen for that algorithm.
Alternatively, press the front panel Parameters button.
The parameter page offers a handy list on the left-hand side of the screen, which
displays:
The master parameters for the current FX Chain container
The algorithms currently loaded in the selected FX Chain
The parameter categories within each algorithm
Use the cursor keys to highlight the specific parameter category you wish to view
the parameters for. The screen will then display the parameters for only that
category.
This approach allows you to more easily “get your head around” the large number of
parameters that may be available to you. Many algorithms contain a large number of
parameters, and a single list of all of them would not be very intuitive to work with.
Page 40

40
Editing Parameters in an Algorithm
To adjust a specific parameter:
Use the cursor up/down keys to navigate to a specific parameter category;
the right-hand side of the screen will display the specific parameters within
that category.
Use the cursor left/right keys to highlight the specific parameter you wish to
adjust.
Use the Enter key and/or wheel to adjust the parameter you have
highlighted.
Note: You can also use the two middle-left soft keys to page up/down among the
parameter categories, or the two outer-left soft keys to page up / page down
through the Algorithms, while highlighting parameters within the parameter view.
This can be a faster way to work than using the cursor keys exclusively; you can
jump around the screen quickly and don’t need to constantly “cursor left” back to
the parameter category list.
The parameters screen contains four additional soft keys:
Quick Map
Custom Map
Random
Functions
Page 41

41
Quick Map
Press the latching Quick Map soft key to bring up the quick mapping function for the
parameters you are viewing.
The quick map feature is extremely powerful, as it lets you quickly map a wide
variety of MIDI controller software or hardware to any Algorithm parameter on the
H9000. Different aspects of different processing effects can be adjusted in real time
using hardware faders, knobs, foot pedals, buttons, etc.
The MIDI functionality on the H9000 is “plug-and-play”. You can connect a MIDI
device to the 5-pin DIN ports, or connect a MIDI class compliant interface to one of
the USB connectors. All MIDI Channel configuration is done when individual
controllers are mapped, as opposed to in a central MIDI settings screen.
You can even map multiple parameters to a single MIDI continuous controller; you
cannot, however, have multiple MIDI controllers affect a single parameter.
For more complex mapping of multiple parameters to a single control source, please
refer to the FUNCTIONS section.
The Quick Map feature works as follows:
Press the Quick Map soft key; you will see a “Press Enter to Learn” label
superimposed over each of the parameters on the screen.
Use the cursor buttons to navigate to the parameter you wish to map a
controller to.
Press the Enter button; the highlighted parameter’s label will change to
“Move Any Controller”.
Move the MIDI hardware/software control you wish to pair to the
highlighted parameter.
Page 42

42
The MIDI hardware/software controller and the parameter are now paired.
Custom Map
The Custom Map feature is also designed to map MIDI controllers to H9000
parameters, but with a much finer level of control. It works as follows:
Use the cursor keys to navigate to the parameter you wish to custom map a
controller to, then press the Enter key.
The “Controller Type” popup menu will appear, where you can select from
the following types of MIDI hardware controllers you wish to map:
o Expression Pedal 1-4
o Switch 1-6
o Note On
o Poly Pressure
o MIDI CC (Continuous Controller) Single
o MIDI CC (Continuous Controller) Double
o MIDI Program Change
o Channel Pressure
o Pitch Wheel
o MIDI Start
o MIDI Stop
Navigate to the controller type you wish to use then press the Enter key;
many of the controller types listed above will contain additional settings that
you can select.
Press the Enter key to navigate to the controller type you wish to use; you
will then be presented with an additional set of controls that allow you to
refine the mapping:
o Control Minimum
o Control Maximum
o Value Minimum
o Value Maximum
Page 43

43
Use the cursor keys to navigate among the above 4 controls, then use the
wheel to set their value.
When you have finished, press the OK soft key and the custom mapping will
be completed.
The display will return to the Parameters display. You will now see a green
text label above the parameter, showing you the specific controller you have
mapped to that parameter.
Random
Press the Random soft key to instantly assign random values to each and every
parameter of the Algorithm you are currently working with.
This extremely creative function allows you to try out different Algorithms in a freeform “what-if” type scenario, because the different parameter values are all selected
with no specific purpose or sound in mind. Give it a whirl with your favorite
algorithm and see what happens…
Page 44

44
Functions
Functions in the H9000 act much like Macros in Ableton Live; essentially, they are
higher-level groupings of parameters that can be adjusted with a single knob.
There are 8 Functions available in each FX chain, with the following three
parameters available:
Range
Map
Ext Control
Range
Each parameter that belongs to a Function has a defined range; it can be as large as
the true Minimum/Maximum range of the Parameter, or anywhere in-between. It
can also be inverted, becoming Max/Min). The main Function knobs then cause
each parameter change to be scaled, according to its defined range.
Minimum/Maximum
You can use the Min/Max soft key to toggle between adjusting the minimum or
maximum value of the range, as indicated by the white and green end cap markers.
Page 45

45
MAP
The Map view displays a condensed view of all the parameters in the FX chain,
allowing selection of them for assigning to Functions. The Add/Remove key
assigns/unassigns the parameter, depending on which Function is selected.
Highlight the Function knob on the left side of the display.
Use the cursor up/down keys to select which of the 8 functions to work with.
A list of available parameters will appear; use the cursor up/down keys to
highlight the function you wish to map.
Press the Enter key; the highlighted parameter is now mapped to the
Function knob you had selected, and that Function’s number (e.g. F1) now
appears on the left side of that parameter’s entry in the list.
If a function is already mapped to a parameter you have highlighted, pressing the
Add/Remove soft key will remove the mapping.
Page 46

46
External Control
External Control offers the same interface for mapping MIDI/foot controllers as
individual parameters, but for the higher-level Function controls.
Use the cursor keys to highlight one of the 8 functions.
Press the Enter key to learn a command.
Move the control on your external MIDI Controller; that control will now be
mapped to the highlighted function.
The Custom Map dialog can also be accessed through this interface, and utilized in
the same way as for normal Parameters.
Page 47

47
Meters
The H9000 offers a set of 8 dedicated 3-segment hardware LED meters, positioned
above the front panel color display. These LED meters are always active.
The first segment of the hardware LED meter represents signal presence, at any dB
level. The second segment, if lit, means the signal is reaching -6dB – in other words,
nominal headroom and nominal S/N ratio. The third segment represents a signal
overload, or too much signal presence.
For a more detailed metering view, press the front panel Meters button to switch the
color display to the Meters page.
The Meters page displays 8 channels of metering at a time, and allows you to assign
which signal sources are assigned to the metering display.
Assigning Input/Output sources to Meters
On the main metering page, use the cursor buttons or the wheel to navigate to
the metering slot you wish to assign an audio input or output to.
Press the Enter key, or the Assign soft key, to make an assignment.
You will be presented with a list of all physical input channels; use the cursor
up/down buttons or wheel to navigate to the physical input you wish to assign.
Page 48

48
Press the Enter button to select your choice; the selected input/output is now
assigned to the highlighted metering channel, and that channel will now show
the assignment above the channel number.
On a stock H9000 unit with no expansion cards installed, the following single
input/output channels can be assigned to the meters:
Off
Digital Audio Connector In 1-8
Analog In 1-8
USB In 1-16
FX Chain In 1-8 (for however many FX Chains are currently running)
Digital Audio Mode Connector Out 1-8
Analog Out 1-8
USB Out 1-16
FX Chain Out 1-8 (for however many FX Chains are currently running)
More Meters
Press the latching More Meters soft key to enter the More Meters screen; the display
changes to show metering data for the currently loaded available FX Chains.
The More Meters screen also has soft keys for the following functions:
Clear Clips
Levels
I/O Meters
Clear Clips: Press this soft key to clear any overload clips that have occurred.
Page 49

49
Levels: Press this latching soft key to switch to the Levels screen; you are presented
with input and output level faders for the currently selected FX Chains.
Use the cursor buttons to navigate to the input or output slider you wish to adjust,
then use the wheel to adjust the signal level fader of the highlighted fader.
On the levels screen, press the latching Group soft key to group together level faders.
When the latching soft key is illuminated, adjusting the level of either fader will
adjust the level of both equally.
I/O Meters: Press the I/O Meters soft key to display the I/O meters screen; you will
be presented with metering views for the H9000’s banks of physical inputs and
outputs, regardless of what custom assignments you have made in the main
metering screen.
The I/O meters screen shows which bank of I/O metering you are on in the upper
left corner, and which of the 8 pages you are on in the upper-right corner. On a stock
H9000 with no expansion cards installed, the following 8 views are available:
1. Digital Audio Connector In 1-8
2. Analog In
3. USB In 1-8
4. USB In 9-16
5. Digital Audio Connector Out 1-8
6. Analog Out
7. USB Out 1-8
8. USB Out 9-16
Use the cursor up/down buttons or wheel to navigate among the 8 pages of
metering views.
Note: While in the I/O Meters page, you can use the navigation keys to navigate
around the meters, IF a Physical Input/Output is routed to or from an FX Chain. In
this scenario, you can highlight the meter to see which FX Chain specifically. This is
indicated by a purple square under the meter, and the corresponding label bar at
the bottom of the page.
Page 50

50
Saving and Importing Data
The H9000 allows you to save various types of data, both to its internal memory as
well as to an off-the-shelf USB drive connected to the front or rear panel USB ports.
Once you have saved this data to an attached drive, you can import it to a H9000,
allowing you to easily share your work between different machines.
The importing/saving process works as follows:
Note: The USB drive must be formatted in FAT32 format. The most recent versions
of Windows and OS X do not offer FAT32 formatting as part of their built in disk
utilities, so depending on the version of Windows or OS X your computer is running,
you may need to format the drive with a 3rd party utility.
Saving
Press the front panel Save/Import button. The Save screen will appear and you will
be presented with the following options:
Save Session
Save FX Chain
Save Preset
Export Sessions
Export Presets
Export FX Chains
Export Algorithms
Page 51

51
The data to be saved is contextually based on the currently selected item, as follows:
Save Session will always save the currently loaded session.
For FX Chains and Presets, the current FX Chain and Algorithm container
selected on the screen will be the items saved for each save option.
At any time, you can refer to the cursor highlight or the title bar in the FX Chain or
Algorithms mode view in order to see the currently selected item.
Navigate to one of the choices above and press the Enter (√) key to access the
naming screen.
Use the front panel keypad to type a custom name for your saved data, then
press the OK soft key. The data will be saved to the H9000’s internal storage.
If a USB drive is attached, you will then be presented with the option to also
save the data to the drive as well.
Press the YES soft key to save your data to the attached USB drive; you will
receive a confirmation message that the data was saved successfully.
Exporting Data
If you have a USB stick plugged in, you will also see the “Export” options. The export
options will NOT appear in the list if no drive is attached.
Whereas “Saving” refers to storing something onto the H9000’s internal memory,
“Exporting” transfers it from the box to the flash drive.
Note that when Saving with a USB stick plugged in, you’ll be given the option to also
Export after the save is complete.
Page 52

52
Importing Data
Once you have saved H9000 data to a USB drive, that data can be imported back into
any H9000 unit by connecting the drive. Importing works as follows:
Attach a USB drive containing H9000 data to a USB port of your H9000.
Long-press the front-panel Save/Import button; the Load Options screen will
appear.
Use the cursor up/down buttons or wheel to navigate to the specific type of
data you wish to load, then press the Enter key. Options include:
o Sessions
o Presets
o FX Chains
o Algorithms
Note: Any loaded Algorithms would be sourced from a 3rd party development
environment, such as Eventide’s “VSIG” software editor. The VSIG software is
available for download at:
https://www.eventideaudio.com/products/software/algorithm-editor/vsig
Use the cursor up/down keys or wheel to select the data you wish to load, then
press the SELECT key; the selected data will be loaded into memory.
If you wish to load all of the data in the list, press the SELECT ALL soft key instead,
or press the CANCEL soft key to cancel out of the load operation.
Page 53

53
Scenes
Long press the front panel Tap/Scenes button to bring up the SCENES screen. The
H9000 can hold 128 scenes in its internal memory.
Overview
Scenes are a high-level functionality used to control sequenced program changes in
the H9000. This mode can be useful when you are using the H9000 in a live
environment such as a concert or theatrical production, and wish to “step through”
different pre-configured states in a certain order you have set up in advance.
For example, the main vocalist in a concert may need different reverb parameters at
different times during the show; scenes provide a quick, simple way to achieve this.
You can create multiple “Scene Maps” and select which one is active at any
given time.
A Scene Map is a collection of Scenes, along with the Trigger Sources, which
define how the scenes are activated.
A Scene itself can be thought of as a particular state of the FX chains, running
under a current session.
The “Scene” denotes a set of actions to be triggered that put the H9000 into
that particular state, either an:
o FX Chain or Algorithm preset to be loaded into a destination
container;
o A mute/bypass/enable action to be applied to a destination container.
A “Trigger Source” allows assignment of actions, such as loading a Scene by
number, or incrementing and decrementing through Scenes to a MIDI
controller.
You can control Scene changes from the front panel, but usually it will be
more convenient to do so from a MIDI controller.
Page 54

54
Trigger Source Options
Scenes can be triggered in the following ways:
Load By Number
Load By Number works like a traditional program change message: it will load
whatever Scene matches the number of the program change message you send,
between 1 and 128.
Although it usually makes sense to use actual MIDI Program Changes, you can also
use Note On or Continuous Controller triggers.
Increment/Decrement
Increment/Decrement switches the H9000 to the next or previous scene, but keeps
it in a pending state to be loaded later. The scene can then be loaded by using the
“Load Current” function.
Increment & Load/Decrement & Load: These functions switch the H9000 to the
next or previous scene and then load it immediately
Note: If your scenes are nicely sequenced, it’s probably easier to use the Increment
& Load/ Decrement & Load options. However, if you need to jump around or skip
Scenes, you can use Increment/Decrement with the Load Current option.
Note that if you are using Load By Number, the full range of:
Program Change
Note On
Continuous Controller messages
will be observed and used to determine which Scene to load.
Page 55

55
Working with Scenes
The right-hand side of the screen displays the 128 available scenes, while the lefthand side of the screen displays a list of scenes you have created.
Create Map
When focused on the left side of the screen, press the Create Map button to create a
MIDI map of a new scene.
You will be prompted to name the scene, at which point it will be added to the list of
created scenes on the left.
Page 56

56
When highlighting any scene in the list on the left, the following soft keys are
available for that scene:
Delete
Press this soft key to delete the highlighted scene.
Activate
Press this soft key to activate the highlighted scene. The circle to the left of the scene
key will turn green, indicating that this scene is now active.
Rename
Press this soft key to rename the highlighted scene; the naming screen will appear.
Trigger Sources
The top of the scenes list on the right-hand side contains the Trigger Sources
function. Highlight this function, then press the Add Source soft key.
Page 57

57
You are presented with the options of:
Load by number
Increment
Increment and load
Decrement
Decrement and load
Load current
Use the cursor up/down keys or wheel to select an option from the above list, then
press the Enter key. You will then be presented with the option to trigger the action
using:
Program change
Note on
CC (MIDI Continuous Controller)
Aux switch
Page 58

58
Add Action
Highlight a scene on the right-hand side, and press the Add Action soft key. You will
be presented with the choices of:
Scene Capture
Manual
Scene Capture:
This is a way to take a “Snapshot” of the current settings of the Session for a Scene.
Manual:
This allows you to go in and fine-tune the assorted parameters, beforehand.
Page 59

59
Setup
Press the Setup button to enter the Setup menus for the H9000. The left-hand side of
the display shows a list of different areas you can customize, including:
Info
Name
Clock
Tempo
Preferences
Pedals
Analog Reference Level
Network
Software Update
Use the cursor buttons or wheel to navigate to the setup screen you wish to adjust.
The setup category will highlight and the right-hand side of the display will show
the specific items that can be adjusted in that section.
Page 60

60
Info
The Info screen is a display only; none of its settings can be adjusted. It provides a
high-level overview of your specific H9000 unit, with the following information:
System Info: This column displays:
Model: (In this case the H9000)
Name: The custom name that you can assign to your unit
Serial Number
Software Version
DSP Modules: This column displays revision and ID information for the DSP
modules installed in your unit.
Expansion cards: This column displays information on any expansions cards that
are installed in the H9000’s three expansion slots (which are labeled slots A, B, and
C).
Page 61

61
Name
The Name screen allows you to create a custom name for your H9000. With custom
names assigned, you can easily select the desired unit when using multiple units at
the same time and controlling them with Emote.
To assign a custom name to your unit:
Use the cursor keys to navigate to the System Name field
Press the front panel Number keys to enter the letters of the custom name
you wish to give your unit.
Each number key has three letters assigned to it, similar to how text entry
worked for old-style cellular telephones. Press the number key repeatedly to
cycle through each of the three letters.
A “virtual number pad” is displayed, showing you which letters are available
on each physical number key.
Press the arrow down key to toggle between uppercase and lowercase
letters.
Press the arrow up key to toggle between letters and special symbols.
Press the Enter key to save the custom name. You will be asked to confirm
your new custom name.
Press the OK soft key to save the name, or Cancel to cancel the operation.
Page 62

62
Clock
The clock setup menus allow you to set the unit’s sample rate and MIDI Clock tempo.
Available settings include:
Clock Source
Digital Audio Mode
Clock Status
To adjust the clock source:
Use the cursor keys to highlight the clock or tempo setting
Press the Enter button or adjust the wheel to reveal up a popup menu with
available choices for that setting.
Use the cursor up/down buttons or wheel to select your desired choice
Press the enter key again to select that choice.
Clock Source
The clock source is the digital audio clock that your H9000 synchronizes to. You can
select an internal clock at various sample rates; alternatively, you can synchronize
your H9000’s system clock to an external clock signal derived from a wide variety of
sources.
Page 63

63
Available clock choices include:
Internal 44.1 kHz
Internal 48 kHz
Internal 88.2 kHz
Internal 96 kHz
AES Any (any AES signal feeding the 8-channel AES connector)
S/P DIF/XLR/AES in 1 (Dig 1-2)
AES In 2 (Dig 3-4)
AES In 3 (Dig 5/6)
AES in 4 (Dig 7/8)
ADAT
USB Audio
Word Clock (BNC Connector)
Digital Audio Mode
The H9000 contains several different digital audio connectors. However, for
simplicity’s sake they are “shared” as an input source to any given FX Chain; you
choose which one you wish to make active at any time.
The Digital Audio Mode menu is where this selection is made. Use the Digital Audio
mode selector to pick your preferred digital audio connector, which will then be
available in the audio routing menus of the H9000.
Available choices include:
AES 3 (DB25 Connector)
AES 3 (XLR Connector)
S/P DIF (RCA Connector)
S/P DIF (Optical Connector)
ADAT (Optical Connector)
By contrast, for the outputs, the same signal is “mult-ed” to all of the digital audio
output connectors simultaneously.
Clock Status
The right-hand side of the screen displays the status of various clocks, as follows:
Clock Status: The large virtual LED illuminates green when the H9000 is
locked to either its internal clock, or a valid external clock that you have told
it to slave to.
The LED illuminates red if the H9000 is not locked; for example, if you tell it
to slave to an external AES signal, but one is not connected, the LED will
illuminate red.
Page 64

64
USB Driver: This field will display as “attached” if the H9000 has a valid USB
connection to an attached computer.
Actual Rate: This field displays the actual sample rate that the H9000 is
operating at.
Please note that the H9000 does not support sample rate conversion. If you want to
feed the H9000 a digital audio signal, the external digital signal and the H9000 must
both be locked to the same digital clock, at the same sample rate.
Tempo
The tempo menu provides controls for setting the H9000’s tempo.
The unit’s tempo affects the H9000’s many time-based effects, which can be
synchronized to an incoming MIDI Clock signal. For example, a digital delay line can
synchronize the tempo of the delay repeats to an incoming MIDI clock.
Tempo Mode: The tempo mode menu includes the following three settings:
Off: In this mode, no MIDI clock signal is sent to the H9000’s MIDI output and
no MIDI clock data is received from the MIDI inputs. Any time-based effects
will not be synchronized to a MIDI clock signal.
Internal: In this mode, you set your own tempo, expressed as Beats per
Minute (BPM); this BPM value is the tempo base for any relevant time-based
effects.
You can set the internal tempo in two different ways:
o Tap Tempo: Tap the front panel Tap button at least two times; the
H9000 will automatically set the unit’s internal tempo to the average
Page 65

65
of the most recent taps, and temporarily display the tempo in BPM on
the display.
The tap function is very useful when using the H9000 in a live sound
environment. Simply press the tap button in time with the music you
are hearing, and then the unit is instantly ready to sync any loaded
effects with the song currently being performed.
o Manual Tempo Adjustment: (See Below)
MIDI Clock: In this mode, the H9000 will automatically set the tempo to an
incoming MIDI signal feeding the rear panel MIDI input (as long as that MIDI
signal contains a valid MIDI clock signal.
Manual Tempo Dial: Highlight the Tempo setting, then adjust the wheel to
manually select the BPM value you wish to set your tempo to.
Page 66

66
Preferences
The Preferences section controls aspects of the H9000’s display, allowing you to
customize various aspects of the H9000’s user-interface.
Use the cursor keys to highlight the setting you wish to adjust, then use the Enter
key and/or wheel to adjust the setting.
Screen Brightness
This control adjusts the brightness of the front panel screen on a scale of 1-10. This
allows you to optimize the screen based on your viewing angle and the amount of
ambient light in your working environment.
Screen Dim Level
This setting adjusts the level that the screen dims to when it automatically dims its
screen after a set amount of time, dubbed display “sleep”. It ranges from being off to
“only slightly dimmed”.
Display Sleep
This setting controls the amount of time after which the front panel display will
automatically dim.
Never
1 minute
5 minutes
10 minutes
20 minutes
30 minutes
1 hour
2 hours
Page 67

67
Key Click
This setting toggles on/off an audible click when using the front panel buttons. The
click is played from a small internal speaker located inside the H9000.
Animations
By default, the H9000 offers assorted onscreen animations for the front panel
display. This control toggles the animations on/off.
Tap LED Timeout
By default, the front panel Tap button flashes in time with the tempo you have set
using the front panel Tap button.
Change this setting to “On” if you wish the button to stop flashing a few moments
after you have set the tempo.
Bonjour Enabled
Turning this setting to “On” configures the H9000 to advertise its services using the
“Bonjour” protocol on the local area network.
Bonjour is a zero-configuration network protocol that allows the H9000 to be
automatically discovered by the Emote software.
Page 68

68
Pedals
The H9000 allows connection of up to four independent foot pedals; these pedals
can be a “switch” type (on/off) or a “continuous” type (volume) pedal.
When setting up an FX Chain and its underlying algorithms, you can map the action
of the footswitch/foot pedals to any parameter of your choosing, allowing
expressive control of the effects. For example, a guitar player can control the cutoff
frequency of a resonant filter using a foot pedal, while playing their instrument.
The Pedals setup page allows you to configure your unit for the wide variety of
different types of pedals available in the marketplace, taking into consideration
factors such as:
On/Off Switch vs. Continuous pedal
How many switches on the foot pedal (pedals can range from one to as many
as three switches per pedal)
“Polarity” of the attached pedal
To configure your attached pedal:
Use the cursor buttons to highlight the “Pedal 1 Mode” or “Pedal 2 Mode”
mode.
Press the Enter key, then use the cursor keys or wheel to navigate among the
popup menu of options. Available choices include:
Page 69

69
o Expression Pedal
o 2 expression Pedals
o 1 Expression Pedal + 1 Aux Switch
o 1 Aux switch + 1 Expression Pedal
o 2 button Aux Switch
o 3 button Aux switch
After you have selected the mode appropriate for your connected switch/pedal,
press the Enter key to save your selection.
Calibrating Your Attached Pedals and Switches
Once you have selected your desired type of pedal/switch hardware you are using,
the H9000 will populate the rest of the display with relevant calibration tools.
Use the cursor button and the Enter key to navigate to and engage the
“Calibrate” field.
If you have attached an on/off type pedal, physically press on it and make
sure that you see the appropriate “SW” circle illuminates. There are separate
SW circles for 1, 2 or 3 button pedals.
If you have attached a continuous foot pedal, navigate to the “Calibrate Pedal”
field, then sweep the pedal back and forth with your foot. You should see the
Calibrate Pedal field display a range between 0-100% on the calibration
meter.
When you’ve finished calibrating, disengage the “Calibrate” button using the
Enter key.
Note: Even though there are only two pedal/switch connectors on the H9000, you
can connect up to four pedals. This is made possible by connecting two pedals to
each connector, using a “Y” cable such as the “Hosa YPP-117 ¼-inch TRS to Dual ¼inch TSF Stereo Breakout cable”.
This capability is possible because:
In the external control section of the parameters mode, there are 4
expression pedals listed.
In set-up mode, there are options to configure a single connector to be
connected to two separate expression pedals.
Page 70

70
Analog Refs
The Analog Reference Levels screen allows you to set the levels for the 8 analog
inputs and outputs present on the 25-pin DSUB connector. This allows the H9000 to
be installed in a wide variety of environments, and interface at an optimum level
with a vast assortment of other equipment.
Each pair of analog inputs and outputs on the DSUB connectors can be separately
adjusted between -10dB and +4dB.
Use the cursor buttons to highlight the specific pair of inputs or outputs you wish to
adjust. Options include:
Analog In 1/2
Analog In 3/4
Analog In 5/6
Analog In 7/8
Analog Out 1/2
Analog Out 3/4
Analog Out 5/6
Analog Out 7/8
Once you have highlighted the appropriate pair of inputs or outputs, press the Enter
button to switch to the alternate operating level.
Note that the rear panel XLR analog connectors are a duplicate “mult” of channels 12 of the 8-channel analog DSUB connectors. As a result, any reference level changes
made to analog input or output 1-2 of the DSUB connector will also affect the XLR
inputs and outputs.
Page 71

71
Network
The network screen controls settings for connecting your H9000 to a standard Local
Area Network. Once connected to a network, the H9000 has the following
capabilities:
Download and install software updates directly from Eventide’s servers. Note
that your Local Area Network must have Internet access.
View and control H9000 parameters from the Emote software.
The middle column of the network screen shows the available network connections,
including:
Ethernet (for a hard-wired connection)
Wireless (for a connection using the included Wi-Fi dongle, which can be
connected to any of the 4 USB connectors).
Ethernet Setup
Use the cursor buttons to highlight the Ethernet field in the middle column. The
right-hand column will display the parameters of the network you have joined
including:
Network Name
Network Type (Wired or Wireless)
IP Address
Netmask
Gateway
Page 72

72
Wireless Setup
To connect the H9000 to a wireless network:
Connect the included Wi-Fi dongle to one of the H9000’s 4 USB ports.
On the network screen, any available wireless networks will be automatically listed
beneath the Ethernet option.
Navigate to the wireless network you wish to connect to and press the Enter key.
If the network is not password protected, you will then be connected to the wireless
network.
If the network is password protected, you will be prompted to enter in the
appropriate password. Use the front panel numbers pad to enter in the password,
then press the OK soft key.
You will then be connected to the Wireless network, and can now use the Emote
software to control the H9000.
Note: The H9000 stores the authentication settings for the most recently joined
network, so if you lose connection for any reason, you can easily re-join the network
without having to enter your details again.
Page 73

73
Creating a Local Access Point
The H9000 also has the ability to broadcast its own personal Wi-Fi network, called
an “access point”. You can use the Emote software with the H9000 on this private
network in environments where there is not an existing LAN for the H9000 and the
computer running Emote to connect to each other.
To create an Access Point, highlight the Create Access Point field and press Enter.
You can choose to enter a password if you wish, or leave the password field blank to
create an unprotected network.
You will then see a message that the Access Point has been created. The Access
Point will appear on your computer or mobile device as a Wi-Fi network with the
same name as the H9000.
Page 74

74
Software Update
The software update screen allows you to update the software of your H9000 unit
quickly and easily. We are always improving the capabilities of the H9000, and this
feature ensures that you can always enjoy the latest and greatest capabilities.
To update your unit:
Please make sure your unit is connected to a network that offers Internet
access
Press the soft key labeled “Download and Install” then follow the onscreen
prompts. When the update has been downloaded and installed, you will be
prompted to restart your unit to complete the update process.
Note: As a precaution against data corruption which could affect system
startup, performing a software update will clear the current state of your
H9000. It is advised to save your current session before updating the
H9000’s software.
If your H9000 unit is connected to a valid Internet connection and a new update is
available, a popup “reminder” message will appear on the display, no matter which
screen you are currently on.
IMPORTANT NOTE: Please be sure not to interrupt power to your unit during the
update process; doing so could damage its internal software, and result in putting
the unit into an unbootable state.
In the event this does occur, the H9000 contains a “fail safe” updater that can be
used to reinstall the software on your H9000. To use it, perform the following steps:
Power on the H9000 on with the check and the X keys pressed, it will open
the fail-safe updater.
Page 75

75
Your H9000 must either be connected to a network via Ethernet for this to
work, or you must have a USB stick connected containing an update file. This
file can be obtained by contacting Eventide support to request the latest
H9000 software as a USB updateable file.
Page 76

76
Using the H9000 as a Computer Audio Interface
The H9000 can stream 16 inputs and 16 outputs to/from your computer/DAW to
serve as a powerful outboard effects processor for your DAW tracks. With this
number of separate I/O channels, you could, for example:
Set up an H9000 reverb effect on an aux send/return of your DAW.
Set up an H9000 Harmonizer effect on another, separate aux/send return.
Set up individual specialized effects on multiple DAW channel insert
sends/returns.
All at the same time!
Note: As of this writing, the H9000 is not currently compatible with Windows-based
DAWs. Check back with our website at www.eventideaudio.com regarding future
availability of a Windows driver/compatibility.
Using the H9000 with OS X
The H9000 works as a “Plug and Play” Core Audio device in OS X, versions 10.10 and
higher. Simply connect a USB cable between the USB B connector on the H9000 and
an available USB A port on your OS X computer. No driver installation required!
The H9000 will now be available to all CoreAudio compatible software as a 16input, 16-output computer audio device, and can be operated at sample rates
between 44.1kHz and 96kHz.
Using the H9000 With Your Existing Computer Audio Interface
The H9000 is an outboard effects processor, and not a traditional, standalone
“Computer Audio Interface” with control room monitoring functions. This means
that you will likely not have a pair of H9000 outputs patched to your main
monitoring system.
As a result, you will likely want to use the H9000’s computer connectivity in
conjunction with your main computer audio interface (the one that likely does have
a main pair of outputs patched into your monitoring setup).
Fortunately, the OS X Core Audio system makes it easy to combine multiple audio
interfaces into one large device called an “Aggregate Device”. Doing so lets you use
your main audio interface and its monitoring capabilities as you always have, while
also having the H9000’s 16 channels of I/O available to process tracks on your DAW
session.
Page 77

77
To Create an Aggregate Device:
In your applications folder, go to “Utilities”, then launch “AudioMidi Setup”.
In the “Audio Devices” window that appears, you should see entries for:
o The H9000
o Any other computer audio interfaces you have connected
o The computer’s built in audio output
Click on the “+” Icon in the lower left-hand corner and select “Create
Aggregate Device”.
In the Aggregate Device configuration window that appears, select the
appropriate I/O for the different devices you wish to use.
In your DAW software of choice, select the Aggregate Device as your audio
device for the software to use.
You will now have the I/O of your main audio interface AND the 16-
input/output channels of the H9000, all available to use in your DAW session
as needed.
Ensure that the H9000’s sample rate matches the sample rate shown in both:
o The Audio MIDI Setup window
o Your DAW session’s
To change the sample rate on your H9000, go to SETUP>CLOCK>CLOCK SOURCE.
Enjoy using USB Audio with the H9000! You can now have 16 I/O’s with just one
simple cable.
Page 78

78
Appendices
AES DB25
AES3 XLR
S/PDIF RCA
S/PDIF Optical
ADAT
XOR
Router
8/8
2/2
USB Audio
Analog XLR
Analog DB25
2/2
8/8
2/2
Analog XLR jacks
use first two
channels of Analog
DB25 jack
8/8
2/2
8/8
8/8
16/16
Expansion Slot 1
32/32
Expansion Slot 2
32/32
Expansion Slot 3
32/32
The router allows any
physical I/O device to
be routed to any other
physical I/O device.
The number of channels
provided by each physical I/O
device is sample rate
independent except for ADAT
which cannot run at 96 Khz.
DSP Module 1
DSP Module 2
DSP Module 3
DSP Module 4
32/32
32/32
32/32
32/32
Appendix A: Signal Flow
Audio Signal Flow
Page 79

79
Control Signal Flow
Page 80

80
Appendix B: Startup Sequences
The H9000 contains various “Startup Sequences”. By pressing and holding different
button sequences while powering up, you can perform the following functions:
Soft Reset: Press the SESSIONS and FX CHAINS buttons for 5 seconds at start-up.
This will clear the current state of the H9000, but does not affect any of your stored
sessions or presets.
Factory Reset: Press the SESSIONS, FXCHAINS, and ALGORITHMS buttons while
powering up. This will clear the current state of the H9000, and will also remove
all of your stored sessions or presets. This operation effectively serves as a
“Factory Reset”.
Fail Safe Updater: Press the CHECK and X buttons while powering up the unit; this
will power up the H9000 into a “Fail Safe Updater” mode.
This mode is useful if a problem occurs when updating the H9000’s software from a
network connection using the normal SETUP menu.
If a problem occurs, the fail safe updater can be used to install an update either from
a USB stick.
Users can contact support@eventide.com to ask for H9000 releases that can be
downloaded and installed via USB.
Page 81

81
Appendix C: Word Clock Termination in the H9000
The H9000 has no internal word clock termination, and can be used in the middle of
a Word Clock cable without change.
To use it at the end of a word clock chain however, external 50-Ohm termination
must be applied. To do this, you will need a BNC T piece, as shown below on the left,
as well as a 50-Ohm terminator as shown below on the right.
Connect the T piece to the Word Clock input, the cable end to one side and the
terminator to the other side.
Why is this Necessary?
Any cable has a characteristic impedance that should be matched to both the signal
source and destination impedance for best results with high speed sharp edged
signals such as Word Clock. This becomes more important with longer cables.
Most Word Clock signals are generated with 50 Ohm source impedance, whereas the
BNC cables used to connect to them may have 50 or 75 Ohm impedances; clearly the
former are to be preferred.
So, we have covered the source and the cable, but what about the destination? If we
only have a single destination it is easy: the destination must also be 50 Ohm, and
this is ensured by the use of termination. An input will be either terminated
meaning its impedance is set to 50 Ohm, or un-terminated meaning it has a high
impedance that will not load the cable.
With multiple destinations only the one at the end of the cable needs to be
terminated; intermediate destinations need not and should not be terminated, as
long as the “stub length” of the cable to them is short. These should be connected by
the use of a BNC “T” connector or splitter attached directly to their inputs so as to
ensure the shortest possible stub length.
Using multiple terminations is wrong, both because twice 50 Ohm in parallel gives
25 Ohms, and also because it increases loading on the source.
Page 82

82
Appendix D: H9000 MIDI Functionality
On the H9000, MIDI is always on and received by both the USB ports as well as the
MIDI DIN connectors.
The H9000 does not currently transmit or respond to any sysex messages.
Controller functionalities such as omni-channel, note mode, pitch bend range etc.
are made at the controller-mapping level, rather than globally.
MIDI Program changes are handled through Scenes mode.
When using the H9000’s custom map feature, the following action types are
available for note-based MIDI controllers (such as a MIDI keyboard)
Velocity: Uses the velocity of the selected note as the control value.
Trigger: Emits a trigger pulse whenever the note is played.
Toggle: Flips between the min and max values when the note is played.
Note Number: Uses the whole range of the keyboard, using the note number
as the control value.
Note To Hz: Uses the whole range of the keyboard, and emits a control value
equal to the actual frequency of the note being played. This can be useful for
“playing” the frequency control of an oscillator or filter.
The “Range” dialog contains 2 range knobs, Control Range and Parameter Range.
Control Range selects what part of the 0-127 the controller will respond to;
Parameter Range controls how that value is applied to the parameter it’s
affecting.
For example, you could use half of the Control Range to sweep the full range of a
parameter, or you could use the full Control Range to sweep half the Param Range.
Page 83

83
Appendix E: H9000 Presets
1
GUITARS IN SPACE
2
OVER THE RAINBOW
3
REGGAE WAHDELAY DARK
4
REGGAE WAHDELAY BRIGHT
5
TIME SLIPS1
6
TIME SLIPS2
7
TIME SLIPS3
8
WAH ECHO1
9
HAW ECHOES1
10
HAW ECHOES2
11
PHASERY BAND
12
PHASERY BAND2
13
LASTFEWBRICKS2
1
BLACKHOLE
2
DARKMATTER
3
NEBULA
4
NEUTRINO
5
PULSAR
6
CIGAROOS
7
HEY HONEY
8
FISHHOLE
9
TRAIN TRACKS
10
DOGSTAR
11
TRANSFIGURED
12
VORTEXTING
13
CENTAURUS
14
STARCRATER
15
AMEBLACKDRONE
Band Delay
Black Hole
Page 84

84
Chorus
WARMTH
POLYMODELICIOUS
SPINNING
PULSATING
70S GUITAR CHORUS
CHORUS BUMPS
LIQUID SWEETENER
BIG CLONE
PHASYCHORUS
1
Fra Diavolo
2
Bisque
3
Sag Harbor
4
Bottom Feeder
5
Jumbo Shrimp
6
Scuttle Butter
7
PunkRock Lobster
8
Steamed in Beer
9
Crawdaddy
10
Decapod Muff
1
CLASSIC CRYSTALS
2
SEAGULLS
3
AREYOUTHERE
4
STEAMPUNK
5
FROM A BAD DREAM
6
REVERSE DETUNE
7
PITCH A LA V
8
REVERSELOWS
9
WEIRDBASS
10
NS REVERB
11
EERIE CAVERN
12
VOICE ON ICE
CrushStation
Crystals
Page 85

85
Diatonic
1
STORYTELLER
2
THIRD DREAMING I
3
DELAYED 3RD AND
4
GUITAR TOY
5
OCTAVE LONG DELA
5
WYLD STALLIONS S
6
COPYCATDELAY
7
BASSTOY
1
PRISTINE DIGITAL DELAY
2
BRIDGE OF SIGHS
3
TWINDELAY
4
COPY CAT
5
WHAT I'M LOOKING FOR
6
1.. AND 2
7
BIG WARM DIGITAL
8
TREM DELAYS
9
DUAL BIG WARM DIGITAL
10
BIG NICE DAY
11
FILTERED DIGITAL
12
CHORUSYTREM
13
FLASER
14
STORM BREWING1
15
STORM BREWING2
16
ANOTHRBRICK1
17
LASTFEWBRICKS1
18
COMFNUMBVERSE
19
RUNRUNRUN
1
DUALVERB
2
HOTSW FREEZE
3
SPACEGALLOP
4
ECHO VERBS
Digital Delay
DualVerb
Page 86

86
Ducked Delay
1
VOLUME SWELL HELPER
2
COUNTRY COMPRESSOR
3
THINICE
4
DONTLEAVEME
5
COMFNUMBSOLO
1
DYNAVERB
2
TAP-N-TREM
3
RADIO STATIC
4
ADAPT-A-ROOM
5
PHIL MCAVITY
6
AMES DUCK
1
Flat EQ
2
Leo to Les
3
Les to Leo
4
Sweet Home
5
DiscoGuit
6
FunkGuit
7
JazGuitar
8
JCM to Metal
9
Balls
12
ParkedWah
13
AcousticElec
14
Mountain1
15
Bright
16
BassPre
17
BassPre2
18
BassPre3
18
DubBass
19
BassyBass
20
SlapBass1
21
SlapBass2
22
PaulsBass1
23
PaulsBass2
24
Basonex
25
Bootyshaker
Dynaverb
EQ Compressor
Page 87

87
26
Walkingbass
27
Walkingbass 2
28
SM58Enhancer
29
SweetVocal
30
VocalPresence
31
Telephony
1
SCHIZO DELAY
2
SPRINGY VERB
3
PONG ECHOES
4
NICE THICK THICKENER
5
WUBBAWUBBAWUB
6
SCIENCE MUSEUM
7
GOOEYFILTEROPONG
1
LONG FLYBY
2
BARREL ROLL
3
SUGARFLANGE
4
ROTATOR FLANGE
5
CLASSICFLANGESWEEP
6
CLASSICFLANGESWEEP2
7
PULSINGFLANGE
8
PULSINGWOWFLANGE
9
PULSINGFLANGE2
10
SUBTLEFLANGE
11
PULSERFLANGE
12
SUBTLE-DRASTIC FLANGE
13
SUBTLEFLANGE2
FilterPong
Flanger
Page 88

88
H910 H949
1
BALLERINA
2
1984
3
WOMENINLOVE
4
1984
5
3 OCTAVE RANGE
6
POWERCHORD
7
SHATTER
8
PHOTON BEAM
9
INSANITY BUILD
10
RISING SWIM
11
BACKING VOCAL
12
ECHOES OF 910 PAST
13
949 CHORUS
14
DLY1
15
DLY2
16
COUNTRY SLAP
17
SLAP
18
DLYOCTAVE
19
CHNELVOCALS1
20
VOXDLY
21
GUITCHNEL
22
SPICY SPRING
23
BUM-BA-DUM
24
DLYDOTSWEET
25
GUITBASSCHORUS
26
FAT H910
1
EARTH HALL
2
KUBRIX
3
CORRIDORS
4
DARK CAVE
5
DELAYEDPLATE
6
CARNEGIE HALL
7
DOOM CHAMBER
8
PHANTOM VERB
9
VAPOR TRAIL
10
PANOROMANCE
11
HALL
12
HI FI
13
1985
Hall
Page 89

89
14
CAVE SPACE
15
DISH DELAY
16
TORNADIAN
17
AMEDEO-SLAP
1
TRANCE OCTAVES
2
PSYCHO WAITING
3
FOREBODING
4
CHROMATIC DELAYE
5
VAIBALLERINA
6
ELEC12STRING ROO
7
LIGHTSIDE DARKSI
8
ONE FINGER POWER
9
PHOTON PISTOL
10
PLANET OBELISK
11
BASSGUITSOLO
12
BASS MIN MAJ MOD
13
MUNCHKIN WHALES
1
HYPERNOTES ARP
2
GET THEM KIDS MO
3
BASSWITH ARPS
4
BOILINGSOLO
5
BUBBLES
6
DOWNUP
7
FAKE SHREDDING
8
INTELLIVISION
9
LIGHTEMUP
10
MACHINES
11
MENACE
12
SPACETREM
13
TREMBOT
14
MOLTEN
15
BIGCHILL
16
OLD VIDEO GAME
17
RAVE VOCALS
HarModulator
HarPeggiator
Page 90

90
Looper
1
Basic Looper
2
16 Beat Auto Loop
3
16 Beat Reverse Start
4
Dub Decay Looper
5
8 Beat Punch
6
8 Beat Punch Replace
7
Thin Loop
8
Long Basic Looper
9
48 Beat Basic Looper
10
LoFi 16 Beat
1
MANGLEDVERB
2
FLUFFER
3
OBLIVION
4
SANSKRITUAL1
5
SCREAMWARP
6
REVUNCHED
7
MANGLEDVERN
8
DOOMDRIVE
9
DRIVEDOOM
1
H3000
2
NICECHORUS
3
VIBRACHORUS
4
CHORUS ROOM
5
SLAP MY ECHO
6
DARKECHOES
7
SPACEY SPRINGS
8
ELEVATOR DELAYS
9
BASSCHORUS(ES)
10
BOTTOMLESS DROP
MangledVerb
MicroPitch
Page 91

91
Mod Delay
1
EVERY LEAD YOU FAKE
2
LOST LUNCH
3
PEDAL PITCH
4
1.. AND 2 MOD
5
LAZYPHASY
6
FUNK ECHO
7
PHASERECHO1
8
PHASERECHO2
9
CREEPY
10
CHORUSPHASE NO DELAY
1
MODECHOVERB
2
EKOSPACE-GOD
3
SOLARDELAY
4
AMBIENCE
5
FLANGE TILES
6
MATRIX DECAY
7
PLANETARIUM1
8
JUNGLEAPPETITE
1
BASS AUTO WAH
2
JUPITER REACTS
3
NERVOUS FILTER
4
HYPERWAH
5
WATERYFILTER DARK
6
WATERYFILTERBRIGHT
7
BUBBLYFILTER
8
TREMMODFILTER
ModEchoVerb
ModFilter
Page 92

92
MultiTap
1
AIRPLANE HANGER
2
GHOST TOWN
3
500 SEATER
4
BIG SWELLPAD1
5
MULTI HALL
6
AMBIENT MULTI
7
MULTI WETLIVE
8
GALLOPER MULTI
9
TAPPER
10
STRUMMER
11
STRUMMER2
12
KING'S MISSILE
13
AUTOMARCH
14
EMPTYSPACE
15
WORMS
1
NAZZTYBASS
2
THROATYBASS
3
WAHELECTRONIQUE
4
CRAB BASS
5
CLASSIC OCTAVER
6
MASSIVUZZ
7
OCTOFUZZVER
8
BASS VOWELER GRO
9
DRTY VOCALS
1
FUNKPHASE
2
AIN'T TALKIN 'BOUT PHASE
3
PHASER WAH
4
LOU-NIVIBE
5
VIBRAPHASER
6
SAWMODPHASER
7
STOPPEDPHASE
8
PHAT PHASE
Octaver
Phaser
Page 93

93
PitchFlex
1
OCTAVE FLEXSWITC
2
FLEX HARMONY -1O
3
FLEX HARMONY -5T
4
FLEX HARMONY -4T
5
FLEX HARMONY +5T
6
FLEX HARMONY +4T
7
FLEX HARMONY +3R
8
FLEX HARMONY +FL
9
FLEX HARMONY +2N
10
PITCH FLEX +1OCT
11
PITCH FLEX +2OCT
12
PITCH FLEX -1OCT
13
PITCH FLEX -2OCT
14
PITCH FLEX -2ND
15
PITCH FLEX -4TH
16
PITCH FLEX UNISO
1
Just the Fuzz
2
WholeLottaPeach
3
Peach Dog
4
HOT MCADAM
5
Chorus and Delay
6
Arpeggiate
7
PEACH SLAP
8
CHERUB
9
HARP CHORDS
10
Peaches KICK IT
11
ORGANIZOR
12
Dovers Peach
13
LawfulKnowledge
14
OhYouAteOneToo
15
Atmospheres
16
MIMA LEAD
17
SUSPENDED PEACH
18
PEACH-TAVIA
19
Fripper Fuzz
20
R U Fuzz
21
COPELAND
22
COBBLER TRIADS
PitchFuzz
Page 94

94
23
FUZZSTACK
24
Lethal Weapon 7
25
Schnapps
26
Goof Delays
27
Delicate Trinkets
28
Muscle
29
Pitch Busters
30
Weird Orchestra
31
Space Peach
32
FruitInTheRain
33
Working Man Bass
34
JUICED UP BASS
35
Boogie Oogie Bass
36
BIG BASS SYNTH
1
PLATE
2
GUITPLATE
3
OILDRUM
4
DINNER PLATE
5
JUST CUZ
6
PRESSURE
7
SIFT PLATE
8
CENTAURI
1
LAZYPHASYWAH
2
SQUAREMODWAH
3
TALKING BACK
4
OTTAWAH
5
MUMBLER
6
VINTAGE WAH
7
PHASYWAH
8
LESSEVENAUTOWAH
9
NERVOUS WAH
10
SLOWSWEEPWITHTREATS
11
BIGMODDEDPLANETSWEEP
12
SOFTCHOPPER
13
WAH-BRAVIBE
14
VIBRAPHASYWAH
Plate
Q-Wah
Page 95

95
1
TEENAGE WASTELAN
2
ANTHEM
3
BANJO STRUMMER
4
GOOD MORNING SUN
5
MOODSWITCH
6
IF IT'S BAROQUE
7
GUITARHARP
8
PITCHDRAMA
9
HEAVY QUAD OCTAV
1
SPELUNKING
2
FILTERED MULTITAP
3
SAVERENCE
4
RESOVERB
5
GUMDROP
6
SUBMERGED
7
TRANSCENDENTAL DOLPHIN
8
SCARY CHORD
9
CLEAN DELAY
10
BEECUZ
11
RENO
12
TICK TOCK
13
RAAG MALHAR
14
CAVERN
15
ELECTRONS
16
THE BEAUTIFUL
17
ANDY WARHOL ON THE RUN
18
CASCADE
19
DISSONANT REPEATER
20
THOR'S BELLS
Quadravox
Resonator
Page 96

96
Reverse
1
BACKWARDS RIFFS
2
ETHEREAL ECHOES
3
DRING MODULATOR
4
REVERSE FLUTTERS
5
REVERSE FLUTTERS2
6
REVERSE SPACE
7
BACKWARDS ALL
8
REVERSE SPACE2
9
BACKWARDS ALL2
10
REVERSE SPACE3
11
REVERSE NO CRYSTALS
12
INSIDE OUT
13
RAMP UP REVERSE
1
REVERSE
2
SPINDIZZY
3
CONTINUUM
4
TWEET OFF
5
REFLEXIVE
6
GHOST PLATE
7
ALIEN VERB
8
GARBLE SPACE
1
WHAT'S THAT SMELL
2
GUITAR DRUMS
3
HELLSBELLS
4
STATIC
5
ELECTRICITYRING
6
RING'S TREM
7
RING'S LESLIE FAST
8
RING'S LESLIE SLOW
9
RING'S CHORUS
10
RING'S TREM2
11
RING'S TREM 2 FASTER
12
TREM TURNS UGLY
13
INTERFERENCE
14
BUZZBELLS
Reverse Reverb
RingMod
Page 97

97
Room
1
ROOM
2
BOXY RO0M
3
PCM60ROOM
4
GUITAR ROOM
5
LUX SPACE
6
SHUTTER ROOM
7
CANISMAJOR
8
ROOM 667
1
SLOWLY ROTATE
2
WHIRLING DERVISH
3
BIG FAT CABINET
4
HYPER ROTOR
5
JAZZYROTARY
6
TREBLE SPIN
7
BASSSTILLROTARY
8
AUTOFASTSLOWROTARY
9
AUTOFASTSLOWROTARY2
10
OLDTYME RADIO
11
SPACESHIP ROTARY
1
Sculpt
2
Wahvolver
3
Dirt Boost
4
Butter Churner
5
Little Speaker
6
Fuzzy Pillow
7
Land O Lakes
8
Embwahss
9
Honki Tonki
9
UFO Shred
11
Chisel
12
Jazzy Box
14
Airbag
15
Wizards Tele
16
Dissect
17
AntiWah
Rotary
Sculpt
Page 98

98
17
Meow Wow
18
Rumble Down Lo
19
Sculpt Da Bass
20
MuthaShip Connect
21
Funke Biass
1
SHIMMER
2
MOUNTAINS
3
IRONWORX
4
TOUCHED BY AN H9
5
HELLS GATE
6
SIZE MATTERS
7
SNEAKY VERB
8
QUASAR
9
DARK ANGELS
10
NEROS ASCENT
11
GUNSHOT SNARE
12
DEMON CALL
13
AMEDEO-BASS-SHIM
1
SpaceTime
2
Nice Chorus
3
Space Cathedral
4
Quarter Delay
5
Faux Leslie
6
Verb Repeats Only
7
Small Tight Room
8
Parallel Delays
9
Aphelion
10
Slap in Space
11
IntaStella
12
Off the Ground
13
Shadows
14
Voyage
15
TwilightZoned
16
Sunlight
17
HUBBLE
18
On the Verge
Shimmer
SpaceTime
Page 99

99
19
EventHorizon
20
Gravitation
22
ExtraTerrestrial
23
Outer Limits
24
Star Sailor
1
SPRING
2
RW TANK
3
SPRINGTHEORY
4
SPICY SPRING
5
BIG BALLS
6
DARK SPRING
7
GUTTER FLANGE
8
AMESPRING
1
MOTORBIKE LEAD
2
FLUTEFACTOR
3
TROMBONEFACTOR
4
WELCOME TO THE M
5
BASSIC SYNTH
1
LENNON SLAP
2
FIBONACCI TAPE
3
TAPE FOR VOCALS
4
CLASSIC SLAP
5
RECORD HEAD
6
BE WOWED
7
MULTI SLAP
8
REELTOREEL
9
FLUTTERWOW
10
TAPEDRONE
11
WARPED RECORD
Spring
Synthonizer
TapeEcho
Page 100

100
TremoloPan
1
I WALK ALONE
2
TUMBLEWEED TREM
3
RAMPCHOPPER
4
SQUARE CHOPPER
5
SPECIAL AGENT FACTOR
6
FLUTTER TREM
7
PULSING TREM
8
PANNING TREMO
9
MODACITY
10
HYPERCHOPTREM
11
CHOPPER TREM
1
TREMOLOVERB
2
BROKEN GLITCH
3
HORROR SHOW
4
SPLITTER VERB
5
ABITSHAKEY
6
AMETREMVERB1
7
AMETREMVERB2
1
ULTRATAP
2
BATMAN
3
BOUNCING BALL
4
GHOSTHUNTER
5
MOSQUITO
6
DISAPPEARING HALL
7
STUTTER
8
SLOWING DOWN
9
ULTRASWELL
10
ZIPPERVERB
11
CHOP HALL
12
SIX PULSING
13
HUH FLANGE
14
FOLLOW ME
15
CLOCKWORKS
16
NANO STUDDER
17
SYNTH GHOSTS
TremeloVerb
UltraTap
 Loading...