

Page 1

Plug-in for Digidesign® Pro Tools®
User Guide
Page 2

© Copyright 2004, Eventide Inc.
P/N: 141089, Rev A
Eventide is a registered trademark of Eventide Inc. Band Delays is a trademark of Eventide Inc.
Digidesign and Pro Tools are trademarks of Digidesign, a division of Avid Technology and names and
logos are used with permission. Macintosh is a trademark of Apple Computer, Inc. All other
trademarks contained herein are the property of their respective owners.
Eventide Inc.
One Alsan Way
Little Ferry, NJ 07643
201-641-1200
www.eventide.com
- 2 -
Page 3

Table of Contents
Table of Contents 3
Introduction 6
About This Manual 8
Don’t Forget to Register 8
CHAPTER 1 – INSTALLATION 9
Read Me 9
Installation 9
Allocating Memory 9
Authorizing with the iLok USB Smart Key 10
Removing an Authorization 10
CHAPTER 2 - USING EVENTIDE BAND DELAYS 11
I/O Formats 11
Using the Controls 12
Signal Flow Diagram 13
Plug-in Panel Overview 13
Plug-in Panel Overview 14
H3000 Front Panel Details 15
Levels 15
Soft Keys 16
Page Select Buttons 16
Knob 16
Snapshots Overview 17
Snapshot Loading 18
Snapshot Saving 18
Renaming a Snapshot 18
Revert 19
Global vs. Current 19
Proper Snapshot Hygiene 20
- 3 -
Page 4

Restoring Global Defaults 20
Automating Snapshots with Program Change 21
Preset Parameter Details 22
Session Tempo 23
Tempo Based 23
Delay Time 23
Frequency 24
Q Factor 24
Pan 24
Feedback Delay 24
Feedback 25
Mix 25
Input Level 25
Output Level 25
Program Page Details 26
Channel Strip Parameters 27
Channel Strip Parameters 27
Beat Grid Elements 27
Beat Grid Callouts 28
Band Display Elements 28
Band Display Elements 29
Expert Page Details 30
Voice On/Off 31
Phase Inv 31
Frequency 31
Note Name 31
Filter Tuning Hint: 32
Q Factor 32
Filter Type 32
Delay Time 32
Output Level 33
Pan 33
MIDI Note Mode 33
- 4 -
Page 5

Function Page Details 35
Parameter Modulation 36
Parameter Modulation 36
Preset Parameter 37
Modulation Source 37
Min Value 37
Max Value 38
Soft Keys 38
Soft Key Setup 38
Function Generator 40
FG Types 41
Saving and Recalling Presets 43
- 5 -
Page 6

Introduction
Welcome, and thank you for your purchase of the Eventide Band Delays plug-in for
Pro Tools TDM. Derived from the original filtered delay algorithm found only in the
legendary H3000 digital multi-effects processor, Band Delays broadens the
landscape with eight voices of tempo-based filtered delays. Tempo, delays and
filters work together in their original incarnation to offer you incredible sonic
possibilities.
All eight filters are fully parametric with configurable low/band/high pass or shelving
choices and a bandwidth control that offers high resonance. The filter frequencies
can even be played via MIDI notes with several useful modes. The delays offer full
tempo support and feature an intuitive Beat Grid for creating incredible pulsing
rhythms. Even the original Parameter Modulation features of the H3000 are included
as well allowing you to create the uniquely dynamic programs that made the original
so popular.
As with all Eventide plug-ins, the convenient Snapshots allow for instant program
loading of up to 32 different presets within a single session. All of this, with the soughtafter sound of the H3000, brings you a great-sounding plug-in that’s as easy to use as
the original that inspired it.
- 6 -
Page 7

Eventide Band Delays features:
Eight voices of tempo-based filtered delays up to 1.2 seconds each.
Beat Grid lets you easily place delays in time with the music.
Tempo features allow all eight delays to lock to the session tempo.
Filter parameters include Band Pass, High Pass, Low Pass and Shelving types
with Q factors up to 100.
Filter frequencies can be “played” with a MIDI keyboard.
Full MIDI implementation offers loading of preset Snapshots and MIDI
controller support for Parameter Modulation.
Parameter Modulation with a host of Function Generator abilities for
incredibly dynamic sound shaping.
Master “Global” controls affect all similar parameters.
Soft Keys let you customize the preset parameters.
Intuitive graphical interface lets you see delay times, center frequencies and
bandwidth simultaneously.
Integrated mixer section offers level, pan and phase control for each voice.
Familiar interface is easy to use.
- 7 -
Page 8

About This Manual
We’re very confident you’ll be able to use your new plug-in without reading this
manual, but we urge you to have a quick look. There are several unique features
and interesting options presented in Band Delays and a cursory glance will help
streamline your efficiency. We’ll try to keep it all relevant and highlight any tips or
cool tricks for you.
We also won’t cover much at all about the operation of Pro Tools or the Macintosh
environments, as their owner’s manuals or online help should provide you with the
answers you need. We’ve made every attempt to integrate the controls and
features that you’re familiar with as a Pro Tools user into our Band Delays plug-in so
that you don’t have to learn anything new.
If you find the need to get more information from us than this manual can provide,
please visit our support forum available via our website (www.eventide.com
Don’t Forget to Register
Before you go any further, please take a moment to register your product. You can
either mail in the enclosed card or click on the Register Now link provided on this CD
and register online
updates, and any special offers that may only be available to registered users.
. This helps us keep you informed of any important software
- 8 -
).
Page 9

Chapter 1 – Installation
Read Me
Please be sure to have a look at the Read Me document on the installation CD for
any important last minute updates from us.
Installation
Eventide Band Delays comes in one tidy installer that contains all the necessary files
for use under Mac OS 9 or OS X. Boot into the Mac OS that you want to install under
before beginning the installation. If you use Pro Tools 5.x, then you’ll need to boot
into OS 9. Pro Tools 6.x users will want to be running Mac OS X before beginning the
installation. Then run the Eventide Band Delays Installer directly from the Application
CD that came with the product. Follow the instructions on-screen to complete the
installation.
Please refer to www.eventide.com
Pro Tools platforms.
for the latest on supported operating systems and
Allocating Memory
If you are running OS9, plug-ins with extensive graphics, such as Eventide Band
Delays, may require increasing your DAE memory allocation to run optimally.
- 9 -
Page 10
Authorizing with the iLok USB Smart Key
Because Eventide Band Delays utilizes the Pace Interlock copy protection system,
you’ll need to have your iLok smart key handy. After you’ve completed the
installation, pop the little rectangular piece out of the license card provided in the
product carton. Insert it as shown below into the key. Connect the key to any free
USB port on the Pro Tools system where you installed Band Delays. Launch Pro Tools
and follow the authorization window’s instructions.
Removing an Authorization
Should you have to remove the authorization from your iLok key, be sure to put it
back onto the original license card. To do this, start Pro Tools. Hold Option+Space
Bar while inserting Band Delays into a channel. Then, follow the instructions onscreen.
- 10 -
Page 11

Chapter 2 - Using Eventide Band Delays
This chapter details the overall operation of the plug-in as well as how each of the
parameters functions.
Please take some time to familiarize yourself with what each parameter does and to
read the section on Snapshots. Snapshots are a new and unique part of the product
and may take a little getting used to in order to utilize them fully.
I/O Formats
Eventide Band Delays is available for use on both mono and stereo sources. When
processing a mono audio source, the channel will be converted to a stereo output
channel and provide you with a stereo effect. When processing a stereo audio
source, the left and right channels will be summed to create a mono input, and a
stereo output will be produced.
Please refer to the signal flow diagram on the following pages for more details.
- 11 -
Page 12

Using the Controls
The control set offered by Band Delays consists mainly of faders and number boxes,
however the Beat Grid offers a simple graphical interface for setting delay times.
These controls have been designed to work in the most intuitive way, allowing you to
quickly and easily adjust parameters or type in values.
To adjust a parameter, simply click on its fader and drag the mouse left and right.
You can also click directly in the number box associated with every parameter and
drag the mouse up or down to increase or decrease the parameter’s value.
Most parameters let you drag the mouse a convenient distance to cover the
parameter’s full value range. However, you can hold the Command key on the
computer keyboard while setting values to get fine resolution control over that
parameter’s values.
Every number box allows you to type values directly in to immediately set the
parameter value. Simply click once in the number box and release the mouse
button without moving it. The box will become highlighted and ready for typing. Try
to type in values that correspond to the parameter; i.e. 8 kHz would be typed as
8000.
- 12 -
Page 13
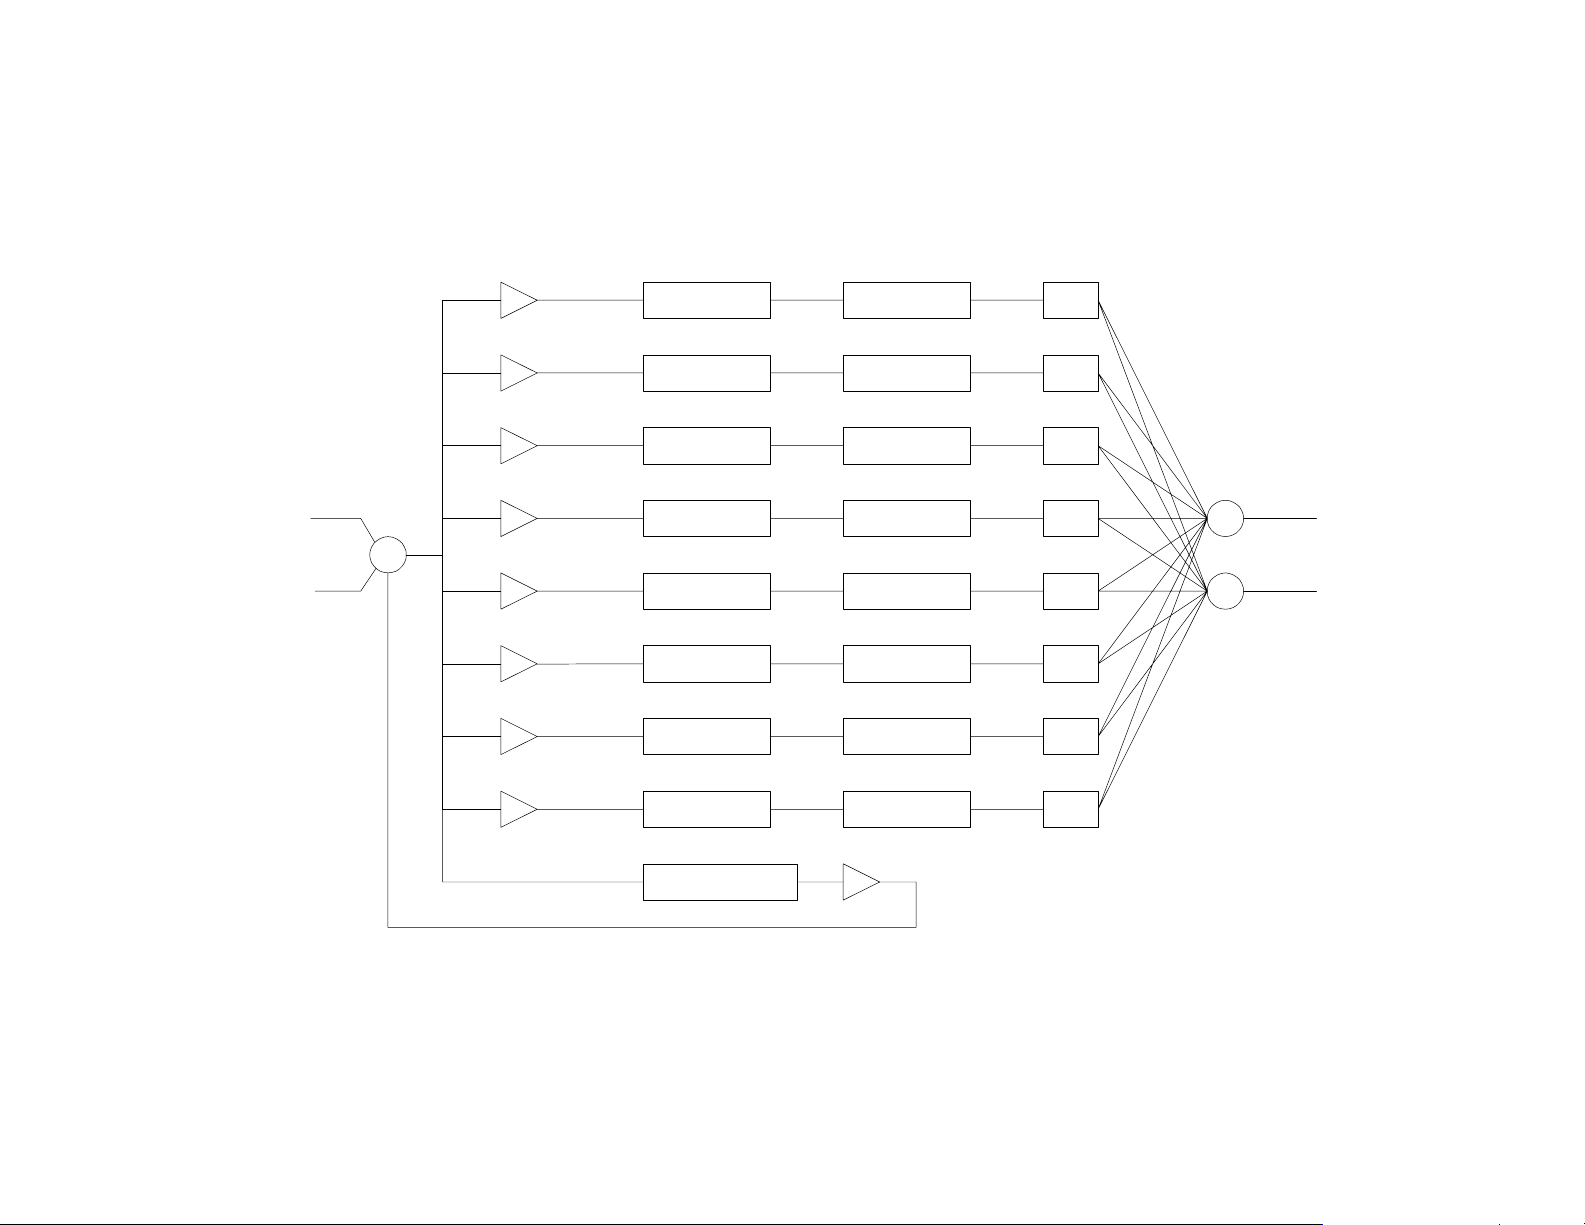
Signal Flow Diagram
Left Input
Right Input
+
Output 1
Output 2
Output 3
Output 4
Output 5
Output 6
Output 7
Output 8
Delay 2
Delay 3
Delay 4
Delay 5
Delay 6
Delay 7
Delay 8
Filter 1
Filter 2
Filter 3
Filter 4
Filter 5
Filter 6
Filter 7
Filter 8
PanDelay 1
Pan
Pan
Pan
Pan
Pan
Pan
Pan
+
+
Left Output
Right Output
Feedback Delay
- 13 -
Feedback
Page 14

Plug-in Panel Overview
For the most part, Band Delays incorporates all of the original controls found in the
H3000’s Band Delays algorithm, plus some new ones. The panel is broken down into
three main sections:
H3000 Front Panel – this is the top portion of the plug-in panel that resembles
the original product’s front panel.
Preset Parameters – this is the center section that includes the Global
parameters and tempo settings.
Expert and Function Parameters – this is the lower tabbed section of the plug-
in. Click on one of the Program, Expert or Function tabs to bring those
parameters to the forefront.
- 14 -
Page 15

H3000 Front Panel Details
The H3000 front panel controls section is always available at the top portion of the
plug-in panel. This is where you load and save Snapshots, edit Soft Parameter values
and view the input and output levels.
Levels
The audio metering can be set to view either input or output on the stereo meter
stack. To view the input levels, click on the Levels button to light the LED. When the
button’s LED is off, the meters are displaying stereo output levels.
Note that the input metering is mono only, displaying the same information on both
meters.
- 15 -
Page 16

Soft Keys
The H3000’s Soft Keys were originally designed to allow you to create custom
parameters that may not have been available in the chosen algorithm. This feature
is incorporated into the Band Delays plug-in as well. To adjust one of these
parameters, simply click on the button below the Soft Parameter’s name and then
turn the big Knob to the right. It is also possible–and easier–to simply click on the
value field below the Soft Parameter’s name and drag the mouse to adjust the
value. Some Soft Keys may be made to initiate a modulation ramp when pressed.
The specifics of creating custom parameters are detailed in the Function page later
in this document.
Page Select Buttons
The page select buttons are found between the Knob and the Soft Keys. These
buttons act like the ones on the original product by selecting the Program, Expert or
Function page of parameters. As you click on one of these buttons, the bottom
portion of the plug-in panel changes to show the appropriate set of parameters. It’s
also possible to access these pages by clicking on the tabs in this lower section.
Knob
The Knob allows you to adjust one Soft Parameter at a time. To do this, click on the
button below the soft name and then turn the Knob.
- 16 -
Page 17

Snapshots Overview
Eventide Band Delays incorporates our unique Snapshots feature that allows you to
quickly and easily load, save and even automate up to 32 of your favorite Band
Delays “scenes.” Snapshots are very much like presets, but you can load them
directly from the plug-in panel and even via MIDI Program Change. This means that
you get the live performance functionality offered in our high-end hardware
processors within the Pro Tools environment.
- 17 -
Page 18

Snapshot Loading
To load a Snapshot, simply click on any of the numbered buttons at any time to light
it. The entire Band Delays plug-in panel will change to reflect the settings stored in
the chosen Snapshot. You’ll also notice that the name of the currently loaded
Snapshot is displayed in the text box above the number pad. And, so you know what
you’re loading before you click, move the mouse over any of the 16 numbered
buttons to reveal its name in a little pop-up window. You can choose from either the
bank of 16 Current or the 16 Global Snapshots by clicking on the Current or Global
buttons to light their LED. These are described in the sections below.
Snapshot Saving
To Save your work and overwrite one of the Snapshots, simply command-click on any
of the numbered Snapshot buttons and it’s instantly stored. There’s no undo, but you
can restore any of the defaults at any time by reloading it from the preset menu,
then saving it in the appropriate location. Read ahead about the differences
between Current and Global to insure your work is repeatable.
Renaming a Snapshot
You can rename any of the preset Snapshots at any time. Click once on the name in
the name box, and it will be selected for editing. Now, type up to 16 characters, hit
return and the Snapshot has a new name. No need to save it just to rename it.
- 18 -
Page 19

Revert
Revert is a special button that gives you the freedom to return to the effect settings
you were working on before you loaded one or more Snapshots. It’s very much like
compare, except that you can load a gajiillion Snapshots, and still get back the
same parameter values that you had edited prior to loading Snapshots.
You’ll notice that as soon as you click on a Snapshot button, the Revert button pops
out to indicate that you can press it. Click on some other Snapshots. It’s still out. If
you click on Revert, it goes back in and you’re back to your original edits.
You’ll also notice that the selected Snapshot button pops out and becomes unlit as
soon as you change a parameter’s value. This is to indicate that you are no longer
listening to a Snapshot.
Global vs. Current
There are two kinds of Snapshots, Global and Current, and they are grouped in banks
of 16 Snapshots. During installation, the Global bank is created as a preference file
on your hard drive. You can overwrite each of these 16 defaults at any time and
they will be available for every instance of the Band Delays plug-in, on every Pro
Tools session on the hard drive. Use these like your favorite 16 Band Delays effects.
You can even copy this file and move it to other systems that have Band Delays
installed so you can take your favorites with you.
Now, the Current bank is a little different. When the plug-in is first inserted on a
channel, the Global bank is copied into the Current bank. At this point, they’re the
same. The only difference is that the Current Snapshots are saved with the current
instance of the Band Delays plug-in. If you save changes to one of the Current
- 19 -
Page 20

Snapshots, you won’t be able to load that Snapshot into another instance of Band
Delays. This is because the Current bank is unique to the current plug-in instance.
Why are there Global banks and Current banks? The main reason to have two is
because you can automate the loading of Snapshots via MIDI Program Change. This
is a very powerful feature, however if you only had Global Snapshots, and they had
been changed since you last loaded the session, the Snapshot that gets loaded is
likely to sound different. Therefore, we offer you two kinds.
Proper Snapshot Hygiene
Snapshots can be very powerful in use, but knowing how they work will help ensure
that your Eventide Band Delays Snapshots load and sound right every time. So, if you
want to load a Snapshot using Program Change, load it from the Current bank. If
you want to build yourself your favorite 16 and use them everywhere, use the Global
Snapshots. If you want to copy a cool Current Snapshot into the Global bank, simply
load it with the Current button selected first, then command-click on the desired
Snapshot button after selecting the Global button.
Restoring Global Defaults
The Global bank contains the same presets that can be found in the Default
Snapshots folder up in the Pro Tools preset load menu. Load one and store it back
into its numbered location on the Global tab to restore it to its “factory settings.”
- 20 -
Page 21

Automating Snapshots with Program Change
As mentioned earlier, you can use MIDI Program Change to select and load any of
the 32 Snapshots. This can occur as part of a MIDI track where Program Change
events are used to automate the loading of Snapshots. Be sure to read the sections
above on using Snapshots for predictable loading every time.
Simply create a MIDI track and assign the desired MIDI Device and Channel to the
channel in which Band Delays is inserted. Sending the appropriate MIDI Program
Change number will load the desired Snapshot.
Program Change number… Loads…
000 Revert
001 thru 016 Current Snapshots 1 thru 16
017 thru 032 Global Snapshots 1 thru 16
- 21 -
Page 22

Preset Parameter Details
Band Delays includes a set of master parameters called Globals. These are the
parameters that would come up instantly after loading a preset on the H3000 and
we’ve grouped them in the Preset Parameter section for easy access any time you’re
working with the plug-in. Like many of the parameters in the product, these sliders
can be automated, but what makes them different is that most of them can be
manipulated using the Parameter Modulation section on the Function page. We’ll
describe how to set that up later, but for now let’s take a look at the parameters on
this panel.
Note than parameters that are being control by Parameter Modulation or locked to
Session Tempo appear in orange and cannot be edited directly.
- 22 -
Page 23

Session Tempo
When this is enabled, Band Delay’s Tempo parameter will use and follow the Tempo
changes that occur in the Pro Tools session. Otherwise, when set to off, changes to
the session Tempo will be ignored. Note that the Tempo and Meter parameters may
still be automated if this parameter is set to off. (Not available in Pro Tools version 5.)
Tempo Based
Enabling this button will cause the delay times to be calculated based on the Tempo
parameter and the current Meter. This applied to Feedback Delay as well as the
eight individual voice delays. As the Tempo value changes, the delays will be scaled
appropriately to maintain the rhythm that you set in the Beat Grid.
When this parameter is off, Tempo changes will be ignored and the Tempo slider will
change to a Delay Time display.
Delay Time
This is the master delay control that scales the eight individual voice delays. Note
that the individual delay times that appear on the Beat Grid and the Expert page do
not show the effects of the master Delay Time control. However, the Band Delay
graphic display does show the delay times after the scaling applied by the Delay
Time parameter.
- 23 -
Page 24

Frequency
This is a master control that affects all eight filter Frequency parameters. It behaves
as an offset parameter meaning the frequency value here is added to the individual
frequency values of each filter. This master offset parameter displays its values in
semitones, allowing the musical pitch of the filters to be easily set over a 256 semitone
range.
Q Factor
This control simultaneously scales the Q factor, or “resonance” of all eight filters.
Pan
This global Pan controls the width of the stereo field. At the maximum setting of 100%,
the stereo image is normal. At 0%, the image is mono. At the minimum setting of
–100%, the left and right channels are swapped allowing you to quickly invert the
overall stereo image.
Feedback Delay
This parameter determines the length, or delay time of the feedback loop. This
parameter can be set using its associated fader or the small pointer in the Beat
Grid for quantized control. As you can see from the signal flow diagram presented
earlier, this delay is independent of the eight filtered delays and is great for repeating
sections of audio through the multi-tap delay line.
- 24 -
Page 25

Feedback
This controls the amount of feedback, or recirculation through the Feedback Delay.
Mix
This parameter sets the overall balance of wet (effected) signal to dry (original)
signal.
Input Level
This parameter allows you to adjust the signal level into this plug-in. Up to 24 dB of
gain is provided to recover low-level signals.
Output Level
This parameter allows you to adjust the signal level into this plug-in. Up to 24 dB of
gain is provided.
- 25 -
Page 26

Program Page Details
The Program page, accessible via the lower portion of the plug-in panel, offers two
graphical displays that help you visualize the large number of parameters and their
settings. The Band Display is a display-only representation of the filter settings while
the Beat Grid actually lets you drag-and-drop the delay times onto a quantized grid.
There is also a “channel strip” of controls for each voice, making it more convenient
to set each voice’s parameters without having to switch to the Expert page. As you
adjust each voice’s parameters, the changes will be reflected in the two displays.
To view this page at any time, simply click on the PROGRAM tab. This page may also
be selected by clicking on the Program button to the left of the Knob.
- 26 -
Page 27

Channel Strip Parameters
Across the top of the Program page is a “channel strip” containing one voice’s set of
controls. This acts as a convenient way to adjust any parameters for one voice at a
time without having to switch to the Expert page. To set the parameters for a given
voice, first click on a voice select button labeled F1 through F8. It will highlight a
ghoulish green to indicate the filtered delay that is selected. The “channel strip” will
instantly update to reflect the current settings for that voice. Note that you can only
edit one voice at a time. Refer to the Expert page for a detailed description of each
voice’s controls.
Beat Grid Elements
There are a few elements to the Beat Grid that you should understand.
Bars and Beats – Bars, beats and the subdivisions are displayed as a large grid.
The number of Bars and Beats displayed will be largely dependent upon the
Tempo and the chosen Meter. The Bars are labeled across the top and are
divided into beats (the heavy vertical lines) and sixteenth note subdivisions
(the light vertical lines).
Delay Markers – Each delay is represented as a color-coded X in the Beat
Grid. They are organized into rows labeled F1 through F8 (“F” for Filter).
Simply click and drag on each X to move it “in time” across the grid. Each
delay will snap to any of the available sixteenth note divisions to force it
perfectly in time. You’ll also notice that you can adjust these delays via the
Delay Time parameter on the Expert page, however they will not be
quantized to subdivided beats.
- 27 -
Page 28

Feedback Delay Pointer – The Feedback Delay is represented by a
downward-pointing triangle. Use the same methods for adjusting this control
as you do with the Delay Markers.
Beat Grid Callouts
Delay
Markers
One Bar
(One Measure)
Feedback
Delay Pointer
One Beat
- 28 -
16th Note Subdivisions
Page 29

Band Display Elements
The Band Display provides a visual representation of up to eight filtered delays. The
colored lines reference a delay voice number as color-coded on the Beat Grid. Their
timing is represented as shorter delay times in front with longer delay times being
toward the back. The height of each curve represents the voice level.
Although the graphic is not directly editable, it helps to understand the interaction
between the individual voices. It also looks great when the filter parameters are
modulated.
- 29 -
Page 30

Expert Page Details
The Expert page is where you’ll find the edit parameters specific to the eight filtered
delay voices. These parameters are organized into rows labeled F1 through F8 and
are described in this section.
To view this page at any time, simply click on the EXPERT tab at the lower portion of
the plug-in panel. This page may also be selected by clicking on the Expert button to
the left of the Knob.
- 30 -
Page 31

Voice On/Off
The Voice On/Off buttons allow you to quickly mute a voice by turning it off. When
the voice is on, the button glows green and will be unlit when turned off.
Phase Inv
The Phase Invert buttons are very useful for special effects, especially when several
voices are phase inverted and panned hard left and right. To invert the phase of a
voice, click the associated button to change its label from Off to Ø, thus lighting it
green as a visual reference.
Frequency
These eight parameters are the center frequencies for each of the filters. They are
displayed in Hertz and Kilohertz and each has a range of 20 Hz to 20 kHz. This
parameter is tied to the Note Name parameter so that you can see the musical note
for any given frequency.
Note Name
Like the Frequency parameter, Note Name adjusts the center frequency for each of
the filters. In this case, the values are displayed as the actual note names allowing
you to set the filter frequencies more musically. When MIDI note information is routed
to this plug-in and a Note Mode is chosen, you’ll see the actual MIDI notes displayed
in this field. As above, this parameter is connected to the Frequency parameter,
displaying the frequency for any given musical note.
- 31 -
Page 32

Filter Tuning Hint:
Keep in mind that the Global Frequency parameter is an offset of these two
parameters. This means that the Global Frequency parameter’s value will add to the
Frequency and Note Name values.
Q Factor
These parameters control the individual Q factor, or bandwidth, for each of the eight
filters. Zero corresponds to a very wide frequency range while higher settings yield an
increasingly narrow, more resonant filter. The highest setting will oscillate for a long
time after the audio source is gone.
These filters are constructed such that the higher the Q factor, the higher the gain
through the filter. The perceived gain is about the same since a smaller band of
audio is passed through. Be careful when setting these filters to very high settings as
they can easily be set to distort signals.
Filter Type
This selects one of four filter types used for each of the eight voices. While the original
H3000 algorithm offered a band pass filter, we’ve included three more filter types
including high pass, low pass and notch.
Delay Time
These parameters set the delay times for each of the eight filtered voices. When
adjusting these values, you can dial in milliseconds and Seconds. They are not
quantized on this page which gives you control of the entire 1.2 Second range. If you
want to utilize quantized tempo control, use the Beat Grid on the Program page.
- 32 -
Page 33

Output Level
Each filtered voice’s output level is controlled by this parameter.
Pan
All eight filters can be placed anywhere in the stereo field using the Pan parameters.
Note that the Global Pan control can modify the overall stereo image. The number
box to the right indicates its actual pan value.
MIDI Note Mode
This parameter determines how the individual filtered voices will respond to incoming
MIDI notes. To help you understand how the modes differ, try out each one while
playing single notes and chords on a connected MIDI keyboard.
Off – incoming MIDI notes are ignored.
Routed – each time a new note is received, the filters are tuned to the
currently pressed keys. The lowest note is routed to Filter 1, the next lowest to
Filter 2, etc. If less than eight notes are pressed, the notes will be repeated
until all the filters are tuned. For example, playing a single note will tune all
eight filters.
Ordered – notes are sent to the filters in the order they are received. The first
note played will be sent to Filter 1, the next note played is sent to Filter 2 and
so on. When all keys are released, the mode is reset so that a new set of
played notes will begin at Filter 1.
- 33 -
Page 34

Circular – this mode is identical to Ordered, however the order in which they
are received is never reset. The notes are continuously sent to each filter in a
circular fashion.
Gated – probably the most useful mode, Gated behaves very much like
Routed, however filters only pass audio when notes are pressed. Keep this in
mind in the event you are hearing no audio output from Band Delays. Disable
this mode first as it may be expecting to process MIDI note events and
therefore no audio is allowed through.
- 34 -
Page 35

Function Page Details
The Function page is where you create incredibly dynamic effects complete with up
to four custom Soft Key parameters. A Function Generator is available with a unique
list of wave shapes to create timed or free-running effects.
To view this page at any time, simply click on the FUNCTION tab at the lower portion
of the plug-in panel. This page may also be selected by clicking on the Function
button to the left of the Knob.
- 35 -
Page 36

Parameter Modulation
Parameter Modulation is the secret behind those wildly dynamic and expressive
effects that the H3000 is so famous for. Band Delays incorporates this exact
modulation system allowing you to create your own amazing treats.
So how does it work, you ask? You start by “patching” a modulation source, such as
MIDI Pitch Bend, to a target parameter. Select a modulation source via the drop
down menu (the complete list is below) under the Modulation Source column. The
target parameters are pre-defined for you under the column labeled “Preset
Parameter.” Now, when you move the source (pitch wheel in this example) from min
to max, the Preset Parameter is also adjusted from its lowest (min) value to its highest
(max) value.
Of course, you may not always want the target parameter to move through its full
range. For example, you might only want to modulate the Frequency within only a
few semitones. To do this, you simply select values for Min Value and Max Value to
affect only a portion of the range. (Min = -2.00 and Max = 2.00 in our example would
cause the pitch wheel to adjust all center frequencies +/- one whole step.)
Also, you may not want to use the pitch wheel all the time. The built-in Function
Generator, or FG for short, offers a host of wave shapes that run continuously at a
rate you choose or even in time with the session tempo. There are also several “one
shot” wave shapes that are executed using the FG’s Trigger button. Refer to the FG
Type descriptions for more information.
Note that any parameter that is being modulated cannot be directly edited. The
modulation “takes control” of the parameter. To make this more obvious, any
- 36 -
Page 37

parameter that is being modulated has its text value displayed in orange, rather than
the normal green color.
Preset Parameter
Many of the Preset Parameters and three of the Function Generator parameters are
available as targets in the Parameter Modulation section. They are detailed in the
Preset Parameter section earlier.
Modulation Source
There are many sources available to dynamically modulate the parameters. These
include:
Soft Keys 1 – 4
Function Generator output
MIDI Pitch Bend
MIDI Mod Wheel
MIDI Volume(#7), Balance(#8), Pan(#10), and Expression(#11) Continuous
Controllers
MIDI General Purpose Controllers 1 – 4 (#16 - #19)
Min Value
This is the value of the target parameter when the source is at its minimum.
- 37 -
Page 38

Max Value
This is the value of the destination parameter when the source is at its maximum.
Soft Keys
The four Soft Keys are useful when you want to create a custom parameter or just
organize the most commonly-used parameters into an easy to access place. These
settings are specific to each preset allowing virtually every preset to be unique.
Name
Polarity
Soft Key Setup
Setting up a Soft Key is very simple and requires two steps.
Name – Click on the name field and type in up to eight characters, then hit
Return or click on the plug-in panel. The name is instantly changed in the
name field and in the H3000 LCD display area.
- 38 -
Page 39

Polarity – This sets the range of the chosen Soft Key and is useful when you
want to change the knob’s behavior. For example, you might choose “–100
to +100” when a Soft Key is controlling Global Pan. Otherwise, a range of “0
to 100” is the norm. Click on the drop down menu below the name field to
select the range of each Soft Key.
That’s all there is to it. Now, to use the Soft Key, select it as a Modulation Source for
one or more of the available Preset Parameters. Click on the button and turn the big
Knob or simply click and drag on the Soft Key value in the H3000 LCD to adjust it.
Here’s a cool feature – if you select a Soft Key as a source for FG Trigger and the FG
Type is one of the ramp (one-shot) wave shapes, clicking the Soft Key under the LCD
will execute the ramp.
- 39 -
Page 40

Function Generator
The Function Generator (FG) is an LFO (low frequency oscillator) which is adopted
from the H3000. It offers a wide variety of wave shapes that you can use to control
many of the Preset Parameters described earlier. You can even assign the FG’s
Amplitude, Rate and Trigger button as targets for Parameter Modulation. Each FG
Type, or wave shape, can be set to a specific speed and range. Many are available
as triggered waveforms as well.
The Function Generator consists of five parameters, plus an LED which lights to help
you see its effective output. These parameters are described below.
- 40 -
Page 41

FG Type – this drop down menu is where you select among the various types
of wave shapes.
FG Rate – this sets the rate or speed at which this oscillator runs or the time
that the one-shot wave-shapes take to complete their cycle. When the
Tempo Based control of the Function Generator is enabled, the FG Rate is
specified in beats. When the Tempo Based mode is disabled, the FG Rate is
specified in Hertz.
FG Amplitude – this sets the overall output level of the oscillator.
Tempo Based – click this button to cause the Function Generator to calculate
rates based on the current tempo. When enabled, its LED will light.
Trigger – use this button to start the triggered wave shapes. A single press will
cause the FG to run through the entire shape of the one-shot types and then
stop.
FG Types
The H300 Band Delays plug-in offers the same 19 waveshapes as the original H3000.
Below is a list of the FG Types and a visual representation of each.
- 41 -
Page 42

- 42 -
Page 43

Saving and Recalling Presets
Band Delays utilizes the standard Pro Tools Save and Recall interface for presets.
Available via the Global Plug-in Header, presets are organized into familiar groups of
folders. Simply click on the preset select menu and select a preset. It will load
instantly.
Click here to select a preset
Click here to access the store features
- 43 -
 Loading...