

Page 1

Programming Manual for
Orville and the DSP7000 family
of Harmonizer
Brand Effects
Processors.
( covering Orville™, DSP7000/7500™ and DSP4000B+™ )
Part No: 141035 Manual Release 1.2.1 17 May, 2001
©1999 Eventide Inc., One Alsan Way, Little Ferry, NJ, 07643 USA
Harmonizer is a registered trademark of Eventide Inc. for its audio special effects devices incorporating pitch shift.
Orville, DSP7000, DSP7500, DSP4000B+and Ultrashifter are trademarks of Eventide Inc.
Page 2

This page intentionally left blank
Page 3

The Harmonizer
Programmer’s Manual
Table of Contents
GENERAL PRINCIPLES____________________________________________________________________________4
VERVIEW ..................................................................................................................................................................................................................4
O
Different Kinds of Si gnals 6
H
OW A PROGRAM INTERFACES WITH THE PARAMETER AREA...................................................................................................................7
Simple Interface 7
Custom Interface 8
M
ODULES................................................................................................................................................................................................................. 10
The IN and OUT “Modules” 10
The Characteristics of Modules 11
W
RAP UP ..................................................................................................................................................................................................................15
VSIGFILE ________________________________________________________________________________________ 16
System Requirements and Background Knowledge Required 16
C
OMMUNICATIONS.................................................................................................................................................................................................16
Establishing a MIDI Connection 16
Establishing a Serial Connection 17
B
ASIC FUNCTIONS .................................................................................................................................................................................................. 18
Adding Modules 18
Connecting Modules 19
Deleting Modules 19
D
ISPLAY FUNCTIONS ............................................................................................................................................................................................. 20
Selecting Modules 20
Moving Modules 20
Re-Positioning Modu les 20
Aligning Modules 21
Zooming 21
View 21
E
DITING...................................................................................................................................................................................................................22
S
ENDING PROGRAMS TO THE HARMONIZER................................................................................................................................................... 24
TUTORIAL 1 -A SIMPLE PROGRAM....................................................................................................................................................................... 24
DVANCED FEATURES ..........................................................................................................................................................................................27
A
The Specifier Display 27
Repeating Fields 31
Editing “Special” Module s 33
Updating the Parameters from the Harmonizer 33
Getting Programs from the Harmonizer 34
Creating the User Interface 35
Viewing Menupages and Menupage Modules 35
Interface Modules 36
Parameter Adjusters 37
The Harmonizer Programmer’s Manual Page 1 of 97 Release 1.2.1
1999 Eventide, Inc.
Page 4

The Harmonizer
Simple “Parameter Adjuster s” 40
Menupages and Parameter Placement 45
T
UTORIAL 2 -PRETTY IN DEPTH..........................................................................................................................................................................48
NTER-DSP COMMUNICATION FOR ORVILLE...................................................................................................................................................56
I
S
UPERMODULES.......................................................................................................................................................................................................57
T
UTORIAL 3 -USING SUPERMODULES .................................................................................................................................................................57
F
ILE FUNCTIONS .....................................................................................................................................................................................................62
“ *.sig” Files versus “ *.sif ” F iles 63
PATCH EDITOR __________________________________________________________________________________64
G
ET COMFORTABLE BY DOING...........................................................................................................................................................................64
The IN and OUT “Modules” 67
T
HE PATCH EDITOR AREA DISPLAY...................................................................................................................................................................68
Front Panel Controls 69
The Patch Editor Area SOFT KEY Functions 70
T
HE <MODIFY> SOFT KEY...............................................................................................................................................................................76
Modifying a delay module 76
Modifying Complex Modules 79
I
NTER-DSP COMMUNICATION FOR ORVILLE ...................................................................................................................................................80
Programmer’s Manual
C
REATING THE USER INTERFACE........................................................................................................................................................................81
Viewing Menupages and Menupage Modules 81
Interface Modules 83
Simple “Parameter Adjusters” 87
Menupages and Parameter Placement 91
The Harmonizer
Programmer’s Manual Page 2 of 97 Release 1.2.1
1999 Eventide, Inc.
Page 5

The Harmonizer
Programmer’s Manual
This manual covers Orville
TM
DSP4000B+
. In the following text these will, for convenience, be referred to as 'Harmonizers'. Much of its contents also
TM
as well as the DSP7000TM family of Harmonizer Brand Effects Processors, as well as the
apply to the older 4000 family, but the reader is not advised to view this publication as an exhaustive reference for these models.
This manual does not cover the Eclipse
TM
or the H3000 family of Harmonizer Brand Effects Processors.
One of the reasons Eventide’s effects units are so versatile is that their effects programs are “modular." A
single program is composed of many smaller “modules." Modules might best be thought of as good old
fashioned “guitar pedals” (except, of course, that unlike guitar pedals, the modules in the Harmonizer are 24 bit, crystal clear, high-end audio
processors!)
. Imagine you have a gym floor covered with guitar pedals and a coat rack draped with patch cords.
You run around connecting pedals, a delay pedal to a pitchshifter pedal, the output of that pitchshifter pedal
to a compressor, the output of that compressor into a filter, etc. The end result of all that patching is, to the
Harmonizer, a program.
Although that picture is oversimplified, it does capture the essence of what’s going on inside VSigfile and
the Patch Editor area. You’re just connecting modules (guitar pedals) to each other to produce a desired
overall program.
Without going into details, the example cited above, “a delay pedal into a pitchshifter into a compressor into
a filter” is shown to the right as seen in the Patch Editor. The little
boxes represent the modules and the lines between them
represent “patch cords."
(Digital Signal Processor) running the program,
delay module,
psh represents the pitchshifter module, cpr
represents the compressor module,
IN represents the inputs to the DSP
dly represents the
flt represents the filter module and OUT represents the outputs from the
DSP running the program.
Of course, if things were going to remain this simple there would be no need for this separate Programmer’s
Manual. But conceptually, things are this simple! We’ll muddy things up by implementing “control” features
that will make your programs easier to use in the
PARAMETER area. We’ll further muddy them by making
large programs that utilize many modules connected in ways that defy the “serial/parallel” paradigm. So the
details may get a little complex, but the main idea should remain crystal clear: we’re just connecting a bunch
of 24 bit, full bandwidth guitar pedals!
The first chapter in this manual, General Principles, will cover the underlying concepts involved in
constructing programs either in VSigfile or the Patch Editor area. It is essential reading. The second
chapter will discuss the mechanics of creating programs in VSigfile, and the third chapter will discuss the
mechanics of creating programs in the Patch Editor area. It is suggested that you only read the chapter
pertaining to the construction “environment” you will in fact use. The Appendix, Modules Manual, will be
indispensable in all of your programming adventures. It lists the Harmonizer’s available modules along with
their specifications.
The Harmonizer Programmer’s Manual Page 3 of 97 Release 1.2.1
1999 Eventide, Inc.
Page 6
The Harmonizer
Programmer’s Manual
GENERAL PRINCIPLES
OVERVIEW
This section will describe in general terms just what goes into constructing a program. Return to this
section if you ever feel like you’re being mired down in details later on.
First, the primary “stuff” of program construction is the “module." Modules are small, functional “chunks."
Some modules may have names that will be familiar to you, such as delay, reverb, filter,
pitchshifter, and eq. As you would expect, a delay module delays the signal at its input. A
reverb module adds reverb to the signal at its input. A filter module filters the signal at its input.
And so on.
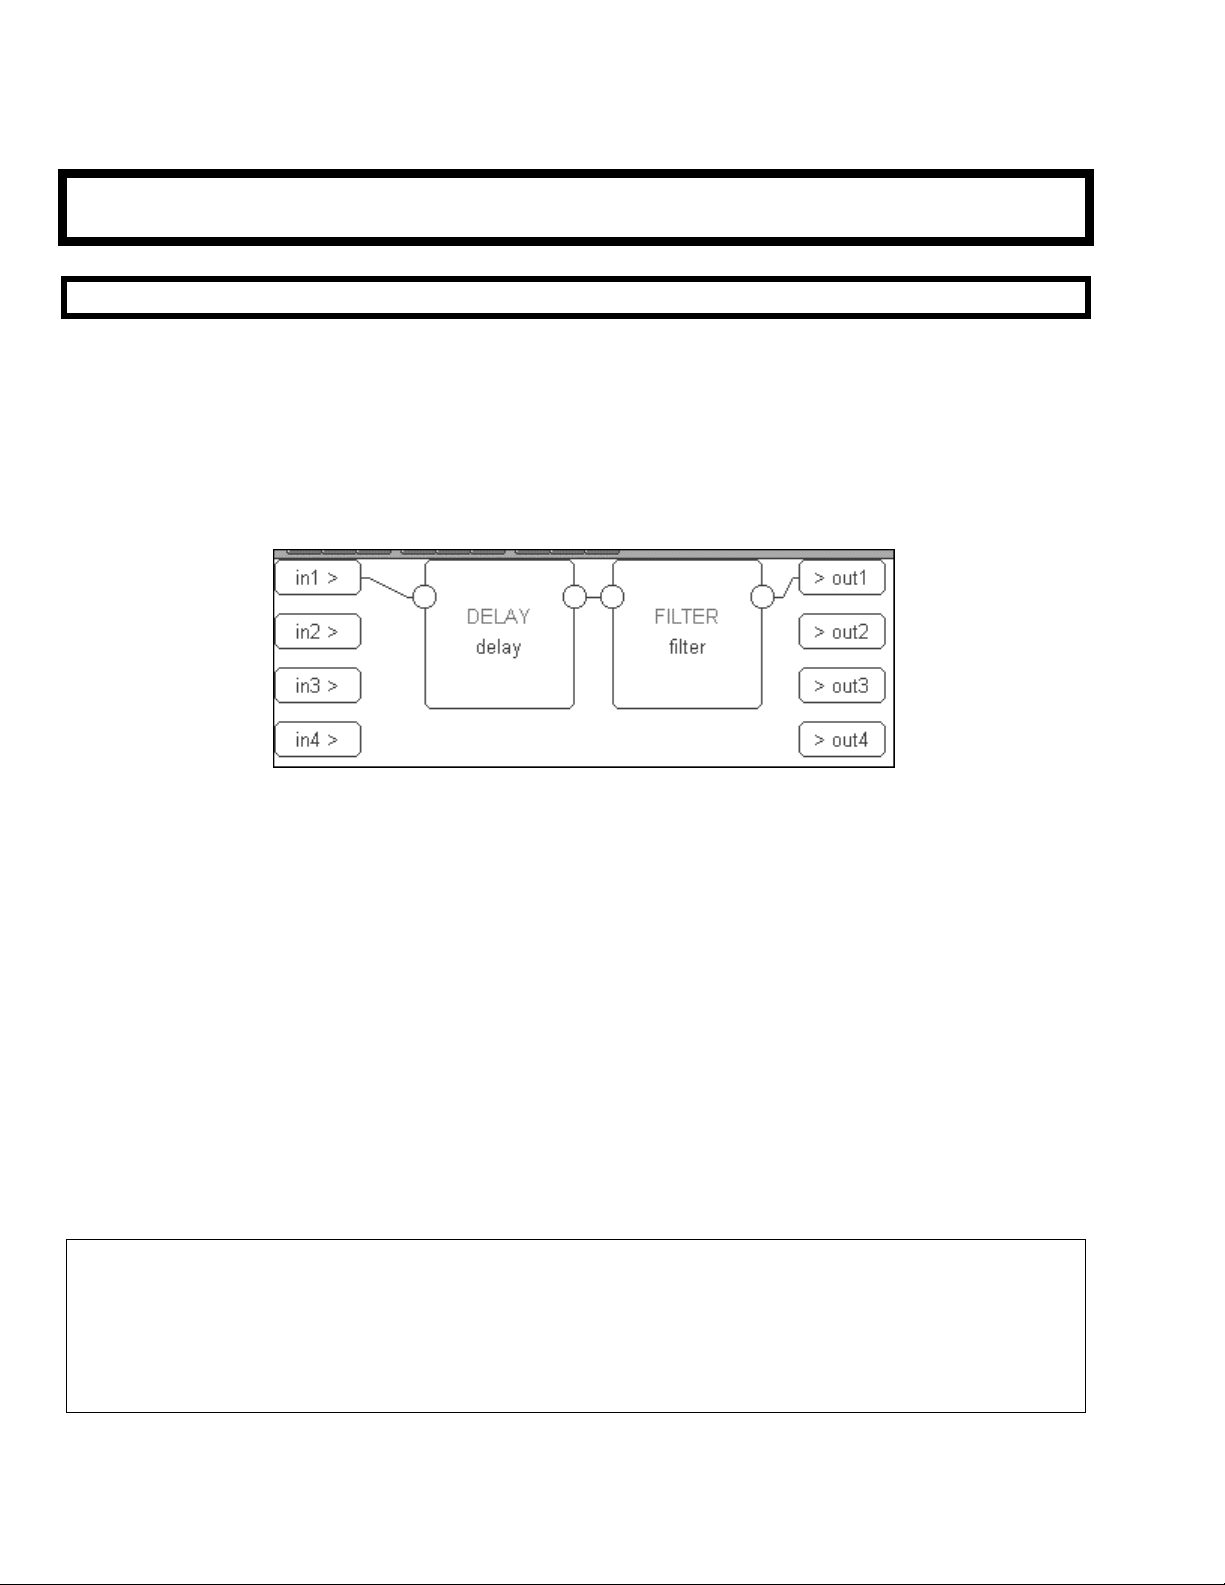
Before going any further, let’s say you wanted to construct a program that delayed and filtered a signal. You
would begin either in VSigfile or the Patch Editor area with a “blank slate” that contained nothing but
representations of the inputs and outputs of the DSP that would run the program. You would then add a
delay module and a filter module. Lastly, you would connect one of the DSP’s inputs to the delay
module, the delay module’s
one of the DSP’s outputs. The result, as seen in VSigfile, is shown above.
Most modules, delay and filter included, have “control inputs” that allow you to change parameters
associated with a given module. For example, a delay module has a control input that allows you to
change the delay time for the module (will it delay the signal 20ms or 1000ms?). A filter module has
three control inputs: one for the cutoff frequency, one for the resonance at the cutoff, and one to select the
type of filtering done by the module (lowpass, highpass, notch, or band).
We normally construct programs so that parameters such as the ones described above can be altered in the
PARAMETER area of the Harmonizer (like the factory presets you’ve probably already played with). Some things called
“userobject signals” are used in the construction of a program to create and organize menu pages of
parameters in the
The three paragraphs above capture the three cornerstones of program construction in the Harmonizer.
1. We must connect appropriate modules to achieve a desired, overall audio effect.
2. We must control the parameters of the modules in a program so that the desired audio effect is
achieved.
3. We must make some of the parameters available in the PARAMETER area so that the user can “tweak”
the program to fit a particular situation.
PARAMETER area.
output to the filter module, and the filter module’s output to
The Harmonizer
1999 Eventide, Inc.
Programmer’s Manual Page 4 of 97 Release 1.2.1
Page 7

The Harmonizer
Programmer’s Manual
Much complication will now be heaped upon the three cornerstones, but all of the complication is
introduced in order to achieve the goals set out in the three cornerstones! Don’t lose sight of the three
cornerstones, as they motivate everything that follows! Get it - cornerstones !
To gain a greater appreciation for what we are doing when we construct an the Harmonizer program,
consider the following analogy:
Computer programs basically compute things. The computer user however, is not directly involved in actual
computation (tha nk goodness). The user does direct the computer regarding what computations it should carry
out and receives the results of those computations through a “user interface." The user interface on a
computer is typically a monitor, a keyboard, and a mouse. The lucky individual who designs a computer
program on the other hand, needs to cons ider both the actual computations that the computer performs and
the way those computations will be controlled and displayed at the user interface.
By analogy, when you construct a program for the Harmonizer you must consider the actual audio
manipulations carried out by the program
controlled and displayed at the user interface
PARAMETER area in conjunction with the front panel keys and display. Don’t worry, constructing programs for the
Harmonizer is decidedly easier than even the easiest computer programming!
(cornerstones one and two) and the way those manipulations will be
(cornerstones two and th ree). In this context, the user interface is the
Unfortunately, we must discuss these two charges “bass ackwards." with user interface coming first and
actual audio manipulations coming second. The latter can’t be properly understood without the former.
you’ve ever learned a computer language, the first thing they teach you is how to print “Hello” on the monitor!)
But first we’ll take a brief detour and look at the different types of signals that interconnect modules in the
Harmonizer. After that, we’ll talk about the user interface.
(If
The Harmonizer Programmer’s Manual Page 5 of 97 Release 1.2.1
1999 Eventide, Inc.
Page 8

The Harmonizer
Different Kinds of Signals
To achieve the goals set out by the three cornerstones, we must employ four signal types. Signals connect
modules together. The four signal types are:
Audio Signals Used to pass full bandwidth audio between modules in accordance with cornerstone
one. Audio signals are represented numerically by a value between -1 and +1.
Control Signals Typically used to pass parameter values between modules in accordance with
cornerstone two. Control signals are low speed and are updated at a variable rate,
depending on how busy the Harmonizer is. Control signals are represented
numerically by a value between -32768.0 and +32767.999.
Mod Signals Used to pass “modulation signals” between modules. A “modulation signal” is a 1/4
bandwidth audio signal. Mod and audio signals may be interconnected, but not
without a loss of signal quality.
Although mod signals look like audio signals, they actually work to achieve
cornerstone two (controlling the parameters of a module). In some cases, control
signals are too slow to alter a parameter without “clicking” or “stuttering." For
instance, if you wanted to alter a delay time quickly to produce a flange effect, a
control signal might not be equal to the job. Thus certain modules (moddelay for
instance) come equipped with a mod input. Other modules (such as the low
frequency oscillator (LFO)) come equipped with a mod output. By interconnecting
the two, fast, smooth parameter adjustment can be executed that would defy control
signals.
Userobject Signals Used to pass
cornerstone three.
There exist module inputs and outputs for each of the four signal types. They are named (logically enough):
• audio inputs/outputs
• control inputs/outputs
• mod inputs/outputs
• userobject inputs/outputs
Only inputs and outputs of a similar type may be interconnected
module will only have those types of inputs/outputs that are pertinent to its function.
PARAMETER area menu page information in accordance with
Programmer’s Manual
(except for audio and mod inputs/outputs). A given
The Harmonizer
1999 Eventide, Inc.
Programmer’s Manual Page 6 of 97 Release 1.2.1
Page 9
The Harmonizer
Programmer’s Manual
HOW A PROGRAM INTERFACES WITH THE PARAMETER AREA
Simple Interface
Because you really shouldn’t be reading this manual if you haven’t
already read the User Guide, we’ll assume you’ve seen menu
pages in the
PARAMETER area.
A menu page, with an associated
SOFT KEY, is created by connecting a module’s userobject output to a
userobject input on something called the “head” module. Every program has one (and only one) head
module. The actual parameters that will appear on a menu page created this way depend on the module
being connected. They will usually be the values of all unconnected control inputs..
For example, consider the simple delay module connected to a filter module we started this chapter
out with
for these modules
we’ve connected their userobject outputs to the userobject inputs on the head module
the lower right corner. The observant user will spot that t he head “module” doesn’t really look like the other modules)
(again, as shown in VSigfile). Now that you’ve learned a little more, we’ve “unhidden” the control inputs
(the unconnect ed ones on the left) and the userobject outputs (the ones on the lower right). As you can see,
(the disembodied “1” and “2” in
.
If we run this program and go to the
PARAMETER area, we see
the screen to the right. A menu page exists for each module that
contains parameters pertinent to its functioning.
Note that the order of the connections to the head module’s userobject inputs dictates the order of the SOFT
.
KEYS
Constructing programs this way is fast and easy. Just concentrate on the audio connections and then
connect every modules’ userobject output to the head module. However, the user interface isn’t very “slick”
and may be cumbersome to use. That’s where “custom” interface construction comes in. . .
The Harmonizer Programmer’s Manual Page 7 of 97 Release 1.2.1
1999 Eventide, Inc.
Page 10

The Harmonizer
Programmer’s Manual
Custom Interface
There is one very special module that is used to create custom menu pages. It’s
called (appropriately) the menupage module. It has any number of userobject inputs
(the example shown to th e right has only one) and a single userobject output. The menupage
module will create a menu page out of the userobject outputs that are connected to it.
The menupage module is typically used with a special group of modules called the
“interface” group. Most of the modules in the interface group have a userobject output and
either a single control output or a single control input. The interface modules that have a
control output
(like the “knob” module shown to the right) are connected to the control input of
another module. The interface module then “takes over” that control input. Similarly,
interface modules that have a single control input
(like the “monitor” module shown to the right) are
connected to the control output of another module to display the value of that control
output.
create a user interface. Still others exist to manipulate control signals.)
(It should now be clear that not all modules exist to deal with audio. Many, such as the interface modules, exist to
For example, we could utilize two knob modules and a menupage module in the program we’ve been
working on. One knob module will take over the delay time control input on the delay module. The
second knob module will take over the
frequency control input on the filter module. The userobjects
of both knob modules are connected to the menupage module, which is in turn connected to the head
module.
When we run the program on the Harmonizer, the screen shown
to the right appears in the
PARAMETER area. Notice that the
order that the knob modules’ userobject outputs are connected to
the menupage module dictate their order on the menu page in
PARAMETER area.
the
Also notice that because the second knob module “took over”
the filter module’s
frequency control input, that parameter
no longer appears on the filter module’s menu page.
The Harmonizer
Programmer’s Manual Page 8 of 97 Release 1.2.1
1999 Eventide, Inc.
Page 11

The Harmonizer
The menu pages found in the factory presets were almost exclusively made with interface modules and
menupage modules.
Now that you have some understanding of audio signals, control signals, and userobject signals coupled with
an understanding of how they all play a role in making a program both functional and accessible from the
PARAMETER area, we can discuss modules in a little more depth.
Programmer’s Manual
The Harmonizer Programmer’s Manual Page 9 of 97 Release 1.2.1
1999 Eventide, Inc.
Page 12
The Harmonizer
Programmer’s Manual
MODULES
Modules are the magic that make the Harmonizer shine. They are signal processing “nuggets” that are
interconnected (via the signals discussed above). Before we discuss aspects of the typical modules like the
delay module, the filter module, the pitch shifter module, etc., we need to look at the more
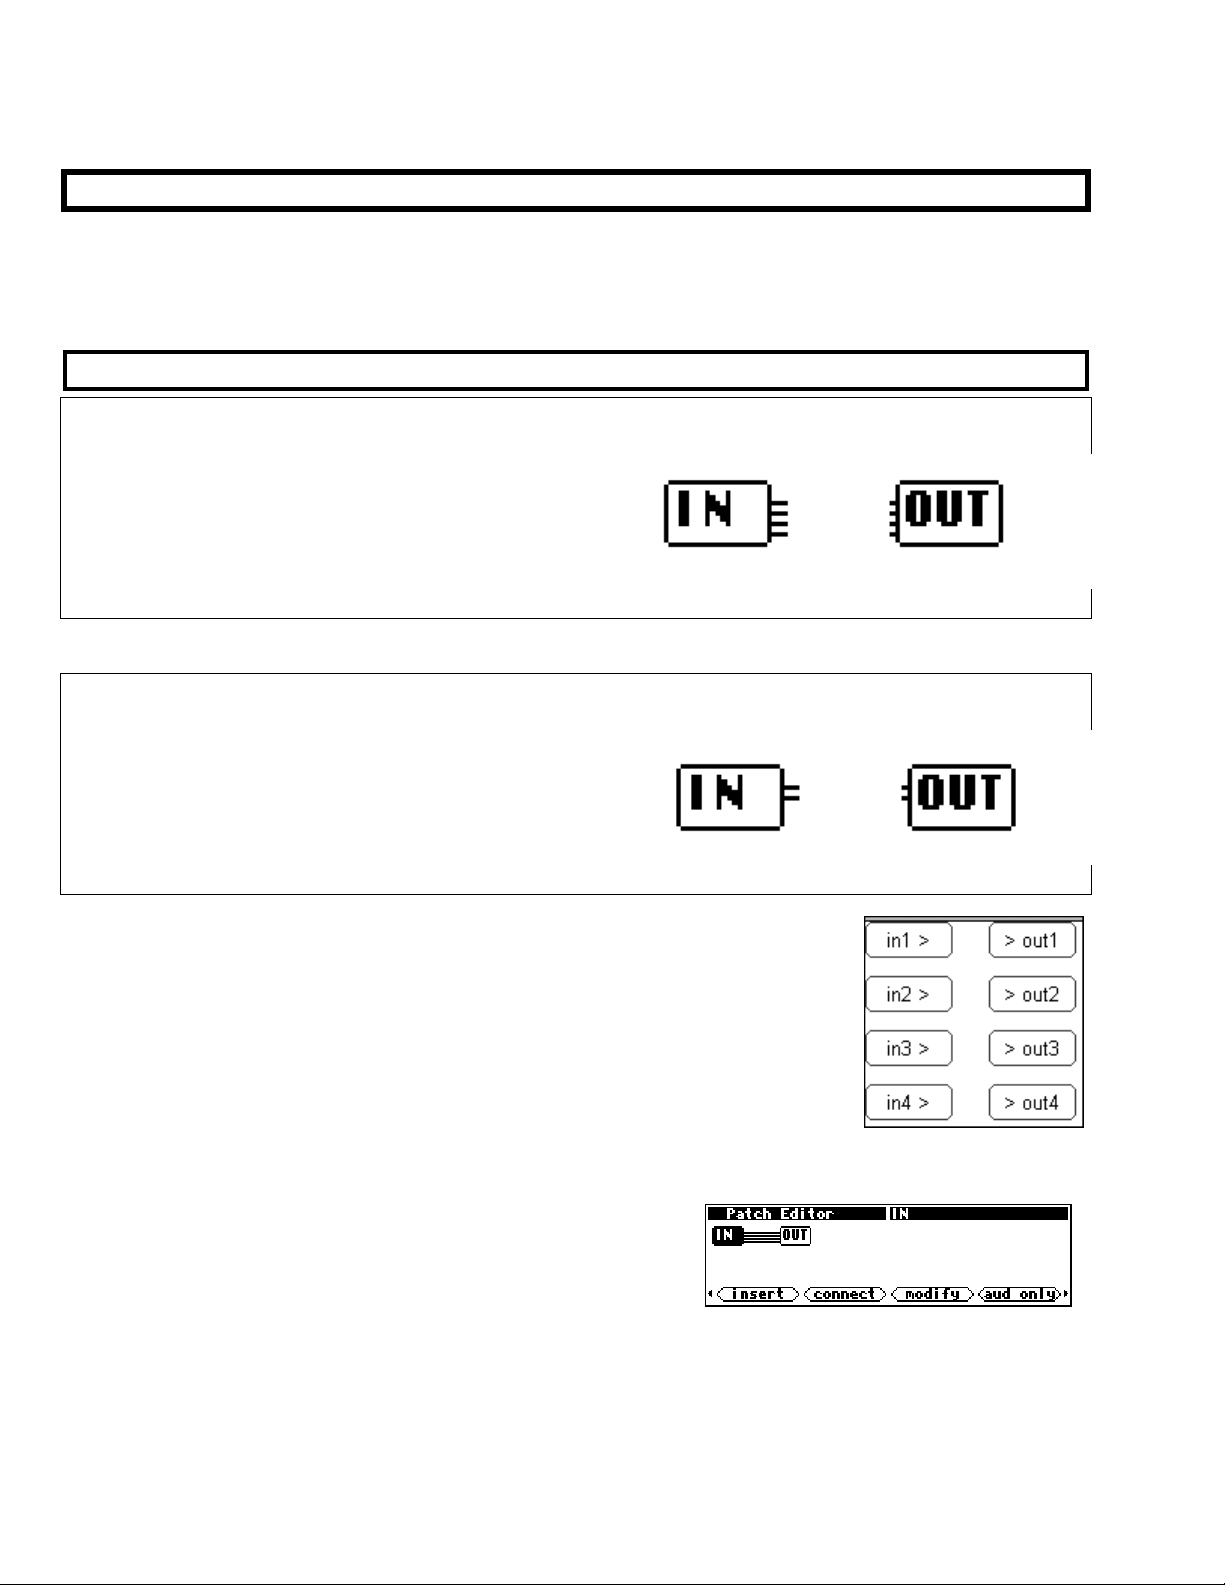
specialized IN and OUT “modules."
The IN and OUT “Modules”
Orville
Orville’s programs are loaded and run one at a time on a given DSP. The DSP running the program
provides the program with four channels of input audio
(where that input audio comes from is a function of the
routing configuration, see the Harmonizer’s User Manual).
The DSP running the program also takes the four channels
of output audio from the program (where it is subsequently
sent is again a function of the routing configuration).
DSP7000
The DSP7000’s programs are loaded and run on its single DSP. The DSP provides the program with two
channels of input audio and takes two channels of output
audio from the program. The remainder of this manual will
show Orville-style four channel processing, but the idea is
the same with the DSP7000’s two channels. If you send a
program that has more than two inputs or outputs to your
DSP7000 from VSigfile, it will not be accepted.
The input audio and output audio connections to the program are handled through
a pair of pre-defined modules called IN and OUT.
The IN module has up to four signals to send to the program, labeled 1, 2, 3, and
4. Since these signals are coming from the module, they are called
outputs of the
module. A small amount of confusion might result because the IN module has
outputs. Similarly, the OUT module has inputs labeled 1, 2, 3, and 4. This
difficulty is minor compared to the gain in consistency created by using the word
output to refer to all signals that come from a module, and using the word input
to refer to all signals that go into a module.
In the simplest of conceivable programs, the IN module’s
outputs are connected directly to the OUT module’s inputs
(this is the
Thru’ program in bank 0). Normally, other, optional
modules are inserted in-between the IN and OUT modules.
The IN and OUT modules always remain as part of the program.
The Harmonizer
Programmer’s Manual Page 10 of 97 Release 1.2.1
1999 Eventide, Inc.
Page 13
The Harmonizer
The Characteristics of Modules
There are several characteristics associated with any module. All modules have:
• a module type
• a module name
Modules use memory and processing resources that can be divided into the following groups:
• audio memory
• signal processing
• user interface and control signal memory
• control processing
Different types of modules use different amounts of these resources.
Modules that have audio inputs and outputs introduce a six-sample delay in the processed signal.
More complex modules have some or all of these items:
• specifiers
• audio inputs (and/or mod inputs)
• audio outputs (and/or mod outputs)
• control inputs
• control outputs
• userobject outputs
• userobject inputs
The following sections will discuss all of these attributes in depth. . .
Programmer’s Manual
M
ODULE TYPE
There are many kinds of modules at our disposal. The “module type” simply defines a module as being a
particular kind of module. When a module is added to a program, it is selected by module type. Once
added, the module type cannot be changed. If a different module type is needed, the “offending” module
must be deleted and then the correct module type must be added anew.
The Modules section in this manual is sorted by module type. When a module is mentioned in this
document, it is referred to by module type. For example, a module whose module type is “samphold”
would be referred to as a samphold module.
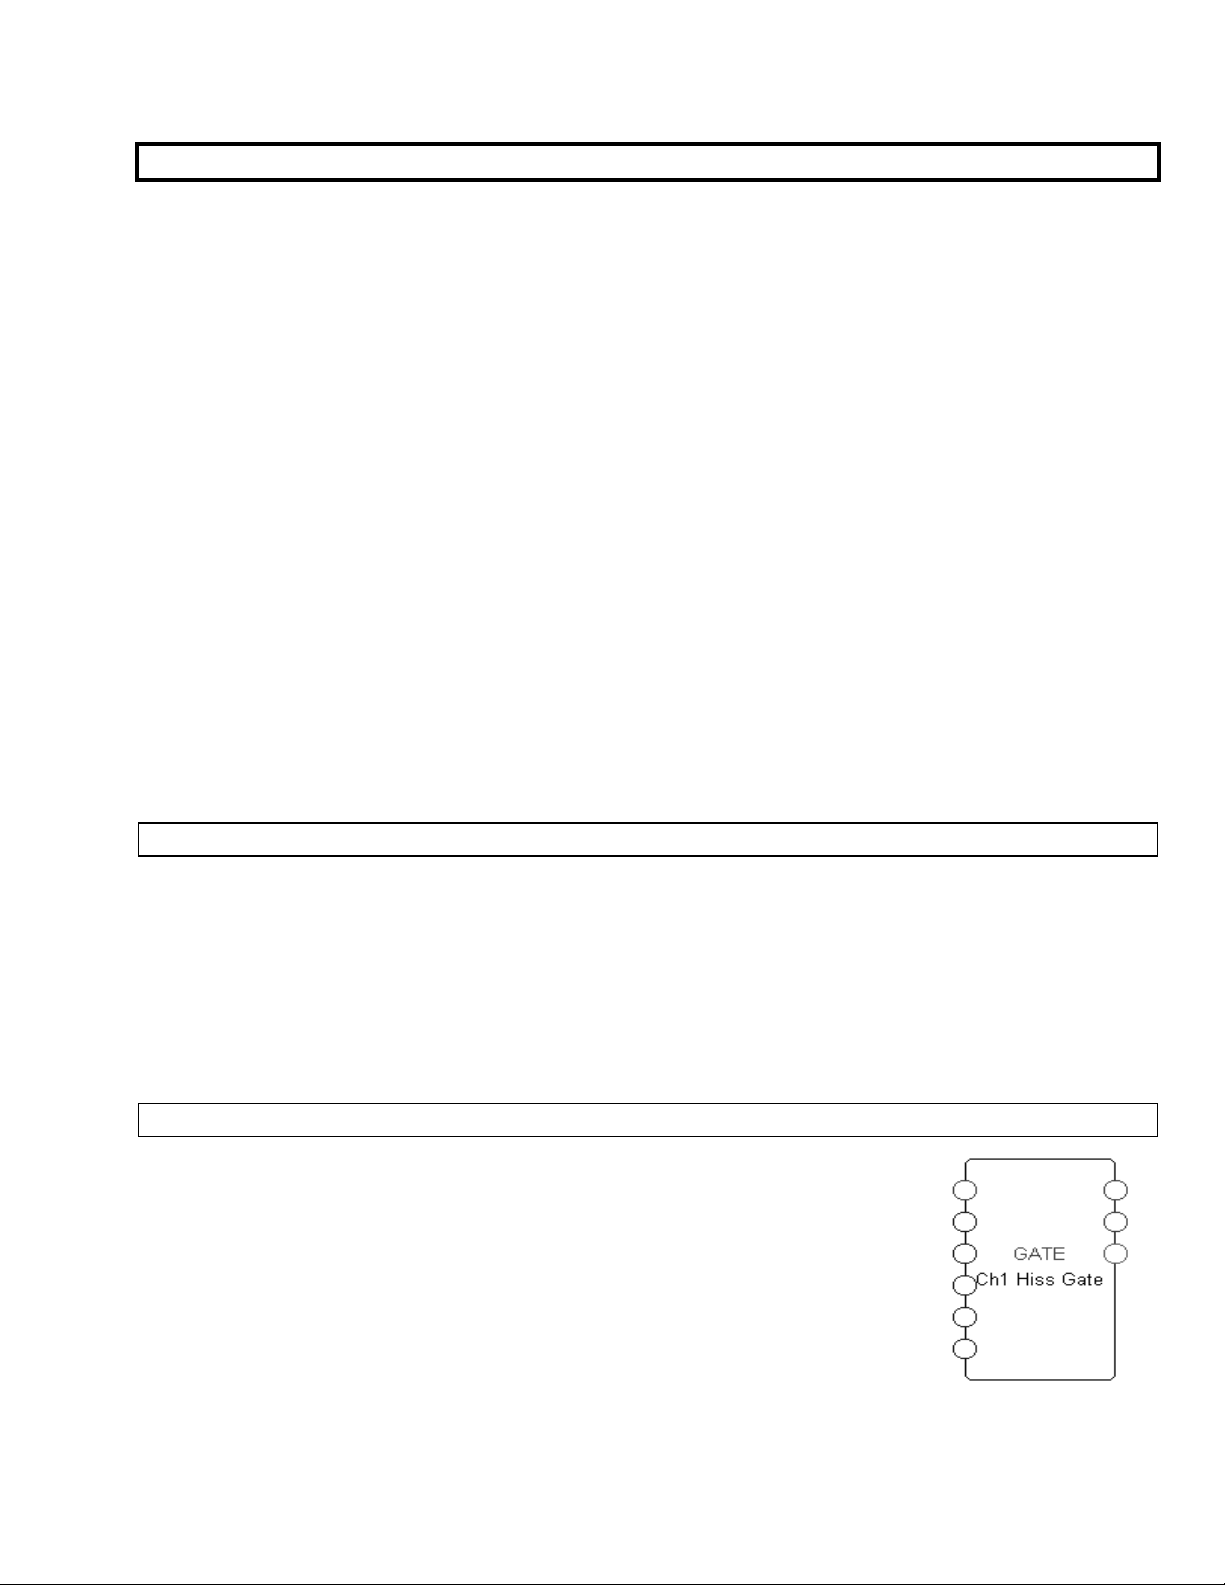
MODULE NAME
The module name is a text string that is stored with a particular module. It is
helpful to change the module name immediately after adding a module so that
modules of the same type can be told apart. Choose a name that reflects both the
purpose of the module within the patch, and the module type. The name may be up
to 18 characters in length. To the right we see gate type module named “Ch1 Hiss
Gate."
The Harmonizer Programmer’s Manual Page 11 of 97 Release 1.2.1
1999 Eventide, Inc.
Page 14

The Harmonizer
Programmer’s Manual
ESOURCES
R
A resource is something that is needed for the operation of a Harmonizer program -there are several
different kinds of resources. A program cannot run if it needs more of a particular resource than is
available.
Audio memory
Modules that store audio for brief periods of time use audio memory. Modules that use audio memory
include modules in the delay, filter, pitch shift, and reverb groups. Some modules contain “specifiers”
(see below)
that increase or decrease the amount of audio memory used by either varying the number of audio channels
or by specifying the amount of delay explicitly.
Signal Processing
Modules that perform operations on audio use signal processing. The amount of processing performed by a module can only be changed via specifiers (see below.) This is important, as the amount of signal processing that can be done in any given period is finite. Modules that perform complex effects on audio use more processing than those that perform simple effects. For example, the reverb_a module uses more processing power than the delay module, even though the delay module might use more audio memory.
User Interface and Control Signal Memory
Interface memory includes memory used to store text, adjustable range limits, default values, control inputs,
control outputs, and any data used by “control” modules. Modules that use text fields consume a large
amount of this kind of memory. For instance, it is possible to use up all of the user interface memory with
just two textblock modules if each contains enough lines of text (See the Modules Section for a closer
look at the textblock module).
Control Processing
Control processing is a resource that cannot be exhausted, though it can be strained. The Harmonizer will
repetitively process everything that comes under the control process category as often as possible. Control
operations will get slower as more operations are required. For instance, if a single menu page has eight
values displayed that are all changing rapidly, the display may appear to update slowly. Typically, control
values are updated about 100 times a second.
PECIFIERS
S
A specifier is a control that affects a module's behavior. For example, a delay module might have a specifier
that sets the maximum delay time a user can enter. A pitchshifter module might have a specifier that
sets the number of pitchshifting voices used by the module. A module may have several specifiers.
Specifiers are only
PARAMETER area). There is no input or output for specifiers; they reside “inside” a module (you’ll learn how
adjustable in the Patch Editor area or in VSigfile (i.e. specifiers can never be altered in the
to access the “inside” of a module in the VSigfile or Patch Editor chapters).
Specifiers have the following features:
• they are extremely efficient in terms of resources. (A module with a specifier for a given characteristic is
more efficient than a module with a control input for that characteristic.)
• they can change the amount of resources that a module needs.
The Harmonizer
Programmer’s Manual Page 12 of 97 Release 1.2.1
1999 Eventide, Inc.
Page 15

The Harmonizer
Programmer’s Manual
• they can change the number of audio, mod, and control inputs and outputs, or even the number of
other specifiers (!) for a module.
• they can be numerical, multiple choice, or text.
The Modules Section in this manual lists all of the module types and their associated specifiers.
UDIO INPUTS
A
An audio input is used to pass high fidelity audio into a module. An audio input can be connected to at
most one audio or mod output. Unconnected audio inputs are actually attached to a special “null signal”
provided by the Harmonizer's operating system. The null signal simulates a zero voltage, noise-free audio
source. Audio signals range if value from -1 to +1, or full negative to full positive. Audio inputs are always
found on the left side of modules.
A
UDIO OUTPUTS
An audio output is used to pass high fidelity audio out of a module. An audio output may be connected to
any number of audio or mod inputs. Audio outputs are always found on the right side of modules.
ONTROL INPUTS
C
One module can control the parameter of a second module by connecting to the second module’s control
(as we saw the knob modules doing in the “Custom Interface” section). The range of values a control input can accept may
input
be set by a specifier, by fixed internal programming, or even by another control input. A few notes concerning
control inputs:
• Control inputs are always found on the left side of a module.
• The value of a control input cannot change the amount of resources used by a module.
• The existence of a control input takes up processing and memory resources. In modules with a variable
number of control inputs (like the c_switch module), reducing the number of inputs reduces the amount
of resources used. (In such modules, specifiers control the number of control inputs.)
• Control inputs can be connected to only one control output.
CONTROL OUTPUTS
A control output sends a numerical value to another module by connecting to one of the other module’s
control inputs. A single control output can connect to any number of control inputs. Control outputs are
always found on the right side of a module.
OD INPUTS
M
A mod input is used to pass a high performance modulation signal into a module. A mod input may be
connected to at most one audio or mod output. Unconnected mod inputs are actually attached to a special
“null signal” provided by the Harmonizer's operating system. The null signal simulates a zero voltage,
noise-free audio source. Mod signals range if value from -1 to +1, or full negative to full positive. Mod
inputs are always found on the left side of a module.
Although mod signals are high performance modulation signals, they kind of stink at passing audio signals
(they were never really meant t o! Remember, they act to achieve cornerstone two - to control the parameters of modules). An audio signal passed
through a mod in/mod out on a module will lose fidelity. This is because the sampling rate used for mod
signals is 1/4 that used for audio signals.
signals might be right up your alley!)
(Of course if you go for that retro, “aliasing." dawn-of-the-samplers kind of sound, mod
The Harmonizer Programmer’s Manual Page 13 of 97 Release 1.2.1
1999 Eventide, Inc.
Page 16

The Harmonizer
Programmer’s Manual
OD OUTPUTS
M
A mod output is used to pass a high performance modulation signal from a module. A mod output may be
connected to any number of audio or mod inputs. Mod outputs are always found on the right side of a
module. See the comments made immediately above concerning the “low-fi” status of mod signals.
U
SEROBJECT OUTPUTS
Most modules have a userobject output. The userobject output can be connected to the userobject input on a
menupage module, the head module, or a gang module. Such a connection will allow the module’s
parameters to be accessible in the
PARAMETER area. The existence or use of a userobject does not affect
system resources or memory. This means that menu pages can be created without using much in the way of
resources or program memory.
In VSigfile, userobject outputs are always found on the right side of a module. In the Patch Editor area,
userobject outputs are not explicitly shown.
SEROBJECT INPUTS
U
A handful of modules (gang, head, and menupage) have userobject inputs. This means that these
modules can accept as inputs other modules’ userobject outputs. For instance, a menupage module may be
used to create a
PARAMETER area menu page by accepting the userobjects of other modules.
In VSigfile, userobject inputs are always found on the left side of a module. In the Patch Editor area, userobject
inputs are not explicitly shown.
The Harmonizer
Programmer’s Manual Page 14 of 97 Release 1.2.1
1999 Eventide, Inc.
Page 17

The Harmonizer
OK, so that completes our birds-eye view of the program construction process. Recall that all of our
constructing is done to satisfy the three so-called “cornerstones”:
1. We must connect appropriate modules to achieve a desired, overall audio effect.
This is achieved by connecting audio-manipulating modules via audio signals. The “heart” of the
program lies in its audio construction.
2. We must control the parameters of the modules in a program so that the desired audio effect is achieved.
This is achieved by using mod signals and control signals to alter the parameters of the audiomanipulating modules.
3. We must make some of the parameters available in the PARAMETER area so that the user can “tweak” the program to
fit a particular situation.
This is achieved by connecting userobject outputs to the head module. Additionally, menupage
modules may be used in conjunction with interface modules to create custom menu pages.
That completes the theory of program construction, but much remains in the way of execution. We’ll cover
that in the VSigfile Chapter and the Patch Editor Chapter. You should now proceed to either the VSigfile
Chapter or
can use with VSigfile, you really ought to use it (see the VSigfile Chapter for system requirements). VSigfile is decidedly
easier to use than the Patch Editor area, especially for constructing large programs.
the Patch Editor Chapter, depending on which you plan to use. If you have a computer that you
Programmer’s Manual
WRAP UP
The Harmonizer Programmer’s Manual Page 15 of 97 Release 1.2.1
1999 Eventide, Inc.
Page 18
The Harmonizer
Programmer’s Manual
VSIGFILE
System Requirements and Background Knowledge Required
To run VSigfile, you will need a PC-compatible running Microsoft Windows 3.1, 3.11, 95, 98, NT3.51, or
NT4.0, fitted with a minimum of 8M ram (16M for NT). Macintosh users have had some success running
Vsigfile under the "Virtual PC" Windows emulator, but Eventide is unable to assist in replicating this
operation.
To communicate with the Harmonizer you need either a Windows supported MIDI interface (typically
Creative Technology’s “Soundblaster”) or an IBM PC type RS232 serial port. You can create programs on
VSigfile without the Harmonizer connected, but you can’t run them on the Harmonizer until they’re
uploaded (and this, of course, requires connecting the Harmonizer to your computer!).
This chapter assumes that you’re familiar with the operation of a PC and with the Windows operating
environment and that you’ve read the User’s Manual and the General Principles Chapters in this manual.
COMMUNICATIONS
You will create programs in VSigfile and then send them to the Harmonizer to be run, or you will receive
programs from the Harmonizer to edit in VSigfile. Either way, there needs to be a communications link
between VSigfile and the Harmonizer. You have your choice of a MIDI connection or a serial port
connection. We’ll look at each in turn.
Establishing a MIDI Connection
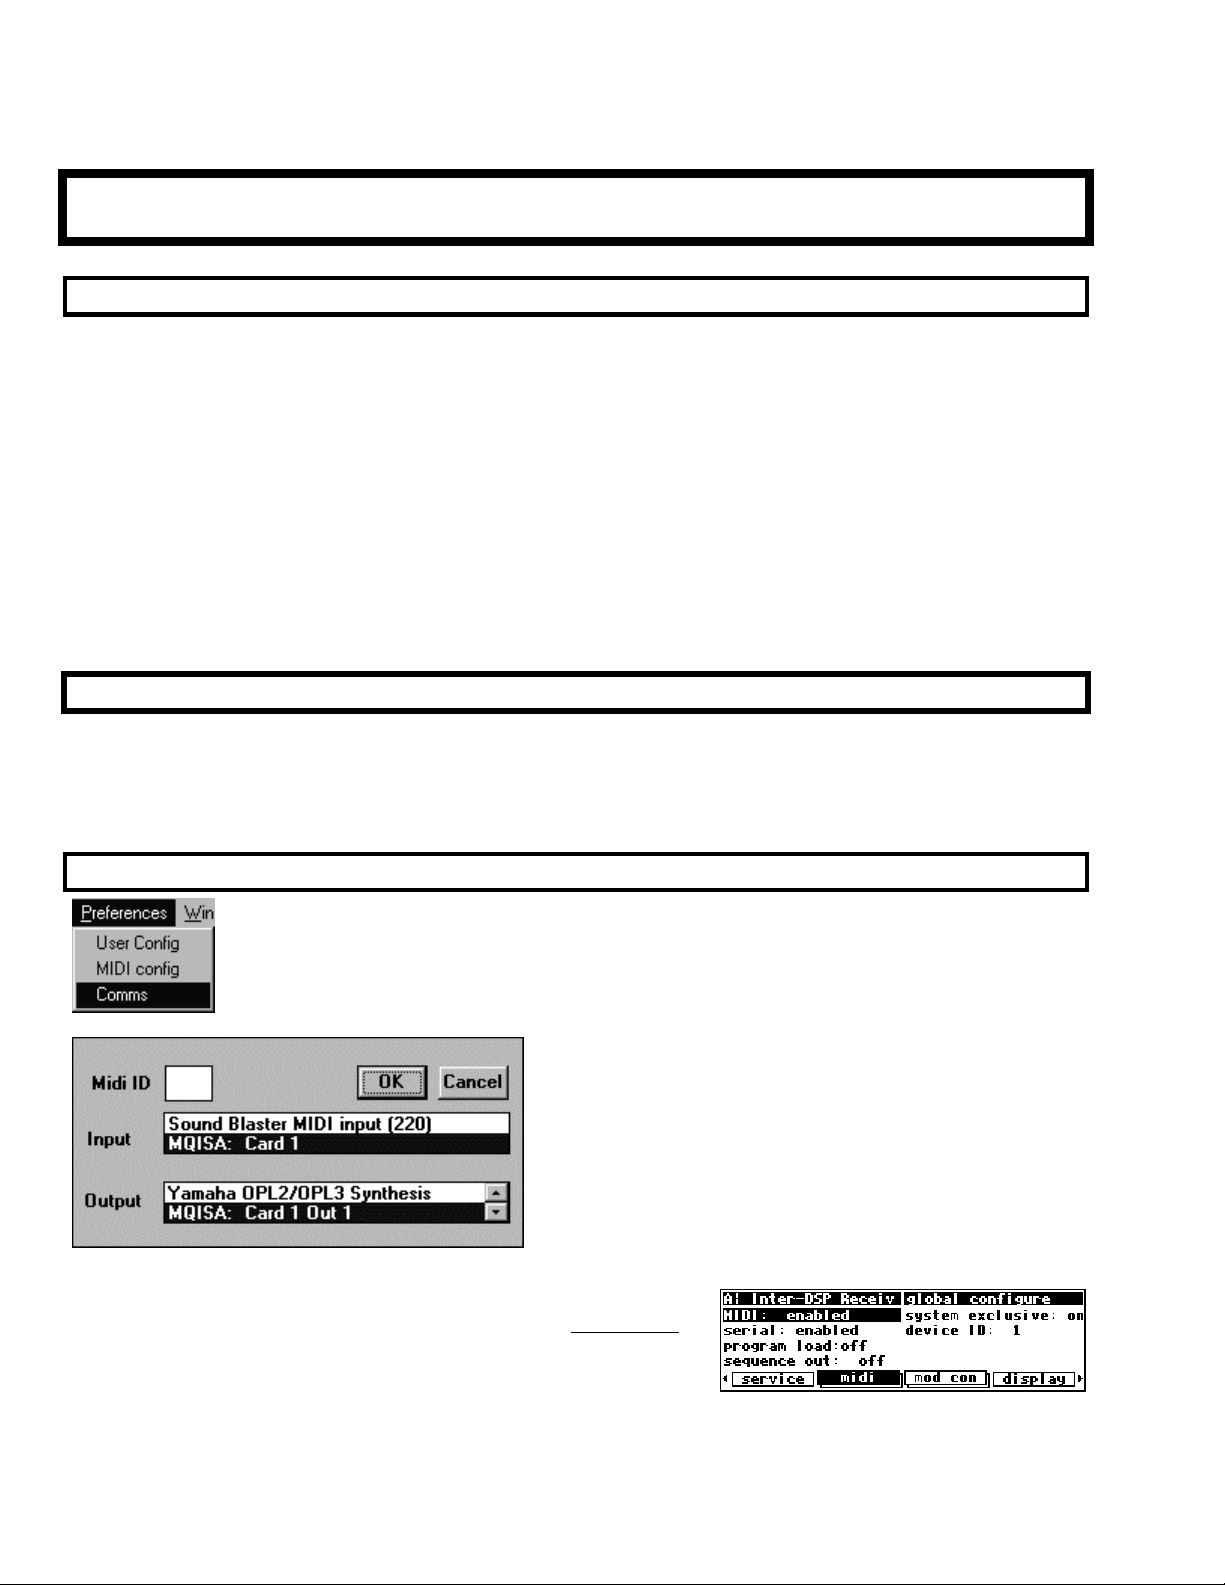
Assuming you’ve launched VSigfile, choose Comms under the Preferences menu. Choose
MIDI as the Comms Type in the dialog box that opens.
Then choose MIDI config.
The dialog box that opens allows you to select an input
interface and an output interface from the possibilities
that exist on your particular computer. Select the
interface(s) you want to use. Make sure that the output
goes to the external MIDI socket, not to the internal
(usually wavetable) synthesizer.
You will need to connect the MIDI Output on the Harmonizer to
your chosen MIDI Input interface on your computer and vice versa
One way communication is not sufficient.
.
The Harmonizer
1999 Eventide, Inc.
Programmer’s Manual Page 16 of 97 Release 1.2.1
Page 19
The Harmonizer
Programmer’s Manual
On the Harmonizer, ensure that MIDI is enabled and system
exclusive
menu page in the
is on. You will find these parameters on the [midi]
SETUP area.
If you find that your PC is “unhappy” about the speed of
transmission (as in “it’s too fast!”), lower the
parameter on the “second”
[midi] menu page in the SETUP area.
sysex speed
This will dumb down the Harmonizer’s transmission speed.
Establishing a Serial Connection
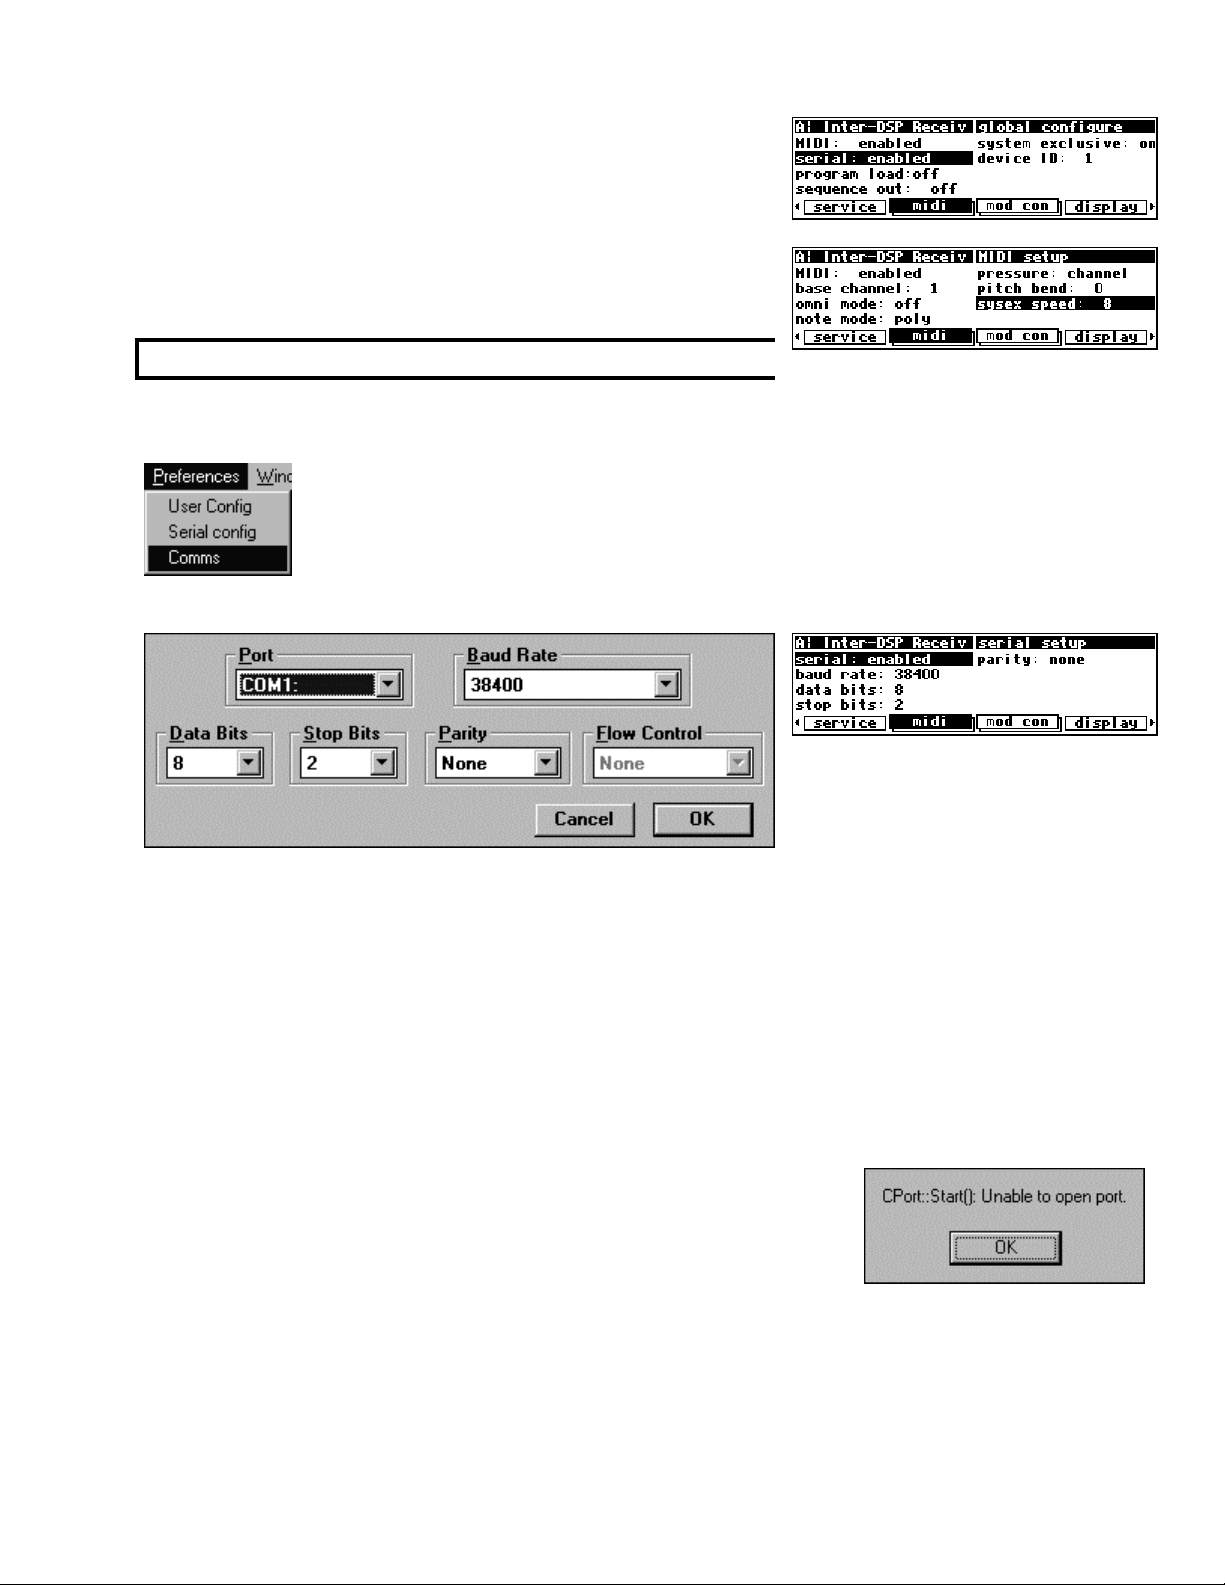
Assuming you’ve launched VSigfile, choose Comms under the Preferences menu.
Choose Serial as the Comms Type in the dialog box that opens.
Choose Serial Config to select the comms port you would like to use.
You must also ensure that the
Harmonizer and VSigfile. These parameters are found on the “third”
baud rate, the data bi ts, the stop bits, and the parity agree on the
[midi] menu page in the SETUP area
in the Harmonizer (as shown above right) and in Serial Config under the Preferences menu in VSigfile (as
shown above left) . The higher you set the
baud rate the faster the communication will be between the
Harmonizer and your computer. However, most computers have a ceiling above which errors occur. You
should set the baud rate as high as you can (on both machines) without incurring errors. On the
Harmonizer, ensure that
on the
[midi] menu page in the SETUP area.
serial is enabled and system exclusive is on. You will find these parameters
Connect your computer’s serial port to the Harmonizer’s serial port and ensure that no other device on your
computer is hogging the comms port (the modem is a common offender on the author’s computer).
If VSigfile is unable to access its assigned comms port, you will get the
message shown to the right. It means that there is a device (or another
program) hogging the comms port or that there is something wrong with
the selected comms port. Either way, you’ve got a problem to ferret out.
VSigfile will itself hog the comms port. To “disconnect” VSigfile from the comms port (so that you can
use another device), choose Disconnect from the Midi menu.
The Harmonizer Programmer’s Manual Page 17 of 97 Release 1.2.1
1999 Eventide, Inc.
Page 20

The Harmonizer
BASIC FUNCTIONS
All right, so now you have VSigfile communicating with the Harmonizer (you do,
don’t you?). Now we can take a look at how we actually add, connect, and
manipulate modules in VSigfile.
Before we look at anything, verify that the View menu is “checked” as shown to the
right. That way, the structures we describe will be visible to you.
In VSigfile, signals are color coded:
• audio and mod inputs, outputs, and signals are coded green.
• control inputs, outputs, and signals are coded blue.
• userobject inputs, outputs, and signals are coded pink.
•
The black and white (damn!) screen capture shown to the right is similar to
Programmer’s Manual
what you should see if you were to begin a new file (by pressing the
button). The green
to the DSP that will eventually run the program. The blue
the left correspond to the “global” control
corresponds to the first userobject
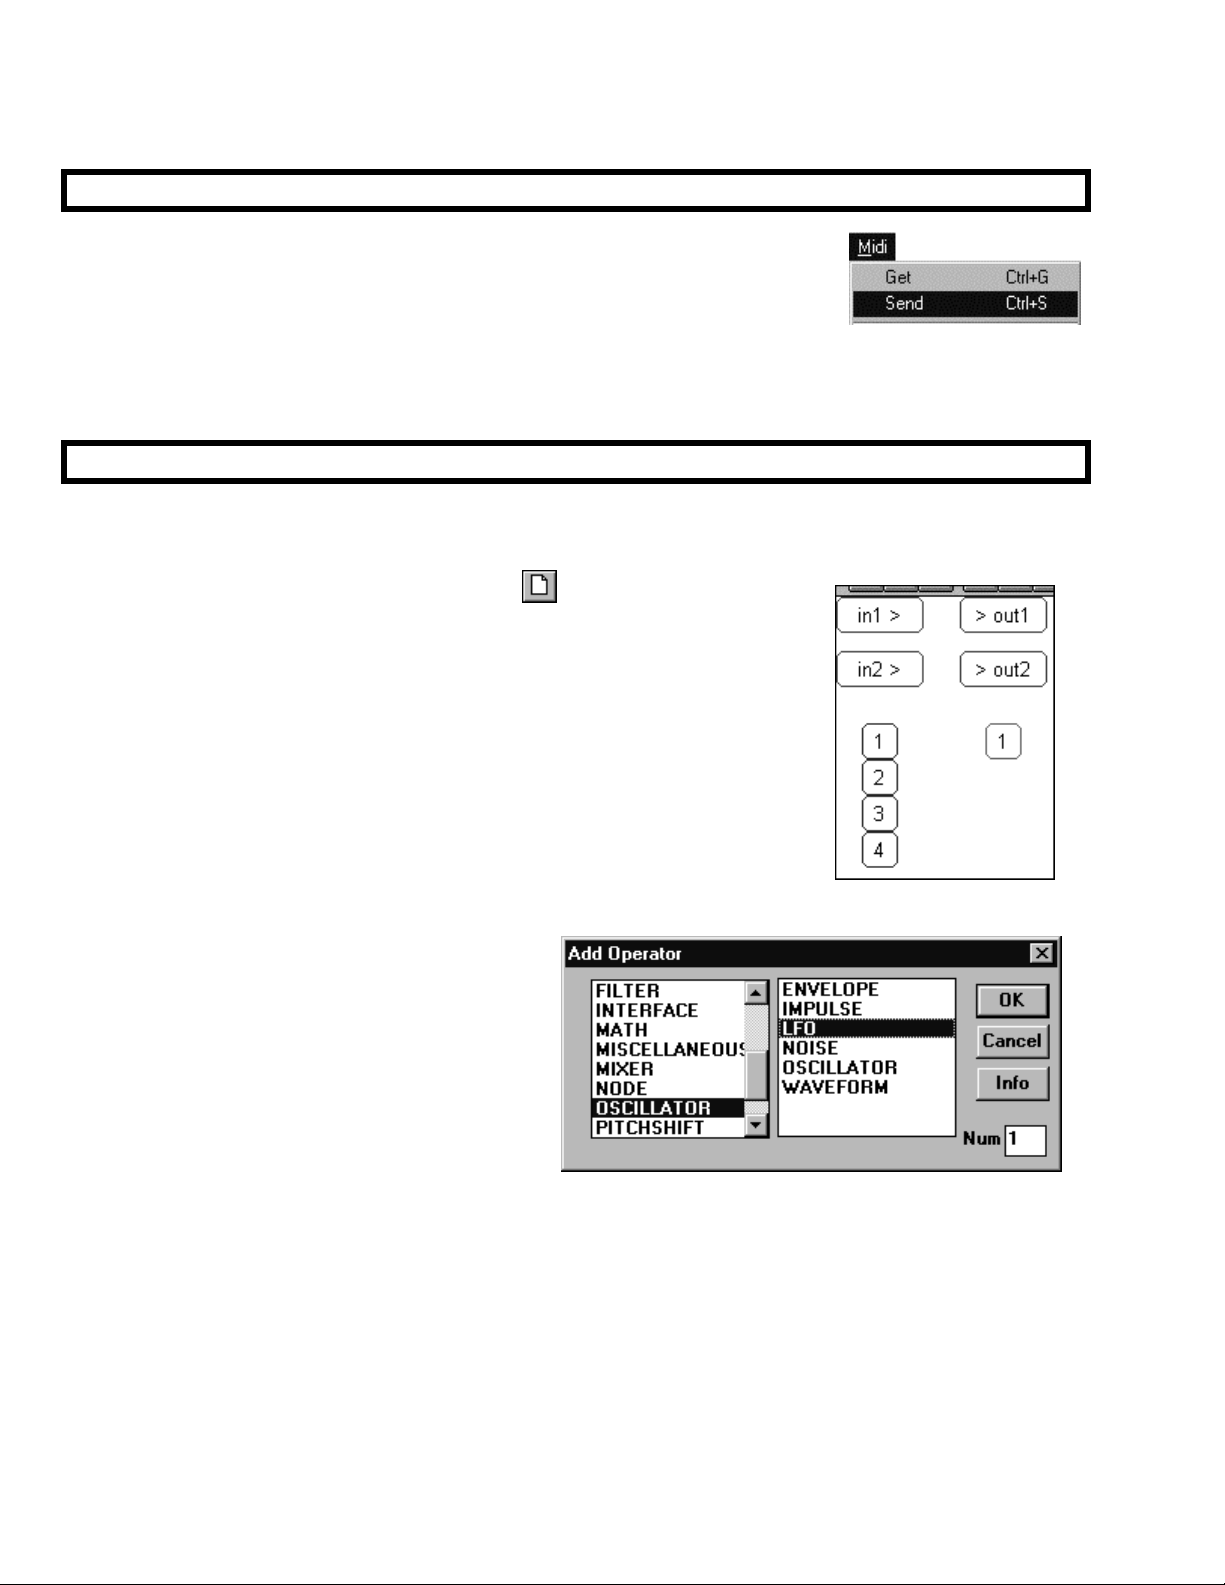
Use the Add Module command found under the Edit
menu to add modules to a program. The dialog box
shown to the right opens. The left side of the box
selects a group (a collection of similar modules) and
the right side selects a module type inside that group.
Additionally, you can change the Num field to insert
more than one instance of a particular kind of
module. Go ahead and insert a IIR module from
the “Filter” group as shown above.
“ins and outs” correspond to the audio inputs and outputs
“1, 2, 3, and 4” on
outputs. The pink “1” on the right
input on the head module.
Adding Modules
The Harmonizer
1999 Eventide, Inc.
Programmer’s Manual Page 18 of 97 Release 1.2.1
Page 21
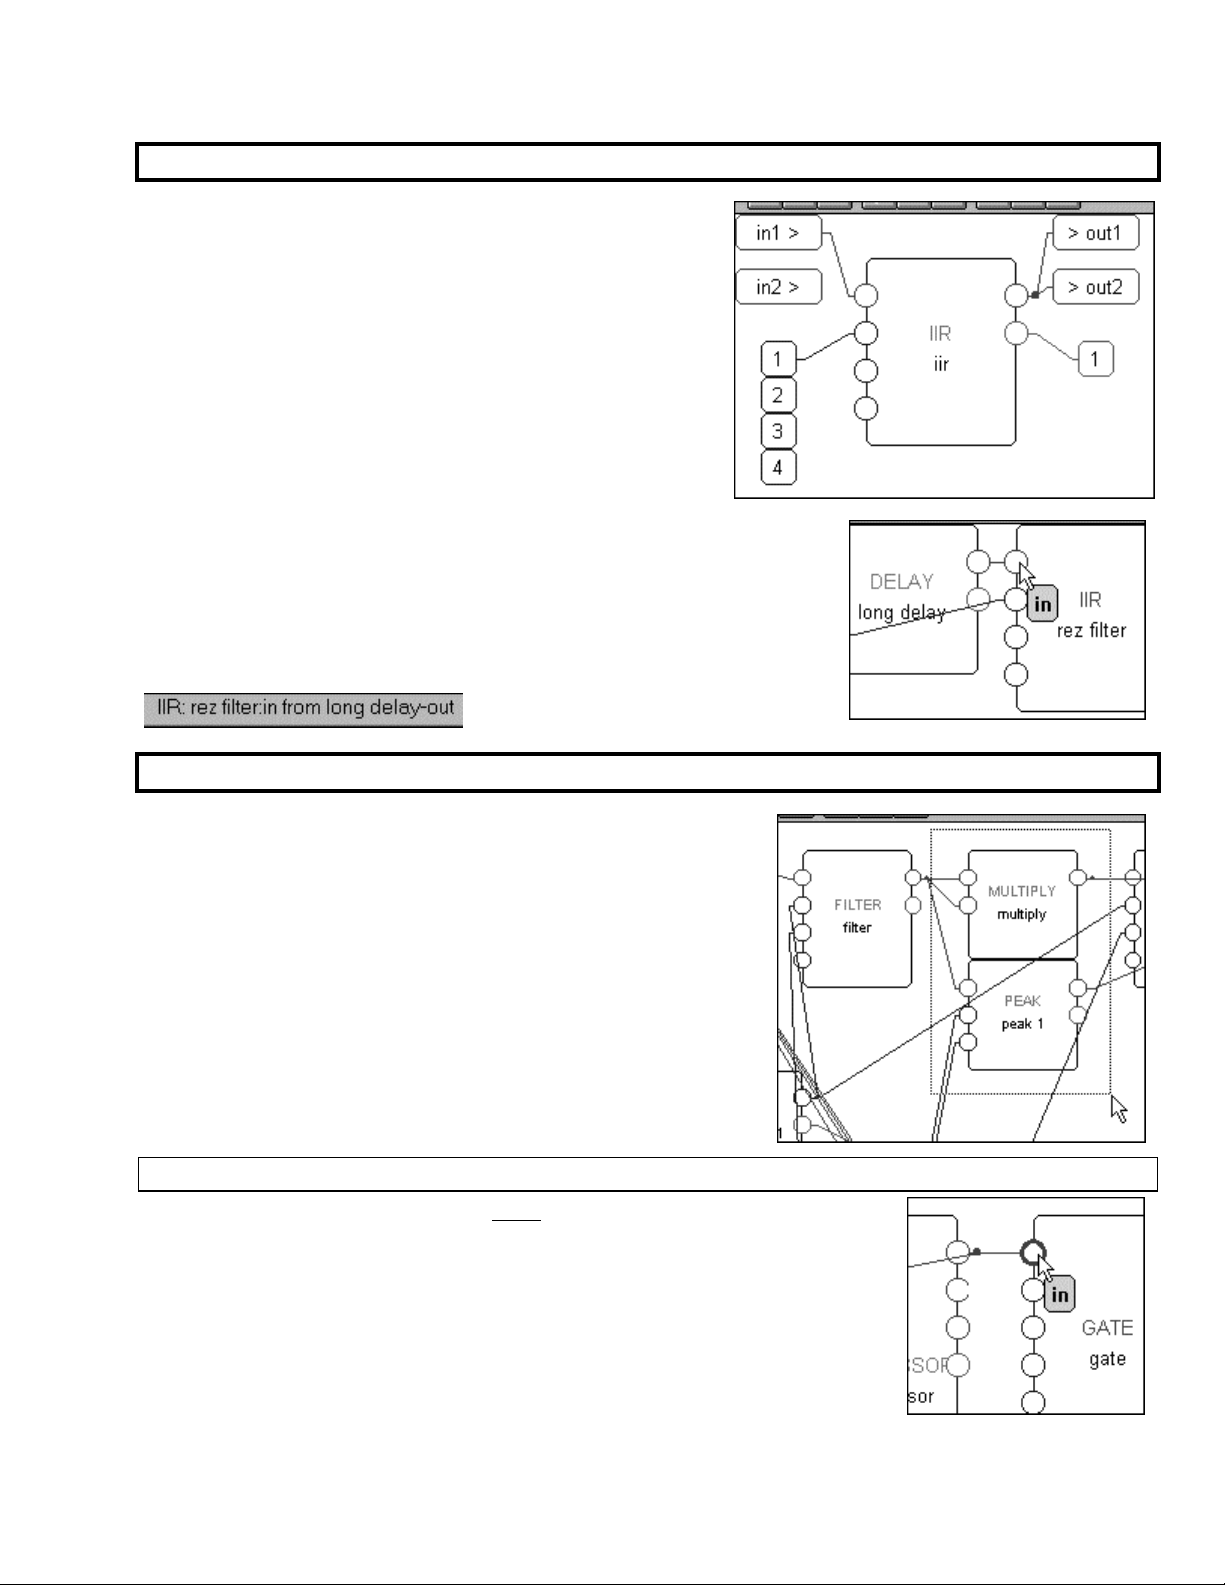
The Harmonizer
To connect an input to an output simply click on the input
or output you want to start with, drag to the output or input
you want to connect to, and release. Go ahead and connect
the IIR module to the other stuff as shown to the right.
Also note that when you “hover” the pointer over an input or output for
a second, a “bubble” appears that describes what that input or output is.
Additionally, the lower left corner of the VSigfile window displays the
Module type you are hovering over, its name, the input/output name,
and what it is connected to (if anything).
Programmer’s Manual
Connecting Modules
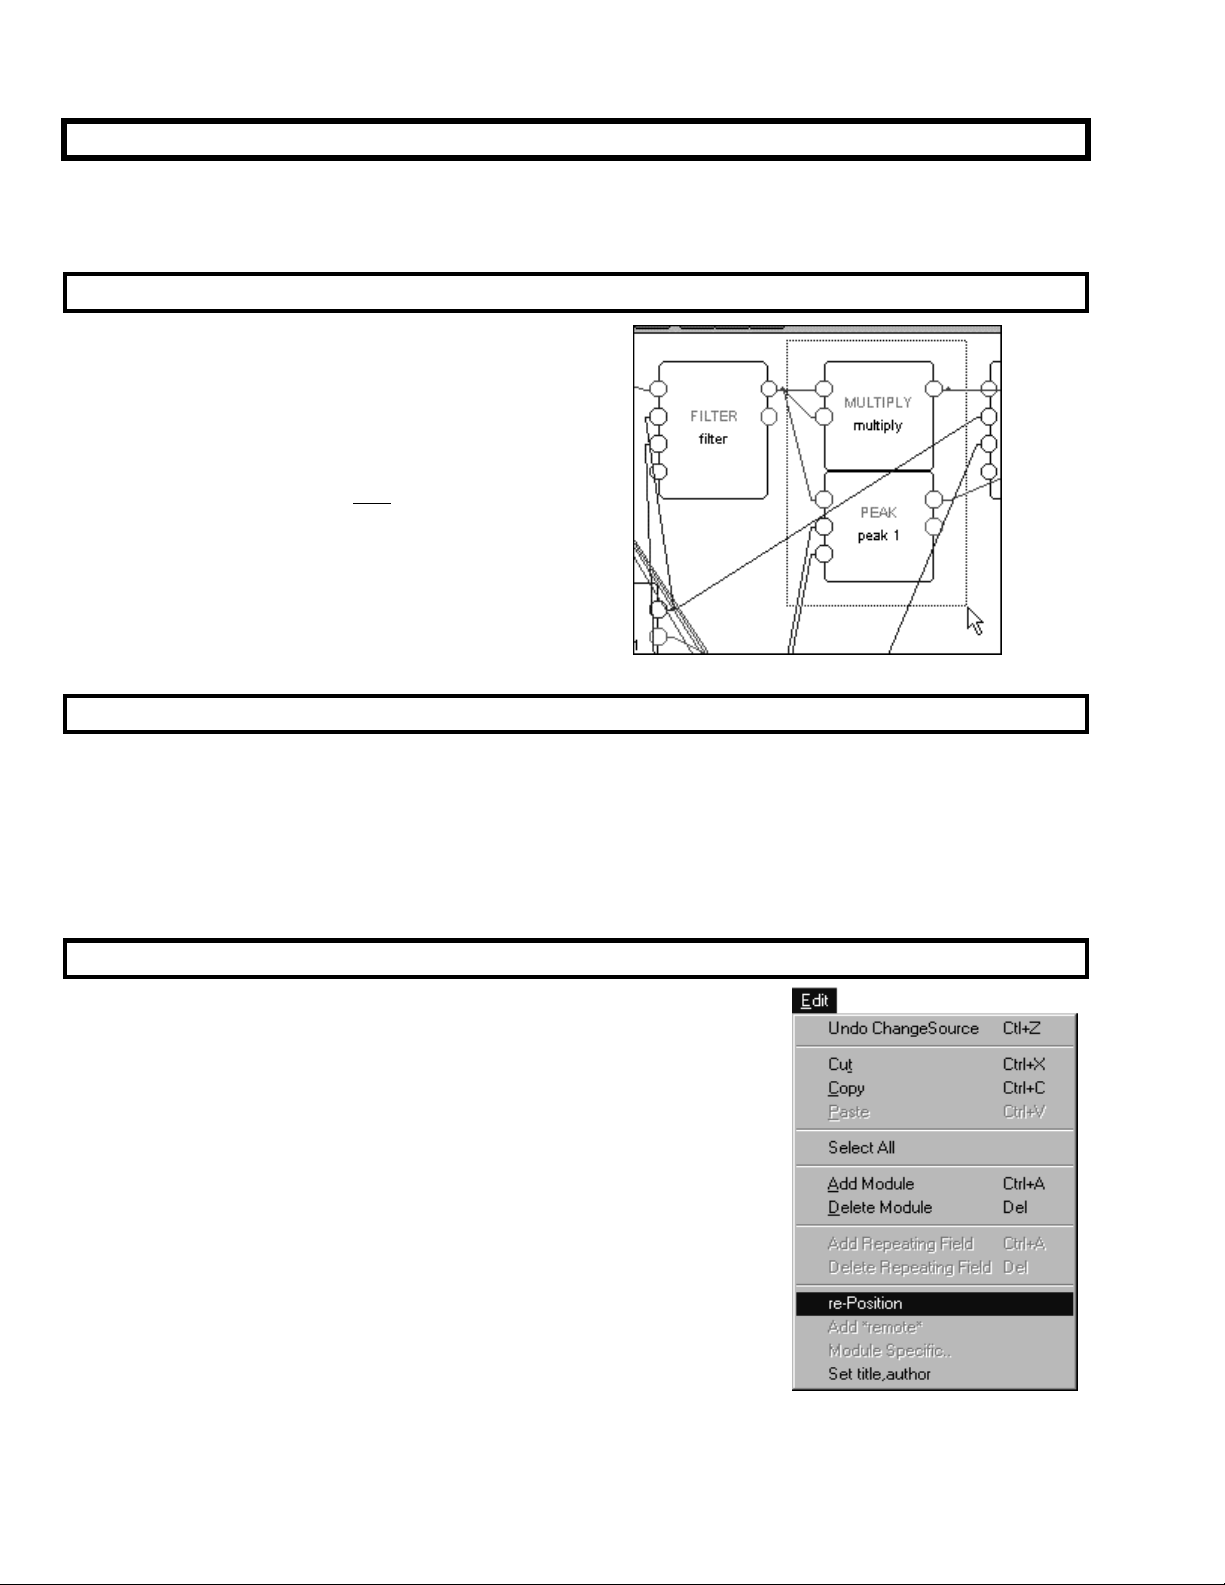
Deleting Modules
To delete modules, first select the module slated for deletion by
clicking on it (its module type name will turn red). Then press the
“Delete” key on the keyboard or select the Delete Module
command from the Edit menu.
To delete more that one module at a time, just click and drag over
the area that contains the modules you would like to delete (in the
screen capture to the right, the multiply and the peak modules are being selected)
the modules that you select will have red module type names.
Then press the “Delete” key on the keyboard or select the Delete
Module command from the Edit menu.
UNPLUGGING CONNECTIONS
To unplug a connection, click on the input that terminates the connection and
press the “Delete” key on the keyboard. Away it goes. . .
. All of
The Harmonizer Programmer’s Manual Page 19 of 97 Release 1.2.1
1999 Eventide, Inc.
Page 22
The Harmonizer
Programmer’s Manual
DISPLAY FUNCTIONS
Now that you can add modules, we can discuss a few of the display-related features of VSigfile. These
functions don’t have anything to do with the actual construction of a program; they simply make it easier to
view and manipulate the display.
Selecting Modules
A single module can be selected by clicking on it. Several
modules can be selected simultaneously by clicking and
dragging over the area on the screen that contains the
desired modules
(as shown to the right) or by clicking on all of
the desired modules while pressing the “Shift” key on the
keyboard. The selected module or modules will have red
module type names
.
names)
(modules that aren’t selected have gray module type
Moving Modules
You can move modules around on the screen at will. Doing so can help to make a patch more “viewable."
Simply click on the module you want to move and drag it to its new position. All of a module’s connections
will stay with the module.
To move more than one module at a time, first select the modules you would like to move. All of the
selected modules will have red module type names. Then click on any one of the selected modules and drag
the whole bunch to its new location.
Re-Positioning Modules
To make a patch more “viewable." a function under the Edit menu exists
that automatically re-Positions all of the modules on the screen. There are
times when this is very useful; particularly when you’ve downloaded a
program from the Harmonizer to work with on VSigfile. There are other
times where using re-Position will just make things less “viewable."
Trouble is, the re-Position function is not “Undoable” (see below). As a work-
around, Save a program just before you use the re-Position function. If the
result is worse than the original, simply reopen the saved version.
The Harmonizer
Programmer’s Manual Page 20 of 97 Release 1.2.1
1999 Eventide, Inc.
Page 23
The Harmonizer
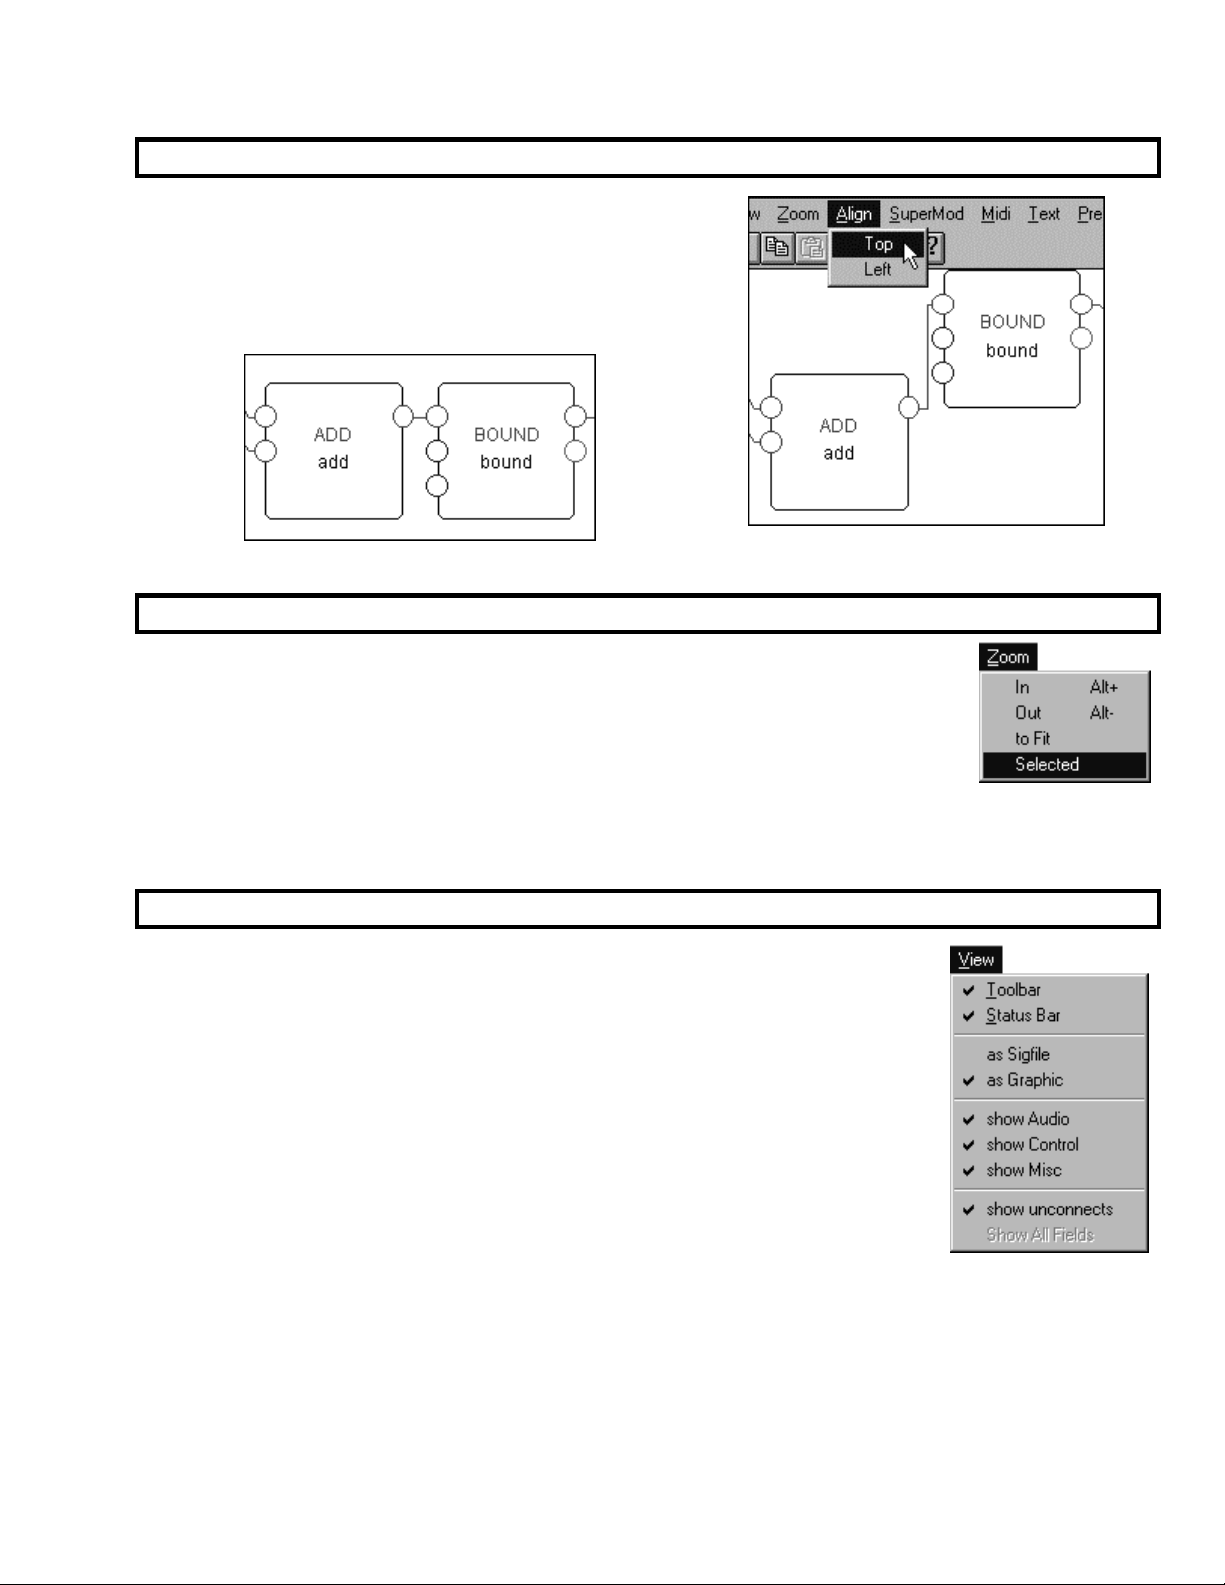
You can align a group of modules either along their top edge
or their left edge. First, select the modules you would like to
align. Then select either Top or Left from the Align menu. The
add and bound modules have been selected to the right.
The result of Top aligning them is shown below. Nice, eh?
You’ll find that as a patch gets very large it’s hard to see the names or input/outputs of
individual modules when the whole patch is in view. A zoom function exists to let us
zoom in or zoom out. Under the Zoom menu you’ll find four choices:
In Get closer relative to the current display.
Out Get further away relative to the current display.
to Fit Zoom such that the entire patch just fits on the screen.
Selected Zoom such that the currently selected modules just fit on the screen. Modules are
selected by clicking and dragging over the area that contains them.
Programmer’s Manual
Aligning Modules
Zooming
View
As your programs become more complicated, you’ll often want to “hide” certain
kinds of signals to make a patch more “viewable." A check mark next to an item
under the View menu indicates that that sort of signal is shown. The absence of a
check mark next to an item indicates that that sort of signal is “hidden."
Audio
Shows or hides all audio/mod
Control
Shows or hides all control
Misc
Shows or hides all userobject
Unconnects
Shows or hides all unconnected inputs and outputs. Hiding all the unconnected inputs and outputs is useful
when trying to follow the logic of a patch.
The Harmonizer Programmer’s Manual Page 21 of 97 Release 1.2.1
1999 Eventide, Inc.
(green) connections, inputs, and outputs.
(blue) connections, inputs, and outputs.
(pink) connections, inputs, and outputs.
Page 24
The Harmonizer
One of the benefits of using VSigfile over the Patch Editor area is that
Editing patches in VSigfile is considerably easier than editing patches in the
Patch Editor area (despite its name!).
Select All
Selects every module in a program. This is the same as clicking and
dragging over all the modules in a program, only easier.
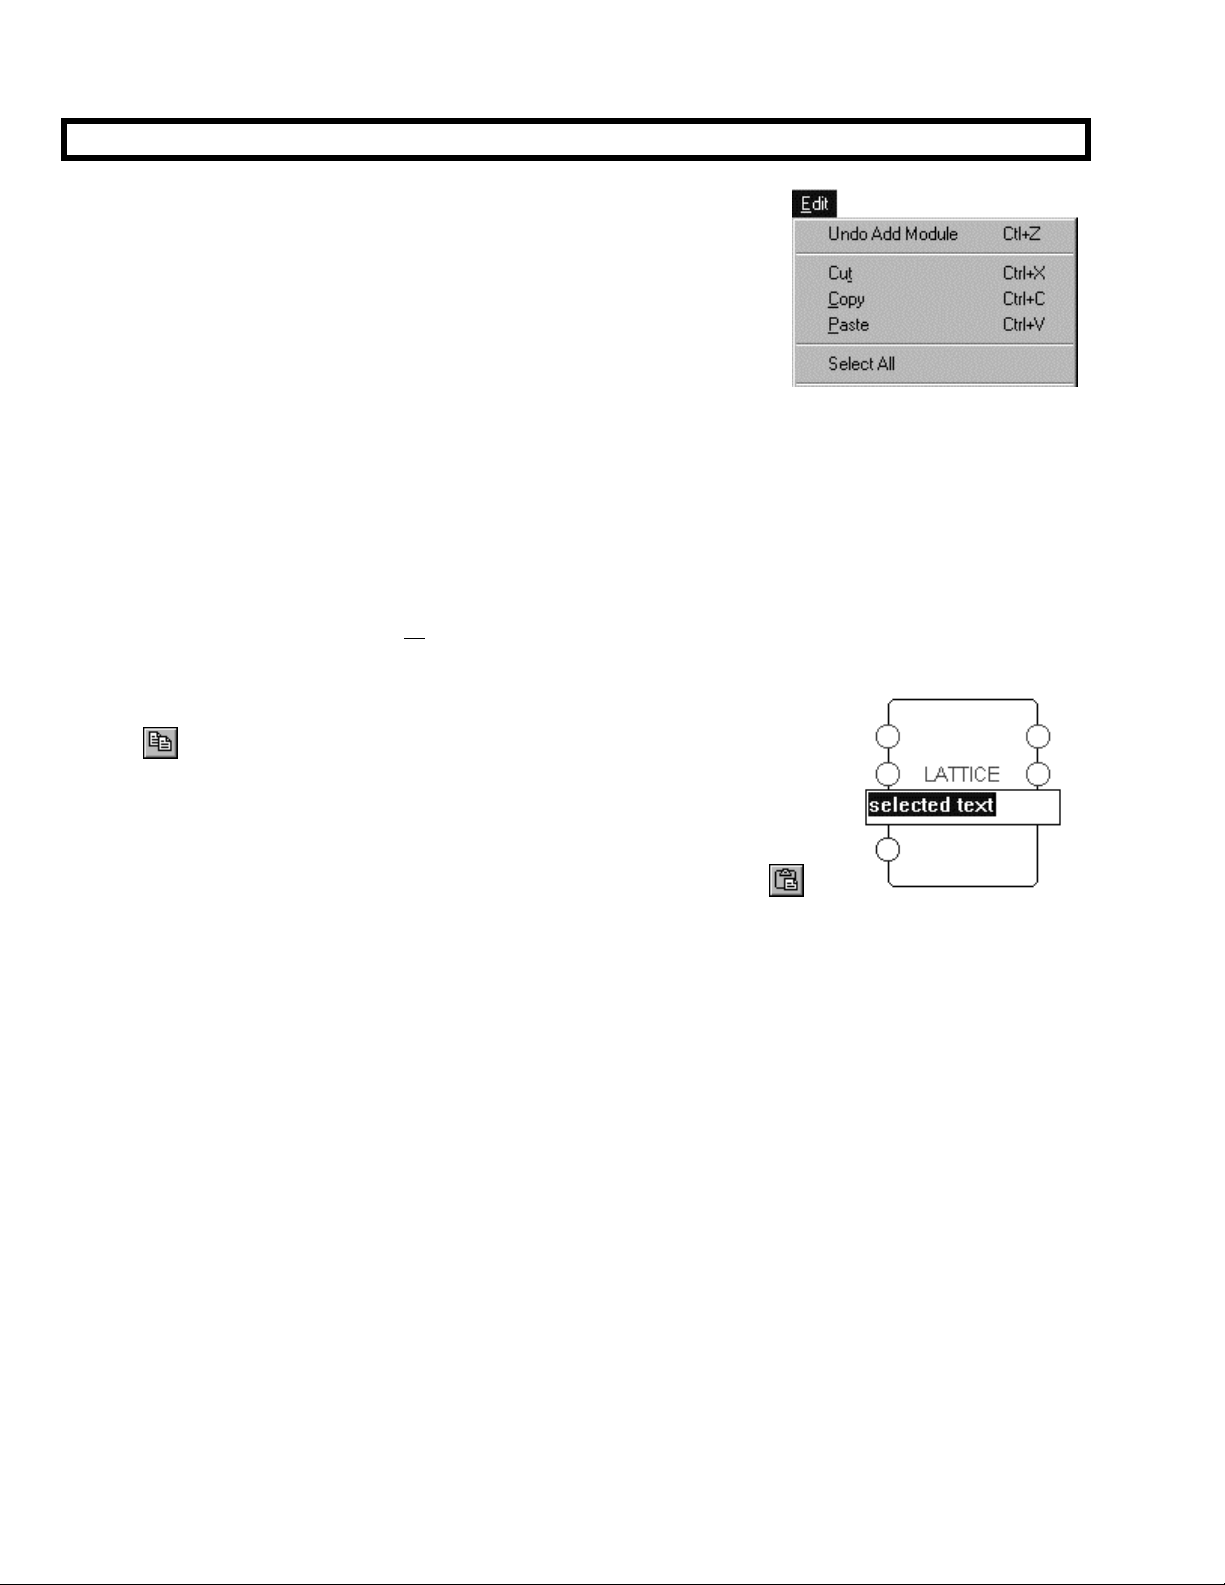
Cut, Copy, and Paste
VSigfile makes use of the standard “clipboard” associated with the Windows operating system. The
clipboard is a temporary holding area for text or modules. The Cut, Copy, and Paste commands work with
the clipboard as follows:
• The Cut command deletes the currently selected text, module, or modules and places what it deletes on
the clipboard
connections exist between those Cut modules, then those connections will exist on the clipboard as well.
(if something was already on the clipboard it will be overwritten!). If more than one module is Cut and
Programmer’s Manual
EDITING
• The Copy command copies
it copies on the clipboard
Copied and connections exist between those Copied modules, then those
connections will exist on the clipboard as well. You can also Copy by pressing
the
• The Paste command places the contents of the clipboard into the patch. A
version still exists on the clipboard so that you can Paste more than once. If
text is selected
with the contents of the clipboard. You can also Paste by pressing the
button.
Undo
Selecting the Undo command under the Edit menu reverses the last change that was made to the patch. You
can Undo many times in a row.
button.
(as shown to the right), the Paste command will replace the selected text
(does not delete) the currently selected text, module, or modules and places what
(if something was already on the clipboard it will be overwritten!). If more than one module is
The Harmonizer
1999 Eventide, Inc.
Programmer’s Manual Page 22 of 97 Release 1.2.1
Page 25
The Harmonizer
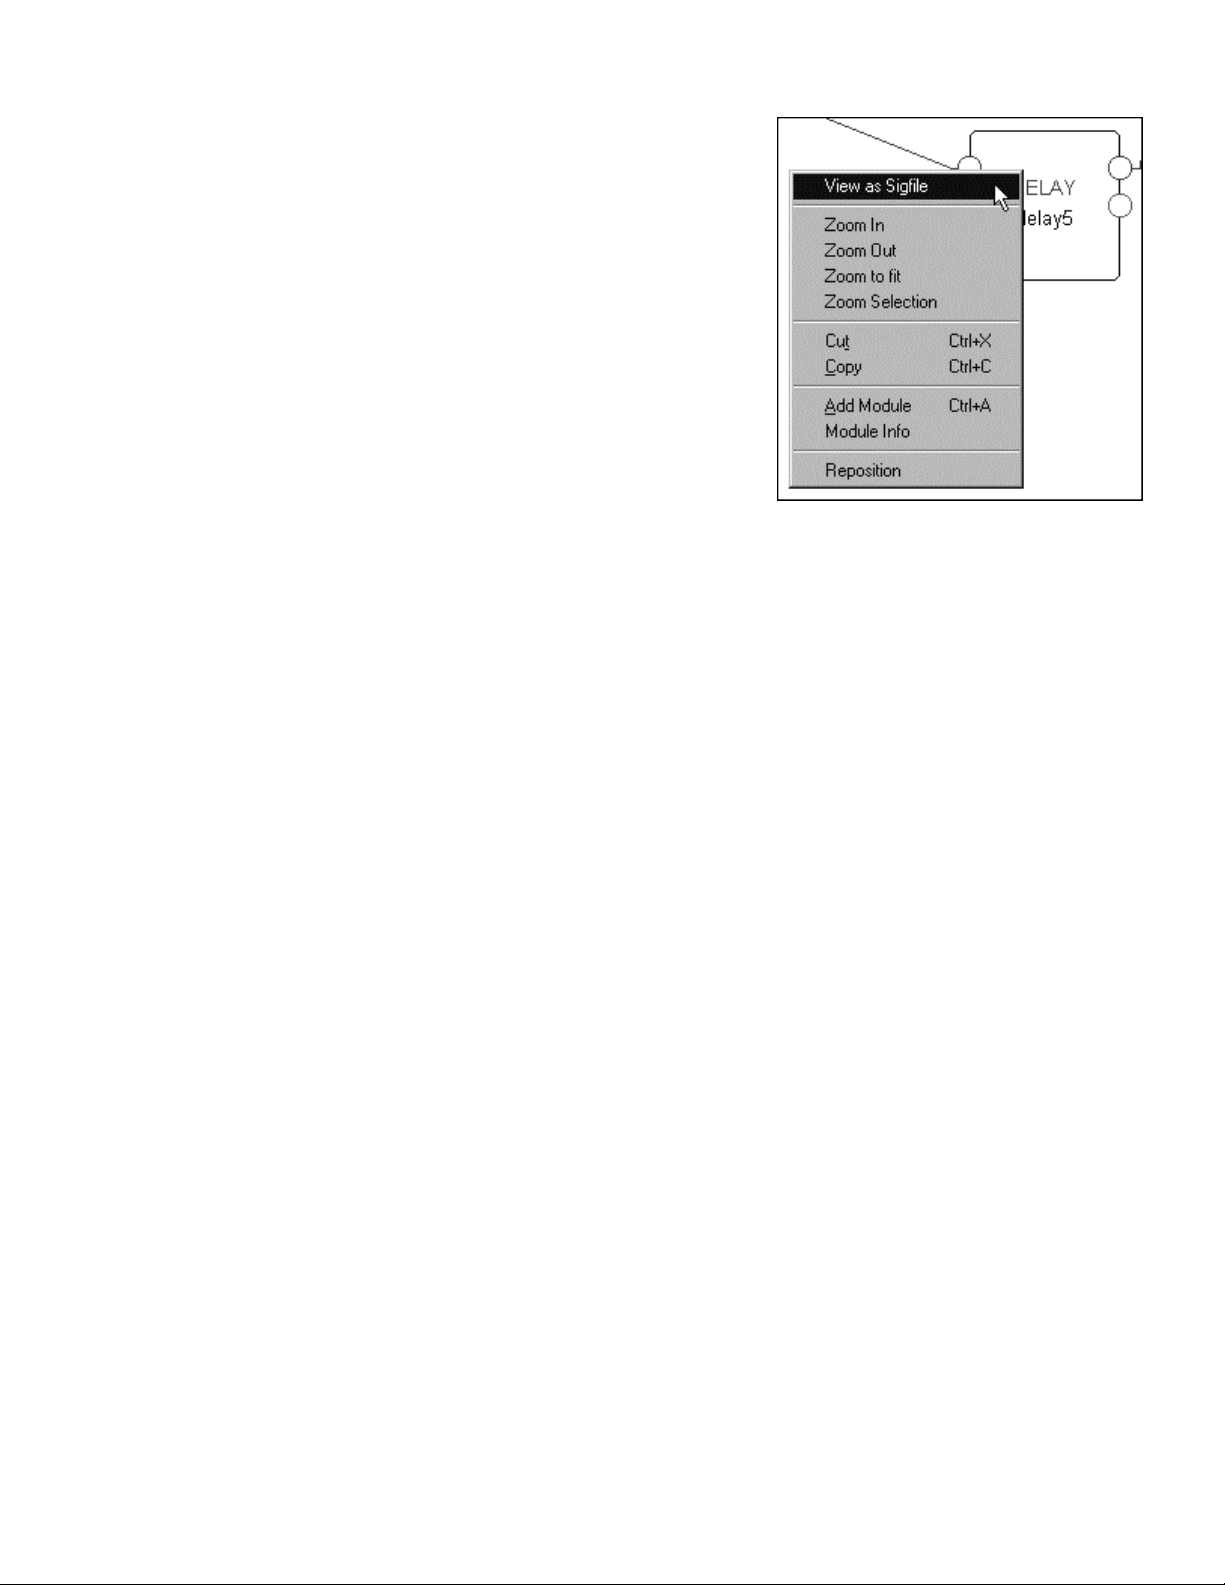
Context Dependent Menus
By right clicking the mouse, a “context dependent menu” will
appear as shown to the right. The available commands will
depend on what’s going on in the “vicinity” of the right click.
Once you get more familiar with VSigfile, using context
dependent menus will save you time.
Shortcut Keys
There are several “shortcut” keys that perform menu commands. They are listed next to their command in
the various menus. For example, the Cut command can be accomplished by holding down the “Ctrl” key
and the “x” key simultaneously. Once you get proficient with VSigfile, these shortcut keys will save you
(and you know what they say about time. . .).
time
Programmer’s Manual
The Harmonizer Programmer’s Manual Page 23 of 97 Release 1.2.1
1999 Eventide, Inc.
Page 26
The Harmonizer
Programmer’s Manual
SENDING PROGRAMS TO THE HARMONIZER
Once you’ve constructed a program in VSigfile, you’ll want to send it to the
Harmonizer so that it can be run. This is accomplished by selecting the Send
command under the Midi menu. Make sure that the Harmonizer is in some area
other than the Patch Editor area when you Send, lest errors occur! Be warned:
the program running on the currently displayed DSP will be “bumped out” by the program you Send! Save
any changes before you Send!
→ Your compute r mu s t be communicating with the Harmonizer f or this to work! See Communications on page 16.
TUTORIAL 1 -A SIMPLE PROGRAM
We can couple our new found knowledge of VSigfile with the material we learned in the General Principles
Chapter to create a simple, but meaningful, program. We’ll create a modulating filter.
To begin, start with a clean slate by pressing the
button. You should see a
work area that looks like the one shown to the right. The green “in1 >” and
“in2 >” on the left represent the inputs 1 and 2 on the DSP that will eventually
run the program
(we’ll learn how to do quad programs for Orville later, but the idea is the same).
Similarly, the green “> out1” and “> out2” on the right represent the outputs 1
and 2 on the DSP that will eventually run the program. The blue “1, 2, 3, and
4” on the left represent the “global inputs” (these only have meaning for Orville’s d ual DSPs,
and we’ll learn about them in “Inter-D SP Communication” on page 56)
. The pink “1” on the right
represents the first userobject input on the head module. Recall that the
userobject outputs of modules are connected to the head module so that their
menu pages will appear in the
PARAMETER area.
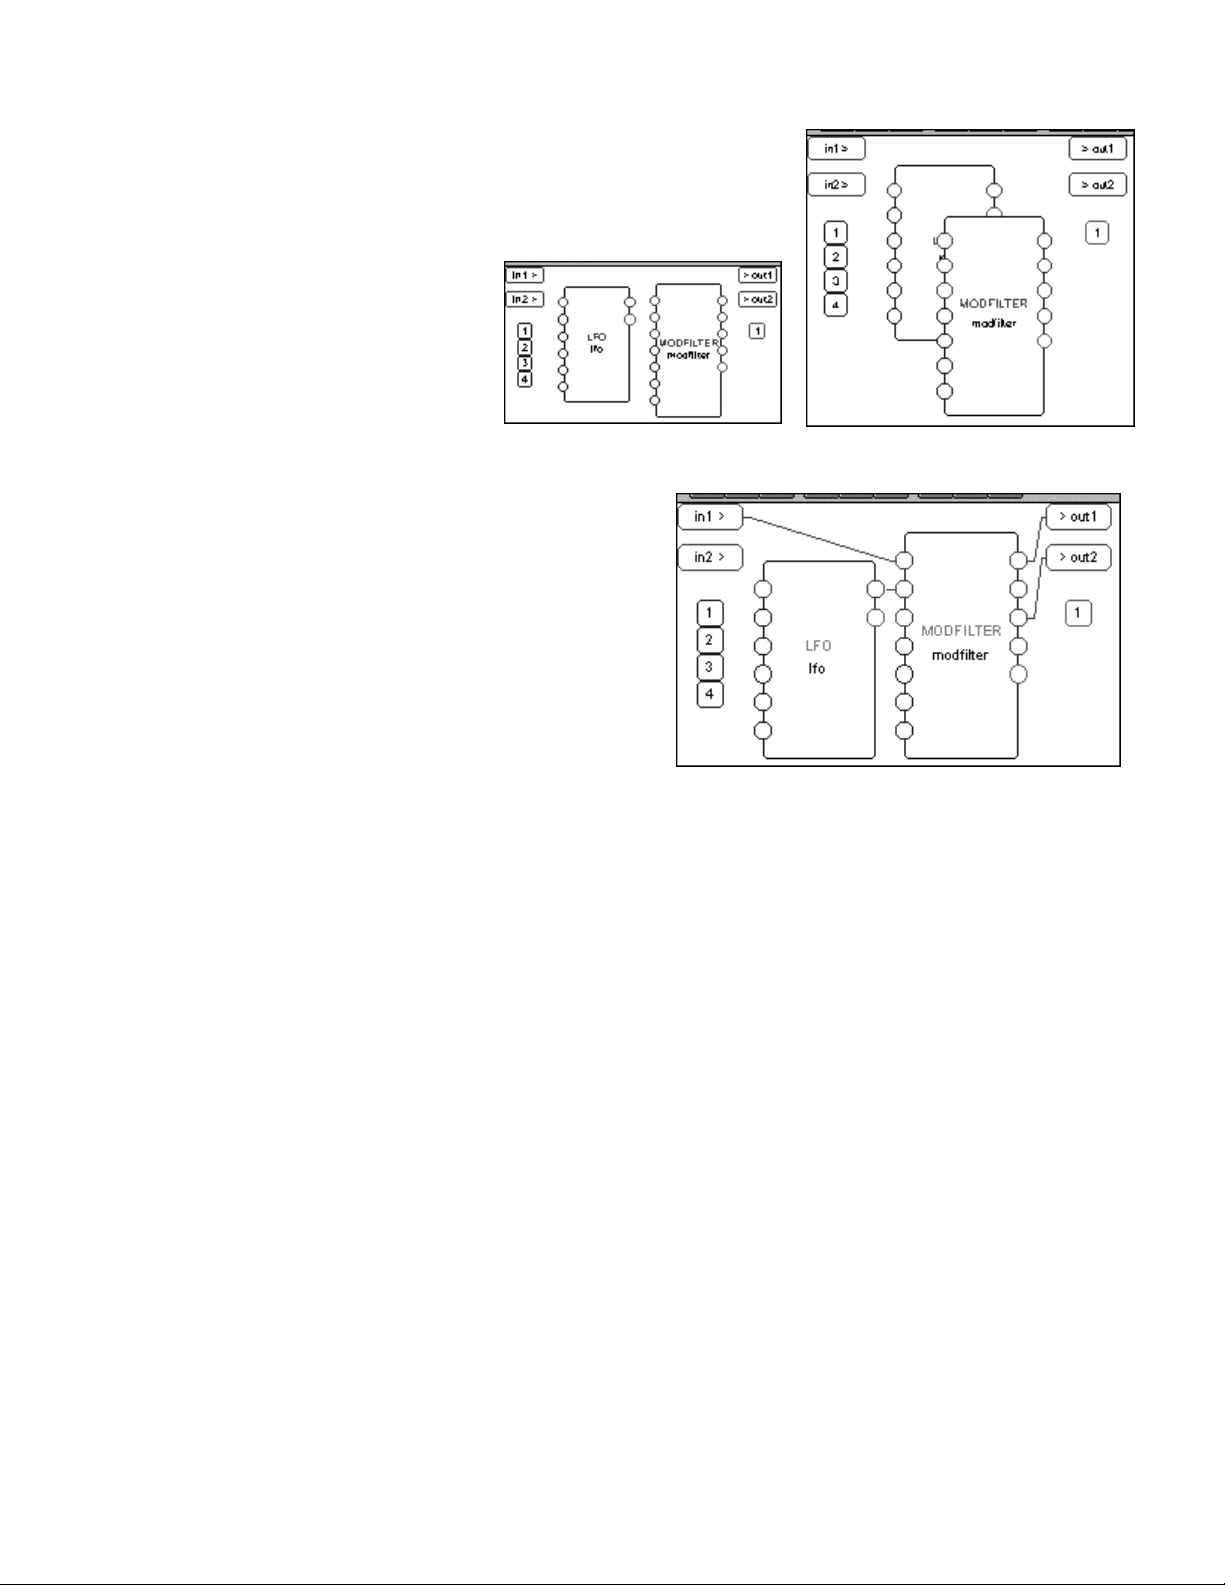
To create a “modulating filter” program, we’ll
need just two modules: an LFO (low frequency oscillator)
module and a modfilter module. Go ahead
and add these modules to the program by using
the Add Module command from the Edit menu.
You’ll find the LFO module in the “Oscillator”
group and the modfilter module in the
“Filter” group.
The Harmonizer
Programmer’s Manual Page 24 of 97 Release 1.2.1
1999 Eventide, Inc.
Page 27
The Harmonizer
Programmer’s Manual
After adding both modules, the screen should look similar to the one
at the right. The modules are overlapping and nothing is yet
connected. Move (by clicking and dragging) the modfilter module to
the right so that both modules are clearly in view. Note that the
DSP outputs and the head module input “move out of the way."
The screen should now look similar
to the small one at the immediate
right.
Now connect
the modfilter module
over an input or output for a second, a “bubble” will appear that describes the
input or output)
• Connect
out1
(“low” is the lowpass output of the filter).
• Connect
>out2 (“high” is the highpass output of the filter).
• Connect
modfilter module.
cutoff frequency will vary as a function of the signal applied to this input.)
in1 > to in on the modfilter module by clicking on in1 > and then dragging to in on
(recall that if you “hover” the pointer
. Similarly,
low on the modfilter module to >
high on the modfilter module to
out on the LFO module to fmod on the
(“fmod” is a modulation input. The filter’s
The result should look similar to that shown right.
Let’s take a moment and analyze these connections. A signal comes into the DSP’s input 1 and then into
the modfilter module. We refer to the Modules Section to learn what exactly the modfilter module
will do with the signal. It reads:
Modfilter:
This module implements a classic state-variable audio filter. It provides simultaneous lowpass, bandpass, highpass,
and notch outputs. It has variable Q. . . and frequency and has mod rate frequency and q factor modulation inputs.
So, not surprisingly, it will filter the signal applied to its input. All of the frequencies in the input signal that
lie below the cutoff frequency will be output at
the cutoff frequency will be output at
high. Furthermore, the LFO module’s output signal will modulate
low, and all of the frequencies in the input signal that lie above
the cutoff frequency. We’ve now satisfied “cornerstone one” of program construction: We’ve connected
appropriate modules to achieve a desired, overall audio effect.
The second and third “cornerstones” of program construction state that:
• We must control the parameters of the modules in a program so that the desired audio effect is
achieved.
• We must make some of the parameters available in the
PARAMETER area so that the user can “tweak”
the program to fit a particular situation.
• In our simple program these will be one in the same. We will arrange to have the parameters for both
modules available in the
PARAMETER area by connecting their userobject outputs to the userobject inputs of
the head module.
The Harmonizer Programmer’s Manual Page 25 of 97 Release 1.2.1
1999 Eventide, Inc.
Page 28
The Harmonizer
Programmer’s Manual
First click on the head module’s userobject input 1 (the
pink square below the DSP outputs). Then select the Add
Repeating Field command from the Edit menu. A second
userobject input should appear.
Connect the modfilter’s
head module’s
userobject
userobject
userobject
output to the head module’s
input 2. The screen should look similar
userobject
input 1 and the LFO’s
output to the
to the one on the right.
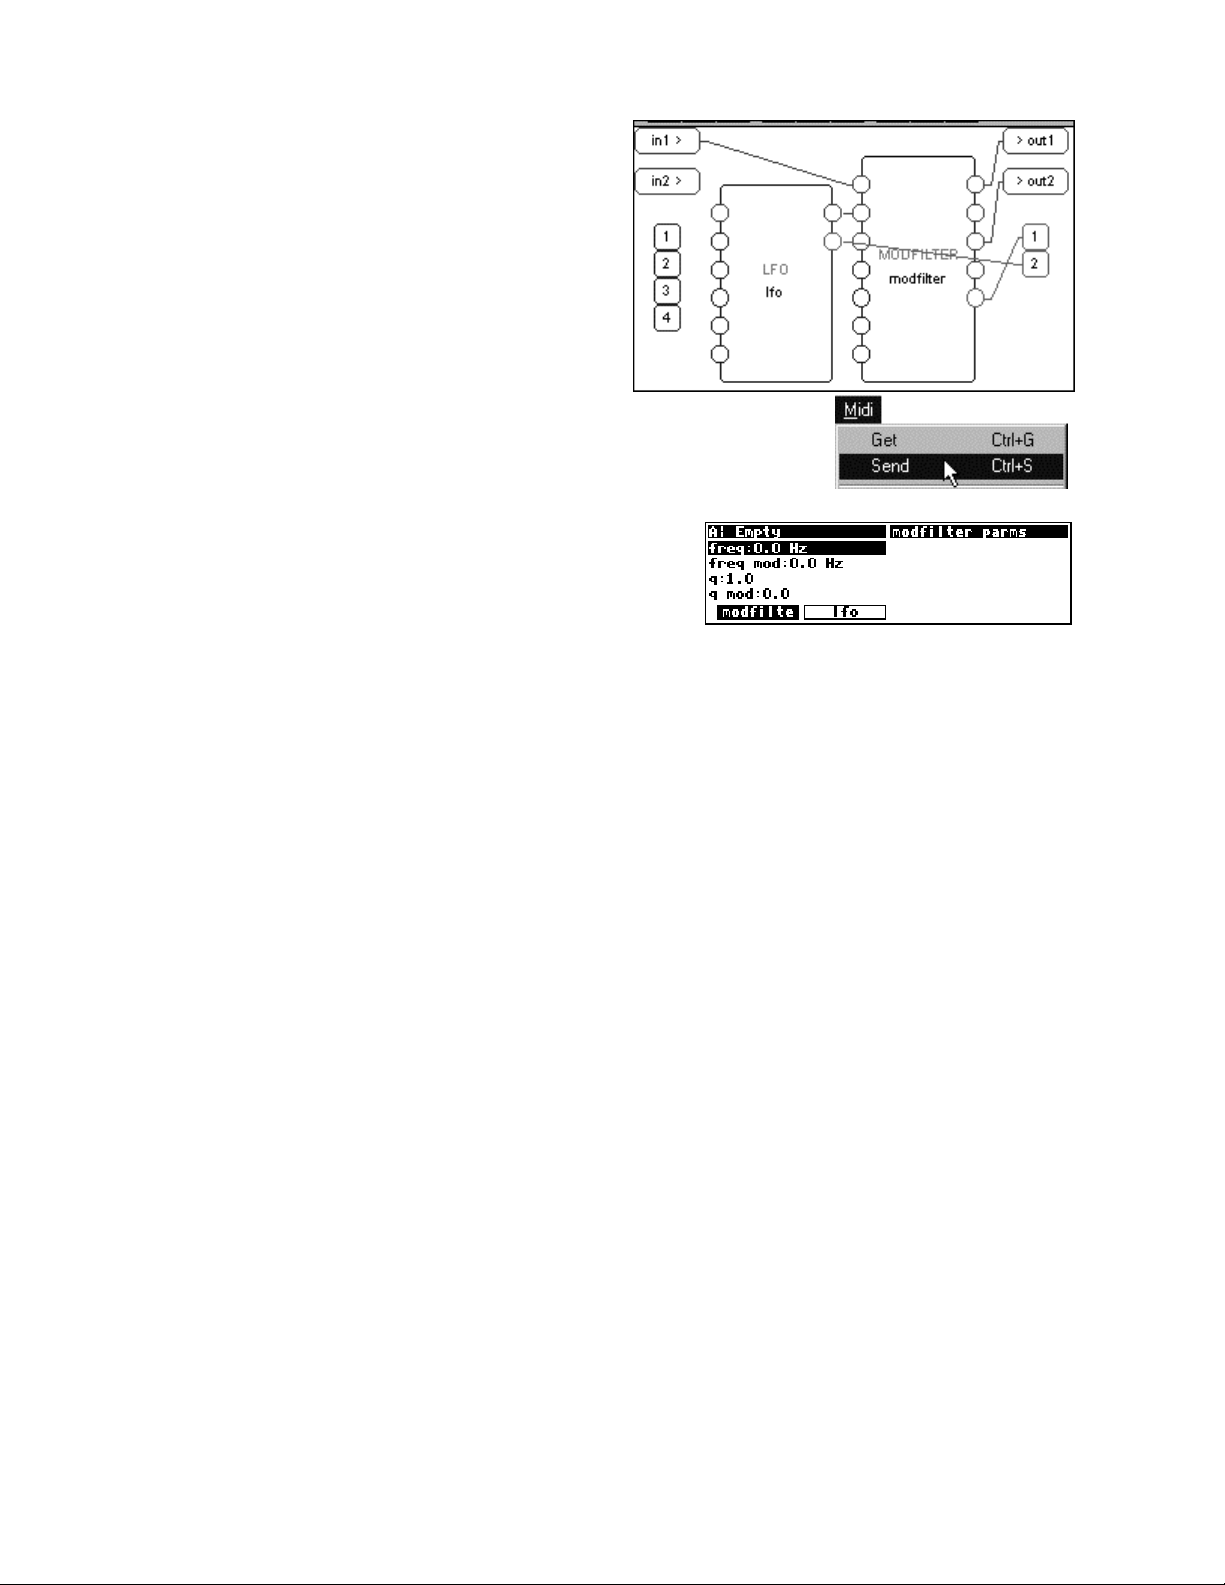
OK, now we’re ready to send the program to the Harmonizer to be run. Make
sure the Harmonizer is in some area other than the Patch Editor area and then
select the Send command from the Midi menu.
→ If you aren’t connected to the Harmonizer, read “Communications” on page 16.
The Harmonizer should flash “coding file from remote” and
loading progra m." You should then find yourself in the
then “
PARAMETER area with a screen that looks like the one to the
right. After turning the
0.0Hz, mess with the [modfilte] /freq and freq mod parameters.
[lfo] /freq to something other than
And that’s basically it. You can create simple programs by concentrating on “cornerstone one” and then
satisfying the other two “cornerstones,” by liberally connecting userobject outputs to the head module. Now
that you’ve been introduced to the basics and have some hands-on experience, let’s move on to more
advanced topics in program construction.
The Harmonizer
Programmer’s Manual Page 26 of 97 Release 1.2.1
1999 Eventide, Inc.
Page 29
The Harmonizer
ADVANCED FEATURES
The Specifier Display
Some mention was made in the General Principles
Chapter of “Specifiers." The astute reader will note
that no mention has been made of these creatures
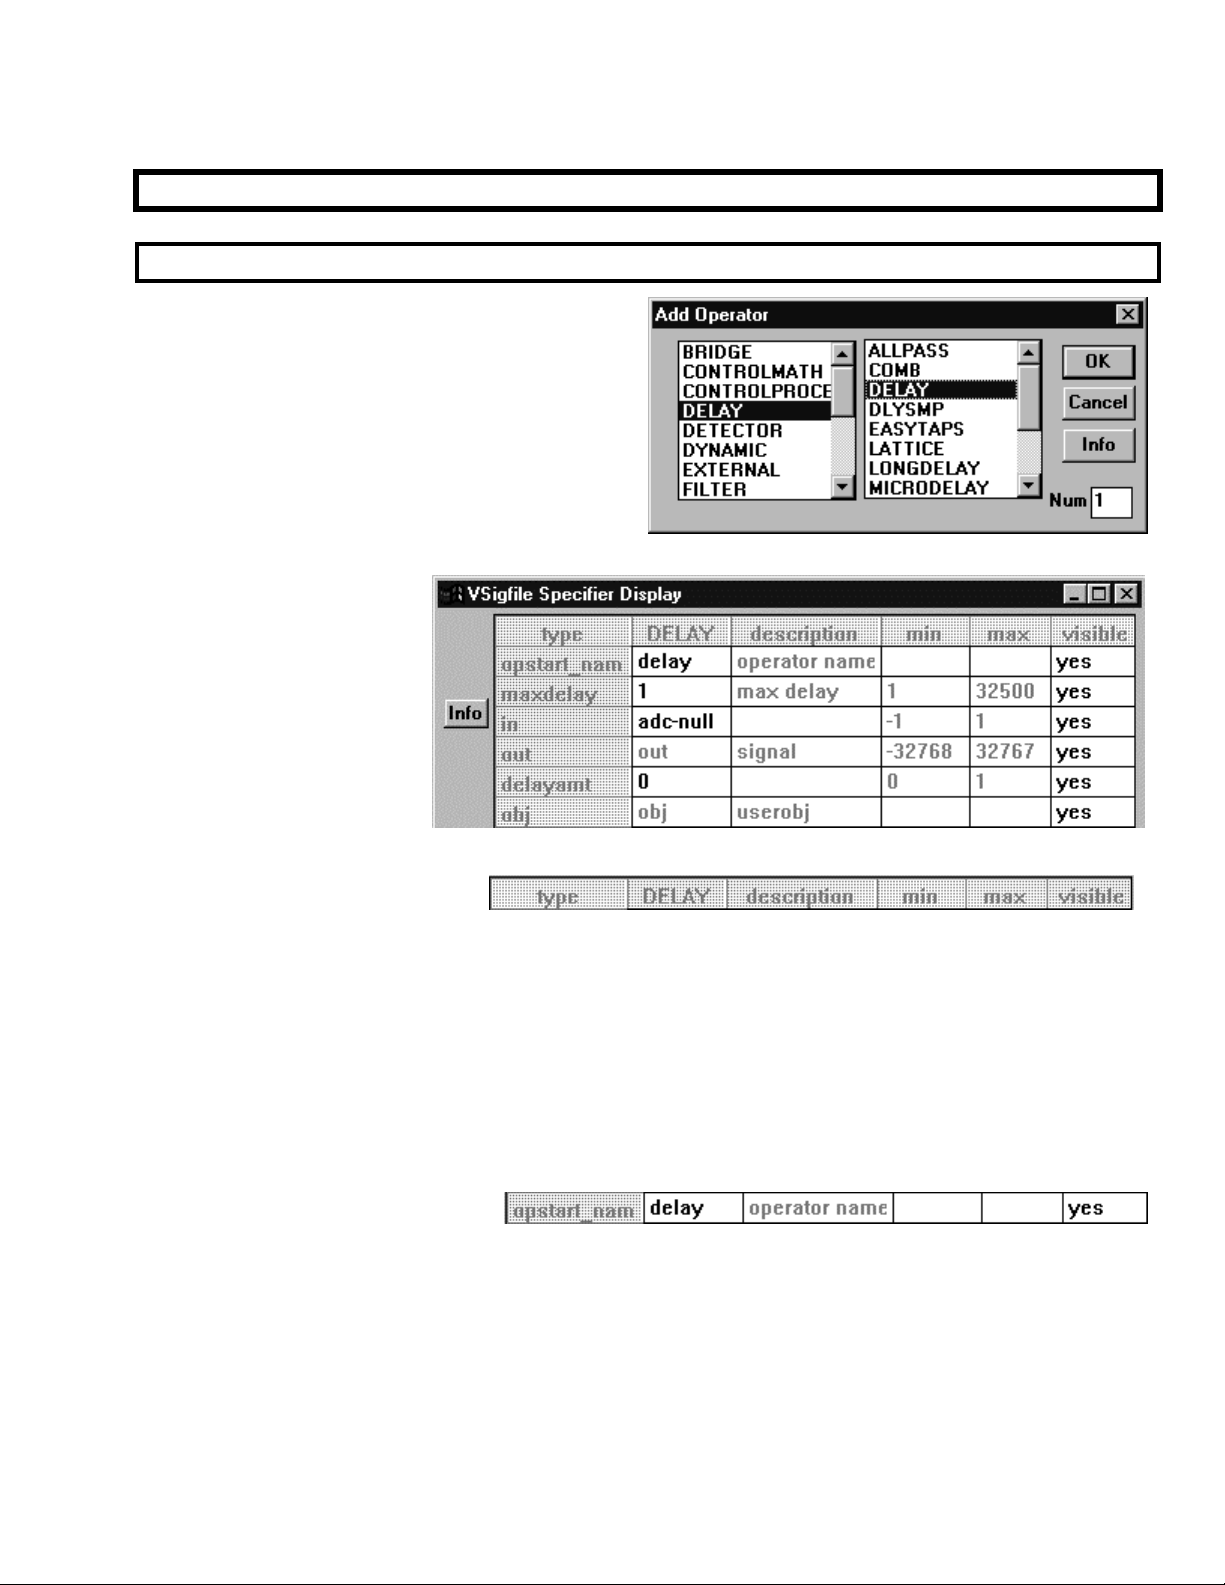
since! Well, now’s the time. Go ahead and add a
delay module from the “Delay” group.
Once it’s added, doubleclick on it. You will call up
the “VSigfile Specifier
Display” shown to the right.
We’ve entered the “guts” of
the module. Here we have
access to all kinds of cool
stuff. Cells that contain
black type can be altered,
while those that contain gray
type cannot. Let’s take each row in turn. . .
Programmer’s Manual
Title Line
The first row gives a general description of each column (more or less).
• The type column describes what type of input or output a row pertains to
inputs or outputs (like the first two shown above), the ‘type’ column is of little value)
• The MODULE column contains most of the alterable information in the Display. The title of the column
(in this case, “DELAY”) is the module type.
• The description column gives a marginally useful description of each row.
• The min and max columns list the minimum and maximum values that can be entered in the MODULE
column.
• The visible column allows you to “hide” input or outputs in the normal VSigfile display.
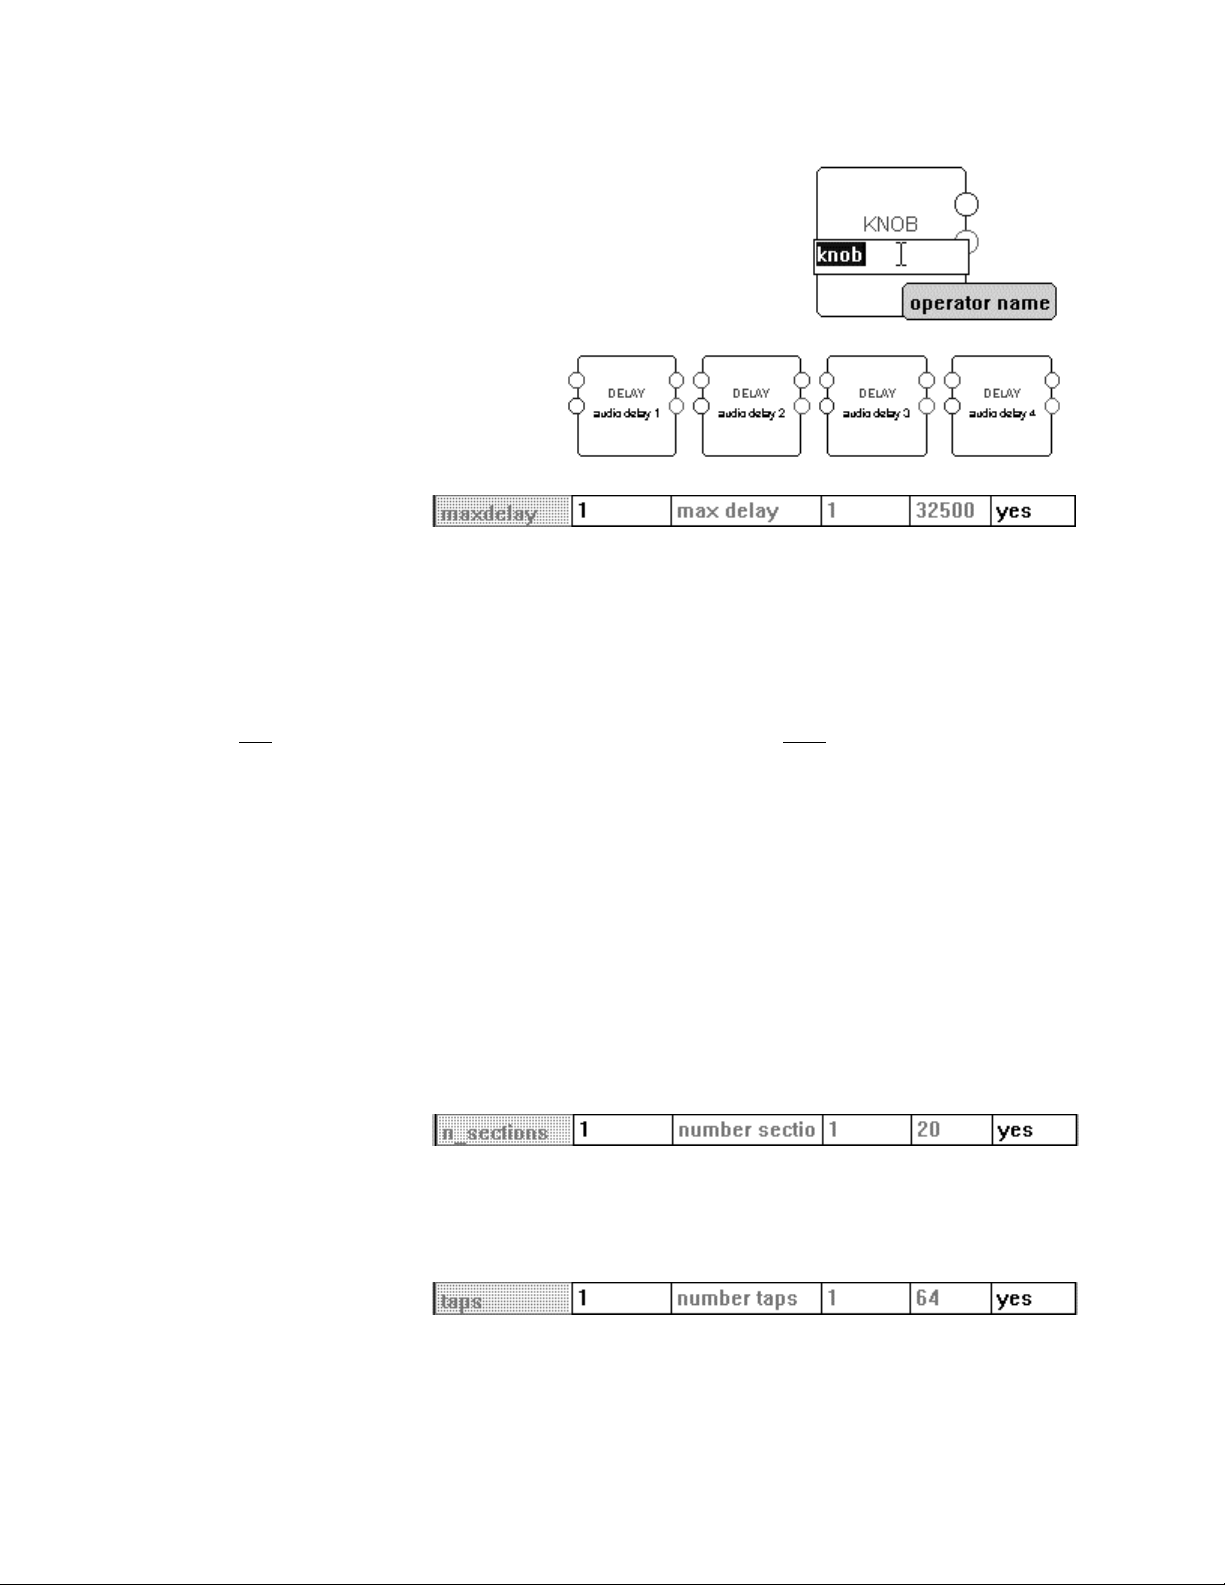
Module Name
The second row, MODULE column cell allows you to alter the name of the module. The module name is a
text string that is stored with a particular module. There is a default module name that is usually the same as
the module type. It is helpful to change the module name immediately after adding a module so that
modules of the same type can be told apart. Choose a name that reflects both the purpose of the module
within the patch, and the module type. The name may be up to 18 characters in length, and no two
modules in a given patch may share the same name.
The Harmonizer Programmer’s Manual Page 27 of 97 Release 1.2.1
1999 Eventide, Inc.
.
(if a row doesn’t have anything to do with
Page 30
The Harmonizer
Programmer’s Manual
Additionally, you can change the name of a module from the normal
VSigfile display by double clicking on the name.
If you plan to use multiple copies of a particular
module type, it’s wise to tack a “1” onto the end
of the first instance and then Copy and Paste that
instance. The subsequent copies will be
numbered sequentially, as shown to the right.
Specifiers
The third row contains a “specifier” for the delay module. Remember specifiers from the General Principles
Chapter? It read:
A specifier is a control that affects a module's behavior. For example, a delay module might have a specifier that
sets the maximum delay time a user can enter. A pitchshifter module might have a specifier that sets the
number of pitchshifting voices used by the module. A module may have several specifiers. The range of
permitted values for a specifier is fixed.
Specifiers are only
PARAMETER ar ea). There is no input or output for specifiers, they reside “inside” a module
adjustable in the Patch Editor area or in VSigfile (i.e. specifiers ca n never be altered in the
Whadaya know? We’ve got a delay module here, and the specifier at hand sets the maximum delay time for
it. By looking at the min and max columns, we can see that the minimum delay time is 1 (millisecond) and
the maximum delay time is 32500 (milliseconds). The maximum delay time is something you set as the
program’s creator; the user will not be able to alter it. This is important, because, like most things in life, the
amount of delay the Harmonizer has available is finite. As a result, it is necessary to divide this among the
modules, so that each has enough. Setting the maximum amount that each module can use in this way,
makes sure that there is enough left for the others.
Different types of modules will have different types of specifiers; some may have no specifiers at all and some
may have many. The Modules Section describes what the specifiers for a given module do. Let’s look at the
VSigfile Specifier Display windows for a few other types of modules to see what sorts of specifiers they have:
• Here we see the single specifier
for the IIR module. This
module is a resonant filter and the n_sections specifier selects the number of “poles” used. The number
of poles used is something you set as the program’s creator; the user will not be able to alter it. Here the
number of poles controls the behaviour of the filter, but it also determines the amount of DSP
resources the filter will use.
• Here we see the single specifier
for the easytaps module. This module produces a tapped delay line and the taps specifier selects the
maximum number of taps that the user can select. As with all specifiers, the maximum number of taps is
something you set as the program’s creator; the user will not be able to alter it.
The Harmonizer
Programmer’s Manual Page 28 of 97 Release 1.2.1
1999 Eventide, Inc.
Page 31

The Harmonizer
• Here we see the four specifiers for the meter module. The meter
module monitors a control signal output and displays its value in what
looks like an old-school VU meter.
• The minimum specifier sets the lowest value that will be
displayed, while the maximum specifier sets the highest. The
name specifier sets the description of the meter, and the tag
specifier sets the description on its SOFT KEY (if it has one).
All of these items are selected by you, the program’s creator,
at its inception. The user can’t change any of this stuff.
There is one other type of specifier that we’ve deliberately ignored: the sort that controls “repeating fields."
This sort of specifier can’t be altered from the VSigfile Specifier Display and is discussed in a section all to itself
below.
Audio Inputs
Returning to the VSigfile Specifier Display window for the delay module that we started out with, the next
row after the specifier row displays the audio inputs.
Double clicking on the MODULE
column calls up yet another window:
the “Editing Signal Input” window.
Here you can select among all of the
possible audio outputs in your patch.
The output you select will be connected to the input you double clicked on to call up the Editing Signal input
window. If connecting things this way works for you, great, but most folks find it easier to click and drag in
the normal VSigfile display.
Programmer’s Manual
Audio Outputs
The next row displays the audio output. Well, actually it just tells you that it exists. This row is mainly
useful if you want to “hide” the audio output.
Control Inputs
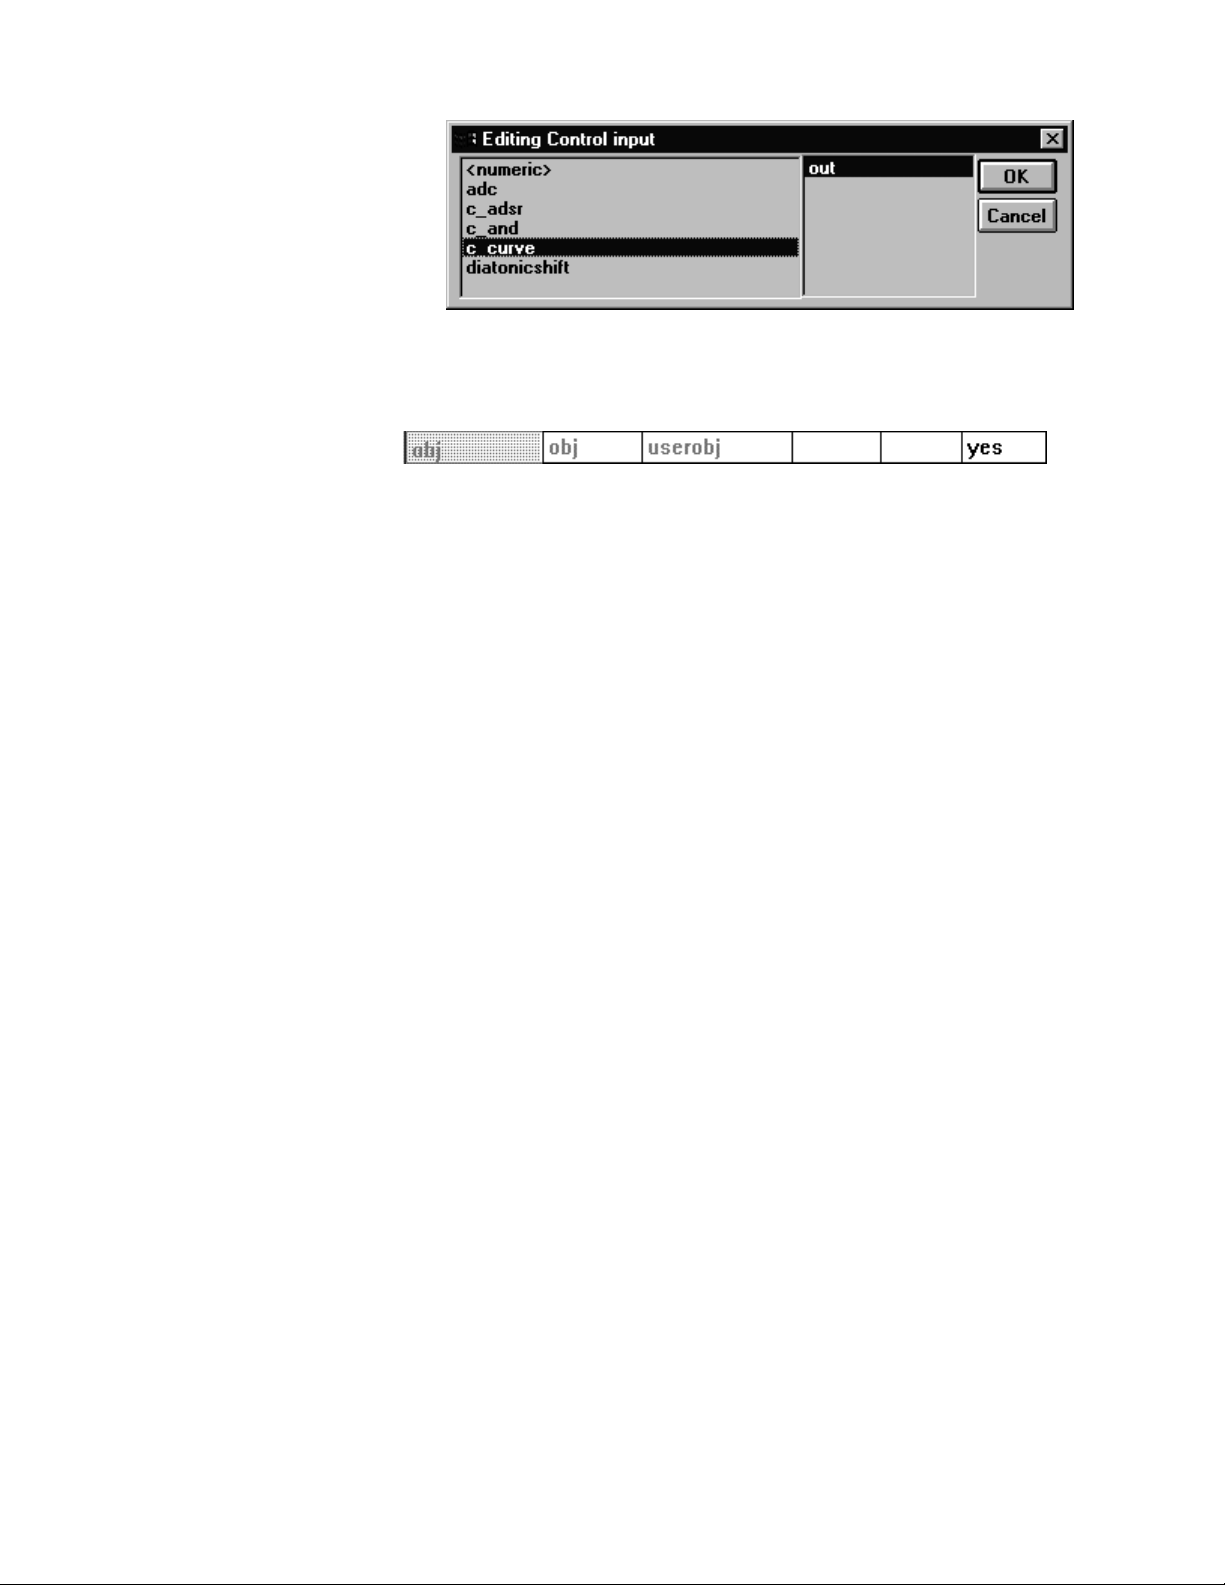
The next row on the other hand, is very useful. It describes the control input for the module. The type
column tells you what the control input is for (in this case, ‘delayamt’ controls the amount of delay). If no control output is
connected to this control input (as is the case here), the MODULE column allows you to set the delay amount just
as you would in the PARAMETER area on the Harmonizer. The value you enter is constrained by the min
and max columns (‘0’ and ‘1’ in this case).
If a control output is connected to this control input
right)
, its module name and output will be displayed.
The Harmonizer Programmer’s Manual Page 29 of 97 Release 1.2.1
1999 Eventide, Inc.
(as is the case shown to th e
Page 32
The Harmonizer
If you double click on the MODULE
column, you’ll call up the Editing
Control input window. Here you can
select among all of the possible
control outputs in your patch. The
output you select will be connected to
the input you double clicked on to
call up the Editing Control input
window.
If connecting things this way works for you, great, but most folks find it easier to click and drag in the normal VSigfile display.
Userobject Outputs
The final row displays the userobject output. This row isn’t too useful unless you want to “hide” the userobject
output.
And that’s basically it. You’ll find that different modules have different displays in the VSigfile Specifier
Display window, but they’re all variations on the theme described above. When in doubt, turn to the
Modules Section for a complete description of a module’s specifiers, inputs, and outputs.
Programmer’s Manual
The Harmonizer
1999 Eventide, Inc.
Programmer’s Manual Page 30 of 97 Release 1.2.1
Page 33
The Harmonizer
The term “repeating fields” is easier to define by example than to explain in mere words, so here are a few
examples of repeating fields:
• A diatonicshift module can have one, two, three, or four pitchshifting voices. The parameters
associated with each pitchshifting voice are repeating fields.
• A menupage module can have any number of userobject inputs. Each input is a repeating field.
• A quadmixer module can have as many as fifty audio inputs. Each input is a repeating field.
• A sequencer module can have between two and fifty “steps” in its sequence. Each step is a
repeating field.
• The DSP inputs and outputs can have two, three, or four connections (DSP7000 users will want to restrict this to
two
). Each input or output is a repeating field.
• The head module can have any number of userobject inputs. Each input is a repeating field.
Get the idea? If not, you will. Read on. . .
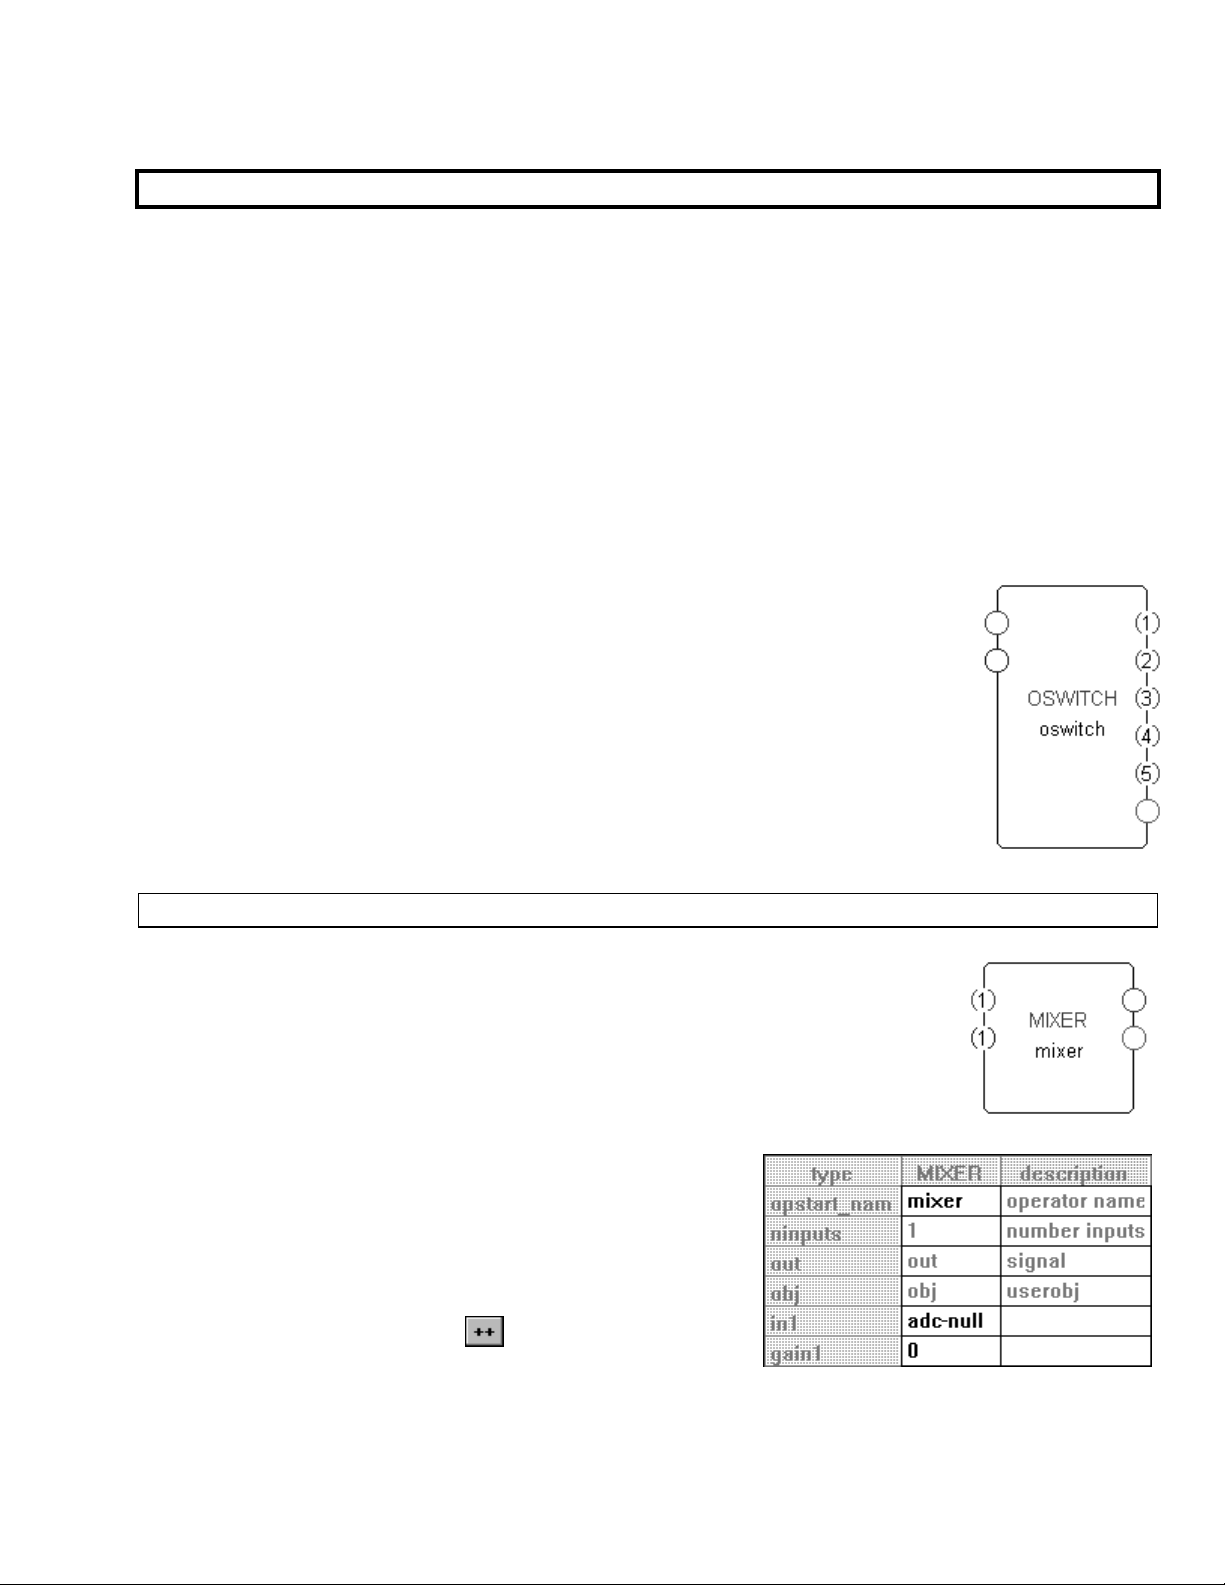
If the repeating field on a module pertains to the number of inputs or outputs (of any
type) on the module, each repeating field will be numbered. The oswitch module
shown to the right has a variable number of outputs. In this case it is set to five.
There are three distinct techniques used to increase or decrease the number of
repeating fields. In most cases, the number of repeating fields can be altered via any of
the techniques. In a few modules however, the number of repeating fields can only be
altered via one of the techniques. We’ll look at each technique in turn.
Programmer’s Manual
Repeating Fields
ALTERING THE NUMBER OF REPEATING FIELDS IN THE SPECIFIER DISPLAY
To demonstrate the first technique, we’ll add a mixer module. Each audio input on
this module is a repeating field. There can be as few as one input
as many as fifty. The top input is an audio input, and the bottom input is a control
input that controls the level of the audio input.
Double click on the module, and the VSigfile Specifier Display
window pops up as shown to the right. To alter the number of
repeating fields, click on any existing example of the repeating
field. In this case, we want to alter the number of inputs.
Clicking on “adc-null” associated with in1 or “0” associated with
gain1 will be sufficient. Click on either of these fields. In the
upper left border of the window a
The Harmonizer Programmer’s Manual Page 31 of 97 Release 1.2.1
1999 Eventide, Inc.
button appears.
(as shown to the right) or
Page 34
The Harmonizer
Programmer’s Manual
Clicking on the
the module as shown to the right. A new
appears that will allow you to similarly decrease the
number of repeating fields.
If you exit the VSigfile Specifier Display you’ll see that the
module now has two audio inputs and two control inputs.
If you wanted more than two inputs, you would follow
the same procedure:
• Double click on the module to open the VSigfile Specifier Display window.
• Click on the existing example of the repeating field immediately “above” where
you would like to insert a new instance when adding. Click on the repeating
field you would like to delete when deleting..
• Press on the
increase or decrease the number of repeating fields.
LTERING THE NUMBER OF REPEATING FIELDS WITH THE CTRL AND DELETE KEYS
A
button will add a repeating field to
button
button or the
button as many times as necessary to
Again we’ll add the mixer module to demonstrate the second technique. In this
simple example, we’ll mix the DSP inputs 1 and 2. First connect DSP input 1 to
the input on the mixer module.
Next connect DSP input 2 to the input on the mixer while holding down the Ctrl key on
the keyboard. A repeating field is added below the one you connected to.
The complement of this technique involves reducing the number of repeating
fields. Simply click on the repeating field you want to remove and press the Delete
key on the keyboard.
LTERING THE NUMBER OF REPEATING FIELDS WITH THE EDIT MENU
A
Finally, we can add or delete repeating fields by clicking on an example of the repeating field in question and
selecting the Add Repeating Field or Delete Repeating Field command under the Edit menu.
For example, click on DSP input 2 and select the Add Repeating Field command under the Edit
menu. A third DSP input appears. Select the same command and the fourth DSP input
appears. You can do the same on the DSP outputs. To delete a repeating field, click on the
repeating field you would like to delete and select the Delete Repeating Field command under
the Edit menu.
It’s worth noting that this is the only technique you can use to add or remove DSP inputs or
outputs from your program!
The Harmonizer
1999 Eventide, Inc.
Programmer’s Manual Page 32 of 97 Release 1.2.1
Page 35
The Harmonizer
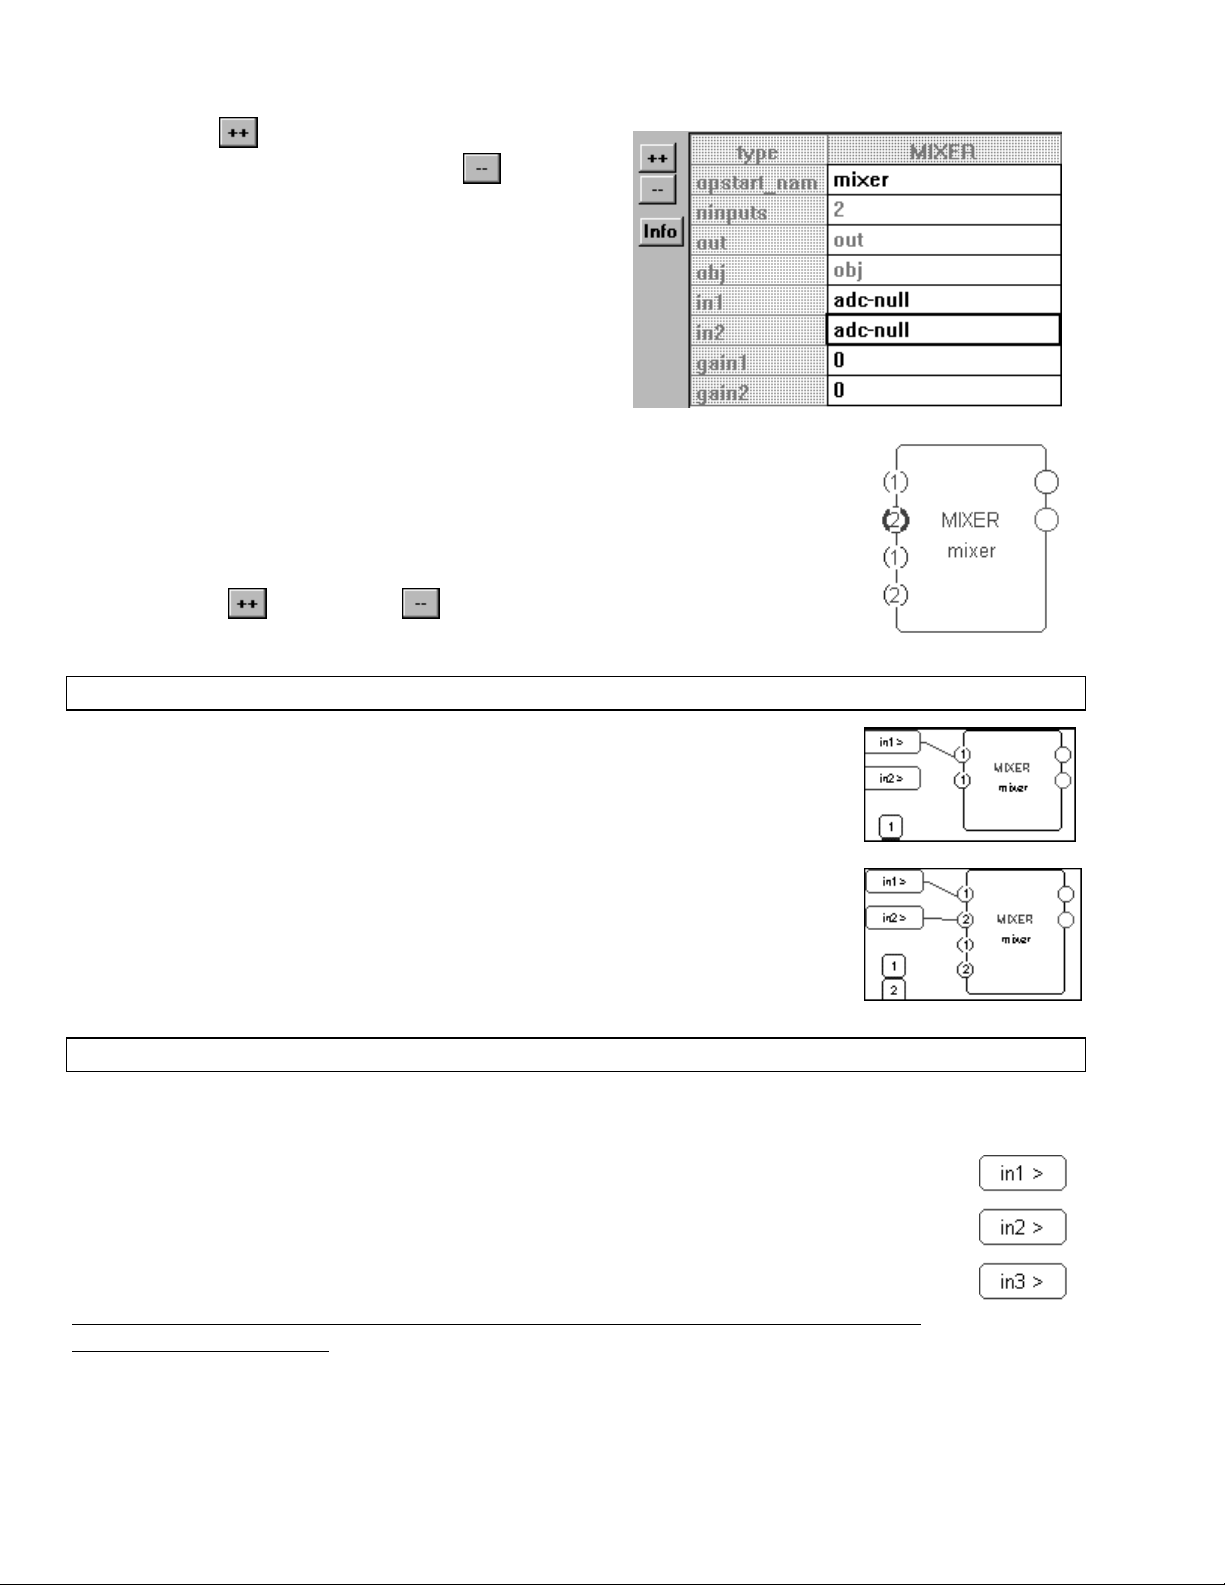
Editing “Special” Modules
A select few modules require a non-standard editing environment. To enter this “special” environment,
click on the special module and then select the second to last command under the Edit menu. The exact
phrasing of this command will change depending on what module you have selected. Here are some
examples:
“Curve” modules, the multitap module,
and the waveform module have a graphical
editor that is considerably easier to use than
the Harmonizer’s front panel.
The textblock module has its own editor.
Programmer’s Manual
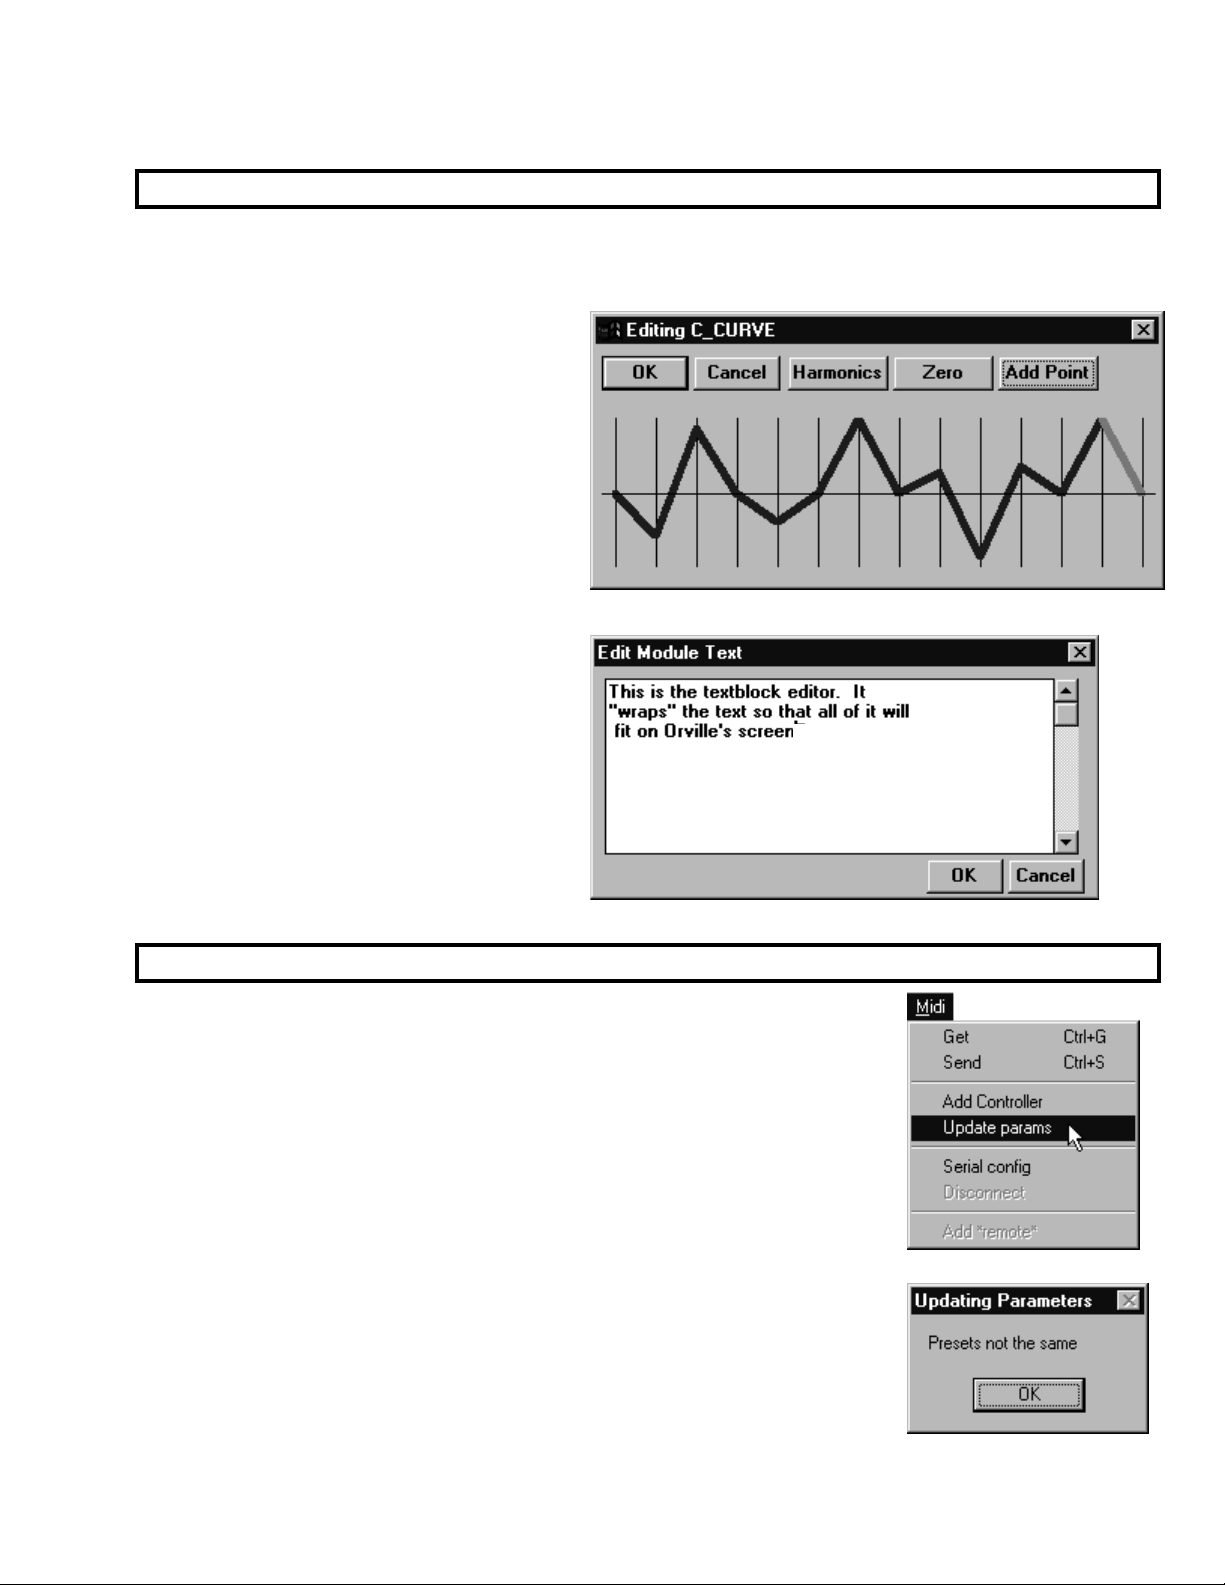
Updating the Parameters from the Harmonizer
As you create more extensive programs, you’ll find yourself frequently Sending
incomplete version of a program to the Harmonizer as you work. When you
do, you will often change parameter values on the Harmonizer. It would be
quite irritating if you lost those parameter changes when you returned to work
in VSigfile.
Fortunately, you don’t have to. Once you’re done tweaking things in the
Harmonizer and are ready to return to VSigfile, select the Update param s
command under the Midi menu. VSigfile will update all of the parameter values
in your patch from the Harmonizer.
Note: if you change the types, order or connections in VSigfile after you’ve sent
a program to the Harmonizer, you will not be able to Update it. You’ll get the
message shown to the right.
The Harmonizer Programmer’s Manual Page 33 of 97 Release 1.2.1
1999 Eventide, Inc.
Page 36

The Harmonizer
Getting Programs from the Harmonizer
In addition to creating programs from scratch in VSigfile, you can alter programs
that exist in the Harmonizer. First,
Orville users: make sure the DSP running the program is referred to in the upper
left corner of Orville’s display. Then select the Get command under the Midi
menu in VSigfile.
If you already have a patch in the active window of VSigfile, you
will get the warning that “All changes will be lost.” This means
that the program you Get from the Harmonizer will overwrite
the patch in the active window. To go ahead, press Yes, to
abort, press No.
Once to program is downloaded, its modules will appear in one
big string across the top
of the display as shown
right. Yuck.
This is a good time to use the re-Position
command under the Edit menu. The result will
look something like that shown to the right.
You’ve still got some organizing to do, but at least
you have a prayer now. A good way to organize
something like this is to first hide Control, Misc,
and Unconnects under the View menu and then
organize the remaining modules. Then show
Control and organize what appears. Finally, show
Misc and organize what appears.
<load> the program in the Harmonizer.
Programmer’s Manual
The Harmonizer
1999 Eventide, Inc.
Programmer’s Manual Page 34 of 97 Release 1.2.1
Page 37
The Harmonizer
Programmer’s Manual
Creating the User Interface
In our first tutorial in this chapter, we used an LFO module and a modfilter module. To allow the user
to control the parameters of these modules in the
outputs to the head module. You can create a wealth of programs this way. In the
parameters will automatically be grouped by module and
PARAMETER area, we simply connected their userobject
PARAMETER area,
SOFT KEYS will appear -one per module. A
program created this way will be fully functional and have all of the audio characteristics of a factory preset.
Audio, however, is where the similarities end. A program created this way will not look as slick, nor be as
easy to use, as the factory presets are. Factory presets are created by hand-connecting the userobjects of
knob modules to menupage modules and then hand-connecting the userobjects of those menupage
modules to the head module. This section details how this is done.
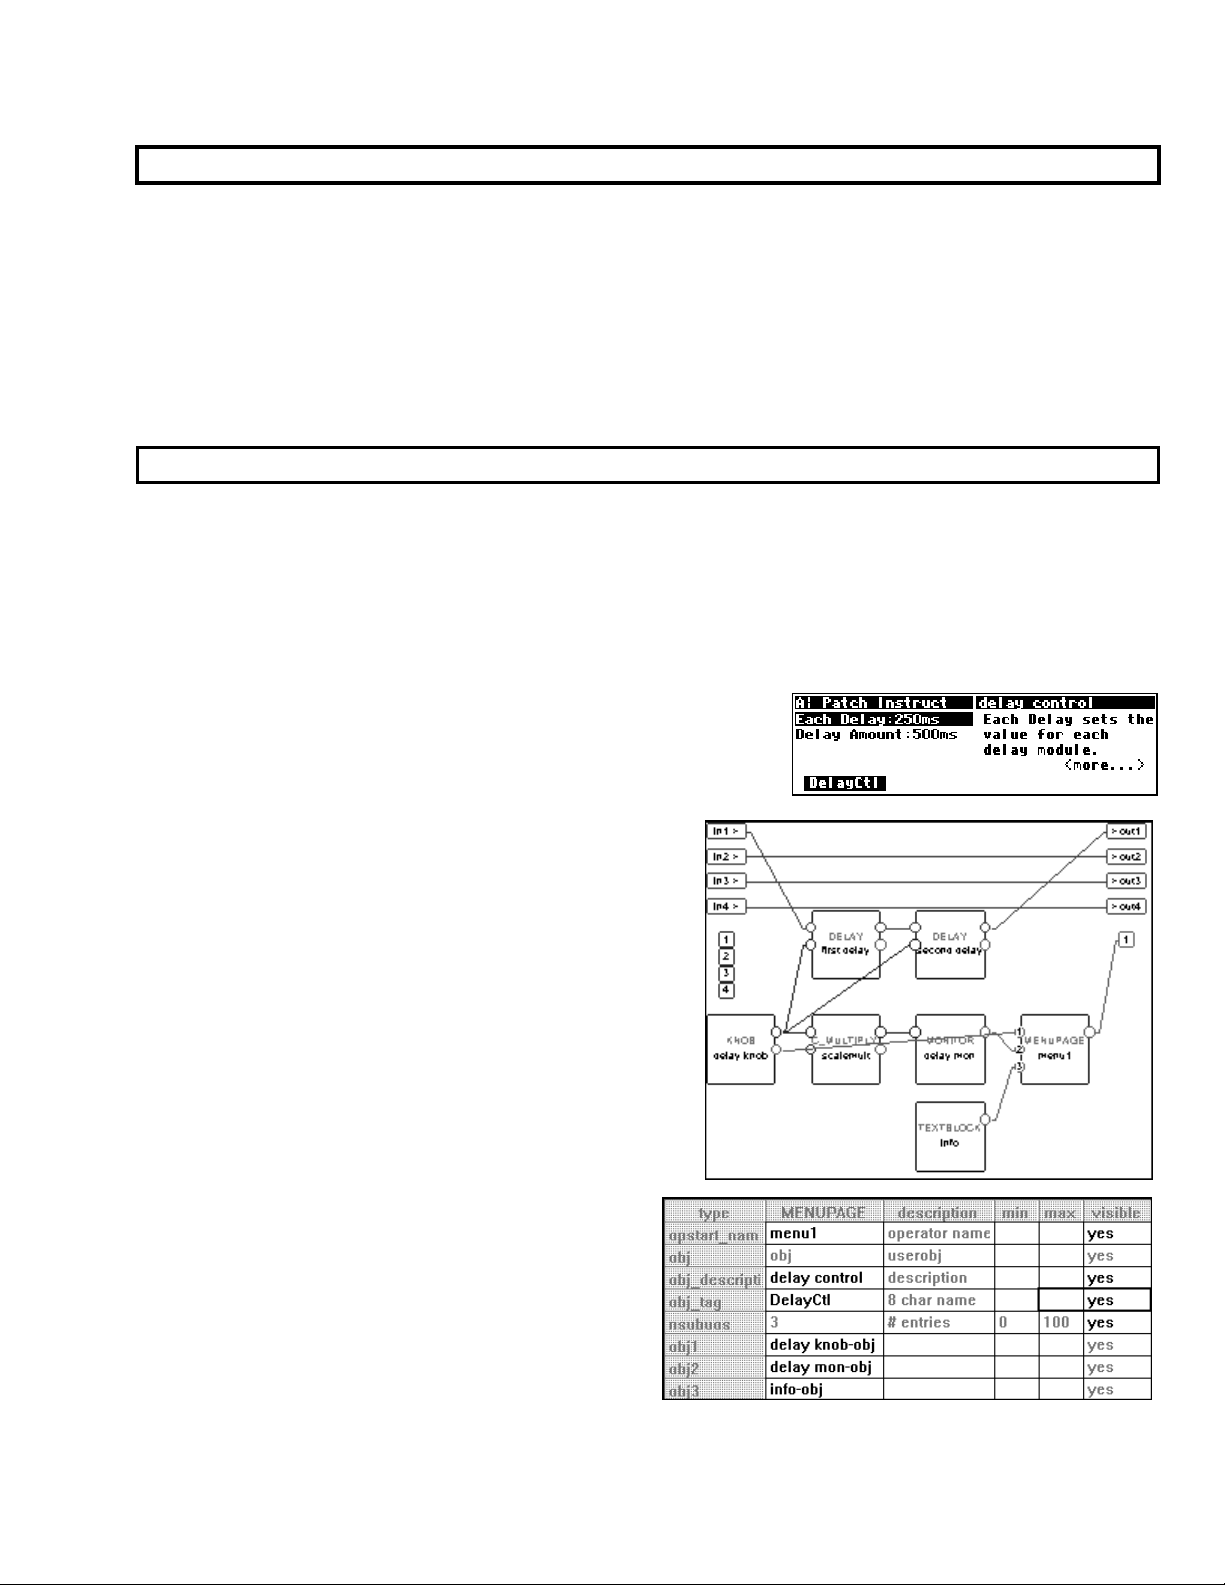
Viewing Menupages and Menupage Modules
A menupage module has a single userobject output and any number of userobject inputs. Normally a
menupage module is connected to the head module. If so, the menupage module shows up in the
PARAMETER area as one or more pages of parameters, a title line, and a SOFT KEY. The information for
the title line and
PARAMETER area are accessible by using the VSigfile Specifier Display on the menupage module (by double
clicking on it)
. For example, load the program Patch Instruct from the “Programming” bank in the
SOFT KEY and the list of connected userobjects that comprise the parameters seen in the
Harmonizer.
The menu page shown to the right is visible in the
PARAMETER
area. It is created with a menupage module, a knob module, a
monitor module, and a textblock module
.
minute)
(we’ll see how in a
Use the Get command under the Midi menu to download
this program into VSigfile. Then select the re-Position
command under the Edit menu. Move the modules
around until they look similar to what is shown on the
right.
Double click on the menupage module to enter the
VSigfile Specifier Display. From here, we can see the
description “delay control” and the 8 char name
“DelayCtl."
The Harmonizer Programmer’s Manual Page 35 of 97 Release 1.2.1
1999 Eventide, Inc.
Page 38
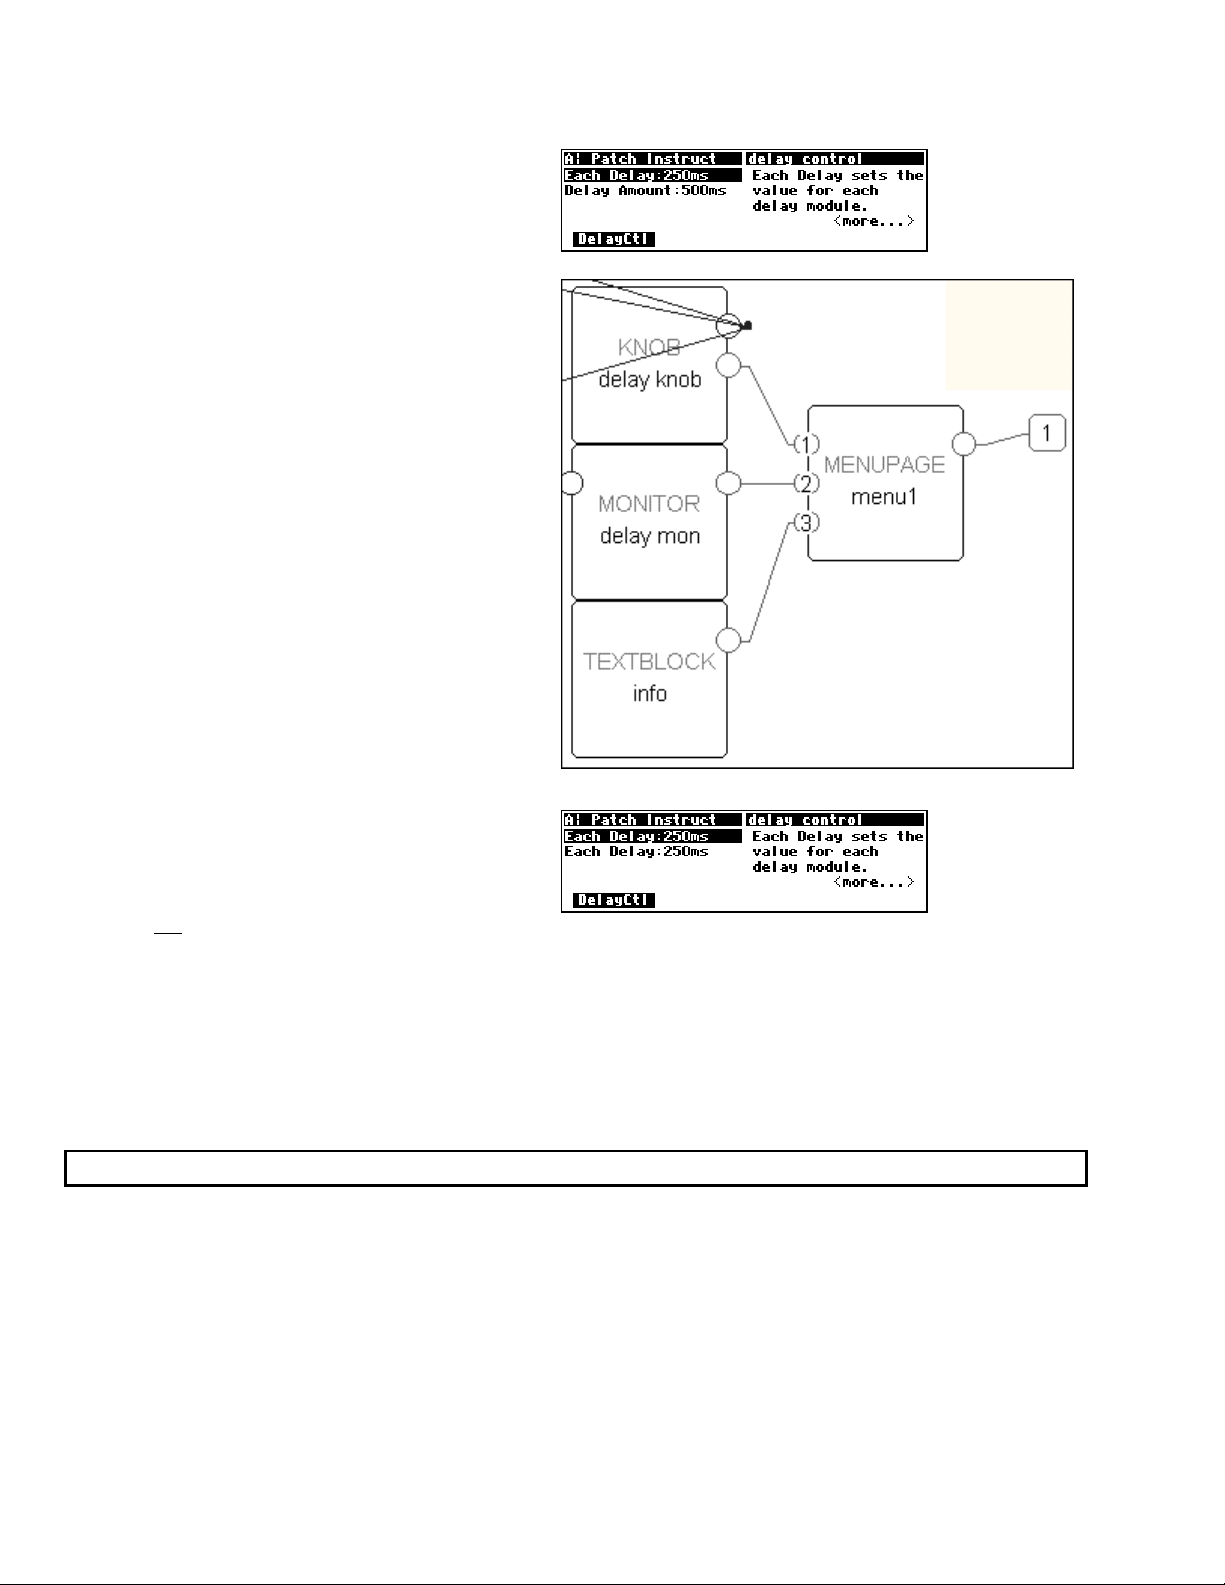
The Harmonizer
Programmer’s Manual
Note that these equate to the title and
SOFT KEY
when the menu page is viewed in the
PARAMETER area.
The obj rows indicate which userobject outputs are
connected to this menupage module’s userobject
inputs. In this case, the userobjects of the module
named “delay knob." the module named “delay
mon." and the module named “info” are all
connected to this menupage module’s userobject
inputs.
To the right is a close-up of what’s actually going
on.
For the fun of it
Specifier Display and connect the
output
input 2
connected to both
of the knob module to
of the menupage module (so that it is
(and what fun it is!) exit the VSigfile
userobject
userobject
1 and 2!). Then select the Send
command under the Midi menu to upload the program to the Harmonizer.
You should see that indeed, the Each Delay parameter is now doubled on the menu page. Change one
version and then highlight the second version; you’ll see that they are the same even if they do exhibit some
peculiar behavior. You won’t normally have any reason to put the same parameter on the same menu page
more than once!
more than one “place” in the program.)
(But you may want to put the same parameter on different menu pages in the same program so that it will be ac cessible from
Interface Modules
Control inputs are used to send a parameter value into a module. The parameter value is generated by
another module, perhaps a knob module. One common use for this capability is the creation of custom
“parameter adjusters” to adjust the parameters for the modules in a program. The custom “parameter
adjusters” are special purpose modules from the “interface” module group. This group includes the
common text/numerical parameter adjuster that is generated by the knob module, as well as several
graphical “parameter adjusters” (hfader module, vfader module, and rfader module).
The Harmonizer
Programmer’s Manual Page 36 of 97 Release 1.2.1
1999 Eventide, Inc.
Page 39
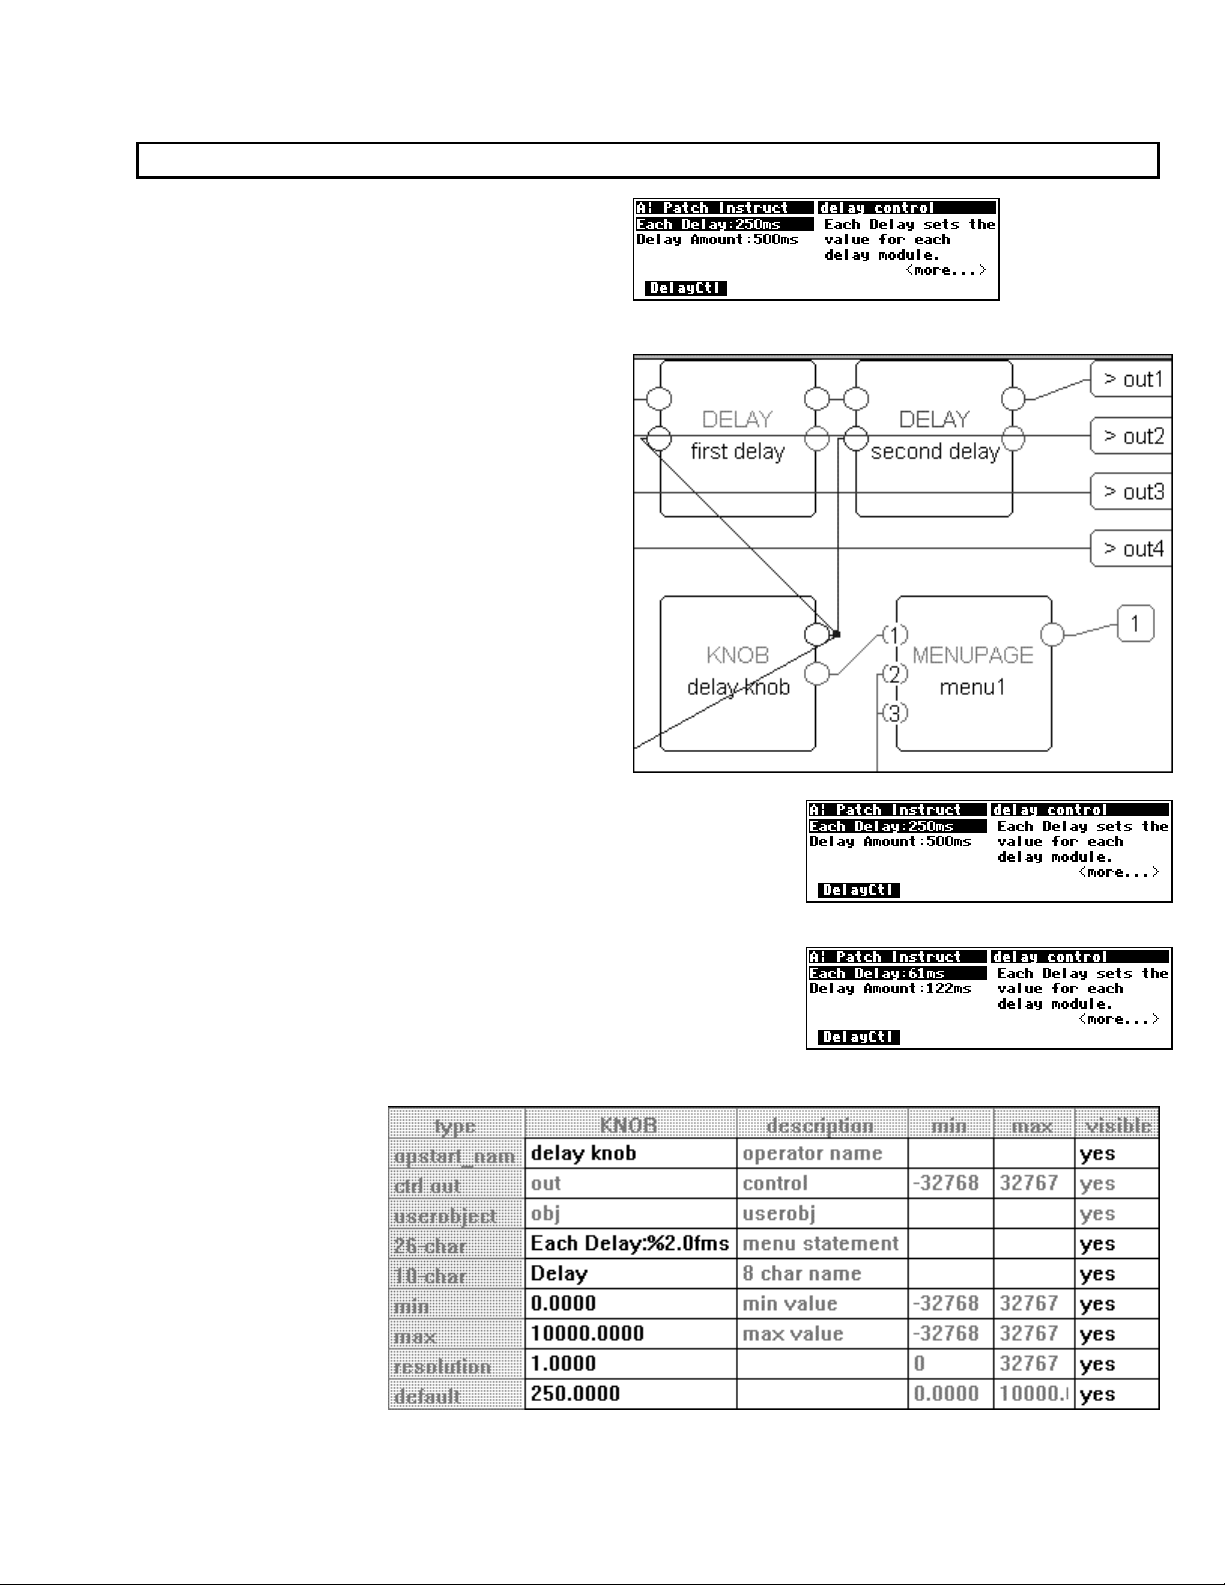
The Harmonizer
Programmer’s Manual
Parameter Adjusters
“Parameter adjuster” modules have a single
control output and a userobject output. If
connected to a menupage module, a “parameter
adjuster” will show up on the menu page in the
PARAMETER area as a parameter.
For example, in the program Patch Instruct (a
section of which is shown to the right)
, the module named
“delay knob” is a “parameter adjuster." It’s
userobject output is connected to a menupage
module which is in turn connected to the head
module.
Thus, the module named “delay knob” shows up in the
area as a parameter (
Each Delay).
PARAMETER
Selecting a parameter in the
KNOB will change the value of the “parameter adjuster’s” control
PARAMETER area and rotating the
output. The change will also be reflected in a textual or graphical
display change. In this case, rotating the KNOB changes the Each
Delay
parameter in the PARAMETER area, and it changes the value
sent from the “delay knob’s” control output into both delay
modules and the c_multiply module
(see the diagram above).
The actual text used for
a parameter and the
way changes made to a
parameter’s value in the
PARAMETER area
translate to control
output changes are set
up in the VSigfile
Specifier Display.
The Harmonizer Programmer’s Manual Page 37 of 97 Release 1.2.1
1999 Eventide, Inc.
Page 40

The Harmonizer
Programmer’s Manual
Double clicking on the knob module in the Patch Instruct program reveals this window as shown above
(you may have to download the program by using the Get command if you haven’t already done so).
• The module name specifier is set to “delay knob."
• The menu statement specifier is set to “Each Delay:%2.0fms." This means that on a menu page in the
PARAMETER area where this knob module’s menu statement shows up, the text “Each Delay:
xxxxxms
” will show, where xxxxx actually reflects the value that the parameter is set to. The “%2.0f”
part is described in some detail later.
• The 8 char name is “Delay." The 8 char name is what would show up as a SOFT KEY if this module’s
userobject output were connected to the head module.
• The min value specifier sets the minimum value that the parameter can be set to.
• The max value specifier sets the maximum value that the parameter can be set to.
• The resolution specifier sets the “jump” that the parameter value makes when the
KNOB is rotated. In
other words, when the user rotates the KNOB, the resolution is how far the parameter value changes per
incremental movement.
• The last row reads “250.000” This allows you to manually set the value of the control output from the
VSigfile Specifier Display.
Let’s look at these lines in more detail, shall we?
Menu Statement
The menu statement is a crucial specifier used in the basic knob module, which is the most common
“parameter adjuster." The menu statement is the line that will appear in
PARAMETER area menu page. The
menu statement may contain up to 20 characters including the parameter value. Anything over 20 characters
will not be displayed.
The first job of the menu statement is to indicate to the user what the parameter is for. It should also
contain the format for the parameter value that will be displayed, indicating the number of spaces that the
parameter value will take up and how many digits will be after the decimal point for a numerical parameter
value (parameter values can be text as well, more on this later). You must specify this format bearing in mind the min value,
the max value, and the resolution.
The syntax of the format is:
%Y.Xf
where Y is the number of spaces reserved for display and X is the maximum number of digits after the
decimal point. The percent(%), period(.), and f must be used as shown. If the period(.) is removed, the
Harmonizer will display six digits after the decimal point. Here are example formats and results that would
be displayed on a menu page in the
PARAMETER area. “~” represents a space that will be inserted.
format for 1.2345 for 23456.0013 for .1234 for 1 for -55.234
%1.2f
%4.2f
%5.2f
%5.0f
%7.1f
%9.4f
%2f
1.23 23456.00 0.12 1.00 -55.23
1.23 23456.00 0.12 1.00 -55.23
~1.23 23456.00 ~0.12 ~1.00 -55.23
~~~~1 23456 ~~~~0 ~~~~1 -55.23
~~~~1.2 23456.0 ~~~~0.1 ~~~~1.0 ~-55.23
~~~1.2345 23456.2345 ~~~0.1234 ~~~1.0000 ~-55.2300
1.234497 23456.001300 0.123398 1.000000 -55.234000
The Harmonizer
Programmer’s Manual Page 38 of 97 Release 1.2.1
1999 Eventide, Inc.
Page 41
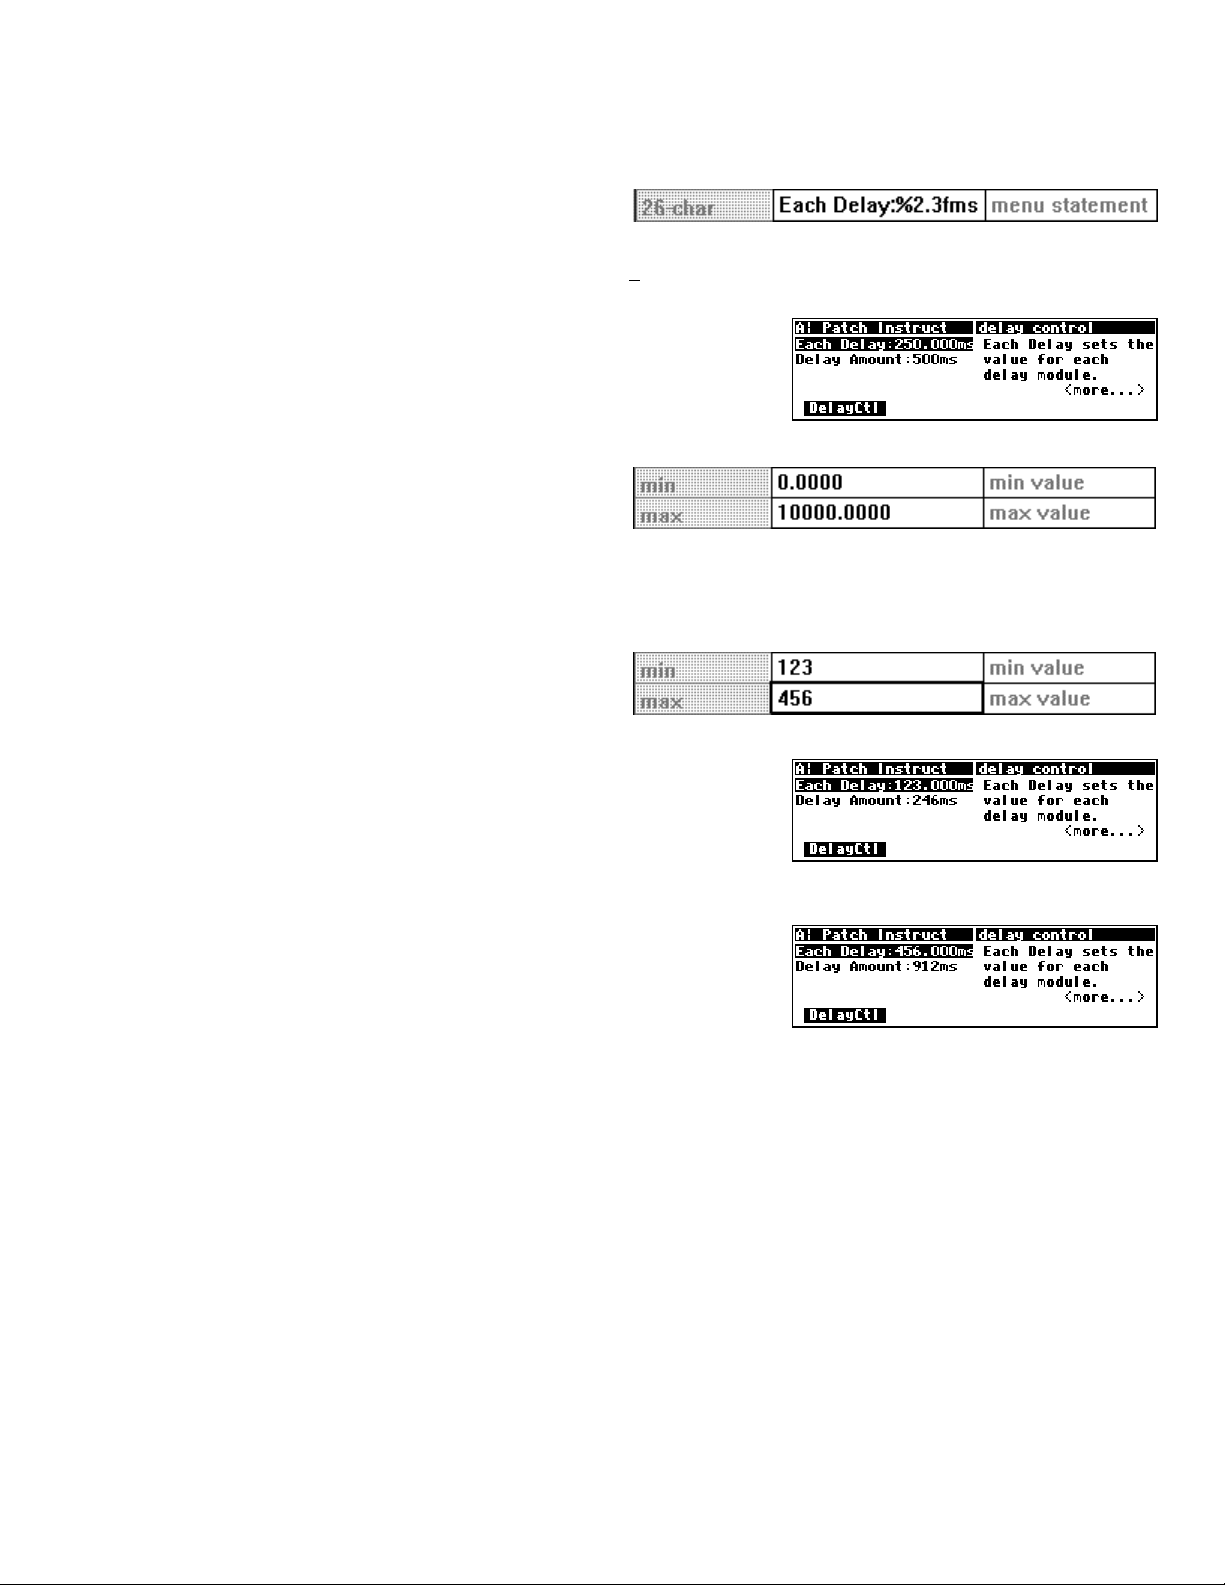
The Harmonizer
Programmer’s Manual
Refer to the separate User’s Manual on entering text for a list of the characters included in the text insert
menus. The formats shown here can be created using the % character, numbers, a small f, and a period(.).
As an wee exercise, Get the
program from the Harmonizer
Then change the menu statement to “Each Delay:%2.3
Patch Instruct
(it’s found in the “Programming” bank”), and double click on the knob module.
fms” as shown above.
Now Send the program back to the Harmonizer, and see the
difference that made to the display. Note the decimal value in the
“
Each Delay” parameter. It used to read 250. Now it reads
250.000. Contain yourself. . .
Min and Max Values
The lower and upper limits of a numeric
parameter value are set as specifiers in the module
that controls the parameter. In the example program
Patch Instruct, the “delay knob” parameter value has
a range of 0.0000 to 10000.0000 set by the min value and max value specifiers. You can adjust these limits if
you wish.
As another wee exercise, Get the
program from the Harmonizer
“Programming” bank”)
, and double click on the knob
Patch Instruct
(it’s found in the
module. Change the min value and max value to
set different limits as shown above.
Now Send the program back to the Harmonizer and test the
parameter. To the right we bump up against the new min
Delay
Each
value.
And on this screen we bump up against the new max value.
You will find min value and max value specifiers in most of the
“interface” group modules.
Resolution
The resolution specifier controls what minimum change in a parameter value can be achieved by turning the
KNOB or by using the INC or DEC key on the numeric keypad. The resolution specifier also controls the “rate
of change” as the
steps” as the
leaps” as the
KNOB is spun. If the resolution is very fine, the parameter value will increment in “baby
KNOB is spun. If the resolution is very course, the parameter value will increment in “great
KNOB is spun.
For example, if the selected parameter displays a value of 45.30 and the resolution is 1.0000, then slow
motion clockwise rotation on the
KNOB will change the value to 46.30 (unless the max value is less th an 46.30!). If
the selected parameter displays a value of 45.30 and the resolution is 0.1000, then slow motion clockwise
rotation on the
KNOB will change the value to 45.40.
As yet another wee exercise, double click on the knob module the same way as in the Min and Max Value
section and adjust the resolution specifier. Notice the difference this makes in the “step size” of the Each
Delay
parameter value. (You’ll have to walk y ourself through this one. . .)
The Harmonizer Programmer’s Manual Page 39 of 97 Release 1.2.1
1999 Eventide, Inc.
Page 42

The Harmonizer
Simple “Parameter Adjusters”
There are seven simple “parameter adjusters” modules:
• A knob module for simple numeric values.
• An rfader module for “rotary” graphical display instead of numeric values.
• An hfader module for “horizontal” graphical display instead of numeric values.
• A vfader module for “vertical” graphical display instead of numeric values.
• A textknob module for “text-valued” parameters.
• A tapknob module for “tapered” (or non-linear) values.
• A percentknob module for percentage display that corresponds to fractional control output.
They have several things in common:
• All have a single control output and no other signal inputs or outputs.
• All have a userobject output that can be connected to a menupage, gang, or head module.
• All have a menu statement and an 8 char name.
These modules are used by connecting their
userobject outputs to a menupage module or the
head module. The
will then show the text or graphic menu statements
for the connected “parameter adjuster” modules.
The following pages describe the simple “parameter
adjusters." To play along at home, load and then
Get the program Interface Modul es from the
Harmonizer
(it’s in the “Programming” bank).
PARAMETER area menu pages
Programmer’s Manual
Hfader Module
The hfader module creates a
horizontal graphic on a
PARAMETER area menu page. In
the example screen to the right it is
the highlighted, upper left
parameter. The area taken up by
the graphic is one half of the width
of the screen and one text line long.
Eight of these can fit on a single
menu page.
Six characters of the 8 char name are
presented on the display to the left
of the graphic. The menu statement
is not used. Refer to the Modules
Section for complete information.
The Harmonizer
1999 Eventide, Inc.
Programmer’s Manual Page 40 of 97 Release 1.2.1
Page 43
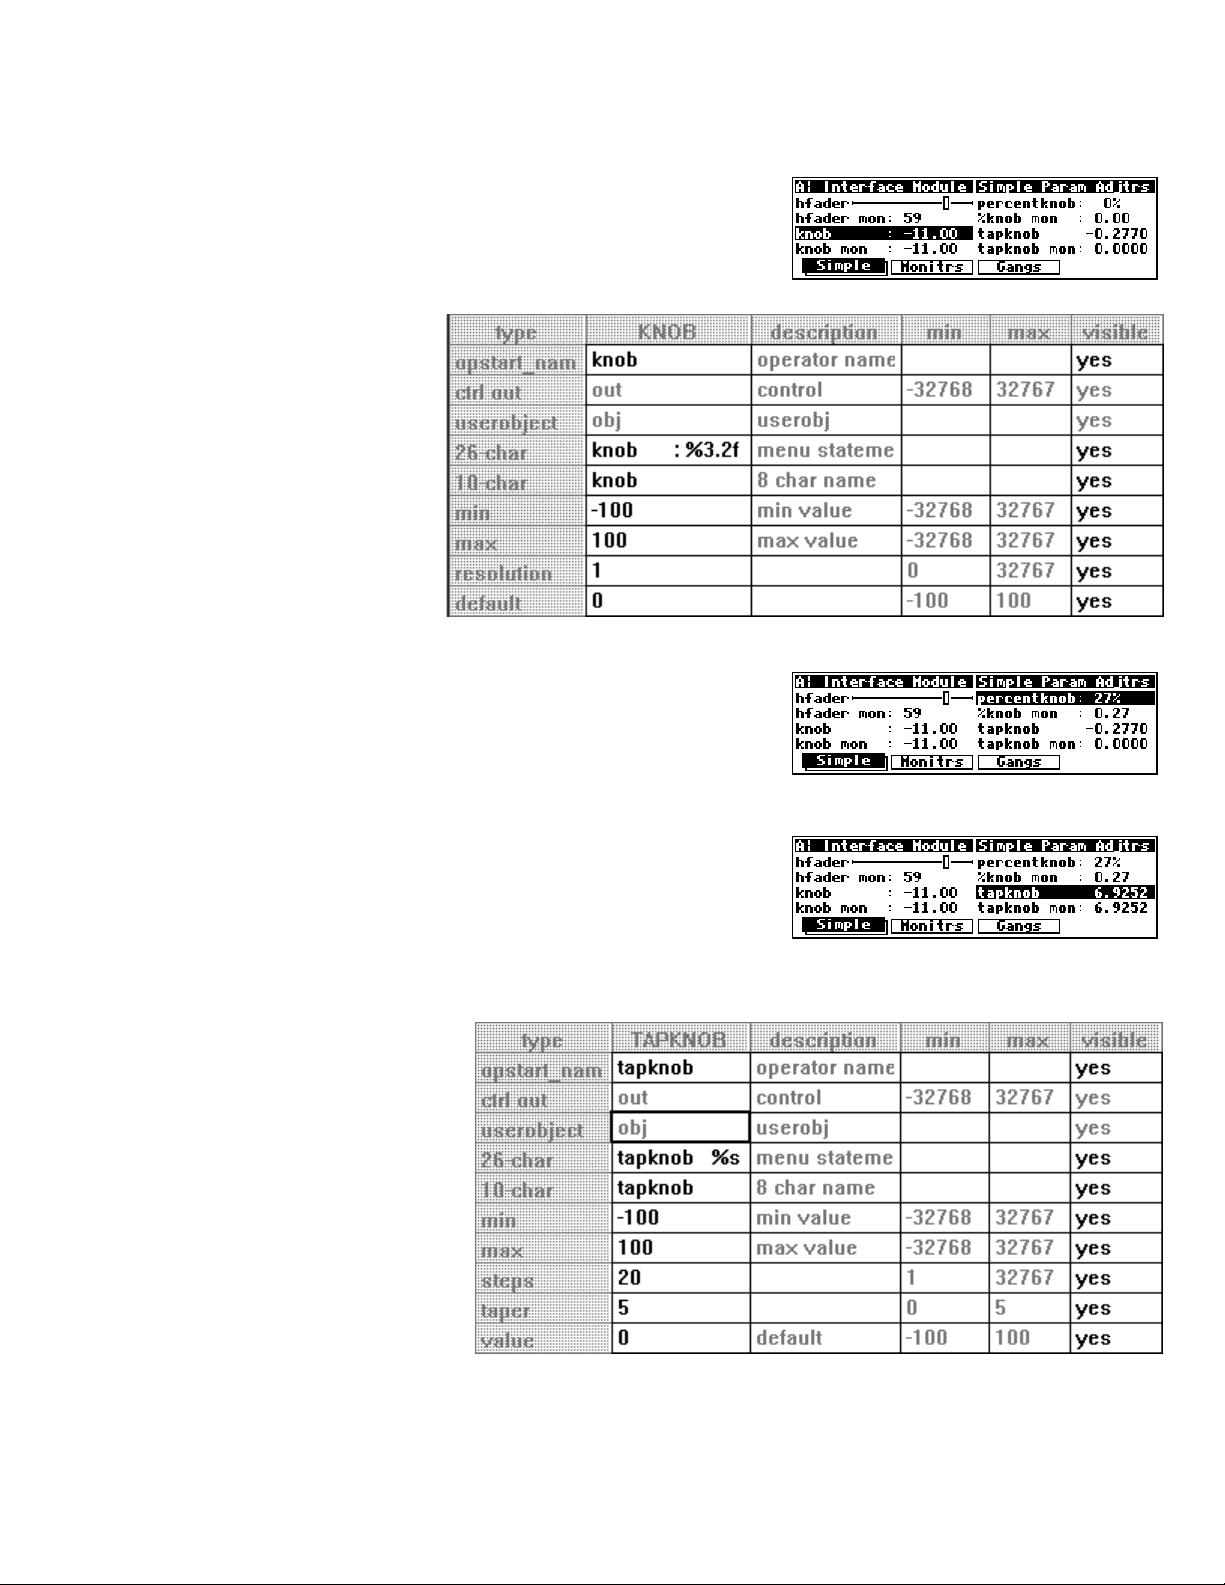
The Harmonizer
Knob module
The knob module is the most popular interface module (in factory
programs). It generates a 20-character text string, including a very
versatile numerical display from the menu statement. Eight of these
can fit on a single menu page.
The 8 char name is used only
if this module’s userobject
output is connected directly
to the head module.
Normally its userobject will be
connected a menupage
module. Refer to the
Modules Section for complete
information.
Percentknob Module
The percentknob module is very similar to the knob module.
The only difference is that the control output value is divided by
100. Refer to the Modules Section for complete information.
Programmer’s Manual
Tapknob Module
The tapknob module is a modification of the standard knob
module. Just like the knob module, the menu statement is used to
create the 20-character text display. However, instead of using the
%f format, the %s format is used. The tapknob module creates
an 8-character numeric result that is inserted in place of the %s.
The tapknob module creates a
tapered (non-linear) control that
has a “selectable” number of
steps (instead of the usual
resolution parameter) and a
“selectable” taper waveform.
The greater the taper specifier, the
more non-linear the parameter
response. Refer to the Modules
Section for complete
information.
The Harmonizer Programmer’s Manual Page 41 of 97 Release 1.2.1
1999 Eventide, Inc.
Page 44

The Harmonizer
Rfader Module
The rfader module creates a
graphic on the
screen. The graphic, including
title, takes up four lines of the
screen and one quarter of the
width of the screen. Up to four
of these modules can fit on one
menu page.
Nine characters of the menu
statement are displayed above
the graphic as a title. Refer to
the Modules Section for
complete information.
Vfader Module
The vfader module creates a
graphic on the PARAMETER
screen. The graphic, including
title, takes up four lines of the
screen and one sixth of the
width of the screen. Up to six
of these modules can fit on one
menu page.
Six characters of the 8 char
name are displayed in the
graphic as a title. Refer to the
Modules Section for complete
information.
PARAMETER
Programmer’s Manual
The Harmonizer
1999 Eventide, Inc.
Programmer’s Manual Page 42 of 97 Release 1.2.1
Page 45

The Harmonizer
Textknob Module
The textknob module
creates a multiple choice
selection in a single line by
half screen width area of a
PARAMETER area menu page.
The choices appear in place
of the %s in the menu
statement. The
only used if the module’s
userobject is connected to the
head module. The control
output reflects which
selection is made. If the 1st
selection is made the output
will equal 0. If the 3rd
selection is made, the output
value will equal 2.
8 char name is
Programmer’s Manual
ONTROL SIGNAL MONITORS
C
Just as “parameter adjuster” modules are used to generate control signals and are displayed as parameters in
PARAMETER area menu pages, control signal monitor modules monitor the value of control signals and may
be displayed on those same menu pages.
Graphical Control Signal Monitors
There are five different monitor modules. Three of these, the
hmonitor, meter, and vmonitor modules, produce
graphical displays. The screen to the right (taken from the program
Interface Modul es
graphical monitors
from the “
(among others).
Programming
” bank) shows the three
• Each of the graphical
control signal monitor
modules has a control
signal input and four
specifiers: minimum,
maximum, name and tag.
minimum sets the lowest
value that may be
indicated by the monitor.
• maximum sets the highest value that may be indicated by the monitor.
• For vmonitor and hmon, the tag specifier is used to generate the text for the monitor.
• For meter, the name specifier is used to generate the text for the monitor.
• The text fields of the monitors may include %f format numeric displays
information)
.
(to convey numerical as well as graphical
The Harmonizer Programmer’s Manual Page 43 of 97 Release 1.2.1
1999 Eventide, Inc.
Page 46

The Harmonizer
Programmer’s Manual
All three graphical monitors will indicate when the control input’s
value falls above or below the range set by the minimum and
maximum specifiers.
11 on the “knob for mons” module in the
(The screen to the right was made by changing the max value to
Interface Modul es
program.)
The vmonitor module creates a graphic that is one sixth of a screen width and four lines high. The
hmonitor module creates a graphic that is one half of a screen width and one line high. The meter
module creates a graphic that is one quarter of a screen width and four lines high.
Form over function. . .
Textual Control Signal Monitors
The monitor and tmonitor modules use text to display their
control input values.
The monitor module is a
mirror image of the knob
module; it displays the
decimal value of its control
input. The format for the
display is set using the text
and %f format described
earlier (page ).
The tmonitor module is
a mirror image of the
textknob module. It
uses the control input to
determine which of several
text strings will be shown.
A control input value of 0
chooses
chooses
text1, a value of 3
text4 and so on.
Both the textual monitor
modules create displays that
are half of a screen width
and one line long.
The Harmonizer
Programmer’s Manual Page 44 of 97 Release 1.2.1
1999 Eventide, Inc.
Page 47

The Harmonizer
Programmer’s Manual
Menupages and Parameter Placement
The use of menupage modules to create menu pages in the
PARAMETER area is crucial for creating easy to use programs. This
section discusses many of the fine points of menu creation. There
are several important points regarding
PARAMETER area menu pages
and their construction in VSigfile:
• Unconnected userobject inputs have no effect on the way things
look in the
PARAMETER area.
• Any userobject output that is connected to the head module
creates a SOFT KEY.
The order that a userobject is connected to the head module determines what location the
appear in the
the fifth
PARAMETER menu. The first userobject output gets the first SOFT KEY. The fifth userobject gets
SOFT KEY and so on.
• The order that a userobject is connected to a
menupage module determines where on
a
PARAMETER area menu page it will
appear.
Objects are placed on a menu in upper left to
lower right order, as listed in the menupage
module.
SOFT KEY will
If a module’s PARAMETER area graphic is too
large to appear on a menu page with other
modules’ graphics, it is placed on a later menu
page in a menu stack, thus creating a
KEY
stack.
SOFT
• menupage modules may be connected to other
menupage modules! A menupage userobject output is the
same as any other module’s userobject output, except that a
menupage userobject output is always big enough to warrant
being placed on its own menu page or pages in the
The Harmonizer Programmer’s Manual Page 45 of 97 Release 1.2.1
1999 Eventide, Inc.
Page 48
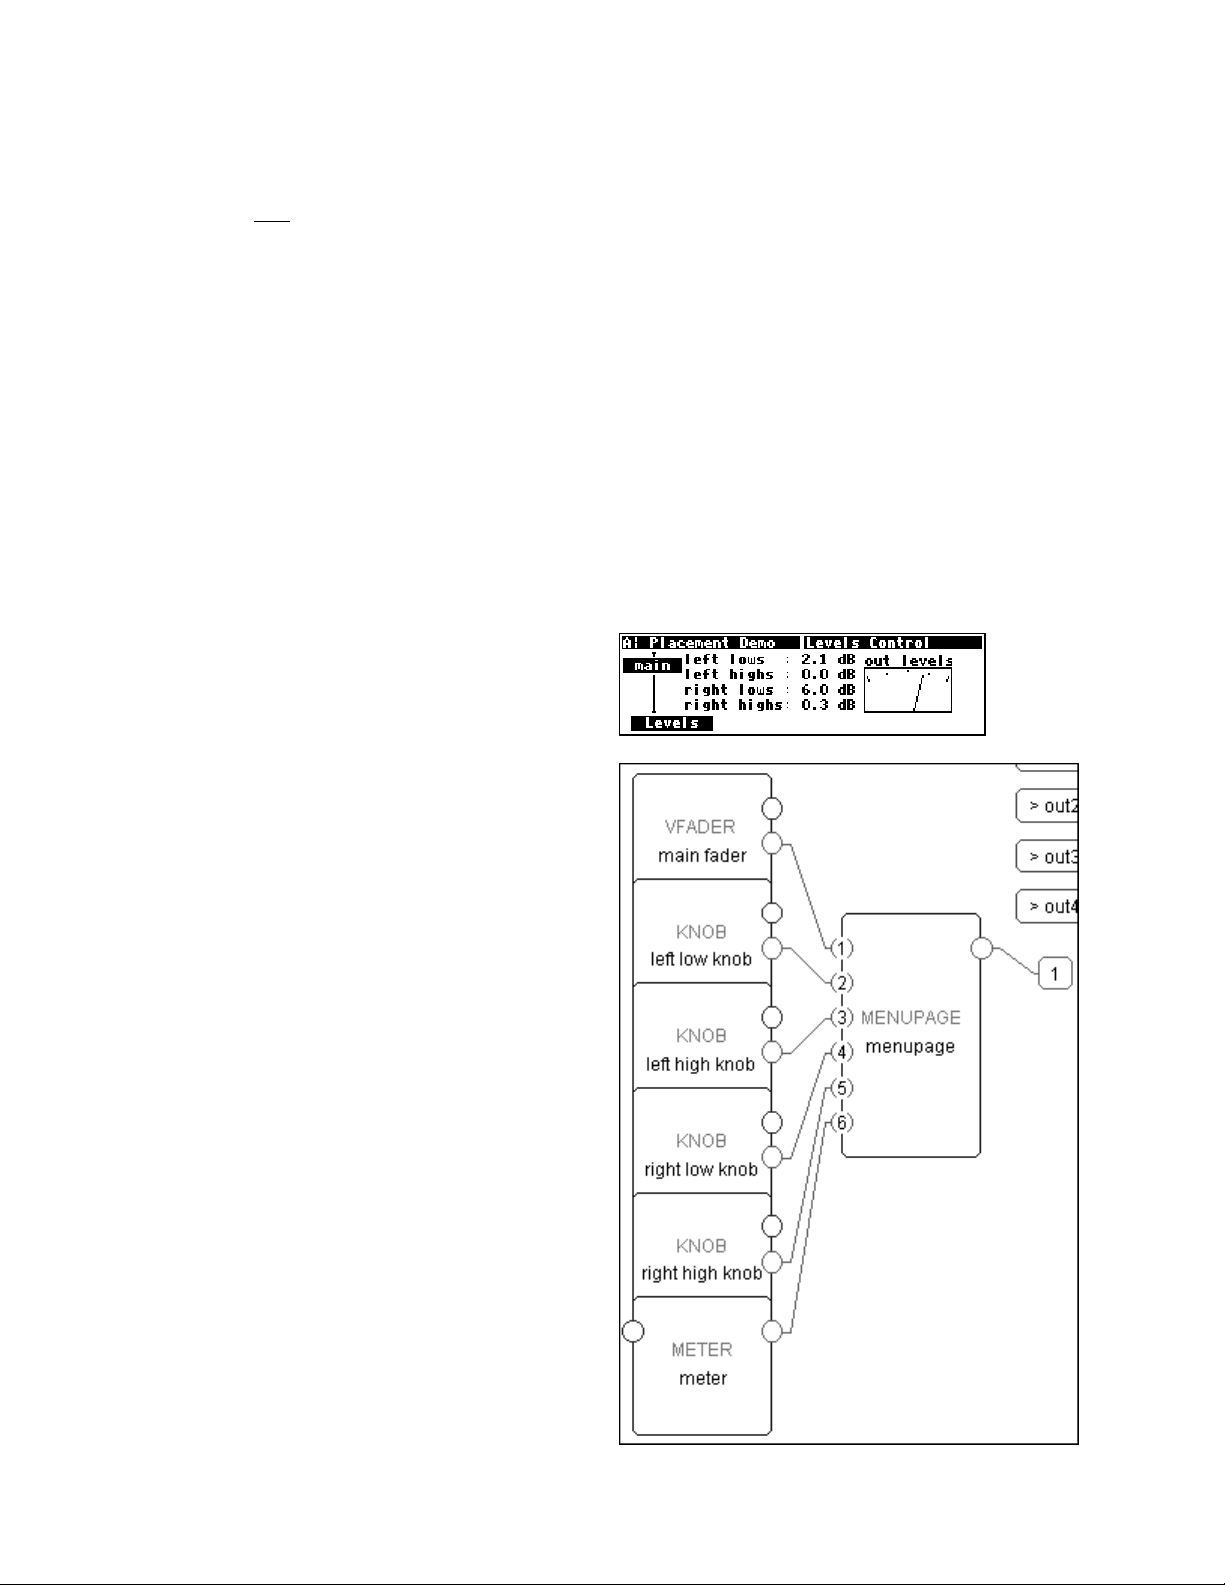
The Harmonizer
PARAMETER area.
Programmer’s Manual
• A userobject output may be connected to multiple userobject inputs. This means a single module’s userobject
output can show up in several menu pages in the
shown more than once on a single
menu page, the second instance might not be updated when the first instance’s value changes and vice versa.
PARAMETER area. Note: If an module’s PARAMETER area graphic is
Parameter Placement on a Menu Page
Menu page design may be highly individualized. The “look and feel” of a menu page is important if a
program is complex or if there are displayed reactions to adjustments that must be viewed and understood
quickly. For instance, if a program uses a meter monitor to display the signal level in a given frequency
range while a knob parameter gives adjustment of the compression level in that frequency range, it is
important to have the knob parameter and the meter monitor on the same menu page. It may also be
possible to show the relationship between a fader parameter and a meter monitor by placing them on
the same menu page. This kind of “look and feel” control is performed through the connection of userobject
outputs to menupage modules.
This section goes through a tutorial to show:
• Parameters are presented on a menu page in the
PARAMETER area in the order their userobjects are
connected to a menupage module, with placement beginning in the upper left corner of the screen
and proceeding to lower right corner of the screen.
• Modules that produce parameters with simple text
take up one eighth of the screen
. Modules that produce parameters with
module)
(exception is the textblock
graphics take up some other portion of the screen.
The order that modules are connected to the
menupage module may cause the parameters to be
placed poorly, allowing only a few parameters to
appear on a screen where better placement might
have allowed more.
Placing a Vfader, a Meter, and Four Knob Modul es
It is possible to build a good looking menu page using
six modules connected to a menupage module. The
order of their connection to the menupage module is
important. The display to the right shows a typical
arrangement of the six modules, taken from the
program
“
Programming” bank.
Placement Demo found in the
To achieve this arrangement, the modules’ userobject
outputs must be connected to the menupage module
in exactly the order shown to the right:
1. main fader-obj
2. left low knob-obj
3. left high knob-obj
4. right low knob-obj
5. right high knob-obj
6. meter-obj
The Harmonizer
Programmer’s Manual Page 46 of 97 Release 1.2.1
1999 Eventide, Inc.
Page 49
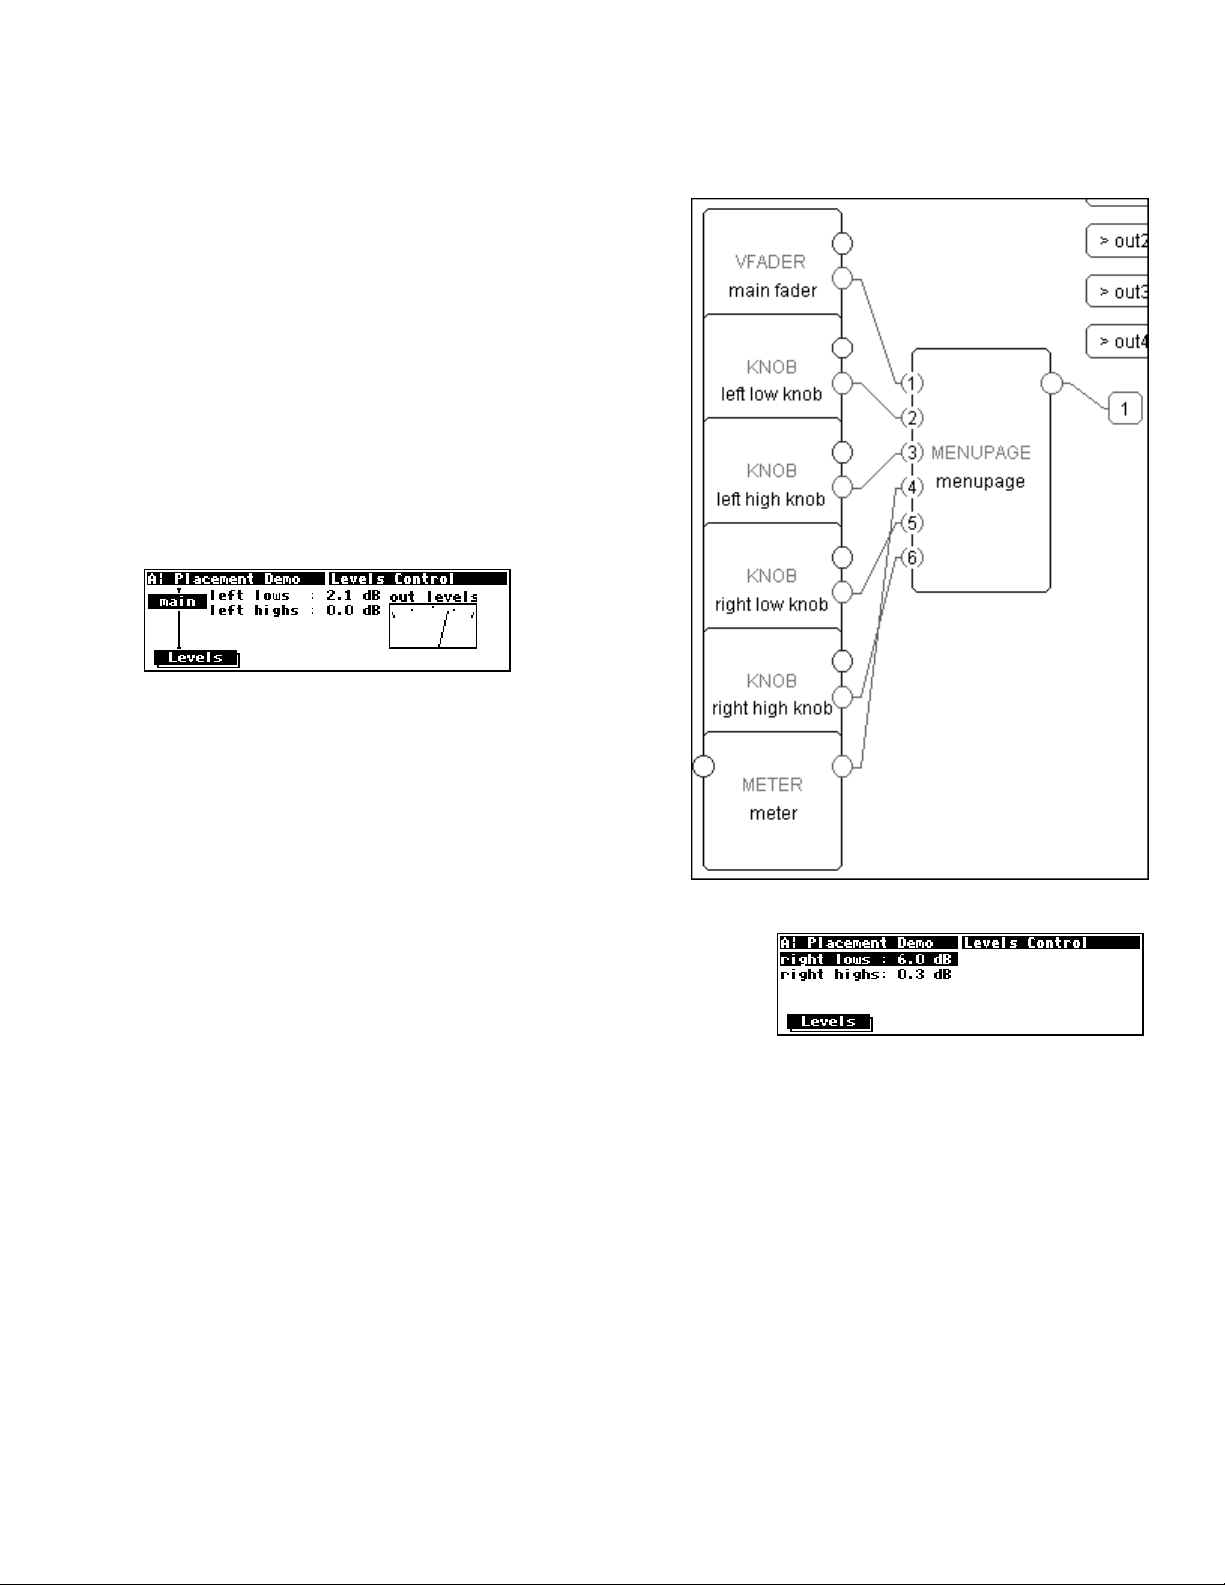
The Harmonizer
If the userobject outputs are connected in a different
order, the menu page items might not only look bad but
might not all fit on the same menu page. For instance,
connecting the userobject outputs in this order:
1. main fader-obj
2. left low knob-obj
3. left high knob-obj
4. meter-obj
5. right low knob-obj
6. right high knob-obj
results in two menu pages
(accessible via a stacked SOFT KEY)!
Programmer’s Manual
Since parameters are always placed from upper left to lower right,
top to bottom, once the meter monitor is placed, (not fitting
below the left highs parameter) there is no more room below the
meter or to the right of the meter on the first menu page.
Therefore, a new menu page is created for the latter two knob
parameters.
The Harmonizer Programmer’s Manual Page 47 of 97 Release 1.2.1
1999 Eventide, Inc.
Page 50
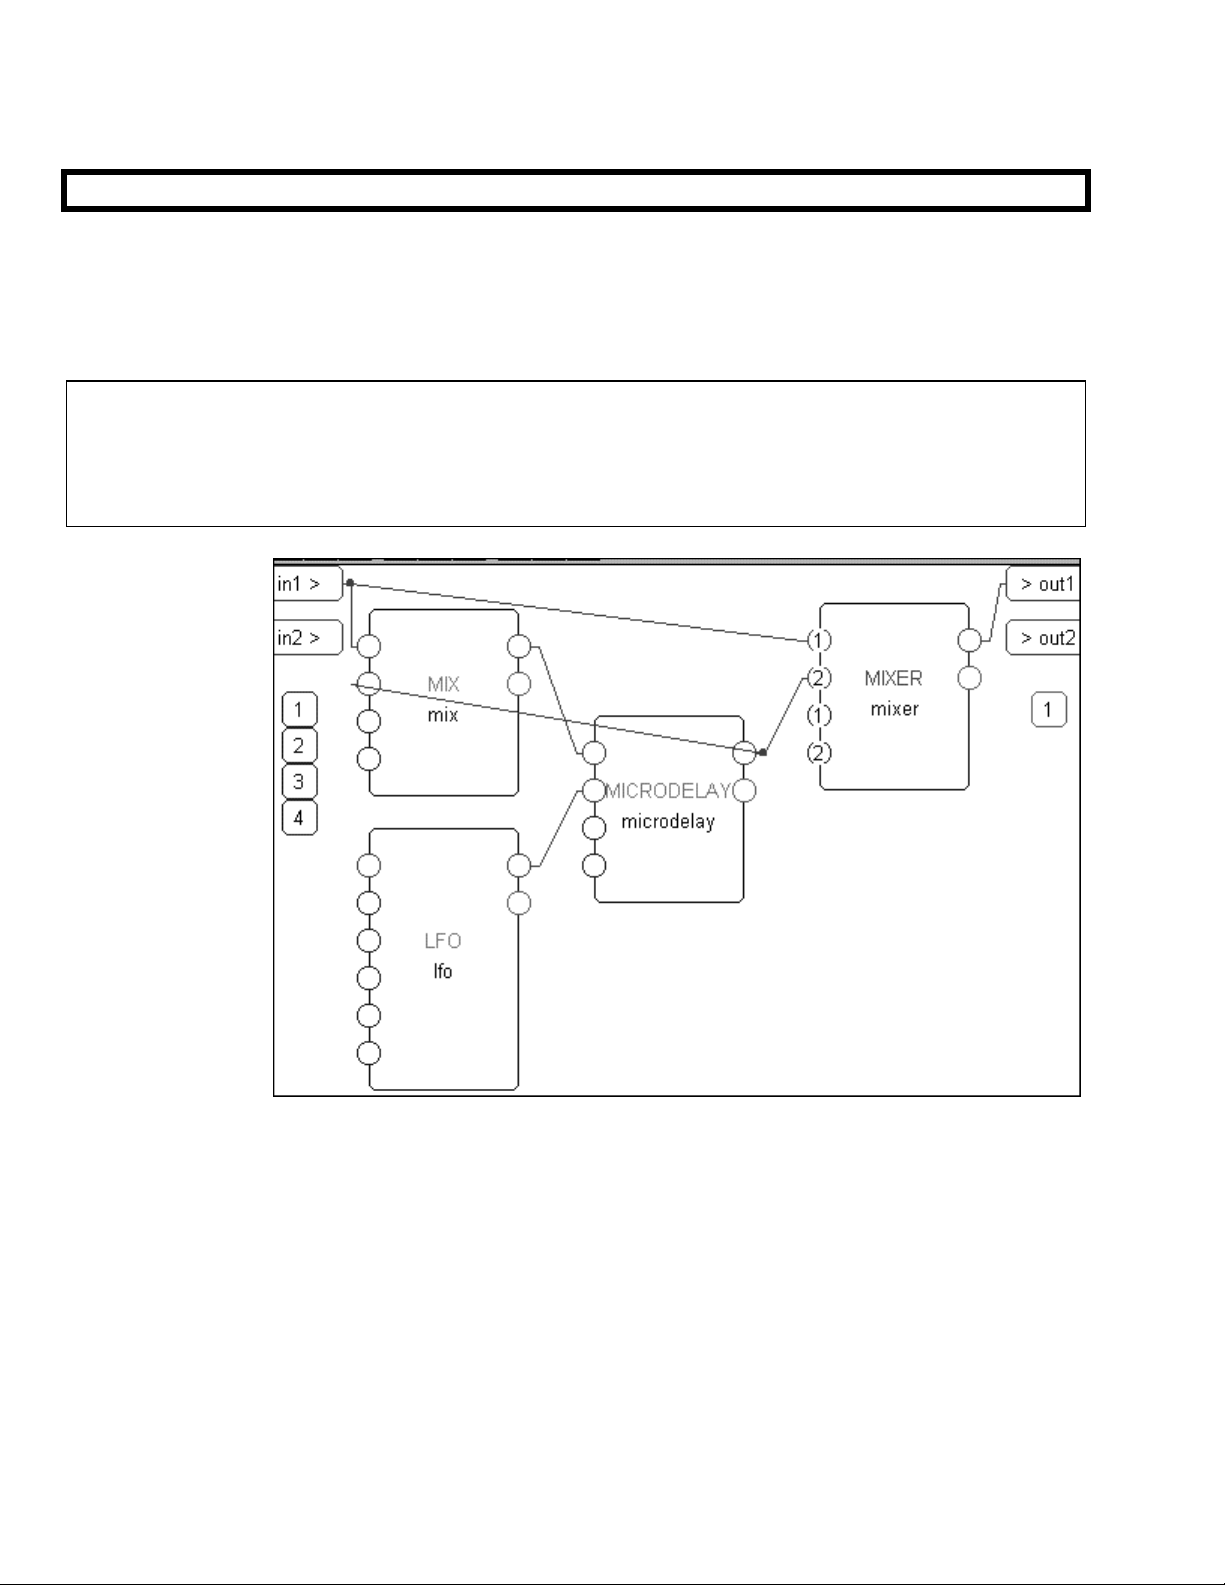
The Harmonizer
TUTORIAL 2 -PRETTY IN DEPTH
OK, now you’ve got just about all the tricks at hand. It’s time to build a serious program, complete with
custom menu pages. We’ll build a dual flanger with a changeable rate, depth, feedback, and waveform.
Flangers work by modulating a short delay and then recombining that signal with the original signal. The
interference that results from the recombination produces that classic “whooshing” effect.
Recall our three “cornerstones” of program construction:
1. We must connect appropriate modules to achieve a desired, overall audio effect.
2. We must control the parameters of the modules in a program so that the desired audio effect is
achieved.
3. We must make some of the parameters available in the PARAMETER area so that the user can “tweak”
the program to fit a particular situation.
We’ll clearly tackle
“cornerstone one”
first. We’ll then
tackle “two” and
“three” at the same
time because
they’re quite
intertwined.
The audio modules
we will need for a
single channel of
our flanger are as
follows:
mix module to mix back part of our modulating delay’s output to produce “feedback."
microdelay module to modulate the signal.
LFO module to modulate the microdelay module’s delay time.
mixer module to combine the modulated signal with the original signal.
Go ahead and add these modules and connect them as shown above. The mix module and the mixer
module are both found in the “Mixer” group. The microdelay module is found in the “Delay” group.
The LFO module is found in the “Oscillator” group. Remember to add a repeating field to the mixer
module by clicking on the first input and then selecting the Add Repeating Field command under the Edit
menu.
The Harmonizer
1999 Eventide, Inc.
Programmer’s Manual Page 48 of 97 Release 1.2.1
Programmer’s Manual
Page 51
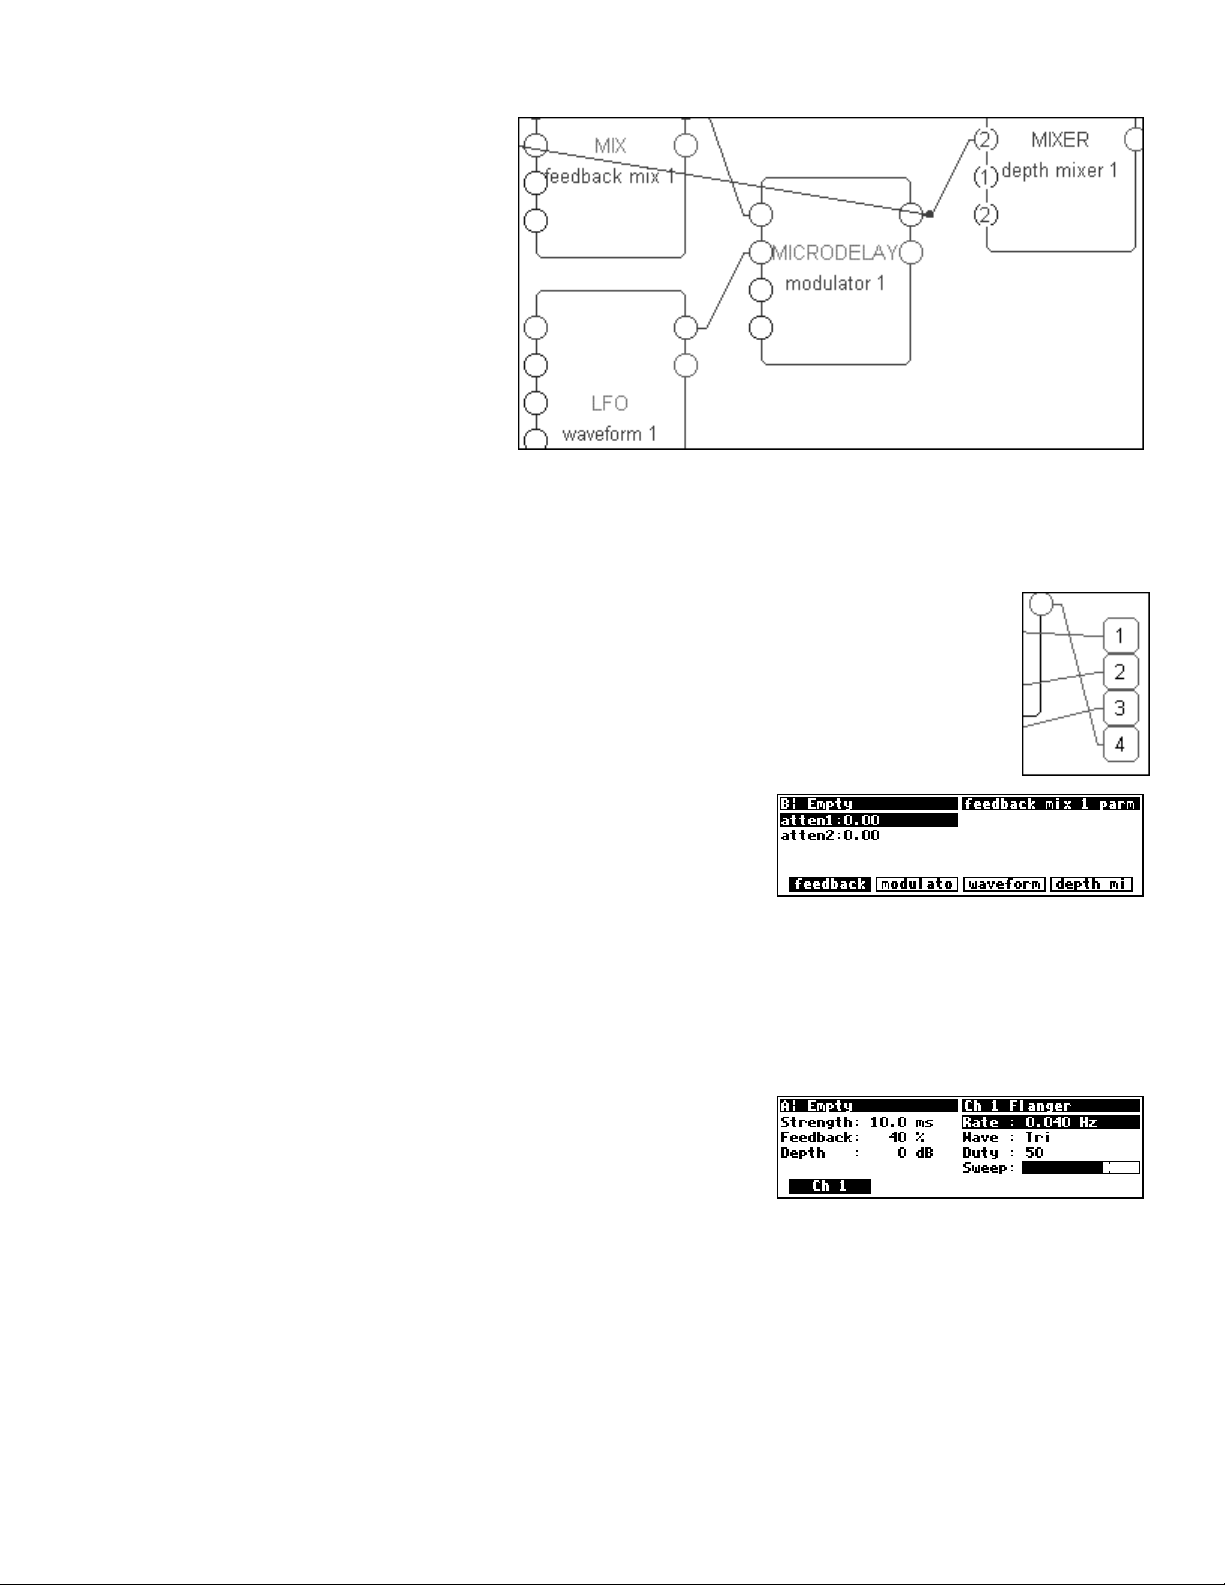
The Harmonizer
Programmer’s Manual
To keep things straight, let’s rename
these modules. Remember to tack a
“1” on at the end of each name. That
way their names will Copy
appropriately when we Copy these
modules for the second channel.
Now double click on the “modulator
1” module and change the max delay specifier to 50 milliseconds. A 50ms modulation is more than sufficient
for a flanger. Also, set its delayamt control input to “0.1." Doing so will ensure that the delay time is never
modulated to zero milliseconds, a situation that can result in audible clicks and pops. Now we’ve
accomplished “cornerstone one." The audio is set (for channel one, anyway).
This is a good time to make sure the flanger works as you expect it to. Connect the userobject
outputs from these four modules to the head module
(adding repeating fields as necessary) and then
select the Send command under the Midi menu to upload the program to the Harmonizer.
Depending on the order of your connections, you’ll see
something like the screen to the right in the Harmonizer. To get
the flanger working, you’ll need to set atten1 on the [feedback]
menu page to
ms
, moddelay on the [modulato] menu page to 5.0 ms, and
freq on the [waveform] menu page to 0.250 Hz. Try it out.
1.00, delay on the [modulato] menu page to 0.1
Assuming it works and you’re not cursing this page, you’ll want to choose the Update params command
under the Midi menu to “grab” the parameter changes you made in the Harmonizer. Now let’s concentrate
on controlling the parameters of this program.
We’re going to create a menu page that utilizes “parameter
adjusters." To create a cool, usable flanger, we’ll need six
“parameter” adjusters and one monitor per channel
“sneak peek” at what we’ll have when we’re done)
• We’ll need a “
Strength” parameter that adjusts the length of
:
(to the right is a
the delay modulation.
• We’ll need a “Feedback” parameter that controls how much of the delay’s output is reapplied to its
input. This will actually control the level of the mix module’s second input.
• We’ll need a “Depth” parameter that controls how much of the modulated signal is recombined with
the original signal. This will actually control the level of the mixer module’s second input.
• We’ll need a “Rate” parameter that controls the rate of the LFO module.
• We’ll need a “
Wave” parameter that selects the LFO module’s waveshape.
The Harmonizer Programmer’s Manual Page 49 of 97 Release 1.2.1
1999 Eventide, Inc.
Page 52
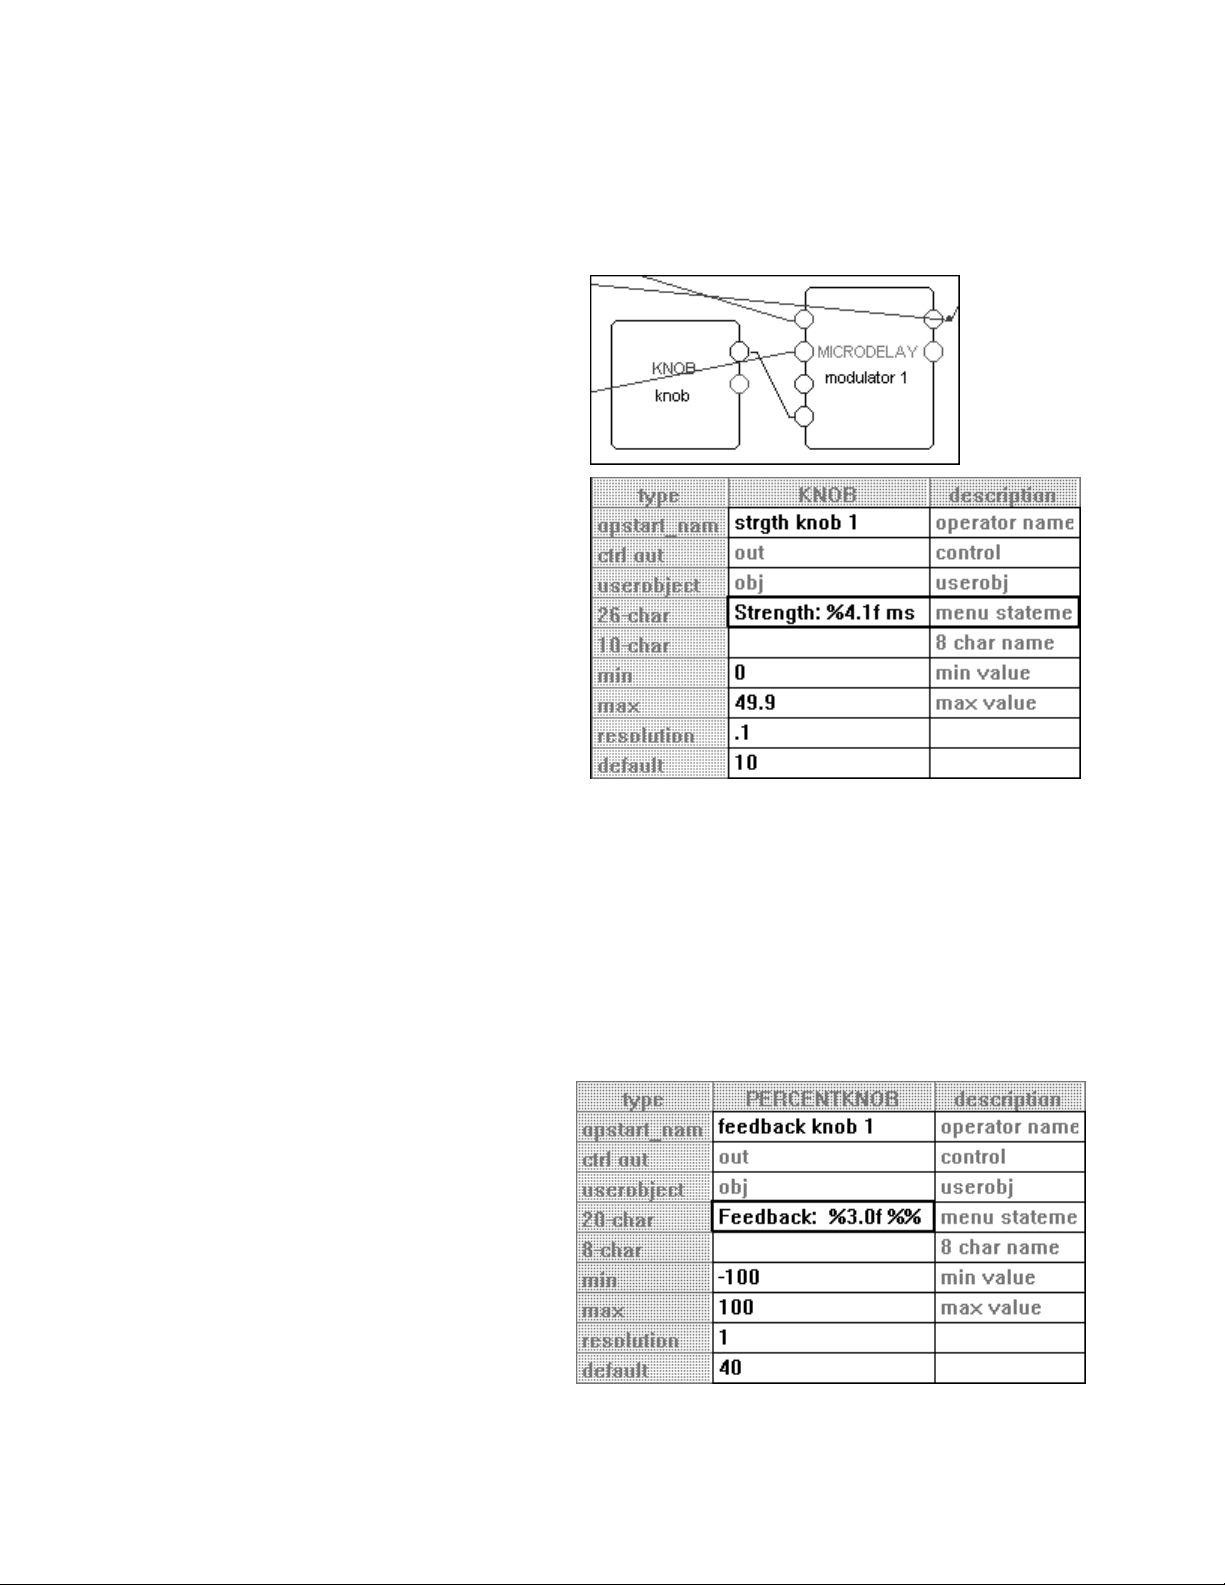
The Harmonizer
Programmer’s Manual
• We’ll need a “Duty” parameter that controls the duty cycle of the LFO module’s waveshape.
• Finally, we’ll want (though we don’t need) a “
Sweep” monitor that monitors the output of the LFO
module.
We’ll hook each one of these up and then use the VSigfile Specifier Display window to set all of the various
specifiers correctly.
Strength
The first “parameter adjuster” we’ll want to add is a
knob module
(from the “Interface” group). Go ahead and
add it, and connect it to the microdelay module
as shown.
Then double click on it to enter the VSigfile Specifier
Display window. To the right is how we’d like to set
everything and here’s why:
• We set the module’s name to reflect its purpose.
Adding the “1” at the end ensures that when we
copy this module later, the copied version is
incremented properly.
• The menu statement is what will appear on the
menu page. We write “4.1” because we want the
value to take up four spaces no matter how many
digits there are and because we want only one
decimal point of precision.
• Because this knob module will be connected to
a menupage module and not to the head module directly, the 8 char name is left blank (it would serve
as the
SOFT KEY title if the module were connected directly to the head module).
• The min is set at zero corresponding to no modulation at all.
• The max is set at “49.9” because we set our maximum delay time to 50 milliseconds and we set the
delayamt to “0.1." We don’t want the user to specify a
Strength that is greater than what the
microdelay module is set up to deliver!
• We set the resolution to “0.1” so that a spin of the
Strength’s value.
KNOB results in a reasonable change in the
• We set the default value at “10” because 10 milliseconds is a pretty standard flanger strength.
Feedback
Add a percentknob module and connect its
control output to
amp2 on the mix module. Then
double click on it. Change the specifiers as shown to
the right.
• The mix module’s control inputs accept a value
from -1 to +1
signal)
. Recall that the percentknob
(negative values invert the phase of the applied
module’s output will be 1/100th that of its
displayed value. Thus we can display the
feedback as a percentage and still get the
appropriate fractional control output.
The Harmonizer
Programmer’s Manual Page 50 of 97 Release 1.2.1
1999 Eventide, Inc.
Page 53

The Harmonizer
• The “%%” in the menu statement is necessary to allow a single “%” symbol to appear on the
Harmonizer’s display. This is because “%” is a special symbol that tells the Harmonizer that numeric
information is to be displayed in what follows. Thus, to tell it that you actually want to display a “%”
symbol requires two.
Depth
Add a knob module and connect its control
output to
double click on it to alter its specifiers to match
those shown to the right.
• The control inputs on the mixer module
Rate
Add a knob module and connect its control
output to
click on it to alter its specifiers to match those
shown to the right.
• The
gain2 on the mixer module. Then
accept values from -100 to zero.
freq on the LFO module. Then double
freq control input on the LFO module
accepts a value between zero and 1000.
Programmer’s Manual
The Harmonizer Programmer’s Manual Page 51 of 97 Release 1.2.1
1999 Eventide, Inc.
Page 54
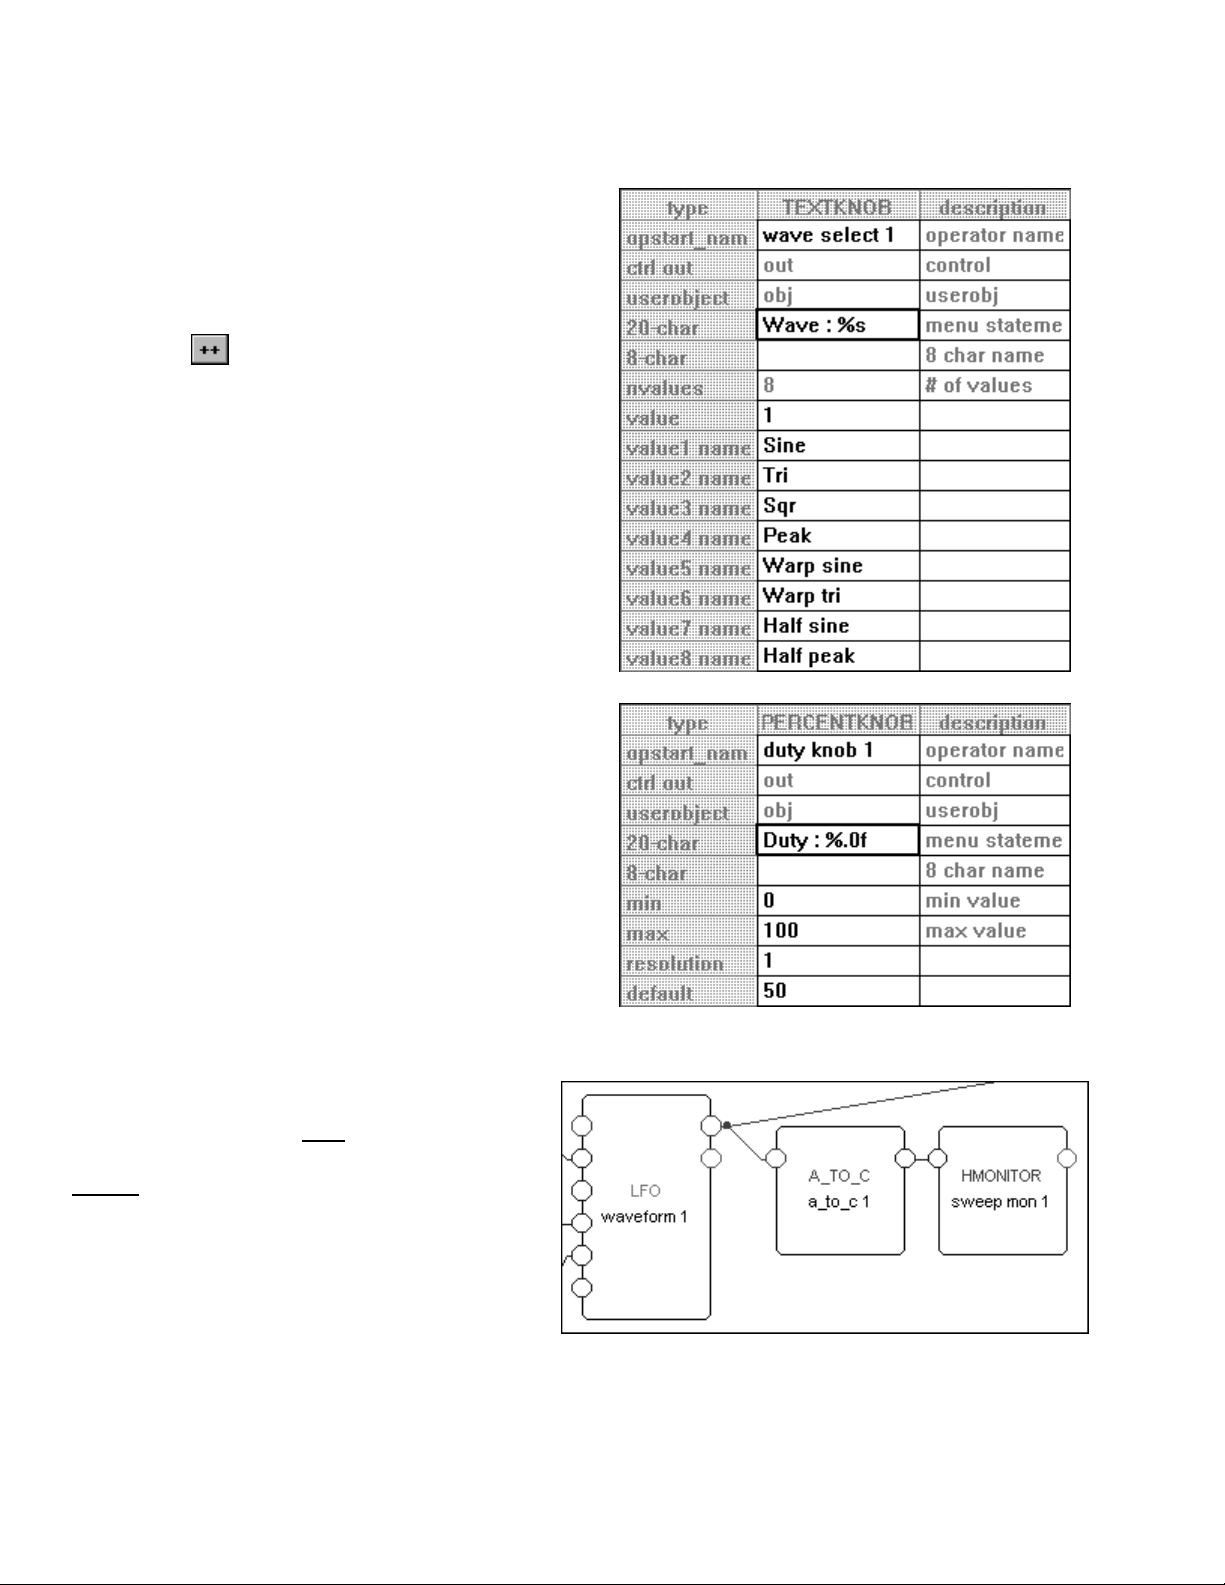
The Harmonizer
Wave
Programmer’s Manual
Add a textknob module and connect its control
output to
freq on the LFO module. Then double click
on it to alter its specifiers to match those shown to the
right. Remember to add the correct number of
repeating fields by first clicking on the cell under the
“TEXTKNOB” column associated with the “value1
name." The
button appears, permitting you to add
repeating fields with abandon.
• The “value” row sets which value the module will
default to. A value of 0 selects value1, a value of 1
selects value2, a value of 2 selects value3, a value of 3
selects value4, and so on. Here, a value of 1 selects
value2, Tri.
• The waveshapes corresponding to each value can be
found in the LFO module’s section in the Modules
Section.
Duty
Add a percentknob module and connect its control
output to
dutycycle on the LFO module. Then
double click on it. Change the specifiers as shown to the
right.
• The
dutycycle control input on the LFO module
accepts an input value between zero and 1, but by using
the percentknob module we can display a value
between zero and 100. The choice is purely aesthetic.
We could have just as well used a normal knob module
and set its min and max to “0” and “1."
Sweep
Arranging a Sweep monitor is a little more
involved than the above interface modules were.
We want to monitor the mod
output of the LFO
module, but all of the monitor modules have only
control
inputs. Of course we can’t directly
connect a mod output to a control input!
Fortunately there exist a few “bridge” modules
that convert audio/mod signals to control signals
and vice versa. Go ahead and add an a_to_c
module from the “Bridge” group and an
hmonitor module from the “Interface” group.
Connect them as shown above.
The Harmonizer
Programmer’s Manual Page 52 of 97 Release 1.2.1
1999 Eventide, Inc.
Page 55
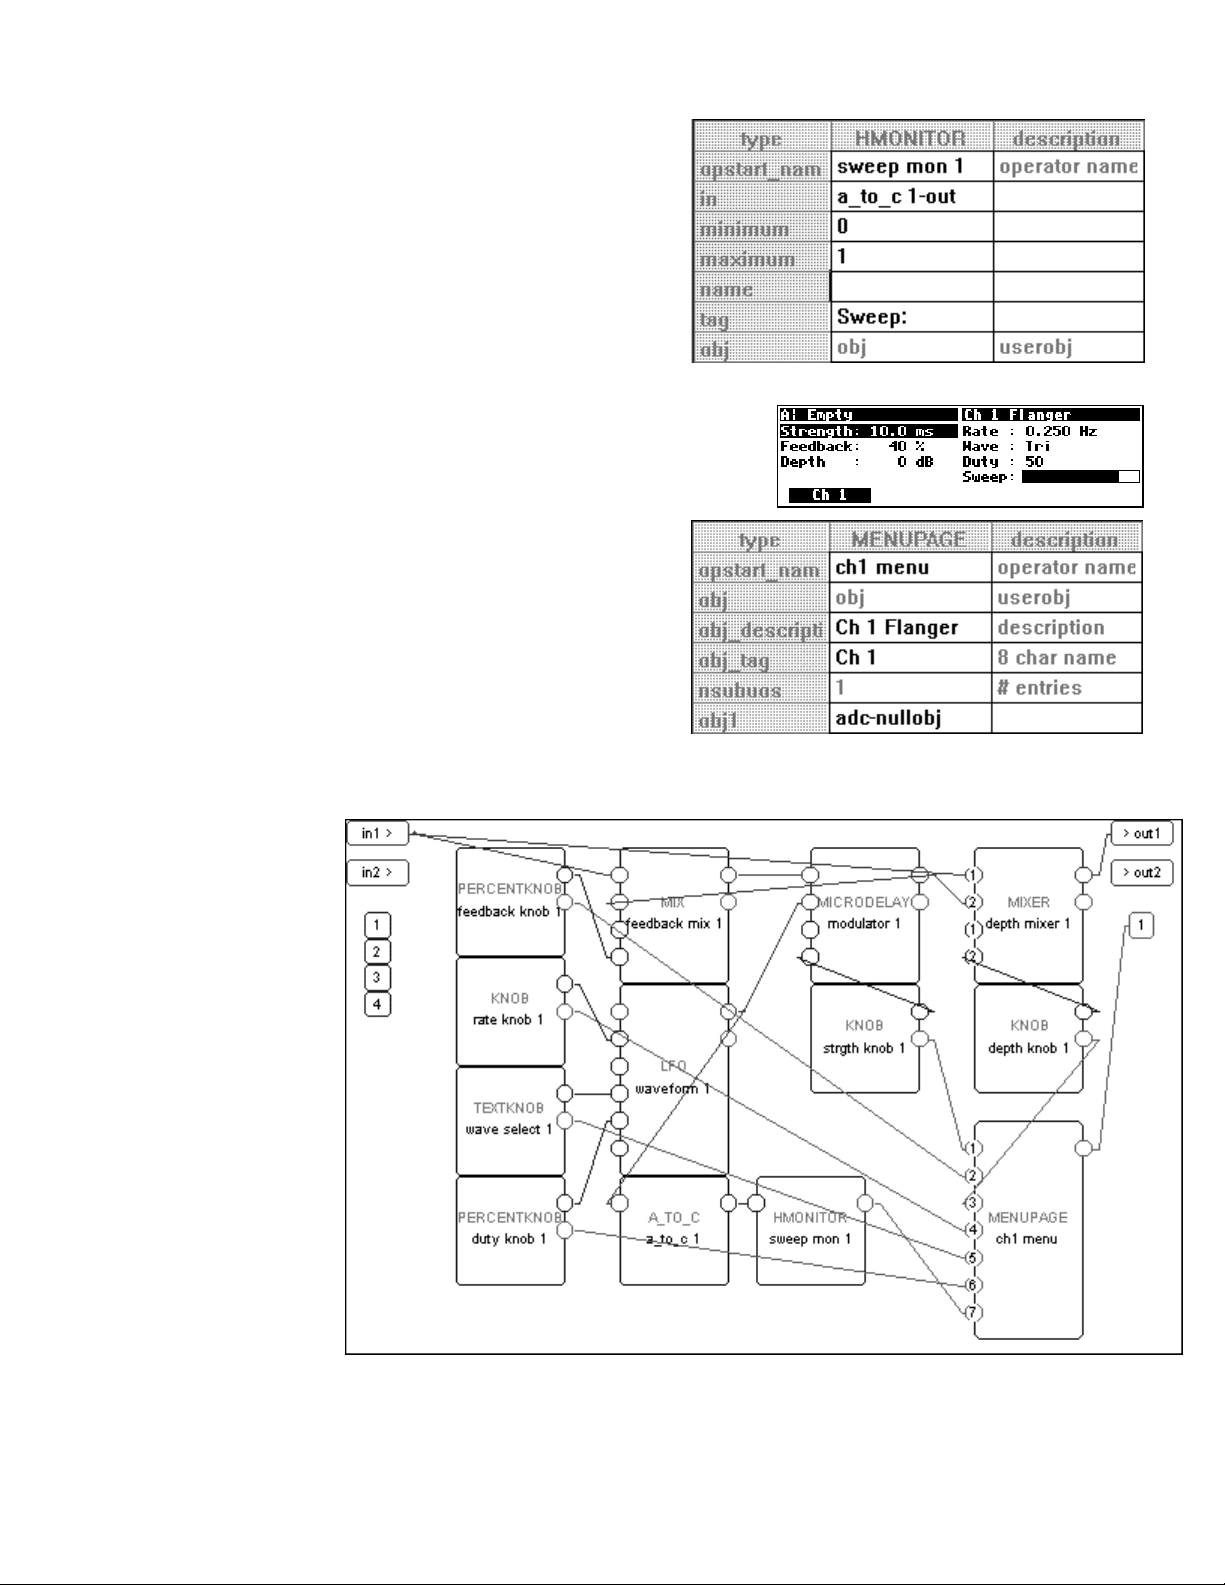
The Harmonizer
Double click on the hmonitor monitor and change
the specifiers as shown to the right.
• Audio and mod signals range from -1 to +1. In this
case, the LFO’s output is only varying from zero to
+1 and so we set the minimum and maximum on the
monitor accordingly.
Constructing the Menu Page
OK, the hard stuff is over. All of the elements are there, we just
need to place them on a menu page. To the right is a sneak peak
at what we will end up with. Notice that the parameters on the
right side of the menu page pertain to the modulation
rate and shape, while the parameters on the left side of
the menu page pertain to everything else. This is a
good, functional arrangement.
Add a menupage module from the “Interface” group
and connect its userobject output to the head module.
Then double click on the menupage module and
change the specifiers as shown to the right.
• The description “Ch 1 Flanger” will be displayed in the upper right corner of the Harmonizer’s display.
• The 8 char name will be used on the menu page’s
Now we’re ready
to connect the
userobject outputs
from the various
“parameter
adjusters” to the
menupage
module. The order
that we connect
them is the order
they will appear on
the menu page.
We’ll connect them
in the order shown
to the right:
1. strgth knob 1
2. feedback knob 1
3. depth knob 1
4. rate knob 1
5. wave select 1
6. duty knob 1
7. sweep mon 1
Programmer’s Manual
SOFT KEY.
The Harmonizer Programmer’s Manual Page 53 of 97 Release 1.2.1
1999 Eventide, Inc.
Page 56
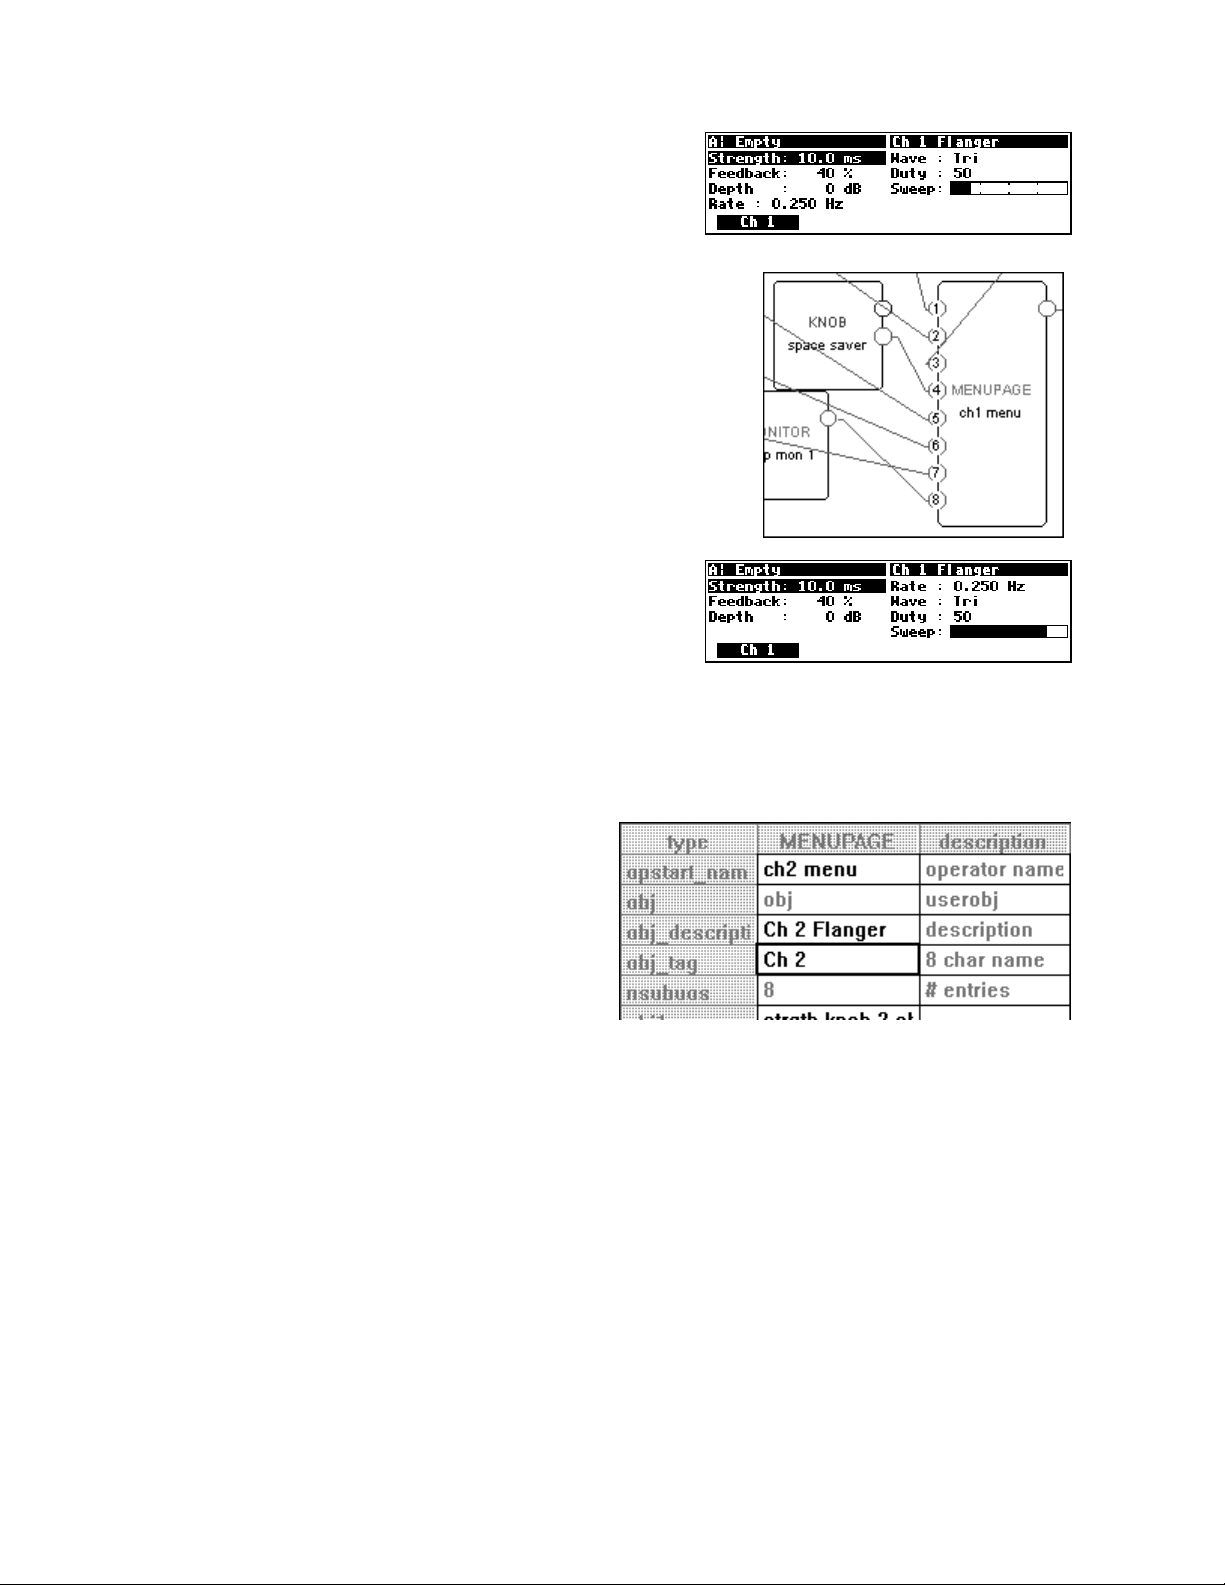
The Harmonizer
Select the Send command under the Midi menu to upload the
program to the Harmonizer. You should see a screen like that to
the right. If you’ve made any errors
back and fix things up.
Notice that our “three parameters on the left side and four parameters
on the right side” idea has been shot! This is because the menupage
module “robotically” places “parameter adjusters” in the order they are
connected. What we really need to do is connect a “space saver” to the
fourth userobject input. Add a knob module and leave its menu
statement blank. Then connect its userobject output to the third userobject
input while holding down the Ctrl key on the keyboard. This will connect the
“space saver” to userobject input four
Upload the program to the Harmonizer. Things should look
pretty good now. . .
Creating the second channel of this dual flanger is easy now that we have the first channel up and running.
Just select all of the modules on the page, and then Copy and Paste them
paste file with head into existing file." simply select all of the modules by clicking on each one while holding down the “Shift” key on the keyboard)
of the new modules except for the menupage module will be named appropriately because we stuck “1”s
on the ends of our original module names. Move the new modules in such a way that the screen is
somewhat understandable.
Double click on the new menupage module and alter
its specifiers as shown to the right.
Follow the instructions on the next page.
(a VERY common occurrence) go
(by adding a repeating field).
Programmer’s Manual
(if you have trouble pasting becaus e “you cannot
. All
The Harmonizer
1999 Eventide, Inc.
Programmer’s Manual Page 54 of 97 Release 1.2.1
Page 57
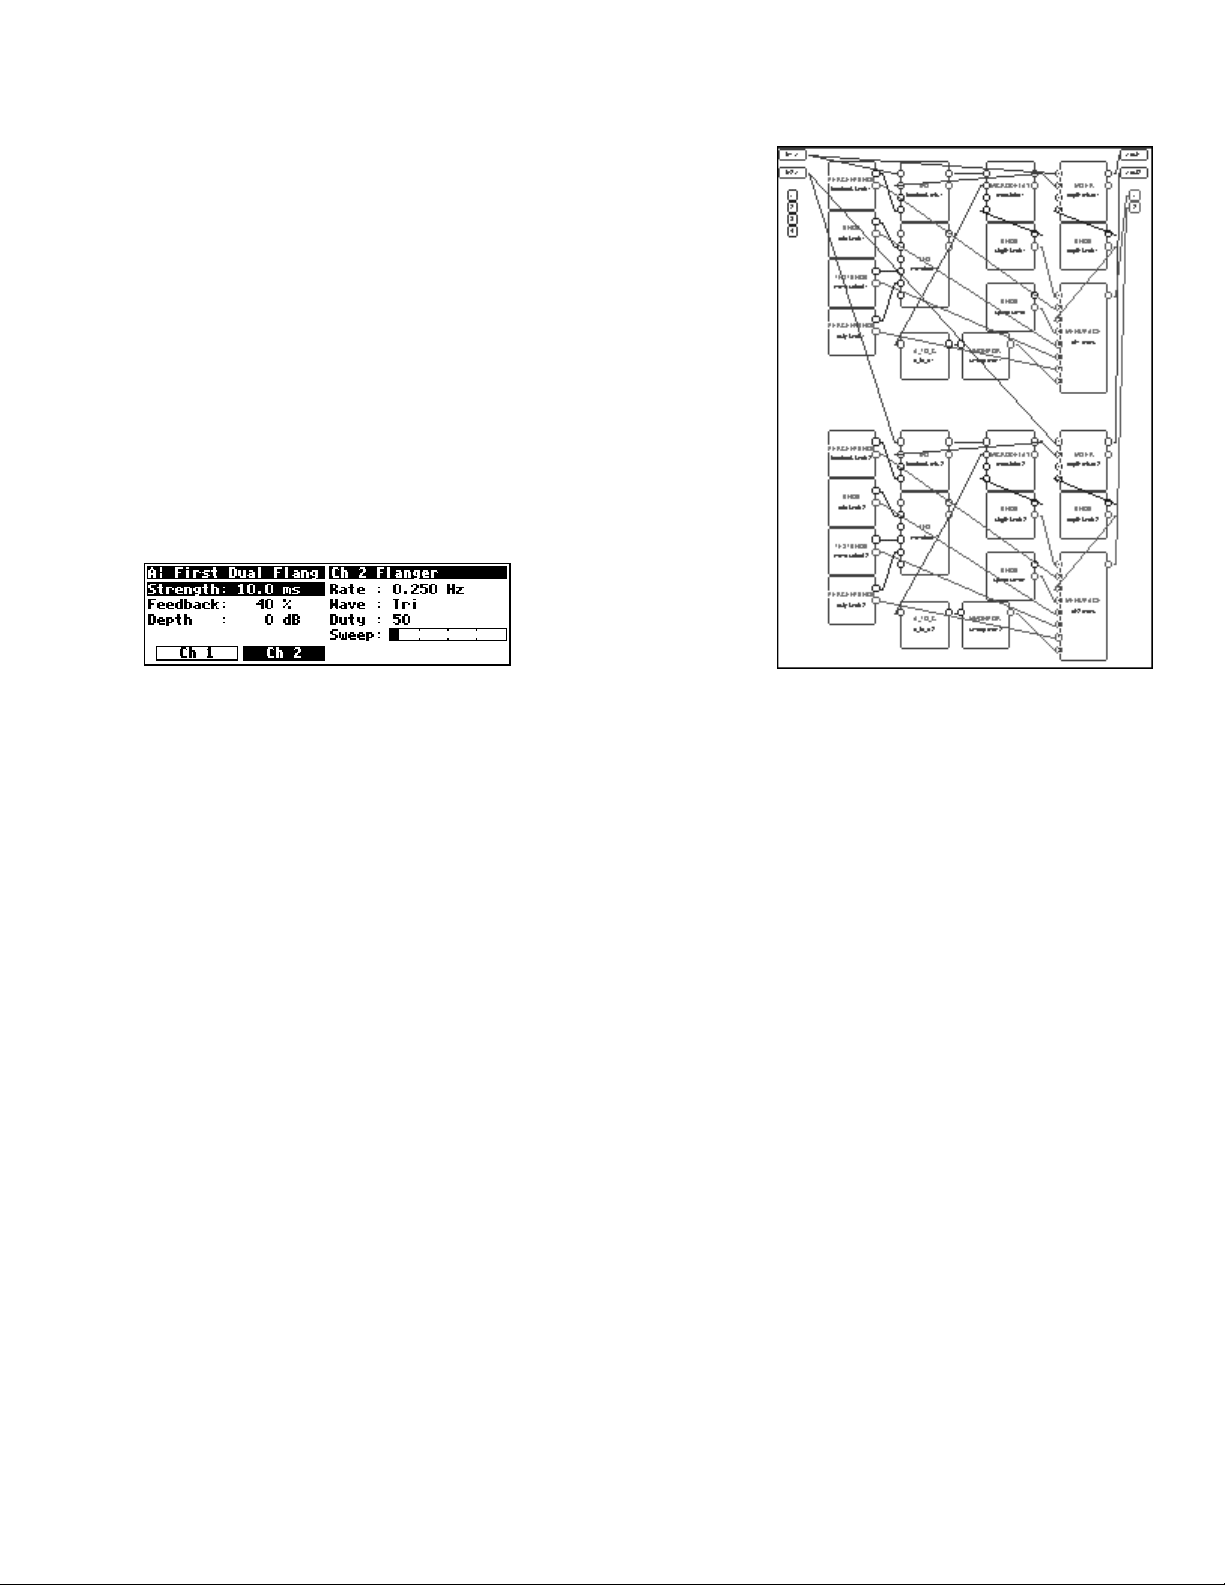
The Harmonizer
Connect:
• DSP input 2 to inputs 1 on both the second mix module and
the second mixer module.
• The output of the second mixer module to DSP output 2.
• The userobject output of “ch2 menu” to userobject input 2 on the
head module (adding a repeating field if necessary).
As a final touch, select Set title,author under the Edit menu and
name this program!
Upload the program to the Harmonizer and flange away. . .
Programmer’s Manual
If you wanted to make a quad mono flanger for your Orville, you’d need to add repeating fields to the DSP
inputs and outputs and then copy and paste as we did above. If you wanted to create a stereo (as opposed
to dual) flanger, you’d need to use two sets of audio processing modules
“control adjusters” connected to both sets of audio processors
You’ll find that our creation of a two channel flanger could have been facilitated somewhat by using
“Supermodule” functions. You’ll read about Supermodules on page 57.
(you’d probably only want to use one LFO module as well).
(like we already have) but only one set of
The Harmonizer Programmer’s Manual Page 55 of 97 Release 1.2.1
1999 Eventide, Inc.
Page 58

The Harmonizer
INTER-DSP COMMUNICATION FOR ORVILLE
DSP7000 users should move ahead - this is for Orville only.
Control signals can be sent from one DSP to the other in Orville! The
c_bridge module accepts four control signal inputs. Control signal
outputs that are connected to these inputs appear at the other DSP’s “global
control outputs” and at the control outputs of a c_bridge module in the
other DSP. A DSP’s global control outputs are the four blue squares on the
left side of the screen.
For example, load the program Inter-DSP Send from the
“
Programming” bank into DSP A. A knob module is
connected to the first input of a c_bridge module in as
shown to the right.
Additionally, the knob module’s userobject output is connected
to the head module so that the knob module’s parameter
shows up in the
Now load the program Inter-DSP Recei ve from the
“
Programming” bank into DSP B. A monitor module is
connected to global control output 1.
Additionally, the monitor module’s userobject output is
connected to the head module so that it shows up in the
PARAMETER area as shown to the right.
You can see for yourself that changing the Send Val ue in DSP A alters the Receive value in DSP B. Of
course, you could add a c_bridge module in DSP B to send control signals to DSP A at the same time that
DSP A is sending control signals to DSP B! This function can be used to write huge programs that span both
DSPs.
PARAMETER area as shown to the right.
Programmer’s Manual
The Harmonizer
1999 Eventide, Inc.
Programmer’s Manual Page 56 of 97 Release 1.2.1
Page 59
The Harmonizer
A “Supermodule” is a module which is itself made up of other modules (possibly
including supermodules) that is able to leap tall buildings in a single bound. It is a
way of making complex functions, and then reusing them without being bothered by
their tedious inner details. Supermodules can also be used when a construction
requires the same functions on multiple channels (like our flanger above) - it is only
necessary to get a single channel working satisfactorily, and then that channel can be
converted to a supermodule and repeated easily. Be aware that different instances of
a supermodule are different modules - changing one will not change the others. The
SuperMod menu contains supermodule related commands as follows:
Combine Modules Converts the selected modules into a supermodule
Break Apart Converts a supermodule back into its constituent modules
Create from File Loads an entire program from disk as a supermodule
Save to File Saves a supermodule to disk as a program
Add to Library Adds a supermodule to the dusk-resident library so it may be easily used in other
designs.
Rename Changes the TYPE name of the supermodule. Note that this can only be done to
supermodules -ordinary modules must live with the type name they were born with.
Also allows various text substitutions to be done to the contents of the module.
Edit Opens another window, allowing the modules within a supermodule to be edited.
This is mainly used for seeing what a supermodule does and for easily hiding and
revealing connections.
Hide Internals Hides all of the internal connections of a supermodule at a stroke.
Supermodules only exist in VSigfile
then returned to VSigfile via the Get command, the Supermodule will no longer appear. In its place will be
its constituent modules.
. If a program containing a Supermodule is Sent to the Harmonizer and
Programmer’s Manual
SUPERMODULES
TUTORIAL 3 -USING SUPERMODULES
In this tutorial we’ll build a compressor, create a Supermodule from it, and use that
Supermodule to generate a second channel.
• To start, begin a new file by pressing the
• Add a ducker module from the “Dynamics” group and name it
“Comp”
• Connect the ducker module’s
• Connect the ducker module’s
The Harmonizer Programmer’s Manual Page 57 of 97 Release 1.2.1
1999 Eventide, Inc.
(by double clicking on its name directly or by entering the VSigfile Specifier Display).
output to its sidechain input.
output to DSP output 1.
button.
Page 60

The Harmonizer
Programmer’s Manual
Cool. Now we need to be able to control our
compressor. We need some interface modules. If we
open the VSigfile Specifier Display window of our
ducker module we see that we have the option of up
to five controls. In this case we will connect “parameter
adjusters” to all five. Also found here are the limits of
these control inputs. We’ll need this information along with the “units” involved (e.g. is the attack control
in seconds or milliseconds?) when we set the min and max specifiers in our “parameter adjusters." Refer to
the Modules Section for the units that each control input is cast in.
Add a knob module and connect its control
output to the ducker module’s
threshcntl
control input. Double click on it and change the
specifiers to match those shown to the right.
Notice that we’re not using the full range of the
parameter as settings beyond the ones we’ve
limited it to are quite “unphysical."
Now add four more knob modules. Connect and alter their specifiers
(in the VSigfile Specifier Display) as the table
below indicates:
name menu statement min max resolution default
cratio Ratio : %3.0f:1 1 100 1 10
cgain Gain : %4.1f dB 0 24 0.1 12
cattack Attack: %6.3f Sec 0 10 0.001 0.003
cdecay Decay: %6.3f Sec 0 10 0.001 0.4000
connected to. . .
ratiocntl
gaincntl
attackcntl
decaycntl
The Harmonizer
Programmer’s Manual Page 58 of 97 Release 1.2.1
1999 Eventide, Inc.
Page 61

The Harmonizer
Next, add a menupage module and connect the
userobject outputs of the five knob modules to its
userobject inputs (adding repeating fields as necessary) as shown
to the right. Connect the menupage module’s
userobject output to the head module.
Finally, double click on the menupage module
and change its specifiers as shown to the right. Be
sure to include the “ ^1” prior to the description and
8 char name. The significance of these will be
discussed when we create a Supermodule. If we
weren’t planning on creating a Supermodule, the “
^1” would not be included.
Our single channel compressor is now fully
functional. You can name it if you like (use the “Set
title,author” command under the Edit menu)
Harmonizer.
and Send it to the
Programmer’s Manual
The Harmonizer Programmer’s Manual Page 59 of 97 Release 1.2.1
1999 Eventide, Inc.
Page 62

The Harmonizer
Now we’ll create a Supermodule!
Select all the modules
choose the Combine Modules command under the SuperMod
menu. The Enter the name for the new SuperModule window
should pop up. Type in the name “monocomp."
In the String Substitution fields, type a blank space in the
Replacement column for “ ^1." A check mark will appear next
to “ ^1” when you do. The substitution windows allows you to
“globally” change text information for a Supermodule. In this
case we do not want the “ ^1” to be part of our menu. Later
we will substitute “L” and “R” to give a clear description of
each menu when we employ them in a dual compressor.
If you think through things when creating Supermodules, the
substitution feature will allow quick redefinitions of multiple
menu and knob names. You can avoid much tedious editing
later.
Once the dialog box looks like the one to the right, press the OK button.
The VSigfile display should now look like the one shown to the right.
Notice that all of its inputs and outputs are visible. Click on the
Supermodule and then select the Hide Internals command under the
SuperMod menu.
The VSigfile display should now look like the one shown to the right. At
this time it would be a good idea to add this Supermodule to the “Library”
module group so that it will always be immediately available to add to a file.
Click on the Supermodule and then select the Add to Libr ary command
under the SuperMod menu. Although you may edit the supermodule
contents at any time
testing and tweaking it prior to saving it to the LIBRARY.
(by clicking and dragging over all of them) and then
(using the Edit command under the SuperMod menu), we suggest
Programmer’s Manual
The Harmonizer
1999 Eventide, Inc.
Programmer’s Manual Page 60 of 97 Release 1.2.1
Page 63

The Harmonizer
Now we will create a two channel version of our compressor. If you did
in fact add the monocomp Supermodule to the “Library” module group,
then you may simply add a second instance of the Supermodule as you
would a normal module
Alternatively, you may highlight the monocomp Supermodule, Copy, and
Paste. Connect the new monocomp Supermodule’s audio input to DSP
in 2, its audio output to DSP out 2, and its userobject output to the head
module’s userobject input 2
We will now highlight each Supermodule in turn and select Rename
under the SuperMod menu. In the Replacement field enter “L ” and “R ”
respectively.
Send the file to the Harmonizer and enjoy your dual compressor!
(by selecting the “Add Module” command under the Edit menu).
(adding a repeating field).
Programmer’s Manual
The Harmonizer Programmer’s Manual Page 61 of 97 Release 1.2.1
1999 Eventide, Inc.
Page 64
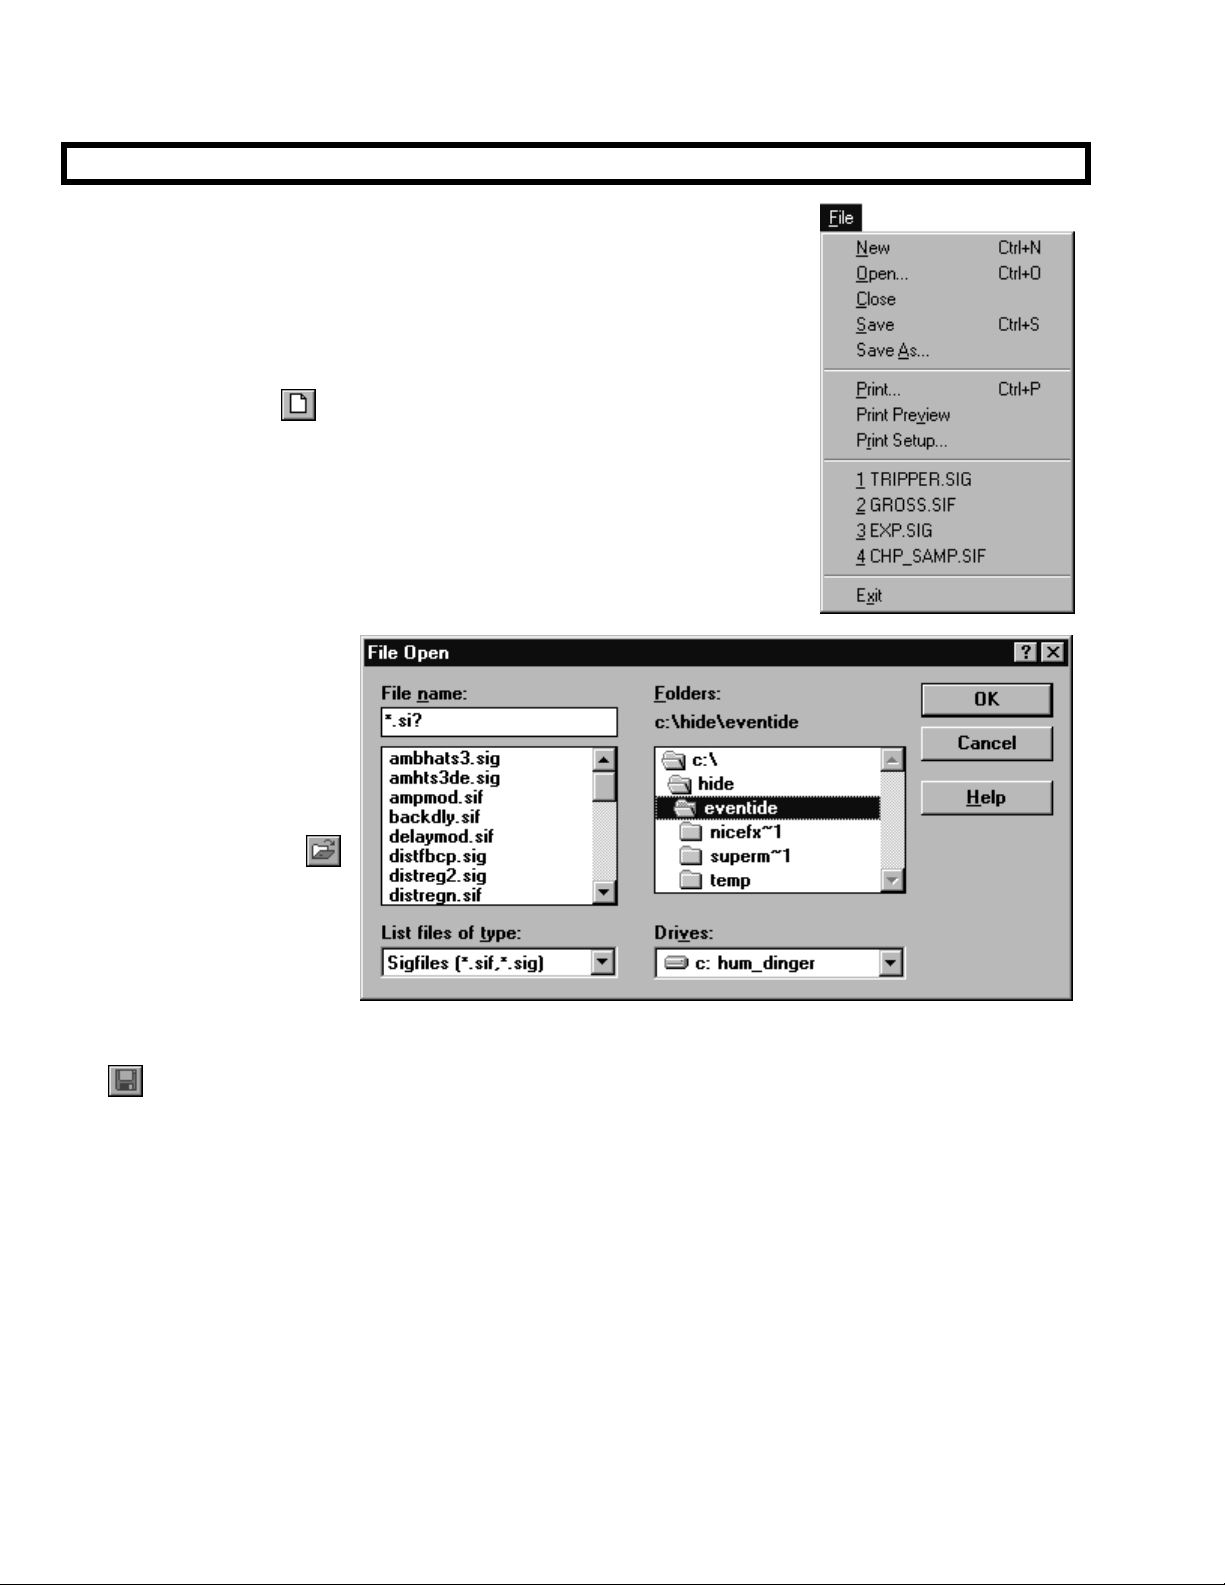
The Harmonizer
As you’d expect, you can save and load the programs you create (or Get) to
and from your computer. In this context, the programs are called “files."
You can also print out a picture of your program. All of these functions are
accessed under the File menu.
• The New command creates an “empty” file. Use this command to start
creating a new program or just before you Get a program from the
Programmer’s Manual
FILE FUNCTIONS
Harmonizer. The
• The Open command
opens an existing file.
The dialog box shown
to the right allows you
to select a file to open
from among the various
drives and folders in
your computer. The
button does the same
thing.
• The Save command saves the program in the active window and overwrites its previous version. The
button does the same thing.
button does the same thing.
• The Save As command opens a dialog box similar to the File Open dialog box above. You can select
from among the various drives and folders in your computer to save the program in the active window.
You can also create or change the name of the file.
The Harmonizer
1999 Eventide, Inc.
Programmer’s Manual Page 62 of 97 Release 1.2.1
Page 65

The Harmonizer
• The Print command prints opens the dialog box shown to the
right. The top section allows you to scale the size of the image to
fit on a given number of pages. If more than one page is selected,
you can overlap their edges by a given amount. The bottom
section allows you to “hide” audio (Signals), control, or userobject
(Misc) connections, inputs, and outputs. Once you’re satisfied with
these settings, press the Print button to print or the Cancel button
to abort.
• The Print Preview command calls up the exact same dialog box
that the Print command calls up. Once you select the Scaling
and Show options you would like to view, press the Print button
to call up the Print Preview
window.
• The Print Setup command calls up
the dialog box shown to the right.
Here you can select the printer,
paper, and orientation for your
VSigfile print jobs.
• The section of the File menu below the print
section contains links to the last four opened
files for quick access.
• The Exit command closes the VSigfile
program entirely.
Programmer’s Manual
“ *.sig” Files versus “ *.sif” Files
Two file formats are recognized by VSigfile. You will normally want to save all of your files with the “ *.sif”
extension, but it may be useful to know why both exist.
• The “Sig” file format is the format recognized by the Harmonizer. When files are transferred to or from
the Harmonizer, they are transferred in the “Sig” format
Midi menu, the file that results has the “Sig” extension)
• “Sig” files are saved as ASCII text. If you want to look at a VSigfile file in a text editor, the “Sig”
extension is the one to use. But be warned, saving files with the “Sig” extension may result in a loss of
some display information. In other words, the program may not look the same in VSigfile when you reopen
it, although it will still function the same when sent to the Harmonizer.
• To view files in their “Sig” format, select the as Sigfile command under the View menu.
• The “Sif” file format on the other hand, does save all of the display information. It’s the format you’ll
normally want to use.
The Harmonizer Programmer’s Manual Page 63 of 97 Release 1.2.1
1999 Eventide, Inc.
.
(you may have noticed that when you use the Get command under the
Page 66
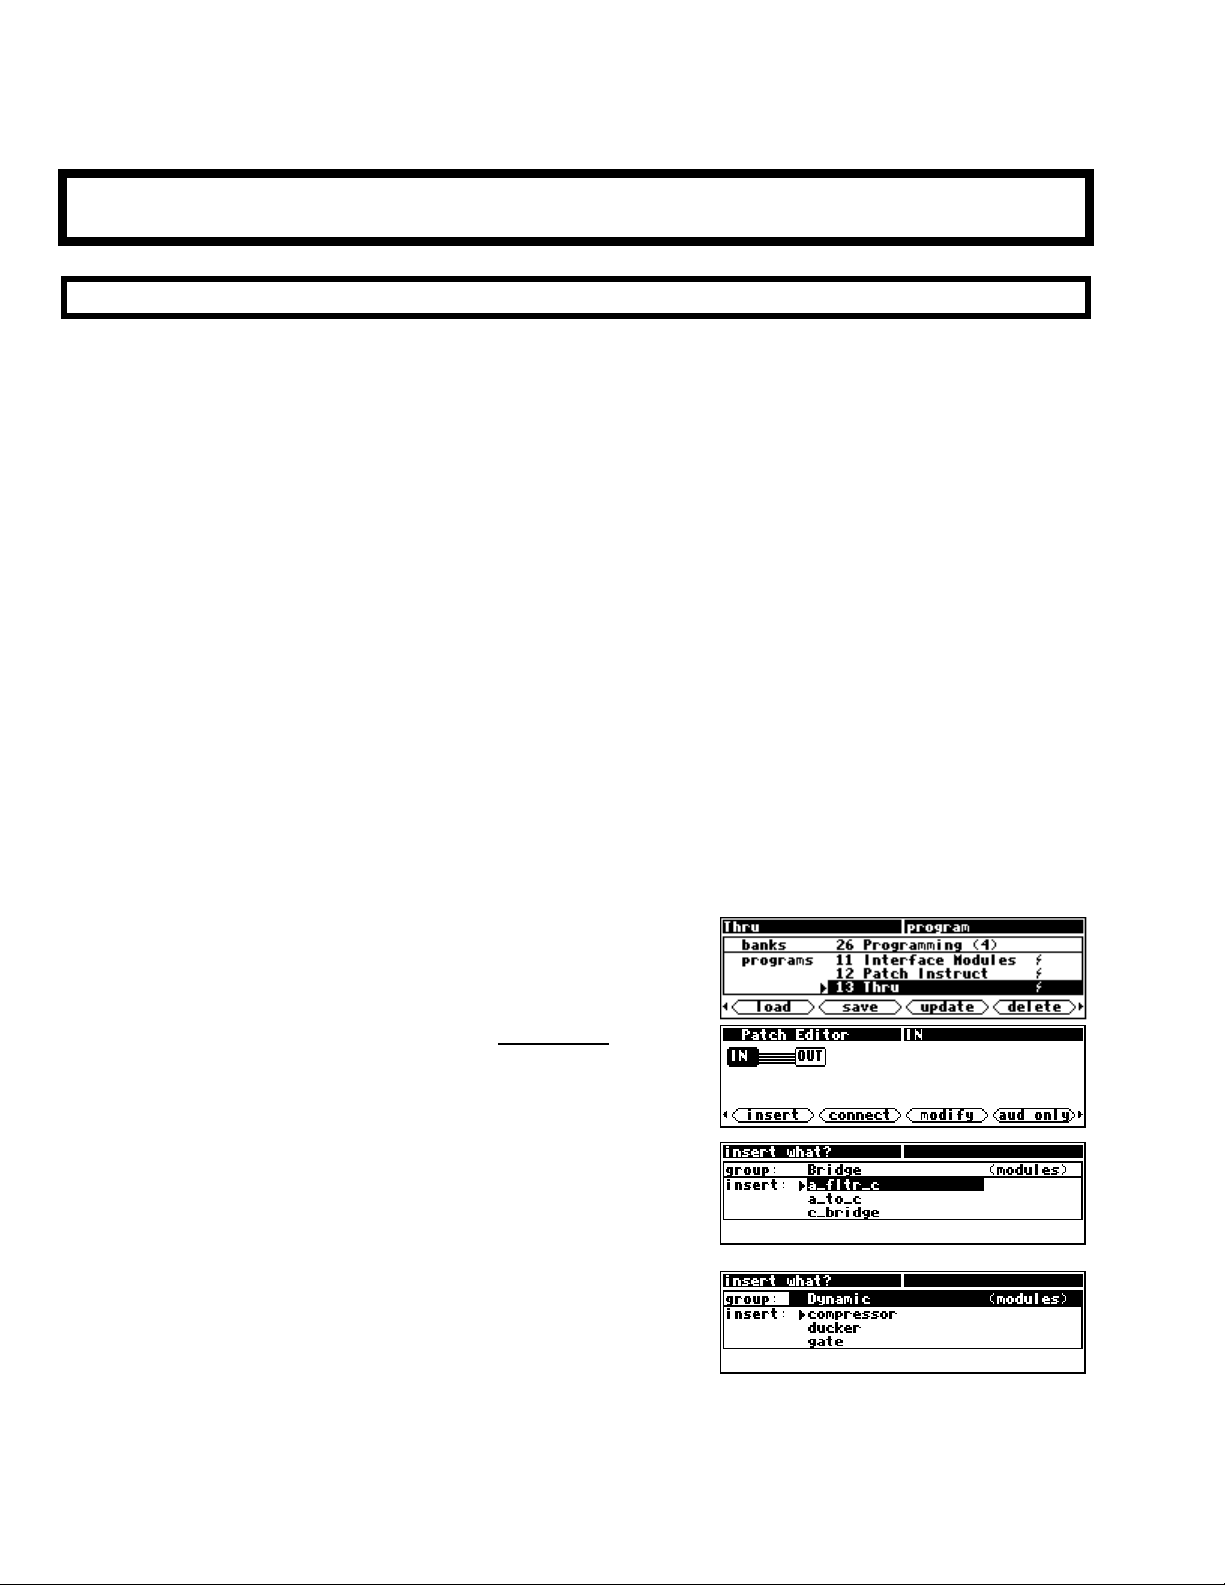
The Harmonizer
Programmer’s Manual
PATCH EDITOR
GET COMFORTABLE BY DOING
Let’s make a patch, OK? That way you’ll get a feel for how the Patch editor works, and you’ll have a much
better understanding of things when you read about the details later.
The patch we're going to make will be an audio compressor. A compressor reduces the audio gain when
louder signals are input. The compressor we will build is constructed from a single “ducker” module.
Here is an excerpt from the Modules Section of this manual describing the module:
The ducker module is the basic building block for most dynamics control patches.
It is essentially a dynamic range compressor with separate inputs for the signal
whose gain is to be processed and for the detection (sidechain) input.
By connecting sidechain to the output, a basic compressor is built. By
connecting a dry signal to the sidechain and a processed signal to the input, the
processed signal can be ducked (have its gain reduced) during louder passages
of audio.
Ducking is often used by radio talk show hosts such that the host’s audio
overrides the guest or telephone caller. Each time the host talks the caller’s
audio is dropped down such that the host’s audio is much louder. If the host
talks loudly, the caller’s audio disappears altogether.
Since we’ll be using the ducker module as a compressor, we’ll loop the output audio back to the
sidechain input. Try the following tutorial out on your Harmonizer:
To start, go to the PROGRAM area and load the Thru’ program
from the
Programming bank.
Next, go to the Patch Editor area by pressing and holding the
PARAMETER key. We're looking at an empty slate. The only
things we see are the IN and the OUT modules, which exist in
every patch. The IN module is where audio signals come into your
program, and the OUT module is where audio signals exit your
program. In its current configuration, the DSP running
Thru’
should be passing audio unchanged, just as the patch display
shows.
To start creating the compressor, insert a ducker module. Press
<insert> SOFT KEY. You will get a list of things to insert.
the
We want a ducker, which is in the “Dynamic” group of modules.
You can either turn the
KNOB until you see the little arrow pointing to ducker, or you can save a little
The Harmonizer
Programmer’s Manual Page 64 of 97 Release 1.2.1
1999 Eventide, Inc.
Page 67
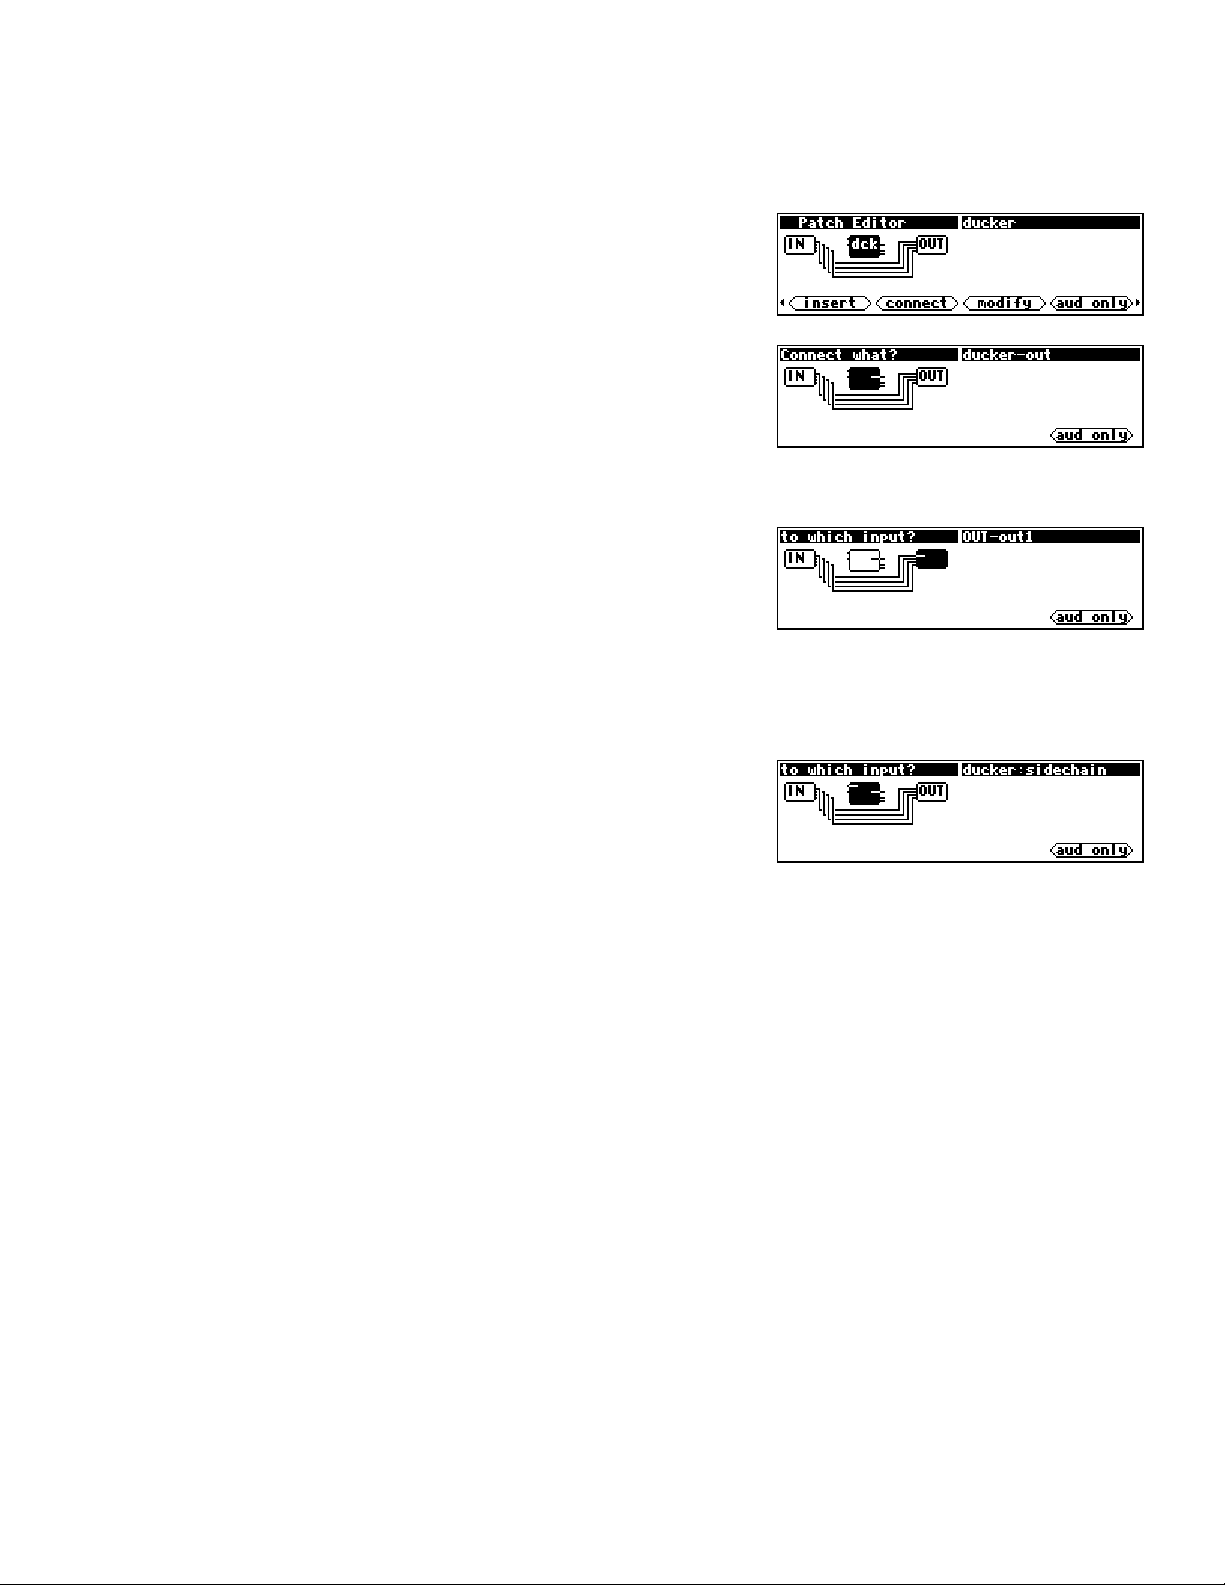
The Harmonizer
time by scrolling through groups first. To do the latter, press the
name is highlighted, and then turn the
KNOB until you see the “Dynamic” group.
Programmer’s Manual
LEFT CURSOR key so that the group
Press the
and press the
program. It's the little box marked
RIGHT CURSOR key twice to highlight the ducker
SELECT key. A ducker will appear in your
dck.
Note that the IN and OUT modules are still connected to each
other, just as they were. Audio is still passing through the DSP
running
Thru unchanged!
Now we need to make a compressor from the ducker. Press
the
<connect> SOFT KEY.
The upper left-hand side of the display now asks you what you
want to connect. The upper right-hand side of the display gives
the name of the currently selected output. The center of the
display shows the currently selected output as a highlighted little
line inside the module’s box. You can choose to connect a different output instead by pressing the
or
LEFT CURSOR key or by turning the KNOB. Right now we want to connect the ducker’s output,
which is the currently selected output. So just press the
SELECT key.
RIGHT
Notice that the output we selected is still identified by a little line
inside its module box, but the box itself is not highlighted. The
little line tells us what we're connecting from. The editor is now
asking what input we would like our previously selected output
connected to. The currently selected input is shown as a
highlighted little line inside the OUT module. Rotate the
select the ducker's
sidechain input. As you move the highlighted little line between available inputs,
KNOB (or use the LEFT or RIGHT CURSOR key) to
the upper right-hand side of the display will show the currently selected input and the name of the module it
resides on.
The Harmonizer Programmer’s Manual Page 65 of 97 Release 1.2.1
1999 Eventide, Inc.
Page 68

The Harmonizer
Programmer’s Manual
The display to the right shows the ducker highlighted, with its
output selected and its sidechain input ready to be selected.
Press the
SELECT key.
There you have it. There’s a wire connecting the ducker’s
output to its sidechain input.
Now let’s connect the ducker’s
Press the
twice. The ducker’s
<connect> SOFT KEY and then the LEFT CURSOR key
main input should be highlighted as
main input to the IN module.
shown to the right.
Press the
input
ducker’s
module’s
SELECT key to actually select the ducker’s main
. Now we need to select something to connect the
main input to. As luck would have it, the IN
input 1 is the currently selected candidate.
Press the
SELECT key to complete the connection.
The last thing we need to do is connect the OUT module to the
ducker so that we can hear what the compressor sounds like.
Press the <connect> SOFT KEY and then the SELECT key to select
the ducker’s
that to the OUT’s
output. Press the SELECT key again to connect
output 1.
Now the compressor will be heard on the first “channel” of the
DSP running the program, while the remaining three “channels” go
uncompressed. Press and hold the PARAMETER key to see the
ducker module’s menu page.
Now that you’re somewhat familiar with the mechanics of inserting and hooking modules up, let’s move on
to something a little more comprehensive.
The Harmonizer
Programmer’s Manual Page 66 of 97 Release 1.2.1
1999 Eventide, Inc.
Page 69
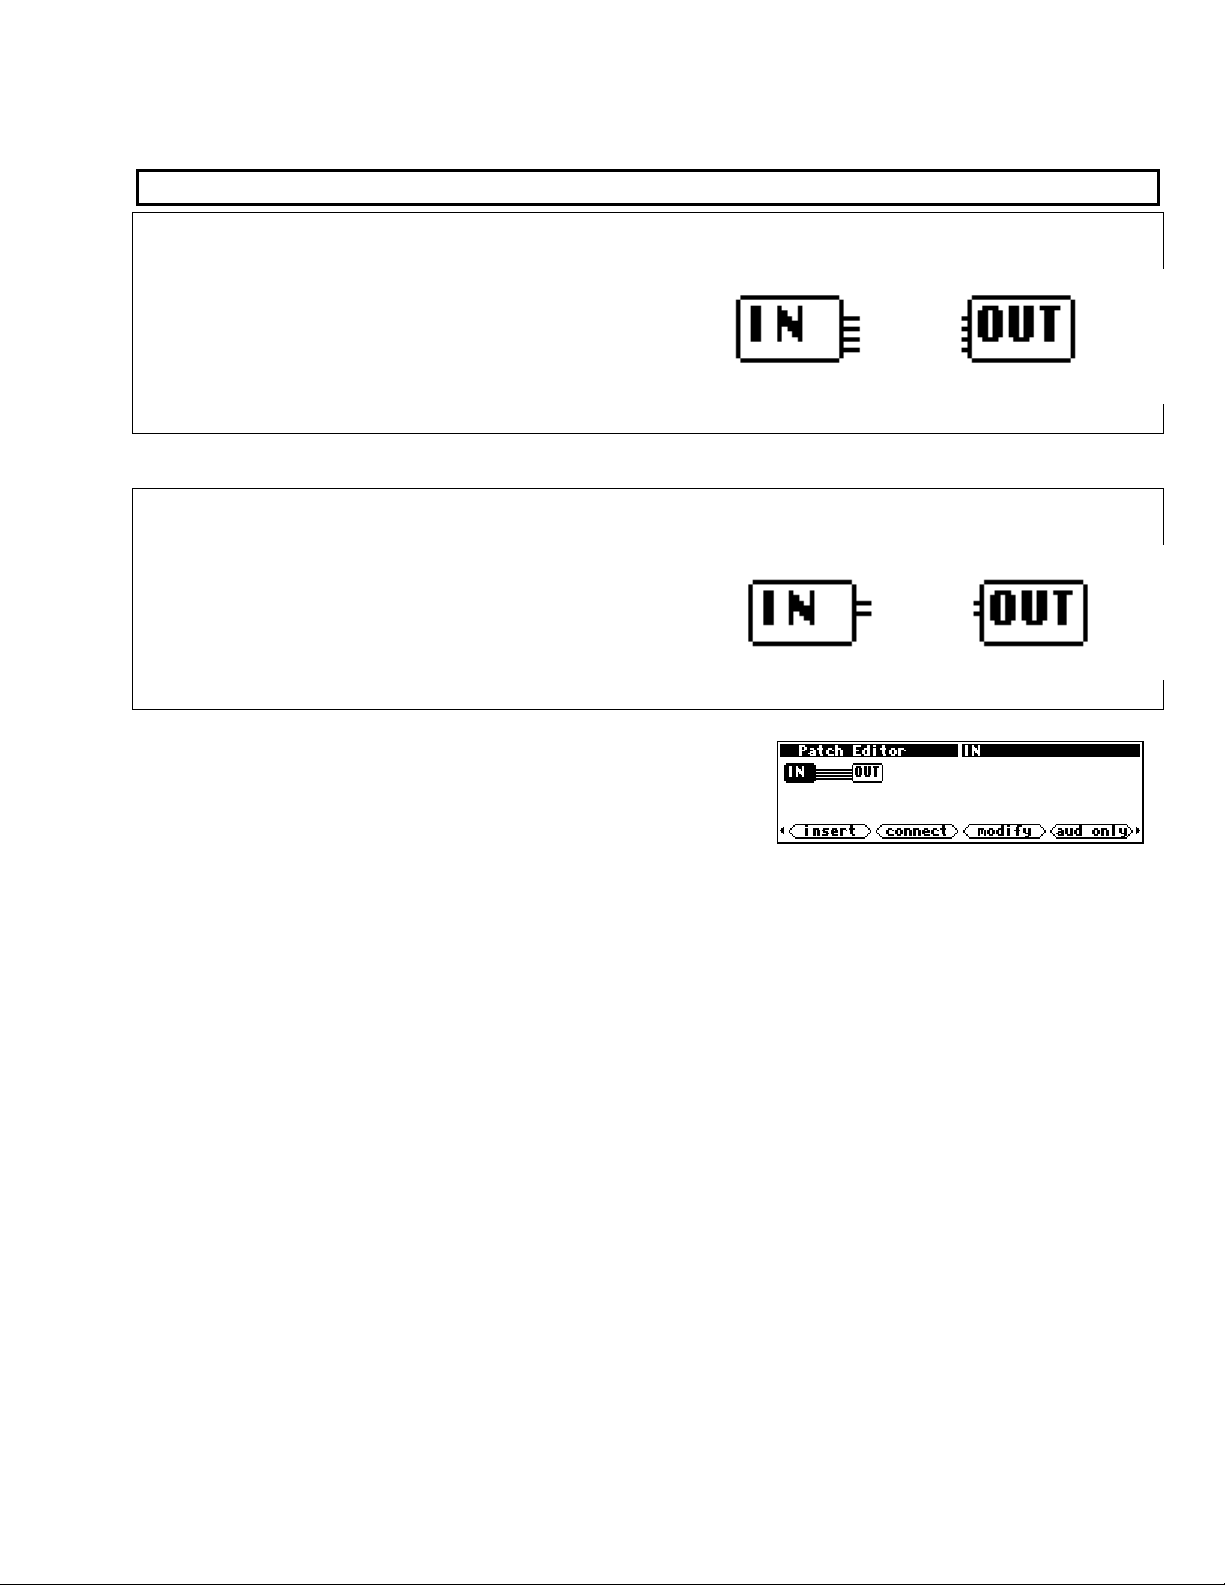
The Harmonizer
The IN and OUT “Modules”
Orville’s programs are loaded and run one at a time on a given DSP. The DSP running the program
provides the program with four channels of input audio
(where that input audio comes from is a function of the
routing configuration, see the Harmonizer’s User Manual).
The DSP running the program also takes the four channels
of output audio from the program (where it is subsequently
sent is again a function of the routing configuration).
The DSP7000’s programs are loaded and run on its single DSP. The DSP provides the program with two
channels of input audio and takes two channels of output
audio from the program. The remainder of this manual will
show Orville-style four channel processing, but the idea is
the same with the DSP7000’s two channels. If you send a
program that has more than two inputs or outputs to your
DSP7000 from VSigfile, it will not be accepted.
In the simplest of conceivable programs, the IN module’s
outputs are connected directly to the OUT module’s inputs
(this is the
modules are inserted in-between the IN and OUT modules. The
IN and OUT modules always remain as part of the program.
Thru’ program in bank 0). Normally, other, optional
Programmer’s Manual
Orville
DSP7000
The Harmonizer Programmer’s Manual Page 67 of 97 Release 1.2.1
1999 Eventide, Inc.
Page 70
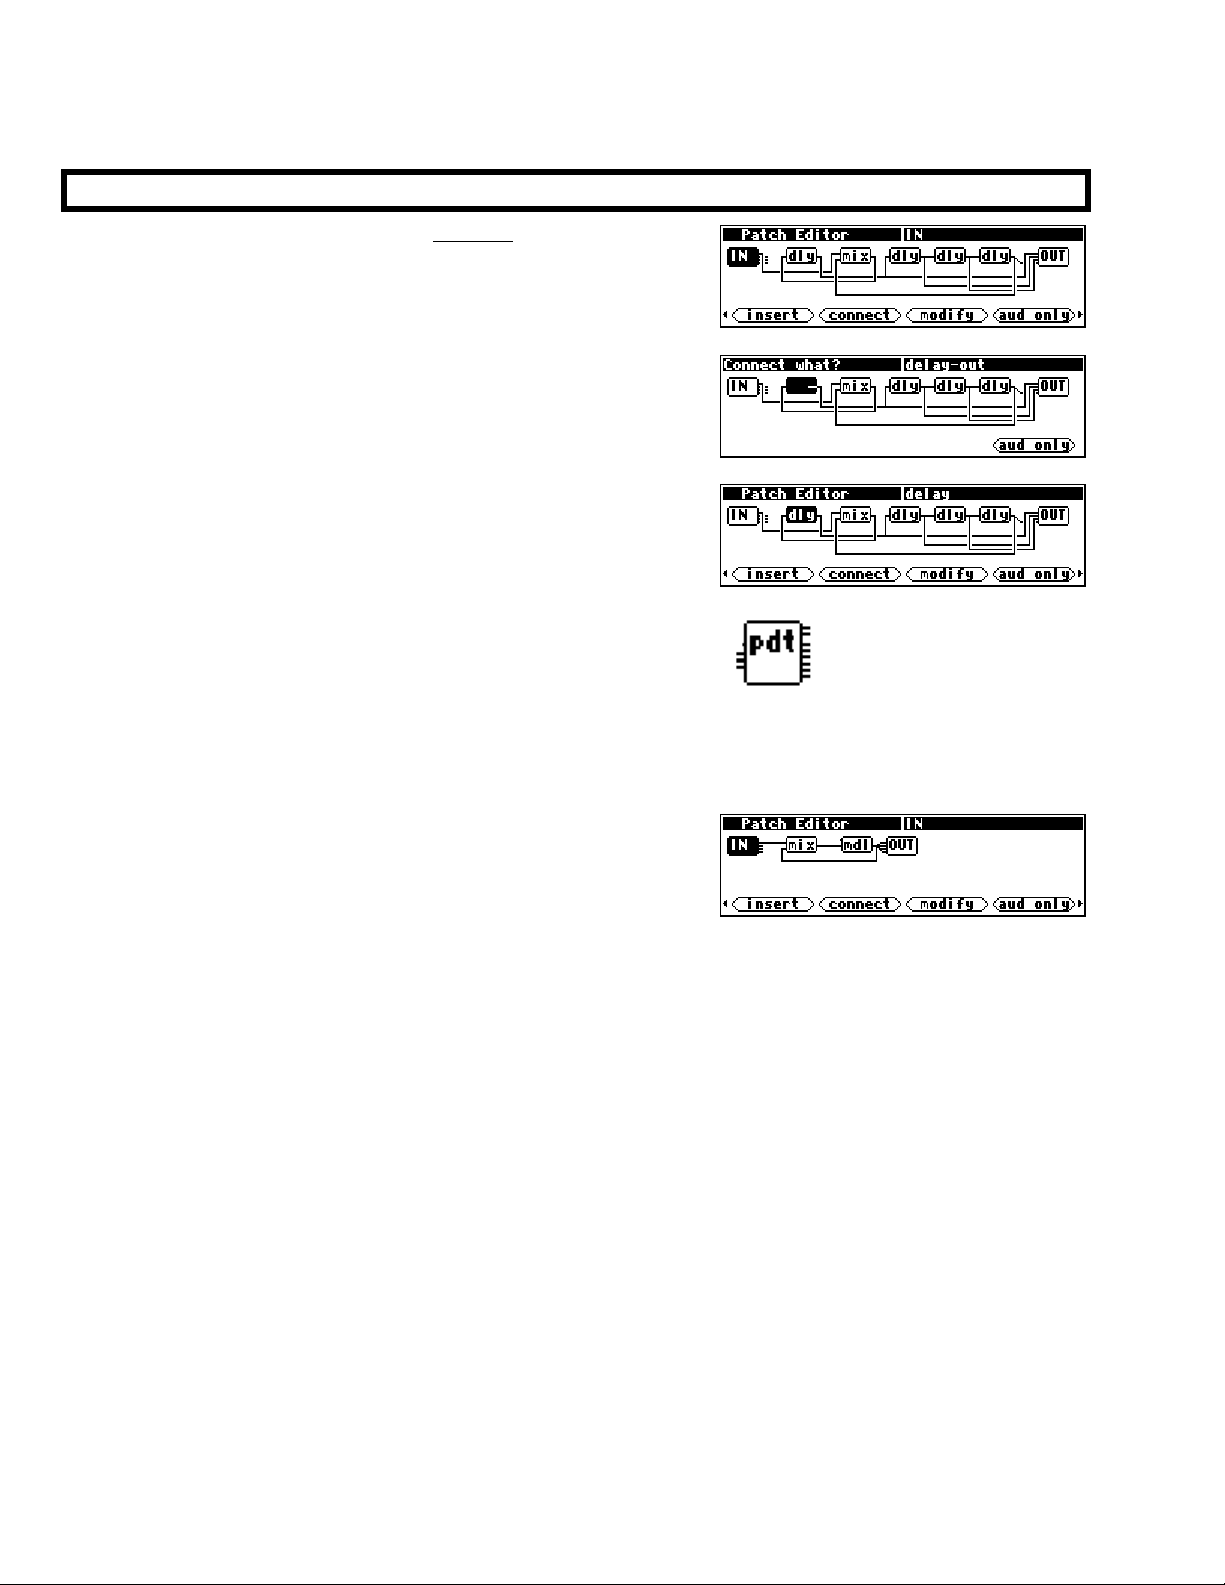
The Harmonizer
Programmer’s Manual
THE PATCH EDITOR AREA DISPLAY
When the PARAMETER key is pressed and held, the Harmonizer
presents a Patch Editor area display of the current program along
with a selection of
SOFT KEYS. This is the default Patch Editor
area screen. Unlike the other areas in the Harmonizer, the top line
of the screen is used for “special purposes."
The left half of the top line is used as a question field when the
<connect> or <unplug> SOFT KEY is used.
The right half of the top line shows the name of the currently
selected module (except during
<connect> or <unplug>
operations when it shows the currently selected input or output).
A block diagram of the program takes up most of the display. As
mentioned before, a program consists of a series of modules. Each
module is shown on the display as a block with lines indicating its
inputs and outputs. Inputs are on the left side of a module while
outputs are on the right side. Each module is shown with a threecharacter (or less) abbreviation of its function name.
→ See the Modules Section for a list o f all modules .
The example screen to the right shows four modules and is shown
in the default “audio only” mode. This means that the only
modules and signals shown are audio paths and modules that work
with audio. The modules shown in the example are:
IN audio from the DSP’s four inputs (only one is being used)
mix a two-input mixer
mdl “modulateable” delay
OUT audio to the DSP’s four outputs
As shown, the IN module’s
mixer
input of the delay. The delay output may be seen to drive five module inputs: the mixer input
input comes from the output of the “modulateable” delay. The mixer feeds the
and all four of the OUT module’s
output 1 is connected to one of the inputs of the mixer. The other
inputs.
The Harmonizer
Programmer’s Manual Page 68 of 97 Release 1.2.1
1999 Eventide, Inc.
Page 71
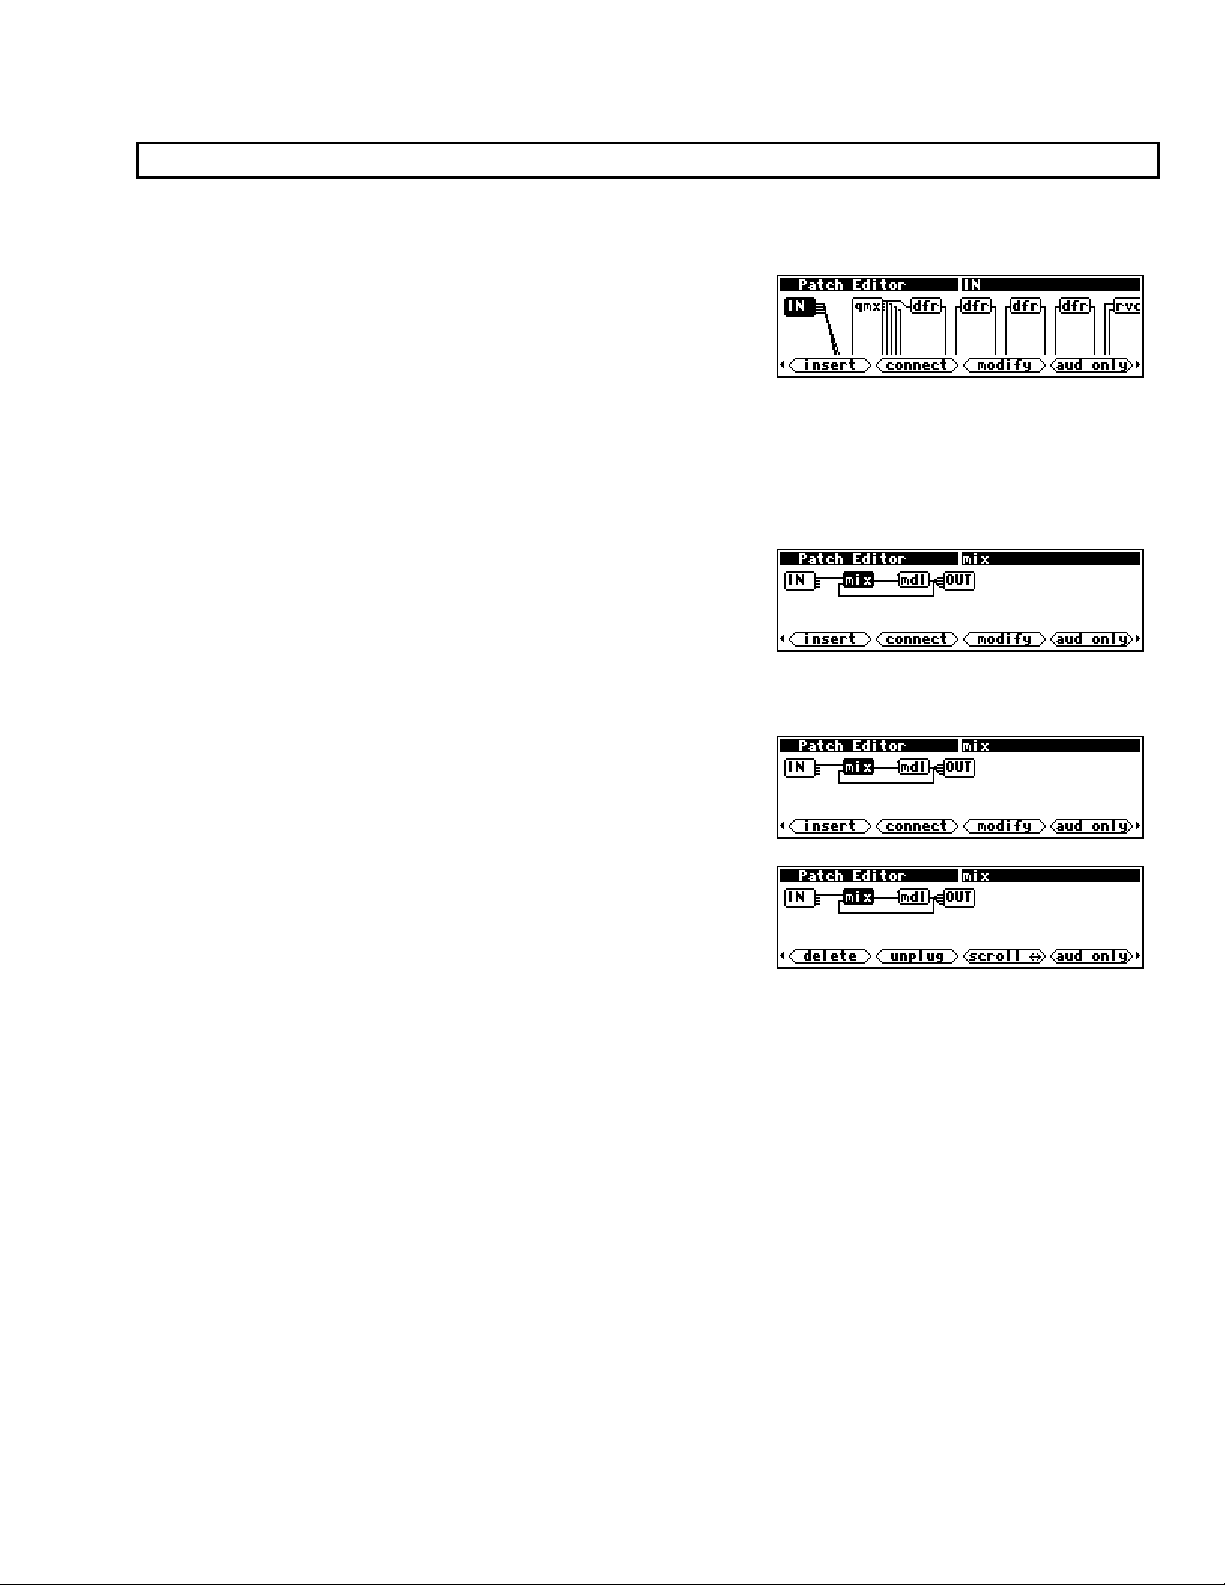
The Harmonizer
Programmer’s Manual
Front Panel Controls
There are several controls used to manipulate the Patch display.
Knob
In many programs, the patch diagram will be larger than the
screen. In such a case, the screen will display only part of the
program. The
KNOB may be used to shift the screen. A
complicated program will move more slowly across the screen as
KNOB is rotated. This is due to the processing required for the Harmonizer to draw the picture of the
the
program. If the
KNOB is rotated very fast, the screen immediately jumps to the end of the program. The screen will not
KNOB is rotated faster than the screen moves, the screen will jump to catch up. If the
“wrap around” to the other end of the program.
Cursor Keys
LEFT and RIGHT CURSOR keys are used to highlight (select)
The
modules. When you first enter the Patch Editor area, the IN
module is highlighted. As shown on the example screen to the
right, pushing the
RIGHT CURSOR key causes the mix module to
be highlighted. The name of the selected module is shown in the top right line of the display.
PARAMETER key
The
PARAMETER key is used to toggle between sets of SOFT
. Tapping the PARAMETER key on the screen to the right
KEYS
would give you access to. . .
. . .these
PARAMETER key. If you hold it down, you will exit the Patch
Editor area and return to the
→ To adjust the “hold time." key hold par ameter on the [misc] menu page in
the SETUP area.
SOFT KEYS. Notice that you need only tap the
PARAMETER area.
The Harmonizer Programmer’s Manual Page 69 of 97 Release 1.2.1
1999 Eventide, Inc.
Page 72
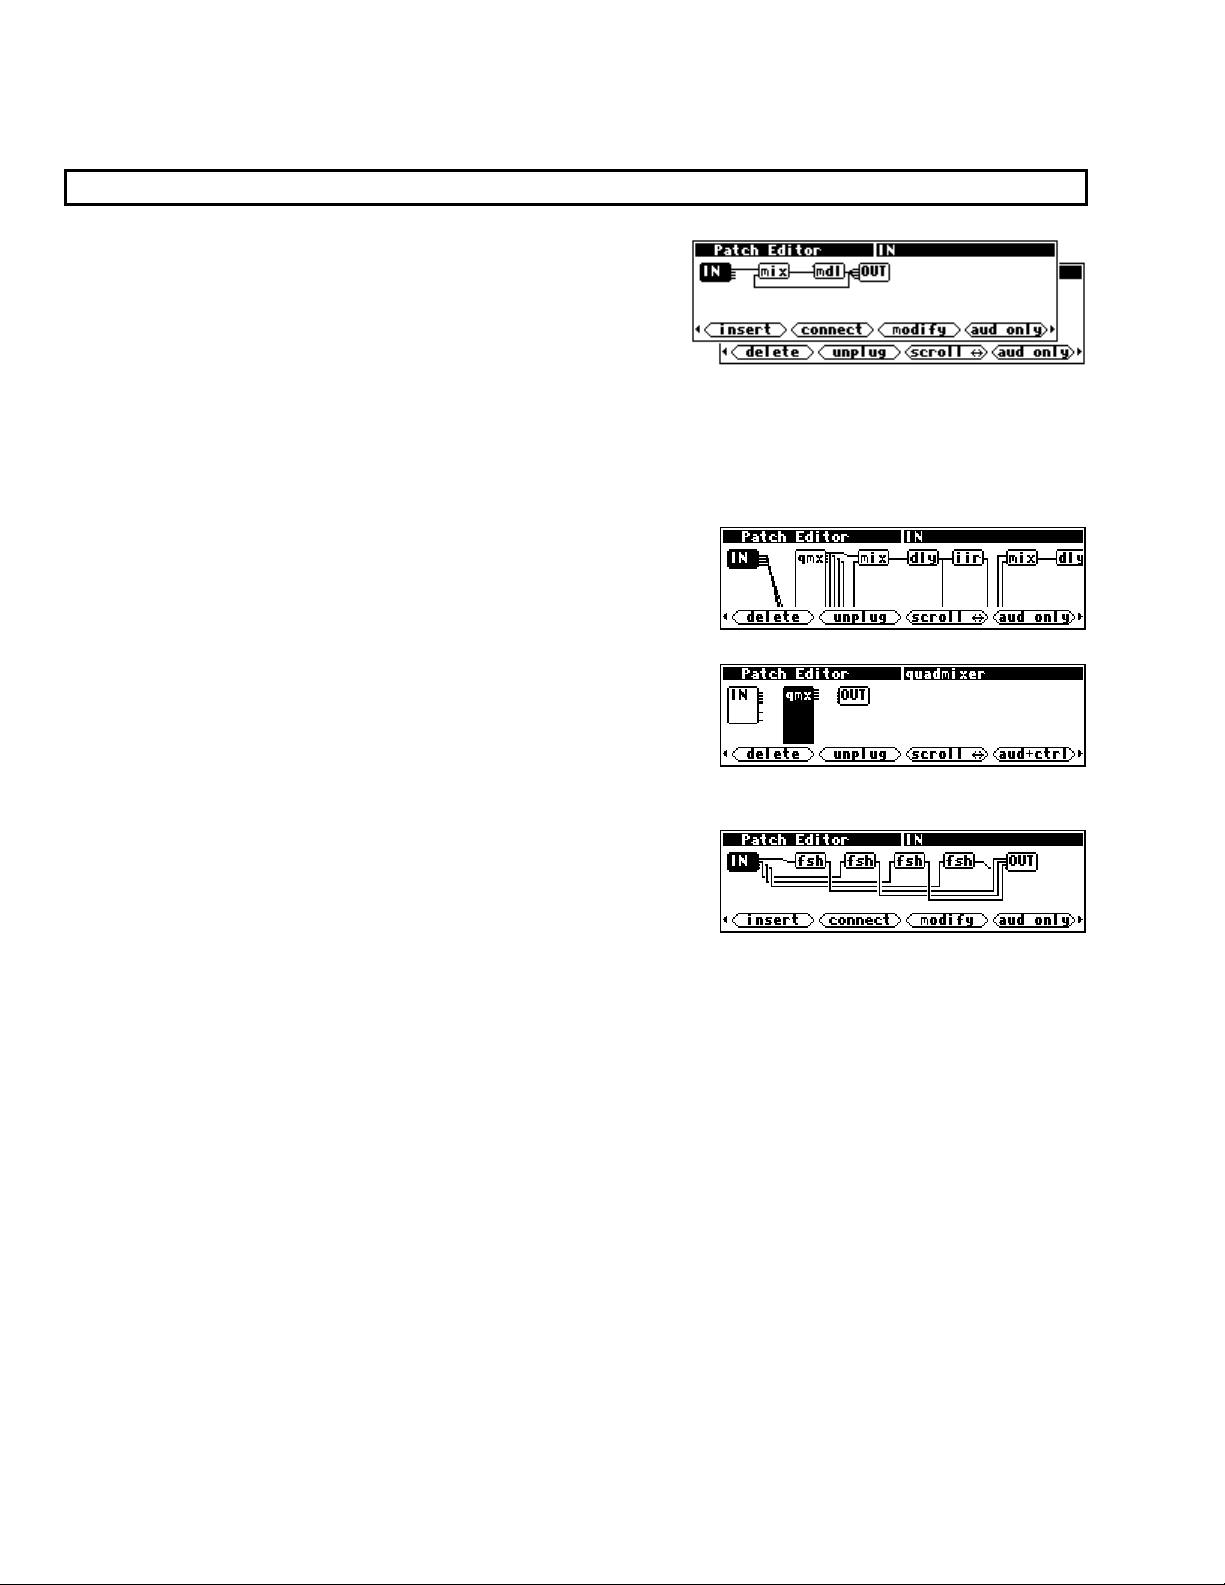
The Harmonizer
Programmer’s Manual
The Patch Editor Area
SOFT KEY Functions
In the Patch Editor area, there are seven SOFT KEY functions.
<insert> and <delete> add and remove modules from a
program.
signal connection.
KNOB moves the display. <aud-only> changes the display
<connect> and <unplug> add, remove, or change a
<scroll> changes the direction that the
mode to show audio and control lines instead of just audio lines
or to show menupage modules. <modify> makes changes to internal module details and userobject
information. Let’s take a closer look at the functions of all these
SOFT KEYS.
Scroll Direction
<scroll> SOFT KEY selects the direction of motion that the
The
KNOB causes. This is useful if the program you are editing has so
<scroll>
many signals that they dip below the level of the screen. . .
. . .or if one or more modules have enough inputs that they are
taller than the screen. Here, the
qmx module has inputs that exist
“below” this screen.
<scroll> SOFT KEY changes to reflect current scroll mode,
The
allowing you to scroll either horizontally or vertically.
The screen will not move if there is no off-screen information in
the direction that you are spinning the KNOB. Thus, in the case of
a simple program such as the one shown to the right, selecting
scroll motion up and down and then rotating the
KNOB will cause
no change.
Display Mode
<aud only>
It is quite possible to construct a complex program without using control signals. Eventually however,
you’ll want to create custom
PARAMETER area menu pages. This is accomplished by using knob modules,
fader modules, and other interface modules that use control signals. Most of the factory presets that
come with the Harmonizer were created using these modules. One of the consequences of using interface
modules is that there are usually more control signals than audio signals. As a result, what might have been
a fairly “viewable” “patch” in terms of its audio signals becomes quite complex in terms of its control
signals. To allow the patch to be viewed in a simplified manner, a feature exists that excludes control signals
from the Patch Editor area display. Furthermore, modules that have no audio signals (this includes knobs,
faders, etc.) are not shown in the
the editor; they will show up in the
aud only view. Note that mod signals are treated like audio signals by
aud only view.
The Harmonizer
Programmer’s Manual Page 70 of 97 Release 1.2.1
1999 Eventide, Inc.
Page 73
The right-most
The Harmonizer
SOFT KEY provides display mode control. When
Programmer’s Manual
this key is pressed, the display mode will change to the next mode
in this order:
aud+ctrl, etc. The right-most SOFT KEY’s label will change to
aud only, aud+ctrl, ctrlonly, misc, au d only,
indicate the current mode. Upon entering the Patch Editor area,
the right-most
SOFT KEY is in the aud only mode, and only the audio path is visible. Control signals (and
modules that contain only control inputs or outputs) are hidden. Note: most modules that have audio inputs
or outputs also have control inputs or outputs.
The following images are composite pictures of a simple program in all 4 display modes.
<aud only>
<aud+ctrl>
<ctrlonly>
<misc>
By comparing these different pictures, we can determine which of the wires in the
audio signals and which carry control signals. The
misc display mode will be discussed later.
aud+ctrl picture carry
Connect Modules
<connect>
Pressing the <connect> SOFT KEY starts a process that will connect a module output to a suitable input.
The Patch Editor will prompt for a starting input or output and then will prompt for a complementary
destination. The Patch Editor automatically limits the available destinations to legal selections. For
example, if a connection is started from a control input, only control outputs will be offered. Similarly, if a
connection is started from a mod output, only audio/mod inputs will be offered. To abort a connect, press
the PATCH key.
To illustrate, load the program
“
Programming” bank. This program consists of a pair of
Patch Instruct from the
delay modules, connected in series between DSP input 1 and
DSP output 1. The remaining DSP inputs and outputs are
“hardwired” one to the other. Press and hold
the PARAMETER
key to see what this “patch” looks like.
As you can see, there are two delay modules.
The Harmonizer Programmer’s Manual Page 71 of 97 Release 1.2.1
1999 Eventide, Inc.
Page 74

The Harmonizer
Programmer’s Manual
If you press the <aud only> SOFT KEY to go to the aud+ctrl
display mode, you'll see the knobs and monitor that make the
Each delay and Delay Amount parameters shown in the
PARAMETER area work. Notice the mul module. That's a
c_multiply module. It is multiplying the control signal from the knob (
amount
(in this case 2 -but you can’t see it in this display) and feeding the result to the monitor (mon) module.
knb) module by a constant
Go back to the
key)
to see how these modules and their connections in the Patch
PARAMETER area (by pressing and holding the PARAMETER
Editor area translate into parameters on a menu page. The
monitor module creates the parameter Delay Amount that
shows the actual delay, while the knob creates the parameter
delay
that sets the delay for each of the delay modules.
Each
For the sake of demonstration, we'll use the <connect> SOFT KEY to rearrange the delay (dly) modules
such that one is in “channel” 1 and the other is in “channel” 2, thus delaying each “channel” by up to 10
seconds (10,000mS).
(Hey! Ya gotta crawl before you can run, OK?)
Press the PROGRAM key and reload Patch Instruct. After the program is loaded, press and hold the
PARAMETER key to re-enter the Patch Editor area.
Press the <aud only> SOFT KEY to get the screen shown to the
right.
Now press the
<connect> SOFT KEY. The Harmonizer will
prompt for something to connect.
Using the
CURSOR keys, select the output of the leftmost dly
module. You'll know you have the correct output when the upper
right of the display reads first delay-out. When the screen looks
like the one shown to the right, press the
SELECT key.
The Harmonizer
Programmer’s Manual Page 72 of 97 Release 1.2.1
1999 Eventide, Inc.
Page 75
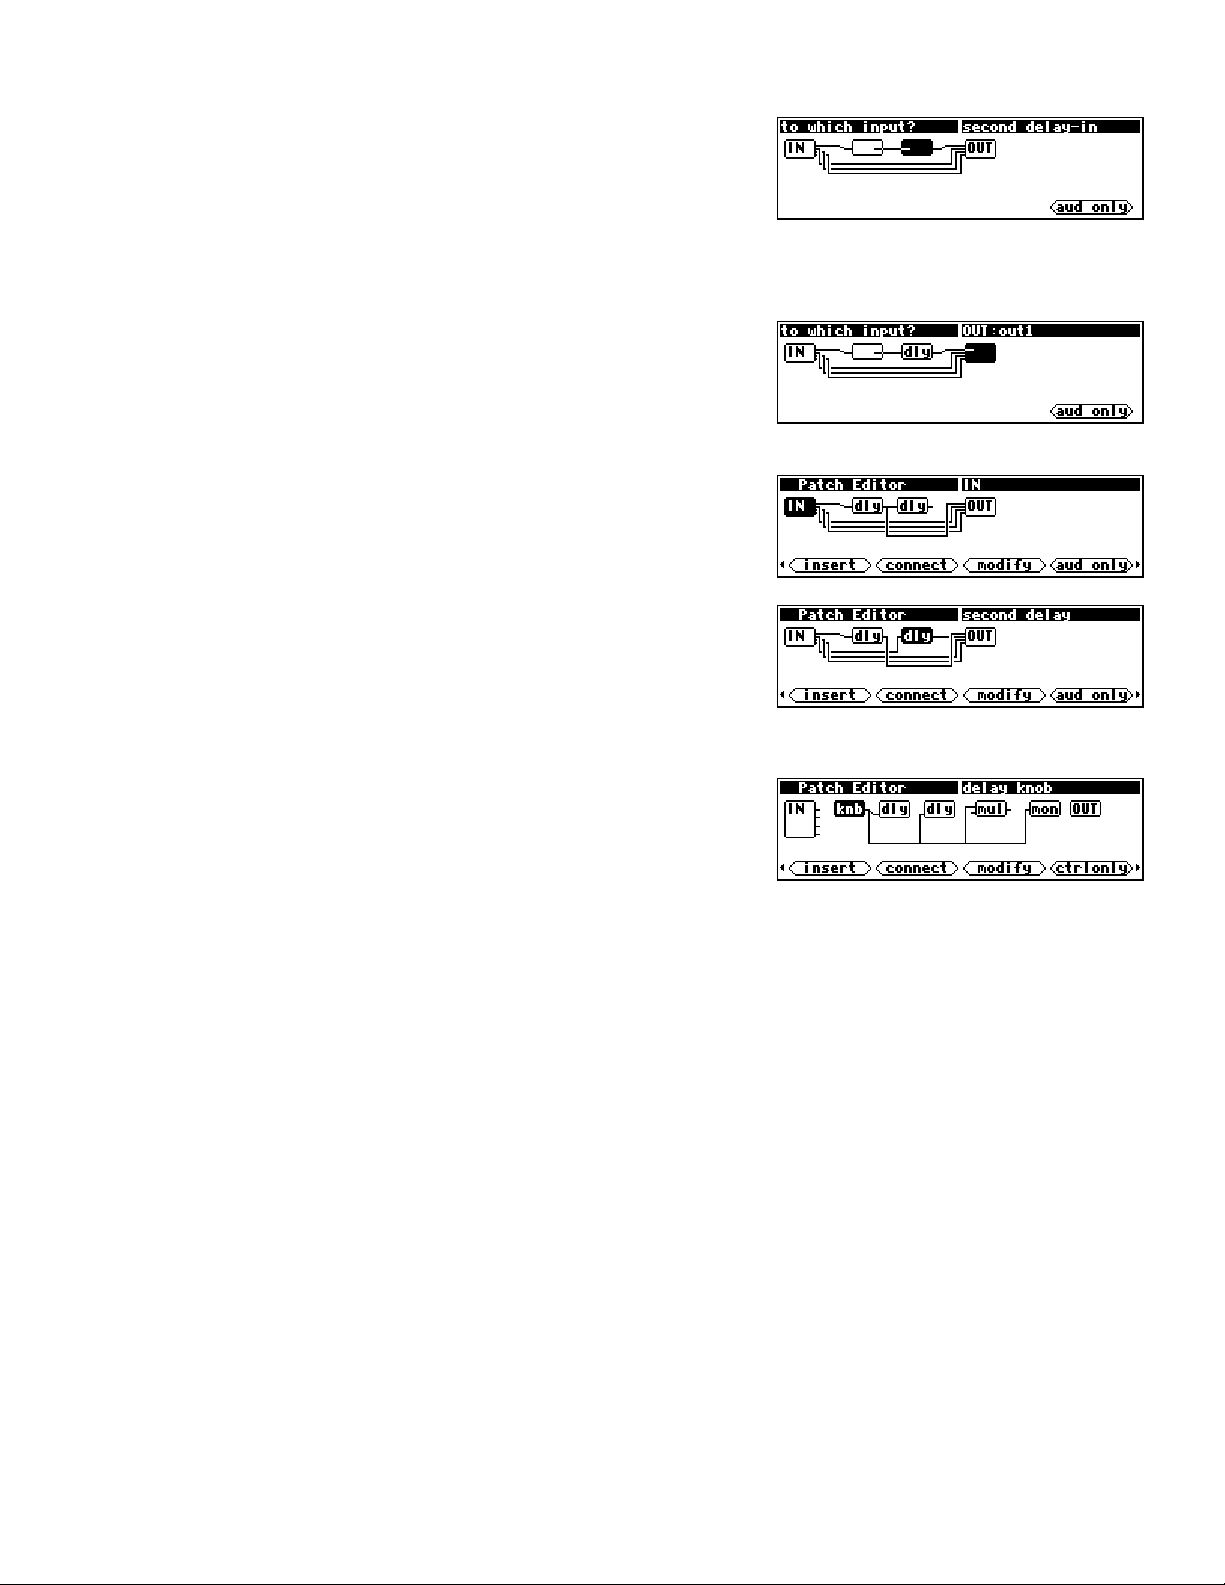
The Harmonizer
Programmer’s Manual
As this is an audio output, the screen mode will automatically
change to
aud only mode. Because you have selected an output,
the screen will now prompt you for an input to connect to. The
Patch Editor will automatically choose a valid audio input for you
to connect to as shown to the right. Note that the Patch Editor’s choice may not be your choice! Use the
LEFT and RIGHT CURSOR keys and the KNOB to experiment with what exactly can be selected.
Although the <aud only> SOFT KEY is presented, pressing it in
this case will not allow connections to anything that isn't an audio
or mod input. This is because we’ve already selected an audio
output, and you can’t connect an audio output to anything but an
audio or mod input. Feel free to press the
<aud only> SOFT KEY,
and you’ll see what we mean.
After you’ve experimented, set the screen mode back to
, select out1 on the OUT module, and press the SELECT key.
only
aud
The current program now has a single delay module between
in1 and OUT:out1, a delay module that has an input but
IN:
no output, and straight paths between the remaining DSP
“channels." Note that the signal that was previously connected to
OUT:
out1 has been automatically disconnected. See Notes
below.
You should now be able to connect IN:
delay:
in. Then connect second delay:out to OUT:out2.
in2 to second
The screen to the right is what you should end up with. This
“patch” has a delay module in each “channel” of audio.
As an exercise, you could go to
knb) to mon-in (as shown to the right). That would make the Delay Amount parameter in the PARAMETER
(
ctrlonly screen mode and bypass the mul module by connecting the knob
area show the correct delay value.
Notes on
<connect>
Although it is possible to connect a single output to multiple inputs, it is not possible to connect two signals
to a single input. If an attempt is made to connect a signal to an input that is already in use, the new signal
will replace the old. To connect multiple audio signals to one input, a mixer or adder module could be
used to combine the audio signals. For control signals, a c_adder module could be used.
Breaking a Connection
<unplug> SOFT KEY removes a single connection between two modules. To break a connection, press
The
the
<unplug> SOFT KEY, then use the CURSOR keys and the KNOB to choose which input to disconnect.
<unplug> SOFT KEY will not allow a disconnect to be specified by output because outputs may be
The
<unplug>
connected to more than one input.
The Harmonizer Programmer’s Manual Page 73 of 97 Release 1.2.1
1999 Eventide, Inc.
Page 76

The Harmonizer
Programmer’s Manual
Example: To break the connection between the two delay modules in the program Patch Instruct from
the “
Programming” bank, first load the program. Then press and hold the PARAMETER key to enter the
Patch Editor area.
After the display updates, briefly press the
to reveal the alternative set of
SOFT KEYS.
PARAMETER key again
Press the <unplug> SOFT KEY
Use the LEFT CURSOR key to select the input for the second
delay module.
Press the SELECT key.
That’s it. You’ve “unplugged” the input to the delay module.
Note that the aud only/aud+ctrl/ctrlonly/misc SOFT KEY is active to aid in selecting a module and
input to be unplugged. Changing the display mode does not deselect the currently selected input. The
upper right corner of the screen will indicate the currently selected input, regardless of the display mode.
Inserting Modules
<insert>
The <insert> SOFT KEY adds a new module to the “patch." The
new module will be inserted to the right of the currently selected
module. Use the
RIGHT and LEFT CURSOR keys to select the
insertion point.
Note that modules do not, strictly speaking, have to be in any particular order because connections can run
in either direction. However, the programmer should be aware that every instance of reverse signal flow will
add a four sample delay to the process. In some casess, such as where a preset has multiple signal paths,
such delays can cause objectionable "phasing," or other artefacts.
After you've chosen where to place a new module, press the
the one given in the
PROGRAM area. Just as in the PROGRAM area, the top area shows the name of a
<insert> SOFT KEY. This display is a lot like
“group” (bank), and the field below lists the contents of that group. The difference is that here a group
“contains” modules instead of programs
manual.
Please read the separate User’s Manual before proceeding!
. If you’re unfamiliar with how to load a program, you probably shouldn’t be reading this
The Harmonizer
Programmer’s Manual Page 74 of 97 Release 1.2.1
1999 Eventide, Inc.
Page 77

The Harmonizer
Most modules will create a menu page in the
Programmer’s Manual
PARAMETER area
when they are inserted in the Patch Editor area. To demonstrate
this, first load the program
Then press and hold
the PARAMETER key to enter the Patch
Long Mono Delay from Bank 2.
Editor area.
Insert an eq module by pressing the <insert> SOFT KEY,
scrolling to the Filter group, and selecting
eq. Press the SELECT
key to actually insert the eq module.
Press and hold
PARAMETER area. Note that now there is a menu page and an
associated
the PARAMETER key to return to the
SOFT KEY for eq parameters.
Most, but not all, modules get their own
PARAMETER area menu keys automatically. If the inserted module
comes from any of the following groups, it will not show up automatically:
• Bridge
• Control Math
• Control Process
• Interface
• Math
• Miscellaneous
If a module does not create an “automatic” menu page in the
created for it in the
PARAMETER area. This is a more advanced operation and is discussed in Chapter 3.
PARAMETER area upon insertion but does have parameters, a menu page can still be
Notes on
<insert>
During the insert process, if you change your mind and decide not to insert anything yet, press the
PARAMETER key to abort. That will put you back at the main edit menu without changing the patch.
Removing a module
<delete>
The <delete> SOFT KEY removes a module from a program. Any
signals connected to the deleted module are disconnected. Select a
module to be deleted by highlighting it using the
CURSOR
keys. Here we’re choosing the second delay delay
LEFT and RIGHT
module.
Next, press the
be sure that the
CURSOR
key (choosing OK) and then press the SELECT key.
<delete> SOFT KEY. The Harmonizer prompts to
<delete> is intentional. If it is, press the DOWN
In the example to the right, the OUT module now has an
unconnected
output.
input and the first dly module has an unconnected
Modifying a module
<modify>
The <modify> SOFT KEY is described in the next section.
The Harmonizer Programmer’s Manual Page 75 of 97 Release 1.2.1
1999 Eventide, Inc.
Page 78

The Harmonizer
Programmer’s Manual
THE <MODIFY>
SOFT KEY
The <modify> SOFT KEY gives you the ability to directly change the “internals” of a module. This is
necessary to create complex, highly customized programs. The
<modify> SOFT KEY works on one module
at a time and is needed to change the following:
• the module name
• specifiers
• connections between userobjects and userobject inputs
• control inputs that are not “patched” and that are not controlled via their userobject
Modifying a delay module
To use the <modify> SOFT KEY in the Patch Editor display, simply
select the desired module using the
LEFT and RIGHT CURSOR
control keys. . .
. . .and then press the
<modify> menu, the display shows the current KNOB mode
(
select or adjust), the name of the module, the module type, and
<modify> SOFT KEY. On entry to the
the first three lines of module information.
<modify> menu scrolls and behaves much like things in the PROGRAM area do.
The
• To scroll through the data for the module use the
keys. If the
can also use the
KNOB mode reads (select) (as shown to the right) you
KNOB to scroll through the data for the
CURSOR
module.
• To change any of the data in the module, first ensure that the
line of data you want to change is highlighted and that the
KNOB mode reads (adjust) (these two requirements are actually one in the
. You highlight a line by either pressing the RIGHT or
same)
DOWN CURSOR key OR by pressing the SELECT key.
• Once a line of data is highlighted, spin the
KNOB or use the
numeric keypad to adjust the data. A pop-up menu appears
that prompts you to either press the
SELECT key or the ENT
key when you are satisfied with the change.
Below is a composite of the information for the first delay module in the
Patch Instruct program.
The Harmonizer
Programmer’s Manual Page 76 of 97 Release 1.2.1
1999 Eventide, Inc.
Page 79

The Harmonizer
Programmer’s Manual
The above example includes several details that are familiar and a few that aren’t. The following is a
breakdown of each line.
KNOB Mode
KNOB mode reads (select), spinning the KNOB will scroll through the menu. If the KNOB mode
If the
(adjust), spinning the KNOB will adjust the data on the current line (the line with the little triangle next to it!).
reads
Module Name
The name of the module we are
<modify>ing!
Module Type
The type of module we are
<modify>ing!
Edit Module Name
This is the current name of the selected module. Selecting this
line and pressing the
name. After the name is changed, press the
SELECT key will allow you to change the
SELECT key to make
it “stick” . The Harmonizer will display a message indicating that
“
Modifying...” and then “Loading new patch...” is taking place. If the <done> SOFT KEY is pressed
while the name is being edited, the name change will be lost and the display will return to the basic Patch
Editor area display.
Specifier
This example (the delay module) has only one specifier. Some
modules have many specifiers. To change the specifier, choose it and
press the
value with the numeric keypad or the
key or the
Modifying...” and then “Loading new patch...” is taking place. If the change in specifiers makes the
“
program take up too much of any resource, the Harmonizer will display the “
and will reverse the change. To return to the
any key other than
SELECT key. This will bring up a menu. Change the
KNOB. Press the SELECT
ENT key to save your alteration. The Harmonizer will display a message indicating that
Patch too big” error message
<modify> menu without changing the value of the specifier, press
SELECT or ENT.
Audio input
The delay module has one audio input. In this program, the
first delay module’s input is connected to adc-in1. That’s
“techie speak” for
in1 on the IN module.
You can change the output that connects to the current module’s
input in the
changed it to
<modify> menu if you so desire. Here we’ve
second delay-out.
The Harmonizer Programmer’s Manual Page 77 of 97 Release 1.2.1
1999 Eventide, Inc.
Page 80
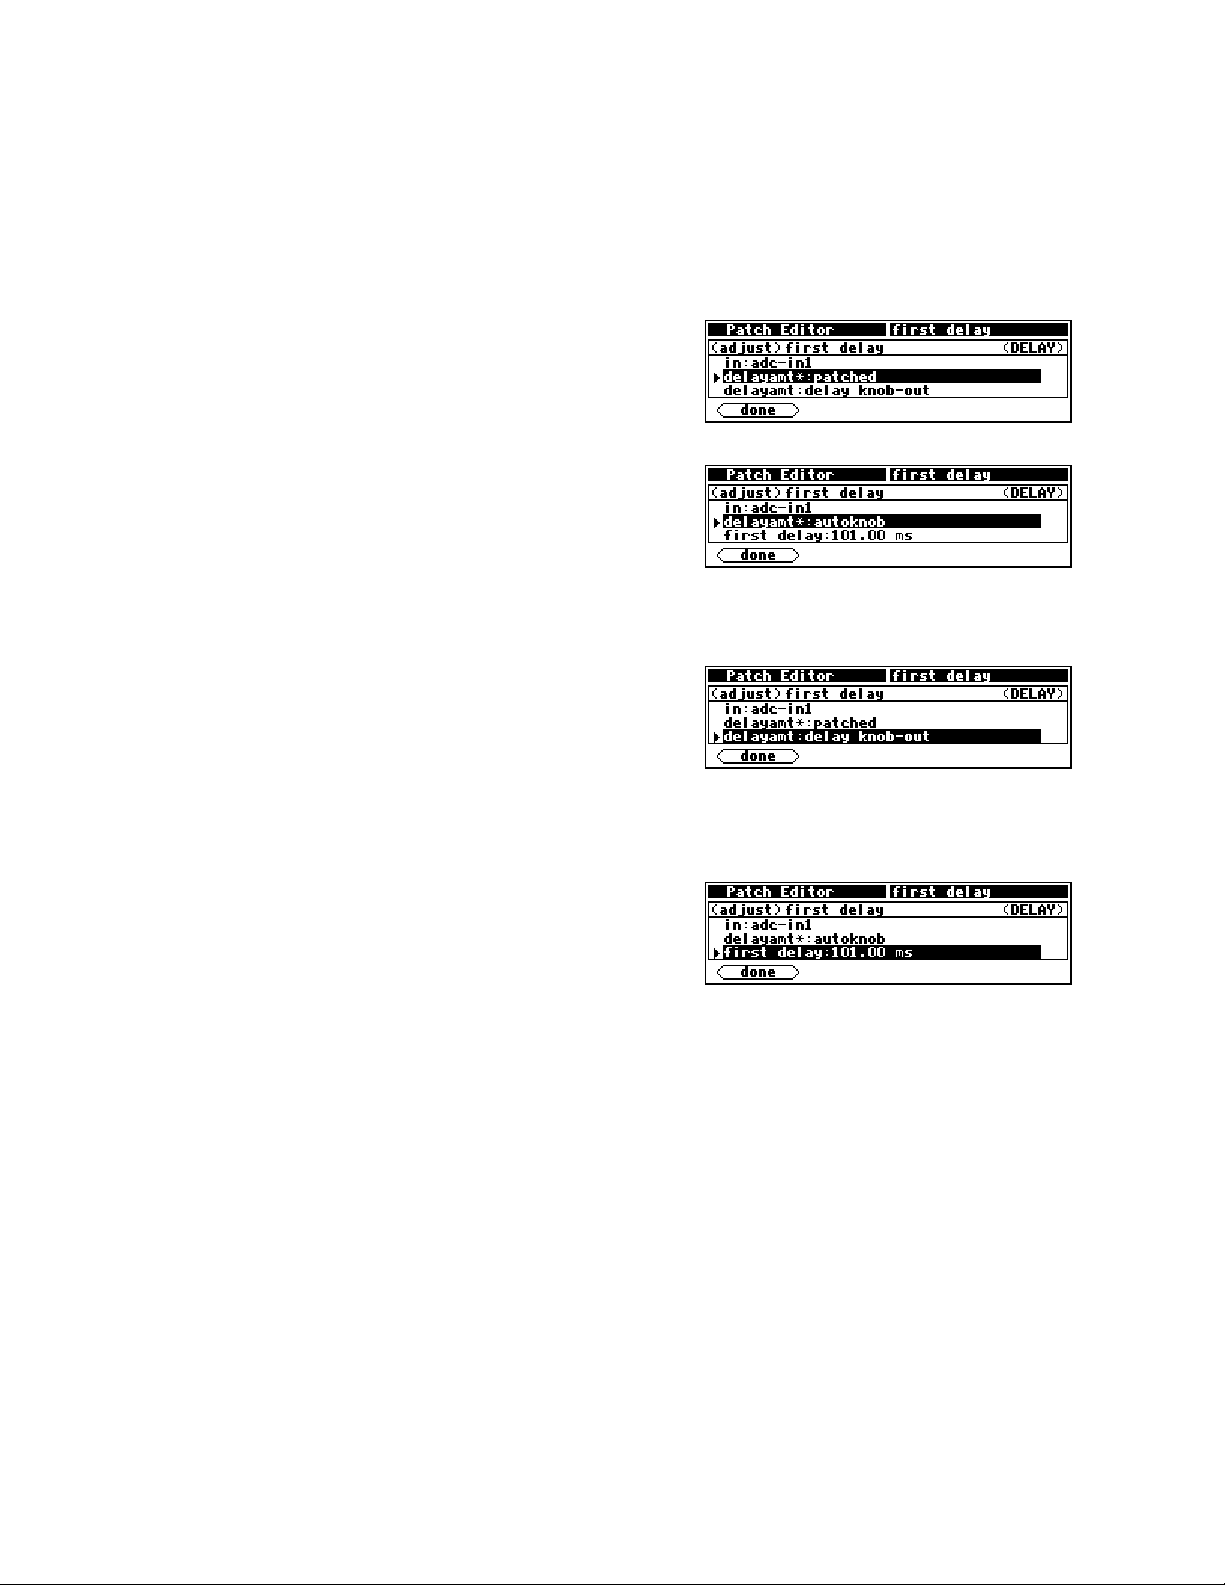
The Harmonizer
Returning to the basic Patch Editor area display (
delay module’s
output is indeed connected to the first delay module’s input.
Programmer’s Manual
by pressing the
<done>
SOFT KEY), we can see that the second
“Fine,” you say, “but it seems simpler to do stuff like that with the <connect> SOFT KEY.” A wise pupil
are you. . .
Mode of 'Delayamt' Control Input
Every control input has two possible modes, “patched” and
“autoknob." If patched is selected
(as in the example to the right) the next
line of the menu will show the module and output connected to
this input
(
delay knob-out
in the example to the right). More on this below
under “Output Connected to ‘delayamt’ Control Input." . .
If “autoknob” is chosen
the menu will show the “autoknob’s”
statement along with the current value of the control input
delay: 101.00 ms
in the example to the right). More on this below under
(as in the example to the right), the next line of
PARAMETER area menu
(
first
“Autoknob." . .
Output connected to 'delayamt' control input
Since the mode of the delayamt control input is set to
“patched” in the example shown to the right, the next line will
show the module and output connected to this input. By selecting
this line
(as shown to the right) and pressing the SELECT key, the
chosen module and output may be changed. But of course the standard method of re-patching control
inputs is to use the
<connect> SOFT KEY in the basic Patch Editor area display.
Autoknob
If this particular module's
delayamt input is set to “autoknob."
the control input's value is adjustable. The prompt offered (in
this case “first delay”) is the same prompt that would be
offered if this module's userobject was displayed on a menu page in
the
PARAMETER area (by connecting this module’s userobject to the head module). The prompt, also called a “menu
statement." is, in this case, the same as the module name. The text that is displayed is determined by the
inherent properties of a particular module type (i.e. delay module) and may be different for other module
types.
The Harmonizer
Programmer’s Manual Page 78 of 97 Release 1.2.1
1999 Eventide, Inc.
Page 81

The Harmonizer
Modifying Complex Modules
Some modules have specifiers that change the number of remaining specifiers in the module or the number of
some other type of input or output on the module. Consider these two composite screen images:
The major difference between these two examples of the c_switch module is that the module on the left
has its
set to
first inserted, the
control inputs in the c_switch module has changed, basic Patch Editor area display will show a different
icon for the module:
number inputs: specifier set to 1 whereas the module on the right has its number inputs: specifier
4. Since the c_switch module will always have its number inputs: specifier set to 1 when it is
<modify> menu must be used to enable more inputs. Note that since the number of
Programmer’s Manual
1 input c_switch:
4 input c_switch:
The Harmonizer Programmer’s Manual Page 79 of 97 Release 1.2.1
1999 Eventide, Inc.
Page 82

The Harmonizer
Programmer’s Manual
INTER-DSP COMMUNICATION FOR ORVILLE
Control signals can be sent from one DSP to the other in Orville.
7000 family users should note that they only have a single DSP, so will
probably want to skip this section.
The c_bridge module accepts four control signal inputs.
Control signal outputs that are connected to these inputs appear at the other DSP’s “global control outputs”
and at the control outputs of a c_bridge module in the other DSP. A DSP’s global control outputs are
located on the IN module as seen on the screen to the right (notice that we’re in
ctrlonly
display mode).
For example, load the program Inter-DSP Send from the
“
Programming” bank into DSP A. A knob module is
connected to the first input of a c_bridge module in as shown
to the right.
Additionally, the knob module’s userobject output is connected to
the head module so that the knob module’s parameter shows
up in the
PARAMETER area as shown to the right.
Now load the program
“
Programming” bank into DSP B. A monitor module is
Inter-DSP Rec eive from the
connected to global control output 1.
Additionally, the monitor module’s userobject output is connected to the head module so that it shows up
PARAMETER area as shown to the right.
in the
You can see for yourself that changing the Send Value in DSP A
alters the
<insert> a c_bridge module in DSP B to send control signals
Receive value in DSP B. Of course, you could
to DSP A at the same time that DSP A is sending control signals to DSP
B!
The Harmonizer
Programmer’s Manual Page 80 of 97 Release 1.2.1
1999 Eventide, Inc.
Page 83
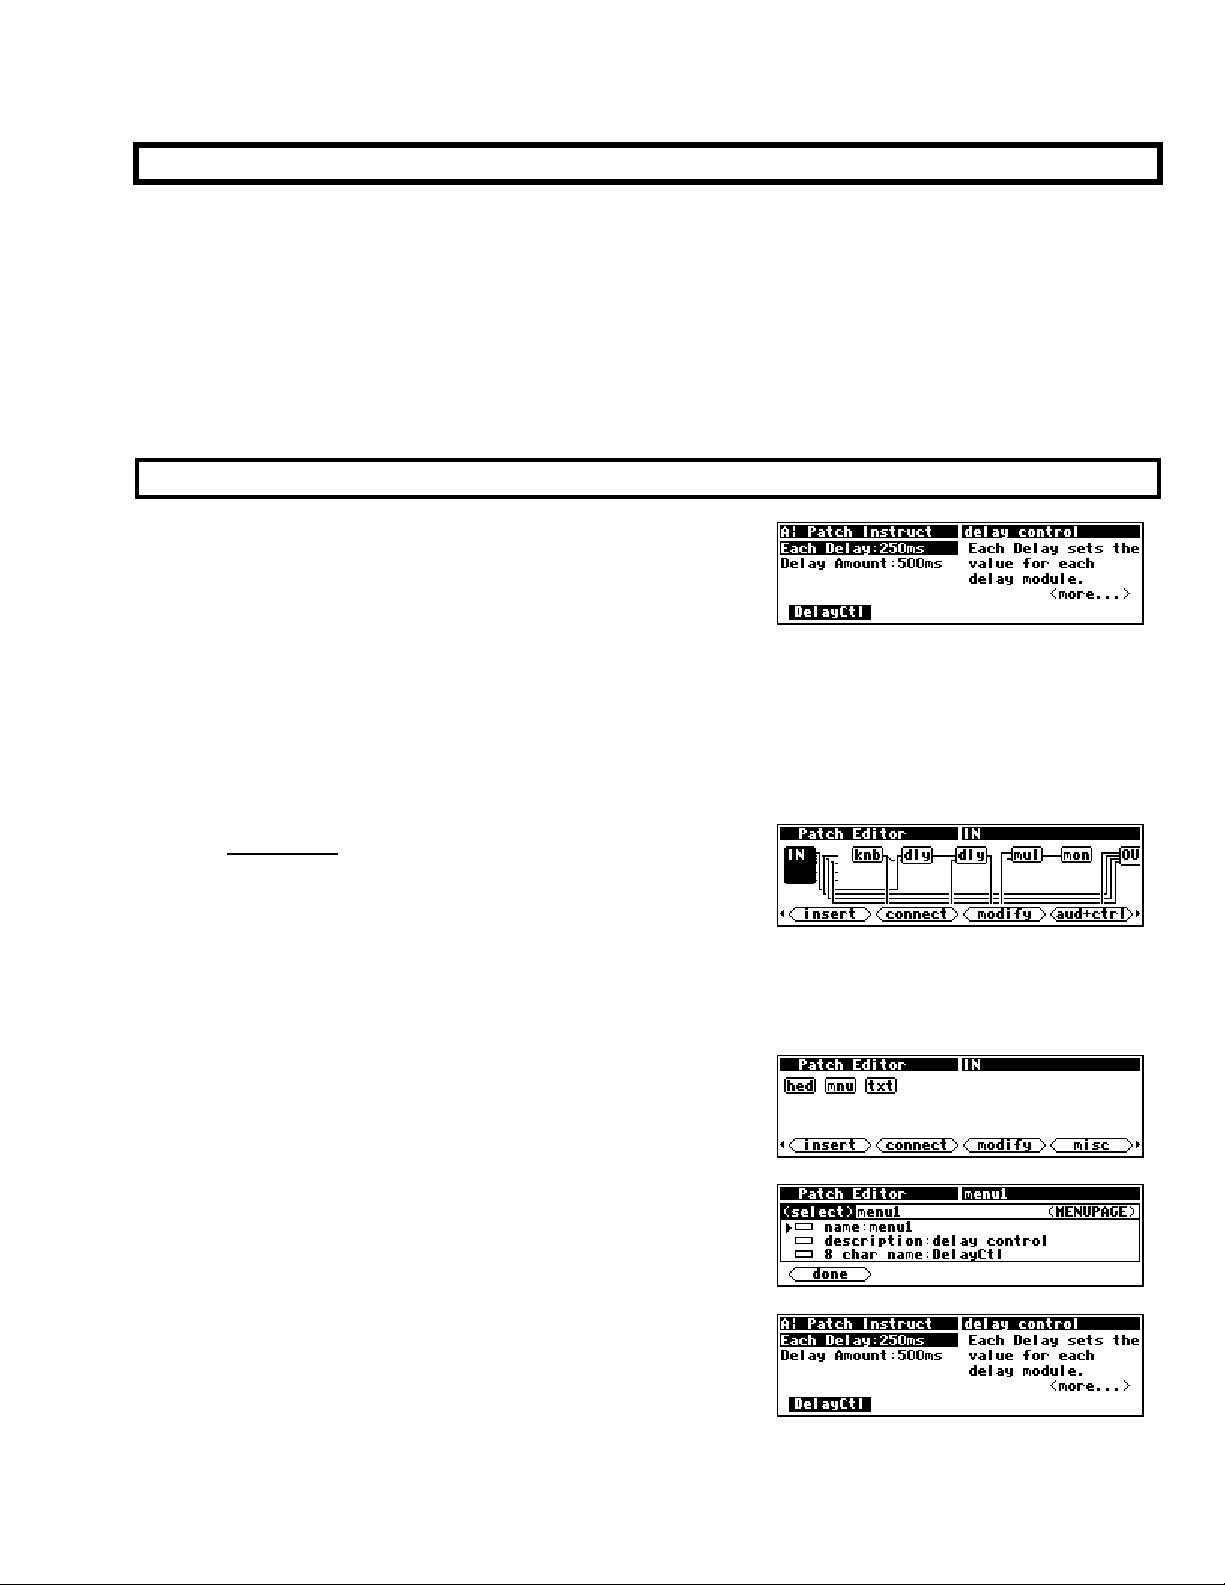
The Harmonizer
Programmer’s Manual
CREATING THE USER INTERFACE
The Patch Editor automatically creates PARAMETER area menu pages for most modules when they are
inserted by connecting their userobjects to the head module. You can create a wealth of programs this way.
In the
PARAMETER area, parameters will automatically be grouped by module and SOFT KEYS will appear -
one per module. A program created this way will be fully functional and have all of the audio characteristics
of a factory preset. Audio, however, is where the similarities end. A program created using the “automatic
menu system” will not look as slick, nor be as easy to use, as the factory presets are. Factory presets are
created by hand-connecting the userobjects of knob modules to menupage modules and then handconnecting the userobjects of those menupage modules to the head module. This chapter details how this
is done.
Viewing Menupages and Menupage Modules
A menupage module has a single userobject and any number of
userobject inputs. Normally a menupage module is connected to
the head module. If so, the menupage module shows up in
PARAMETER area as one or more pages of parameters, a title
the
line, and a
SOFT KEY and the list of connected userobjects that comprise the parameters seen in the PARAMETER area
are accessible by using the
program
SOFT KEY. The information for the title line and
<modify> SOFT KEY on the menupage module. For example, load the
Patch Instruct from the “Programming” bank.
The menu page shown above is visible in the
knob module, a monitor module, and a textblock module
PARAMETER area. It is created with a menupage module, a
(we’ll see how in a minute).
Pressing and holding
Editor area. Do so and then press the
the PARAMETER key will access the Patch
<aud only> SOFT KEY to
get the screen shown to the right. From this display the knob
(knb) module and monitor (mon) module are visible. Both
are visible in this display mode because they have one or more control inputs or outputs. The menupage
and textblock modules have neither so they will only be visible in the
<aud+ctrl> SOFT KEY twice to view the program in the misc display mode.
misc display mode. Press the
The three modules, head (hed), menupage (mnu), and
textblock (
RIGHT CURSOR key will select one of the modules. Select the
menupage module and then press the
txt) can now be seen. Pressing the LEFT or
<modify> SOFT KEY.
From here, we can see the description “delay control” and
8 char name “DelayCtl."
the
Note that these equate to the title and SOFT KEY when the menu
page is viewed in the
PARAMETER area.
The Harmonizer Programmer’s Manual Page 81 of 97 Release 1.2.1
1999 Eventide, Inc.
Page 84
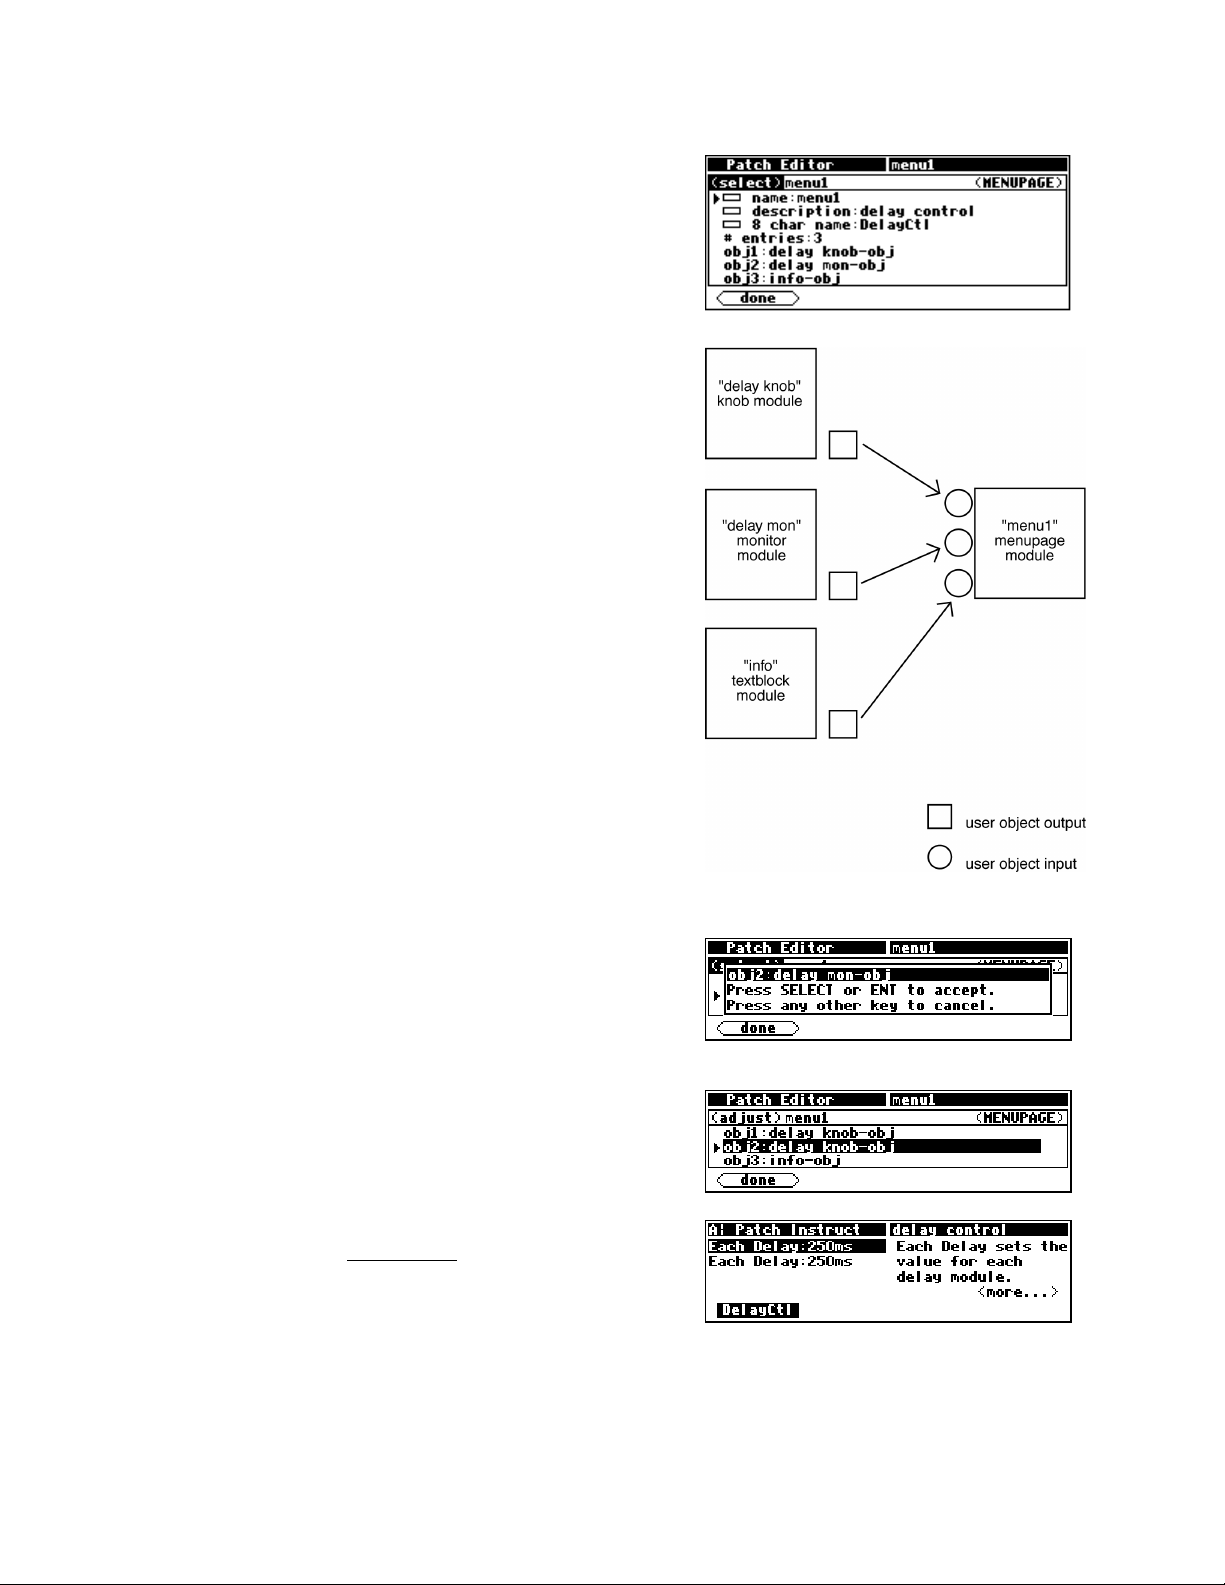
The Harmonizer
Programmer’s Manual
To the right is a composite of the
would be seen by rotating the
<modify> menu data that
KNOB. The obj data lines indicate
which userobject outputs are connected to this menupage
module’s userobject inputs. In this case, the userobjects of the
module named “
and the module named “
delay knob." the module named “delay mon."
info” are all connected to this
menupage module’s userobject inputs. are included userobjects.
To the right is a diagram of what’s actually going on. As was
mentioned before, the connections made between userobject
outputs and userobject inputs are not shown as little lines in the
Patch Editor area. The connections are implicit, much like the
connections made between inputs and outputs when routing
signal flow on the [analog], [dsp A], [dsp B], and [digital]
menu pages in the
SETUP area of Orville.
As an exercise, use the
should look like the one to the right. Rotate the
KNOB and RIGHT CURSOR key to select obj2. Press the SELECT key. The screen
KNOB left and
right to view available userobjects that can be connected to this
userobject input. The possibilities are: adc-nullobj, delay knob-
, scalemult-obj, delay mon-obj, menu1-obj, and info-
obj
obj
.
Just for the fun of it (and what fun it is!) select delay knob- obj. The
screen should look like the one to the right, with
connected to both userobject input 1 and userobject input 2.
obj
delay knob-
Now return to the PARAMETER area by pressing the <done>
SOFT KEY and then pressing and holding the PARAMETER key.
You should see that indeed, the
Each Delay parameter is now
doubled on the menu page. Change one version and then
highlight the second version; you’ll see that they are the same
even if they do exhibit some peculiar behavior. You won’t normally have any reason to put the same
parameter on the same menu page more than once! (But you may want to put the same parameter on different menu pages in the
same program so that it will be acc essible from more than one “place” in the p rogram.)
The Harmonizer
Programmer’s Manual Page 82 of 97 Release 1.2.1
1999 Eventide, Inc.
Page 85
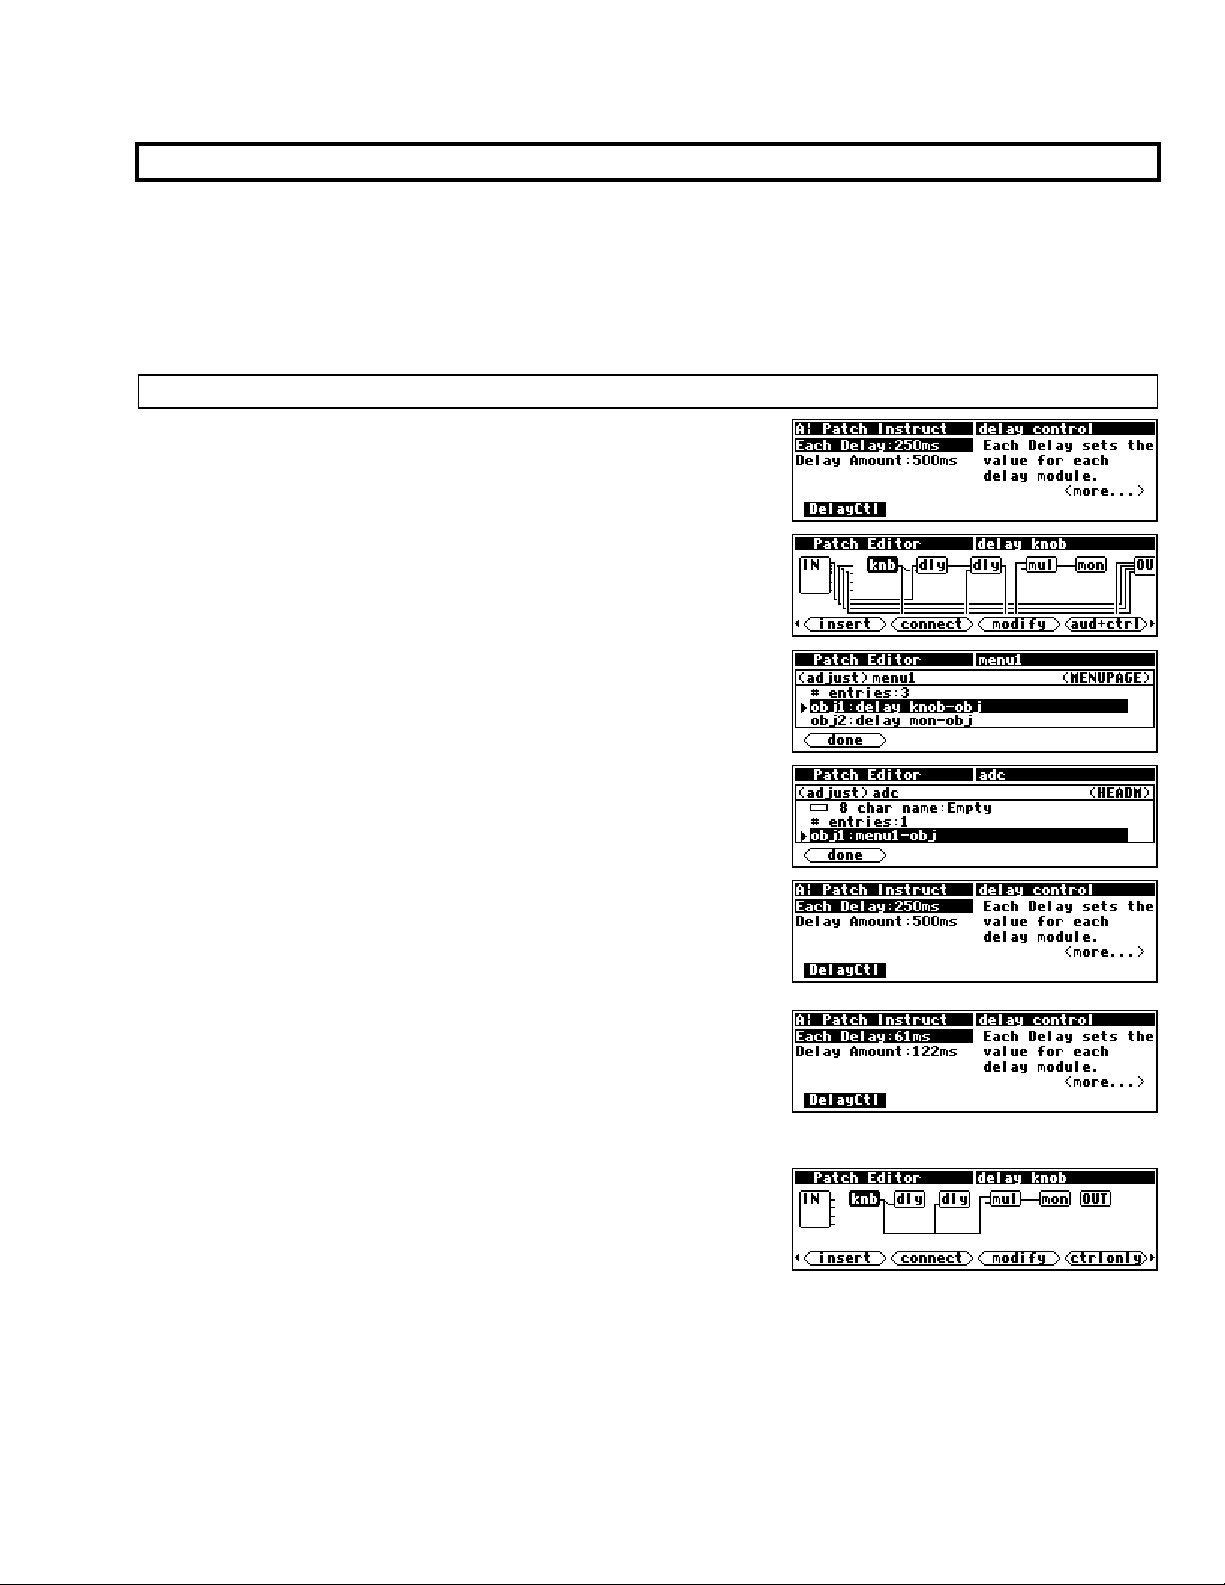
The Harmonizer
Programmer’s Manual
Interface Modules
Control inputs are used to send a parameter value into a module. The parameter value is generated by
another module, perhaps a knob module. One common use for this capability is the creation of custom
“parameter adjusters” to adjust the parameters for the modules in a program. The custom “parameter
adjusters” are special purpose modules from the “interface” module group. This group includes the
common text/numerical parameter adjuster that is generated by the knob module, as well as several
graphical “parameter adjusters” (hfader module, vfader module, and rfader module).
ARAMETER ADJUSTERS
P
“Parameter adjuster” modules have a single control output and a
userobject output. If connected to a menupage module, a
“parameter adjuster” will show up on the menu page in the
PARAMETER area as a parameter.
For example, in the now infamous program
shown to the right, the module named “
Patch Instru ct
delay knob” is a
“parameter adjuster."
Its userobject is connected to a menupage module. . .
. . .which is in turn connected to the head module.
Thus, the module named “delay knob” shows up in the
PARAMETER area as a parameter (Each Delay).
Selecting a parameter in the
KNOB will change the value of the “parameter adjuster’s” control
PARAMETER area and rotating the
output. The change will also be reflected in a textual or graphical
display change. In this case, rotating the KNOB changes the Each
Delay
parameter in the PARAMETER area. . .
. . .and it changes the value sent from the “delay knob’s” control
output into both
dly modules and the mul module (of course this
screen doesn’t show the change, but the value has changed
nonetheless!) .
The Harmonizer Programmer’s Manual Page 83 of 97 Release 1.2.1
1999 Eventide, Inc.
Page 86
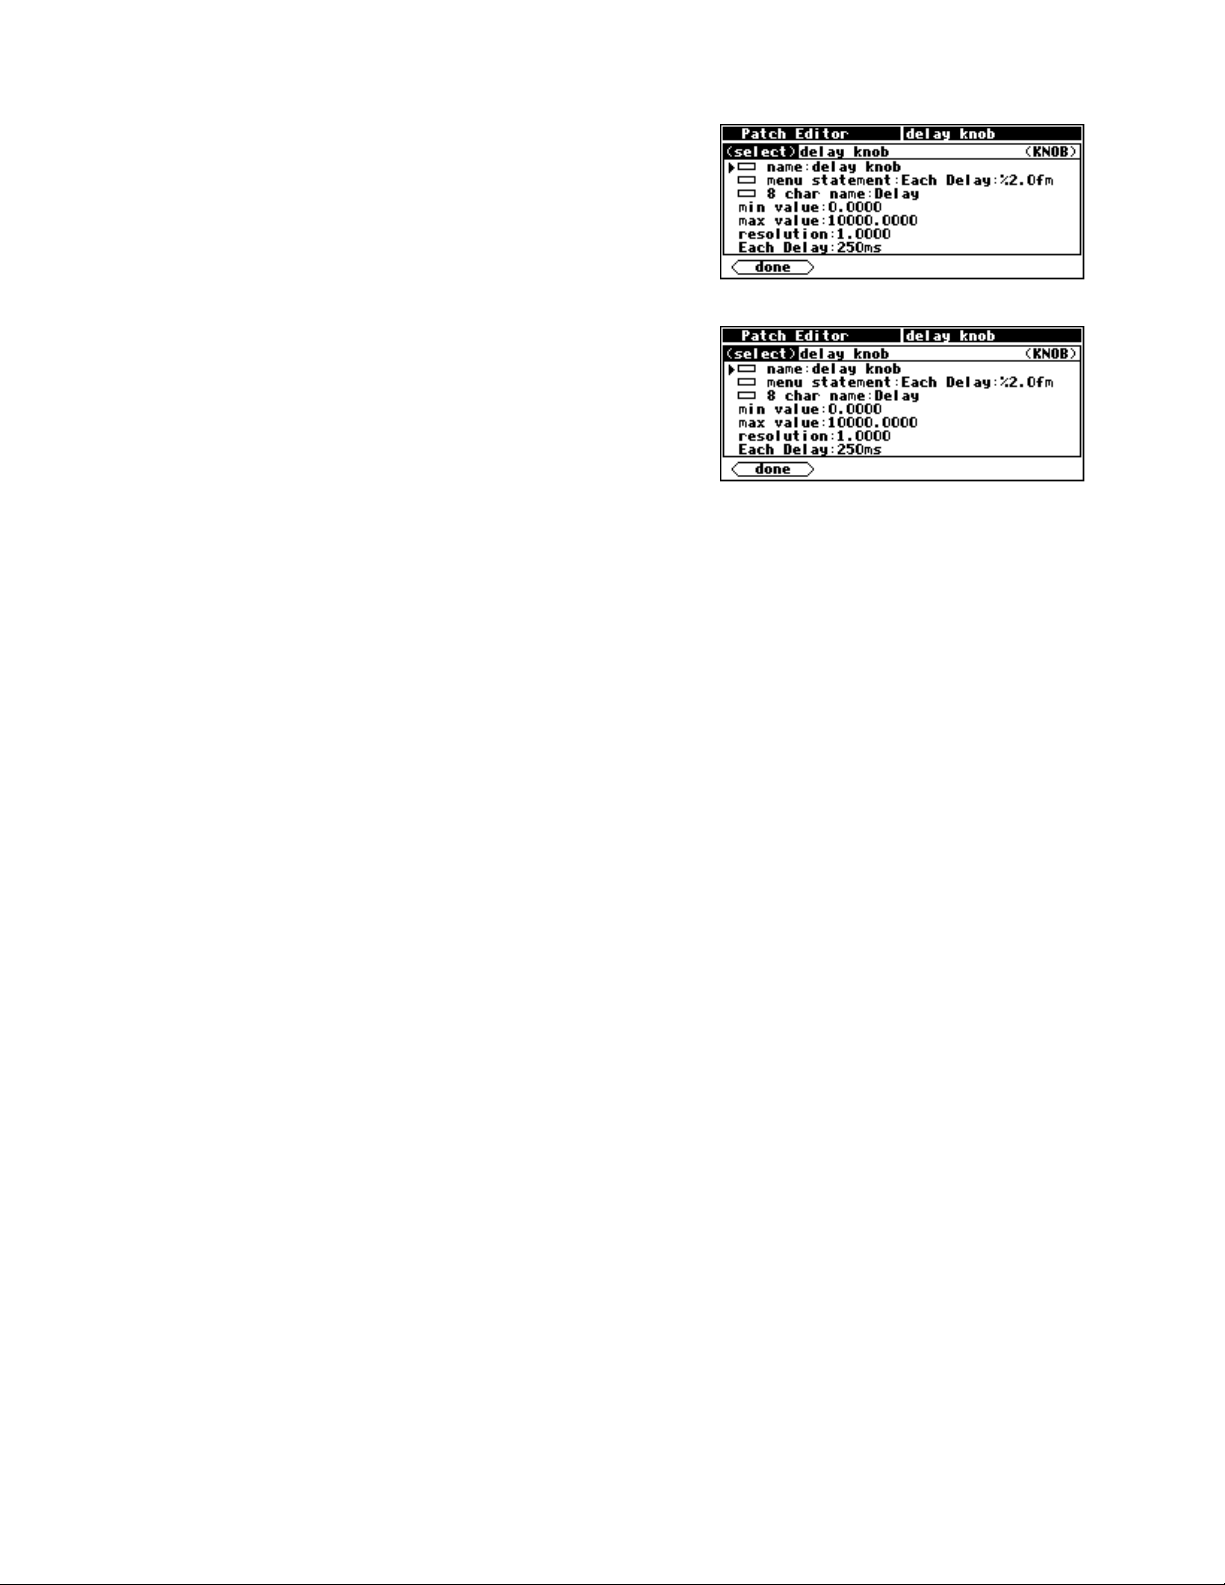
The Harmonizer
Programmer’s Manual
The actual text used for a parameter and the way changes made to
a parameter’s value in the
output changes in the Patch Editor area are set up by
PARAMETER area translate to control
<modify>ing
the “parameter adjuster’s” module in the Patch Editor area.. This
screen shown to the right is a composite picture of the <modify>
menu for the knob module in the
• The module
• The
menu statement specifier is set to “Each
Delay:%2.0fms
page in the
menu statement shows up, the text “Each Delay:
xxxxxms
name specifier is set to “delay knob."
” (the last ‘s’ is hidden). This means that on a menu
PARAMETER area where this knob module’s
” will show, where xxxxx actually reflects the value
that the parameter is set to. The “
Patch Instruct program.
%2.0f” part is described in
some detail later.
• The 8 char name is “Delay." The 8 char name is what would show up as a SOFT KEY if this
module’s userobject were connected to the head module.
• The
• The
• The
min value specifier sets the minimum value that the parameter can be set to.
max value specifier sets the maximum value that the parameter can be set to.
resolution specifier sets the “jump” that the parameter value makes when the KNOB is rotated. In
other words, when the user rotates the
KNOB, the resolution is how far the parameter value changes
per incremental movement.
• The last line in the
is an example of what the
<modify> menu shows “Each Delay:250ms” This is called the “example line." It
menu statement actually looks like when viewed in the PARAMETER area.
If the example line is selected, the parameter value can be set and the parameter will behave the same as
it does when used in the
PARAMETER area.
Let’s look at these lines in more detail, shall we?
Menu Statement
The menu statement is a crucial specifier used in the basic knob module, which is the most common
“parameter adjuster." The
menu statement may contain up to 20 characters including the parameter value. Anything over 20
The
menu statement is the line that will appear in PARAMETER area menu page.
characters will not be displayed.
The first job of the
menu statement is to indicate to the user what the parameter is for. It should also
contain the format for the parameter value that will be displayed, indicating the number of spaces that the
parameter value will take up and how many digits will be after the decimal point for a numerical parameter
value
(parameter values can be text as well, more on this later). You must specify this format bearing in mind the min
, the max value, and the resolution.
value
The syntax of the format is:
%Y.Xf
where
decimal point. The percent(
Y is the number of spaces reserved for display and X is the maximum number of digits after the
%), period(.), and f must be used as shown. If the period(.) is removed, the
The Harmonizer
Programmer’s Manual Page 84 of 97 Release 1.2.1
1999 Eventide, Inc.
Page 87
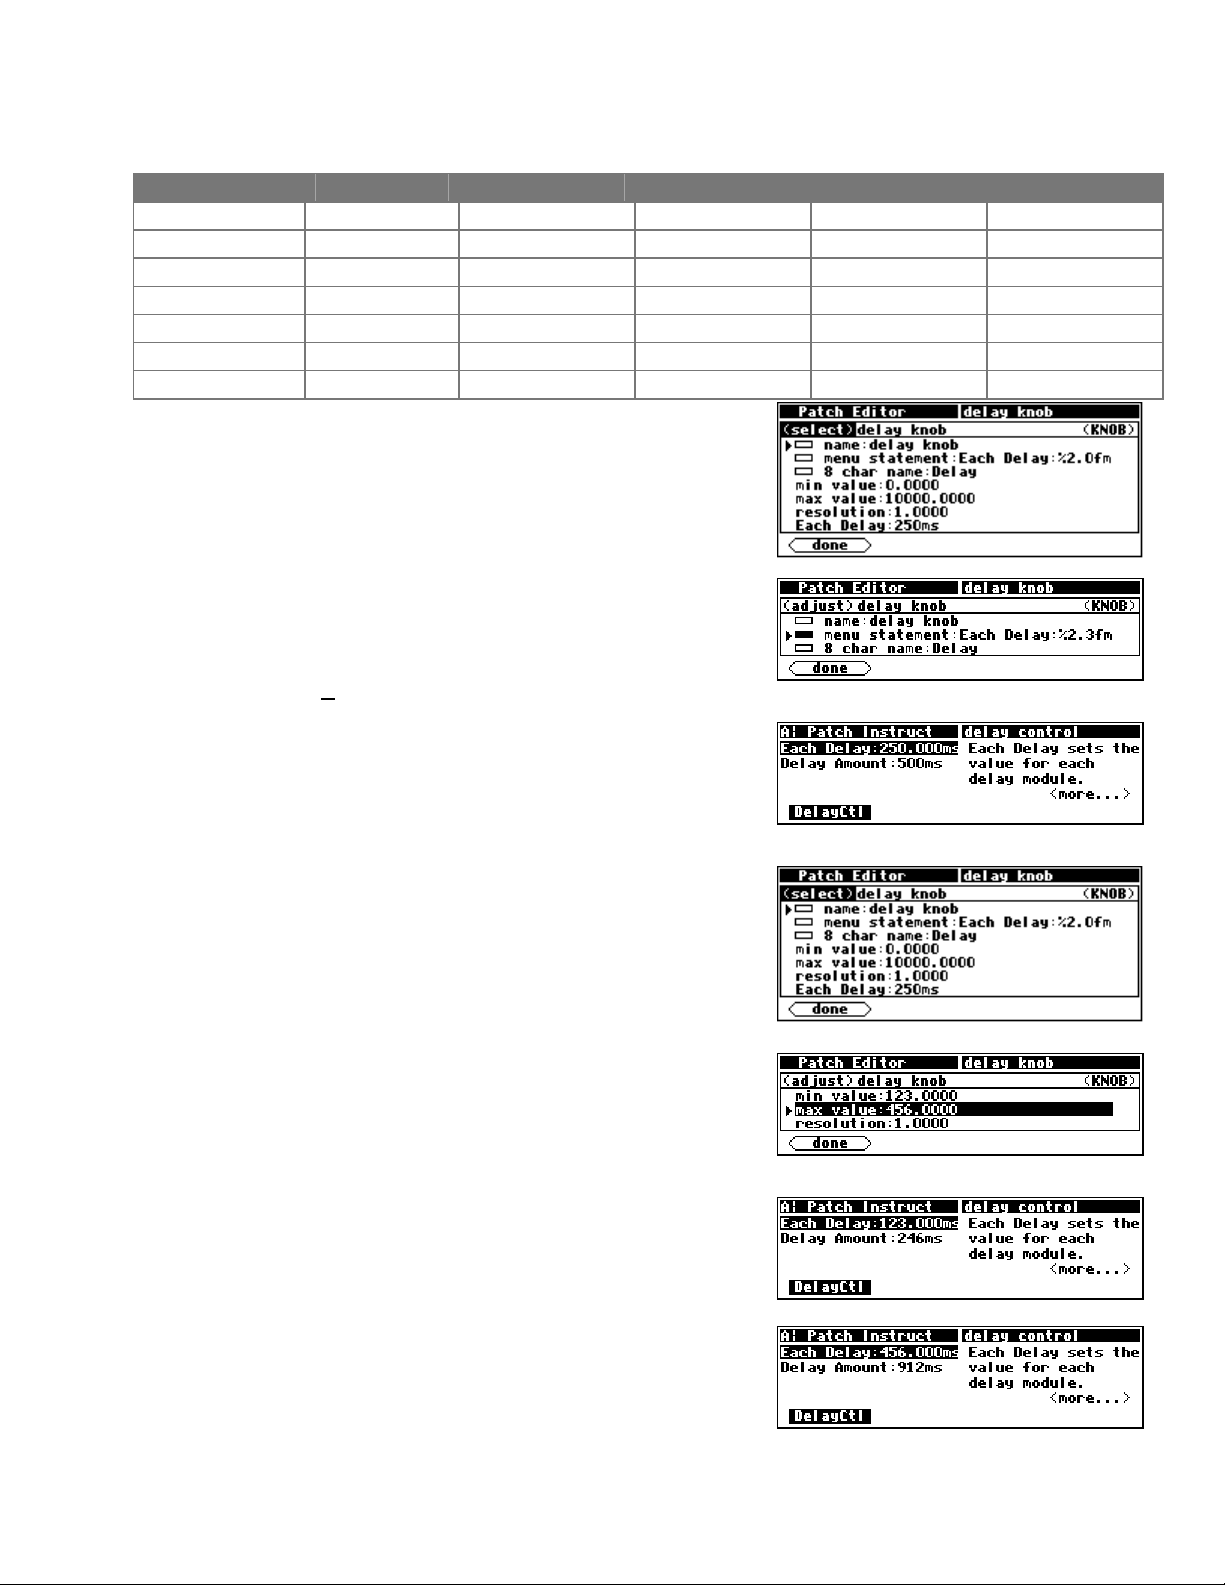
The Harmonizer
Programmer’s Manual
Harmonizer will display six digits after the decimal point. Here are example formats and results that would
be displayed on a menu page in the
PARAMETER area. “~” represents a space that will be inserted.
format for 1.2345 for 23456.0013 for .1234 for 1 for -55.234
%1.2f 1.23 23456.00 0.12 1.00 -55.23
%4.2f 1.23 23456.00 0.12 1.00 -55.23
%5.2f ~1.23 23456.00 ~0.12 ~1.00 -55.23
%5.0f ~~~~1 23456 ~~~~0 ~~~~1 -55.23
%7.1f ~~~~1.2 23456.0 ~~~~0.1 ~~~~1.0 ~-55.23
%9.4f ~~~1.2345 23456.2345 ~~~0.1234 ~~~1.0000 ~-55.2300
%2f 1.234497 23456.001300 0.123398 1.000000 -55.234000
Refer to the separate User Manual on entering text for a list of
the characters included in the text insert menus. The formats
shown here can be created using the % character, numbers, a
f, and a period(.).
small
As an wee exercise, load the Patch Instruct program from the
Programming” bank, go to Patch Editor area, change the
“
screen mode to
use the
Each Delay:%2.3 fms” as shown to the right.
“
<modify> SOFT KEY to change the menu statement to
aud+ctrl, and highlight the knb module. Then
Now go to the
made to the display. Note the decimal value in the “
Delay
” parameter. It used to read 250. Now it reads 250.000.
Contain yourself. . .
PARAMETER area and see the difference that
Each
Min and Max Values
The lower and upper limits of a numeric parameter value are set
as specifiers in the module that controls the parameter. In the
example program
value has a range of
and max value specifiers. You can adjust these limits using
value
the numeric keypad or the
As another wee exercise, load the program
Programming” bank, go to the Patch Editor area, change
the “
the screen mode to
Then use the
max value to set different limits as shown to the right.
Now go to the
parameter. To the right we bump up against the new
Patch Instruct, the “delay knob” parameter
0.0000 to 10000.0000 set by the min
KNOB.
Patch Instruct from
aud+ctrl, and highlight the knb module.
<modify> SOFT KEY to change the min value and
PARAMETER area and test the Each Delay
min value.
And on this screen we bump up against the new max value.
You will find max value and min value specifiers in most of the
“interface” group modules.
The Harmonizer Programmer’s Manual Page 85 of 97 Release 1.2.1
1999 Eventide, Inc.
Page 88

The Harmonizer
Programmer’s Manual
Resolution
The resolution specifier controls what minimum change in a parameter value can be achieved by turning the
KNOB or by using the INC or DEC key on the numeric keypad. The resolution parameter also controls the
“rate of change” as the
“baby steps” as the
“great leaps” as the
KNOB is spun. If the resolution is very fine, the parameter value will increment in
KNOB is spun. If the resolution is very course, the parameter value will increment in
KNOB is spun.
For example, if the selected parameter displays a value of 45.30 and the resolution is 1.0000, then slow
motion clockwise rotation on the
the selected parameter displays a value of
clockwise rotation on the
KNOB will change the value to 45.40.
KNOB will change the value to 46.30 (unless the
45.30 and the resolution is 0.1000, then slow motion
max value
is less than
46.30
!). If
As yet another wee exercise, use the <modify> SOFT KEY the same way as in the Min and Max Value
section and adjust the
size” of the
Each Delay parameter value. (You’ll have to walk yourself through this one. . .)
resolution specifier of the knb module. Notice the difference this makes in the “step
The Harmonizer
Programmer’s Manual Page 86 of 97 Release 1.2.1
1999 Eventide, Inc.
Page 89
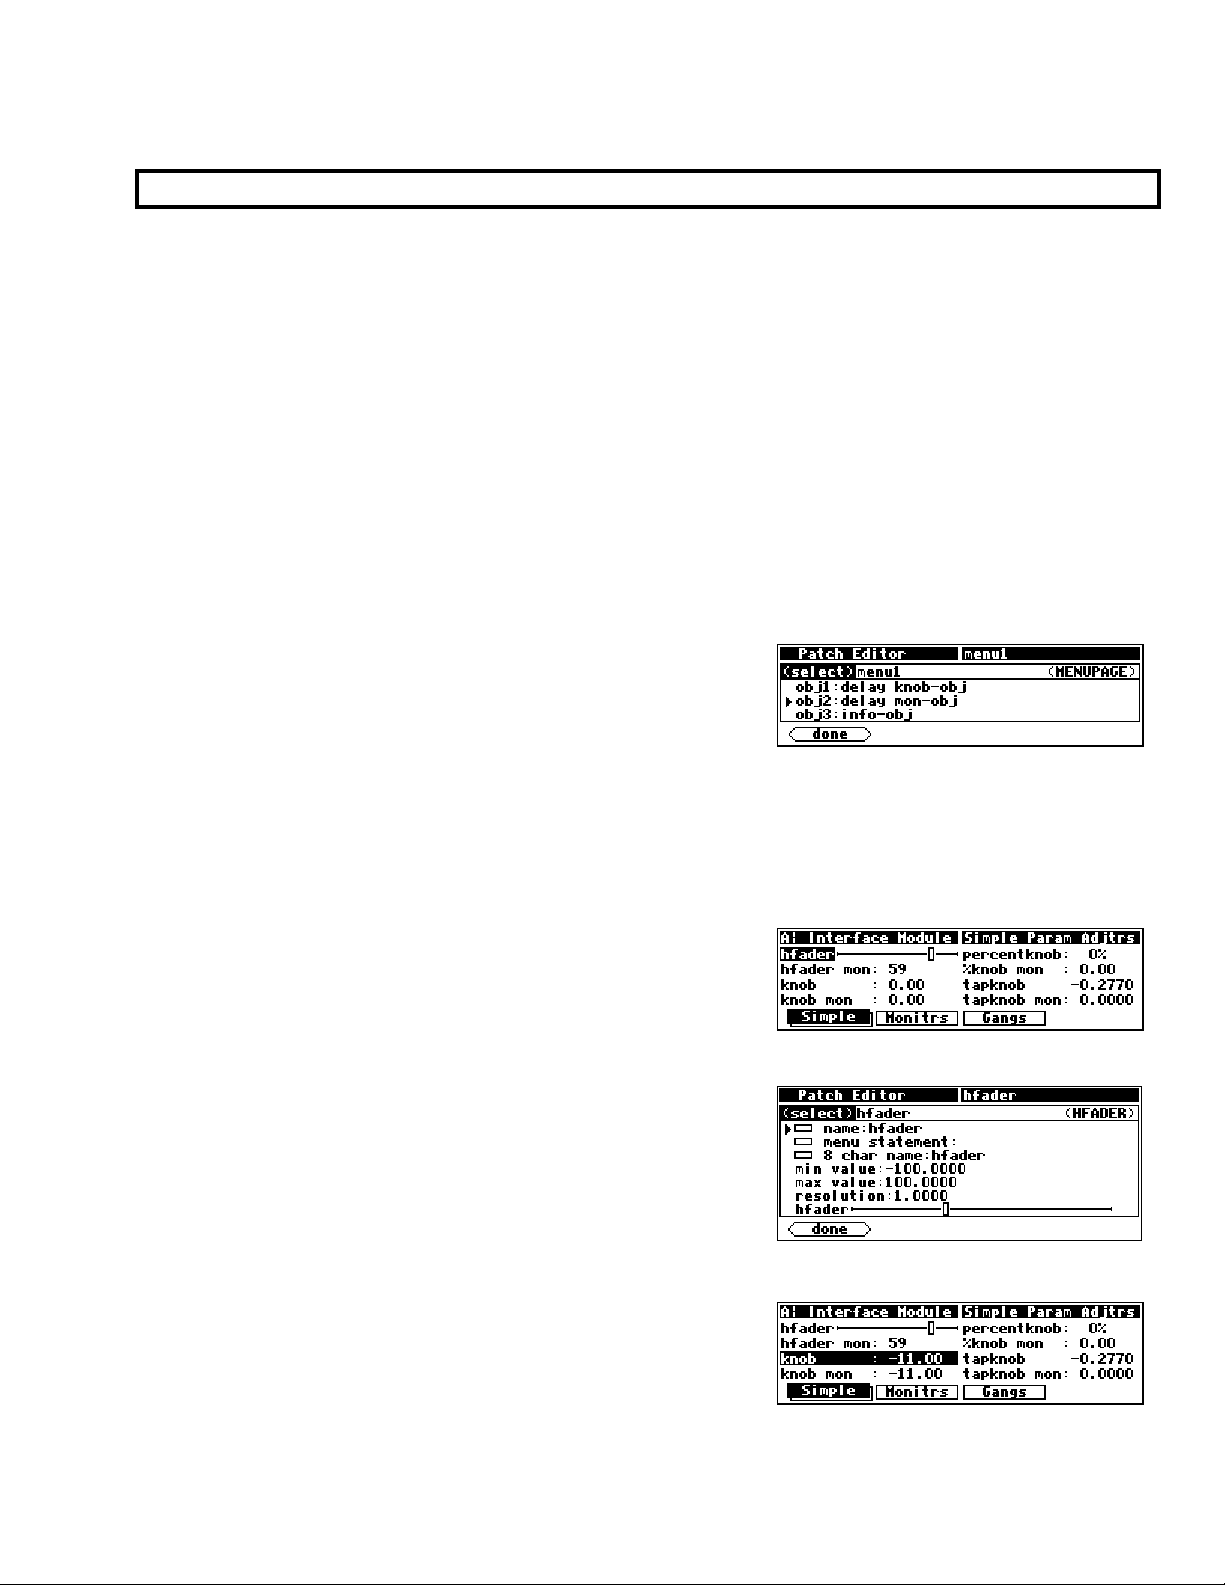
The Harmonizer
Programmer’s Manual
Simple “Parameter Adjusters”
There are seven simple “parameter adjusters” modules:
• A knob module for simple numeric values.
• An rfader module for “rotary” graphical display instead of numeric values.
• An hfader module for “horizontal” graphical display instead of numeric values.
• A vfader module for “vertical” graphical display instead of numeric values.
• A textknob module for “text-valued” parameters.
• A tapknob module for “tapered” (or non-linear) values.
• A percentknob module for percentage display that corresponds to fractional control output.
They have several things in common:
• All have a single control output and no other signal inputs or outputs.
• All have a userobject output that can be connected to a menupage, gang, or head module.
• All have a
menu statement and an 8 char name.
These modules are used by connecting their userobject outputs to a
menupage module
as shown to the right)
on the head module)
. The PARAMETER area menu pages will then
show the text or graphic
(using the
<modify>
SOFT KEY on the menupage module
or the head module (using the
menu statements for the connected
<modify>
SOFT KEY
“parameter adjuster” modules.
The following pages describe the simple “parameter adjusters." To play along at home, load the program
Interface Mod ules from the “Programming” bank.
Hfader Module
hfader module creates a horizontal graphic on a
The
PARAMETER area menu page. In the example screen to the right
it is the highlighted, upper left parameter. The area taken up by
the graphic is one half of the width of the screen and one text line
long. Eight of these can fit on a single menu page.
Six characters of the
to the left of the graphic. The
8 char name are presented on the display
menu statement is not used.
Refer to the Modules Section for complete information.
Knob module
The knob module is the most popular interface module (in
factory programs). It generates a 20-character text string,
including a very versatile numerical display from the
statement
. Eight of these can fit on a single menu page.
menu
The Harmonizer Programmer’s Manual Page 87 of 97 Release 1.2.1
1999 Eventide, Inc.
Page 90
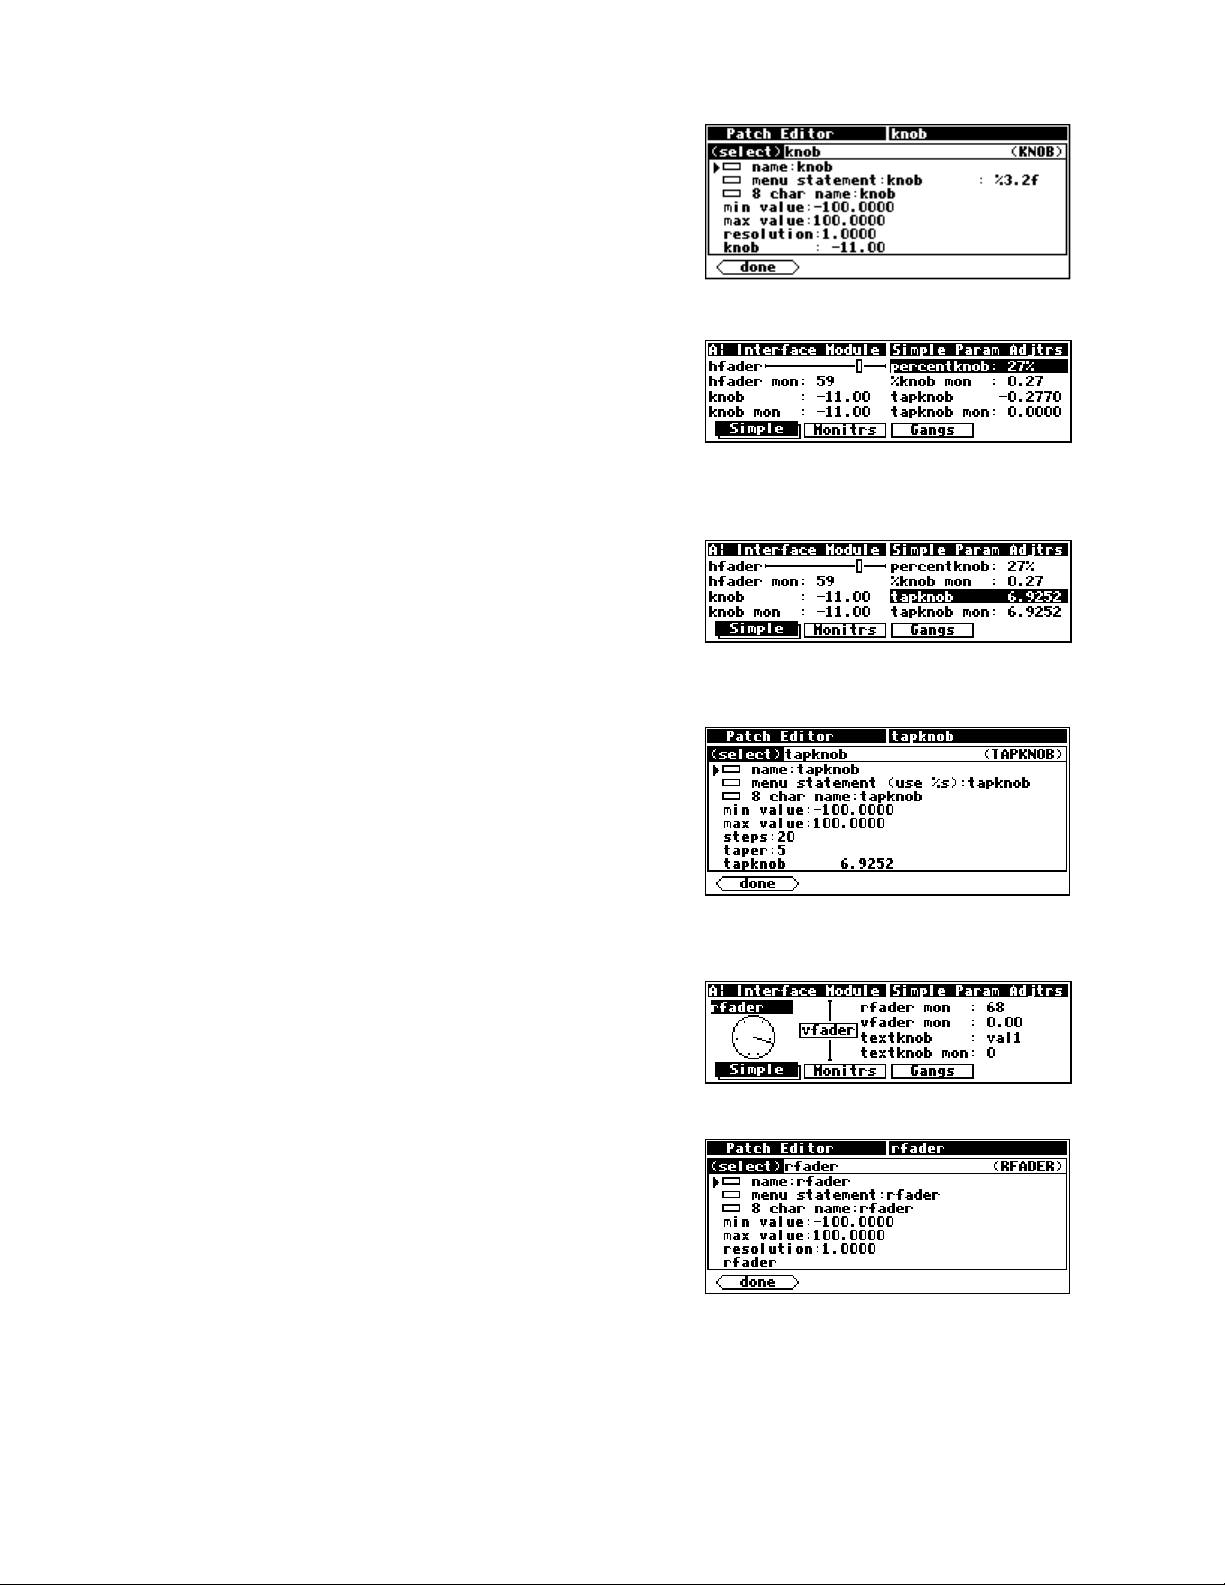
The Harmonizer
Programmer’s Manual
The 8 char name is used only if this module’s userobject is
connected directly to the head module. Normally its userobject
will be connected a menupage module. Refer to the Modules
Section for complete information.
Percentknob Module
The percentknob module is very similar to the knob
module. The only difference is that the control output value is
divided by 100. Refer to the Modules Section for complete
information.
Tapknob Module
The tapknob module is a modification of the standard knob
module. Just like the knob module, the
menu statement is
used to create the 20-character text display. However, instead of
using the %f format, the %s format is used. The tapknob
module creates an 8-character numeric result that is inserted in
place of the
%s.
The tapknob module creates a tapered (non-linear) control that
has a “selectable” number of
resolution parameter) and a “selectable” taper waveform. The
greater the
taper specifier, the more non-linear the parameter
steps (instead of the usual
response. Refer to the Modules Section for complete
information.
Rfader Module
The rfader module creates a graphic on the
PARAMETER
screen. The graphic, including title, takes up four lines of the
screen and one quarter of the width of the screen. Up to four of
these modules can fit on one menu page.
Nine characters of the menu statement are displayed above the
graphic as a title. Refer to the Modules Section for complete
information.
The Harmonizer
Programmer’s Manual Page 88 of 97 Release 1.2.1
1999 Eventide, Inc.
Page 91
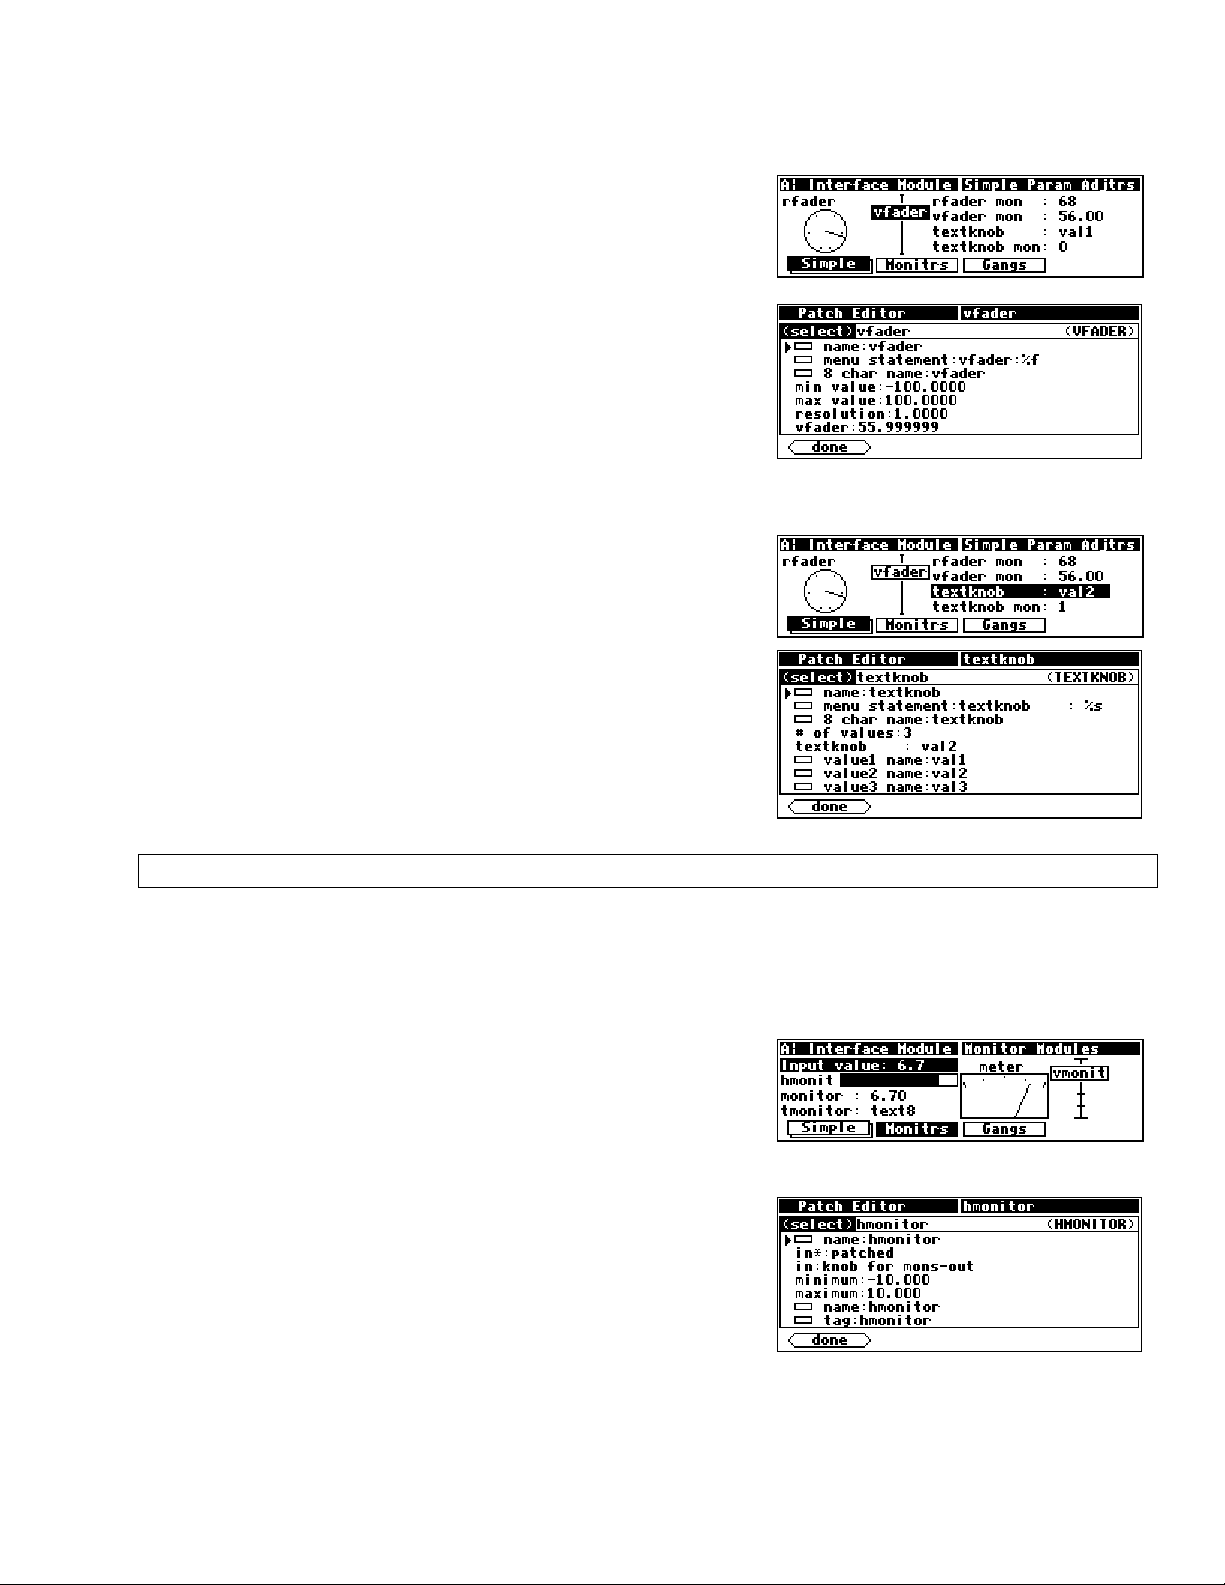
The Harmonizer
Programmer’s Manual
Vfader Module
The vfader module creates a graphic on the
PARAMETER
screen. The graphic, including title, takes up four lines of the
screen and one sixth of the width of the screen. Up to six of
these modules can fit on one menu page.
Six characters of the
8 char name are displayed in the graphic as
a title. Refer to the Modules Section for complete information.
Textknob Module
The textknob module creates a multiple choice selection in a
single line by half screen width area of a
PARAMETER area menu
page.
The choices appear in place of the
8 char name is only used if the module’s userobject is
The
%s in the menu statement.
connected to the head module. The control output reflects
which selection is made. If the 1st selection is made the output
will equal 0. If the 3rd selection is made, the output value will
equal 2. Refer to the Modules Section for complete information.
ONTROL SIGNAL MONITORS
C
Just as “parameter adjuster” modules are used to generate control signals and are displayed as parameters in
PARAMETER area menu pages, control signal monitor modules monitor the value of control signals and may
be displayed on those same menu pages.
Graphical Control Signal Monitors
There are five different monitor modules. Three of these, the
hmonitor, meter, and vmonitor modules, produce
graphical displays. The screen to the right (taken from the program
Interface Modul es
graphical monitors
from the “
(among others).
Programming
” bank) shows the three
Each of the graphical control signal monitor modules has a
control signal input and four specifiers:
name and tag.
•
minimum sets the lowest value that may be indicated by the
minimum, maximum,
monitor.
• maximum sets the highest value that may be indicated by the
monitor.
• For vmonitor and hmon, the tag specifier is used to generate the text for the monitor.
The Harmonizer Programmer’s Manual Page 89 of 97 Release 1.2.1
1999 Eventide, Inc.
Page 92

The Harmonizer
Programmer’s Manual
• For meter, the name specifier is used to generate the text for the monitor.
• The text fields of the monitors may include
information)
.
%f format numeric displays (to convey numerical as well as graphical
All three graphical monitors will indicate when the control input’s
value falls above or below the range set by the minimum and
maximum specifiers. (The screen to the right was made by changing the
11
on the “
to
knob for mons
” module in the
Interface Modul es
max value
program.)
The vmonitor module creates a graphic that is one sixth of a screen width and four lines high. The
hmonitor module creates a graphic that is one half of a screen width and one line high. The meter
module creates a graphic that is one quarter of a screen width and four lines high.
Form over function. . .
Textual Control Signal Monitors
The monitor and tmonitor modules use text to display their
control input values.
The monitor module is a mirror image of the knob module; it
displays the decimal value of its control input. The format for the
display is set using the text and
%f format described earlier.
The tmonitor module is a mirror image of the textknob
module. It uses the control input to determine which of several
text strings will be shown. A control input value of 0 chooses
text1, a value of 3 chooses text4 and so on.
Both the textual monitor modules create displays that are half of a
screen width and one line long.
The Harmonizer
Programmer’s Manual Page 90 of 97 Release 1.2.1
1999 Eventide, Inc.
Page 93

The Harmonizer
Programmer’s Manual
Menupages and Parameter Placement
The use of menupage modules to create menu pages in the PARAMETER area is crucial for creating easy
to use programs. This section discusses many of the fine points of menu creation and the care and feeding
of userobjects. There are several important points regarding
PARAMETER area menu pages and their
construction in the Patch Editor area:
• Null userobjects are invisible. They do not take space on a
menu page in the
PARAMETER area. Having the head
module or a menupage module include a nullobj
(sometimes titled adc-nullobj (as shown to the right) or head-
nullobj
) creates null userobjects.
• Any userobject that is connected to the head module creates
a
SOFT KEY (with the exceptions of those userobjects that are
null).
• The order that a userobject is listed in the head module
determines what location the
PARAMETER menu. The first userobject gets the first SOFT
. The fifth userobject gets the fifth SOFT KEY and so on.
KEY
SOFT KEY will appear in the
• The order that a userobject is listed in a menupage module
determines where on a PARAMETER area menu page it will
appear.
• Objects are placed on a menu in upper left to lower right
order, as listed in the menupage module.
• If a module’s
PARAMETER area graphic is too large to
appear on a menu page with other modules’ graphics, it is
placed on a later menu page in a menu stack, thus creating a
SOFT KEY stack.
• menupage modules may be connected to other menupage modules! A menupage userobject output
is the same as any other module’s userobject output, except that a menupage userobject output is always
big enough to warrant being placed on its own menu page or pages in the
•
A userobject output may be connected to multiple userobject inputs. This means a single module’s userobject
output can show up in several menu pages in the
is shown more than once on a single
menu page, the second instance might not be updated when the first instance’s value changes and vice versa.
PARAMETER area. Note: If an module’s PARAMETER area graphic
PARAMETER area.
• When a module with a userobject output from the “delay." “detector." “dynamic." “external." “filter."
“mixer." “oscillator." “pitchshift." or “reverb” module groups is inserted using the
<insert> SOFT KEY,
its ‘userobject” output is automatically connected to the head module.
The Harmonizer Programmer’s Manual Page 91 of 97 Release 1.2.1
1999 Eventide, Inc.
Page 94
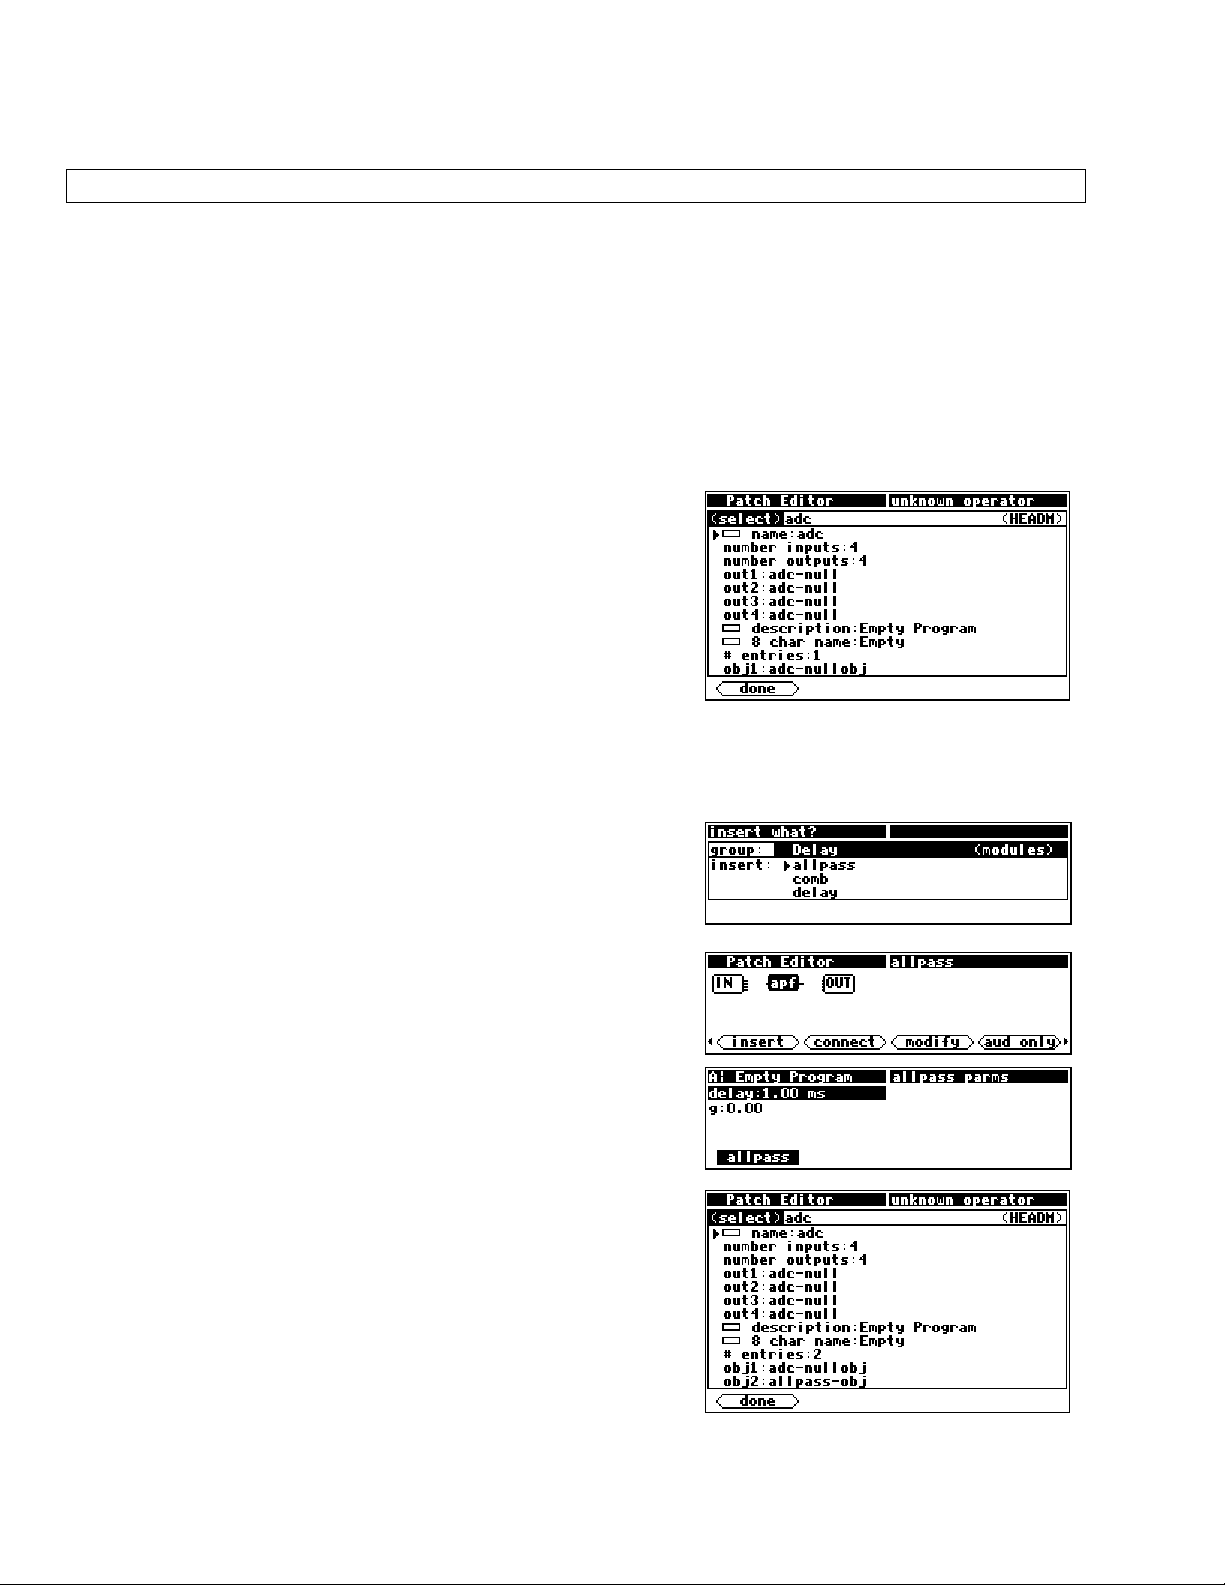
The Harmonizer
Programmer’s Manual
PARAMETER AREA MENU PAGE PLACEMENT
This section goes through a tutorial to show:
• Certain modules that have userobject outputs are automatically connected to the head module upon
<insert>ion.
• The order of userobject connection to the head module affects
SOFT KEY location in the PARAMETER
area.
• A null userobject connected to the head module or a menupage module does not appear in the
PARAMETER area menu pages, but rather acts as a place holder.
Start with a “clean slate”
• Load Empty Program from the “Utilities” bank.
• Go to the Patch Editor area
key)
• Select the
SOFT KEY three times. Select the module marked hed with
LEFT or RIGHT CURSOR key. Press the <modify> SOFT
the
KEY
<modify> menu looks like for the head module at this time.
misc display mode by pressing the <aud only>
. To the right is a composite image of what the
(by pressing and holding the PARAMETER
Automatically connecting a userobject to the head module
• Press the <done> SOFT KEY to leave the <modify> menu for the head module. Press the <misc>
SOFT KEY twice to select the aud+ctrl display mode.
• Press the
key. Turn the
Press the
<insert> SOFT KEY and then the LEFT CURSOR
KNOB until the “Delay” group is shown.
RIGHT CURSOR key to highlight the allpass
module.
• Press the
SELECT key to go ahead with the insertion.
• Press and hold the
menu page and
PARAMETER key to see that there is now a
SOFT KEY for the allpass module.
• Go back to the Patch Editor area and select the
mode and use the
module. This is a composite of what the
can see in the head module now. This shows that the
KEY
<modify> SOFT KEY on the head
<modify> SOFT
misc display
allpass-obj userobject was automatically connected to the head
module.
The Harmonizer
Programmer’s Manual Page 92 of 97 Release 1.2.1
1999 Eventide, Inc.
Page 95

The Harmonizer
Programmer’s Manual
• Go back to the basic Patch Editor area by pressing the
<done> SOFT KEY. Now <insert> an easytaps module.
• Return to the
now a second
PARAMETER area and observe that there is
SOFT KEY. This SOFT KEY is stacked because the
easytaps’ parameters take up more than one menu page.
• Go back to the Patch Editor and use the
KEY
on the head module. Note there are now three
<modify> SOFT
userobjects connected to the head module and that the new
userobject was connected after the existing two userobjects.
Adding a menupage module
This section demonstrates how an empty menu page shows up in
the
PARAMETER area with a SOFT KEY.
<insert> a menupage module (from the “Interface”
•
group).
• Use the
change the
<modify> SOFT KEY on the head module and
obj1 specifier to menupage-obj.
• Return to the PARAMETER area and observe that the
menupage module has created a new menu page and that
the allpass and easytaps’
SOFT KEYS were bumped
over when the null userobject was replaced.
TACKED MENU PAGES
S
This section goes through a tutorial to show:
• That modules’ parameters are presented on a menu page when their userobject outputs are connected to a
menupage module (which is in turn connected to the head module).
•
That multiple connections of the same module’s userobject output creates multiple “images” of the
module’s parameter(s).
Note: The second image of a module’s parameter(s) on the same menu page may not be active.
• That menupage modules’ userobject outputs may be connected to other menupage modules to create
SOFT KEY stacks.
Inserting Multiple men upa g e s
• Load Empty Program from the “Programming” bank.
• Go to the Patch Editor area by pressing and holding the
• Select
•
misc display mode by pressing the <aud only> key three times.
<insert> a menupage module from the interface group.
PARAMETER key.
The Harmonizer Programmer’s Manual Page 93 of 97 Release 1.2.1
1999 Eventide, Inc.
Page 96

The Harmonizer
Programmer’s Manual
• So that we can differentiate this menupage module from the
next one we insert, use the
its
name to “1menupage." Do this by selecting the name
specifier, pressing the
SELECT key, turning the KNOB right until the
highlighted line reads “
<modify> SOFT KEY on it and change
1menupage." and pressing the SELECT
key.
After you’ve changed the
name, press the<done> SOFT KEY and
note that the module name is displayed in the upper right corner of
the screen.
• Select the
•
<insert> a meter module from the “Interface” group.
aud+ctrl display mode.
• Go back to the
SOFT KEY on the menupage module. (Use the LEFT or
RIGHT CURSOR key to choose the menupage module.)
• Set the
meter-obj. Make sure you use the SELECT key to save each
# entries specifier to 1 and then set the obj1 specifier to
change. Press the
misc display mode and use the <modify>
<done> SOFT KEY to exit from the <modify> menu.
• Use the
Change its
obj1 to 1menupage-obj.
<modify> SOFT KEY on the head (hed) module.
# entries parameter to 1 (if it isn’t already) and set
• Return to the
PARAMETER area and observe the menu page.
Note that it has one meter module monitor. Note also that
the
SOFT KEY is not stacked and that the menu page’s title is
menupage."
“
• Go back to the Patch Editor,
<modify> SOFT KEY on the menupage module.
• Set the
meter-obj (same as obj1).
# entries specifier to 2 and then set the obj2 specifier to
misc display mode and use the
The Harmonizer
Programmer’s Manual Page 94 of 97 Release 1.2.1
1999 Eventide, Inc.
Page 97
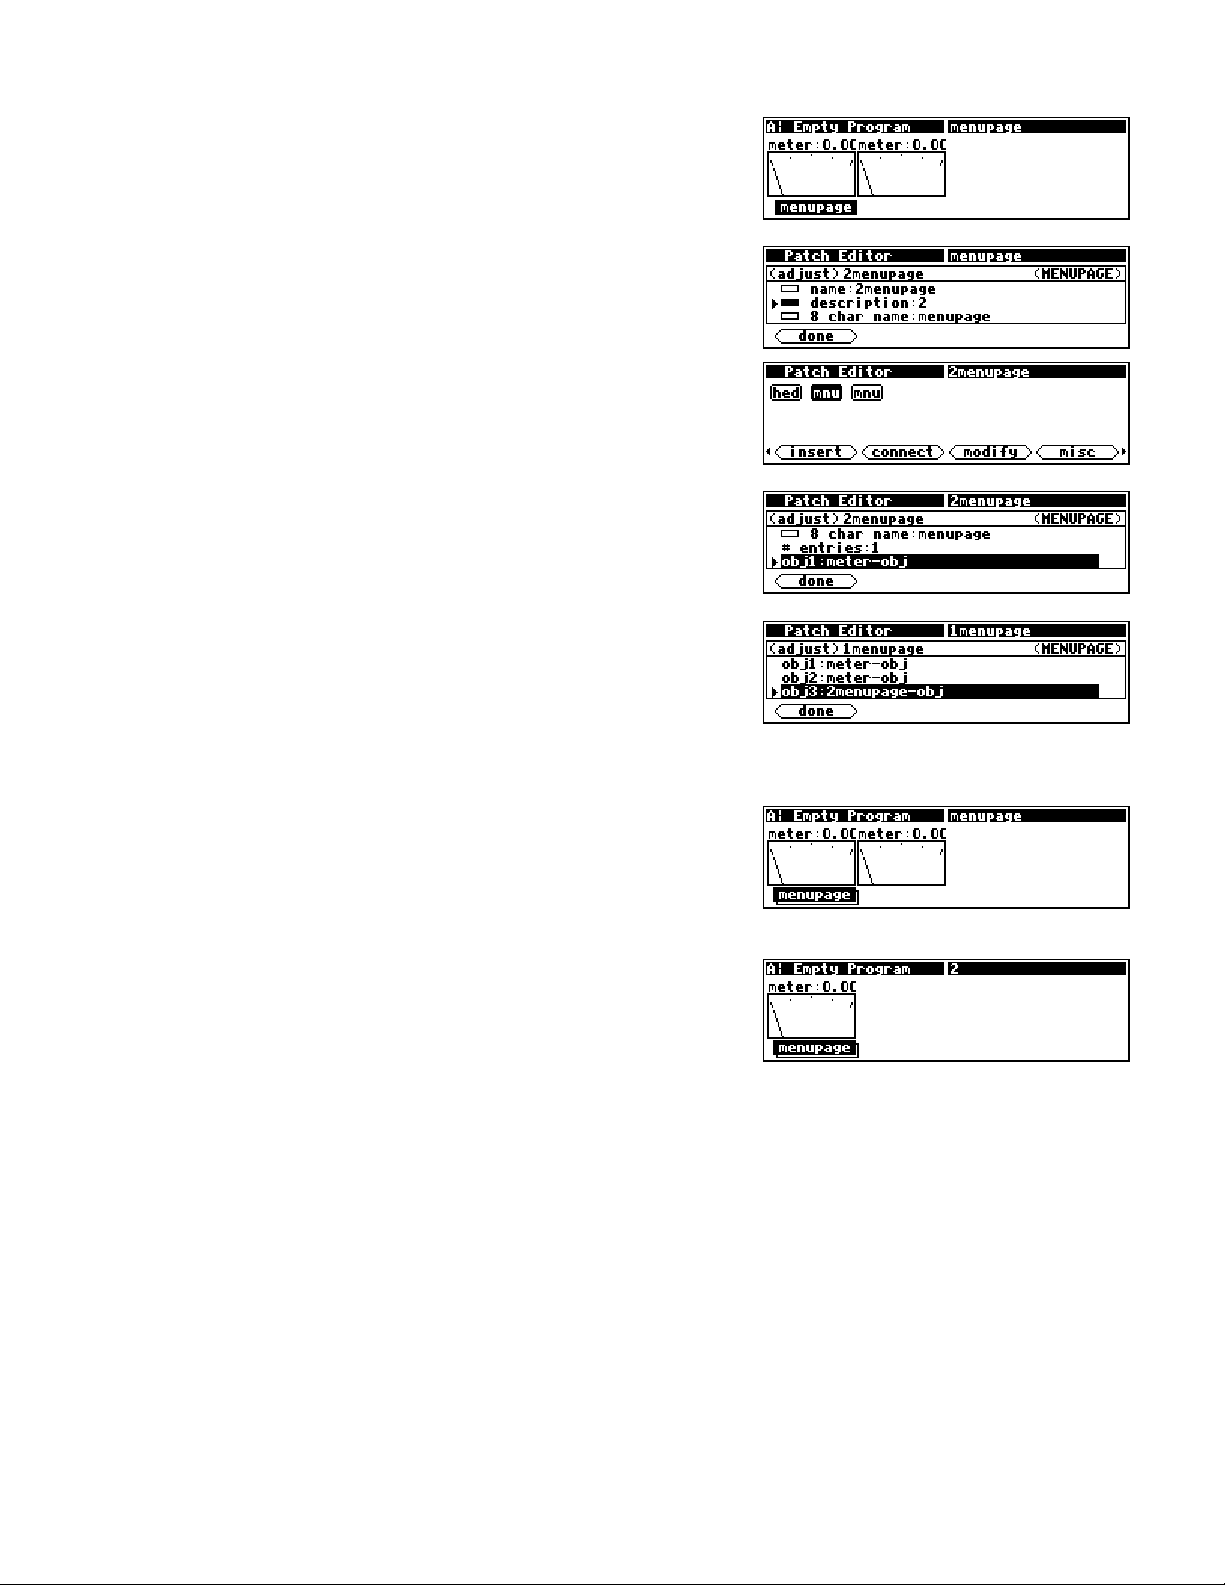
The Harmonizer
Programmer’s Manual
• Return to the PARAMETER area and observe the menu
page. Note that it shows two meter module monitors
are in fact two pictures of the same meter module)
is not stacked.
KEY
. Notice that the SOFT
(these
• Go back to the Patch Editor area,
<insert> another menupage module. Edit its module
name using the <modify> SOFT KEY such that it reads
2menupage." Then change the description specifier to
“
read “
2” (you will need to use the CXL key to delete characters). Press
<done> to exit the <modify> menu.
misc display mode and
Note the module name in the upper right corner of the display.
• Go back into the
2menupage module and set the # entries specifier to 1
and then change the
the
<modify> menu by pressing <done>.
<modify> SOFT KEY menu for the
obj1 specifier to meter-obj. Exit from
• Now, using the LEFT or RIGHT CURSOR key, select the
1menupage module. Use the <modify> SOFT KEY and
change its
2menupage. Press <done>.
# entries specifier to 3 and its obj3 to
• Return to the
stack of
page is still “
PARAMETER area. Notice that there is now a
SOFT KEY menu pages. The title of the top menu
menupage."
• Press the
SOFT KEY. The second menu, whose title is “2."
has only one meter module monitor on it.
The Harmonizer Programmer’s Manual Page 95 of 97 Release 1.2.1
1999 Eventide, Inc.
Page 98
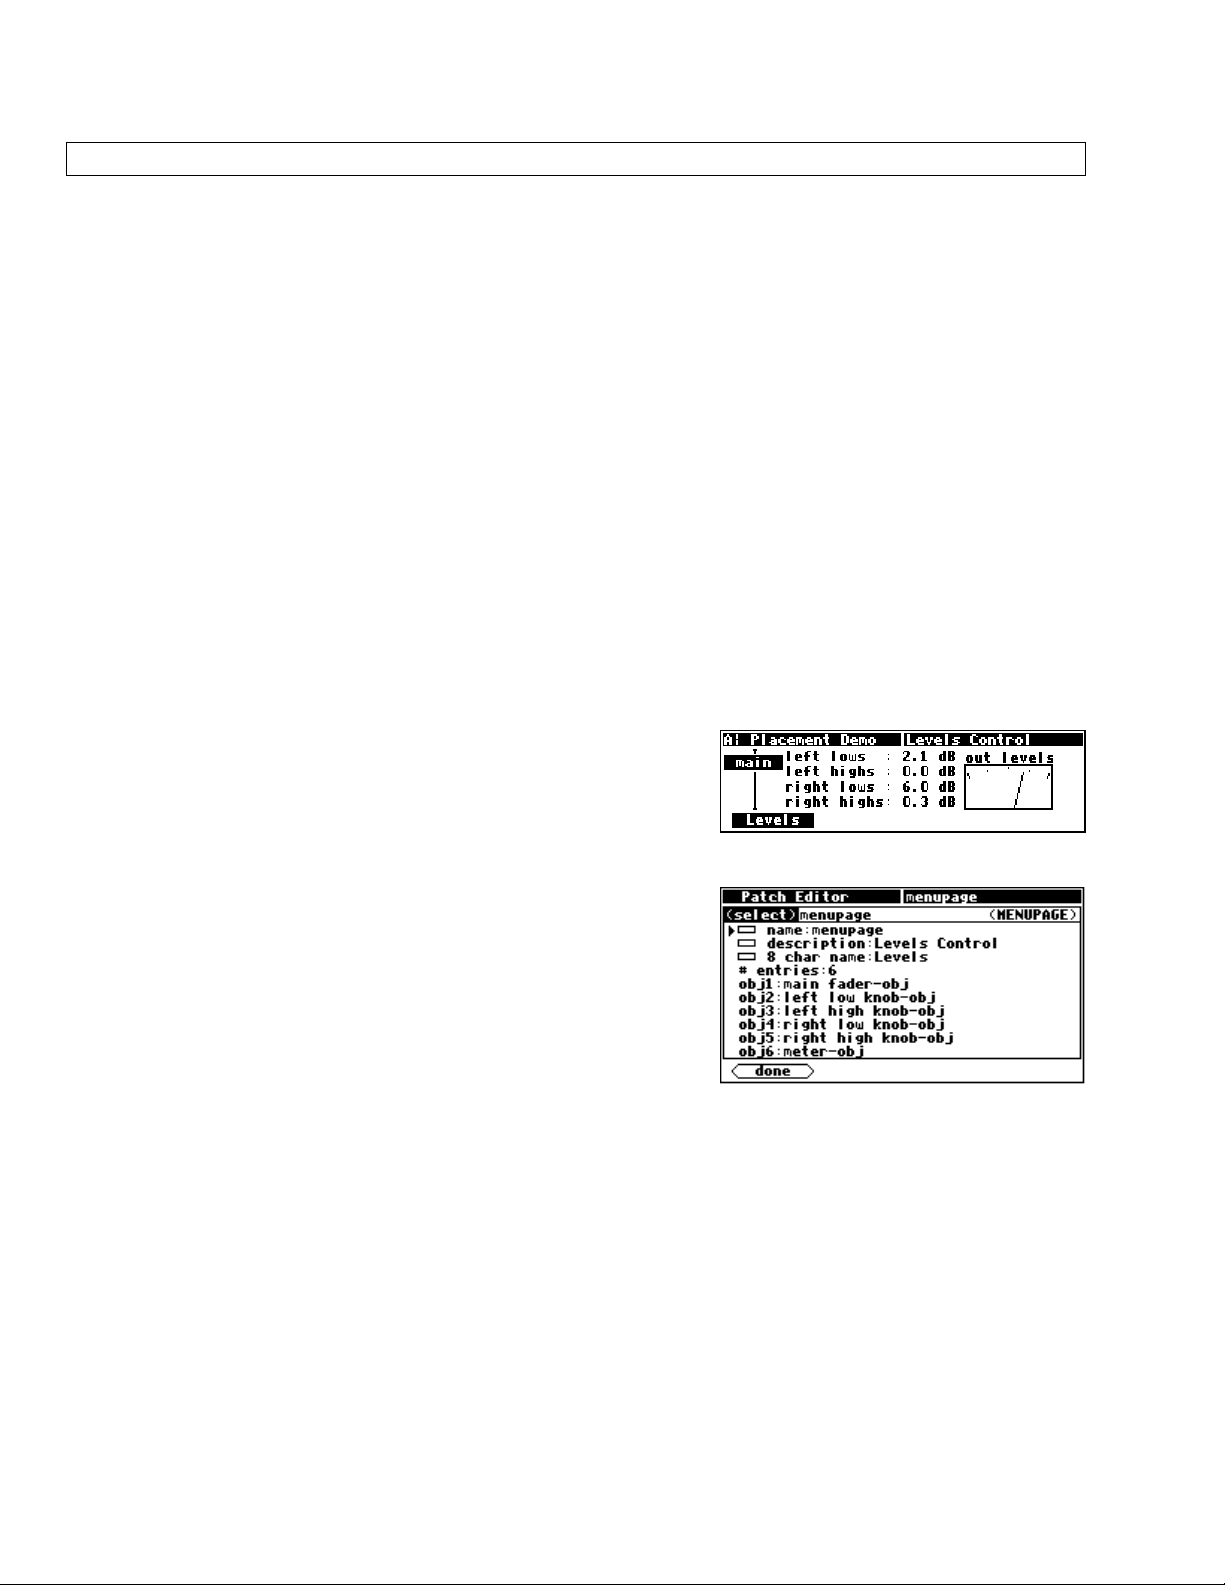
The Harmonizer
P
ARAMETER PLACEMENT ON A MENU PAGE
Programmer’s Manual
Menu page design may be highly individualized. The “look and feel” of a menu page is important if a
program is complex or if there are displayed reactions to adjustments that must be viewed and understood
quickly. For instance, if a program uses a meter monitor to display the signal level in a given frequency
range while a knob parameter gives adjustment of the compression level in that frequency range, it is
important to have the knob parameter and the meter monitor on the same menu page. It may also be
possible to show the relationship between a fader parameter and a meter monitor by placing them on
the same menu page. This kind of “look and feel” control is performed through the connection of userobject
outputs to menupage modules.
This section goes through a tutorial to show:
• Parameters are presented on a menu page in the
PARAMETER area in the order their userobjects are
connected to a menupage module, with placement beginning in the upper left corner of the screen and
proceeding to lower right corner of the screen.
• Modules that produce parameters with simple text take up one eighth of the screen
module)
. Modules that produce parameters with graphics take up some other portion of the screen. The
(exception is the textblock
order that modules are connected to the menupage module may cause the parameters to be placed poorly,
allowing only a few parameters to appear on a screen where better placement might have allowed more.
Placing a Vfader, a Meter, and Four Knob Modul es
It is possible to build a good looking menu page using six modules
connected to a menupage module. The order of their
connection to the menupage module is important. The display
to the right shows a typical arrangement of the six modules, taken
from the program
Placement Demo found in the “Programming” bank.
To achieve this arrangement, the modules’ userobject outputs must
be connected to the menupage module in exactly the order
shown to the right:
1. main fader-obj
2. left low knob-obj
3. left high knob-obj
4. right low knob-obj
5. right high knob-obj
6. meter-obj
To create a menu page such as the one shown, the programmer inserts the six “parameter” modules and the
menupage module using the <insert> SOFT KEY and then uses the <modify> SOFT KEY on the
menupage module. The
# entries is first set to the desired number (six) and then the obj entries are
adjusted, one at a time, to connect the userobject outputs to the menupage module.
The Harmonizer
Programmer’s Manual Page 96 of 97 Release 1.2.1
1999 Eventide, Inc.
Page 99
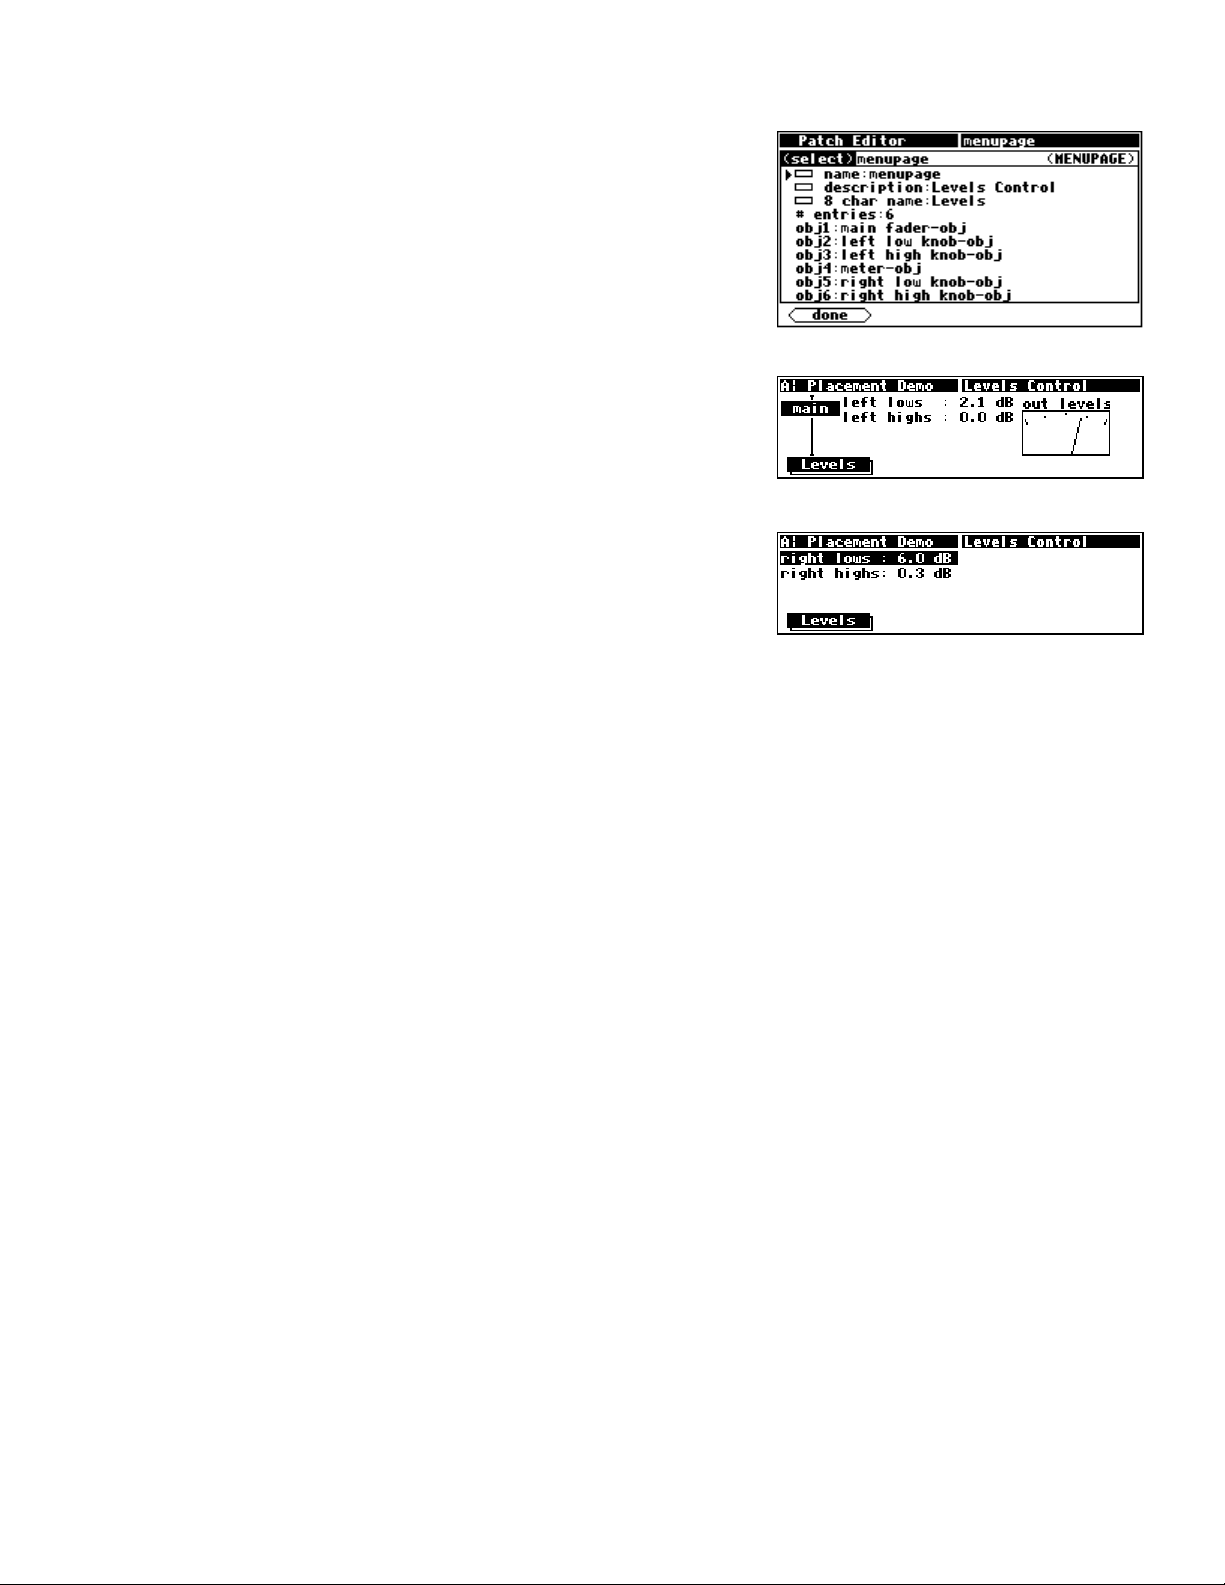
The Harmonizer
Programmer’s Manual
If the userobject outputs are connected in a different order, the
menu page items might not only look bad but might not all fit on
the same menu page. For instance, connecting the userobject
outputs in this order:
1. main fader
2. left low knob
3. left high knob
4. meter
5. right low knob
6. right high knob
results in two menu pages
(accessible via a stacked SOFT KEY)!
Since parameters are always placed from upper left to lower right,
top to bottom, once the meter monitor is placed, (not fitting
below the
left highs parameter) there is no more room below
the meter or to the right of the meter on the first menu page.
Therefore, a new menu page is created for the latter two knob
parameters.
The Harmonizer Programmer’s Manual Page 97 of 97 Release 1.2.1
1999 Eventide, Inc.
 Loading...