


Rear-facing
2.3 to 18 kg (5 to 40 lbs)
48 to 94 cm
(19 to 37 in.)
Forward-facing
10 to 29.4 kg
(22 to 65 lbs)
71 to 127 cm
(28 to 50 in.)
Booster
18 to 49.8 kg
(40 to 110 lbs)
110 to 145 cm
(43.3 to 57 in.)
© 2013 Evenflo Company, Inc.

More children are killed every year as passengers in car crashes than by any other type of injury.
To reduce the risk of SERIOUS INJURY or DEATH, read this owner’s manual and your vehicle owner’s manual before installing and using this child restraint. Using a child restraint makes a big difference. By properly using this child restraint and following these instructions (and the instructions that accompany your vehicle), you will greatly reduce the risk of serious injury or death to your child from a crash. Do not be misled by the commonly used term “safety seat”; no restraint system can prevent all injuries in all crashes. Many properly restrained adults and children are injured in motor vehicle crashes, including relatively minor crashes. A properly used child restraint is the best way to minimize injuries to your child and to increase the chances for your child’s survival in most crashes.
U.S. REGULATORY NOTICE
This child restraint meets all applicable requirements of Federal Motor Vehicle Safety Standard 213.
CANADIAN REGULATORY NOTICE (Model numbers ending in “C.”)
This child restraint meets all applicable requirements of Canadian Motor Vehicle Safety Standards CMVSS 213, 213.1, and 213.2.
Child Requirements
•No restraint can guarantee absolute protection from injury in every crash.
•This child restraint is designed for use by children in rearfacing, forward-facing, and booster modes. To use this child restraint properly, children MUST meet weight/size specifications as follows:
For Rear-facing Use
•The child weighs 2.3 to 18 kg (5 to 40 lbs).
•The child is 48 to 94 cm (19 to 37 inches) AND the top of child’s head is at least 25 mm (1 inch) below the top of the
child restraint headrest in either of its two lowest positions.
For Forward-facing Use
•The child weighs 10 to 29.4 kg (22 to 65 lbs).
•The child is 71 to 127 cm (28 to 50 inches) AND the tops of their ears are below the top of the child restraint headrest.
•Child is one year old or older.
For Booster Use
•The child weighs 18 to 49.8 kg (40 to 110 lbs).
•The child is 110 to 145 cm (43.3 to 57 inches) AND the tops of their ears are below the top of the child restraint headrest.
•Child is four years old or older.
Table of Contents
Important Information
Warnings............................................................................. |
2 |
Important |
|
Safe Practices |
9 |
||
|
|||
Recall Information for U.S. Customers................................ |
10 |
|
|
Public Notice for Canadian Customers............................... |
10 |
|
|
Motor Vehicle/Aircraft Usage............................................. |
10 |
|
|
Symbol Legend ................................................................ |
11 |
|
|
Storing Your Instructions.................................................... |
11 |
|
|
Visual Glossary................................................................... |
12 |
|
|
Securing the Child in the Child Restraint............................ |
14 |
|
|
Removing the Child from the Child Restraint..................... |
16 |
|
Rear-facing Use |
|
|
facing- |
Rear-facing Installation Checklist |
19 |
|
|
|
|
||
Which Type of Lower Anchor Connector Is on Your Child |
|
|
Rear |
Restraint? |
20 |
|
|
|
|
||
Moving Lower Anchor Connector Assembly to |
|
|
|
Rear-facing Belt Path....................................................... |
20 |
|
|
Rear-facing Installation with Lower Anchor Connectors...... |
23 |
|
|
Rear-facing Installation with Seat Belt................................ |
26 |
|
|
Forward-facing Use |
|
|
|
31 |
|
facing- |
|
Which Type of Lower Anchor Connector Is on Your Child |
|
||
Forward-facing Installation Checklist.................................. |
|
Forward |
|
Restraint? |
32 |
|
|
|
|
||
Moving Lower Anchor Connector Assembly to |
|
|
|
Forward-facing Belt Path................................................. |
32 |
|
|
Forward-facing Installation with Lower Anchor Connectors.... |
35 |
|
|
|
|||
Forward-facing Installation with Seat Belt.......................... |
39 |
|
|
Booster Use |
|
|
|
|
|
|
|
When to Put Your Child in a Booster Seat.......................... |
44 |
|
Booster |
Booster Installation Checklist |
47 |
|
|
|
|
||
Converting into a Booster Seat.......................................... |
48 |
|
|
General Information |
|
|
|
Using the SureLatch™ Connectors..................................... |
52 |
|
|
...........................................Using the Quick Connectors™ |
52 |
|
|
Adjusting the Headrest...................................................... |
53 |
|
|
|
|
||
Adjusting the Recline Position............................................ |
53 |
|
General |
Using the TruTether™ Adjuster.......................................... |
54 |
|
|
Installing the Locking Clip |
55 |
|
|
|
|
||
Removing the Seat Pad...................................................... |
57 |
|
|
Installing the Accessories................................................... |
57 |
|
|
Securing Your Child Restraint in Aircraft............................. |
58 |
|
|
..................Installing Child Restraint Rear-facing in Aircraft |
58 |
|
|
Installing Child Restraint Forward-facing in Aircraft............ |
60 |
|
|
Care and Cleaning ............................................................ |
63 |
|
|
Replacement Parts............................................................. |
64 |
|
|
Limited Warranty............................................................... |
65 |
|
1 |
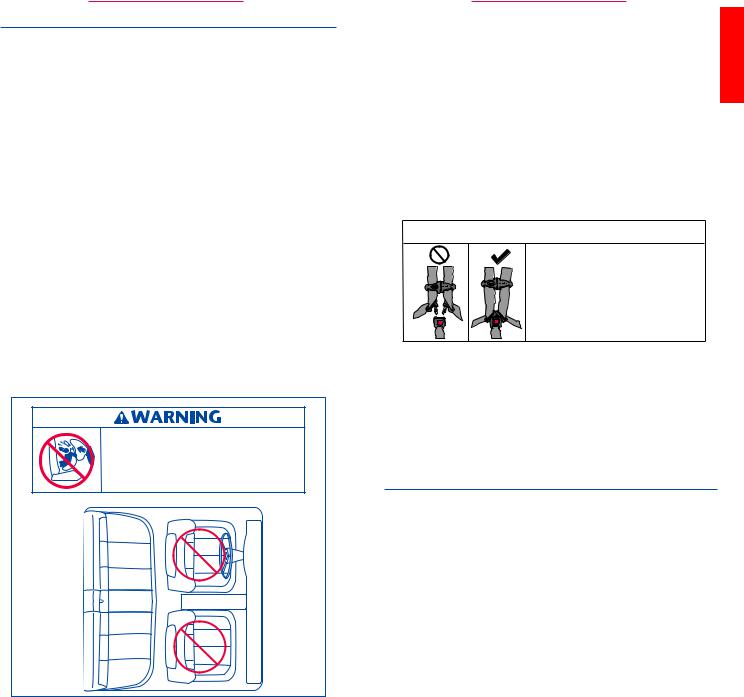
 WARNING
 Air Bag Warnings
Rear-facing, Forward-facing, and Booster Use
•DO NOT use this child restraint in the front seat of a vehicle equipped with an air bag, unless the air bag has been deactivated. Interaction between a rearfacing restraint and air bags may cause serious injury or death. Air bags may cause serious injury or death to children 12 and under.
If your vehicle has an air bag, refer to your vehicle owner’s manual for child restraint installation.
•If the rear seat of your vehicle is equipped with side air bags, refer to the following information for proper usage.
Vehicles built prior to the 2002 model year: DO NOT use this restraint in a vehicle seating position equipped with a side air bag unless authorized by the vehicle manufacturer.
Model year 2002 and newer vehicles:
Refer to your vehicle owner’s manual before placing this restraint in a seating position equipped with a side air bag. DO NOT place any objects between the restraint and the side air bag, as an expanding air bag may cause the items to strike the child.
DO NOT place rear-facing child seat on front seat with air bag. DEATH or SERIOUS INJURY can occur.
The back seat is the safest place for children 12 and under.
2
 WARNING
General Warnings
Rear-facing, Forward-facing, and Booster Use |
Important |
|
• Failure to follow installation instructions can result in the child striking the vehicle’s interior during a sudden stop or crash. Serious injury or death may result. These instructions and the instructions in your vehicle owner’s manual must be followed carefully. If there is a conflict between the two, the vehicle owner’s manual regarding child restraint installation must be followed.
• NEVER leave child unattended.
• Children have STRANGLED in loose or partially buckled harness straps. Fully restrain the child.
 WARNING
Children have STRANGLED in loose or partially buckled harness straps. Fully restrain the child.
•DO NOT use child restraint if it is damaged, broken, or missing parts.
•DO NOT use this restraint if it has been involved in a crash. It must be replaced.
•DO NOT remove back cover.
•NEVER use this child restraint without the headrest installed.
Location Warnings
Rear-facing, Forward-facing, and Booster Use
•ALWAYS read and follow exactly the instructions that accompany your vehicle and child restraint.
•According to statistics, children are safer when properly restrained in a rear seating position than in the front seating position. Generally, the center rear position is safest and should be used if available.
•Some child restraints do not fit all vehicles or all seating locations. There are many thousands of combinations of vehicle makes, models, child restraint configurations, vehicle seat belt designs, and seat cushion shapes. The easiest way to determine whether your child restraint is
3

 WARNING
Location Warnings – cont.
Rear-facing, Forward-facing, and Booster Use
suitable for a particular seating position is to check for a tight installation. If the child restraint cannot be properly installed, DO NOT use the child restraint.
Consult vehicle owner’s manual, try a different seating location, or call Evenflo for further assistance.
•ONLY use this child restraint on forward-facing vehicle seats. DO NOT use this restraint with vehicle seats that face the rear or side.
•ONLY use this child restraint on vehicle seats with backs that lock into place.
Premature Infants
Rear-facing, Forward-facing, and Booster Use
•DO NOT use this or any child restraint with a premature infant until after consulting your doctor. Premature infants may have difficulty breathing when in a seated or semi-reclined position. Using additional padding or pillows behind the infant’s head or failing to properly recline the child restraint could increase the child’s risk of serious injury or death.
Rear-facing Position Warnings
Rear-facing Use Only
•DO NOT use this child restraint rear-facing in a vehicle equipped with lap belts that only lock during a sudden stop or crash (emergency locking retractor – ELR). You must use a seating location with a locking seat belt.
Check your vehicle owner’s manual to see if you have lap belts with ELRs.
•When using this restraint rear-facing, DO NOT loosen the vehicle seat belt to provide more leg room, as this will prevent the child restraint from protecting the child.
•Fold-down armrests could pose a hazard to a rearfacing child in certain types of collisions. Consult your vehicle owner’s manual before installing any rearfacing child restraint in front of a fold-down armrest.
•NEVER turn a child restraint forward-facing with an infant who weighs less than 10 kg (22 lbs) or is less than one year of age. Crash forces may cause serious injury or death.
 WARNING
Rear-facing Position Warnings
Rear-facing Use Only
•NEVER use Recline Position #2 or Recline Position #3 when using this child restraint rear-facing. Use ONLY
Recline Position #1.
•DO NOT use the tether strap when the child restraint is in the rear-facing position.
•The headrest on the vehicle seat that the child faces when sitting in the rear-facing mode should be placed in the lowest position. The vehicle seat back that the child faces must be fully padded and free of any hard objects.
Forward-facing Position Warnings
Forward-facing and Booster Use Only
•When using the harness straps to secure a child who is more than 18 kg (40 lbs), NEVER place the child restraint in Recline Position #2. Use ONLY Recline Position #3.
•DO NOT use Recline Position #1 or Recline Position #2 when using this child restraint in Booster Mode. Use
ONLY Recline Position #3.
•DO NOT use the lower anchors of the child restraint anchorage system (LATCH system) to attach this child restraint when restraining a child weighing more than
18 kg (40 lbs) with the internal harnesses of the child restraint.
•Install this child restraint with a vehicle seat belt (NOT lower anchor connectors) when using the restraint’s internal harnesses to secure a child who weighs more than 18 kg (40 lbs).
•If the child weighs more than 29.4 kg (65 lbs) OR their shoulders are above the highest harness level, you MUST use this child restraint as a booster (p. 44).
•Adjust, or remove, the vehicle headrest, in the seat where the child restraint is to be installed, so that the back of the child restraint rests against the vehicle seat back.
•The headrest on the vehicle seat in front of the child should be put in its lowest position. The vehicle seat back that the child faces must be fully padded and free of any hard objects.
Important
4 |
5 |

 WARNING
Booster Seat Position Warnings
Booster Use Only
• DO NOT use this booster seat rear-facing.
Seat Belt Warnings
Rear-facing and Forward-facing Use Only
•DO NOT use this child restraint if it moves more than
25 mm (1 inch) side to side or front to back at either the rear-facing or forward-facing belt path on the child restraint. Serious injury or death may result from poor installation. If you cannot tightly secure the child restraint, try again or move it to another location.
•DO NOT use this child restraint in a seating position with door-mounted seat belts.
•DO NOT use this child restraint in a vehicle with seat belts that automatically move along the vehicle frame when the door is opened. These seat belts will not hold a child restraint properly.
•If the vehicle seat belts are not routed and fastened correctly, the child restraint may not protect the child in a crash.
•DO NOT allow the vehicle seat belt release button to touch the child restraint. Accidental contact may cause the seat belt to release. If necessary, turn the seat belt release button away from the child restraint or move the child restraint to a different location.
•Failure to adjust the harness or vehicle seat belts snugly around the child may result in the child striking the vehicle’s interior during a sudden stop or crash. Serious injury or death may occur.
• Remove locking clip from vehicle seat belt when not used with a child restraint, or the vehicle seat belt will not properly restrain
an adult or child. Serious injury or death may occur.
Booster Mode Only
• To prevent serious injury, use ONLY the vehicle’s lap AND shoulder belt system when restraining a child in this booster seat.
• DO NOT use the locking clip when using this child restraint as a booster seat.
 WARNING
Seat Belt Warnings
Booster Mode Only
•The shoulder belt MUST be threaded through the shoulder belt guide (p. 46).
•DO NOT use this booster seat if the tops of the child’s ears are above the back of the booster seat headrest.
•The shoulder belt MUST NOT cross the child’s neck or fall off the child’s shoulder. If you cannot adjust the shoulder belt to properly lay midway between the child’s shoulder and neck AND at or above the shoulder, try another seating location or do not use the booster seat.
 LATCH Warnings
Rear-facing and Forward-facing Modes Only
•The LATCH system is intended to be used ONLY as described in these instructions. Serious injury or death may result from misuse. LATCH (Lower Anchors and Tethers for CHildren) is a system for attaching the child restraint to your vehicle seat. It can be used in place of the seat belts in vehicles with vehicle lower anchor bars. Refer to your vehicle owner’s manual for the locations of the vehicle lower anchor bars.
Note: Your vehicle owner’s manual may refer to this system as “Universal Anchorage System,” “Lower Universal Anchorage System,”or ”ISOFIX.”
•In addition to these instructions, read and follow your vehicle owner’s manual regarding installation of the child restraint and LATCH. If there is a discrepancy, follow your vehicle owner’s manual.
•ONLY use for securing child restraint to vehicle lower anchor bars.
•NEVER attach two lower anchor connectors to one vehicle lower anchor bar.
•NEVER use the vehicle seat belts when using the
LATCH system. Using both together can cause slack in a sudden stop or crash.
•When not in use, the lower anchor connectors should be securely attached to the D-rings on the child restraint’s seat pad. Keep out of reach of children.
Important
6 |
7 |

 WARNING
 LATCH Warnings – cont.
Rear-facing and Forward-facing Modes Only
•ALWAYS be sure that the lower anchor connectors are attached to the vehicle lower anchor bars by pulling hard on the lower anchor connectors. If they are not attached, the lower anchor connector assembly will not secure your child restraint. Serious injury or death may result.
•DO NOT use this child restraint if it moves more than
25 mm (1 inch) side to side or front to back at either the rear-facing or forward-facing belt path on the child restraint. Serious injury or death may result from poor installation. If you cannot tightly secure the child restraint, try again or move it to another location.
 Tether Strap Warnings
Forward-facing and Booster Use Only
•To avoid a strangulation hazard, you MUST tightly roll or fold excess or unused tether strap and secure with a rubber band. Attach the tether hook to the storage clip when not in use (p. 13). This will keep an unused tether from hitting someone during a crash.
Additional Warnings
Rear-facing, Forward-facing, and Booster Use
•In hot or sunny weather, ALWAYS check the areas of the child restraint that may contact your child (e.g., buckle, buckle tongues, etc.) for hot areas before placing him/her into the child restraint. The child could be burned. Cover the child restraint with a light colored blanket when you leave the vehicle.
•This child restraint must be securely fastened to the vehicle, even when unoccupied, using the vehicle seat belts or lower anchor connectors. An unsecured child restraint may injure someone if a crash occurs.
•DO NOT use the cup holders to store cans or hard cups. Only for use with soft cups (such as styrofoam or paper).
•DO NOT place any cups that contain hot liquids (such as coffee or tea) in the cup holders.
•DO NOT attach additional padding, toys, or other devices not made by Evenflo or described in these
8
 WARNING
Additional Warnings |
Important |
|
Rear-facing, Forward-facing, and Booster Use |
||
|
instructions for the child restraint. Items not tested with the child restraint could injure the child. Additional pads or pillows may interfere with the function of the harness system, or cause breathing problems if the child’s head falls forward, increasing the risk of serious injury or death.
•Failure to follow installation instructions could result in serious injury or death. These instructions and the instructions in your vehicle owner’s manual must be
followed carefully. If there is a conflict between the two, the vehicle owner’s manual regarding child restraint installation must be followed.
•In cold weather, DO NOT dress the child in bulky clothing like snowsuits if the child is riding in a child restraint. Bulky coats/snowsuits make it difficult to properly tighten the harness to the child, which may allow the child to be ejected from the restraint during a crash. If necessary, place a blanket over the harnessed child without interfering with the child restraint harness system.
Safe Practices
• Everyone rides buckled up or the vehicle does not go. Make no exceptions for adults or children. If someone unbuckles, stop the vehicle. Being firm and consistent from the start will mean fewer discipline problems as children get older. An unrestrained person can be thrown into and injure other passengers.
• Many safety advocates and healthcare professionals recommend that children ride rear-facing for as long as possible. See limitations recommended on rear-facing use on the inside front cover.
• NEVER try to tend to a crying baby’s needs while driving. NEVER take a baby out of a child restraint for comforting while the vehicle is moving.
• DO NOT allow a child in a vehicle to have objects such as lollipops or ice cream on a stick. The object can injure the child if the vehicle swerves or hits a bump.
• DO NOT feed an infant who is riding in a child restraint.
• Put sharp or heavy items in the trunk. Anything loose
can be deadly in a crash.
9
Recall Information for U.S. Customers
•Child restraints could be recalled for safety reasons.
You must register this restraint to be reached in a recall. Send your name, address, e-mail address, the restraint’s model number, and manufacturing date to:
Evenflo Company, Inc., 1801 Commerce Dr., Piqua, OH 45356, or call 1-800-233-5921.
You may also register online at www.evenflo.com/registercarseat.
•For recall information call the U.S. Government’s Vehicle Safety Hotline at 1-888-327-4236 (TTY:1-800- 424-9153), or go to www.NHTSA.gov.
Public Notice for Canadian Customers
•To register your child restraint, return your registration card, call 1-937-773-3971, or register online at www.evenflo.com/registercarseatcanada.
•For recall information, call Transport Canada at 1-800-333-0510 (1-613-993-9851 in Ottawa region) or Evenflo at 1-937-773-3971.
Motor Vehicle/Aircraft Usage
When used with the internal harness and properly installed pursuant to these instructions, this
restraint is certified for use only in passenger and multi-purpose passenger motor vehicles,
buses, and trucks equipped with Type I or II seat belts and in aircraft.
TIPip!
Check with your airline before
departure to make sure this restraint meets their requirements.
When used without the internal harness (in booster
mode) and properly installed pursuant to these instructions, this restraint is certified for use only in passenger and multi-purpose passenger motor vehicles, buses, and trucks equipped with Type II seat belts. In booster mode, this restraint is NOT certified for aircraft use. A belt-positioning booster requires the use of a lap/ shoulder belt system, which is not available on aircraft.
Refer to pages 58 to 62 for instructions on installing your
10child restraint in aircraft.
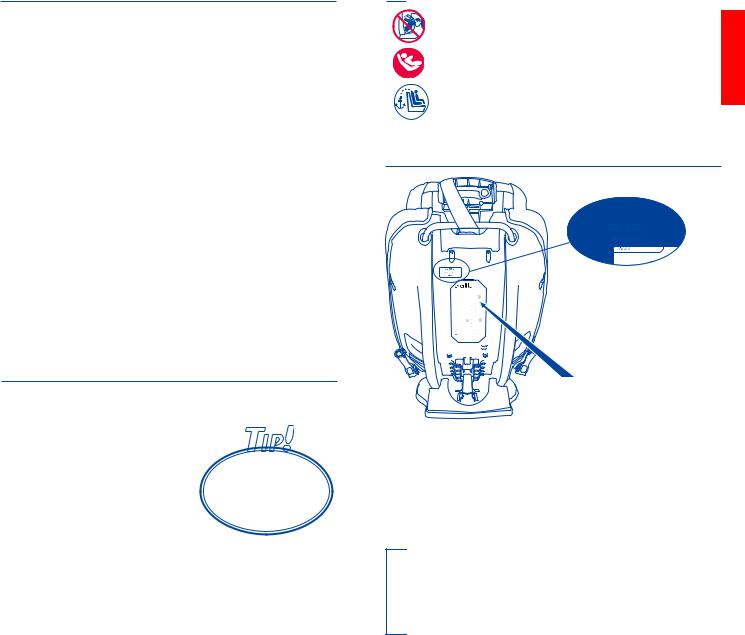
Symbol Legend
Air Bag Symbol – Alerts you to important
information about air bag safety. |
Important |
|
|
LATCH Symbol – Alerts you to important |
|
information about LATCH safety. |
|
Tether Anchor Symbol – Alerts you to |
|
important information about tether anchor safety.
Storing Your Instructions
After thoroughly reading and following these instructions, store them in the slots provided on the back of the child restraint, as shown.
For future reference, record the model number of your child restraint AND the date of manufacture below.
Model Number:
Date of Manufacture:
11

Visual Glossary
Your vehicle components may be significantly different than pictured. Consult your owner’s manual to help you identify your vehicle components.
Rear |
Fold-down Armrest |
Headrests |
Consult your vehicle |
Tether |
owner’s manual. |
Anchors |
|
Forward-facing |
Back Seat |
|
|
|
Belt Buckles |
|
Center Lap |
Back Seat |
Belt |
|
|
Belt Retractor |
|
Lap/Shoulder |
|
Belt |
|
Vehicle |
|
Lower |
|
Anchor |
|
Bars |
Seat Crease |
IMPORTANT: If your vehicle has side air bags, please refer to the warnings on page 2.
Front
|
|
Headrest |
|
Shoulder Belt |
|
Shoulder Belt Guide |
|
|
|
||
Guide |
|
Access Flap |
|
Harness Tabs |
|
Buckle Tongue Holder |
|
|
|
||
Seat Pad |
|
Chest Clip |
|
Buckle Tongue |
|
Buckle |
|
Holder |
|
||
|
|
||
Harness Straps |
|
|
|
|
|
Harness |
|
D-rings for |
|
Release |
|
|
Button |
||
SureLatch™ |
|
||
|
|
||
Connector |
|
Harness |
|
|
|
||
|
|
Adjust Strap |
|
SureLatch Connector |
|
|
|
(Shown in rear-facing |
Base |
|
|
belt path) |
Recline Lever |
||
|
|||
|
|
Crotch Strap |
* Not all features are available on all models.
12
Visual Glossary
Front Seat Lap |
Important |
|
and Shoulder Belts |
||
|
||
Front |
|
|
Headrests |
|
|
|
30 |
|
|
20 |
|
|
10 |
|
|
G |
|
|
A |
|
|
I |
|
|
R |
|
|
B |
|
|
A |
|
Important |
|
Consult your vehicle |
|
owner’s manual to determine |
Front Seat |
proper placement of child restraint |
Retractor |
in your vehicle and familiarize |
|
yourself with your vehicle’s |
|
components. |
Back |
|
Headrest Adjust Lever |
Headrest |
|
Tether Strap |
|
and Hook |
|
(Shown fastened |
Instructions |
to storage clip) |
|
|
Forward-facing |
Forward-facing |
Belt Path |
Belt Path |
SureLatch Connector |
SureLatch Connector |
(Shown in rear- |
(Shown in rear-facing |
facing belt path) |
belt path) |
Base |
Locking Clip |
* Not all features are available on all models.
13
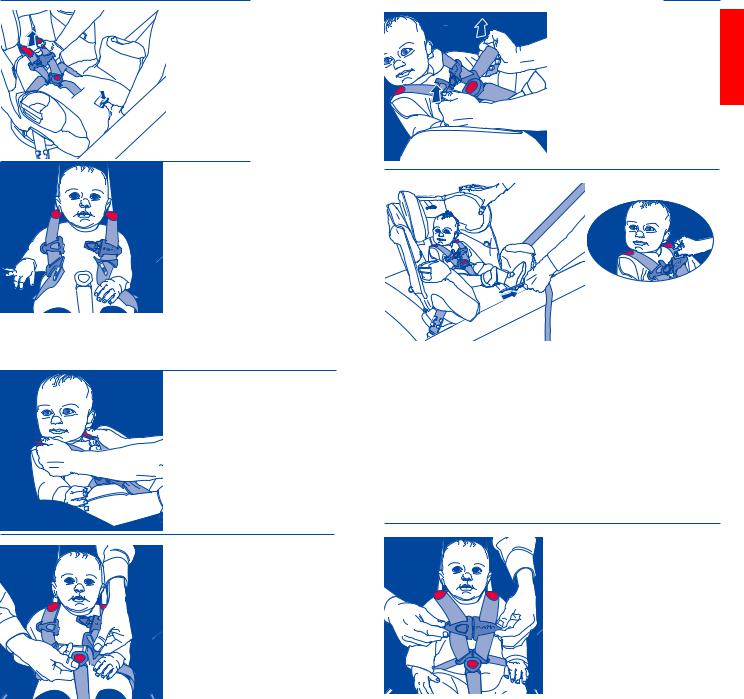
Securing the Child in the Child Restraint
1. Loosen harness.
Press the harness release button on the front of the seat, then pull up on the harness strap behind the fastened chest clip.
2. Position harness straps.
Unfasten chest clip and place the child in the child restraint.
Bring each harness strap over each of the child’s shoulders.
IMPORTANT: The baby’s back and bottom should be flat against the restraint. If there is a gap, the baby will not be comfortable.
3. Adjust harness straps.
storage |
Grasping both red harness |
e |
|
buckl |
|
|
tabs, slide downward until |
|
the harness straps are at |
|
the child’s shoulders. |
4. Buckle the harness.
Insert both buckle tongues into the buckle. Note: Pull up on the harness straps to ensure that the buckle tongues are fastened securely.
Securing the Child in the Child Restraint
5. Remove all slack in |
Important |
|
harness. |
||
|
||
Pull upward on the |
|
|
harness straps near the |
|
|
hips, as shown, to |
|
|
ensure that all slack is |
|
|
removed. |
|
6. Tighten harness.
Pull the harness adjuster strap to tighten the harness. The harness straps must be snug against the child.
A snug strap should not allow any slack. It lies in a relatively straight line without sagging. It does not press on the child’s flesh or push the child’s body into an unnatural position.
Check the harness straps near the shoulders for slack.
You should NOT be able to pinch the harness (see illustration). Adjust as needed.
7. Fasten and adjust chest clip.
Snap the two halves of the chest clip together, as shown, and slide to armpit level.
14 |
15 |

Removing the Child from the Child Restraint |
This page is intentionally blank. |
1. Loosen harness straps.
Press the harness release button on the front of the seat while pulling up on the harness strap behind the fastened chest clip.
|
2. Disconnect chest clip. |
|
Push the release button |
|
and pull the chest clip |
storagbuckle |
apart. |
e |
|
3. Unbuckle harness.
Press the red button on the buckle and release both buckle tongues.
You may now remove your child.
Important
16 |
17 |
Using Symphony™ in the
Rear-facing Position
Child Requirements
Weight: 2.3 to 18 kg (5 to 40 lbs) Height: 48 to 94 cm (19 to 37 inches) AND the top of child’s head is at least 25 mm (1 inch) below the top of the child restraint headrest
in either of its two lowest positions.
 25 mm (1 inch) or more
Harness straps are at, or slightly below, child’s shoulders.
e buckl storage
Rear-facing
Belt Path
SureLatch
Connector
Rear-facing Installation Checklist
1. Secure child restraint to the vehicle seat.
aRestraint is securely locked in Recline Position #1
(p. 53).
aLocking clip is installed, if necessary (p. 55).
aThe level line is level with ground (p. 24/28).
A towel/small blanket is rolled up and placed beneath the front edge of the base, if necessary.
aChild restraint is securely installed with one of the
following methods using the rear-facing belt |
facing |
• SureLatch Connectors (p. 20) |
|
path: |
|
• Quick Connectors™ (p. 20) |
- |
• Vehicle Seat Belts (p. 26) |
Rear |
Note: To determine which type of lower anchor |
|
connector is on your child restraint, go to page 20. |
|
2. Place the child in the child restraint. |
|
aThe child’s back and bottom are flat against the |
|
back and bottom surfaces of the child restraint. |
|
aTop of child’s head is at least 25 mm (1 inch) |
|
below the top of the child restraint headrest in |
|
either of its two lowest positions. |
|
3. Make necessary adjustments. |
|
aRed harness tabs MUST be at, or slightly below, |
|
shoulder level (p. 14). |
|
aHeadrest is adjusted to either of the bottom two positions closest to the harness tabs (p. 53).
4.Fasten both buckle tongues. Refer to page 14.
5.Position and connect chest clip.
aChest clip MUST be placed at armpit level (p. 15).
6.Check your work.
aHarness straps are snug against the child’s shoulders, with no slack (p. 15).
aTo properly secure this child restraint, it MUST NOT move more than 25 mm (1 inch) from side to side or front to back at the rear-facing belt path.
TIP! |
To make installation easier, watch the installation |
ip |
video of this child restraint at www.evenflo.com. |
18 |
19 |
 Loading...