

Page 1
EVE AUDIO PRODUCT MANUAL
DEC 2022
SC2070
Page 2

SC2070
SAFETY INSTRUCTIONS
To avoid the risk of electrical shock, do not attempt to open the unit.
There are no user-serviceable parts inside. Do not attempt to service the
equipment yourself. In case of problems, please contact your local dealer
or distributor.
This unit should be connected to a grounded power outlet. If you use
!
extension cords and power distributors they should be grounded as well.
Verify that the specied operating voltage on the rear side matches the
!
local mains voltage. If these values do not match you will have to adjust
the loudspeaker setting appropriately and change the fuse type.
Use only the fuse types specied on the rear side of the unit. Never bypass
the fuse.
Make sure that no liquids wet the inside of the cabinet. Never spray, pour
or spill liquids directly onto the unit.
Do not use a wet cloth nor ammable or acid chemicals for cleaning.
Do not touch the diaphragms of the loudspeaker and do not obstruct the
!
bass reex ports.
Make sure there is enough air ow behind the loudspeaker to maintain the
!
electronic components cool.
Do not expose this product to extreme temperatures.
!
The diaphragms build up a magnetic eld around the loudspeaker.
High sound pressure levels can damage your hearing permanently! Avoid
standing close to loudspeakers producing high sound pressure levels.
2
Page 3

EVE Audio product manual
TABLE OF CONTENTS
1. INTRODUCTION ............................................................................4
2. QUICK START .................................................................................5
2.1. First Steps .............................................................................................................................5
2.2. Speaker Connection .........................................................................................................5
2.3. Powering On .......................................................................................................................5
3. OPERATION ...................................................................................6
3.1. First Steps .............................................................................................................................6
3.2. Operating Modes ..............................................................................................................7
3.3. Powering on/o: Standby Mode .................................................................................7
3.4. Volume Mode .....................................................................................................................7
3.5. Settings Menu .................................................................................................................... 9
3.6. Filters .....................................................................................................................................9
3.7. Low Filter ..............................................................................................................................9
3.8. High Filter.......................................................................................................................... 10
3.9. Mid Filter ........................................................................................................................... 10
3.10. Desk Filter ......................................................................................................................... 11
3.11. LED Mode .......................................................................................................................... 11
3.12. Saving Your Settings ..................................................................................................... 12
3.13. Power Switch ................................................................................................................... 12
3.14. DIP Switches ..................................................................................................................... 13
3.15. Mains Voltage Selector ................................................................................................. 13
3.16. Power Connector (IEC) ................................................................................................. 13
4. POSITIONING ..............................................................................14
4.1. Speaker Positioning + Rubber Feet ......................................................................... 14
4.2. Height and Distance ..................................................................................................... 15
4.3. Stereo Setup..................................................................................................................... 15
4.4. Stereo Setup + Subwoofer (2.1) ................................................................................ 16
4.5. Multichannel Setup (5.1) ............................................................................................. 17
4.6. Mixer/Workplace Reections ..................................................................................... 18
4.7. Room Acoustics .............................................................................................................. 19
5. TECHNICAL SPECIFICATIONS .....................................................20
6. DECLARATION OF CONFORMITY ...............................................21
7. WARRANTY ..................................................................................22
3
Page 4

SC2070
1. INTRODUCTION
Thank you for your time and interest in the EVE Audio product range.
EVE Audio is a loudspeaker manufacturer based in Berlin, Germany, that
specializes in the development and design of unique studio monitors.
The use of rst-class components is our highest priority because we rmly
believe this is the only way to manufacture rst-class products.
You have chosen a loudspeaker from our Silvercone SC series. The
SC2070 was conceived as a two-way system. The features allow multiple
applications for use in professional recording studios as well as home
studios.
The SC2070 combines a 6.5” SilverCone chassis with the Air Motion
Transformer developed by EVE Audio for the RS series. The loudspeaker
system is completed by high-performance ampliers and high-resolution
DSP technology. The woofer of the SC2070 is powered by a dedicated
150W amplier, while the tweeter is fed by a 100W amplier.
We wish you enjoy your new EVE Audio monitor. If you have any questions
regarding our products, do not hesitate to contact your nearest dealer or
get directly in touch with us... We will be more than happy to help you
out!
All the best from Berlin.
The EVE Audio Team
4
INTRODUCTION
Page 5

EVE Audio product manual
2. QUICK START
If you already have experience with studio monitors, the Quick Start guide
ought to be more than enough to get you started.
For unexperienced users we recommend reading the whole user’s manual
in order to prevent any misuse.
2.1. First Steps
Check the package components (loudspeaker, user’s manual, power cord,
grid, rubber feet).
Check the voltage setting (see “Mains Voltage Selector”).
Check the setting of the DIP Switches (variable).
2.2. Speaker Connection
Connect one of the monitor inputs on the rear side (RCA or XLR) to the line
output of a playback source, for instance an audio interface. The output
level should be as low as possible.
2.3. Powering On
Engage the Power switch on the rear side of the loudspeaker to turn it on
or o.
The LEDs around the Volume control on the front panel will light up
clockwise. If the LED on the right end is dimly lit, this indicates that the
loudspeaker is in Standby Mode. Press the Volume control to turn the
loudspeaker on. If you turn the Volume control counter clockwise until the
LED on the left end lights up dimly the loudspeaker will be muted.
Increase the output level on the source device until the LED ring starts to
blink, then reduce the output level a bit. The maximum operating level for
the input (i.e. the analog to digital converter) is now set optimally. To set
the desired listening volume use the Volume control on the loudspeaker.
The LED ring indicates the volume setting. If the LED ring starts to blink,
reduce the output level on the signal source.
QUICK START
Powering On
5
Page 6
SC2070
3. OPERATION
3.1. First Steps
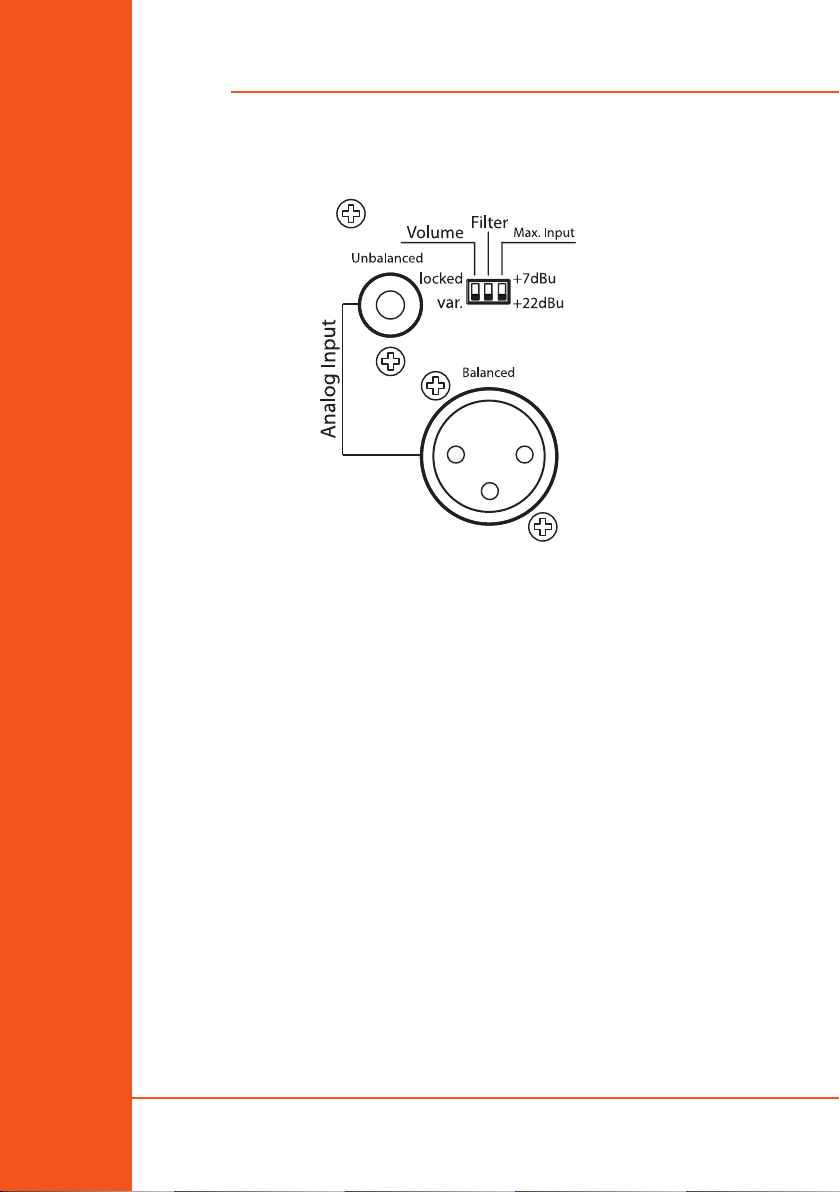
Rear connectors & DIP switches
Check the package components (loudspeaker, user’s manual, power cord,
grid, rubber feet).
Check the voltage setting (see “Mains Voltage Selector”).
Check the setting of the DIP Switches (variable).
Connections: there are two input connectors on the rear side. These allow
the connection of balanced sources with XLR connectors or unbalanced
sources with RCA connectors.
• Pin assignment XLR: 1= Shield, 2= hot (+), 3= cold(-).
• Pin assignment RCA: Center conductor= Signal, Ring= Shield.
Both analog inputs can be used simultaneously, whereby the signals are
summed.
The maximum level of the source signal should not exceed 8dBu. If the
input is overloaded the LED ring will start blinking.
6
OPERATION
First Steps
Page 7
EVE Audio product manual
3.2. Operating Modes
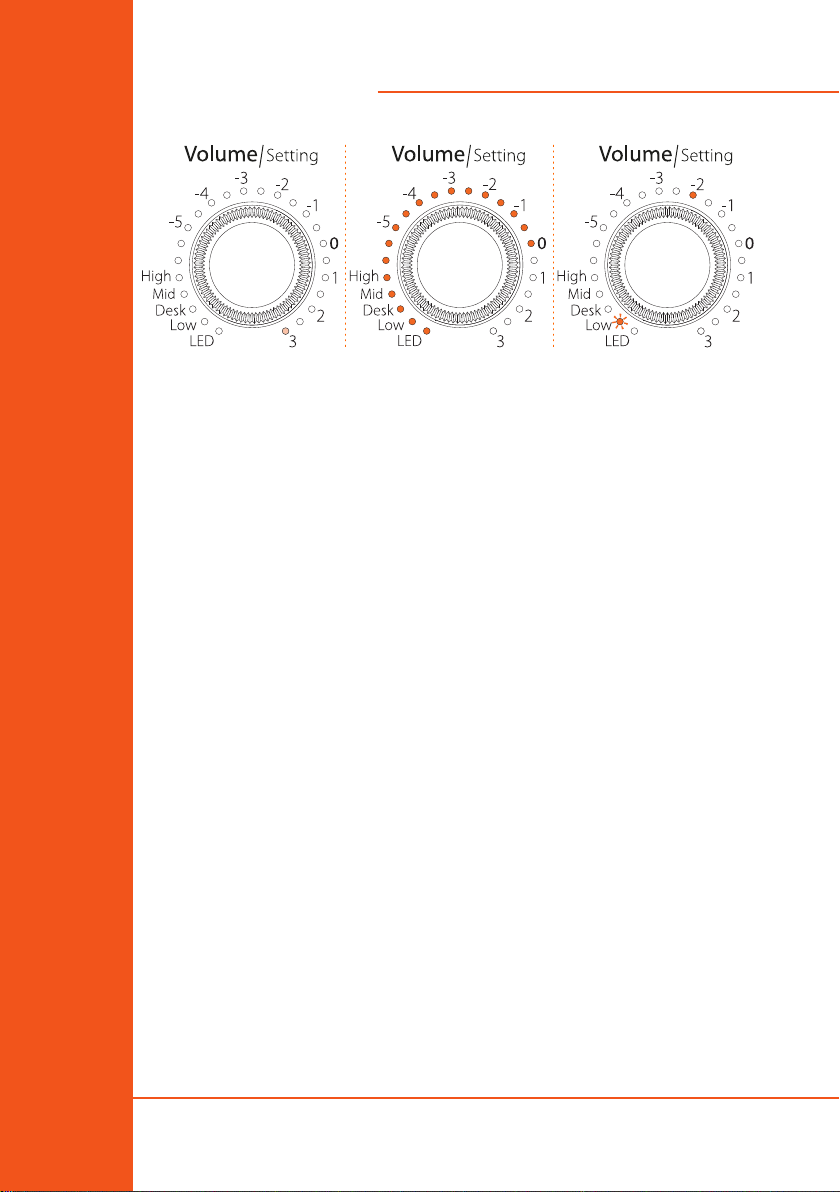
Standby Mode | Volume Mode (-10dB) | Setting Menu (Low lter @ -2dB)
3.3. Powering on/off: Standby Mode
Press and hold the control three seconds in order to put the monitor in
Standby Mode. The volume will decrease gradually while the LED ring
lights up once around the Volume control. Afterwards, the LED on the right
end will light dimly and the power consumption is reduced to 1watt.
! To exit the Standby Mode press briey the Volume control once again. The
level will increase gradually.
3.4. Volume Mode
• Level adjustment
The maximum input level for balanced (XLR) and unbalanced signals (RCA)
is +7dBu or +22dBu, depending on the position of the Max. Input switch
on the rear panel (see DIP Switches). Higher levels produce distortion due
to the overloading of the analog to digital converter.
Given that some professional studio devices can produce in excess of
+22dBu, the LED ring will start blinking whenever the AD converter is
overloading. If that is the case, the output level of the source should be
reduced.
OPERATION
Volume Mode
7
Page 8
SC2070
1 Step = 2 dB
(1 LED = 4 Steps)
1 Step = 1 dB
(1 LED = 4 steps)
1 Step = 0.5 dB
(1 LED = 4 Steps)
1 Step = 0.5 dB
(1 LED = 4 Steps)
1 Step = 0.5 dB
(1 LED = 2 Steps)
-80 dB
-48 dB
-20 dB
-12 dB
-8 dB
0 dB
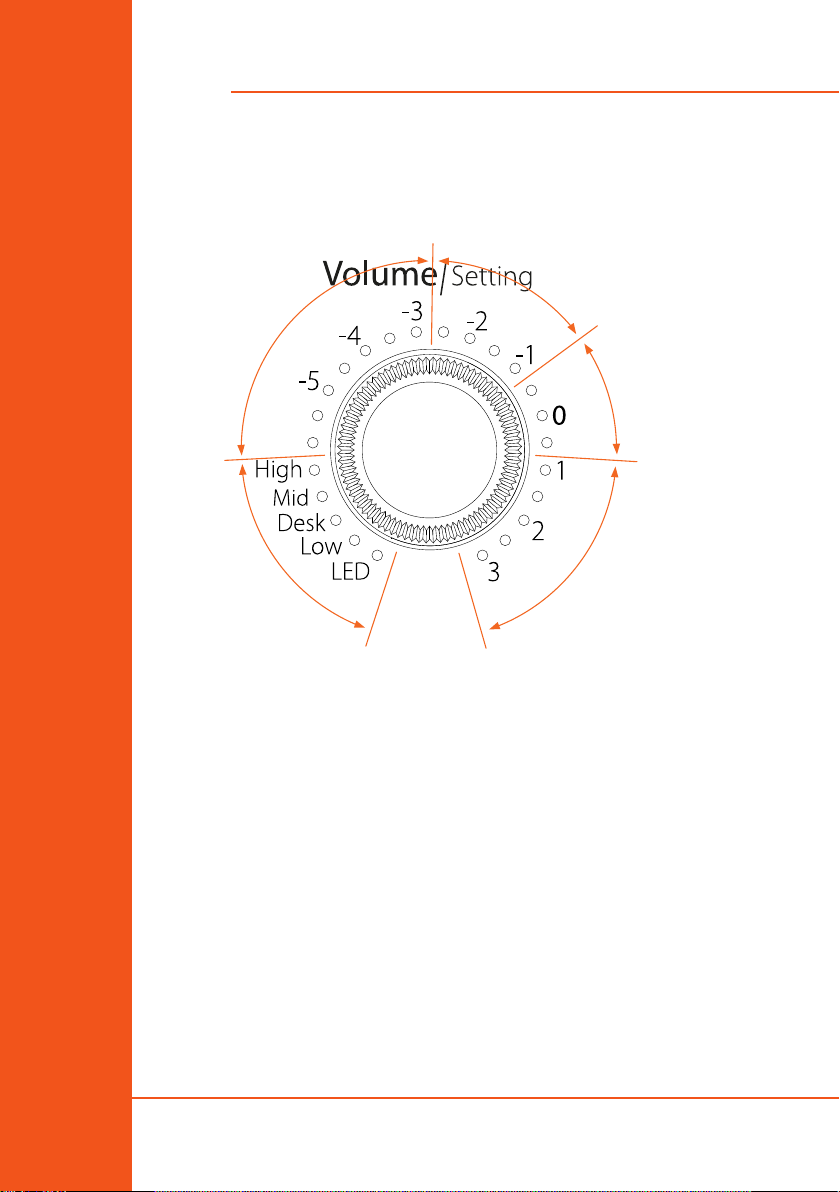
• Volume adjustment
Turn the knob to adjust the volume. Depending on the LED mode selected
(see LED Mode), the volume will be displayed as a dim/bright circle or as a
dim/bright point.
• Mute
! To exit the Mute Mode simply turn the control clockwise until you reach
8
The control’s response curve is not linear. The increments become ner as
the volume increases:
-80dB (minimum) to -48dB: 2dB
-48dB to -20dB: 1dB
-20dB to 0dB (maximum): 0.5dB
To mute the monitor, turn the Volume control counter clockwise until you
reach the minimum level. When the LED on the left end lights up dimly the
Mute Mode is activated.
the desired volume.
OPERATION
Volume Mode
Page 9
EVE Audio product manual
3.5. Settings Menu
Press the control once to enter the Settings menu. Here you can set four
dierent lters (High, Mid, Desk, Low), as well as the LED ring’s behavior.
The LED of the currently active function will blink.
Turn the control to choose the lter or LED mode desired. The blinking
LED indicates the function selected while the steady-on LED indicates the
value assigned to that function.
Press the control to conrm your selection. The blinking will stop once the
selection is conrmed.
Turn the control to adjust the lter or the LED behavior.
When you are satised with the setting, press the control again to go back
to the Settings menu. You can then select and edit another function.
! To exit the Settings menu press and hold the control for three seconds or
simply wait 10 seconds. The loudspeaker will then return automatically to
the Volume Mode.
3.6. Filters
The lters of the EVE Audio monitors were specially developed to oer you
the possibility of adjusting your monitoring system to the characteristics
of your room. These lters help correct the alterations to the frequency
response produced by the room acoustics and listening distance. Do bear
in mind that correcting bad room acoustics with lters will only achieve
average results. In any case, you should try to use the lters as little as
possible.
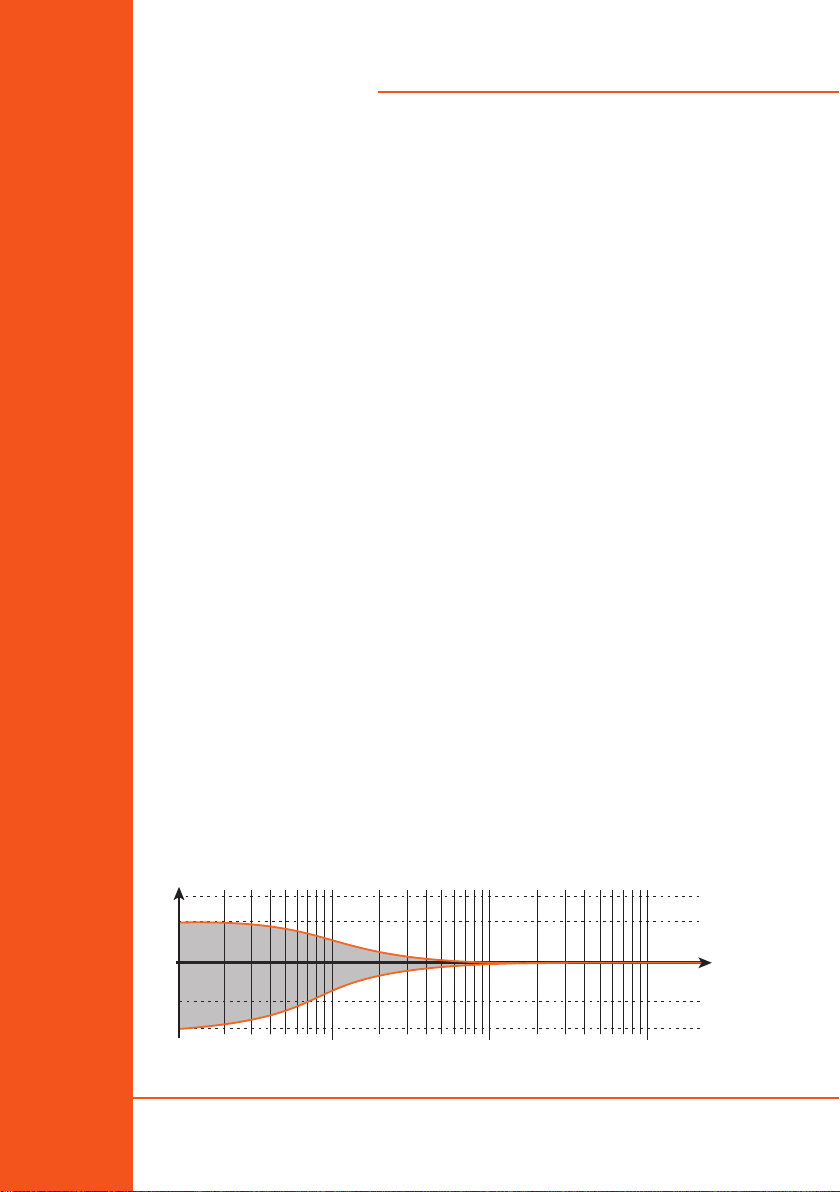
3.7. Low Filter
The Low-Shelf Filter allows you to boost or attenuate frequencies below
300Hz in 0.5dB steps. Use this lter whenever the acoustics of your room
cause problems in the low frequency range.
dB
+5
+3
0
-3
-5
100 1k 10k
OPERATION
Low Filter
Hz
9
Page 10
SC2070
100 1k 10k
dB
If the low frequencies are boosted by the room, you can attenuate them
with the Low-Shelf Filter. The reasons for this boost could be the room
modes or the loudspeakers being too close to the walls. In the same way,
if the low frequencies are to weak, you can boost them to balance the
frequency response.
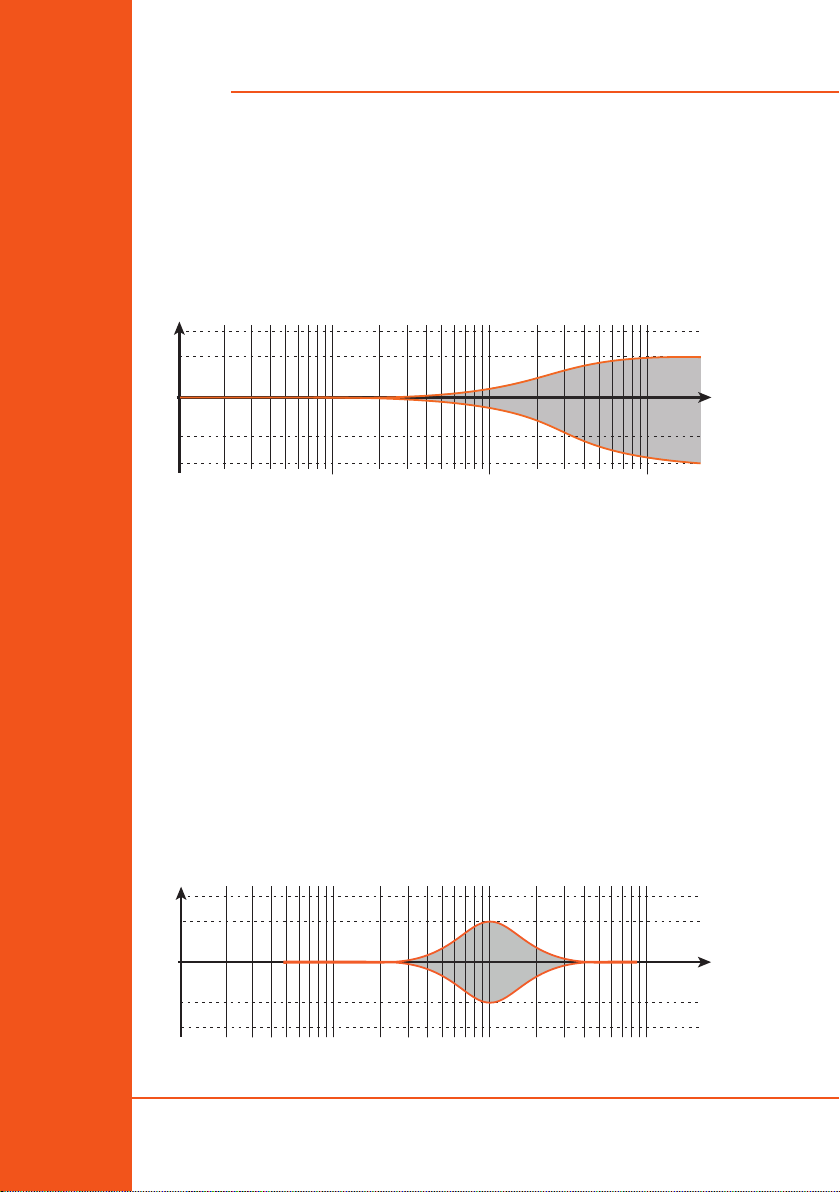
3.8. High Filter
dB
+5
+3
0
-3
-5
100 1k 10k
The High-Shelf Filter allows you to boost or attenuate frequencies above
3kHz in 0.5dB steps. High frequencies are aected depending on the
distance from the sound source to the listening position. The further you
are from the loudspeakers, the weaker the high frequencies. In such cases
the lter should be set to boost them. In desktop applications, distances
can be as short as 1m (3ft), which results in the high frequencies being
boosted. To compensate for this eect you should use the High-Shelf Filter
to attenuate the high frequencies.
If you have a very dead room, it might be wise to boost the high frequencies
in order to have a more balanced overall sound. When the listening position
is too close to the loudspeakers or the room has reective surfaces, it is
reasonable to attenuate the high frequencies.
3.9. Mid Filter
+5
+3
0
Hz
Hz
10
-3
-5
OPERATION
Mid Filter
Page 11
EVE Audio product manual
The Mid Filter is a bell lter with 1kHz center frequency. It allows you to
boost or cut the mid range up to +/-3dB in 0.5dB steps.
This frequency range is very important for the balance between lower
mid and higher mid frequencies. Use the Mid lter to adjust the balance
between fundamental and harmonic frequencies in the music material.
Depending on the acoustics of your room, some of the sound energy
produced by the monitors may be reected by surfaces like walls, oor
and/or ceiling in the room, thus altering the perceived sound.
3.10. Desk Filter
dB
+5
+3
0
-3
-5
100 1k 10k
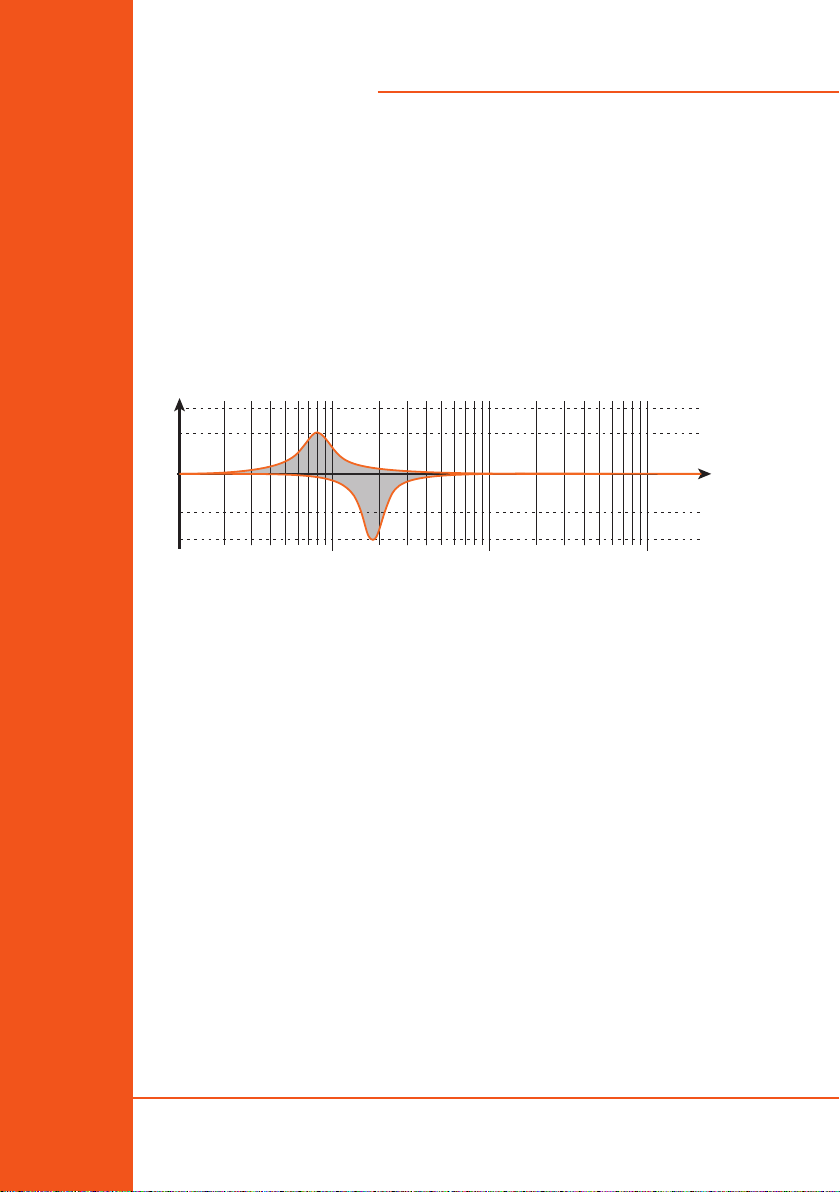
The Desk Filter has two functions. When turned down it acts as a narrowband EQ set to 170Hz.
The reections of mixers and similar surfaces usually result in the boosting
of low mids. With the Desk Filter you can lessen this eect by turning down
the lter gain.
When turned up, the Desk Filter also works as an EQ but this time set to
80Hz. This allows you to give more punch to the lower frequencies.
! The following applies to the Low, High and Desk lters:
• Every step represents a 0.5dB increment.
• Maximal boost is +3dB and maximal attenuation is -5dB.
• Refer to the chapter on POSITIONING to set the lters of your EVE Audio
monitors eectively.
3.11. LED Mode
The LED Mode determines in which of the four available fashions the LED
ring displays the volume level. The LEDs represent given levels, which are
displayed and adjusted according to four steps. Intermediate steps are
indicated by the brightness between two adjacent LEDs.
Hz
OPERATION
LED Mode
11
Page 12

SC2070
• Bright Ring
All LEDs up to the selected volume level light up brightly. The louder the
signal, the longer the brightly lit-up ring.
• Bright Point
Only the LEDs corresponding to the selected volume level light up brightly.
The louder the signal, the further up the brightly lit-up point moves.
• Dim Ring
All LEDs up to the selected volume level light up dimly. The louder the
signal, the longer the dimly lit-up ring. In this mode, the LEDs light up
brightly momentarily while you adjust the volume level.
• Dim Point
Only the LEDs corresponding to the selected volume level light up dimly.
The louder the signal, the further up the dimly lit-up point moves.
! Intermediate steps are indicated by the lighting of two adjacent LEDs. The
level ranges from -60dB to +10dB, taking “0 dB” as reference point.
3.12 . Saving Your Settings
All settings on the front and rear panels are automatically saved. The
loudspeakers can be disconnected anytime without the settings being
lost.
3.13. Power Switch
The power switch on the rear panel disconnects the loudspeaker completely
from the power grid. When powered o all loudspeaker settings are saved
and the power consumption is reduced to 0 watts.
After powering on again, the loudspeaker will return to the state it was
in before being turned o (Standby Mode, Mute Mode or a given volume
level). Even if powered o via a multiple outlet power strip, the monitor will
return to the state it was in before being turned o.
! In order to prevent switching noise with your monitoring system keep in
mind the following rules:
Power all audio sources on rst and your loudspeakers last.
When turning o your system, power o your loudspeakers rst and then
all audio sources.
12
OPERATION
Power Switch
Page 13

EVE Audio product manual
3.14 . DIP Switches
On the rear panel of your EVE Audio monitors you will nd three DIP
Switches. These allow you to secure your loudspeaker settings to prevent
them from being changed inadvertently.
• Volume
When set to “lock,” this DIP Switch secures the current volume setting. The
LED ring on the front panel indicates the volume setting, but it cannot be
modied. When set to “variable,” the volume setting can be changed by
simply turning the knob.
• Filter
When set to “lock,” this DIP Switch secures the current lter settings. The
lter settings can be read on the LED ring, but they cannot be modied.
When set to “variable,” the lters can be modied freely.
• Max. Input
This DIP Switch determines the input sensitivity of the SC2070. In a
studio environment, the reference level (0dB) ought to be 4dBu. In such
environments, leave the setting at “+7dBu.” However, some studio gear
allow much higher output levels. If it were impossible to reduce the output
level of such devices, set the switch to “+22dBu.”
The “+7dBu” setting ought to be suitable for most situations.
3.15. Mains Voltage Selector
The Mains Voltage Selector allows you to adjust the operating voltage of
your EVE Audio monitors to the local power grid. Set it to “230” if your local
power grid is 220-240 volts or “115” if it is 110-120 volts.
If you change the mains voltage value you also have to replace the fuse of
the IEC connector with an appropriate one. The corresponding fuse values
are printed on the unit underneath the IEC connector.
3.16. Power Connector (IEC)
Use the power cord supplied to connect your EVE Audio monitors to the
power grid. The IEC connector includes an integrated fuse. If your EVE
Audio monitors stop working and the fuse seems to be the problem,
proceed as follows:
• Turn the loudspeaker o.
• Disconnect it from the power grid.
• Detach the IEC connector from the unit.
OPERATION
Power Connector (IEC)
13
Page 14

SC2070
• Remove the fuse.
• Change the fuse. The replacement fuse should comply with the values
stated on the loudspeaker.
4. POSITIONING
4.1. Speaker Positioning + Rubber Feet
Ideally, there should be no objects or obstacles between the loudspeakers
and the listening position. Furthermore, a symmetrical positioning is
important. This applies to the distance between speakers as well as to the
walls, ceiling and oor. In order to have a symmetrical stereo image it is
also important to have symmetrical reections. We recommend to keep
a distance of at least 0.5m (19 inches) to the walls, in order to avoid low
frequency boosting.
EVE Audio monitors can also be ush-mounted in a wall, in which case
there should be enough air ow. This is important to keep the electronic
components cool but also to allow for the best performance of the bass
reex ports. We recommend to keep at least 3cm (1 in) to the sides and top.
The SC2070 monitor was especially designed to be placed vertically. Fix
the supplied rubber feet to the bottom side of the monitor and place it on
an even and steady surface.
If the room conditions force you to place the SC2070 monitor in horizontal
position, make sure that the tweeter is pointing to the outside and that
the loudspeakers are angled towards the listening position. In any case,
you should also try placing the tweeters pointing to the inside. Regardless
of the position, always mind the symmetry (both tweeters should point
either to the inside or to the outside)!
Rubber feet: your EVE Audio monitors are supplied with four self-adhesive
rubber feet. Fix them to the bottom of your loudspeakers to place the
monitors safely on an even surface. Furthermore, the rubber feet improve
the acoustic decoupling of the loudspeakers from the surface.
14
Speaker Positioning + Rubber Feet
POSITIONING
Page 15
EVE Audio product manual
4.2. Height and Distance
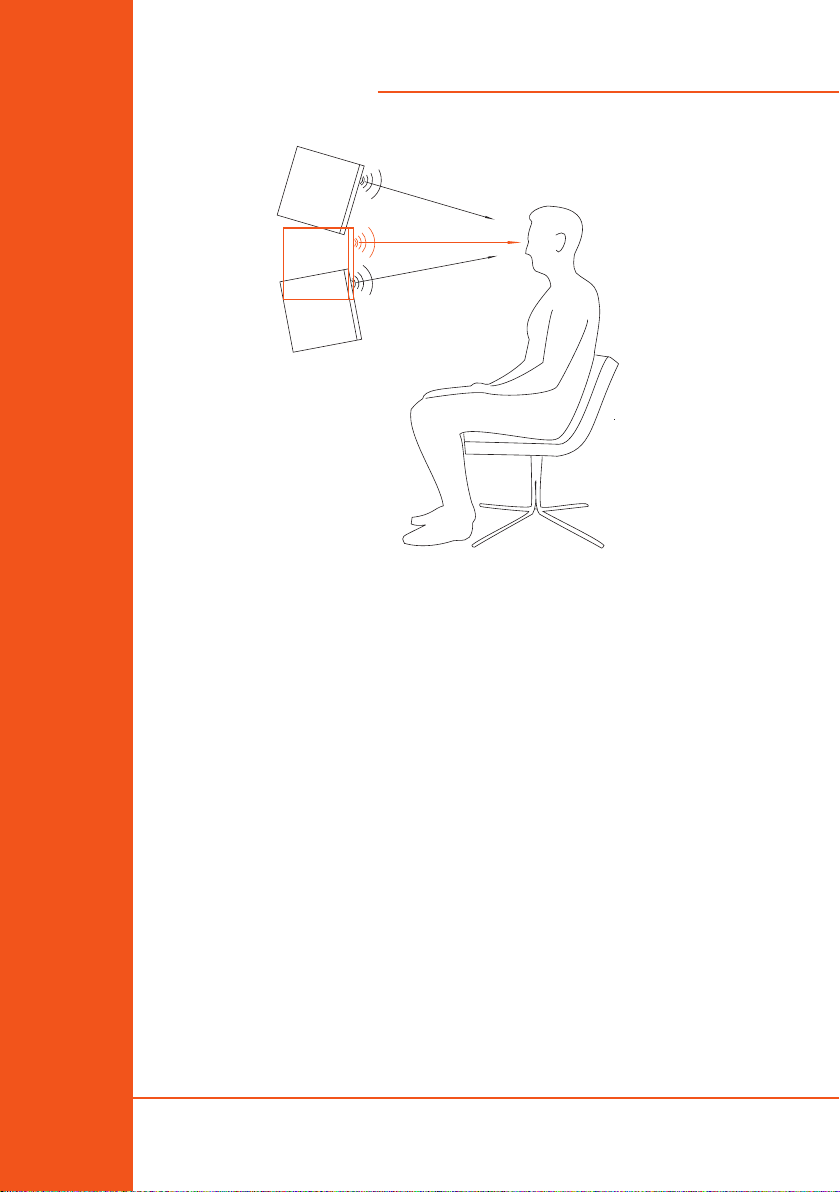
The tweeter of your EVE Audio monitors should be ideally placed at the
same height as your ears. If this is not possible tilt the monitors so that the
tweeter is directed to your ears.
The ideal distance between the SC2070 and the listening position is 1-2m
(3.4-6.5 ft).
! These values are only meant as a reference and depend a lot on the
characteristics of the room. In live rooms you will be forced to reduce the
distance, while in dead rooms the distance to the loudspeakers can be
larger.
4.3. Stereo Setup
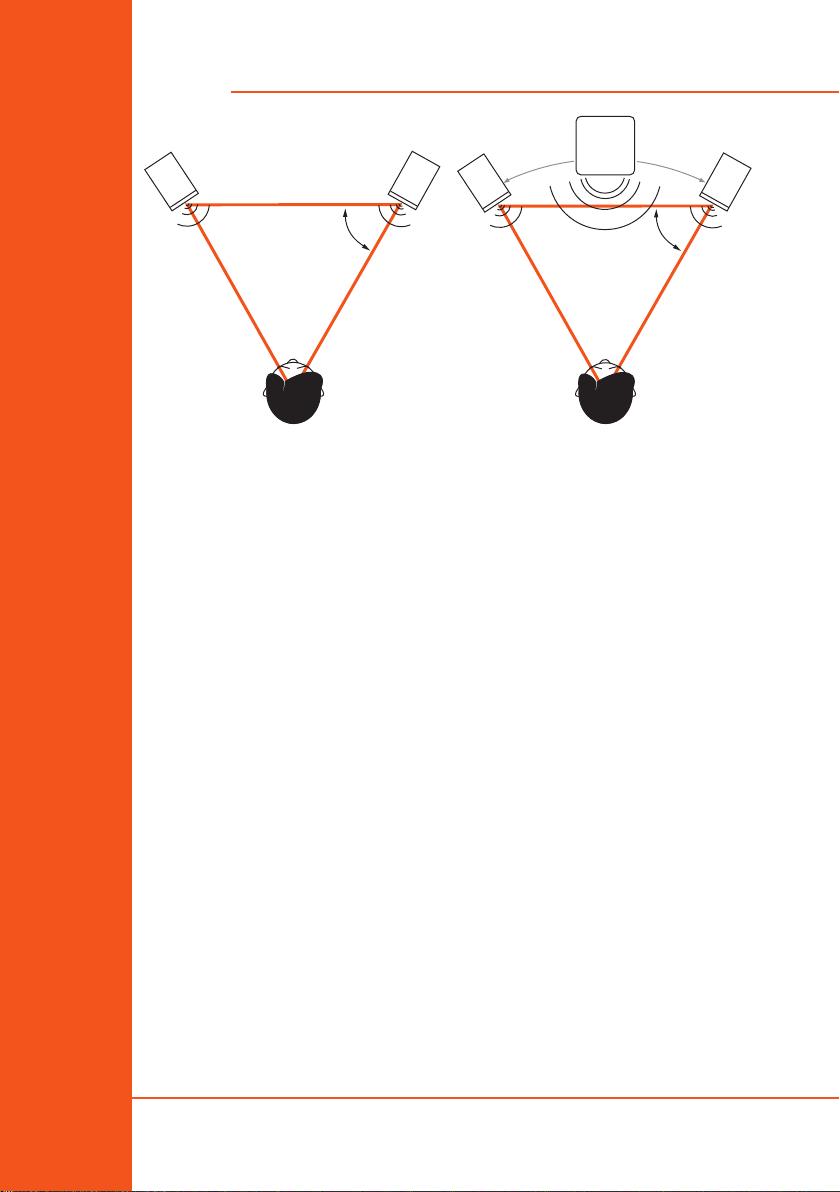
The so-called “stereo triangle” is the best way to place speakers in a stereo
setup, i.e. the monitors and the listening position should form an equilateral
triangle. Try the following:
Establish the ideal distance to the listening position (see “Height &
Distance”).
Place the monitors in such a way that the distance from each other and to
the listening position is the same.
Turn both monitors so that their front panels are pointed towards the
listening position (all angles of the stereo triangle should be 60º).
POSITIONING
Stereo Setup
15
Page 16
SC2070
60°
Stereo-Setup (left) & Stereo-Setup + Subwoofer (right)
4.4. Stereo Setup + Subwoofer (2.1)
In such a setup, the subwoofer is fed by the stereo signal source. The
subwoofer lters the low frequency components of the stereo channels
and sums them to produce a mono signal which it then reproduces. The
high frequencies are forwarded to the full-range satellite speakers.
Ideally, such a system would comprise two EVE Audio SC2070 monitors
plus one EVE Audio TS110 or TS112 subwoofer, or even two TS108
subwoofers. All these subwoofers allow you to set the crossover frequency
for the satellite speakers and the subwoofer.
The positioning of the two satellites should be done in the same manner as
in a stereo setup (see “Stereo Setup”).
The subwoofer should be placed on the ground between both satellites.
Considering that low frequencies are omnidirectional, the subwoofer does
not have to be centered exactly between the two satellites. The subwoofer
can be moved back a bit so that it is at the same distance from the listening
position as the satellites. This guarantees all transducers are aligned in time.
60°
16
Stereo Setup + Subwoofer (2.1)
POSITIONING
Page 17
EVE Audio product manual
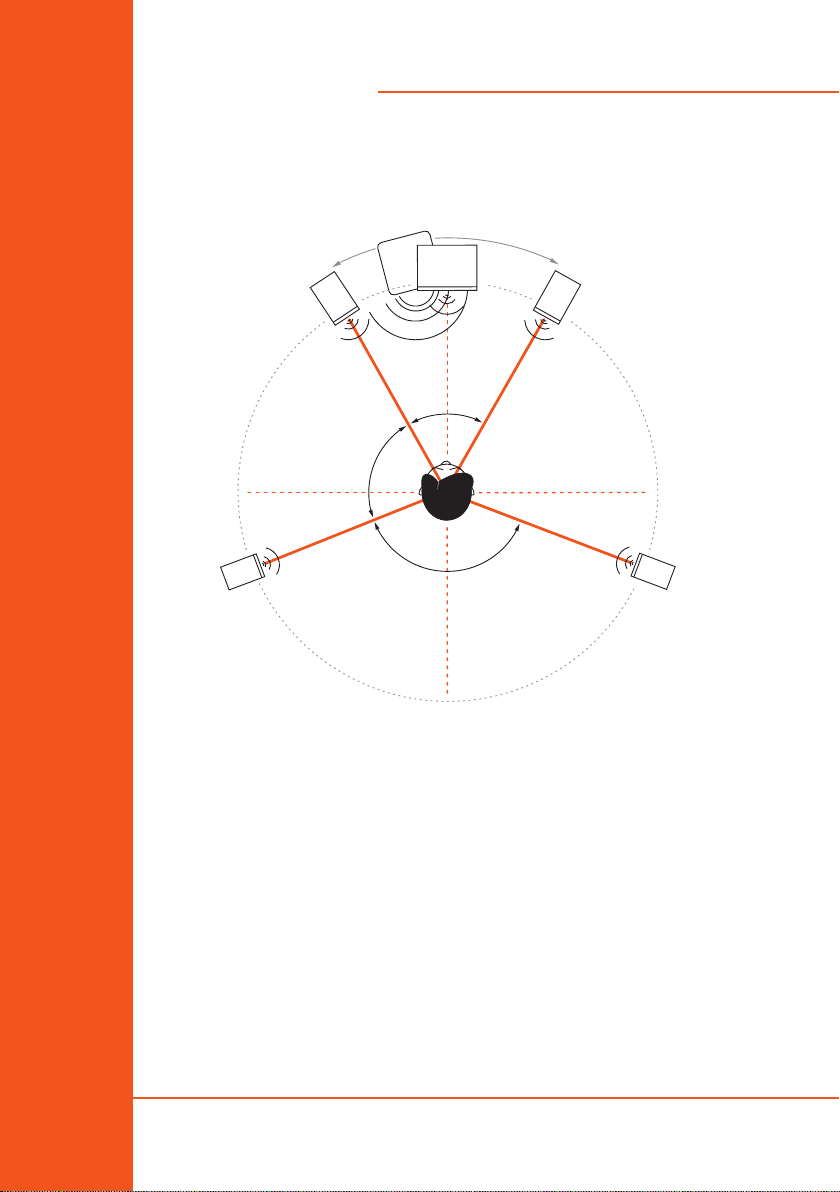
4.5. Multichannel Setup (5.1)
The most common 5.1 systems consist of three front channels (left, right
and center), two surround channels (left/right) and a subwoofer for the
low frequencies. The speakers form a circle around the listening position.
60°
80°
140°
Ideally, a 5.1 system would comprise ve EVE Audio SC2070 and a TS110 or
TS112 subwoofer. Other combinations are also possible.
The positioning of the two front speakers and the subwoofer should be
done in the same manner as in a stereo setup with a subwoofer (see “Stereo
Setup + Subwoofer“).
Place the center monitor directly in front of the listening position, i.e. right
in the center between both front satellites.
The rear satellites should form an isosceles triangle with the listening
position forming an angle of 140º.
Verify that all speakers are at the same distance from the listening position,
so that they are aligned in time.
POSITIONING
Multichannel Setup (5.1)
17
Page 18
SC2070
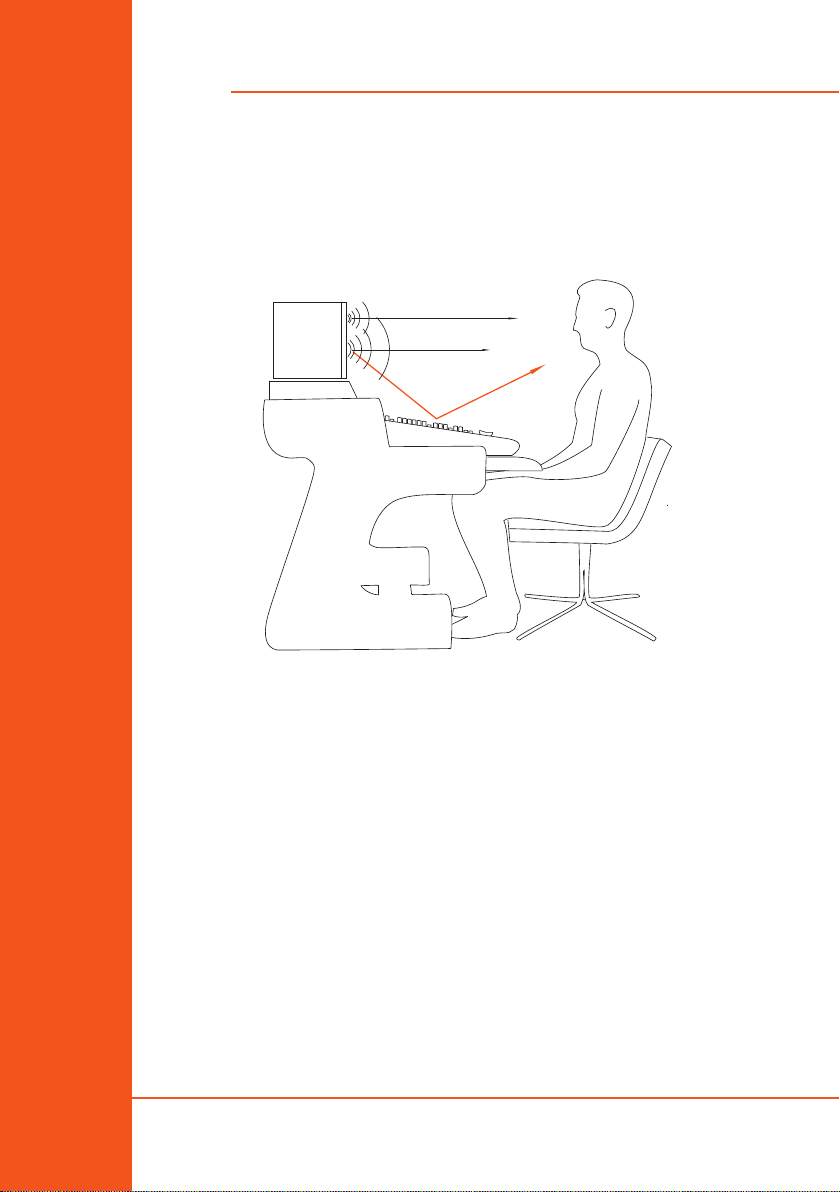
4.6. Mixer/Workplace Reflections
Regardless of whether the monitors are to be used in a recording studio
with a mixing desk and meter bridge or in a desktop environment,
hard surfaces can produce annoying reections that alter the natural
reproduction of the loudspeakers. Especially in the low-mid frequency
range.
18
If this is the case with your setup, use the Desk Filter of your EVE Audio
monitors to reduce the impact of the reections from the desk or mixer.
POSITIONING
Mixer/Workplace Reflections
Page 19

EVE Audio product manual
4.7. Room Acoustics
In order for the described measures to work eectively, we recommend
that you put special attention to the room acoustics. The size, contents,
wall parallelism, proportion, and reective behavior of the room, as well
as the corners, the building materials and their characteristics play a very
important role in the acoustics of a room.
Room acoustics is a science in itself and it is unfortunately out of the scope
of this manual. However, we have put together a short bibliography for
you:
• „Recording Studio Design“ (Englisch), Philip Newell. ISBN: 0-240-51917-5
• „Home Recording Studio – Build it like the Pros“ (Englisch), Rod Gervais.
ISBN: 1-59863-034-2
• „Studio Akustik“ (German), Andreas Friesecke. ISBN: 978-3-932275-81-4
• „Praktische Raumakustik“ (German), Thomas Hentschel. ISBN 978-3-8364-
6800-8
• „Handbuch der Tonstudiotechnik“ Band 1 (German), Michael Dickreiter.
ISBN 3-598-11321-8
• „Handbuch der Audiotechnik“ (German), Stefan Weinzierl (Ed). ISBN 978-
3-540-34300-4
POSITIONING
Room Acoustics
19
Page 20

SC2070
5. TECHNICAL SPECIFICATIONS
Product SC2070
Description 2-Way Monitor
Dimensions (WxHxD) (mm) 230 x 345 x 304
Dimensions (WxHxD) (“) 9.05 x 13.58 x 11.96
Free-eld frequency range (-3dB) 38Hz - 25kHz
Tweeter AMT RS7
Woofer 165mm / 6.5”
Crossover frequency 1,800Hz
Maximum SPL @ 1m 106dB
Number of ampliers 2
Total short-term output power 250W
Short-term out power (woofer) 150W
Short-term out power (tweeter) 100W
Protection limiter yes
Settings
Volume -inf. – +6dB
High-shelve lter (-5db – +3dB) > 3kHz
Mid EQ (-5db – +3dB) 1kHz
Desk lter boost (0db – +3dB) 80Hz
Desk lter cut (-5db – 0dB) 170Hz
Low-shelve lter (-5db – +3dB) < 300Hz
LED brightness setting yes
Max. Input dip switch +7dBu / +22dBu
Level-lock dip switch yes
Filter-lock dip switch yes
Connectors
XLR in (impedance) yes (10kΩ)
RCA in (impedance) yes (10kΩ)
Power consumption
Standby < 1W
Full output 170VA
Misc.
Weight kg / lb. 9.4 / 20.7
20
TECHNICAL SPECIFICATIONS
Room Acoustics
Page 21

EVE Audio product manual
6. DECLARATION OF CONFORMITY
We,
EVE Audio GmbH
whose registered oce is situated at
Ernst Augustin Str. 7, 12489 Berlin, Deutschland
declare under our sole responsibility that the
SC2070 product
complies with the following directives and standards:
EC standards:
EN 62368-1: 2014 + A11:2017
EC Regulation 1275/2008
EN 50564: 2011
EMC standards:
FCC Part 15, Subpart B
ANSI C63.4:2014
ANSI C63.4a-2017
EN 55032: 2015+A1:2020
EN 55035: 2017+A11:2020
EN IEC 61000-3-2: 2019+A1:2021
EN 61000-3-3:2013+A2:2021
This declaration attests that the manufacturing process quality control
and product documentation accord with the need to assure continued
compliance.
Issued in Berlin.
Signed:
Roland Stenz
Director EVE Audio
DECLARATION OF CONFORMITY
Room Acoustics
21
Page 22

SC2070
7. WARRANTY
▷ The manufacturer warranty is valid for a period of two (2) years after the
date of purchase.
▷ The warranty covers repair costs (labor and spare parts), product
replacement if applicable, and return transport within the country where
the product was bought.
▷ The warranty will be void if any of the following applies:
• Damages have been caused by incorrect installation and/or connection,
• Damages have been caused by misuse or negligence,
• The unit has been tampered or modied in any way,
• The unit has been repaired or modied by unqualied personnel,
• Damages have been caused by factors beyond the reasonable control of
EVE Audio (lightning, re, ood, etc.).
▷ The client should always keep the original packaging of any EVE Audio
product. Only products with original packaging are eligible for warranty
service. If the product is not packaged in its original box, EVE Audio will not
be liable for any damages occurred during transit.
▷ Should service be required during or after the warranty period, please
contact your local EVE Audio dealer or distributor.
This device complies with part 15 of the FCC Rules. Operation is subject
to the following two conditions: (1) This device may not cause harmful
interference, and (2) this device must accept any interference received,
including interference that may cause undesired operation.
22
WARRANTY
Room Acoustics
Page 23

EVE Audio product manual
WARRANTY
Room Acoustics
23
Page 24

EVE AUDIO PRODUCT MANUAL
EVE AUDIO GmbH
. Ernst Augustin Str. 7,
12489 Berlin, Germany
. +49-30-6704 4180
. +49-30-6704 4188
@
. [email protected]
. www.eve-audio.com
. facebook.com/EveAudio
. twitter.com/EveAudio
EVE Audio reserves the right to make changes in or additions to the information provided at any time.
Dec 2022 © EVE Audio. All rights reserved.
 Loading...