

Eurotech Appliances EWC177 User Manual
Owner’s Manual
REFER TO
WEBSITE FOR INFORMATIONAL
VIDEOS FOR PROPER USE AND
CARE OF EUROTECH COMBINATION
WASHER / DRYER PRODUCT.
Model EWC177
Combination Washer/Dryer
Contents
Technical Data . . . . . . . . . . . . . . . . . . . . . . . . . . 2
Installation Requirements . . . . . . . . . . . . . . . . . . . 3
Installation Instructions . . . . . . . . . . . . . . . . . . . . 4
Important Safety Information . . . . . . . . . . . . . . . . 6
About Your Washer/Dryer . . . . . . . . . . . . . . . . . . 7
Understanding the Control Panel . . . . . . . . . . . . . . 8
Fabric Care Labels . . . . . . . . . . . . . . . . . . . . . . 1 0
Stain Removal Chart.. . . . . . . . . . . . . . . . . . . . 1 0
Guide to Wash & Dry Programs . . . . . . . . . . . . . 1 1
Guide to Wash Only Programs . . . . . . . . . . . . . . 1 2
Operating Instructions . . . . . . . . . . . . . . . . . . . 1 3
Preparing Your Laundry .. . . . . . . . . . . . . . . . . . 1 3
Choosing Load Size . . . . . . . . . . . . . . . . . . . . . 1 3
Using the Laundry Aid Dispenser . . ........ . ... . .. 1 4
Using Your Washer/Dryer . . . . . . . . . . . . . . . . . 1 4
Troubleshooting . . . . . . . . . . . . . . . . . . . . . . . 1 4
Taking Care of Your Washer/Dryer . . . . . . . . . . 1 5
Common Laundry Problems . . . . . . . . . . . . . . . 1 7
Product Warranty . . . . . . . . . . . . . . . . . . . . . . 1 8
Service Contacts . . . . . . . . . . . . . . . . . . . . . . . 1 8
Important! To get the best performance
from your washer/dryer, read all operating
instructions before using for the first time.
CUSTOMER CARE CENTER
800.898.1879
www.eurotechappliances.com
WHAT IS A COMBINATION
Technical Data
WASHER AND DRYER PRODUCT?
The Eurotech combination washer and dryer product is
a “unique laundry solution” for households that can not
accommodate traditional laundry products. The large
capacity tub provides an impressive 15 lb (Full Load) wash
capacity or 7.5 lb (Half Load) drying capacity. This laundry
solution provides the customer with the convenience of a
120V in-house laundry product that is designed to wash and
dry smaller loads of laundry on a regular basis.
Our washer and dryer combination product utilizes a
condenser dryer technology (vent-less) allowing for
seamless wash to dry performance without the need
for special electrical requirements or an external vent.
These features make this product convenient for multiple
applications where traditional laundry solutions (separate
washer and dryer requiring 220V electrical) will not
operate. This product features a large 2.5 cubic foot drum
(largest in its class) which features more capacity for wash
AND dry performance. Keep in mind it uses a standard
household current which limits the wattage available for the
dry performance, which results in longer total cycle times
(3-4 hours). The 1200 RPM spin provides the maximum
moisture removal to reduce the drying times along with the
Heavy Stain cycles that provides a 140 degree temperature
boost for improved stain removal.
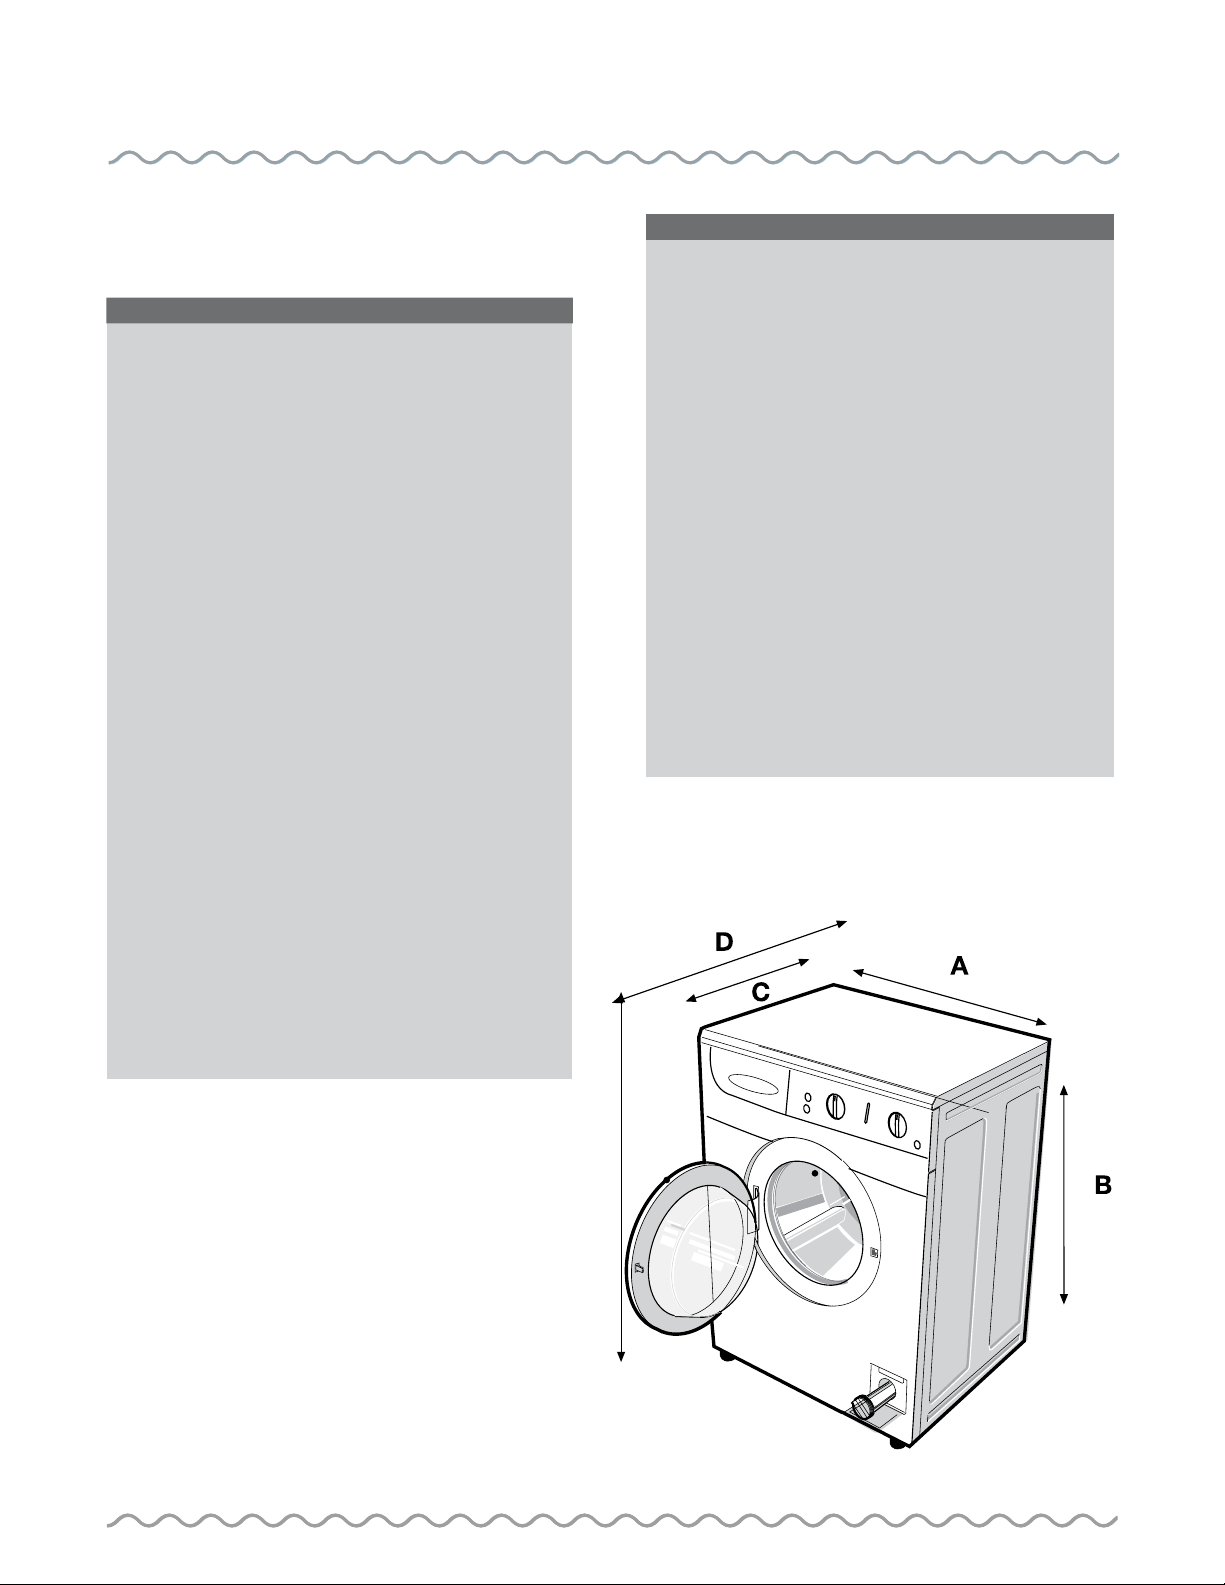
Dimensions
A. Width: 23 ½” (597 mm)
B. Height: 33 ¼”- 34“ (845 - 864 mm)
5
C. Depth: 23
D. Depth w/door open: 39” (991 mm)
Capacity
Large
Electrical Conn.
Voltage: 120 Volts, 15 Amp, 60Hz
Water Conn.
Inlet supply hose: Two 6’ (1.5 m) fill hoses, hot & cold
Supply pressure: 15 – 142 PSI
Outlet hose” 6.5’ (1.7 m) polypropylene hose, ¾” ID
Note: The manufacturer reserves the right to improve appliance specifications
without prior notice. For more information, see the type plate on inner door
facing of machine.
/
8” (600 mm)
2
CUSTOMER CARE CENTER 800.898.1879 www.eurotechappliances.com
Installation Requirements
Location
The washer/dryer can be installed as a freestanding unit or in a recessed
Grounding Instructions
This appliance must be properly grounded. In the event
of breakdown or malfunction, grounding reduces the risk
of electric shock by providing a path of least resistance
for electric current. The cord for this appliance has
an equipment-grounding conductor and a grounding
plug. The plug must be plugged into an outlet that is
properly installed and grounded in accordance with all
local codes and ordinances. Do not modify the electrical
plug provided with the appliance – if it does not fit the
electrical outlet, have a qualified electrician install a
proper outlet. Make sure the power supply and electrical
outlet support a 110/120V, 15 amp single-phase
circuit.
Warning!
Improper connection of the equipment-grounding conductor may result in
electric shock. If you are in doubt as to whether the appliance is properly
grounded, check with a qualified electrician or service representative.
area, under a counter or in a closet with appropriate clearance. See page 4.
FILL/DRAIN HOSES
Fill Hoses – Two hoses are supplied with the machine. The hot water hose
has a red stripe running the length of the hose.
Drain Hose – Drain outlet should be between 23” (60 cm) and 35” (90
cm) above the floor. To prevent siphoning, do not seal the drain hose
connection into the drain outlet. If machine is not connected to a drain
outlet, position drain hose and bracket over the edge of sink or wash basin
and secure in place before draining. See page 5 for complete installation
instructions for the fill and drain hoses.
Eurotech denies all liability if installation use and care instructions are not
followed completely.
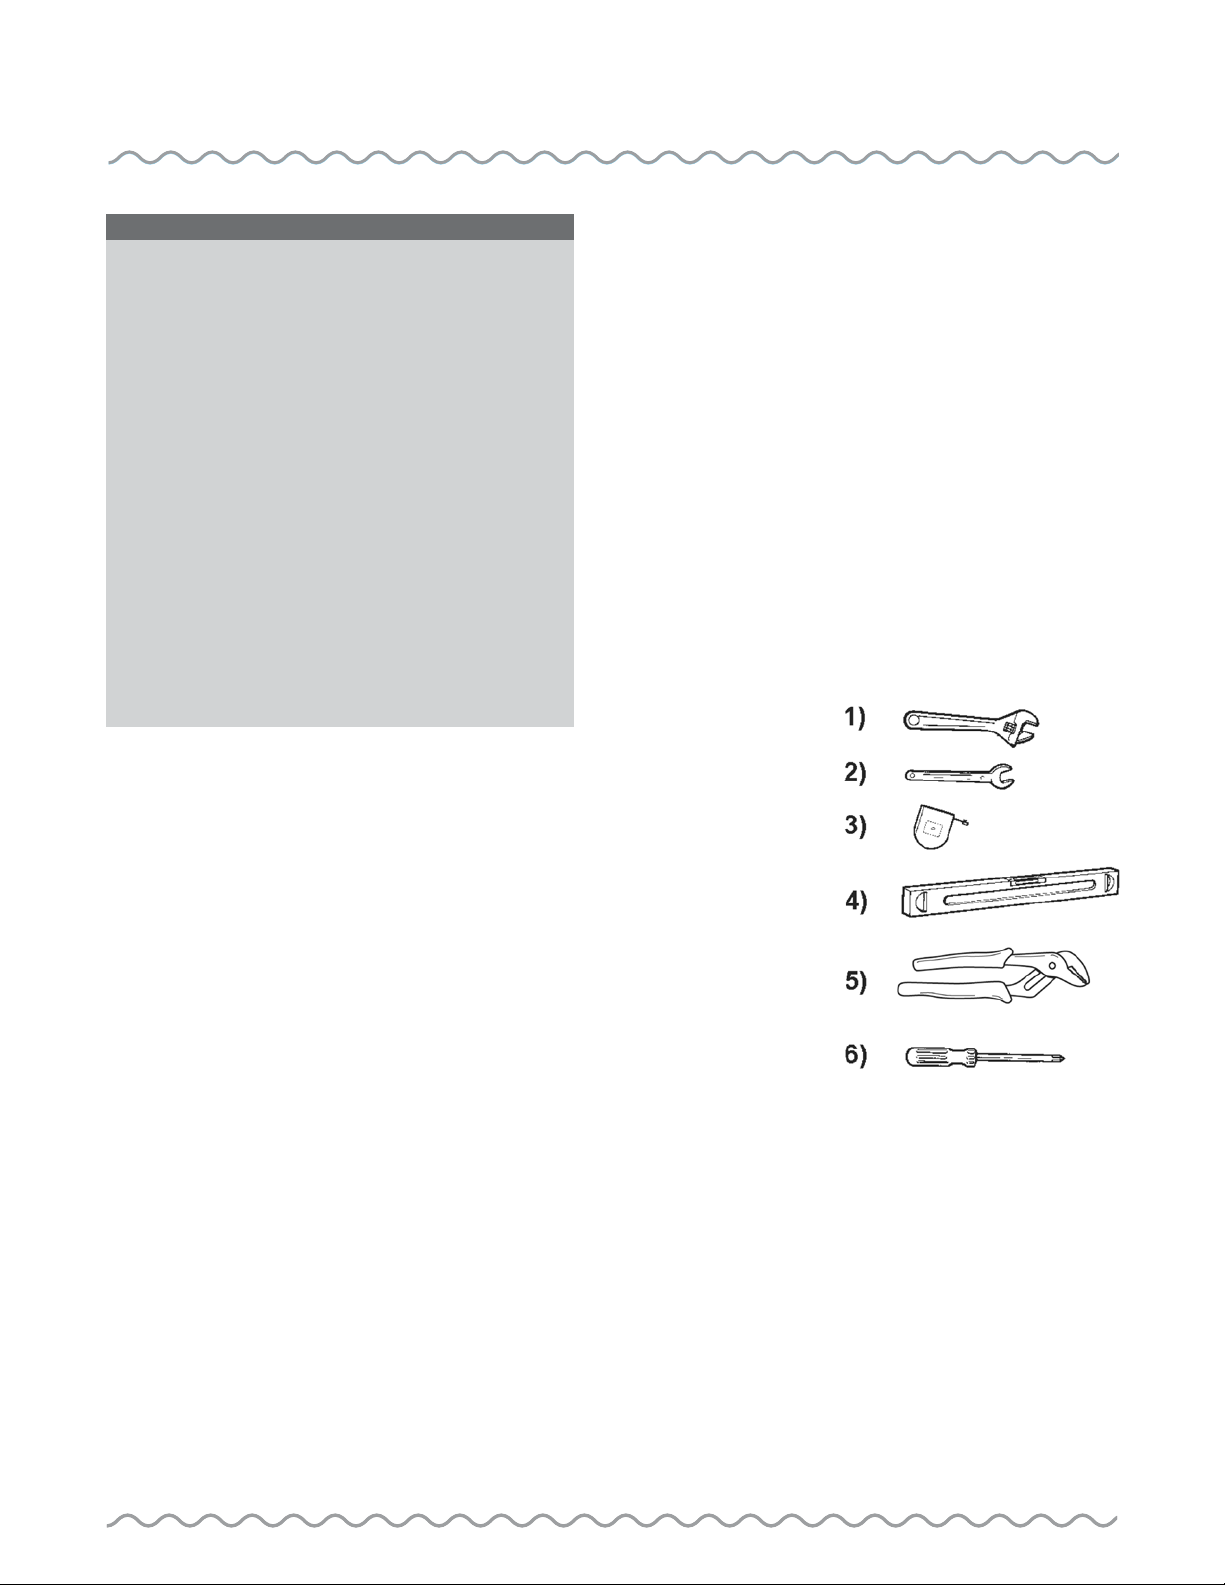
Tools
1. Adjustable Wrenches (if
you use adjustable fittings)
2 Open-ended Wrench
[10mm]
3. Tape Measure
Important!
To prevent accidents, injury and fire, read instructions carefully before you
install the machine.
A qualified installer familiar with all local codes and ordinances for plumbing
and electricity should do the installation and grounding. Incorrect installation
may cause damage or injury.
Install washer/dryer on a strong, level floor in a protected, dry and wellventilated area with room for electrical cords and hoses behind the machine.
Temperature should be not less than 38° F (3° C)
Make sure power supply and outlet support a 110/120 V, 15 amp singlephase circuit.
Do not use an extension cord.
If integrity of the machine is in doubt, do not use it. Call Customer Care
Center at 800-898-1879.
Electrical
Machine Voltage/Amperage – 120V, 60Hz, 15 Amp
Connection – 3-prong plug (must be grounded)
Circuit/Protector – single phase, 15 AMP, 120V, 60Hz
4. Spirit Level
5. Channel Lock
6. 20 Torx screwdriver
CUSTOMER CARE CENTER 800.898.1879 www.eurotechappliances.com
3
Installation Instructions
Installation/Removal
1. Unpack Washer/Dryer
Move the machine to its installation position. Remove the packing materials
carefully to avoid damage to the machine’s pre installed drain hose and power
cord. Make sure the machine is intact and report any damage to the retail
location you purchased your product from immediately.
WARNING: Destroy the carton and plastic bags after
unpacking washer-dryer. Plastic bags and other packing
material are not children’s toys and can be dangerous.
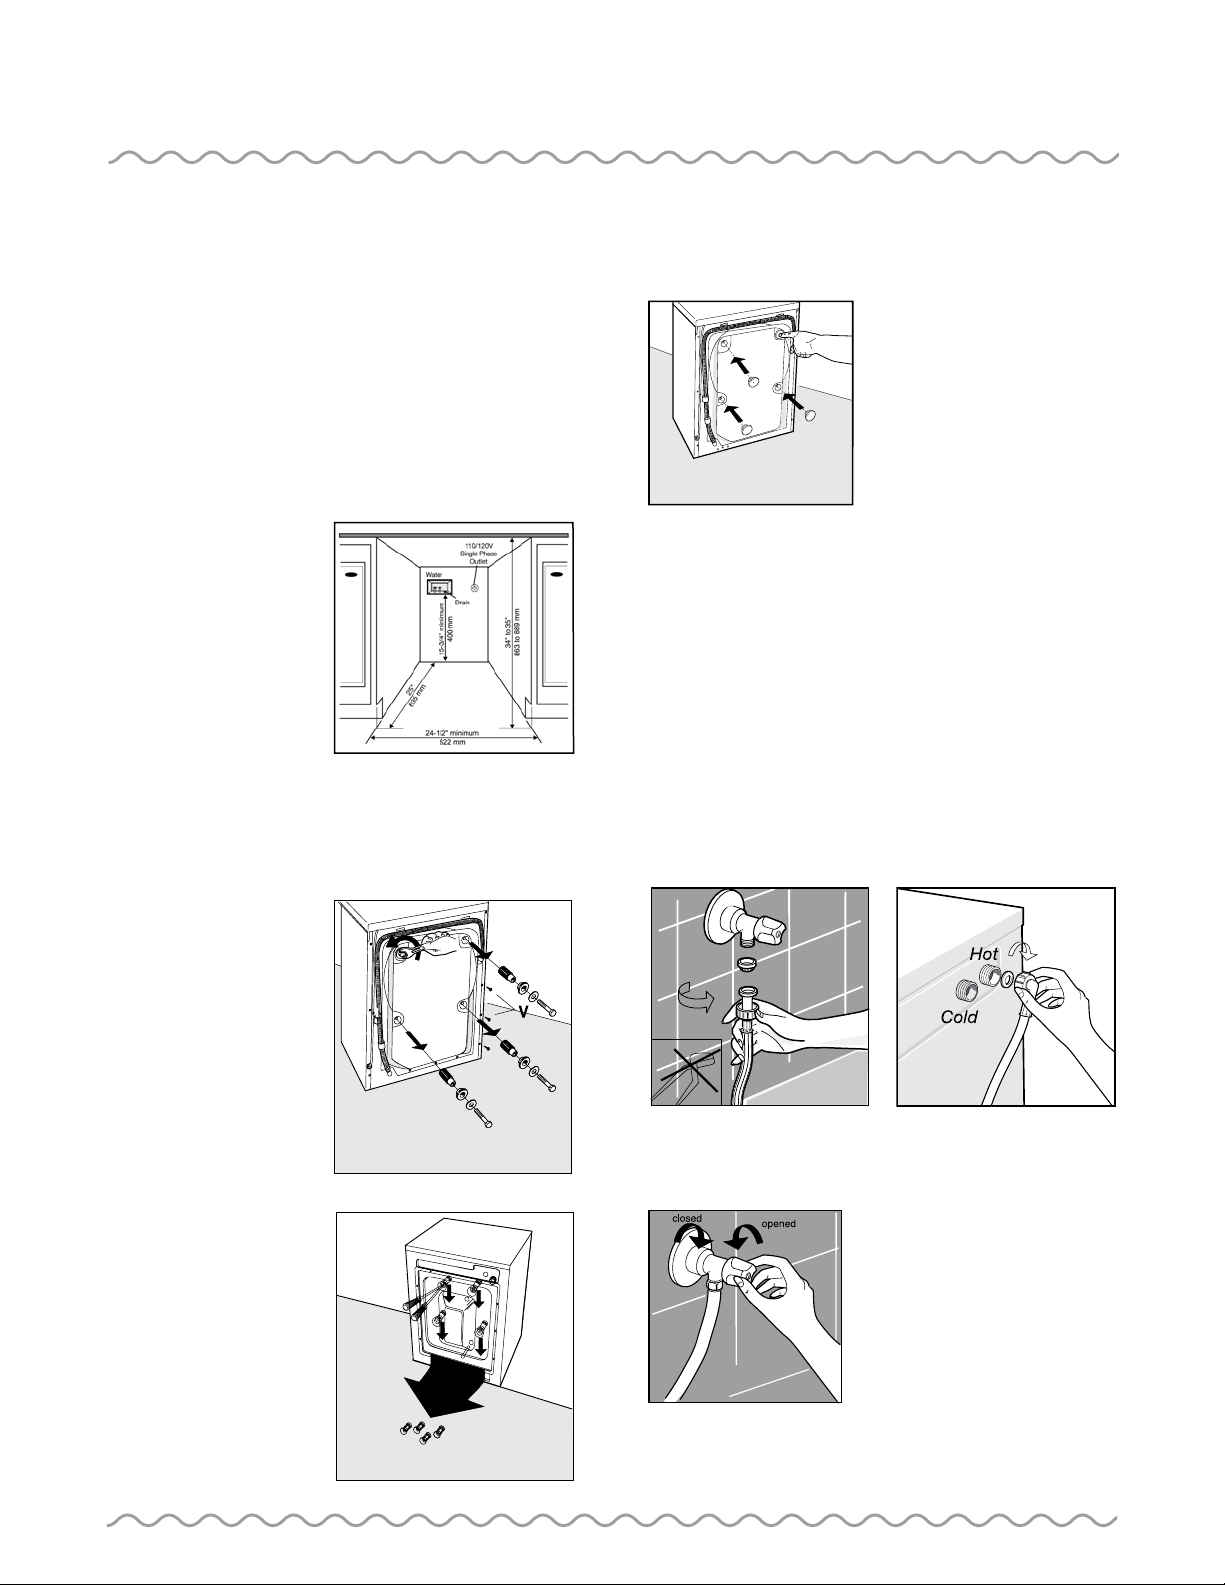
Built-In Installation
The Eurotech EWC177 can be
installed beneath a cabinet or
worktop with a height of 34-1/2“
( 876 mm). There must be a gap
of about 1/2“ (12 mm) all around
the machine, including between the
rear edge of the machine top panel
and the back wall. The opening
width must be at least 24-1/2“
(622 mm). Space must also be
available for the inlet and drain
hoses. See the diagram above for measurements and positions.
2. Remove Shipping Bolts/Spacers/Grommets
The machines shipping security consists of shipping bolts (4), spacers and
grommets on the back panel to
secure the wash / dry drum during
shipping and delivery.
IMPORTANT: Remove all
shipping bolts/spacers/
grommets before using the
washer/dryer to allow
proper operation and
prevent damage to the
appliance.
Once the machine is in its
installation location, remove the
four locking 10mm bolts and plastic
spacers (Fig.1A). If plastic spacers
cannot be removed, open rear panel
(20 torx) screwdriver as shown in
Fig 1B, remove spacers and replace
the panel.
Keep bolts, shipping bolts, spacers
and grommets for future use.
Plug holes with four plastic plugs
enclosed packed with manual (Fig. 2)
Remove power cord restraints
before plugging in machine.
4
Fig. 1A
Fig. 1B
IMPORTANT: Retain all shipping bolts, spacers and grommets
Reinstall to prevent damage if you transport machine in the
future.
Fig. 2
* Do not plug in power supply until shipping
bolts are removed.
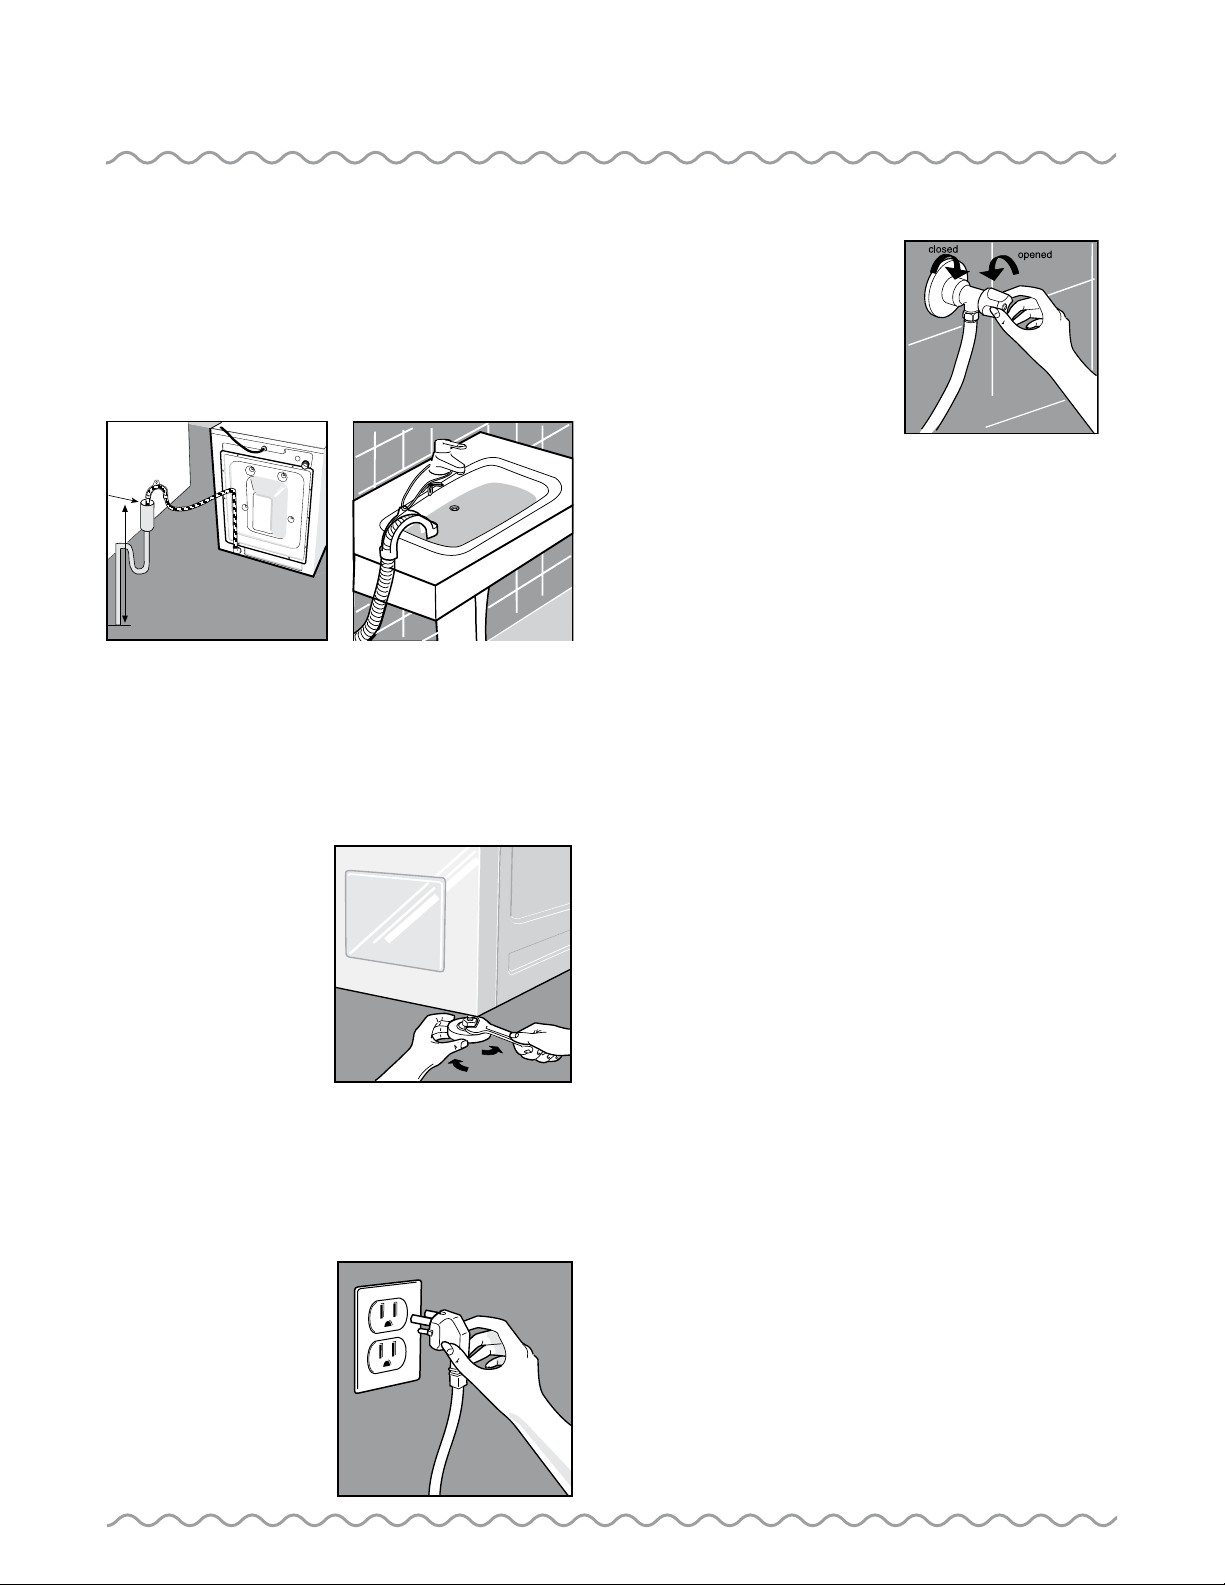
3. Connect Water Inlet
If connecting to new or unused water pipes, run water until clear before
connecting to machine to remove any debris that could clog the water valve
screens. NOTE: Make sure water supply shut-off valves are
easily accessible.
IMPORTANT: Water pressure MUST be within the range of
values indicated in Specifications.
Two inlet hoses are provided with the machine. Hot water hose has red
stripe running the length of the hose. Insert washer/filter (Fig. 5A) before
connecting water inlet hose to valve. Check that other end of the hose is tight
Connect to faucet (Fig. 5A). Connect to machine (Fig. 5B).
NOTE: connect fill hoses, plastic end to machine AND metal end to water
faucet.
IMPORTANT: Do not overtighten. Excessive force can
damage the couplings. Tighten by
hand; use a tool only in case of
a leak.
Turn on water supply (Fig 5C).
Flush out water lines before connecting the hoses to machine.
CUSTOMER CARE CENTER 800.898.1879 www.eurotechappliances.com
Installation Instructions
M
IN
.
6
0
CM
M
A
X
.9
0
C
M
A
4. Water Drainage
Water may be drained into a sink, drainpipe or standpipe. To prevent
siphoning, do not seal drain hose into drain outlet.
Wall or Floor Standpipe Drain System - The top of the standpipe must be
between 23” (60 cm) - 35” (90 cm) from the bottom of the washer.
You should securely attach drain hose to keep water pressure from allowing
hose to come loose and leak on the floor.
5. Level Washer/Dryer
The front and rear legs may be screwed /unscrewed to level the machine.
To access legs, tilt machine backwards until it rests against wall or other
stable structure. Adjust legs up or down until washer is stable and does
not rock front-to-back or side-to-side when upright. Once machine is level,
tighten locknuts.
7. Turn on water supply.
Check for leaks at water faucet and
machine before proceeding. Be sure the
water taps are on before starting.
8. Prepare Washer/
Dryer for Use
Before using washer/dryer, read owner’s
manual thoroughly. Save all instructions
for future reference.
Wipe inside and outside of washer/dryer with a damp cloth before running to
remove any dust or debris.
Run your empty washer/dryer through a complete wash cycle before washing
clothes. Check for water leaks and proper operation during this
test run.
Eurotech denies all liability if instructions are not followed correctly.
IMPORTANT:
For best performance,
washer/dryer
must rest solidly
on a sturdy floor
or platform, with
minimum vibration.
6. Connect to electric power
Plug power cord into grounded outlet only (see Grounding Instructions on
page 3 for complete details). Be sure power is OFF at fuse box/circuit
breaker before plugging in machine for the first time. Plug cord into outlet
and turn power on at circuit breaker.
NOTE: Remove four
(4) shipping bolts
prior to plugging
machine into
electrical outlet.
Do not cut power
supply cord!
5
CUSTOMER CARE CENTER 800.898.1879 www.eurotechappliances.com

Introduction
Thank you for choosing Eurotech!
Your new Eurotech washer/dryer uses less energy and space while providing
outstanding washing and drying performance. The ingenious combination of
style and technology will give you years of safe, reliable service.
Read Instructions Carefully
This manual includes instructions for installation, use and care of your new
Eurotech washer/dryer combination. Take a few minutes to read through
these instructions – learning to properly use your machine can save you
time and money. The enclosed Quick Start Guide should be kept near your
machine for easy, convenient reference.
If you have questions or need assistance, call our Customer Care Center at
800-898-1879.
Record Model and Serial Numbers
For future reference, write down your model number and serial number,
found inside the door of your machine.
Model _________________________
Serial __________________________
Date of Purchase __________________
Important Safety Information
Eurotech complied with the highest international safety
regulations when designing and manufacturing your washer/
dryer. For your safety, however, please carefully follow all
precautions within this manual in order to minimize any risk
of fire, electric shock, property damage, personal injury or
loss of life
• Read all instructions before using this appliance.
• Do not run washer/dryer while you are not at home.
• Do not wash or dry articles that have been previously cleaned, washed,
soaked or spotted with gasoline, dry cleaning solvents, cooking oils or other
flammable or explosive substances, because they give off vapors that could
ignite or explode.
• Do not allow children to play on or in washer / dryer. Supervise children
whenever appliance is in use.
• Before removing appliance from service or discarding appliance, remove the
door to washing/drying compartment.
• Do not reach into appliance while drum is moving.
• Do not install or store appliance where it will be exposed to the weather.
• Do not tamper with controls.
• Do not attempt to repair or replace any part of the appliance unless
specifically recommended in the user instructions or in published user-repair
instructions that you understand and are qualified to carry out. Call Eurotech
to locate a qualified repair technician near you.
• Do not add dry cleaning solvents, gasoline or other flammable or explosive
substances to the wash water. These substances give off harmful vapors that
can catch fire or explode.
• Do not heat-dry items containing foam rubber or similarly textured rubberlike materials, fiberglass and wool (unless specified “washable” on label).
• Do not heat-dry items that have been dry-cleaned.
• Do not place flammable substances around your washer/dryer during
operation.
• If a hot water system has not been used for 2 weeks or more, under
certain conditions, hydrogen gas may be produced. HYDROGEN GAS IS
EXPLOSIVE. To release any accumulated hydrogen, turn on all hot water
faucets and let the water flow from each for several minutes.
• In case of water break or rupture, turn off water faucets to relieve pressure
on hoses and valves and to minimize leakage.
• Have machine interior cleaned by qualified service personnel periodically.
• When emergency service is required, unplug machine or turn off power to
washer at the circuit breaker/fuse box.
6
CUSTOMER CARE CENTER 800.898.1879 www.eurotechappliances.com
• Make sure drum is empty before loading washer.
• Do not dry feather or down bedding
 Loading...