

Eurotech Appliances EDW242C, EDW254E, EDW274E, EDW294E User Manual

Dishwasher Owner’s Manual
ENGLISHENGLISH
ENGLISHENGLISH
ENGLISH
AISAIS
AISAIS
AIS
ÇÇ
ÇÇ
Ç
!
IMPORTANT
To get the best performance
from your appliance, read all
operating instructions before
using it for the first time.
SAVE THESE INSTRUCTIONS FOR FUTURE REFERENCE
FRANFRAN
FRANFRAN
FRAN
ESPAÑOLESPAÑOL
ESPAÑOLESPAÑOL
ESPAÑOL
Version 4

CONTENTS
Important Safety Instructions 3
Child Safety Tips 3
Dishwasher Features 4
Dishwasher Dimensions 4
Installation Instructions 5
Loading the Dishwasher 16
Detergent Dispenser 18
Rinse Aid Dispenser 20
Model EDW242C Operating Instructions 21
Model EDW254E Operating Instructions 22
Model EDW274E Operating Instructions 23
Model EDW294E Operating Instructions 25
Care and Maintenance 27
Overfill Protection 28
Solutions to Common Dishwashing Problems 29
Troubleshooting 30
Washing Special Items 32
Product Warranty 33
Index 34
2

IMPORTANT SAFETY INSTRUCTIONS
This manual does not cover all possible conditions and situations that may occur. Some situations may arise
where use of common sense and caution should always be used when installing, operating, and maintaining
any appliance.
WARNING! Before using your dishwasher, follow basic precautions, including the following:
← Read all instructions before using the dishwasher.
← Dishwashers must be electrically grounded. Read the Installation Instructions for details.
← Use the dishwasher only for its intended purpose.
← Do not run the dishwasher while you are out of the home.
← Use only automatic dishwasher detergents and rinse agents.
← To reduce the risk of injury, keep detergents and rinse aids out of the reach of children.
← Do not load sharp items near the door; you could damage the door seal.
← Place sharp knives in the silverware basket with the sharp ends down to avoid the risk of cut-type injuries.
← Do not wash plastic items unless they are marked “dishwasher safe” or the equivalent. For items not marked,
check the manufacturer’s recommendations. Items not dishwasher safe could become deformed or melt
and create a potential fire hazard.
← Do not touch the heating element during or immediately after use.
← Do not operate the dishwasher unless all enclosure panels are properly in place (i.e., guard plate, access
panel, toe kick, etc.)
← Do not tamper with controls by removing or changing.
← Do not abuse, sit on, or stand on the dishwasher door or baskets .
← To reduce the risk of injury, do not allow children to play in or on a dishwasher.
← Under certain conditions, hydrogen gas may be produced in a hot water system that has not been used
for two weeks or more. HYDROGEN GAS IS EXPLOSIVE. If the hot water system has not been used for
two weeks, before using the dishwasher turn on all hot water faucets and let the water flow from each for
several minutes. This will release any accumulated hydrogen gas. As the gas is flammable, do not
smoke or use an open flame during this time.
← When removing an old dishwasher from service or discarding it, remove the door to the washing
compartment.
← Do not store or use combustible materials, gasoline, or other flammable vapors and liquids in the vicinity
of this or any other appliance.
← Disconnect electrical power to dishwasher before servicing.
← Repairs should be done by a qualified technician.
ENGLISHENGLISH
ENGLISHENGLISH
ENGLISH
CHILD SAFETY TIPS
← Dishwasher detergents and rinse aids are corrosive, so always keep them out of reach of children.
← Should a child swallow dishwasher detergent or rinse aid, give plenty to drink immediately, i.e., one or
two glasses of milk or water. Do not try to induce vomiting. Seek medical advice immediately:
1-800-POISON1
← Always close the door and start the dishwasher as soon as you put in the detergent.
← Always keep small children away from the machine when it is open. There may be some detergent
residue left inside the machine.
← If dishwasher detergent gets in someone’s eyes, rinse them with plenty of water for at least 15 minutes.
← Do not allow children to use or play in or on the dishwasher.
← Load all long and sharp items in the knife/utensil basket. If this is not possible, load sharp objects with the
pointed end facing the back of the dishwasher. Sharp items loaded in the silverware basket should be
loaded with pointed ends down.
SAVE THESE INSTRUCTIONS FOR FUTURE REFERENCE
3
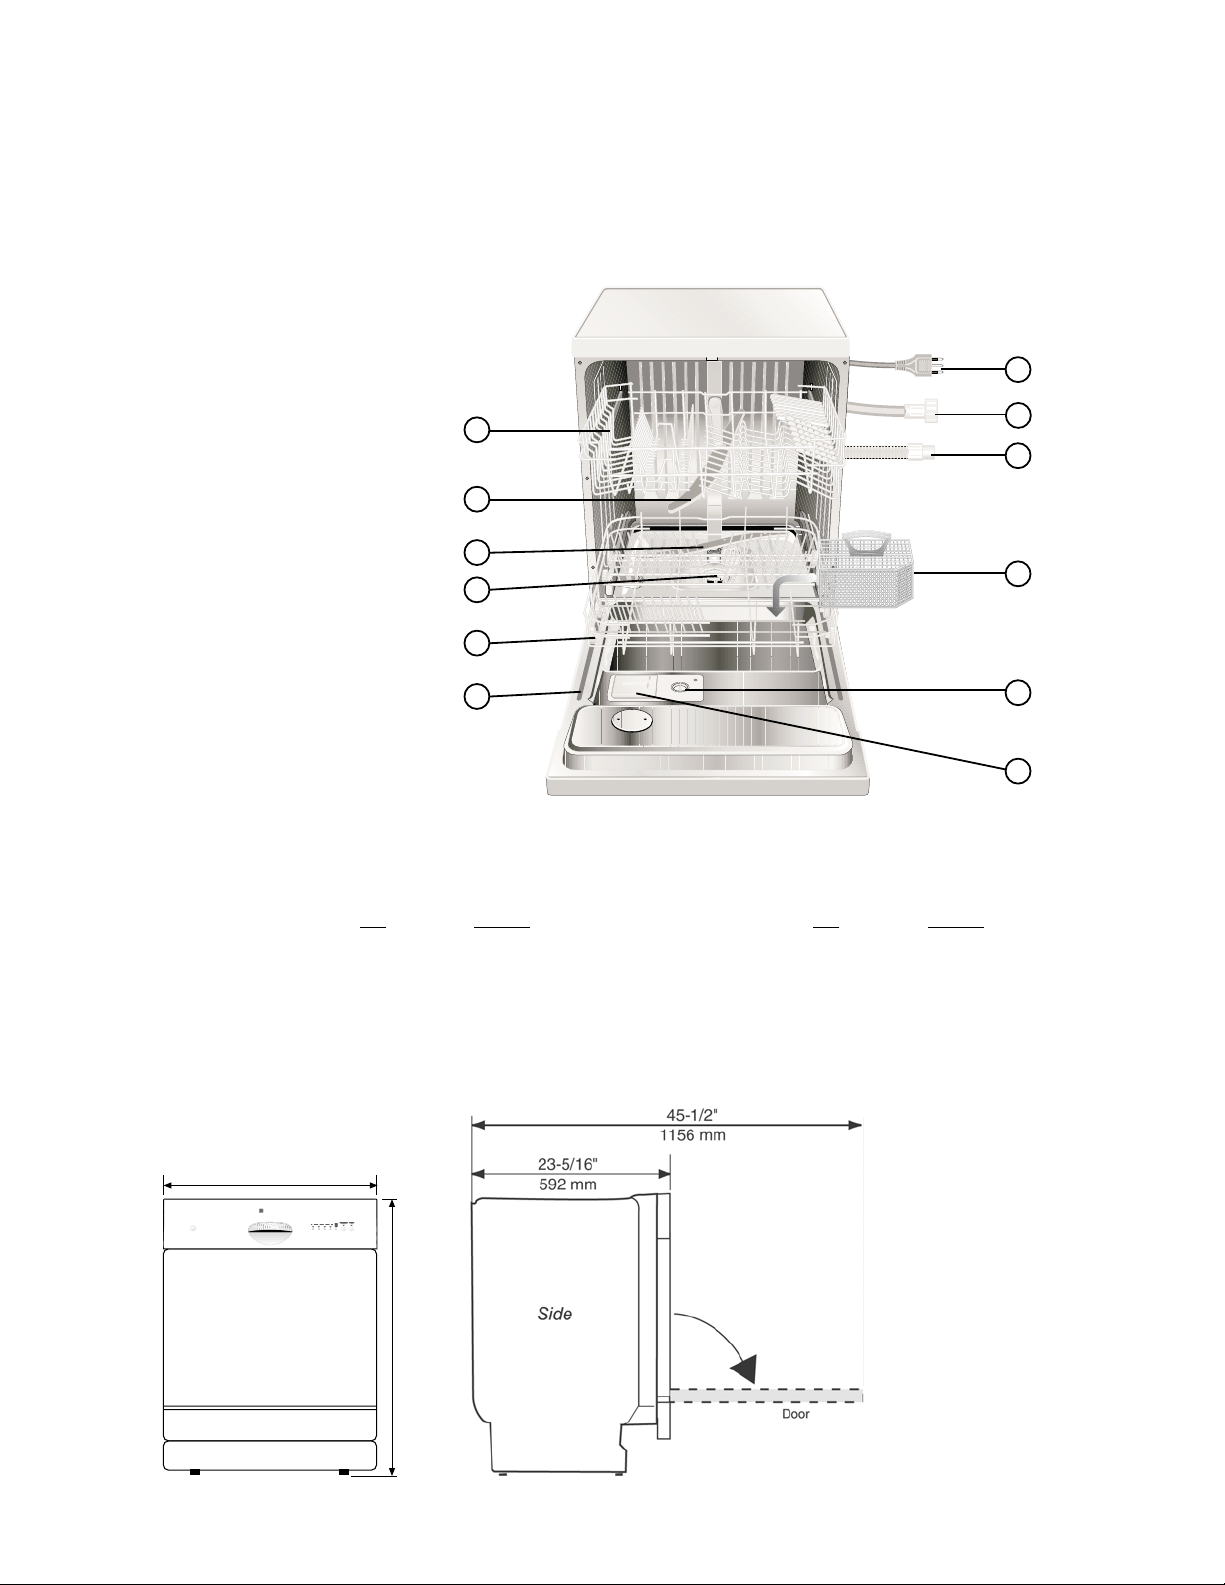
DISHWASHER FEATURES
Your new dishwasher features our EuroStyle™ wash system. This means that after the prewash, the water
is drained out and the main wash starts with clean water. If you plan to start your dishwasher right away,
it’s not necessary to rinse the dishes. You do, however, need to scrape off the large particles of food
before loading.
NOTE: Deviations in features may occur, depending on the model.
9
1) Detergent dispenser
8
2) Rinse aid dispenser
3) Data tag
4) Lower basket
5) Filters
6) Lower spray arm
7) Upper spray arm
8) Upper basket
7
6
5
4
9) Power cord
10) Water supply hose
3
11) Drain hose
12) Cutlery basket
DISHWASHER DIMENSIONS
Models EDW242C, EDW254E, EDW274E
US Metric
Height 32 1/4"–35" 820–890 mm
Width 23-15/16" 608 mm
Depth *23-5/16" 592 mm
Depth w/door open *45-1/2” 1156 mm
Weight 106 lb 48 kg
* Includes 1” for high loop.
20
05-0
25
LA
Model EDW294E
US Metric
Height 32 1/4"–35" 820–890 mm
Width 23-15/16" 608 mm
Depth *21-7/8" 556 mm
Depth w/door open *45-3/8” 1153 mm
Weight 95 lb 43 kg
* Includes 1” for high loop. This depth
measurement is without the door panel.
10
11
12
2
1
**
23-15/16”
608 mm
On / Off
Eurotech
1
Soak & Hold
2 Light
1234
3 Normal
4
Pots & Pans
PROGRAMS
START
ON
Front
32 1/4” to 35”
820 to 890 mm
4
**
** These dimensions are different for
EDW294E. See dimensions above.
INSTALLATION INSTRUCTIONS
Read these instructions carefully and completely before you install the machine. The installation should be
carried out by a qualified person who is familiar with all local codes and ordinances for electrical and plumbing
connections.
If a dishwasher is being installed in this area for the first time, most of the cabinet work, plumbing, and
electrical has to be done before you move the machine into place.
If you are replacing an old dishwasher, you must check the plumbing connection and wiring before you
move the new dishwasher into place.
A built-in dishwasher must be enclosed on the top, both sides and the back. The best place for your dishwasher
is in the kitchen near the sink. This makes it easier to connect the water and drain supply lines.
After you have placed the dishwasher near the installation location, remove the wrappings from the dishwasher.
Be sure to remove any items packaged inside the dishwasher.
NOTE: It is a good idea to inspect for any shipping damage before you proceed with the installation. Should
you find any damage, you should report it to your dealer or builder immediately.
WHAT YOU NEED
TOOLS
1) Phillips No. 2 screwdriver or power screwdriver (preferably with magnetic screw bits)
2) Adjustable 10” crescent wrench
3) Open-ended wrench (1/2", 3/8” and 5/8")
4) Tape measure
5) Spirit level
6) Electric drill with 1-1/2”” drill bit or hole saw (for new installations)
7) Keyhole saw
8) 2-1/2” Squeeze Clamps (for EDW294E door panel installation only)
ENGLISHENGLISH
ENGLISHENGLISH
ENGLISH
MATERIALS NEEDED
← Shut-off valve and fittings for water supply line
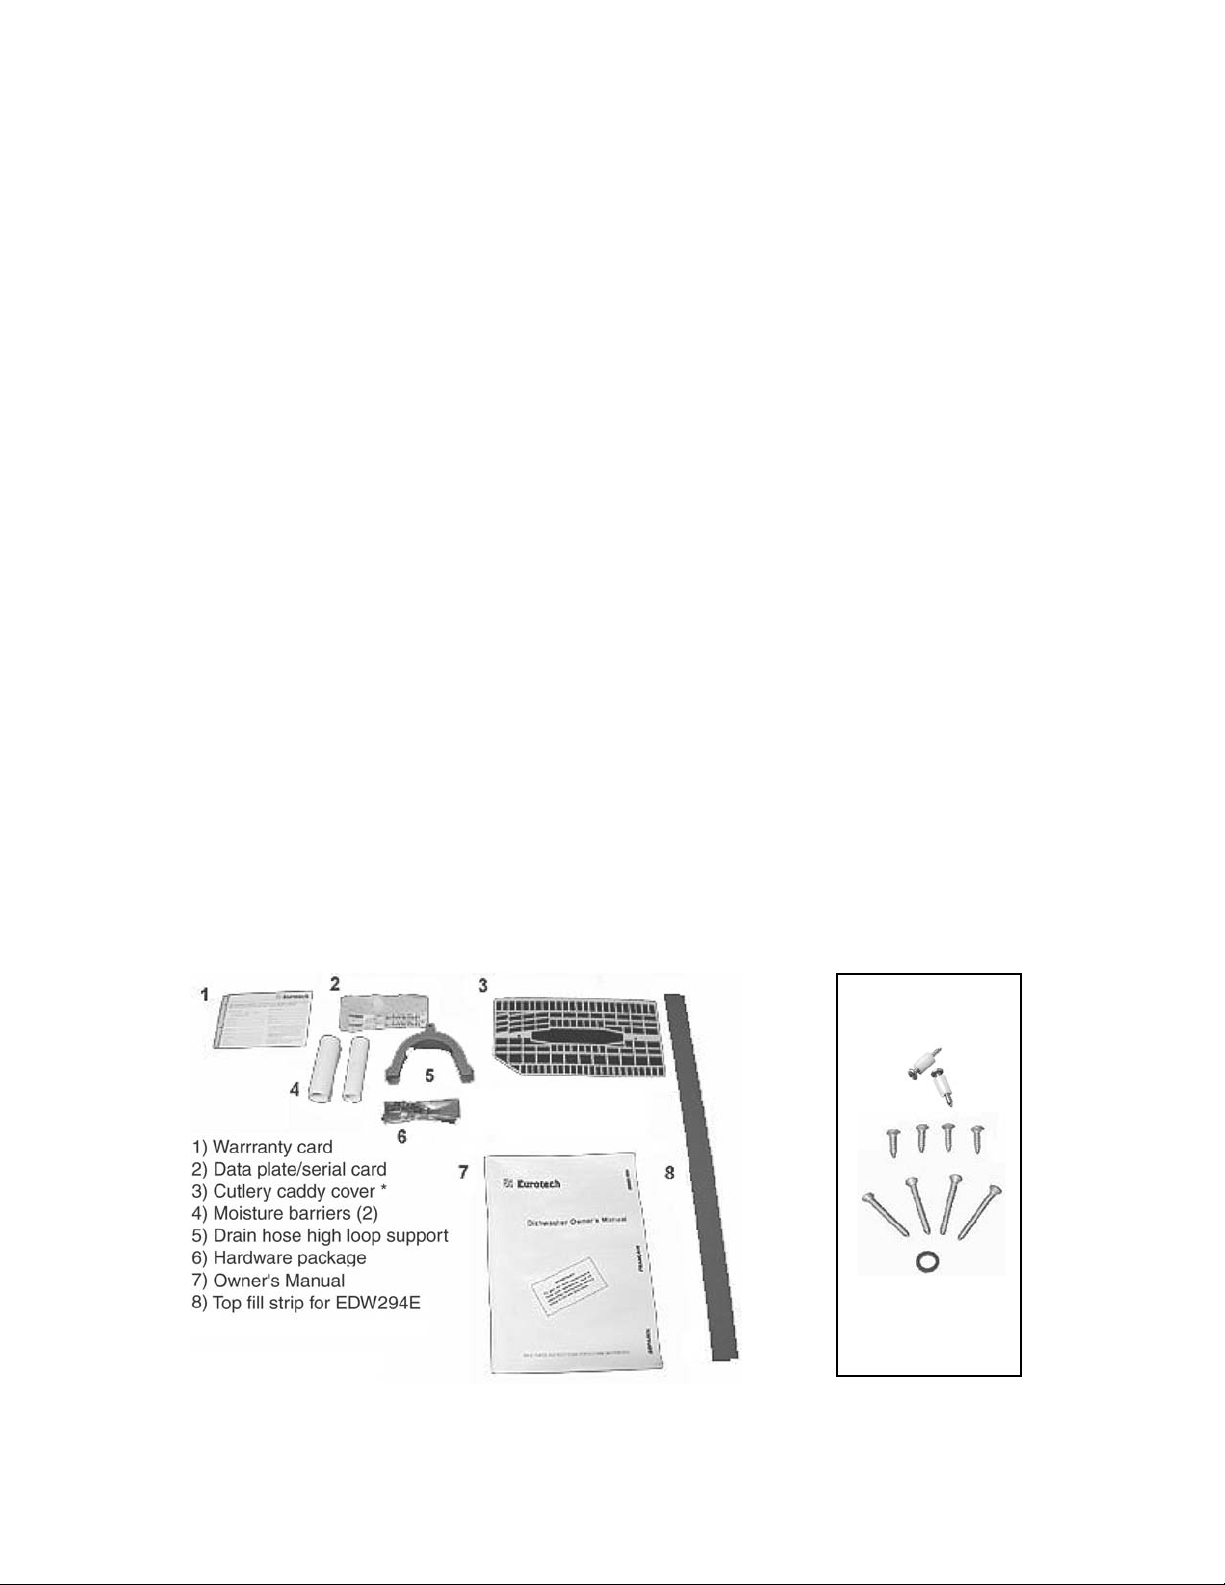
MATERIALS SUPPLIED WITH UNIT
The items illustrated below are packaged inside each unit for your convenience.
Hardware Package
Contents
Two 1-1/8” screws
with sleeves
Four 3/4” screws
Four 1-1/2” screws
One rubber washer
5
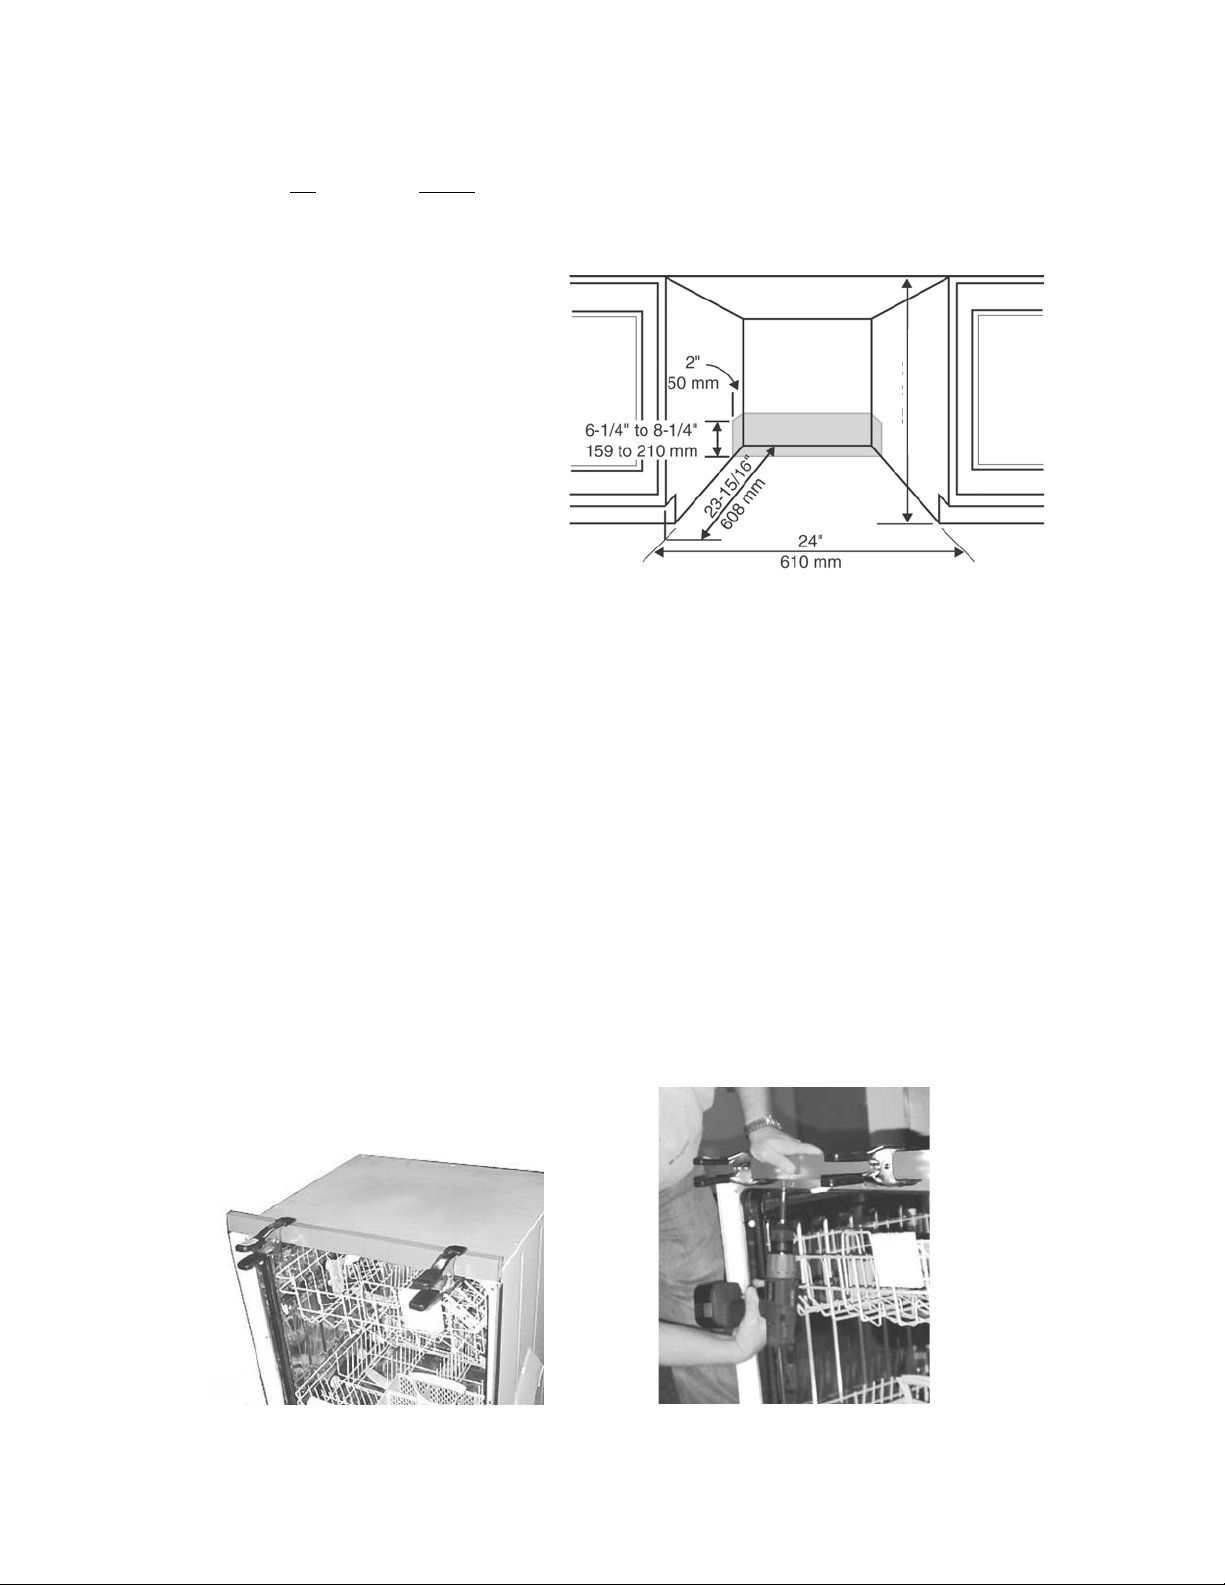
CABINET OPENING DIMENSIONS
Measurements
US Metric
Height 32 1/4"–35" 820–890 mm
Width 24" 610 mm
Depth 23-15/16" 608 mm
The electrical and water supplies should
enter through the area indicated by the shading
on the illustration at right. They should come
through the right side of the machine, a
maximum of 2” (50 mm) from the back wall and
6-1/4” to 8-1/4” (159–210 mm) from the floor,
depending on the underneath cabinet height.
After determining where the water supply line
will enter under the sink, drill a 1-1/2" (38 mm)
access hole. The water line inlet valve is on the
right rear of the machine.
MOISTURE BARRIER
Among the materials supplied with your unit are two strips of moisture resistant material (moisture barriers).
One of these is intended to be affixed underneath the front edge of the countertop to prevent possible
moisture damage. The other is for a custom wood panel (EDW294E only).
If you intend to use a moisture barrier on the cabinet, you should affix it to the cabinet before you install the
dishwasher.
32 1/4” to 35”
820 to 890 mm
INSTALLING THE TOP FILL STRIP ON MODEL EDW294E
If you have Model EDW294E, you will need to install the fill strip before you place the dishwasher inside the
cabinet. To do this, follow the instructions below:
1. Center the fill strip on top of the installation lip on the front edge of the unit.
2. If the fill strip is wider than the cabinet opening, use a coarse sandpaper or straight edge hack saw to trim
one end.
3. Using 2-1/2” squeeze clamps, secure the fill strip to the installation lip, as illustrated below.
4. Fasten the fill strip to the dishwasher using the four 3/4” screws supplied with the unit in the holes on the
installation lip.
5. Remove the clamps.
6
ADJUSTING THE LEVELING LEGS
You should adjust the levelling legs to within 1/8” of the opening
height. The four leveling legs should be adjusted by unscrewing the
leg out to the length required. When the feet are properly adjusted,
tighten the locking nuts to the base pan.
(The machine may have an inclination of 2° maximum without
affecting its performance.)
ENGLISHENGLISH
ENGLISHENGLISH
ENGLISH
WARNING! Never lay the dishwasher on its front or
side. When necessary, lay the unit on its
back.
It is advisable to lay the unit on a tarp or
blanket so as not to scratch or damage the
floor or the dishwasher.
* Use caution when standing the
dishwasher up so you do not break the
legs.
Levelling leg
Locking nut
MOVING THE MACHINE INTO PLACE
WARNING! Make sure you put the slides cups under the legs to prevent damaging the
1. Remove the toe kick from the top of the unit and set it aside.
2. Remove the zip tie holding the hoses and power supply cord in place
on the back of the unit as illustrated at right.
3. Position the unit in front of the cabinet opening.
4. Weave the drain line through the U shaped High Loop bracket and
attach that bracket to the back of the unit or the surrounding cabinets
as illustrated on page 10 of this manual.
5. Start to feed the water and drain lines, as well as the power cord (if
necessary) into the access hole in the cabinet.
6. Grip the unit at the top or side edges and gently slide the unit into the
dishwasher opening using the slide cups provided with the unit under
the rear legs.
WARNING! Never use your knee or shoulder to push
7. Check the level and make adjustments if necessary. (See above.)
floor or unit when you slide it into place (see page 5).
the unit in place. You could damage the
dishwasher.
WARNING! Be careful of sharp edges.
OPENING THE EDW294E CUSTOM DOOR
To open the door panel on the EDW294E, insert your fingers into the
rectangular slots on each side of the door and pull.
7

FASTENING THE DISHWASHER TO THE CABINET
It’s necessary to fasten the dishwasher to the cabinet so it won’t tilt when the door is opened or if something
heavy is placed on the door. Use only the screws provided with the machine. The dishwasher can be
fastened to the cabinet on the top, at the sides, or both, depending on the type of installation.
STANDARD CABINET INSTALLATIONS
For a standard cabinet and ADA installations, you should mount the
dishwasher at the top. To do this, follow the instructions below:
1. Use the four 3/4” screws provided with the unit to mount the
dishwasher to underneath the cabinet top.
2. Insert the screws through the four holes on the top installation lip
and tighten securely.
3. When the machine is properly attached, check that the feet are
tight against the floor and the machine is level.
SOLID SURFACE COUNTER TOP INSTALLATIONS
If you have a solid surface countertop that will not accommodate screws, mount the dishwasher to the
cabinet using the side mount holes. To do this, follow the instructions below:
1. Remove the white plugs from the side holes and use a “center
punch” to assist in starting the screws.
2. Insert the two mounting screws with sleeves provided with the
unit into the side holes and tighten the screw securely.
3. Cover the screw heads with the plastic plugs provided with the
machine.
4. When the machine is properly attached, check that the feet are
tight against the floor and that the machine is level.
EDW294E WITH A TOP FILL STRIP INSTALLATIONS
Model EDW294E installations with a top fill strip should be mounted to the cabinet on the sides for all
installations, except ADA height installations, which should be mounted at the top.
NOTE: Do not fasten the dishwasher to the cabinet until
after you have installed the custom door panel.
To do this installation, follow the steps below:
1. Install the fill strip as explained on page 6.
2. Remove the white plugs from the side holes and use a
“center punch” to assist in starting the screws.
3. Insert the two mounting screws with sleeves provided
with the unit into the side holes and tighten securely.
NOTE: Failure to use the sleeves could cause the
unit to warp, which could cause it to leak.
4. Cover the screw heads with the plastic plugs provided
with the machine.
5. When the machine is properly attached, check that the feet are tight against the floor and that the
machine is level.
This method is for standard
installations only.
Use this method only for solid surface
counter tops, such as marble.
This method is for EDW294E
installations with a top fill strip.
INSTALLING THE TOE KICK
You must attach the toe kick brackets to the desired depth. Push the spring tab on the sides of the base pan
towards the outside of the machine and carefully pull or push the T shaped toe kick bracket to the desired depth.
Make sure the toe kick bracket is securely inside the guides on the base pan.
Once you have adjusted the toe kick bracket to the desired depth, you can install
the toe kick, as follows:
1. Position the toe kick at the edge of the access panel, slide the toe kick up behind
the access panel then let it slide to the floor.
2. Screw the toe kick to the toe kick brackets.
8

TECHNICAL DATA
Water pressure 18-176 psi
Power 110–120 v, 60 Hz
Heating element 1200 w
Max loading 1450 w
EASY CONNECTION
Your Eurotech comes with everything you need for an easy, problem-free installation:
PEX tubing with 3/8” compression fitting—This tubing has a 50-year spec life. It fits American
dishwasher water supply valves.
Drain hose—Corrugated drain hose and holder to form a high loop.
Electrical cord and plug—110-120 volts, 15 amp cord supplied with unit.
WARNING! Do not use an extension cord for this appliance.
WATER SUPPLY
WARNING! Plumbing connections must comply with applicable sanitary, safety and
The dishwasher comes with a 5-foot PEX water supply line that has a 3/8" NPT female connection. Be sure
to insert the black rubber washer (enclosed in the hardware package) into the PEX hose connection
before you attach it to the water supply. Do not over tighten. Damage to the hose could occur.
The electrical and water supplies should come through the right side of the machine, a maximum of 2” (50
mm) from the back wall and 6-1/4” to 8-1/4” (159–210 mm) from the floor, depending on the underneath
cabinet height.
For service convenience, a shut-off valve (not supplied) should be installed in the water supply line in an
easily accessible location, such as, beneath the sink.
It is important that the water supply line and the shut-off valve have a sufficient flow volume. At least 3
gallons (12 liters) per minute must be able to pass through the line. The water pressure should be 18-176
psi.
WARNING! In order to prevent heat damage to the inlet valve, all solder connections
plumbing codes in your area.
must be made before the water line is connected to the dishwasher.
ENGLISHENGLISH
ENGLISHENGLISH
ENGLISH
NOTE: Be sure to run the PEX water supply
line, drain line, and power supply
cord through the hole to sink
compartment before moving the
dishwasher into position.
1
2
(1) Water supply
(2) Water supply valve (not supplied)
9
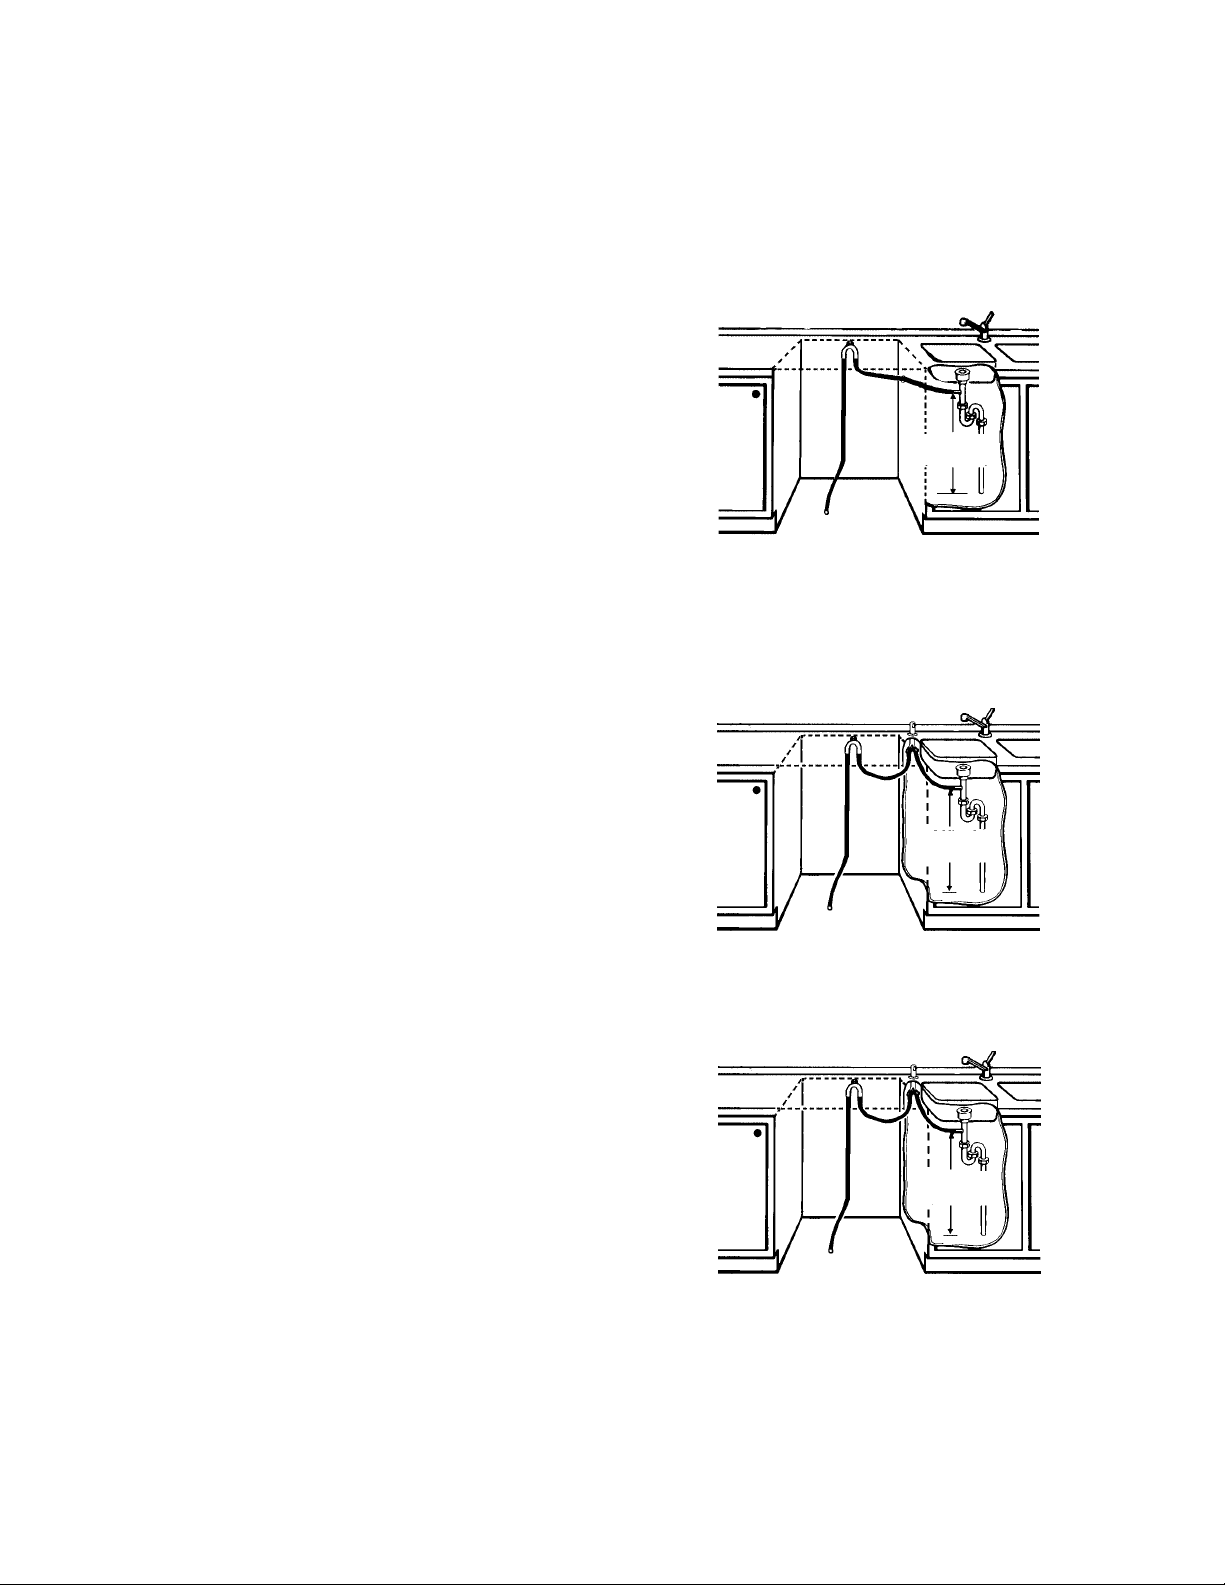
DRAIN CONNECTIONS
Eurotech provides a 3/4” (19 mm) ID corrugated drain hose with a drain line holder to form a high loop.
NOTE: Do not use any fittings anywhere in the drain line that are less than 3/4" (19 mm) OD. Stock.
The access hole for the drain line should be 1-1/2" (38 mm).
The high loop is necessary for proper draining and should be
located as close to the dishwasher as possible.
There are three ways to connect the drain supply line, as shown in
the illustrations at right:
A) Typical connection to sink plumbing before trap (high loop drain)
B) Connection to air gap then to the trap.
C) Connection to waste disposer with air gap
NOTE: Don’t forget to remove the knockout or plug
from the disposer fitting.
IMPORTANT THINGS TO KNOW ABOUT DRAIN
CONNECTIONS:
← Failure to provide the proper drain connection height (minimum of 20" (508 mm)) above the bottom of the
dishwasher base) or a 20" (508 mm) high loop will result in improper drainage, which will damage the
machine.
← No part of the drain hose should be higher than 35" (889 mm) from the bottom of the dishwasher.
← The hose must not be drawn straight to a floor well or its
equivalent because it might function as a siphon and empty
the machine.
← The drain hose can be extended to a maximum length of 10 feet
(3048 mm). Joints and jointed tubes, if any, must have a minimum
3/4" (19 mm) OD.Stock.
← If the drain line is going to be connected to a waste disposer,
be sure to remove the knockout or plug from the fitting on the
disposer before connecting the drain line.
When the installation is ready, open the supply valve and let the
pressure act for a while. Then check that all connections are tight
and there are no leaks.
A) Typical connection to sink plumbing
before trap (high loop drain)
20" min.
(508 mm)
B) Connection to air gap then to the trap.
20" min.
(508 mm)
10
C) Connection to waste disposer with air
gap.
20" min.
(508 mm)
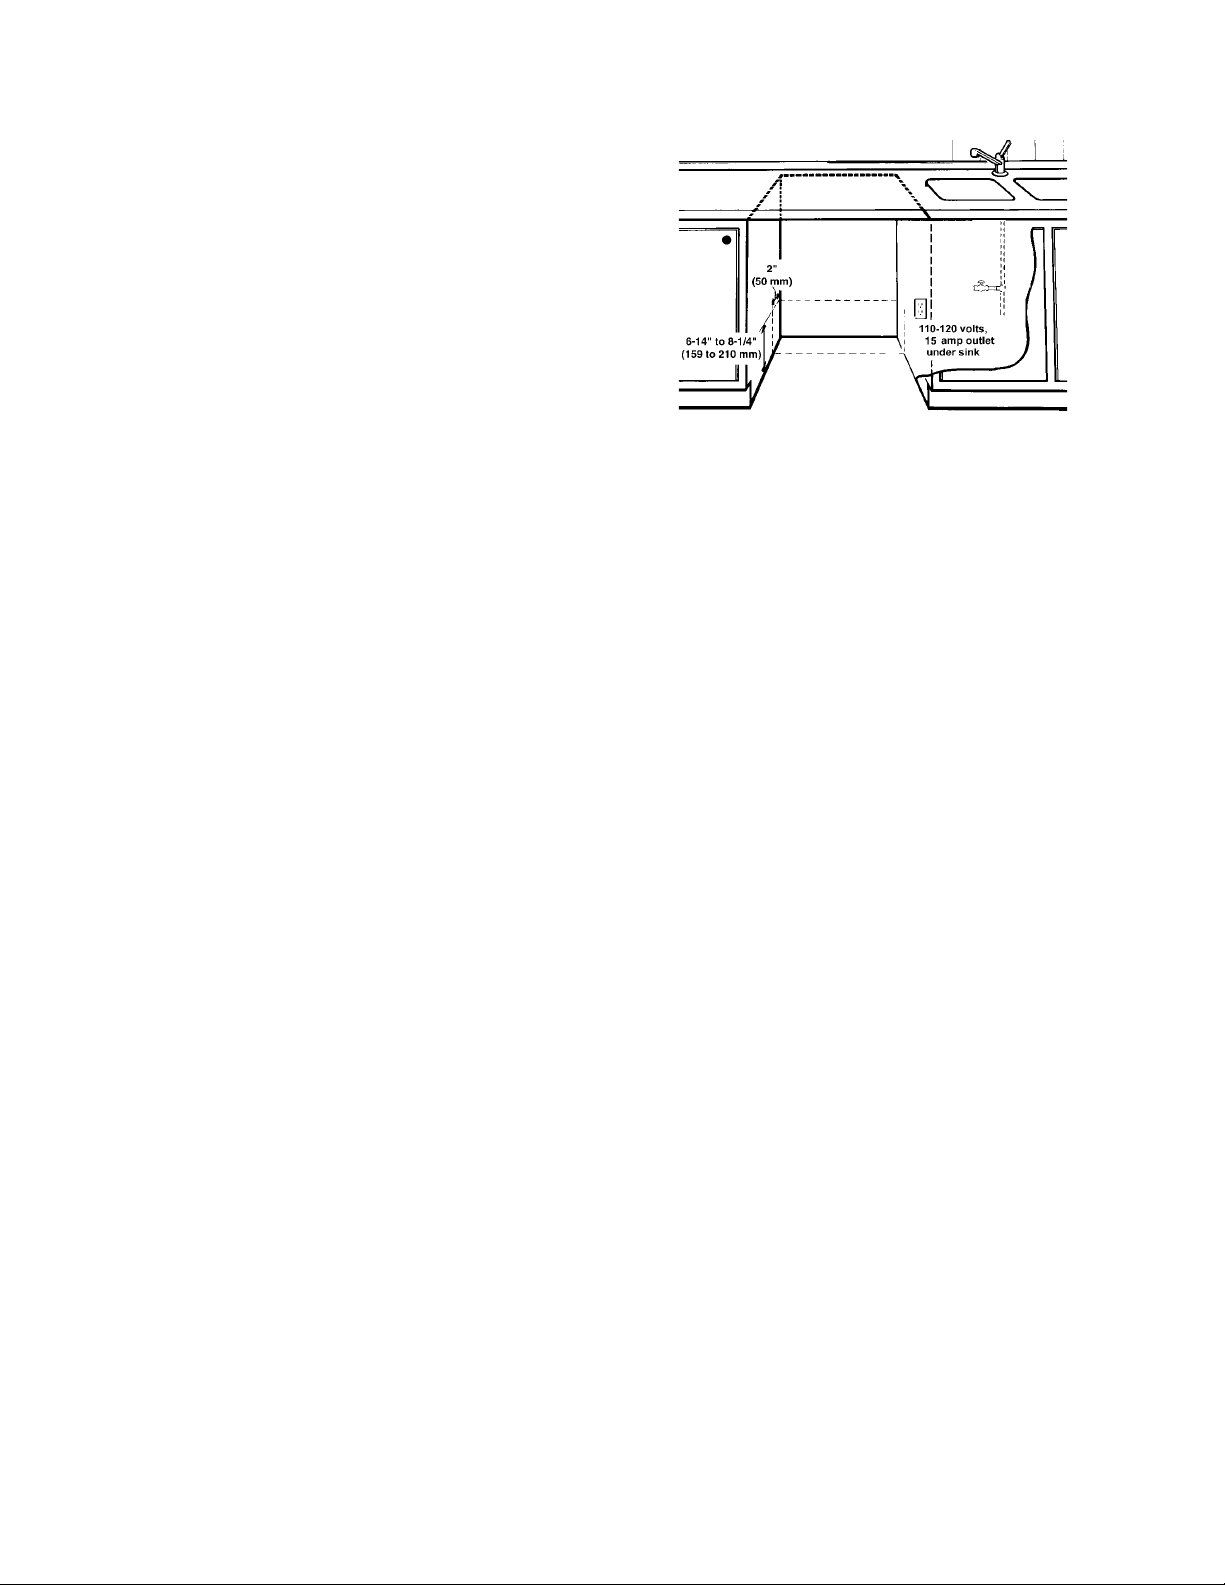
ELECTRICAL CONNECTIONS
The dishwasher comes with an electrical cord for 110–
120 volts, 15 amp supplied. This cord should be plugged
into the 110-120 volt outlet under the sink. If the cord is
not long enough, or if a hard-wire installation is needed,
see “Connecting An Electrical Cable” below.
WARNING! Do not use an extension cord for
this appliance.
The power-supply receptacle for the appliance should be
installed in a cabinet or on a wall adjacent to the
undercounter space in which the appliance is to be
installed.
There should be an opening through the partition between
the opening for the dishwasher and the area under the sink that is large enough for the power cord to pass
through. This opening should not be more than 1-1/2” (38 mm) in diameter and the edges should be smooth
and rounded. If the partition is metal it should be covered with an edge protector provided for this purpose by
the manufacturer.
When moving the appliance into or out of the cabinet, be careful not to damage the power-supply cord.
ENGLISHENGLISH
ENGLISHENGLISH
ENGLISH
WARNING! Before working on wiring for any electrical appliance, be sure the electrical
WARNING! Disconnect electrical power supply and place a tag at the disconnect switch
WARNING! Electrical and grounding connections must comply with the applicable
power has been turned off at the breaker/fuse box.
indicating that you are working on the circuit.
portions of the national electrical code and/or other local electrical codes.
GROUNDING INSTRUCTIONS
WARNING! This appliance must be properly grounded.
A) Grounding instructions for a grounded, cord-connected appliance
In the event of malfunction or breakdown, grounding will reduce the risk of electric shock by providing a path
of least resistance for electric current. This appliance is equipped with a cord having an equipment-grounding
conductor and a grounding plug. The plug must be plugged into an appropriate outlet that is properly installed
and grounded in accordance with all local codes and ordinances.
WARNING! Improper connection of the equipment-grounding conductor can result in a
B) Grounding instructions for a permanently connected appliance:
This unit must be grounded to operate properly. It must be connected to a grounded metal, permanent
wiring system or an equipment-grounding conductor must be run with the circuit conductors and connected
to the equipment-grounding terminal or lead of the appliance.
risk of electric shock. Check with a qualified electrician or service
representative or personnel if you are in doubt as to whether the appliance
is properly grounded. Do not modify the plug provided with the appliance. If
it will not fit the outlet, have a proper outlet installed by a qualified
electrician.
11
 Loading...