

Eurotech Appliances 3100, 3200, 3300 User Manual

Operator’s Manual and Safety Instructions
For models
3100, 3200 and 3300 .
EuroTech Smooth Ceramic Cooktops
by ORIGO
Operators should read and become familiar with these instructions prior to use of these appliances.
Special Safety Section
Carefully read and understand these instructions before operating your ORIGO stove. Save these
instructions for periodic review. Anyone operating this appliance should be familiar with the
information and instructions contained herein.
FOR YOUR SAFETY, PLEASE READ AND FOLLOW THESE SAFETY PRECAUTIONS. THEY ARE
INTENDED TO MINIMIZE THE POSSIBILITY OF SERIOUS HARM.
• Insure the stove is properly installed and grounded in
accordance with all applicable regulations.
• Do not modify or alter the stove.
• Insure that the appliance is secure in its position.
• Turn the stove off when not in use.
• Do not hang or place towels, papers, curtains or other
combustibles near the stove.
• Keep surfaces and interior parts free of grease or
other flammable substances.
• Use due care not to touch the ceramic area above the
burners for approximately 15 minutes after the stove
has been turned off.
• The stove is intended for cooking purposes only. Do
not use as a comfort space heater
• Do not store items of interest to children above or
beside the cooktop. Children climbing on or around
the appliance while hot can be seriously injured.
• Do not allow children to operate this appliance.
Never leave children unattended in the area when it is
in use and never allow children to sit or stand on any
part of the stove. Never leave the appliance
unattended while burners are in operation. Boilovers
can cause excessive smoke, greasy spills can catch
fire and a hot dry pan can crack or melt.
• Do not place plastic items such as salt and
peppershakers, food wrappings or other utensils on
top of the stove when it is in use. Also be cautious in
the use of potholders, towels and wooden spoons.
• Be cautious and watch closely when cooking with
grease and oil. Remember: Do not use water to
extinguish grease fires. Use a properly rated fire
extinguisher.
• Do not allow clothing or flammable items to come in
contact with burners while in use.
• Use pots, pans and utensils that are designed and
rated for use with ceramic surfaces and rated burner
output. Use pots and pans that cover a burner surface.
• Clean the ceramic surface periodically with an
appropriate agent. Do not allow spills to remain on
the surface.
• Do not operate this appliance if it is not in a proper
and safe condition, or has any broken or defective
parts. Only a qualified technician should make
repairs. Order only genuine Origo replacement parts,
when necessary.
• SAVE THESE INSTRUCTIONS FOR FUTURE
REFERENCE
Installation must be in accordance with all applicable standards. Follow ABYC
standards for marine use and RVIA standards for RV use. Other installations
may have other requirements. Installation should be performed by qualified
persons only!
1
Specifications and Installation Instructions
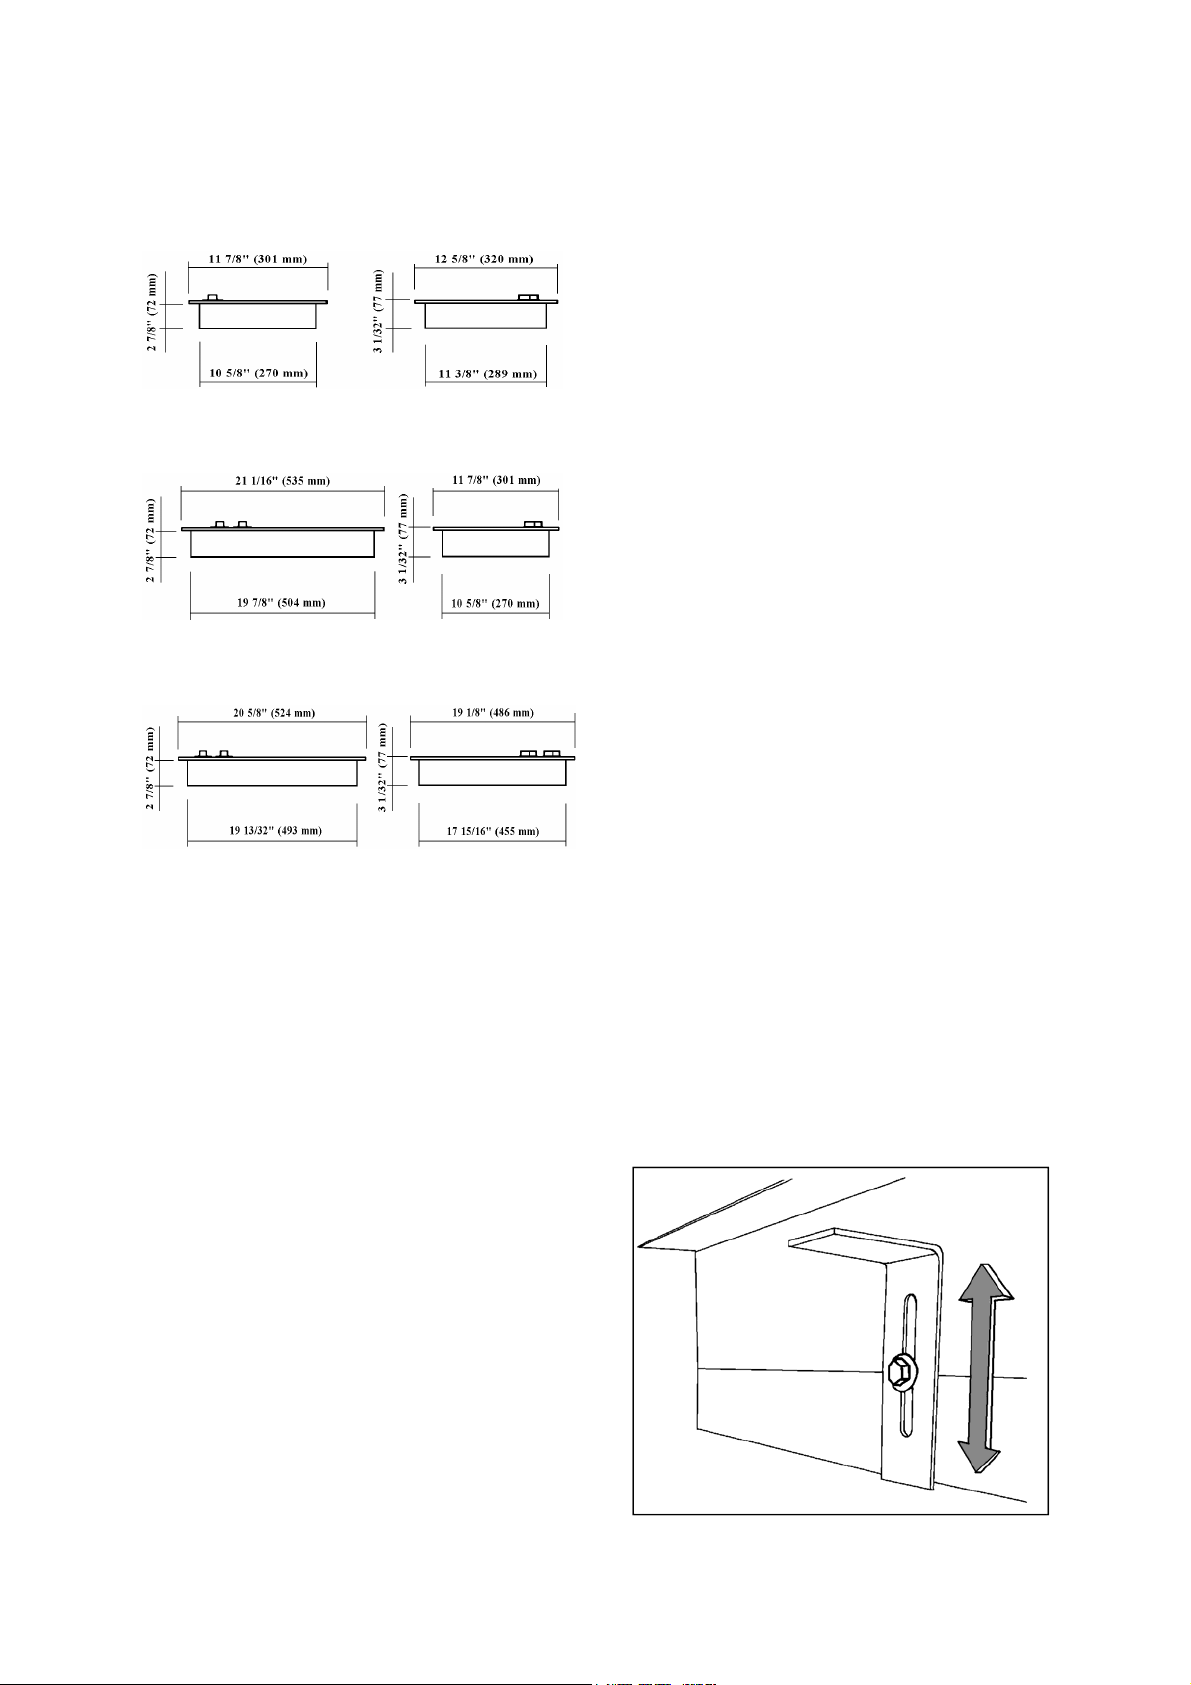
Model 3100
Model 3200
Model 3300
Installation Guidelines
The stove should be installed in a location appropriate for
easy use and safe operation. A minimum clearance of 3-4
inches should be maintained in all directions.
Normal installation of the appliance requires a cutout in
the countertop of a dimension indicated in the
specifications. Insure there is no interference below the
countertop prior to cutting.
Allow for proper ventilation beneath the countertop. A
minimum of 3-sq. in. per burner is recommended.
(Example: Model 2300-3 burner X 3 = 9 sq. in total.)
Failure to provide adequate ventilation may result in poor
performance and is a potential fire hazard. In addition,
inadequate ventilation of the Origo cooktop may affect
proper operation of an adjacent built-in appliance.
The ceramic cooktop may be secured to the countertop by
two methods:
1. The metal frame should be bedded to the countertop
using a non-hardening compound that will permit later
removal without damage if service should be necessary.
2. Secure the cooktop to the countertop utilizing the two
brackets provided, adjust them to the countertop and
tighten screws. (See picture)
A three conductor, tinned stranded marine-type cable is
supplied with the appliance for connection to AC
electrical current only. Check the label on the product to
insure that the voltage of the unit matches the voltage of
Dimensions and Specifications
Overall 11 7/8"L x 12 5/8"W x 3 1/32"D
mm 301 L x 320 W x 77 D
Cutout 10 7/8"L x11 9/16"W x 3 5/32"D
mm 275 L x 294 W x 80 D
Power requirements
120 V 60 Hz 1000 W 8.3 A 10 A breaker
230 V 50 Hz 1200 W 5.2 A 10 A breaker
Dimensions and Specifications
Overall 21 1/16"L x 11 7/8"W x 3 1/32"D
mm 535 L x 301 W x 77 D
Cutout 20 1/32"L x 10 7/8"W x 3 5/32"D
mm 509 L x 275 W x 80 D
Power requirements
120 V 60 Hz 2000 W 16.7 A 20 A breaker
230 V 50 Hz 2400 W 10.4 A 15 A breaker
Dimensions and Specifications
Overall 20 5/8"L x 19 1/8"W x 3 1/32"D
mm 524 L x 486 W x 77 D
Cutout 19 5/8"L x 18 1/8"W x 3 5/32"D
mm 498 L x 460 W x 80 D
Power requirements
120 V 60 Hz 3000 W 25.0 A 30 A breaker
230 V 50 Hz 3600 W 15.7 A 20 A breaker
the source. The color-coded wires are: Black L1 =
ungrounded conductor; White L2 = neutral; Green =
ground.
The electrical circuit should be fused with double pole
circuit breaker sized in accordance with the voltage and
amperage listed for that model in the specifications
section.
2
 Loading...