

Euro-Pro PC104 User Manual
/
Pressure Cooker
Use and Care Instructions
Model PC104
EURO-PRO Operating LLC
Boston, MA 02465
Tel.: 1 (800) 798-7398
www.euro-pro.com
CAUTION!
Read all instructions in this book before using.
Be sure you understand all operating instructions before using
the pressure cooker.
IMPORTANT SAFEGUARDS
To reduce the risk of personal injury or damage to propert y,
follow basic safety precautions when using this appliance,
including the following:
1. Read all instructions carefully.
2. Do not touch hot surfaces. Use handles or knobs.
3. Close supervision is necessary when the pressure cooker
is used near children.
4. Do not place the pressure cooker in a heated oven.
5. Extreme caution must be used when moving a pressure
cooker containing hot liquids.
6. Do not use the pressure cooker for other than intended
use.
7. This appliance cooks under pressure. Improper use may
result in scalding injury. Make certain unit is properly
closed before operating.
8. Do not fill the unit over 2/3 full. When cooking foods that
expand during cooking such as rice and dried vegetables,
do not fill the unit over 1/2 full. Cooker is marked with 2/3
(MAX) fill lines.
9. Do not cook foods such as applesauce, cranberries, pearl
barley, oatmeal or other cereals, split peas, pasta and
rhubarb in the pressure cooker. These foods tend to
foam, froth and sputter and may block the pressure
release device.
10. Always check the pressure release devices for clogging
before each use.
11. Do not attempt to open cover until internal pressure has
been reduced.
12. Do not use this pressure cooker for pressure frying with oil
or shortening.
13. Never operate the cooker under pressure without any liquid
inside. Do not allow the cooker to boil dry.
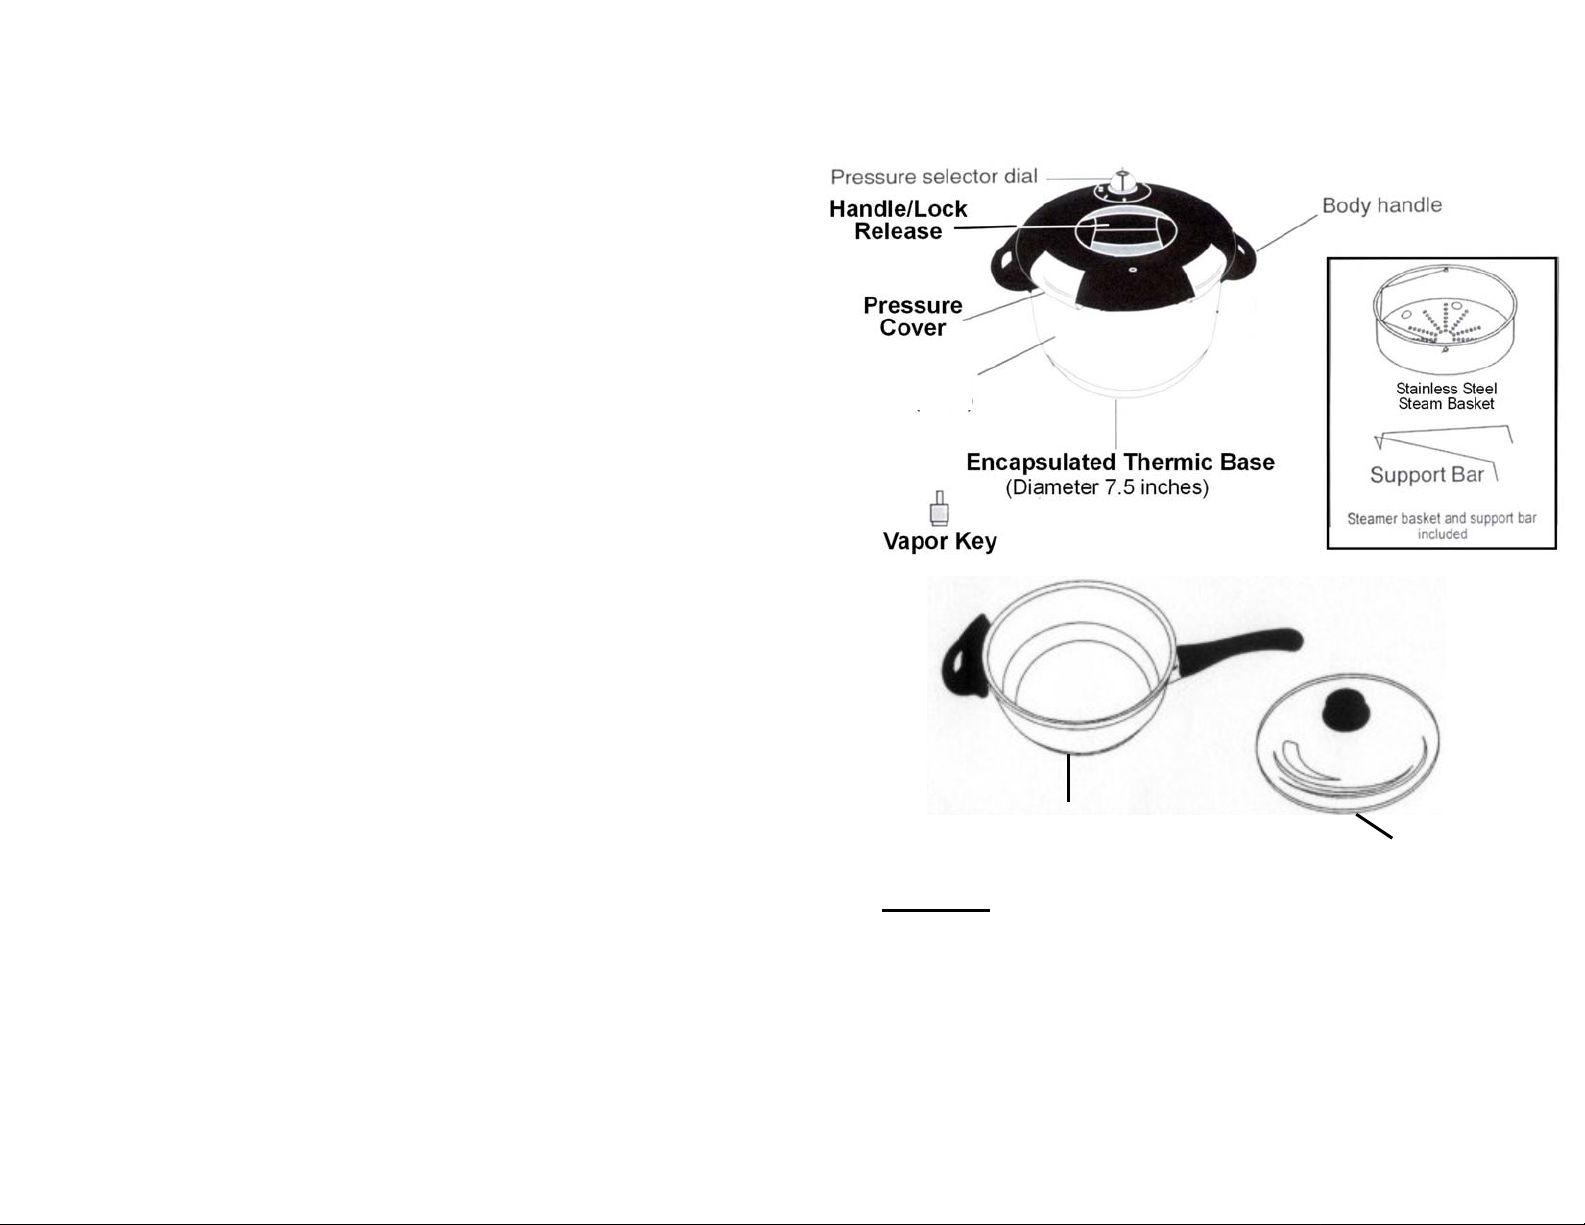
Main Components
8 Qt. Pot
3.5 Qt. Pot
Tempered Glass Lid
Features:
• Pressure Selector Dial for 3 internal pressure settings.
• Quick Pressure Release.
• Cool Touch Handle.
• Encapsulated Thermic Base for superior heat distribution, 18/10 stainless steel
body for strength, lasting beauty and easy care.
• Handle Lock Release Mechanism for one handed opening and closing of lid.
The mechanism design prevents the lid from being opened when any pressure
exists inside of the unit.
SAVE THESE INSTRUCTIONS
FOR HOUSEHOLD USE ONLY
Rev. 1101C
1
USING FOR THE FIRST TIME
Please read these instructions carefully before using the
cookware for the first time.
• Before first use, wash the pressure cooker and lightly oil the seal ring.
• Put at least 1 1/2 cups of water/liquid in the pot with the food. Never
fill the pot more than two-thirds f ull.
• Lock the lid.
• Turn pressure selector to the desired pressure: (I) Low, (II) Medium,
(III) High. See cooking chart on page 3 for guidance.
• Turn the heat source to high until the pressure reaches the desired
setting. Once the cooker has reached its intended pressure, a red
dot will appear in the pressure indicator window. As pressure builds
up, it is normal for a small amount of steam to be released from
around the edges of the cooker and handles. Also at this time, you
may hear a hissing sound. This is normal. Reduce the heat to the
minimum required to maintain pressure.
• Set a timer for precise timing. See cooking chart on page 3 as a
guide.
• When the cooking time is complete, release the pressure by using
either of the methods described on page 6 in this manual.
• Slowly and carefully turn the pressure selector dial “in steps” to the
“Open” position (0) and unlock the lid by pulling the handle and lifting
the lid up. Open the lid away from you.
• NEVER USE FORCE TO OPEN THE COOKER. NEVER OPEN
THE LID TOWARDS YOUR FACE.
• After use, wash, rinse and dry all parts. Lightly oil the seal. Store the
lid upside down on the pot.
• All components of the pressure cooker set are dishwasher safe
EXCEPT
the pressure cooker lid.
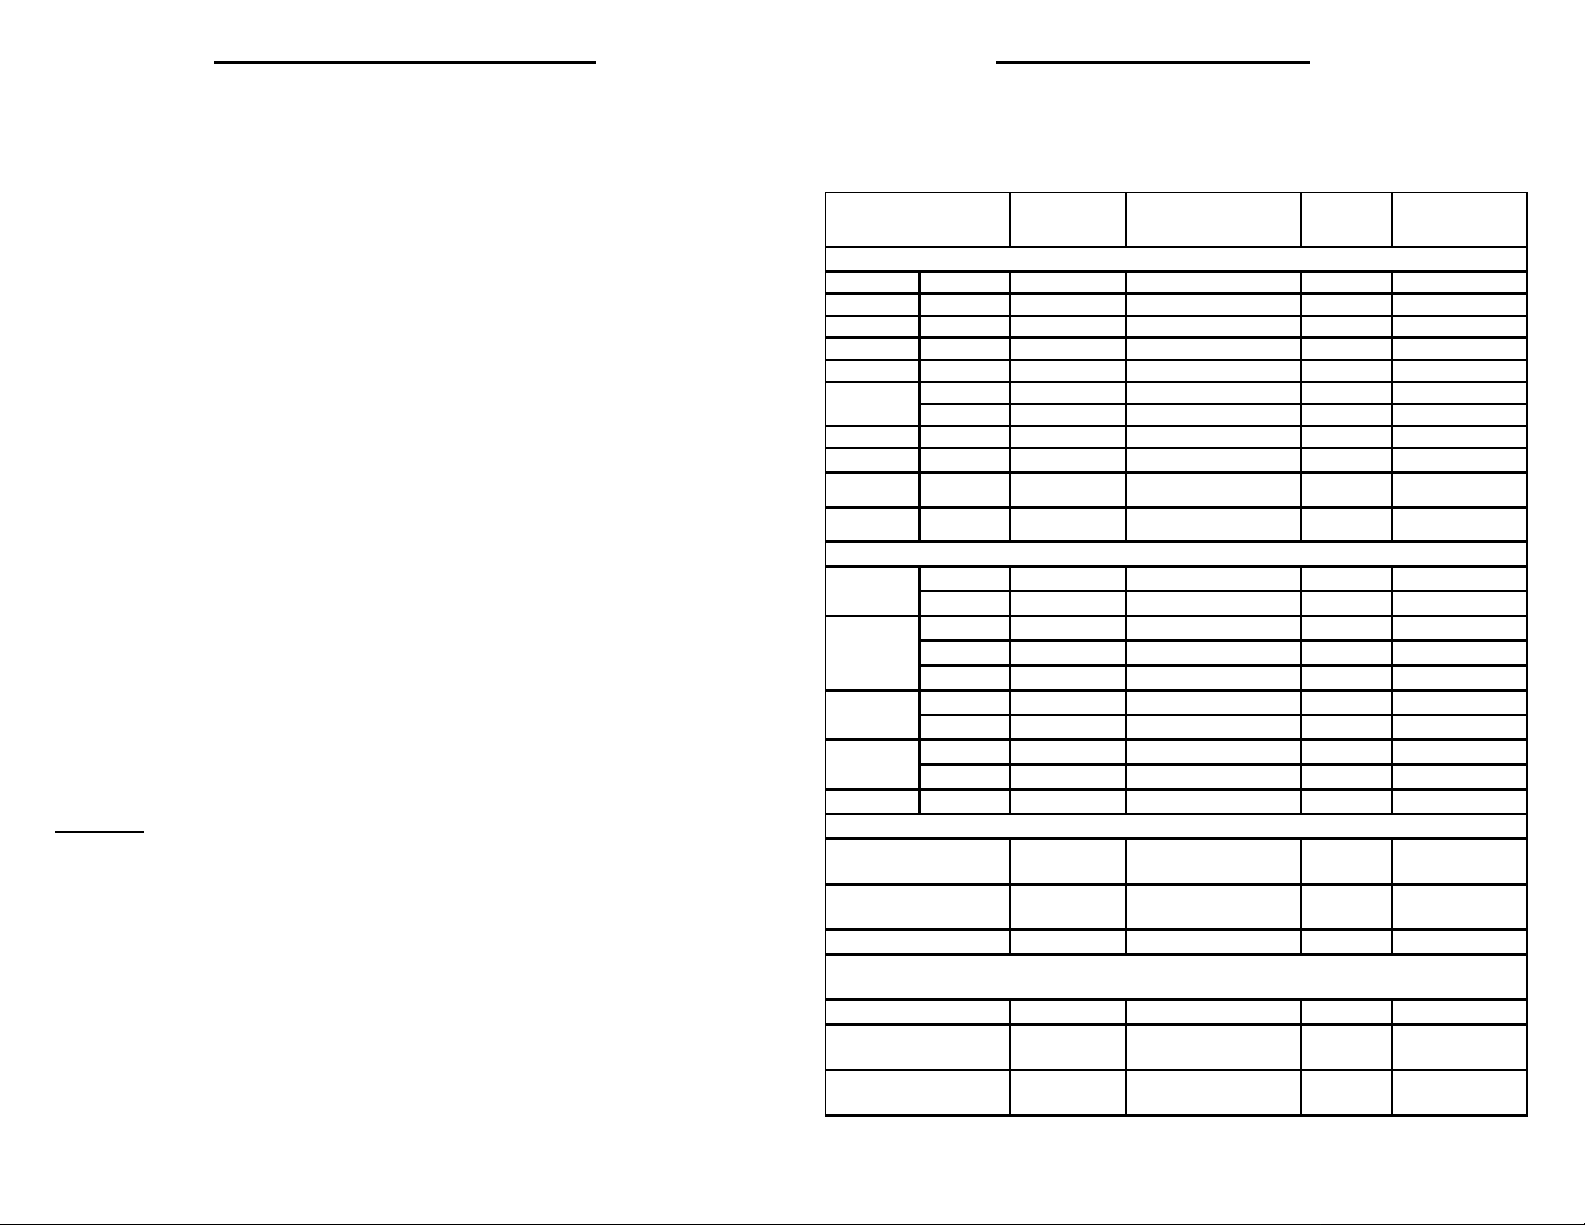
COOKING TIME CHART
Use the cooking times on this chart as guidelines. Actual times will
vary depending upon the amount of ingredients in the cooker and
your individual preferences. Start timing when desired pressure is
reached.
FOOD
PRESSURE
SELECTOR
VEGET ABLES - Add 1 1/2 cups water, use Steamer Basket on Steamer Support and time precisely
Artichokes Medium
Asparagus Medium stems
Beans (green) Whole
Broccoli (florets) Stems cut to 1"
Cabbage (1 /2) Cut into quarters
Carro ts
Cauliflower Florets
Corn On cob
Po tato
Potato, swe e t
MEAT, POULTRY AND FISH - When adapting standard recipes,use 1/2 amount of water used with co nventional cooking
Beef
Chicken
Pork
Shellfish
Fish 1" Steaks
White - use 1/3 to 1 /2 less water than
in normal recipe
Brown - use 1/4 to 1 /2
less than in normal recipe
Split peas or other small beans
Navy beans or other
Kidney beans or other
2" pieces
1/4" slices
large,
quartered
Halved
lengthwise
Stews
Roasts
Who le
Parts
Boneless
Roasts
Boneless
Mussels/Clams
Shrimps/Prawns
RICE - Always add at least one tablespoon of o il or butter to reduce fo am
Risotto
DRIED BEANS - No pre-soaking required - use 6 cups of water for each two cups of beans - add at
least one tablespoon of o il o r butter. Quick release under cold water only.
medium bean
large bean
III 6 Quic k II 1 1/2 Quic k -
I2QuickI2Quick-
I 6 C om bina t io n 4
II 4 Quic k II 2 Quic k -
I3Quick-
I6Quick
III 8
III 10
III 16-20 Natural 10-20
III 40-50 Natural 10-20
II 18 - 2 5 N a t ura l 10-20
II 8- 15 Quic k II 5- 7 Quic k III 15-25 Natural II 7- 10 Quic k -
I3-6Quick-
I2-8Quick-
I5-8Quick-
III 3
III 15
III 5 Quic k -
I14-18
I 30-32
I 35-40
COOKING TIME
(Min)
RELEASE
METHOD
C om bina t io n 5
C om bina t io n 3
C om bina t io n 7
C om bina t io n
Quick
C om bina t io n 3
C om bina t io n 5
STANDING TIME
(Min)
-
10
-
2
3
USING YOUR PRESSURE COOKER
It is essential that you read this instruction manual and keep it handy
when cooking with your pressure cooker. This manual will answer
any questions that you might have on safety, operation and timing.
PLEASE NOTE
PLEASE NOTE
: The Pressure Cooker cannot reach pressure
unless the Lid is properly closed, the operating
pressure has been selected and sufficient liqui d
has been added.
: Before using the pressure cooker for the first
time, wash all the parts with hot water, rinse and
dry them. Remove the seal from the rim of the
lid. Oil it lightly with vegetable oil before cooking
for the first time and after each use. (DO NOT
use any other type of oil or vegetable fat.) This
facilitates locking.
OPENING YOUR PRESSURE COOKER
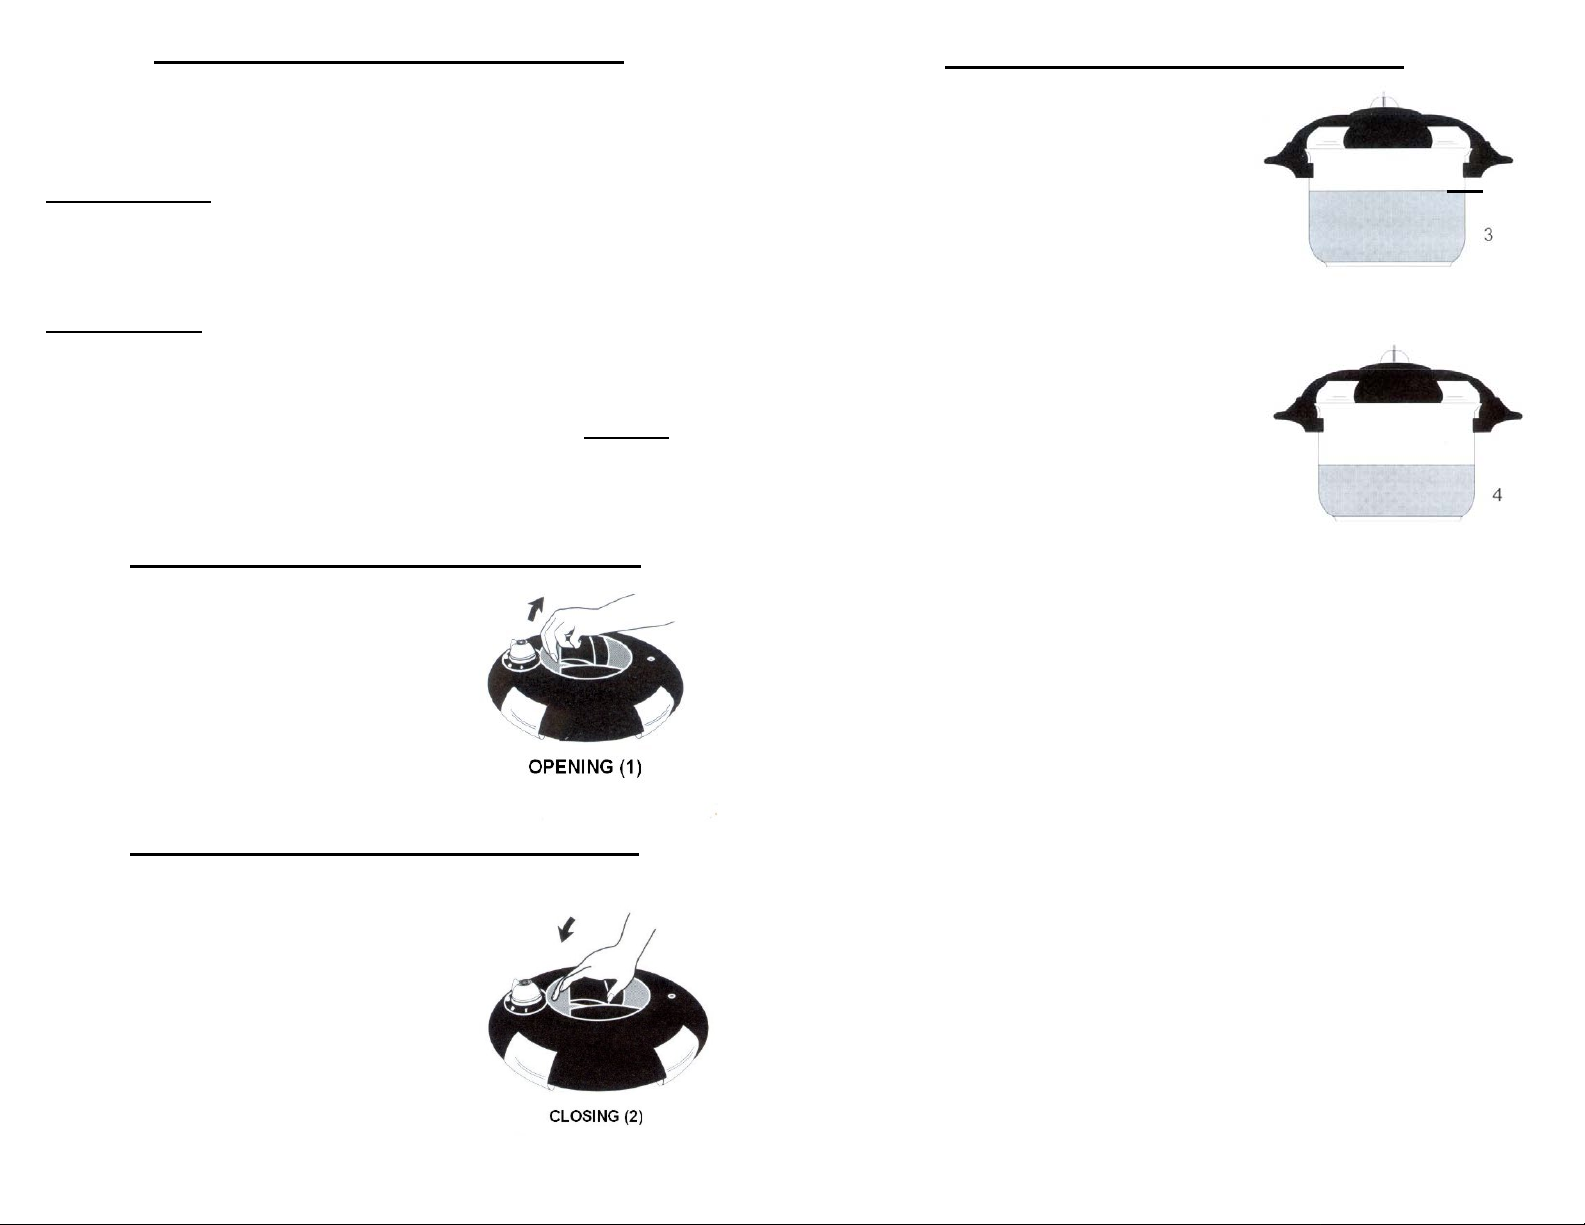
ADDING INGREDIENTS & LIQUIDS
When cooking, always use a minimum of 1
1/2 cups of liquid. You may fill the
pressure cooker up to a maximum of 2/3
full. This includes liquids and ingredients,
(see illustration 3).
When cooking foods which produce foam
or expand greatly such as peas, rice or
beans, the pressure cooker should not be
filled more than 1/2 full, (see illustration 4).
To reduce foam, add one tablespoon of
butter or oil to the pressure cooker prior to
cooking.
2/3
Max. Liquid
Min. Liquid
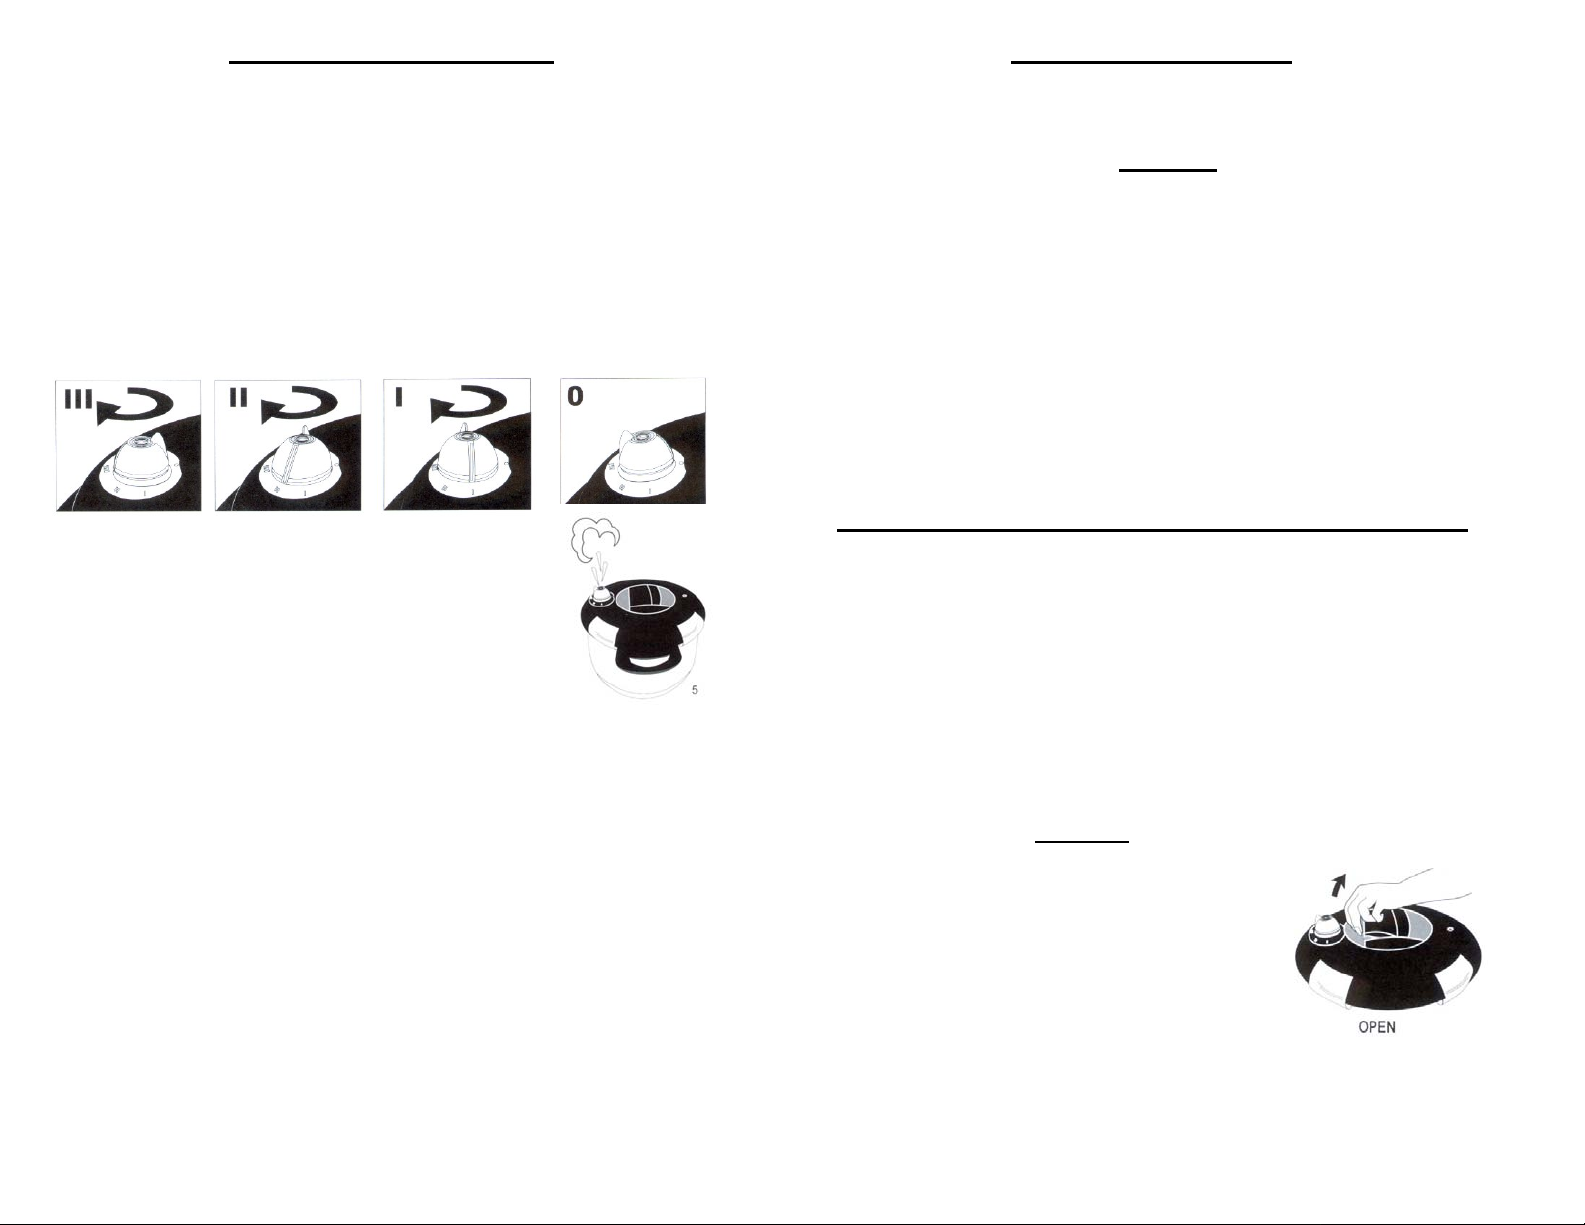
To open the pressure cooker, make
sure that the Pressure Selector Dial is
on “0” setting and all pressure has been
released. Unlock the lid by pulling the
handle and lifting the lid up. (See
illustration 1)
CLOSING YOUR PRESSURE COOKER
Before closing the pressure cooker
ALWAYS CHECK THE VALVES.
Using the vapor key provided, press the
Automatic Valve from inside the lid to
see that it moves freely up and down.
To close the pressure cooker, place the
lid on the body and push the handle
down you will feel the lock engage.
(See illustration 2.)
4
A “Maximum Fill” mark has been
embossed into your pressure cooker at
the 2/3 level.
NEVER OVERFILL THE PRESSURE COOKER
5
RELEASING PRESSURE
STARTING TO COOK
Combination Method:
Turn heat off. Remove pressure cooker from burner. Allow the
pressure cooker to cool off and the pressure to naturally decrease
for the amount of time indicated on the recipe (standing time).
Release the remaining pressure by using either the Natural
Steaming-Off method or the Quick-release Method.
Quick-Release Method:
Caution must be exercised when using this method as a large
volume of steam will escape from pressure selector dial and may
cause a scalding injury if your face or any other part of the body is
in front of this valve when steam is being released.
When using the Quick Release Method, you
must be prepared for a loud hissing sound.
This sound is normal and only occurs when
you use this method of steam release.
You can either release the pressure on the stove
or take it to the pressure cooker to the sink or
counter. When removing the pressure cooker from
the stove, use two hands and only touch the Stay cool handles.
Slowly turn the pressure setting to “0” . You should momentarily
stop at each interim pressure setting before reaching zero. Once
all of the steam had escaped, you can remove the lid by opening it
away from your face or body.
DO NOT USE QUICK RELEASE METHOD WITH FOODS LIKE
LEGUMES, GRAIN OR OTHER FOODS THAT FROTH OR
WHEN COOKER IS VERY FULL.
Never put any part of your body in front of the Quick Release
Valve.
To begin cooking, set the Pressure Selector on “I” low, “II” Medium
or “III” High. Bring the cooker up to pressure at high heat.
TIMING
Timing for most recipes begins after the desired pressure is
reached. However, some recipes indicate that timing starts
immediately upon closure of lid. If this is the case, do not wait for
the red pressure indicator dot to appear before timing.
Be aware that it can take the pressure cooker up to 15 minutes to
achieve full pressure if it is full and the contents are cold. If
practical, some ingredients (water, stock, etc.), can be pre-heated
before adding them to the pressure cooker.
WHEN THE PRESSURE SELECTOR IS SET AT “0” - No
pressure - the pot will act as a normal stockpot, without any
pressure and may be used with the tempered glass cover.
RELEASING PRESSURE & REMOVING THE LID
NEVER FORCE THE LID OPEN.
NEVER OPEN THE LID TOWARDS YOUR FACE.
NEVER OPEN THE PRESSURE COOKER ABRUPTLY.
NEVER OPEN THE PRESSURE COOKER WITH THE LID
TOWARDS YOU.
After the cooking time ends, you can use either the quick-release
method, the natural steaming-off method or the combination
method to release the pressure from the pressure cooker. See
cooking chart on page 3 for the recommended pressure release
method for the type of food that you are preparing. Once the
pressure is fully released, you may then remove the lid. For safety
reasons, the lid will not open
in the pot. Never force the lid open.
To open the lid after all of the pressure is
released, unlock the lid by pulling the
handle and lifting the lid up.
if there is any pressure whatsoever
Never force the lid open.
Never open the lid towards your face.
6
6
7
 Loading...