

Page 1

User Manual
54cm Upright Cooking Appliances
FGG54W / GG54GW / F54GGW
Page 2

Product / Installer details
1
For future reference we suggest that you staple a copy of your purchase receipt here and complete the below so the
information is always at hand.
Product Details
Model number: ________________________________________________________________________________________
Description: ___________________________________________________________________________________________
Serial number: _________________________________________________________________________________________
(Located on the product rating label)
Purchase Details
Date of purchase: ______________________________________________________________________________________
Place of purchase: _____________________________________________________________________________________
Store name: ___________________________________________________________________________________________
Address: ______________________________________________________________________________________________
Telephone: ____________________________________________________________________________________________
Invoice / receipt number: ________________________________________________________________________________
Installation Details
Electrical date of installation: ___________________________________________________________________________
Electrician Installers Details: Company / Installers Name: _____________________________________________
Licence Number: ______________________________________________________
Telephone Number: ____________________________________________________
Gas date of installation: _________________________________________________________________________________
Gas installers details: Company / Installers Name: _____________________________________________
Licence Number: ______________________________________________________
Telephone Number: ____________________________________________________
Plumbing date of installation: ___________________________________________________________________________
Plumbers installers details: Company / Installers Name: _____________________________________________
Licence Number: ______________________________________________________
Telephone Number: ____________________________________________________
Page 3
Dear Customer,
2
Congratulations on the purchase of your new product from
Home Appliances Pty Ltd.
We recommend you please take some time to read the instruction manual
thoroughly to familiarise yourself with the functionality and operations to ensure
optimum performance of your new appliance.
After reading the manual, please store it in a safe and accessible location for
future reference.
Installation
installer / technician in accordance to local regulations.
The packaging of your appliance has been selected from environmentally
friendly materials and can usually be recycled. Please ensure these are disposed
of correctly.
Customer Care
Our Customer Care centre is available should you wish to learn more about your
appliance in relation to how to use it to its best potential, or tips on cleaning as
well as available accessories.
For further details please contact our Customer Care team on
1800 444 357 or email: customercare@hapl.com.au
Thank you
Regards,
Home Appliances
Page 4

4
3
4
10
4
5
5
5
6
6
7
CONNECTION TO THE GAS SUPPLY
10
11
12
13
15
16
17
18
19
21
Page 5

We recommend that you read the instructions in this Manual carefully before use for the best performance and
4
to extend the life of your appliance, as it will provide you with all the instructions you require to ensure its safe
installation, use and maintenance. Always keep this Manual close to hand since you may need to refer to it in the
future. Thank you.
1
、
1
、
CCoonnddiittiioonnss OOff UUssee
This appliance is intended to be used for domestic use, not commercial use.
2
、
2
、
SSaaffeettyy PPrreeccaauuttiioonnss
This appliance is not intended for use by persons (including children) with reduced physical, sensory or mental
capabilities, or lack of experience and knowledge, unless they have been given supervision or instruction
concerning use of the appliance by a person responsible for their safety.
Warning – ensure that no downward presure is applied to the oven door when open. in particular, do not allow
a child to climb on to open oven door.
Warning - accessible parts can become hot during use, especially the oven door. to avoid burns, young
children must be kept away.
Young children should be supervised to ensure they do not play with this appliance.
During use this appliance becomes hot. Care should be taken to avoid touching hot external and internal
surfaces when in use. Use oven gloves.
Install cooker, shelving and fittings in accordance with this Manual.
Ensure all specified vents, openings and airspaces are not blocked.
To ensure your safety all electric appliance should only be installed or service by qualified staff. If the supply
cord is damaged, it must be replaced a service agent or similarly qualified person in order to avoid a hazard.
To ensure your safety all electric appliance should only be installed or service by qualified staff. If the supply
cord is damaged, it must be replaced by the manufacture, its service agent or similarly qualified staff in order
to avoid a hazard.
DO NOT USE OR STORE FLAMMABLE MATERIALS IN THE APPLIANCE STORAGE DRAWER OR NEAR
THIS APPLIANCE.
DO NOT SPRAY AEROSOLS IN THE VICINITY OF THIS APPLIANCE WHILE IT IS IN OPERATION.
DO NOT USE THIS APPLIANCE AS A SPACE HEATER.
DO NOT MODIFY THIS APPLIANCE.
DO NOT PLACE ARTICLES ON OR AGAINST THIS APPLIANCE.
TThhee MMaannuuffaaccttuurreerrss aanndd IImmppoorrtteerrss//DDiissttrriibbuuttoorrss aanndd RReettaaiilleerrss sshhaallll nnoott bbee lliiaabbllee ttoo aannyy lleeggaall
lliiaabbiilliittyy,, ppeerrssoonnaall iinnjjuurryy aanndd pprrooppeerrttyy ddaammaaggee dduuee ttoo iinnccoorrrreecctt ooppeerraattiioonn oorr iinnccoorrrreecctt IInnssttaallllaattiioonn..
• Not suitable for use with aftermarket lids or covers.
Page 6

3
5
、
3
、
OOtthheerr IImmppoorrttaanntt SSaaffeettyy IInnffoorrmmaattiioonn
This appliance must not be used as a space heater.
Do not remove any labels or use abrasive/ corrosive cleaners on.
Do not use corrosive cleaners eg oven cleaners that contain caustic soda.
4
、
4
、
WWaarrnniinnggss ffoorr uussee ooff ggrriillll,, oovveenn,, aanndd aapppplliiaannccee hhoobb
44..11 GGrriillll wwaarrnniinnggs
Do not leave grill on unattended.
Do not cover the grill dish insert with foil.
Placing thick portions of food under grill can be a fire hazard.
Fat left on a grill dish is a fire hazard! Keep grill clean and turn off grill immediately after use.
2
、
44..2
、
OOvveenn wwaarrnniinnggss
Do not push down or apply any weight on open oven door.
Do not line oven with foil or place anything on the bottom of the oven while baking to avoid permanent damage,
as trapped heat will crack or craze the enamel floor of the oven cavity liner.
Use of olive oil and other poly-unsaturated oils (vegetable oils) when roasting uncovered food causes deposits
inside the oven which are very difficult to remove.
5
、
5
、
DDiissppoossaall ooff ppaacckkaaggiinngg
Please recycle the cardboard, and also any polystyrene packaging where possible.
6
、
6
、
IInnssttaallllaattiioonn,, CClleeaanniinngg aanndd SSeerrvviicciinngg
An authorized person must install this appliance. (Certificate of Compliance to be retained).
Before using the appliance, ensure that all packing materials are removed from the appliance.
In order to avoid any potential hazard, the Installation Instructions must be followed.
In order to avoid accidental tipping of the appliance (for example, by a child climbing onto the open oven door),
the anti tilt plate must be installed.
Only authorized personnel should carry out servicing (Certificate of Compliance to be retained).
Always ensure the appliance is switched off before cleaning.
Do not use caustic soda- based cleaners.
Do not use steam cleaners, as this may cause moisture build up.
Always clean the appliance immediately after any food spillage.
To be serviced only by an authorized person.
s
Page 7
7
6
、
7
、
SSppeecciiffyy pprroodduucctt ssttrruuccttuurree
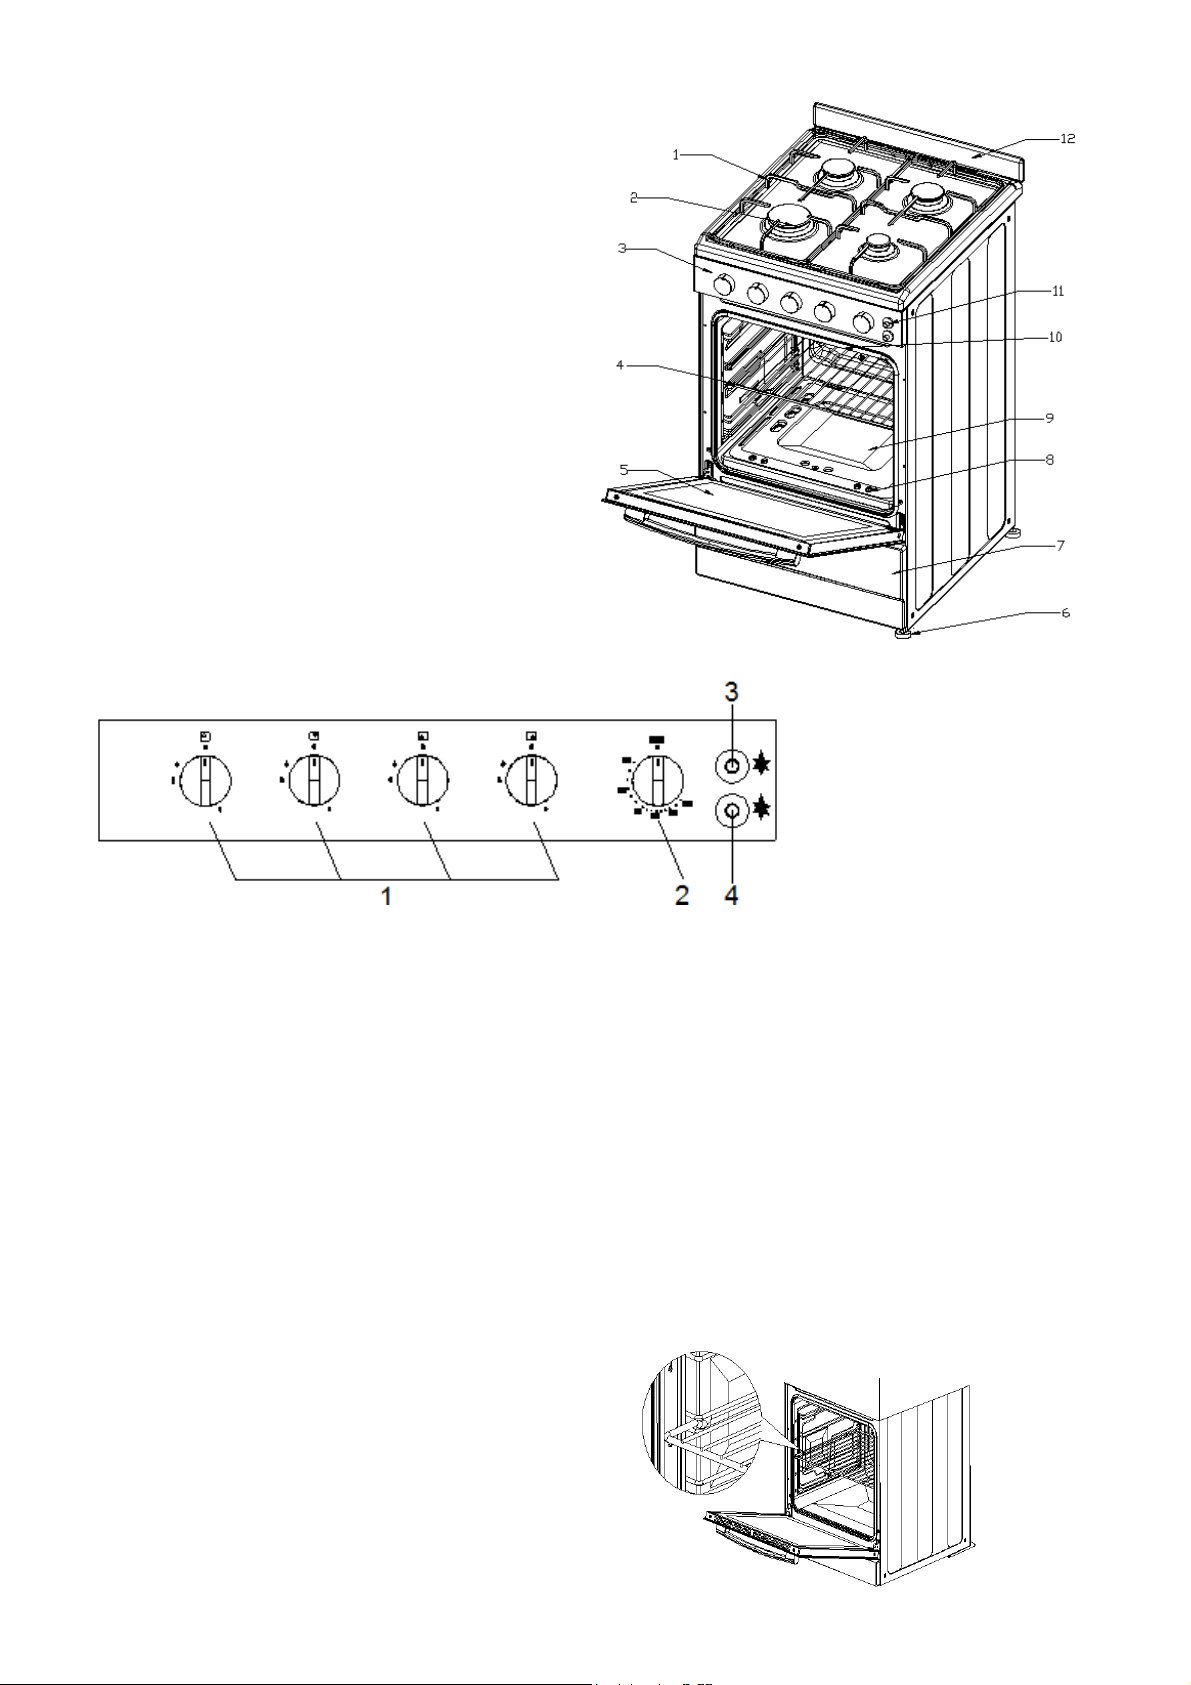
77..11 DDeessccrriippttiioonn ooff ggaass ccooookkeerr
1. Focal plane
2. Burner with removable cap, distributor
3. Control Panel
4. Grilling rack
5. Oven door
6. Anti slip feet
7. Under the cover
8. The burner
9. Burning baffle
10.Grill burner
11. Ignition switch
12. Back wall plate
77..22 DDeessccrriippttiioonn ooff ffrroonntt ppaanneell ccoonnttrroollss
1. Burner Control Knob
• Sets the burner cooking temperature.
2. The oven temperature control valve .
• Control the oven temperature
3. igniter
• Control on the top gas oven
4. igniter
• control to the bottom gas oven
NNoottee:: TThhee oovveenn bbuurrnneerr ccoonnttrrooll kknnoobb hhaass ttoo bbee pprreesssseedd aanndd ttuurrnneedd ffiirrsstt..
8
、
8
、
FFoorr tthhee ffiirrsstt ttiimmee uussee tthhee aapppplliiaannccee
88..11 FFiittttiinngg oovveenn sshheellvvees
Ensure shelf orientation is correct (refer picture).
Slide into oven at an angle until raised back of shelf is past the stop on side runners.
Lower front of shelf and push in until stop is reached.
s
NNOOTTEE:: TThhee ttoopp lleeddggee iiss nnoott aa sshheellff ppoossiittiioonn
Page 8

88..33 PPrreeppaarriinngg yyoouurr aapppplliiaannccee ffoorr tthhee ffiirrsstt ttiimmee
7
Please wipe out the oven interior prior to operation with warm soapy water and polish dry with a soft clean
cloth.
New appliances can have an odor during first operation. It is recommended to ‘run in’ your oven before you
cook for the first time. Run the oven at 180°C for 2-4 hours and ensure that the room is well ventilated.
Please install oven furniture as outlined in the “Fitting Oven Accessories and Cleaning” section.
If your appliance is fitted with solid burners, turn heat setting to high for 3 minutes to fully harden the coating.
When cooled, apply a thin coating of cooking oil to seal the surface.
The gas grill may have oils left on the grill during manufacture. Before you cook on the grill for the first time,
turn on for 15 minutes with 10mm of water in the bottom of the grill dish.
9
、
9
、
UUssiinngg tthhee GGaass oovveen
99..11 OOvveenn ssaaffeettyy wwaarrnniinnggss
Always follow the instructions for putting the shelves and side racks into the oven, to avoid accidents.
Do not line the oven with foil, it will damage the enamel.
Do not touch the hot surfaces or heating elements inside the oven.
Do not use the oven door as a shelf.
Do not push down on the open oven door.
Do not place shelves on top of upper most shelf runner as there are no stops for shelf withdrawal.
After each use, always check that the control knobs are turned to 0(off).
n
99..22 UUssiinngg tthhee oovveenn ooff yyoouurr ggaass ccooookkeerr
SSeett:: 11)) TTeemmppeerraattuurree
22)) GGaass OOvveenn FFuunnccttiioonn
This knob lights the gas burner inside the oven. The cooking
temperature is set by turning the knob anti-clockwise to the
value required, between Min. and Max.
TTiipp:: wwhheenn uussiinngg tthhee ggrriillll bbuurrnneerr ccaann nnoott aaddjjuusstt tteemmppeerraattuurree
99..33 UUssiinngg tthhee ggaass oovveenn
Piezoelectric ignition control
Completely open the oven door, and put it by the thermostat knob counterclockwise the highest temperature setting,
press the piezoelectric ignition device. Once ignited burner, press a few seconds to allow the thermocouple
temperature on knob.
If the burner not lit after 15 seconds, stop trying, leave the oven door, waiting for one minute before trying again
LLiigghhttiinngg tthhee bbuurrnneerr bbyy hhaannd
Completely open the oven door and turn the thermostat knob
Anti-clockwise. Place a lit match close to the end of the flame pipe A in the
centre of the bottom of the oven and press the thermostat knob. Once the
burner has ignited, keep the knob pressed down for a few seconds to allow
the thermocouple to heat up and check that the burner has lit properly
through the inspection hole B. The cooking temperature is set by turning the
knob clockwise to the value required, between 50° and 231°.
d
Page 9

If the burner accidentally goes out, turn the knob to the off ( ) position and wait at least one minute before trying
Food
Fan forced oven
Time in minutes
Temperature(℃)
Oven shelf
position
Plain or fruit scones
210
Any
10-15
Rolled biscuits
150(170)
Any
10-15
Spooned biscuits
180
Any
12-15
Shortbread biscuits
150
Any
30-35
Hard individual meringues
100
Any
90
Soft individual meringues
165
Any
15-20
Pavlova
100
Any
75
Patty cakes
180
Any
15-20
Sponge
170
Any
20-30
Plain butter cake
170
Any
25-40
Rich fruit cake
130
Any
180
Shortcrust cornish pasty
160(180)
Any
40-45(10/35)
Shortcrust custard tart
170-200
Any
20-30(10/25)
Cream puffs
200
Any
25-30
Yeast bread
200
Any
25-30
Pizza
220
Any
15-25
8
to relight it.
99..44 AAddjjuussttiinngg tthhee mmiinniimmuumm sseettttiinngg
The oven thermostat has a screw for regulating the
minimum setting, accessed by removing the thermostat
knob. When the type of gas used changes, the minimum
setting must be adjusted as follows:
Light the oven burner and keep it operating at the
highest setting for 10/15 minutes with the door
closed. Then turn the knob to the minimum
temperature setting, remove the knob and use a
straight-head screwdriver to adjust. Firstly, turn the
knob in clockwise direction tightly then anticlockwise
to adjust the flame. For natural gas you should turn
one of a circle while 1/8 circle for LPG
When using bottled gas, the adjuster screw must be turned fully clockwise.
When using town or natural gas, adjust the screw so that when the thermostat knob is turned from the
maximum to the minimum setting, the flame always remains stable and uniform. Close the oven door and check
that the burner remains on at the minimum setting.
99..55 OOvveenn ccooookkiinngg gguuiiddee
The following is intended as a rough guide. It is often required to set oven 10-20 degrees above or below this
guide to get the result you want. Also adjustments are needed for the cooking time to suit personal expectations,
Where the gas models vary from electric, details for gas cooking is shown in brackets. For best results when baking,
preheat your oven for 15-20 minutes.
Page 10

Shelf position is counted from the bottom shelf up. Bottom shelf position is 1.Turn down temperatures shown
Meat/Poultry/Fish
Recommended temperature (℃)
Minutes per kilogram
Beef
Rare
200
35-40
Medium
200
45-50
Well done
200
55-60
Lamb
Medium
200
40
Well done
60
Veal
180
60
Pork
200
60
Chicken
180-200
45-60
Duck
180-200
60-70
Turkey
180
40–45 (less than10kg)
35–40 (more than10kg)
Fish
180
20
Problem
Causes
What to do
Uneven cooking
Incorrect shelf position
Select shelf that puts food in centre of oven
Oven tray too large
Remove oven tray. Use smaller trays or dishes
Trays not in centre
Put trays in centre
Oven fan causing uneven browning
or small cakes to lean over
Rotate food during cooking, or use Conventional
Mode (i.e. no fan)
Baked products too
brown on bottom
Baking tins too large (diameter)
Use correct size tins
Baking tins are dark metal or glass
Change to shiny, light tins or lower the
temperature by 10°-20 C
Food too low in oven
Cook one shelf higher
Oven door opened too frequently
during baking
Don’t open the oven door until at least half the
cooking time has passed
Baking temperature too high
Lower the temperature
Oven tray blocking heat (below
thermostat)
Use higher shelf position for oven tray
Cakes have a cracked
thick crust
Baking temperature too high
Lower the temperature
Food too low in oven
Cook one shelf higher
Cake batter over mixed
Mix just long enough to combine the ingredients
Baking tin too deep
Check size of tin and use recommended size
Baking tins dark
Change to shiny light tins
Baked products are pale,
flat and undercooked
Baking temperature too low
Raise the temperature
Food too low in oven
Cook one shelf higher
Baking time too short
Increase cooking time
Incorrect baking tin size
Use correct size tin
Cakes fallen in centre
Baking temperature too low
Raise the temperature
Baking time too short
Increase cooking time
Proportions of ingredients incorrect
for recipe
Check recipe
Opening door too early during
baking
Do not open door until the last quarter of
cooking time
Roast meat and potatoes
Poor hot air circulation
Elevate food onto a rack to allow air circulation
9
6
、
99..6
、
UUnnddeerrssttaannddiinngg bbaakkiinngg pprroobblleemm
Page 11

not browning in fan oven
Oven temperature is too low
Increase temperature to 200 - 220
Not long enough in oven
Continue cooking for another 15+ minutes
NNOOTTEE:: CCoonnddeennssaattiioonn oonn oovveenn ddoooorr iiss nnoorrmmaall,, eessppeecciiaallllyy wwhheenn kkiittcchheenn iiss ccoolldd
Problem
Causes
What to do
Grilled meats overcooked on
outside and raw in centre
Meat too close to grill
Use inverted grill tray insert and/or reduce
temperature setting
Excess grill smoke
Build-up of fats in grill
clean grill after every use
Trim excess fat from meat prior to cooking
Grilled steaks and
chops buckling
Cut fat with knife towards meat or remove all fat
10
Also spacing and size of food on trays and the number of baking dishes in the oven can affect air circulation.
0
、
110
、
UUssiinngg tthhee ggrriillll
1100..11 GGrriillll ssaaffeettyy wwaarrnniinnggss
Always turn off the grill immediately after you have finished cooking and pull drawer out or remove grill tray
otherwise fat left in the tray in the hot grill compartment will continue to smoke or could catch fire.
Wash grill tray & insert after every use.
Grill insert rack can be inverted…..to provide 2 different settings for the distance from top of food to the grill
element.
Do not line the grill rack with foil.
Do not leave the grill unattended and check progress of cooking every 1 – 2 minutes (especially bread).
Do not try to grill place food more than 25mm thick. Food may catch fire.
Do not store flammable materials near the grill.
1100..22 GGrriillll iinnffoorrmmaattiioonn
The grill function is suitable for tender cuts of meat, steak, chops, sausages, fish, bread, cheese tootsies and
other quick-cooking foods.
Preheat for 3 minutes on 7 setting. This will help seal
natural juices of steak, chops etc. for a better flavour.
The grill drawer door must be closed during grilling.
1100..33 UUssiinngg tthhee ggrriillll
Turn the grill control knob to adjust the temperature to get the desired result
Preheat the grill. After 3 minutes, put food in.
Note that put grease closed correctly in the (have screens on both sides).
Close the grill drawer.
In the process of barbecue, open the oven door check progress every 1 to 2 minutes
1100..44 HHaannddlliinngg ggrriilllliinngg pprroobblleemmss
1
、
111
、
UUssiinngg tthhee bbuurrnneerrss ooff yyoouurr ccooookkeerr
1111..11 bbuurrnneerrss ssaaffeettyy wwaarrnniinnggss
Do not use pots and pans which are unsteady, as these could overbalance.
Do not use mats, heat diffusers or wok stands. These will cause a temperature build-up which can damage the
cook top.
Do not let cooking pots overhang sides or front of hob get too close to the burner control knobs.
CCeerraammiicc bbuurrnneerrss
Page 12

GOOD BAD
11
(recessed base) (convex base) (undersize) (oversize) (no utensil)(moisture on hotplate)
BAD BAD BAD BAD BAD
Page 13

2 2
12
1 3
Page 14

Cast iron pan frame
13
components
Iron burner cover
Burner Crown
Burner Cup
Page 15

cleaner applied with a nylon scourer.
14
1144..77 CClleeaanniinngg tthhee OOvveenn
Open the door fully.
Remove oven shelves and side racks.
Clean in hot soapy water.
1144..88 CClleeaanniinngg tthhee oovveenn ddoooorr //HHooww ttoo rreemmoovvee tthhee oovveenn ddoooorrss
For a more thorough clean, you can remove and disassemble the oven door. Proceed as follows:
Oven door structures 1 remove and assemble procedure:
Open the door to the full extent(fig.1);
Open the lever A completely on the left and right hinges(fig.2);
Hold the door as shown in fig.3
Gently close the door(fig.3)until left and right hinge levers A are hooked to part B of the door(fig.4).
Withdraw the hinge hooks from their location following arrow C(fig.4);
Rest the door on a soft surface;
To replace the door, repeat the above steps in reverse order.
RReemmoovviinngg tthhee IInnnneerr PPaannee ooff GGllaassss
Double oven door: Remove the seal G by unscrew the no.2 bolts (fig.1)
Gently pull out the inner pane of glass(fig.2)
Clean the glass with an appropriate cleaner. Dry thoroughly, and place on a soft surface.
Now you can also clean the inside of the outer glass.
CClleeaanniinngg tthhee ddoooorr ggllaassss
Clean the glass door using non-abrasive products or sponges and dry it with a soft cloth.
Do not use the oven without the inner door glass fitted.
Do not use harsh abrasive cleaners or sharp metal scrapers to clean the oven door glass since they can
scratch the surface, which may result in shattering of the glass.
Replace the glass cover. Reconnect the appliance to the mains power supply.
Page 16

5
Problem
Causes
What to do
Burner will not light
even though
spark can be
seen/heard
Gas supply valve is turned off
Turn on gas supply
burner crown & cap not
positioned correctly
Remove parts and refit carefully
Port blockage in ignition area
Make sure that ports and ignition area are clean and
dry
Oven not hot
enough
Heat escaping through
incorrectly
sealed door
Check shelves or dishes are not preventing door
closing properly, Check that door is fitted properly after
door removal for cleaning
Door seal is worn or has moved
Replace seal or refit it
The burner has not lit
Stop trying, leave the oven door open and wait 1
minute before trying again
Digital timer
display flashing
Power failure or interruption
Reset time of day
Household fuse blown or power
supply is off
Check fuses, power supply
Unit smoking when
first used
Protective oils being removed
This is normal
first use of oven
This is normal
Allow 2– 4 hours for odour to dissipate (open all
windows)
Oven shelf tight
Oven shelf not inserted correctly,
may be upside down or back to
front
Remove shelf and insert as per diagram
15
、
115
、
SSoollvviinngg PPrroobblleemmss
If you have a problem with your appliance, check the table below before calling service. You may be able to avoid a
service call by and avoid unnecessary inconvenience and expense.
For cooking problems, refer to Handling Baking Problems.
NNoottee:: OOnnllyy sseerrvviiccee cceenntteerrss sshhoouulldd ccaarrrryy oouutt sseerrvviicciinngg.. OOtthheerrwwiissee wwaarrrraannttyy mmaayy bbee vvooiidd..
Page 17

1
16
1
66、、IInnssttaalllliinngg tthhee ggaass ccooookkeerr
1
1
66..11 UUnnppaacckkiinngg
When packaging is removed from product you will notice there are several items nested in the packaging base.
The burner crowns, burner caps and trivets can be fitted to the hob.
Note: That work trivet is a different size and must be correctly located over wok burner.
16.2 Locating the cooker
This appliance must be installed by an authorised person in accordance with this instruction manual, AS/NZS 5601
- Gas installations (installation and pipe sizing), local gas fitting regulations, local electrical regulations, local water
regulations, local health regulations, Building Code of Australia and any other government authority.
Side clearances-(Measurements B & C) Where B,
measured from the periphery of the nearest burner to
any vertical combustible surface, or vertical combustible
surface covered with toughened glass or sheet metal, is
less than 200 mm, the surface shall be protected to a
B
A
C
D
E
height C of not less than 150 mm above the hob for the
full dimension (width or depth) of the cooking surface
area. Where the gas cooking appliance is fitted with a
‘splashback’, protection of the rear wall is not required.
Additional requlrements for freestanding and elevated gas
cooking appliances-(Measurements D & E). Where D, the
distance from the periphery of the nearest burner to a horizontal
combustible surface is less than 200 mm, then E shall be 10 mm
or more, or the horizontal surface shall be above the trivet.
Overheat clearances -(Measurement A): The distance between
the highest part of the hob of the gas cooking appliance should
be higher than 600mm for a range hood and higher than 750mm
for an overheat exhaust fan.
16.3 Installation of the anti-tilt plate
Datermine position of cooker and anti-tilt plate.
Securely fix the anti-titlt plate to the floor with appropriate fasteners.
Fasten the stability bolt bracket to the front frame with the 2 screws
supplied.
Reposition the cooker back into the anti-tilt plate and then mark the
position of the stability bolt hole.
Pull the cooker back out and drill the bolt location hole. Use a 10mm
masonry or wood drill. When drilling into concrete ensure a minimum
hole depth of 30mm.
Reposition the cooker back into the anti-tilt plate, aligning the stability
bolt bracket with the 10mm drilled hole. Then slide the bolt through the
bracket and into the hole.
Connect Electricity supply/gas supply but do not turn on until installation
is completed
Anti-tilt
bracket
Page 18

17
Page 19

18
When the installation is complete, always check that all the unions are absolutely tight using a soapy
solution. Never use a flame to make this check.
Page 20

8
19
、
118
、
TTeessttiinngg tthhee ooppeerraattiioonn ooff tthhee ggaass ccooookkeerr
NNOOTTEE:: YYoouu mmuusstt tteesstt tthhee ccooookkeerr aafftteerr iinnssttaallllaattiioonn,, bbeeffoorree yyoouu hhaanndd iitt oovveerr ttoo tthhee ccuussttoommeerr.. YYoouu mmuusstt hhaavvee aa
mmaannoommeetteerr aanndd aa ccoonnnneeccttiinngg ttuubbee..
1188..11 CChheecckkiinngg ggaass ssuuppppllyy
Check the manometer zero point is correct.
Connect the manometer to the cooker pressure test point. This is located on the regulator or LPG inlet fitting.
Turn on the gas supply and the electricity (if applicable) and try to ignite the gas.
NOTE: It will take additional time to light the gas for the first time as air needs to be purged from the pipes.
Check the operating pressure for the particular gas type (see table).
1188..22 FFoorr LLPPGG ccooookkeerrss
Adjust the regulator if necessary (this may be remote from the cooker).
1188..33 FFoorr NNaattuurraall GGaass ccooookkeerrss
Regulators are supplied pre-adjusted and configured by the component maker for use with Natural Gas. The
appliance installer is not required to make an adjustment to obtain the correct outlet pressure setting.
An arrow on the base of the regulator indicates the direction of gas flow when the inlet and outlet of the regulator
are orientated correctly. When the regulator has been fitted check for leaks from the connections with soapy
water.
1188..44 CChheecckkiinngg tthhee FFuunnccttiioonn ooff tthhee RReegguullaattoorr
With the appliance operating check the outlet pressure:
When all burners of the appliance are operating at maximum,
When the smallest burner of the appliance is operating at minimum.
Under these conditions the outlet pressure should not vary from the nominal outlet pressure of 1.0kPa by more than
±20% of the nominal outlet pressure (±0.20kPa for Natural Gas).
If the regulator appears to not be performing satisfactorily then check the following points.
If the outlet pressure is consistently too low then the inlet pressure may be too low and adjustment of an
upstream regulator may be needed, or an upstream regulator or valve with insufficient flow capacity may be
present in the gas supply line. If this is suspected then it may be necessary to repeat the checks whilst measuring
both the inlet and outlet pressure to determine if the inlet pressure is in the range 1.13 – 5kPa.
Check that the regulator has been fitted to the gas supply line in the correct orientation, the arrow on the base of
the body indicates the direction of gas flow. Once these checks have been completed, if the regulator still fails to
perform in a satisfactory manner it should be replaced.
1188..55 TTeessttiinngg tthhee ccooookkeerr ffeeaattuurreess
Observe the flame appearance on each burner. If it is much smaller or larger than expected, then the injector size
needs checking.
When maximum flame appearance is correct, then check the turn-down setting on each burner. If the settings
appear to be incorrect, proceed as follows:
Adjust the bypass screw mounted on the body of each burner control cock. This is accessible when the
control knob and the control panel are removed.
Check the ignition on all burners both separately and in combination.
Check the operation of the electrical components, if applicable.
If you are satisfied that the cooker is operating correctly, then turn it off and show the customer how to use it.
Make sure you ask the customer to operate the clock and controls.
NNoottee:: IIff tthhee ccooookkeerr ccaannnnoott bbee aaddjjuusstteedd ttoo ppeerrffoorrmm ccoorrrreeccttllyy,, tthheenn iinnffoorrmm tthhee ccuussttoommeerr ooff tthhee pprroobblleemm aanndd
ppuutt aa wwaarrnniinngg nnoottiiccee oonn tthhee ccooookkeerr.. IIff tthhee pprroobblleemm iiss ddaannggeerroouuss,, tthheenn ddiissccoonnnneecctt tthhee ccooookkeerr.. IIff tthheerree iiss aa
ffaauulltt,, tthheenn tthhee ccuussttoommeerr sshhoouulldd bbee aaddvviisseedd ttoo ccoonnttaacctt tthhee mmaannuuffaaccttuurreer
rreettaaiilleerr..
r
’
’
ss llooccaall sseerrvviiccee oorrggaanniizzaattiioonn oorr tthhee
Page 21

20
from rear
Page 22

20、Technical specifications
21
product dimension(mm) 540*600*910
package size(mm) 630*735*982
gross/net weight(Kg) 49.5/57
For all product enquiries (including warranty support),
please contact our customer care team 1800 444 357
or via email:sales@lendimplex.com.au
Gas Type: Natural Gas @ 1.00kPa Test Point Pressurej
oven capacity(L) 73
Burner Injector Size (mm)
Rapid 1.55mm 12.0
Semi-rapid 1.16mm 6.70
Auxiliary 0.90mm 4.00
Grill Oven 1.18mm 7.00
Oven 1.40mm 10.0
ULPG @ 2.75kPa Test Point Pressurej
Burner Injector Size (mm) N.G.C. (MJ/h)
Rapid 0.93mm 11.0
Semi-rapid 0.72mm 7.50
Auxiliary 0.57mm 4.00
Grill Oven 0.72mm 7.00
Oven 0.85mm 11.5
Total Gas Consumption:
Natural Gas (MJ/h)
N.G.C. (MJ/h)
ULPG (MJ/h)
45.4 48.5
Page 23

For all product enquiries (including warranty support),
please contact our Customer Care team on
1800 444 357 or via email: customercare@hapl.com.au
 Loading...