

Page 1

User Manual
540mm Upright Electric Cooker
EFF54W / EFF54S
EEF54W / EFF54S Upright Cooker User Manual Page i
Page 2

CONTENTS
Conditions of use 2
Safety precautions 2
Other Important Safety Information 2
Warnings for use of oven and appliance hob 3
Product description 4
First time use of the appliance 5
Using the oven of your electric cooker 6
Oven shelf location 7
Oven cooking guide 7
Understanding baking problems 8
Using the hotplates of your cooker 9
Using the hotplates of your electric cooker 10
Cleaning the COOKER 11
Information about the cooling fan 13
Replacing the Oven Lamp 13
Solving Problems 14
Installing cooker - power connections 15
Installing your new cooker 16
Installation Sequence 17
Ambry installation 17
Technical specications 18
We recommend that you read the instructions in this Manual carefully before use for the best performance and to extend
the life of your appliance, as it will provide you with all the instructions you require to ensure its safe installation, use and
maintenance. Always keep this Manual close to hand since you may need to refer to it in the future. Thank you.
Page 1 EEF54W / EFF54S Upright Cooker User Manual
Page 3

CONDITIONS OF USE
This appliance is intended to be used for domestic use, not commercial use.
SAFETY PRECAUTIONS
• This appliance is not intended for use by persons (including children) with reduced physical, sensory or mental
capabilities, or lack of experience and knowledge, unless they have been given supervision or instruction
concerning use of the appliance by a person responsible for their safety.
• Warning – ensure that no downward pressure is applied to the oven door when open.
in particular, do not allow a child to climb on to open oven door
• Warning - accessible parts can become hot during use, especially the oven door.
To avoid burns, young children must be kept away.
• Young children should be supervised to ensure they do not play with this appliance.
• During use this appliance becomes hot.
Care should be taken to avoid touching hot external and internal surfaces when in use. Use oven gloves.
• Install cooker, shelving and ttings in accordance with this manual.
• Ensure all specied vents, openings and airspaces are not blocked.
• To ensure your safety all electric appliances should only be installed or service by qualied staff.
If the supply cord when tted, is damaged, it must be replaced a service agent or similarly qualied
person in order to avoid a hazard.
• Do not spray aerosols in the vicinity of this appliance while it is in operation.
• Do not store ammable materials in the appliance or near this appliance.
• Do not modify this appliance.
• Appliance must be installed according to current laws and regulations by qualied tradesmen/Installers
The Manufacturers, Importers/Distributors and Retailers shall not be liable to any legal liability,
personal injury and property damage due to incorrect operation or incorrect Installation.
OTHER IMPORTANT SAFETY INFORMATION
This appliance must not be used as a space heater.
Do not obstruct the ventilation slots on front or back of appliance.
Do not remove any labels or use abrasive/ corrosive cleaners on.
According to the electrical safety regulations the appliance equipment must be properly earthed.
Do not use corrosive cleaners e.g. oven cleaners that contain caustic soda.
EEF54W / EFF54S Upright Cooker User Manual Page 2
Page 4

WARNINGS FOR USE OF OVEN AND APPLIANCE HOB
Oven warnings
• Do not push down or apply any weight on open oven door.
• Do not line oven with foil or place anything on the bottom of the oven while baking to avoid permanent damage,
as trapped heat will crack or craze the enamel oor of the oven cavity liner.
• Use of olive oil and other poly-unsaturated oils (vegetable oils) when roasting uncovered food causes deposits
inside the oven which are very difcult to remove.
Hotplate and burner warnings
• Do not allow pots to boil dry, as damage to hotplate may result.
• Do not operate hotplates or burners without a pot, fry pan etc.
• Do not allow cookware to overhang hob onto adjacent bench tops, this will cause scorching to the bench
top surface.
• Stainless steel sealing ring around the hotplate will discolour due to heat.
Disposal of packaging
• Please recycle the cardboard and also any polystyrene packaging where possible.
Installation, Cleaning and Servicing
• An authorized person must install this appliance.
• Before using the appliance, ensure that all packing materials are removed from the appliance.
• In order to avoid any potential hazard, the Installation Instructions must be followed.
• In order to avoid accidental tipping of the appliance (for example, by a child climbing onto the open oven door),
the anti tilt plate must be installed.
• Where the appliance is installed next to cabinets, the cabinet material must be capable of withstanding 85°C.
• Only authorized personnel should carry out servicing.
• Always ensure the appliance is switched off before cleaning.
• Do not use caustic soda- based cleaners.
• Do not use steam cleaners, as this may cause moisture build up.
• Always clean the appliance immediately after any food spillage.
• Appliances requiring connection to 220-240V and must be earthed.
Page 3 EEF54W / EFF54S Upright Cooker User Manual
Page 5
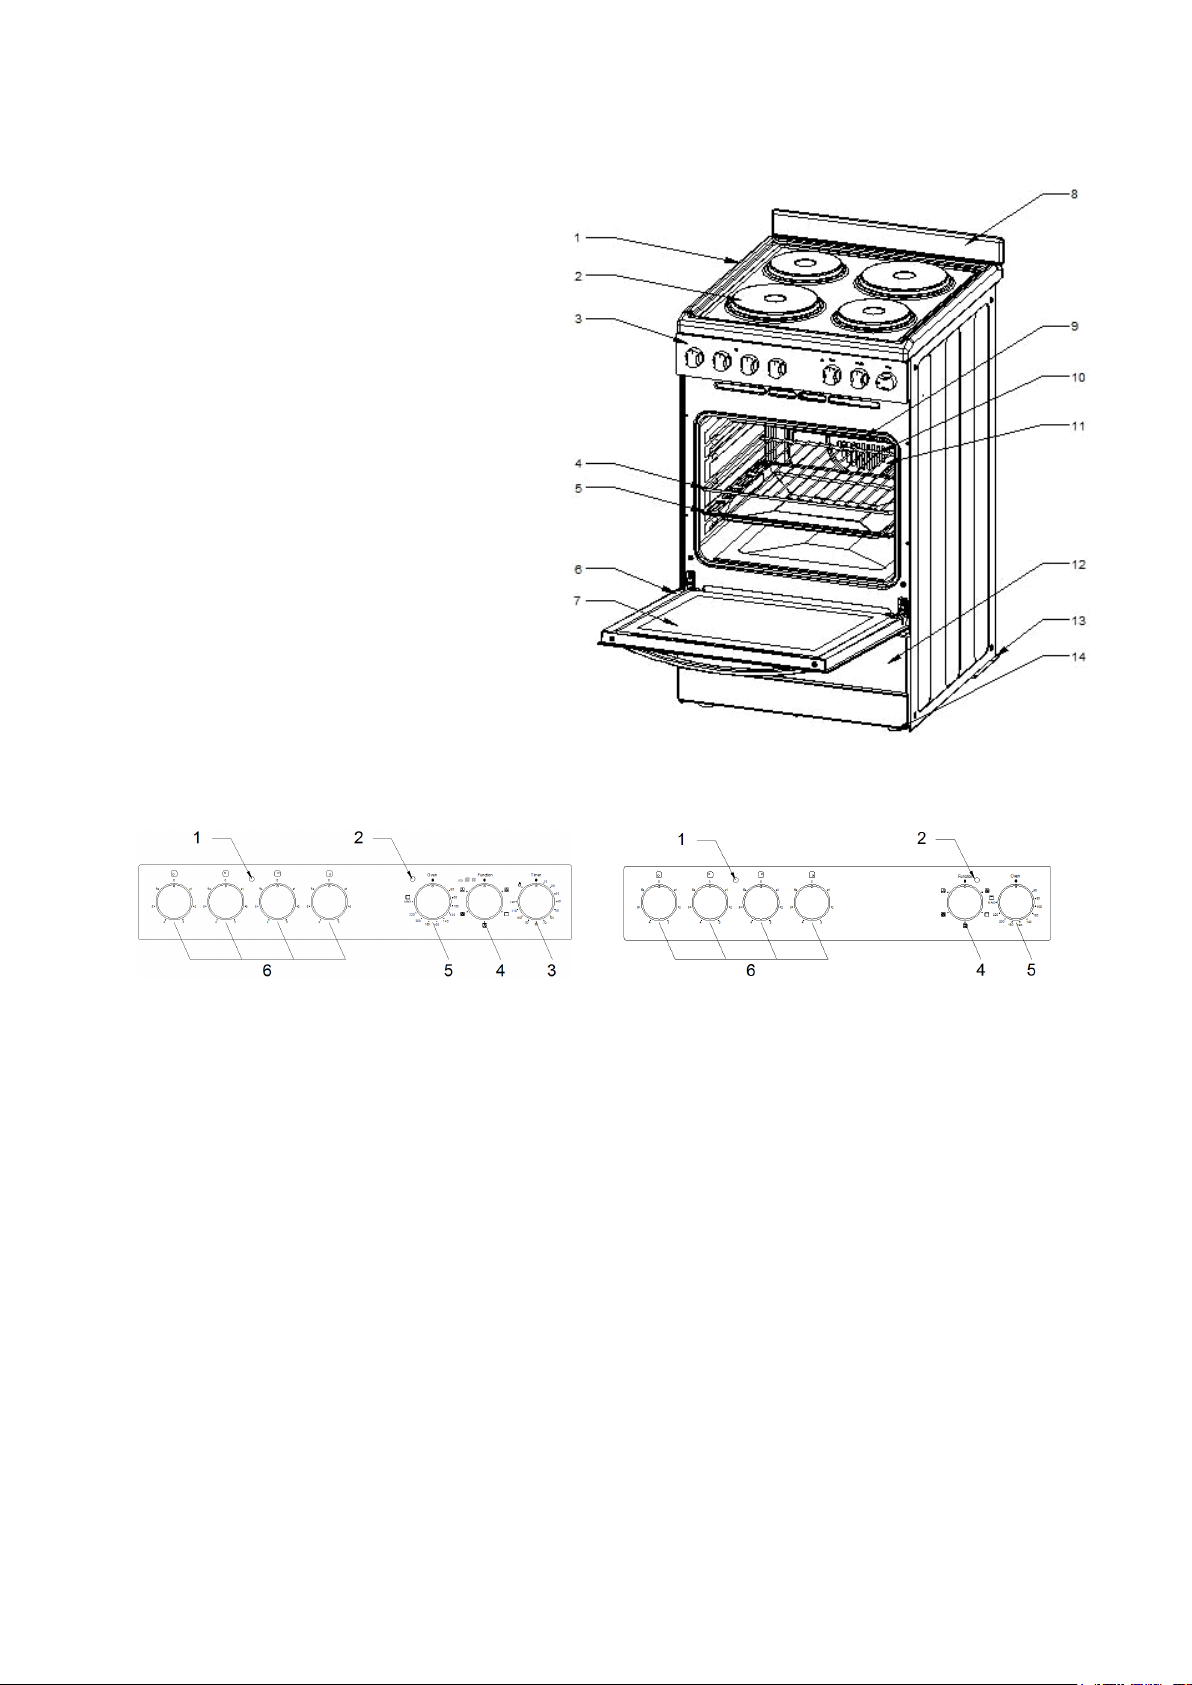
PRODUCT DESCRIPTION
Description of electric cooker
1. Cooktop hob area
2. Hotplate Burner (4 of)
3. Control Panel
4. Chrome oven shelf (1 supplied)
5. Baking tray with grill insert (1 supplied)
6. Oven Door
7. Oven Inner Door Glass
8. Splashback (1 supplied)
9. Integrated Grill element
10. Fan forced oven element
11. Fan & element cover
12. Front panel
13. Anti-tilt bracket
14. Anti slip feet
Controls
Front control panel (various models)
1. Hotplate Indicator Lamp (where tted)
• Comes on when a hotplate is turned on.
2. Oven Indicator Lamp
• Lamp is on when oven element is heating up oven or cycling on.
3. 120 Minute Ringer Timer (optional)
• Sets “reminder” alarm count-down time or if oven is being used,
switches oven OFF after cooking time set has ended.
4. Function switch Control Knob
• Sets Oven Function/ Mode.
5. Oven Temperature Control Knob
• Sets temperature for baking.
6. Hotplate Control Knob - can be rotated in either direction
• Adjusts temperature of hotplate.
7. Programmable Clock (where tted)
• Sets baking/grilling reminder times.
• Sets automatic cooking duration and stop time
Note: Clock time must be set before oven can operate
EEF54W / EFF54S Upright Cooker User Manual Page 4
Page 6
FIRST TIME USE OF THE APPLIANCE
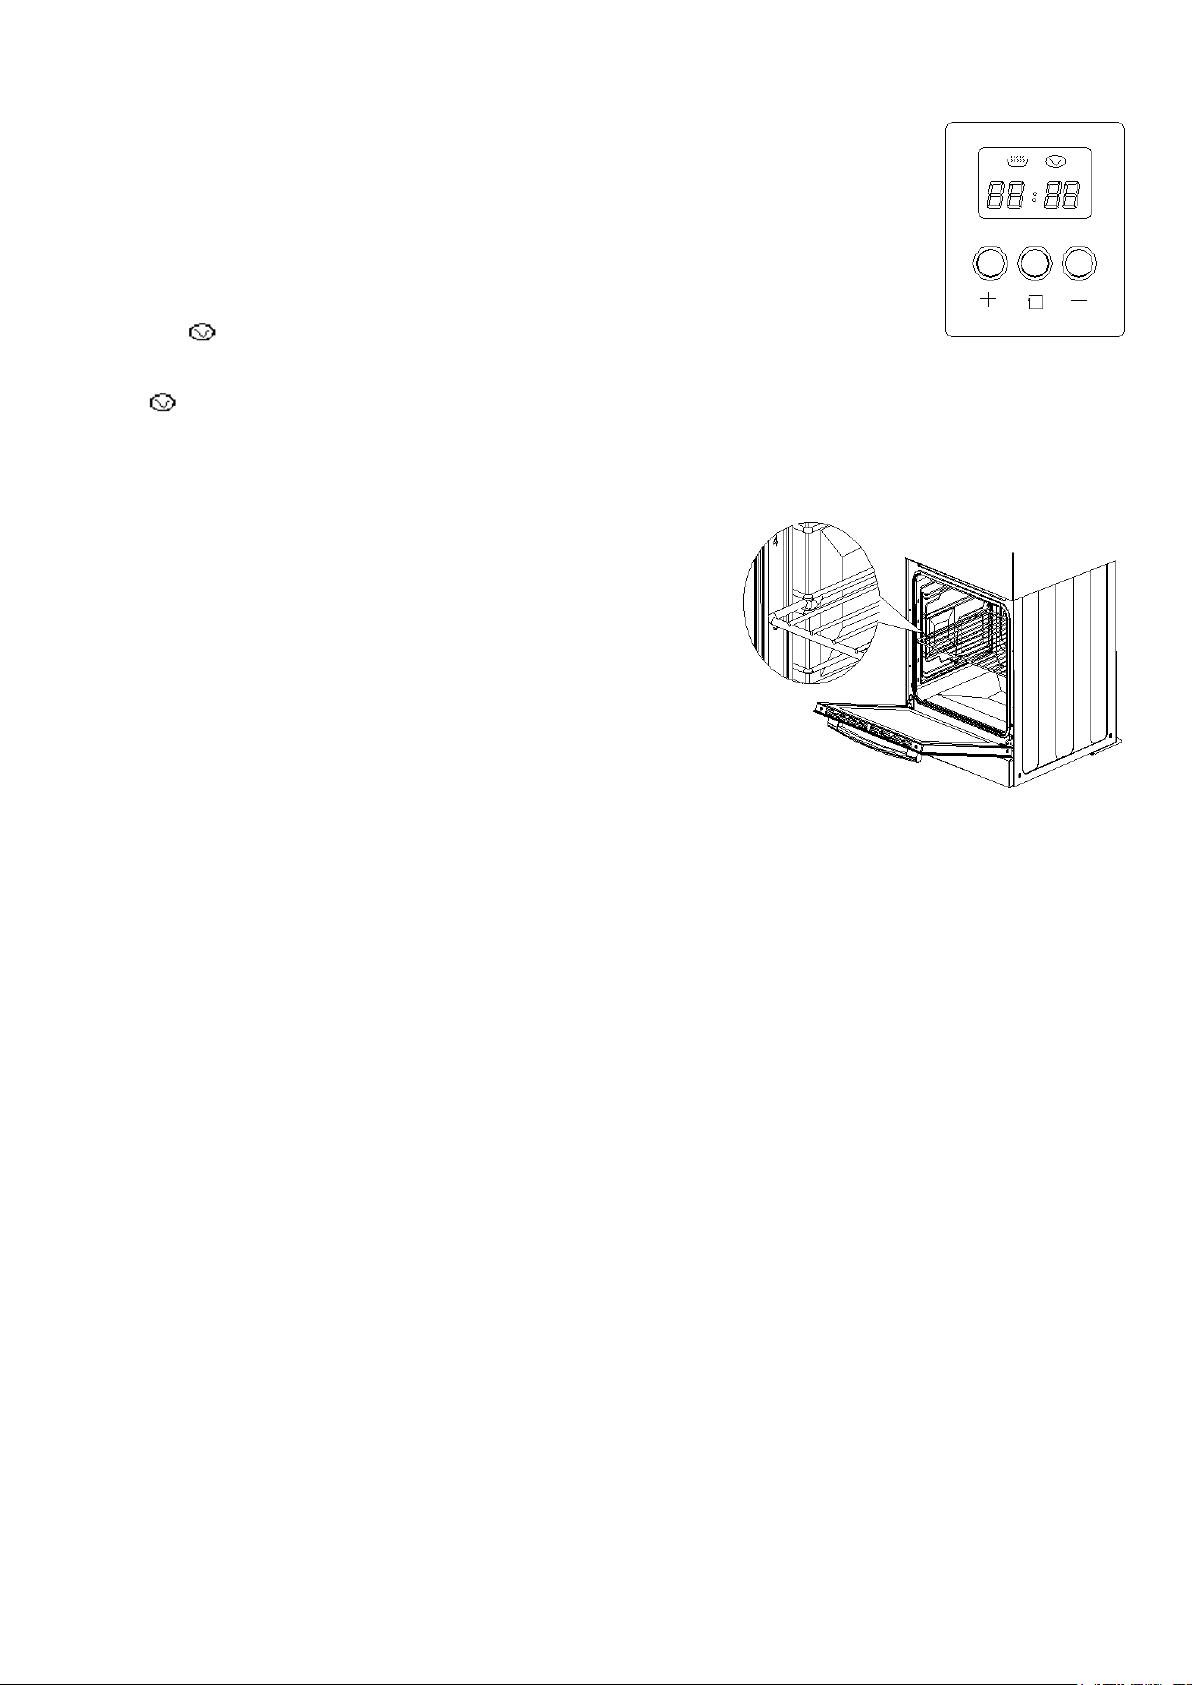
Setting the time
If you have purchased a model tted with a 3 button programmable timer,
you must set the time of day before you can operate your appliance. Note:
The clock has a 24 hour display
• After the appliance has been electrically connected “00.00” will be displayed
and the “ ” will ash.
• To set the time of day, press the “–” or “+” buttons. 15 seconds after the last change,
the “ ” will disappear, conrming the time has been set.
Fitting oven shelves
• Ensure shelf orientation is correct (refer picture).
• Slide into oven at an angle until raised back of shelf is
past the stop on side runners.
• Lower front of shelf and push in until stop is reached.
NOTE: The top ledge is not a shelf position
Preparing your appliance for the first time
• Wipe out the oven interior prior to operation with warm soapy water and polish dry with a soft clean cloth.
• New appliances can have an odour during rst operation. It is recommended to ‘run in’ your oven before you cook
for the rst time. Run the oven at 180°C for 2-4 hours and ensure that the room is well ventilated.
• Please install oven furniture as outlined in the “Fitting Oven Accessories and Cleaning” section.
• If your appliance is tted with solid hotplates, turn heat setting to high for 3 minutes to fully harden the coating.
When cooled, apply a thin coating of cooking oil to seal the surface.
Using the oven
Oven safety warnings
• Always follow the instructions for putting the shelves and side racks into the oven, to avoid accidents.
• Do not line the oven with foil, it will damage the enamel.
• Do not place cookware or anything else on the bottom of conventional oven model as
trapped heat will damage the oven
• Do not touch the hot surfaces or heating elements inside the oven.
• Do not use the oven door as a shelf.
• Do not push down on the open oven door.
• Do not place shelves on top of upper most shelf runner as there are no stops for shelf withdrawal.
Page 5 EEF54W / EFF54S Upright Cooker User Manual
Page 7
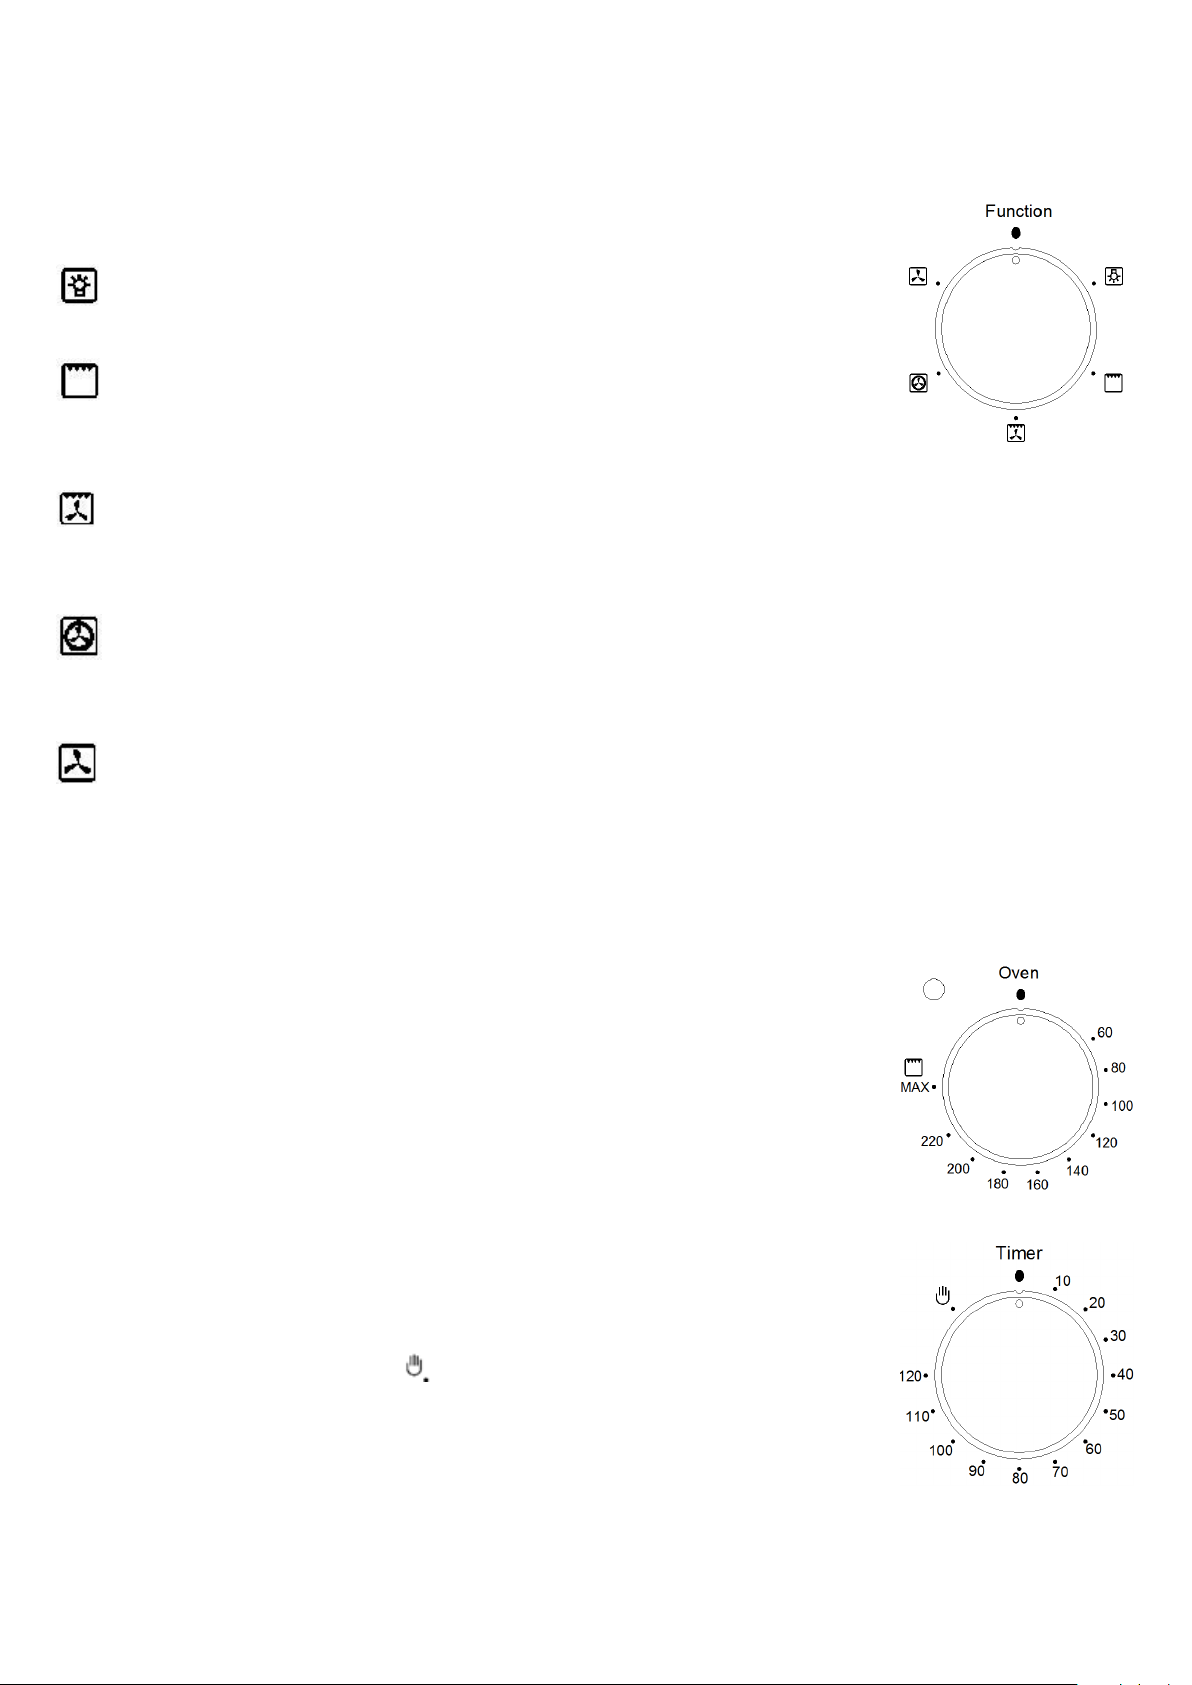
USING THE OVEN OF YOUR ELECTRIC COOKER
Set Oven Function
Description of oven functions (mode)
Lamp
The lamp of the oven is on. No heating elements are on.
Grill (uses upper element)
Suitable for grilling food or browning food.
Do not use lowest shelf position.
Fan Assisted Grill cooking
The upper heating element and the fan come on.
Suitable for Grilling food without turning over and using two shelves. Do not use lowest shelf position
Fan-forced Cooking
The rear circular heating element and the fan come on to make heat distribution more uniformly throughout
the oven. This mode is ideal for general purpose cooking on 3 shelves at the same time.
Defrosting Mode
Only the fan operates. It is located on the back of the oven, making the air circulate at room temperature
around the food. This is recommended for the defrosting of all types of food. By using the fan, the
defrosting time is approximately halved .
Set Thermostat knob (Temperature setting)
• Selection of cooking temperature is carried out by turning the knob clockwise to the
required temperature, between 60c to MAX .
• Oven indicator lamp will come on when the oven is heating up.
• When it goes out it means that it reached the required temperature.
• The lamp will cycle ‘on & off’ regularly during use which is normal.
It means that oven temperature is being constantly maintained at the selected level.
Set Cooking Time
120 Minute Ringer Timer with “Oven ON/OFF”
Operating oven without Timer
• Turn knob counter clockwise to “ ” symbol.
The oven will operate without use of the timer function.
Operating oven using the Timer
• To set the timer, simply turn the knob clockwise to the required number of minutes.
The timer will automatically shut down the oven after the set minutes and the timer will ring at the same time.
NOTE: For any time below fifteen minutes turn the knob past the fifteen then turn it back to the required
number of minutes. When the timer returns to zero, the timer gives a short ring.
EEF54W / EFF54S Upright Cooker User Manual Page 6
Page 8

OVEN SHELF LOCATION
(5 shelf positions side racks)
OVEN COOKING GUIDE
The following is intended as a guide only. It is often required to set oven 10-20 degrees above or below this guide to get
the result you want. Also adjustments are needed for the cooking time to suit personal desired results.
Also you should follow the recipe guide when setting temperature and times.
For best results when baking, preheat your oven for 15-20 minutes.
Food Conventional Oven Fan forced oven Time in minutes
Temperature
(°C)
Plain or fruit
scones
Rolled biscuits 170 (18 0 ) 2 150 (170) Any 10-15
Spooned biscuits 190 2 180 Any 12-15
Shortbread
biscuits
Hard individual
meringues
Soft individual
meringues
Pavlova 110 ( 120) 1 10 0 Any 75
Patty cakes 190 2 180 Any 15-20
Sponge 180 2 170 Any 20-30
Plain butter cake 180 2 170 Any 25-40
220 2 (3) 210 Any 10-15
160 1 (2) 150 Any 30-35
110 2 100 Any 90
180 2 165 Any 15-20
Oven shelf
position
Temperature
(°C)
Oven shelf
position
Rich fruit cake 140 (150) 2 130 Any 180
Shortcrust
cornish pasty
Shortcrust
custard tart
Cream puffs 210 2 200 Any 25-30
Yeast bread 210 1 200 Any 25-30
Pizza 200 2 220 Any 15-25
Shelf position is counted from the bottom shelf position up. Bottom shelf position is 1.
Page 7 EEF54W / EFF54S Upright Cooker User Manual
180 -20 0 2 160 (18 0) Any 40-45 (10/35)
180 -220 1 (3) 170 -20 0 Any 20-30 (10/25)
Page 9

Meat/Poultry/Fish
Rare 200 35-40
Recommended
temperature (°C)
Minutes per kilogram
Beef
Lamb
Veal 180 60
Pork 200 60
Chicken 180 -20 0 45-60
Duck 180 -20 0 60-70
Turke y 180
Fish 18 0 20
Medium 200 45-50
Well done 200 55-60
Medium
200
Well done 60
40
40–45 (less than 10kg)
35–40 (more than 10kg)
UNDERSTANDING BAKING PROBLEMS
Problem Causes Remedy
Incorrect shelf position
Select shelf that puts food in centre
of oven
Uneven cooking
Baked products too brown on top
Oven tray too large
Trays not in centre Put trays in centre
Oven fan causing uneven browning or
small cakes to lean over
Oven not preheated Preheat the oven
Baking tins too large (diameter) for
recipe
Fan-forced mode with oven
temperature too high
Cooking time too long Next time, shorten cooking time
Baking tins not evenly spaced
Items to be cooked are not evenly
sized or spaced on trays
Baking tins too large (diameter) Use correct size tins
Baking tins are dark metal or glass
Food too low in oven Cook one shelf higher
Remove oven tray. Use smaller trays
or dishes
Rotate food during cooking, or use
Conventional Mode (i.e. no fan)
Use correct size tins
Check recipe. Reduce oven
temperature by 10 – 20 or more
Stagger baking tins at least 3cm
between tins and the oven walls
Make into same size and shape and
spread evenly over trays
Change to shiny, light tins or lower
the temperature by 10°-20 C
Baked products too brown on bottom
Oven door opened too frequently
during baking
Baking temperature too high Lower the temperature
Oven tray blocking heat (below
thermostat)
Don’t open the oven door until at
least half the cooking time has
passed
Use higher shelf position for oven tray
EEF54W / EFF54S Upright Cooker User Manual Page 8
Page 10

Problem Causes Remedy
Baking temperature too high Lower the temperature
Food too low in oven Cook one shelf higher
Cakes have a cracked thick crust
Baked products are pale, at
and undercooked
Cakes fallen in centre
Roast meat and potatoes not
browning in fan oven
Cake batter over mixed
Baking tin too deep
Baking tins dark Change to shiny light tins
Baking temperature too low Raise the temperature
Food too low in oven Cook one shelf higher
Baking time too short Increase cooking time
Incorrect baking tin size Use correct size tin
Baking temperature too low Raise the temperature
Baking time too short Increase cooking time
Proportions of ingredients incorrect
for recipe
Opening door too early during baking
Poor hot air circulation
Oven temperature is too low Increase temperature to 200 - 220
Not long enough in oven
Mix just long enough to combine
the ingredients
Check size of tin and use
recommended size
Check recipe
Do not open door until the last
quarter of cooking time
Elevate food onto a rack to allow
air circulation
Continue cooking for another 15+
minutes
NOTE: Condensation on oven door is normal, especially when kitchen is cold
Also spacing and size of food on trays and the number of baking dishes in the oven can affect air circulation.
USING THE HOTPLATES OF YOUR COOKER
Hotplates safety warnings
• Do not use pots and pans which are unsteady, as these could overbalance.
• Do not use mats, heat diffusers or wok stands. These will cause a temperature build-up which can damage
the cook top.
• Do not let cooking pots overhang sides or front of hob get too close to the hotplate control knobs.
Choosing cooking pots and pans
Look at this diagram below which shows you which utensils to use on the hotplates and which utensils should not be
used.
• Always use pots and pans with at bottoms. Uneven or thin bottoms will waste energy and cook slowly.
• Always use pots and pans which are slightly larger than the hotplate. Small pans waste energy.
• Always put dry pots and pans on the hotplates.
• Do not use pots and pans which are too large. Pans which overhang the hotplate more than 50mm
can damage the hob
Page 9 EEF54W / EFF54S Upright Cooker User Manual
Page 11

USING THE HOTPLATES OF YOUR ELECTRIC COOKER
Check the hotplates on your cooker against the diagrams below before you use your cooker for the rst time
Solid Hot Plates
Solid hotplates
• The strong solid-cast hotplates give wide contact for fast, efcient cooking.
• The hotplates are sealed all around which means that spilt liquids do not go under the hotplates.
NOTE: The stainless steel ring will tarnish with use.
Before first use
• The top surface of the hotplates are sealed with a heat resistant coating. Before using for the rst time the
hotplates should be heated for a short period without a pan to harden the protective coating.
• Turn the heat setting to high for approx 3 minutes to fully harden the coating.
When the hotplates have cooled apply a thin coating of cooking oil to the hotplate to seal and protect the surface.
• After switching off, this light will continue to glow until the temperature of the hotplate drops below 60°C
EEF54W / EFF54S Upright Cooker User Manual Page 10
Page 12

CLEANING THE COOKER
Safety warnings about cleaning
• Always make sure that the cooker is turned off before cleaning.
• Always clean cooker immediately after use.
• Do not use steam cleaners. These may cause moisture build-up.
• Do not use caustic- based cleaners. These will damage aluminums parts, and remove enamel gloss.
Cleaning the enamel
• Keep enamel clean by wiping it with a soft cloth dipped in warm soapy water.
• Rub difcult stains with a nylon scourer or creamed powder cleanser.
• Do not use abrasive cleaners, dry powder cleaners, steel wool or wax polishes.
• If you use an oven cleaner, then follow the instructions on the product carefully.
Cleaning the control panel
• Make sure control knobs are in off position.
• Clean the control panel by wiping it with a soft cloth dipped in warm soapy water and squeezed dry.
Cleaning the electric cook top
DO NOT PUT ELEMENT IN WATER!
Solid hotplates
• For normal cleaning use a moist cloth.
• For very dirty hotplates use any commercial cleanser.( Hot plate cleaner ).
• After cleaning, remove any cleanser remaining and dry the hotplate completely running the element for
a short period.
• For prolonged life of the hotplate we recommend Hillmark “Shine On” hotplate protector,
or similar to prevent rust or corrosion.It is recommended this be done weekly.
• Permanent heat- discolouration of the trim ring is normal
NOTE: Do not use abrasive sponges or scourers, oven sprays or stain removers on solid hotplates.
These may damage, scratch or stain the hot plate. Any pitting, staining or scratching will not be covered by warranty.
Cleaning the Oven
• Open the door fully.
• Remove oven shelves and side racks.
• Clean with hot soapy water.
Page 11 EEF54W / EFF54S Upright Cooker User Manual
Page 13

Cleaning the oven door / How to remove the oven door
For a more thorough clean, you can remove and disassemble the oven door.
Proceed as follows:
• Oven door structures 1 remove and assemble procedure:
• Open the door to the full extent (g.1);
• Open the lever A completely on the left and right hinges (g.2);
• Hold the door as shown in (g.3)
• Gently close the door (g.3) until left and right hinge levers A are hooked to part B of the door (g.4).
• Withdraw the hinge hooks from their location following arrow C (g.4).
• Rest the door on a soft surface;
• To replace the door, repeat the above steps in reverse order.
Removing the Inner Pane of Glass
• Oven door: Remove the seal G by unscrew the 2 screws (g.1)
• Gently pull out the inner pane of glass (g.2)
• Clean the glass with an appropriate cleaner. Dry thoroughly, and place on a soft surface.
• Now you can also clean the inside of the outer glass.
Cleaning the door glass
• Clean the glass door using non-abrasive products or sponges and dry it with a soft cloth.
• Do not use the oven without the inner door glass tted.
• Do not use harsh abrasive cleaners or sharp metal scrapers to clean the oven door glass since they can
scratch the surface, which may result in shattering of the glass.
EEF54W / EFF54S Upright Cooker User Manual Page 12
Page 14

INFORMATION ABOUT THE COOLING FAN
NOTE: Your cooker is fitted with a cooling fan that will run after the oven has been turned off.
The reduce the time of the cooling fan running time it is suggested to open door ajar to assist in cooling
down of oven.
REPLACING THE OVEN LAMP
• Disconnect the oven from the power supply at the fuse-box by means of the switch used to connect the appliance
to the electrical mains.
• Remove the glass cover of the lamp-holder by rotating anti-clockwise
• Remove the lamp and replace with a lamp resistant to high temperatures (300°) with the following characteristics:
» Voltage: 220-240V
» Wattage: 25W
» Type: E 14
• Replace the glass cover. Reconnect the appliance to the mains power supply.
Page 13 EEF54W / EFF54S Upright Cooker User Manual
Page 15

SOLVING PROBLEMS
Problem Causes Remedy
Elements wont work
Oven or grill not working
Oven light not working
Oven not hot enough
Unit smoking when rst used Protective oils being removed This is normal
Odour on rst use of oven Manufacturing oils on elements
Circuit breaker tripped Check circuit breaker
Household fuse blown Replace household fuse.
120 min Timer not in “Manual”
position
Power not turned on Switch on electricity
Controls incorrectly set Reset controls
Circuit breaker tripped Check circuit breaker
Power not turned on Switch on electricity
Household fuse blown Check fuses
Circuit breaker tripped Check circuit breaker
Lamp blown or loose in socket Replace or tighten globe
Heat escaping through incorrectly
sealed door
Door seal is worn or has moved Replace seal or ret it
Refer to 120 min timer instructions
Check shelves or dishes are not
preventing door closing properly,
Check that door is tted properly
after door removal for cleaning
This is normal
Allow 2–4 hours for odour to dissipate
(open all windows)
Turn timer knob past 15 minute mark.
120 minute timer buzzer not audible Timer not wound sufciently
Oven shelf tight
Clock display off
NOTE: Only Euromaid Authorised service agents should carry out servicing otherwise warranty may be void.
Oven shelf not inserted correctly, may
be upside down or back to front
Household fuse blown or power
supply is off
Then turn to the required number of
minutes
Remove shelf and insert as per
diagram
Check fuses, power supply
EEF54W / EFF54S Upright Cooker User Manual Page 14
Page 16

INSTALLING COOKER - POWER CONNECTIONS
Fitting on a Power Supply Cable
Connecting appropriate power supply ` terminal board/ connector block:
• Using a screwdriver ,prize open tabs of the Terminal board cover.
• Remove the wire clamp screw.
• Fasten the wires beneath the corresponding screw heads, using brass ‘bridge’ for single phase supply.
• Fasten cable clamp and close the cover of the terminal board.
• The ac power supply should be 220-240 V, 50/60 Hz. For electric cookers, the minimum 32A circuit breaker.
NOTE: To be carried out by a qualified electrician / installer.
WARNING: CONNECT THE POWER CORD MUST BE IN ACCORDANCE
WITH THE INSTRUCTIONS LISTED IN THE TABLE BELOW
Wire cross-
sectional
area (mm2)
Connection
mode
1N ~ Min6 - - Min6 Min6
2N ~ Min2.5 Min2.5 - Min6 Min6
3N ~ Min2.5 Min2.5 Min2.5 Min6 Min6
L1 L2 L3 N E
Connecting the supply cable to the mains
Install an approved circuit breaker with a minimum contact opening of 3 mm, between the appliance and the mains fuse
box .The circuit breaker should be sized according to the load and should comply with current regulations (the earth wire
should not be interrupted by the circuit breaker).
The supply cable should be positioned so that it does not reach a temperature of more than 50° with respect to the
room temperature, anywhere along its length. Before switching fuse ON in meter-box check:
• Earth continuity. The electrical safety of this appliance can only be guaranteed if the cooker is correctly installed
and earthed, in compliance with regulations on electrical installations.
• The electrical capacity of the system and sockets will support the maximum power of the appliance,
as indicated on the data plate
• Go to section “Installing your new cooker”
Page 15 EEF54W / EFF54S Upright Cooker User Manual
Page 17

INSTALLING YOUR NEW COOKER
Safety warnings about installation
• The cooker must be installed and serviced only by an authorized person.
• A certicate of compliance must be supplied by Installer and is to be kept by the customer.
• The packing materials must be removed before you install the cooker.
• You must follow the installation instructions in this booklet.
• The surrounding kitchen cabinets must be able to withstand 85°C. We will not accept responsibility for damage
caused by installation in to kitchen cabinets which cannot withstand 85°C.
• The appliance must not be installed in a corner. It must be installed at least 100mm from the side wall.
• The vents; openings and air spaces must not be blocked.
• The anti-tilt plate must be installed to avoid accidental tipping.
• The stabilizing bolt must be installed to avoid accidental moving.
• You must not pull the cooker by the door handles.
• Electricity isolation switch for electric models 32A plug, is to be installed in an accessible position near the
cooker (but not behind cooker).
• If the supply cord or cable is damaged, it must be replaced by an approved service agent or a similarly
qualied person in order to avoid a hazard.
Unpacking and installation Instructions for Installer
Unpacking
• Please check the product and make sure that there is no damage.
• Read the relevant Installation Sections of this Manual. Ensure all is understood..
• Conrm that product is compatible with available electrical connections.
Ensure proposed installation position does not conict with Installation Sections.
• Check the attachment packing in good condition, complete accessories.
• Use screw driver to remove two xed Anti-tilt plate screws and plate.
Locating the cooker
Study the diagrams below to be sure of the dimensions required to locate the cooker safely. Make sure that the top of
the cooker is at least 10mm higher than the level of the bench tops. The appliance has been designed to t in a 540mm
wide gap in kitchen cabinets. The cooker may also be installed at the end of a line of benches or with a free space on
either side.
NOTE: To ensure cooker stability, both the anti-tilt plate and anti-movement/ stability bolt must be installed on the
cooker.
The installation the splash back
• Upon unpacking cooker, using a philips head screwdriver to
remove splashback from rear of cooker.
• Position splash back into tabs at rear of cooker and push downwards
gently until properly in position.
• Screw in splashback from behind to secure in place.
EEF54W / EFF54S Upright Cooker User Manual Page 16
Page 18

INSTALLATION SEQUENCE
(Refer to diagram relating to minimum Clearances required for correct installation)
• Determine position of cooker and ant-tilt plate.
• Securely x the anti-tilt plate to the oor with appropriate fasteners.
• Fasten the stability bolt bracket to the front frame with the 2 screws supplied.
• Reposition the cooker back into the anti-tilt plate and then mark the position of the stability bolt hole.
• Pull the cooker back out and drill the bolt location hole. Use a 10mm masonry or wood drill, depending on
oor type. When drilling into concrete ensure a minimum hole depth of 30mm.
• Reposition the cooker back into the anti-tilt plate, aligning the stability bolt bracket with the 10mm drilled hole.
Then slide the bolt through the bracket and into the hole.
• Connect Electricity supply but do not turn on until installation is completed.
• Slide the cooker back into the anti-tilt plate so that rear cover rests against the rear wall. Then check the height and
level of the cooker. If required, pull the cooker back out and adjust the leveling feet as required.
AMBRY INSTALLATION
Only a qualied person in compliance with the instructions provided must install the appliance.
manufacturer declines all responsibility for improper installation, which may harm persons and damage property.
Important
The power supply to the appliance must be turned off before any adjustments or maintenance work is to be carried out
on the cooker. Air vents at the rear of the cooker should not be fully covered otherwise ventilation will be restricted and
cause possible damage to the cooker.
Page 17 EEF54W / EFF54S Upright Cooker User Manual
Page 19

TECHNICAL SPECIFICATIONS
Model EFF54W / EFF54S
Oven net capacity (L) 56
Voltage(v) 220 -240
Frequency (Hz) 50/60
Circuit breaker(A) 32amp
Oven power (W) 2.15 k W
Cooktop power (W) 5.0KW
Product dimension (mm) 540*630*910
Package size (mm) 636*740*976
Gross /net weight (Kg) 53.8 / 44.3
EEF54W / EFF54S Upright Cooker User Manual Page 18
Page 20

THIS PAGE HAS BEEN LEFT BLANK INTENTIONALLY
Page 19 EEF54W / EFF54S Upright Cooker User Manual
Page 21

THIS PAGE HAS BEEN LEFT BLANK INTENTIONALLYTHIS PAGE HAS BEEN LEFT BLANK INTENTIONALLY
EEF54W / EFF54S Upright Cooker User Manual Page 20
Page 22

THIS PAGE HAS BEEN LEFT BLANK INTENTIONALLY
Page 21 EEF54W / EFF54S Upright Cooker User Manual
Page 23

Distributed by:
Home Appliances Pty. Ltd.
20 Carlotta Street, Artarmon NSW 2064
Tel: 02 9958 3111 Fax: 02 9958 3555
Email: info@hapl.com.au
Website: www.hapl.com.au
 Loading...