

Page 1
Q
U
I
C
KS
T
A
R
T
®
euroliteeurolite
L
E
DK
L
S
-
4
0
0R
G
BD
M
XL
I
G
H
TS
E
T
O
P
E
R
A
T
I
N
GE
L
E
M
E
N
T
SA
N
DC
O
N
N
E
C
T
I
O
N
S
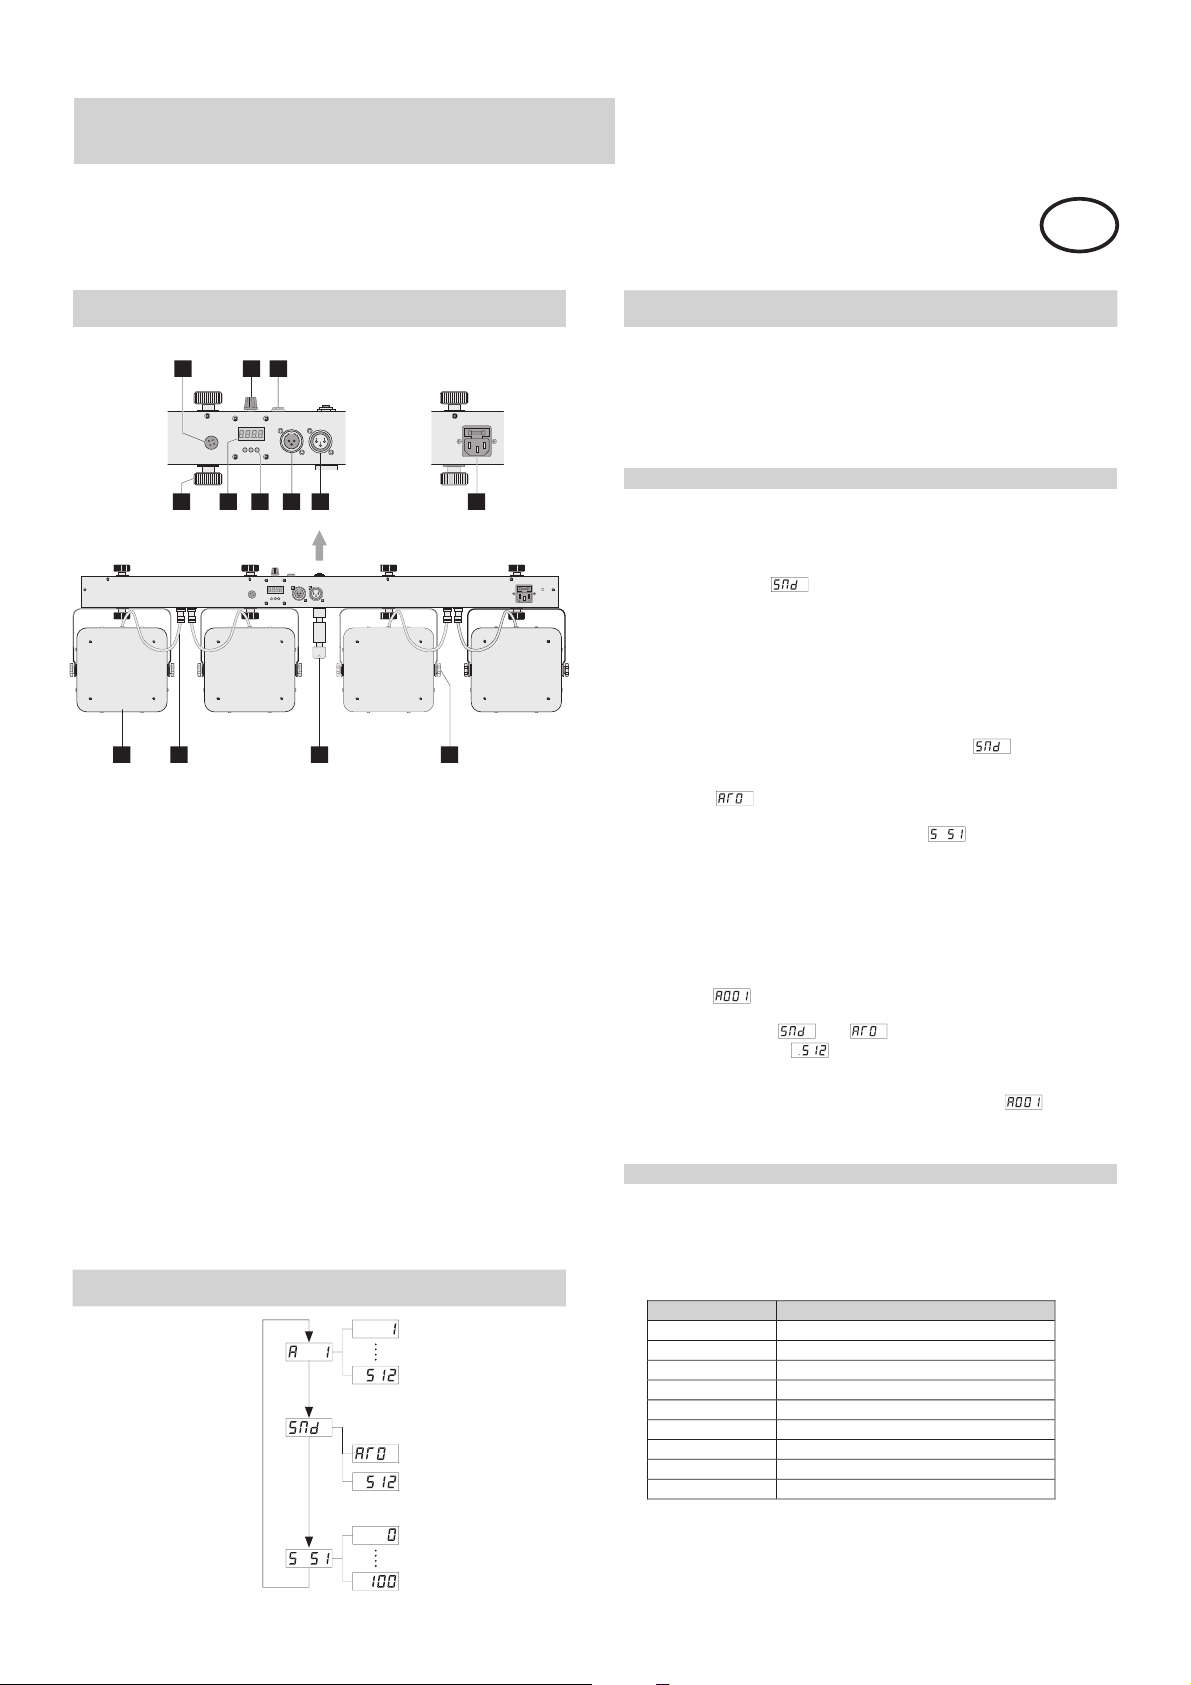
1
4
10
11
1
Microphone for sound-controlled operation
2
Sensitivity control for the microphone
3
Connector for the foot pedal FP-1
4
Fixation screw
5
LED display
6
Control buttons
• button MENU to call the menu items
• button DOWN to switch between sound control and automatic mode
•
button UP to switch to DMX operation
•
buttons UP and DOWN to set the speed in automatic mode and to
set the DMX starting address
7
Jack DMX IN
DMX signal input (3-pin XLR) for connecting a controller
8
Jack DMX OUT
DMX signal input (3-pin XLR) for connection to the DMX input of
another light effect unit
9
Power input with fuse holder
Used to plug the supplied power cord in. Only replace the fuse when
the device is disconnected from mains. Only use fuses of the same
rating and power.Thecorrectvalueisspecifiedonthedevice.
10
LED spot 1 to 4
11
Connection cable for the control unit
12
TV pin for placing on a stand
13
Fixation screw
2
3
DMXIN
Microphone
DOWN
MENU
5
Microphone
M
DMXOUT
UP
7
6
8
DMXOUT
DMXIN
MENU
UP
DOWN
12
E
N
US
T
R
C
U
T
U
R
E
DMXstartadress
Soundcontrol
Automode
DMXcontrol
Speed
inautomode
9
13
EN
O
P
E
R
A
T
I
O
N
After connecting the unit to the mains it requires a short initialization
process and is then ready for operation. It may be controlled via DMX
controller or a foot pedal. Alternatively, it can be operated without
external control in sound-controlled mode or in automatic mode with
processor-controlled color changes. The operating modes can be
selected by means of the display and the control buttons.
Operationwithoutexternalcontrol
Sound control
1. Via themicrophone,whichisintegratedinthecontrol unit, the rhythm
of the music (sufficient bass provided) can be perfectly reproduced
by the light set. To select sound control press the button MENU so
many times until is indicated in the display.
2. Adjust the microphonesensitivity to thevolume of themusic with the
control SENSIVITY. If the volume of the music is changed
afterwards, the microphone sensitivity must be readjusted
accordingly.TheLEDs do no light ifthe volume is too lowor if there is
no sufficient bass beat.
Automatic mode
1. To select the automatic mode with processor-controlled color
changes, press the buttonsomanytimesuntil is indicated in
the display.
2. Press the button DOWN to switch to automatic mode. The display
indicates .
3. Once again, press the button MENU to activate menu item speed.
The display indicates the default value . Use the buttons UP
and DOWNto adjust the desired speed in automaticmode from high
(S 00) to low (S 100).
Master/slave operation with several light sets
1. When several light sets are interconnected, the slave units can be
synchronized and controlled with the master unit. For this select the
desired operating mode (music control or automatic mode) at the
master unit and set each slave unit to the same DMX starting
address: . Finally, switch eachslave unit to theDMX operating
mode. For this press the button MENU so many times until the
display indicates or . Then press the button UP. The
display will indicate andthe interconnected light sets will now
operate in sync.
2. When themasterunitistobecontrolled with the foot pedal FP-1, also
set each slave unit to the DMX starting address and then
switch to the DMX operating mode. The interconnected light sets can
now be operated in sync with the foot pedal.
RemotecontrolwiththefootpedalFP-1
The foot pedal available as accessory allows convenient control of the
light set.
1. Press pedal 1 PRESETS repeatedly for the desired function. One in
seven preset colors or color change and color fade of the colors can
be selected.
Number
1 white
2red
3 green
4 blue
5cyan
6 yellow
7 purple
8 color change every second
9 color fadeevery 3 seconds
2. Press pedal2SOUNDCONTROLtoselectsoundcontrol.
3. Press pedal 3 FREEZE to select the freeze function. Then the
current color is kept.
4. Press pedal4BLACKOUTtoswitchoffallLEDs.
5. After switching the lightset ofand onagain, thefunction selectedlast
is activated.
Function
Page 2

OperationviaDMXcontroller
For operation with a controller with DMX512 protocol, the light set is
equipped with 15 control channels.
Channel 9, Spot 2: Brightnessblue
DMX value Function
000 – 255 Dimming from 0 – 100%
Setting the DMX starting address and selecting the DMX operating
mode
1. To be able to operate the light set with a DMX controller, the DMX
starting address mustbe set for the first DMX channel. For this press
the button MENU so many times until is indicated in the
display.Then usethe buttonsUP and DOWN to set theaddress.
Note: The starting address depends upon which DMX controller is
being used. Please refer to itsuser manual.
2. To switch to the DMX operating mode, press the button MENU so
many times until the display indicates or . Then press
the button UP. The display willindicate and after a few seconds
the light set can beoperated with the DMX controller.
DMX protocol
Channel 1, Preset programs,automatic mode, sound control
DMX value Function
000 – 009 Off
010 – 029 Program 1
030 –049 Program 2
050 –069 Program 3
070 –089 Program 4
090 –109 Program 5
110 –129 Program 6
130 –149 Program 7
150 –169 Program 8
170 –189 Program 9
190 –209 Program 10
210 –229 Program 11
230 –249 Automaticmode
250 –255 Soundcontrol
Channel 10, Spot 3:Brightness red
DMX value Function
000 – 255 Dimming from 0 – 100%
Channel 11,Spot3: Brightnessgreen
DMX value Function
000 – 255 Dimming from 0 – 100%
Channel 12, Spot 3:Brightness blue
DMX value Function
000 – 255 Dimming from 0 – 100%
Channel 13, Spot 4:Brightness red
DMX value Function
000 – 255 Dimming from 0 – 100%
Channel 14, Spot 4:Brightness green
DMX value Function
000 – 255 Dimming from 0 – 100%
Channel 15, Spot 4:Brightness blue
DMX value Function
000 – 255 Dimming from 0 – 100%
Channel 2, Master control
DMX value Function
000 – 009 Off
010 - 255 Dimming from 0 – 100%
Channel 3, Strobe control
DMX value Function
000 – 009 Off
010 - 255
Channel 4, Spot 1:Brightness red
Strobe slow ® fast
DMX value Function
000 – 255 Dimming from 0 – 100%
Channel 5, Spot 1:Brightness green
DMX value Function
000 – 255 Dimming from 0 – 100%
Channel 6, Spot 1:Brightness blue
DMX value Function
000 – 255 Dimming from 0 – 100%
Channel 7, Spot 2:Brightness red
DMX value Function
000 – 255 Dimming from 0 – 100%
OperationwiththeDMXLEDOperator4
The control panel DMX LED Operator 4 available as accessory is
optimally adaptedto the light set. It has four channels so thatall spots of
the light set can be controlled in sync. To control the light set with the
DMX LED Operator 4 adjustthe DMX starting address 021.
Channel 8, Spot 2:Brightness green
DMX value Function
000 – 255 Dimming from 0 – 100%
www.eurolite.de
©CopyrightReproductionprohibited!
Subject to change 30.07.2010
00054260.DOC
Page 3

S
C
H
N
E
L
L
S
T
A
R
T
®
euroliteeurolite
L
E
D
K
L
S
-
4
0
0
R
G
B
D
M
X
K
O
M
P
A
K
T
-
L
I
C
H
T
B
E
D
I
E
N
E
L
E
M
E
N
T
EU
N
DA
N
S
C
H
L
Ü
S
S
E
1
4
10
11
1
Mikrofon zur Musiksteuerung
2
Empfindlichkeitsregler für dasMikrofon
3
Anschluss für den Fußschalter FP-1
4
Feststellschraube
5
LED-Display
6
Bedientasten
• TasteMENU zumAufrufen derMenüpunkte
•Taste DOWN zum Wechsel zwischen Musiksteuerung und
Automatikbetrieb
Taste UP zum Wechselin denDMX-Betrieb
•
Tasten UP und DOWN zum Einstellen der Geschwindigkeit im
•
Automatikbetrieb und der DMX-Startadresse
7
Buchse DMX IN
DMX-Signaleingang (3-pol. XLR) zum Anschlusseines Controllers
8
Buchse DMX OUT
DMX-Signalausgang (3-pol. XLR) zum Anschluss an den DMXEingang eines weiteren Lichteffektgeräts
9
Netzanschluss mit Sicherungshalter
Stecken Sie hier die Netzleitung ein. Ersetzen Sie die Sicherung nur
bei ausgestecktem Gerät und nur durch eine gleichwertige
Sicherung. Der korrekte Wertist amGerät angegeben.
10
LED-Scheinwerfer 1 bis 4
11
Anschlusskabel für die Steuereinheit
12
TV-ZapfenzumAufsetzen aufein Stativ
13
Feststellschraube
2
3
DMXIN
Microphone
DOWN
MENU
5
Microphone
DMXOUT
UP
7
6
M
8
DMXOUT
DMXIN
MENU
UP
DOWN
12
E
N
Ü
S
T
R
U
K
T
U
R
9
13
S
E
T
B
E
D
I
E
N
U
N
G
Nach dem Anschluss ans Netz benötigt das Gerät eine kurze
Einstellphase und ist danach betriebsbereit. Es lässt sich dann über
einen DMX-Controller oder den Fußschalter FP-1 bedienen. Alternativ
kann es auch ohne externe Steuerung im musikgesteuerten Modus
oder im Automatikbetrieb mit prozessorgesteuerten Farbwechseln
betrieben werden. Mithilfe des Displays und der Bedientasten lassen
sich die Betriebsarten einstellen.
BetriebohneexterneSteuerung
Musiksteuerung
1. Durch das in der Steuereinheit integrierte Mikrofon lässt sich der
Rhythmus der Musik (bei deutlichem Bassschlag) optimal mit dem
Lichtset wiedergeben. Zum Anwählen der Musiksteuerung drücken
Sie die Taste MENU sooft, bis das Display anzeigt.
2. Passen Sie mit dem Regler SENSITIVITY die Mikrofonempfindlichkeit an die Lautstärke der Musik an. Wird die Lautstärke der
Musik danach geändert, muss die Mikrofonempfindlichkeit erneut
entsprechend angepasst werden. Bei zu geringer Lautstärke oder
fehlendem Bassschlag leuchten die LEDs nicht.
Automatikbetrieb
1. Zum Anwählen des Automatikbetriebs mit prozessorgesteuerten
Farbwechseln drücken Sie die Taste MENU so oft, bis das Display
2. Drücken Sie die Taste DOWN, um in den Automatikbetrieb zu
3. Drücken Sie erneut die Taste MENU, um den Menüpunkt
Master/Slave-Betrieb mit mehreren Lichtsets
1. Sind mehrere Lichtsets zusammengeschaltet, lassen sich mit
2. Soll das Hauptgerät mit dem Fußschalter FP-1 gesteuert werden,
Das Lichtset lässt sich mit dem als Zubehör erhältlichen Fußschalter
bequem bedienen.
anzeigt.
wechseln. Das Display zeigt .
Geschwindigkeit zu aktivieren. Das Display zeigt den Vorgabewert
an. Stellen Sie mit den Tasten UP und DOWN die
Geschwindigkeit im Automatikbetrieb von hoch (S 00) bis niedrig
(S 100) ein.
dem Hauptgerät (Master) alle Nebengeräte (Slave) synchron
steuern. Wählen Sie dazu am Hauptgerät die gewünschte
Betriebsart (Musiksteuerung oder Automatikbetrieb) und stellen Sie
jedes der Nebengeräte auf die gleiche DMX-Startadresseein: .
Wechseln Sie abschließend an allen Nebengeräten in die DMXBetriebsart. Drücken Sie dazu die Taste MENU so oft, bis das
Display oder anzeigt. Drücken Sie dieTaste UP.Das
Display zeigt und die zusammengeschalteten Lichtsets
arbeiten synchron.
stellen Sie ebenfalls jedes Nebengerät auf die DMX-Startadresse
ein und wechseln dann in die DMX-Betriebsart. Die
zusammengeschalteten Lichtsets können nun synchron mit dem
Fußschalter betrieben werden.
FernbedienungmitdemFußschalterFP-1
DE
DMX-Startadresse
Musiksteuerung
Automatikbetrieb
DMX-Steuerung
Geschwindigkeit
im Automatikbetrieb
1. Drücken Sie Fußpedal 1 PRESETS wiederholt für die gewünschte
Funktion. Es können eine der sieben voreingestellten Farben oder
Farbwechsel bzw. Farbüberblenden der Farben ausgewählt
werden.
Anzahl
1Weiß
2Rot
3 Grün
4 Blau
5 Cyan
6 Gelb
7 Violett
8 Farbwechsel jede Sekunde
9 Farbüberblendung alle 3 Sekunden
Funktion
Page 4

2. Drücken Sie Fußpedal 2 SOUND CONTROL zum Anwählen der
Musiksteuerung.
3. Drücken Sie Fußpedal 3 FREEZE zum Anwählen der Funktion
Freeze. Es wird dann dieaktuelle Farbegehalten.
4. DrückenSie Fußpedal4 BLACK OUT zum Ausschalten der LEDs.
5. Nach dem Aus- und Wiedereinschalten ist immer die zuletzt
angewählte Funktion aktiviert.
BetriebübereinenDMX-Controller
Für den Betrieb übereinen Controller mitDMX512-Protokoll verfügt das
Lichtset über 15Steuerkanäle.
Kanal 8, Spot2: Helligkeit Grün
DMX-Wert Funktion
000 – 255 Dimmen von 0 – 100%
Kanal 9, Spot2: Helligkeit Blau
DMX-Wert Funktion
000 – 255 Dimmen von 0 – 100%
Kanal 10, Spot3: Helligkeit Rot
DMX-Startadresseeinstellen und DMX-Betriebsart anwählen
1. Um das Lichtset mit einem DMX-Controller betreiben zu können,
muss die DMX-Startadresse für den ersten DMX-Kanal eingestellt
sein. Drücken Sie dazu die Taste MENU so oft, bis das Display
anzeigt und stellen Sie dann mit den Tasten UP und DOWN
dieAdresse ein.
Hinweis: Die Startadresse ist abhängig von Ihrem DMX-Controller.
Lesen Sie hierzu dessen Bedienungsanleitung.
.
2. Zum Wechseln in dieDMX-Betriebsart drücken Sie die Taste MENU
so oft, bis das Display oder anzeigt. DrückenSie die
Taste UP. Das Display zeigt und nach wenigen Sekunden
kann das Lichtsetmit demDMX-Controller betrieben werden.
DMX-Protokoll
Kanal 1, Voreingestellte Programme, Automatikbetrieb, Musiksteuerung
DMX-Wert Funktion
000 – 009 Aus
010 – 029 Programm 1
030 –049 Programm 2
050 –069 Programm 3
070 –089 Programm 4
090 –109 Programm 5
110 –129 Programm 6
130 –149 Programm 7
150 –169 Programm 8
170 –189 Programm 9
190 –209 Programm 10
210 –229 Programm 11
230 – 249 Automatikbetrieb
250– 255 Musiksteuerung
Kanal 2, Mastersteuerung
DMX-Wert Funktion
000 – 009 Aus
010 - 255 Dimmen von 0 – 100%
DMX-Wert Funktion
000 – 255 Dimmen von 0 – 100%
Kanal 11, Spot3: HelligkeitGrün
DMX-Wert Funktion
000 – 255 Dimmen von 0 – 100%
Kanal 12, Spot3: Helligkeit Blau
DMX-Wert Funktion
000 – 255 Dimmen von 0 – 100%
Kanal 13, Spot4: Helligkeit Rot
DMX-Wert Funktion
000 – 255 Dimmen von 0 – 100%
Kanal 14, Spot4: Helligkeit Grün
DMX-Wert Funktion
000 – 255 Dimmen von 0 – 100%
Kanal 15, Spot4: Helligkeit Blau
DMX-Wert Funktion
000 – 255 Dimmen von 0 – 100%
BetriebmitdemDMXLEDOperator4
Das als Zubehör erhältliche Steuerpult DMX LED Operator 4 ist optimal
auf das Lichtset abgestimmt. Es verfügt über vier Kanäle, mit denen
sich die Spots des Lichtsets synchron steuern lassen. Um das Lichtset
mit dem DMX LED Operator 4 betreiben zu können, stellen Sie die
DMX-Startadresse021 ein.
Kanal 3, Strobesteuerung
DMX-Wert Funktion
000 – 009 Aus
010 - 255
Kanal 4, Spot1: Helligkeit Rot
Strobe langsam ® schnell
DMX-Wert Funktion
000 – 255 Dimmen von 0 – 100%
Kanal 5, Spot1: Helligkeit Grün
DMX-Wert Funktion
000 – 255 Dimmen von 0 – 100%
Kanal 6, Spot1: Helligkeit Blau
DMX-Wert Funktion
000 – 255 Dimmen von 0 – 100%
Kanal 7, Spot2: Helligkeit Rot
DMX-Wert Funktion
000 – 255 Dimmen von 0 – 100%
www.eurolite.de
©CopyrightNachdruckverboten!
Änderungen vorbehalten 30.07.2010
00054260.DOC
 Loading...