

Page 1

Model #: EZ1
EZ1 MONSTER FLOOR STEAMER
INSTRUCTION MANUAL
S
t
e
a
m
B
o
o
s
t
e
r
For Authentic Monster Replacement Parts
Canada:
888.978.3262
US: 888-896-8786
ENGLISH
Page 2

SAVE THESE INSTRUCTIONS
When using an electrical appliance, basic safety precautions should always be observed, including the following:
Read all instructions before using this appliance.
WARNING:
To reduce the risk of re, electrical shock, or injury:
1. This appliance is authorized for household/residential use only.
2. Do not charge or use outdoors or on wet surfaces. Do not immerse the
oor steamer in water or other liquids.
3. Do not allow to be used as a toy. Close attention is necessary when used
by or near children. Do not leave Steamer unattended. Always unplug
unit when not in use.
4. Use only as described and for the uses described in this manual. Use only
manufacturer’s approved and supplied parts and accessories. Use of
other accessories is not recommended and will void warranty.
5. Always make sure the Handle Assembly is in the upright position before
plugging in or unplugging. Keep cord away from heated surfaces (e.g.,
cooking surfaces), and sharp edges and corners.
6. Do not use if power cord or plug has been damaged, or if any part of
appliance has been dropped, damaged, left outdoors, or dropped in
water. Do not attempt to disassemble or repair appliance. Return it to
manufacturer or an authorized service center for examination or repair.
7. Do not wrap cord too tightly around appliance. Never carry by the cord,
or yank to disconnect from an outlet. To unplug, always grasp plug to
remove from outlet – do not pull on cord.
8. Do not handle cord or appliance with wet hands or without shoes on.
9. Look closely at steamer and follow all labels and marking instructions.
10. Do not put any objects into openings. Do not use with any opening
blocked.
11. Keep hair, loose clothing, ngers, and all parts of body away from
openings and moving parts.
12. Before lling with water or emptying, always place Handle Assembly in
upright position, unplug the appliance and allow it to cool completely.
Always turn the Boiler Cap slowly to open the water tank – this will allow
any remaining steam to escape gradually.
13. Use caution while emptying the appliance. Contact with hot water or
steam may cause burns.
14. Be sure Boiler Cap is (and remains) closed during use.
15. Never use cleaning solutions, perfumes, oils or other chemical substances
other than tap or distilled/demineralized water in the Steamer. Use of
chemicals may damage Steamer and will void your warranty.
16. When in use, never turn the appliance on its side. Do not direct steam at
people, animals or other electrical equipment (i.e, inside an oven).
IMPORTANT SAFE TY INSTRUCTIONS
2
Safety Instructions
Page 3

SAVE THESE INSTRUCTIONS
17. Do not operate around ammable or combustible liquids such as gasoline, or in areas where fumes may be present.
18. Not for space heating purposes.
19. To reduce the likelihood of circuit overload, do not operate another high
wattage appliance on the same circuit. Plug in to a standard (120V,
60Hz) electrical outlet.
ATTENTION: This appliance is equipped with a 3-prong grounded power
cord. Insert only into a 3-prong grounded electrical outlet. Do not try to
remove the contacts of the grounded connection.
20. Do not use extension cords or outlets with inadequate voltage. Use only
heavy duty, high-rated extensions cords.
21. Store appliance indoors in a cool, dry place.
22. If appliance is damaged, it must be repaired by manufacturer or its
service agent or a similarly qualied person in order to avoid safety issues
to the operator.
23. This appliance is not intended for use by persons (including children) with
reduced physical, sensory or mental capabilities, or lack of experience
and knowledge, unless they have been given supervision or instruction
concerning use of appliance by a person responsible for their safety.
24. Read and follow all important notices in this guide.
3
Safety Instructions
*IMPORTANT*
Please read all of the
instructions for use and
Important Safety
Instructions carefully.
Remove and discard all
packaging materials
and keep them out
of the reach of children.
CAUTIONS
•
Do not use your Floor Steamer without a Hard Surface Pad or Carpet Glide
& Pad attached to the system.
• Never leave your Floor Steamer in one spot on any surface for any period
of time. Always place on the Parking Pad and make sure that the Floor
Steamer Handle Assembly is in the full “UP POSITION” when not in use - this
turns the Steamer Off.
Save your back
No need to
press hard
The steamer
does the
work for you
Page 4
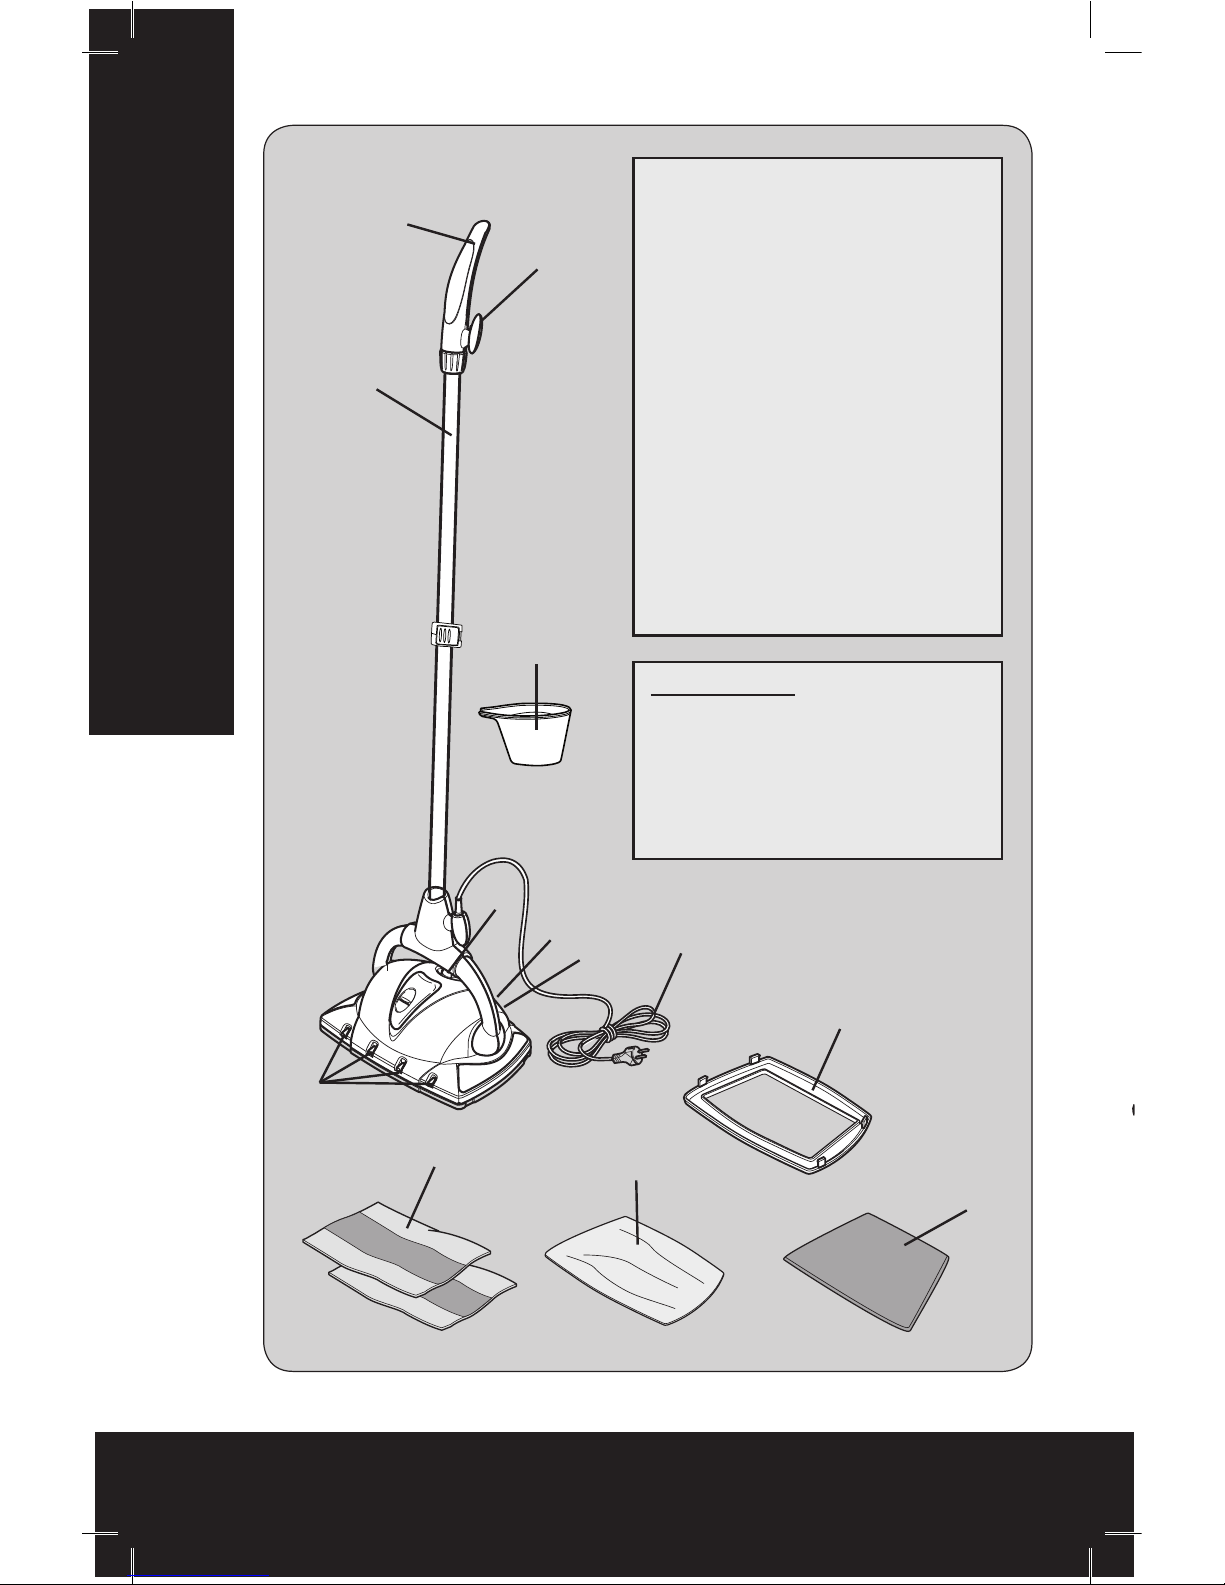
One (1) Floor Steamer
1
4
5
3
6
9
2
1 - Cord Winder
2 - Handle
3 - Metal Extension Tube
4 - Measuring Cup (pre-marked)
5 - Boiler Cap
6 - Steam Ready Indicator Light
(green)
7 - Power Indicator Light
(orange)
8 - Power Cord
9 - Steam Nozzles
10 - Hard Surface Floor Pad
11 - Carpet Floor Pad
12 - Carpet Glide
13 - Parking Pad
What’s Inside? & Product Description
4
What’s Inside? & Product Description
8
7
Technical Data
Adapter Input: 120V~, 60Hz
Cord Length: 7 meters/23 feet
Power: 1200 watts
Boiler: Stainless Steel
Boiler Capacity: 0.6 liter/20 ounces
PARKING PAD
13
12
11
10
For Authentic Monster Replacement Parts
Canada:
888.978.3262 US: 888-896-8786
Page 5
Before Use
5
Before Use
Assembly of Parts & Preparation of Steamer
Make sure all parts are in the box (see pg 4).
IMPORTANT: FOLLOW THESE INSTRUCTIONS CAREFULLY!
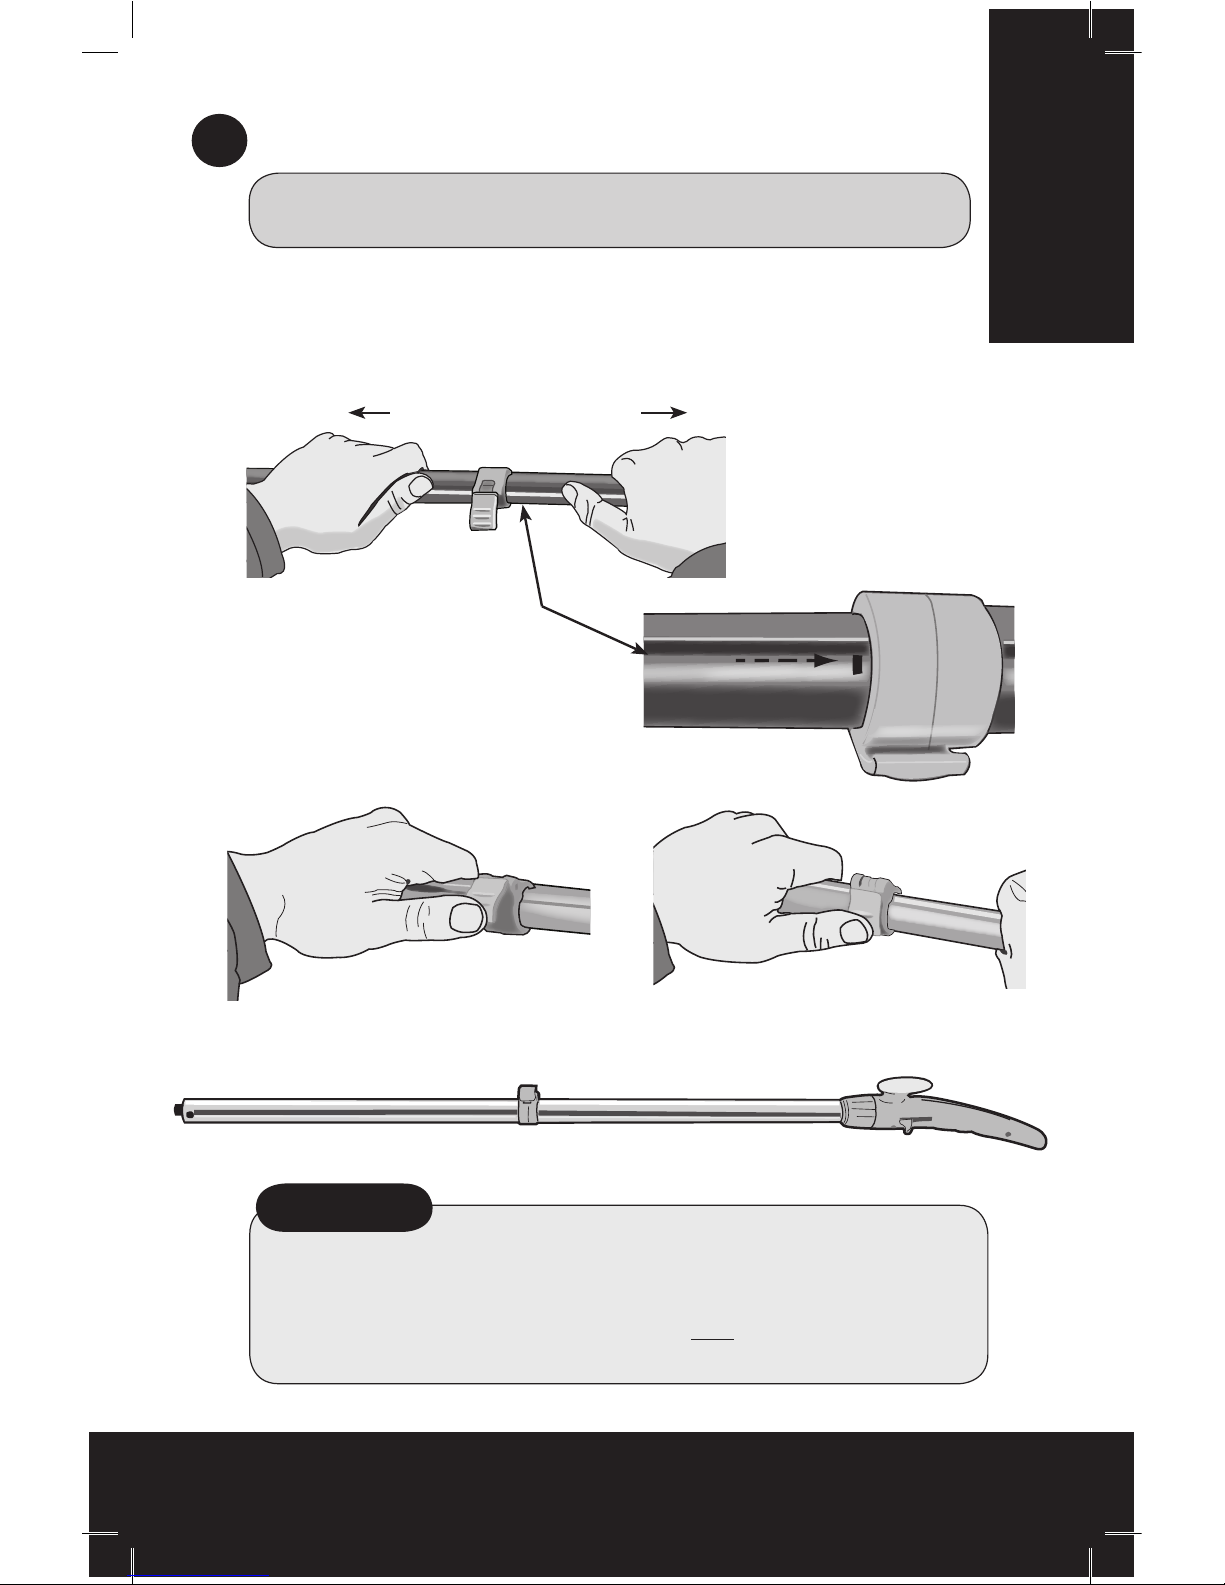
1
*IMPORTANT*
Frontal steam can only be generated when Extension Tube is in the
“Maximum Extension” position.
BE SURE EXTENSION TUBE IS FULLY
EXTENDED AND LOCKED IN PLACE FOR OPTIMAL STEAM OPERATION.
Use Extension Tube in Collapsed position only with the Carpet Glide
(when cleaning upholstery) or when storing.
“Maximum Extension” Position
• Snap connector down. When a “click” is heard, the Tube is locked in position.
• Extend Tube to the
“Lock - I” position.
LOCK
CLICK!
Pull apart Extension Tube
A. Assemble Handle
After removing Handle Assembly from carton:
• Pull Extension Tube apart (shown below).
Page 6
6
Before Use
Before Use
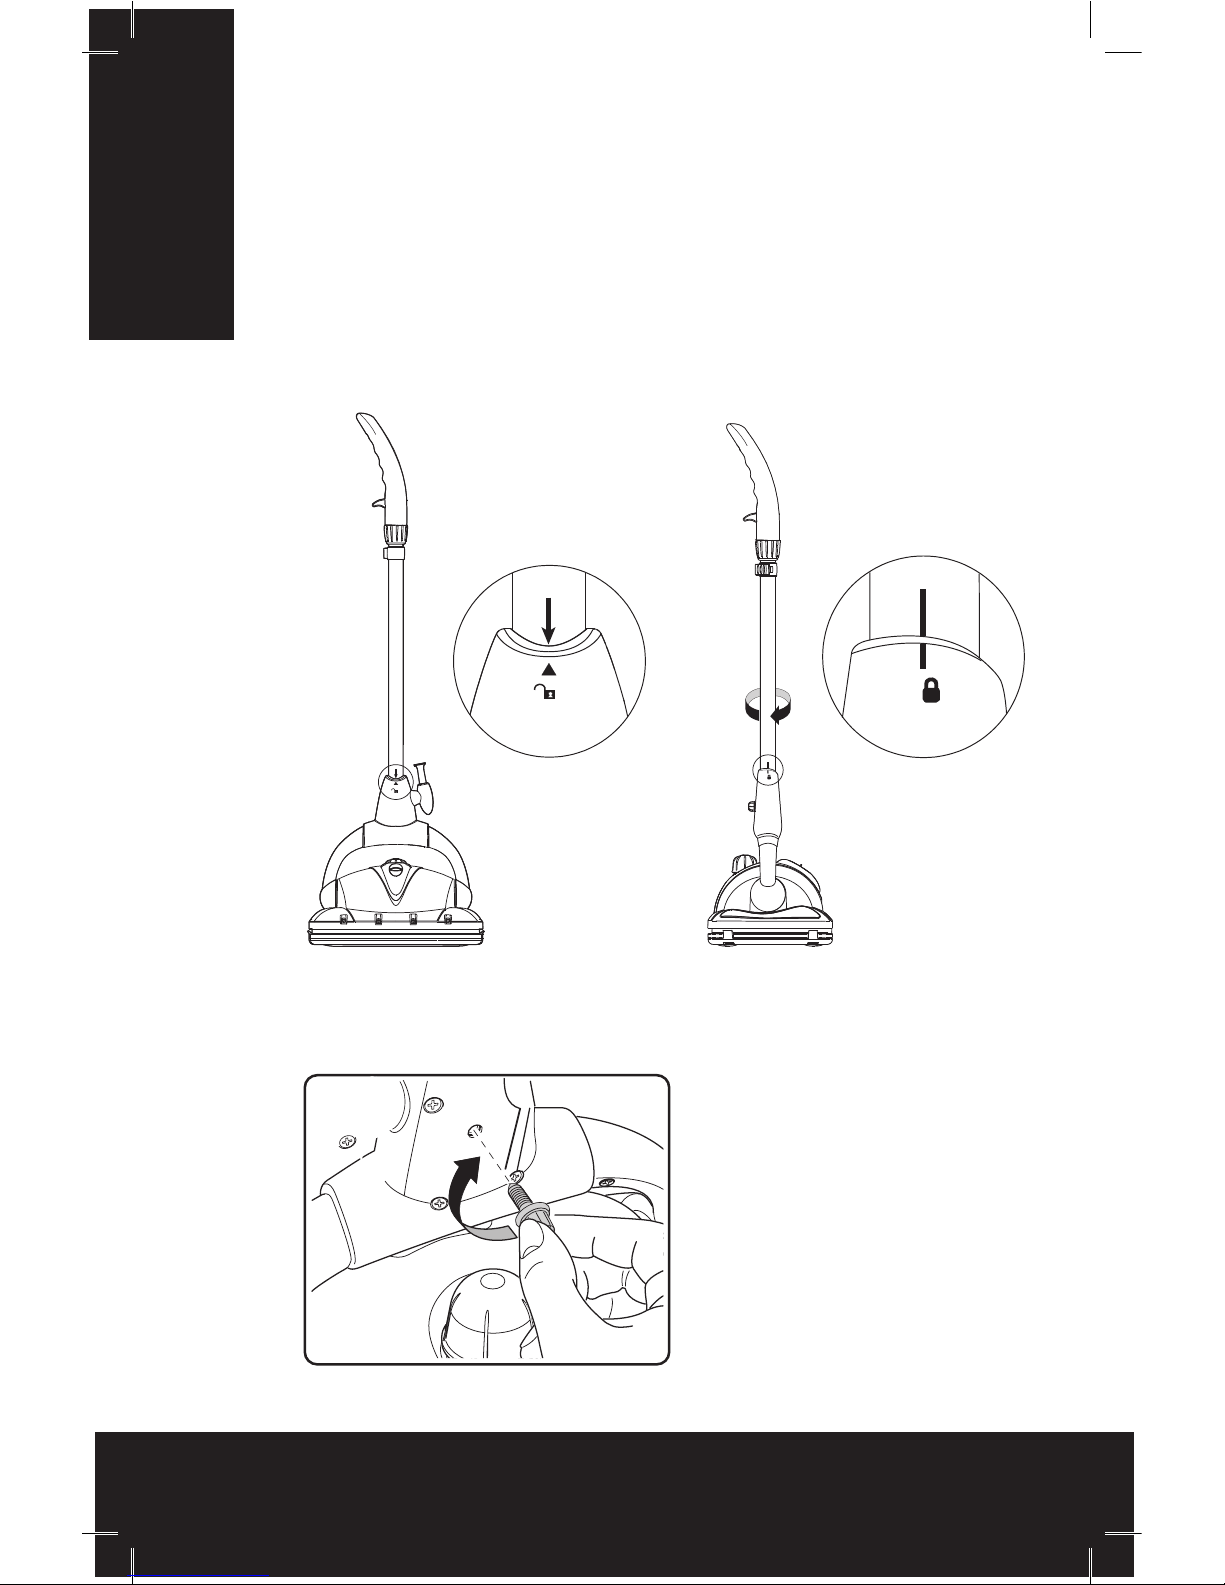
B. Attach Handle to Steamer
• Before starting, remove the self-tapping screw from the bottom
of Extension Tube.
• Insert the Handle Assembly into the Floor Steamer Base. Align
Arrow on Handle with Arrow on Base (as shown in Fig. A).
• Once inserted, twist Handle Assembly 90° clockwise (as shown
in Fig. B). Be sure Arrow on the Handle is aligned with Line/Lock
Icon on Base.
• Align the Handle Assembly
screw hole with the opening
in the steamer housing.
Secure the handle assembly
with self-tapping screw which
was removed from bottom of
Extension Tube (as shown in
Fig. C).
Fig. A
Fig. B
Fig. C
Front View Side View
90°
For Authentic Monster Replacement Parts
Canada:
888.978.3262 US: 888-896-8786
Page 7
7
Before Use
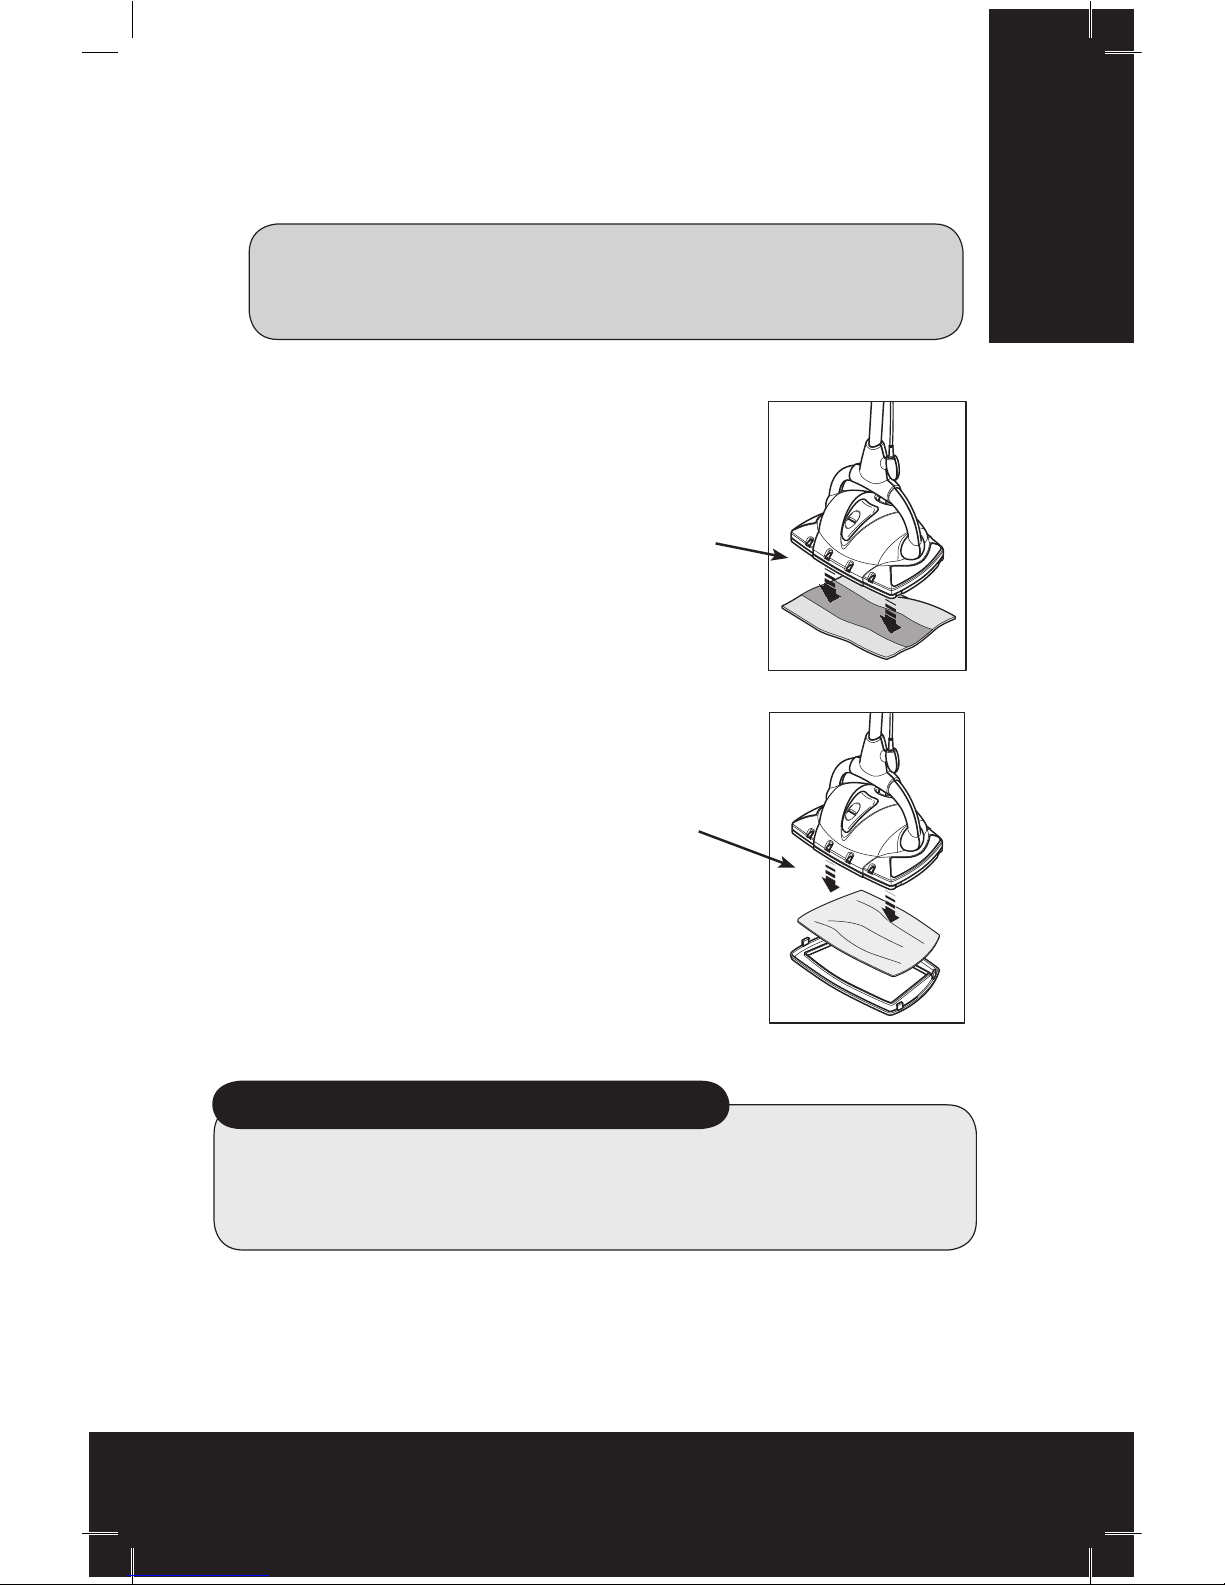
C. Attach Hard Surface Floor or Carpet Pad to Steamer
Afx either the Hard Surface Floor Pad or Carpet Glide with
Carpet Pad to your Floor Steamer.
WARNING:
To prevent oor damage, ALWAYS attach either the
HARD SURFACE FLOOR PAD or the CARPET GLIDE ACCESSORY
with CARPET PAD when using your Floor Steamer. NEVER use
without either of these attachments afxed to the machine.
ATTACHING HARD SURFACE FLOOR PAD
Place Floor Pad face down on the oor, wide
side forward, with white hook and loop strips
facing up. Hold Floor Steamer about 2”
above Pad and gently place Floor Steamer
onto the Pad. Firmly press down to assure
Pad is securely adhered to the Floor Steamer.
ATTACHING CARPET GLIDE WITH CARPET PAD
Place Carpet Glide face up on oor. Center
and place Carpet Pad on top of Carpet
Glide, wide side forward, with white hook
and loop strips facing up. Hold Floor Steamer
about 2” above Pad and gently place Floor
Steamer onto the Pad. Firmly press down to
assure Pad is adhered to the Floor Steamer
and Carpet Glide is securely attached.
USE ON HARDWOOD FLOORS
For hardwood oors, use only on “sealed”
hardwood surfaces. Carefully control the
amount of steam used when cleaning, as too
much water could cause damage.
Before Use
IMPORTANT NOTE ABOUT LINOLEUM FLOORING
Steam can cause wax to be stripped from, and consequently damage,
some varieties of linoleum ooring. ALWAYS test a small, inconspicuous
portion of the oor BEFORE using steam to ensure that your linoleum
oor does not have this issue.
NOTE: See “Maintenance & Cleaning” for care and cleaning instructions for
Microber Pads.
For Authentic Monster Replacement Parts
Canada:
888.978.3262 US: 888-896-8786
Page 8
Before Use
8
Before Use
D. Filling Boiler with Water
WARNINGS:
•
Carefully read all instructions before removing Boiler Cap.
•
Always unplug appliance before lling the Boiler.
Follow these instructions to avoid overlling the
Boiler.
• Be sure appliance is unplugged, and has
cooled for at least 10 minutes before lling
with water.
• Make sure Handle Assembly is in the
upright “Off” position.
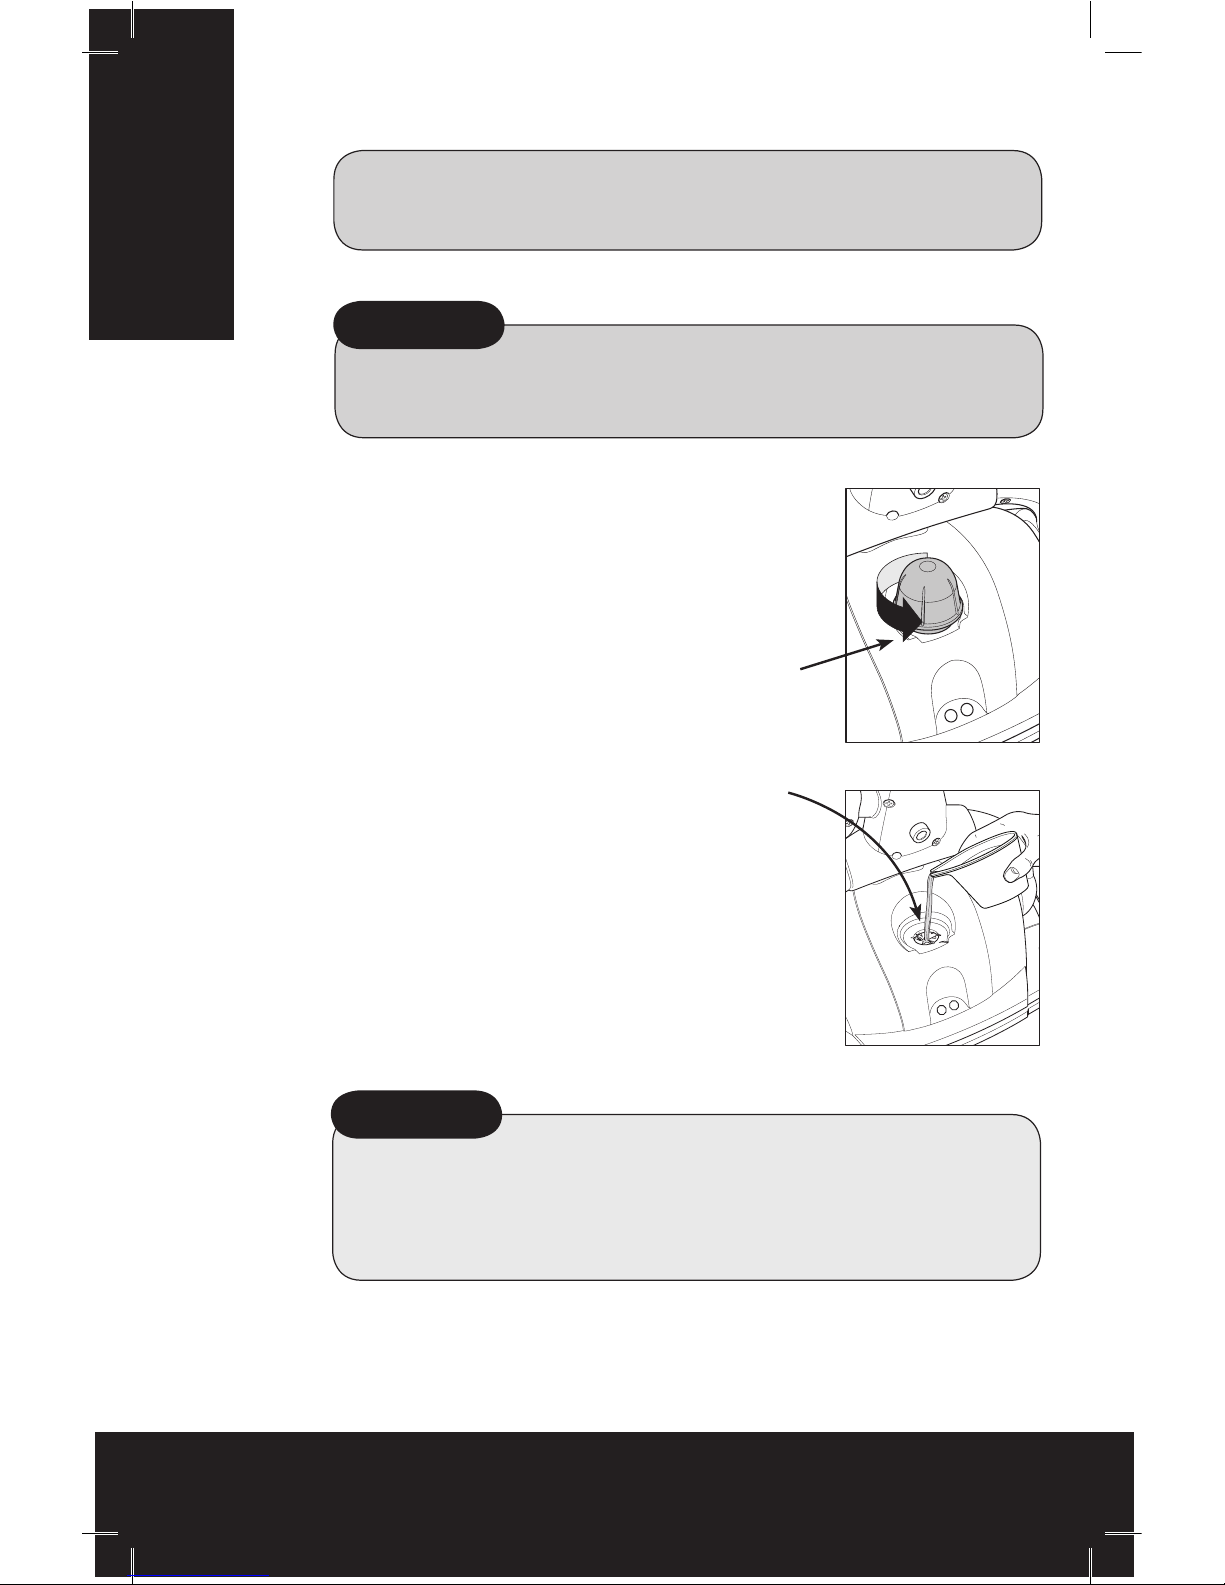
Remove Boiler Cap
by pressing it down and turning it counter-
clockwise.
• Pour in a maximum of 0.6 l / 20 oz. water
using the provided measuring cup. Make
sure that
water does not overflow.
Replace
Boiler Cap by pressing it down and turning
it clockwise. If using cold water, heating
time is about 3-5 minutes. If using warm
water, heating time is reduced.
*IMPORTANT*
Use tap water – distilled or demineralized water if tap water is too
hard.
DO NOT add detergents, perfumes, oils or other chemical
substances.
*IMPORTANT*
If re-lling the Boiler while Steamer has been in use, be sure to
allow Steamer to cool for at least 10 minutes and loosen Boiler
Cap slowly to allow any excess steam to escape before completely removing Cap. (See step 2D, “Relling Boiler During Use”
for detailed instructions.)
For Authentic Monster Replacement Parts
Canada:
888.978.3262 US: 888-896-8786
Page 9
9
Using Your Floor Steamer
Using Your Floor Steamer
Using Your Floor Steamer
2
B. Starting the Appliance
• Be sure Boiler is lled with water and Boiler
Cap is securely in place.
• Insert the plug into a-3 prong grounded
electrical outlet (orange Power Indicator
Light will illuminate).
•
Keeping the handle in the upright “Off”
position
, wait until the (green) Steam Ready
Indicator Light illuminates.
Once Boiler is lled and the green Steam
Ready Indicator Light glows, the Monster is ready to clean.
(Steam temperature at the nozzle end is between 104°C / 219°F
and 115°C / 239°F. Temperature lowers to 38°C / 100° F at a
distance of 25cm / 10 in from the nozzles.
A. Using the Parking Pad
You can use the Parking Pad if the Steamer is warm or hot.
CAUTION
The Parking Pad is provided to prevent
oor damage that can result from leaving
a hot steamer on the same spot for more
than a few minutes. ALWAYS place Floor
Steamer on the Parking Pad when not in
use, or while it is cooling before storage.
PARKING PAD
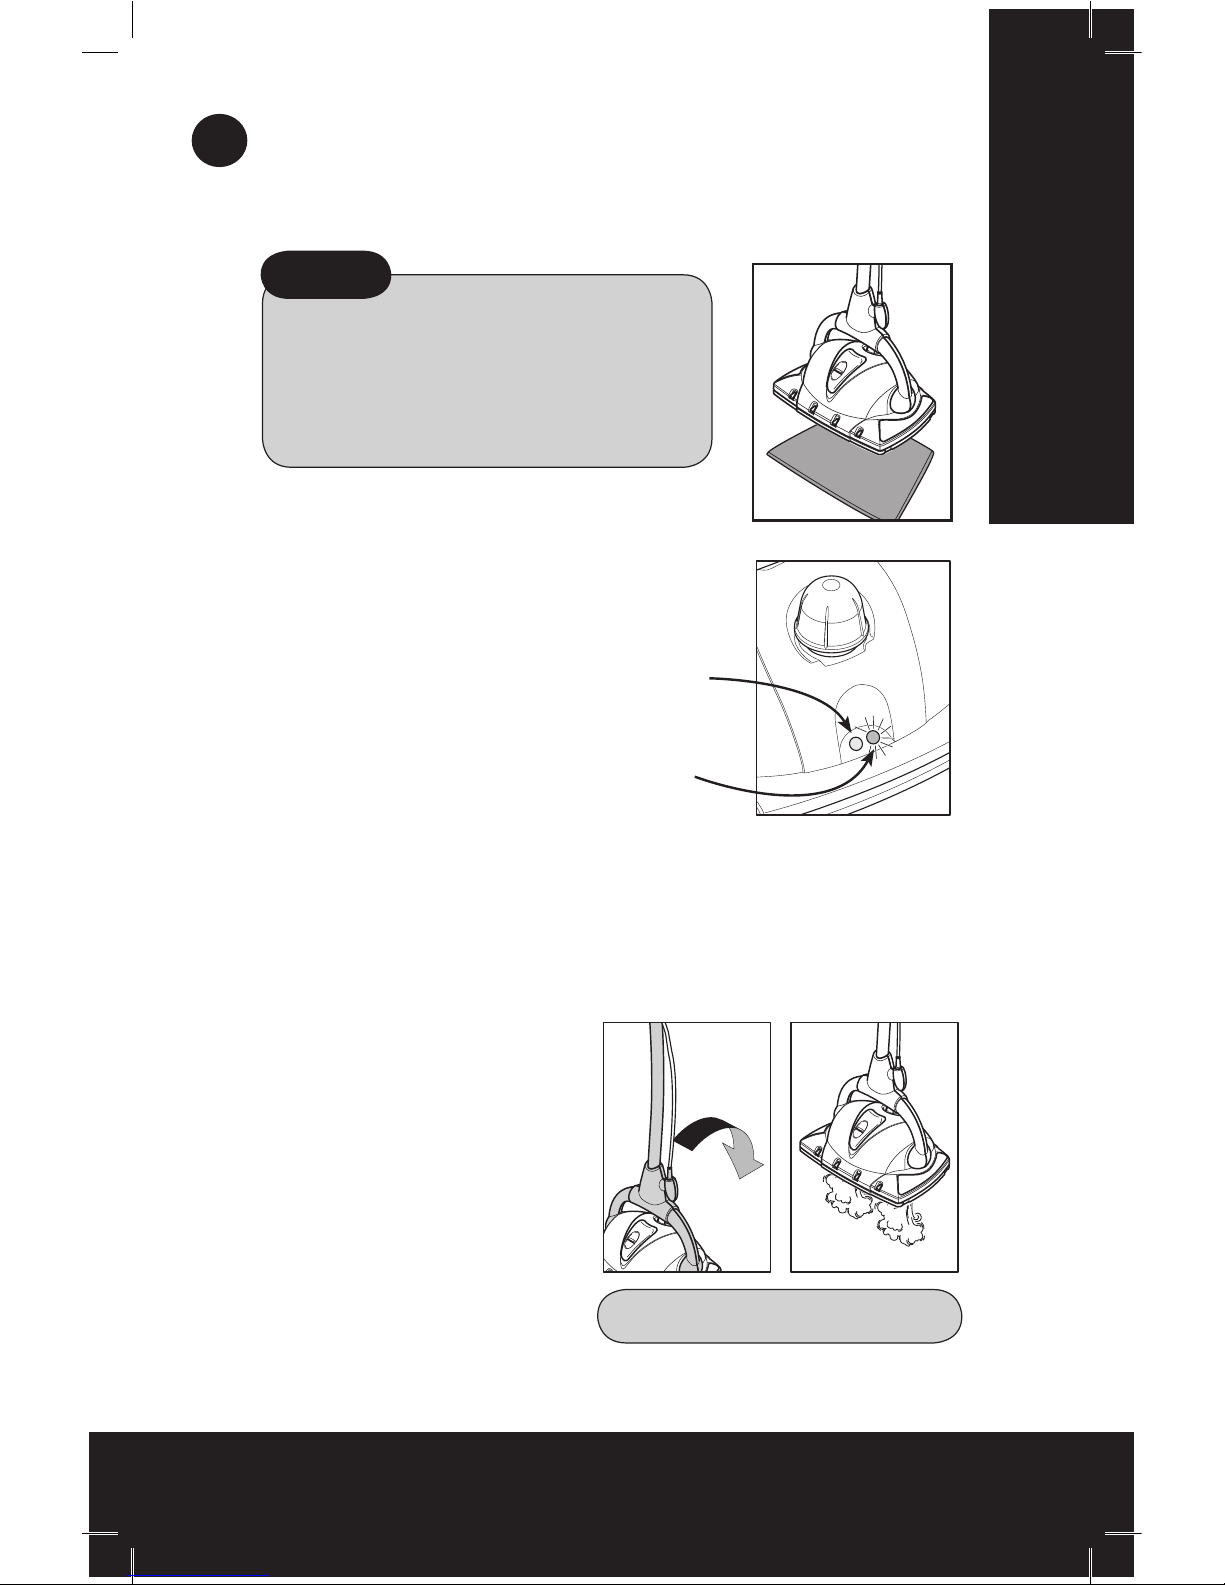
C. Using Steam
• To emit steam from the
underside of the Steamer,
simply pull the Handle
downwards.
• Return Handle to upright
position to stop steam.
You will nd that your Floor
Steamer can easily clean
and refresh most hard
surfaces and oors using
the underside steam alone.
NOTE: Some water may be emitted.
This is normal.
Continued on next page
For Authentic Monster Replacement Parts
Canada:
888.978.3262 US: 888-896-8786
Page 10
10
Using Your Floor Steamer
D. Relling Boiler During Use
WARNING: Let Steamer cool 10 minutes before opening Boiler
Cap. Use care when opening the Boiler Cap – it may still be hot
and steam may escape, causing burns. If Boiler is still hot, water
may spurt out during relling – this can also cause burns.
• Unplug appliance.
• Press trigger on the Handle to clear steam from Steam Nozzles.
• Press down and slowly turn Boiler Cap counterclockwise. This will
allow remaining steam to escape.
•
Be sure Steamer has cooled 10 minutes before relling with water.
• Fill Boiler using Measuring Cup provided. Be sure Steamer Handle
remains in the upright “Off” position.
• Firmly push down and screw Boiler Cap back on by turning it
clockwise.
• Insert plug into 3-prong electrical outlet.
REMINDERS
• Always use tap water.
• If tap water is too hard, use distilled or demineralized water to
avoid the risk of staining pale colored fabrics.
• Do not add detergents, perfumes, oils or other chemical
substances.
Using Your Floor Steamer
• To emit steam from the
Steam Nozzles, push the
trigger on the Handle.
*IMPORTANT*
The Steam Nozzles are meant
to be used in steam “bursts”
and should never be used on
a sustained basis. The Steam
Nozzles will loosen especially
difcult debris and will also
assist in treating hard to
reach areas.
NOTE:
Your Steamer will not need
the Boiler relled for up to 30
minutes.
The Floor Steamer will stop producing steam when the Boiler is
empty. When this happens unplug and store unit or rell with
water per instructions (1D).
C. Using Steam (continued)
For Authentic Monster Replacement Parts
Canada:
888.978.3262 US: 888-896-8786
Page 11

11
Maintenance & Cleaning
Cleaning and Rinsing Floor Steamer
If distilled or demineralized water is regularly used there is no
need to clean the Boiler.
Rinsing the Boiler
We reccomend you periodically rinse the Floor Steamer to prevent the
accumulation of calcium and sediment caused by hard water use.
After 10 - 15 uses, ll the Boiler 3/4 full with hot tap water, shake several
times and empty out into sink or bathtub. Wipe the Steamer base with
a damp cloth and wipe dry.
NEVER HOLD THE STEAMER UNDER TAP TO FILL. Use Measuring Cup
provided to ll.
Cleaning the Boiler
If you use tap water, we reccomend cleaning the Boiler every 3-4
months (depending on mineral buildup). Use a Hard Water Mineral
Remover (found in most hardware or small appliance stores).
• Remove Boiler Cap and empty water from Boiler into a sink.
• Follow manufacturer’s instructions on cleaner package, and ll
tank with specied amount of cleaner.
• Empty cleaner from Boiler and ll with water. Rinse thoroughly and
empty from Boiler. Repeat until water in tank comes out clear.
• Replace Boiler Cap and store appliance properly.
Cleaning of Boiler and Steamer is the sole responsibility of appliance
owner and is not covered by the product warranty.
3
Microber Pad Care & Cleaning
Your Microber Pads are designed for hundreds of uses. Clean Pads
regularly, either by hand (using mild soap and warm water) or in your
clothes washer on a delicate cycle, cool water. Never use fabric
softener or bleach. We recommend letting Pads air dry to maintain
maximum long term effectiveness.
Microber washing instructions – ULTRA MICROFIBRE
90% Polyester / 10% Polyamide
Hand wash only
Tumble dry low or air dry
No bleach / No fabric softener
80% Polyester / 20% Polyamide
Hand wash only
Tumble dry low or air dry
No bleach / No fabric softener
Before rst use after cleaning the Boiler, hold Steamer so it is fac-
ing downward and direct steam into a sink or standing shower to
clear any leftover residue from Boiler. When clean drops of water
appear, wipe clean with soft cloth. Your Steamer is ready for use.
For Authentic Monster Replacement Parts
Canada:
888.978.3262 US: 888-896-8786
Page 12

12
Troubleshooting
IMPORTANT QUESTION:
Q: Do I always need to use a Microber Pad when cleaning with my
Steamer?
A. YES!
It is critically important to ALWAYS use your Microber Pads. The
Floor Steamer should NEVER be used without either a Hard Surface
Floor Pad or Carpet Glide with Carpet Pad.
Troubleshooting
Issues Possible Causes Solutions
Steam is not coming out of the Improper Handle assembly. Call Customer Service to receive instructions
Steam Nozzles. to correct the problem.
The Hard Surface Floor Pad No enough pressure was Position Steamer about 2” above Pad and
is not adhering to Steamer. applied when attaching Pad. FIRMLY press it down onto the Pad.
The Cleaning Pads are getting Boiler is overfilled. Let Steamer run until excess water ceases.
soaked (too wet). Why? -OR- Remove some water from Boiler.
Green “Steam Ready Indicator Wait for green “Steam Ready Indicator Light”
Light” is not illuminated. to illuminate.
The steam seems to be Steam Nozzles are being used Only use Steam Nozzles in short bursts for
making my floor too wet. too frequently. cleaning tougher stains or to clean hard to
reach areas.
The green Steam Ready Optical illusion. Because the subtle green light is positioned
Indicator Light seems “dull”. nex t to the more vibrant orange light, it is
naturally overpowered by the brighter color.
For Authentic Monster Replacement Parts
Canada:
888.978.3262 US: 888-896-8786
Page 13

13
Notes
For Authentic Monster Replacement Parts
Canada:
888.978.3262 US: 888-896-8786
Page 14

14
Notes
Notes
For Authentic Monster Replacement Parts
Canada:
888.978.3262 US: 888-896-8786
Page 15

15
Notes
For Authentic Monster Replacement Parts
Canada:
888.978.3262 US: 888-896-8786
Page 16

EZ1 8/8/13
EFLX-005C AC
EUROFLEX CANADA
CUSTOMER SERVICE • 888.978.3262
EUROFLEX AMERICAS
CUSTOMER SERVICE • 888.896.8786
For Authentic Monster Replacement Parts, call
Canada: 888.978.3262 US: 888-896-8786
You can register your product online:
Canada: www.euroflex.ca US: www.euroflexusa.com
LIMITED WARRANTY
Euroex Canada warrants this product to be free from defects in material and workmanship for a
period of one (1) year from the date of the original purchase, when utilized for normal household use,
subject to the following conditions, exclusions and exceptions.
Should any defect covered by the terms of the limited warranty be discovered within one (1) year,
Euroex Canada will repair or replace any defective part provided the unit is returned by the original
purchaser, freight prepaid, to:
Canada: Euroex Canada, 391 Steelcase Road, W., Unit 16, Markham, ON., L3R 3V9, Canada
Proof of purchase and $11.00 for handling and return packing/shipping charges must be included.
The liability of Euroex Canada under this warranty is limited solely to the cost of the replacement
parts or the complete unit at our option. LABOR CHARGES ARE NOT INCLUDED.
This warranty does not cover normal wear of parts and does not apply to any unit that has been
tampered with or used for commercial purposes. This warranty does not apply to any defect arising
from misuse of the product, negligence, failure to follow Euroex’s instructions, use on current or
voltage other than that stamped on the product, alteration or repair not authorized by Euroex,
or damage due to faulty packaging or mishandling in transit (by any common carrier). Repair or
disassembly by anyone other than a Euroex authorized service center will void the warranty.
This warranty is extended to the original purchaser of the unit and excludes all other legal and/
or conventional warranties. The responsibility of Euroex Canada, if any, is limited to the specic
obligations expressly assumed by it under the terms of the limited warranty. In no event is Euroex
Canada liable for incidental or consequential damages of any nature whatsoever. Some Provinces do
not permit the exclusion or limitation of incidental or consequential damages, so the above may not
apply to you.
This warranty gives you specic legal rights which vary from province to province.
If you have questions or concerns regarding your Euroex appliance, please contact Customer
Service. Please do not return any product without contacting Euroex for return authorization.
Unauthorized returns, as well as C.O.D. shipments, will be refused.
*Important: After receiving return authorization, carefully pack item to avoid damage in shipping.
Be sure to include your name, complete address and phone number with note giving purchase
information, model number and what you believe is the problem with item. We recommend you insure
the package (as damage in shipping is not covered by your warranty). Mark the outside of your
package “ATTENTION CUSTOMER SERVICE”.
We are constantly striving to improve our products, therefore the specications contained
herein are subject to change without notice.
Patent Pending
Page 17

N° de
modèle : EZ1
BALAI VAPEUR EZ1 MONSTER
MANUEL D'UTILISATION
Pour obtenir des pièces de rechange Monster
Canada : 888.978.3262 États-Unis : 888-896-8786
S
t
e
a
m
B
o
o
s
t
e
r
FRANÇAIS
Page 18

CONSERVEZ CES INSTRUCTIONS
Lors de l'utilisation d'un appareil électrique, il convient d'observer
les règles de sécurité suivantes :
Lisez la totalité des instructions avant d'utiliser l'appareil.
AVERTISSEMENT :
An de réduire les risques d'incendie,
d'électrocution ou de blessure :
1. Cet appareil est réservé à un usage domestique.
2. Ne l'utilisez pas et ne le branchez pas à l'extérieur ou sur des surfaces humides.
Ne plongez pas le balai vapeur dans l'eau ou dans un autre liquide.
3. Cet appareil n'est pas un jouet. L'utilisation par ou à proximité des enfants doit se
faire sous votre surveillance. Ne laissez jamais le balai vapeur sans surveillance.
Débranchez systématiquement l'appareil lorsqu'il n'est pas utilisé.
4. Ne l'utilisez que conformément aux instructions et pour l'usage présenté dans ce
manuel. N'utilisez que des pièces et/ou des accessoires agréés et fournis par le
fabricant. L'utilisation d'autres accessoires n'est pas recommandée, et annule la
garantie.
5. Veillez à ce que la poignée soit toujours à la verticale avant de brancher ou de
débrancher l'appareil. Éloignez le cordon des surfaces chaudes (cuisinière par
exemple), des surfaces coupantes ou des arêtes vives.
6. N'utilisez pas l'aspirateur si le cordon ou la prise est endommagé(e), si une partie
de l'appareil est tombée, endommagée, restée à l'extérieur ou a été plongée
dans l'eau. N'essayez pas de démonter ou de réparer l'appareil. Renvoyez-le,
si nécessaire, au fabricant ou à un centre de réparation agréé.
7. N'enroulez pas le cordon trop serré autour de l'appareil. Ne portez jamais
l'appareil par son cordon d'alimentation. Ne tirez pas sur le cordon pour le
débrancher, saisissez toujours la che d'alimentation.
8. Ne touchez pas l'appareil ou le cordon d'alimentation avec les mains mouillées
ou les pieds nus.
9. Examinez le balai vapeur et respectez toutes les instructions indiquées sur les
étiquettes.
10. N'insérez aucun objet dans les ouvertures. N'utilisez pas l'appareil si l'une des
ouvertures est obturée.
11. Veillez à tenir les cheveux, les vêtements amples, les doigts et les différentes
parties du corps éloignés des
ouvertures et des pièces mobiles.
12. Avant de remplir le balai vapeur d'eau ou le vider, placez toujours la poignée à
la verticale, débranchez le cordon d'alimentation et laissez l'appareil se refroidir
complètement. Ouvrez doucement le bouchon de la chaudière, de façon à
permettre à la vapeur restante de s'évacuer graduellement.
13. Videz l'appareil avec précaution. L'eau chaude ou la vapeur peuvent provoquer
des brûlures.
14. Veillez à ce que le bouchon de la chaudière soit bien fermé pendant l'utilisation.
15. N'utilisez jamais de solution nettoyante, de parfum, d'huile ou de substances
chimiques. Remplissez la cuve uniquement avec de l'eau du robinet ou de l'eau
distillée ou déminéralisée. L'usage de produits chimiques risque d'endommager
le balai vapeur et annulera la garantie.
16. Ne placez jamais l'appareil sur le anc pendant son utilisation. Ne dirigez pas
la vapeur vers des personnes ou des animaux, ni sur des appareils électriques
(par exemple à l'intérieur d'un four).
INSTRUCTIONS DE SÉCURITÉ IMPORTANTES
2
Instructions de sécurité
Page 19

CONSERVEZ CES INSTRUCTIONS
17. N'utilisez pas l'appareil à proximité de liquides inammables tels que l'essence,
ou dans les zones susceptibles de contenir des vapeurs inammables.
18. Cet appareil n'est pas destiné au chauffage des locaux.
19. Pour limiter le risque de surcharge du circuit électrique, ne branchez pas d'autre
appareil à forte puissance sur le même circuit. Branchez l'appareil sur une prise
électrique standard (120 V, 60 Hz).
ATTENTION : Cet appareil est équipé d'un cordon d'alimentation à 3 broches avec
une prise de terre. Ne l'insérez que dans une prise murale à 3 broches reliée à la terre.
N'essayez pas de démonter les branchements à la terre.
20. N'utilisez que des rallonges ou des prises électriques de tension adaptée. N'utilisez
que des rallonges électriques renforcées acceptant de fortes puissances.
21. Rangez l'appareil à l'intérieur, dans un endroit frais et à l'abri de l'humidité.
22. Si l'appareil est endommagé, faites-le réparer par le fabricant, un agent agréé
ou un technicien qualié an d'éviter tout accident.
23. Cet appareil n'est pas prévu pour être utilisé par des personnes (y compris
des enfants) aux capacités physiques, sensorielles ou mentales réduites, ou
des personnes ne possédant aucune connaissance ou expérience dans ce
domaine, à moins qu'un individu responsable de leur sécurité leur ait donné
des instructions ou les ait surveillées lors de l'utilisation de l'appareil.
24. Lisez et respectez les instructions importantes contenues dans ce manuel.
3
Instructions de sécurité
*IMPORTANT*
Veuillez lire attentivement
toutes les instructions
d'utilisation et de sécurité
importantes. Retirez et
jetez tous les emballages;
ne les laissez pas à la
portée des enfants.
ATTENTION
•
N'utilisez pas le balai vapeur sans la lavette surface dure ou sans l'adaptateur
moquettes et tapis équipé de la lavette adaptée.
• Ne laissez jamais le balai vapeur trop longtemps au même endroit, quelle que
soit la surface. Placez-le sur la plaque de protection et maintenez la poignée en
position verticale (l'appareil est alors à l'arrêt) lorsque vous ne l'utilisez pas.
Épargnez votre dos
Inutile de
frotter
Le balai
vapeur fait
le travail
pour vous
Page 20

Un (1) balai vapeur
1
4
5
3
6
9
2
1 - Ergot d'enroulement du cordon
2 - Poignée
3 - Tube rallonge métallique
4 - Tasse à mesurer (graduée)
5 - Bouchon de la cuve
6 - Voyant de vapeur (vert)
7 - Voyant d'alimentation (orange)
8 - Cordon d'alimentation
9 - Buses à vapeur
10 - Lavette surface dure
11 - Lavette moquettes et tapis
12 - Adaptateur moquettes et tapis
13 - Plaque de protection
Contenu de l'emballage et description du produit
4
Contenu de l'emballage et description du produit
8
7
Caractéristiques techniques
Adaptateur : 120 V~, 60 Hz
Longueur du câble : 7 mètres
(23 pieds)
Puissance : 1200 watts
Cuve : Inox
Capacité de la cuve : 0,6 litre
(20 onces)
PARKING PAD
13
12
11
10
Pour obtenir des pièces de rechange Monster
Canada :
888.978.3262 États-Unis : 888-896-8786
Page 21

Avant utilisation
5
Avant utilisation
Assemblage et préparation du balai vapeur
Vériez que l'emballage contient toutes les pièces (voir p. 4).
IMPORTANT : SUIVEZ BIEN CES INSTRUCTIONS!
1
CLIC!
*IMPORTANT*
Le nettoyeur vapeur ne produit de la vapeur frontale que lorsque le tube
rallonge est en position d'extension maximale.
ASSUREZ-VOUS QUE LE TUBE
RALLONGE EST COMPLÈTEMENT ÉTENDU ET BLOQUÉ POUR UNE EFFICACITÉ
OPTIMALE.
Utilisez le tube rallonge en position rétractée uniquement avec l'adaptateur
moquettes et tapis (pour le nettoyage du garnissage des fauteuils) ou pour
ranger l'appareil.
Position d'extension maximale
• Fixez le raccord. Le « clic » signie que le tube est bloqué.
• Étendez le tube à la
position de « LOCK - I ».
LOCK
Tirez le tube rallonge
A. Assemblage de la poignée
• Retirez toutes les pièces de la poignée de l'emballage.
• Séparez le tube rallonge (voir illustration ci-dessous).
Page 22

6
Avant utilisation
Avant utilisation
Pour obtenir des pièces de rechange Monster
Canada :
888.978.3262 États-Unis : 888-896-8786
B. Fixation de la poignée sur le balai vapeur
• Avant de commencer, retirez la vis de blocage située au bas du tube
rallonge.
• Insérez la poignée dans la base du balai vapeur. Alignez
la èche de la poignée avec celle de la base (Fig. A).
• Lorsque la poignée est en place, faites-la tourner de 90° dans le sens des
aiguilles d'une montre (Fig. B). Assurez-vous que la èche de la poignée
est bien alignée avec l'icône ligne/cadenas de la base.
• Alignez l'ouverture de vis de la
poignée avec l'orice situé dans
la coque du balai vapeur.
Fixez la poignée avec la vis de
blocage précédemment retirée
du tube rallonge (Fig. C).
Fig. A
Fig. B
Fig. C
Vue de face Vue latérale
90°
Page 23

7
Avant utilisation
C. Fixation de la lavette surface dure ou moquettes et tapis
au balai vapeur
Placez la lavette surface dure ou l'adaptateur moquettes et tapis, équipé
de la lavette correspondante, sur le balai vapeur.
AVERTISSEMENT :
Pour éviter d'abîmer le sol, utilisez TOUJOURS votre
balai vapeur avec une LAVETTE SURFACE DURE ou l'ADAPTATEUR
MOQUETTES ET TAPIS équipé de la lavette correspondante. Ne l'utilisez
JAMAIS sans l'un de ces accessoires.
FIXATION DE LA LAVETTE SURFACE DURE
Posez la lavette à l'envers sur le sol, le côté large
vers l'avant, avec le crochet et les boucles vers le
haut. Approchez le balai vapeur à environ 5 cm
de la lavette et posez-le doucement dessus.
Appuyez fermement de façon à ce que la
lavette adhère au balai vapeur.
FIXATION DE L'ADAPTATEUR POUR TAPIS ET
MOQUETTE ET DE LA LAVETTE
Posez l'adaptateur retourné sur le sol. Centrez la
lavette pour tapis et moquette et posez-la sur
l'adaptateur, le côté large vers l'avant, avec le
crochet et les boucles vers le haut. Approchez
le balai vapeur à environ 5 cm de la lavette et
posez-le doucement dessus. Appuyez fermement
de façon à ce que la lavette adhère au balai
vapeur et que l'adaptateur moquettes et tapis
soit bien xé.
UTILISATION SUR PLANCHER
Utilisez cet appareil uniquement sur des planchers
scellés. Contrôlez soigneusement la quantité de
vapeur utilisée. Une quantité d'eau trop importante
pourrait endommager vos planchers.
Avant utilisation
Pour obtenir des pièces de rechange Monster
Canada :
888.978.3262 États-Unis : 888-896-8786
REMARQUE IMPORTANTE AU SUJET DES SOLS EN LINOLÉUM
La vapeur peut décaper la cire de certains types de revêtements en linoléum
et donc les endommager. Faites TOUJOURS un test sur une petite surface dans
un endroit discret AVANT de commencer le nettoyage à la vapeur pour vous
assurer que cela n'endommagera pas votre sol en linoléum.
REMARQUE : Voir « Entretien et nettoyage » pour consulter les instructions d'entretien et
de nettoyage des lavettes microbre.
Page 24

8
Avant utilisation
D. Remplissage de la cuve
AVERTISSEMENTS :
•
Lisez attentivement toutes les instructions avant de retirer le bouchon de
la cuve.
•
Veillez toujours à ce que l'appareil soit débranché avant de remplir la
cuve.
Respectez ces instructions pour éviter que la cuve ne
déborde.
• Assurez-vous que l'appareil est débranché, et
laissez-le
refroidir au moins 10 minutes avant de
verser l'eau dans la cuve.
• Placez la poignée en position verticale
(position d'arrêt). Retirez le bouchon de la
cuve en appuyant dessus et en le tournant
dans le sens inverse des aiguilles d'une montre.
• Versez l'eau (maximum 0,6 l ou 20 onces)
avec la tasse à mesurer. Assurez-vous que l'eau
ne déborde pas.
Refermez le bouchon de la cuve
en appuyant dessus et en le tournant dans le sens
des aiguilles d'une montre. Si vous utilisez de l'eau
froide, le temps de chauffe est de 3 à 5 minutes.
Ce temps est réduit avec de l'eau chaude.
*IMPORTANT*
Utilisez de l'eau du robinet, ou de l'eau distillée ou déminéralisée si votre
eau est trop calcaire.
N'AJOUTEZ PAS de détergent, de parfum, d'huile ou
d'autres produits chimiques.
Pour obtenir des pièces de rechange Monster
Canada :
888.978.3262 États-Unis : 888-896-8786
*IMPORTANT*
Si vous souhaitez remplir à nouveau la cuve après avoir utilisé le balai
vapeur, laissez l'appareil refroidir pendant au moins 10 minutes et
dévissez doucement le bouchon de la cuve avant de l'enlever de sorte
que l'excès de vapeur puisse s'échapper. (Voir étape 2D, « Remplissage
de la cuve en cours d'utilisation » pour des instructions détaillées.)
Avant utilisation
Page 25

9
Utilisation du balai vapeur
Utilisation du balai vapeur
Utilisation du balai vapeur
2
Pour obtenir des pièces de rechange Monster
Canada :
888.978.3262 États-Unis : 888-896-8786
B. Mise en route de l'appareil
• Assurez-vous que la cuve est remplie d'eau et
que le bouchon de la cuve est bien fermé.
• Branchez le cordon d'alimentation dans une
prise à 3 broches reliée à la terre. Le voyant
d'alimentation (orange) s'allume.
•
Maintenez la poignée en position verticale
(position d'arrêt)
, et attendez que le voyant
de vapeur (vert) s'allume.
Une fois la cuve remplie, le voyant de vapeur
(vert) s'allume, le balai vapeur Monster est prêt à l'utilisation.
(La température de la vapeur à la sortie des buses est comprise
entre 104 °C et 115 °C. À 25 cm des buses, la température n'est plus
que de 38 °C.
A. Utilisation de la plaque de protection
Utilisez la plaque de protection lorsque le balai vapeur est chaud ou
encore tiède.
ATTENTION
La plaque de protection est destinée à éviter
que le balai vapeur chaud n'endommage le
sol lorsqu'il est posé trop longtemps au même
endroit. Posez TOUJOURS le balai vapeur
sur la plaque de protection lorsque vous ne
l'utilisez pas ou pendant que vous le laissez
refroidir, avant de le ranger.
PARKING PAD
C. Utilisation de la vapeur
• Pour que la vapeur soit émise
par la partie inférieure du
balai vapeur, abaissez la
poignée.
• Replacez la poignée en
position verticale pour arrêter
la vapeur.
Ce type de vapeur permet
de nettoyer et de rafraîchir la
plupart des surfaces dures.
REMARQUE : Il se peut que de l'eau
sorte des orices. C'est
tout à fait normal.
Suite à la page suivante
Page 26

10
Utilisation du balai vapeur
D. Remplissage de la cuve en cours d'utilisation
AVERTISSEMENT : Laissez le balai vapeur refroidir une dizaine de minutes
avant d'ouvrir le bouchon de la cuve. Ouvrez le bouchon de la cuve
avec précaution. Il peut être chaud, et laisser échapper de la vapeur,
ce qui risque de provoquer des brûlures. Si la cuve est encore chaude,
l'eau peut gicler pendant le remplissage, ce qui risque également de
provoquer des brûlures.
• Débranchez l'appareil.
• Appuyez sur la gâchette de la poignée pour évacuer la vapeur des buses.
• Appuyez sur le bouchon de la cuve et tournez-le doucement dans le
sens inverse des aiguilles d'une montre. La vapeur restante va ainsi
s'échapper.
•
Laissez le balai vapeur refroidir pendant 10 minutes avant de le remplir
d'eau.
• Remplissez la cuve à l'aide de la tasse à mesurer. Veillez à laisser la
poignée en position verticale (position d'arrêt).
• Revissez à fond le bouchon en appuyant dessus et en le tournant dans le
sens des aiguilles d'une montre.
• Branchez le cordon d'alimentation dans une prise 3 broches.
RAPPELS
• N'utilisez que de l'eau du robinet.
• Si l'eau du robinet est trop calcaire, utilisez de l'eau distillée ou
déminéralisée an d'éviter de tacher les tissus clairs.
• N'ajoutez pas de détergent, de parfum, d'huile ou d'autres produits
chimiques.
Utilisation du balai vapeur
Pour obtenir des pièces de rechange Monster
Canada :
888.978.3262 États-Unis : 888-896-8786
• Pour que la vapeur soit émise
par les buses, appuyez sur la
gâchette de la poignée.
*IMPORTANT*
Les buses sont conçues pour
émettre des jets de vapeur.
Elles ne doivent pas être
utilisées de manière continue.
Elles permettent de détacher
les salissures particulièrement
incrustées et d'atteindre plus
facilement les zones difciles
d'accès.
REMARQUE :
Le balai vapeur peut
fonctionner pendant
30 minutes sans être
rempli.
Lorsque la cuve est vide, le balai ne produit plus de vapeur. Dans
ce cas, débranchez-le et rangez-le, ou remplissez-le en suivant les
instructions (1D).
C. Utilisation de la vapeur
(suite)
Page 27

11
Entretien et nettoyage
Nettoyage et rinçage du balai vapeur
Le nettoyage de l'appareil est inutile si vous utilisez régulièrement de l'eau
déminéralisée.
Rinçage de la cuve
Nous vous recommandons de rincer le balai vapeur périodiquement pour
empêcher l'accumulation de calcium et de sédiments due à l'utilisation
d'eau dure. Après 10 à 15 utilisations, remplissez la cuve aux 3/4 avec de l'eau
chaude du robinet, secouez à plusieurs reprises et videz dans un évier ou
une baig noi re. Essu yez l a base du ba la i va peu r à l'aide d'u n chif fon humi de,
puis séchez-la à l'aide d'un chiffon sec.
NE REMPLISSEZ JAMAIS LE BALAI VAPEUR DIRECTEMENT À PARTIR DU ROBINET.
Servez-vous de la tasse à mesurer fournie.
Nettoyage de la cuve
Si vous utilisez l'eau du robinet, il est recommandé de nettoyer votre appareil
tous les 3-4 mois (en fonction du dépôt calcaire). Utilisez un produit anticalcaire
(disponible dans la plupart des quincailleries et magasins d'électroménager).
• Retirez le bouchon de la chaudière et videz le contenu de la cuve dans
l'évier.
• Suivez les instructions sur l'étiquette du produit nettoyant et remplissez la
cuve en respectant la dose de produit.
• Videz la cuve et remplissez-la d'eau. Rincez soigneusement et videz la
cuve. Répétez cette opération jusqu'à ce que l'eau soit claire.
• Remettez le bouchon de la cuve en place et rangez l'appareil.
Le nettoyage de la cuve et du balai vapeur se fait sous la responsabilité de
l'utilisateur et n'est pas couvert par la garantie.
3
Entretien et lavage des lavettes microbre
Les lavettes microbre sont conçues pour des centaines d'utilisations.
Lavez-les régulièrement, soit à la main (avec du savon doux et de l'eau
chaude) soit à la machine (cycle délicat, à l'eau froide). N'ajoutez pas
d'adoucissant ni d'eau de Javel. Il est conseillé de les laisser sécher à l'air
libre pour préserver le plus longtemps possible leur efcacité.
Instructions de lavage des lavettes microbre – ULTRA MICROFIBRE
90 % polyester / 10 % polyamide
Lavage à la main uniquement
Séchage à l'air libre ou au
sèche-linge cycle doux
Pas d'eau de Javel /
d'adoucissant
80 % polyester / 20 % polyamide
Lavage à la main uniquement
Séchage à l'air libre ou au
sèche-linge cycle doux
Pas d'eau de Javel /
d'adoucissant
Avant d'utiliser l'appareil après le nettoyage de la cuve, orientez le balai
vapeur vers le bas et dirigez la vapeur vers un évier ou une baignoire
de façon à évacuer les éventuels résidus. Lorsque de l'eau claire sort
des orices, nettoyez avec un chiffon doux. Le balai vapeur est prêt à
l'utilisation.
Pour obtenir des pièces de rechange Monster
Canada :
888.978.3262 États-Unis : 888-896-8786
Page 28

12
Dépannage
QUESTION IMPORTANTE :
Q : Dois-je toujours utiliser une lavette microbre lorsque j'utilise mon
balai vapeur?
A. OUI.
Il est très important de TOUJOURS utiliser les lavettes microbre.
N'utilisez JAMAIS votre balai vapeur sans lavette surface dure ou
adaptateur moquettes et tapis équipé de la lavette correspondante.
Dépannage
Problèmes Causes probables Solutions
Aucune vapeur ne sort des Montage de la poignée Communiquez avec le service clientèle pour
buses à vapeur. incorrect. résoudre le problème.
La lavette surface dure Vous n'avez pas appuyé Placez le balai vapeur à environ 5 cm de la
n'adhère pas au balai vapeur. assez fort lorsque vous avez lavette et appuyez FERMEMENT sur la lavette.
fixé la lavette.
Les lavettes sont rapidement La cuve est trop remplie. Faites fonctionner le balai vapeur jusqu'à ce
mouillées. Pourquoi? que l'excès d'eau disparaisse. -OU- Enlevez
un peu d'eau de la cuve.
Le voyant de vapeur (vert) Attendez que le voyant de vapeur (vert)
n'est pas allumé. s'allume.
Il semble que la vapeur Les buses à vapeur sont Utilisez les buses à vapeur uniquement par
mouille le sol. utilisées trop fréquemment. jets pour nettoyer les taches incrustées
ou les zones difficiles d'accès.
Le voyant de vapeur (vert) Illusion d'optique. Le voyant de vapeur (vert) étant placé à côté
ne brille pas beaucoup. du voyant d'alimentation (orange), il semble
moins lumineux.
Pour obtenir des pièces de rechange Monster
Canada :
888.978.3262 États-Unis : 888-896-8786
Page 29

13
Notes
Pour obtenir des pièces de rechange Monster
Canada :
888.978.3262 États-Unis : 888-896-8786
Page 30

14
Notes
Notes
Pour obtenir des pièces de rechange Monster
Canada :
888.978.3262 États-Unis : 888-896-8786
Page 31

15
Notes
Pour obtenir des pièces de rechange Monster
Canada :
888.978.3262 États-Unis : 888-896-8786
Page 32

EZ1 8/8/13
EFLX-005C AC
EUROFLEX CANADA
SERVICE CLIENTÈLE • 888.978.3262
EUROFLEX AMÉRIQUE
SERVICE CLIENTÈLE • 888.896.8786
GARANTIE LIMITÉE
Euroex Canada garantit que ce produit est exempt de défaut de fabrication ou de matériaux
pendant une période d’un (1) an, à compter de la date d’achat du produit et dans le cadre d’une
utilisation domestique normale. Les conditions, exclusions et exceptions suivantes sont à prendre en
considération.
Si l’appareil se révélait défectueux aux termes de la garantie limitée durant la période d’un (1) an,
Euroex Canada s’engage à réparer ou remplacer toute pièce défectueuse dès lors que l’appareil est
retourné par l’acquéreur d’origine, frais de transport prépayés, à :
Euroex Canada, 391 Steelcase Road, W., Unit 16, Markham, ON., L3R 3V9, Canada
L’appareil doit être accompagné de la preuve d’achat et de la somme de 11.00 $ correspondant aux
frais de traitement et de transport.
La responsabilité d’Euroex Canada aux termes de cette garantie se limite uniquement au coût de
remplacement des pièces de rechange ou de l’appareil. LA MAIN-D’ŒUVRE N’EST PAS INCLUE.
Cette garantie ne couvre pas l’usure normale des pièces et ne s’applique pas si l’appareil a été
modié ou utilisé à des ns commerciales. Cette garantie exclut tout dommage survenant suite à
une mauvaise utilisation du produit, à une négligence ou au non-respect des instructions données
par Euroex, à une alimentation électrique ne correspondant pas aux informations données sur le
produit, à une modication ou à une réparation non autorisée par Euroex, à un emballage ou à
une manipulation inadapté(e) au cours du transport par un transporteur habituel. La réparation ou le
démontage par une personne non agréée par Euroex annule la garantie.
Cette garantie couvre l’acheteur initial du produit et exclut toute autre garantie juridique ou
conventionnelle. La responsabilité d’Euroex Canada, le cas échéant, se limite aux obligations
expressément reconnues aux termes de la présente garantie limitée. Euroex Canada ne saurait être
tenue responsable des dommages accessoires et indirects de quelque nature que ce soit. certaines
provinces n’autorisent pas l’exclusion ou la limitation des dommages accessoires ou indirects. Ainsi,
la disposition ci-dessus pourrait ne pas s’appliquer à vous.
Cette garantie vous confère des droits juridiques précis pouvant varier d’une province à l’autre.
Si vous avez des questions relatives à votre appareil Euroex, veuillez communiquer avec le service
clientèle. Merci de ne pas retourner d’appareil sans en avoir au préalable obtenu l’autorisation
de la part d’Euroex. Les retours non autorisés ainsi que les retours aux frais du destinataire seront
refusés.
*Important : lorsque vous aurez reçu l’autorisation de retourner l’appareil, emballez-le soigneusement
an d’éviter tout dommage au cours du transport. Veillez à indiquer votre nom, votre adresse
complète, votre numéro de téléphone, ainsi qu’une note précisant les détails de l’achat, le numéro
du modèle et la nature du problème. Nous vous recommandons d’assurer votre colis (les dommages
survenus durant le transport ne sont pas couverts par la garantie). Indiquez sur l’emballage extérieur
« À L’ATTENTION DU SERVICE CLIENTÈLE ».
Nous nous efforçons constamment d’améliorer nos produits. Les spécications contenues
dans ce guide sont donc sujettes à modication sans préavis.
Pour obtenir des pièces de rechange Monster
Canada : 888.978.3262 États-Unis : 888-896-8786
Vous pouvez enregistrer votre produit en ligne à l'adresse suivante :
Canada : www.euroex.ca États-Unis : www.euroexusa.com
Brevet en instance
 Loading...