

Page 1

503
555
816-832
479
63
A
B
6
113
76
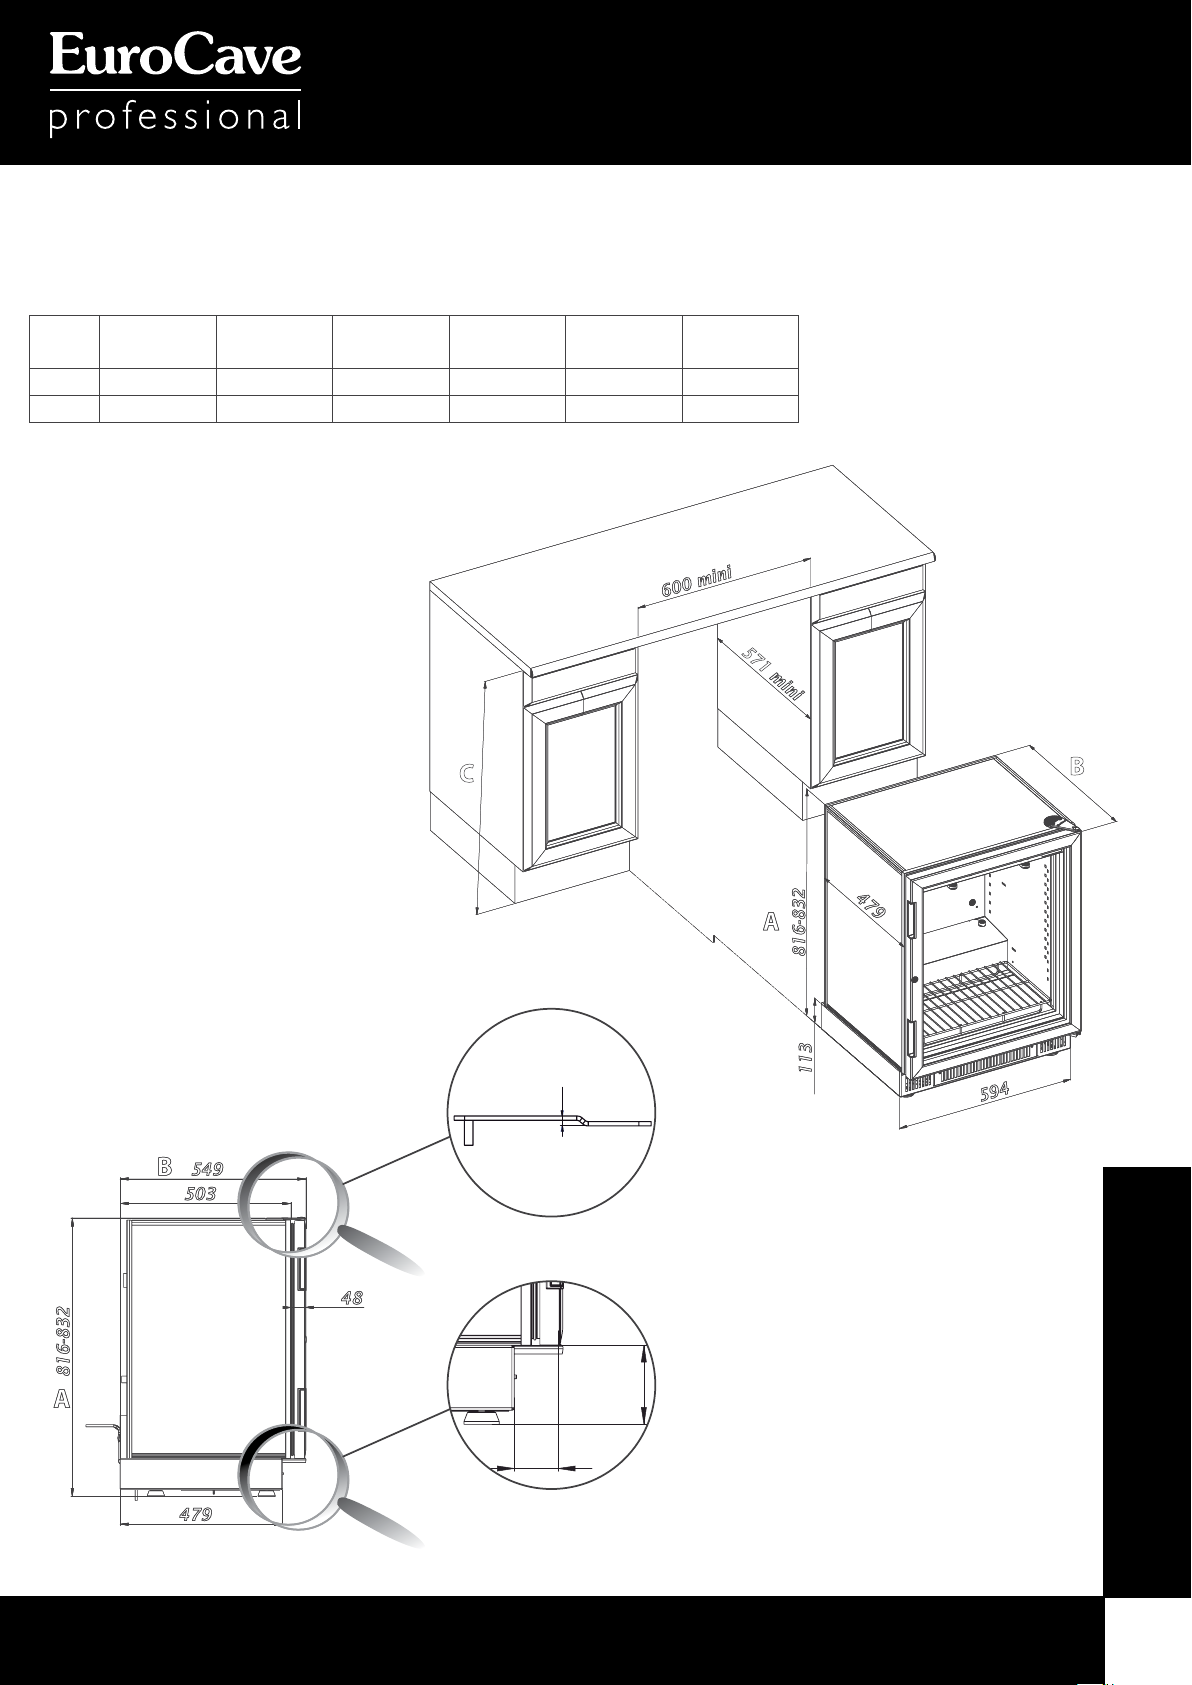
Wine cabinet installation
Dimensions to be observed
.for a solid door
Flush-fitting diagrams - Compact 59
A max. A min. A max. A min. B C min.
with raising piece*with raising piece
*
059 832 816 875 859 555 821
259 1792 1776 1835 1819 572 1781
mini
600
577
C
mini
A
B
479
238-618
816-832
A
B
555
503
479
63
113
594
See chapter “Adjusting the feet and securing the cabinet”
Compact Range
www.eurocave.com
Page 2
Wine cabinet installation
503
549
479
B
A
816-832
48
503
549
479
B
A
816-832
48
6
113
70
Dimensions to be observed
.for a glass door
Flush-fitting diagrams - Compact 59
A max. A min. A max. A min. B C min.
with raising piece*with raising piece
*
059 832 816 875 859 549 821
259 1792 1776 1835 1819 566 1781
mini
mini
600
600
571
C
mini
mini
A
A
479
479
816-832
816-832
B
816-832
816-832
A
A
B
B
549
549
503
503
479
479
48
48
113
113
See chapter “Adjusting the feet and securing the cabinet”
594
594
Compact Range
www.eurocave.com
Page 3

Wine cabinet installation
82
503
548
479
B
A
816-832
6
113
62
Dimensions to be observed
.for a full glass door
Flush-fitting diagrams - Compact 59
A max. A min. A max. A min. B C min.
with raising piece*with raising piece
*
059 832 816 875 859 548 821
259 1792 1776 1835 1819 565 1781
mini
600
C
570
mini
B
479
A
816-832
816-832
A
B
548
503
479
82
113
See chapter “Adjusting the feet and securing the cabinet”
594
Compact Range
www.eurocave.com
Page 4

Wine cabinet installation
25
47
69,5
548
503
113
837
726
495
47
837-853
A
B
Dimensions to be observed
.for a technical door
Flush-fitting diagrams - Compact 59
A max. A min. A max. A min. B C min.
with raising piece*with raising piece
*
059 853 837 896 880 548 842
259 1813 1797 1856 1840 565 1802
Weight of
door face:
15 Kg max.
059 259
600
560
mini
C
B
594
C
1802 mini
570 mini
Weight of
door face:
17,5 Kg max.
B
837-853
A
113
B
548
503
495
A
837-853
594
47
726
837
600
1797 mini
A
See chapter “Adjusting the feet and securing the cabinet”
Compact Range
www.eurocave.com
Page 5

Changing the hinges
Wine cabinet installation
Flush-fitting diagrams - Compact 59
- Gently remove the caps using a thin blade.
- Unscrew the three screws (1) using a T25 Torx wrench.
- Remove the hinge (2).
- On the other side, gently remove the caps using a thin blade
(3).
- Assemble (4) the hinge with pin (B) using the screws (5) in
such a way that the door is completely parallel to the body.
- Assemble (6) the hinge without pin (A) using the screws (7).
When you close the door, ensure that the seal adheres well to
the body to guarantee air tightness
1
2
3
Adjusting the feet and securing the cabinet
(to be carried out only when the cabinet is empty)
The wine cabinet’s 4 feet can be adjusted in height.
- If necessary, use the hexagonal raising pieces (8) supplied in the “accessories” sachet. Tilt the appliance forwards, ensuring that the door remains shut.
Unscrew the back feet and fit the raising pieces, using a 17 mm open-ended spanner. Screw the 2 back feet onto the raising pieces.
Repeat the procedure for the 2 front feet, this time tilting the appliance backwards.
- Use suitable screws to secure the wine cabinet underneath the work top or inside the unit via the holes provided in the hinges.
5
4
7
6
B
A
8
Fastening a unit door to a technical door
Size 059 259
- Position the cabinet so that it is level underneath the work top or inside the unit
- Open the cabinet door to 90°
- Fasten the door face of the kitchen unit onto the cabinet door (8 screws supplied)
- Ensure that the seal is completely air tight
Door height (in mm) 696 1656
Door width (in mm) 592 592
Door thickness (in mm) 29 29
Seal thickness (in mm) 10 10
Total thickness (in mm) 39 39
Max. weight of door face (in kg) 17,5 17,5
Door face + door total weight (in kg) 16 39,5
N.B.!
.the air vent
Never obstruct the front air vent.
This could result in poor functioning
of the cabinet.
.rotation of the door
On the side of the axis of rotation
of the door, position it at least 3 mm
from the adjacent unit.
Do not
obstruct
.access to the plug
The plug must be accessible after the appliance has been
installed. For medium and large models, it is essential that
the cabinet is fastened to the unit. Check that the appliance
is securely fastened to the unit and that the unit is securely
fastened to the wall.
.glass door
If your door is glazed, never place it on its side as it may
break.
www.eurocave.com
Compact Range
 Loading...