

Page 1
Mode d’emploi - Gamme Compact 59
Technical Manual - Compact 59 R a n g e
G e b r a u c h s a n w eisung - Reihe Compact 59
Modo de empleo - Gama Compact 59
Page 2
2
Des solutions adaptées à tous vos besoins - Solutions to meet all your needs
All Ihren Bedürfnissen angepaßte Lösungen - Soluciones adaptadas a todas sus necesidades
A
RMOIRES ÀVINS
- W
INECABINETS
W
EINKLIMASCHRÄNKE
- A
RMARIOS PARAVINOS
S
YSTÈMES DERANGEMENT
- S
TORAGESYSTEMS
R
EGALSYSTEME
- S
ISTEMAS DECOLOCACIÓN
C
LIMATISEURS DECAVE
C
ELLARCONDITIONERS
W
EINKELLERKLIMAGERÄTE
C
LIMATIZADORES PARABODEGA
S
ERVICE DUVIN AUVERRE
S
YSTEM TO SERVE WINES BY THE GLASS
O
FFENAUSSCHANKSYSTEM
D
ISPENSADOR DE VINO POR COPA
First Classic Compact
Cuir - Leather - Leder - Cuero Meuble à Vins Elite
Modulothèque Modulocube Modulorack
CL-C* CL-A* Vin au Verre
Sommelier
Page 3

3
Our principle aim is to the best of our ability to enhance your enthusiasm for wine throughout the years …To achieve
this, EuroCave uses all its know-how to bring together the 6 criteria essential to wine maturing:
Temperature:
The two worst enemies of wine are extreme temperatures and wildly fluctuating temperatures.A constant temperature
of 10 to 14°C (50 to 57°F) is considered ideal for wine to reach its peak.
Humidity:
This is an essential factor, enabling the corks to retain their sealing characteristics. The humidity level should be higher
than 50% (ideally between 60 and 75%).
Darkness:
Light,and more especially its ultra-violet content, has a rapid and harmful effect on wine through the irreversible oxidation
of the tannins. For this reason it is strongly recommended that you store your wine in the dark and away from U.V. rays.
Lack of vibration:
Vibration disturbs the slow process of biochemical evolution in wine and is often fatal to the finer ‘crus’.
Storage:
Moving your wine bottles around too often is detrimental to correct wine preservation. Having appropriate storage that
cuts down on handling is essential.
Natural ventilation:
A constant supply of filtered air from the outside is indispensable if unpleasant smells and mould development are to be
avoided.
All of these criteria are embodied in the EuroCave Compact cabinet that you have just acquired. We thank you for the
faith you have shown in us.
French Wines
Alsace 10°C / 50°F
Beaujolais 13°C / 55°F
Sweet white Bordeaux 6°C / 43°F
Dry white Bordeaux 8°C / 46°F
Bordeaux reds 17°C / 63°F
White Burgundy 11°C / 52°F
Burgundy reds 18°C / 64°F
Champagne 6°C / 43°F
Jura 10°C / 50°F
Languedoc-Roussillon 13°C / 55°F
Provence Rosé 12°C / 54°F
Savoie 9°C / 48°F
Dry white Loire wines 10°C / 50°F
Sweet white Loire wines 7°C / 45°F
Loire reds 14°C / 57°F
Rhône wines 15°C / 59°F
Sweet wines from the South-West 7°C / 45°F
Reds from the South-West 15°C / 59°F
Australian Wines
Cabernet franc 16°C / 61°F
Cabernet sauvignon 17°C / 63°F
Chardonnay 10°C / 50°F
Merlot 17°C / 63°F
Muscat à petit grain 6°C / 43°F
Pinot noir 15°C / 59°F
Sauvignon blanc 8°C / 46°F
Semillon 8°C / 46°F
Shiraz 18°C / 64°F
Verdhelo 7°C / 45°F
Other wines
Californian 16°C / 61°F
Chile 15°C / 59°F
Spanish 17°C / 63°F
Italian 16°C / 61°F
Standard wine service temperatures
W
ELCOME TO THE WORLD OFEUROCAVE
Page 4

4
EN
C
ONTENTS
1 • D
ESCRIPTION OF YOUR WINE CABINET
p. 5
2 • I
MPORTANT SAFETY RECOMMENDATIONS
p. 6
3 •
POWER SUPPLY
p. 6
4 • E
NVIRONMENTAL PROTECTION AND POWER SAVING
p. 6
5 • I
NSTALLING YOUR WINE CABINET
l- In general p. 7
II- Building in and reversibility p. 8
a- Summary of parts p. 8
b- Building in p. 9
c- Reversibility of door p. 11
6 • A
RRANGEMENT AND STORAGE
l- Various storage methods p. 13
lI- Advice on arranging your wine cabinet p. 13
lII- Adding sliding shelves p. 13
lV- Modifying the layout of your cabinet p. 14
7 • C
OMMISSIONING YOUR WINE CABINET
1- Connecting up your wine cabinet p. 14
II- Switching on the cabinet p. 14
III- Control panel description p. 15
IV- Temperature settings
a- 1-temperature models (V059 - V159 - V259) p. 16
b- Multi-temperature models (S059 - S159 - S259) p. 17
V- Humidity level display p. 18
VI- Lighting mode adjustment p. 18
VII- Adjusting the display contrast p. 18
VIII- Carbon filter counter log display p. 18
8 • A
LARMS
1- Temperature p. 19
II- Open door p. 19
III- Relative humidity level p. 19
IV- Carbon filter p. 20
9 • S
TANDARD MAINTENANCE
p. 20
10 • O
PERATING FAULTS
1- Temperature p. 20
II- Hot and cold circuits p. 21
III- Temperature probes p. 21
IV- Frost prevention device p. 21
V- Lighting p. 21
11 • T
ECHNICAL SPECIFICATIONS
p. 21
12 • S
TORAGE LAYOUT EXAMPLES
p. 79
Page 5
5
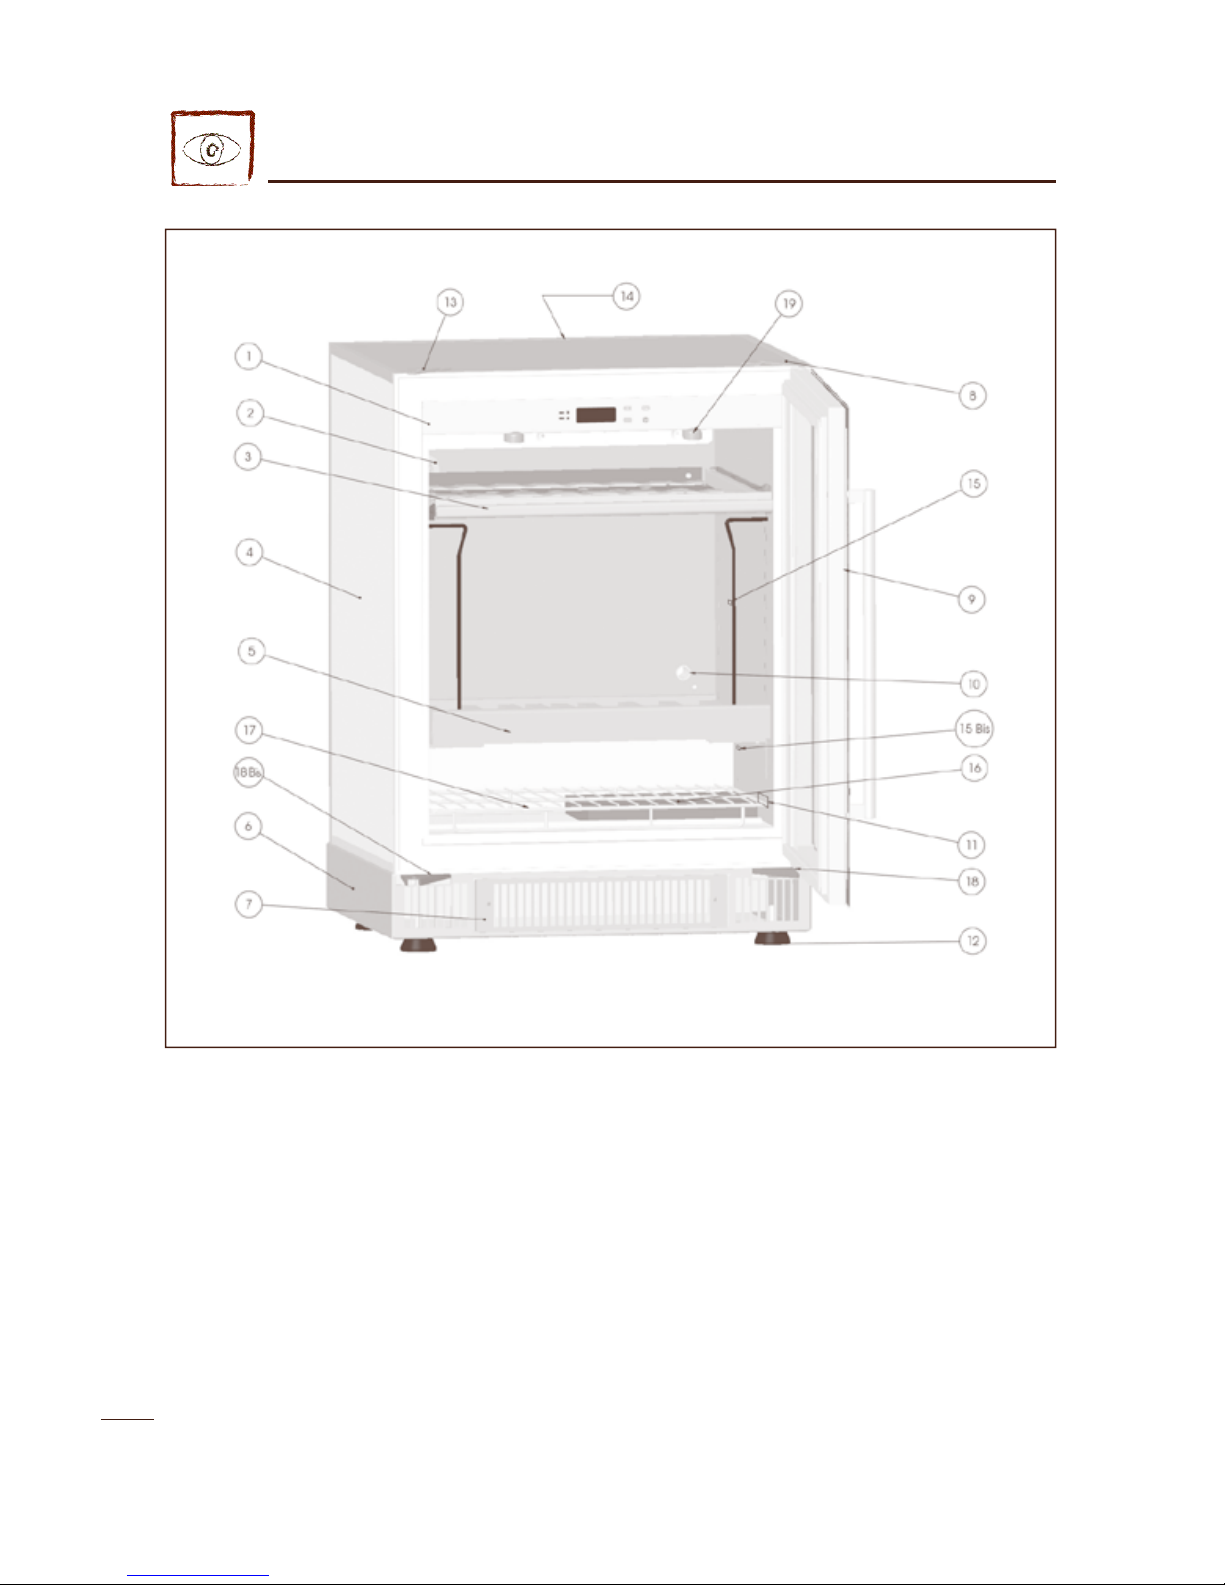
1 - D
ESCRIPTION OF YOUR WINE CABINET
1 -
Control and adjustment panel
2 -
Air circulation hole + Active carbon filter
3 -
Sliding shelf
4 -
Cabinet case
5 -
Storage shelf
6 -
Base with front ventilation
7 -
Filter access grille
8 -
Upper hinge
9 -
Door and handle
10 -
Free air circulation hole
11 -
Specification label
12 -
4 adjustable levelling feet
13 -
Lug for fixing to work surface (if flush fitted)
14 -
Anti-tilt system (for medium and large models)
15 -
Location of temperature probe in 1 temperature
models
15
bis
-
Location of temperature probe in multiple
temperature models
16 -
Humidity cassette (1 temperature models)
17 -
Grid
18 -
Lower hinge + removable door pin
18
bis
-
Lower hinge
19 -
Light (2 leds)
Page 6
6
EN
2 - I
MPORTANT SAFETY RECOMMENDATIONS
Only use your wine cabinet for its intended purpose as described in
this manual.
Never disconnect the wine cabinet by pulling on the power supply lead.
To remove the plug, grip it firmly and pull in a straight line.
Do not use a power lead that is frayed or showing signs of wear. Have
any damaged power lead replaced immediately.
Do not allow children to climb, sit on, stand on or hang from the
shelves of the wine cabinet. They could damage the wine cabinet and
cause themselves serious injury.
If the door has a lock, take care to keep keys out of reach of children
in order to avoid them locking themselves in the cabinet.
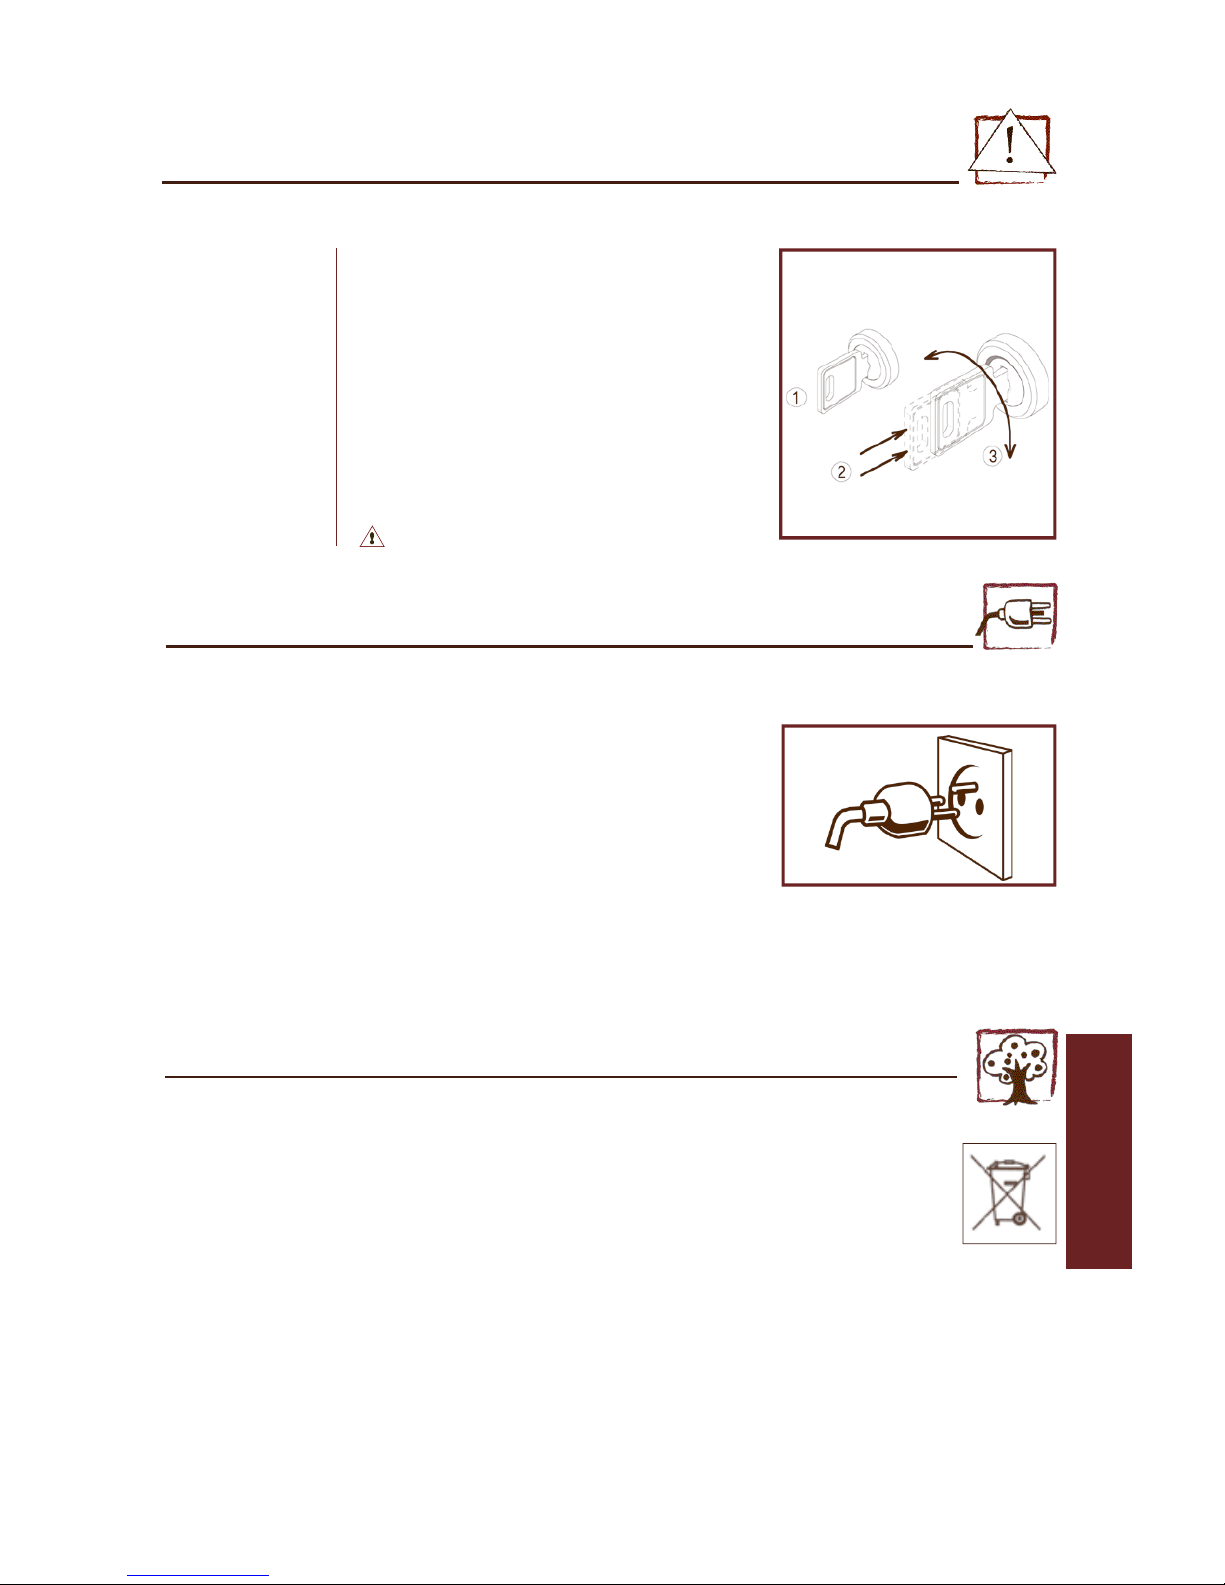
NB :If the door has a lock, to ensure optimum safe t y,the wine cabinet is
fitted with a double movement lock. To open or close the door, you mu s t
p u s h , then turn the key while keeping it pressed (see diagram opposite).
N e ver damage the refrigeration system of the unit.
To avoid all risk of electric shock, the wine cabinet's power supply lead is fitted with a plug designed to
fit into a standard earthed socket.
Have the power supply socket checked by a qualified electrician to confirm that it is earthed, and, if
necessary have the work done to bring it into compliance.
If the power supply lead is damaged obtain a new one from your usual EuroCave dealer.
The power lead should be replaced by an original manufacturer’s part.
I M P O RTA N T: a n y intervention should be carried out by a qualified electrician.
Caution
When using your wine
cabinet alw ays take
certain basic precautions, especially:
Make sure that the plug is earthed and that the installation's circuit is protected
by a 30 mA* fuse.
3 - P
OWER SUPPLY
For your personal safe t y, the wine cabinet should be pro p e r l y eart h e d .
Disposal of packaging:
The packaging components used by EuroCave are made out of recyclable materials.
After unpacking your cabinet, take the discarded packaging, the majority of which is recyclable, to a refuse collection point.
To comply with environmental protection legislation, your wine cabinet does not contain C.F.C gases.
Power saving:
- Install your cabinet in an appropriate location (see page 7) which provides the recommended ambient temperature ranges.
- Do not keep the door open any longer than necessary.
- Make sure that the door seal is not damaged and seals correctly. Contact your EuroCave dealer if damaged.
N. B.:Respect the environment: when replacing your wine cabinet, enquire about your local waste disposal services and use the correct recycling procedure.
Some substances and parts contained in EuroCave wine cabinets, particularly the refrigeration gases, use recyclable materials that require special disposal
procedures.
If the door has a lock, remove the lock so that children cannot become trapped inside the cabinet.
Disable non operable appliances and disconnect and cut the power lead into short lengths.
4 - E
NVIRONMENTAL PROTECTION
AND POWER SAVING
*not applied to certain countries
Page 7
7
5 - I
NSTALLING YOUR WINE CABINET
- On unpacking you wine cabinet after delivery, check for any obvious exterior damage (dents, malformation, etc.).
Open the door and check that the inside of the appliance is complete and in good condition (walls, shelves, hinges,control panel, etc.).
- In the event of a problem, contact your dealer.
- M o ve your wine cabinet to your selected location.This position must be:
- away from any heat source
- not too wet (wash room, utility room, bathroom, etc.)
- be on a flat solid floor
- have an electrical power supply (standard 13A plug connected to a 30 mA circuit breaker)
- Never place your wine cabinet in a location liable to flooding.
- Avoid splashing water onto the base of the appliance.
- Place the clay humidity cassette (for 1 temperature models only),which you will find inside your cabinet's "accessories" box) in the receptacle provided for
it beneath the grid located at the base of the cabinet (see diagram page 19). When using the cassette for the first time, please soak the cassette for ten
minutes in water,and let it drain.
- Take the power lead (which you will find inside your cabinet's "accessories" box) and connect it to the
socket provided at the rear bottom left of the cabinet.
- Unwind the power supply lead so that it can be accessed.
- Place the power supply lead so that it is not in contact with any of the appliance's components.
- I M P O R TANT - Wait 48 hours befo re switching on to allow the fluids contained in the internal
c i r cuits to settle.
- Adjust the 4 feet of the cabinet (by screwing
in or out), so that your wine cabinet stands perfectly level
(we recommend using a spirit level).
- Never obstruct the front ventilation grille.
- Remove the protective packing inside the cabinet.
- Install the carbon filter,which you will find inside your cabinet's "accessories" box , by placing it in the air circulation hole located inside the cabinet on the
top left hand side (see diagram opposite).
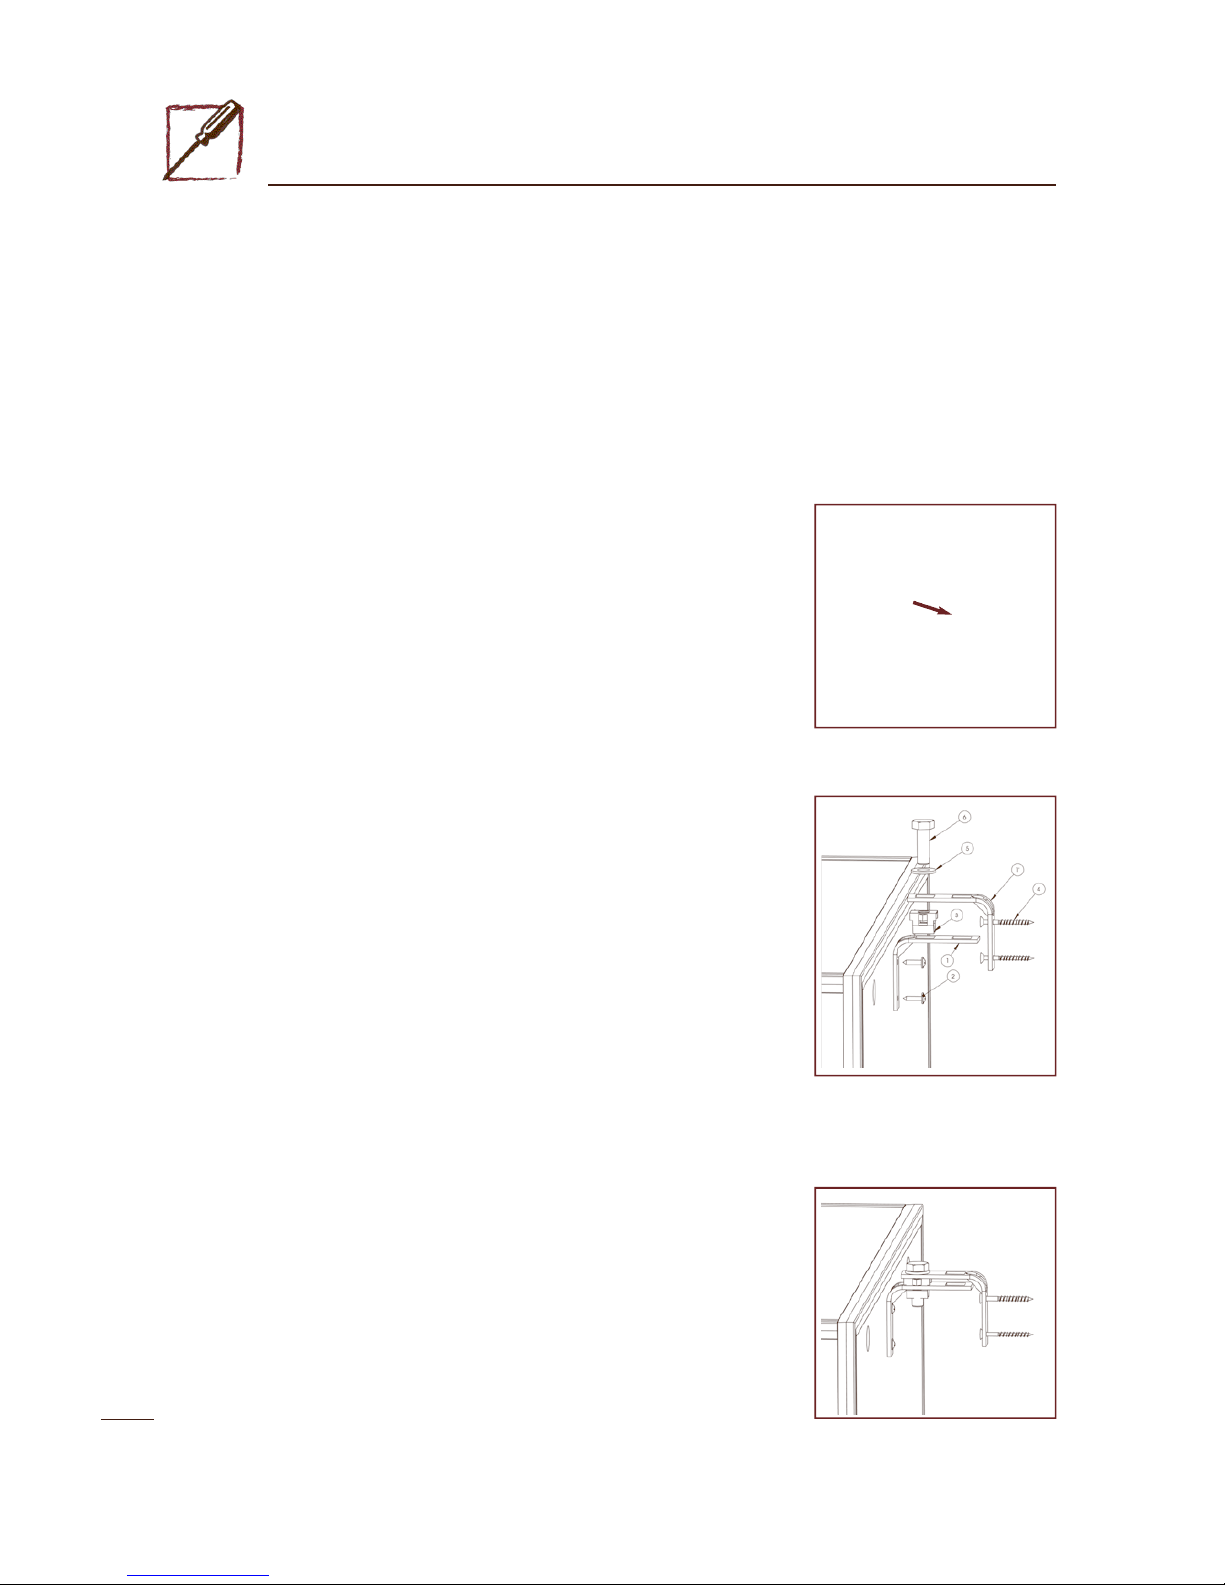
- For medium and large models, if the wine cabinet is not fbuilding in, it is essential to secure it to the wall
to prevent it fromtipping forward.
You will find all the necessary parts in the accessories bag supplied with the unit.
For installation (see diagram opposite):
1- Attach the bracket (1) to the cabinet with the screws (2)
2- Clip the nut (3) to this bracket (preferably choose the hole nearest to the cabinet)
WARNING:make sure that the part is correctly clipped by pulling upwards by hand.The clip must not come
out
3- Preposition the wall bracket (1’) (on the nut (3) to determine the position for drilling the holes for the
wall-mounting screws
4- Drill the holes then attach the wall bracket (1’) with (4) suitable screws
WARNING:ensure that the wall fixing can withstand a tensile force of 100 kg
5- Tighten screw (6) with the washer (5) until it is screwed fully in and there is contact between the wall
bracket (1’) and the nut (3).
Only full tightening of the screw will ensure correct fixing of the unit.
N.B.: when moving your wine cabinet, do not incline it more
than 45°,and always toward side where the power lead is
located.
I - In General
1 - fixing bracket (x2)
2 – screw for fixing to cabinet (x2)
3 – clipped nu t
4 - screw to suit wall fixing (not supplied)
5 - washer
6 - fixing screw
Page 8
8
EN
5 - I
NSTALLING YOUR WINE CABINET
II - Building in and reversibility
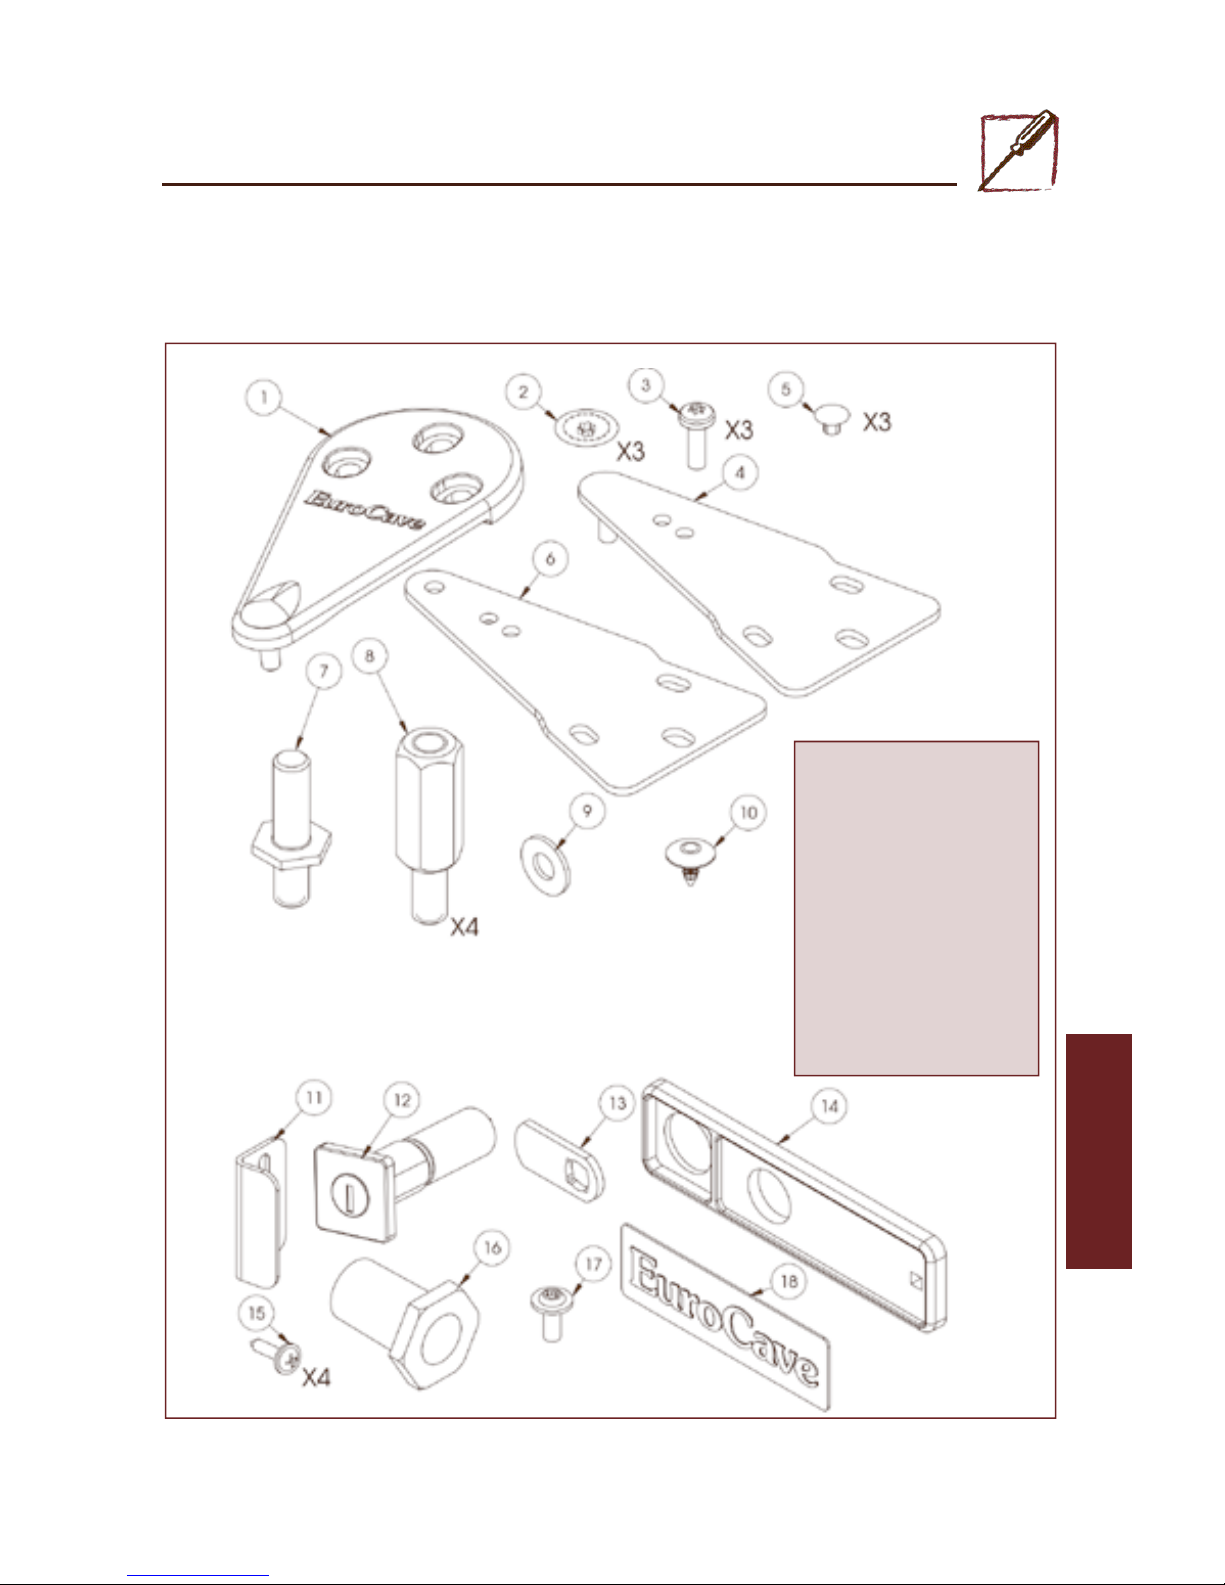
a - Summary of parts
1 • Hinge
2-5-10 • Grommets
3 • No. 25 Torx screw
4 • Flush fitting hinge
6 • Hinge without pin
7 • Door pivot guide
8 • Pillar
9 • Washer
11 • Closing clip
12 • Lock
13 • Locking bar
14 • Logo support
15 • Phillips screws
16 • Nut
17 • No.20 Torx screw
18 • EuroCave Logo
Page 9
9
5 - I
NSTALLING YOUR WINE CABINET
b - Building in
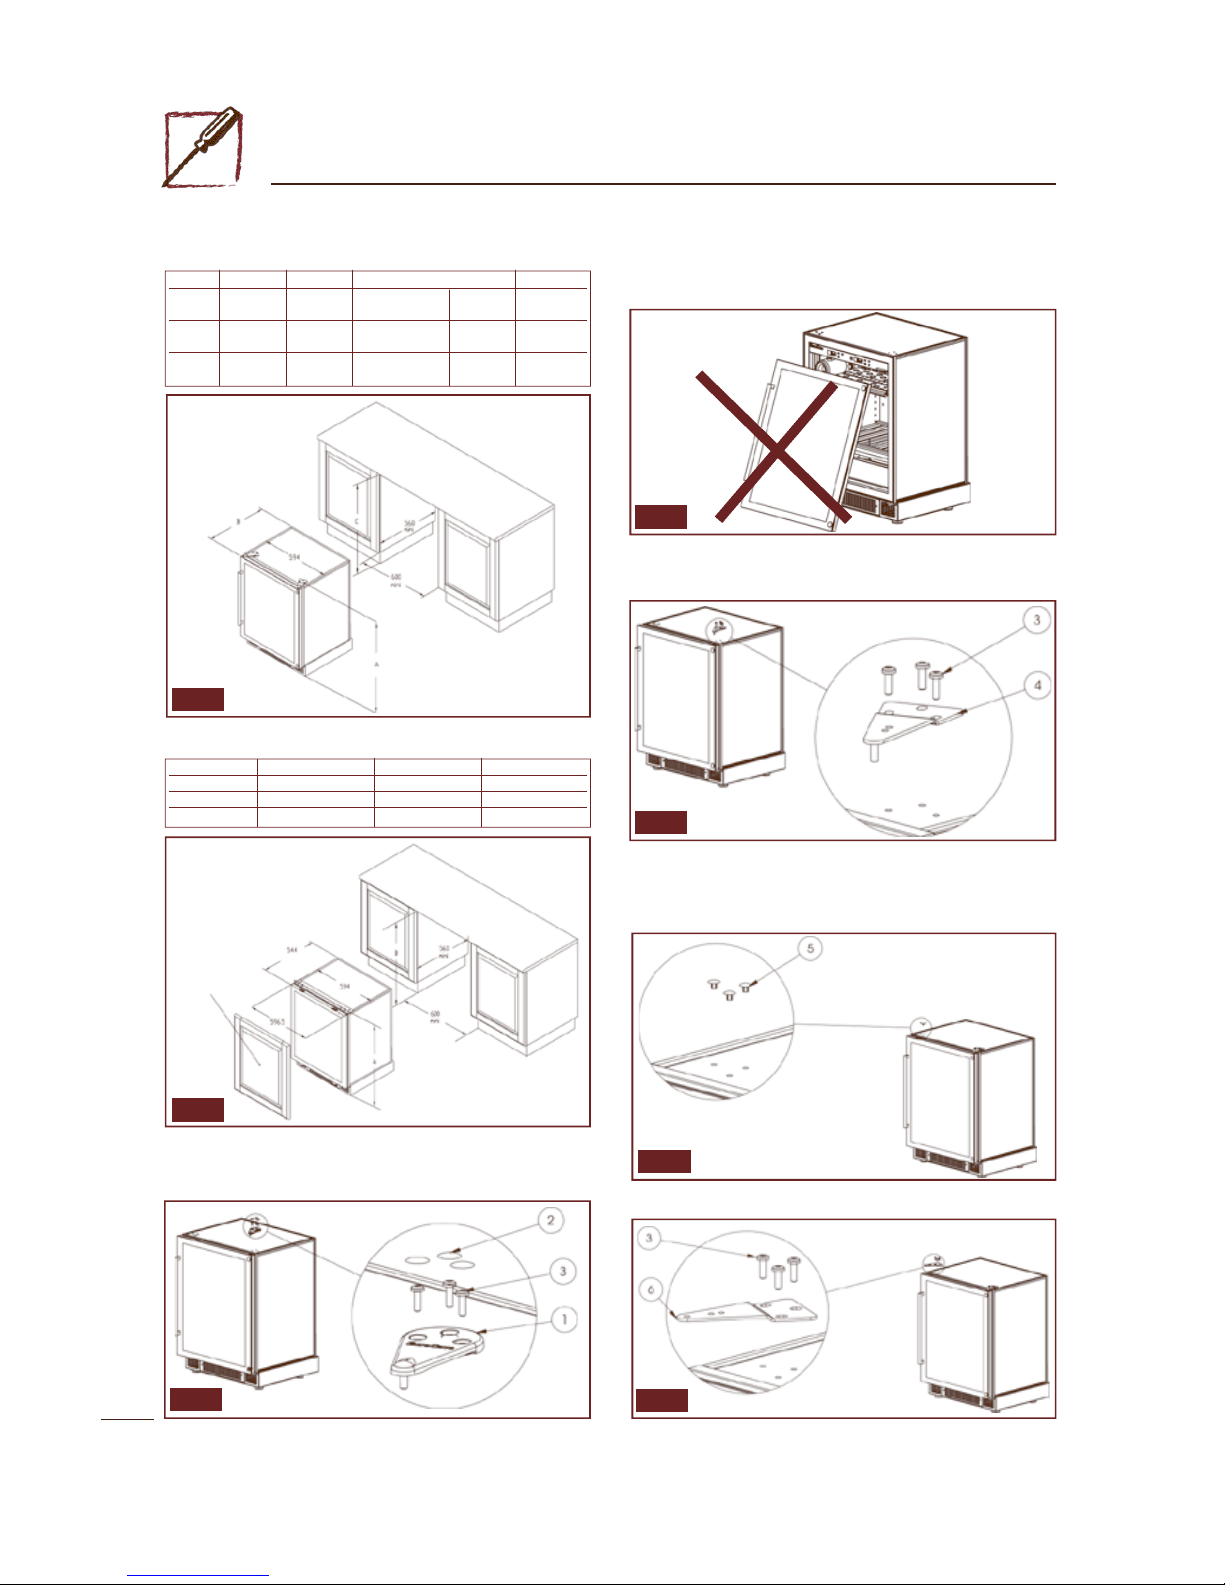
• Dimensions for solid or glass door (Fig. 1) :
Precautions :
If you lift off the glass door of the cabinet, never place it on its edges which
may cause it to break (Fig. 4).
• Dimensions for a technical door (Fig.2) :
- Fit the hinge with pin (4) using the screws (3) so that the door is parallel
to the cabinet (Fig. 5).
• Changing the hinges
- Remove the plugs (2) and screws(3) with a T25 Torx screwdriver and lift
off the hinge (1) (Fig. 3).
Fig. 1
Fig. 2
Fig. 3
Precautions : When closing the door, check that the seal adheres
correctly to the cabinet so that it is airtight.
Remove plugs (5) (Fig. 6).
Weight of
the panel:
max.15kg
- Fit the hinge without pin (6) with the screws (3) (Fig. 7 ) .
A maxi A mini B C mini
059 831 815 Solid door 552 820
Glass door 540
159 1231 1215 Solid door 552 1220
Glass door 543
259 1791 1775 Solid door 552 1780
Glass door 543
A maxi A mini B mini
059 852 836 841
159 1252 1236 1241
259 1812 1796 1801
Fig. 4
Fig. 5
Fig. 6
Fig. 7
Page 10
10
EN
5 - I
NSTALLING YOUR WINE CABINET
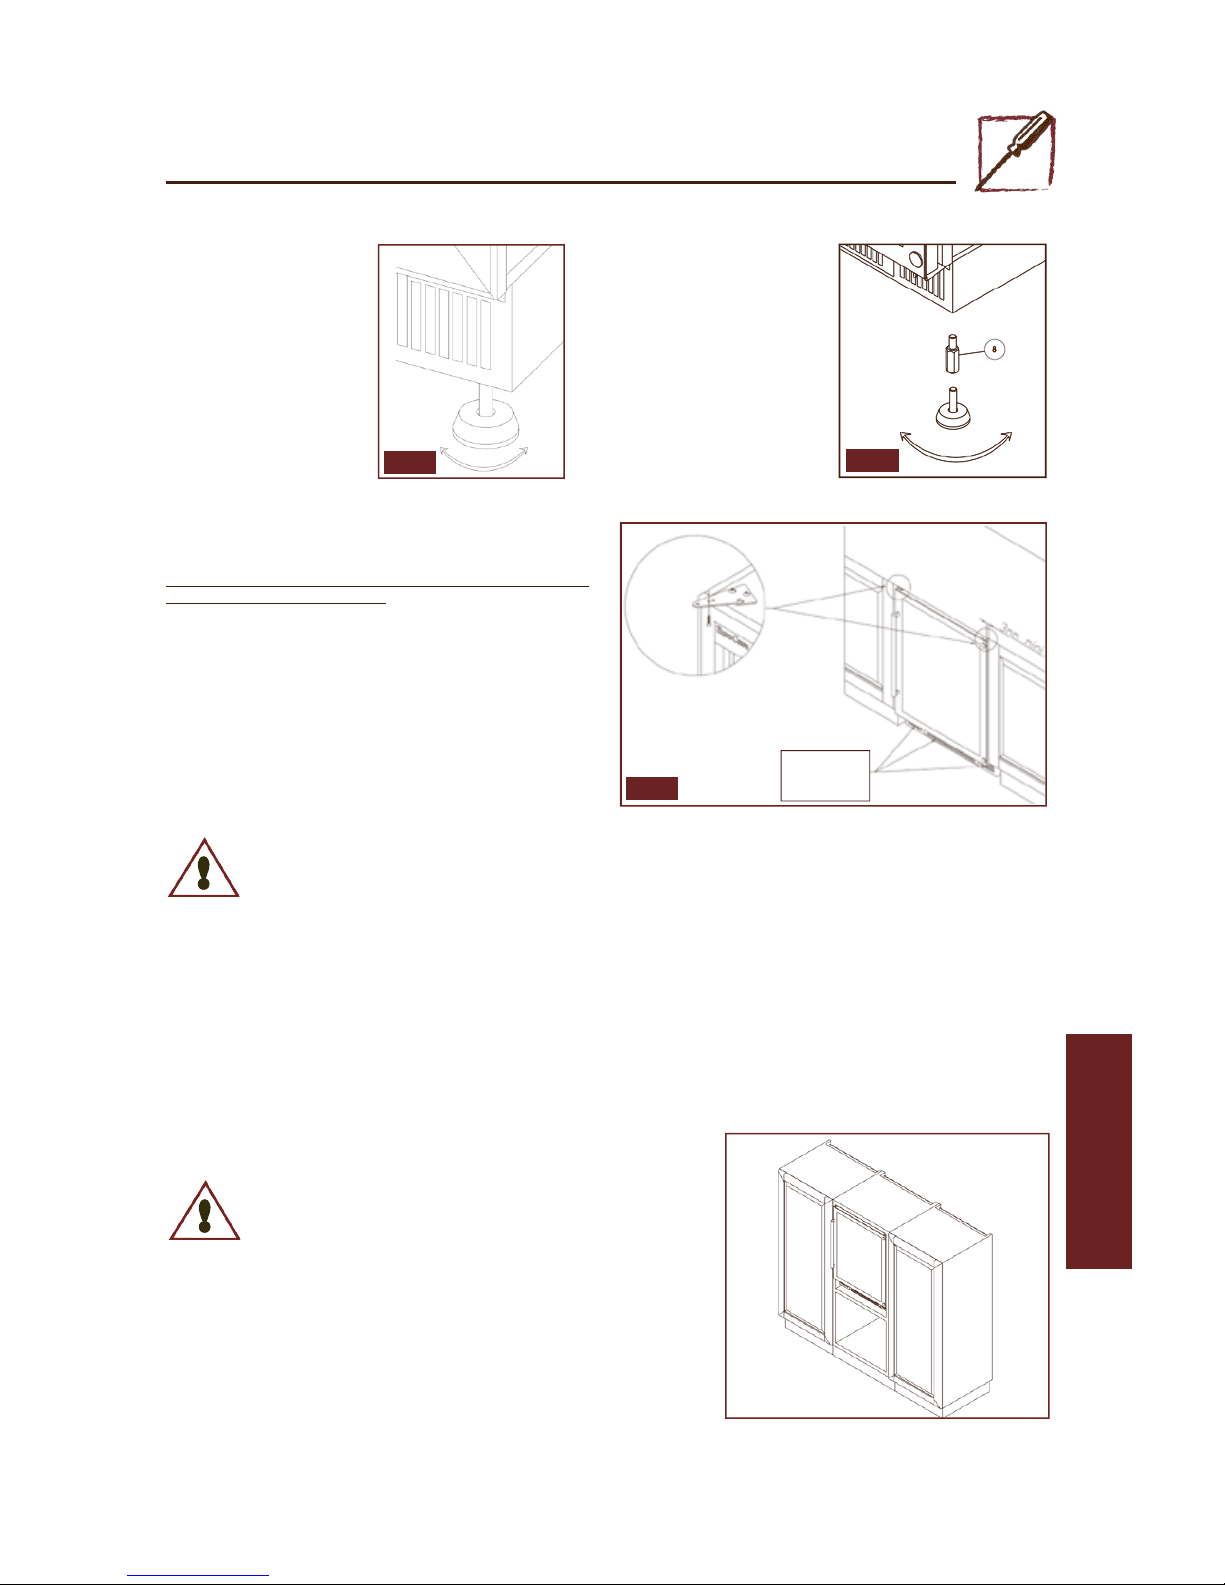
- The 4 feet of the wine cabinet
are adjustable in height so that the
height below the work surface or
in the unit can be adjusted, and to
align the doo r with adjacent
furniture (Fig. 8).
Fig. 8
Fig. 10
- Use the correct screws to secure the wine cabinet under the wo r k
surface or in the unit through the holes provided in the hinges.
N e ver obstruct the front ventilation grille which would impair the
operation of the wine cabinet (Fig. 1 0 ) .
P re c a u t i o n s : on the sid e of the axis of rotation of the door, p o s i t i o n
the latter a minimum of 3 mm from adjacent furniture.
- Position the cabinet level under the work surface or in the furniture.
- Open the cabinet door 90
o
.
- Fix the facing of the kitchen furniture to the cabinet door 98 screws supplied).
- Check that the seal is airtight.
Attachment of a furniture door with a technical door:
Fig. 9
• Adjusting the mounting feet and attachment (only when the cabinet is empty)
- If necessary, use the hexago n a l
pillars (8) (Fig. 9) that you will find
in the "accessories" bag. Tilt the
unit fo r w a rd , taking care to ke e p
the door closed.
U n s c r ew the rear feet and install
the pillars, using a 17 mm flat
s p a n n e r
S c r ew the 2 rear feet back onto
the pillars
Repeat these operations for the 2
f r ont fe e t , taking good care to tilt
the unit backward s .
Do not
obstruct
For safety reasons, we do not advise installing the wine cabinet in a kitchen
unit.
If this is the case, check with a furniture specialist that the unit supporting
the equipment and the surrounding furniture can support the weight of the
cabinet when filled with full bottles, or 200 kg. Have its stability checked
when opening the door and removing shelves loaded with full bottles.
Installing a cabinet within a high level kitchen unit
The mains power socket must be accessible after installation of the unit.
For medium and large models, it is essential to secure the cabinet to the wall to prevent it from tipping forward.Have your cabinet
checked by a professional to confirm that it is fixed to the furniture and that the furniture is fixed to the wall.
Page 11
11
5 - I
NSTALLING YOUR WINE CABINET
c - Reversibility of the door
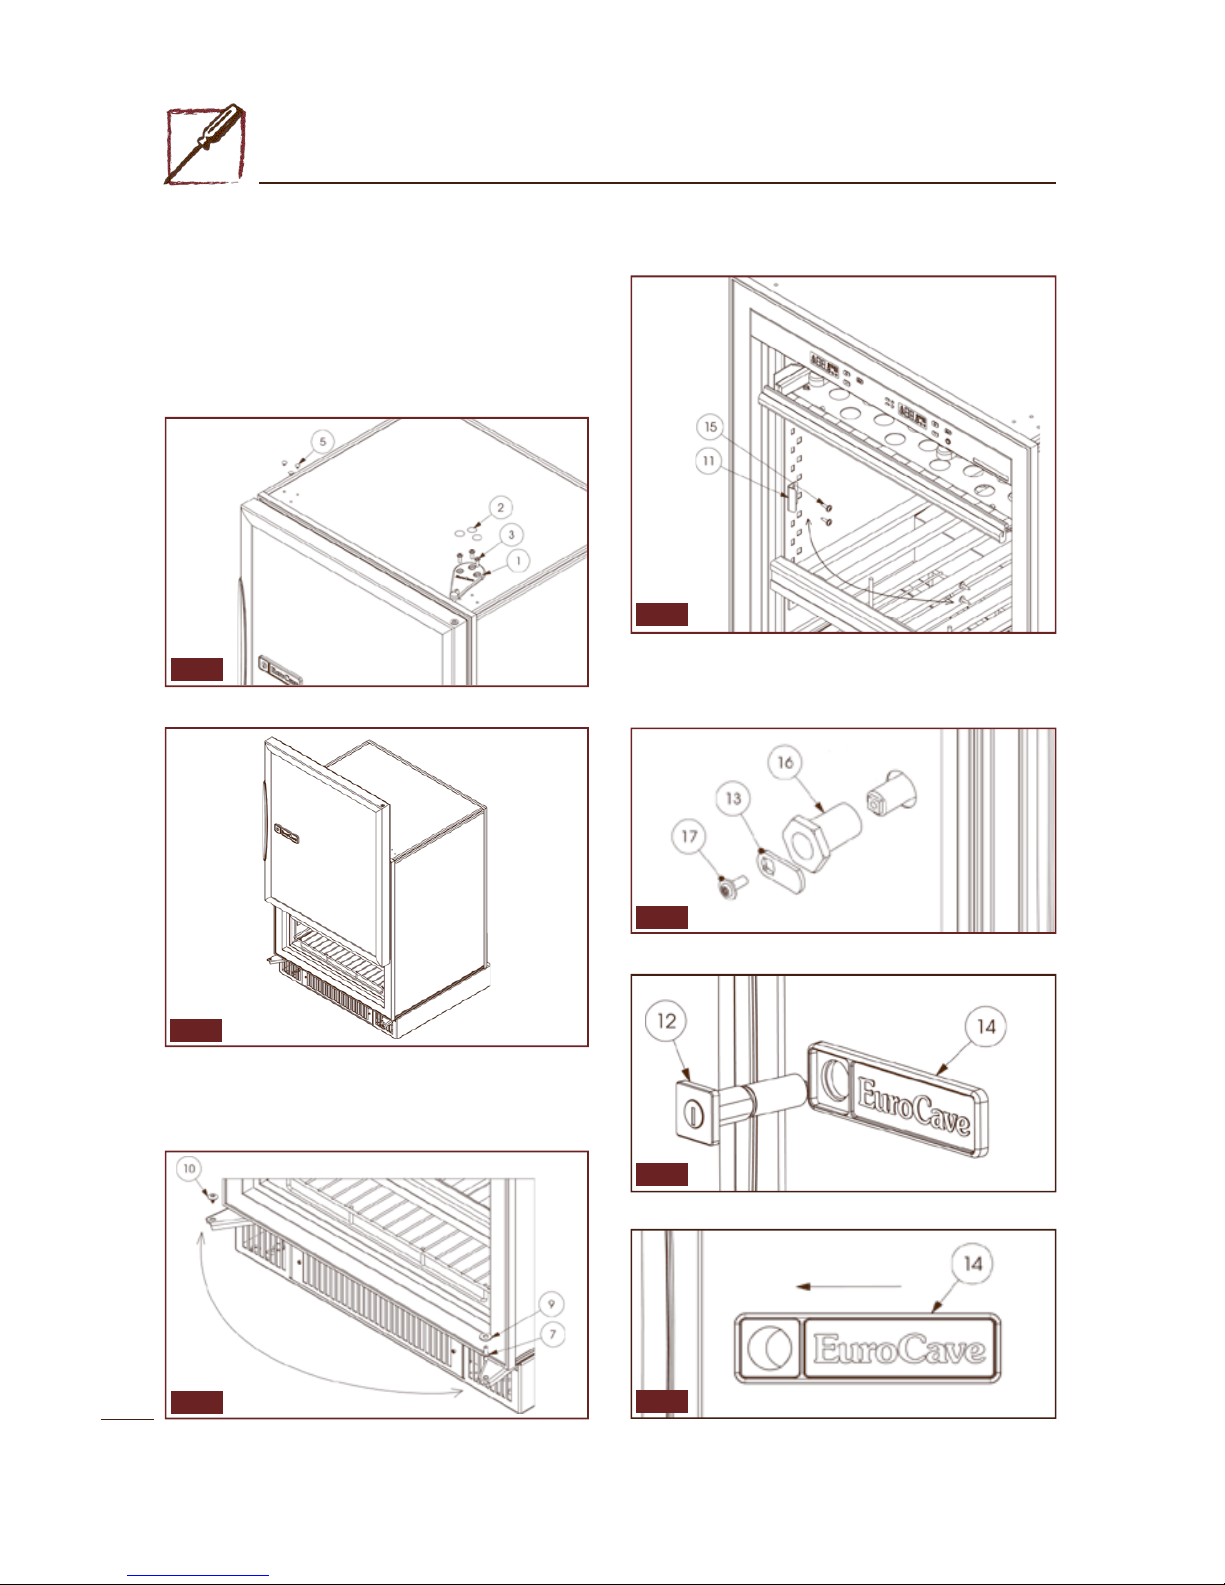
The door of the wine cabinet is reversible so you can change the direction
of opening.
To do this, proceed as follows (for example, to change a right hand door
into a left hand door):
- Close the door
- Carefully remove the plugs (2) and (5) with a thin blade (Fig. a)
- Unscrew the screws (3) with a Torx screwdriver while holding the door
to prevent it falling (Fig. a)
- Remove the upper hinge (1) (Fig. a).
• Lift the door off the cabinet by opening it slightly,then lifting it up (Fig.b ) .
• Remove the washer (9), remove the pin (7) with a no. 10 hexagonal
spanner (Fig. c)
• Carefully remove the plug (10) with a thin blade and in its place fit the
pin (7) and washer (9) (Fig. c)
• Replace the plug (10) on the opposite side (Fig. c).
Then turn the logo round (solid doors only)
• Unscrew the screw (17) with a 25 Torx screwdriver (Fig. e)
• Remove the cam (13) (Fig. e)
• Unscrew the nut (16) with a no. 28 spanner (Fig. e).
• Unscrew the 4 screws (15) (Fig. d)
- Attach the lug (11) to the opposite side of the cabinet, using the screws
(15) (Fig. d).
Fig. a
Fig. b
Fig. c
Fig. d
Fig. e
Fig. f
• Remove the lock (12) while holding the logo support (14) (Fig.f).
Fig. g
• Taking care, t r a n s fer (to the lock side) the logo support (14) (Fig.g ) .
Page 12
12
EN
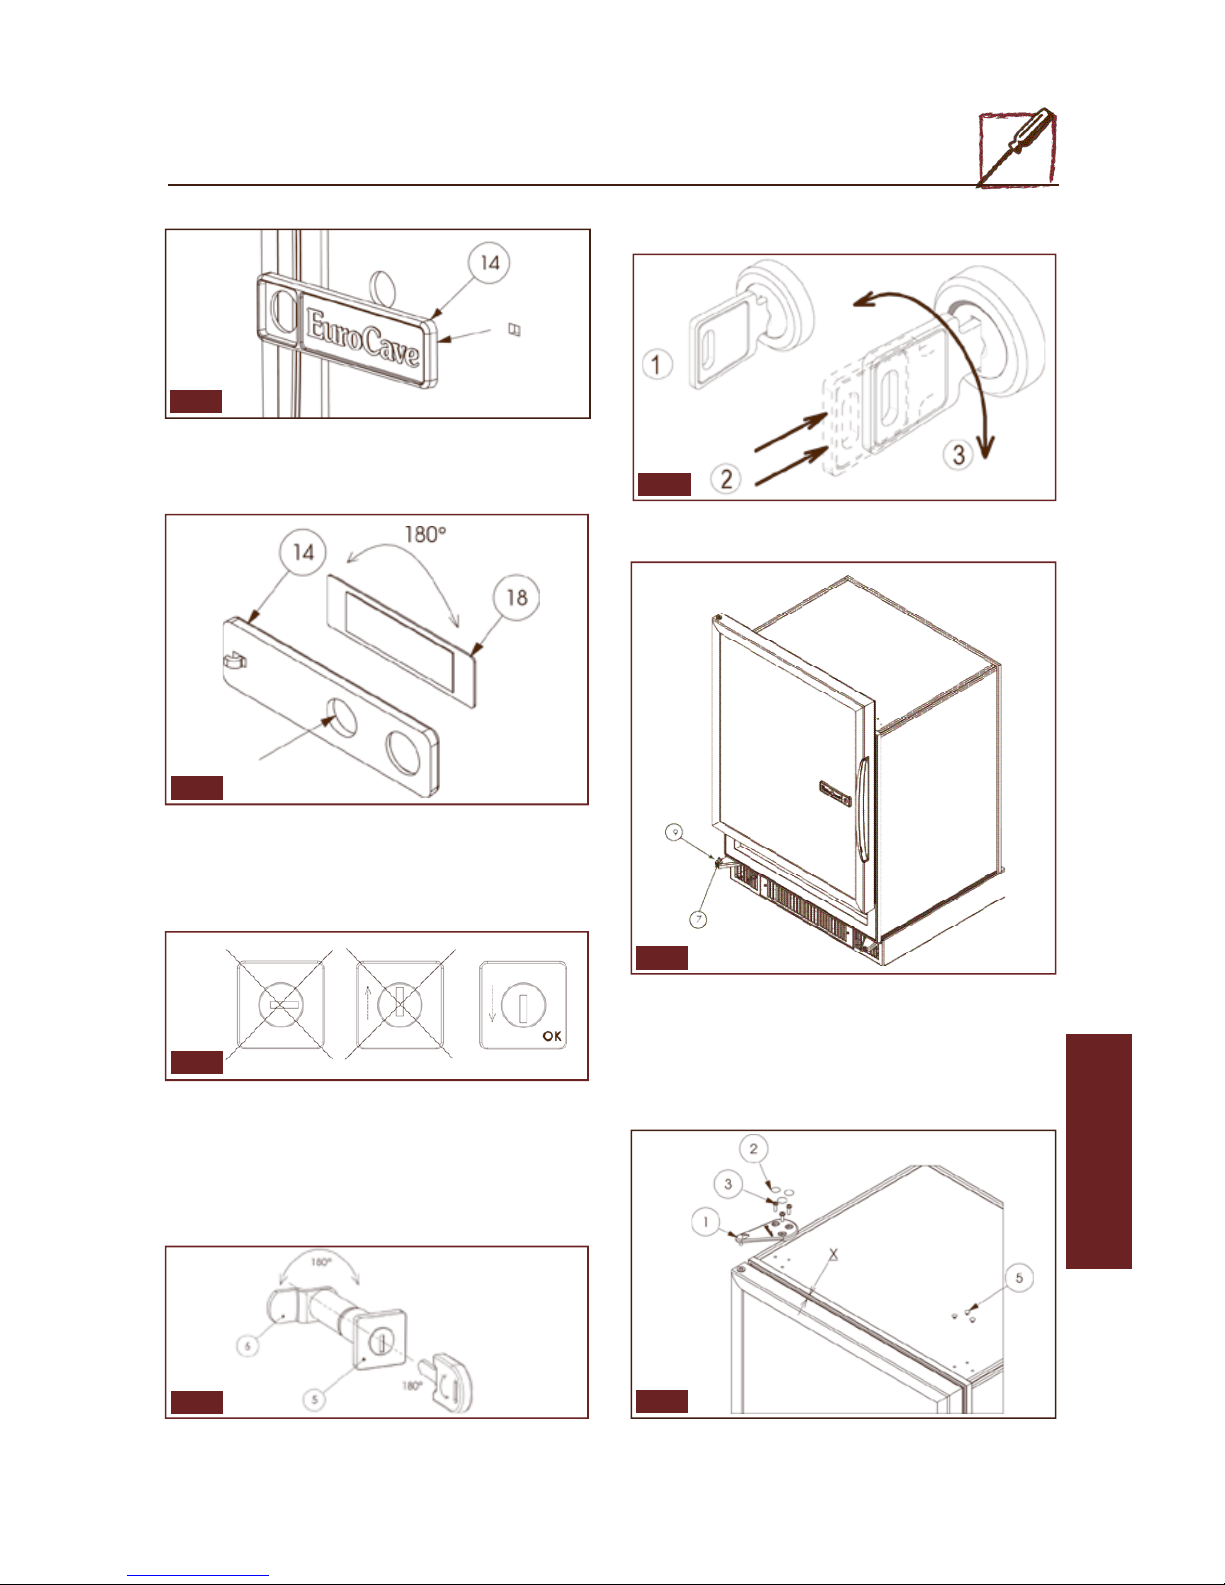
• Gently press the "EuroCave" logo (18) to loosen it from the logo support
(14) (Fig. 1)
• Rotate the logo (18) 180° before repositioning it on the logo support
(14) (Fig. 1).
• Turn the door through 180°
!!! WARNING: the glazed doors are very heavy. Take all necessary
precautions not to injure yourself or drop the door. Never place it on its
edges, which may break it.
- Replace the logo support (14) (Figs. g and h).
- Replace the lock with the slot vertical and pointing downwards(Fig. j).
• Tighten the plastic nut (16) first by hand as far as possible, then with a 28
spanner (maximum 1/2 turn of the spanner)
• Attach the cam (13) to the end of the lock (12) with the screw (17) and
with a “TX20" Torx spanner supplied in the accessories bag (Figs. k and e)
!!! WARNING note the direction of rotation of the cam (13): it must
always turn upwards (whether the door is mounted on the right or left
side).
- Reposition the door vertically on its axis (7) not forgetting the washer
(9) (Fig. m).
Fig. i
Fig. j
Fig. k
Fig. m
Fig. n
• Reattach the hinge (1) with the screws (3) so that the door is parallel
with the cabinet (Fig. n)
• Check that the seal adheres to the cabinet (by closing the door), to make
it airtight
!!! WARNING:maintain the distance X between the door and the cabinet
(X = 11 mm for the glazed door of the small model and X = 10 mm for all
other models).
• Insert the plugs (2) and (5) (Fig. n).
!!! WARNING: for safety reasons, the key has a double action: it must be
pressed and turned at the same time (Fig. l)
Fig.l
Fig. h
• Remove th logo support (14) (Fig.h).
5 - I
NSTALLING YOUR WINE CABINET
Page 13
13
Adjusting screw
Slider
Slider
Adjusting screw
Slider
6 - A
RRANGEMENT AND STORAGE
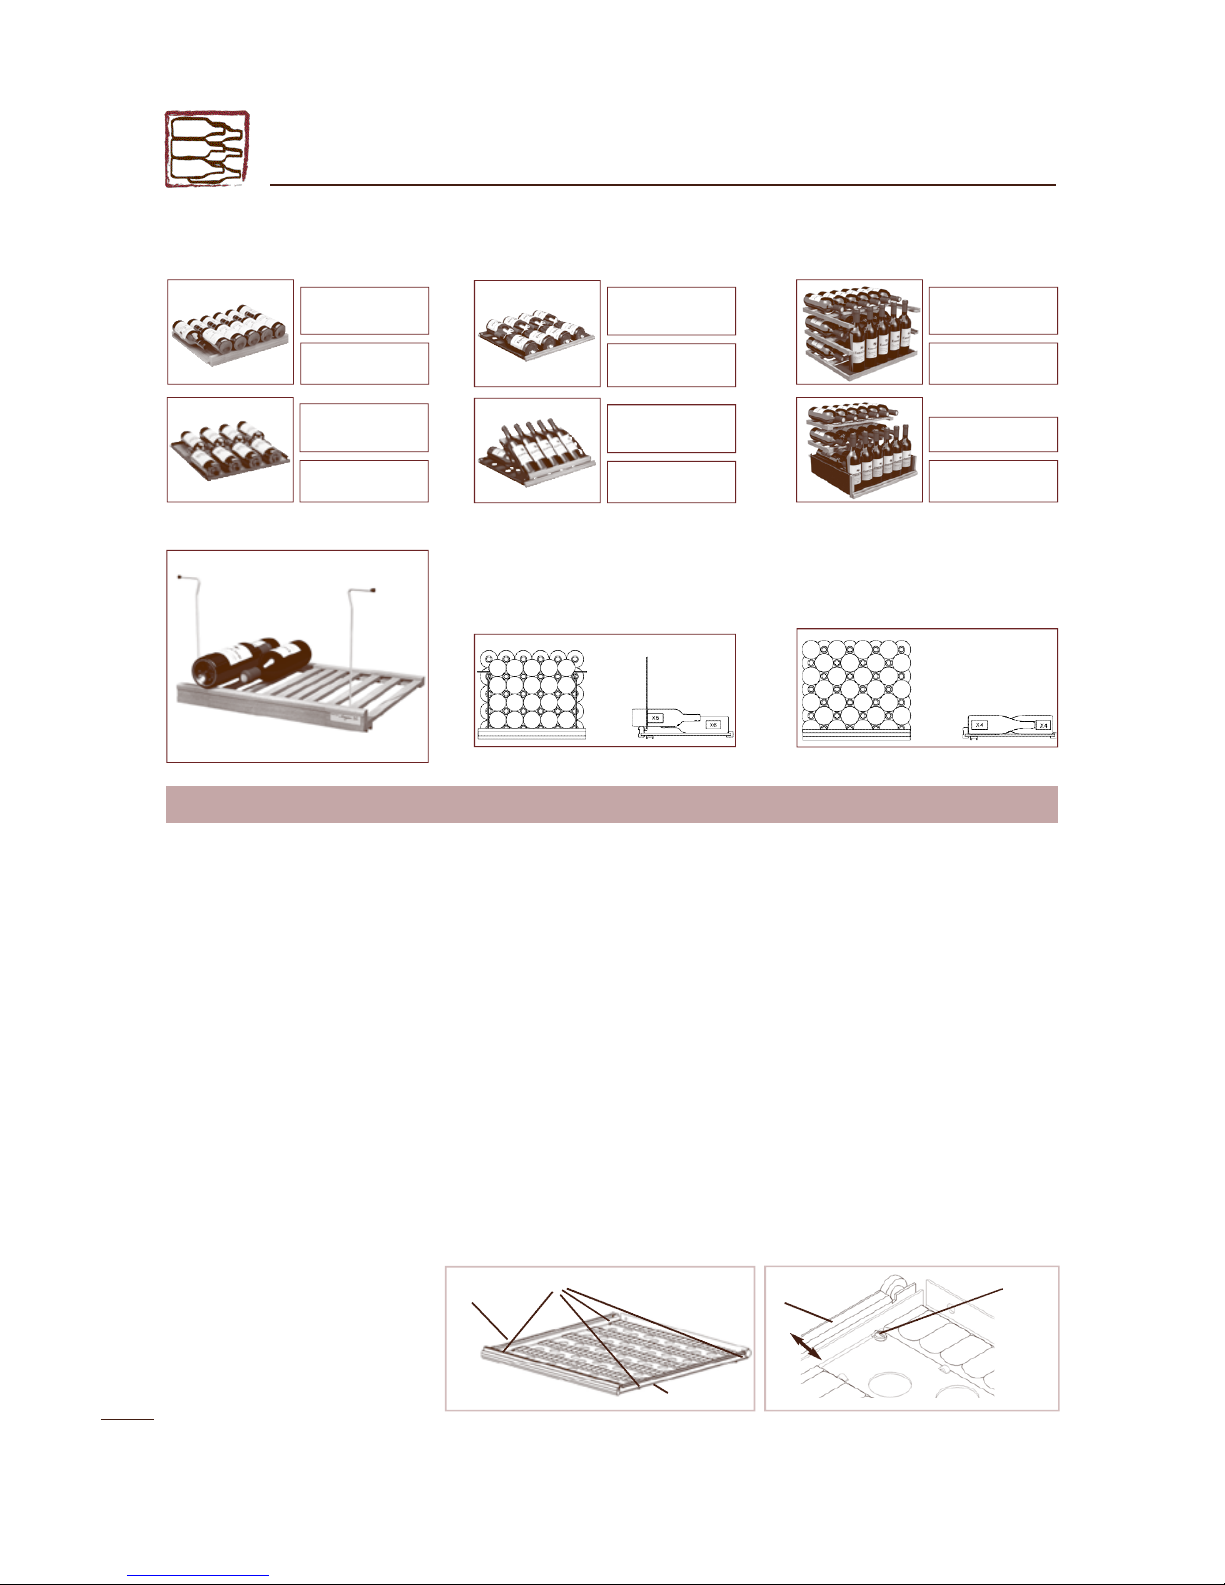
Your Euro C ave wine cabinet has been designed to evo l ve. Depending on the model,it can be adapted to your re q u i rements and be modified in terms of storage:
I - Various storage methods
Capacity: 50 bottles
Max. weight:85 kg
U n i versal storage
s h e l f
Ref:AXLN
Capacity: 8 bottles
U n i versal slatted
sliding shelf
Ref:ACUPC
Capacity: 33 bottles
with 6 vertical
Service Kit
R e f : AC L K
The layout of your wine cabinet can be m o d i fied according to your re q u i r e m e n t s . Refer to pages 79 to 82 to look at arrangement examples
III - Adding sliding shelves
II - Advice on arranging your wine cabinet
Your EuroCave wine cabinet has been designed to store a maximum number of bottles in total safety. We recommend that you abide by the following few
suggestions in order that the maximum storage capacity can be obtained.
-Make sure that you distribute your bottles as evenly as possible onto the various shelves contained in your cabinet so as to spread the weight equally. Also
take care that your bottles do not touch the cabinet's rear wall.
- Make sure you distribute your bottles evenly throughout the height of the wine cabinet (avoid loading all bottles at the top or all bottles at the bottom).
- Be sure to observe the storage recommendations in accordance with the type of storage facility provided by your cabinet. Never stack more than one
layer of bottles on a sliding shelf.
- If you have sliding shelves, for easy day to day access it is a good idea to place them in the upper part of your wine cabinet.
- For this reason, place one or two bottles of each of your various wines on the sliding shelves and your reserve stock on the storage
shelves.Then all you have to do is top them up as required.
- When using your wine cabinet, never pull out more than one sliding shelf at a time.
WA R N I N G : N e ver modify the position of your wine cabinet's bracing bar without first consulting your dealer, a n d
n e ver manoeuvre this part when the cabine
t is stocked (only for159 and 259 models).
When you purchase your wine cabinet, the
dimensions of the sliding shelves have been
adjusted so that they fit perfectly into the
interior of your cabinet. In the event that you
purchase another sliding shelf, if necessary,
you can adjust it yourself. To do this, loosen
the right and left screws of the first slider
(2 screws), then adjust the slide to the width
required and retighten the screws. Repeat
the pro c e d u re for the second slider (if
required):
Capacity: 29 bottles
with 6 vertical
Bar sliding shelf
Ref:ACOK
Capacity: 9 bottles
with 5 inclined
Optional pre s e n t a t i o n
for ACUPC
Ref:ACOP
Capacity: 8 bottles
Universal matted
sliding shelf
Ref:AXMU
How to use the storage shelf (Ref.AXLN)
To store bottles of Bordeaux: Turn each
metal rod so that it is in contact with the wall
of the cabinet. Storage for 4 rows at the front
and 5 rows at the back, or 50 bottles*.
To store bottles of Burgundy: Remove the
metal rods.
Storage on 7 levels, 8 bottles on each level, or
56 bottles*.
* Each shelf is fitted with a label holder.(p. 33)
Page 14
14
EN
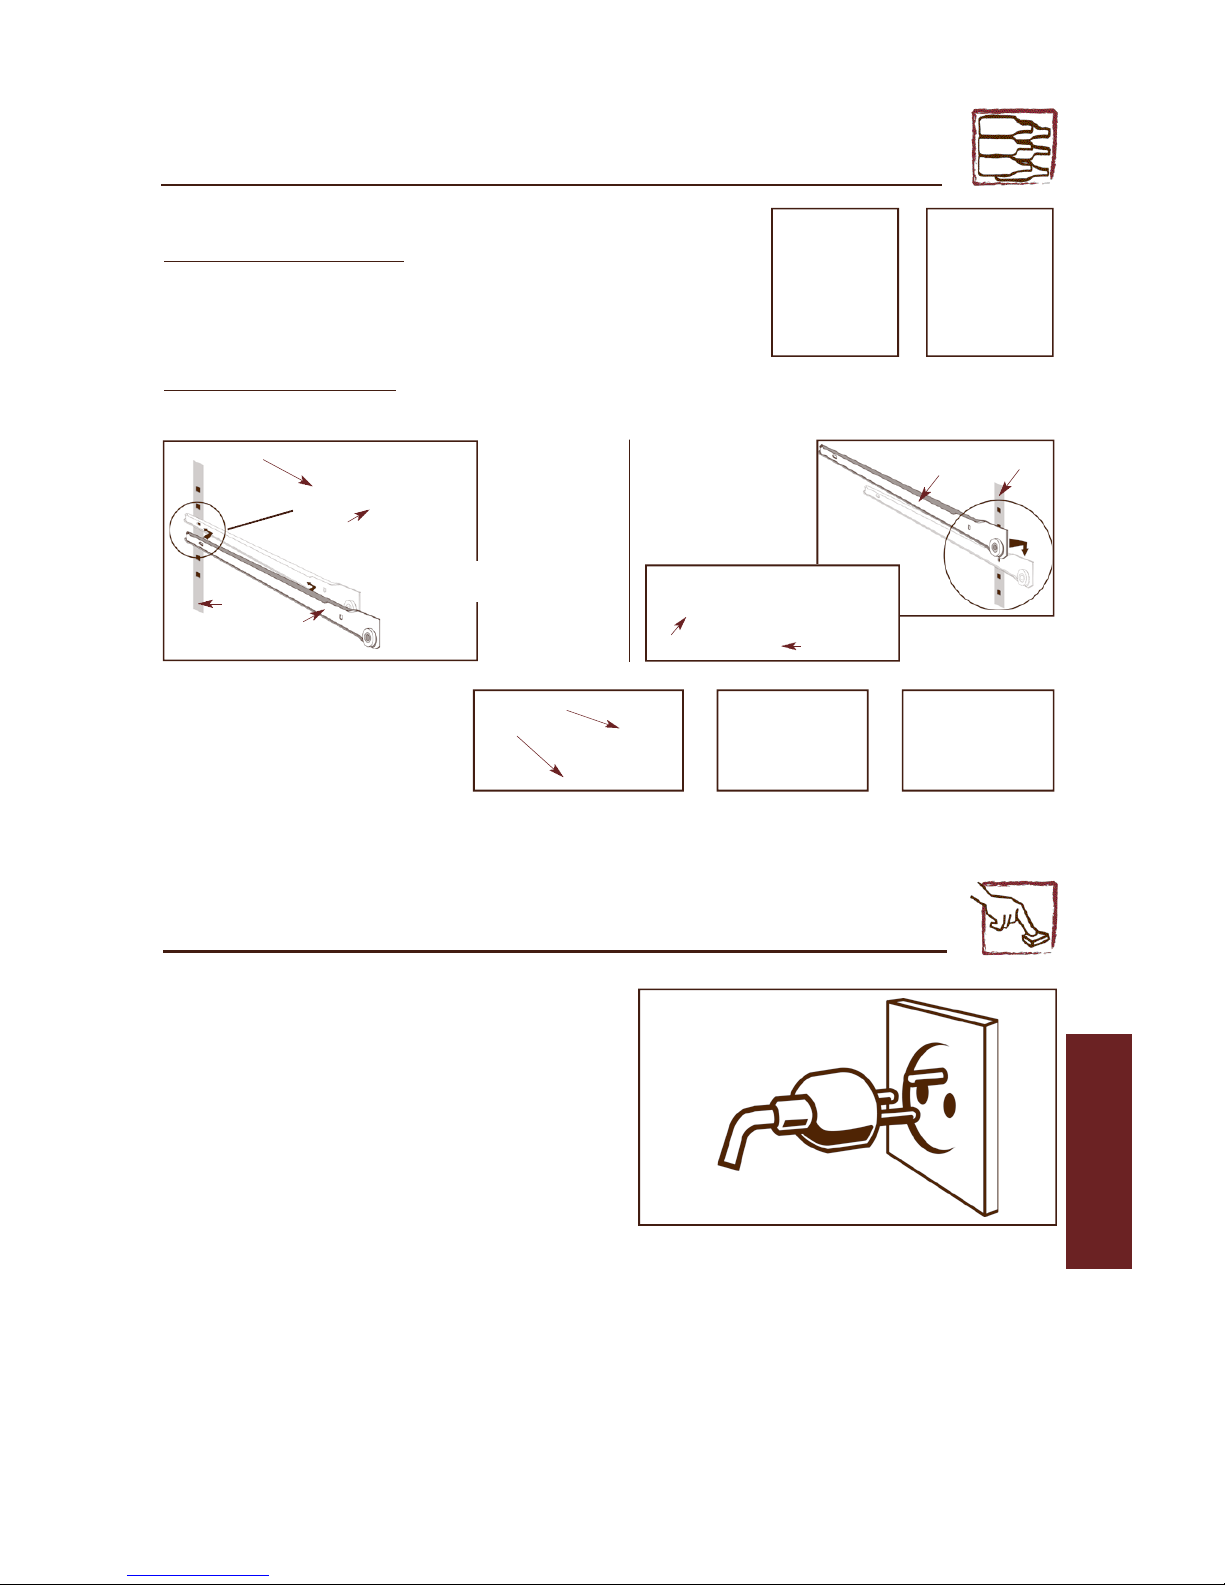
IV - Modifying the layout of your cabinet
To change the position of a storage shelf, you must first of all unload the shelf, then remove the
shelf supports taking care to reinstall them as shown opposite:
To change the position of a sliding shelf, you must first of all completely unload it. Then lift out the sliding tray by sliding it forwards whilst at the same time
lifting it from the front. Find the runner guides on the left and right and remove.Then reinstall them in the new position as shown below:
Then replace the sliding drawer as shown opposite:
Setting up the front part
of the guide
Setting up the rear part
of the guide
6 - A
RRANGEMENT AND STORAGE
7 - C
O M M I S S I O N I N G YO U R W I N E CA B I N E T
1- Connecting up your wine cabinet
Make check that your socket has a power supply (presence off fuses and
amperages, and that there is an operational 30 mA circuit breaker*).
* Not applied to certain countries.
Having waited for 48 hours, switch on your wine cabinet at the main power
supply
II- Switching on the cabinet
Press on the internal and standby button and then release. A start-up message flashes for 5 seconds before the cabinet's temperature is displayed.
At the time of switching on, if the set temperature is less than the ambient temperature, the blue cold circuit indicator will light up.
If the set temperature is higher than the ambient temperature, the red hot circuit indicator will light up.
To put your cabinet in standby, press on the button for 5 seconds.
Wall
Guide
WallGuide
Wall
Guide
Wall
Guide
Guide
Sliding shelf
Wall
S h e l f
s u p p o r t
Page 15
15
7 - C
O M M I S S I O N I N G YO U R W I N E CA B I N E T
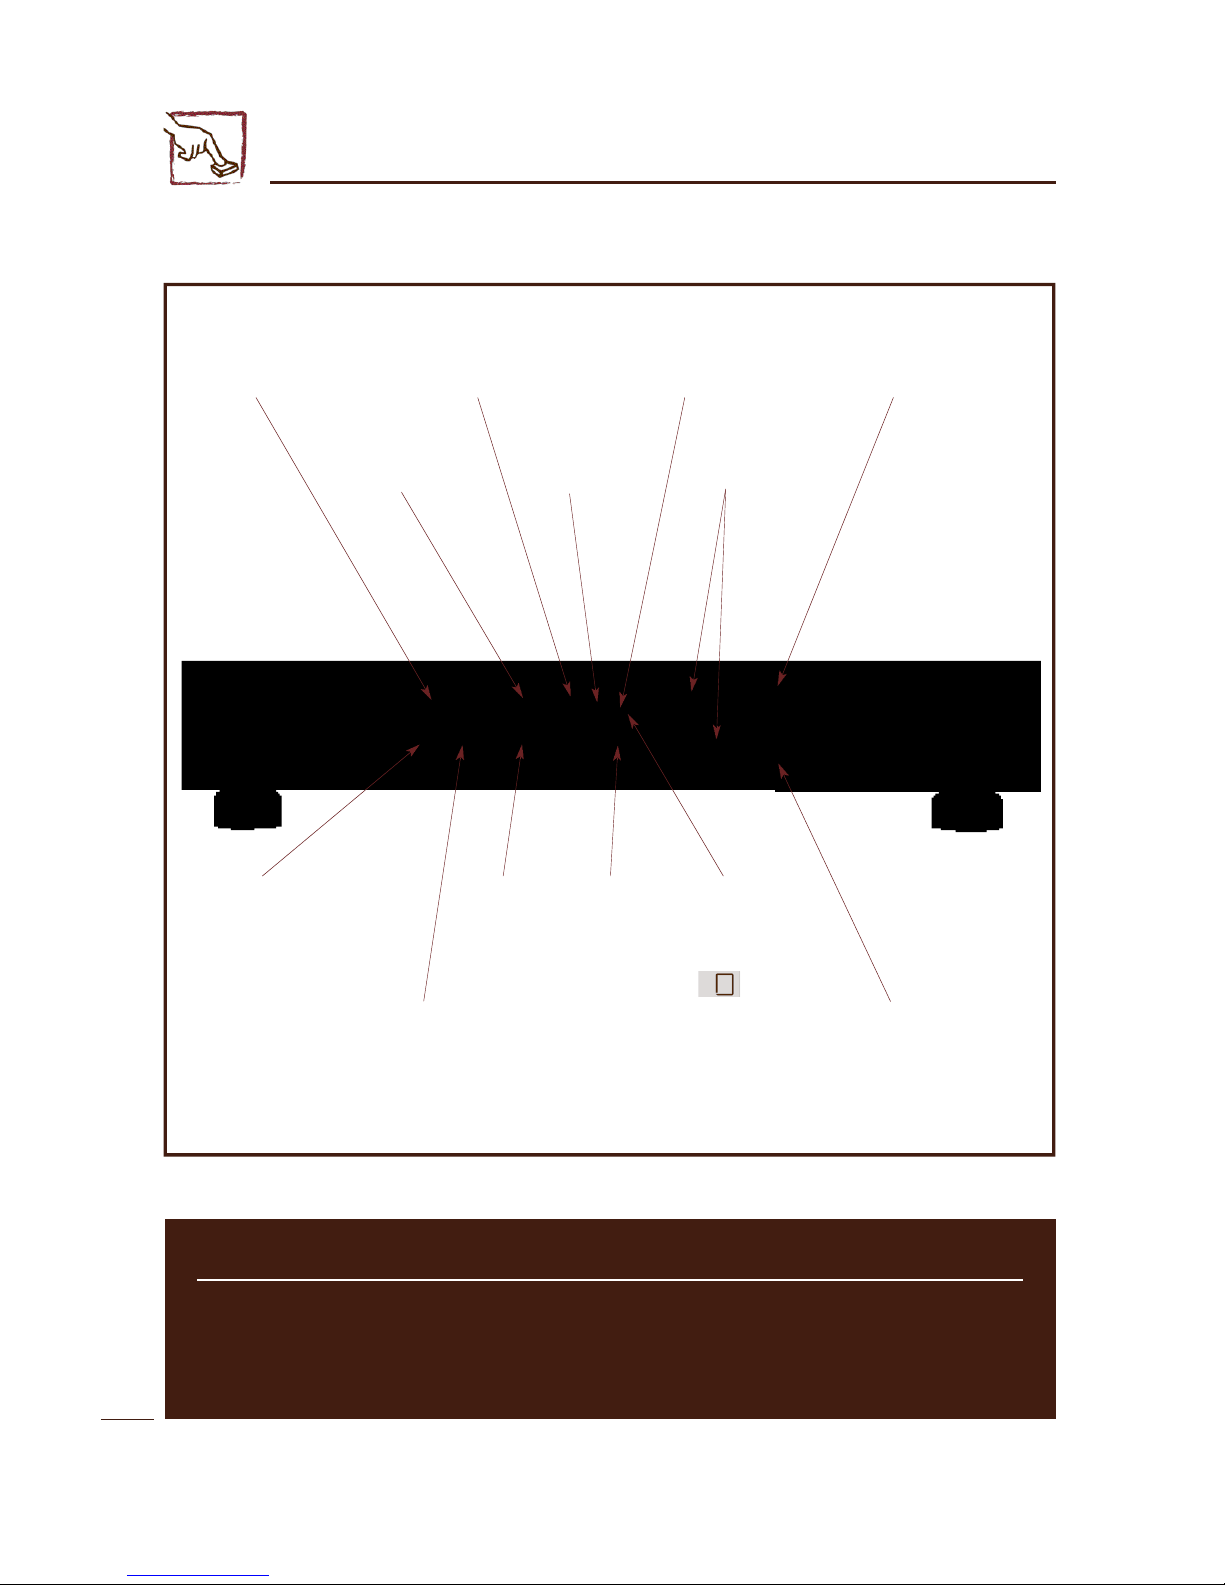
III - Control panel description
Hot circuit operating
indicator light (red)
Cabinet temperature,
relative humidity and
carbon filter log display
Humidity level display and
alarm (1 temperature models)
Selection and
confirmation
button
Hot and cold circuit failure
alarms and temperature
measurement sensors
Carbon filter
display and
alarm
Selection and
adjustment
buttons
Cold circuit operating
indicator light (blue)
Temperature
alarm
Temperature
units
(depending
on country)
Temperature
zone
concerned
and door open
alarm
Infra-red “door open”
detection sensors
Standby status
button
Did you know?
Contrary to popular belief, all,red, white or sparkling wines can be preserved at a temperature of between 10°
and 14°C. If wine is subjected to violent heat variations, it will “dilate” then “contract”. Such variations create
fatigue in the wine, alter its organic vitality and lead to a loss in quality. For further information on the
temperatures for serving wine, please refer to the table on page 3.
Page 16
16
EN
7 - C
O M M I S S I O N I N G YO U R W I N E CA B I N E T
IV - Temperature settings
a- 1-temperature models (V059 - V159 - V259)
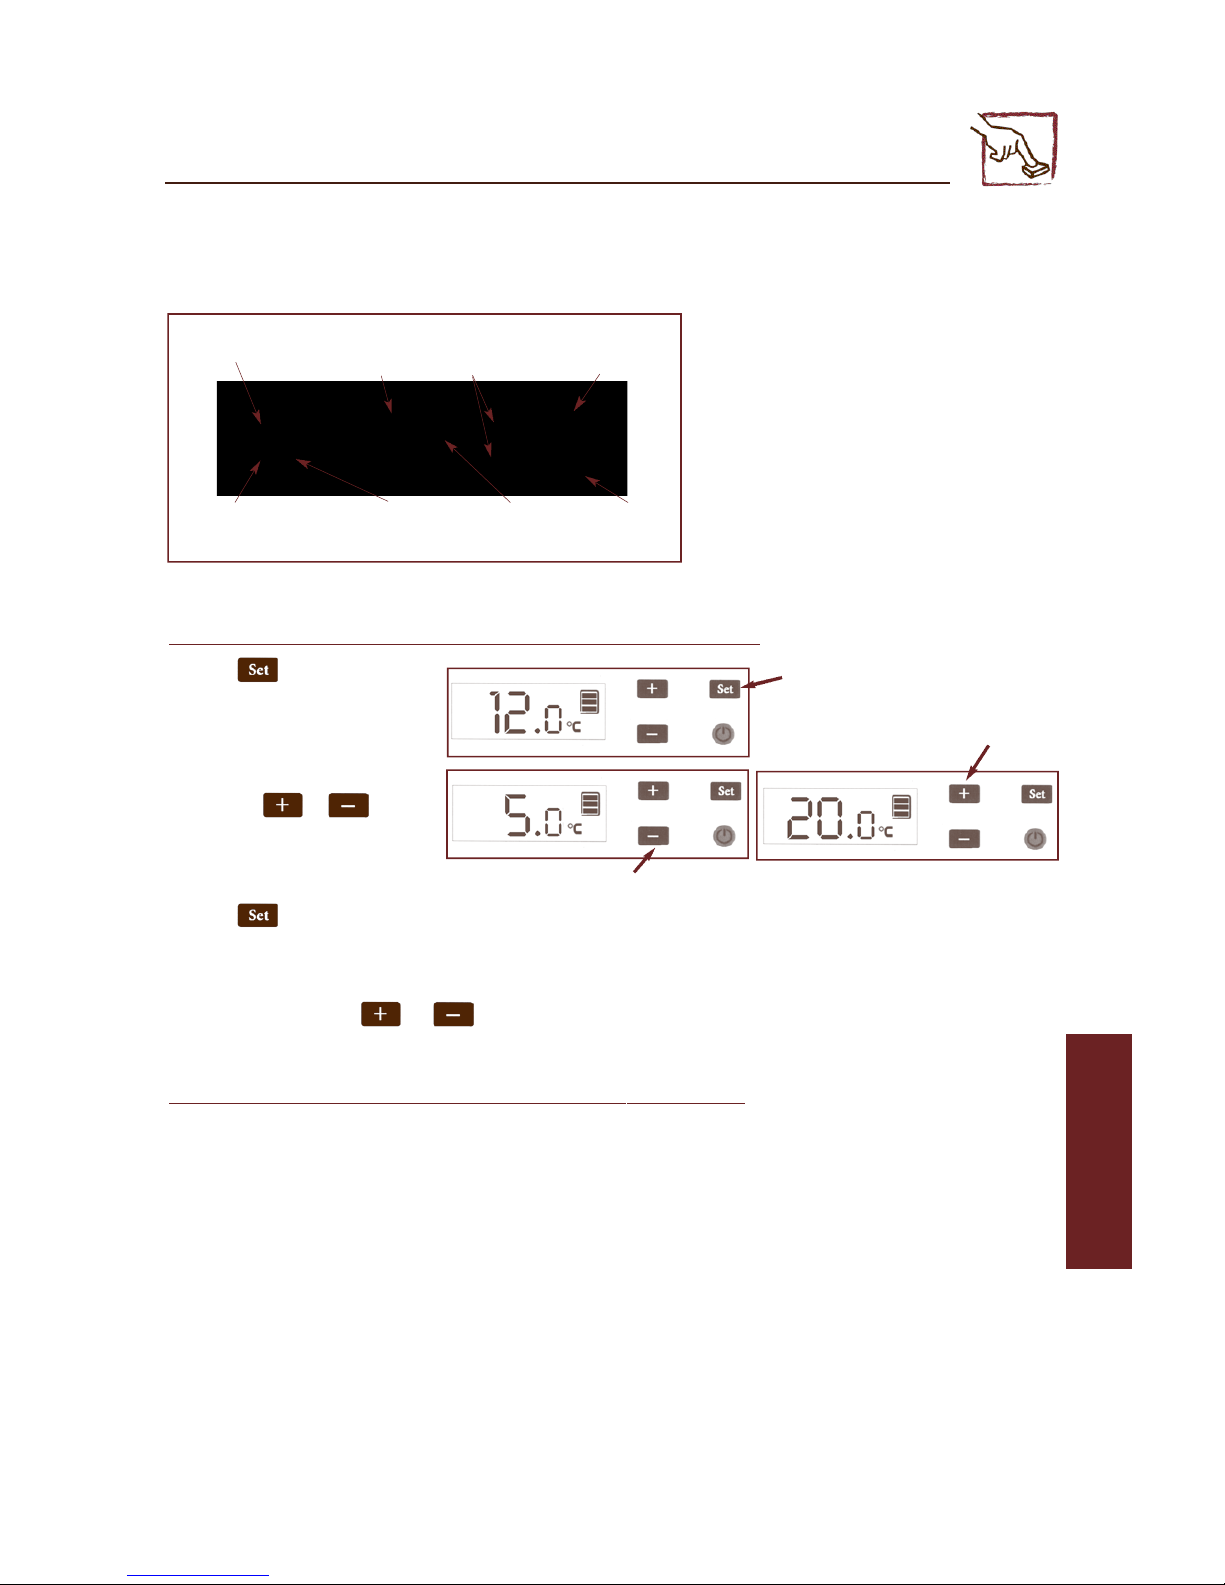
Your wine cabinet's temperature is adjusted at the control panel which contains the following features:
• Temperature display: displays the actual temperature inside
your wine cabinet
• Adjustment buttons: enables the required temperature
inside the cabinet to be selected
• Indicator lights: display the operational status of the hot
(red) and cold (blue) circuits
To adjust the temperature of your 1-temperature cabinet:
• Press the button and release it
immediately
The current set temperature is displayed
(the displayed figure flashes).
• When the displayed figure flashes you have
5 seconds to change the temperature setting
by pressing the or button
as appropriate, otherwise the display
automatically returns to the previous setting.
Recommended maturing setting range: 10 to 14°C (50° to 57°F)
• Press the set button to confirm the new setting and the display will show the new setting.
The default setting is 12°C / 54°F (ideal maturing temperature). However, this setting can be adjusted between
5 and 20°C* (41° and 68°F*).
Beyond these limits, the buttons and are disabled.
*Converting your maturing cabinet into a service cabinet
You can use your 1-temperature maturing cabinet as a service cabinet in order to bring your white and red wine to tasting temperature
(setting range between 5° to 20°C / 41° to 68°F).
- White wines:recommended setting between 6° to 10°C (43° to 50°F),
- Red wines: recommended setting between 15° to 18°C (59° to 64°F).
This cabinet can therefore be used as a specific white or red wine service cabinet.
WA R N I N G : to operate corre c t ly your cabinet should be located in a room with a temperature between
0° and 35°C (32° and 95°F)
When making substantial changes to the temperatures it may take several hours to stabilise and display the required temperature.
Hot circuit operating
indicator light (red)
Cabinet
temperature setting
buttons
Selection and
confirmation
button
Cabinet
temperature
display
Cold circuit operating
indicator light (blue)
Temperature
zone
concerned
Standby status
button
Infra-red “door open”
detection sensors
Page 17
17
7 - C
OMMISSIONING YOUR WINE CABINET
IV - Temperature settings
b- Multi-temperature models (S059 - S159 - S259)
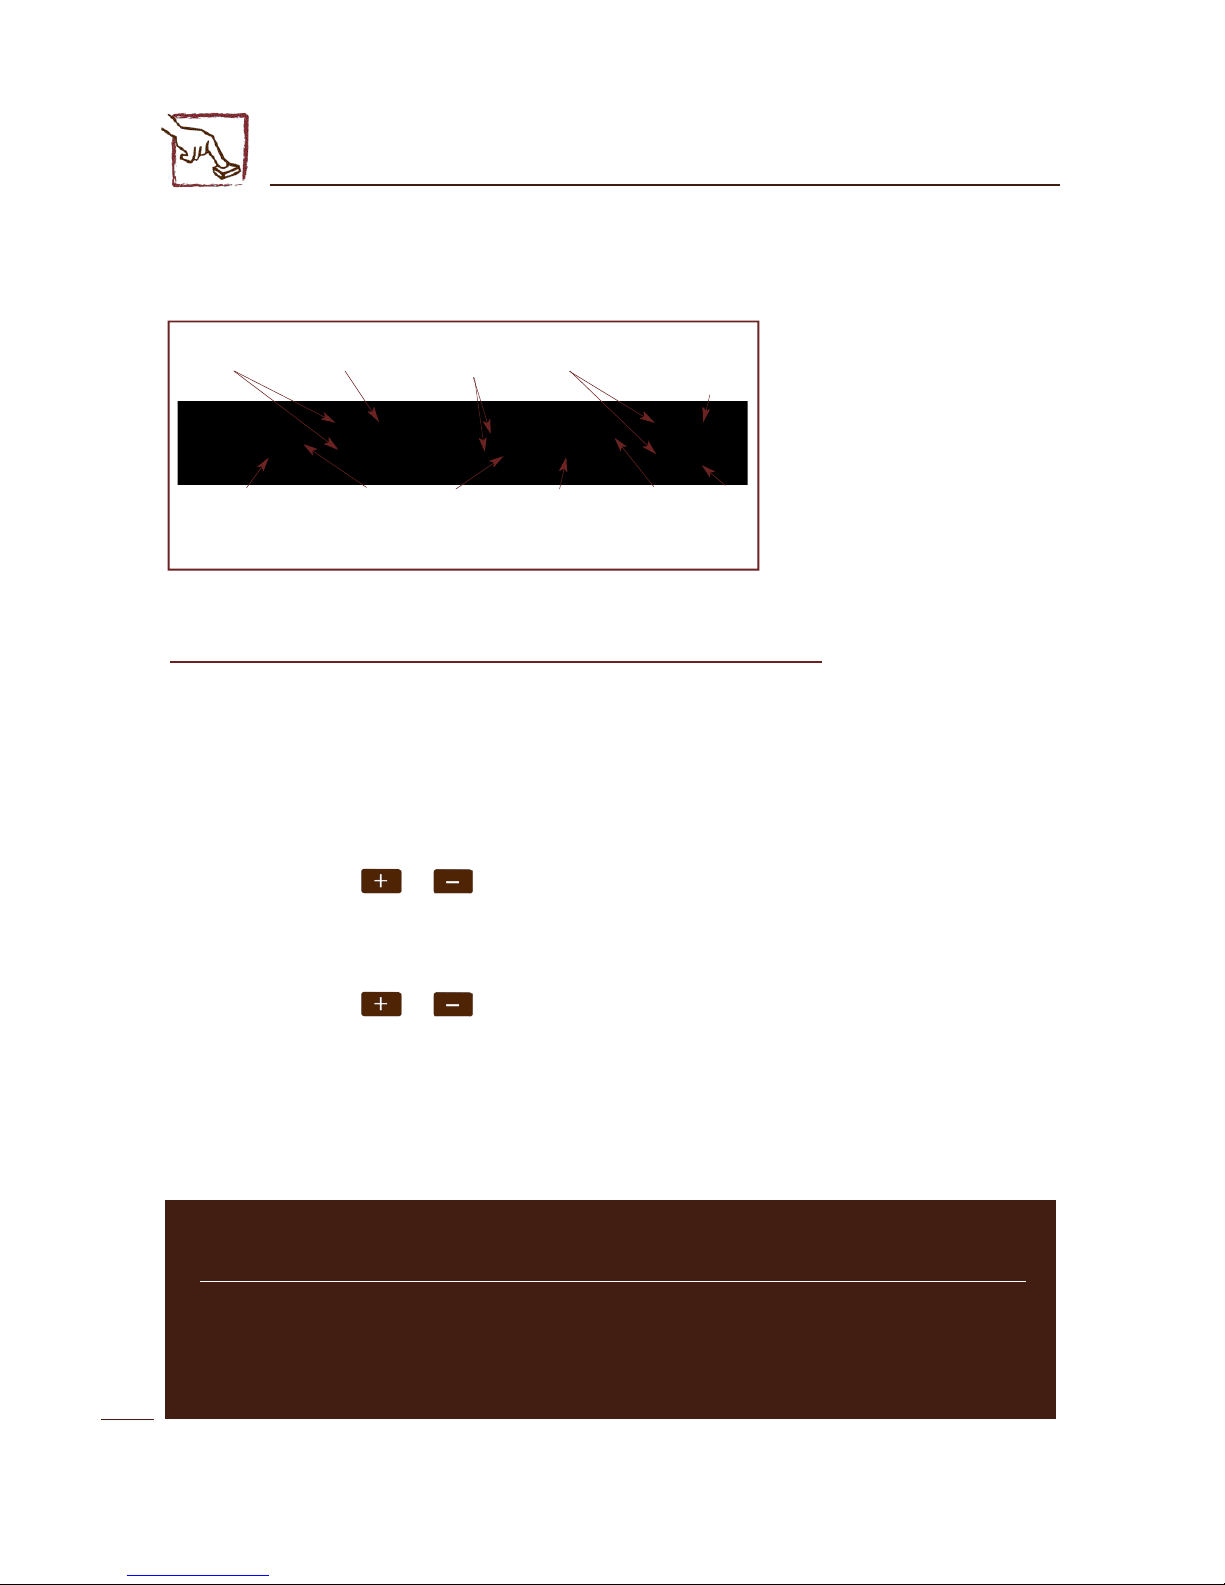
Your wine cabinet's temperature adjustment is carried out using the control panel which contains the following features:
• Temperature display: displays the actual
temperature inside your wine cabinet
• Adjustment buttons: enables the required
temperature inside the cabinet to be selected
• Indicator lights: display the operational status
of the hot (red) and cold (blue) circuits
To adjust the temperature of your multiple temperature cabinet:
• Carry out the same procedure as for adjusting the temperature setting of the 1 temperature model.
Recommended setting range for the lowest temperature: 7 to 12°C (45° to 54°F)
Recommended setting range for the highest temperature: 15 to 21°C (59° to 70°F).
The default setting for the lowest temperature range is 8°C (46°F).
However, this setting can be adjusted between 5 and 12°C (41° and 54°F).
Beyond these limits, the buttons and are disabled.
The default setting for the highest temperature range is 18°C (64°F).
However, this setting can be adjusted between 15 and 22°C (59° and 72°F).
Beyond these limits, the buttons and are disabled.
WARNING: to operate correctly your cabinet should be located in a room with a temperature between
12° and 35°C (54° and 95°F).
When making substantial changes to the temperatures it may take several hours to stabilise and display the required temperature.
Lowest cabinet
temperature
adjustment buttons
Hot (red) and
cold (blue)
circuit operating
displays
Lowest cabinet zone
selection and
confirmation button
L o west cabinet
t e m p e r a t u r e display
( l owest temperature
zone in the cabinet)
Temperature
zone
concerned
Highest cabinet
t e m p e r a t u re display
(upper zone in the
c a b i n e t )
Highest cabinet
temperature
adjustment buttons
Temperature
zone
concerned
Standby
status
button
Selection and
confirmation
button for upper
zone of the wine
cabinet
Infra-red
“door
open”
detection
sensor
Did you know?
A wine cabinet must be designed in such a way that bottles do not come into contact with the rear wall. In
some circumstances, condensation created on the rear wall can trickle down onto the shelves and damage the
bottle labels. Also, contact with a cold wall can create a frost point which is harmful to the wine.
Page 18
18
EN
7 - C
O M M I S S I O N I N G YO U R W I N E CA B I N E T
V- -Humidity level display
Your wine cabinet is equipped with a hygrometry function (1-temperature models set between 9°C
and 15°C / 48° and 59°F), enabling you to see the relative humidity level inside the cabinet.
The ideal hygrometry rate is over 50%.
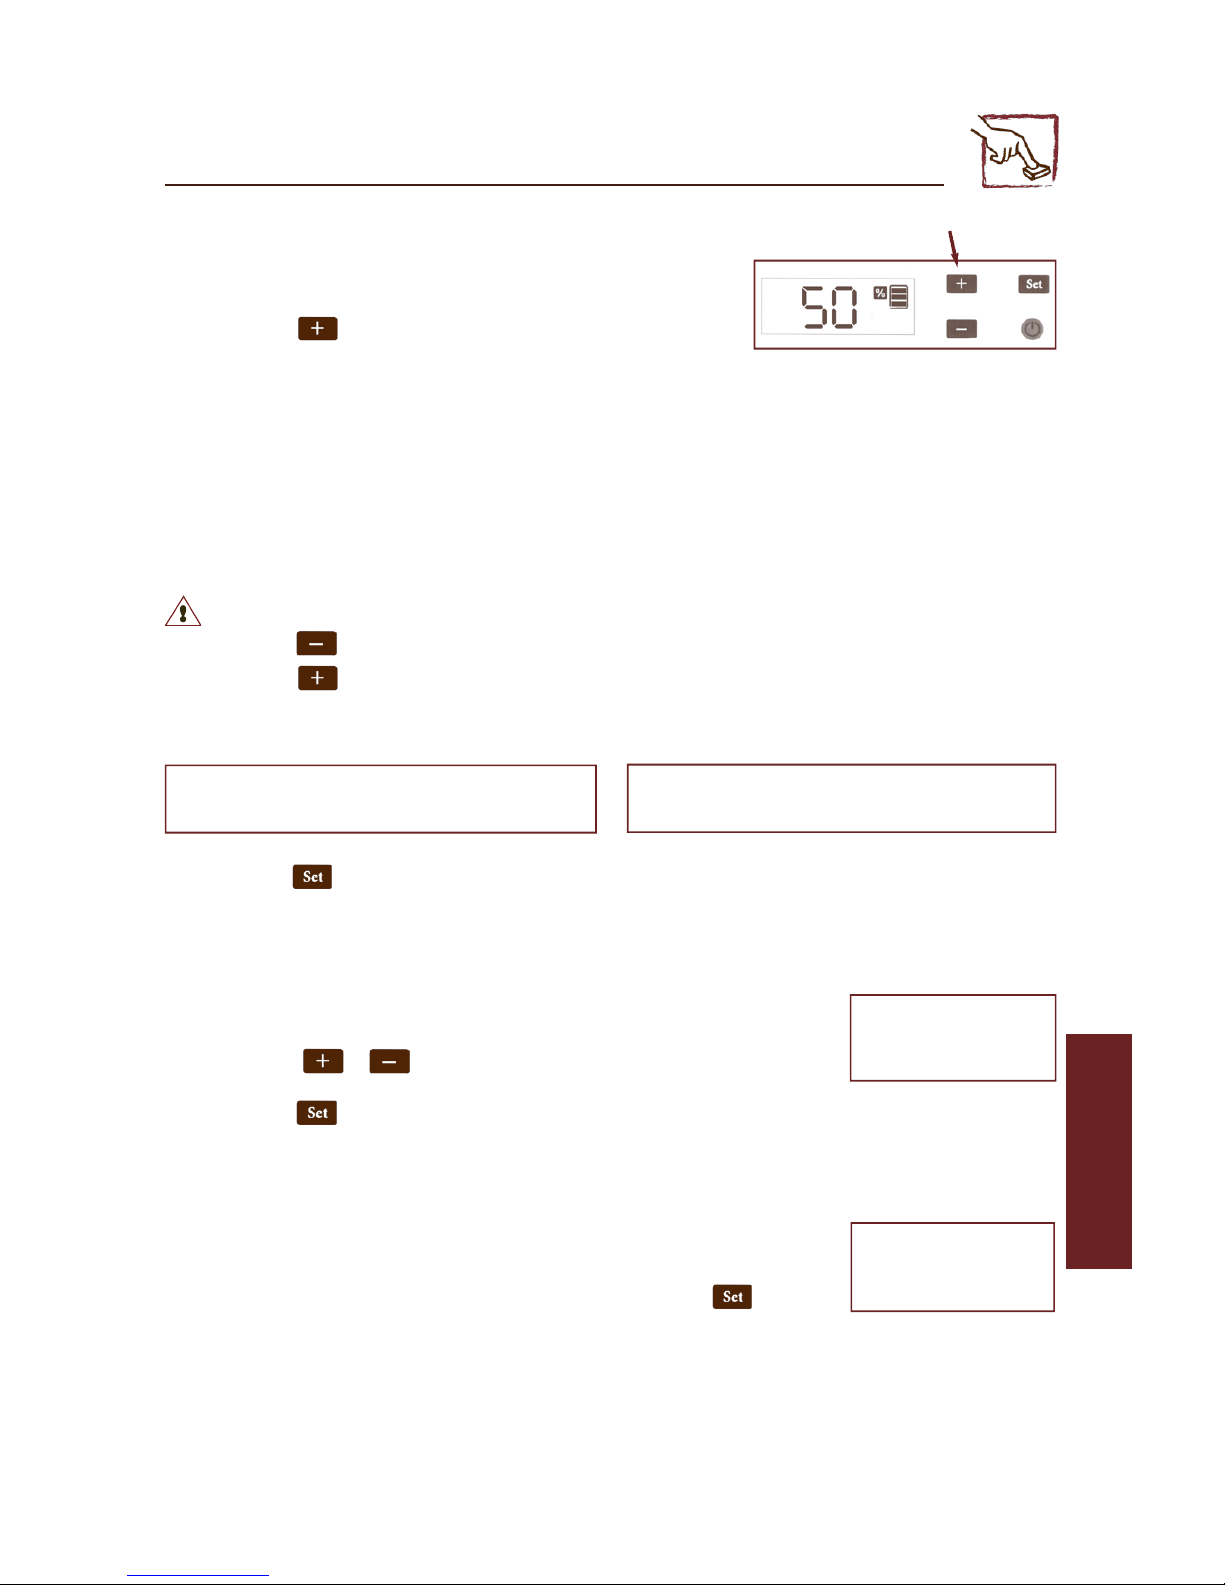
• Press on the button
*
for 5 seconds
The relative humidity is displayed (from 50% to 90%).
After 15 seconds the display will automatically return to cabinet temperature.
Should you wish to increase the level of relative humidity inside your cabinet, pour the equivalent of one glass of water on the clay humidity cassette in the
receptacle located at the bottom right hand side of your cabinet (see diagram on next page “Relative humidity level alarm”).
VI- Lighting mode adjustment
Your wine cabinet has mood lighting that also enables you to read your wine labels more easily.
Unlike standard lighting, EuroCave lighting does not produce ultraviolet rays, and only gives off a miniscule amount of heat.
Thus, your wines are preserved in total safety
Electrical consumption less than 7 watts / hour in constant use.
Usage precautions:
Intense light, never look directly into the beam.
There are two possible lighting settings:
- lighting when door opens (it goes out when the door is closed),
- lighting all the time (for mood lighting when using a glass door cabinet, for example).
• Press on the button
*
for 5 seconds, the lighting mode is then displayed.
• Press on the button
*
to select your lighting mode (two options):
Example of a display for 1-temperature model
•Press on the button
*
to confirm your choice and move on to the next step (setting display contrast)
Note:When “Ecl” is displayed, you have 15 seconds to select and confirm the required lighting mode, otherwise the display automatically returns to cabinet
temperature.
VII- Adjusting the display contrast
You can increase or reduce your cabinet’s display contrast:
Once you have confirmed the lighting mode, “LU n”
appears:
• Press on the buttons or
*
to increase or reduce your cabinet’s display contrast
• A figure of 0 to 7 is displayed after the “LU” (0 being the least contrast, and 7 the most).
• Press on the button
*
button to confirm your choice and move on to the next step (display of the carbon filter log)
Note:When “LU n” is displayed, you have 15 seconds to select and confirm the required lighting contrast, otherwise the display automatically returns to
cabinet temperature.
VIII- Carbon filter counter log display
Your wine cabinet has a counter that displays the number of days that the carbon filter has been in use (change once
a year, see current maintenance chapter page 20)
After setting the display contrast, the counter is displayed, as in the following example:
• The display here shows that the filter has been operating for 28 days
After 15 seconds the display will automatically return to cabinet temperature, or press on the
*
button.
* For multi-temperature models, the buttons are located to the right of the casing.
Lighting is in intermittent mode: comes
on when door is opened
Lighting is in constant mode
Page 19
19
8 - A
LARMS
Your wine cabinet has several alarms
A signal warns you if:
the temperature inside the cabinet exceeds the set temperatures
the door has been left open or is badly closed
- the relative humidity level is too low (1-temperature models set between 9 and 15°C / 48° and 59°F)
- the carbon filter needs changing
In this way your fine ‘crus’ are secure.
1- Temperature
If your cabinet’s temperature stays at + or - 4°C (7°F) in relation to the set temperature for more than 24 hours, a visual and sound alarm is triggered.
The icon flashes and a sound signal alerts you.
• The sound alarm cuts out if one of the buttons is pressed or
*.
• However, the icon stays displayed until the temperature has returned within the limits of + or – 4°C (7°F).
The alarm can trigger in the following circumstances:
- The door has been left open or is badly closed:
the open door alarm (see next chapter) will trigger, and if you do not close the door the temperature within the cabinet will exceed the limits and the
temperature alarm will also trigger.
Close the door and wait a few hours until the temperature inside the cabinet has stabilised, the icon will then disappear.
- The door seal is damaged:
the door sealing is degraded, and the temperatures may exceed the limits and trigger the alarm
Contact your EuroCave dealer
- You have loaded your cabinet with a large number of bottles:
it takes several hours for your cabinet to reach the right temperature, so the alarm may trigger.
This could happen when first starting up the cabinet, this is not due to an operating fault.
Wait a few days for the cabinet interior temperature to stabilise.
If however,after a few days, the alarm is still triggered, please contact your dealer.
Apart from these three cases, if the alarm triggers it could be the result of an operating fault (see ne
xt page)
Contact your dealer.
N.B. :Only prolonged exposure to temperatures outside the set range and temperature fluctuations can damage your fine ‘crus’
II- Open door
If the door of your cabinet remains open for more than 15 minutes, a visual and sound alarm will trigger.
The icon flashes and a sound signal alerts you.
• The sound alarm cuts out if one of the buttons is pressed, or
*
• However, the icon stays displayed until the door is closed
Close the door: the icon will disappear after one minute
III- Relative humidity level
(1-temperature models used between 9°C and
15°C / 48° & 59°F)
If the relative humidity rate in your wine cabinet falls below 50% for
more than 72 hours, a visual alarm is triggered
The icon is displayed flashing
• The icon remains on display until the level of humidity rises above
50%
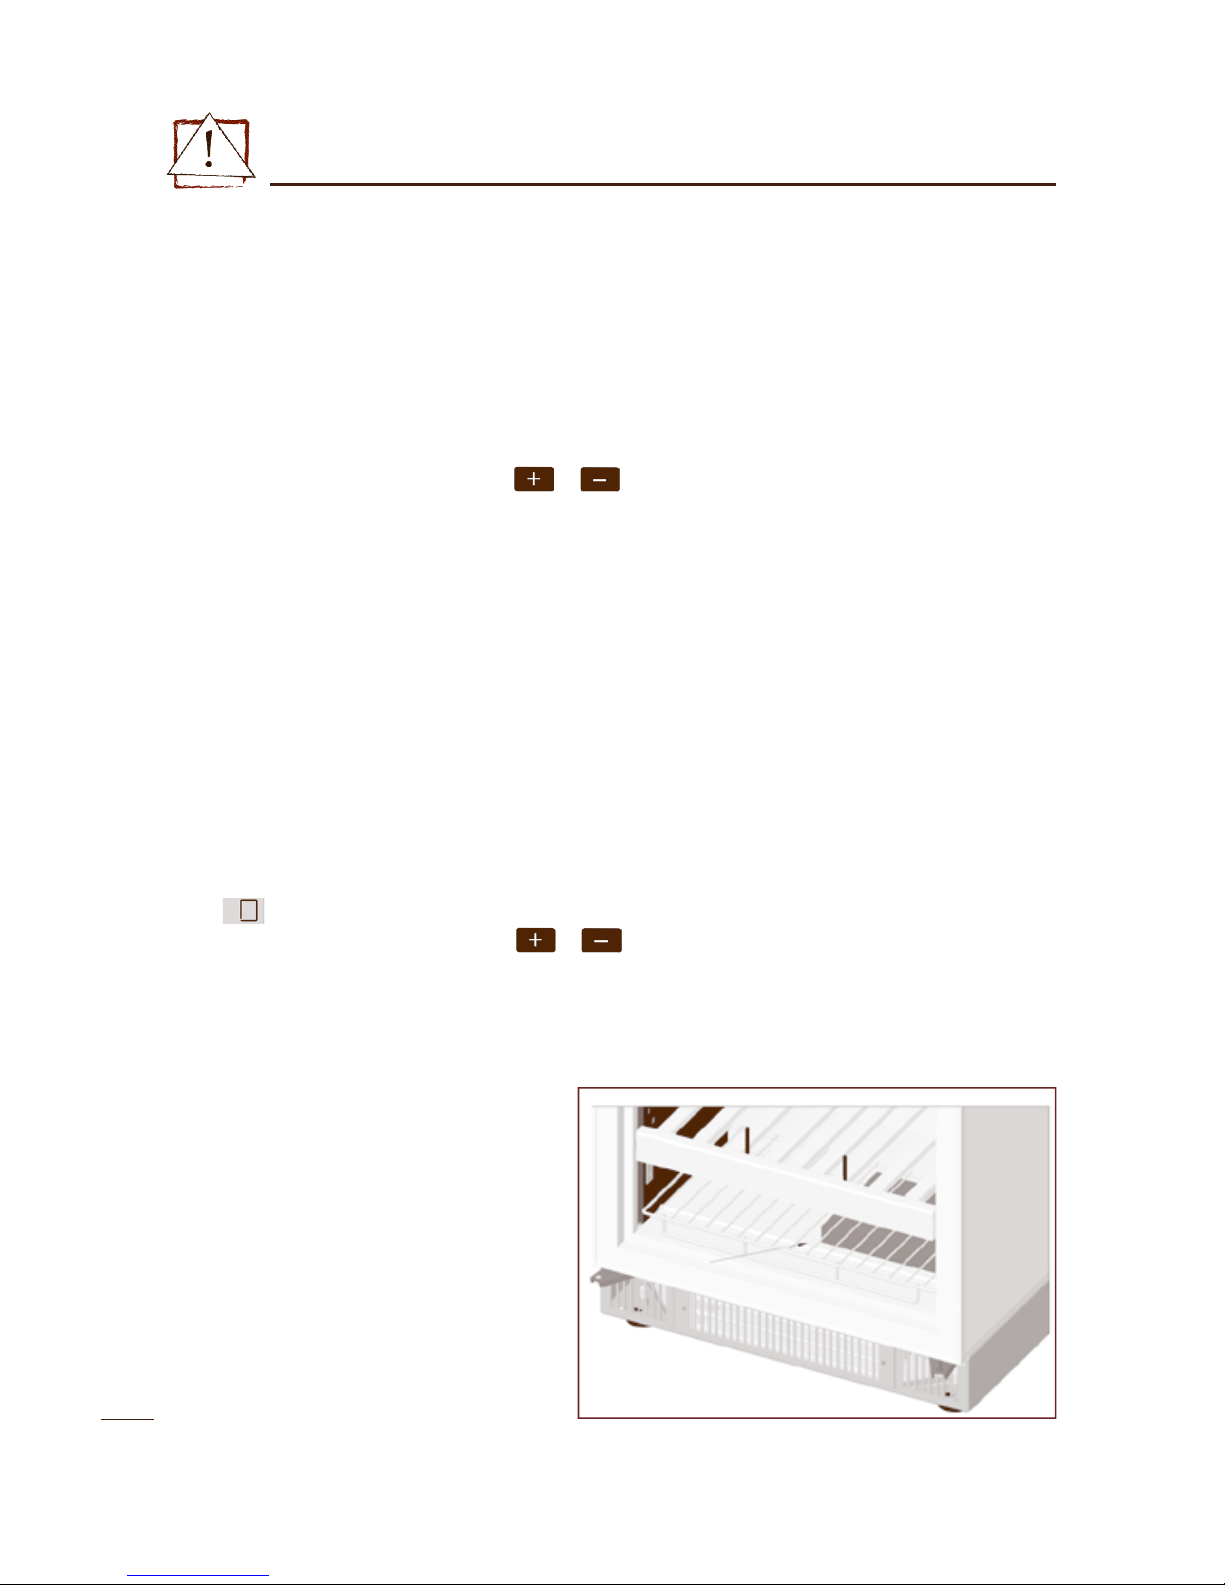
To return to a level of humidity of over 50%, pour the
equivalent of a glass of water into the channel located at
the bottom right of the cabinet . You need to remove the
bottles before (see diagram opposite).
The hygrometry level rises to a suitable level, and after a
few hours the icon will go out.
N.B: Only prolonged exposure to humidity rates of under 50% may
prove harmful to your bottle corks.
* For multi-temperature models the buttons are located to the
right of the casing.
Page 20
20
EN
9 - S
TANDARD MAINTENANCE
Your EuroCave wine cabinet is a tried and tested, easy-to-use appliance.
The few following maintenance steps will enable you to achieve a very
long appliance lifetime.
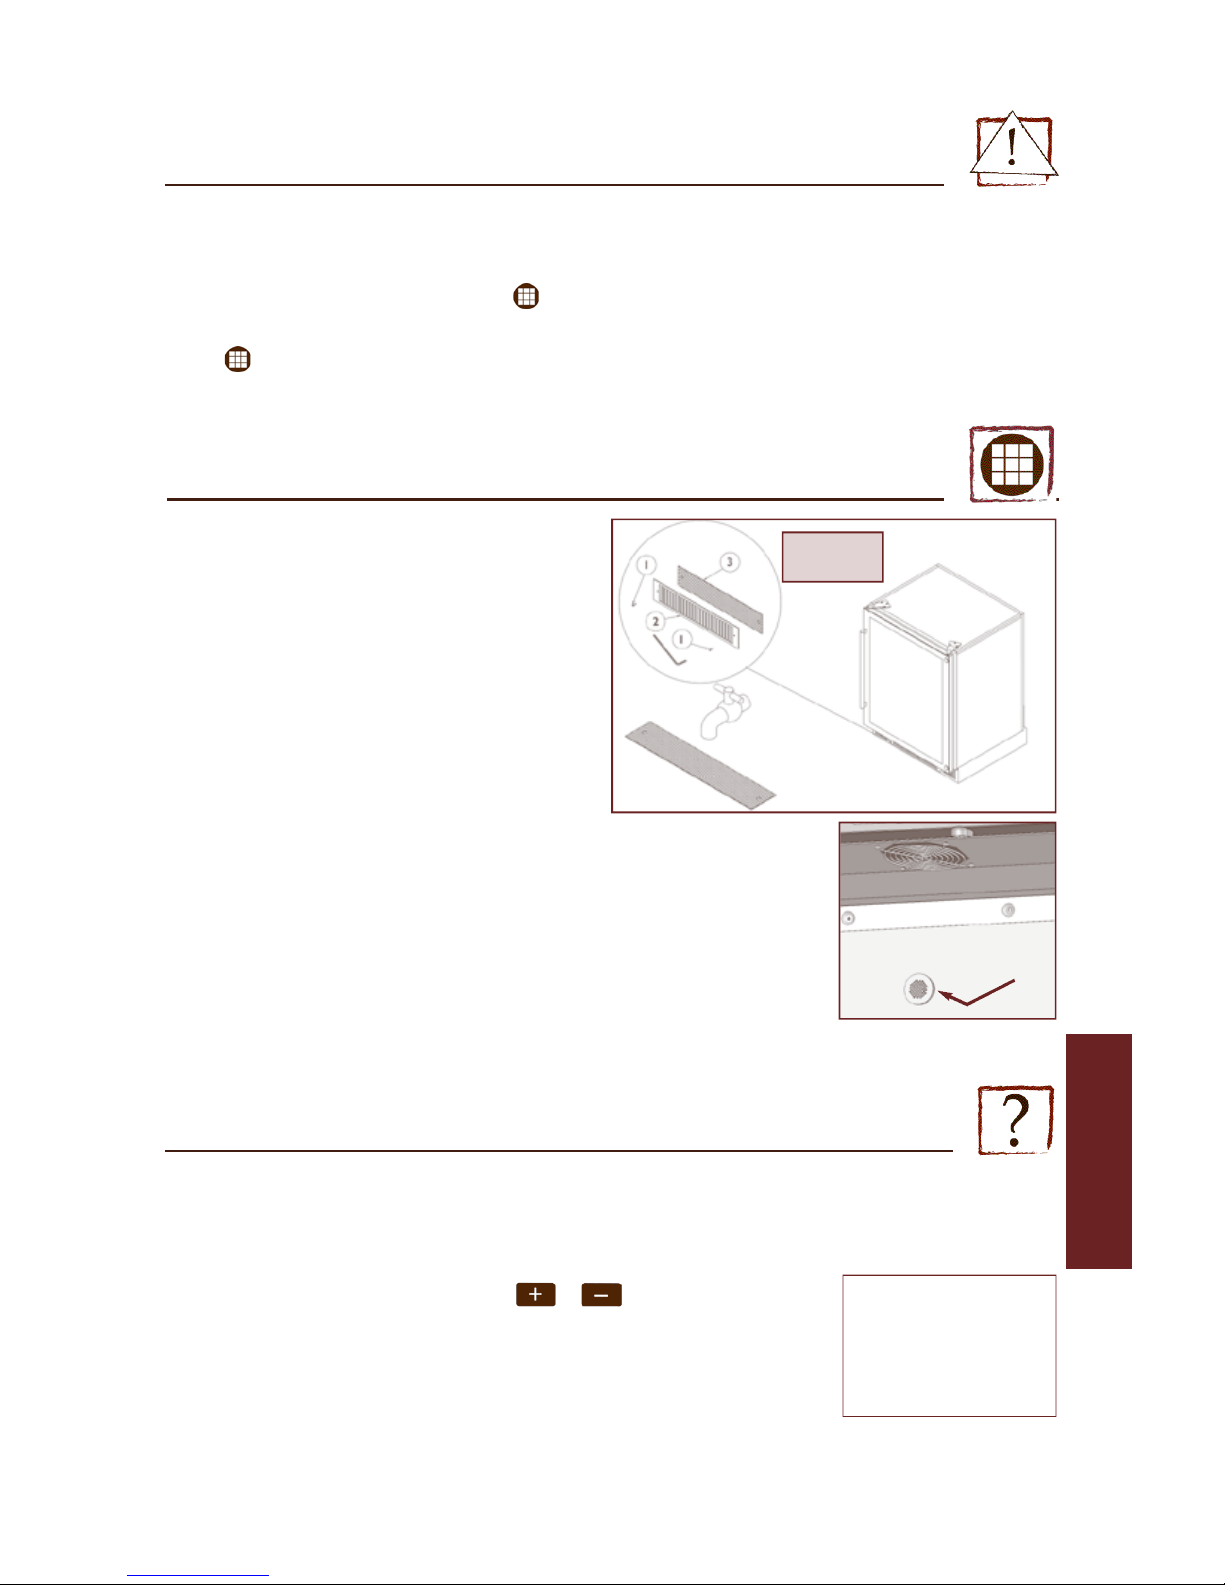
Clean the filter at least every 3 months, (see diagram opposite)
- Remove the 2 screws (1) from the grille with a no. 2 hexagonal spanner
(not supplied)
- Remove the grille (2), take out the filter (3) and place under running
water
- Leave to dry and refit the assembly.
- Each year, replace the active carbon filter housed in the upper ventilation
hole in your cabinet.
Remove the carbon filter, if necessary using a screwdriver to lever it out
(see diagram opposite). The carbon filter is available from your usual
dealer. It must be replaced using a manufacturer guaranteed part.
A visual alarm will warn you when you need to change the carbon filter
(see previous chapter).
- When cleaning your cabinet, and before moving it, make sure that you have unplugged it and removed all the
bottles from the cabinet.
- Carry out a complete cleaning of the inside of the cabinet once a year, after having
unplugged and unloaded it (use water and a gentle cleaning product, then rinse carefully).
Monitor your appliance re g u l a r l y and re p o rt anything that might appear abnormal
to your dealer, in this way you can guarantee the long life of your cabinet.
10 - O
PERATING FAULTS
In the event of operating faults in your appliance, alarms will warn you of the type of problem encountered.
1- Temperature
If your cabinet’s temperature stays at + or - 4°C (7°F) in relation to the set temperature for more than 24 hours, a visual and sound alarm is triggered.
The icon flashes and a sound signal alerts you.
• The sound alarm cuts out if one of the buttons is pressed, or
*
• However, the icon stays displayed until the temperature has returned within the limits of + or - 4°C (7°F).
Check that (see temperature alarms chapter page 19):
- The door of the cabinet is closed the door seal is not damaged
-You have not loaded a large number of bottles into your cabinet during the last few hours-
- Once you have checked these points,if the alarm continues for a few days, there may be an operating
fault. In this case, please contact your dealer.
N . B : O n l y p ro l o n ge d
e x p o s u re to excessive
t e m p e r a t u r es or violent
fluctuations in temperature
will harm your fine ‘crus’.
IV- Carbon filter
We recommend that you change the carbon filter in your cabinet every year (see current maintenance chapter)
When the filter has reached a lifespan of one year,the icon will flash.
Once the carbon filter has been changed, go to the “carbon filter counter log” menu (see page 18) and reset the counter by pressing on the button .
The icon will then go out.
8 - A
LARMS
1- Filter screw
2- Filter grille
3- Filter
Page 21
21
II- Hot and cold circuits
In the event of a fault in the hot/cold circuits:
The icon flashes and a sound signal alerts you
The blue indicator light flashes in the event of a cold circuit fault
The red indicator light flashes in the event of a hot circuit fault
The sound alarm cuts out if one of the buttons is pressed, or
*
• H oweve r, the icon stays displayed until the problem is solved
In this case, please contact your Euro C ave dealer
* F or mu l t i - t e m p e r a t u re models, the buttons are located to the right of the casing.
III- Temperature probes
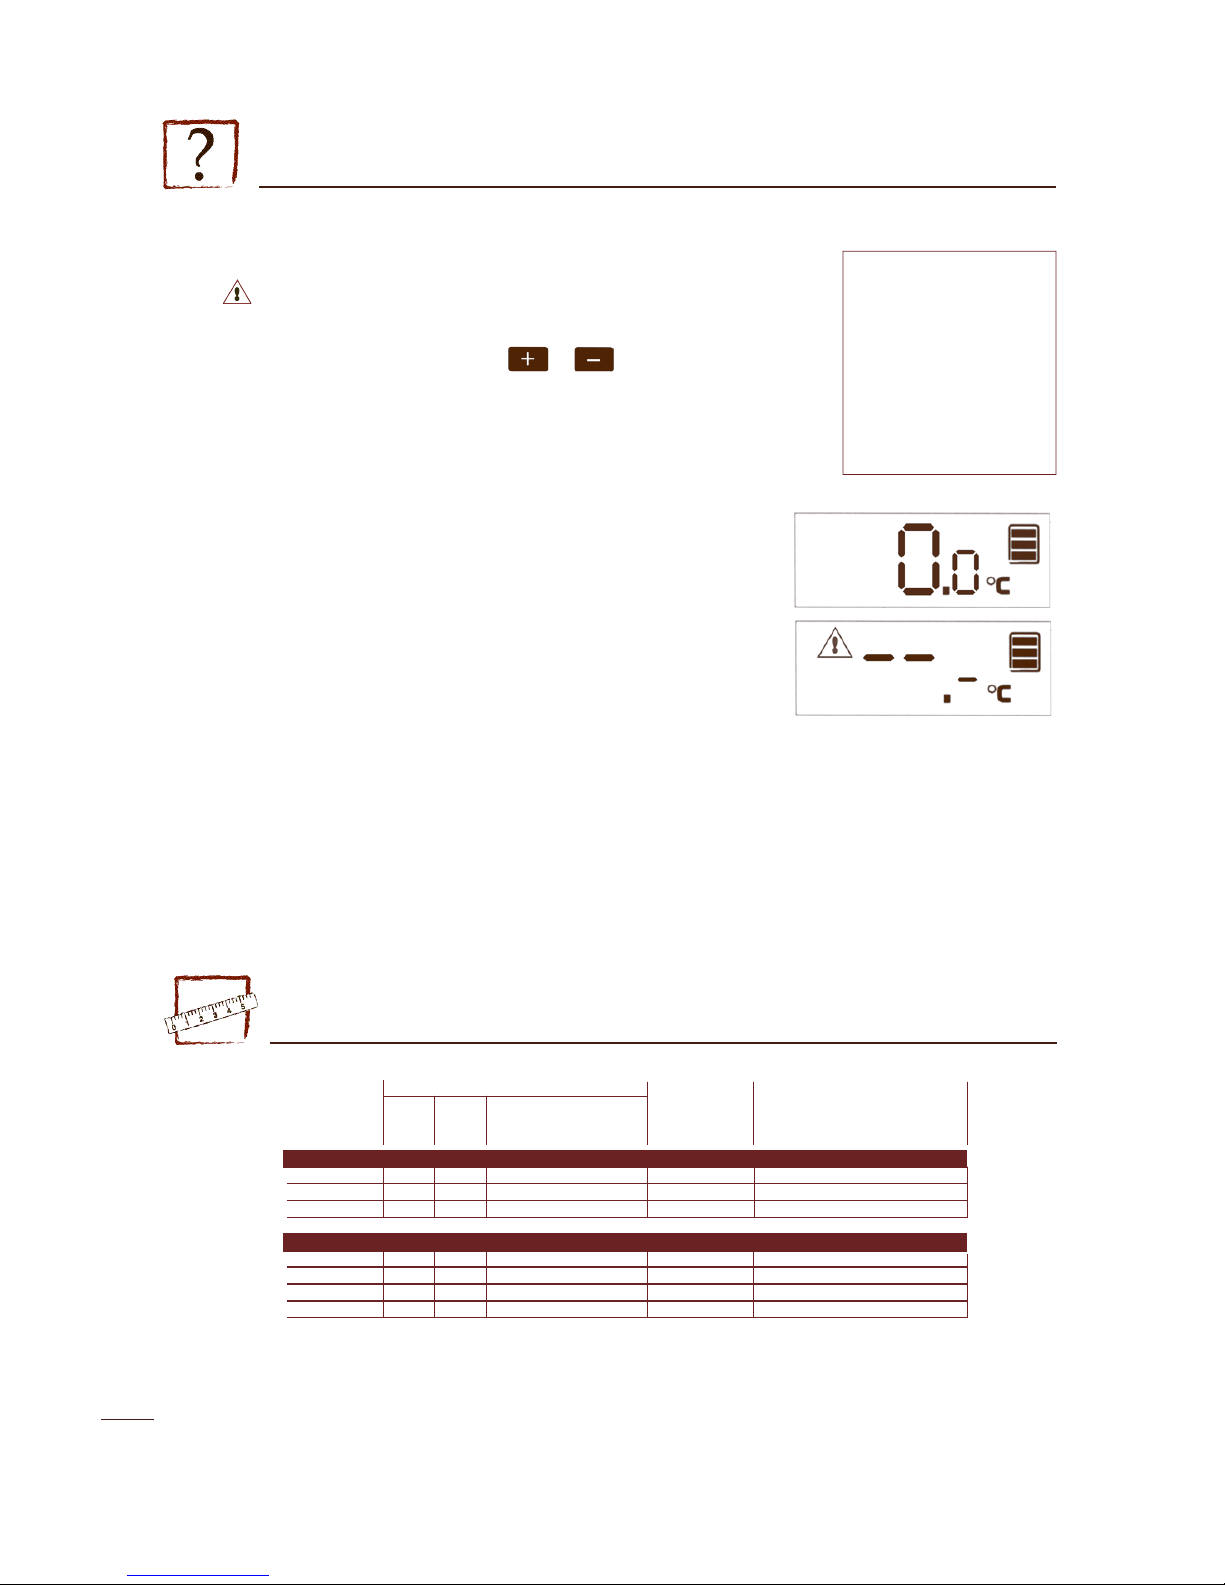
In the event of a failure in the temperature measurement pro b e s , the 2 displays shown
opposite will light up and flash in turn.The displays stay lit until the problem is solve d
In this case, please contact your EuroCave dealer.
IV- Frost prevention device
Your cabinet is equipped with a frost prevention device to protect you in the event of a cold circuit failure (see above chap t e r )
V- Lighting
In the event of a lighting failure, do not handle the casing or the diodes. Contact your dealer.
10 - O
PERATING FAULTS
Wa r n i n g : A n y intervention on
the cold circuit must be carr i e d
out by a qualified expert who
should carry out a circ u i t
sealing check befo re starting it
up again.
In the same way, a ny
i n t e r vention on the electrical
c i r cuit should be carried out by
a qualified electrician.
Size (mm) Unloaded Usage limits
H W D weight (kg) Min.T° Max.T°
(without handle) (C° / F°) (C° / F°)
1 temperature
V 059 820 594 552 43 0 35/32
V 159 1220 594 552 48 0 35/32
V 259 1780 594 552 61 0 35/32
Multi-temperatures
S 059 820 594 552 43 12/54 35/32
S 159 1220 594 552 48 12/54 35/32
S 259 1780 594 552 61 12/54 35/32
Setting precision: +/- 1°C (2°F)- Display precision +/- 0.5 °C (1°F).
11 - T
ECHNICAL SPECIFICATIONS
NB: In all cases, if you feel your appliance is not behaving normally, contact your dealer.
Page 22
12 - S
IMULATIONS DE RANGEMENT
12 - S
TORAGE LAYOUT EXAMPLES
12 - L
AGERUNGS
-B
EISPIELE
12 - S
IMULACIONES DE COLOCACIÓN
79
Page 23
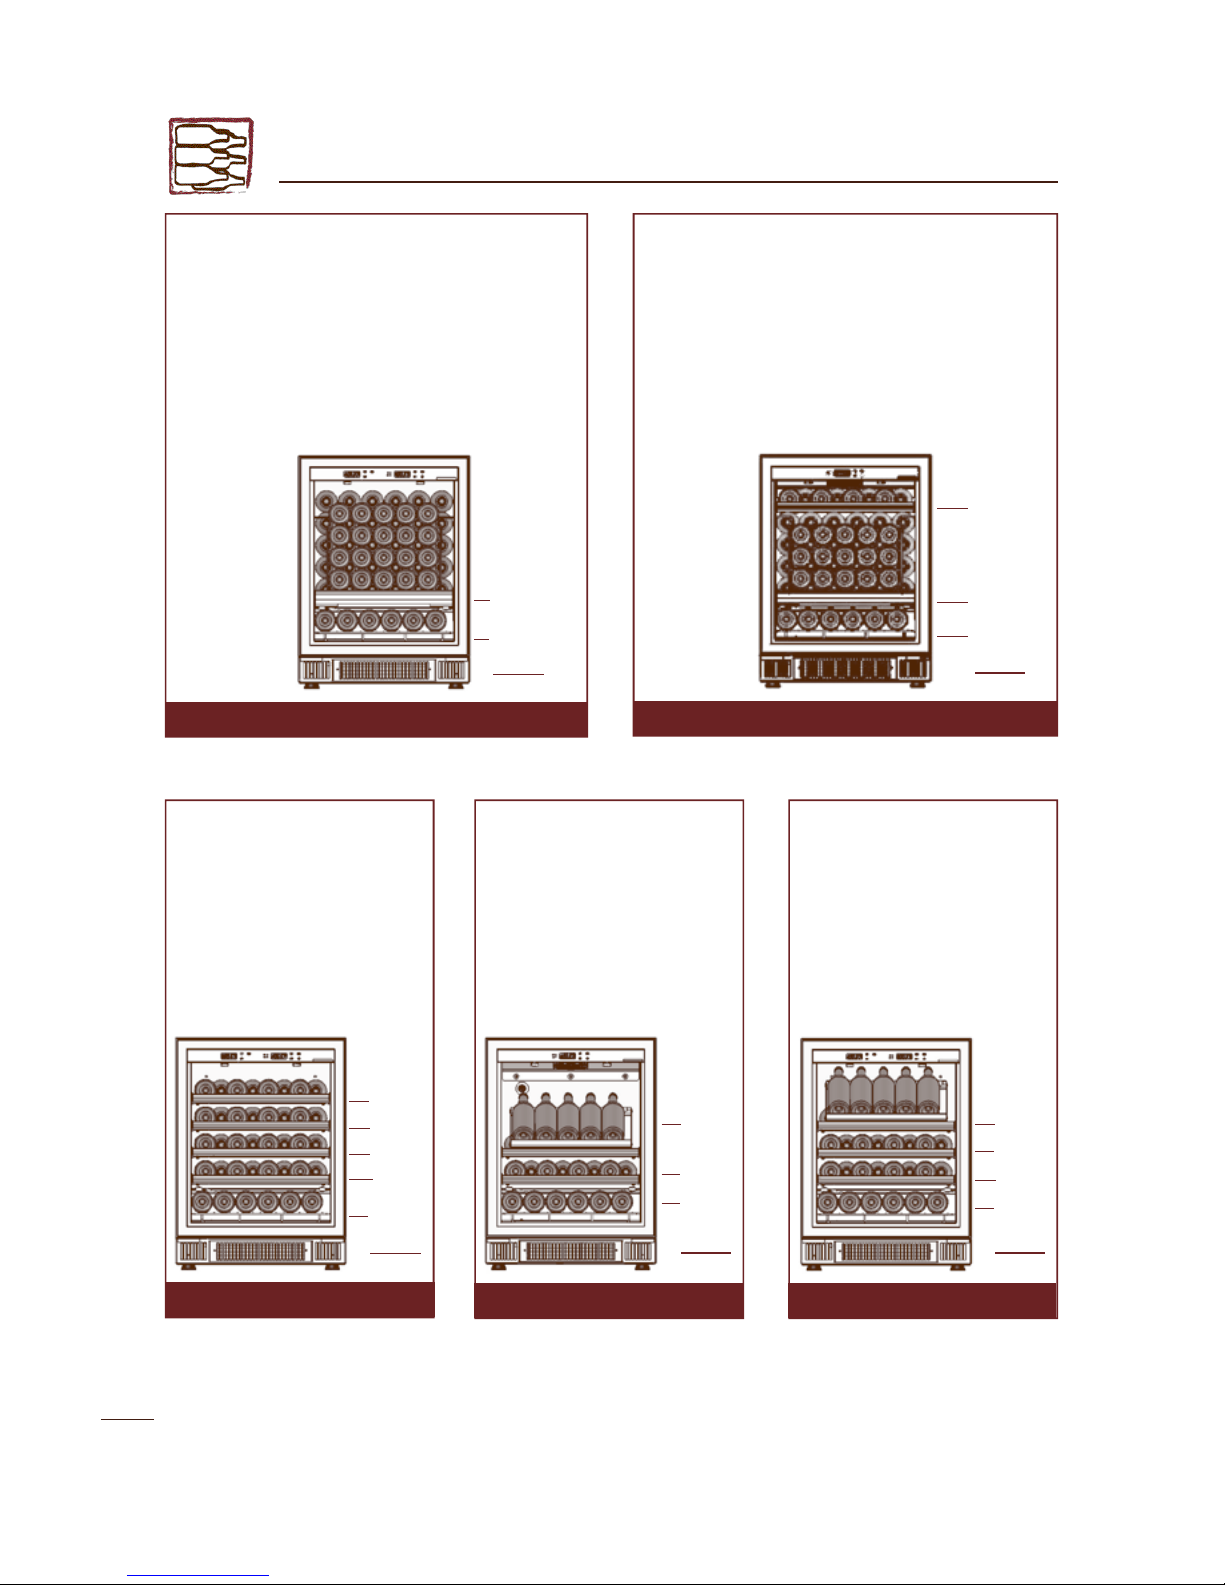
80
12 - 1
TEMP
. V059 / M
ULTI-TEMP
. S059
V/S - Stockage - Storage - Lagerregal - Almacenamiento
V/S - Mixte - Mixed - Gemischte Regalsysteme - Mixta
V/S - Coulissante - Sliding -
Auszugsregale - Deslizante
S - Présentation - Presentation -
Präsentationsregale - Presentación
56 bouteilles - 56 bottles - 56 F l a s c h e n
56 b o t e l l a s
53 bouteilles - 53 bottles - 53 F l a s c h e n
53 b o t e l l a s
38 bouteilles - 38 bottles - 38 F l a s c h e n
38 b o t e l l a s
31 bouteilles - 31 bottles - 31 F l a s c h e n
31 b o t e l l a s
AXLN 50
6
AXLN 39
6
ACUPC 8
ACUPC 8
6
ACUPC 8
6
ACUPC +
ACOP 9
56
53
38
31
*Les capacités des armoires sont calculées en configurations usine, avec des bouteilles Bordeaux Tradition.
*The cabinet capacities are calculated in factor y configuration using traditional Bordeaux bottles.
*Die Kapazitäten der Schränke werden mit Bordeauxflaschen „Tradition“.in Fabrik-Konfigurationen berechnet.
*Las capacidades de las bodegas están calculadas en configuraciones de fábrica, con botellas Burdeos Tradición.
ACUPC 8
ACUPC 8
ACUPC 8
ACUPC 8
V - Présentation - Presentation -
Präsentationsregale - Presentación
23 bouteilles - 23 bottles - 23 F l a s c h e n
23 b o t e l l a s
6
ACUPC +
ACOP 9
23
ACUPC 8
Page 24
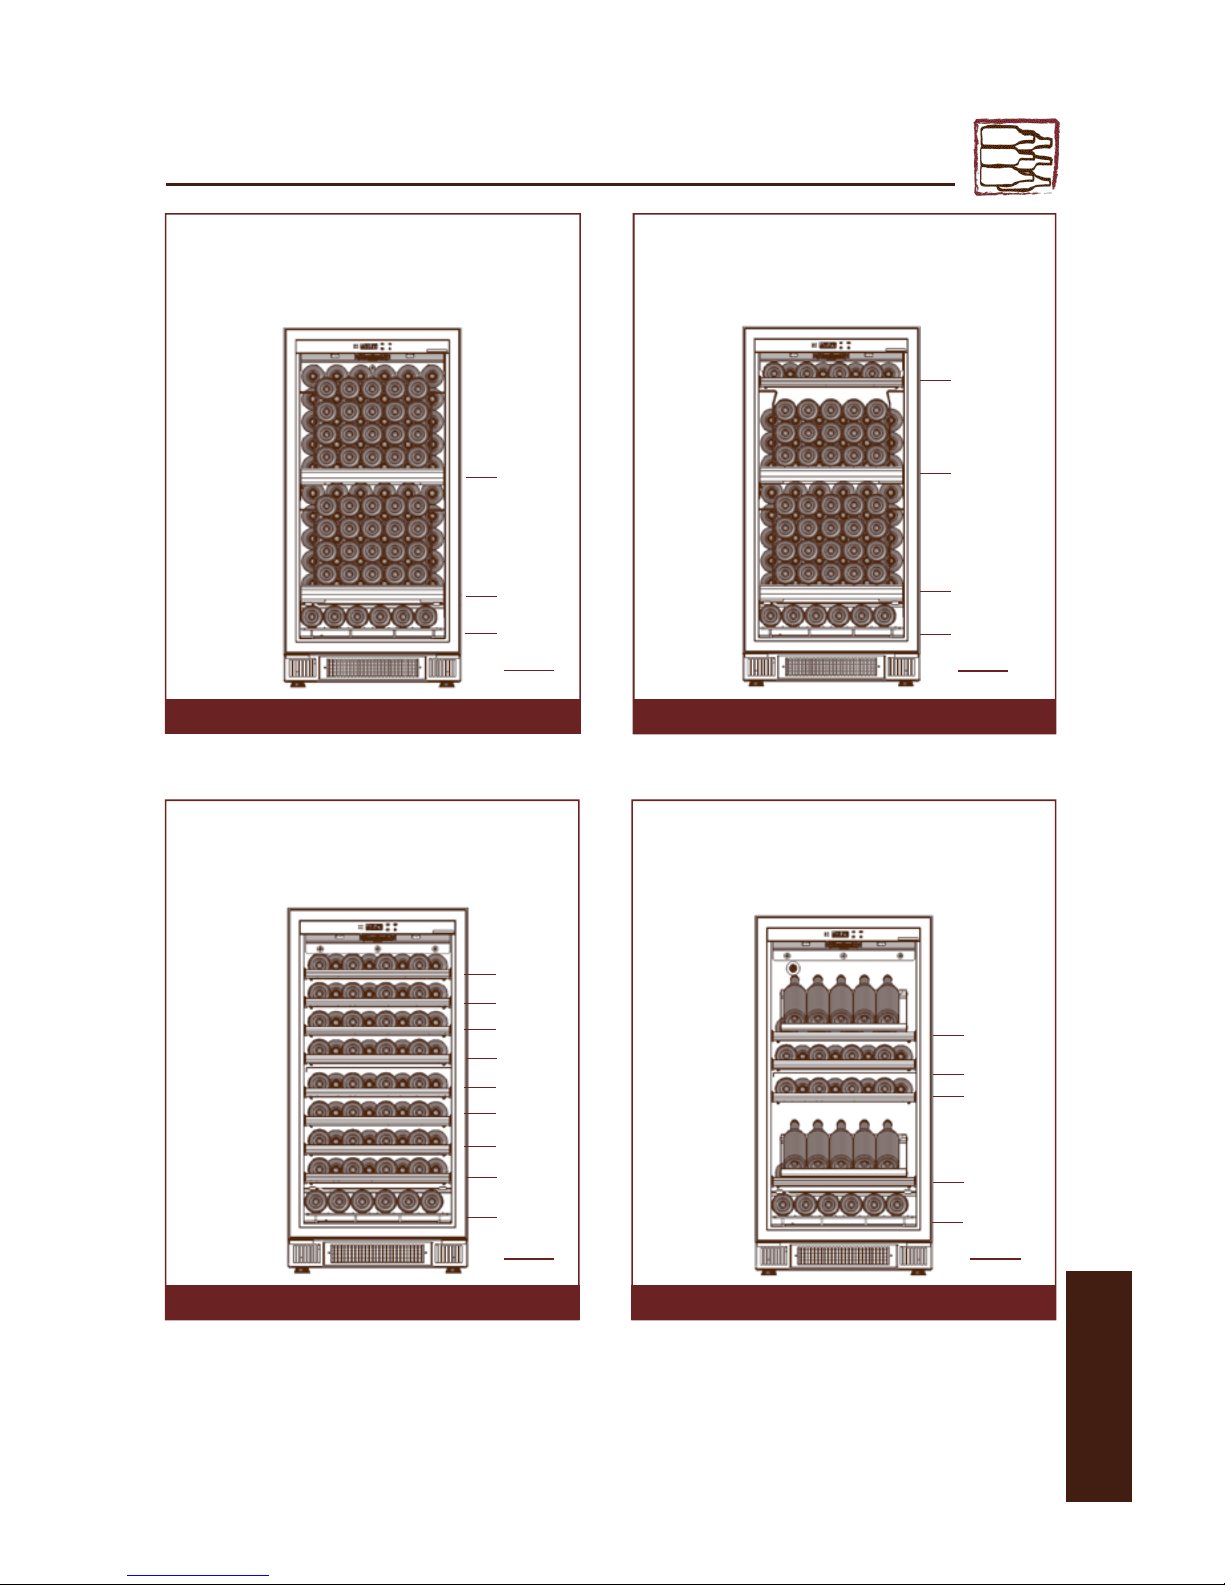
V/S - Coulissante - Sliding - Auszugsregale - Deslizante
V/S - Mixte - Mixed - Gemischte Regalsysteme - Mixta
12 -
1
TEMP
. V159 / M
ULTI-TEMP
. S159
70 bouteilles - 70 bottles - 70 F l a s c h e n
70 b o t e l l a s
97 bouteilles - 97 bottles - 97 F l a s c h e n
97 b o t e l l a s
6
ACUPC 8
AXLN 50
6
AXLN 33
ACUPC 8
70
97
*Les capacités des armoires sont calculées en configurations usine, avec des bouteilles Bordeaux Tradition.
*The cabinet capacities are calculated in factory configuration using traditional Bordeaux bottles.
*Die Kapazitäten der Schränke werden mit Bordeauxflaschen „Tradition“.in Fabrik-Konfigurationen berechnet.
*Las capacidades de las bodegas están calculadas en configuraciones de fábrica, con botellas Burdeos Tradición.
81
V/S - Présentation - Presentation Präsentationsregale - Presentación
V/S - Stockage - Storage - Lagerregal - Almacenamiento
40 bouteilles - 40 bottles - 40 F l a s c h e n
40 b o t e l l a s
106 bouteilles - 106 bottles - 106 F l a s ch e n
106 b o t e l l a s
6
ACUPC 8
ACUPC +
ACOP 9
AXLN 50
6
AXLN 50
40
106
ACUPC 8
ACUPC 8
ACUPC 8
ACUPC 8
ACUPC 8
ACUPC 8
ACUPC 8
ACUPC 8
ACUPC +
ACOP 9
Page 25
82
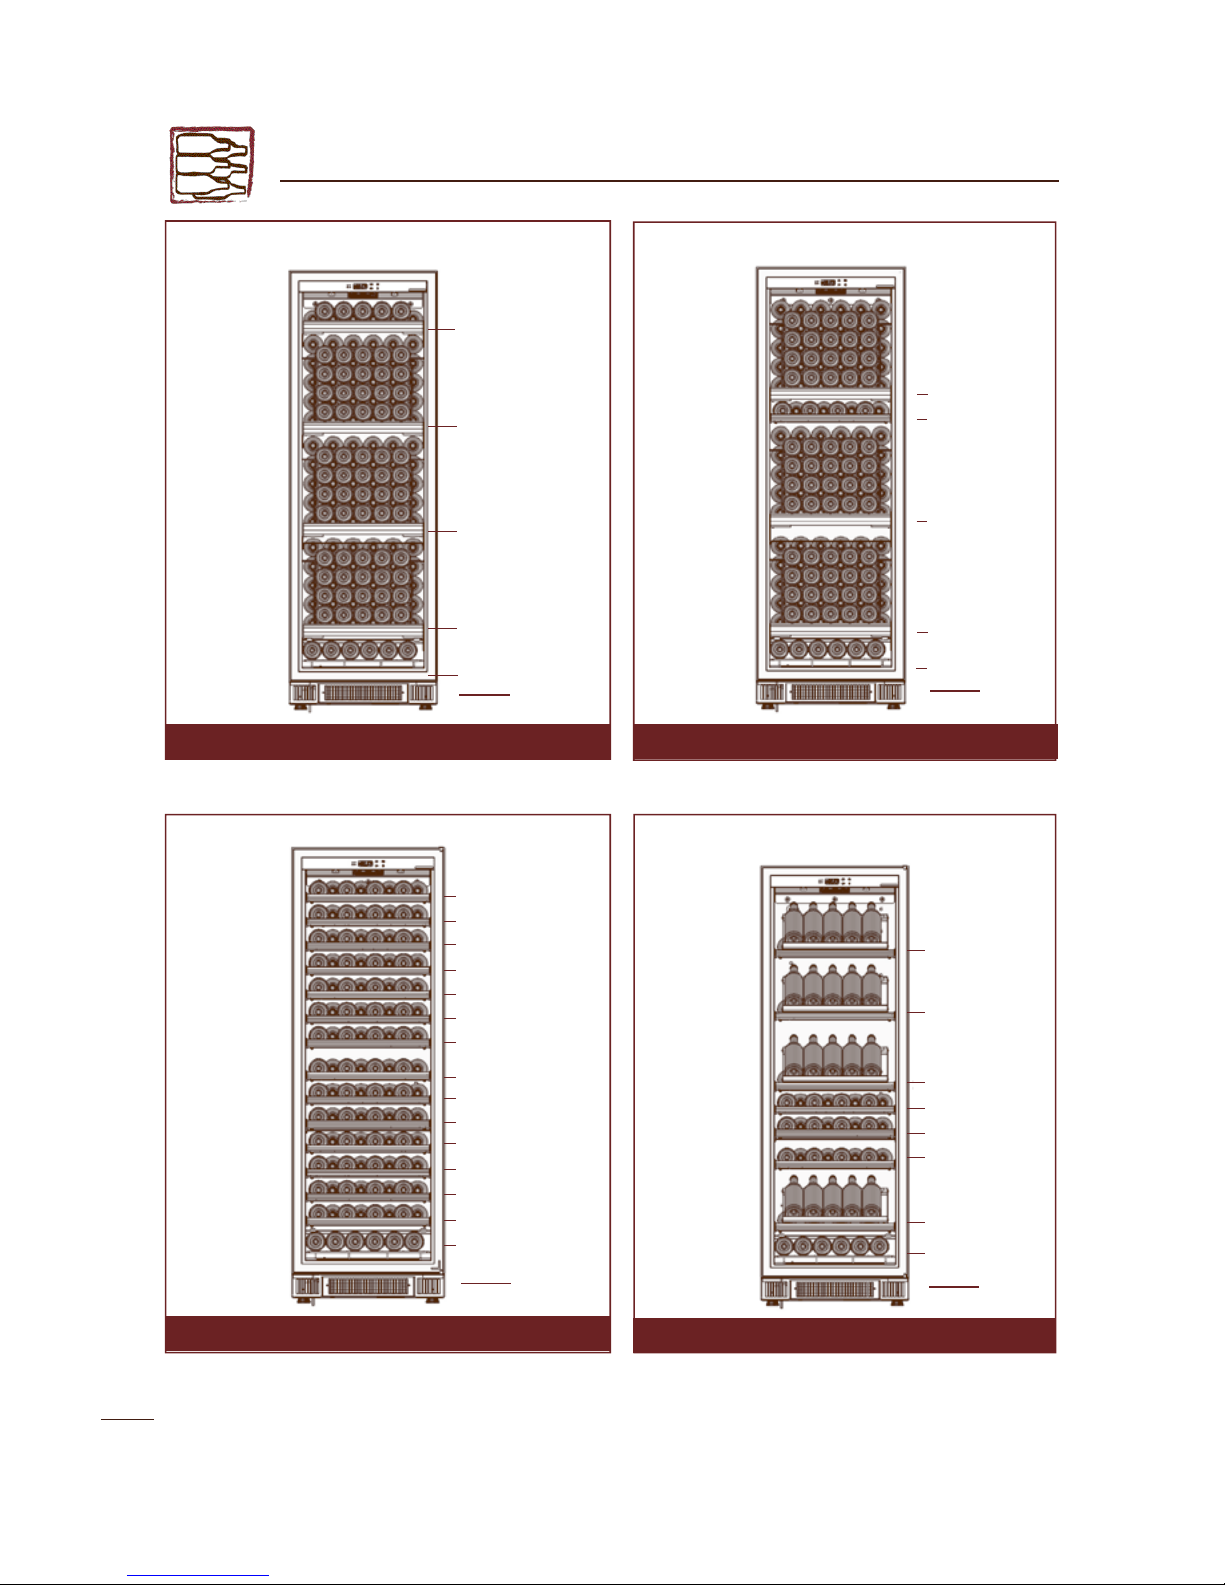
V/S - Coulissante - Sliding - Auszugsregale - Deslizante
V/S - Mixte - Mixed - Gemischte Regalsysteme - Mixta
V/S - Présentation - Presentation - Präsentationsregale - Pre s e n t a c i ó n
V/S - Stockage - Storage - Lagerregal - Almacenamiento
66 bouteilles - 66 bottles - 66 F l a s c h e n
66 b o t e l l a s
167 bouteilles - 167 bottles - 167 F l a s ch e n
167 b o t e l l a s
118 bouteilles - 118 bottles - 118 F l a s ch e n
118 b o t e l l a s
164 bouteilles - 164 bottles - 164 F l a s ch e n
164 b o t e l l a s
6
6
6
ACUPC 8
ACUPC 8
ACUPC 8
6
AXLN 50
12 -
1
TEMP
.V 259 / M
ULTI-TEMP
. S 259
ACUPC 8
ACUPC 8
ACUPC 8
ACUPC 8
ACUPC 8
ACUPC 8
ACUPC 8
118
164
AXLN 11
167
66
*Les capacités des armoires sont calculées en configurations usine, avec des bouteilles Bordeaux Tradition.
*The cabinet capacities are calculated in factory configuration using traditional Bordeaux bottles.
*Die Kapazitäten der Schränke werden mit Bordeauxflaschen „Tradition“.in Fabrik-Konfigurationen berechnet.
*Las capacidades de las bodegas están calculadas en configuraciones de fábrica, con botellas Burdeos Tradición.
ACUPC 8
ACUPC 8
ACUPC 8
ACUPC 8
ACUPC 8
ACUPC 8
ACUPC 8
ACUPC +
ACOP 9
AXLN 50
ACUPC 8
AXLN 50
AXLN 50
ACUPC +
ACOP 9
ACUPC +
ACOP 9
ACUPC +
ACOP 9
AXLN 50
AXLN 50
Page 26

A
VERTISSEMENT
W
ARNING
W
ARNUNG
A
DVERTENCIA
Les informations contenues dans ce document sont sujettes à modifications sans préavis.
EuroCave n’offre aucune garantie sur cet appareil lorsqu’il est utilisé pour un usage particulier autre que celui pour lequel il a été prévu. EuroCave ne pourra
pas être tenu pour responsable des erreurs contenues dans le présent manuel, ni de tout dommage lié ou consécutif à la fourniture, la performance ou
l’utilsation de cet appareil.
La photocopie, la reproduction ou la traduction totale ou partielle de ce document sont formellement interdites, sans le consentement préalable et écrit de
EuroCave.
The information in this document is subject to modification without prior notice.
EuroCave offers no guarantee on this equipment item if it is used for any specific purpose other than that for which it was designed. EuroCave cannot be
held responsible for any errors in this manual, nor for any damage linked to or following the provision, performance or use of the equipment item.
All photocopying, reproduction, translation,wether partial or total, are strictly prohibited, without prior written consent from EuroCave.
Die Angaben in diesem Dokument können ohne Ankündigung geändert werden.
EuroCave gewährt keine Garantie, wenn das Gerät anders als für seine gedachte Zweckbestimmung eingesetzt wird. EuroCave haftet nicht für Fehler, die
diese Anweisung enthalten könnte und auch nicht für Schäden in Zusammenhang oder im Anschluss an die Lieferung,Leistung oder Verwendung des Gerätes.
Das Dokument darf ohne zuvoriges und schriftliches Einvernehmen von EuroCave weder ganz noch teilweise fotokopiert, vervielfältigt oder in andere
Sprachen übersetzt werden.
Las informaciones contenidas en este documento estan sujetas a modificaciones sin previo aviso.
EuroCave ofrece ninguna garantía sobre este aparato cuando se utilice para un uso particular distinto de aquel para el que ha sido previsto. EuroCave no
podrá ser considerado responsable de los errores contenidos en el presente manual,ni de cualquier daño asociado o consecuente al suministro,las cualidades
técnicas o la utilización de este aparato.
La fotocopia, la reproducción o la traducción total o parcial de este documento están formalmente prohibidas,sin el consentimiento previo y por escrito de
EuroCave.
83
Page 27
Leader dans le domaine de la conservation, la présentation et le service des vins depuis
plus de 30 ans, EuroCave vous propose des solutions adaptées à chacun de vos besoins.
Armoires à vins, rangements, climatiseurs de cave, système de Vin au Verre….n’hésitez
pas à contacter votre revendeur EuroCave pour toute information complémentaire !
Leader in the wine preservation, presentation and service sector for over 30 years,
EuroCave offers you solutions adapted to every one of your requirements. Wine
cabinets, storage layouts, cellar conditioners, wine by-the-glass system… don’t hesitate
to contact your EuroCave dealer for further information!
Seit mehr als 30 Jahren führend im Bereich der Lagerung, der Präsentation und dem
Ausschank von Weinen schlägt Ihnen Euro C ave Lösungen vo r, die jedem Ihrer Bedürfnisse
angepasst sind: We i n - , Z i g a r re n k l i m a s c h r ä n k e, We i n k e l l e r- K o m p a k t k l i m a a n l a g e n , G e r ä t e
für den glasweisen Offe n a u s s c h a n k , We i n ke l l e r - R e g a l s y s t e m e.
Zögern Sie nicht länger,setzen Sie sich mit Ihren EuroCave-Händler in Verbindung,wenn
Sie noch irgendwelche Fragen haben!
Líder en el campo de la conservación, presentación y el servicio de vinos desde hace 30
años, EuroCave le propone soluciones adaptadas a cada una de sus necesidades.
Bodegas, estanterías, climatizadores de bodegas,sistemas de vinos a la copa… ¡Para toda
información complementaria, no dude en contactar a su distribuidor EuroCave!
www.eurocave.com - [email protected]
 Loading...