

Page 1
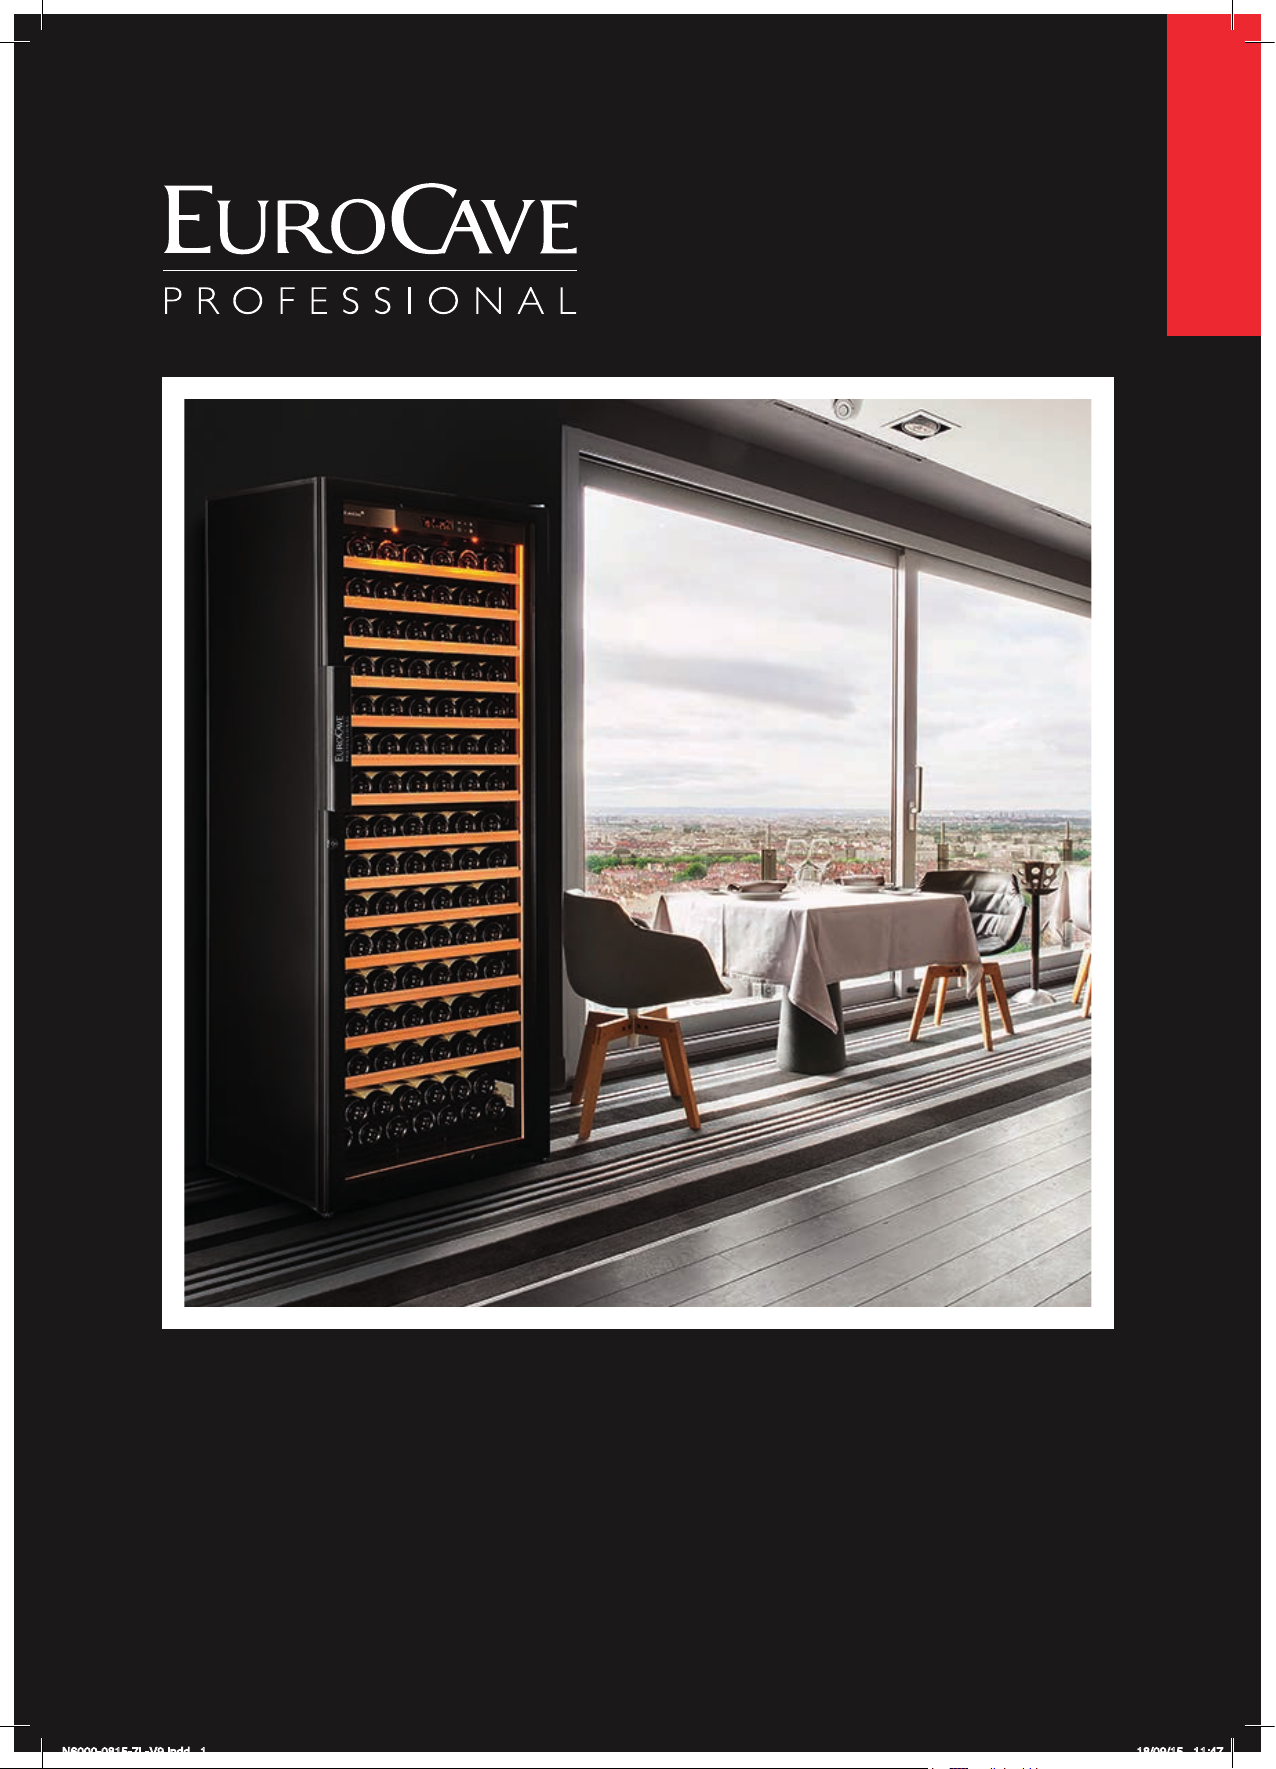
Série 6000
Solutions pour la mise en valeur & le service du vin
*
**
* Solutions for merchandising and the service of wine - 6000 Series – ** Fully customizable wine cabinets
Mode d’emploi • Technical Manual • Gebrauchsanweisung
Modo de empleo • Mode d’emploi • Technical Manual
Gebruiksaanwijzing • Modo de empleo • Mode
Des caves intégralement personnalisables
d’emploi • Istruzioni per l’uso • Gebrauchsanweisung
N6000-0815-7L-V9.indd 1 18/09/15 11:47
Page 2

N6000-0815-7L-V9.indd 2 18/09/15 11:47
Page 3

gB
WelCome
PleAse note
You have just purchased a EuroCave Professional product – thank you for your custom. We take particular care in
manufacturing our products in terms of their design, ergonomics and ease of use.
We hope that you will be completely satisfied with this product.
The information contained in this document may be changed without warning.
EuroCave Professional offers no guarantee for this appliance when it is used for purposes other than those for which it
was designed.
EuroCave Professional shall not be held responsible for any errors contained in this manual or for any damage linked to or
resulting from the supply, performance or use of this appliance.
This document contains original information, which is protected by copyright. All rights are reserved. Photocopying,
reproducing or translating this document, whether partially or completely, is strictly forbidden, without EuroCave
Professional’s prior written consent.
This appliance is intended solely for storing wine.
It is not designed to be used by people (including children) with reduced mental, sensorial or physical abilities, or by people
who have no experience or knowledge, unless they have first received instructions on how to use the machine or are
supervised by a person responsible for their safety.
Children must be supervised to ensure that they do not play with the appliance.
If the power lead is damaged, it must be replaced by a special cable or unit available from the manufacturer or its customer
service department.
WARNING:
- Ensure that the air vents in the appliance’s cavity and the flush-fitting structure are unobstructed.
- Do not use mechanical devices or other means to speed up the defrosting process other than those recommended by
the manufacturer.
- Do not damage the refrigeration circuit.
- Do not use electrical appliances inside the wine storage compartment, unless they have been recommended by the
manufacturer.
- Do not store in this appliance explosive substances such as aerosols containing flammable propellant gas.
This appliance is intended for domestic and similar applications such as:
- kitchenettes reserved for staff of shops, offices and other professional environments;
- gites and use by guests of hotels, motels and other environments which are residential in nature
- hotel rooms;
- the food service industry and other similar applications except for retail sale.
There is a name plate inside the cabinet. The name plate provides various technical information and safety notice with a
yellow flame triangle label, name and chemical symbol of the refrigerant.
The refrigerator contains flammable refrigerant (R600a: iso-butane). Requirements to ensure gas safety and safe use of
refrigerators: The refrigerator system behind and inside the refrigerator contains refrigerant. Do not allow any sharp
objects must come into contact with the refrigeration system.
- Do not use electrical appliances inside the wine cabinet.
Childrend should be supervised to ensure that the refrigerator should be used properly.
Do not use the mechanical devices or other means to accelerate the defrosting process, unless they are of the type
recommended by the manufacturer.
Do not block the openings on the circumstances of the refrigerator.
- In case of having damaged the refrigerant circuit, do not use electic items or fire equipments nearby, and open all the
windows to provide good ventilation. Please also contact your local maintenance agent to follow up
- Do not remove the bottom grill of the cabinet unless it is recommended by the manufacturer. Do not place directly the
wine bottles without the grill.
- The use of an extension cord is not recommended.
- DANGER: Risk of child entrapment. Before you throw away your old wine cabinet:
- Take off the doors
- Leave the shelves in place so that children may not easily climb inside.
The warning labels mentioned above should be kept throughout the life of the refrigerator. The user manual should be
handed over to any person who would use or handle the refrigerator whenever the refrigerator would be transferred to
another location and delivered to a recycling plant;
N6000-0815-7L-V9.indd 3 18/09/15 11:48
Page 4
WelCome to the WoRld oF euRoCAve PRoFessionAl
Our priority is helping you to find the best solutions for your wine storage needs…To do so, EuroCave Professional has
drawn on its considerable expertise to combine the 6 essential criteria for serving wine:
Temperature
The two enemies of wine are extreme temperatures and sudden fluctuations in temperature. A constant temperature
allows wine to reach its full potential.
Humidity
It is an important factor, allowing the corks to retain their sealing qualities. The level of humidity must be above 50%
(ideally between 60 and 75%).
Protection from light
Light, particularly its ultraviolet component, causes wine to deteriorate very quickly by irreversible oxidation of tannins.
It is therefore strongly recommended that you store your wine in a place protected from U.V. light.
Lack of vibration
Vibration disturbs wine’s long development process and is often fatal for your finest wines. The “Main Du Sommelier”
supports adapt to the shape of the bottle and protect it from vibration (anti-vibration technology).
Circulation of air
A constant supply of fresh air prevents mould from developing in your cabinet. EuroCave Professional cabinets benefit
from a ventilation system by breather effect, which makes it very similar to the ventilation system found in a natural cellar.
Storage
Moving bottles around too often is harmful to your wine. Having suitable shelving which limits handling is essential.
Thank you for placing your trust in EuroCave Professional.
Standard temperatures for serving wine
French wines Australian wines
GB
Alsace
Beaujolais
Sweet White Bordeaux
Dry White Bordeaux
Bordeaux Reds
Burgundy Whites
Burgundy Reds
Champagne
Jura
Languedoc-Roussillon
Provence Rosé
Savoie
Dry White Loire Wines
Sweet White Loire Wines
Loire Reds
Rhône wines
Sweet Wines from the South-West
4
Reds from the South-West
10 °C
13 °C
6 °C
8 °C
17 °C
11 °C
18 °C
6 °C
10 °C
13 °C
12 °C
9 °C Other wines
10 °C
7 °C
14 °C
15 °C
7 °C
15 °C
Cabernet franc
Cabernet sauvignon
Chardonnay
Merlot
Muscat à petit grain
Pinot noir
Sauvignon blanc
Semillon
Shiraz
Verdhelo
California
Chile
Spain
Italy
16 °C
17 °C
10 °C
17 °C
6 °C
15 °C
8 °C
8 °C
18 °C
7 °C
16 °C
15 °C
17 °C
16 °C
N6000-0815-7L-V9.indd 4 18/09/15 11:48
Page 5
Contents
1 - Description of your wine cabinet 6
2 - Power supply 7
3- Protecting the environment and saving energy 7
4 - Installing your wine cabinet 7
I - Door reversibility 8
5 - Layout – Storage 11-14
I- Adding or changing the position of a sliding shelf 12
II- Adding or changing the position of a storage shelf AXUH2 14
III- Assembly and use of shelf labels 14
6 - Commissioning your wine cabinet 15
I Connection and powring up 15
II-A Description (1 temperature model 6074V, 6182V) 15
II-B Temperature setting 15
III-A Description (2 temperatures model (6170D) 16
III-B Temperature setting 16
IV-A Description (multi temperatures model (6074S, 6182S) 17
IV-B Temperature setting 17
V - Relative humidity level display 18
VI - Setting the lighting mode 18
VII - Charcoal filter meter display 18
7 - Everyday maintenance 19
8 - Operating faults 20
9 - Energy and technical features 20-21
10 - Storage simulation 111-112
5
GB
N6000-0815-7L-V9.indd 5 18/09/15 11:48
Page 6
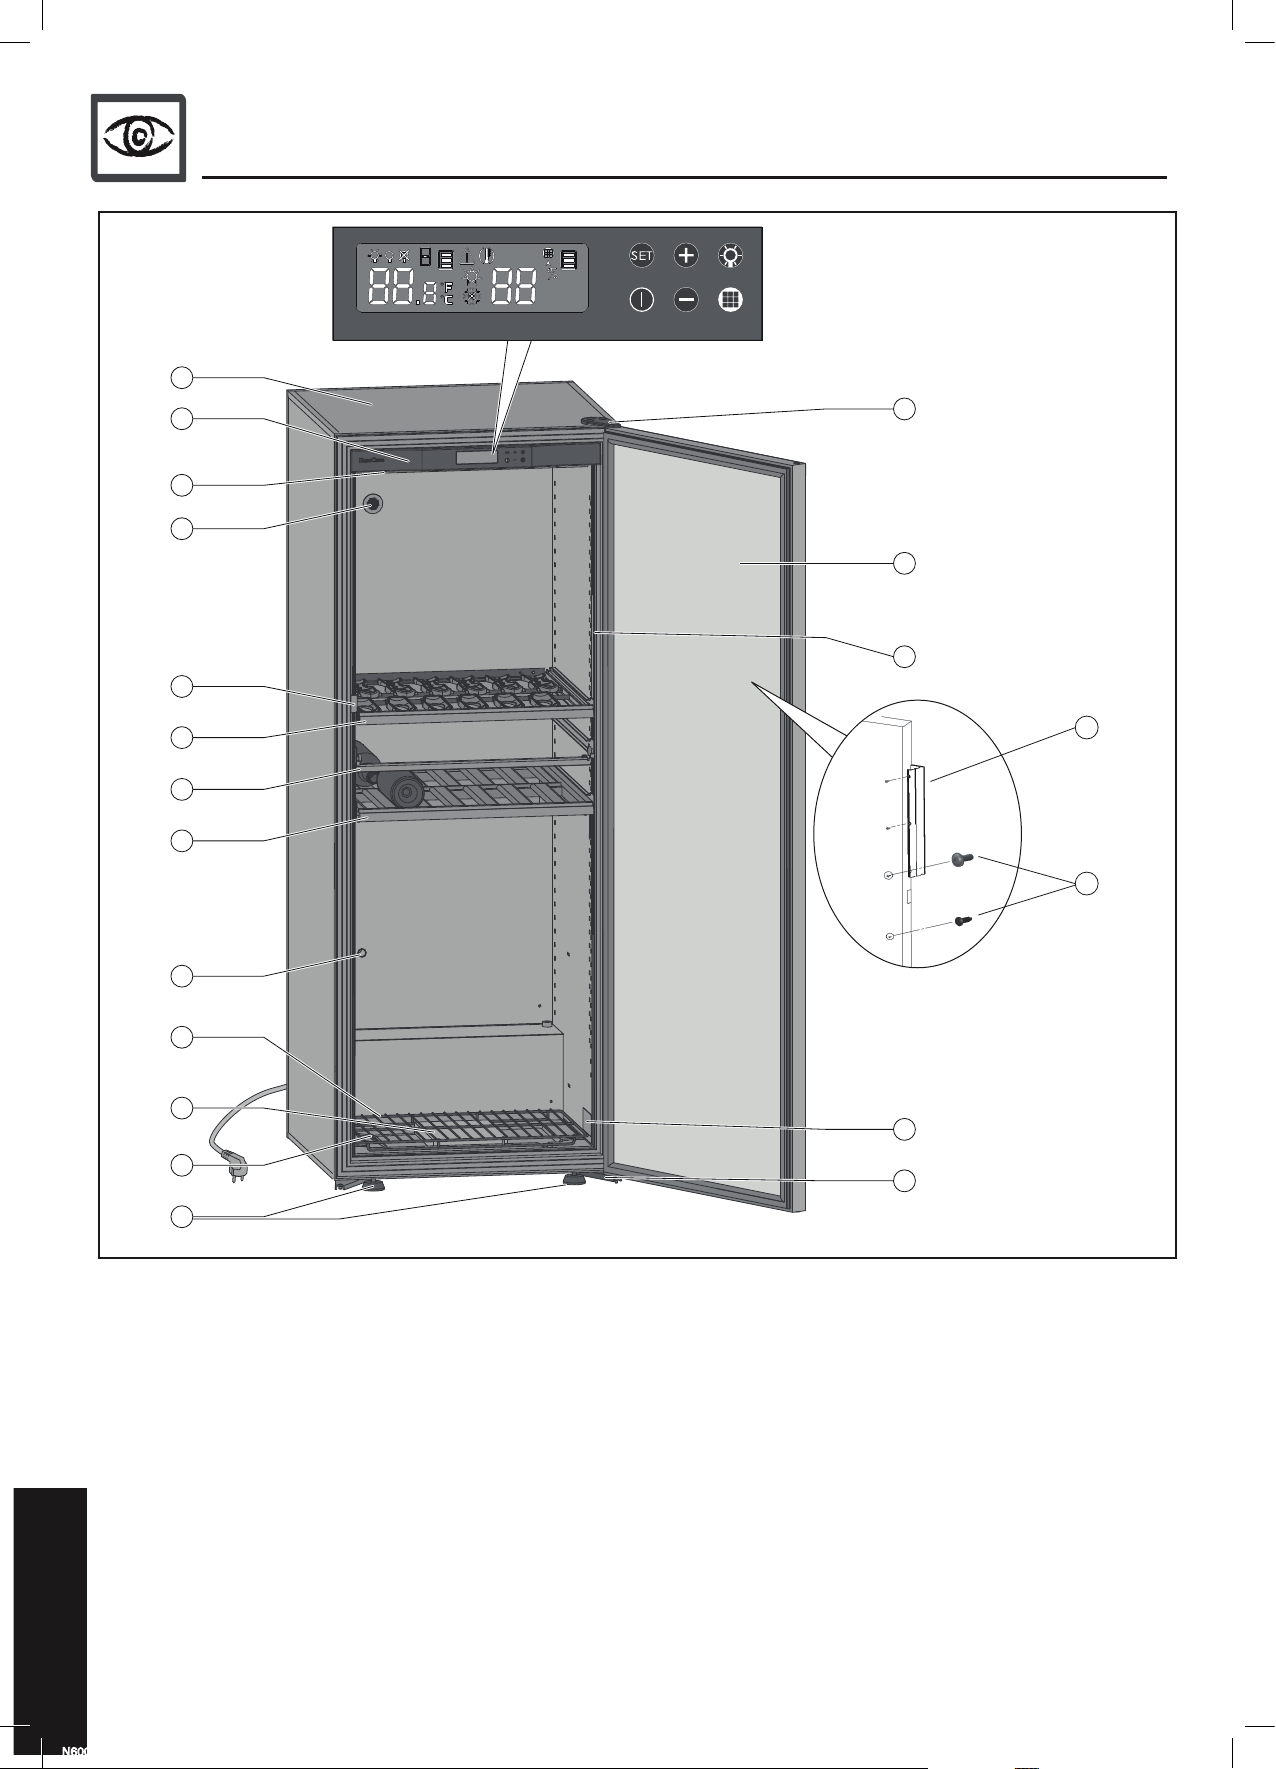
1 - desCRiPtion oF youR Wine CABinet
A
B
C
E
F
Q
P
D
G
H
I
O
J
K
R
L
A Cabinet body
B Setting and control panel
C Lighting (2 LEDs or 4 LEDs on 6170D model)
D Light strip (optional extra - except 6170D model)
E Breather hole + Active charcoal filter except 6170D
model
F Door catch
G Sliding shelf
H Cabint body stiffener (large models only) or shelf
separating the 2 compartments includes the stiffener
(6170D model only) - do not remove
I Storage shelf
6
GB
S
T
N
M
J Grill
K Humidity cartridge - 1-temperature model only
L 2 adjustable feet for levelling
M Lower hinge (x2)
N Product identification label
O Fresh air vent (except 6170D model)
P Door (fitted with a handle and a dual-action lock)
Q Upper hinge
R Condensate collection tray with outlet hole
S Detachable handle (Full Glass doors only)
T Three screws, three caps (Full Glass doors only)
N6000-0815-7L-V9.indd 6 18/09/15 11:48
Page 7
2 - PoWeR suPPly
For your personal safety, the wine
cabinet must be correctly earthed.
Ensure that the socket is correctly
earthed and that your installation is
protected by a circuit breaker
(30 mA*)
*Not applicable to some countries.
3 - PRoteCting the enviRonment And sAving
eneRgy
4 - instAlling youR Wine CABinet
The wine cabinet’s power lead has a plug, to be plugged into a standard earthed outlet to prevent
The wine cabinet’s power lead has a plug, to be plugged into a standard earthed outlet to prevent
any risk of electric shock.
any risk of electric shock.
Have the power supply socket checked by a qualified electrician who will check that it is
Have the power supply socket checked by a qualified electrician who will check that it is
correctly earthed and will carry out, if necessary, work to ensure that the socket
correctly earthed and will carry out, if necessary, work to ensure that the socket
complies with current standards.
complies with current standards.
Contact your usual EuroCave Professional retailer to change the power lead if it is damaged. It
must be replaced by a EuroCave Professional original manufacturer’s part.
If you are moving to a foreign country, check that the supply characteristics of the cabinet
If you are moving to a foreign country, check that the supply characteristics of the cabinet
correspond to the country (voltage, frequency).
correspond to the country (voltage, frequency).
Disposal of packaging
All packaging used by EuroCave Professional is made
from recyclable materials.
After unpacking your cabinet, take the packaging to
a refuse collection point. For the most part, it will be
recycled.
Recycling: a caring gesture
Electrical and electronic equipment can have a harmful effect on the
environment and human health owing to the presence of hazardous
substances.
You should never therefore trash electronic and electrical equipment with
unsorted municipal waste.
When purchasing a new EuroCave Professional product, you can entrust
recycling of your old appliance to your EuroCave Professional retailer.
Unpacking
• When your cabinet is delivered, check the outside for signs of damage
(impact, warping…).
• Open the door and check that the various elements inside are intact
(walls, Main du Sommelier supports, hinges, bottle support…).
• Remove the protective elements found inside and outside your cabinet
including the lower hinge protector (see diagram (1))
• Fit the cap (see diagram 2), found in the accessories bag, used for sealing
1
Speak to your EuroCave Professional retailer. He will explain the removal
and collection arrangements set up in the EuroCave Professional network.
In compliance with legislation relating to protecting and caring for the
environment, your wine cabinet does not contain C.F.C.s or H.C.F.Cs.
To save energy
•Install your wine cabinet in a suitable location (see following page) and
observe the recommended temperature ranges.
• Keep the door open for as short a time as possible.
•Ensure that the door seal is in good working order and that it is not
damaged. If it is, contact your EuroCave Professional retailer.
Disable any unusable appliances by unplugging them and cutting off the
power lead.
the hole in the lower hinge.
Precautions
• Do not place your cabinet in an area liable to flood.
• Do not place your cabinet close to a source of heat or expose it to
direct sunlight
• Prevent water from splashing on any parts of the rear of the machine.
• Arrange the power lead so that it is accessible and does not come into
contact with any of the appliance’s components.
• Tilt the cabinet slightly backwards in order to adjust the front feet (by
screwing or unscrewing them) so that you can level your cabinet (spirit
level recommended).
2
7
GB
N6000-0815-7L-V9.indd 7 18/09/15 11:48
Page 8
When moving your cabinet, never tilt it more than
45°, and always on its side (on the opposite side of
the flexible lead).
Fig.1
Fig.2
Fig.3
Fig.1
Fig.2
4 - instAlling youR Wine CABinet
Precautions (Continued)
• For 1-temperature models only, place the humidity cartridge (located in
your cabinet’s “accessories” bag) in the base of the cabinet, under the grid,
in the tray provided (see diagram below). When using for the first time,
immerse the entire cartridge in water for a few minutes to saturate it then
drain it thoroughly.
• Install the stop (which is located in the accessories bag) at the back of the
cabinet (see diagram).
• This allows a space of 7 cm
to be maintained between
the wall and the rear of the
cabinet. This spa
ce allows your cabinet’s
power consumption to be
optimised.
• Place the 2 caps in the 2
holes at the top of the
cabinet.
• Do not push the caps all the
way in, in order to allow the
rear stop to be installed.
• Slide the rear stop between
the caps and the wall of the
cabinet, then push the 2
caps all the way in.
Installation
Place your cabinet in the desired location.
• Take the lead and plug it into the connector, located at the back of the
cabinet, on the bottom left-hand side.
• Wait 48hrs before plugging in
your cabinet
• When using your cabinet for the
first time, the charcoal filter
alarm will display. Reset the filter
meter to 365 (see chapter 6, §
VII).
Fitting the handle
1. Full Glass door
• Unscrew the three screws placed on the side of the door, using the Allen
wrench, which you will find in the handle's box.
View from above
Handle
Front
Figure 1
Figure 2
Seal
Door frame
Figure 3
• Position the handle on the specially designed groove on the door frame
(figure 2).
• Insert the handle all the way into the groove using a forward movement
(figure 2).
• Screw the three screws back on (figure 3).
• Take care not to catch the seal when screwing.
Note: adjustment of the handle is possible thanks to the oblong holes.
2. Glass door with black frame and plain door
It must:
• be open to the outside and well ventilated (not in an enclosed cupboard,
for example),
• not be too damp (utility room, laundry room, bathroom...),
• have a flat, stable floor,
• be supplied with power (standard outlet, 16 A, earthed with 30mA*
circuit breaker). (* not applicable to some countries).
• Place your cabinet in the desired location.
• Fit the charcoal filter (located in the “accessories” bag) by inserting it into
the breather hole located on the top left-hand side of the inside of your
cabinet (except 6170D model).
The handle can be found in its protective bag. It is attached to the rack at the
bottom of your cabinet.
• Move the seal away from the handle position.
• Screw the 2 screws using the Allen key (3 mm) provided in the bag of
accessories.
• Reposition the seal ensuring that it is correctly clipped in place.
Installing two cabinets side by side
N.B.: If you are placing two cabinets side by side, ensure that you leave a
gap of at least 1 cm between each cabinet.
8
GB
N6000-0815-7L-V9.indd 8 18/09/15 11:48
Page 9

4
- instAlling youR Wine CABinet
I. Door reversibility (Full Glass only)
x3 x4x3
This allows you to change the direction in which the door opens. Follow
the instructions below (example for changing a right-hand door into a
left-hand door):
x3
C E
DB GF H JA
x2
1
2
A Upper hinge
B Caps
H Door pin
J Door pin cap
C Caps
D Torx screw
E Hex screw
F Door catch
G Lower hinge
8 Mount the door catch on the desired opening side, using screws.
Replace the washers, then the screws, on the side opposite the door catch.
3
4
1 Unscrew the three screws using a "T25" Torx wrench.
2 Remove the upper hinge.
3 Carefully remove the caps using a thin blade.
4 Remove the cabinet door by opening it slightly, then lifting it upwards.
5 Unscrew the door pin.
6 Carefully remove the cap using a thin blade and assemble the pin in its
place. Reposition the cap on the opposite side
8
9 Turn the door through 180°.
Warning: the door is very heavy. Take any necessary
precautions to ensure that you do not injure yourself or drop it.
10 Put the door back on its pin.
13
12
11
11 Put in place the upper hinge.
7
7 Unscrew the two screws and the door catch.
Unscrew the two screws on the opposite side and remove the two
washers.
N6000-0815-7L-V9.indd 9 18/09/15 11:48
12 Screw the hinge so that the door is completely parallel to the cabinet.
Check that the door seal adheres well to the cabinet (by closing the door),
to ensure that it is completely air-tight.
13 Put in place the caps.
9
GB
Page 10

Vue du dessus
16 Positionnez la poignée sur
la rainure du cadre de porte
prévue à cet effet. Emboîtez
complètement la poignée dans
la rainure grâce à un
mouvement vers l’avant.
17 Revissez les trois vis.
Prenez garde à ne pas pincer
le joint au moment du vissage.
18 Replacez les trois
bouchons.
Cadre de porte
Côté face
avant
Joint
4 - instAlling youR Wine CABinet
15
14
16
View from above
Seal
Door frame
Handle
Front
17
18
Lock
Lock
14 As the door has turned 180 degrees, reposition your handle above
the lock (Full Glass doors only): Unscrew the three screws placed
on the side of the door, using the Allen wrench (2,5 mm), which you
will find in the handle's box.
15 Remove the three caps.
16 Position the handle on the specially designed groove on the door
frame. Insert the handle all the way into the groove using a forward
movement.
17 Screw the three screws back on. Take care not to catch the seal
when screwing.
18 Replace the three caps.
Replacement of the LEDs on the control panel must
only be carried out by a qualified electrician.
Bottles must be arranged so that they do not come into contact
with the back wall. If this happens, the condensation created on
the wall may trickle onto the shelves and damage the bottle
labels. In addition, contact with the cold wall may create a frost point,
which is harmful to your wine.
10
GB
N6000-0815-7L-V9.indd 10 18/09/15 11:48
Page 11

5 - lAyout – stoRAge
Your EuroCave Professional cabinet was designed to be adaptable. Its storage equipment adapts to your requirements and can be added to over
time.
Different types of storage
Standard storage equipment
Universal storage shelf
Ref.: AXUH
Capacity: 77 bottles
Max weight: 100 kg
Bordeaux
storage shelf
Ref.: AXBH
Capacity: 78 bottles
Max weight: 100 kg
Universal sliding shelf
"Main du sommelier"
Capacity: 12 bottles
fitted with
supports
Ref.: ACMS
Champagne sliding
shelf
Ref. : ACHH
Capacity: 10 bottles Capacity: 7 bottles Capacity: 20 bottles
Display shelf
Ref.: ACPH
Capacity: 22 bottles Capacity: 32 bottles
Magnum sliding shelf
fitted with
"Main du sommelier"
supports
Ref.: ACGMS
Articulated
presentation kit for
ACMS shelves
Ref.: AOPRESAR
Serving sliding shelf
Ref.: ACVH
Storage equipment available as an optional extra (equipment "PLUS")
Universal storage shelf
Ref.: AXUH2B
Ref.: AXUH2W
Capacity: 77 bottles
Max weight: 100 kg
The layout of your cabinet can be modified according to your requirements. Refer to pages 111-115 to see storage simulations.
1- A white marker pen is supplied in the accessories bag. It allows you to write on the shelf labels (“PLUS” equipment) in order to identify your bottles. 2- glossy black front 3- light wood front
Layout advice
Your EuroCave Professional wine cabinet has been designed to safely hold
a maximum number of bottles. We recommend that you observe the
following advice to optimize loading.
• Distribute your bottles as uniformly as possible over the
various cabinet shelves, in order to spread the weight. Also
ensure that none of the bottles is touching the rear wall of the
cabinet.
• Spread the load over the entire cabinet rather than placing
bottles all at the top or all at the bottom.
• Observe the loading instructions for the specific storage layout
of your cabinet and never stack bottles on a sliding shelf.
• If you have sliding shelves, it is preferable to position them in
the upper section of your cabinet to facilitate daily access.
1
2
3
Universal sliding
shelf fitted with "new
generation Main du
sommelier"supports
Ref.: ACMS2B
Ref.: ACMS2W
Capacity: 22 bottles Capacity: 32 bottles
1
2
3
Articulated
presentation kit for
ACMS2 shelves
Ref.: AOPRESAR2
• In the same way, place one or two bottles of each of your
different wines on the sliding shelves and keep spare bottles on
the storage shelves. You then simply replace bottles when they
are consumed.
• When using your wine cabinet, never pull out more than one
sliding shelf at a time.
NB: Never modify the position of the stiffener in your cabinet
(see description page 6) without first consulting your retailer
and never handle this part when the cabinet is loaded.
Note: adjusting an ACMS/ACHH/ACGMS sliding
shelf
2
When you purchase your cabinet, the sliding shelves are already adjusted
to ideally suit the internal dimensions of your appliance. If you purchase
a new sliding shelf, you may have to carry out this adjustment. To do so,
unscrew the screws
1 of the first right or left runner 2 (2 screws) then
position the runner at the desired width and tighten the screws. Repeat
this process for the second runner (if necessary).
N6000-0815-7L-V9.indd 11 18/09/15 11:48
1
2
11
GB
Page 12

5 - lAyout – stoRAge
I. Adding or changing the position of a sliding shelf
If the sliding shelf is already in place in your cabinet:
• Completely unload the sliding shelf.
• Then remove the sliding shelf by sliding it towards you whilst lifting the front section.
• Remove the slide guides from the walls, marking off the right guide and the left guide.
• Refit the slide guides (see diagram below).
A. Putting in place the back section of the guide B. Putting in place the front section of the guide
Guide
Wall
Guide
Wall
Wall
Guide
C. Then place the sliding shelf
ACMS
Guide
ACMS 2
The latch of the soft-close device may not be locked (left runner).
It is essential to lock it before positioning the sliding shelf on the runners.
Ensure that the latch is correctly positioned at the front.
If it is not, pull it towards the front to lock it.
Guide
Wall
Sliding shelf
a. b.
12
GB
N6000-0815-7L-V9.indd 12 18/09/15 11:48
Page 13

5 - lAyout – stoRAge
a.
1
2
b.
d.
TAC !
c.
1
2
Place your shelf on the left and right runners and start by locking
the back section of the shelf.
e.
Slide the shelf along until the back fasteners of the shelf lock into
the slots provided in the runners.
f.
2
1
Note: In order to prevent the shelf from tipping, ensure that the studs on each side of the shelf are pushed all the way
into the holes before pushing the shelf back in.
N6000-0815-7L-V9.indd 13 18/09/15 11:48
Then place the front studs of the shelf into the slots provided in
the front section of the runners. It is necessary to jiggle the shelf in
order to make the studs slot into the holes. Tip: Start by inserting
the left stud. The right stud will then easily slot into the oblong hole.
g.
2
1
13
GB
Page 14

1
2
5 - lAyout – stoRAge
II. Adding or changing the position of a storage shelf AXUH2
a.
1
b. c. d.
2
Note: to install a storage shelf the back section of which rests on the ledge, located at the back of the cabinet, fit 2 rack support pins at
the front to support the front section of the shelf (pins supplied in the accessories bag).
The same applies if you place a storage shelf just above the stiffener, position two rack support pins at the back of the cabinet (for large
models only).
III. Assembly and use of shelf labels
The shelf labels in epoxy coated steel allow you to identify your bottles and locate
them easily. White marker pen supplied in the accessories bag (erasable).
back
wall
(supplied with ACMS2 and AXUH2 shelves)
b. c.
14
GB
N6000-0815-7L-V9.indd 14 18/09/15 11:48
Page 15

6 - Commissioning youR Wine CABinet
1. Connection and starting up
Wait 48 hours before plugging in your wine cabinet.
To switch it on, press and hold down button
Have your plug checked (presence of fuses, amps and 30 mA
circuit breaker).
Do not plug several cabinet into a multi-socket.
for 5 seconds.
II-A. Description (1-temperature 6074V, 6182V model)
EDC FBA G H I
To ensure that your cabinet functions optimally, we
recommend that you fill it to at least 75 % of its capacity.
The tactile keys are very sensitive.
There is no need to apply force, only a
light touch is required to register the
command.
Remember to remove your finger from
the panel between each press.
N M
L K J
A Lighting mode
B Open door alarm
C Temperature zone
D Sensor fault alarm
E Temperature alarm
F Charcoal filter alarm
G Confirmation and setting access key
H Setting and selection keys
II-B. Temperature setting
5 sec.
Press and hold down the key for 5 seconds to start up.
1 Press and hold down the key for approximately 5 seconds.
The display will start to flash
I Lighting mode confirmation and access key
J Charcoal filter meter access key
K Standby key
L Humidity level alarm
M Relative humidity level display
N Heater in-use light
O Compressor in-use light
P Temperature display
The value shown on the display is the actual temperature inside
the cabinet. It is therefore necessary to wait before your new
setting takes effect.
• The default setting is 12 °C / 54°F (ideal maturing temperature).
However, you can set the temperature from 5 to 20 °C / 41 to 68°F.
• Recommended temperature setting range for maturing wine:
10 -14 °C / 50 - 57°F.
N.B.: to function correctly, your cabinet must be placed in a room with a
temperature of 10 - 35 °C / 50 - 95°F (solid door) or 10 - 30 °C / 50 - 86°F
(glass door).
Transforming your wine maturing cabinet into a wine serving
cabinet: you can use your 1-temperature cabinet as a wine
2 Press the or keys to set the desired temperature
3 Press the button to confirm
N6000-0815-7L-V9.indd 15 18/09/15 11:48
serving cabinet to bring your white or red wines to the correct
serving temperature
(temperature setting possible from 5 - 20 °C / 41 - 68°F):
• for white wine: recommended setting range: 6 -10°C / 43 - 50°F
• for red wine: recommended setting range: 15 -18 °C/ 59- 64°F
This cabinet can therefore be used as a red or white wine
serving cabinet
15
GB
Page 16

6 - Commissioning youR Wine CABinet
III-A. Description (2-temperature 6170D model)
EDC FBA G H I
The tactile keys are very sensitive.
There is no need to apply force, a light
touch is sufficient to register the
command. Remember to remove your
finger from the panel between presses.
N M
A Lighting mode
B Open door alarm
C Red serving temperature compartment temperature
zone (lower compartment of the cabinet)
D Sensor fault alarm
E Temperature alarm
F Chilling compartment temperature
zone (top compartment of the cabinet)
L K J
H Setting and selection keys
I Lighting mode access and confirmation key
J Power button
K Chilling compartment temperature display
L Hot circuit indicator
M Cold circuit indicator
N Red serving temperature compartment temperature
display
G Confirmation and setting access key
III-B. Temperature setting
Chilling compartment temperature setting range: 5 to 11°C / 41 to 52°F.
Red serving temperature compartment temperature setting range: 15 to 20°C / 59 to 68°F.
5 sec.
Appuyer 5 s sur la touche
1 Press and hold down the key for approximately
5 secs.
The display will start to flash.
pour la mise en route.
2 Press the or keys to set the desired temperature
in the serving temperature compartment.
5 sec.
3 Press the button to confirm.
The temperature display of the chilling compartment will
flash.
4 Press the or keys to set
the desired temperature in the chilling
compartment.
5 Press the button to confirm.
The value shown on the display is the actual temperature inside
the cabinet. It is therefore necessary to wait before your new
setting takes effect.
16
GB
N6000-0815-7L-V9.indd 16 18/09/15 11:48
N.B: in order to operate correctly, your cabinet must be placed in a room
with a temperature of 10 - 35 °C / 50 - 95°F. (solid door) or 10 - 30 °C /
50 - 95°F. (glass door)
Page 17

F CEDCBA G H I
6 - Commissioning youR Wine CABinet
IV-A. Description (multi-temperature 6074S, 6182S model)
The tactile keys are very sensitive.
There is no need to apply force, a light
touch is sufficient to register the
command. Remember to remove your
finger from the panel between presses.
O N
A Lighting mode
B Open door alarm
C Temperature zones concerned
D Sensor fault alarm
E Temperature alarm
F Charcoal filter alarm
G Confirmation and setting access key
M L K J
I Lighting mode access and confirmation key
J Charcoal filter meter access key
K Power button
L Highest temperature in cabinet display
M Hot circuit indicator
N Cold circuit indicator
O Lowest temperature in cabinet display
H Setting and selection keys
IV-B. Temperature setting
Recommended temperature setting range for the lowest temperature: 7 - 9 °C / 45 - 48 °F.
Recommended temperature setting range for the highest temperature: 17 - 20 °C / 63- 68 °F.
5 sec.
Press and hold down the
key for 5 secs to power up.
1 Press and hold down the key for approximately 5 secs.
The display will start to flash.
3 Press the button to confirm.
The right-hand display will flash.
The value shown on the display is the actual temperature inside
the cabinet. It is therefore necessary to wait before your new
setting takes effect.
2 Press the or keys to set the desired temperature.
4 Press the or keys to set the desired temperature.
5 Press the button to confirm.
• For the lowest temperature, the default setting is 8 °C / 46°F. However
you can set the temperature between 5 - 12 °C / 41 - 54°F..
• For the highest temperature, the default setting is 18 °C / 64°F..
• However you can set the temperature between 15 - 22 °C / 59 - 72°F.
N.B: in order to operate correctly, your cabinet must be placed in a room
with a temperature of 12-30°C / 54-86°F.
17
GB
N6000-0815-7L-V9.indd 17 18/09/15 11:48
Page 18

The charcoal filter must be replaced every year.
In a particularly dry environment and/or in not very good
weather conditions (e.g. winter), you can use the
"Hygro++" humidity kit which allows you to increase the
level of relative humidity inside your wine cabinet.
6 - Commissioning youR Wine CABinet
V. Relative humidity level display (1-temperature model only)
Your wine cabinet has a function for measuring humidity levels, allowing
you to see the level of relative humidity inside the appliance, when the
setting is 9 - 15° C.
The ideal level of humidity is above 50% and ideally between 60 and 75 %.
2。
VI. Setting the lighting mode
If you want to increase the level of relative humidity in your cabinet, pour
the equivalent of one glass of water into the duct of the tray located on
the bottom right-hand side of the cabinet.
1 Press the key.
The indicator of the active mode will flash
There are 3 setting options for lighting:
Permanent lighting (mood lighting for a cabinet fitted with a glass
door, for example).
Lighting which comes on when the door opens (it is switched off
when the cabinet door is closed).
Lighting disabled
2 Press the or keys to select the desired mode.
3 Press the key to confirm
Precaution : bright light, never look directly at the LED beam.
VII. Charcoal filter meter display (except modèle 6170D)
When using the filter for the first time or replacing it, set the meter to 365.
1 Press the key.
The display will flash.
2 Press the key to set to 365.
You can consult the meter by pressing the key.
3 Press the to confirm
The alarm display will switch off
18
GB
N6000-0815-7L-V9.indd 18 18/09/15 11:48
Page 19

7 - eveRydAy mAintenAnCe
Regular monitoring of your cabinet and reporting any
faults to your retailer will ensure that your appliance
provides you with many years of faithful service.
Your EuroCave Professional cabinet is a tried and tested appliance.
Maintenance operations to be carried out approximately once a year
• Unplug and unload the appliance.
• Clean the water drain at the bottom of the wine cabinet. Pay attention that nothing is
blocking this drain.
• Regularly vacuum the condenser at the back of the appliance.
• Clean the inside of the compartments with water and a gentle cleaning product.
• Rinse thoroughly.
• Dry it with a soft rag.
• Replace the active charcoal filter in the breather hole at the top of your cabinet
• Remove the charcoal filter manually. It is available from your usual retailer. It must
be replaced by an original manufacturer’s part.
• Check that the seals are in good condition. It is often necessary to clean the door seal.
Using unsuitable cleaning products can cause premature ageing of the seals. Certain
rules must therefore be followed: whenever you clean the seal, always rinse off any
cleaning product with clear water. All traces of cleaning product must be removed from
the seal. EuroCave Professional only recommends using a mild soapy solution. If this
proves insufficient, it is possible to occasionally use an ethanol-based solution, provided
that the concentration used is less than 10% and that the seal is then rinsed thoroughly
with clear water.
Maintenance of the optional extra “PLUS” equipment:
• Clean the light strip with a microfibre or soft cloth only. Never use cleaning products containing alcohol.
• To remove text, written using the white marker pen, from the bottle identification supports ("premium" equipment), use a damp cloth.
• To clean the fronts of the shelves:
- use a microfibre or soft cloth only
- only use water or a cleaning product designed for glass
Never use cleaning products containing acetone, spirit or alcohol, white
spirit or synthetic thinners which could damage the front of the shelf.
Caring for glass elements:
• To clean the glass elements of your cabinet (all doors and the glass handle supplied with Full Glass doors only), use a non-abrasive soft cloth which has had
a suitable glass cleaning product applied to it.
19
GB
N6000-0815-7L-V9.indd 19 18/09/15 11:48
Page 20

9 - eneRgy And teChniCAl FeAtuRes
8 - oPeRAting FAults
Possible incidents Causes Corrective actions
The pictogram is displaying
The
even though I have taken the corrective
actions above
The
The
The appliance cannot lower the level of
humidity to the desired value
The
The
pictogram is still displaying
pictogram is displaying
pictogram is flashing
pictogram is displaying
pictogram is displaying
The temperature has
not returned to within
the ±4 °C threshold
Operating fault Unplug the cabinet and contact your EuroCave Professional retailer.
Open door alarm Make sure that the door is correctly closed.
The level of relative
humidity has been <
50 % for over 72 hrs
Charcoal filter alarm Replace the charcoal filter (see chapter 4).
Temperature sensor
fault alarm
Check that the door is correctly closed.
Check the condition of the door seal.
If you placed a large amount of bottles in your cabinet in the last few hours,
wait a while then check again. If the alarm is still displaying, contact your
EuroCave Professional retailer.
• Pour a glass of water into the duct of the tray (see chapter 7, § IV).
• In order to know how often to add water, count the number of days
separating the 1st day you added water and the day when the pictogram was
displayed
After a few hours, the pictogram will disappear.
• Empty the cabinet, remove the humidity cartridge and clean the tray.
• Remove the tube placed at the back of the tray. The humidity will be directly
discharged out of the appliance.
Call the EuroCave Professional retailer if the problem persists despite having
carried out these different operations.
Contact your EuroCave Professional retailer.
If your appliance does not seem to be working correctly, contact your EuroCave Professional retailer.
6000
Height1 Width Depth
mm mm mm Full Glass door
1 temperature
6182V 1825 680 690 96 94 89 75 105 0-30 / 32-86 0-35 / 32-95
6074V 960 680 690 60 58 56 65 95 0-30 / 32-86 0-35 / 32-95
temperatures
2
6170D 1825 680 690 100 98 93 65 95 10-30 / 50-86 10-35 / 50-95
Multi-temperatures
6182S 1825 680 690 94 92 87 75 105 12-30 / 54-86 12-30 / 54-86
6074S 960 680 690 58 56 54 70 95 12-30 / 54-86 12-30 / 54-86
Control accuracy: +/- 1°C (2°F), display accuracy: +/- 1°C (2°F).
1- Height including the top hinges and the feet, adjusted to mid-height.
2- Depth including a gap of 29 mm at the back of the cabinet for ventilation.
3- Electrical power per 24hrs measured with an external temperature of 25°C / 77°F and a solid door.
2
Weight when empty Electrical power3
(Kg)
Glass door (Kg) Solid door (Kg) Min T°(°C / °F) - Max T° (°C / °F)
230V-50Hz
(R600a gas)
(Watts)
115V-60Hz
(R134a gas)
Recommended
temperature range
Glass Solid door
The use of glass doors can alter your wine cabinet’s performance
in some extreme temperature conditions.
20
GB
N6000-0815-7L-V9.indd 20 18/09/15 11:48
Page 21

1- Safety
3- environMent
R600a
9 - eneRgy And teChniCAl FeAtuRes
Data relating to European regulations on power consumption
Ref. Types of doors Energy
efficiency
1
rating
6000
1 temperature
6182V Solid A+ 128 183 445 37 38
6182V Full Glass A 165 256 445 37 38
6182V Glass A 165 256 445 37 38
6074V Solid A+ 114 165 210 37 38
6074V Full Glass A 146 219 210 37 38
6074V Glass A 146 219 210 37 38
3 températures
6170D Solid A+ 128 183 430 37 38
6170D Full Glass A 165 256 430 37 38
6170D Glass A 165 256 430 37 38
Multi-températures
6182S Solid A+ 128 183 460 37 38
6182S Full Glass A 165 256 460 37 38
6182S Glass A 165 256 460 37 38
6074S Solid A+ 114 165 225 37 38
6074S Full Glass A 146 219 225 37 38
6074S Glass A 146 219 225 37 38
1- Only concerns 230V-50Hz models (R600a gas).
2- Power consumption calculation based on the result obtained over 24 hrs in standard test conditions (25°C/77°F). Actual power consumption depends on
the appliance’s location and operating conditions.
This appliance is intended exclusively for wine storage.
Category of all models: 2
Climate class: Our appliances are designed for use at an ambient temperature of between 10°C and 32°C (50°F and 90°F) (Class SN). Nevertheless, refer to
the technical properties tables (p16) for the optimal performance levels of your product..
These appliances cannot be built-in.
3- red serving temperature
Annual energy
consumption AEc
(Kwh/an)
230V-50Hz
(R600a gas)
115V-60Hz
(R134a gas)
2
Useful
volume
(litres)
Acoustic emissions
(dB(A))
230V-50Hz
(R600a gas)
115V-60Hz
(R134a gas)
Standards
Your product complies with the following standards:
Standards EN60335-1: Version 5 - 2010 +A1 + A2 + A11 + A12 + A13
EN60335-2-89
2- eMC - Directive 2004/108/CE
Standard EN55014-1/2
Directive 2010/30/EU
Regulation 1060/2010
N6000-0815-7L-V9.indd 21 18/09/15 11:48
- Directive 2006/95/CE
- Directive 2010/30/EU
Depending on the country, EuroCave
wine cabinets may contain flammable
refrigerant gas (R600a: ISO BUTANE).
Page 22

notes
______________________________________________________________________________
______________________________________________________________________________
______________________________________________________________________________
______________________________________________________________________________
______________________________________________________________________________
______________________________________________________________________________
______________________________________________________________________________
______________________________________________________________________________
______________________________________________________________________________
______________________________________________________________________________
______________________________________________________________________________
______________________________________________________________________________
______________________________________________________________________________
______________________________________________________________________________
______________________________________________________________________________
______________________________________________________________________________
______________________________________________________________________________
______________________________________________________________________________
______________________________________________________________________________
______________________________________________________________________________
______________________________________________________________________________
______________________________________________________________________________
______________________________________________________________________________
______________________________________________________________________________
______________________________________________________________________________
______________________________________________________________________________
______________________________________________________________________________
______________________________________________________________________________
______________________________________________________________________________
______________________________________________________________________________
______________________________________________________________________________
______________________________________________________________________________
______________________________________________________________________________
______________________________________________________________________________
______________________________________________________________________________
______________________________________________________________________________
______________________________________________________________________________
______________________________________________________________________________
______________________________________________________________________________
N6000-0815-7L-V9.indd 22 18/09/15 11:48
Page 23

10 -
1 temP. / multi-temP.
6074v/s
ACMS/ACMS2 12
ACMS/ACMS2 12
ACMS/ACMS2 12
ACMS/ACMS2 12
ACMS/ACMS2 12
14
74 bouteilles - 74 bottles - 74 Flaschen
74 botellas - 74 flessen - 74 bottiglie
Coulissante - Sliding - Auszugsregale - Deslizante
Schuifplateau - Scorrevole
74
AOPRESAR
/AOPRESAR2 32
ACMS/ACMS2 12
ACMS/ACMS2 12
14
70
70 bouteilles - 70 bottles - 70 Flaschen
70 botellas - 70 flessen - 70 bottiglie
Présentation - Presentation - Präsentationsregale - Presentación
Presentazione - Presentatieplateaus
*Les capacités des armoires sont calculées en configurations usine, avec des bouteilles Bordeaux Tradition. / *The cabinet capacities are calculated in factory configuration using traditional Bordeaux
bottles. / *Die Kapazitäten der Schränke werden mit Bordeauxflaschen „Tradition“.in Fabrik-Konfigurationen berechnet. / *Las capacidades de las bodegas están calculadas en configuraciones de
111
fábrica, con botellas Burdeos Tradición. / *De capaciteit van de wijnkasten is berekend in de fabrieksconfiguratie met traditionele Bordeaux-flessen. / *Le capacità delle cantinette per vini sono calcolate
in configurazioni di fabbrica con bottiglie bordolesi tradizionali.
N6000-0815-7L-V9.indd 111 18/09/15 11:50
Page 24

10 -
1 temP. / multi-temP.
2 temP.
-13 clayettes soit 156
Total : 170
TOUT COULISSANT :
-14 ds niche
Avec clayette de présentation :
- Compartiment haut : 12 + 32 = 44
- Compartiment bas : 14 + 5x12 + 32 = 106
Total : 150
AXUH 77
AXUH 77
AXUH 66
14
234
ACMS 12
ACMS 12
ACMS 12
AXUH 44
AXUH 44
AXUH 77
14
215
AXUH 77
AXUH 77
AXUH 66
14
234
234 bouteilles - 234 bottles - 234 Flaschen
234 botellas - 234 flessen - 234 bottiglie *
215 bouteilles - 215 bottles - 215 Flaschen
215 botellas - 215 flessen - 215 bottiglie *
Stockage - Storage - Lagerregal
Mixte - Mixed - Gemischte Regalsysteme
Mixta - Gemengd - Misto
ACMS 12
14
ACMS 12
ACMS 12
ACMS 12
ACMS 12
ACMS 12
ACMS 12
ACMS 12
ACMS 12
ACMS 12
ACMS 12
ACMS 12
ACMS 12
ACMS 12
ACMS 12
ACMS 12
ACMS 12
AXUH 44
AXUH 44
AXUH 77
14
AXUH 77
AXUH 77
AXUH 66
14
14
AOPRESAR 32
AOPRESAR 32
AOPRESAR 32
ACMS 12
ACMS 12
ACMS 12
10 - v-pure-l
6182v/s
6170d
ACMS/ACMS2 12
ACMS/ACMS2 12
ACMS/ACMS2 12
ACMS/ACMS2 12
ACMS/ACMS2 12
ACMS/ACMS2 12
ACMS/ACMS2 12
ACMS/ACMS2 12
ACMS/ACMS2 12
ACMS/ACMS2 12
ACMS/ACMS2 12
ACMS/ACMS2 12
ACMS/ACMS2 12
ACMS/ACMS2 12
14
182
6182
6182
AOPRESAR
/AOPRESAR2 32
AOPRESAR
/AOPRESAR2 32
ACMS/ACMS2 12
ACMS/ACMS2 12
ACMS/ACMS2 12
ACMS/ACMS2 12
ACMS/ACMS2 12
ACMS/ACMS2 12
ACMS/ACMS2 12
14
162
182 bouteilles - 182 bottles - 182 Flaschen
182 botellas - 182 flessen - 182 bottiglie
Coulissante - Sliding - Auszugsregale - Deslizante
Schuifplateau - Scorrevole
Présentation - Presentation - Präsentationsregale - Presentación
162 bouteilles - 162 bottles - 162 Flaschen
162 botellas - 162 flessen - 162 bottiglie
Presentazione - Presentatieplateaus
6170 6170
ACMS/ACMS2 12
ACMS/ACMS2 12
ACMS/ACMS2 12
ACMS/ACMS2 12
ACMS/ACMS2 12
ACMS/ACMS2 12
ACMS/ACMS2 12
ACMS/ACMS2 12
170 bouteilles - 170 bottles - 170 Flaschen
170 botellas - 170 flessen - 170 bottiglie
Coulissante - Sliding - Auszugsregale - Deslizante
Schuifplateau - Scorrevole
*Les capacités des armoires sont calculées en configurations usine, avec des bouteilles Bordeaux Tradition. / *The cabinet capacities are calculated in factory configuration using traditional Bordeaux
bottles. / *Die Kapazitäten der Schränke werden mit Bordeauxflaschen „Tradition“.in Fabrik-Konfigurationen berechnet. / *Las capacidades de las bodegas están calculadas en configuraciones de
fábrica, con botellas Burdeos Tradición. / *De capaciteit van de wijnkasten is berekend in de fabrieksconfiguratie met traditionele Bordeaux-flessen. / *Le capacità delle cantinette per vini sono calcolate
in configurazioni di fabbrica con bottiglie bordolesi tradizionali.
N6000-0815-7L-V9.indd 112 18/09/15 11:50
ACMS/ACMS2 12
ACMS/ACMS2 12
ACMS/ACMS2 12
ACMS/ACMS2 12
ACMS/ACMS2 12
14
170
Présentation - Presentation - Präsentationsregale - Presentación
AOPRESAR
/AOPRESAR2 32
ACMS/ACMS2 12
AOPRESAR
/AOPRESAR2 32
ACMS/ACMS2 12
ACMS/ACMS2 12
ACMS/ACMS2 12
150 bouteilles - 150 bottles - 150 Flaschen
ACMS/ACMS2 12
ACMS/ACMS2 12
14
150 botellas - 150 flessen - 150 bottiglie
Presentazione - Presentatieplateaus
150
112
Page 25

Leader dans le domaine de la conservation, la présentation et le service des vins
depuis plus de 35 ans, EuroCave vous propose des solutions adaptées à chacun de
vos besoins. Armoires à vins, rangements, climatiseurs de cave, système de Vin au
verre….n’hésitez pas à contacter votre revendeur EuroCave pour toute information
complémentaire !
Leader in the wine preservation, presentation and service sector for over 35 years,
EuroCave offers you solutions adapted to every one of your requirements. Wine
cabinets, storage layouts, cellar conditioners, wine by-the-glass system… don’t hesitate
to contact your EuroCave (or Around Wine) dealer for further information!
Seit mehr als 35 Jahren führend im Bereich der Lagerung, der Präsentation und
dem Ausschank von Weinen schlägt Ihnen EuroCave Lösungen vor, die jedem
Ihrer Bedürfnisse angepasst sind: Wein-, Zigarrenklimaschränke, WeinkellerKompaktklimaanlagen, Geräte für den glasweisen Offenausschank,WeinkellerRegalsysteme. Zögern Sie nicht länger, setzen Sie sich mit Ihren EuroCave-Händler in
Verbindung,wenn Sie noch irgendwelche Fragen haben!
Líder en el campo de la conservación, presentación y el servicio de vinos desde hace
35 años, EuroCave le propone soluciones adaptadas a cada una de sus necesidades.
Bodegas, estanterías, climatizadores de bodegas, sistemas de vinos a la copa… ¡Para
toda información complementaria, no dude en contactar a su distribuidor EuroCave!
EuroCave, al meer dan 35 jaar toonaangevend op het gebied van het behoud, de
presentatie en het serveren van wijn, levert oplossingen aangepast aan elke behoefte.
Wijnkasten, opbergsystemen, klimaatregelaars, Vin au verre-systeem….neem gerust
contact op met uw EuroCave-dealer voor aanvullende informatie!
Leader nel settore della conservazione, della presentazione e del servizio dei vini
da più di 35 anni, EuroCave vi propone delle soluzioni adatte a ciascuna delle vostre
esigenze. Armadi per vini, sistemi di stoccaggio, climatizzatori da cantina, sistema
di Vino al bicchiere… non esitate a contattare il vostro rivenditore EuroCave per
qualsiasi informazione complementare!
09/2015 - 100 - 10003731 // Groupe Eurocave - 24 rue Francis de Pressensé - 69628 Villeurbanne cedex - RCS Lyon B320316995
www.eurocavepro.com • contact-pro@eurocave.com
-113-
N6000-0815-7L-V9.indd 113 18/09/15 11:50
 Loading...