

Page 1
eur0
liances
cooking
USE AND
CARE GUIDE
MODELNO.
ESM60SOTSX
EMBRACE EUROPEAN QUALI+PASSION
www. eu roa ppli a nces.com .au
Page 2
ES NL PTDE
SEHR GEEHRTER
KUNDE,
wir danken Ihnen und be-
glückwünschen Sie zu Ihrer
Wahl.
Dieses neue Produkt, sorg-
fältig entworfen und mit
erstklassigen Materialien
hergestellt, wurde genau
geprüft um alle Ihre Forder-
ungen an ein perfektes Ko-
chen zu erfüllen.
Wir bitten Sie deshalb die
einfachen Anweisungen zu
lesen und einzuhalten, da-
mit von der ersten An-
wendung an ausgezeichnete
Ergebnisse erreicht werden
können.
DER HERSTELLER
ESTIMADO
CLIENTE,
Le agradecemos mucho y le
felicitamos por su elección.
Este nuevo producto,
cuidadosamente estudiado
y fabricado con materiales
de primera calidad, ha sido
probado a conciencia para
poder satisfacer todas sus
exigencias de una perfecta
cocción.
Por lo tanto le rogamos lea
y siga detenidamente estas
sencillas instrucciones que
le permitirán llegar a
resultados excelentes desde
la primera utilización.
EL FABRICANTE
GEACHTE KLANT,
wij danken u en feliciteren
u met de door u gedane
keuze.
Dit nieuwe produkt, zorg-
vuldig ontworpen en ge-
construeerd uit materialen
van de allerbeste kwaliteit,
is gedegen uitgetest om al
uw eisen voor een perfect
kookresultaat te kunnen be-
vredigen.
Wij verzoeken u daarom de
eenvoudige instructies te
lezen en te respecteren,
welke u in staat zullen
stellen om al vanaf het
eerste gebruik uitstekende
resultaten te bereiken.
DE FABRIKANT
ESTIMADO
CLIENTE,
Agradecemos, muito since-
ramente a sua escolha, e
aproveitamos a ocasião para
o felicitar.
Este novo produto, que foi
projectado com grande
atenção e construído com os
melhores materiais, foi ve-
rificado e aprovado, de
maneira a dar-lhe total
satisfação para um co-
zinhado perfeito.
Por conseguinte, pedimos
que leia e siga as instruções
que lhe permitirão alcançar
excelentes resultados desde
o início da sua utilização.
O FABRICANTE
IMPORTANTE
La placa de características
del horno se encuentra
disponible junto con el apa-
rato. En esta placa, visible
abriendo la puerta, se
muestran todos los datos de
identificación del aparato a
los que se deverá hacer
referencia para el pedido de
piezas de repuesto.
IMPORTANTE
A placa com as caracterí-
sticas do forno é acessível
também com o aparelho in-
stalado. Nesta placa, visível
abrindo a porta, estão refe-
ridos todos os dados de
identificação do aparelho
aos quais se deverá fazer
referência para pedidos de
peças de substituição.
WICHTIG
Das Typenschild mit den
technischen Merkmalen des
Backofens ist auch bei
installiertem Gerät zugäng-
lich. Auf diesem Typen-
schild, das bei Öffnen der
Ofentür sichtbar ist, sind
auch alle Kenndaten des
Geräts aufgeführt, die bei
eventuellen Ersatzteilbe-
stellungen angegeben
werden müssen.
BELANGRIJK:
“Het typeplaatje van de
oven is ook bereikbaar als
het apparaat geïnstalleerd
is. Op dit plaatje, dat u kunt
zien als u de deur opent,
staan alle identificatiege-
gevens van het apparaat,
waarnaar u dient te ver-
wijzen bij het bestellen van
vervangingsonderdelen”.
2
DEAR
CUSTOMER,
We thank you and congratulate you on your
choice.
This new carefully designed
product, manufactured with
the highest quality materials, has been carefully
tested to satisfy all your
cooking demands.
We would therefore request
you to read and follow
these easy instructions
which will allow you to
obtain excellent results
right from the start.
THE MANUFACTURER
IMPORTANT
The oven’s data plate is
accessible even with the
oven fully installed. The
plate is visible simply by
opening the door. Always
quote the details from it to
identify the appliance when
ordering spare parts.
ENGLISH
FOR WHATEVER INJURIES OR DAMAGES ARE
CAUSED BY INCORRECT INSTALLATION OR
BY UNSUITABLE, WRONG OR ABSURD USE.
PHYSICAL, SENSORY OR MENTAL
CAPABILITIES, OR LACK OF
EXPERIENCE AND KNOWLEDGE,
UNLESS THEY HAVE BEEN GIVEN
SUPERVISION OR INSTRUCTION
CONCERNING USE OF THE APPLIANCE
BY A PERSON RESPONSIBLE FOR
THEIR SAFETY. CHILDREN SHOULD BE
SUPERVISED TO ENSURE THAT THEY
DO NOT PLAY WITH THE APPLIANCE.
SUPERVISION. DO NOT PLACE TIN
FOIL, PANS OR SIMILAR IN CONTACT
WITH THE INNER BASE OF THE OVEN
TO COOK. THE HEATING ACTION OF
THE LOWER RESISTANCE CAUSES
THE LOWER PART OF THE OVEN TO
OVERHEAT, LEADING TO DAMAGE AND
EVEN SERIOUS CONSEQUENCES (FIRE
RISK) ALSO TO THE UNIT IN WHICH THE
OVEN IS INSTALLED.
GB
CONTENTS
pag. 6First use
Self-cleaning panel 8
Respect for the
environment 10
Instructions for use:
- conventional cooking 14
- fan cooking
- grill cooking
Thermostat
Cooking timer
Electronic timer 24
Light replacement 22
Removing the oven door 24
INSTALLATION
INSTRUCTIONS
Flush fitting 26
Electrical connections 30
THIS APPLIANCE IS CONCEIVED
FOR DOMESTIC USE ONLY. THE
MANUFACTURER SHALL NOT IN
ANY WAY BE HELD RESPONSIBLE
THIS APPLIANCE IS NOT
INTENDED FOR USE BY
PERSONS (INCLUDING
CHILDREN) WITH REDUCED
CHILDREN SHOULD NOT
OR PERFORM CLEAN
MAINTENANCE WITHOUT
12-14Control panel
16
18
20
20
Page 3
GB
THE FIRST TIME
YOU USE THE
OVEN
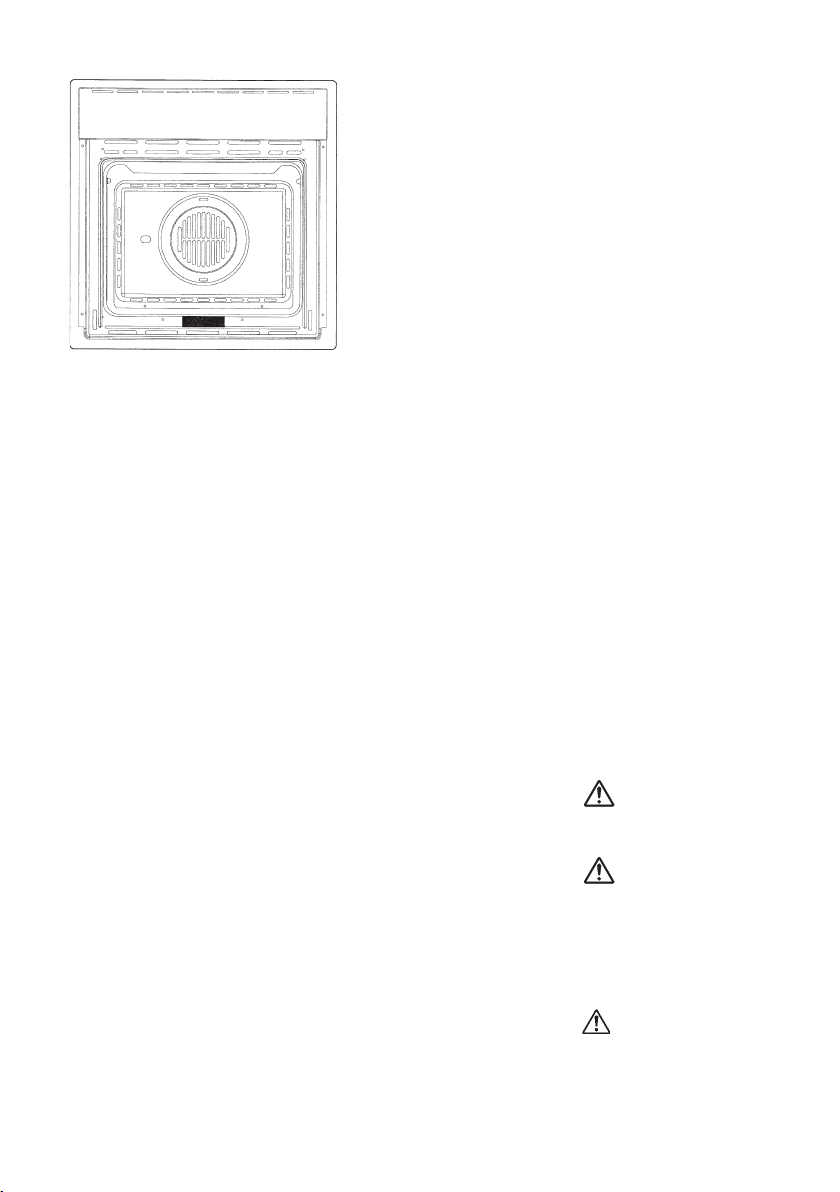
Clean the oven thoroughly
with soapy water and rinse
well. To remove the lateral
frames from smooth-walled
ovens, proceed as shown in
the figure.
Operate the oven for about
30 minutes at maximum
temperature to burn off all
traces of grease which
might otherwise create
unpleasant smells when
cooking.
Do not use rough abrasives
or sharp metal scrapers to
clean the glass door of the
oven because they could
scratch the surface and
cause the glass to shatter.
GB
SELF-CLEANING
CATALYTIC
PANELS
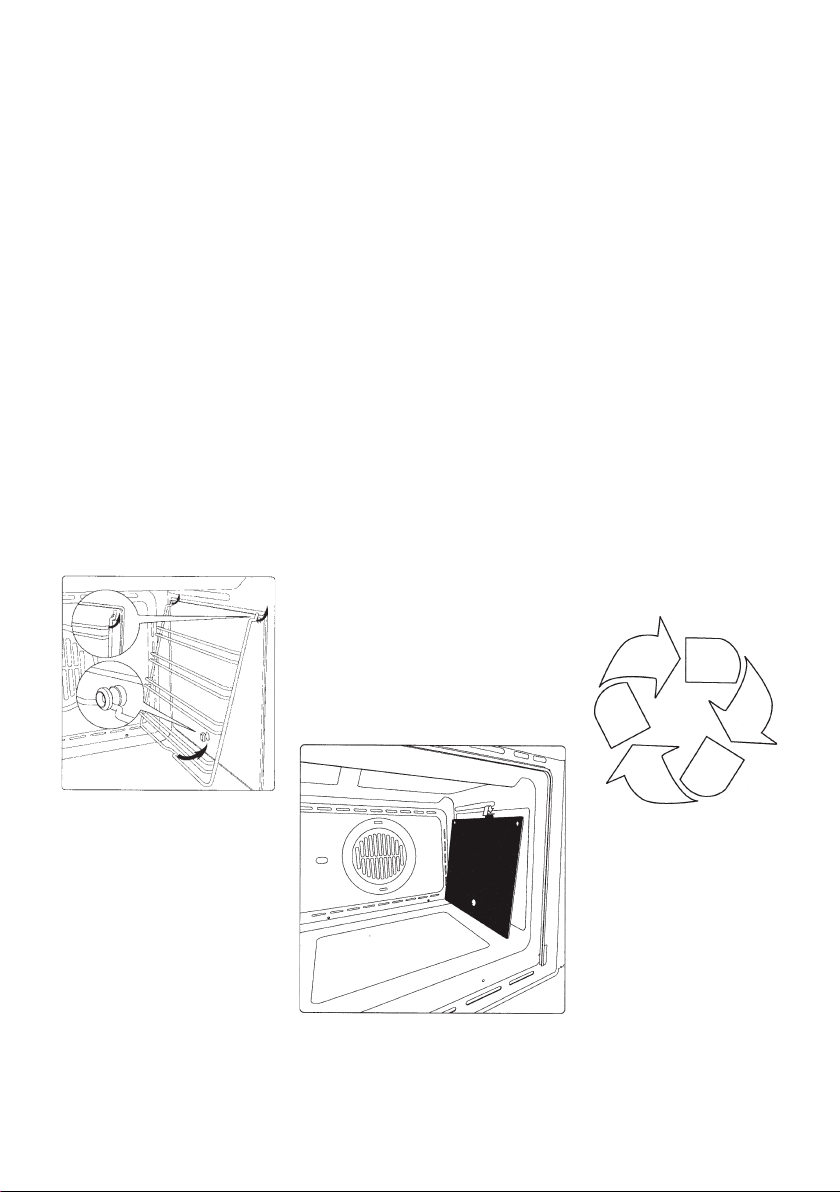
Our smooth walled ovens
can be fitted with selfcleaning panels to cover the
inside walls.
These special panels are
simply hooked on to the
walls before the side frames
are fitted. They are coated
in a special, micro-porous
catalytic enamel which
oxidises and gradually vaporises splashes of grease
and oil at cooking temperatures above 200° C.
If the oven is not clean after
cooking fatty foods, operate
the empty oven for 60 minutes (max.) at maximum
temperature.
Never wash or clean selfcleaning panels with abrasive, acid, or alkaline
products.
GB
RESPECT FOR THE
ENVIRONMENT
The documentation provided with this oven has
been printed on chlorine
free bleached paper or recycled paper to show
respect for the environment.
The packaging has also
been designed to avoid environmental impact. Packaging material is ecological
and can be re-used or
recycled.
By recycling the packaging,
you will help save raw materials as well as reducing
the bulk of domestic and
industrial waste.
Important:
Do not use steam cleaners to
clean the appliance.
As a safety precaution,
before cleaning the oven,
always disconnect the plug
from the power socket or
the power cable from the
oven. Do not use acid or
alkaline substances to clean
the oven (lemon juice,
vinegar, salt, tomatoes etc.).
Do not use chlorine based
products, acids or abrasive
products to clean the
painted surfaces of the
oven.
3
Page 4
ES NL PTDE
INDICE
Primera utilización pag. 7
Paneles autolimpiantes 9
Respeto por el medio
ambiente 11
Panel de control 13-15
Instrucciones de
funcionamiento:
- Cocción convencional 15
- Cocción ventilada 17
- Cocción al grill 19
Termostato 21
Temporizador 21
Temporizador
electrónico 25
Cambio de la bombilla 23
Desmontaje
de la puerta horno 25
PARA EL INSTALADOR
Encastre del horno 27
Conexión eléctrica 31
INHOUD
Eerste gebruik pag. 7
Zelfreinigende panelen 9
Respect voor het milieu 11
Bedieningspaneel 13-15
Werkingsinstructies:
- Traditionele bereidingen 15
- Bereiding met ventilatie 17
-
Bereiding met
grill 19
Thermostaat 21
Timer 21
Elektronische timer 25
Vervanging lampje 23
Demontage
van de ovendeur 25
VOOR DE INSTALLATEUR
Inbouw van de oven 27
Elektrische aansluiting 31
INDICE
Primeira utilização pág. 7
Painéis autolimpantes 9
Respeito do ambiente 11
Painel comandos 13-15
Instruções de
funcionamento:
- Cozedura convencional 15
- Cozedura ventilada 17
- Cozedura ao gril 19
Termóstato 21
Temporizador 21
Timer electrónico 25
Substituição da lâmpada 23
Desmontagem
da porta forno 25
PARA O INSTALADOR
Encastre do forno 27
Ligação eléctrica 3
INDEX
Erstmalige Benutzung S. 7
Selbstreinigende Platten 9
Umweltverträglichkeit 11
Bedienblende 13-15
Betriebsanleitung:
- Konventionelles Backen 15
-
Umluftbacken
17
- Grillen 19
Thermostat 21
Zeitschalter 21
Elektronische Zeitschaltuhr 25
Auswechslung der
Ofenbeleuchtung 23
Ausbauen der Ofentür 25
FÜR DEN INSTALLATEUR
Einbau des Backofens 27
Stromanschluß 31
DIT PRODUKT IS ALS
HUISHOUDELIJK APPARAAT
GEDACHT. VOOR BESCHADIGINGEN
AAN SPULLEN OF PERSONEN DIE
AAN VERKEERDE INSTALLATIE, MISBRUIK OF
VERKEERDE GEBRUIK ZIJN TE WIJTEN, NEEMT
DE FABRIKANT GEEN
VERANTWOORDELIJKHEID OP ZICH.
DIT APPARAAT IS NIET BEDOELD
VOOR GEBRUIK DOOR PERSONEN
(MET INBEGRIP VAN KINDEREN) MET
VERLAAGDE FYSIEKE, SENSORISCHE
OF MENTALE VERMOGENS, OF MET GEBREK
AAN ERVARING EN KENNIS, TENZIJ ZIJ LEIDING
OF INSTRUCTIES HEBBEN ONTVANGEN
BETREFFENDE HET GEBRUIK VAN HET APPARAAT
DOOR MIDDEL VAN EEN PERSOON DIE VOOR
HUN VEILIGHEID VERANTWOORDELIJK IS.
KINDEREN MOETEN WORDEN GECONTROLEERD
OM TE GARANDEREN DAT ZIJ NIET MET HET
APPARAAT SPELEN.
ESTE PRODUCTO FUE CONCEBIDO
PARAUN USO DE TIPO DOMÉSTICO.
EL CONSTRUCTOR DECLINA
CUALQUIER RESPONSABILIDAD
EN ELCASO DE DAÑOS EVENTUALES ACOSAS
O PERSONAS QUE DERIVEN DE UNA
INSTALACIÓN INCORRECTA O DE UN USO
IMPROPIO, ERRADO O ABSURDO.
NO PUEDEN UTILIZAR EL APARATO
PERSONAS (INCLUIDOS NIÑOS) CON
CAPACIDADES FÍSICAS, SENSORIALES
O MENTALES REDUCIDAS, NI
PERSONAS QUE NO DISPONGAN DE LA
EXPERIENCIA Y DE LOS CONOCIMIENTOS
NECESARIOS, A MENOS QUE ESTÉN BAJO LA
SUPERVISIÓN DE UNA PERSONA RESPONSABLE
DE SU SEGURIDAD O HAYAN RECIBIDO LAS
INSTRUCCIONES NECESARIAS SOBRE LA
UTILIZACIÓN DELAPARATO. LOS NIÑOS TIENEN
QUE ESTAR CONTROLADOS PARA ASEGURARSE
DE QUE NO JUEGAN CON EL APARATO.
ESTE PRODUTO FOI CONCEBIDO
PARA UMA UTILIZAÇÃO DE TIPO
DOMÉSTICA. O FABRICANTE
DECLINA TODAS AS
RESPONSABILIDADES NO CASO DE EVENTUAIS
DANOS ACOISAS OU PESSOAS DERIVADOS DE
UMA INSTALAÇÃO INCORRECTA OU DE USO
IMPRÓPRIO, ERRÓNEO OU ABSURDO.
O APARELHO NÃO DEVE SER USADO
POR PESSOAS (INCLUSIVE
CRIANÇAS) COM CAPACIDADES
FÍSICAS, SENSORIAIS OU MENTAIS
REDUZIDAS, OU POR PESSOAS QUE NÃO
TENHAM EXPERIÊNCIAS NEM CONHECIMENTO
NECESSÁRIO A NÃO SER QUE SEJAM
SUPERVISIONADAS E INSTRUÍDAS, SOBRE
O
USO DO APARELHO, POR UMA PESSOA
RESPONSÁVELPELA SEGURANÇADAS MESMAS
.
AS CRIANÇAS DEVEM SER CONTROLADAS PARA
CONTROLADAS PARA SE TER CERTEZA DE QUE
NÃO BRINQUEM COM O APARELHO.
DIESES PRODUKT IST ALS
HAUSHALTSGERÄT GEDACHT. FÜR
SCHADEN AN SACHEN ODER
PERSONEN, DIE AUF FALSCHE
INSTALLATION BZW. UNGEEIGNETEN
GEBRAUCH ODER MISSBRAUCH
ZURÜCKZUFÜHREN SIND, ÜBERNIMMT DER
HERSTELLER KEINERLEI VERANTWORTUNG.
DAS GERÄT DARF NICHT VON
PERSONEN (EINSCHLIESSLICH
KINDERN) MIT EINGESCHRÄNKTER
KÖRPERLICHER ODER GEISTLICHER
KAPAZITÄT ODER PERSONEN OHNE
ERFAHRUNG UND DIE NOTWENDIGEN
KENNTNISSE BENUTZT WERDEN, ES SEI DENN,
DIES GESCHIEHT UNTER DER AUFSICHT ODER
NACH UNTERWEISUNG IM GEBRAUCH DES
GERÄTS DURCH EINER FÜR DEREN SICHERHEIT
VERANTWORTLICHEN PERSON. KINDER SIND
ZU BEAUFSICHTIGEN, UM SICHERZUSTELLEN,
DASS SIE NICHT MIT DEM GERÄT SPIELEN.
1
CONTROL PANEL
FUNCTIONS
GB
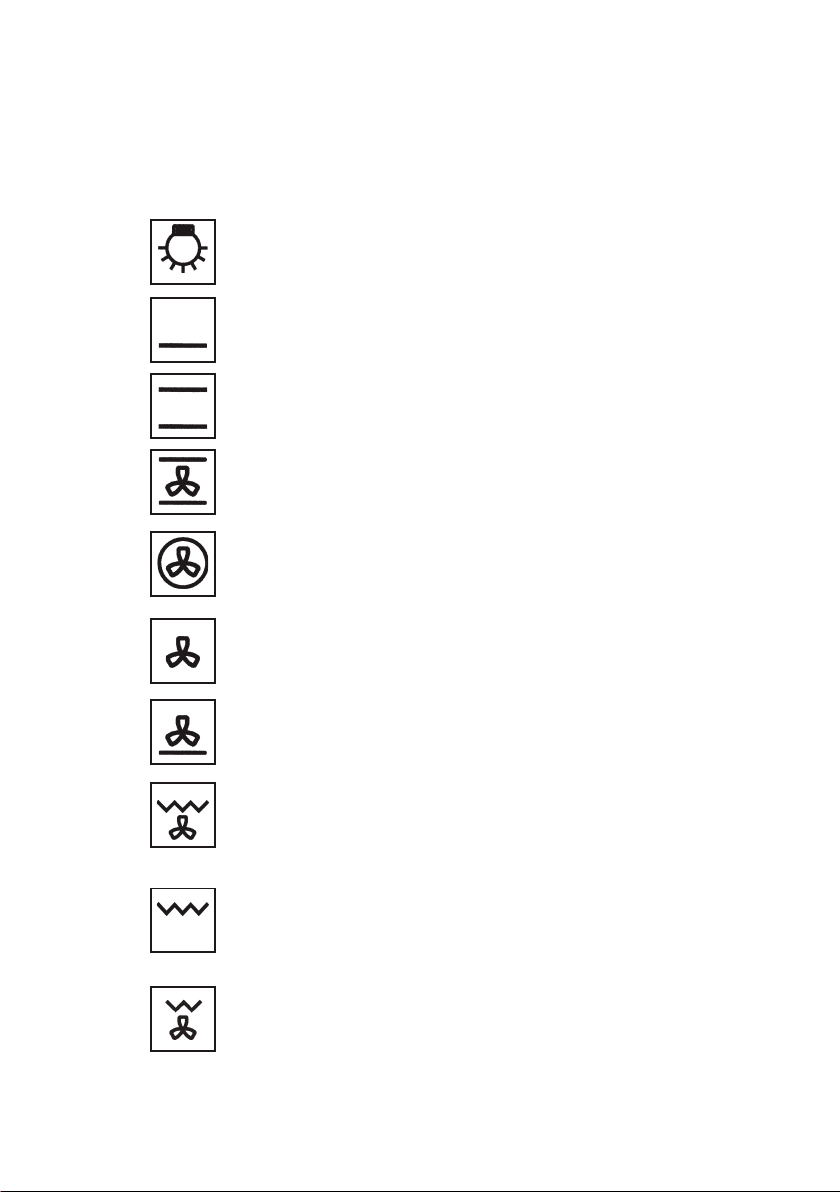
FUNCTION SYMBOLS
ON THE SELECTOR
Oven light (stays on while
oven is in use).
Bottom heating element.
Thermostat setting from
50°C to MAX.
Top and bottom heating
elements. Thermostat
setting from 50°C to MAX.
Top and bottom heating
elements with fan. Thermo-
stat setting from 50°
MAX.
Circular heating element
with fan. Thermostat setting
from 50°C to MAX.
C to
4
Fan for defrosting. Thermostat setting at 0°C.
Bottom heating element
with fan. Thermostat
setting from 50°C to MAX.
Double top heating element
with fan ( large area grill).
Thermostat setting from
50°C to 200°C.
Double top heating element
(large area grill). Thermo-
stat setting from 50°C to
200°C.
Top heating element with
fan. Thermostat setting from
50°C to 200°C.
Page 5

GB
Top heating element (small,
low power grill). Thermostat setting from 50°C to
200°C.
Circular heating element
tingBottom hea element +
with fan. Thermostat setting
from 50°C to MAX.
A TTENTION: Accessible
parts may become very hot
during use. Children should
be kept at a distance.
INDICATIVE table for
positioning foods based on
functions, temperatures and
cooking times
INSTRUCTIONS
FOR USE
CONVENTIONAL
COOKING
Conventional cooking uses
top and bottom heat to cook
a single dish.
Place the food in the oven
only once cooking temperature has been reached, i.e.
when the heating indicator
goes out.
If you want to increase top
or bottom temperature to-
wards the end of the cook-
ing cycle, set the tempe-
rature control to the right
position.It is advisable to
open the oven door as little
as possible during cooking.
5
Page 6

ES NL PTDE
PRIMERA
UTILIZACIÓN
El horno se limpia a fondo
con agua y jabón y se
enjuaga cuidadosamente.
Para sacar los armazones
laterales en los hornos con
paredes lisas proceder como
se ilustra en la figura.
Recalentar el horno alre-
dedor de 30 minutos a la
máxima temperatura; serán
así eliminados todos los
residuos grasos ya que po-
drían causar olores desagra-
dables durante la fase de
cocción.
ERSTMALIGE
BENUTZUNG
Der Backofen muss gründ-
lich mit Seifenwasser ge-
säubert werden. Wie auf
der Abbildung dargestellt
vorgehen, um bei den Öfen
mit glatten Wänden die
seitlichen Backbleche her-
auszunehmen.
Den Backofen für etwa 30
Minuten auf Höchsttempe-
ratur aufheizen; auf diese
Weise werden alle fett-
haltigen Bearbeitungsrück-
stände eliminiert, die beim
Backen unangenehme Ge-
rüche verursachen könnten.
EERSTE GEBRUIK
De oven moet grondig wor-
den schoongemaakt met
water en zeep, en zorgvuldig
worden afgespoeld.
Voor
het verwijderen van de zij-
frames in ovens met gladde
wanden dient u te werk te
gaan zoals op de afbeelding
wordt geïllustreerd.
Verwarm de oven ge-
durende ongeveer 30 minu-
ten op de hoogste tempe-
ratuur; zodoende worden
alle achtergebleven vetten
geëlimineerd die onaange-
name geuren zouden kunnen
veroorzaken tijdens het
bereiden van voedsel.
rança antes de proceder a
qualquer operação de lim-
peza do forno tirar sempre a
ficha da tomada de corrente
ou tirar a linha de alimen-
tação do aparelho. Além
disso evite usar substâncias
ácidas ou alcalinas (sumos
de limão, vinagre, etc.).
Evitar a utilização de
produtos à base de cloro,
ácidos ou abrasivos espe-
cialmente para a limpeza
das paredes envernizadas.
moet altijd de stekker uit
het stopcontact worden ge-
haald of moet de voeding
van het apparaat worden
afgekoppeld alvorens de
oven te gaan schoonmaken.
Gebruik bovendien geen
zure of alkaline stoffen (ci-
troensap, azijn, zout, enz.).
Gebruik geen producten op
chloorbasis, of zure of
schurende producten, voor-
al voor het reinigen van
gelakte oppervlakken.
Como precaución de segu-
ridad, antes de proceder con
cualquier operación de lim-
pieza del horno quitar
siempre el enchufe de la
toma de corriente o quitar la
línea de alimentación del
aparato. Además evitar el
uso de sustancias ácidas o
alcalinas (jugos de limón,
vinagre, sal, tomates, etc.).
Evitar el uso de productos a
base de cloro, ácidos o
abrasivos especialmente
para la limpieza de las
paredes barnizadas.
Als Sicherheitsvorkehrung
muss vor jeder Reinigung
des Backofens immer das
Stromnetz abgeschaltet
werden. Zum Reinigen
dürfen keine sauren oder
alkalischen Substanzen ver-
wendet werden (Zitronen-
saft, Essig, Salz, usw.).
Chlorhaltige Produkte, so-
wie Säuren oder Scheuer-
mittel sind ebenfalls zu
vermeiden, dies gilt vor
allem für die Reinigung der
lackierten Wände.
PRIMEIRA
UTILIZAÇÃO
O forno deve ser limpo a
fundo com água e sabão e
depois cuidadosamente se-
cado com um pno. Para tirar
as estruturas laterais nos
fornos com paredes lisas
proceder como ilustrado na
figura.
Aquecer o forno à máxima
temperatura por cerca de 30
minutos; assim serão elimi-
nados todos os resíduos de
gorduras de fabrico que po-
deriam causar cheiros desa-
gradáveis ao cozinhar.
Als veiligheidmaatregel
Como precaução de segu-
IT GB FR
PRIMO UTILIZZO
Il forno va pulito a fondo
con acqua e sapone e ri-
sciacquato accuratamente.
Per togliere i telai laterali
nei forni con pareti lisce
procedere come illustrato in
figura.
Riscaldare il forno per circa
30 minuti alla massima
temperatura; verranno così
eliminati tutti i residui
grassi di lavorazione che
potrebbero causare sgrade-
voli odori in fase di cottura.
PREMIERE
UTILISATION
Le four doit être nettoyé à
fond à l’eau et au savon,
puis rincé méticuleusement.
Pour enlever les cadres la-
téraux dans les fours à pa-
rois lisses, procéder comme
indiqué sur la figure.
Il convient de n’insérer la
nourriture que lorsque le
four a atteint la température
préétablie, c’est-à-dire
quand s’éteint le voyant
lumineux.
THE FIRST TIME
YOU USE THE
OVEN
Clean the oven thoroughly
with soapy water and rinse
well. To remove the lateral
frames from smooth-walled
ovens, proceed as shown in
the figure.
Operate the oven for about
30 minutes at maximum
temperature to burn off all
traces of grease which
might otherwise create
unpleasant smells when
cooking.
ES NL PTDE
PRIMERA
UTILIZACIÓN
El horno se limpia a fondo
con agua y jabón y se
enjuaga cuidadosamente.
Para sacar los armazones
laterales en los hornos con
paredes lisas proceder como
se ilustra en la figura.
Recalentar el horno alre-
dedor de 30 minutos a la
máxima temperatura; serán
así eliminados todos los
residuos grasos ya que po-
drían causar olores desagra-
dables durante la fase de
cocción.
ERSTMALIGE
BENUTZUNG
Der Backofen muss gründ-
lich mit Seifenwasser ge-
säubert werden. Wie auf
der Abbildung dargestellt
vorgehen, um bei den Öfen
mit glatten Wänden die
seitlichen Backbleche her-
auszunehmen.
Den Backofen für etwa 30
Minuten auf Höchsttempe-
ratur aufheizen; auf diese
Weise werden alle fett-
haltigen Bearbeitungsrück-
stände eliminiert, die beim
Backen unangenehme Ge-
rüche verursachen könnten.
EERSTE GEBRUIK
De oven moet grondig wor-
den schoongemaakt met
water en zeep, en zorgvuldig
worden afgespoeld.
Voor
het verwijderen van de zij-
frames in ovens met gladde
wanden dient u te werk te
gaan zoals op de afbeelding
wordt geïllustreerd.
Verwarm de oven ge-
durende ongeveer 30 minu-
ten op de hoogste tempe-
ratuur; zodoende worden
alle achtergebleven vetten
geëlimineerd die onaange-
name geuren zouden kunnen
veroorzaken tijdens het
bereiden van voedsel.
PRIMEIRA
UTILIZAÇÃO
O forno deve ser limpo a
fundo com água e sabão e
depois cuidadosamente se-
cado com um pno. Para tirar
as estruturas laterais nos
fornos com paredes lisas
proceder como ilustrado na
figura.
Aquecer o forno à máxima
temperatura por cerca de 30
minutos; assim serão elimi-
nados todos os resíduos de
gorduras de fabrico que po-
deriam causar cheiros desa-
gradáveis ao cozinhar.
IT GB FR
PRIMO UTILIZZO
Il forno va pulito a fondo
con acqua e sapone e ri-
sciacquato accuratamente.
Per togliere i telai laterali
nei forni con pareti lisce
procedere come illustrato in
figura.
Riscaldare il forno per circa
30 minuti alla massima
temperatura; verranno così
eliminati tutti i residui
grassi di lavorazione che
potrebbero causare sgrade-
voli odori in fase di cottura.
PREMIERE
UTILISATION
Le four doit être nettoyé à
fond à l’eau et au savon,
puis rincé méticuleusement.
Pour enlever les cadres la-
téraux dans les fours à pa-
rois lisses, procéder comme
indiqué sur la figure.
Il convient de n’insérer la
nourriture que lorsque le
four a atteint la température
préétablie, c’est-à-dire
quand s’éteint le voyant
lumineux.
THE FIRST TIME
YOU USE THE
OVEN
Clean the oven thoroughly
with soapy water and rinse
well. To remove the lateral
frames from smooth-walled
ovens, proceed as shown in
the figure.
Operate the oven for about
30 minutes at maximum
temperature to burn off all
traces of grease which
might otherwise create
unpleasant smells when
cooking.
A titre de précaution, avant
d’effectuer toute opération
de nettoyage du four quelle
qu’elle soit, débrancher
toujours la fiche de la prise
de courant ou couper la
ligne d’alimentation de
l’appareil. Veiller à ne pas
utiliser de substances acides
ou alcalines (jus de citron,
vinaigre, sel, tomate, etc.).
Ne pas utiliser de produits à
base de chlore, acides ou
abrasifs, surtout pour le
nettoyage des parois
peintes.
As a safety precaution,
before cleaning the oven,
always disconnect the plug
from the power socket or
the power cable from the
oven. Do not use acid or
alkaline substances to clean
the oven (lemon juice,
vinegar, salt, tomatoes etc.).
Do not use chlorine based
products, acids or abrasive
products to clean the
painted surfaces of the
oven.
rezza prima di procedere a
qualsiasi operazione di puli-
zia del forno staccare sem-
pre la spina della presa di
corrente o togliere la linea
di alimentazione dell’appa-
recchio. Inoltre evitare di u-
sare sostanze acide o alcali-
ne (succhi di limone, aceto,
sale, pomodori ecc.). Evita-
re di usare prodotti a base di
cloro, acidi o abrasivi spe-
cialmente per la pulizia del-
le pareti verniciate.
Come precauzione di sicu-
6
(#
GRILL COOKING
Use the grill to grill or
brown foods.
Some ovens may be
equipped with an electric
motor, spit and skewers for
turning on the spit.
Place the shelf with the
food to be cooked in the 1st
or 2nd position from the
top.
Pre-heat the oven for 5 minutes. Turn the thermostat
to a temperature between
50o and 200o.
COOLING FAN
(if supplied)
The fan is positioned on the
upper part of the oven and
create a circle of cooling air
on the inside of the furniture and through the door of
the oven.
It is turned on when the
temperature of the outer
shell of the oven reaches
60oC.
By switching on the oven
with the thermostat at
200oC the fan starts working after approx.10 min.
It is turned off when the
temperature of the outer
shell of the oven descends
under 60oC.
By switching off the oven
with the thermostat at
200oC the fan stops working after approx. 30 min.
FAN
COOKING
For this type of cooking a
fan positioned at the back
allows the circulation of hot
air inside the oven, creating
uniform heat. In this way
cooking is more rapid than
conventional cooking. It is
a suitable method for
cooking dishes on more
than one shelf, especially
when the food is of
different types (fish, meat
etc.)
DEFROSTING
By selecting one of the fan
cooking functions and
setting
the thermostat to zero, the
fan allows cold air to
circulate
inside the oven. In this way
frozen food can be rapidly
defrosted.
It is not essential to preheat the oven, but you are
advised to do so when
cooking pastries.
GB
Page 7

ES NL PTDE
PRIMERA
UTILIZACIÓN
El horno se limpia a fondo
con agua y jabón y se
enjuaga cuidadosamente.
Para sacar los armazones
laterales en los hornos con
paredes lisas proceder como
se ilustra en la figura.
Recalentar el horno alre-
dedor de 30 minutos a la
máxima temperatura; serán
así eliminados todos los
residuos grasos ya que po-
drían causar olores desagra-
dables durante la fase de
cocción.
ERSTMALIGE
BENUTZUNG
Der Backofen muss gründ-
lich mit Seifenwasser ge-
säubert werden. Wie auf
der Abbildung dargestellt
vorgehen, um bei den Öfen
mit glatten Wänden die
seitlichen Backbleche her-
auszunehmen.
Den Backofen für etwa 30
Minuten auf Höchsttempe-
ratur aufheizen; auf diese
Weise werden alle fett-
haltigen Bearbeitungsrück-
stände eliminiert, die beim
Backen unangenehme Ge-
rüche verursachen könnten.
EERSTE GEBRUIK
De oven moet grondig wor-
den schoongemaakt met
water en zeep, en zorgvuldig
worden afgespoeld.
Voor
het verwijderen van de zij-
frames in ovens met gladde
wanden dient u te werk te
gaan zoals op de afbeelding
wordt geïllustreerd.
Verwarm de oven ge-
durende ongeveer 30 minu-
ten op de hoogste tempe-
ratuur; zodoende worden
alle achtergebleven vetten
geëlimineerd die onaange-
name geuren zouden kunnen
veroorzaken tijdens het
bereiden van voedsel.
PRIMEIRA
UTILIZAÇÃO
O forno deve ser limpo a
fundo com água e sabão e
depois cuidadosamente se-
cado com um pno. Para tirar
as estruturas laterais nos
fornos com paredes lisas
proceder como ilustrado na
figura.
Aquecer o forno à máxima
temperatura por cerca de 30
minutos; assim serão elimi-
nados todos os resíduos de
gorduras de fabrico que po-
deriam causar cheiros desa-
gradáveis ao cozinhar.
GB
THERMOSTAT
Use the thermostat to set
the cooking temperature
you need. The thermostat
can be adjusted from 50° to
250° C.
0-11 HEAT REGULATOR
0-6 SELECTOR
Use these to adjust the heat
in the cast iron or glassceramic plates. Increase the
setting from 0 to 6 or from
0 to 11 to raise the temperature.
ALARM TIMER
You can set this timer to
sound a buzzer after 0 to 60
minutes of cooking. First
turn the knob fully clockwise, then turn it back to
the desired alarm time.
COOKING TIMER
First, turn the cooking selector to the required cooking function, and the thermostat to the desired cooking temperature.
Then, to set end of cooking
time, turn the cooking timer
to the right and to the
desired time. First turn the
knob fully clockwise, then
turn it back to the desired
alarm time. A buzzer
sounds at the end of the
timed cooking period, and
the oven switches itself off.
To set only the start of
cooking, turn the cooking
timer to the left to the
symbol.
OVEN LIGHT
IMPORTANT:
The oven light must have
these precise features:
a) it must be able to resist
high temperatures (up
to 300
b) power supply: see V/Hz
indicated on data plate.
c) power 25W.
d) E 14 connection.
Before proceeding,
disconnect the appliance
from the power line to
avoid the possibility of
electric shock.
- to prevent damage, place
a tea cloth in the oven
- unscrew the glass cover of
the light
- unscrew the old light bulb
and replace it with the new
one
- put back the glass cover
and remove the tea cloth
- connect the appliance to
the main electricity supply
REPLACING THE
GB
°C)
7
Page 8

ES NL PTDE
PAINÉIS DE
AUTOLIMPEZA
CATALÍTICOS
Os nossos fornos com pare-
des lisas têm a possibilidade
de montar dentro da mufla
painéis de autolimpeza que
recobrem as paredes.
Estes painéis especiais, que
se engancham às paredes
antes dos bastidores late-
rais, estão recobertos de um
esmalte especial catalítico
microporoso que oxida e
vaporiza gradualmente os
salpicos de óleo e gorduras
eliminando-as durante o
funcionamento acima dos
200° C.
Se depois de uma cozedura
de alimentos com muito
gordura o forno não estiver
limpo, fazê-lo funcionar a
vazio à máxima temperatu-
ra por um tempo máximo
de 60
Os painéis de autilimpeza
não devem ser lavados nem
limpos com produtos abra-
sivos ou produtos que con-
tenham na sua composição
ácidos ou álcalinos.
KATALYSERENDE
ZELFREINIGENDE
PANELEN
In onze ovens met gladde
wanden kunnen in de
moffel zelfreinigende pane-
len worden geplaatst die de
wanden afdekken.
Deze speciale panelen, die
aan de wanden moeten
worden bevestigd voordat
de zijframes worden ge-
plaatst (afb. ...), zijn bedekt
met speciale microporeuze,
katalytische lak die ge-
leidelijk de olie- en vet-
spatten oxideert en laat
verdampen, zodat ze ge-
ëlimineerd worden bij be-
reidingen boven 200° C.
Als de oven na het bereiden
van erg vet voedsel niet
schoon is, laat hem dan
leeg functioneren op de
maximum temperatuur ge-
durende maximaal 60
minuten”.
De zelfreinigende panelen
mogen niet afgewassen of
schoongemaakt worden
met schurende producten of
met zuur- of
alkalihoudende producten.
PANELES
CATALÍTICOS
AUTOLIMPIANTES
Nuestros hornos provistos
de paredes lisas, tienen la
posibilidad de llevar mon-
tados en su interior paneles
autolimpiantes que
recubran dichas paredes.
Estos paneles especiales,
que se enganchan a las pa-
redes antes de los
bastidores laterales, están
recubiertos de un especial
esmalte catalítico
microporoso que oxida y
vaporiza gradualmente las
salpicaduras de aceite y
grasa eliminándolas du-
rante las cocciones por
encima de los 200° C.
Si después de una cocción
de alimentos muy grasos el
horno no está limpio,
hacerlo funcionar en vacío
a la máxima temperatura
por un tiempo máximo de
60 minutos.
Los paneles autolimpiantes
no deben ser lavados ni
limpiados con productos
abrasivos o productos que
contengan ácidos o álcali.
SELBST-
REINIGENDE
KATALYTISCHE
PLATTEN
Unsere Backöfen mit glat-
ten Wänden bieten die
Möglichkeit, in der Muffel
selbstreinigende Platten zu
montieren, mit denen die
Wände verkleidet werden.
Diese Spezialplatten, die
vor den seitlichen Rahmen
an den Wänden eingehängt
werden, sind mit einem
mikroporösen katalytischen
Speziallack bedeckt, der
oxidiert, die Öl- und Fett-
spritzer nach und nach ver-
dampfen lässt, und so bei
den Backvorgängen über
200°C eliminiert.
Sollte der Ofen nach dem
Backen sehr fetthaltiger
Speisen nicht sauber sein,
lässt man ihn maximal 60
Minuten lang leer bei
Höchsttemperatur einge-
schaltet.
Die selbstreinigenden
Platten dürfen weder ge-
waschen, noch mit
scheuernden oder säure-
haltigen bzw. alkalischen
Produkten gereinigt
werden.
REMOVING THE
OVEN DOOR
GB
The oven door can be
removed quickly and easily.
To do so, proceed as
follows:
- Open the door fully.
- Lift the two levers shown
in fig.
- Close the door as far as
the first stop (caused by the
raised levers).
- Lift the door upwards and
outwards to remove it from
its mountings.
To replace fit the door, fit
the hinges in their
mountings and lower the
two levers.
INSTALLATION
INSTRUCTIONS
Flush fitting
The oven can be installed
under a work top or in a
cooking
shows the installation dimensions.
Make sure that surrounding
materials are heat resistant.
Align the oven centrally
with respect to the side
walls of the units surrounding it and fix it in place
with the screws and Allen
screws provided.
Insert the bushings
in the holes in the face.
Use the four screws provided
to fasten the bushings to the
cabinet, taking care not to
over tighten and break the
bushing.
GB
column. Figure
c
provided
8
Page 9

GB
See
the
accompanying
structions
the oven with multifunctional gas or gaselectric cookers.
GAS OR ELECTRICAL CONNECTIONS
for
in-
combi ning
GB
ELECTRICAL
CONNECTIONS
Before connecting the oven
to the mains power supply,
make sure that:
- The supply voltage corresponds to the specifications
on the data plate on the
front of the oven.
- The mains supply has an
efficient earth (ground)
connection complying with
all applicable laws and regulations. Correct earthing
(grounding) is a legal requirement.
The power cable should
never reach a temperature
50° C above ambient temperature at any point along
its length.
If a fixed appliance is not
provided with a power cable
and plug, or some other
device permitting it to be
disconnected from the
mains electricity supply,
with a gap between the
contacts big enough to
TIPI E DIAMETRO MINIMO DEI CAVI
CABLE TYPES AND MINIMAL DIAMETERS
TYPES ET DIAMÈTRE MINIMAUX DES CÂBLES
SASO
H05RR-F 3x1,5 mm² H05RR-F 3x2,5 mm²
H05VV-F 3x1,5 mm² H05VV-F 3x2,5 mm²
H05RN-F 3x1,5 mm² H05RN-F 3x2,5 mm²
H05V2V2-F 3x1,5 mm² H05V2V2-F 3x2,5 mm²
9
Page 10

ES NL PTDE
RESPEITO PELO
AMBIENTE
A documentação do presen-
te aparelho utiliza papel
embranquecido, sem cloro,
ou papel reciclado com a
finalidade de contribuir
para a protecção do
ambiente
As embalagens são conce-
bidas para não poluir o am-
biente; podendo ser recupe-
radas ou recicladas sendo
produtos ecológicos. Reci-
clando a embalagem,
contribuirá a uma poupança
das matérias-primas e a
uma redução do volume dos
refugos industriais e do-
mésticos.
RESPECT VOOR
HET MILIEU
De documentatie die bij dit
apparaat hoort is gemaakt
van zonder chloor gebleekt
papier of van recycling-
papier, als bijdrage tot de
milieubescherming
De verpakkingen zijn zo
ontwikkeld dat ze het
milieu niet schaden; zij
kunnen opnieuw gebruikt of
gerecycled worden, aange-
zien het om ecologische
producten gaat.
Door de verpakking te re-
cyclen wordt een bijdrage
geleverd aan de besparing
van grondstoffen en aan de
beperking van het volume
industrieel en huisvuil.
RESPETO POR EL
MEDIO AMBIENTE
La documentación de este
aparato utiliza papel
blanqueado, sin cloro, o
papel reciclado con el fin
de contribuir a la protección
del medio ambiente
Los embalajes están conce-
bidos para no dañar el
medio ambiente; pueden ser
recuperados o reciclados
siendo productos ecoló-
gicos. Reciclando el emba-
laje, se contribuirá a un
ahorro de materias primas y
a una reducción del volú-
men de los desechos in-
dustriales y domésticos.
UMWELTVER-
TRÄGLICHKEIT
Als Beitrag zum Umwelt-
schutz wurde die Doku-
mentation dieses Geräts auf
chlorfrei gebleichtes oder
Recycling-Papier gedruckt.
Bei der Verpackung wurde
auf deren Umweltverträg-
lichkeit Wert gelegt; sie
kann gesammelt oder re-
cycelt werden, da es sich
um umweltschonendes
Material handelt.
Durch Recycling der Ver-
packung wird zur Redu-
zierung des Rohstoffver-
brauchs und des Volumens
von Industrie- und Haus-
müll beigetragen.
guarantee class III overvoltage p
power supply in compliance with the regulations governing electrical installations.
The omnipolar plug or
KABELTYPEN UND MINIMALE DURCHMESSER
TIPOS Y DIÁMETRO MÍNIMO DE LOS CABLES
KABELTYPES EN MINIMALE DOORSNEDEN
TIPOS E DIÁMETRO MÍNIMO DOS CABOS
H05RR-F 3x1,5 mm² H05RR-F 3x2,5 mm²
H05VV-F 3x1,5 mm² H05VV-F 3x2,5 mm²
H05RN-F 3x1,5 mm² H05RN-F 3x2,5 mm²
H05V2V2-F 3x1,5 mm² H05V2V2-F 3x2,5 mm²
SASO
GB
rotection, then such a device must be fitted to the
switch must be easy to reach when the
230V
230V 3
400V 2N
400V 3N
appliance is
installed.
*3 x 4 mm
*4 x 2,5 mm
*4 x 2,5 mm
*5 x 1,5 mm
2
2
2
2
10
The unit becomes very hot during use. Be careful not to
touch the heating elements
inside the oven.
If the oven came with a meat probe, use only the probe recommended for this oven.
The different cooking levels where grids and drip pans
can be placed are shown in the
table on page 10.
N.B. The manufacturer de-clines all responsibility for damage or injury if the above instructions
and nor-mal safety precautions are not respected.
Page 11

11
Page 12

The contents of this manual are generic and not all the functions described may be available on
your product.
Cod. 2.000.00.3 - 6ed
13
 Loading...