

Euro Appliances EIS900B Instructions For Use And Installation
Instructions for use and installation
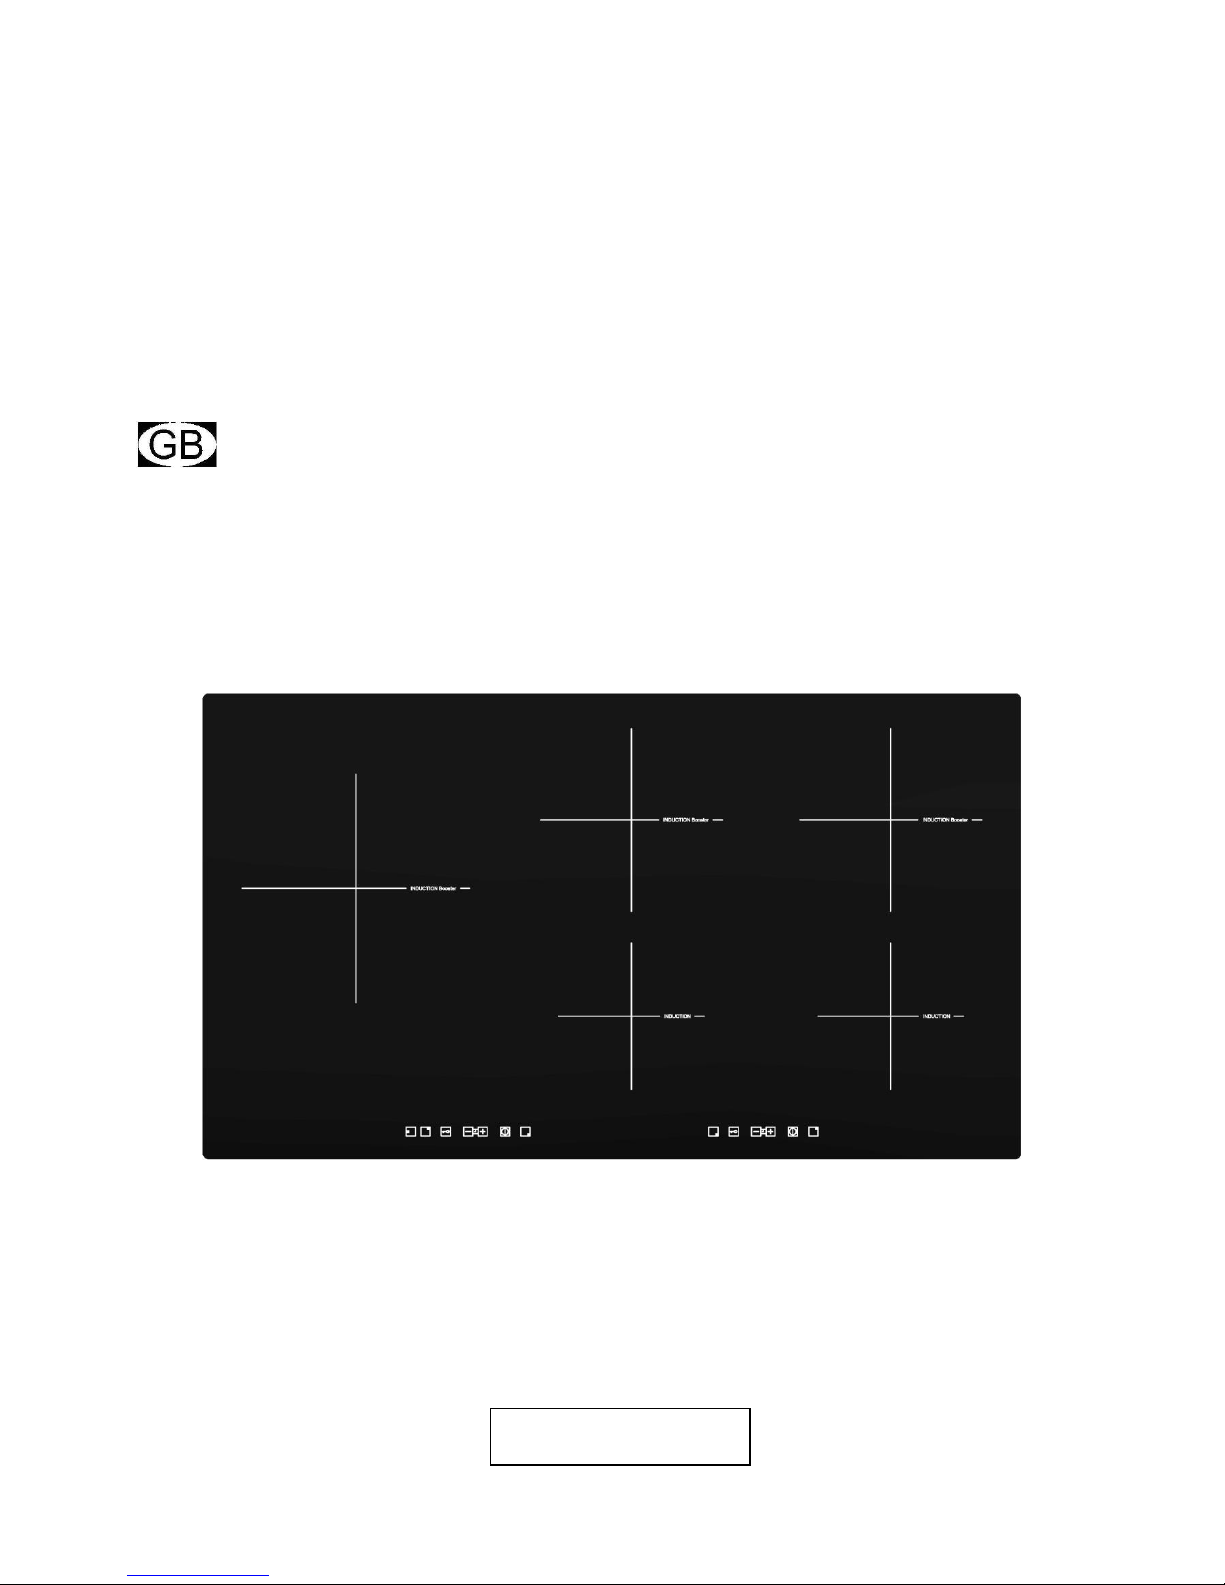
Induction cooktop
EIS900B

2
I The Manufacturer strives for continuous improvements. For this reason,
the text and illustrations in this book are subject to change without notice.

3
Dear customer!
The built-in ceramic-glass cooktop is intended for household use only.
Materials used for packaging are nature friendly and may be recycled,
deposited or destroyed without any threats to the environment. In order to
recognize these features, all packing materials are marked with relevant
symbols.
Once your appliance has become obsolete and you do not intend to use it any
longer, take adequate care not to litter the environment. Deposit your old
appliance with the authorized depot dealing with used household appliances.
Instruction for use
Instructions for use have been prepared for the user, anddescribe the
particulars and handling of the appliance. These instructions apply to different
models from the same family of appliances, therefore you may fi nd
information and descriptions that may not apply to your particular appliance.
Installation instruction
he appliance should be connected to the power supply in accordance with the
instructions from the chapter “Electrical connections” and in line with the
standing regulations and standards. The connections should be carried out by
a qualified personnel only.
Rating plate
The rating plate with basic information is located underneath the appliance.
Fire hazard protection
Appliances are allowed to be mounted on one side next to a high kitchen
cabinet, the height of which may exceed that of the appliance. On the
opposite side however, only a kitchen cabinet of equal height as the appliance
is allowed.
Important warnings
4
Mounting the built-in cooktop
5
Connection to the power supply
6
Tecnical information
7
Ceramic-glass cooktop
10
Hob control
10
Safety functions and error display
14
Cleaning and maintenance of ceramic-glass hob
15

4
IMPORTANT WARNINGS
• The appliance may be built-in and connected to the power supply only by a
qualified technician.
• Particular areas of the cooktop surface (adjacent to the hotplates) are hot
during operation.
Prevent the children to hang around the appliance and warn them properly
against the danger of burns.
• Hot oil ignites readily, so be sure have the preparation of such food (fries)
under constant control.
• Hotplates may not be left in operation empty, without any dishes on top.
• Never use the appliance for heating the ambience.
• Never use the ceramic-glass cooktop as a working surface. Sharp objects
may damage the cooktop surface.
• Never place any metal objects upon the induction hotplate, such as knives,
forks, spoons, pot lids, and the like, as they may get very hot.
• Preparation of food in aluminium or plastic cookware is not allowed. Never
place any plastic objects or aluminium foil upon the cooktop surface.
• In case any other appliances are plugged in the electric mains close to the
cooktop, prevent the contact of the plug cable with the hot cooking zones.
• Never keep any flammable or temperature sensitive objects, like cleaning
agents, sprays, detergents, etc., below the appliance.
• Never use cracked or broken ceramic-glass cooktop. In case you notice any
visible cracks on the surface, cut the power supply immediately.
• In case of any malfunctions, disconnect the appliance from the power supply
and call service department.
• Do not use high-pressure steam cleaner or hot steam to clean the appliance.
• The appliance is manufactured in compliance with the relevant effective
safety standards.
• The appliance is not intended for use by persons (including children) with
reduced physical, sensory or mental capabilities, or lack of experience and
knowledge, unless they have been given supervision or instruction concerning
use of the appliance by a person responsible for they safety.
• Children should be supervised to ensure that they do not play with the
appliance.
• The hob can not be activated by external timers or remote controls systems.
• Be careful not to drop objects or crockery on the ceramic glass's surface.
Even light objects (e.g. a salt shaker) can crack or damage the ceramic plate.
• If the appliance is built in over an oven with a pyrolytic system, it should not
be operated while the pyrolytic process is in progress because it can trigger
the overheating protection of the cooktop.
• Don't connect the hob to the power supply with an extension cable or
multiple sockets, because they don't assure a sufficient safety (e.g.
overheating risk of multiple sockets).
• After using the cooktop, disconnect it from the user’s interface. Do not trust
the pot detector.
• Connect the equipment to a permanent connection.
The symbol on the product or on its packaging indicates that this
product may not be treated as household waste. Instead it shall be
handed over to the applicable
collection point for the recycling of electrical and electronic equipment.
By ensuring this product is disposed of correctly, you will help prevent
potential negative
consequences for the environment and human health, which could
otherwise be caused by inappropriate waste handling of this product.
For more detailed information about recycling of this product, please
contact your local city office, your household waste disposal service or
the shop where you purchased the product.

5
MOUNTING THE BUILT-IN COOKTOP
Caution !
• To avoid any possible hazard, the appliance may be installed by qualified personnel only.
• Panels and furniture lining of the kitchen cabinet receiving the hob must be treated with temperature resistant
adhesives 100°C (otherwise they might be discoloured or deformed because of inadequate temperature
resistance).
• The cooking hob is intended for building into the worktop above the kitchen element of 600 mm width or more.
• After the installation of built-in hob make sure that there is free access to the two fixing elements in front.
• Suspended kitchen elements above the cooktop must be installed at such distance to provide enough room for
comfortable working process.
• The distance between the worktop and the hood must be at least such as indicated in the instructions for
installation of the kitchen hood, but in no case it may be less than 700 mm.
• The use of hard wood decorative borders around the worktop behind the appliance is allowed, in case the
minimum distance remains as indicated on the installation illustrations.
• Minimum distance between the built-in cooktop and rear wall is indicated at the illustration for the installation of
the built-in cooktop.
Built-in induction hob
opening dimensions
A
900mm
B
510mm
C
880mm
D
490mm
E
50mm
F
5mm
G
50mm
• Induction hob may be built into the 25 to 40 mm thick worktops.
• Bottom kitchen element must not have a drawer. It must be fitted with a
horizontal plate 20 mm away from the worktop bottom surface. Space
between the plate and the hob must be empty and no objects may be stored
or kept there.
• Rear side of the kitchen element must also have a 50 mm high opening
along the entire width of the element, and the front part must have an opening
of no less than 5 mm.
• Incorporation of the oven under the induction hob is permissible for ovens
equipped with a cooling fan.
Prior inserting the oven, it is necessary to remove the rear kitchen element
panel in the area of the oven opening.
Equally, the front part of the element must have an opening of no less than 5
mm.
6
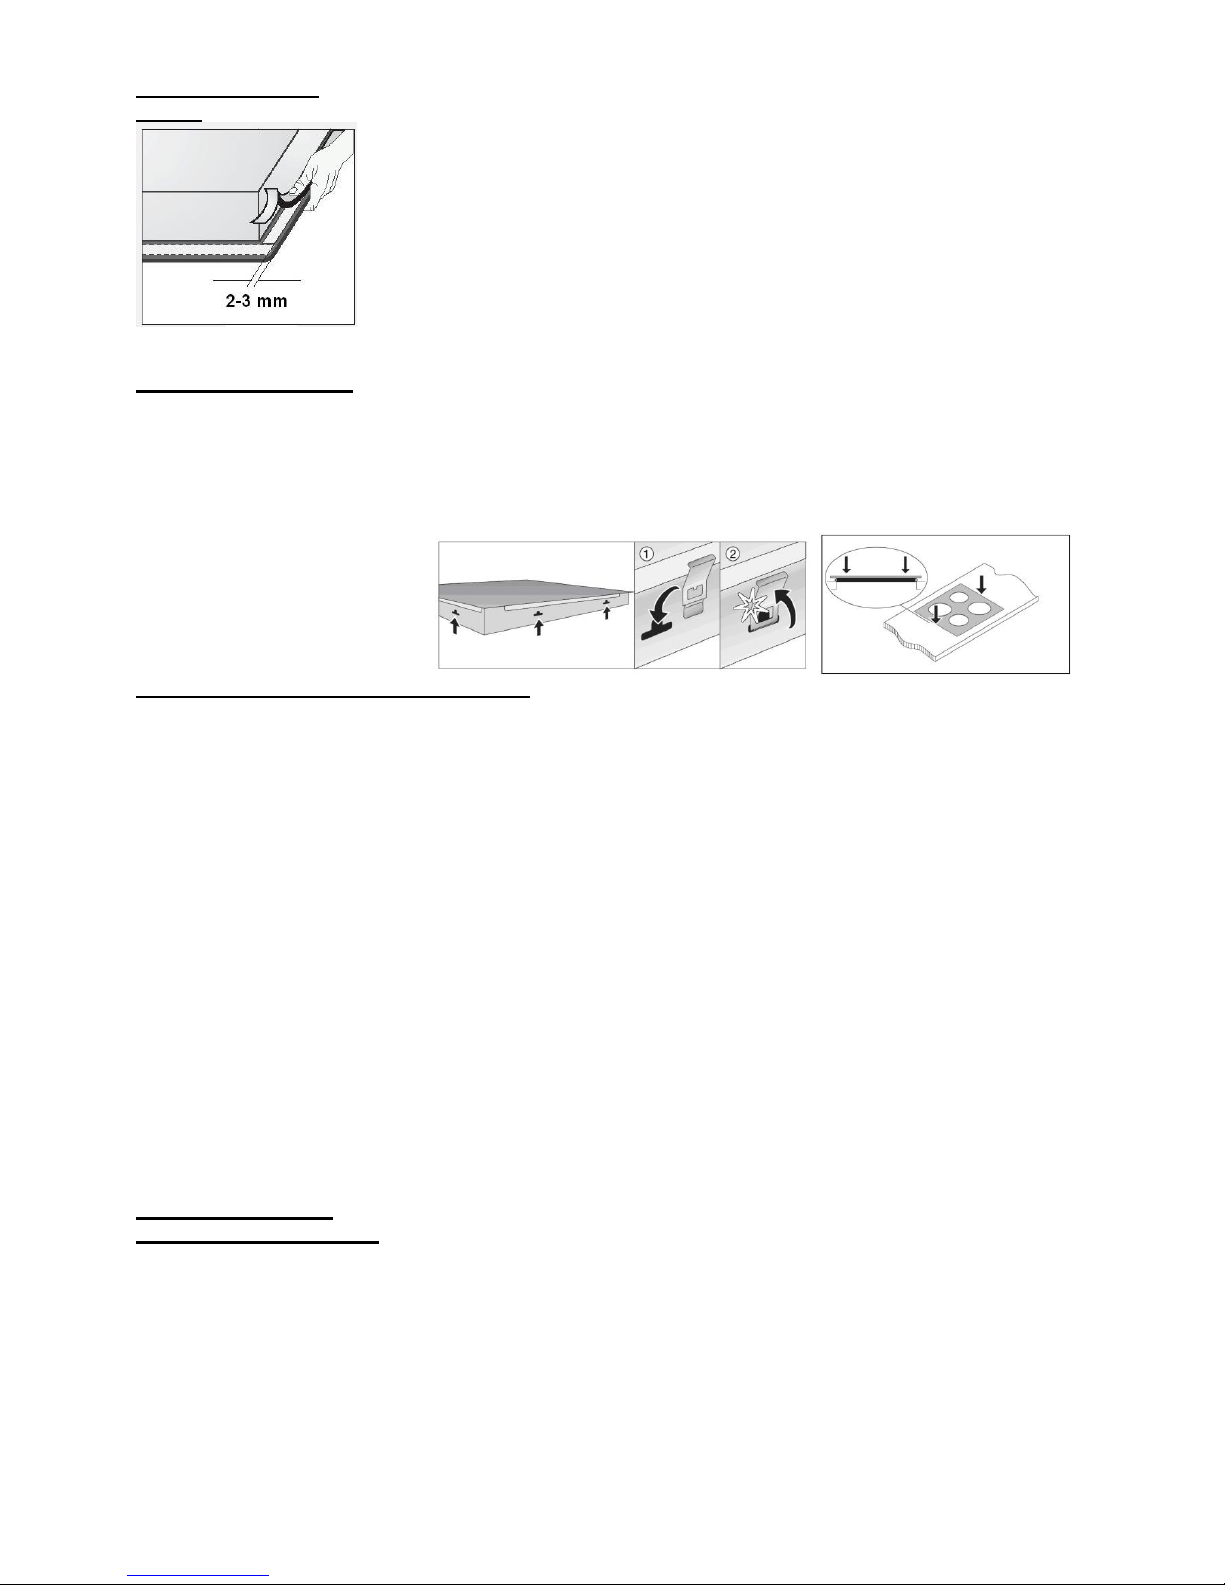
Installing the foam
gasket
Before inserting the appliance into the opening in the kitchen worktop, the
supplied foam gasket must be attached to the lower side of the glass ceramic
(glass) cooking hob.
Do not install the appliance without the foam gasket!
The gasket should be attached to the appliance in the following way:
▪ Remove the protective film from the gasket.
▪ Then, attach the gasket to the lower side of the glass, approximately 2-3
millimetres from the edge.
▪ The gasket must be attached along the entire length of the glass edge and
should not overlap at the corners.
▪ When installing the gasket, make sure that the glass does not come into
contact with any sharp objects.
Installation procedure
• Worktop must be placed absolutely horizontal.
• Suitably protect the edges of the cut aperture.
• Connect the cooking hob to the mains power supply (see instructions for the
connection of the cooking hob to mains power supply).
• Put the supplied springs in their places.
• Insert the hob into the cut aperture.
• Press the hob firmly towards the worktop from above.
CONNECTION TO THE POWER SUPPLY
• Connections may be carried out by a qualifi ed technician only. The earthing
protection must comply with the standing regulations.
• Connection terminals are revealed when the connection box cover is
removed.
• Prior any attempted connection check that the voltage indicated on the rating
plate is in line with your home power supply.
• The rating plate is located underneath the appliance.
• The appliance is manufactured for use with the power supply voltage
220-240 V ~.
• In order to make a fixed connection to the mains, insert an all-pole circuit
breaker between the appliance and the mains. This device shall have a
contact separation in all poles, providing full disconnection under overvoltage
category III conditions.
• The connection should be selected in accordance with the declared charge
capacity of the mains and the fuse power.
• Such appliances are allowed to be mounted on one side next to a high
kitchen cabinet, the height of which may exceed that of the appliance. On the
opposite side however, only a kitchen cabinet of equal height as the appliance
is allowed.
• Upon the completion of installation, live wires and isolated cables must be
adequately protected against accidental touching.
Basic adjustment of
sensors to the ambience
Upon each connection to the power supply the sensors of the appliance are
automatically adjusted to the environment to ensure their proper function. All
displays turn on and are fully illuminated for a few seconds.
During the adjustment procedure the sensors must be free of any objects,
otherwise the adjustment procedure will be interrupted until such objects are
removed from the sensor surface. During this period the regulation of the
cooktop is impossible.
ATTENTION !
Before attempting any repairs on the appliance, disconnect the power supply.
In accordance with the mains voltage the appliance should be connected in
line with the attached diagram.
The earthing wire (PE) must be connected to the terminal marked with the
 Loading...