

Page 1

Wet/Dry
Vacuum Cleaner
Owner’s Guide
2800 Series
Wet/Dry Vac
Refer to the rating plate on cleaner for model and serial
number. Record the number and keep for future
reference.
Model # Serial #
FOR LOCATION OF NEAREST EUREKA W ARRANTY
STATION OR SERVICE INFORMATION CALL
1-800-282-2886
Part No. 58418A (1/01)
www.eureka.com
Wet/Dry Detachable
Blower Vac
Household Type
Printed in U.S. A.
Page 2

IMPORT ANT SAFEGUARDS
When using an electrical appliance, basic precautions should always be followed,
including the following:
READ ALL INSTRUCTIONS BEFORE USING THIS VACUUM CLEANER.
W ARNING
To reduce the risk of fire, electric shock, or injury.
• Do not expose to rain. Store indoors.
• Do not leave vacuum cleaner when plugged in. Turn off the switch and unplug the
electrical cord when not in use and before servicing.
• Do not allow to be used as a toy. Close attention is necessary when used by or near
children.
• Use only as described in this manual. Use only manufacturer’s recommended
attachments.
• Do not use with damaged cord or plug. If vacuum cleaner is not working as it should,
has been dropped, damaged, left outdoors, or dropped into water, return it to a service
center before using.
• Do not pull or carry by cord, use cord as a handle, close a door on cord, or pull cord
around sharp edges or corners. Do not run vacuum cleaner over cord. Keep cord
away from heated surfaces.
• Connect to a properly grounded outlet only (refer to Grounding Instructions).
• Do not use extension cords or outlets with inadequate current carrying capacity.
• Turn off all controls before unplugging.
• Do not unplug by pulling on cord. To unplug, grasp the plug, not the cord.
• Do not handle plug or vacuum cleaner with wet hands.
• Do not put any object into openings. Do not use with any opening blocked; keep free
of dust, lint, hair, and anything that may reduce airflow.
• This vacuum cleaner creates suction. Keep hair, loose clothing, fingers, and all parts
of body away from openings and moving parts.
• Do not pick up anything that is burning or smoking, such as cigarettes, matches, or
hot fireplace or barbeque ashes. Live sparks or embers could start a fire in waste
material inside the tank.
• Do not use without motor filter or with a damaged filter.
• Use safety goggles to avoid the discharge air as particles in the air could cause eye
damage.
• Use extra care when cleaning on stairs.
• If the machine tips over during use, shut it off immediately, set it upright, and wait for
the motor to stop completely . This allows the ball float to return to normal position and
permits proper airflow through the cleaner.
• Do not use to pick up flammable or combustible liquids such as gasoline, or use in
areas where they may be present.
• Store your cleaner indoors and in a cool, dry area.
• Keep your work area well lighted.
• Unplug electrical appliances before vacuuming them.
SA VE THESE INSTRUCTIONS
2
Page 3

CONSEILS DE SÉCURITÉ
IMPORTANTS
L’utilisation d’un appareil électrique sous-entend l’observation de certaines règles de
sécurité élémentaires:
LIRE TOUTES LES INSTRUCTIONS AVANT D’UTILISER L ’ASPIRATEUR.
A VERTISSEMENT
Pour réduire les risques de feu, de secousse électrique ou de blessure:
• Ne laisser pas sous la pluie. Ranger à l’intérieur.
• Ne pas s’absenter tant que l’aspirateur est branché. Éteindre l’appareil et le débrancher
lorsqu’on ne s’en sert plus et avant son entretien.
• Veiller à ce que l’aspirateur ne serve pas de jouet, particulièrement si l’usager est un
enfant ou si l’on s’en sert près d’un enfant.
• Ne s’en servir que selon la description qu’en donne le guide. N’employer que les
accessoires que recommande le fabricant.
• Ne pas s’en servir si le cordon ou la fiche sont abîmés. Avant de se servir de l’aspirateur,
le retourner à un centre de réparation s’il ne fonctionne pas comme il faut, s’il est
tombé ou abîmé, si on l’a laissé dehors ou laissé tomber dans l’eau.
• Ne pas le tirer ou le transporter par le cordon, ne pas se servir du cordon comme
d’une poignée, ne pas coincer le cordon en fermant une porte et ne pas tirer le cordon
sur des encoignures ou des bordures pointues. Ne pas passer l’aspirateur sur le cordon.
Éloigner le cordon des surfaces chauffées.
• Branchez toujours l’aspirateur dans une prise à trois (mise à la terre).
• Ne pas se servir de cordons de rallonge ou de prises d’intensité admissible mal adaptée
aux besoins.
• Éteindre complètement l’aspirateur avant de le débrancher.
• Ne pas tirer sur le cordon pour débrancher l’aspirateur. Le débrancher en tirant sur la
fiche et non sur le cordon.
• Ne toucher ni à la fiche ni à l’aspirateur avec les mains mouillées.
• Ne pas introduire d’objets dans les orifices. Ne pas se servir de l’aspirateur avec une
ouverture bouchée et en écarter poussière, charpie, cheveux et autres qui risquent de
réduire la circulation de l’air.
• L’aspirateur créé une aspiration. Cheveux, vêtements amples, doigts et d’une manière
générale tous les membres du corps doivent se trouver à l’écart des pièces mobiles et
des ouvertures.
• Ne rien ramasser de brûlant ou de fumant, comme par exemple mégots, allumettes
ou cendres chaudes des cheminées ou des grilles. Des étincelles ou des braises
peuvent commencer un feu dans les dégâts au dedans du réservoir.
• Ne pas s’en servir sans le filtre du moteur ou que le filtre soit abîmé.
• Utiliser avec des lunettes protectrices ou éviter des bouffées d’air car des poussières
dans l’air peuvent abîmer les yeux.
• Redoubler de prudence lorsqu’on aspire les escaliers.
• Si l’aspirateur se renverse quand il est en usage, tout-de-suite il faut l’éteindre, mettrele à la position droite et attendre que le moteur s’arrête complètement. Cela permettra
que la flotteur retourne à sa position normale et laisse la normale circulation d’air
passée dans l’aspirateur.
• Ne pas s’en servir pour recueillir des liquides inflammables ou combustibles, tels
l’essence, et ne pas utiliser dans le endroits où ces produits risquent de se trouver.
• Ranger l’aspirateur à l’intérieur, au frais et au sec.
• Bien éclairer la surface de travail.
• Débrancher les appareils électriques avant de les aspirer.
CONSERVER CES INSTRUCTIONS
3
Page 4

Grounding Instructions
This appliance must be grounded. If it should malfunction or breakdown, grounding
provides a path of least resistance for electric current to reduce the risk of electric shock.
This appliance is equipped with a cord having an equipment-grounding conductor and
grounding plug. The plug must be plugged into an appropriate outlet that is properly
installed and grounded in accordance with all local codes and ordinances.
Improper connection of an equipment-grounding conductor can result in risk of electric
shock. Check with a qualified electrician or service person if you are in doubt as to
whether the outlet is properly grounded. Do not modify the plug provided with the
appliance. If it will not fit the outlet, have proper outlet installed by a qualified technician.
This appliance is for use on a nominal 120 volt circuit and has a grounding plug that
looks like the plug illustrated in Figure A. A temporary adapter which looks like the
adapter illustrated in Figure B may be used to connect this plug to a two-pole receptacle,
as shown, if a properly grounded outlet is not available. The temporary adapter should
be used only until a properly grounded outlet, Figure A, can be installed by a qualified
electrician. The green colored rigid ear, lug, or the like extending from the adapter must
be connected to a permanent ground such as a properly grounded outlet box cover.
Whenever the adapter is used, it must be held in place by a metal screw.
NOTE: In Canada, the use of a temporary adapter is not permitted by the
Canadian Electrical Code.
INSTRUCTIONS VISANT LA MISE À TERRE
Cet appareil doit être mis à la terre. En cas défaillance ou de panne éventuelles, la mise
à la terre fournit au courant un chemin de moindre résistance qui réduit le risque de
choc électrique. Cet appareil est pourvu d’un cordon muni d’un conducteur de terre et
d’une fiche avec broche de terre. La fiche doit être branchée dans une prise appropriée
correctement installée et mise à la terre conformément aux règlements et ordonnances
municipaux.
A VERTISSEMENT
Un conducteur de terre mal raccordé peut entraîner un risque de choc électrique.
Consulter un électricien ou un technicien d’entretien qualifié si vous n’êtes pas certain
que la prise est correctement mise à la terre. Ne pas modifier la fiche fournie avec
l’appareil-si elle ne peut être insérée dans la prise, faire installer une prise adéquate par
un électricien qualifié.
DANGER
Note. Au Canada, l’utilisation d’un adaptateur temporaire n’est pas autorisée par le
Code canadien de l’électricité.
Cet appareil est destiné à un circuit de 120V et est muni d’une fiche de mise à la terre
semblable à celle illustrée par le Figure A. S’assurer que l’appareil est branché à une
prise de courant ayant la même configuration que la fiche. Aucun adaptateur ne devrait
être utilisé avec cet appareil.
Grounded Outlet Box
Boîte de Prise de Terre
Figure B
Grounding Blade is
Longest of the Three
Blades
La Lame de Terre Est La
Plus Longue Des Trois
Lames
4
Grounded Outlet Box
Boîte de Prise de Terre
Figure A
Adapter
Adaptateur
Metal Screw
Vis de Métal
Grounding Tab
Taquet de Terre
Page 5
GENERAL INFORMATION
Automatic Suction Shut-Off
NOTE: The unit must be used in upright position at all times, otherwise the ball
float will automatically shut-off the suction.
The automatic suction shut-off functions when tank is full of liquid. As the tank fills, the
ball float (inside cage) rises until it seats itself against bottom of motor. This shuts off the
suction causing the motor sound to become higher in pitch. When this happens, empty
tank.
The automatic suction shut-off also functions if the cleaner tips over. To continue use,
turn cleaner off and set it upright. Wait a few seconds to allow motor to come to a
complete stop so ball drops; restart the motor.
Service Information
The instructions in this booklet serve as a guide to routine maintenance. If additional
service is required, telephone toll free:
USA: 1-800-282-2886
México: 5670-6169
Canada: 1-800-282-2886
for the nearest Eureka Authorized Warranty Station. If you prefer, you can write to The
Eureka Company, Service Division, 807 North Main Street, Bloomington, Illinois 61701,
USA. In Canada write to The Eureka Company, 866 Langs Drive, Cambridge, Ontario
N3H 2N7. Refer to The Eureka Warranty for complete service information.
DO NOT OIL the motor at any time. The bearings are permanently lubricated
and sealed.
Rating Information
The model, type and serial number are
indicated on the rating plate, located on the
backside of the lid. For prompt and complete
service information, always refer to these
numbers when inquiring about service.
MODEL TYPE SERIAL NO.
127 7.5 60
VOLTS AMPS. HERTZ
SERVICIO DE REPARACIONES Y PARTES: 1-800-282-2886
THE EUREKA COMPANY
BLOOMINGTON, ILLINOIS 61701
5
Page 6
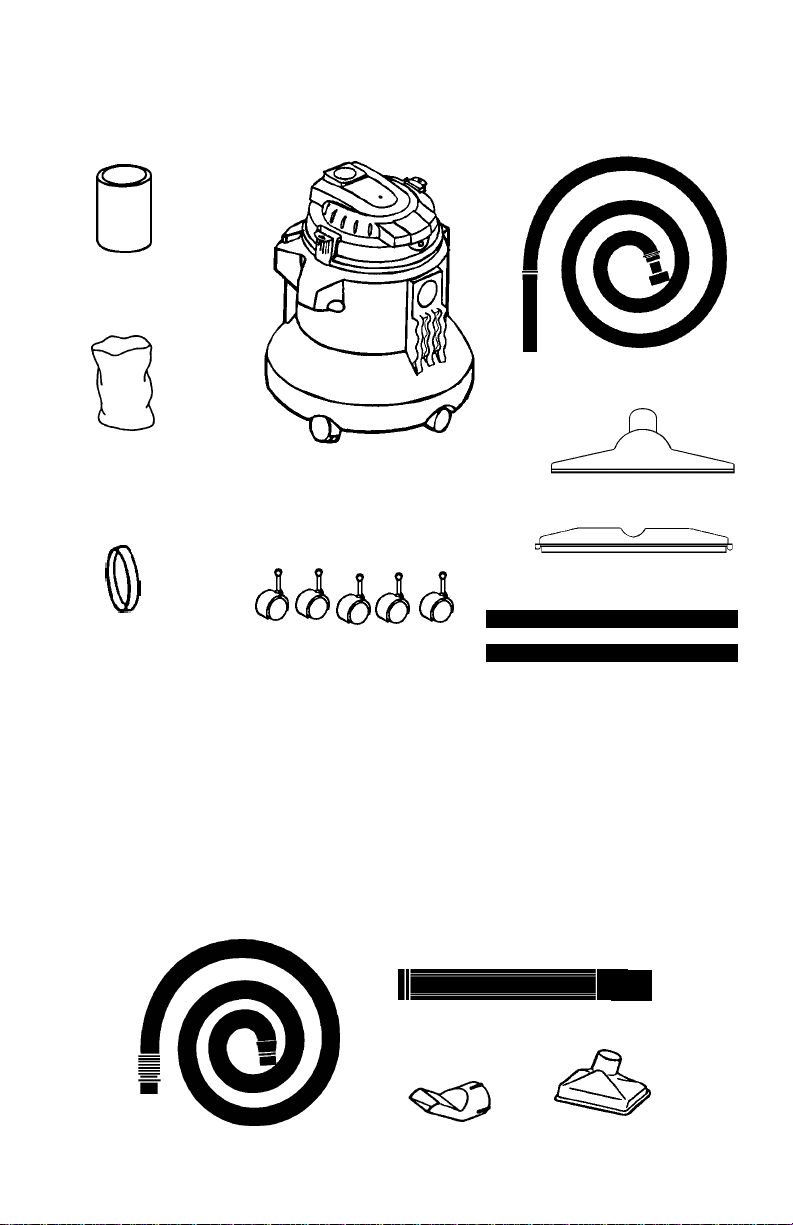
CONTENTS OF WET/DRY VAC
Unpack accessories from carton and remove vacuum cleaner. Additional accessories
may be packed inside tank.
1 1/4 inch diameter TOOLS
Foam Filter
Hose
Disposable Paper
Filter Bag
Floor Nozzle
Squeegee
Rubber Band
6
Swivel Casters
Wands
2 1/2 inch diameter TOOLS (on selected models only)
Wand
Hose
Utility NozzleBlower Nozzle
Page 7
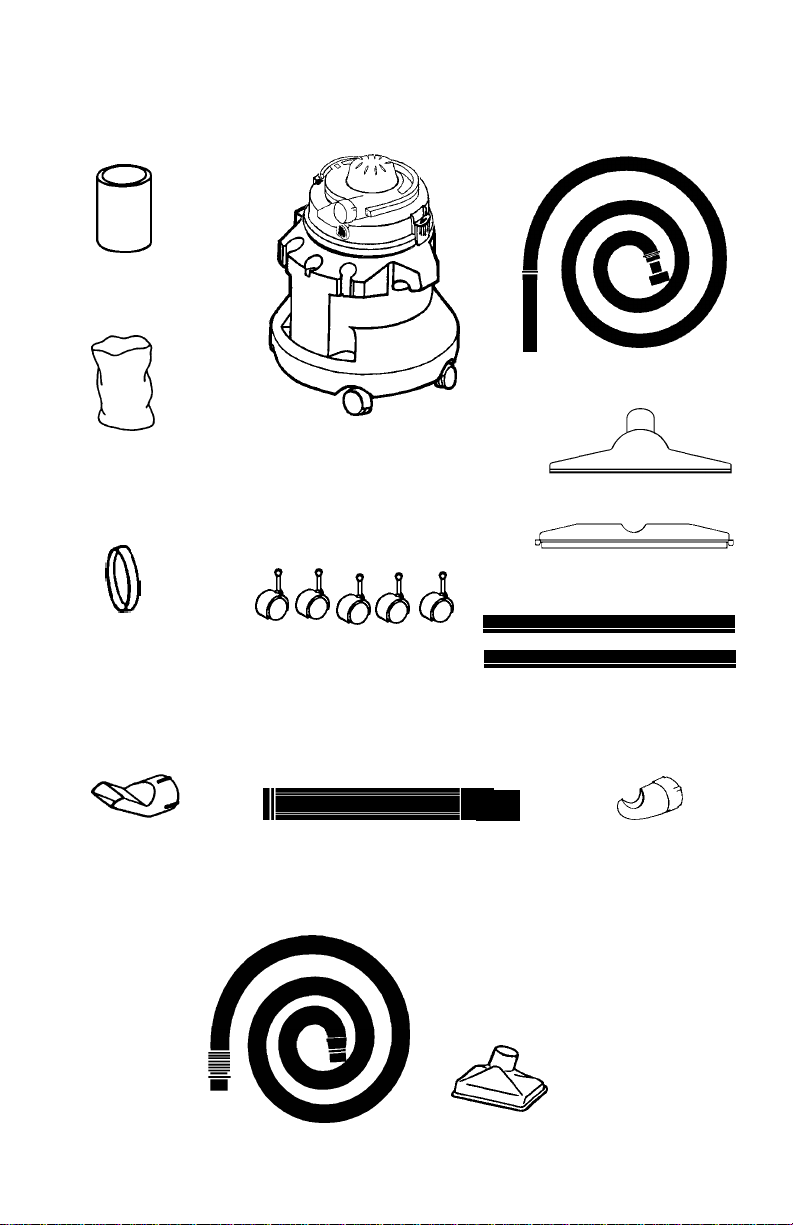
CONTENTS OF WET/DRY VAC WITH DETACHABLE BLOWER
Unpack accessories from carton and remove vacuum cleaner. Additional accessories
may be packed inside tank.
1 1/4 inch diameter TOOLS
Foam Filter
Hose
Disposable Paper
Filter Bag
Floor Nozzle
Squeegee
Rubber Band
Swivel Casters
2 1/2 inch diameter TOOLS
Blower Nozzle Air DiffuserWand
2 1/2 inch diameter TOOLS (on selected models only)
Hose Utility Nozzle
Wands
7
Page 8

HOW TO ASSEMBLE
CAUTION: Fully assemble the cleaner before using.
1. Squeeze latches together; lift
to remove lid.
Latch
Latch
3. Install filters for type of cleaning.
NOTE: Filters install the same for both wet/dry unit (as pictured) or wet/dry
with detachable blower.
FOR WET PICK-UP ONLY :
NOTE: Do not use disposable paper
filter bag for wet pick-up.
Ball
Float
Cage
a. Pull foam filter over
ball float cage.
b. Place rubber band
around bottom of
foam filter.
2. With tank placed upside
down, push swivel caster
into each socket. Be sure it
snaps into place.
FOR DRY PICK-UP ONLY:
Ball
Float
Cage
a. Pull foam filter over
ball float cage.
b. Slide disposable
paper filter bag over
foam filter.
c. Place rubber band
around top of paper
filter bag.
4. Place lid over tank so power
Power Switch
Hose
Inlet
8
switch is toward front above
hose inlet.
Page 9
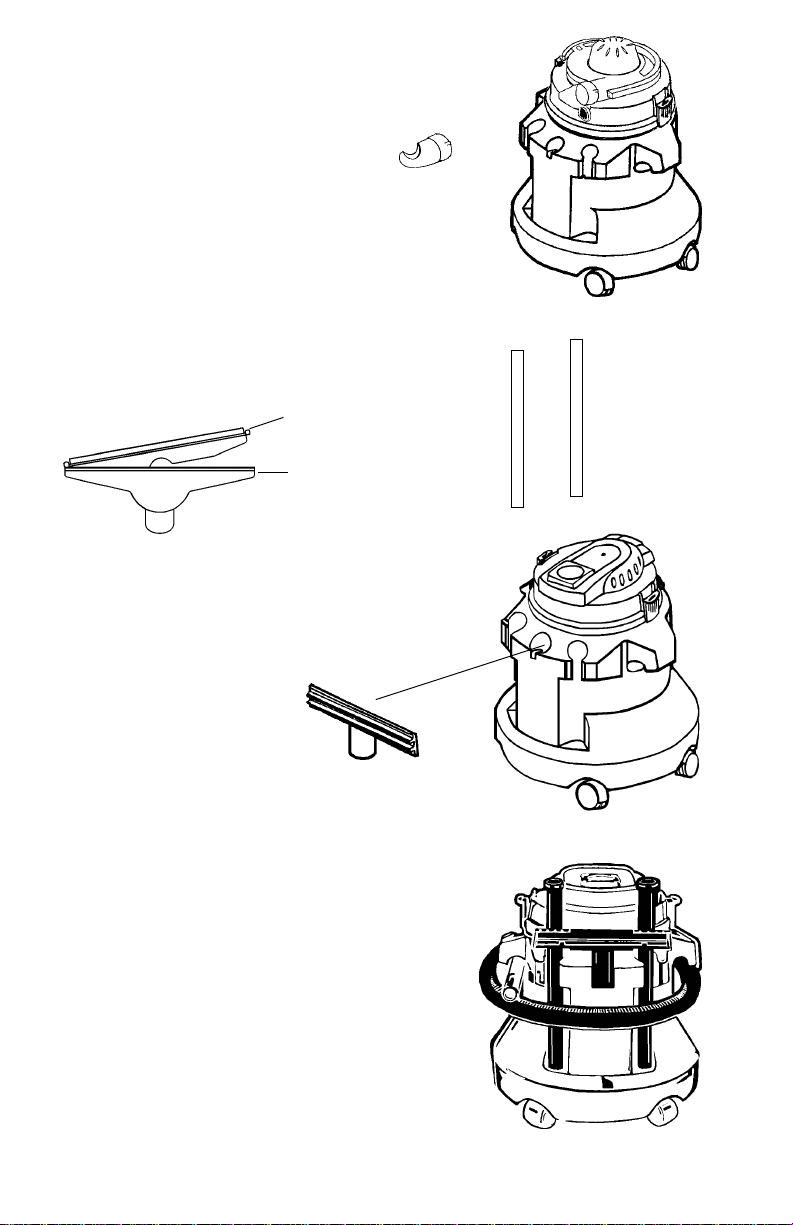
5. (
For detachable blower models only
Push air diffuser onto detachable
blower exhaust.
Tool Storage For All Models
6. Store 1 1/4 inch diameter
wands on back of tank.
Squeegee
<
<<
<<
Floor
Nozzle
7. Push squeegee into floor
nozzle for wet pick-up.
Remove and store
squeegee alone to best
retain shape and fit.
)
<<
<
<<
<
<<
<<
<
<<
<<
8. Place floor nozzle, facing
out, onto tank storage.
9. Hose Storage Store unit
with hose connected to
hose inlet. Wrap hose
around tank and slide
wand end underneath
one carrying handle to
secure.
10. Electrical Cord Storage
Wrap cord around tank
for storage. Fasten plug
to cord to prevent
unwinding.
9
Page 10

HOW TO USE
The Eureka Wet/Dry V ac is designed for various cleaning chores around the home. The
accessories are sufficient to clean a garage, workshop, or patio. Y et, the cleaner is gentle
enough to use in the home. It will quickly pick-up spills, water in a basement, or kitchen
accidents.
NOTE: When an extension cord is used, make sure the plug connections does
not come into contact with the liquid. Never operate vacuum cleaner
without motor filter(s) or with defective filter(s). Never use paper bag for
wet pick-up. See How To Maintain section for care of foam and paper filters.
If operated for a prolonged period of time, ear protection is recommended.
Dry Pick-Up
Use floor nozzle (without squeegee attached) or hose for dry pick-up cleaning.
Wet Pick-Up
Place squeegee into floor nozzle to pick-up water or spilled liquids. Filters should be
clean for maximum cleaning efficiency.
Power Switch
Hose Coupling
Hose
Inlet
Power
Switch
1. Push hose coupling with twisting
motion into hose inlet.
2. Plug electrical cord into outlet.
Use extension cord (not provided) for
models with short electrical cord.
Extension cord must be marked
“Suitable for use with outdoor
appliances”.
NOTE: When an extension cord is
used, make sure the plug
connection does not come
into contact with any liquid.
Use a grounded extension cord
with 3-prong plug and 3-pole
receptacle; 16 gauge, SJTW-A
type. We recommend using
Eureka extension cord, part
number 54806, available from
The Eureka Company. Loop the
cords to prevent unplugging.
10
3. Push power switch to turn on.
NOTE: Detachable blower switch
is located on top of blower
handle.
4. Place 1 1/4 inch diameter
wand(s) onto hose and attach
desired tool.
Page 11

Carrying Handle
CAUTION: Do Not attempt to carry wet/dry vac by lid or detachable blower handle.
Only use carrying handles molded onto tank.
Automatic Suction Shut-Off
NOTE: The unit must be used in upright position at all times, otherwise the ball
The automatic suction shut-off functions when tank is full of liquid. As the tank fills, the
ball float (inside cage) rises until it seats itself against bottom of motor. This shuts off the
suction causing the motor sound to become higher in pitch. When this happens, empty
tank.
The automatic suction shut-off also functions if the cleaner tips over. To continue use,
turn cleaner off and set it upright. Wait a few seconds to allow motor to come to a
complete stop so ball drops; restart the motor.
float will automatically shut-off the suction.
How To Empty Wet or Dry Contents From Tank
NOTE: Turn off power switch and unplug electrical cord before emptying tank.
1. Raise hose above tank to drain
excess liquid into tank.
(For wet pick-up only.)
2. Remove hose.
3. Remove lid.
4. Empty contents into suitable
drain for liquids or container for
dry contents.
5. Replace lid and hose and
continue cleaning.
Blower
The hose, tank, and accessories must be cleaned before using as a blower.
NOTE: Always wear safety goggles (not provided). If operated for a prolonged
1. Place hose coupling into blower
2. Use 1 1/4 inch diameter hose
3. Use optional 2 1/2 inch diameter
period of time, ear protection is recommended. Never point blower toward
people, animals, or objects that may be injured/damaged by flying debris.
These units must NOT be used to power a paint sprayer or to supply air
to any other sprayer.
outlet.
and wand(s) to direct air into
small areas.
hose, wand, and blower nozzle
for large areas.
Blower
Outlet
Hose Coupling
Blower Nozzle (optional)
11
Page 12

Detachable Blower (selected models)
NOTE: Always wear safety goggles (not provided). Never point blower toward
people, animals, or objects that may be injured/damaged by flying
debris. These units must NOT be used to power a paint sprayer or to
supply air to any other sprayer.
1.
1. Release detachable blower
latches by turning.
2. Lift detachable blower.
3. Pull off air diffuser.
4. Push and twist 2 1/2 inch
diameter wand over blower
outlet.
5. Attach blower nozzle.
6. Hold detachable blower by
large carrying handle.
7. Grasp auxiliary handle for
better control, if needed.
8. The detachable blower can
be replaced and latched
onto the lid in any position.
For user safety , the blower
outlet should aim away
from user.
9. Replace air diffuser.
2.
3.
Power Switch
7.
““
“
““
<<
<<
<
6.
12
4.
5.
Page 13

HOW TO MAINTAIN
These instructions serve as a guide to routine maintenance. T o avoid unnecessary service
calls, clean motor filter, change disposable paper filter bag, and empty tank often. Empty
all liquids after each use.
Motor Filters
NOTE: Turn off power switch and unplug electrical cord before servicing. Never
operate vacuum cleaner without motor filter(s) or with defective filter(s).
The motor filter(s) must be kept clean for maximum efficiency and proper airflow.
Periodically replace disposable paper filter bag. The bag should be changed often when
vacuuming fine particles like plaster dust or powder substances which tend to clog filter(s).
How To Clean Foam and Disposable Paper Bag Filters
1. Release motor housing.
2. Remove filters from ball float
cage.
3. Shake foam filter vigorously
over a suitable container to
remove loose particles.
The foam filter can be washed
in soapy water for further
cleaning. Shake out water before
reinstalling. The foam filter
should be completely dry before
using for dry pickup or for
storage.
4. Replace foam filter over ball float
cage;
place rubber band around
bottom of foam filter if you plan
wet pick-up otherwise go to step
5.
5. Install new disposable paper
filter;
secure with rubber band
around top of paper bag for dry
pick-up.
Be sure to use only GENUINE EUREKA
replacement filters.
Filters For
Wet Pick-up
Ball
Float
Cage
Foam
Filter
Rubber
Band
Filters For
Dry Pick-up
Ball
Float
Cage
Foam
Filter
Disposable
Paper
Filter
Bag
Rubber
Band
How T o Clean Tank and Store Unit
NOTE: T urn off power switch and unplug electrical cord before cleaning tank.
1. Empty tank of all liquids and rinse inside thoroughly before storing especially
after picking up wet or sticky substances other than plain water. Use warm,
soapy water to clean tank and tools if wet sticky liquids have been vacuumed.
2. Clean and dry tank, hose, and accessories before storing in a cool, dry area.
13
Page 14

Your Eureka cleaner is warranted to be free from all defects in material and workmanship in normal household use for a period of one year. The warranty is granted only to the
original purchaser and members of his or her immediate household. The warranty is subject to the following provisions.
hat This Warranty Covers
THE EUREKA LIMITED WARRANTY
W
• Parts of the cleaner that require replacement under normal use, such as disposable dust bags, filters, drive belts, light bulbs, and brush roll bristles.
• Damages or malfunctions caused by negligence, abuse, or use not in accordance with the Owner's Guide.
hat This Warranty Does Not Cover
• Defects or damages caused by unauthorized service or the use of other than Genuine Eureka parts.
W
The Eureka Company will, at its option, repair or replace a defective cleaner or cleaner part that is covered by this warranty. As a matter of warranty policy, the Eureka Company
will not refund the consumer's purchase price.
hat The Eureka Company Will Do
W
México: 5670-6169
USA: 1-800-282-2886
Please fill out and return the warranty registration card accompanying your cleaner.
arranty Registration
W
btaining Warranty Service
O
To obtain warranty service you must return the defective cleaner or cleaner part along with proof of purchase to any Eureka Authorized Warranty Station.
You will find the nearest location in the Yellow Pages, under "Vacuum Cleaners–Service and Repair." Be certain that the Warranty Station is "Eureka Authorized."
For the location of the nearest Eureka Authorized Warranty Station or for service information, telephone toll free:
Canada: 1-800-282-2886
If you prefer, you can write to The Eureka Company, Service Division, 807 North Main Street, Bloomington, Illinois 61701, USA. In Canada write to The Eureka Company,
If it is necessary to ship the cleaner outside your community to obtain warranty repair, you must pay the shipping charges to the Eureka Authorized Warranty Station.
866 Langs Drive, Cambridge, Ontario N3H 2N7.
Return shipping charges will be paid by the Warranty Station. When returning parts for repair, please include the model, type, and serial number from the data plate on the cleaner.
Page 15

GENUINE
EUREKA PRODUCT
Bloomington, Illinois 61701
THE EUREKA COMPANY
For Genuine Eureka Value, Accept No Imitations!
Any warranty that may be implied in connection with your purchase or use of the cleaner, including any warranty of Merchantability or any warranty for Fitness For A Particular
Purpose is limited to the duration of this warranty. Some states do not allow limitations on how long an implied warranty lasts, so the above limitations may not apply to you.
Your relief for the breach of this warranty is limited to the relief expressly provided above. In no event shall Eureka be liable for any consequential or incidental damages you
may incur in connection with your purchase or use of the cleaner. Some states do not allow the exclusion or limitation of incidental or consequential damages, so the above
limitation or exclusion may not apply to you.
urther Limitations and Exclusions
This warranty gives you specific legal rights. You may also have other rights which vary by state.
F
Q: Why should I use only Genuine Eureka paper bags, belts, and parts in my Eureka vacuum cleaner?
uestions & Answers about Genuine Eureka Products
Q
the long life and cleaning efficiency of your vacuum cleaner. Overall, this saves you money and helps to keep your home clean.
A: Using Genuine Eureka Products, which are made to our exacting specifications and engineered with emphasis on quality, performance, and customer satisfaction, ensures
call our toll-free number, 1-800-282-2886, for the location of a nearby Eureka Authorized Warranty Station.
Q: How can I be sure I am using only Genuine Eureka products in my vacuum cleaner?
A: Typically, packaged products and paper bags can be identified by a "Genuine Eureka Product" symbol (see illustration above). For further identification assistance, you may
thinking they purchased genuine. Unfortunately, many of these customers discovered the differences after they experienced related difficulties.
Q: Are there any differences between "made to fit" or "imitation" and Genuine Eureka paper bags, belts, and parts?
A: Yes, there are some very important differences in materials, quality, and reliability. Many customers have mistakenly purchased "imitation" paper bags and parts while
Page 16

y exclusiones adicionales
Su compensación por el incumplimiento de esta garantía está limitada a la compensación expresamente dispuesta arriba. En ningún caso será responsable Eureka por
Cualquier garantía implícita en relación con su compra o el uso de su aspiradora, incluyendo cualquier garantía de Comerciabilidad o cualquier garantía de aptitud para una
finalidad determinada está limitada a la duración de esta garantía. Algunos estados no aceptan limitaciones sobre la duración de una garantía implícita, de modo que es
imitaciones
posible que las limitaciones anteriores no se apliquen a su caso.
Esta garantía le proporciona derechos legales específicos. Puede que tenga otros derechos que varían por estado.
cualquier daño emergente o imprevisto en los que usted pueda incurrir en relación con su compra o el uso de la aspiradora. Algunos estados no aceptan la exclusión o
limitación de los daños emergentes o imprevistos, con lo que es posible que las limitaciones o exclusiones anteriores no se apliquen a su caso.
L
EUREKA PRODUCT
GENUINE
P: ¿Por qué debo usar sólo bolsas de papel, bandas y piezas genuinas de Eureka en mi aspiradora eléctrica Eureka?
R: El uso de productos genuinos Eureka, fabricados de acuerdo con nuestras especificaciones exactas y diseñados poniendo énfasis en la
reguntas y respuestas sobre los productos genuinos de Eureka
P
Bloomington, Illinois 61701
THE EUREKA COMPANY
¡Si busca el valor genuino de Eureka, no acepte imitaciones!
calidad, el rendimiento y la satisfacción del cliente, asegura una vida útil larga y la eficiencia de piezas de su aspiradora eléctrica. En general,
podrá ahorrar dinero y mantener limpia su casa.
de arriba. Para asistencia en la identificación adicional, puede llamar a nuestro número gratuito, 5670-6169, para enterarse de la situación de
la Estación de Garantía Autorizada de Eureka.
bolsas de papel y piezas pensando que eran genuinas. Desafortunadamente, muchos de estos clientes descubrieron las diferencias después
P: ¿Cómo puedo estar seguro de que estoy usando sólo productos genuinos Eureka en mi aspiradora?
R: Típicamente, los productos empacados y las bolsas de papel pueden identificarse por el símbolo de “Genuine Eureka Product” (vea la ilustración
de experimentar problemas.
P: ¿Hay alguna diferencia entre las bolsas de papel, correas y piezas “hechas a medida” o de “imitación y las Genuinas de Eureka”?
R: Sí, hay algunas diferencias muy importantes en cuanto a material, calidad y confiabilidad. Muchos clientes han cometido el error de comprar
Page 17

GARANTIA LIMITADA DE EUREKA
México: 5670-6169
Su aspiradora Eureka está garantizada contra todo defecto de material y mano de obra, bajo su uso normal en el hogar, durante un período de un año.
La garantía se otorga sólo al comprador original y a los miembros de su familia inmediata. Está garantía está sujeta a las siguientes disposiciones.
o que cubre esta garantía
L
o que no cubre esta garantía
L
cepillo circular.
• Las piezas de la aspiradora que requieran reemplazarse por el uso normal, tales como las bolsas para polvo, filtros, bandas de impulsión, bombillas y cerdas del
• Las averías o los daños causados por negligencia, abuso o uso que no esté de acuerdo con la Guía del propietario.
• Los defectos o daños causados por un servicio no autorizado o el uso de piezas que no sean genuinas de Eureka.
Eureka Company, a su elección, reparará o reemplazará cualquier aspiradora o pieza defectuosas cubiertas por esta garantía. Como cuestión de política de la
garantía, Eureka Company no devolverá el precio de compra al consumidor.
o que hará Eureka Company
L
Tenga la bondad de rellenar y enviar la tarjeta de registro de la garantía que acompaña a su aspiradora.
egistro de la garantía
R
Para informarse de cuál es la Estación de Garantía Autorizada de Eureka más cercana, en Canadá y los Estados Unidos, llame gratuitamente al teléfono:
Para obtener servicio en garantía, debe enviar la aspiradora o pieza defectuosa junto con una prueba de la compra a cualquier Estación de Garantía Autorizada de
Eureka. Puede encontrar la estación más cercana en la Páginas Amarillas. Asegúrese de que las Estación de Garantía esté "Autorizada por Eureka".
ómo obtener servicio en garantía
C
Si lo prefiere, puede escribir a The Eureka Company, Service Division, 807 North Main Street, Bloomington, Illinois 61701, USA. En Canada escriba a The Eureka
Si es necesario que envíe la aspiradora fuera de su comunidad para que sea reparada en garantía, usted deberá pagar los gastos de envío hasta la Estación de
Company, 866 Langs Drive, Cambridge, Ontario N3H 2N7.
Garantía Autorizada de Eureka. Los gastos de envío de regreso serán abonados por la Estación de Garantía. Cuando envíe piezas para su reparación, tenga la bondad
de incluir el modelo, tipo y número de serie que aparecen en la placa de datos de la aspiradora.
Page 18

POLIZA DE GARANTIA
Grupo Gomo, S.A. de C.V . garantiza este producto por el término de UN AÑO, en todas sus
partes y mano de obra, contra cualquier defecto de fabricación y funcionamiento; a partir del
día de su entrega.
Tratándose de productos que requieran enseñanza o adiestramiento en su manejo o de la
instalación de aditamentos, accesorios, implementos o dispositivos, la presente GARANTIA
entrará en vigor a partir de la fecha en que hubiere quedado operando normalmente dicho
producto después de su instalación en el domicilio que haya señalado el consumidor.
CONDICIONES
1. Para hacer efectiva esta garantía, no podrán exigirse mayores requisitos que la
presentación de esta POLIZA con el producto, en el lugar donde éste fue adquirido o en
cualquiera de los Centros de Servicio.
2. La Compañia promete reparar o cambiar este producto y todas las partes defectuosas
sin cargo alguno. Pagaremos los gastos de transportación de ida y vuelta.
3. El tiempo de reparación en ningún caso será mayor a 30 días, contados a partir de la
recepción del producto, en cualquiera de nuestros Centros de Servicio.
4. El consumidor podrá adquirir refacciones y partes en cualquiera de nuestros Centros de
Servicio.
ESTA GARANTIA NO ES VALIDA EN LOS SIGUIENTES CASOS:
I. Cuando se necesita mantenimiento regular, algunas partes de la aspiradora no se cubren
en la garantía, como las bolsas de papel desechables, los filtros, bandas de impulsión,
bombillas y cerdas del cepillo circular.
II. Cuando el producto ha sido utilizado en condiciones distintas a las normales.
III. Cuando el producto no ha sido operado de acuerdo el instructivo de uso, en idioma
español, proporcionado.
IV. Cuando el producto ha sido alterado o reparado por personas no autorizadas por la
Empresa.
Producto:
Modelo:
Marca:
No. de serie:
Fecha de Compra:
EL CONSUMIDOR PODRA SOLICITAR QUE SE HAGA EFECTIVA LA PRESENTE GARANTIA ANTE
LA PROPIA CASA COMERCIAL DONDE ADQUIRIO EL PRODUCTO.
NOTA: En caso que la presente garantía se extraviara, el consumidor puede recurrir a su proveedor para
que le expida otra póliza de garantía, previe presentación de la nota de compra o factura respectiva.
Nombre del distribuidor:
Dirección:
Colonia o población:
Deleg. o municipio: C.P.
Ciudad: Estado:
Teléfono:
NOM
LA GARANTIA ESTA EN EL NOM
Grupo Comercial Gomo (Corporativo)
Blvd. Adolfo López Mateos No. 2370 2do. Piso
Col. Altavista Deleg. Alvaro Obregón
México, D.F . C.P. 01060 T el. 55 50 66 50
Tel. 56 70 61 69 Con 15 Lineas Fax: 55 81 93 09
Centro de Servicio Matriz
Grupo Comercial Gomo, S.A. de C.V .
Av. Tlahuac 171 Col. Santa Isable Industrial
Delegación Iztapalapa, México, D.F . 09820
01 800 710 47 10
Page 19

MANTENIMIENTO
Estas instrucciones son una guía para un mantenimiento de rutina. Para evitar llamadas
innecesarias al centro de servicios de reparaciones y partes, limpié el filtro del motor,
cambie la bolsa/filtro desechable de papel y vacíe el tanque con frecuencia. Vacíe todo el
líquido después de cada uso.
Filtros de Motor
NOT A: Apague el interruptor de corriente y desconecte el cordón eléctrico antes
El/los filtro(s) del motor deben estar siempre limpios para obtener una máxima eficiencia
y el debido flujo de aire. Periódicamente cambie la bolsa/filtro desechable de papel.
Debe cambiarse la bolsa con frecuencia cuando se aspiran partículas muy finitas como
polvo de cualquier tipo que tiende a tapar el/los filtro(s).
de limpiar la aspiradora. Nunca la haga funcionar sin filtro(s) de motor o
filtro(s) defectuosos.
Cómo limpiar los filtros de goma espuma y bolsa/filtro desechable de papel
1.
Quite la cobertura del motor.
2.
Saque los filtros del depósito
del flotador.
3.
Sacuda vigorosamente el filtro de
goma espuma sobre un envase
apropiado para ese fin.
El filtro de goma espuma puede
lavarse en agua enjabonada para
limpiarlo mejor. Quite el agua
sacudiéndolo antes de volver a
instalarlo. El filtro de goma espuma
debe estar bien seco antes de usarlo
para aspirar en seco o antes de
guardarlo.
Filtros para
aspirar en mojado
Depósito
del
flotador
Filtro de
goma
espuma
Filtros para
aspirar en seco
Depósito
del
flotador
Filtro de
goma
espuma
4.
Vuelva a colocar el filtro de goma
espuma sobre el depósito del
flotador;
coloque la liga de goma
alrededor de la parte inferior del
Liga de
goma
Bolsa/filtro
desechable
de papel
filtro de goma espuma si piensa
aspirar en mojado, en caso contrario
siga con el paso número 5.
5.
Instale un nuevo filtro desechable
de papel;
asegúrela con la liga de
goma alrededor de la parte
superior de la bolsa/filtro en el caso
de aspirar en seco.
Use únicamente filtros genuinos de la
marca EUREKA.
Liga de
goma
Cómo limpiar el tanque y guardar la aspiradora
NOTA: Apague el interruptor de corriente y desconecte el cordón eléctrico antes
de limpiar el tanque.
1. Vacíe todo el líquido del tanque y enjuague bien el interior antes de guardar la
aspiradora, especialmente luego de aspirar substancias mojadas o pegajosas,
con excepción de agua pura. Use agua tibia enjabondada para limpiar el tanque
y los accesorios si se han aspirado líquidos pegajosos.
2. Limpié y seque el tanque, la manguera y los accesorios antes de guardarlos
en un lugar fresco y seco.
12
Page 20

Soplador desmontable (en determinados modelos)
NOTA: Siempre use lentes protectores (no incluidos). Nunca apunte el soplador
hacia personas, animales u objetos que pueden ser dañados por basura
despedida por el soplador. Estos aparatos NO deben ser usados para
proveer electricidad a atomizadores para pintar ni para suministrar aire a
ningún atomizador.
.
1.
1. Afloje los pestillos del
soplador desmontable
haciéndolos girar.
2. Levante el soplador
desmontable.
3. Quite el difusor de aire.
4. Presione y haga girar el
tubo de extensión de 6.5
cms. (2 1/2 pulgadas) de
diámetro sobre la salida
del soplador.
5. Coloque la boquilla del
soplador.
6. Sostenga el soplador
desmontable por la
manija grande provista
para ese fin.
7. En caso necesario,
sostenga la manija
auxiliar para lograr un
mejor control.
8. El soplador desmontable
puede volver a ponerse
y fijarse a la tapa en
cualquier posición. Para
seguridad, la salida del
soplador debe apuntar
en dirección contraria al
usuario.
9. Vuelva a poner el difusor
de aire.
2.
3.
7.
Interruptor de
corriente
""
"
""
6.
<<
<<
<
5.
4.
11
Page 21

Manija para levantar la aspiradora
Precaución: No trate de levantar y cargar la aspiradora para mojado/seco jalando
la tapa o el mango del soplador desarmable. Use únicamente la
manija que se encuentra sobre el tanque.
Corte automático de succión
NOTA: Esta máquina debe ser usada siempre en posición vertical, en caso
El corte de succión automático funciona cuando el tanque está lleno de líquido. Al ir
llenándose el tanque, el flotador (dentro del depósito) va subiendo hasta que se asienta
contra la base del motor. Esto corta la succión haciendo que el motor haga un ruido
más agudo. En este caso, vacíe el tanque.
El corte de succión automático también se activa si la aspiradora se cae sobre un
costado. Para seguir usándola, desconéctela y enderécela. Espere unos segundos para
que el motor se pare del todo y baje el flotador; vuelva a prender el motor.
contrario el flotador cortará la succión automáticamente.
Como vaciar contenidos líquidos o secos del tanque
NOTA: Apague el interruptor de corriente y desenchufe el cordón eléctrico antes
1. Levante la manguera más arriba
únicamente.)
2. Saque la manguera.
3. Saque la tapa.
de vaciar el tanque.
del tanque para drenar dentro
del tanque el exceso de líquido.
(Para uso en mojado
4. Vacíe el contenido líquido en un
desagüe o, en el caso de basura
seca, en un bote de basura.
5. Vuelva a colocar la tapa y la
manguera y siga limpiando.
Soplador
La manguera, el tanque y los accesorios deben ser limpiados antes de usar el
soplador.
NOTA: Siempre use lentes protectores (no incluidos). En caso de usarlo durante
un periodo prolongado de tiempo, se recomienda protección en los oídos.
Nunca apunte el soplador hacia personas, animales u objetos que pueden
ser dañados por basura despedida por el soplador. Estos aparatos NO deben
ser usados para proveer electricidad a atomizadores para pintar ni para
suministrar aire a ningún otro atomizador.
1. Coloque el acople de la
manguera en la salida del
soplador
2. Use una manguera de 3.1 cms.
(1 1/4 pulgada) de diámetro y
tubos de extensión para
dirigir aire a espacios pequeños.
3. Use la manguera opcional de 6.5
cms. (2 1/2 pulgadas) de
diámetro, el tubo de extensión y
la boquilla del soplador para
limpiar sectores grandes.
Boquilla del soplador (opcional)
10
Salida del
soplador
Acople
de la
manguera
Page 22

COMO USARLA
La aspiradora Eureka para mojado/seco ha sido diseñada para ser utilizada en la limpieza
del hogar. Con los accesorios usted puede limpiar en el garaje, taller, o patio. Y, sin
embargo es tan flexible que sirve para usar en casa. Aspira al instante agua que se
derramó en el piso, agua en el sótano o de cualquier accidente de cocina.
NOTA: Cuando use un cordón eléctrico extra, asegúrese que las conexiones no entren en
contacto con nada líquido. Nunca opere su aspiradora sin el filtro del motor o con un
filtro defectuoso. Nunca utilice la bolsa de papel para aspirar en mojado. Vea la
sección de mantenimiento para informarse sobre el cuidado de los filtros de papel y
de goma espuma. En caso de usarlo durante un período prolongado de tiempo, se
recomienda utilizar protección en los oídos.
Aspirado en seco
Use la boquilla de piso (quite el secador de goma) o la manguera para aspirar en seco.
Aspirado en mojado
Coloque el secador de goma en la boquilla de piso para aspirar agua u otros líquidos.
Para una limpieza más eficiente, los filtros deben estar limpios.
Interruptor de
corriente
Acople de
manguera
Entrada de
manguera
Interruptor de
corriente
1. Presione y haga girar el acople de
la manguera en la entrada para la
misma.
2. Conecte el cordón eléctrico en el
toma corriente. Utilice un cordón
eléctrico (no incluido) para los
modelos que vienen con un cordón
corto. El cordón eléctrico debe estar
marcado “Apropiado para el uso de
aparatos exteriores”.
NOTA: Cuando use un cordón
eléctrico extra, asegúrese
que la conexión no entre en
contacto con nada líquido.
Use un cordón eléctrico para
conexión a tierra con enchufe
de 3 dientes y un receptor de 3
polos; medida 16, tipo SJTWA. Recomendamos el uso del
cordón eléctrico Eureka,
número de parte 54806,
disponible en la Compañia
Eureka. Enlace los cordones
para que no se desconecten.
Modelo con sopladora desmontable
3. Para encender la máquina apriete el
interruptor de corriente.
NOTA: El interruptor del soplador
desarmable se encuentra
arriba del mango del
soplador.
4. Inserte el o los tubos de extensión
de 3.1 cms. (1 1/4 pulgadas) de
diámetro en la manguera y el
accesorio que desea usar.
9
Page 23

5. (
Para modelos con sopladoras
desmontables únicamente
difusor de aire haciéndolo entrar en el
escape del soplador desarmable.
) Empuje el
Para Guardar Los Accesorios
De T odos Los Modelos
6. Guarde los tubos de
extensión de 3.1 cms. (1 1/ 4
pulgadas) de diámetro en la
parte de atrás del tanque.
Secador de
<
<<
<<
goma
Boquilla
para piso
7. Presione el secador de goma
en la boquilla para piso al
aspirar en mojado. Quite y
guarde el secador de goma
aparte para que mantenga
mejor su forma y ajuste.
<<
<
<<
<
<<
<<
<
<<
<<
8. Coloque la boquilla para piso
de frente en el depósito del
tanque.
9. Al guardar la mangera Déjela
conectada a la aspiradora.
Enróllela alrededor del tanque
y para asegurarla deslice la
punta del tubo de extensión
debajo de una de las manijas
con que se levanta la
aspiradora.
10. Al guardar el cordón eléctrico
Enrolle el cordón alrededor
del tanque. Sujete el enchufe
al cordón para que no se
desenrolle.
8
Page 24

COMO ARMAR LA ASPIRADORA
PRECAUCIÓN: Arme toda la aspiradora antes de usarla.
1. Presione los pestillos hacia
adentro; levante la tapa del
motor.
Pestillo
Pestillo
3. Instale los filtros para el tipo de limpieza que va a hacer.
NOTA: Los filtros se colocan de la misma manera en la aspiradora mojado/
seco (que aparece en la ilustración) y en la que tiene también sopladora
desmontable.
PARA ASPIRAR EN
MOJADO UNICAMENTE:
NOTA: No uitilize la bolsa/filtro
desechable de papel cuando
aspire en mojado.
Depósito
del
flotador
a. Jale el filtro de
goma espuma
sobre el depósito
del flotador.
b. Coloque la liga de
goma alrededor de
la parte inferior del
filtro de goma
espuma.
2. Teniendo el tanque al revés,
coloque cada rueda giratoria en
uno de los agujeros y presiónela
hacia adentro.
PARA ASPIRAR EN SECO
UNICAMENTE:
Depósito
del
flotador
a. Jale el filtro de
goma espuma
sobre el depósito
del flotador.
b. Deslice la bolsa/
filtro desechable de
papel sobre el filtro
de goma espuma.
c. Coloque la liga de
goma alrededor de
la parte superior de
la bolsa de papel.
Interruptor de
corriente
Entrada de
manguera
4. Coloque la tapa del motor
sobre el tanque de manera
que el interruptor de
corriente quede hacia el
frente arriba de la entrada de
la manguera.
7
Page 25

PARTES DE LA ASPIRADORA MOJADO/SECO CON
SOPLADORA DESMONTABLE
Primero saque de la caja los accesorios, luego la aspiradora. Puede ser que haya más
accesorios dentro del tanque.
Filtro de goma
espuma
Bolsa/filtro
desechable de
papel
Accesorios de 3.1 cms.
(1 1/4 pulgadas) de diámetro
Manguera
Boquilla para piso
Secador de goma
Liga de goma
Ruedas giratorias
Tubos de extensión
Accesorios de 6.5 cms. (2 1/2 pulgadas) de diámetro
Boquilla sopladora
T ubo de extensión
Difusor de aire
Accesorios de 6.5 cms. (2 1/2 pulgadas) de diámetro
(únicamente en algunos modelos)
Manguera
6
Boquilla para
uso general
Page 26

PARTES DE LA ASPIRADORA MOJADO/SECO
Primero saque de la caja los accesorios, luego la aspiradora. Puede ser que haya más
accesorios dentro del tanque.
Filtro de goma
espuma
Bolsa/filtro
desechable de
papel
Accesorios de 3.1 cms.
(1 1/4 pulgadas) de diámetro
Manguera
Boquilla para piso
Secador de goma
Liga de goma
Ruedas giratorias
Tubos de extensión
Accesorios de 6.5 cms. (2 1/2 pulgadas) de diámetro
(únicamente en algunos modelos)
T ubo de extensión
Manguera Boquilla
sopladora
Boquilla para
uso general
5
Page 27

INFORMACION GENERAL
Corte automático de succión
NOTA: Esta máquina debe ser usada siempre en posición vertical, en caso
contrario el flotador cortará la succión automáticamente.
El corte de succión automático funciona cuando el tanque está lleno de líquido. Al ir
llenándose el tanque, el flotador (dentro del depósito) va subiendo hasta que se asienta
contra la base del motor. Esto corta la succión haciendo que el motor haga un ruido
más agudo. En este caso, vacíe el tanque.
El corte de succión automático también se activa si la aspiradora se cae sobre un
costado. Para seguir usándola, desconéctela y enderécela. Espere unos segundos para
que el motor se pare del todo y baje el flotador; vuelva a prender el motor.
Información sobre servicio de reparaciones y partes
Las instrucciones en este folleto sirven como guía para el mantenimiento rutinario. A fin
de obtener información adicional sobre el servicio de reparaciones y partes telefonee a
nuestro número sin cargo para averiguar sobre la oficina de garantía autorizada por
Eureka más cercana. Debe usted saber los números de modelo, tipo y serie cuando
llama al:
México: 5670-6169
para informarse sobre la oficina de garantía autorizada por Eureka más cercano a su
domicilio. Si prefiere, escribanos a: La Compañia Eureka, Bloomington, Illinois 61701,
USA. En Canada escriba a La Compañia Eureka, 866 Langs Drive, Cambridge, Ontario
N3H 2N7. Vea la sección Garantia Eureka, donde encontrara información completa
sobre el servicio de reparaciones y partes.
NUNCA PONGA ACEITE en el motor . Los cojinetes están permanentemente
lubricados y sellados herméticamente.
Información sobre la placa de datos
El modelo, tipo y número de serie aparecen
en la placa de datos que está en la parte
trasera de la tapa. Cuando llame por
cualquier asunto relacionado con el servicio
de reparaciones y partes, siempre tenga a
mano estos números para obtener
información inmediata y completa sobre el
servicio de su máquina.
4
MODEL TYPE SERIAL NO.
127 7.5 60
VOLTS AMPS. HERTZ
SERVICIO DE REPARACIONES Y PARTES: 1-800-282-2886
THE EUREKA COMPANY
BLOOMINGTON, ILLINOIS 61701
Page 28

Instrucciones para la conexión de corriente a tierra
Este aparato debe ser conectado a tierra. Si funciona mal o deja de funcionar, la conexión a tierra provee una salida de menor resistencia para la corriente eléctrica lo cual
reduce el riesgo de recibir una descarga eléctrica. Este aparato ya viene con un cordón
que tiene un conductor que conecta el equipo a tierra y un enchufe especial de conexión a tierra. El enchufe debe ser enchufado a un toma corriente con conexión a
tierra, correctamente instalado de acuerdo con todos los códigos y reglamentos locales.
PELIGRO
La conexión incorrecta del conductor a tierra puede resultar en una descarga eléctrica.
Consulte con un electricista calificado o personal del servicio de reparaciones y partes,
si no está seguro de que el toma corriente está bien instalado con salida a tierra. No
modifique el enchufe que viene con la aspiradora. Si no entra en el toma corriente,
consiga a un técnico calificado para instalar el toma corriente correcto.
Esta aspiradora es para ser usada en un circuito nominal de 120 voltios y tiene un
enchufe a tierra como el de la Ilustración A. Puede usarse un adaptador temporario
como el que se muestra en la Ilustración B para conectar este enchufe a un toma
corriente de dos polos, tal como aparece en la ilustración, para el caso de que no se
cuente con un toma corriente con conexión a tierra. El adaptador temporario debe ser
usado únicamente hasta que un electricista calificado coloque un toma corriente
debidamente conectado a tierra, Ilustración A. La lengüeta verde y que sobresale del
adaptador debe ser conectada a una conexión a tierra permanente como ser la tapa de
una caja de enchufe a tierra. Siempre que se use el adaptador, debe utilizarse un tornillo
de metal para sujetarlo en el lugar correspondiente.
NOTA: En Canadá no se permite el uso del adaptador temporario.
El diente de conexión a
tierra es el más largo de
los tres
Caja de enchufe con
conexión a tierra
Ilustración A
Tornillo de
metal
Adaptador
Lengüeta de
corriente a tierra
Caja de enchufe con
conexión a tierra
Ilustración B
3
Page 29

IMPORTANTE PARA SU SEGURIDAD
Hay precauciones básicas a seguir siempre que se usa un aparato eléctrico, incluyendo
las siguientes.
LEA TODAS LAS INSTRUCCIONES ANTES DE USAR ESTA ASPIRADORA.
PRECAUCION
Para reducir el riesgo de incendio, descarga eléctrica o accidentes:
• No deje su aspiradora afuera (a la intemperie). Guárdela bajo techo.
• No la deje enchufada cuando no la está usando. Apague el interruptor y desenchufe el
cordón eléctrico cuando termine de usarla y antes de limpiarla.
• No deje que se use como un juguete. Preste especial atención cuando un niño la usa
o cuando un niño está cerca.
• Usela sólo como lo indica este manual. Use sólo los accesorios recomendados por el
fabricante.
• No la use con un cordón o enchufe en mal estado. Si la aspiradora no funciona bien,
si ha recibido un golpe o si está en mal estado, si se ha dejado al aire libre, o se ha
mojado, llévela al centro de servicio de reparaciones y partes antes de volver a usarla.
• No jale del cordón para moverla, evite que el cordón roce esquinas y bordes filosos. Al
usar la aspiradora no la pase sobre el cordón. Asegúrese de que el cordón no esté
cerca de una superficie caliente.
• Conecte la aspiradora únicamente a una toma corriente con conexión a tierra (vea las
instrucciones sobre conexiónes a tierra).
• No use cordones de extensión o toma corriente con menos capacidad de corriente
que la necesaria.
• Apague todos los controles antes de desconectar la aspiradora.
• No la desconecte jalando del cordón. Para desconectar, tome el enchufe, no el cordón.
• No toque el enchufe o la aspiradora con las manos húmedas.
• No ponga ningún objeto en ninguna de las aberturas. No use la aspiradora si ve que
cualquiera de las aberturas está bloqueada; manténgala limpia de polvo, pelusa, cabello
o cualquier cosa que no deje pasar el aire.
• Esta aspiradora produce succión. Cuídese de que el cabello, ropa suelta, dedos y
todas las partes del cuerpo estén lejos de las aberturas y las partes movibles.
• No aspire nada que se esté quemando o humeando, como cigarrillos, fósforos o cerillos
o cenizas calientes de la chimenea o del asador. Cualquier chispa o brasa puede
empezar un incendio en la basura dentro del tanque.
• No la use sin el filtro del motor o con un filtro en malas condiciones.
• Use lentes protectores o evite contacto con la salida de aire ya que las partículas en
el aire pueden dañar los ojos.
• Tenga cuidado especial al limpiar las escaleras.
• Si la aspiradora se tumba mientras la está usando, desconéctela inmediatamente,
enderécela y espere que el motor se pare por completo. Esto permite que el flotador
vuelva a su posición normal y hace que el aire pase como debe hacerlo.
• No la use para aspirar líquidos inflamables o combustibles como la gasolina, ni la use
en áreas donde los hay.
• Guarde su aspiradora bajo techo y en un lugar fresco y seco.
• Asegúrese que el área donde usa la aspiradora tenga buena luz.
• Desconecte los aparatos eléctricos antes de pasarles la aspiradora.
GUARDE ESTA INSTRUCCIONES
2
Page 30

Guía del
propietario de la
aspiradora
mojado/seco
serie 2800
Aspiradora para
mojado/seco
Consulte la placa de datos de la aspiradora para ver el modelo y el
número de serie. Anote el número y guárdelo para futura referencia.
Número de modelo Número de serie
POR FA VOR LEA T ODAS LAS INSTRUCCIONES RELACIONADAS
CON SU AP ARA TO Y GUARDE ESTE MANUAL P ARA SU FUTURA
REFERENCIA. SIGA TODAS LAS ADVERTENCIAS E
INSTRUCCIONES MARCADAS EN EL MISMO.
No. de Parte 58418A (1/01)
www.eureka.com
Aspiradora mojado/seco
con sopladora desmontable
Tipo domestico
Impreso en EE.UU.
 Loading...