

Page 1

I300 Robotic Vacuum Cleaner
INSTRUCTIONS MANUAL
Please keep this instruction Manual carefully,
and read it before operating
Page 2

Safety instructions
Product introduction
Operation introduction
Product maintenance
Troubles shooting
1
5
9
15
19
1.It is not allowed to dismantle the product by non-technicians
without permit.
2.The product only applies the original power adapter, other-
wise, it may bring damage to the product.
3.Please do not touch electric wire, socket or power adapter
with wet hands.
4.Please pay attention to the cloth curtains, substances that
are easy to entangle, or the user's body to ensure that not to be
rolled into the driven wheel.
5.Please do not get the product close to cigarette butt, lighter
or other types of flames.
6.The product is for indoor use only.
7.It is not allowed to put weight of 10kg or more or stand on
the product.
8.Please do not use the product in the damp environment
such as bathroom and do not use it to absorb liquid.
9.Before using the product, please remove all vulnerable goods
and fragile items such as glass cup and lamp as well as the
things which may entangle the side brush or block the air inlet,
for example, electric wire,paper,curtain,etc.
10.Please switch it off when the product is not going to be
used for a long time or transported.
11.Please check if the adapter is well connected with the
socket betofre charging.
12.The working temperature for this product is 0℃-40℃.
13.Please remove the battery before scrap of the product.
14.Users should recover the old battery when you change the
battery.
15.It is forbidden to let children,mentally retarded person or
person who do not have common knowledge or
experience about the domestic households without surveil-
lance.
16.Please do not dismantle the battery by yourself. Please
contact the after-sales service if you want to change the
battery.
This appliance is not intended to be used by children and
person with reduced physical, sensory or mental capabilities, or
lack of experience and knowledge on the domestic household,
unless they have been given supervision or instruction concern-
ing use of the appliance by a person responsible for their safety.
Children should be supervised to ensure that they do not play
with the appliance.
Switch off before cleaning or maintaining the appliance
‒ The battery in appliance must be removed from the appli-
ance before it is scrapped;
‒ The appliance must be disconnected from the supply mains
when removing the battery;
‒ The battery must be removed and discarded according to
local laws and regulations before disposal of the appliance.
This appliance batteries that are only replaceable by skilled
person.
WARNING: For the purposes of recharging the battery, only use
the detachable supply unit GQ12-240060 provided with this
appliance
1
2
Page 3
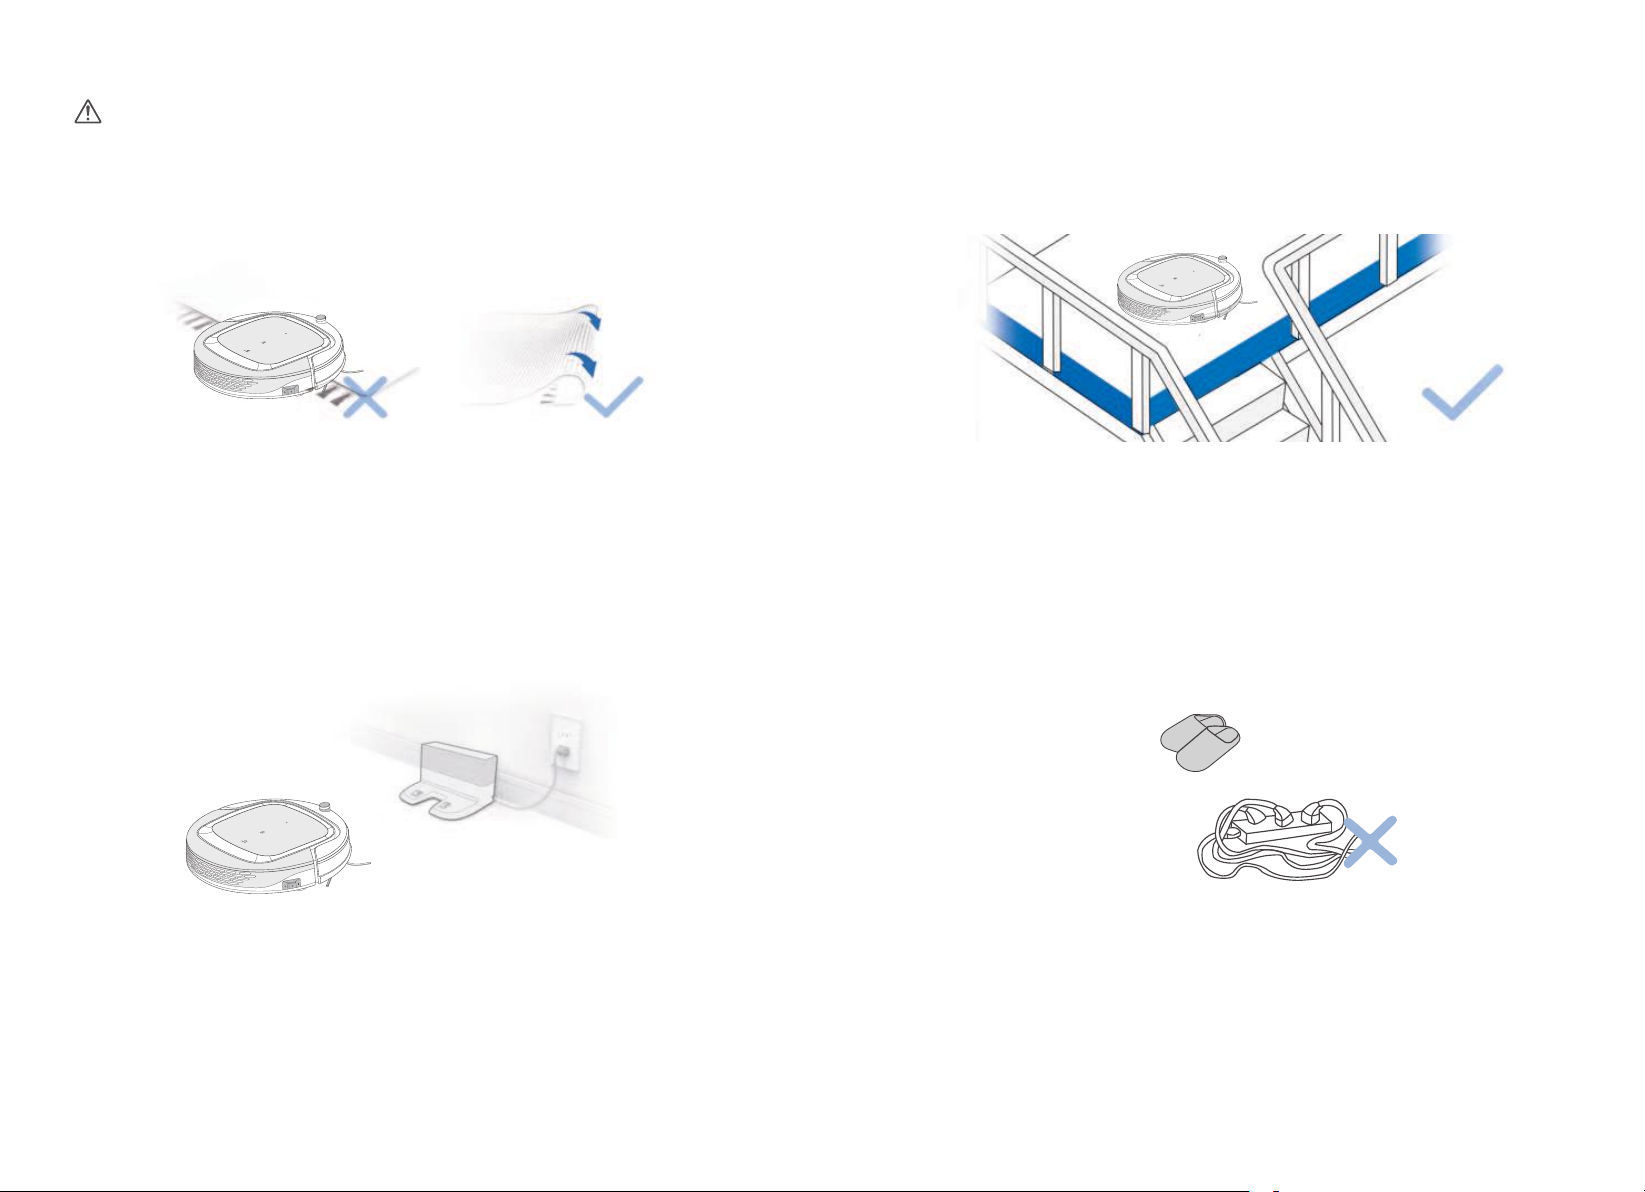
Notes Before Cleaning
WARNING: Do not use your robot on wet surfaces or surfaces
1
with standing water.
Before using the product on a rug with tasseled edges,
please fold the rug edges under.
2
Remove power cords and small objects from the floor that the robot
could be obstructed by, and tidy up the area to be cleaned by putting
furniture, such as chairs, in their proper place.
3
It may be necessary to place a physical barrier at the edge of a drop to
stop the unit from falling over the edge.
4
Please remove all the stuff on the floor, like slipper, cord, curtain,
etc. to make sure the robot works regurally.
3
4
Page 4

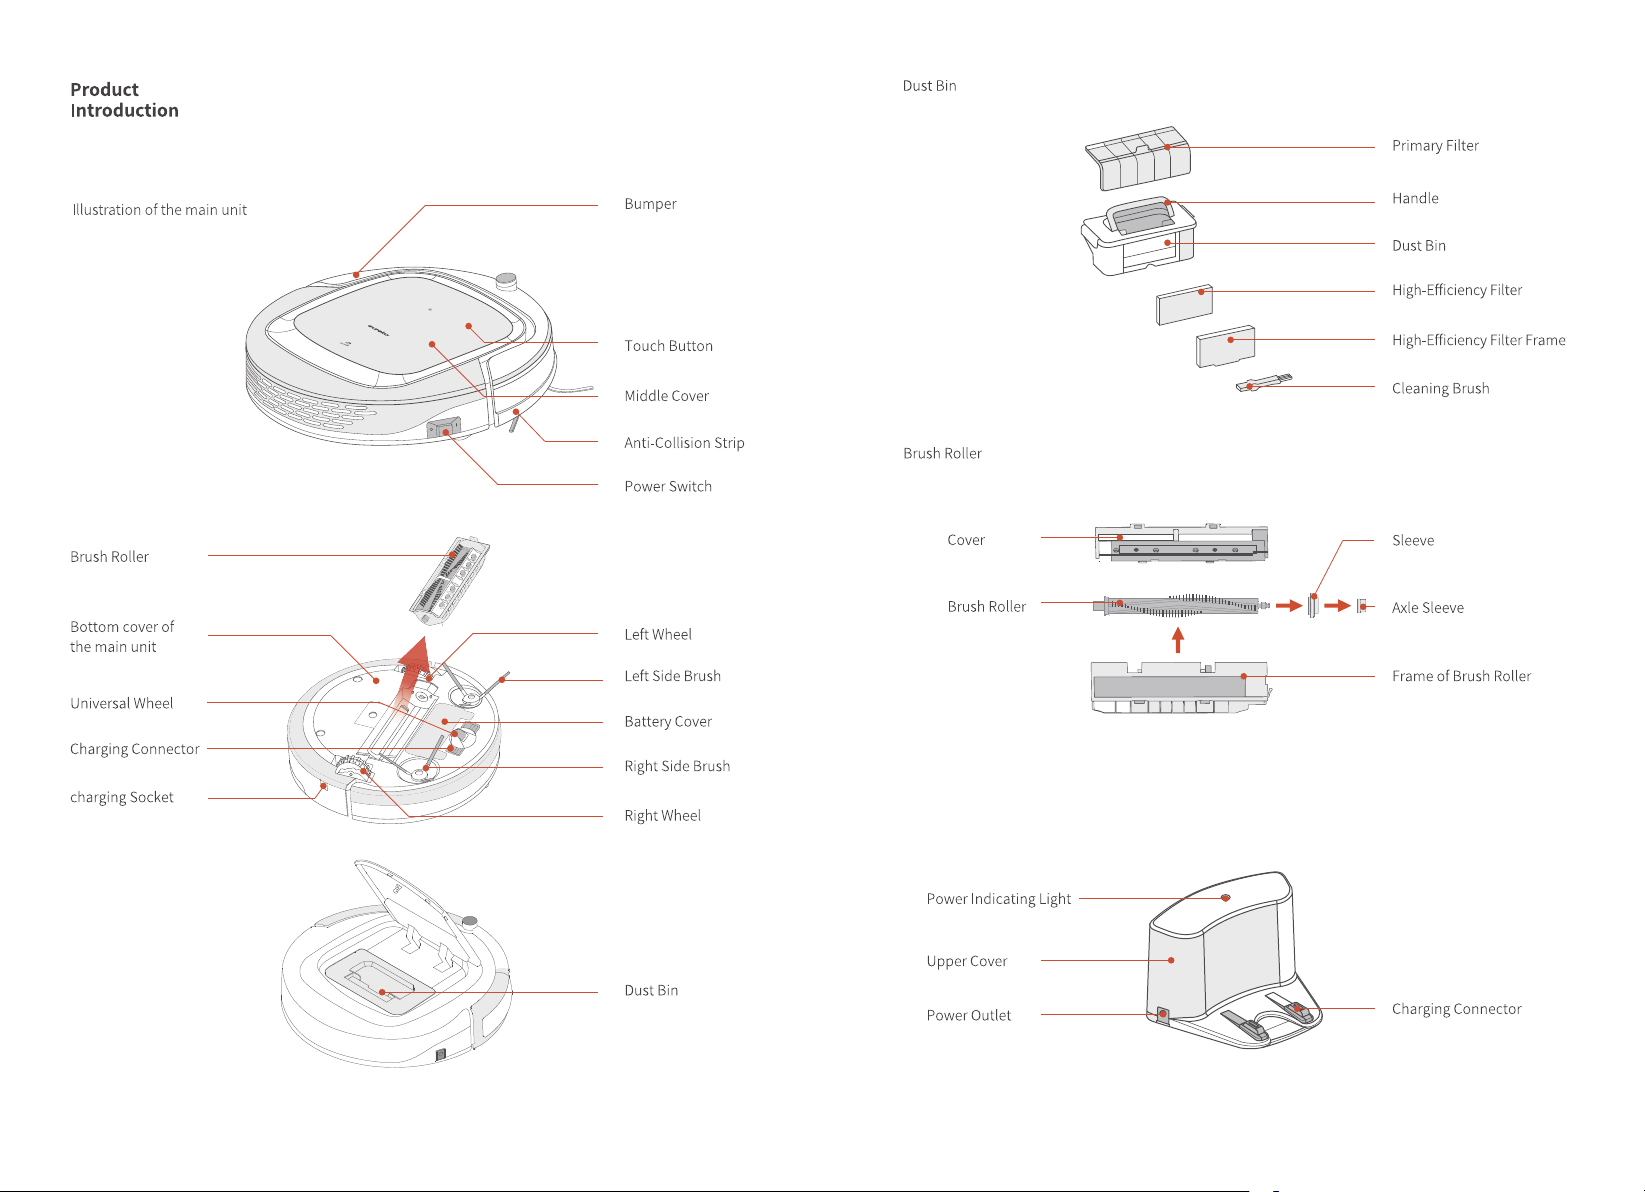
Main Unit
Charging Dock
Power Adapter
Side Brush
Remote Control
High-Efficiency Filter
Manual Instruction
7
7
Manual
x 4
5
Instruction
6
Page 5
Charging Dock
7
8
Page 6

Illustration of the Main Unit and Remote Control
Firstly switch the “On/Off” button on unit body, indicator ” ” light on cover flash blue and your I300
robot is ready for cleaning.
Press the “ ” light on machine middle cover, to start the operation of cleaning or stop the operation of
cleaning.
The signal information of “ ” indicator light as below.
Switch the “On/Off” button, your I300 robot is ready for cleaning and indicator light shows blue color,
and the light will shut off if no operation in 30 min.
Robot system reset, the light will quick-flash blue for 7 seconds.
Press the “ ”, the light flash blue for 3 times , then start to cleaning and the light keeps in blue color.
When in low battery level, the “ ” light will flash red color slowly.
When back to charging dock and start charging, the “ ” light will keep flash blue color slowly, the light
will keep in blue color once full-charged.
Once meet any problems, the “ ” indicator light will flash red color quickly.
1
Press the “ ” button and hold for a while to start the setting of time. Press the direction
arrows to set times and finally press the “ ” button to save setting.
2
Shortly press ” ” button to start or pause the cleaning of your I300 robotic cleaner.
3
Press “ ” , to start spot deep cleaning for specific area.
4
Press the ” ” button to change the cleaning mode,
MODE1 :Edge cleaning ;
MODE2 :Zone cleaning;
MODE3: Auto cleaning;
MODE4:Zigzag cleaning
Kindly note that there will have a pause if you change MODE4 to MODE1; more details,please see the
page 12 of the manual instruction.
Cautions
Install the battery to remote conrtol before operations, or take the battery out of remote if long time
no usage of remote.
Remote control
1. LCD Display
2. Direction Control Buttons
1
3. Start / Stop Button
4. Time Schedule Button
2
3
7
8
4
5
6
The operation of remote control is similar as operation on TV remote, press the buttons and control
your I300 cleaner directly. Firstly switch the On/Off button on your i3 robot’s body and robot is ready
for cleaning:
9 10
5. Return To Charge Mode Button
6. Mode Settings Button
7. Current Time Setting Button
8. Spot Cleaning Mode Button
Page 7

Caution and Room Preparation before Operating Your I300 Robot.
Put the charging dock on the ground against the wall and remove all the obstacles 2-3 meters
in front of the dock as shown in the figure below.
If your I300 robot is in the power-off state,please switch it on.
03.
You can charge your I300 robotic cleaner by the following two ways.
a. Plug the power adapter directly on your I300 robotic cleaner with the other end connected with
power as shown in the pic.a.
b.Please press “ ”remote control to make your I300 robotic cleaner back to charging dock by itself
as shown in the pic.b.
a.When your I300 robotic cleaner is in charging, the “ ” indicator light will flash blue color slowly
b.When the charging is completed, the “ ” indicator light will keep in blue color.
c.When the power is not enough in standby mode,
message ”please charge” and “ ” indicator light will become red color.
d.When the power is not enough in the working model,
and look for charging dock automatically and “ ” indicator light flash red color.
Methods for extending the lifetime of the battery:
a.Please charge
b.When the power is not enough, please charge it immediately.
c.When the cleaning is finished or the power is too low,
return the charging dock automatically.
your I300 robotic cleaner will not be used for a long time, please charge it fully, take the
d.If
battery out and keep it in the dry and ventilated place.
e.If
your I300 robotic cleaner is not used for 3 months, please charge it for 12 hours at one time.
your I300 robotic cleaner for 12 hours for the first use.
your I300 robotic cleaning will send out a voice
your I300 robotic cleaning will stop cleaning
your I300 robotic cleaner will start to
11 12
Page 8

Reservation Schedule Cleaning Settings
Make sure your I300 robotic cleaner is in Standby or Charge state, and then long press the
1
“ " button on the remote control, the remote control to enter the schedule setting
mode;
At this point the remote control display appears flashing numbers, change the flashing number by
2
press up and down button, set a number by left and right buttons to move to the next number to
be set.
After setting the remote control at your I300 robotic cleaner, press the remote control “ " key,
3
the success of the reservation machine will display the corresponding appointment time.
Introduction Of The Cleaning Modes
When press “ ”,the remote control displays “ 1 ”, your I300 robotic cleaner will enter to the edge cleaning,
ceaning along with the obsacle.
Note
The current setting is 8:00 AM. The remote control setting value is 01:00. After the setting is
successful, your I300 robotic cleaner will start working after 1 hour. Your I300 robotic cleaner starts to
work at 9 o'clock and will start working at 9 o'clock everyday.
Cancel the schedule cleaning settings
Make sure your I300 robotic cleaner is in Standby or Charge state, and then long press the
“ ” button on the remote control, the remote control to enter the schedule setting
mode;press the “ ” button again.(If the wiring harness is 00:00, the reservation is canceled,
otherwise please press “ ” key once)
Note
Setting time, please long press " "button to set the time, press the left& right direction button to
switch the hours/minutes; and up/down direction button to change the hours/minutes; press " ”
to exit the time setting
When press “ ” the remote displays “ 2 ”, your I300 robotic cleaner will enter the zone cleaning, and start
cleaning in a specific areas within a scope of 2*2m.
End
Start
When press “ ” the remote control display “ 3 ”, your I300 robotic cleaner will enter auto cleaning; robot
starts 2 meters cleaning and then turn a auto direction.
When press “ ” the remote control display “ 4 ”, your I300 robotic cleaner will enter Zigzag mode, in this
d.
mode ,robot will clean in “ z ” way.
13
14
Page 9

Side Brush
Cleaning of the Dust Bin and Filter
below.
objects
15
16
Page 10

Cleaning Of The Dust Bin And Filter Cleaning Of The Sensor And Wheels
day once. lifetime
17
18
Page 11

TROUBLES SHOOTING
Voice Notice/Proble ms Possib le reasons Solution
Please turn on the power switch
Please put the machine in a safe
place
Wheel overload
Please install dustbin
Side brush fault
Signal-short
Front bumper fault
Please Charge
Power switch is not power on
when charging
Machine is not on floor,or its
wheel falls down. Sensors
covered by dusts
Left and right wheel jammed by
cables or ropes
Machine trapped by obstacles
ustbin in machine,
No d
Dustbin is incorrect installed
Left side brush or right side
brush ammed by dusts, or
obstacles
Hair or other debris jammed the
roller and cause Overload on roll
Front bumper does not reset to
position.
Front bumper jammed by
obstacles
Battery in un it machine is in low
level power
Switch on the power button
Put the machine in a safe floor
Check the sensors hole,
and remove all the dusts.
move the obstacles
Re
wheels
Take out the machine from
obstacles
Check and fit the dustbin into
machine.
Take out and reinstall the dustbin
into machine
Remove the dusts or obstacles
jammed on brush
Remove the hairs or other debris
on roller brush
Check out the bumper
function if it can trigger back, and
reset to position
Machine trapped in obstacles, take
it out of obstacles.
Press the charging to
machine.
Machine will get back to
station for charging automatically
winded on
charge the
WARNINGS ABOUT BATTERY INSIDE UNIT BODY
You must not remove (or attempt to remove) the battery incorporated in this product on
your own. To replace the battery, you must contact your service provider or an
independent qualified professional. These instructions have been prepared for the
exclusive use of your service provider or independent qualified professional.
UR OWN S
FOR YO
OWN OR DISPOSE OF IT IN FIRE. DO NOT DISASSEMBLE, CRUSH OR PUNCTURE THE
BATTERY.
AFETY, DO NOT ATTEMPT TO REMOVE THE BATTERY ON YOUR
REMOVAL OF BATTERY INSIDE UNIT BOY
1.Remove the screws on battery cover with a screw driver.
2.Remove the battery cover.
3.Grasp the insulating tape at two sides of the battery and lift the battery.
4.Unplug the wire connector that links the battery and robot.
Correct disposal of batteries in this pr
(Applicable in countries with separate battery return systems.)
The marking on the battery, manual or packaging indicates that the battery in this
product should not be disposed of with other household waste. Where marked, the
chemical symbols Hg, Cd or Pb indicate that the battery contains mercury,
cadmium or lead above the reference levels in EC Directive 2006/66.
The battery incorporated in
its replacement, please contact your service provider. Do not attempt to remove the
battery or dispose it in a fire. Do not disassemble, crush, or puncture the battery. If
you intend to discard the product, the waste collection site will take the appropriate
measures for the recycling and treatment of the product, including the battery.
this pr
oduct.
oduct is not user replaceable. For information on
If the problems still can not resolved with above solutions, please email:customersupport@eureka.com.cn
for technical support directly.
19 20
Page 12

The Eureka twelve months limited warranty
Eureka, subject to the terms and conditions
herein, warrants this vacuum cleaner to be free
from defects in material and workmanship for a
term of twelve months from the date
of original purchase when used in accordance with
the Eureka operating and maintenance instructions
and under normal household usage. This warranty
is granted only to the original purchaser and
members of immediate household, and is applicable
only to original purchases from Eureka authorized
resellers.
What Eureka will do:
Eureka will, at its option, repair or replace a
defective vacuum or vacuum part that is covered
by this warranty. Repairs may be performed using
new or refurbished parts that meet or exceed
elects to replace the vacuum, the replacement may
be a reconditioned unit. Depending on availability
of products, Eureka reserves the right to provide
you with a replacement product that is the same
or similar, or substitute equivalent of the original
product. As a matter of warranty policy, Eureka will
not refund the consumer’s purchase price.
This warranty does not cover:
• Normal wear and tear of the vacuum and vacuum
parts that require replacement under normal use
light bulbs, brush-roll, bristles, impellers and
cleaning.
• Damages or malfunctions resulting from:
improper or unreasonable use or maintenance,
abuse, negligence, failure to follow instructions
contained in any written materials that accompany
the product, deterioration by reason of excess
moisture, corrosive atmosphere, lightning, power
surges, connections to improper voltage supply,
unauthorized alteration, or other external causes
such as extremes in temperature or humidity,
accidents, misuse, or acts of God. This warranty
also does not cover damage resulting from repair
or attempted repair by anyone other than Eureka
or an authorized Eureka Warranty Station. This
warranty is not applicable to any product that has
been altered or on which the serial number has
erasing, or forging any proof-of-purchase
documents voids any applicable product warranty.
21
Obtaining warranty service:
To obtain warranty service you must contact the
Eureka Service Team,
customersupport@eureka.com,
warranty claim and procedures to be followed. All
warranty claims must include submission of proofof-purchase documentation.
Shipping charges:
You will be responsible for any initial shipping and
insurance charges if the defective product(s)
must be shipped for warranty service or warranty
evaluation; however, Eureka or a Eureka Authorized
Warranty Station will pay the return shipping
charges if repairs are covered by the warranty.
When returning parts for repair, you must include
the model, type and serial number located on the
rating plate on the lower backside of the vacuum.
If any product submitted for warranty service is
found to be ineligible, an estimate of repair cost
will be furnished and the repair performed only
if requested by the owner and upon receipt of
payment or acceptable arrangements for payment.
Further limitations and exclusions:
Any warranty that may be implied in connection with
your purchase or use of the vacuum, including any
warranty of Merchantability or any warranty of
Fitness For A Particular Purpose is limited to the
duration of this limited warranty. Some states do not
allow limitations on how long an implied warranty
lasts, so the above limitations may not apply to you.
Your relief for the breach of this warranty is
limited to the relief expressly provided above. In
no event shall the manufacturer be liable for any
consequential or incidental damages you may incur
in connection with your purchase or use of the
vacuum. Some states do not allow the exclusion or
limitation of incidental or consequential damages,
so the above limitation or exclusion may not apply
to you.
also have other rights, which may vary by state.
to discuss the
Need spare parts?
Problems with your vacuum cleaner?
DO NOT RETURN THIS ITEM
TO THE PLACE OF PURCHASE
JUST MAIL
customersupport@eureka.com
Page 13

Page 14

 Loading...