

Page 1
Note: Charge
14-16 hours
before rst
use.
PLEASE RETAIN
We suggest you record the model, type and serial
numbers below. They are located on the silver rating
plate on your cleaner. For prompt and complete
service information, always refer to these numbers
when inquiring about service.
Combi-Vac with
Detachable Hand Vac
Household Type
Owner’s Guide
Model Series 100-110
IMPORTANT
Do not return this product to
the store. Call 1-800-282-2886*
Monday - Friday, 8 am to 7:30
pm CST and 10 am to 6:30 pm
Saturday or visit our web site,
www.eureka.com for any of the
following:
• assembly problems
• replacement of broken or missing
items
• to order replacement parts and
accessories
• to locate the nearest Eureka
Warranty Station
*En Mexico llame al (55) 5343-4384
Model & Type
Serial No.
It is also important to keep your receipt as proof of
date of purchase.
Part No. 81382 (12/08) ©2009 Electrolux Home Care Products Ltd. Printed in China
www.eureka.com
Page 2
Index
IMPORTANT
Important Safeguards .................................. 2
Service Information ...................................... 2
Battery Disposal ........................................... 3
Assembly ..................................................... 3
Use ............................................................... 4
Accessories .................................................. 5
Dust Cup ...................................................... 6
Filter ............................................................. 6
Brush Roll .................................................... 6
Problem Solving ........................................... 7
Warranty ...................................................... 8
Customer Order Form .................................. 9
GENERAL INFORMATION
The cordless vacuum cleaner is the answer for quick,
convenient, and easy cleanups. Grab the cleaner for
little tasks rather than using a larger cleaner.
Charge for 14-16 hours before rst use. Batteries
could lose charge in shipping.
It is best to charge the batteries when temperatures
are between 32°F (0°C) and 104°F (40°C). Other
temperatures could damage batteries.
While charging, the charger may become warm to the
touch. This is a normal condition and does not indicate
a problem.
Service Information
The instructions in this booklet serve as a guide to
routine maintenance. For additional service information
telephone our toll free number for the nearest Eureka
Authorized Warranty Station.
USA: 1-800-282-2886
Mexico: (55) 5343-4384
Canada: 1-800-282-2886
www.eureka.com
If you prefer, you can write to Electrolux Home Care
Products North America, Customer Service, P.O.
Box 3900, Peoria, IL 61612, USA. In Canada, write to
Electrolux Home Care Products Canada, 5855 Terry
Fox Way, Mississauga, Ontario L5V 3E4. Refer to The
Eureka Warranty for complete service information.
DO NOT OIL. The motor has
lubrication and has a
permanent seal.
SAFEGUARDS
When using an electrical appliance, basic precautions should
always be followed, including the following:
READ ALL INSTRUCTIONS
BEFORE USING THIS VACUUM CLEANER.
WARNING
To reduce the risk of re, electric shock, or injury:
• Do not use outdoors or on wet surfaces.
• Do not operate the vacuum cleaner or charger that has been damaged
in any way. If vacuum cleaner is not working as it should, has been
dropped, damaged, left outdoors, or dropped into water, return it to
a service center.
• To avoid excessive heat and damage to the unit or batteries, do not
operate the vacuum cleaner while charging.
• Do not allow to be used as a toy. Close attention is necessary when
used by or near children.
• Use only as described in this manual.
• Use only the charger provided to recharge; Model No.
KA12D150020033U for 120 volt.
• Do not pull or carry the charger by cord, use cord as a handle, close
a door on cord, or pull cord around sharp edges or corners. Keep
cord away from heated surfaces.
• Do not use extension cords or outlets with inadequate current carrying
capacity.
• Do not unplug by pulling on cord. To unplug, grasp the charger, not
the cord.
• Do not handle charger or vacuum cleaner with wet hands.
• DO NOT MUTILATE OR INCINERATE BATTERIES AS THEY WILL
EXPLODE AT HIGH TEMPERATURES.
• Leaks from battery cells can occur under extreme usage or
temperature conditions. If the liquid gets on the skin (1) wash
quickly with soap and water or (2) neutralize with a mild acid such
as lemon juice or vinegar. If the liquid gets into the eyes, ush them
immediately with clean water for a minimum of 10 minutes. Seek
medical attention.
• The terminal on the vacuum cleaner should be kept free and clean
of objects. While there is no shock hazard from the terminal, a burn
could occur if metal objects are inserted into the terminal area.
• This vacuum cleaner creates suction. Keep hair, loose clothing,
ngers, and all parts of body away from openings and moving
parts.
• Do not pick up anything that is burning or smoking, such as cigarettes,
matches, or hot ashes.
• Do not use without a lter in place. When servicing the unit, never put
ngers or other objects into the fan chamber in case the unit would
accidentally be turned on.
• Use extra care when cleaning on stairs.
• Do not use to pick up ammable or combustible liquids such as
gasoline, or use in areas where they may be present.
• Charge unit indoors in a cool, dry area not exposed to the weather
to avoid electrical shock and/or cleaner damage.
• Keep your work area well lighted.
• Unplug electrical appliances before vacuuming them.
SAVE THESE
2
INSTRUCTIONS
Page 3
Important Battery Disposal Information - Call 1-800-822-8837
Nickel-Metal Hydride Batteries
Your vacuum cleaner contains nickel-metal hydride batteries. To protect our environment, properly dispose of the vacuum when the batteries no longer hold a charge. A municipal waste will not
dispose of the product with battery intact. Remove the batteries by cutting the connector wires one
by one before you discard the appliance. Do not dispose of batteries with your regular household
trash. Remove the batteries and take or send it to your nearest Eureka Warranty Service Station.
To learn the address of the nearest factory service center call 1-800-282-2886.
CAUTION: Do not short circuit or dispose of in re.
How To Assemble
CAUTION: Assemble the cleaner completely before plugging into an electrical outlet.
CAUTION: Moving parts, stay clear of brush roll when plugging in. Make sure brush roll is clear of moving parts
when plugging in.
NOTE: Features may vary by model yet all parts assemble the same.
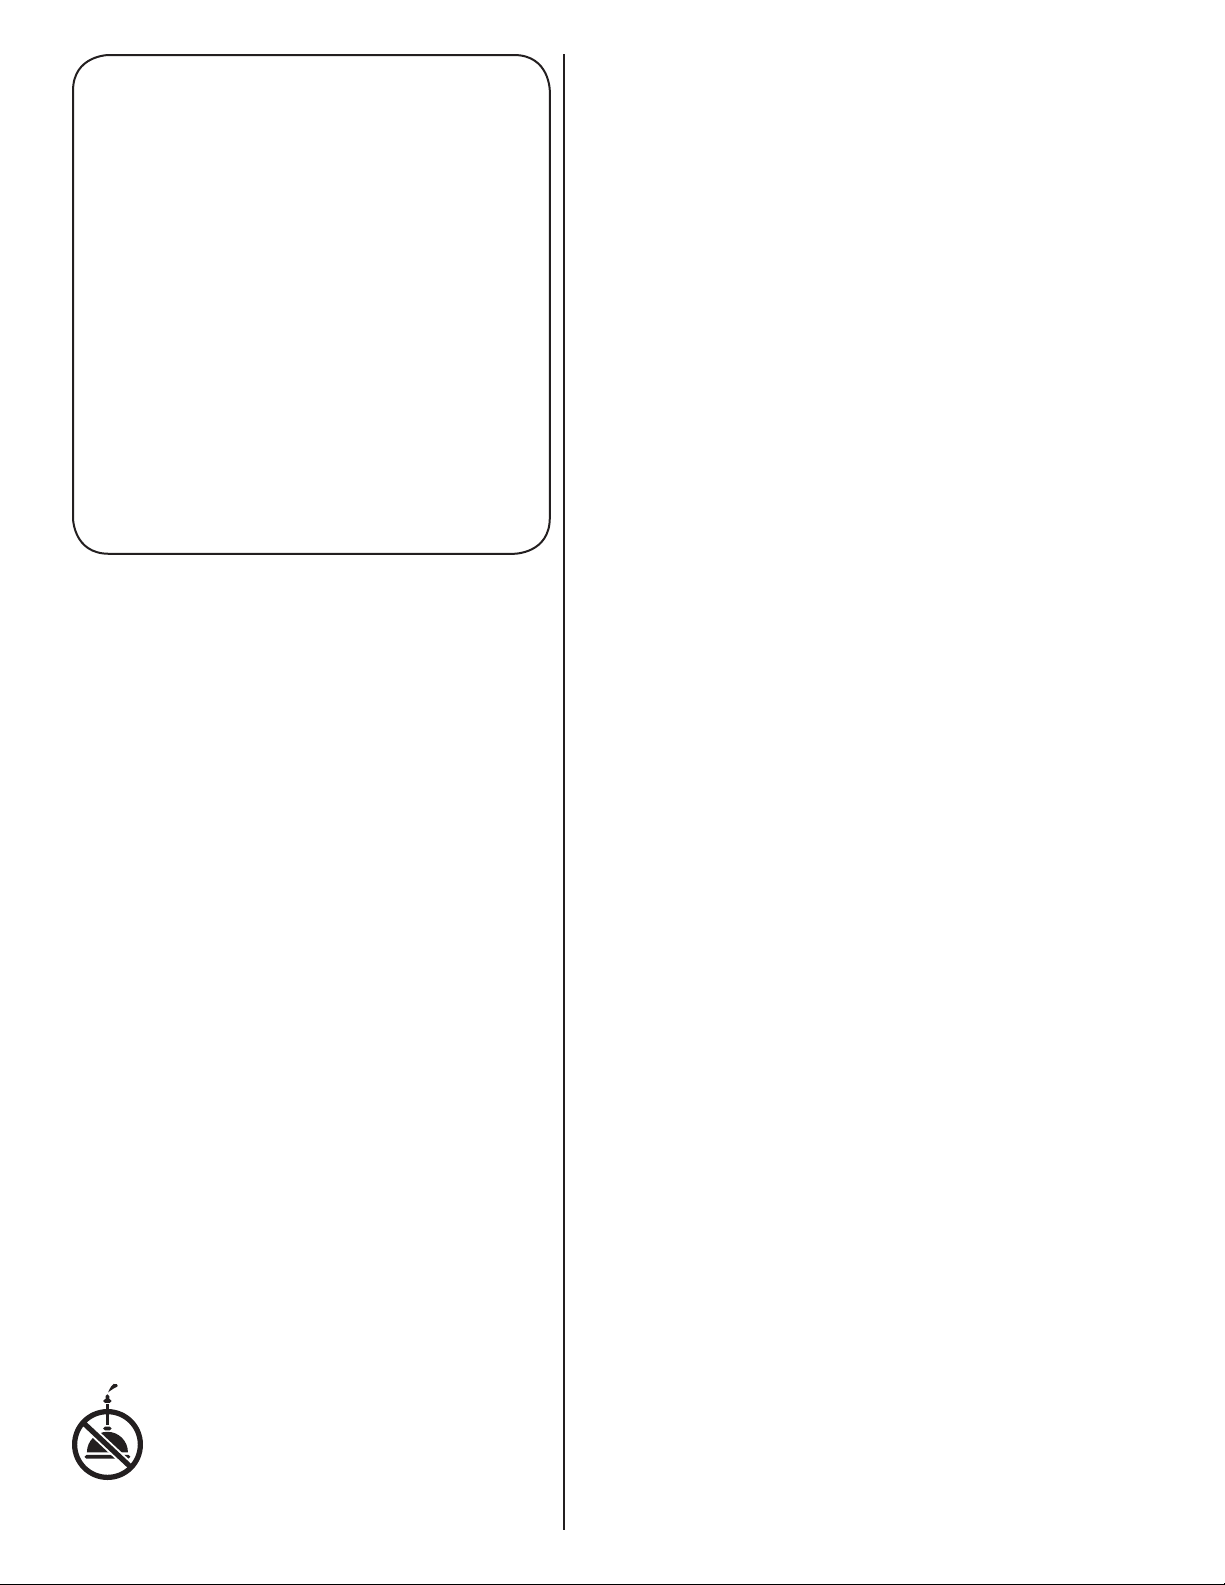
Step A Unpack Body of Vacuum
and Handle
Handle
Release
Button
Step B Attach Handle
Handle
Tabs
Vacuum Body Handle
1. Remove vacuum body and handle from carton. Locate
the handle release button on body and the handle tabs
on handle.
2. Position handle above vacuum body. Line up the
handle tabs to the notches in the opening at the top of
the vacuum body.
3. Press down on the handle release button as shown
above. Slide the handle down into the unit, until it clicks
into place.
3
Page 4

How To Use
L
CAUTION: Do not plug in cleaner until you understand all controls and features.
1
3
7
6
1. Telescoping Handle. The handle has two positions,
all the way up or all the way down.
2. Handle Release Button. Push in on this button when
you want to raise or lower the handle.
3. Hand Vac Release Button. Push in on this button to
release hand vac from body.
4. Crevice Tool. The crevice tool is stored in the body of
the vacuum behind the dust cup.
5. Three Position On/Off Switch. O = Off, I = Suction
and IIIII = suction with brush roll.
6. Dust Cup Release Button. Push in on this button to
release dust cup from hand vac.
2
4
5
9
8
7. Charger Inlet. To charge unit, insert charger connector
into cleaner.
8. Charger Connector. After connecting to cleaner, plug
charger into 120V outlet to charge cleaner.
9. Charging Light. The light will come on when the unit is
charging.
Charge the Batteries
Note: Charge the batteries for 14-16 hours before
rst use. A cleaner may lose charge in
shipment. The charger plug may become warm,
however, this is not a cause for concern.
Note: If the batteries are completely discharged, the
charging light may not shine until there is
sufcient charge in the batteries to provide power.
You may leave the cleaner on constant charge so it is
always ready to use. Unplug only if it will not be in use for
several weeks at a time.
4
Page 5
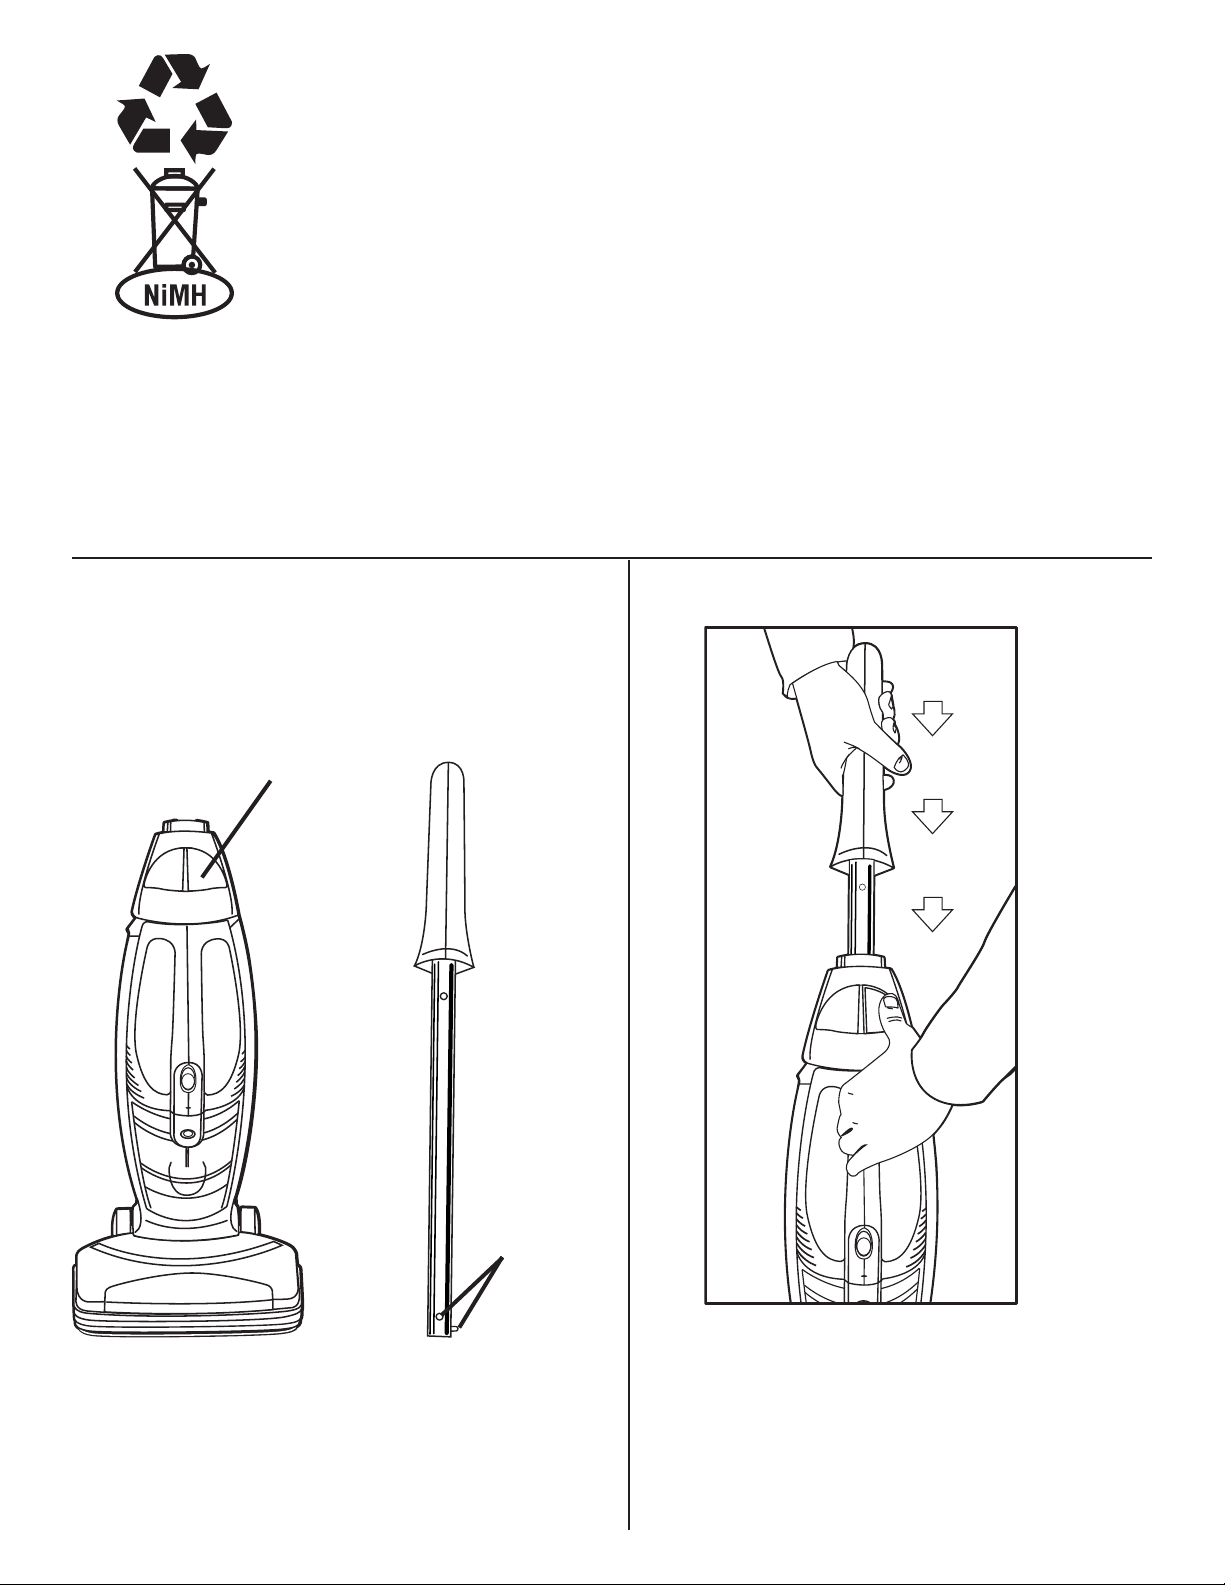
How To Use Accessories
Crevice
Tool
Hand
Vac
1. To remove the hand vac from the base, push in on
the hand vac release button, and tilt hand vac out of
base as shown above.
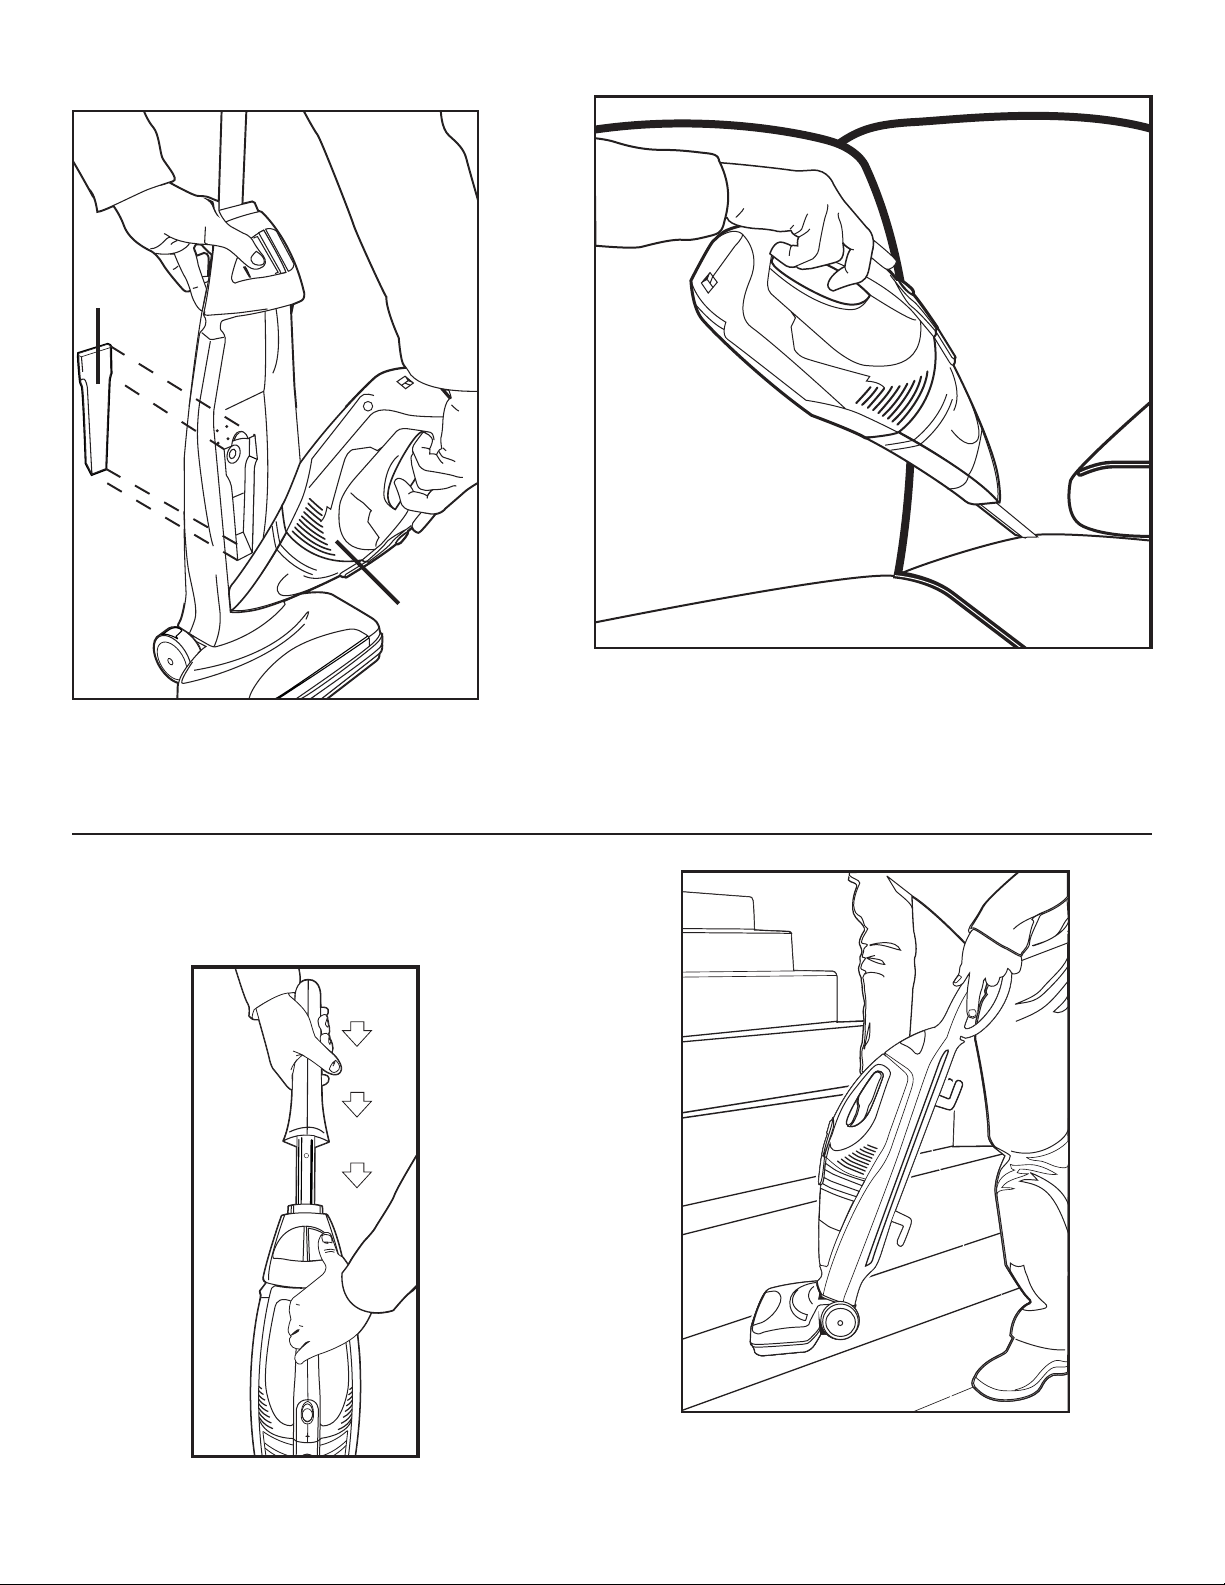
3. To use as a stair vac, collapse handle. Push in on
the handle release button and push handle down
into unit. See below.
2. The crevice tool is stored in the base behind the hand vac (see
g. 1). Pull crevice tool away from the base and put the wide
end into the end of the hand vac nozzle. (See above) The
crevice tool is used to clean corners, baseboards, between
cushions.
CAUTION: Use extra care when cleaning on stairs.
5
Page 6
How To Maintain
The instructions in this booklet serve as a guide to routine maintenance. To keep the cleaner operating at top efciency empty
the dust cup and clean the lter after each use.
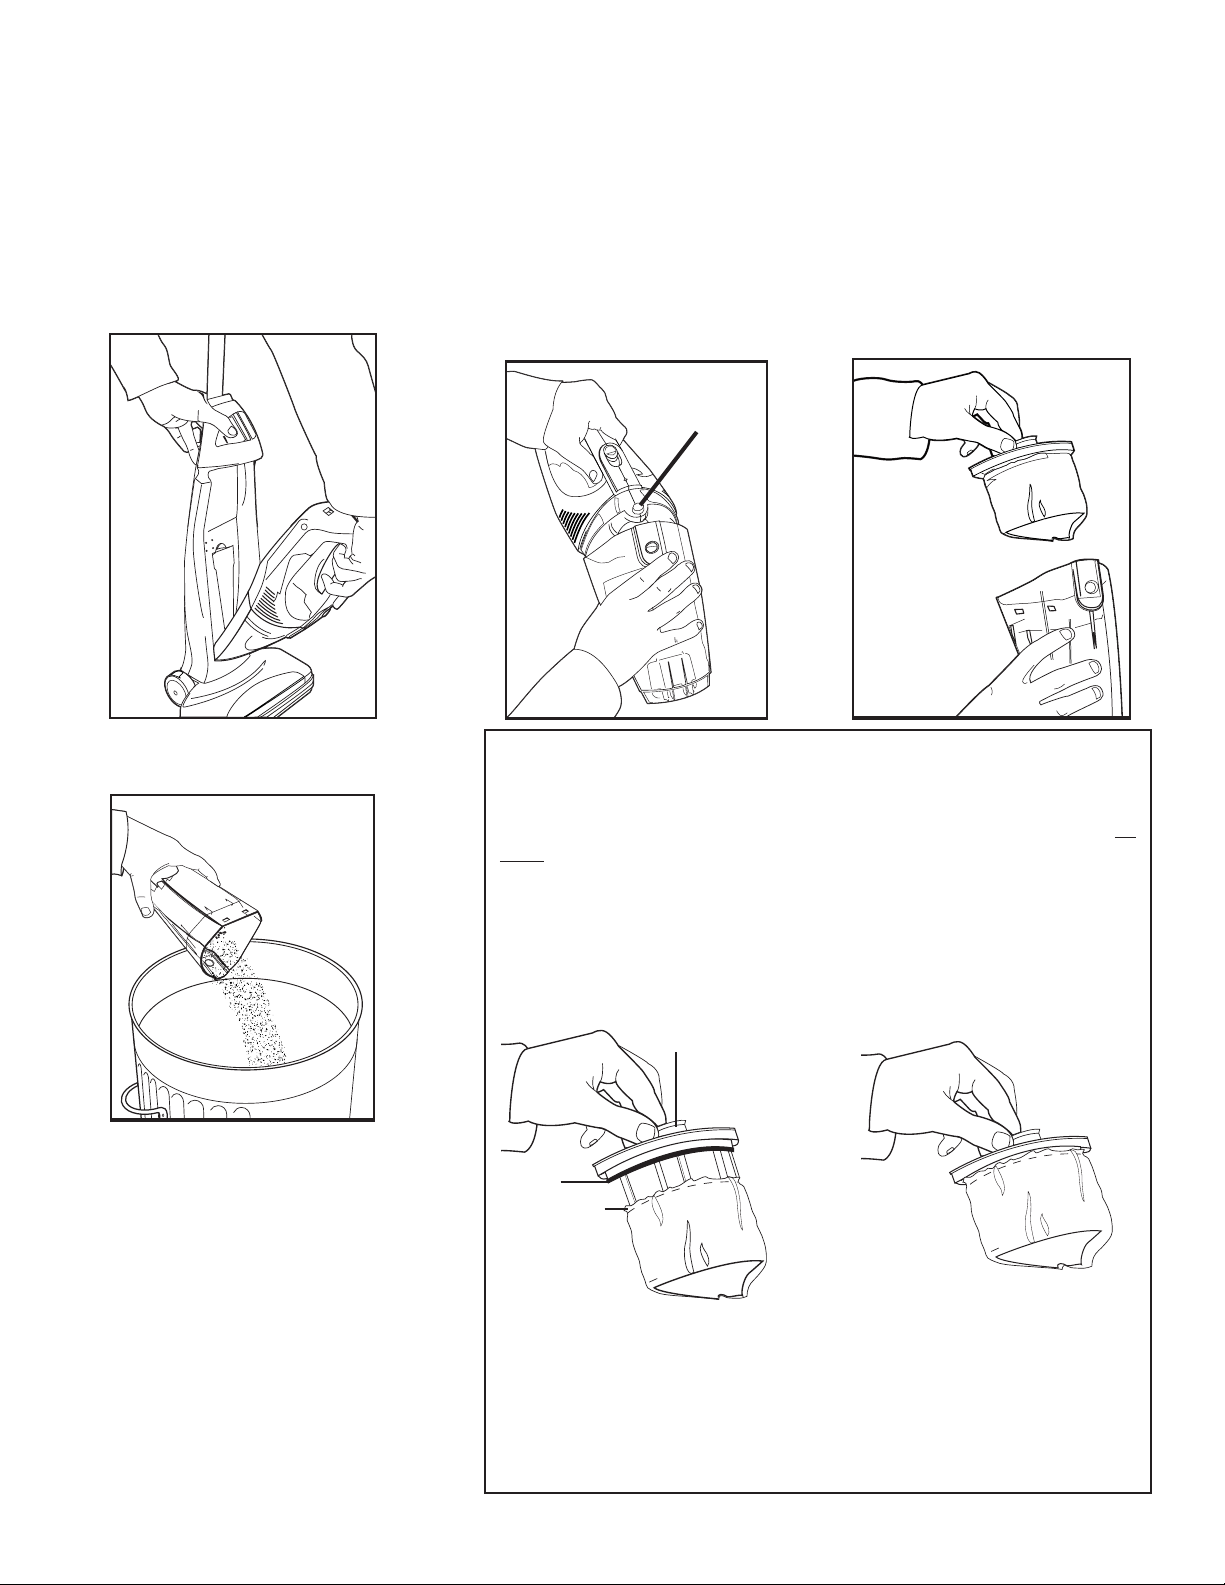
Empty Dust Cup
CAUTION: Turn off the switch.
1. Remove hand vac from the base unit.
4. Shake contents of dust cup into a
waste container.
2. Push in on dust cup latch
and pull dust cup from
handle section.
Dust
Cup
Latch
3. Remove dust cup lter from dust
cup. Shake and brush the dust and
dirt from lter.
Cleaning and Replacing Dust Cup Filter, PN 62406
Pull lter off of lter frame.
Shake and brush the dust and dirt from lter. If desired, launder lter by
hand in warm water using a mild detergent.
5. Replace dry dust cup filter in dust
cup and reassemble following above
directions in reverse.
NOTE: Replace a dirty or torn lter.
6. Dust cup may be cleaned with warm
water and mild detergent. Wipe dry, do
not put dust cup in dishwasher.
NOTE: Air dry thoroughly before returning to use.
To put lter on lter frame, pull and stretch the elastic edge of lter up and
over the rim on the lter frame.
Filter
Frame
Rim
Elastic
Edge
Correct Installation
NOTE: If lter is not properly installed, dirt and dust will go past the
lter and this can damage the cleaner motor.
Clean Brush Roll
The brush roll turns to sweep and comb the carpet nap. Keep the brush
roll free from hair and threads so it will continue cleaning.
6
Page 7

PROBLEM SOLVING
NOTE: Turn off the switch and unplug the electrical cord before servicing.
PROBLEM CAUSE SOLUTION
Cleaner will not run. M Battery Low M Charge Battery
Does not clean the carpet M Dust Cup and Filter M Empty the dust cup and clean or replace the lter.
or oor. Hint: If picking up ne dust, the dust cup may
not look full but a ne substance tends to reduce
suction when it blocks the airow through the lter.
M Be sure dust cup is properly installed in hand vac.
M Brush Roll M Clean hair and thread from bristles and end cap
area.
M Intake Nozzle M Remove hand vacuum from base and look for
blockage in the air path from the oor nozzle to the
hand vacuum. Lay the stick vacuum at and use a
screwdriver to pull the blockage up and out of the
air path. Reattach the hand vacuum; turn the unit
on to clear any remaining debris. Remove hand
vacuum and recheck for additional clogs. Repeat
above steps if needed.
M Battery Low M Charge Battery
No suction. M Filter M Clean or replace the lter. Hint: If picking up ne
dust, the dust cup may not look full, but a ne
substance tends to reduce suction when it blocks
the airow through the lter.
M Intake Nozzle M Remove hand vacuum from base and look for
blockage in the air path from the oor nozzle to the
hand vacuum. Lay the stick vacuum at and use a
screwdriver to pull the blockage up and out of the
air path. Reattach the hand vacuum; turn the unit
on to clear any remaining debris. Remove hand
vacuum and recheck for additional clogs. Repeat
above steps if needed.
Noise from brush roll area. M Brush Roll M Remove and clean debris from brush roll area.
M Clean hair and threads from brush roll.
Brush roll not turning. M Brush Roll M Remove and clean debris from brush roll area.
M Clean hair and threads from brush roll.
M Power Switch M Switch has three positions; off (O), suction only (I)
and suction with brush roll (IIII).
M Hand Vacuum Not Secured M Remove hand vacuum from base. Reinstall into
base by pushing rmly until hand vac locks into
place.
How to maintain brush roll. M Brush Roll Area M Remove and clean debris from brush roll area.
M Clean hair and threads from brush roll.
M Do not attempt to lubricate the bearings in the
brush roll. They are permanently lubricated at the
factory.
M Brush Roll Belt M The brush roll belt is a cogged design that should
not require replacement.
Cleaner only runs a short time M Low Battery Charge M Charge Battery.
Battery will not charge M Charger Not Connected M Plug in charger, check for Charge battery light.
to Power Supply M Check electrical outlet.
7
Page 8

ENGLISH
THE EUREKA LIMITED WARRANTY
What This Warranty Covers
Your Eureka cleaner is warranted to be free from all defects in material and workmanship in normal household
use for a period of one year. The warranty is granted only to the original purchaser and members of his or her
immediate household. The warranty is subject to the following provisions:
What This Warranty Does Not Cover
• Parts of the cleaner that require replacement under normal use, such as disposable dust bags, filters, drive
belts, light bulbs, brushroll bristles, impellers and cleaning.
• Damages or malfunctions caused by negligence, abuse, or use not in accordance with the Owner’s Guide.
• Defects or damages caused by unauthorized service or the use of other than Genuine Eureka parts.
What Eureka Will Do
Eureka will, at its option, repair or replace a defective cleaner or cleaner part that is covered by this warranty. As a
matter of warranty policy, Eureka will not refund the consumer’s purchase price.
Warranty Registration
Please fill out and return the warranty registration card accompanying your cleaner.
Obtaining Warranty Service
To obtain warranty service you must return the cleaner or cleaner part along with “proof of purchase” to any Eureka
Authorized Warranty Station.
For the location of the nearest Eureka Authorized Warranty Station or for service information visit www.eureka.com,
or telephone toll free:
USA: 1-800-282-2886
Mexico: 55-5343-4384
Canada: 1-800-282-2886
www.eureka.com
If you prefer, you can write to Electrolux Home Care Products North America, P.O. Box 3900, Peoria, Illinois 61612,
USA. In Canada write to Electrolux Home Care Products Canada, 5855 Terry Fox Way, Mississauga, Ontario L5V
3E4.
If it is necessary to ship the cleaner outside your community to obtain warranty repair, you must pay the shipping
charges to the Eureka Authorized Warranty Station.
Return shipping charges will be paid by the Warranty Station. When returning parts for repair, please include the
model, type, and serial number from the data plate on the cleaner.
Further Limitations and Exclusions
Any warranty that may be implied in connection with your purchase or use of the cleaner, including any warranty of
Merchantability or any warranty for Fitness For A Particular Purpose is limited to the duration of this warranty. Some
states do not allow limitations on how long an implied warranty lasts, so the above limitations may not apply to you.
Your relief for the breach of this warranty is limited to the relief expressly provided above. In no event shall the
manufacturer be liable for any consequential or incidental damages you may incur in connection with your purchase
or use of the cleaner. Some states do not allow the exclusion or limitation of incidental or consequential damages,
so the above limitation or exclusion may not apply to you.
This warranty gives you specific legal rights. You may also have other rights, which may vary by state.
Page 9

Con mango aspiradora demano
Nota:
Cárguela
durante 14
a 16 horas
antes de
usarla por
primera vez.
Aspiradora “Combi-Vac”
tipo doméstico
Guía del propietario
Modelo de la serie 100-110
IMPORTANTE
No devuelva este producto al negocio
donde lo compró. Llame al 1-800-2822886* de lunes a viernes, 8 am a 7:30
pm (hora estándar central), sábados
de 10 am a 6:30 pm, o visite nuestro
sitio de internet, por cualquiera de las
siguientes razones:
• problemas de ensamblaje
• reposición de ítemes rotos o
faltantes
GUARDE LA INFORMACIÓN SIGUIENTE
Le sugerimos que registre el modelo, el tipo y el número de
serie de la aspiradora en los espacios suministrados más
abajo. Encontrará esta información en la placa de datos
plateada que tiene la aspiradora. Cuando necesite obtener
información completa y rápida en cuanto al servicio de esta
aspiradora, remítase a estos números.
Modelo y tipo
Número de serie
También es importante guardar el recibo para tener prueba
de la fecha de compra.
Pieza No. 81382 (12/08) ©2009 Electrolux Home Care Products Ltd. Impreso en China
• para ordenar repuestos y
accesorios
• para averiguar la dirección del
Centro de Garantía de Eureka más
cercano
*En Mexico llame al (55) 5343-4384
www.eureka.com
Page 10

Índice
IMPORTANTE PARA SU
Importante para su seguridad ...................... 2
Información sobre servicio de reparaciones 2
El desecho de baterías ................................ 3
Armado ........................................................ 3
Uso ............................................................... 4
Accesorios ................................................... 5
Cepillo circular ............................................. 6
Recipiente para polvo .................................. 6
Filtro ............................................................. 6
Resolviendo Problemas ............................... 7
Garantía ....................................................... 8
INFORMACIÓN GENERAL
La aspiradora sin cable es la solución para limpiar rápida,
cómoda y fácilmente. Para tareas pequeñas, use esta
aspiradora en lugar de un artefacto grande.
Cárguela durante 14 a 16 horas antes de usarla por
primera vez. Las baterías pueden perder carga durante
el transporte.
Es mejor cargarlas a temperaturas entre 32°F (0°C) y
104°F (40°C). Otras temperaturas pueden dañar las
baterías. Durante el carga, el cargador puede calentarse
al tacto. Esto es
Información sobre servicio
de reparaciones y partes
Las instrucciones de este folleto sirven como guía para el
mantenimiento de rutina. Para información adicional sobre
el servicio, llame a nuestro número telefónico gratuito a n
de conocer la dirección del Centro de Garantía Autorizado
de Eureka más cercano.
EE.UU.: 1-800-282-2886
México: (55) 5343-4384
Canadá: 1-800-282-2886
www.eureka.com
Si lo preere, puede dirigirse por escrito a Electrolux Home
Care Products North America, Customer Service, P.O. Box
3900, Peoria, Illinois, 61612, USA. En Canadá, diríjase
a Electrolux Home Care Products Canada, 5855 Terry
Fox Way, Mississauga, Ontario L5V 3E4. Para obtener
la información completa sobre el servicio, reérase a la
Garantía de Eureka.
NO LA LUBRIQUE. El motor
tiene lubricación y un sello
permanente.
SEGURIDAD
Hay precauciones básicas a seguir siempre que se usa un aparato
eléctrico, incluyendo las siguientes:
LEA TODAS LAS INSTRUCCIONES
ANTES DE USAR ESTA ASPIRADORA.
PRECAUCIÓN
Para reducir el riesgo de incendios, electrocución o lesiones:
• No utilice la aspiradora a la intemperie ni en supercies húmedas.
• Si la aspiradora se dañó de alguna manera, no la ponga en
funcionamiento ni la cargue. Si la aspiradora no funciona de manera
adecuada, se ha caído, dañado, dejado a la intemperie o mojado,
devuélvala a un centro de servicio.
• Para evitar calor excesivo y daños a la unidad o las baterías, no
ponga a funcionar la aspiradora durante la recarga.
• No permita que se utilice la aspiradora como juguete. Preste especial
atención cuando es utilizada por o cerca de niños.
• Utilícela solamente según se indica en este manual.
• Use sólo el cargador suministrado para recargar; el Modelo No.
KA12D150020033U para 120 voltios.
• No jale la aspiradora ni la transporte jalando el cable, no utilice el
cable como mango, no cierre una puerta sobre el cable ni lo jale
alrededor de bordes o esquinas cortantes. Mantenga el cable lejos
de supercies calientes.
• No utilice cables alargadores ni tomacorrientes con capacidad de
conducción incorrecta.
• No jale el cable para desenchufar la aspiradora. Para desenchufarla
aspiradora, jale el enchufe, no el cable.
• No manipule el cargador o la aspiradora con las manos húmedas.
• NO ROMPA NI INCINERE LAS BATERÍAS. PUEDEN EXPLOTAR
A ALTAS TEMPERATURAS.
• Se pueden producir fugas de las celdas de las baterías en
condiciones extremas de uso o a altas temperaturas. Si el líquido
entra en contacto con la piel, (1) lave enseguida la zona afectada con
agua y jabón o (2) neutralícelo con un ácido débil tal como jugo de
limón o vinagre. Si el líquido entra en contacto con los ojos, lávelos
inmediatamente con agua limpia durante 10 minutos como mínimo.
Busque atención médica.
• La terminal de la aspiradora debe mantenerse libre de obstáculos u
objetos. Aunque no exista peligro de electrocución en la terminal,
pueden producirse quemaduras si se insertan objetos metálicos en
el área de la misma.
• Esta aspiradora produce succión. Mantenga el cabello, la ropa suelta,
los dedos y todas las partes de su cuerpo lejos de las aberturas y
de las partes móviles.
• No recoja objetos calientes o humeantes, como cigarrillos, fósforos
o cenizas calientes.
• No utilice la aspiradora si el ltro no está colocado en su sitio. Cuando
se efectúe el servicio de la unidad, nunca coloque los dedos u otros
objetos en la cámara del ventilador. La unidad podría encenderse
accidentalmente.
• Tenga extremada precaución cuando aspire en escaleras.
• No utilice la aspiradora para recoger líquidos inflamables o
combustibles, como gasolina, ni la utilice en lugares en los que
puedan estar presentes estos líquidos.
• Recargue la unidad en un área cerrada, fresca y seca, sin exponerla
a la intemperie para evitar choques eléctricos y/o daños a la
aspiradora.
• Mantenga el área de trabajo bien iluminada.
• Desenchufe todos los electrodomésticos antes de limpiarlos con la
aspiradora.
GUARDE ESTAS
2
INSTRUCCIONES
Page 11

Información importante sobre el desecho de baterías – Llame
al 1-800-822-8837
Baterías de níquel-cadmio
Su aspiradora contiene baterías híbridas de hidruro metálico de níquel. Para proteger su entorno,
extraiga las baterías de la aspiradora para desecharlas ya no se puedan recargar. Un basurero
municipal no desecha productos con baterías intactas. Para retirar las baterías, corte uno por uno
los cables del conector, antes de deshacerse del aparato. No deseche las baterías en un cesto de
basura. Retire las baterías y llévelas o envíelas a la Estación de Servicio Eureka más cercana.
Para conocer la dirección del centro de servicio de la fábrica más cercano, llame al
1-800-282-2886.
PRECAUCIÓN: No provoque cortocircuitos ni arroje al fuego.
Como armarla
PRECAUCIÓN: Arme completamente la aspiradora antes de enchufarla a un toma corriente.
PRECAUCIÓN: Partes movibles, mantenga su distancia del cepillo circular cuando la enchufa. Asegurese,
que el cepillo circular mantenga su distancia, de las partes movibles, cuando la
enchufa.
NOTA: Las características pueden variar según el modelo pero todas las partes se arman de la misma
manera.
Paso A Desempaque el cuerpo de
la aspiradora y el mango
Botón para
liberar el
mango
Lengüetas
del mango
Paso B Acople el mango
Cuerpo de la
aspiradora
1. Saque de la caja el cuerpo de la aspiradora y el mango.
Localice el botón para liberar el mango en el cuerpo
y las lengüetas del mango en el mango.
Mango
2. Posicione el mango sobre el cuerpo de la aspiradora.
Alinee las lengüetas del mango con las muescas
en la abertura en la parte superior del cuerpo de la
aspiradora.
3. Presione el botón para liberar el mango como lo indica
la ilustración. Deslice el mango hacia abajo dentro de
la aspiradora hasta que encaje en su lugar.
3
Page 12

Como usarla
L
PRECAUCIÓN: No enchufe la aspiradora hasta haber entendido todos los controles y características.
1
3
7
6
1. Mango telescópico. El mango tiene dos posiciones,
levantado completamente o bajado completamente.
2. Botón para liberar el mango. Presione hacia adentro
este botón cuando quiere subir o bajar el mango.
3. Botón para liberar la aspiradora manual. Presione
hacia adentro este botón para liberar la aspiradora
manual del cuerpo.
4. Utensilio para hendiduras. El utensilio para
hendiduras está almacenado en el cuerpo de la
aspiradora detrás del recipiente para polvo.
5. Interruptor con tres posiciones. O = Apagado, I =
Succión. IIIII = Succión con el cepillo circular.
6. Botón para liberar el recipiente para polvo. Presione
este botón hacia adentro para liberar el recipiente para
polvo de la aspiradora manual.
2
4
5
9
4
8
7. Toma del cargador. Para cargar la unidad, inserte el
conector del cargador en la aspiradora.
8. Conector del cargador. Después de conectarlo a la
aspiradora, conecte el cargador a una toma de corriente
de 120 voltios para recargar la aspiradora.
9. Luz de carga. La luz se enciende cuando la unidad se
está recargando.
Cargue las Baterías
Nota: Recargue las baterías durante 14 a 16 horas antes
del primer uso. La aspiradora podría perder carga durante el envío. El conector del cargador podría calentarse, sin embargo esto no es motivo de preocupación.
Nota: SI las baterías están totalmente descargadas, la
luz de carga puede no encenderse hasta que haya suciente carga en las baterías como para alimentarla.
Deberá dejar la aspiradora en recarga constante de modo
que siempre esté lista para utilizarla. Desenchúfela sólo si
no se usará durante varias semanas consecutivas.
Page 13

Como usar los accesorios
Utensilio
para
hendiduras
Aspiradora
manual
1. Para extraer la aspiradora manual de su base,
presione el botón de desbloqueo de la aspiradora de
mano e incline la aspiradora manual para extraerla
de la base como se ilustra arriba.
3. Para usarla como aspiradora de escalones, baje el
mango hasta abajo. Presione el botón para liberar
el mango y baje el mango dentro de la unidad. Vea
la siguiente ilustración.
2. El utensilio para hendiduras se guarda en la base detrás de
la aspiradora manual (vea la g. 1). Jale el utensilio para
hendiduras hacia afuera de la base y coloque el extremo
ancho en el extremo de la boquilla del a aspiradora manual.
(Vea la ilustración de arriba.) El utensilio para hendiduras se
utiliza para limpiar rincones, zócalos, entre cojines.
PRECAUCIÓN:` Tenga especial cuidado al limpiar
escalones.
5
Page 14

Cómo hacerle mantenimiento
Las instrucciones en este manual son una guía para el mantenimiento rutinario. A n de mantener un rendimiento óptimo de
la aspiradora vacíe el recipiente para polvo y límpie el ltro después de cada uso.
Vacíe el recipiente para polvo.
PRECAUCIÓN: Apague el interruptor.
1. Saque la aspiradora manual de la
base.
4. Sacuda el contenido del recipiente
para polvo vaciándolo en un bote de
basura.
2. Presione hacia adentro el pestillo
del recipiente para polvo y
saque el recipiente para polvo
de la sección del mango.
Pestillo del
recipiente
para polvo
3. Quite el ltro del recipiente para
polvo. Sacuda o cepille el polvo y
la suciedad del ltro.
Limpieza y Reemplazo del Filtro del Recipiente para
Polvo, PN 62406
Saque el ltro de su armazón.
Sacuda o cepille el polvo y la suciedad del ltro. Si desea, lave el ltro
a mano en agua tibia usando un detergente suave.
5. Vuelva a colocar en el recipiente para
polvo y el filtro seco que va en el
recipiente para polvo y vuelva a armar
siguiendo las indicaciones dadas, pero
en sentido contrario.
NOTA: Cambie el ltro si está sucio o
roto.
6. El recipiente para polvo puede ser
limpiado con agua tibia y un detergente
suave. Séquelo con una toalla, no
coloque el recipiente para polvo en el
lavaplatos.
6
NOTA: Séquelo completamente al aire antes de volver a colocarlo.
Para poner el ltro en su armazón, jale y estire la orilla elástica del ltro
por encima del bordo del armazón del ltro.
Armazón
del Filtro
Bordo
Orilla
Elástica
Instalación Correcta
NOTA: Si el ltro no es instalado adecuadamente, el polvo y la
suciedad penetraran el ltro y esto puede dañar el motor de
la aspiradora.
Límpie el cepillo circular
El cepillo circular gira para barrer y peinar la lanilla de la alfombra.
Mantenga el cepillo circular libre de cabello o hilos a n de que siga
limpiando.
Page 15

RESOLVIENDO PROBLEMAS
NOTA: Apague el interruptor de corriente y desenchufe el cordón eléctrico antes de hacerle
mantenimiento a su aspiradora.
PROBLEMA CAUSA SOLUCION
El motor no arranca. M Enchufe eléctrico M Empuje bien el enchufe dentro del toma corriente.
No limpia la alfombra o el M Recipiente para polvo y M Vacíe y limpie el recipiente para polvo o cambie el
piso. ltro ltro. Sugerencia: Si aspira polvo no, el recipiente para
polvo quizá no parezca lleno pero cualquier sustancia
na tiende a reducir la succión cuando bloquea el paso
del aire por el ltro.
M Asegúrese de que el recipiente para polvo esté instalado
correctamente en la aspiradora manual.
M Cepillo circular M Quite cabellos e hilos de las cerdas y del área del
capacete.
M Boquilla de entrada M Quite la aspiradora manual de la base y revise para ver
si hay alguna obstrucción en el paso del aire desde la
boquilla del piso hasta la aspiradora manual. Ponga el
cuerpo de la aspiradora en posición horizontal y use un
destornillador para sacar hacia arriba la obstrucción del
paso del aire. Vuelva a acoplar la aspiradora manual,
prenda la aspiradora para quitar cualquier basura que
haya quedado. Quite la aspiradora manual y vuelva a
chequear para ver si hay más obstrucciones. Repita
dichos pasos si fuera necesario.
M Batería con poca carga M Cargue la batería
No hay succión. M Filtro M Limpie o cambie el ltro. Sugerencia: Si aspira polvo
no, el recipiente para polvo quizá no parezca lleno
pero cualquier sustancia na tiende a reducir la succión
cuando bloquea el paso del aire por el ltro.
M Boquilla de entrada M Quite la aspiradora manual de la base y revise para ver
si hay alguna obstrucción en el paso del aire desde la
boquilla del piso hasta la aspiradora manual. Ponga el
cuerpo de la aspiradora en posición horizontal y use un
destornillador para sacar hacia arriba la obstrucción del
paso del aire. Vuelva a acoplar la aspiradora manual,
prenda la aspiradora para quitar cualquier basura que
haya quedado. Quite la aspiradora manual y vuelva a
chequear para ver si hay más obstrucciones. Repita
dichos pasos si fuera necesario.
Ruido en el área del cepillo M Cepillo circular M Quite el cepillo y limpie la basura del área del
circular. cepillo circular.
M Quite cabellos e hilos del cepillo circular.
Cepillo circular no gira. M Cepillo circular M Quite el cepillo y limpie la basura del área del
cepillo circular.
M Quite cabellos e hilos del cepillo circular.
M Interruptor de corriente M El interruptor tiene tres posiciones: apagado (O), succión
únicamente (I) y succión con el cepillo circular (IIII).
M Bloqueo incorrecto de M Quite la aspiradora manual de la base. Vuelva a
la aspiradora de mano instalarla en la base presionando rmemente hasta que
la aspiradora manual se traba en su lugar.
Como hacerle mantenimiento M Área del cepillo circular M Quite el cepillo y limpie la basura del área del
al cepillo circular. cepillo circular.
M Quite cabellos e hilos del cepillo circular.
M No intente lubricar los cojinetes en el cepillo circular.
Tienen lubricación permanente de fábrica.
M Correa del cepillo M La correa del cepillo circular es un modelo dentado
circular que no debiera requerir ser cambiado.
La aspiradora sólo funciona M Baja carga de la batería M Cargue la batería
por un lapso breve.
La batería no se carga. M Cargador no conectado M Conecte el cargador, revise la luz de carga de la batería.
al tomacorriente M Verique la toma eléctrica.batería.
7
Page 16

ESPAÑOL
GARANTÍA LIMITADA DE EUREKA
Qué cubre esta garantía
Se garantiza su aspiradora Eureka contra todos los defectos de material y mano de obra durante el uso doméstico normal por un período de un ano La garantía se otorga solamente al comprador original y a los miembros inmediatos de su
hogar. La garantía está sujeta a las siguientes estipulaciones:
Qué no cubre esta garantía
• Partes de la aspiradora que es necesario reemplazar durante el uso normal, tales como bolsas para polvo descarta-
bles, filtros, correas motrices, bombillas de luz y cerdas del cepillo giratorio.
• Partes de la aspiradora que es necesario reemplazar durante el uso normal, tales como bolsas para polvo descarta-
bles, filtros, correas motrices, bombillas de luz y cerdas del cepillo giratorio.
• Defectos o danos causados por servicios no autorizados o el uso de repuestos que no sean partes Eureka
legítimas.
Qué hará Eureka
La companía Eureka, a opción de la misma, reparará o reemplazará una aspiradora o parte defectuosa que esté
cubierta por esta garantía. En cumplimiento de la política de la garantía, Eureka no reembolsará al consumidor
el precio de compra.
Registro de la garantía
Llene y envíe en devolución la tarjeta de registro de garantía que acompana a su aspiradora.
Cómo obtener el servicio de garantía
Para obtener el servicio de garantía, debe devolver la aspiradora o la parte de la misma junto con el comprobante
de compra a cualquier Centro de Garantía Autorizado de Eureka.
Para conocer la dirección del Centro de Garantía Autorizado de Eureka más cercano o para obtener información
sobre el servicio, visite www.eureka.com o llame gratuitamente al:
EE.UU.: 1-800-282-2886
México: 55-5343-4384
Canadá: 1-800-282-2886
www.eureka.com
Si lo prefiere, puede dirigirse por escrito a Electrolux Home Care Products North America, Customer Service, P.O.
Box 3900, Peoria, Illinois, 61612, USA. En Canadá, diríjase a Electrolux Home Care Products Canada, 5855 Terry
Fox Way, Mississauga, Ontario L5V 3E4.
Si fuera necesario despachar la aspirador afuera de su comunidad para obtener la reparación por garantía, debe
pagar los cargos de despacho al Centro de Garantía Autorizado de Eureka.
El Centro de Garantía pagará los cargos de despacho de devolución. Cuando envíe partes para reparación, incluya
el modelo, el tipo y el número de serie que figuran en la placa de datos de la aspiradora.
Limitaciones y exclusiones adicionales
Cualquier garantía implícita relacionada con su compra o uso de la aspiradora, incluida cualquier garantía de comerciabilidad o de aptitud para un propósito determinado se limita a la duración de esta garantía. En algunos estados
no se permiten limitaciones a la duración de las garantías implícitas, por lo tanto las limitaciones anteriores pueden
no aplicarse en su caso.
Su compensación por el incumplimiento de esta garantía se limita a la compensación descrita anteriormente. Bajo
ninguna circunstancia el fabricante será legalmente responsable por los danos y perjuicios consecuentes o incidentales que usted pueda sufrir debido a la compra o uso de esta aspiradora. En algunos estados no se permite la exclusión o limitación de danos y perjuicios consecuentes o incidentales, por lo tanto la limitación o exclusión anterior
puede no aplicarse en su caso.
Esta garantía le otorga derechos legales específicos. Usted puede tener además otros derechos que varían de un
estado a otro.
Page 17

Page 18

Page 19

www.eureka.com
Canada: 1-800-www.eureka.com
Mexique : 55-5343-4384
ÉTATS-UNIS : 1-800-282-2886
GARANTIE LIMITÉE EUREKA
raient différer selon l’État.
Cette garantie vous donne des droits légaux particuliers. Vous pouvez également avoir d’autres droits, qui pourdommages corrélatifs ou indirects, ainsi les limitations et les exclusions ci-dessus pourraient ne pas s’appliquer.
tivement à votre achat ou l’utilisation de l’aspirateur. Certains États n’autorisent pas l’exclusion ou la limitation de
cas le fabricant ne sera tenu responsable pour tous dommages corrélatifs ou indirects qui pourraient survenir relaVos recours pour non-respect de cette garantie sont formellement limités aux conditions décrites ci-haut. En aucun
hautes pourraient alors ne pas s’appliquer.
garantie. Quelques États ne permettent pas de restrictions sur la durée d’une garantie implicite, les restrictions cirantie de qualité marchande ou toute garantie pour l’adaptation à un usage particulier est limitée à la durée de cette
Toute garantie pouvant être implicite concernant votre achat ou l’utilisation de votre aspirateur, incluant toute gaRestrictions et exclusions supplémentaires
veuillez inclure le modèle, le type et le numéro de série de la plaque signalétique sur l’aspirateur.
Les frais de transport de retour seront payés par le centre de garantie. Lors du retour des pièces pour la réparation,
garanties, vous devez payer les frais de transport au centre de garantie agréé Eureka.
S’il est nécessaire d’envoyer l’aspirateur à l’extérieur de votre communauté pour obtenir des services de réparations
Way, Mississauga, Ontario, L5V 3E4
Peoria, Illinois, 61612, États-Unis Au Canada, écrivez à Electrolux Home Care Products Canada, 5855 Terry Fox
Si vous préférez, vous pouvez écrire à Electrolux Home Care Products North America, Service Division, C.P. 3900,
notre site Web au www.eureka.com ou téléphonez sans frais le:
Pour le centre de garantie agréé Eureka le plus près de chez vous ou pour des informations sur le service, visitez
de votre “preuve d’achat” à un centre de garantie agréé Eureka.
Pour obtenir les services de la garantie, vous devez retourner l’aspirateur ou la pièce de l’aspirateur accompagné
Obtention des services de garantie
Veuillez compléter et retournez la carte d’enregistrement de la garantie venant avec l’aspirateur.
Enregistrement de la garantie
Eureka ne remboursera pas le prix d’achat du client.
défectueuse qui est couvert par sa garantie. Selon les termes de cette garantie,
Eureka pourra, à sa discrétion, réparer ou remplacer un aspirateur défectueux ou une pièce d’aspirateur
Ce que Eureka fera
que les pièces authentiques Eureka.
• Les défectuosités ou les dommages causés par une réparation non autorisée ou l’utilisation d’autres pièces
d’utilisateur.
• Les dommages ou défectuosités causés par la négligence, l’abus ou l’utilisation non-conforme au manuel
turbines et les nettoyants.
poussière jetables, les filtres, les courroies d’entraînement, les ampoules, les poils du cylindre brosseur, les
• Les pièces de l’aspirateur qui nécessitent d’être remplacées sous l’utilisation normale, telles que les sacs de
Cette garantie ne couvre pas
aux membres de sa famille immédiate. Le garantie est sujette aux dispositions suivantes :
des conditions d`usage domestique normal seulement. La garantie est agréée seulement à l’acheteur original et
Votre aspirateur Eureka est couvert par une garantie pièces et main d`oeuvre pour un période de un an; ce dans
Couverture de cette garantie
FRANCAIS
Page 20

7
d’engrenage qui ne demanderait pas d’être remplacée.
le rouleau-brosse. Ils ont été lubriés à vie à l’usine.
brosse.
soit bien bloqué en place.
uniquement (I) et aspiration avec le rouleau-brosse (IIII).
dessus si nécessaire.
blocages supplémentaires. Répéter les étapes ci-
Retirer l’aspirateur portable pour revérier pour des
enlever tous débris qui peuvent rester dans l’appareil.
l’aspirateur portable ; remettre l’appareil en marche pour
blocage et l’enlever du passage de l’air. Rattacher
sur le sol et utiliser une tournevis pour soulever le
parquet à l’aspirateur portable. Poser à plat l’aspirateur
blocage éventuel dans le passage de l’air du suceur du
débit d’air à travers le ltre.
tendance à réduire la succion quand elle bloque le
ne pas avoir l’air sale mais une substance ne a
aspirez de la poussière ne, les ltres peuvent
dessus si nécessaire.
blocages supplémentaires. Répéter les étapes ci-
Retirer l’aspirateur portable pour revérier pour des
enlever tous débris qui peuvent rester dans l’appareil.
l’aspirateur portable ; remettre l’appareil en marche pour
blocage et l’enlever du passage de l’air. Rattacher
sur le sol et utiliser une tournevis pour soulever le
parquet à l’aspirateur portable. Poser à plat l’aspirateur
blocage éventuel dans le passage de l’air du suceur du
brosse et de la zone de la capsule.
placé dans l’aspirateur portable.
le ltre.
l’aspiration quand elle bloque le débit d’air à travers
sale mais une substance ne a tendance à réduire
poussière ne, les ltres peuvent ne pas avoir l’air
M Vériez la prise de courant.
au secteur de charge est allumé.
La pile ne charge pas M Chargeur non connecté M Branchez le chargeur, assurez-vous que le voyant
que brièvement
L’aspirateur ne fonctionne M Charge de la pile trop faible M Chargez la pile
M La courroie du rouleau-brosse M La courroie du rouleau-brosse est un type à dent
M Ne pas tenter de lubrier les paliers qui se trouvent dans
M Enlever les cheveux et les ls du rouleau-brosse.
L’entretien du rouleau-brosse M La zone du rouleau-brosse M Enlever et nettoyer les débris de la zone du rouleau-
pas bien xé. dans la base en poussant avec fermeté jusqu’à ce qu’il
M L'aspirateur portable n'est M Retirer l’aspirateur portable de la base. Le réinstaller
M L’interrupteur M L’interrupteur a trois positions ; arrêt (O), aspiration
M Enlever les cheveux et les ls du rouleau-brosse.
tourne pas. rouleau-brosse.
Le rouleau-brosse ne M Le rouleau-brosse M Enlever et nettoyer les débris de la zone du
M Enlever les cheveux et les ls du rouleau-brosse.
zone du rouleau-brosse. rouleau-brosse.
Un bruit qui émane de la M Le rouleau-brosse M Enlever et nettoyer les débris de la zone du
M Le suceur M Retirer l’aspirateur portable de la base et chercher un
Manque d’aspiration. M Le ltre M Nettoyer ou remplacer le ltre. Conseils : Si vous
M Pile déchargée M Chargez la pile
M Le suceur M Retirer l’aspirateur portable de la base et chercher un
M Le rouleau-brosse M Enlever les cheveux et les ls des poils du rouleau-
M S’assurer que le collecteur à poussière est correctement
la moquette ou le plancher. et le ltre remplacer le ltre. Conseils : Si vous aspirez de la
L’aspirateur ne nettoie pas M Le collecteur à poussière M Vider le collecteur à poussière et nettoyer ou
Le moteur ne marche pas. M La che électrique M Insérer bien la che dans la prise.
PROBLÈME : CAUSE : SOLUTION :
travail d’entretien.
REMARQUE : Mettez l’aspirateur sur arrêt et débranchez-le cordon électrique avant tout
RÉSOLUTION DES PROBLÈMES
Page 21

Installation correcte
rouleau-brosse libre des cheveux et des ls an qu’il continue à nettoyer.
Le rouleau-brosse tourne et peigne la laine de la moquette. Gardez le
Nettoyer le rouleau-brosse
endommager le moteur de l’aspirateur.
et la poussière traverseront le filtre et cela peut
REMARQUE : Si le ltre n’est pas correctement installé, la saleté
élastique
Côté
Bord
du ltre
Monture
le placer sur le bord de la monture du ltre.
Pour mettre le ltre sur la monture, étirez le côté élastique du ltre pour
nouveau.
REMARQUE : Séchez complètement à l’air avant de l’utiliser de
un détergent doux.
Si vous le désirez, lavez le ltre à la main dans de l’eau tiède en utilisant
Retirez le ltre de sa monture.
à poussière, PN 62406
Nettoyage et remplacement du ltre du collecteur
6
à poussière dans le lave-vaisselle.
l’essuyant. Ne mettez pas le collecteur
un détergent doux. Séchez-le en
être nettoyé avec de l’eau tiède et
6. Le col lect eur à poussière peut
ou déchiré.
REMARQUE : Remplacez un ltre sale
inverse.
les indications ci-dessus dans le sens
à poussière et rassemblez en suivant
5. Remettez le ltre sec dans le collecteur
poubelle.
collecteur à poussière dans une
4. Videz en secouant le contenu du
poussière
poussière et la saleté du ltre.
poussière. Secouez et brossez la
3. Enlevez le filtre du collecteur à
collecteur à
Le loquet du
à poussière du manche.
à poussière et retirez le collecteur
2. Appuyez sur le loquet du collecteur
de l’appareil.
1. Retirez l’aspirateur portable de la base
ATTENTION : Éteignez l'appareil en appuyant sur l'interrupteur.
Vider le collecteur à poussière
efcacement, videz le collecteur à poussière et nettoyez le ltre après chaque usage.
Les instructions de ce livret vous serviront de guide pour l’entretien de routine. Pour permettre à l’aspirateur d’opérer
Entretien
Page 22

5
nettoyage des escaliers.
ATTENTION : User de plus de prudence lors du
ci-dessous.
manche et poussez le manche dans l’appareil. Voir dessin
le manche. Appuyez sur le bouton de déclenchement du
3. Pour l’utiliser en vue de nettoyer les escaliers, faites entrer
pour nettoyer les coins, les plinthes, entre les coussins.
portable. (Voir dessin ci-dessus.) Le suceur plat est utilisé
mettez le bout large dans le bout du suceur de l’aspirateur
portable (voir g. 1). Retirez le suceur plat de la base et
2. Le suceur plat est rangé dans la base derrière l’aspirateur
portable
Aspirateur
base tel que démontré ci-dessus.
inclinez l'aspirateur portable et retirez-le de la
appuyez sur le bouton de déclenchement,
1. Pour détacher l'aspirateur portable de la base,
plat
Suceur
Comment utiliser les accessoires
Page 23

sez que s’il doit rester inutilisé plusieurs semaines d’aflée.
L
manière à ce qu'il soit toujours prêt à l'utilisation. Ne le dépriVous pouvez laisser l'aspirateur en charge permanente de
fournir une alimentation.
que la charge dans les piles n’est pas sufsante pour
possible que le voyant de charge ne s’allume pas tant
Remarque : Si la pile est complètement déchargée, il est
devenir chaude. Toutefois, il ne faut pas s'en inquiéter.
décharger lors de l'expédition. La prise du chargeur peut
heures avant la première utilisation. L'appareil peut se
Note : vous devez charger les piles pendant 14 à 16
Charger les Piles
est en mode chargement.
9. Voyant de charge. Une lumière s'allumera lorsque l'unité
courant de 120 volts pour recharger l'appareil.
chargeur à l'aspirateur, branchez-le dans une prise de
8. Connecteur du chargeur. Après avoir connecté le
into cleaner.
7. Entrée du chargeur. To charge unit, insert Charger/Plug
4
collecteur à poussière de l’aspirateur portable.
poussière. Appuyez sur ce bouton pour libérer le
6. Le bouton de déclenchement du collecteur à
Aspiration et IIIII = Aspiration avec rouleau-brosse.
5. L’interrupteur à trois positions. O = Arrêt, I =
de l’aspirateur derrière le collecteur à poussière.
4. Le suceur plat. Le suceur plat est rangé dans le corps
l’aspirateur portable du corps.
portable. Appuyez sur ce bouton pour libérer
3. Le bouton de déclenchement de l’aspirateur
le manche.
sur ce bouton quand vous voulez monter ou baisser
2. Le bouton de déclenchement du manche. Appuyez
positions : haut et bas.
1. Le manche télescopique. Le manche a deux
9
5
4
2
8
1
6
7
3
les pièces.
ATTENTION : Ne branchez pas l’aspirateur jusqu’à ce que vous compreniez tous les boutons de contrôle et toutes
Mode d’emploi
Page 24

3
déclic.
l’appareil jusqu’à ce qu’il se mette en place après le
tel que montré ci-dessus. Glissez le manche dans
3. Appuyez sur le bouton de déclenchement du manche
dans l’ouverture sur le haut du corps de l’aspirateur.
Alignez les languettes du manche avec les rainures
2. Placez le manche au dessus du corps de l’aspirateur.
Le manche
du manche
languettes
Les
le corps et les languettes du manche sur le manche.
Repérez le bouton de déclenchement du manche sur
1. Retirez de la boîte le corps de l’aspirateur et le manche.
l’aspirateur
Le corps de
Étape B Attacher le manche
du manche
déclenchement
Le bouton de
l’aspirateur et le manche
Étape A Déballer le corps de
même.
REMARQUE : Les caractéristiques peuvent varier selon le modèle, cependant le mode d’assemblage reste le
que le rouleau-brosse soit éloigné de tout ce qui bouge quand vous branchez l’appareil.
ATTENTION : Pièces mobiles : Eloignez-vous du rouleau-brosse quand vous branchez l’aspirateur. Assurez-vous
ATTENTION : Assemblez l’aspirateur complètement avant de le brancher à une prise électrique.
Assemblage
ATTENTION : ne court-circuitez pas l'appareil et ne le jetez pas au feu.
appelez le : 1-800-282-2886.
Pour obtenir l’adresse du centre d’entretien-dépannage d’usine le plus proche,
risé pour l'application de la garantie Eureka le plus près de chez vous.
piles avec vos ordures ménagères. Retirez les piles et apportez-les ou envoyez-les à l'atelier auto-
les piles en coupant les ls du connecteur un par un avant de recycler l'appareil. Ne jetez pas les
Les décharges municipales n'accepteront pas d'éliminer des piles qui fonctionnent toujours. Retirez
jetez ou éliminez l'aspirateur de manière appropriée lorsque les piles ne sont plus rechargeables.
L'aspirateur contient de piles nickel métal hydrure (NiMH). An de protéger notre environnement,
Piles au nickel-cadmium
Appeler le 1-800-822-8837
Renseignements importants sur l’évacuation de la pile –
Page 25

INSTRUCTIONS
CONSERVEZ CES
2
• Dépriser les appareils électriques avant d’y passer l’aspirateur.
• Veiller à ce que l’aire de travail soit bien éclairée.
l'endommagement de l'appareil.
des intempéries an de prévenir les décharges électriques ou
• Rechargez l'unité à l'intérieur, dans un endroit frais, sec et à l'abri
présents.
l’essence, ou utiliser dans des lieux ou de tels liquides sont
• Ne pas aspirer des liquides inammables ou combustibles, telle
escaliers.
• Faire preuve d’un surcroît de prudence quand on nettoie des
cas où l’appareil se mettrait spontanément en service.
ou de quelconques objets dans le compartiment du ventilateur au
d’entretien-dépannage de l’appareil, ne jamais introduire les doigts
• Ne pas utiliser s’il n’y a pas de ltre en place. Lors des interventions
cigarettes, des allumettes ou des cendres chaudes.
• Ne rien ramasser qui soit en train de brûler ou de fumer, telles des
l’écart des ouvertures et des pièces en mouvement.
chevelure, les vêtements, les doigts et toutes les parties du corps à
• Le présent aspirateur engendre une aspiration. Maintenir la
du bornier.
peut se produire si l'on introduit un objet métallique aux alentours
que le bornier ne présente aucun risque d'électrocution, une brûlure
• La borne de l’aspirateur doit être propre et exempt d’objets. Bien
médecin.
de l’eau propre pendant un minimum de 10 minutes. Consulter un
entre en contact avec les yeux, les baigner immédiatement avec
avec un acide doux tel du jus de citron ou du vinaigre. Si le liquide
peau (1), lavez rapidement à l’eau savonneuse ou (2) neutraliser
ou de température extrêmes. Si le liquide entre en contact avec la
• Les cellules des piles peuvent fuir dans des conditions d’utilisation
SUSCEPTIBLES D’EXPLOSER À HAUTE TEMPÉRATURE.
• NE PAS MUTILER OU INCINÉRER LES PILES, CELLES-CI ÉTANT
mouillées.
• Ne pas manipuler le chargeur ou l’aspirateur avec les mains
chargeur et non sur le cordon.
• Ne pas dépriser en tirant sur le cordon. Pour dépriser, saisir le
admissible inadéquate.
• Ne pas utiliser de rallonge ou de prise ayant une intensité de courant
coins. Tenir le cordon à l’écart des surfaces chauffées.
cordon et ne pas tirer le cordon autour d’arêtes tranchantes ou de
le cordon en guise de poignée, ne pas refermer une porte sur le
• Ne pas tirer ou transporter le chargeur par le cordon, ne pas utiliser
KA12D150020033U pour 120 volts.
• Utilisez uniquement le chargeur fourni pour la recharge; no de modèle
• N’utiliser que de la façon décrite dans le présent manuel.
de ceux-ci.
très attentif quand l’appareil est utilisé par des enfants ou à proximité
• Ne pas autoriser qu’on s’en serve comme d’un jouet. Il faut se montrer
n'utilisez pas l'aspirateur lorsque celui-ci est en mode chargement.
• Pour éviter le surchauffage ou des dommages à l'unité ou aux piles,
retourner à un centre de service après-vente.
s’il a été laissé en plein air ou s'il a été immergé dans l'eau, le
fonctionne pas normalement, s’il a fait une chute, s’il est endommagé,
endommagé de quelque façon que ce soit. Si l’aspirateur ne
• Ne pas faire fonctionner l’aspirateur ou le chargeur s’il a été
• Ne pas utiliser en plein air ou sur des surfaces humides.
Pour réduire le risque d’incendie, d’électrocution ou de lésions :
AVERTISSEMENT
scellé de façon permanente.
NE PAS GRAISSER. Le moteur est lubrié et
l’ensemble des renseignements d'entretien.
3E4. Consultez la garantie Eureka en ce qui concerne
Canada, 5855 Terry Fox Way, Mississauga, Ontario L5V
Canada, écrivez à Electrolux Home Care Products
P.O. Box 3900, Peoria, Illinois, 61612, États-Unis Au
Care Products North America, Customer Service,
Si vous préférez, vous pouvez écrire à Electrolux Home
www.eureka.com
Canada : 1-800-282-2886
Mexique : (55) 5343-4384
É.-U. : 1-800-282-2886
agréée.
l’entretien,appelez notre station de garantie Eureka
renseignements supplémentaires en ce qui concerne
en ce qui concerne l’entretien de routine. Pour des
Les instructions contenues dans ce livret sont un guide
l’entretien
Renseignements pour
Cela est normal et n’est pas un signe de problème.
le chargement, le chargeur peut devenir chaud au toucher.
hors de cette plage pourra endommager les piles. Pendant
comprise entre 0°C (32°F) et 40°C (104°F). Une température
Il vaut mieux charger les piles quand la température est
Les piles peuvent se décharger en transit.
Chargez 14 à 16 heures avant la première utilisation.
plus grande taille.
pour les petites tâches plutôt que d’utiliser un aspirateur de
nettoyage rapides et faciles. Servez-vous de cet aspirateur
L’aspirateur sans l est ce qu’il vous faut pour les petits
Généralités
Bon de commande ....................................... 9
Garantie ....................................................... 8
Résolution des problèmes ........................... 7
Filtre ............................................................. 6
Collecteur à poussière ................................. 6
Rouleau-brosse ............................................ 6
Accessoires .................................................. 5
Mode d’emploi .............................................. 4
VOTRE ASPIRATEUR.
LISEZ TOUTES LES INSTRUCTIONS AVANT D’UTILISER
élémentaires doivent être observées, incluant les suivantes :
Lors de l’utilisation d’un appareil électrique, quelques précautions
SÉCURITÉ
CONSEILS DE
Assemblage ................................................. 3
Disposition de batterie ................................. 3
Renseignements généraux .......................... 2
Conseils de sécurité ..................................... 2
Table des matières
Page 26

Pièce nº 81382 (12/08) ©2009 Electrolux Home Care Products Ltd. Imprimé aux La Chine
www.eureka.com
*En Mexico llame al (55) 5343-4384
votre maison
garantie Eureka le plus proche de
autorisé pour l’application de la
• pour savoir l’adresse de l’atelier
accessoires de rechange
• pour commander des pièces et des
ou manquantes
• remplacement des pièces cassées
• problèmes d’assemblage
ci-dessous:
www.eureka.com pour les situations
le samedi ou visiter notre site Web,
Centre et de 10 heures à 18 heures 30
à 19 heures 30, heure normale du
du lundi au vendredi, de 8 heures
magasin. Appelez le 1-800-282-2886
Ne rendez pas cet appareil au
preuve pour la date d’achat.
Il est aussi très important de garder votre reçu comme
N° de série
Modèle et type
toujours à ces numéros :
service après-vente rapide et complet, reportez-vous
signalétique, argent, de votre appareil. Pour obtenir un
de type et de série ci-dessous. Ils se trouvent sur la plaque
Nous vous suggérons d’inscrire les numéros de modèle,
NUMÉROS ET CE MANUEL
VEUILLEZ CONSERVER CES
A usage ménager
IMPORTANT
Gamme de modèles 100-110
Guide du propriétaire
utilisation.
aspirateur portable
Aspirateur combiné avec
la première
à 16 avant
Chargez 14
Remarque :
 Loading...