

Page 1

VP1(VP1V2)
Slot 1 Motherboard
USER’S GUIDE
Model : VP1(VP1V2)
Manual Version : English, version 2.0
Release Date : Sep 7, 1999
Page 2

Copyright
r
f
r
A
Copyright 1998 by this company. All r ights reserved.
No par t of this p ublica tion m ay be r eproduc ed, t ransmi tted, t ranscribed, s tored in a retrieval sys tem, o
transl ated int o any langu age in any form or by any means , electronic, mechanical, magnetic , optic al, manual
or otherwise, without the prior wr itten con sent of the cop yright holde rs.
User’s Notice
The co ntents of this pu blication are subject to change. This company reserves t he right to alter the co ntents o
this publicatio n at any time and with out notice. The content s of this public ation may contain inac curacies o
typographical errors a nd is supplied for informational us e only.
Intel and P entium are registered trademarks of Intel C orporation.
OS/2 and IBM are register ed trademar ks of International Busines s Machines.
Windows and MS-D OS ar e registered trademarks of Microsof t Cor poration .
WARD is a regist ered trademark of Award Software Inc.
Other brand, corporate, and product nam es may or may n ot be re gistere d
tradema rks or copyright of their respect ive compani es
.
Page 3

FCC & DOC Compliance
ederal Communications Commission Statement
F
This device complies with FCC Rules Part 15. Operation is subject to the following two
conditions:
This device may not cause harmful interference, and
!
!
This device must accept any interference received, including interference that may
cause undesired operation.
This equipment has been tested and found to comply with the limits for a Class B digital
device, pursuant to Part 15 of the FCC Rules. These limits are designed to provide
reasonable protection against harmful interference in a residential installation. This
equipment generates, uses and can radiate radio frequency energy and, if not installed
and used in accordance with the manufacturer’s instructions, may cause harmful
interference to radio communication. However, there is no guarantee that interference will
not occur in a particular installation. If this equipment does cause harmful interference to
radio or television reception, which can be determined by turning the equipment off and on,
the user is encouraged to try to correct the interference by one or more of the following
measures:
!
Re-orient or relocate the receiving antenna.
!
Increase the separation between the equipment and the receiver.
!
Connect the equipment to an outlet on a circuit different from that to which the
receiver is connected.
!
Consult the dealer or an experienced radio/TV technician for help.
.
Warning! Th e use of shielded cables for the connection of the monitor to the graphics
card is re quired to ass ure compl iance with FCC regulations Cha nges or modifi cations
to this authority to operate this equipment.
Page 4

CONTENTS
SECTION 1: PRODUCT INFORMATION
1-1 Manual Features............................................................................ 1-1
1-2 Package Check List........................................................................ 1-1
1-3 Mainboard Specifications............................................................... 1-2
1-4 Mainboard Layout............................................................................1-3
SECTION 2: HARDWARE INSTALLATION
2-1 Jumper Settings...............................................................................2-1
2-2 Connectors......................................................................................2-4
2-3 System Memory Installation..............................................................2-8
2-4 Game / Audio Connector...................................................................2-9
2-5 AMR Slot Connector..........................................................................2-9
SECTION 3: CMOS SETUP UTILITY
3-1 BIOS Setup Main Menu.....................................................................3-1
3-2 Standard CMOS Setup......................................................................3-2
3-3 BIOS Features Setup.........................................................................3-4
3-4 Chipset Feature Setup.......................................................................3-8
3-5 Power Management Setup................................................................3-12
3-6 PNP / PCI Configuration Setup........................................................... 3-17
3-7 Load BIOS Defaults...........................................................................3-19
3-8 Load Setup Defaults......................................................................... 3-20
3-9 CPU Speed Setting............................................................................ 3-21
3-10 Integrated Peripherals.........................................................................3-21
3-11 Password Setting...............................................................................3-25
3-12 IDE HDD Auto Detection......................................................................3-26
3-13 Save & Exit Setup............................................................................... 3-26
3-14 Exit Without Saving..............................................................................3-26
SECTION 4: SOFTWARE UTILITY
4-1 VIA V x D Setup Program.....................................................................4-1
4-2 VIA Audio Setup Program.....................................................................4-1
4-3 VIA Chipset Driver Setup Program.........................................................4-2
4-4 VIA Hardware Monitor System V1.05...................................................4-2
Page 5

SECTION 1
PRODUCT INFORMATION
Thanks for purchasing VP1(VP1V2) Slot-1 mainboard. This users manual contains all the
information and features that show you how to use the VP1(VP1V2) motherboard. Please
take a moment to familiarize yourself with the design and organization of this manual.
1-1 Manual Features
This manual is divided into the following four sections:
Section 1: Product Information
A brief overview of what comes in the mainboard package, the mainboard layout and the
specification it appears.
Section 2: Hardware Installation
Tell you the usage of the mainboard jumpers and the connectors.
Section 3: CMOS Setup Utility
A summary of the mainboard CMOS (BIOS) Setting.
Section 4: BIOS / Software Utility
Introduction of some useful Software utility.
1-2 Package Check List
This VP1 mainboard package contains the following items. Please inspect the package
contents and
confirm that every thing is there. If anything is missing or damaged, call your vendor for
instructions before operating.
The Package includes:
! One VP1(VP1V2) mainboard
! One Floppy Interface Cable
! One IDE Interface Cable
! One Motherboard Resource CD
! One User Manual
VP1(VP1V2) Motherboard User’s Manual
1-1
Page 6

I. Product Information
1-3 Mainboard Specifications
Form Factor • AT X form factor
Board Size • 3 0 .5cm x 1 9.8c m
• S upp orts Slot 1 Ce leron, PIII, PII and further CP Us
• S upp orts CPU Clock Ratio:
CPU
System Memory
Chipset
Exp ansion Slots
Serial Port • Tw o serial ports U AR T 16 C550 c ompatible
P ara lle l P or t
Floppy Interface
IDE Interface
USB Port
PS/2 Mouse • P S/2 m ouse suppo rted by connector onboard
PS /2 ke yb oa rd • P S/2 k eyboa rd suppo rted by c onnector o nbo ard
Soun d Fu nction • O N -Bridge Aud io Code c AC '97+ MC '97
Fuse
RTC and B attery
Power Connector
Wake up Function
Hardware Monito r
BIO S
LED Indicator
1.5/2/2.5/3/3.5/4/4.5/5/5.5/6/6.5/7/7.5/8X
• S upp orts C P U type/cloc k by jum p erless B IO S
se t up .
• S upp orts CPU Clock Frequ ency:
66/75/83/100/10 3/112/133/124/140 /150M hz
• DIMM 168-pin x 3 SDRAM maximum 768MB
• S upp orts 64M -bit SDR AM technolo gy
• V IA Ch ip se t inc lud ing :
- VIA VT82C693A north bridge(VP1)
VIA V T82 C69 3 north bridge(VP 1V2 )
- VIA V T82 C68 6A south bridge
1 x AGP Slot
2 x ISA Slots
4 x PC I Slots (all of them c an be P CI mas ter)
1 x AMR Slot
• O ne p arallel port supports:
- S P P- st an d ar d p ara llel po rt
- E PP- enhanc ed parallel por t
- E CP -e x ten ded c apa bilities p o rt
• Su pp o r t d rive rs in c h e s / fo rm at w ith
- 3.5 inche s-720KB /1.44MB /2.88MB
- 5.2 5 inch es-360 KB /1.2M B
• T he V T82 C68 6A includes du al channe l m aster m ode P CI
supp ort 4EIDE dev ices.
• S up port PIO M ode 4, U LTR A DM A /33 & ULT RA D M A/66
• Tw o U SB ports sup ported
• S upp ort U S B Legac y Keybo ard function
• Supports Recoverable fuse for USB, KB & MOUSE
• B uilt in So u th B rid ge
• L ith iu m (C R -2 0 32 ) b a tte ry
• AT X
• Modem ring wake up
• Lan wa ke up
• RTC Alarm wake up
• Sys tem fan speed co ntrol
• 4 P o sitive Voltag e Inp uts, 2 intrinsic voltage m on itoring
• O ver tem perature ind icate ou tput
• A utom atic P owe r o n voltag e d etection be ep
• Aw ard B IOS
• Year 20 00 Com p lia nce
• S upp orts APM , D MI and A CPI
• S upp orts virus warning
• S upp orts Flash / Upg rade B IOS functions
• S ystem Po wer LE D
• HD D activity LED
• Sy stem Su spend LE D
VP1(VP1V2) Motherboard User’s Manual
1-2
Page 7
I. Product Information
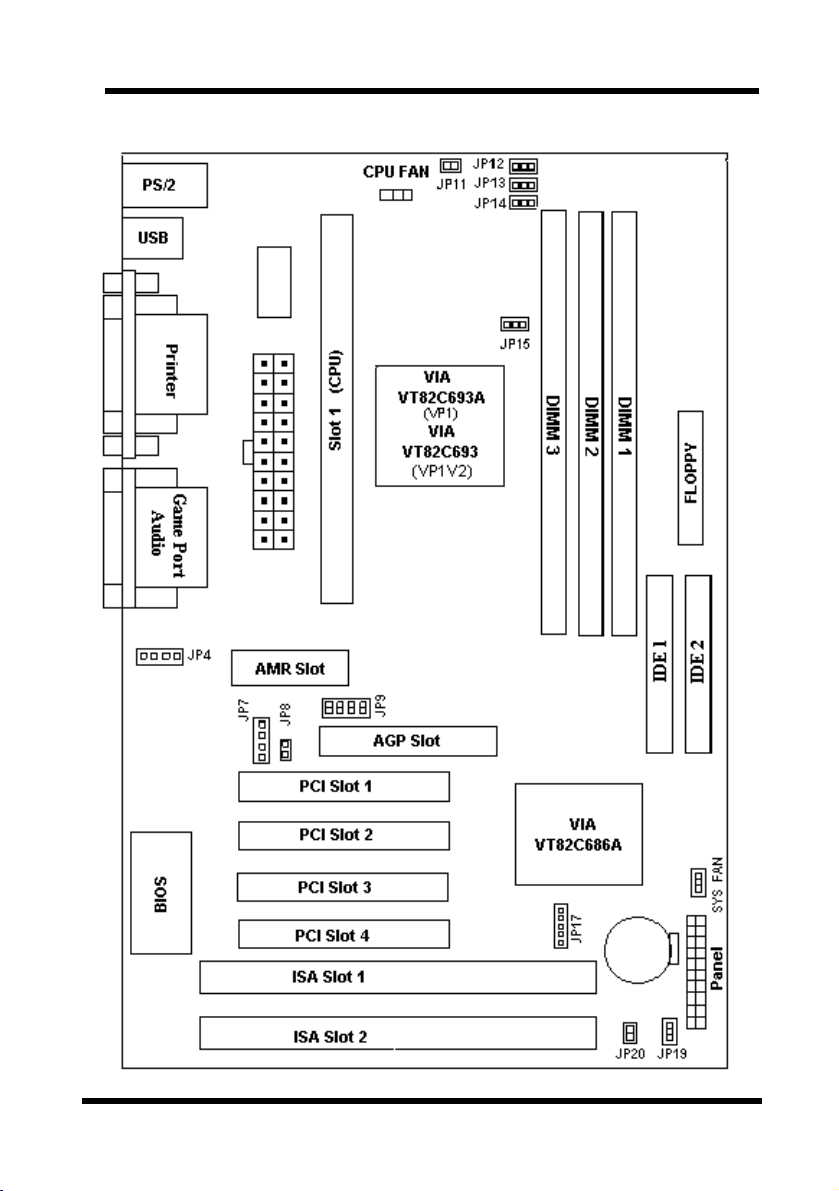
1-4 Motherboard Layout
VP1(VP1V2) Motherboard User’s Manual
1-3
Page 8

I. Product Information
Jumpers
1. JP19 Clear CMOS(RTC)
2. JP9 CPU clock Ratio
3. JP20 Sleep Mode function
4. JP7,JP8 AMR and AC97 jumper setting
5. JP17 IrDA Connector
6. JP4 CD Audio In
7. JP11-JP15 CPU Clock Frequency
Expansion Sockets
1. DIMM 1 Support 168-pin DIMM Memory
2. DIMM 2 Support 168-pin DIMM Memory
3. DIMM 2 Support 168-pin DIMM Memory
Expansion Slots
1. CP U Supporting Slot 1 CPU
2. PCI slot1 to slot4 32-bit PCI Bus Expansion slot
3. ISA slot1 to slot2 16-bit ISA Bus Expansion slot
4. A M R AMR Expansion Slot for AC 97 Devices
5. AGP AGP Expansion Slot
Connectors
1. IDE 1 Primary IDE Connector
2. IDE 2 Secondary IDE Connector
3. Floppy Floppy Drive Connector
4. IrDA Infrared ray Port Connector
5. Panel - PowerOn ATX Power on / off switch
- Reset Reset Switch Connector
- HDD Led HDD Led Connector
- Power Led ATX Power Led Connector
- Speaker Chassis Speaker Connector
- KBLCK Keyboard Lock Switch
Connector
6. Sys Fan System Fan Connector
7. CPU Fan CPU Fan Connector
8. Wake on LAN Lan Wake Up Connector
9. Wake on MODEM MODEM Wake Up Connector
10. ATX Power ATX Power Connector
11. COM1/COM2 Serial Port1/Serial Port2
12. CD-IN Audio CD-IN Connector
13. Audio/Game Port Audio / Game Port Connector
14. Printer Printer (Parallel) Port Connector
15. U S B Universal Serial Bus Port1 & Port2
16. PS/2 connector PS/2 Mouse & Keyboard
VP1(VP1V2) Motherboard User’s Manual
- S LP Suspend Switch Connector
1-4
Page 9
SECTION 2
HARDWARE INSTALLATION
This section gives you a step-by-step procedure on how to install you system. Follow each
sectiion accordingly.
2-1 Jumper Settings
Please refer the following figures for the locations of the jumpers on the mainboard.
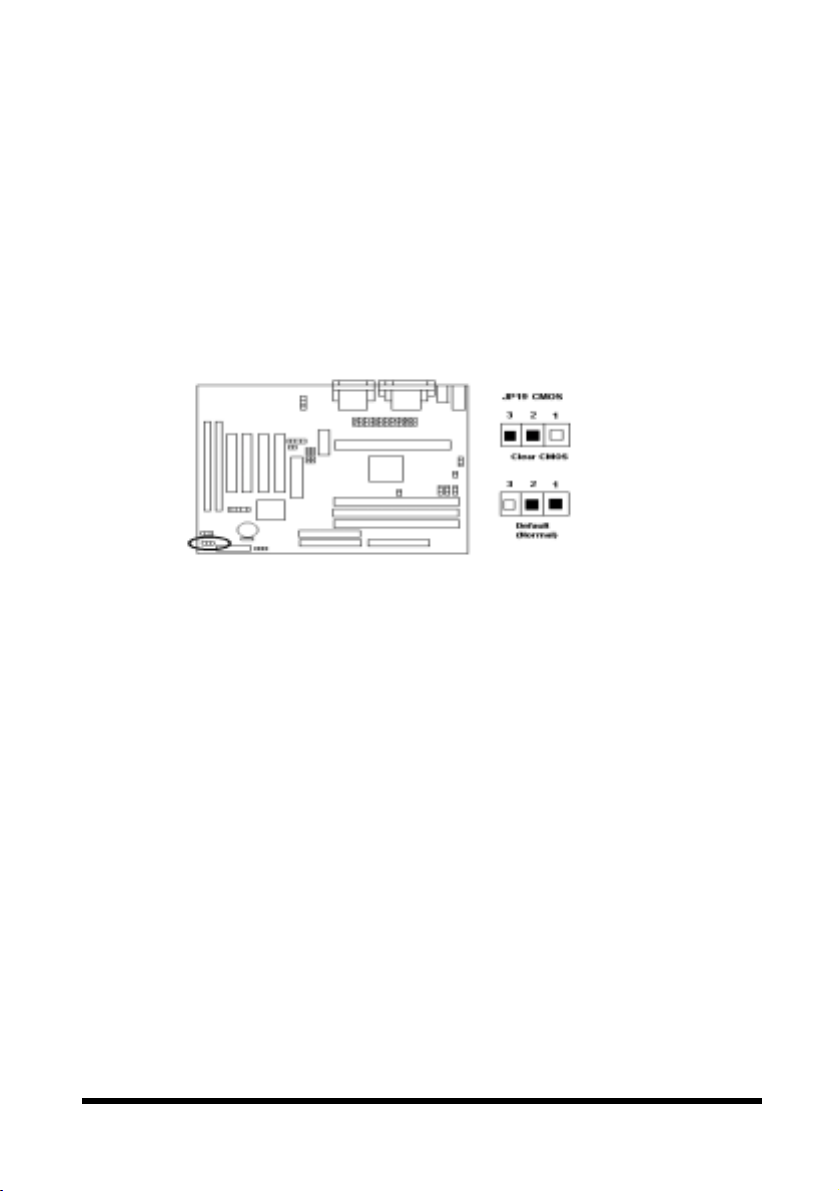
2-1.1 CMOS Clear Setting
To Clear CMOS, please follow the steps below:
1. Power off the system and unplug the chassis AC power cord.
2. Short JP19 at pin 2-3 for few seconds.
3. Set JP19 back to its Normal position at pin1-2
4. Plug the AC power cord to the chassis.
5. Power on the system and load the BIOS set up default.
2-1.2 CPU Type Setting
Static Precautions
Static electricity can be a serious damage to the electronic components on this motherboard.
To avoid damage caused by electrostatic discharge, observe the following precautions:
- Don’t removes the motherboard from its anti-static packaging until you are ready to install
it into a computer case.
- Before you handle the motherboard in any way, touch a grounded, antistatic surface, such
as an unpainted portion of the system chassis, for a few seconds to discharge any built-up
static electricity.
- Handle add-in cards and modules by the edges or mounting bracket.
VP1(VP1V2) Motherboard User’s Manual
2-1
Page 10
II. HARDWARE INSTALLATION
CPU Setting
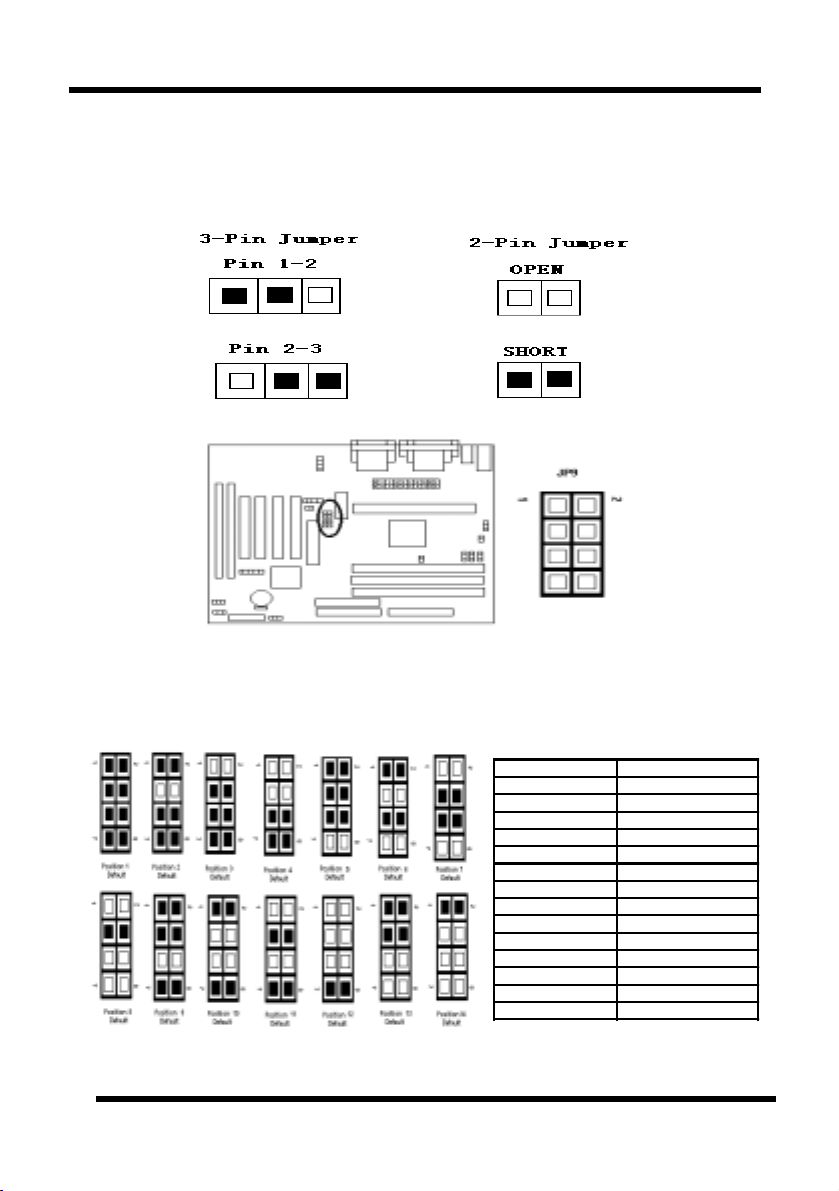
After installing the CPU, you must set the clock selection jumpers to match the frequency of
the CPU. Find the jumpers labeled JP9 and set the jumpers according to the figure below and
table for CPU frequency.
""
"
CPU Clock Ratio:
""
JP9 is used to select the CPU clock ratio.
Core Freq./ Bus Freq. JP 9 Position
2 Position 1
3 Position 2
4 Postion 3
5 Postion 4
6 Postion 5
7 Postion 6
8 Postion 7
1.5 Postion 8
2.5 Postion 9
3.5 Postion 10
4.5 Postion 11
5.5 Postion 12
6.5 Postion 13
7.5 Postion 14
VP1(VP1V2) Motherboard User’s Manual
2-2
Page 11
II. HARDWARE INSTALLATION
""
"
Clock Generator:
""
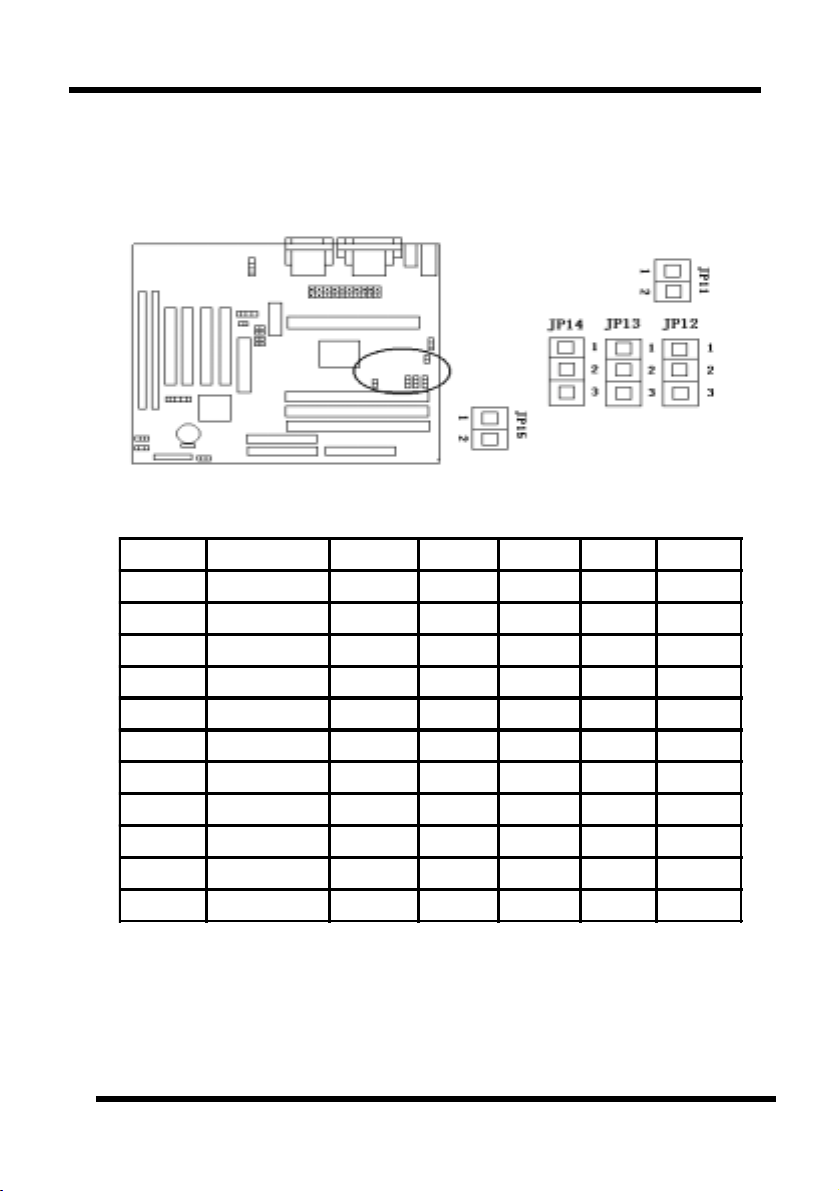
CPU Clock Frequency:
JP11,JP12,JP13,JP14 £¬JP15 are used to select the CPU Clock Frequency.
CPU (MHz) PCICLK (MHz) JP11 JP12 JP13 JP14 JP15
66 33 Shor t 2-3 1-2 1-2 Short
75 37 Shor t 2-3 1-2 2-3 Short
83 41 Shor t 2-3 2-3 1-2 Short
100 33 Open 2-3 1-2 1-2 Short
103 34 Open 2-3 2-3 2-3 Short
112 37 Open 2-3 1-2 2-3 Short
133 44 Open 2-3 2-3 1-2 Short
124 31 Open 1-2 2-3 1-2 Open
133 33 Open 1-2 1-2 1-2 Open
140 35 Open 1-2 2-3 2-3 Open
150 37 Open 1-2 1-2 2-3 Open
VP1(VP1V2) Motherboard User’s Manual
2-3
Page 12
II. HARDWARE INSTALLATION
2-2 Connectors
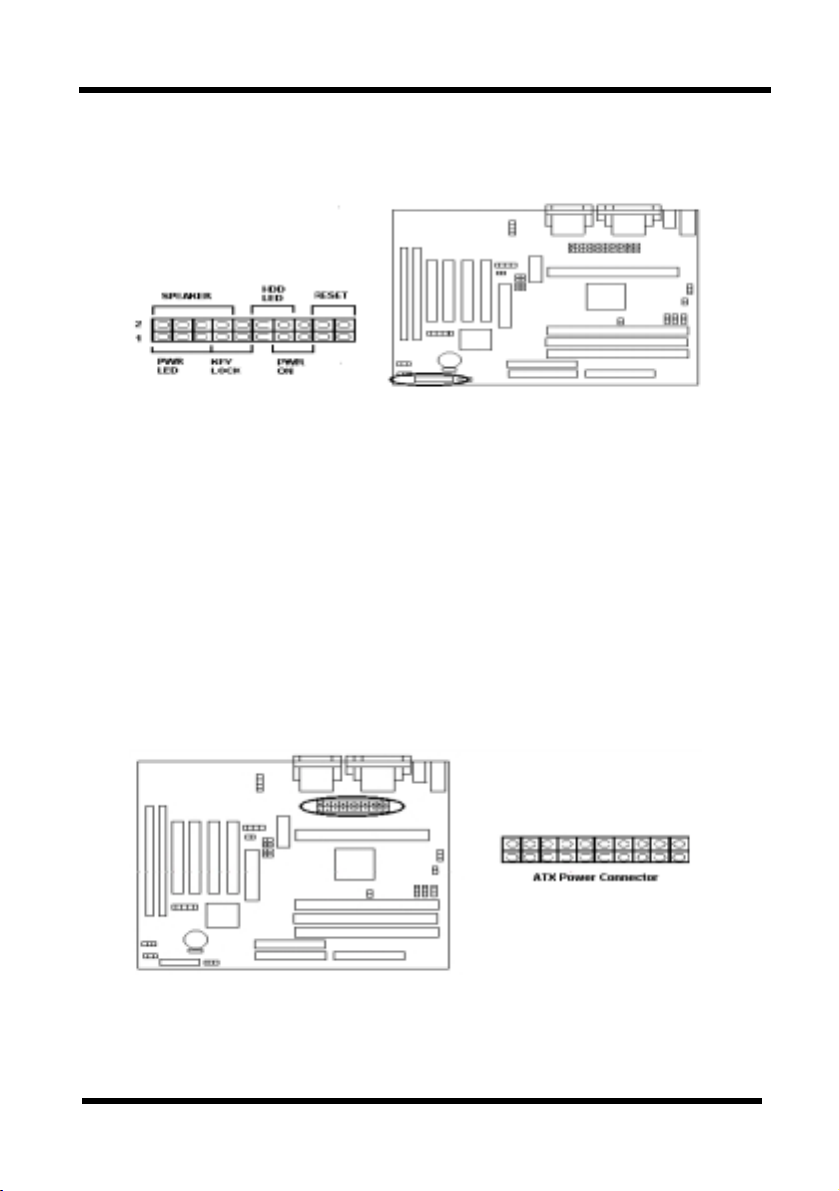
2-2.1 Panel Connector
- PWR ON ATX Power Swith Connector(3 pins)
- RESET Reset Swith Connector (2 pins)
- HDD LED HDD LED Connector (2 pins)
- PWR LED ATX Power LED Connector (3 pins)
- SPEAKER Chassis Speaker Connector (4 pins)
- KEY LOCK Key Lock Connector (2 pins )
2-2.2 Power Cnnector
Connect the 20-pin ATX power supply cable to this power connector. Make sure the right
plug-in direction and the power supply is off before connecting or disconnecting the power
VP1(VP1V2) Motherboard User’s Manual
2-4
Page 13
II. HARDWARE INSTALLATION
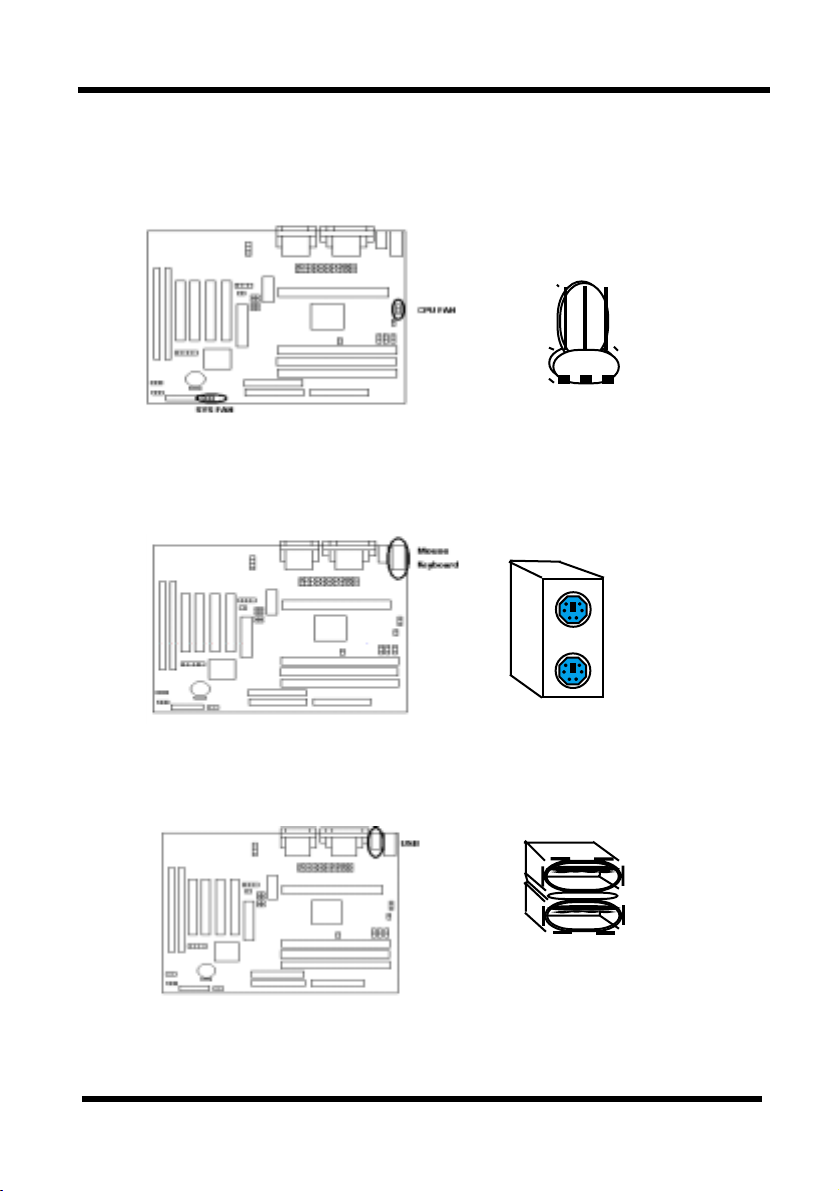
2-2.3 Fan Connectors
Connect the CPU and SYS fan cables to the fan connectors shown below. The fan
connectors are marked as: CPUFAN and SYSFAN on the mainboard.
CPU Fan
SYS Fan
2-2.4 PS/2 Mouse & Keyboard Connector
Connect the PS/2 mouse and keyboard to the onboard 6-pin Mini-Din connector marked
as MOUSE and KB.
Mouse
Keyboard
2-2.5 USB Device Connector
Connect your USB device(s) to the onboard USB connector marked as USB.
Top: USB1
Botton: USB2
VP1(VP1V2) Motherboard User’s Manual
2-5
Page 14
II. HARDWARE INSTALLATION
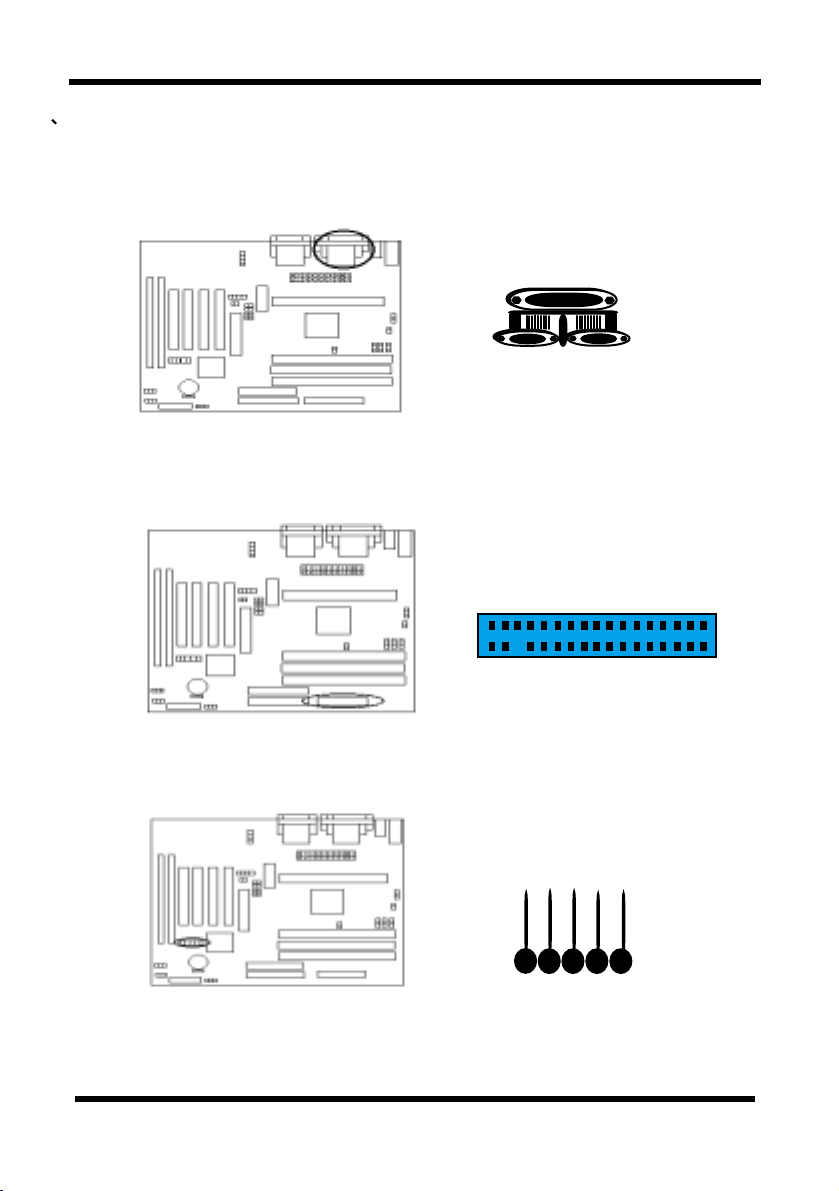
2-2.6 Serial Device (COM1/COM2)and Printer Connectors
Connect your serial device(s) to the onboard 9-pin serial connectors marked as COM 1
and COM 2. Connect your local printer to the onboard 25-pin printer connector marked
as PRINTER.
PRINTER
COM1 COM2
2-2.7 Floppy Drive Connector
Connect the floppy drive cable to the onboard 34-pin floppy drive connector marked as FDD.
FLOPPY
2-2.8 IrDA Connector
Connect your IR device to the onboard IrDA connector marked as IR.
JP17 IrDA
VP1(VP1V2) Motherboard User’s Manual
2-6
Page 15
II. HARDWARE INSTALLATION
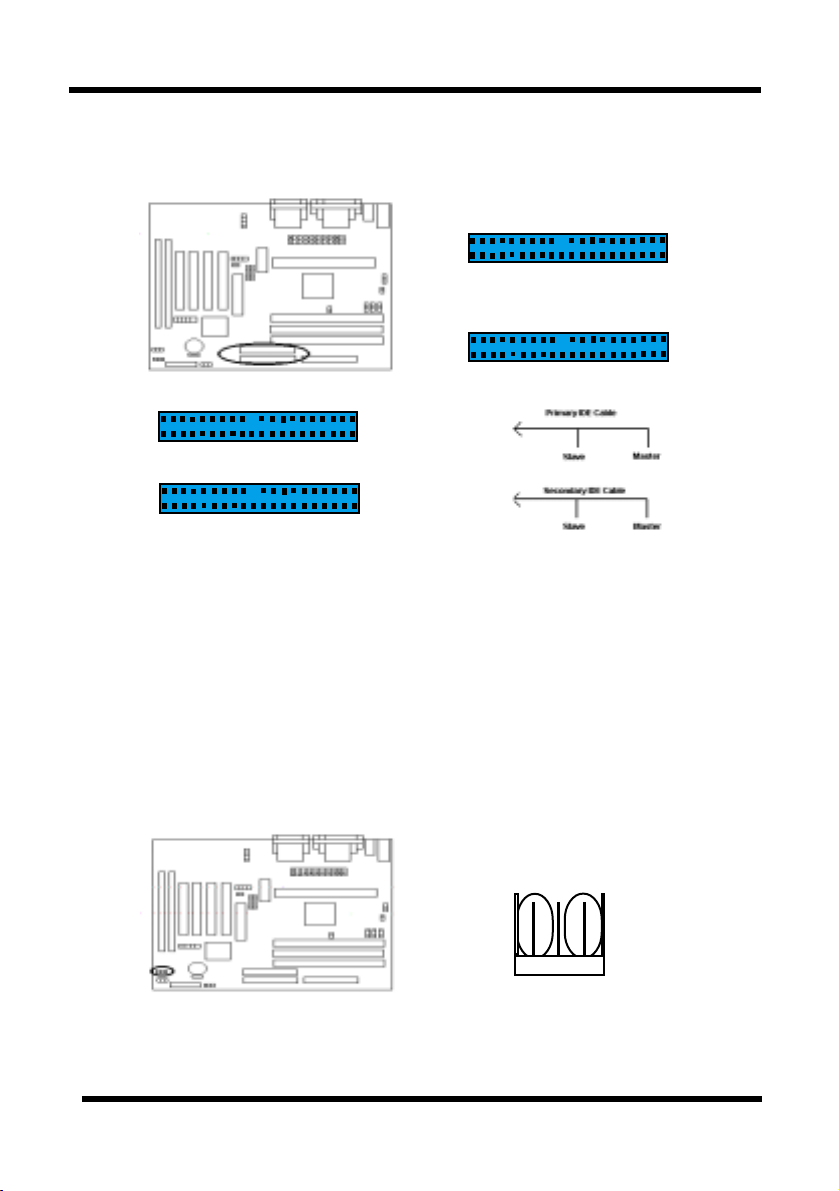
2-2.9 IDE Hard Drives and CD-ROMs Connector
Connect your IDE devices to the onboard 40-pin IDE connectors marked as IDE1 and IDE2.
IDE 1
IDE 2
It is suggested that you connect the IDE devices to your IDE cables as the figure shown
above. Each IDE channel, either Primary or Secondary, supports two IDE devices which
must be set differently to master mode and slave mode. (Refer to your hard disk and
CD-ROM user’s manual for detailed settings of IDE master and slave mode.)
2-2.10 Wake On LAN Connector
This mainboard supports wake up on LAN function. To use this function, you need a
Wake On LAN supported network card and software. To use the Wake On LAN function,
you must enable the “ Power On By Ring/Lan” field in the power Management Setup of the
Award BIOS.
CON17 Wake On LAN
VP1(VP1V2) Motherboard User’s Manual
2-7
Page 16
II. HARDWARE INSTALLATION
2-3 System Memory Installation
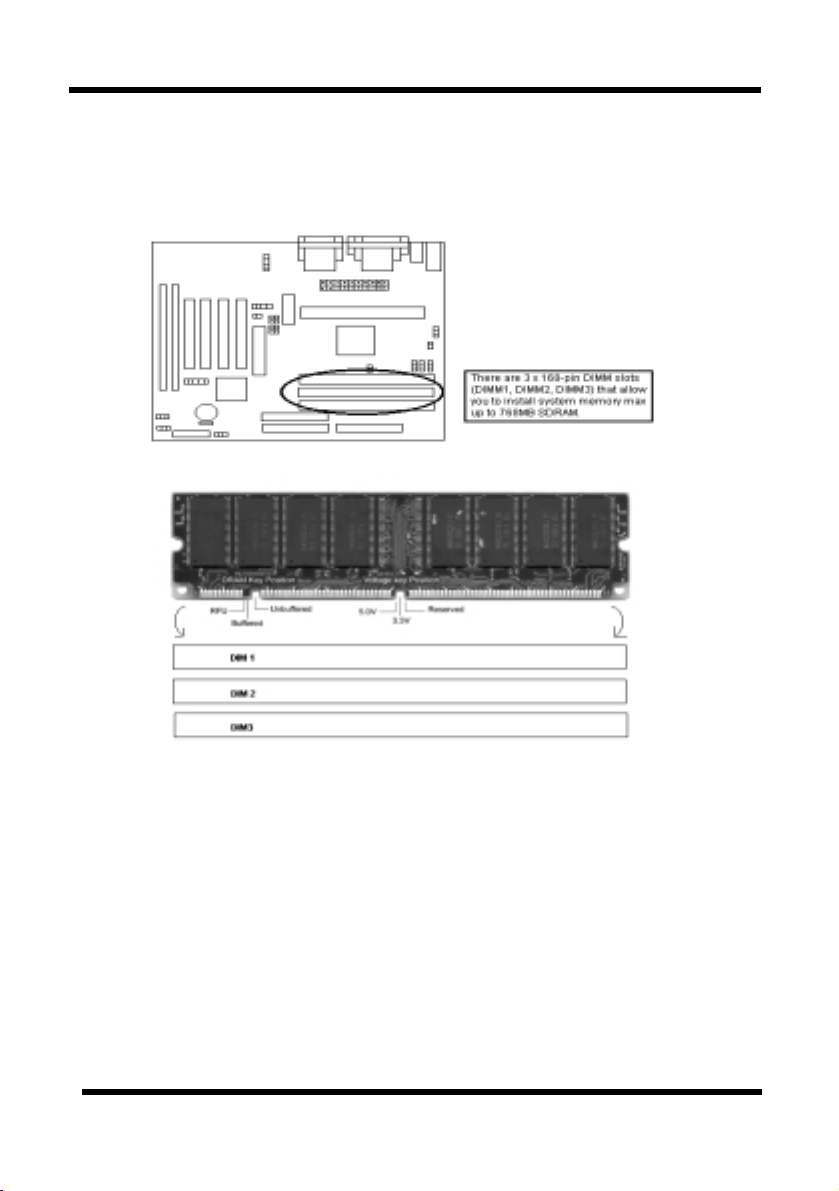
There are 3 pieces 168-pin DIMM (Dual Inline Memory Module) sockets on the motherboard
which support SDRAM and EDO DRAM meory.
♦ To ensure reliability, it is recommended to use PC 100 or PC 133 SDRAM for your high
clock SDRAM performance requirement.
♦ If you are using low clock SDRAMs, you should set the SDRAM clock option of the
BIOS’s Chipset Feature Setup to HCLK-33 to ensure stability.
♦ DIMM Sizes supported: 8MB, 16MB, 32MB, 64MB, 128MB and 256MB.
♦ Total Memory Size = DIMM1 + DIMM2 + DIMM3, maximum up to 768MB.
VP1(VP1V2) Motherboard User’s Manual
2-8
Page 17
II. HARDWARE INSTALLATION
2-4 Audio / Game Port Connector
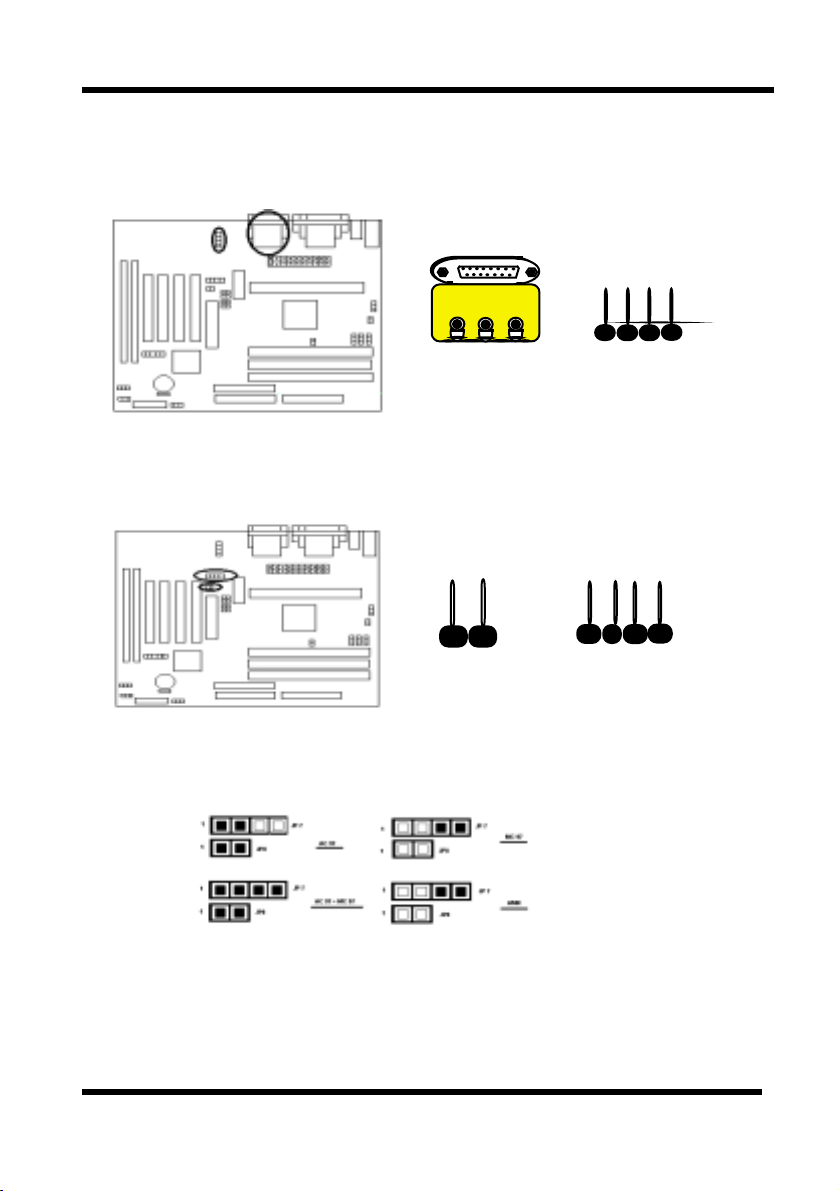
Connect the audio cable to the onboard Audio / Game Port connector marked as Audio /
Game Port. The onboard CD connector marked as CD is for CD-ROM audio.
Audio / Gsme Port
JP4 CD Audio In
Line
Line
in
Mic in
out
2-5 AMR(Audio/Modem Riser) Slot Connector
This motherboard provides an AMR slot to support both audio and modem.
AMR jumper setting:
JP8
VP1(VP1V2) Motherboard User’s Manual
2-9
JP7
Page 18
SECTION 3
CMOS SETUP UTILITY
The rest of this manual is intended to guide you through the process of configuring your
system using Setup. While the BIOS is in control, the Setup program can be activated by
pressing the <Del>key during the POST (Power On Self-Test).If the message disappears
before you respond and you still wish to enter Setup, restart the system to try again by
turning it OFF then ON or pressing the “RESET” button on the system case. You may also
restart by simultaneously pressing <Ctrl>, <Alt>, and <Delete> keys.
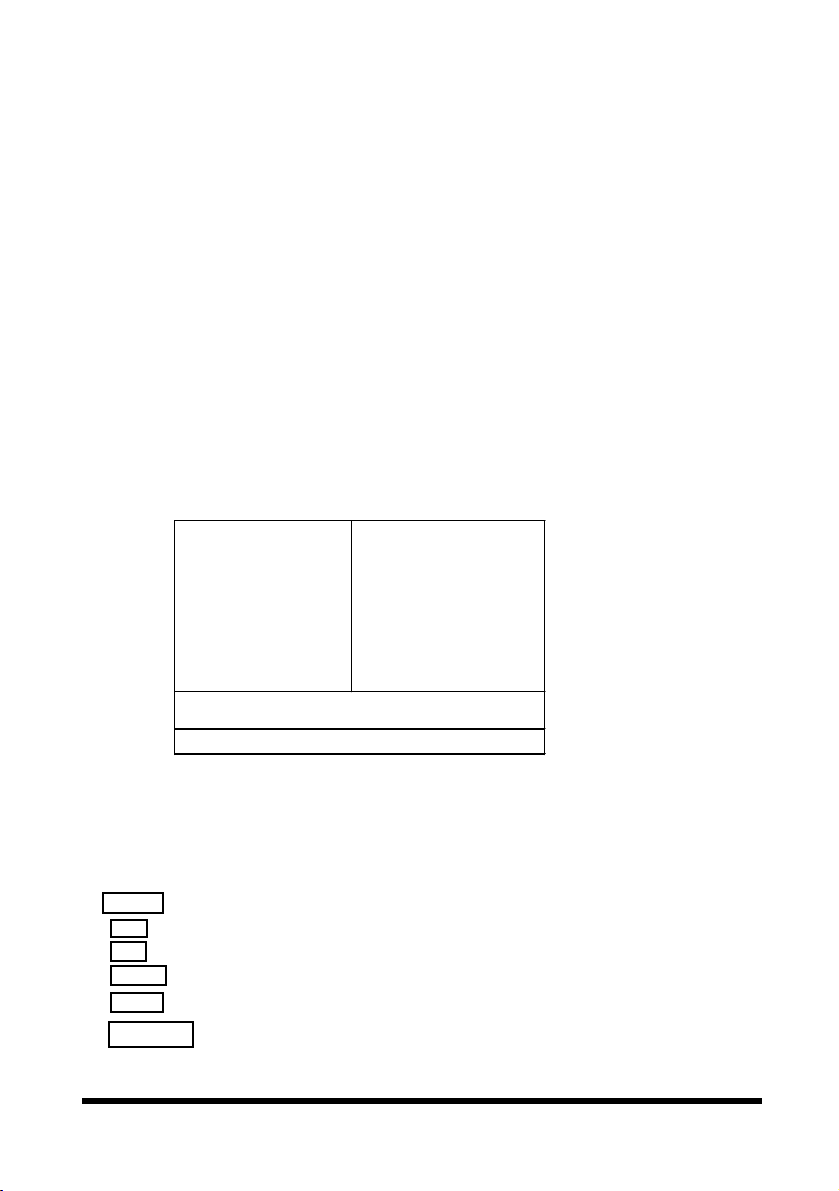
3-1 BIOS Setup Main Menu
Once you enter the BIOS setup utility, the Main Menu will appear on the screen. The Main
Menu allows you to select from several setup functions . the arrow keys to select among
the items and press <Enter> to accept and enter the submenu.
CMOS Setup Utility
Award Software, INC
# Sta nda rd CMO S F e at ur e
#
BIOS Feature Setup
#
Chi pset F eatu re Setup
#
Power Ma na ge m en t S et up
#
PnP/PCI Co nfiguratio ns
#
Load BI OS D ef aul ts
# Load Setup Defaults
Esc : Qui t ↑ ↓ ← → : Select Item
F10 : Save & Exit Setup (Shift)F2: Change Color
Time, Date, Hard Disk Type….
# CPU Speed Setting
#
Int eg rat ed Per i ph er als
#
Supe rv is or P ass wor d
#
User P as sw or d
#
I DE HDD Auto Detection
# Sa ve & Ex it S etup
#
Exit Without Saving
The main menu includes the following main setup categories, which defines basic
information about your system. Below are the keyboard function keys you can use
under the menu.
Menu function keys:
↑ ↓ ← →
F1
F10
ENTER
ESC
Shift + F2
: To Move around the screen. An item is highlighted if it is selected.
: Help.
: Save CMOS Changes & Exit.
: To select or enter a submenu.
: To quit the BIOS Setup Utility.
: To change color.
VP1(VP1V2) Motherboard User’s Manual
3-1
Page 19
III. CMOS SETUP UTILITY
3-2 Standard CMOS Setup
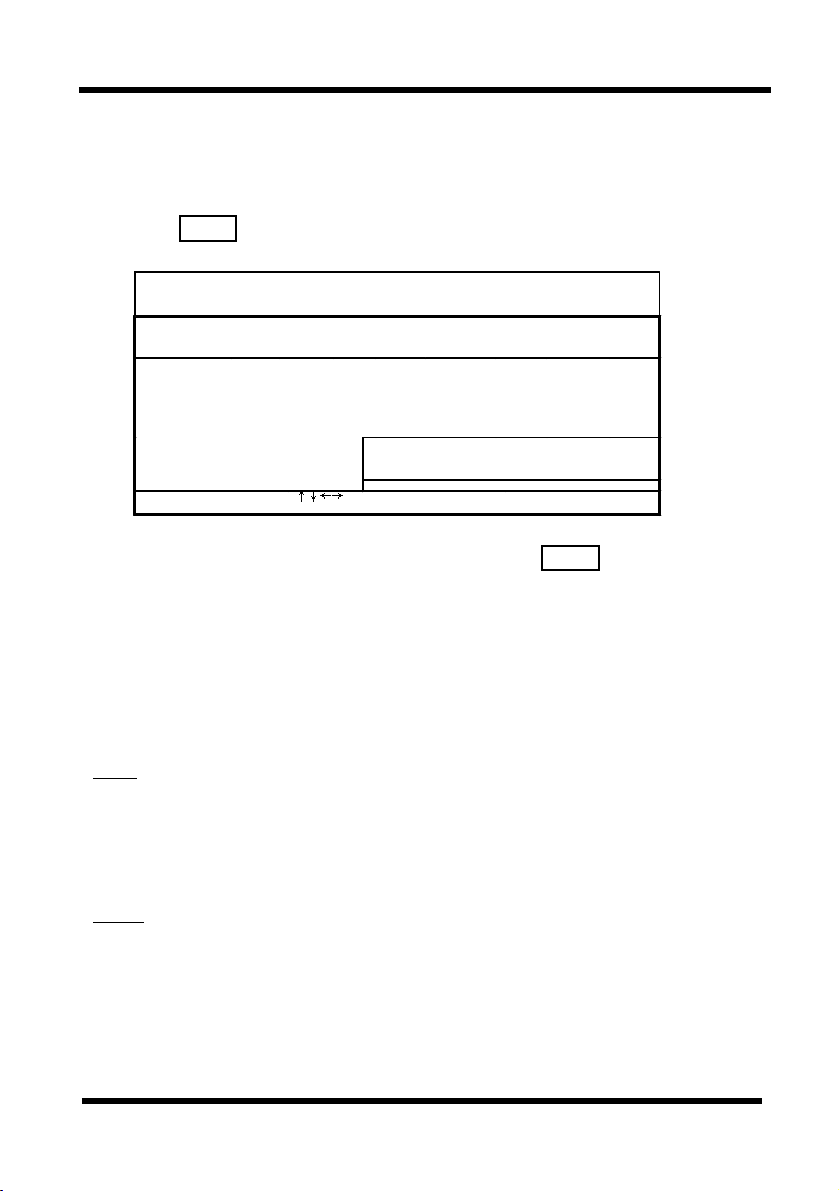
The items in Standard CMOS Setup Menu are divided into 10 categories. Each category
includes no, one or more than one setup items. Use the arrow keys to highlight the item and
then use the / <PgUp> / <PgDn> keys to select the value you want in each item.
$$
$ Date & Time
$$
$ Hard Disks → Primary Master
$ Hard Disks → Primary Slave
$ Hard Disks → Secondary Master
$ Hard Disks → Secondary Slave
↑ ↓ ← →
ROM PCI/ISA BIOS(2A6KL00B)
CMOS SETUP UTILITY
Date (mm:dd: yy): Fri, Jan 1 1999
Time (hh:mm:ss): 14: 8: 0
HARD DISKS TYPE SIZE CYLS HEAD PRECOMP LANDZ SECTOR MODE
Primary Master
Primary Slav e
Secondary Master
Secondary Slave
Drive A
Drive B : None Extended Memory: 64512K
Video : EGA/VGA
Halt O n : All, But keyboard Tot al Memory: 65536K
ESC: Qu it :S elect Ite m PU/PD /+ /-: Modify
F1 : Help (Shift)F2:Change Color
: Auto 0M 0 0 0 0 0 Au to
: Auto 0M 0 0 0 0 0 Au to
: Auto 0M 0 0 0 0 0 Au to
: Auto 0M 0 0 0 0 0 Au to
: 1.44M, 3.5in Base Memory: 640K
To set the date and time, highlight the date area.Press /<PgUp> / <PgDn>
to set the current date. The date format is month: Jan. ~ Dec; date: 1 ~ 31; year:
1994 ~ 2079; hour: 00 ~ 23; and second: 00 ~ 59.
AWARD SOFTWARE, INC.
Other Memory: 384K
↑ ↓ ← →
Type: This item lets you set your system IDE hard disk type. Select Auto to let
- Auto BIOS automatically detects the installed hard disk when system boot up.
- User Select the User will let you select the number of cylinders, heads, etc.
- None (Note: PRECOMP = 65535 means NONE!)
Default: Auto
Mode: Select NORMAL for IDE HDD smaller than 528MB. Select LBA for IDE HDD
- Auto over than 528MB and support LBA (logical Block Addressing) mode. Select
- Normal LARGE for IDE HDD over than 528MB and do not support LBA mode.
- LBA
- LARGE Default: Auto
Note: We recommend that you set both IDE HDD TYPE and MODE to AUTO to let BIOS
automatically detect the hard disk drives for you.
VP1(VP1V2) Motherboard User’s Manual
3-2
Page 20

III. CMOS SETUP UTILITY
$$
$ Floppy → Drive A
$$
$$
$ Floppy → Drive B
$$
Drive A / B: Select the floppy drive type installed in your system. The available
- None options for Drive A and Drive B are: 360KB 5.25”, 1.2MB 5.25”,
- 360KB 5.25” 720KB 3.5” 1.44MB 3.5”, 2.88MB 3.5” and NONE.
- 1.2MB 5.25”
- 720KB 3.5”
- 1.44MB 3.5” Default: Drive A 1.44MB 3.5”
- 2.88MB 3.5” Drive B None
$$
$ Video
$$
Video: Select the video display card type installed in your system. The
- EGA / VGA available types are: EGA/VGA, CGA 40, CGA 80 and Mono.
- CGA40
- CGA80
- Mono Default: EGA/VGA
$$
$ Halt On
$$
Halt On: This item defines the operation of the system POST (Power On
- All Errors Self-Test). You can use this item to select which kind of errors will
- No Errors cause the system to halt during POST.
- All, But keyboard
- All, But Diskette
- All, But Disk / Key Default: All, But Keyboard
VP1(VP1V2) Motherboard User’s Manual
3-3
Page 21

III. CMOS SETUP UTILITY
3-3 BIOS Features Setup
This section allows you to configure your system for basic operation.
ROM PCI / ISA BIOS (2A6LGTXA)
BIOS FEATURES SETUP
AWARD SOFTWARE, INC
Virus Warning Enabled
CPU Internal Cache Enabled
External Cac he Enabled
CPU L2 Cache E CC Checking Enab led
Quick Power On Self T est Disabled
Boot Se quence A, C, SC SI
Swap F loppy Drive Disabled
Boot Up Fl oppy Seek Disabled
Boot Up Num Lock Stat us O n
IDE HDD Block Mod e Enabl ed
Gate A20 Option Fa st
Memory Parity/ECC Check Disabled
Typ emati c Rat e Setting D isabl ed
Typ emati c Rat e (C hars/Se c) 6
Typematic Delay (Msec) 250
Secur ity O ption Setup
PCI /VGA P alette Sno op Disabled
OS Select For DRAM > 64MB Non-OS2
↑↓←→
Move E nter: Select +/-/PU/PD: Modify F10:Save ESC: E xit F1:Gener al Help
F5:Old Value s F6:Load BIOS defaul ts F7:Load Setup Defaults
$$
$ Virus Warning
$$
Virus Warning: If this function enabled and someone attempt to write data into
- Enabled this area, BIOS will automatically show a warning message
- Disabled on screen and alarm beep.
Video BIOS Shadow : Enabled
C8000 -CBFFF Shadow : Dis abled
CC000-CF FFF Shado w : Disabled
D0000 -D3FFF Shadow : Disabled
D4000 -D7FFF Shadow : Disabled
D8000 -DBFFF Shadow : Dis abled
DC000-DF FFF Shado w : Disabled
Default: Disabled
$$
$ CPU internal / external cache
$$
CPU internal / external cache: These two items controls Enable / Disable the CPU internal /
- Enabled external cache.
- Disabled
Default: Enabled
$$
$ CPU L2 Cache ECC Checking
$$
CPU L2 Cache ECC Checking: This item allows you to enable / disable CPU L2 Cache
- Enabled ECC Checking.
- Disabled
Default: Enabled
VP1(VP1V2) Motherboard User’s Manual
3-4
Page 22

III. CMOS SETUP UTILITY
$$
$ Quick Power On Self Test
$$
Quick Power On Self Test: This item speeds up Power On Self Test (POST) after
- Enabled you power up the computer. If it is set to Enable, BIOS will
- Disabled shorten or skip some check items during POST.
Default: Disabled
$$
$ Boot Sequence
$$
Boot Sequence: This item defines where the system will look for an operating
- A,C,SCSI system, and the order of priority. The boot up search sequence
- C,A,SCSI shown as left.
- C,CDROM,A
- CDROM,C,A
- D,A,SCSI
- E,A,SCSI
- F,A,SCSI
- SCSI,A,C
- SCSI,C,A
- C only
- LS/ZIP, C
Default: A,C,SCSI
$$
$ Swap Floppy Drive
$$
Swap Floppy Drive: If the system has two floppy drives, choose enable to assign
- Enabled physical drive B to logical drive A and vice-versa.
- Disabled
Default: Disabled
$$
$ Boot Up Floppy Seek
$$
Boot Up Floppy Seek: Seeks disk drives during boot up.
- Enabled
- Disabled
Default: Enabled
$$
$ Boot Up Numlock Status
$$
Boot Up Numlock Status: Selects power on state for Numlock.
-Off
-On
Default: On
VP1(VP1V2) Motherboard User’s Manual
3-5
Page 23

III. CMOS SETUP UTILITY
$$
$ Gate A20 Option
$$
Gate A20 Option: Normal- a pin in the keyboard controller controls GateA 20.
- Normal Fast-lets chipset control GateA 20
- Fast
Default: Fast
$$
$ Memory Parity/ECC Check
$$
Memory Parity/ECC Check: To Enabled or Disabled the BIOS memory parity / ECC Check
- Enabled function.
- Disabled
Default: Disabled
$$
$ Typematic Rate Setting
$$
Typematic Rate Setting: Key strokes repeat at a rate determined by the keyboard
- Enabled controller, when enabled, the typematic rate and typematic
delay.
- Disableddelay can be selected.
Default: Disabled
$$
$ Typematic Rate (Chars/Sec)
$$
Typematic Rate (Chars/Sec): Sets the number of times a second to repeat a key stroke when
- 6 you hold the key down.
-8
-10
-12
-15
-20
-24
-30
Default: 6
$$
$ Typematic Delay (Msec)
$$
Typematic Delay (Msec): Select the delay time after the key is held down before it begins
- 250 to repeat the key strokes.
- 500
- 750
- 1000
Default: 250
VP1(VP1V2) Motherboard User’s Manual
3-6
Page 24

III. CMOS SETUP UTILITY
$$
$ Security option
$$
Security option: Select whether the password is required every time the
- Setup system boots or only when you enter setup.
- System Setup - The system will boot up.
System - The system will not boot and access to setup will
be denied if the correct password is not entered at the
prompt.
Default: Setup
$$
$ PCI/VGA Palette Snoop
$$
PCI/VGA Palette Snoop: Set this item to Enabled to reduce display problem when both
- Enabled PCI VGA and some graphic accelerator devices such as
- Disabled MPEG/Video capture cards are installed in your system.
Default: Disabled
$$
$ OS Select for DRAM > 64MB
$$
OS Select for DRAM > 64MB: Select OS2 only if you are running OS/2 operating system
- Non-OS/2 with greater than 64MB of RAM on the system.
- OS/2
Default: Non-OS/2
$$
$ Video BIOS Shadow
$$
Video BIODS Shadow: This item defines if you leave default setting, video BIOS
- Enabled memory will be copied from ROM into DRAM area to enhance
- Disabled system performance as DRAM access time is faster than
ROM.
Default: Enabled
$$
$ C8000-CBFFF Shadow to DC000-DFFFF Shadow
$$
C8000-CBFFF Shadow to Set Enabled if you know the address that your add on card
DC000-DFFFF Shadow: ROM used to shadow them. If the item isEnabled, BIOS will
- Enabled copy the selected area from ROM to RAM to increase
- Disabled system performance.
Default: Disabled
VP1(VP1V2) Motherboard User’s Manual
3-7
Page 25

III. CMOS SETUP UTILITY
p
p
3-4 Chipset Feature Setup
This item allows you to configure the system based on the specific features of the chipset.
This chipset manages bus speed and access to system memory resources, such as DRAM
and external cache. It also coordinates communications between the conventional ISA bus
and the PCI bus. It must be stated that these items should never need to be altered.The default
settings have been chosen because they provide you the best operating conditions for your
system. The only time you might consider making any changes if you discovered that the datas
were being lost while control your system.
CHIPSET FEATURE SETUP
AWARD SOFTWARE, INC.
Bank 0/1 DR AM Timi ng : SDRA M 10ns A uto Detect DIM M/PCI Clk : E nabled
Bank 2/3 DR AM Timi ng : SDRA M 10ns S pread Spectr um : Dis abled
Bank 4/5 DRAM Timing : SDRAM 10ns CPU Hos t Clock (C PU / PCI) : Default
SDRAM Cycle Le ngth : 3
DRAM Clock : HC LK-33M
Memor y Hol e : Dis abled
Read A ro und Write : Disabled
Concu rr ent P CI/Host : Dis abled
System BIOS Cachea ble : Dis abled
Video RAM Cac heabled : Di sabled
AGP Aperture Size : 64M
AGP-2X Mode
Onchi
USB
USB K eyboa rd Sup port : Dis abled
Onchi p Sound
Onchi
Modem
$$
$ Bank 0/1 DRAM Timing
$$
$$
$ Bank 2/3 DRAM Timing
$$
$$
$ Bank 4/5 DRAM Timing
$$
Bank 0/1 DRAM Timing: These items allow you set the DRAM timing type on the memory
- SDRAM 10ns slot DIMM1, DIMM2 & DIMM3.
- SDRAM 8ns
- Normal
- Medium
- Fast
- Turbo
: Enab led
: Enab led
: Enab led
: Enab led
ESC : Quit
F1 : Help PU/PD/+/- : Modify
F5 : Old Values (Shift) F2 : Color
F6 : Lo ad BIO S Defaul ts
F7 : Lo ad Setu p Defa ults
↑ ↓ → ←
: Selec t Item
Default: SDRAM 10ns
VP1(VP1V2) Motherboard User’s Manual
3-8
Page 26

III. CMOS SETUP UTILITY
$$
$ SDRAM Cycle Length
$$
SDRAM Cycle Length: This item defines SDRAM Cycle Length.
-3
-2
Default: 3
$$
$ DRAM Clock
$$
DRAM Clock: You can set the speed of the DRAM in terms of a fraction of the
- Host CLK CPU Clock speed (Host CLK), or at the fixed speed of (HCLK-33M).
- HCLK-33M
Default: HCLK-33M
$ Memory Hole
Memory Hole: In order to improve performance, certain space in memory is
- Disabled reserved for ISA cards. This memory must be mapped into the
- 15M-16M memory space below 16MB.
Default: Disabled
$ Read Around write
Read Around write: DRAM optimization feature: If a memory read is addressed to a
- Enabled location whose latest write is being held in a buffer before being
- Disabled written to memory, the read is satisfied through the buffer contents,
and the read is not sent to the DRAM.
Default: Disabled
$ Concurrent PCI/Host
Concurrent PCI/Host: When disabled, CPU bus will be occupied during the entire PCI
- Enabled operation period.
- Disabled
Default: Disabled
$ System BIOS Cacheabled
System BIOS Cacheabled: Selecting Enabled allows caching of the system BIOS ROM at
- Enabled F0000h-FFFFFh, resulting in better system performance. However,
- Disabled if any program writes to this memory area, a system error may
result.
Default:Disabled
VP1(VP1V2) Motherboard User’s Manual
3-9
Page 27

III. CMOS SETUP UTILITY
$ Video RAM Cacheabled
Video RAM Cacheabled: Select Enabled allows caching of the video RAM, resulting in
- Enabled better system performance. However, if any program writes
- Disabled to this memory area, a system error may result.
Default: Disabled
$ AGP Aperture Size
AGP Aperture Size: Select the size of Accelerated Graphics Port (AGP) aperture.
- 128M The aperture is a portion of the PCI memory address range
- 64M dedicated for graphics memory address space. Host cycles
- 32M that hit the aperture range are forwarded to the AGP without
- 16M any translation.
-8M
-4M
Default: 64M
$ AGP-2X Mode
AGP-2X Mode: This item allows you to enable / disable the AGP-2X (Clock
- Enabled 133MHz) Mode.
- Disabled
Default: Enabled
$ Onchip USB
Onchip USB: This should be enabled if your system has a USB installed on
- Enabled the system board and you wish to use it. Even when so
- Disabled equipped, if you add a higher perfor mance controller, you will
need to disable this feature.
Default: Enabled
$ USB Keyboard Support
USB Keyboard Support: Select Enabled if your system contains a Universal Serial Bus
- Enabled (USB) controller and you have a USB keyboard.
- Disabled
Default: Disabled
VP1(VP1V2) Motherboard User’s Manual
3-10
Page 28

III. CMOS SETUP UTILITY
%%$ Onchip Sound
Onchip Sound: This should be enabled if your system has a sound
- Enabled installed on the system board and you wish to use it.
- Disabled Even when so equipped, if you add a higher performance controller, you will need to disable this feature.
Default: Enabled
%%$ Onchip Modem
Onchip Modem: This should be enabled if your system has a modem
- Enabled installed on the system board and you wish to use it.
- Disabled Even when so equipped, if you add a higher performance controller, you will need to disable this feature.
Default: Enabled
%%$ Auto Detect DIMM/PCI Clk
Auto Detect DIMM/PCI Clk: This item will detect DIMM/PCI Clk automatically.
- Enabled
- Disabled Default: Enabled
%%$ Spread Spectrum
Spread Spectrum: This item will help to low Electro Magnetic Interfermance.(EMI)
- Disabled
- 0.25%
- 0.50% Default: Disabled
%%$ CPU Host Clock (CPU/PCI)
CPU Host Clock (CPU/PCI): This item allows you select CPU Host Clock with software
way.
VP1(VP1V2) Motherboard User’s Manual
3-11
Page 29

III. CMOS SETUP UTILITY
ouse)
y
ode
esume
F6: Load BIOS Defaults
oad Setu p Defaults
3-5 Power Management Setup
RO M PC I/ISA BI OS(2 A6 KL0 0B)
POWER M ANAGEMEN T SETUP
ACPI Function : Enabled Primary INTR : ON
Power Management : User Define IRQ3 (COM2) : Primary
PM Co ntro l by AP M : Yes IRQ4 (COM 1) : Prim ary
Video Off After : Suspend IRQ5 (LPT 2) : Prim ary
Video Off Method : V/H SYNC + Blank IRQ6 (Flop py Disk) : Primary
MODEM Use IRQ : 3 IRQ7 (LPT 1) : Primary
Soft-Off by P WRBTN : Instant-Off IRQ8 (RTC Alarm)
PW RON After PW -Fail : Fo rme r- Sts IRQ9 (IR Q2 Re dir) : Seco nd ar y
HDD Power Down
Doze mode : D isable IRQ11 ( Reserved) : Secondary
Suspend Mode : Disable IRQ12 (PS/2 M
VGA : OFF IRQ14 (Hard Disk) : Primary
LPT & COM : LPT & CO M IRQ15 (Reserved) : Disabled
HDD & FDD : ON
P CI Ma ste r : O F F F1 : He lp PU/PD/+/-:Modif
M
RTC Alarm Resume : D isabled
**PM Events** IRQ13 (Coprocessor): Primary
m Ring R
$ ACPI function
ACPI function: This item allows you to enable/disable the Advanced
- Enabled Configuration and Power Management (ACPI).
- Disabled
$ Power Management
Power Management: This category allows you to select the type (or degree)
AWARD SOFTWAR E, INC .
: Disabled
: Disable
: Disabled F5 : Old Valu es (Shift) F2:Co lor
IRQ1 0 (Re serv ed) : S eco ndar y
: Primary
ESC: Quit
F7: L
:Select Ite m
Default: Enabled
- User Define of power saving and there of power saving and there
- Min Saving are three selections for Power management:
- Max Saving 1. Min. Power Saving: Minimum power management.
Doze Mode = 1 hr. Standby Mode = 1 hr., Suspend Mode = 1 hr.,
and HDD Power Down = 15 min.
2. Max. Power Saving: Maximum power management
ONLY AVAILABLE FOR SL CPUS. Doze Mode = 1 min.,
Standby Mode = 1 min., Suspend Mode = 1 min., and HDD Power
Down = 1 min.
3. User Defined: Allows you to set each mode
individually. When not disa bled, each of the ranges are from 1 min.
to 1 hr. except for HDD Power Down which ranges from 1 min. to
15 min. and disable.
Default: User Define
VP1(VP1V2) Motherboard User’s Manual
3-12
Page 30

III. CMOS SETUP UTILITY
$%% PM Control by APM
PM Control by APM: When enabled, an Advanced Power Management device will be
- Yes activated to enhance the Max. Power Saving mode and stop the
- No CPU internal clock. If Advance Power Management (APM) is
installed on your system, selecting Yes gives better power
savings. If the Max. Power Saving is not enabled, this will be
preset to No.
Default: Yes
$ Video Off After
Video Off After: When enabled, this feature allows the VGA adapter to operate in
- NA a power saving mode.
- Suspend
- Doze Default: Suspend
%$ Video Off Method
Video Off Method: This determines the manner in which the monitor is blanked.
- Blank Screen 1. V/H SYNC+Blank: This selection will cause the system to
- V/H SYNC + Blank turn off the vertical and horizontal synchronization ports and
- DPMS Support write blanks to the video buf fer.
2. Blank Screen: This option only writes blanks to the video
buffer.
3. DPMS Support: Select this option if your monitor supports
the Display Power Management Signaling (DPMS) standard of
the Video Electronics Standards to select video power manage
ment values.
Default: V/H SYNC + Blank
%$ Modem Use IRQ
Modem Use IRQ: This determines the IRQ in which the MODEM can use.
- NA
- 3
- 4
- 5
- 7
- 9
- 10
- 11
Default: 3
VP1(VP1V2) Motherboard User’s Manual
3-13
Page 31

III. CMOS SETUP UTILITY
$ Soft-Off by PWRBTN
Soft-off by PWRBTN: Pressing the power button for more than 4 seconds forces the
- Delay 4 Sec system to enter the Soft-Off state when the system has hung.
- Instant-Off Default: Instant-Off
$ PWRON After PW-Fail
PWRON After PW-Fail: When the power fails to start, system power will be on automatically.
- Former-Sts
-On
-Off Default: Former-Sts
$ HDD Power Down
HDD Power Down: When enabled and after the set time of system inactivity, the hard
- Disable disk drive will be powered down while all other devices remain active.
- 1min--15min
. Default: Disable
$ Doze Mode
Doze Mode: When enabled and after the set time of system inactivity, the CPU
- Disable clock will run at slower speed while all other devices still operate
- 10Sec--40Sec at full speed.
- 1Min--40Min
- 1 hour Default: Disable
$ Suspend Mode
Suspend Mode: When enabled and after the set time of system inactivity, all devices
- Disable except the CPU will be shut off.
- 10 Sec--40 Sec
- 1 Min--40 Min
- 1 Hour Default: Disable
$ VGA
VGA: When set to On,any event occurring at a VGA port will awaken a
system which has been powered down.
- Off
-On Default: Off
VP1(VP1V2) Motherboard User’s Manual
3-14
Page 32

III. CMOS SETUP UTILITY
$ LPT & COM
LPT & COM: When On of LPT & COM, any activity from one of the listedsy
- None stem peripheral devices or IRQs wakes up the system.
- LPT
- COM
- LPT/COM
Default:LPT/COM
$ HDD & FDD
HDD & FDD: When On of HDD & FDD, any activity from one of the listed
- On system peripheral devices wakes up the system.
- Off
Default: On
$ PCI Master
PCI Master: ;When On of PCI Master, any activity from one of the listed
- On system peripheral devices wakes up the system.
-Off
Default: Off
$ Modem Ring Resume
Modem Ring Resume: An input signal on the serial Ring Indicator (RI) line (in other
- Enabled words, an incoming call on the modem) awakens the system
- Disabled from a soft off state.
Default: Disabled
$ RTC Alarm Resume
RTC Alarm Resume: When Enabled, your can set the date and time at which the RTC
- Enabled (real-time clock) alarm awakens the system from Suspend mode.
- Disabled
Default: Disabled
$ Primary INTR
Primary INTR: When set to On, any event occurring at will awaken a system
- On which has been powered down.
-Off
Default: On
VP1(VP1V2) Motherboard User’s Manual
3-15
Page 33

III. CMOS SETUP UTILITY
$ The following is a list of IRQs, Interrupt ReQuests, which can be exempted much as
the COM ports and LPT ports above can. When an I/O device wants to gain the
attention of the operating system, it signals this by causing an IRQ to occur. When the
operating system is ready to respond to the request, it interrupts itself and performs
the service.
· IRQ3 (COM 2 ) Primary
. IRQ4 (COM 1) Primary
· IRQ5 (LPT 2) Primary
. IRQ6 (Floppy Disk) Primary
· IRQ7 (LPT 1) Primary
. IRQ8 (RTC Alarm) Disabled
· IRQ9 (IRQ2 Redir) Secondary
. IRQ10 (Reserved) Secondary
· IRQ11 (Reserved) Secondary
. IRQ12 ( PS / 2 Mouse ) Primary
· IRQ13 (Coprocessor) Primary
. IRQ14 (Hard Disk) Primary
· IRQ15 (Reserved). Disabled
When set On, activity will neither prevent the system from going into a power management
mode nor awaken it.
VP1(VP1V2) Motherboard User’s Manual
3-16
Page 34

CPU to PCI W rite Buffer
esources Controlled By
eset Co
ata
aste
ues
oad Setu p Defaults
III. CMOS SETUP UTILITY
3-6 PNP / PCI Configuration Setup
This section describes configuring the PCI bus system. PCI- Personal Computer Interconnect,
is a system which allows I/O devices to operate at speeds nearing the speed ofCPU itself
using when communicates with its own special components. This section covers some very
technical items and it is strongly recommended that only experienced users should make any
changes to the default settings.
ROM PC I/ISA BIOS(2A6K L00B )
PNP/PCI CO NFIGURATION SE TUP
AWARD SOFTWARE, INC.
PNP OS Install ed :No
R
R
nfiguration D
:Auto PCI Dynamic Bursting : E nabled
:Disabled PCI Master 0 WS W rite : E nabled
PCI Delay Transaction : Enabled
PCI#2 Ac cess #1 Retr y : Disabled
AGP M
r 1 WS Write: Enabl ed
AGP Master 1 WS Read : Disabled
Assign I RQ For USB : Enabled
Assign I RQ For VGA : E nabled
: Enabl ed
ESC : Quit
F1: Help PU/PD/+/-: Modify
F5:Old Val
F6: Loa d BIOS De faults
F7: L
:Select Item
(Shif t) F 2:Color
$ PNP OS Installed
PNP OS Installed: This item allows you to determine install PnP OS or not.
-Yes
-No Default: No
$ Resources Controlled By
Resources Controlled By: The Award Plug and Play BIOS has the capacity to automatically
- Auto configure all of the boot and Plug and Play compatible
- Manual de vices. However, this capability means abso lutely
nothing unless you are using a Plug and Play operating
system such as Windows95.
Default: Auto
$ Reset Configuration Data
Reset Configuration Data: Normally, you leave this field Disabled. Select Enabled to reset
- Enabled Extended System Configuration Data (ESCD) when you exit Setup
- Disabled if you have installed a new add-on and the system reconfiguration
has caused such a serious conflict that the operating system can
not boot.
Default: Disabled
VP1(VP1V2) Motherboard User’s Manual
3-17
Page 35

III. CMOS SETUP UTILITY
$ CPU to PCI Write Buffer
CPU to PCI Write Buffer: When this field is Enabled, writes from the CPU to the
- Enabled PCI bus are buffered, to compensate for the speed
- Disabled differences between the CPU and the PCI bus. When
Disabled, the writes are not buffered and the CPU must
wait until the write is complete before starting another
write cycle..
Default: Enabled
$ PCI Dynamic Bursting
PCI Dynamic Bursting: When Enabled, every write transaction goes to the write
- Enabled buf fer. Bur stable tr ansactions then burst on the PCI bus
- Disabled and nonburstable transactions dont.
Default: Enabled
$ PCI Master 0 WS Write
PCI Master 0 WS Write: When Enabled, writes to the PCI bus are executed with
- Enabled zero wait states.
- Disabled Default: Enabled
$ PCI Delay Transaction
PCI Delay Transaction: The chipset has an embedded 32-bit posted write buffer
- Enabled to support delay transactions cycles. Select Enabled to
- Disabled support compliance with PCI specification version 2.1.
Default: Enabled
$ PCI#2 Access #1 Retry
PCI#2 Access #1 Retry: When PCI#2 (AGP bus) access to PCI#1 (PCI bus) has a
- Enabled error occurred, .
- Disabled Default: Disabled
$ AGP Master 1 WS Write
AGP Master 1 WS Write: When Enabled, writes to the AGP(Accelerated Graphics
- Enabled Port) are executed with one wait states..
- Disabled Default: Enabled
VP1(VP1V2) Motherboard User’s Manual
3-18
Page 36
III. CMOS SETUP UTILITY
$ AGP Master 1 WS Read
AGP Master 1 WS Read: When Enabled, read to the AGP (Accelerated
- Enabled Graphics Port) are executed with one wait states..
- Disabled
Default: Disabled
$ Assign IRQ For USB/VGA
Assign IRQ For USB/VGA: Enable/Disable to assign IRQ for USB/VGA.
- Enabled
- Disabled Default: Enabled
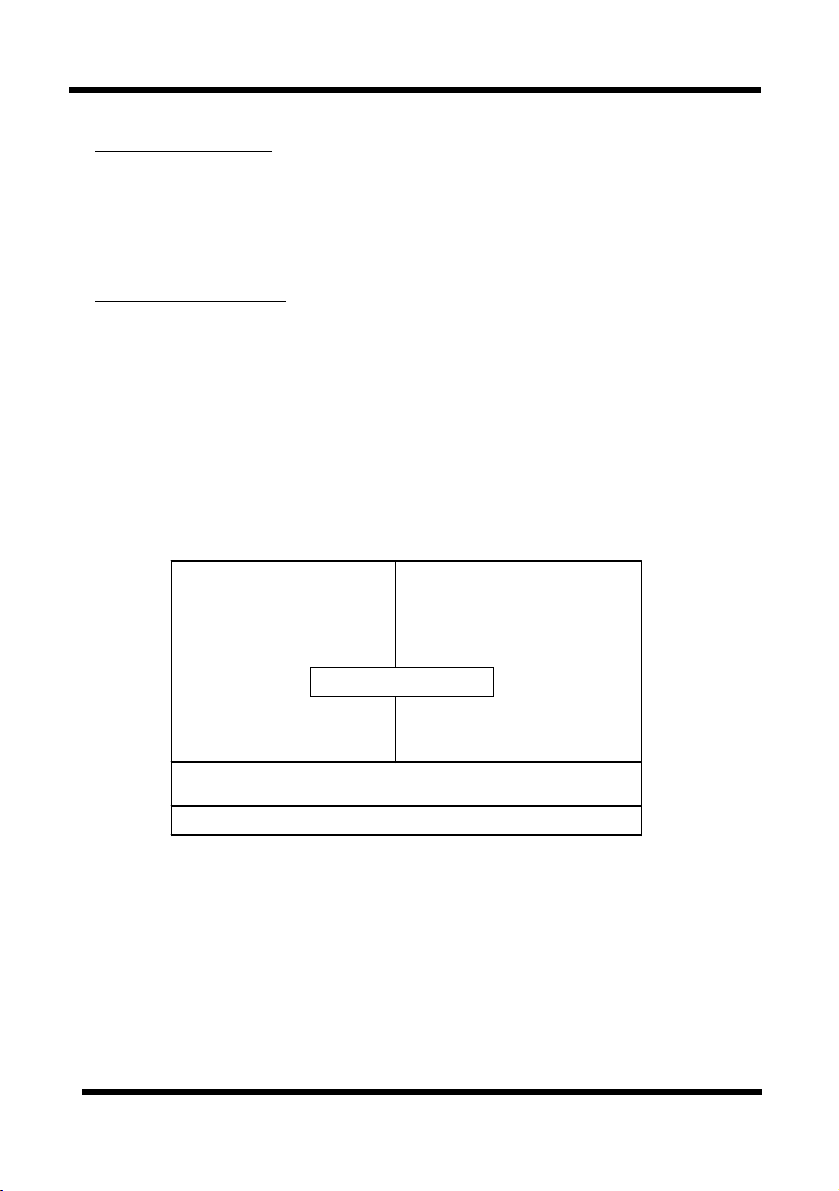
3-7 Load BIOS Defaults
This option provides the minimum requirements for your system to operate. Load the
BIOS default values if your system has unstable problem with the setup default value.
CMOS Setup Utility
Award Software, INC
# Standard CMOS Feature
# BIOS Feature Setup
#
Chipset Feature Setup
#
Power Managem ent S etup
# PnP/PCI Configurations
#
Load BIOS Defaults
#
Load Setup Defaults
Esc : Quit ↑ ↓ ← → : Select Item
F10 : Save & Exit Setup ( Shift)F2: Change Color
Time, Date, Hard Disk Type….
Load B IOS Defa ults (Y /N)?N
# CPU Speed Setting
#
Integrated Peripherals
# Supervisor Password
#
User Password
#
IDE HDD Auto Detection
# Save & Exit Setup
#
Exit Without Saving
VP1(VP1V2) Motherboard User’s Manual
3-19
Page 37
III. CMOS SETUP UTILITY
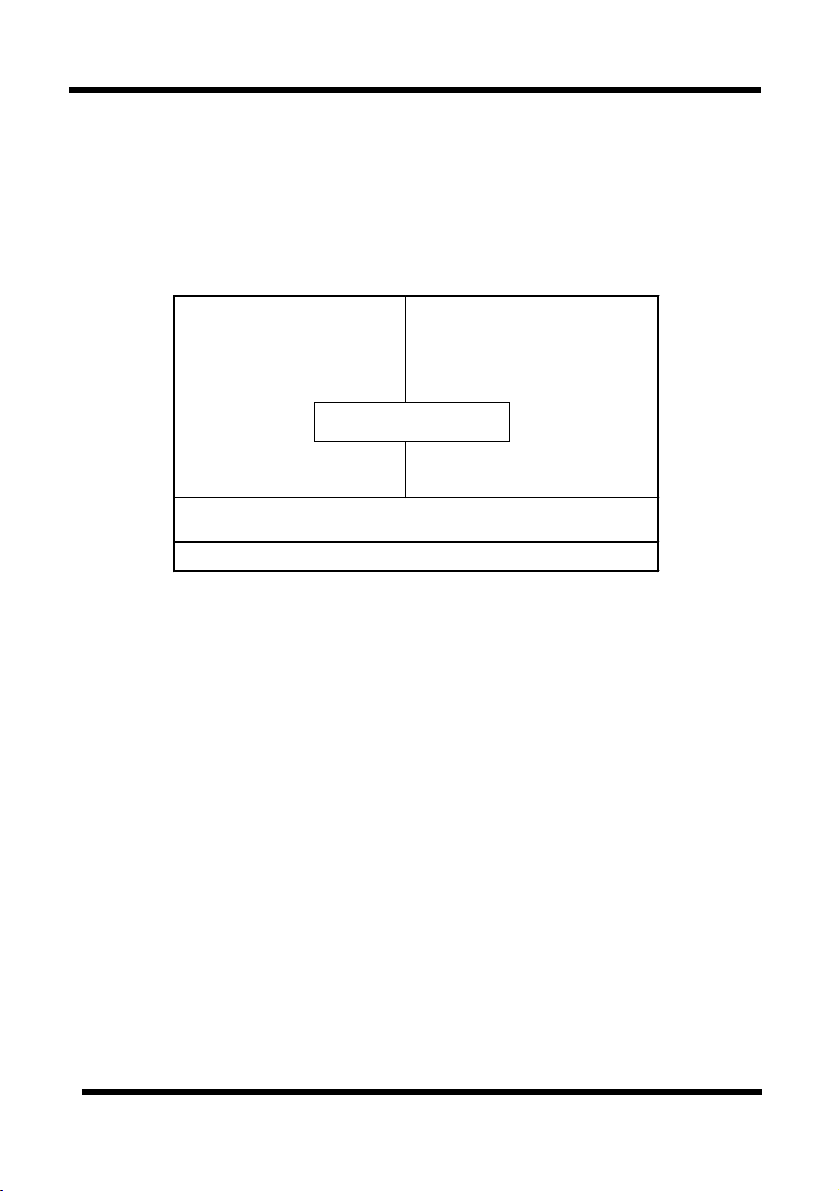
3-8 Load SETUP Defaults
The option allows you load BIOS optimized settings for maximum system performance.
To load setup default, press Y key to confirm the operation when you see the above display.
CMOS Setup Utility
Award Software, INC
# Standard CMOS Feature
#
BIOS Feature Setup
#
Chipset Feature Setup
# Power Manageme nt Setup
#
PnP/PCI Configurations
# Load BIOS Defaults
# Load Setup Defaults
Esc : Quit ↑ ↓ ← → : Sel ec t It em
F10 : Save & Exit Setup (Shift)F2: Chang e C olor
Load SETUP Default (Y/N)?N
Time, Date, Hard Disk Type…
# CPU Speed Setting
#
Integrated Peripherals
#
Supervisor Password
# User Password
#
IDE HDD Au to Detection
#
Sav e & Ex it Set up
# Exit Without Saving
VP1(VP1V2) Motherboard User’s Manual
3-20
Page 38
y
III. CMOS SETUP UTILITY
ROM PCI/ISA BIOS(2A6KL00B)
F5: Old Val
F6: Load BIOS Default
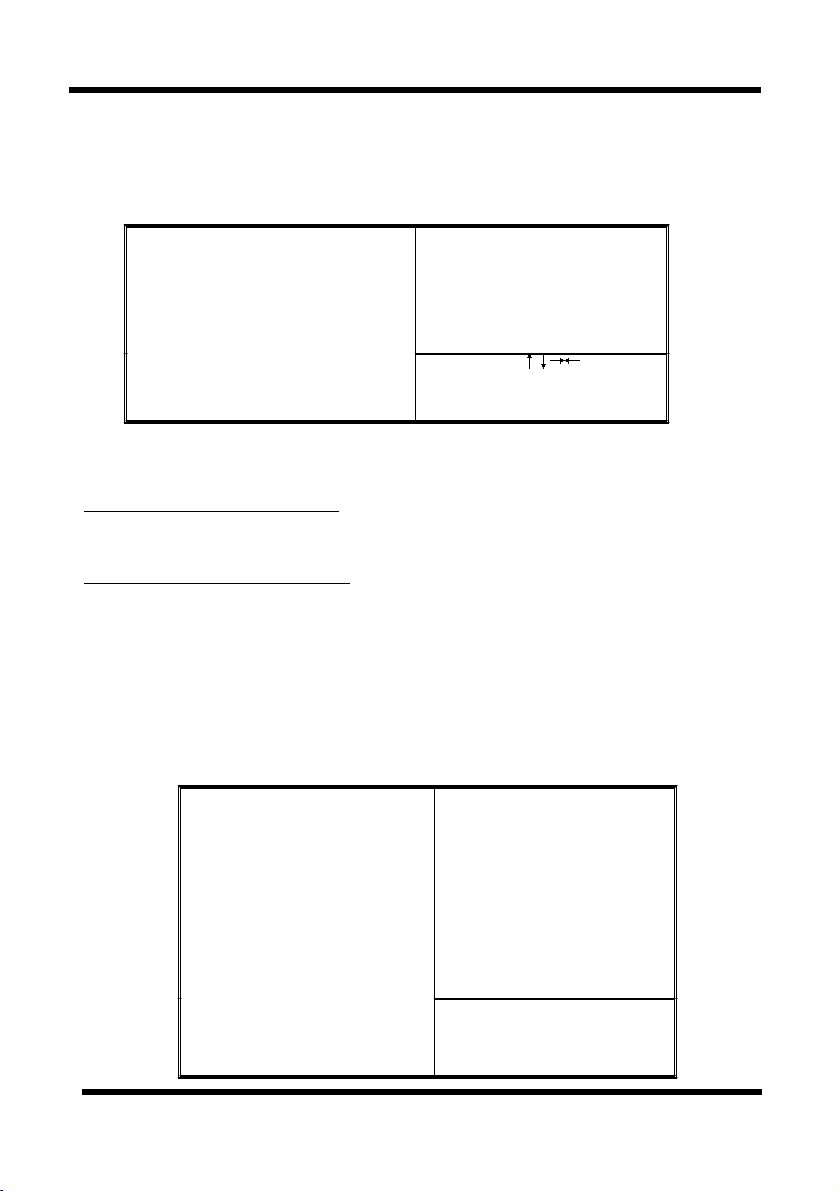
3-9 CPU Speed Setting
This option allows you to configure the CPU features.
Hardware Monit or
AWARD SOFTWARE, INC.
CPU CurrentTemperature : 11C/51F
Current System Temp. : 15C/759F
Current CPUFAN1 Speed : 0 RPM
Current CPUFAN2 Speed : 0 RPM
Vcore :2.01V 2.5V :2.51V
3.3V :3.25 V 5V :4.92V
12V :11.70 V
ESC: Quit :Select Item
F1: Help PU/PD/+/-: Modify
F7:Load Setup Defaults
$ Current CPU / System Temperature
Current CPU / System Temperature: Indicate the temperature of current CPU/System.
$ Current CPUFAN1 / CPUFAN2 Speed
Current CPUFAN1 / CPUFAN2 Speed: Ind ica te the speed of current CPUFAN1/CPUFAN2 on.
3-10 In tegrated Peripherals
This option allows you to configure the I/O features.
ROM PCI/ISA BIOS (2A6LGTXA)
INTEGRATED PERIPHERALS
AWARD SOFTWARE, INC.
ues (Shift) F2:Color
s
OnCh ip I DE Chan nel 0 : Ena bled Onboa rd Pa rall el Po rt : 378/ IRQ7
OnChip IDE Channel 1 : Enabled Onboard Parallel Mode : Normal
IDE Pr efet ch Mode : Ena bled
Primary Master PIO : Auto Onboard Legacy Audio : Enabled
Primary SlavePIO : Auto Sound Blaster : Disabl ed
Secondary Master PIO : Auto SB I/O Base Ad dress : 220H
Secondary Slave PIO : Au to SB IRQ Select : IRQ 5
Primary Master UDMA : Auto SB DMA Sel ect : DMA 1
Primary SlaveUDMA : Auto MPU-401 : Disabl ed
Secondary Master UDMA : Auto MPU-401 I/O Address : 330 –333H
Secondary Slave UDMA : Auto Game Port (200-207H) : Enabled
Init Disp lay First : PCI Slot
Keyboard power on(VP1 only) : Disable
Onboard FDD Controller : Enabled
Onboard Serial Port 1 : Auto ESC: Quit ↑ ↓ → ←: Select Item
Onboard Serial Port 2 : Auto F1 : Help PU/PD/+/- : Modif
UART 2 Mode : Standard F5 : Old Values (Shift) F2: Color
VP1(VP1V2) Motherboard User’s Manual
F6 : Load BIOS Defaults
F7 : Load Setup Defaults
3-21
Page 39

III. CMOS SETUP UTILITY
$ Onchip IDE Channel 0
Onchip IDE Channel 0: The chipset contains a PCI IDE interface with support for two
- Enabled IDE channels. Select Enabled to activate the primary IDE interface.
- Disabled Select Disabled to deactivate this interface.
Default: Enabled
$ Onchip IDE Channel 1
Onchip IDE Channel 1: The chipset contains a PCI IDE interface with support for two IDE
- Enabled channels. Select Enabled to activate the secondary IDE interface.
- Disabled Select Disabled to deactivate this interface.
Default: Enabled
$ IDE Prefetch Mode
IDE Prefetch Mode: The onboard IDE drive interfaces supports IDE prefetching, for
- Enabled faster drive accesses. If you install a primary and / or secondary
- Disabled add-in IDE interface, set this field to Disabled if the interface
does not support prefetching.
Default: Enabled
$ Primary/Secondary Master/Slave PIO
Primary/Secondary Master/Slave PIO: The four IDE PIO (Programmed Input/Output) fields let you
- Auto set a PIO mode (0-4) for each of the four IDE devices
- Mode 0 that the onboard IDE interface supports. Modes 0 through
- Mode 1 4 provide successively increased performance. In Auto
- Mode 2 mode, the system automatically determines the best mode
- Mode 3 for each device.
- Mode 4 Default: Auto
$ Primary/Secondary Master/Slave UDMA
Primary/Secondary Master/Slave UDMA: Ultra DMA 33 implementation is possible only if your
- Auto hard drive supports it and the operating environment
- Disabled includes a DMA driver (Windows 95 OSR2 or a third-
party IDE bus master driver). If your hard drive and
your system software both support Ultra DMA/33,
select Auto to enable BIOS support.
Default: Auto
$ Init Display First
Init Display First: This item allows you to decide to active whether PCI Slot
- PCI Slot or AGP first.
- AGP
Default: PCI Slot
VP1(VP1V2) Motherboard User’s Manual
3-22
Page 40

III. CMOS SETUP UTILITY
$ Keyboard Power On
Keyboard Power On:%%% This i tem allows you to power on your PC with keyboard.
- Disabled
- Enabled
%%%%%%%%%%%%%%%%%%%%%%%%%%%%%%%Default: Disabled
NOTE: The Keyboard Power On function only belongs to the VP1.
$ Onboard FDD Controller
Onboard FDD Controller: Select Enabled if your system has a floppy disk controller (FDC)
- Disabled installed on the system board and you wish to use it. If you
- Enabled install and-in FDC or the system has no floppy drive, select
Disabled in this field.
Default: Enabled
$ Onboard Serial Port / Port2
Onboard Serial Port / Port2: Select an address and corresponding interrupt for the first and
- Disabled second serial ports.
- 3F8/IRQ4
- 2F8/IRQ3
- 3E8/IRQ4
- 2E8/IRQ3
- Auto Default: Auto
$ UART 2 Mode
UART 2 Mode: This item allows you to determine which Infra Red (IR) function of
- Standard onboard I/O chip.
- HPSIR
- ASKIR Default: Standard
$ Onboard Parallel Port
Onboard Parallel Port: This item allows you to determine access onboard parallel port
- Disabled controller with which I/O address.
- 3BC/IRQ7
- 378/IRQ7
- 278/IRQ5 Default: 378/IRQ7
VP1(VP1V2) Motherboard User’s Manual
3-23
Page 41

III. CMOS SETUP UTILITY
$ Onboard Parallel Mode
Onboard Parallel Mode: Select an operating mode for the onboard parallel (printer) port.
- Normal S elect Normal unless your hardware and software require one
- EPP of the other modes offered in this field.
- ECP
- ECP/EPP
Default: Normal
$ Onboard Legacy Audio
Onboard Legacy Audio: Enabling this option allows the system to use the onchip
- Enabled legacy Sound Blaster-compatible audio support. If you
- Disabled want to use the on-chip AC97 audio support or an add-on
audio card instead set this option to Disabled to avoid
possible conflict.
Default: Enabled
Note: The following fields are available only when the Onboard Legacy Audio is enabled.
$%%%Sound Blaster
Sound Blaster: Enables / Disables the Sound Blaster compatible mode.
- Enabled
- Disabled
Default: Disabled
%%%$ SB I/O Base Address
SB I/O Base Address: This option allows the user to select the audio I /O base address
- 220H in Sound Blaster compatible mode.
- 240H
- 260H
- 280H Default: 220H
$ SB IRQ Select
SB IRQ Select: This option allows the user to select the IRQ for audio in Sound
- IRQ 5 Blaster compatible mode.
- IRQ 9
- IRQ 10 Default: IRQ 5
VP1(VP1V2) Motherboard User’s Manual
3-24
Page 42

III. CMOS SETUP UTILITY
$ SB DMA Select
SB DMA Select: This option allows the user to select the DMA for audio in
Sound
- DM A 0 Blaster compatible mode.
- DMA 1
- DMA 2
- DMA 3 Default: DMA 1
$ MPU - 401
MPU - 401: Enables / Disables the MPU-401 MIDI interface standard.
- Enabled
- Disabled Default: Disabled
$ MPU - 401 I/0 Address
MPU - 401 I/0 Address: This option allows the user to select the I/O base address for
the use of MPU-401 MIDI device.
- 300-303H
- 310-313H
- 320-323H
- 330-333H Default: 330-333H
$ Game Port (200-207H)
Game Port (200-207H): Enable this option to use the game port, which occupies
- Enabled 200-207H address.
- Disabled Default: Enabled
3-11 Password Setting
Password prevents unauthorized use of your computer. If you set a password, the system
prompts for the correct password before boot or access to setup, the steps as follows:
1. Highlight the item Password Setting on the main menu and press ENTER.
2. The password dialog box will appear.
3. If you are installing a new password, carefully type in the password. Press ENTER after you
have typed in the password. If you are deleting a password that is already installed just press
ENTER when the password dialog box appears.
4. The system will ask you to confirm the new password by asking you to type it in a second
time. Carefully type the password again and press ENTER, or just press ENTER if you are deleting
a password that is already installed.
5. If you typed the password correctly, the password will be installed.
VP1(VP1V2) Motherboard User’s Manual
3-25
Page 43

III. CMOS SETUP UTILITY
[NOTE]
if you forget your password, or you want to cancel your password, you can do the steps as the
following:
(1) Password forgotten:
i. Tur n off the sys tem .
ii. Short JP19 at Pin 2-3 for a few seconds to clear CMOS.
iii. Set the JP19 back to Pin 1-2.
iv. Power on the system.
(2) Clear Password:
Clear your password by key in the password you installed before, then go
to password setting to press ENTER twice.
3-12 IDE HDD Auto Detection
Th is item automatically detects and installs any hard disk drives installed on the primary and
secondary IDE channel. Most modern drives can be detected. If you are using a very old drive
that can not be detected, you can install it manually using the Standard CMOS Setup option.
Setup will check for two devices on the primary IDE channel and then two devices on the
secondary IDE channel. At each device, the system will flash an N in the dialog box. Press
Enter to skip the device and proceed to the next device. Press Y, then Enter to tell the system
to accept the BIOS auto-detected device type.
3-13 S av e & Exit Setup
Highlight this item and press ENTER to save the changes that you have made in the setup utility
and exit the setup program. When the Save and Exit dialog box appears, press Y to save and
exit, or press N to return to the setup main menu.
3-14 Exit without Saving
Use this option to exit setup utility without saving the CMOS value changes.
VP1(VP1V2) Motherboard User’s Manual
3-26
Page 44

IV. SOFTWARE UTILITY
SECTION 4
SOFTWARE UTILITY
The support software for this mainboard may be supplied on a diskette or diskettes. All the
support programs are stored in separate folders, so you can find the program you need easily
enough. We recommend you to choose the program which you need most, it will assist your
computer system to high performance. The support software contains the following programs:
& VIA V x D Setup Program
& VIA Audio Setup Program
& VIA Chipset Driver Setup Program
& VIA Hardware Monitor System V1.05
4-1 VIA V x D Setup Program
4-1.1 Driver files location:
VIA V x D driver location: \Ide\via\AGP\setup.exe
4-1.2 Procedure:
It will guide you to setup the processor and it is strongly recommended that you exit all windows
program before running this setup program.
%%%"%%%"
%%%"
%%%"%%%"
%%%"%%%"
%%%"
%%%"%%%"
%%%"%%%"
%%%"
%%%"%%%"
Click “Next” to continue with the setup program.
It appears three installation information, we had better choose the first choice:
%%%' Install VIA AGP V x D in turbo mode
%%%' Install VIA AGP V x D in normal mode
%%%' Uninstall VIA AGP V x D
Click Finish to exit VIA AGP V x D finished setup. System will restart the computer.
4-2 VIA Audio Drivers
♦♦
♦ Driver files location:
♦♦
VIA Audio Driver location: \Audio\via1611\setup.exe
VIA Audio Driver Setup program will install VIA Audio Driver on your computer.It
is strongly recommended that you exit all windows program before running this setup
program.
VP1(VP1V2) Motherboard User’s Manual
4-1
Page 45
IV. SOFTWARE UTILITY
4-3 VIA Chipset Driver Setup Program
4−3.1 4−3.1
4−3.1 Driver files location:
4−3.1 4−3.1
VIA Chipset Drive files location: \Ide\via\ide\setup.exe
4-3.2 Procedure:
It will guide you to setup the processor and it is strongly recommended that you exit all
windows program before running this setup program.
""
"
Click “Next” to continue with the setup program.
""
' Install the VIA Chipset driver
""
"
Click Finish to exit VIA Chipset finished setup. System will restart the computer.
""
4-4 VIA Hardware Monitor System V 1.05
♦ ♦
♦ Driver files location:
♦ ♦
HardwareMonitor Driver location: \Sysmon\viahm105\VIAhm.exe
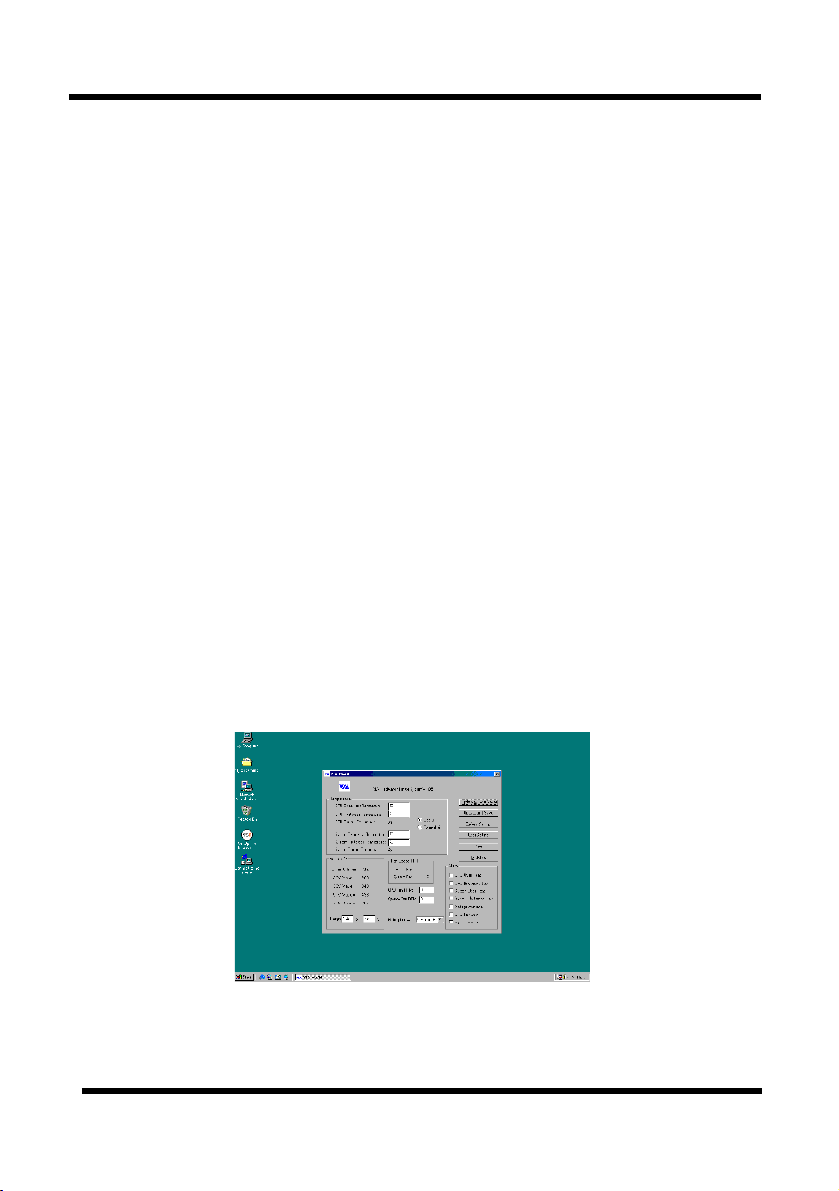
You shoud copy the file from CD to your hard disk, then run viahm.exe program.
You will see the following interface on the monitor, it shows CPU temperatur, voltage
an d sy stem environment temperature etc.
VP1(VP1V2) Motherboard User’s Manual
4-2
 Loading...