

Page 1
Anker Innovations Limited. All rights reserved.
the Eufy logo
registered in the United States and other countries. All other
trademarks are the property of their respective owners.
51005001492 V01
are trademarks of Anker Innovations Limited,
Eufy and
User Manual
eufy Security SpaceView
Baby Monitor
Page 2
Tabel of Content
What’s in the Box 01
Feature Introduction 02
Setting Up the Camera and Monitor 03
Replacing the Camera lens 11
Safety 12
Customer Service 16
Page 3
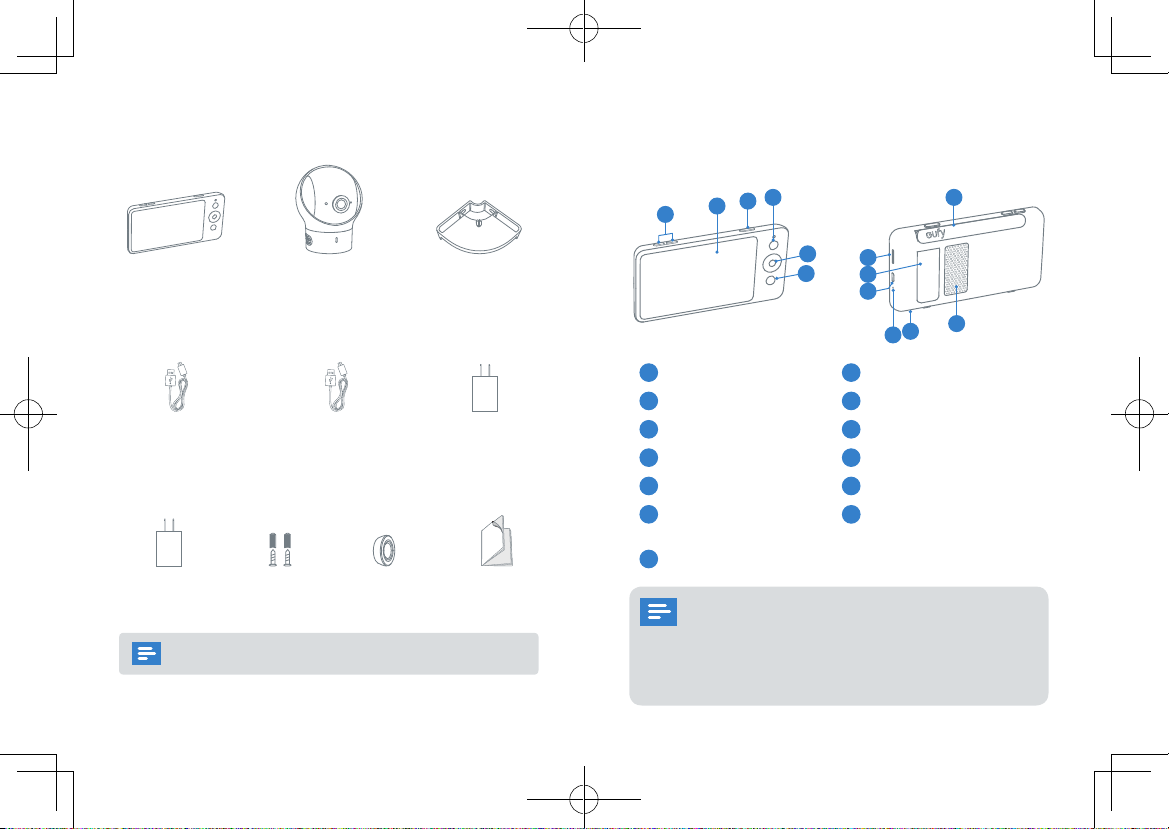
What’s in the Box
6
5
2
1
3
4
9
10
8
12
11
13
7
Feature Introduction
Monitor Features:
Baby Monitor
Monitor Micro-USB
Power Cable (1.5 m)
Baby Camera Wall Mount
Camera Micro-USB
Power Cable (3 m)
Camera Adapter
(5V 2A)
Volume controls
1
Screen
2
Power button
3
Menu button
4
Navigation buttons
5
Return to previous level
6
microSD card slot
8
Support stand
9
Micro USB charging port
10
LED indicator
11
Microphone
12
Speaker
13
of menu / Talk button
Monitor Antenna
7
Monitor Adapter
(5V 2A)
Mounting
Screws
User manualWide-Angle Lens
Press and hold the Talk button to speak to the
camera. When Menu is opened, press Talk button
once to return to previous level of menu.
Power adapter varies by region.
01
English English
Press Power button to switch on / off the monitor
screen. Press and hold the Power button for 2
seconds to switch on / off the monitor.
02
Page 4

microSD memory card can only be used for firmware
2
1
3
4
5
6
upgrade, it cannot be used to store video recordings.
Camera Features:
Standard camera lens
1
Microphone
2
Power LED Status indicator
3
Speaker
4
Micro USB port
5
Pairing button
6
Setting Up the Camera and Monitor
Monitor Installation
Fully charge the monitor before use. To charge:
Connect the baby monitor to the monitor adapter with the Micro
USB cable, and then connect the adapter to a power outlet. Connect
the other end of the baby monitor’s Micro USB power cable to
the Micro USB port in the monitor to charge it. Press and hold the
power button for 2 seconds to turn the baby monitor on.
Camera Installation
Connect the baby camera’s Micro USB power cable to the camera
adapter (5V 2A), and then connect the adapter to a power outlet.
Finally, connect the other end of the baby camera’s micro USB
power cable to the micro USB port in the camera.
03
English English
04
Page 5

Adding a new Camera to the Monitor
The baby camera and baby monitor are paired out
of the box. Refer to the following steps when adding
extra baby cameras or after resetting a baby camera.
1. Enter menu settings, go to
follow onscreen instructions to start the pairing.
2. Press and hold the pairing button on the rear of the
camera for 1 second until a notification prompt is heard.
When volume is set to high, monitor will emit a loud
noise if placed close to the camera. This is normal
phenomenon and can be resolved when camera is
moved away from the monitor.
Camera
Add Camera
->
, then
Camera Placement (on the Wall Mount)
1. Use the monitor to test the viewing angle from your
desired mounting spot.
2. Mark the screw holes with a pencil.
3. Drill 1/5” holes into the wall and then insert the anchors
into the holes.
4. Insert the screws through the mounting holes of the wall
mount and screw into the anchors.
5. Place the camera on the wall mount.
05
English English
06
Page 6

Press and hold the power button to power on the monitor.
1
Press the menu button to open Menu Settings.
Monitor Menu Settings
Menu Options Description
Brightness
Sleep Mode
Sound Alert
Set the brightness of the screen.
Enable to automatically turn off the screen
after 1 min, 3 min, 5 min or Off.
You can set the baby monitor to alert you
when a specific noise level is detected.
Note: Surrounding noise might set off false
alarm.
Alarm Volume
Menu Options Description
Select your desired lullaby song. You can
adjust the volume by selecting the volume
Lullaby
Zoom
Camera
Time
Night Vision
Mode
button.
Note: Sound Alert is automatically disabled
when Lullaby function is enabled.
Warning: Your baby’s cry might be
obscured by the sound of a lullaby.
Set the zoom level.
Add Camera
Note: You can add up to 4 cameras per
baby monitor.
Delete Camera
Cycle Cameras
Note: Cycles through the list of connected
baby cameras according to preset intervals.
Set the time on the monitor.
When enabled, the camera will change the
screen color according to the light conditions
in the room. When disabled, the camera
will only use daylight mode’s screen colors
and will not change when the surrounding
environment is getting dark.
Note: We recommend you to set this function
to On for most of the situations.
07
English English
08
Page 7

Menu Options Description
:
1
Anti-Screen
Flicker
Language
Default Settings
Temperature
Unit
About
Connect with Us
To solve flickering, change the refresh rate
of the screen.
Sets the on-screen display menu language.
Resets all options to their default setting.
Select your desired temperature measure
unit.
Displays the current hardware version,
software version, and product number.
Contact details.
The interval duration between each sound alert is 30
seconds. It will not alert during this interval even if
there is alert trigger condition.
4
Brightness
On-screen Menu Icons
Icon Icon Description
Wireless signal strength
Night Vision Mode is enabled
Shows the camera that is currently presenting
on the baby monitor screen
Note: This icon will not appear on the screen
when there is only one camera connected to
monitor.
Cycle Cameras enabled
Sound Alert enabled
Sound level of the room the camera is in
08: 30 AM
Current time
Current battery level of the baby monitor
06 12 AM
09
English English
10
Page 8

Replacing the Camera lens
Back
Front
Safety
Lens type Usage Lens
Standard camera
lens (default lens)
Wide-angle lens This lens provides a
The standard camera lens is not removable. When you want
to use the wide-angle lens, simply place it over the standard
camera lens and fasten.
11
English
This lens is
recommended for
general viewing;
infants are clearly
seen within a 2~3m
range.
The lens angle of
view for standard
camera lens is 62°.
wide-angle view of
the room. The lens
angle of view for
wide-angle lens is
110°.
Warning
Strangulation Hazard: Children have STRANGLED in cords. Keep this cord out
of the reach of children (more than 1m (3ft) away). Never use extension cords
with AC Adapters. Only use the AC Adapters provided.
This product complies with the radio interference requirements of
the European Community.
Declaration of Conformity
Hereby, Anker Innovations Limited declares that this device is in compliance
with the essential requirements and other relevant provisions of Directive
2014/53/EU.For the declaration of conformity, visit the Web site https://
www.eufylife.com/.
This product can be used across EU member states.
Due to the used enclosure material, the product shall only be connected to a
USB Interface of version 2.0 or higher. The connection to so called power USB
is prohibited.
A statement regarding the AC/DC adapter as disconnect device is missing in
the user manual.
The statement shall require a socket outlet that is installed near equipment
and that shall be easily accessible.
The adapter shall be installed near the equipment and shall be easily
accessible.
Do not use the Device in the environment at too high or too low temperature,
never expose the Device under strong sunshine or too wet environment.
The suitable temperature for T8300-M and accessories is -20°C-45°C.
The suitable temperature for T8300-C and accessories is -20°C-40°C.
When charging, please place the device in an environment that has a normal
room temperature and good ventilation.
It is recommended to charge the device in an environment with a
temperature that ranges from -10°C~40°C.
12
English
Page 9

Please ensure to use only the charger offered by the manufacturer. Using
unauthorized charger may cause danger and violate the authorization of the
projecter and the guarantee article.
The charger output voltage/current is 5Vdc/2A. The plug considered as
disconnect device of adapter.
If you use a third-party charger, the recommended outputvoltage/current of
the adaptor is 5Vdc/2A,and the adapter shall be CE approval type.
CAUTION RISK OF EXPLOSION IF BATTERY IS REPLACED BY AN INCORRECT
TYPE. DISPOSE OF USED BATTERIES ACCORDING TO THE INSTRUCTIONS
RF exposure information: The Maximum Permissible Exposure (MPE) level
has been calculated based on a distance of d=20 cm between the device and
the human body. To maintain compliance with RF exposure requirement, use
product that maintain a 20cm distance between the device and human body.
Operating Frequency Range: 2410-2477MHz
The T8300-C Max Output Power: 18.04dBm, The T8300-M Max Output
Power: 14.89dBm
This T3800-M was tested for typical body-worn operations with the back
of the handset kept 0 mm from the body. The SAR limit of Europe is 4.0 W/
kg. Device types T8300-M has also been tested against this SAR limit. The
highest SAR value reported under this standard during product certification
for use at the limb is1.707W/kg . This device was tested for typical hand held
operations with the back of the device kept 0mm from the Limb.
The T3800-C device has been evaluated to meet general RF exposure
requirements and can be used in fixed exposure condition. RF exposure
information: The Maximum Permissible Exposure (MPE) level has been
calculated based on a distance of d=20 cm between the device and the
human body. To maintain compliance with RF exposure requirement, use
product that maintain a 20cm distance between the device and human body.
The following importer is the responsible party (contact for EU matters only)
Importer:Anker Technology (UK) Ltd
Importer Address:Suite B, Fairgate House, 205 Kings Road, Tyseley,
Birmingham,United Kingdom B11 2AA
This product is designed and manufactured with high quality
materials and components, which can be recycled and reused.
This symbol means the product must not be discarded as household
waste, and should be delivered to an appropriate collection facility
for recycling. Proper disposal and recycling helps protect natural
resources, human health and the environment. For more information
on disposal and recycling of this product, contact your local
municipality, disposal service, or the shop where you bought this
product.
FCC Statement
This device complies with Part 15 of the FCC Rules. Operation is subject
to the following two conditions: (1) this device may not cause harmful
interference, and (2) this device must accept any interference received,
including interference that may cause undesired operation.
Warning:
Changes or modifications not expressly approved by the party
responsible for compliance could void the user's authority to operate the
equipment.
Note:
This equipment has been tested and found to comply with the limits
for a Class B digital device, pursuant to Part 15 of the FCC Rules. These limits
are designed to provide reasonable protection against harmful interference
in a residential installation.
This equipment generates uses and can radiate radio frequency energy and, if
not installed and used in accordance with the instructions, may cause harmful
interference to radio communications. However, there is no guarantee that
interference will not occur in a particular installation. If this equipment does
cause harmful interference to radio or television reception, which can be
determined by turning the equipment off and on, the user is encouraged to
try to correct the interference by one or more of the following measures:
(1) Reorient or relocate the receiving antenna. (2) Increase the separation
between the equipment and receiver. (3) Connect the equipment into an outlet
on a circuit different from that to which the receiver is connected. (4) Consult
the dealer or an experienced radio/TV technician for help.
FCC Radio Frequency Exposure Statement
13
English English
14
Page 10

The T8300-C device has been evaluated to meet general RF exposure
requirements. The T8300-C can be used in fixed exposure condition. The min
separation distance is 20cm.
This T8300-M was tested for typical body-worn operations with the back of
the handset kept 0 mm from the body.
RF Exposure Information(SAR)
The Extremity SAR limit of FCC for Hand held is 4.0W/kg.
Device is recommended to use in hand held only and SAR when hand held is
1.804W/kg
Worn on body will have unexpected RF exposure RISK.
The following importer is the responsible partyCompany Name:
POWER MOBILE LIFE, LLC
Address: 400 108th Ave NE Ste 400, Bellevue, WA 98004-5541
Telephone:1-206-383-8247
Customer Service
• Warranty
12-month limited warranty
• Call Us
United States +1 (800) 988 7973 Mon-Fri 9AM-5PM (PT)
United Kingdom +44 (0) 1604 936 200 Mon-Fri 6AM-11AM (GMT)
Germany +49 (0) 69 9579 7960 Mon-Fri 6:00-11:00
• Email Us
Customer Support: support@eufylife.com
15
English
 Loading...