


Owner’s Manual
RoboVac 30C (T2118)
|
|
Bedienungsanleitung l Manual del propietario |
T2118 51005001198 |
V01 |
Manuel d'utilisation l Guida di Utilizzo l Handleiding |
|
English |
01 |
Deutsch |
31 |
Español |
63 |
Français |
95 |
Italiano |
127 |
Nederlands |
159 |
English
Table of Contents
02 Important Safety Instructions
05 About Your RoboVac
What's in the Box RoboVac Anatomy LED Indication
09 Using Your RoboVac
Important Tips Before Use Preparation
Charge Your RoboVac
Use Your RoboVac with the EufyHome App Start / Stop Cleaning
Select a Cleaning Mode
Use the Boundary Strip
Use Your RoboVac with Amazon Alexa / the Google Assistant
21 Cleaning and Maintenance
Clean the Dust Collector and Filters Clean the Rolling Brush
Clean the Side Brushes
Replace the Side Brushes
Clean the Sensors and Charging Pins Clean the Swivel Wheel
26 Troubleshooting
Wi-Fi Connection
30 Specifications
30 Customer Service
Thank you for purchasing RoboVac 30C. Read all instructions before using this product, and keep it properly for future reference.
01
English
Important Safety Instructions
To reduce the risk of injury or damage, read these safety instructions carefully and keep them at hand when setting up, using, and maintaining this device.
WARNING SYMBOLS USED
This is the safety alert symbol. This symbol alerts you to potential hazards that could result in property damage and/or serious bodily harm or death.
•This device can be used by children aged from 8 years and above and persons with reduced physical, sensory or mental capabilities or lack of experience and knowledge if they have been given supervision or instruction concerning use of this device in a safe way and understand the hazards involved.
•Children should be supervised to ensure they do not play with this device.
•Cleaning and maintenance shall not be performed by children without adult supervision.
•This device is only to be used with the power supply unit provided.
•For the purposes of recharging the battery, only use the detachable power supply unit provided with this device.
•The battery must be removed from this device before this device is disposed of. To remove the battery from this device, first remove the screws on the bottom, then
remove the main PCB and unscrew the battery cover using a screwdriver. Remove the battery by disconnecting the quick connector.
•The used battery should be placed in a sealed plastic bag and disposed of safely according to local environmental regulations.
English
•The external flexible cable or cord of the power supply unit cannot be replaced; if the cord is damaged, the power supply unit shall be disposed of.
•This device is for indoor use only.
•This device is not a toy. Do not sit or stand on this device. Small children and pets should be supervised when this device is operating.
•Store and operate this device in room temperature environments only.
•Clean with a cloth dampened with water only.
•Do not use this device to pick up anything that is burning or smoking.
•Do not use this device to pick up spills of bleach, paint, chemicals, or anything wet.
•Before using this device, pick up objects like clothing and loose paper. Lift up cords for blinds or curtains, and move power cords and fragile objects out of the way. If this device passes over a power cord and drags it, an object could be pulled off a table or shelf.
•If the room to be cleaned has a balcony, a physical barrier should be used to prevent access to the balcony and to ensure safe operation.
•Do not place anything on top of this device.
•Be aware that this device moves around on its own. Take care when walking in the area where this device is operating to avoid stepping on it.
•Do not operate this device in areas with exposed electrical outlets on the floor.
•Do not expose the electronics of this device, its battery, or the integrated Charging Base. There are no user-serviceable parts inside.
02 |
03 |

English
•Do not use this device on an unfinished, unsealed, waxed or rough floor. It may result in damage to the floor and this device. Use only on hard floor surfaces or low-pile carpet.
•This device has been designed to be used on floors without scratching them. We still recommend that you test this device on a small area of the room to be cleaned to ensure no scratches are made before cleaning the whole room.
Notice
This symbol on the device or its packaging indicates: Do not dispose of electrical appliances as unsorted municipal waste; use separate collection facilities. Contact your local authority for information regarding the collection systems available. If electrical appliances are disposed of in landfills or dumps, hazardous substances can leak into the groundwater and get into the food chain, damaging your health and well-being. When replacing old appliances with new ones, the retailer is legally obliged to take back your old appliance for disposal at least free of charge.
Declaration of Conformity
This product complies with the radio interference requirements of the European Community. Hereby, Anker Innovations Limited declares that the radio equipment type T2118 is in compliance with Directive 2014/53/EU. The full text of the EU declaration of conformity is available at the following internet address: https://www.eufylife.com/.
Maximum output power: <20 dBm
Frequency band: 2.4G band (2.4000GHz - 2.4835GHz)
Trademark Notice
•Amazon, Echo, Alexa and all related logos are trademarks of Amazon.com, Inc. or its affiliates.
•Apple and the Apple logo are trademarks of Apple Inc., registered in the U.S. and other countries. App Store is a service mark of Apple Inc., registered in the U.S. and other countries.
•Google Play and the Google Play logo are trademarks of Google Inc.
•Google Home is a trademark of Google Inc.
English
About Your RoboVac
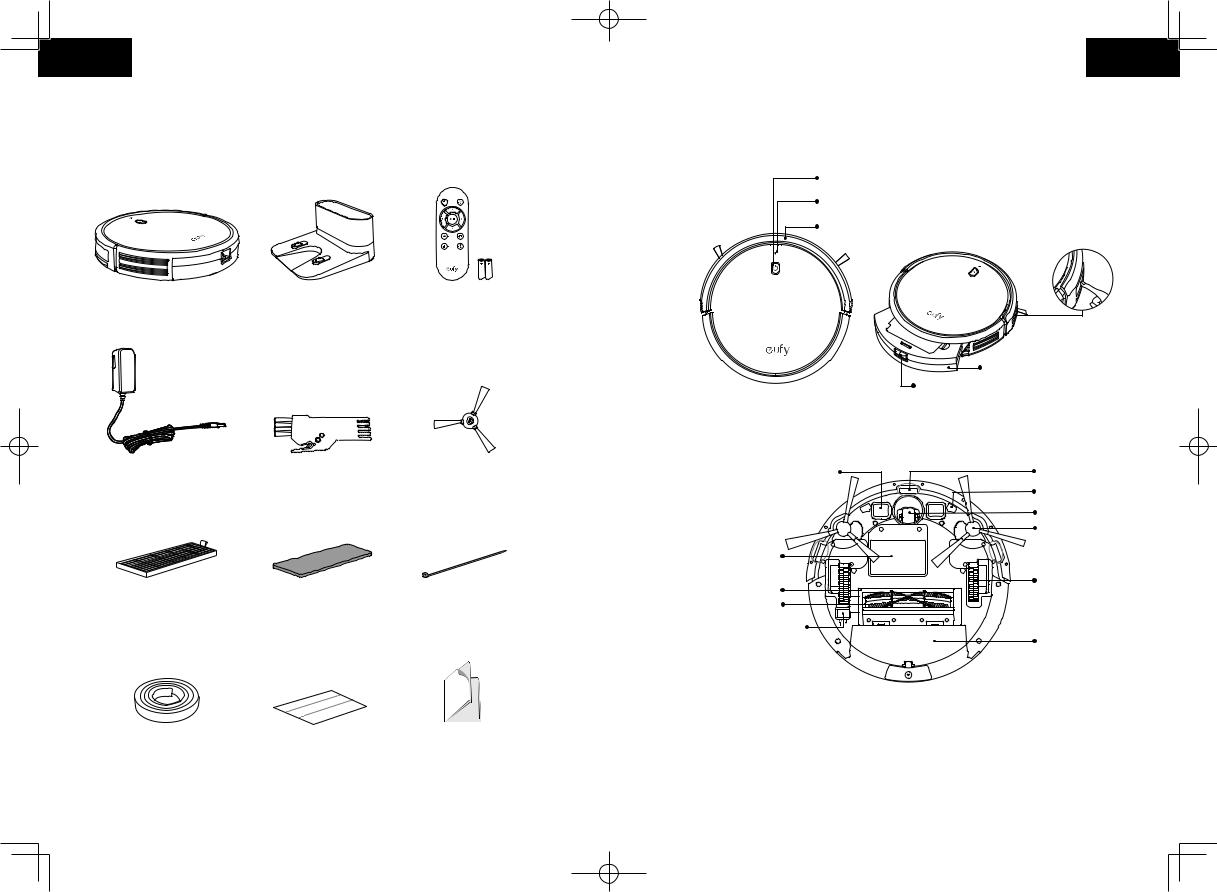
What's in the Box
RoboVac 30C |
Charging Base |
Remote Control |
|
|
(AAA Battery x2) |
Power Adapter |
Cleaning Tool |
Side Brushes (x4) |
Additional |
Additional |
Cable Ties (x5) |
High-Performance |
Foam Filter |
|
Filter |
|
|
Boundary Strips |
Adhesive Tapes (x4) |
Owner’s Manual & |
6.6 ft/2 m Length |
|
Other Documents |
(x2) |
|
|
04 |
05 |

|
|
|
|
|
|
|
|
|
|
|
|
|
|
|
|
|
|
|
|
|
|
|
|
|
|
|
|
|
|
|
|
|
|
|
|
|
|
|
English |
|
|
|
|
English |
|
|
|
|
|
|
|
|
|
|
|
|
|||
|
|
|
|
|
|
|
|
|
|
|
|
RoboVac Anatomy
Top & Side
 Auto cleaning Start/Stop button
 Wi-Fi status light
 Bumper
Infrared sensor


 Dust collector
 Dust collector release button
Bottom
Charging contact pins |
Drop sensors |
|
Hall sensors |
|
Swivel wheel |
|
Side brushes |
Battery compartment |
|
Brush guard |
Wheels |
|
|
Rolling brush |
|
Main power switch (On/Off) |
Dust collector |
|
Dust Collector
Suction Inlet
Dust collector
Suction inlet
Charging Base


 Pre-filter


 High-performance filter
 Foam filter
|
Status light |
Charging contact pins |
Power cord storage |
|
compartment |
|
Power socket |
06 |
07 |
English
Remote Control
|
|
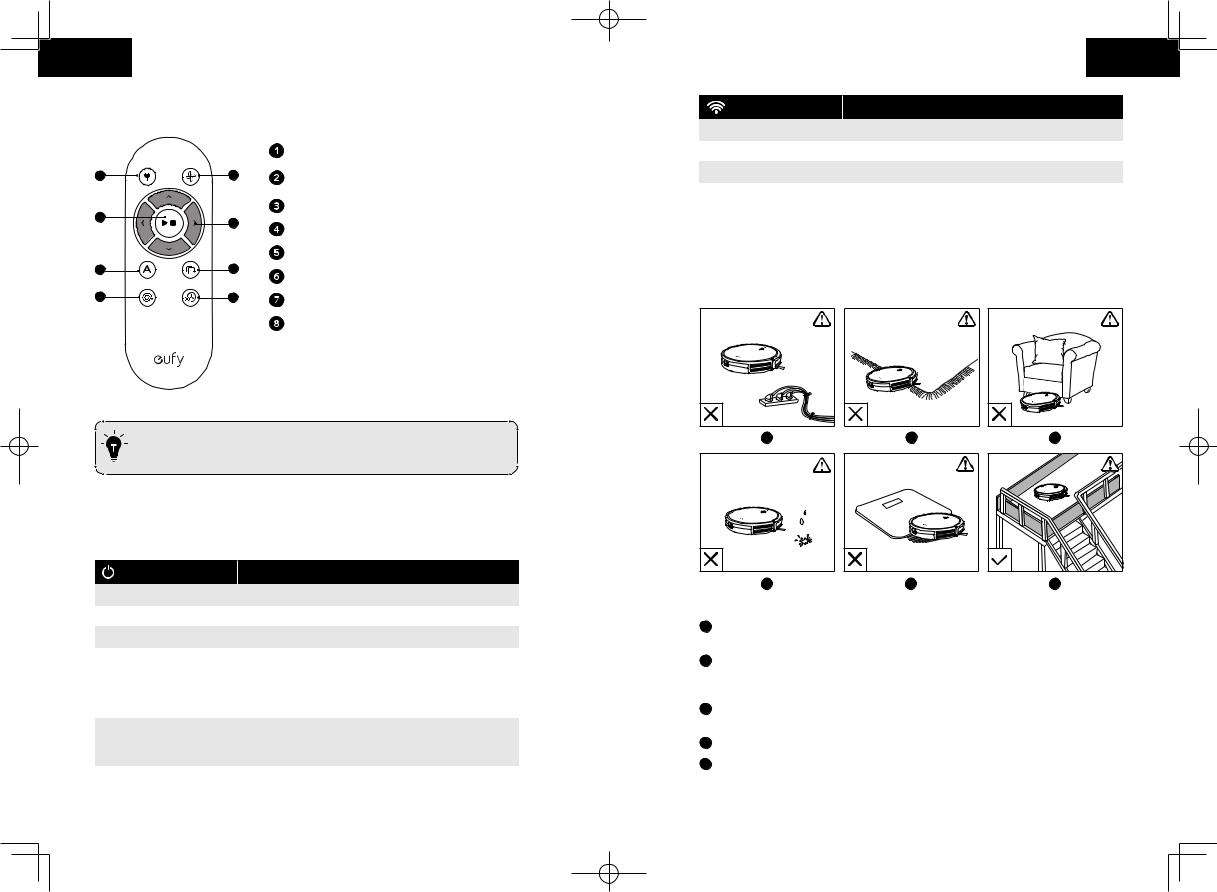
Return RoboVac to Charging Base |
|
1 |
2 |
Adjust suction power level in Auto and Quick |
|
Cleaning modes |
|||
|
|
||
3 |
|
Start Auto cleaning / Stop cleaning |
|
4 |
Control cleaning direction manually |
||
|
|||
|
|
||
|
|
Start Auto cleaning |
|
5 |
6 |
Start Edge cleaning |
|
|
|
||
7 |
8 |
Start Spot cleaning |
|
|
|
Start Quick cleaning |
Install 2 AAA batteries before using the remote control for the first time. Make sure the positive and negative ends are facing the correct polarity direction as marked in the battery compartment.
LED Indication
You can see the status of RoboVac from the LED indicators.
(Power Status Light) |
Status |
|
|
|
|
Breathing orange |
Charging |
|
|
|
|
Solid blue |
Standby / Cleaning / Fully charged |
|
|
|
|
Solid orange |
Low power and returning to Charging Base |
|
|
|
|
|
• |
RoboVac is off. |
Off |
• |
To conserve power, the light automatically turns off |
|
when RoboVac is not docked to the Charging Base |
|
|
|
|
|
|
and has been inactive for 1 minute. |
|
|
|
Flashing / Solid red + Beeping |
RoboVac has an error. |
|
Refer to the “Troubleshooting>Error Tone” section in this |
||
|
manual for solutions. |
|
|
|
|
English
(Wi-Fi Status Light) |
Status |
|
|
Slowly flashing blue |
Waiting for connection |
|
|
Rapidly flashing blue |
Connecting with your wireless router |
|
|
Solid blue |
Connected to your wireless router |
|
|
Using Your RoboVac
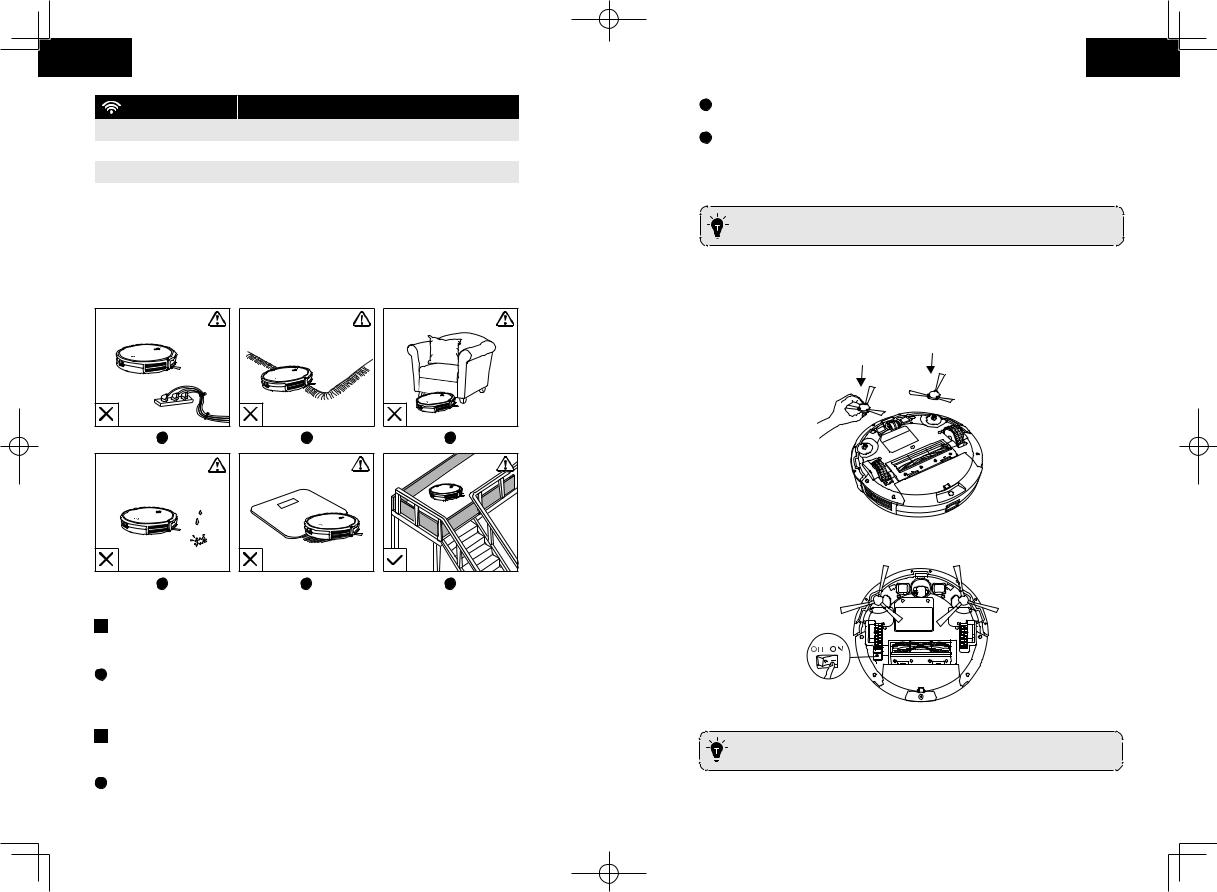
Important Tips Before Use
a
d
b |
e |
c |
f |
aRemove power cords and small objects from the floor that may entangle RoboVac. You can use the supplied cable ties to organize your wires and power cords.
bFold tasseled edges of area rugs underneath to prevent tangling RoboVac. Avoid cleaning very dark-colored high-pile rugs or rugs thicker than 1.02 in/26 mm as they may cause RoboVac to malfunction.
cKeep RoboVac away from spaces lower than 2.87 in/73 mm to prevent RoboVac from getting stuck. If necessary, place a physical barrier to block off the problem areas.
d Keep RoboVac away from wet areas.
eRoboVac may climb on top of objects less than 0.63 in/16 mm in height. Remove these objects if possible.
08 |
09 |
English
fAnti-drop sensors prevent RoboVac from tumbling down stairs and steep drops. They may work less effectively if dirty or used on reflective/very dark-colored floors. It is recommended to apply the Boundary Strip(s) to block off areas where RoboVac may fall.
Place physical barriers or Boundary Strips in front of fireplaces and areas that may cause damage to RoboVac if entered.
Preparation
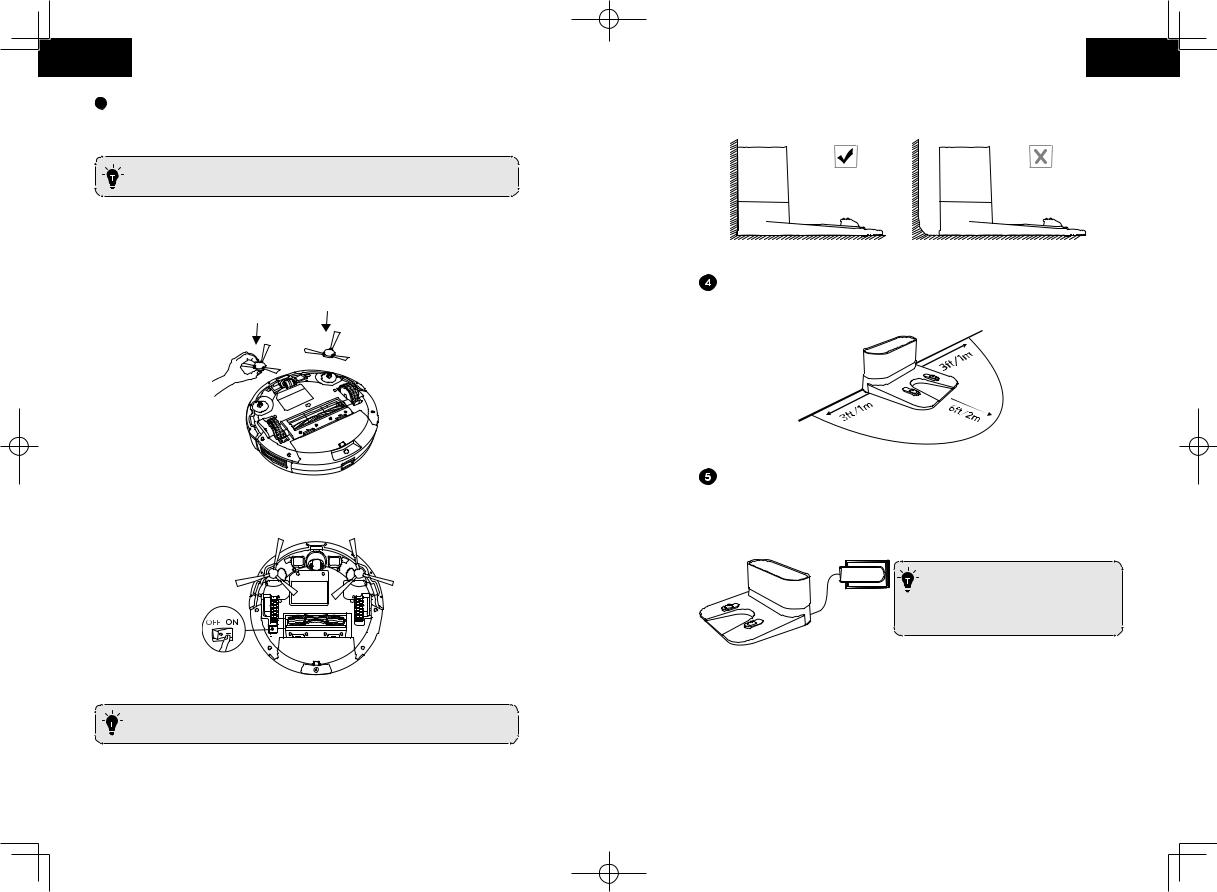
 Install the side brushes before use.
 Turn on the main power switch on the bottom of RoboVac.
Remove the sticker next to the power switch, and the foam blocks beside the bumper before use.
English
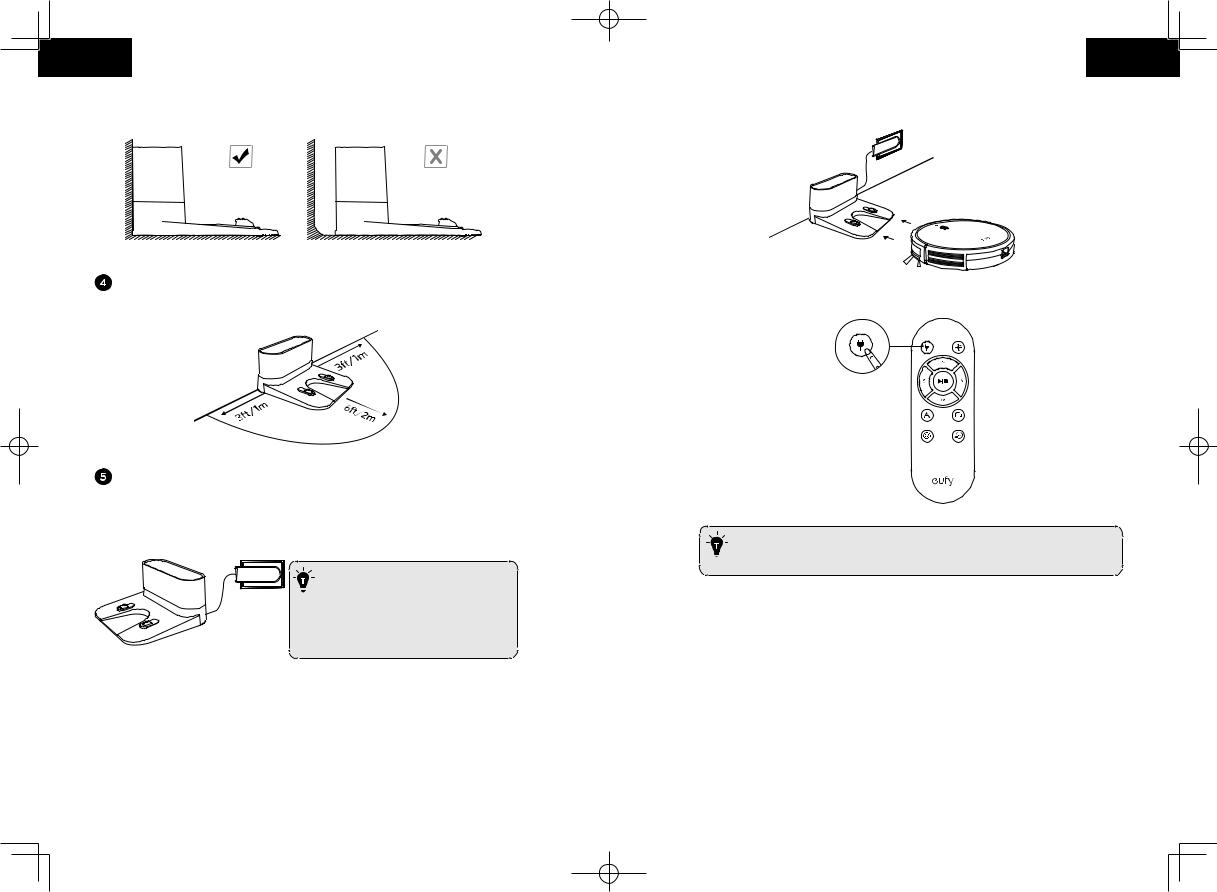
 Place the Charging Base on a hard, level surface and against a wall.
Remove objects within 3 ft/1 m of the left and right side and within 6 ft/2 m of the front of the Charging Base.
Connect the round connector of the adapter into the power socket on the Charging Base and the other end into a wall outlet.
•When the Charging Base connects to AC power, the LED indicator on the Charging Base is SOLID WHITE.
- Install the Charging Base in a location that RoboVac can easily access. It is recommended to place the Charging Base against a wall, and on a hard-level surface rather than on rugs or carpets.
- Always keep the Charging Base plugged in, otherwise RoboVac will not automatically return to it.
Charge Your RoboVac
•RoboVac has a pre-installed rechargeable battery that has to be fully charged before use.
•RoboVac returns to the Charging Base at the end of a cleaning cycle or when its battery is running low.
10 |
11 |
English
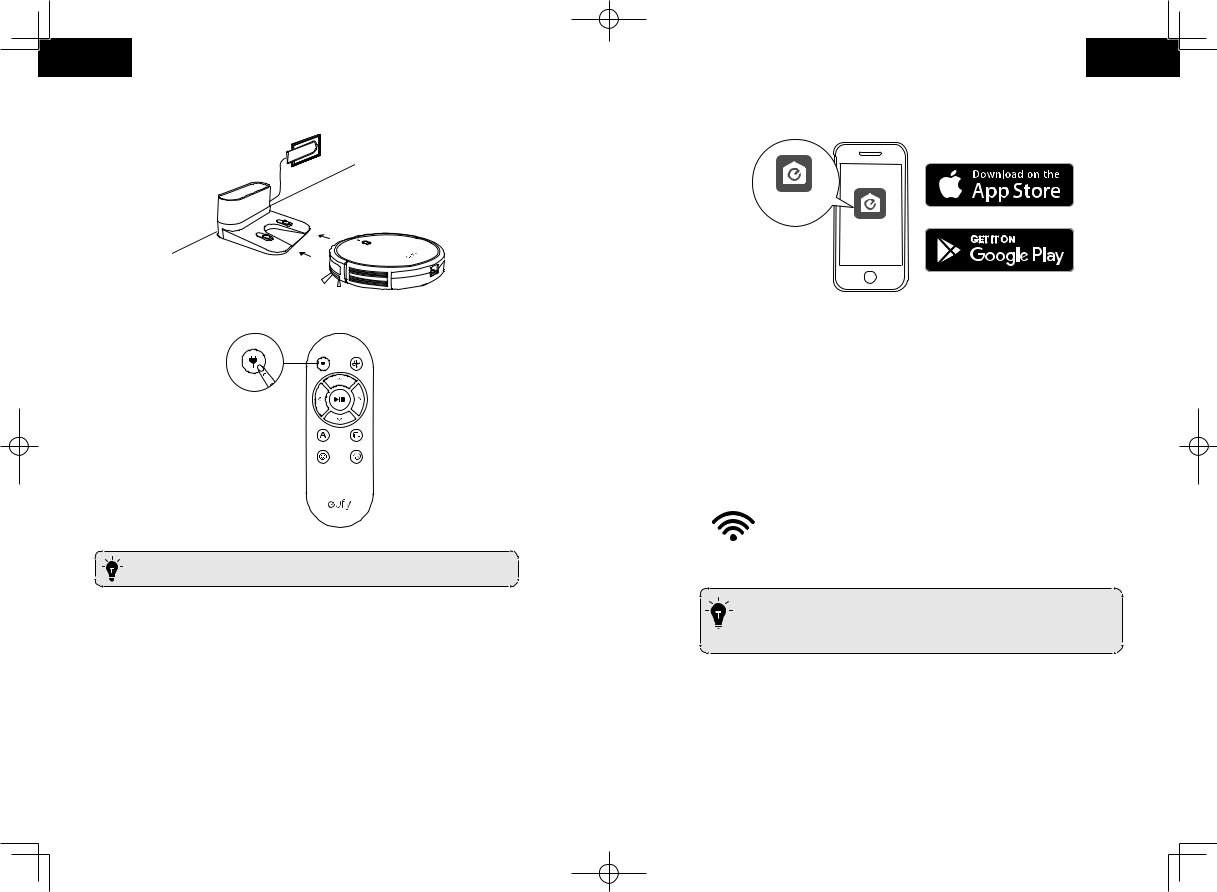
Method 1: Attach RoboVac to the Charging Base by aligning its charging pins with the charging pins on the base.
Method 2: Press  on the remote control to return RoboVac to the Charging Base.
Turn off the main power switch if RoboVac will not be used for a long period of time. To preserve the battery’s lifespan, recharge at least once every 6 months.
Use Your RoboVac with the EufyHome App
To enjoy all available features, it is recommended to control your RoboVac via the EufyHome app.
Before you start, make sure that:
•Your smartphone or tablet is connected to a Wi-Fi network.
•Your smartphone or tablet is running iOS 8.0 (or above) or Android 4.4 (or above).
•The 2.4GHz band wireless signal is enabled on your wireless router.
•The Wi-Fi status light on RoboVac is slowly flashing blue.
English
•RoboVac is attached to the Charging Base to ensure it has enough power during setup.
EufyHome
EufyHome
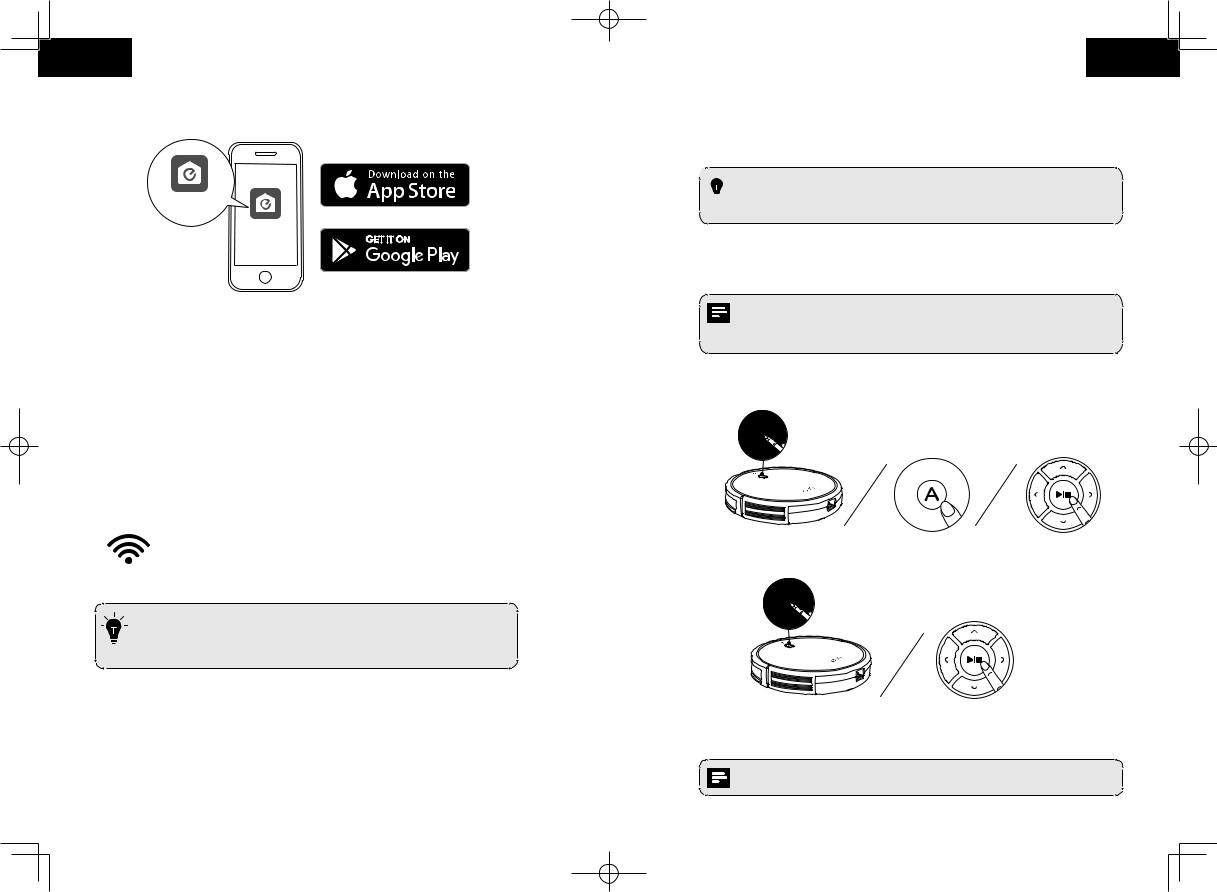
1.Download the EufyHome app from the App Store (iOS devices) or Google Play (Android devices).
2.Open the app and create a user account.
3 Tap the “+” icon in the top right corner to add RoboVac to your EufyHome account.
4.Follow the instructions in the app to set up the Wi-Fi connection.
-After connecting successfully, you can control RoboVac via the app.
-With the app, you can select a cleaning mode, set the time, schedule a cleaning, view the system status, receive notifications and access additional features.
Wi-Fi Status Light
|
Slowly flashing blue |
Waiting for connection |
|
|
|
|
Rapidly flashing blue |
Connecting with your wireless router |
|
|
|
|
Solid blue |
Connected to your wireless router |
|
|
|
-If you have any problems during the Wi-Fi setup process, refer to the “Troubleshooting > Wi-Fi connection” section in this Manual.
- If RoboVac gets stuck in any space, tap Find My Robot in the app to find the machine. This function is available in the app only.
Reset the Wi-Fi Connection
Press and hold on RoboVac for 10 seconds to reset the Wi-Fi connection if necessary.
-You will hear a beep when the Wi-Fi connection has been reset and the Wi-Fi status light will slowly flash blue. Now you can follow the Wi-Fi instructions in the EufyHome app to set up the Wi-Fi connection.
12 |
13 |
English
Schedule Cleaning
With the EufyHome app, you can schedule RoboVac to start cleaning at a particular time.
 • You can set the time and customize the cleaning schedules from Sunday to
  Saturday on the EufyHome app. This function is available in the app only.
Start / Stop Cleaning
• Make sure the main power switch on the bottom of RoboVac is turned on before use.
• You can also start or stop cleaning via the EufyHome app.
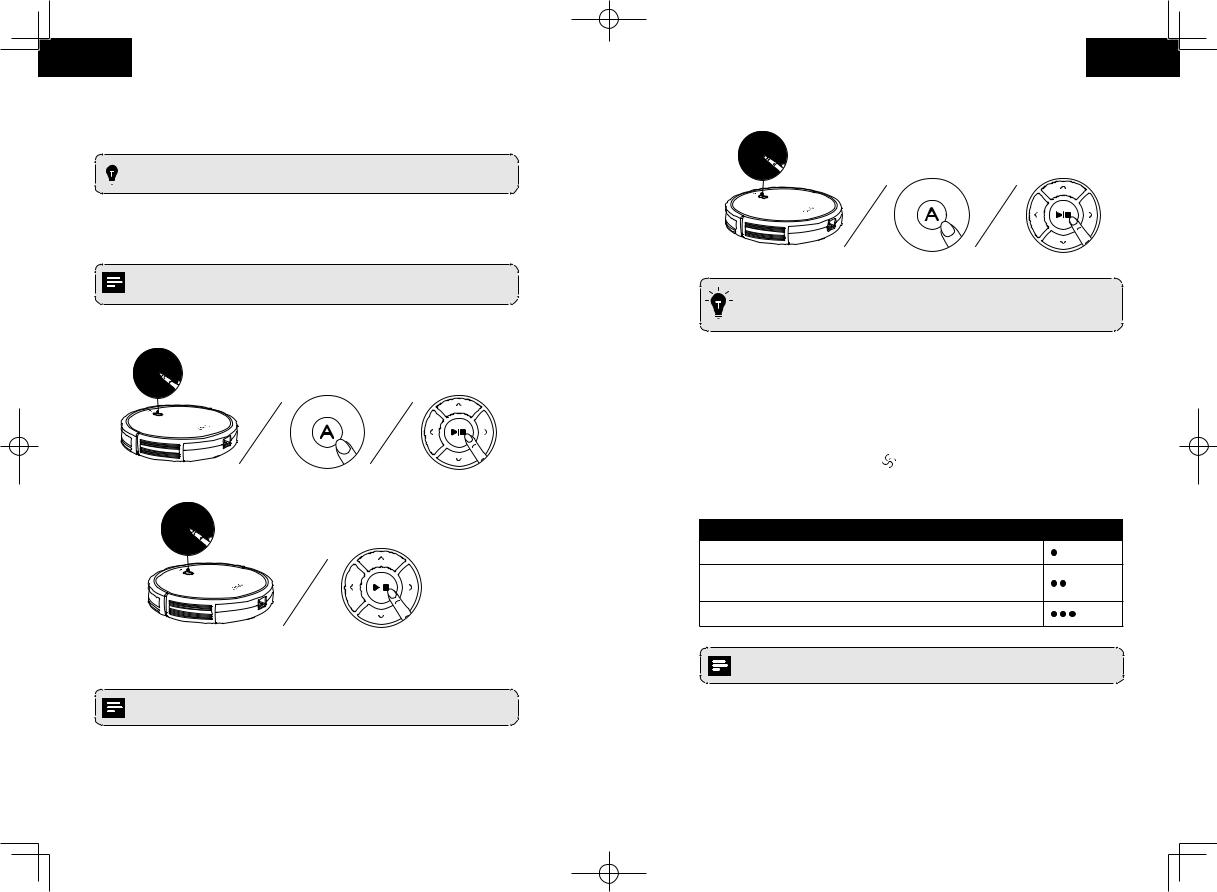
1. Press on RoboVac or
 /
/ on the remote control to start cleaning in Auto Mode.
2. Press  on RoboVac or
 on the remote control to stop cleaning.
Select a Cleaning Mode
You can also select a cleaning mode via the EufyHome app.
1. Auto cleaning
RoboVac optimizes its cleaning path by selecting different cleaning modes automatically until cleaning is complete. This is the most commonly used cleaning mode.
English
Press  on RoboVac or
  /
/  on the remote control to start cleaning in Auto Mode.
-RoboVac will return to the Charging Base automatically when the battery level becomes low or when RoboVac finishes cleaning.
- By default, RoboVac starts in Auto cleaning mode when it is turned on.
BoostIQ™ Feature
When the BoostIQ™ feature is enabled, RoboVac will automatically increase the suction power if it detects stronger power is needed to ensure the best clean. BoostIQ™ is ideal for cleaning thicker carpets and hard-to-sweep messes, which will reduce the total cleaning time, but increase the noise level. If the vacuuming noise caused by BoostIQ™ disturbs you, you can disable this feature. This feature only works in Auto and Quick cleaning modes.
In Auto or Quick cleaning mode, press |
on the remote control repeatedly to adjust the |
suction power level. |
|
• The corresponding icon is displayed on the remote control. |
|
|
|
Suction Power Level |
Beeps |
|
|
Standard power |
|
BoostIQ™
(Default, automatically switches between Standard and Enhanced power)
Maximum power
When RoboVac starts cleaning in Auto or Quick mode the next time, it will clean according to the suction power level you previously selected.
14 |
15 |
English
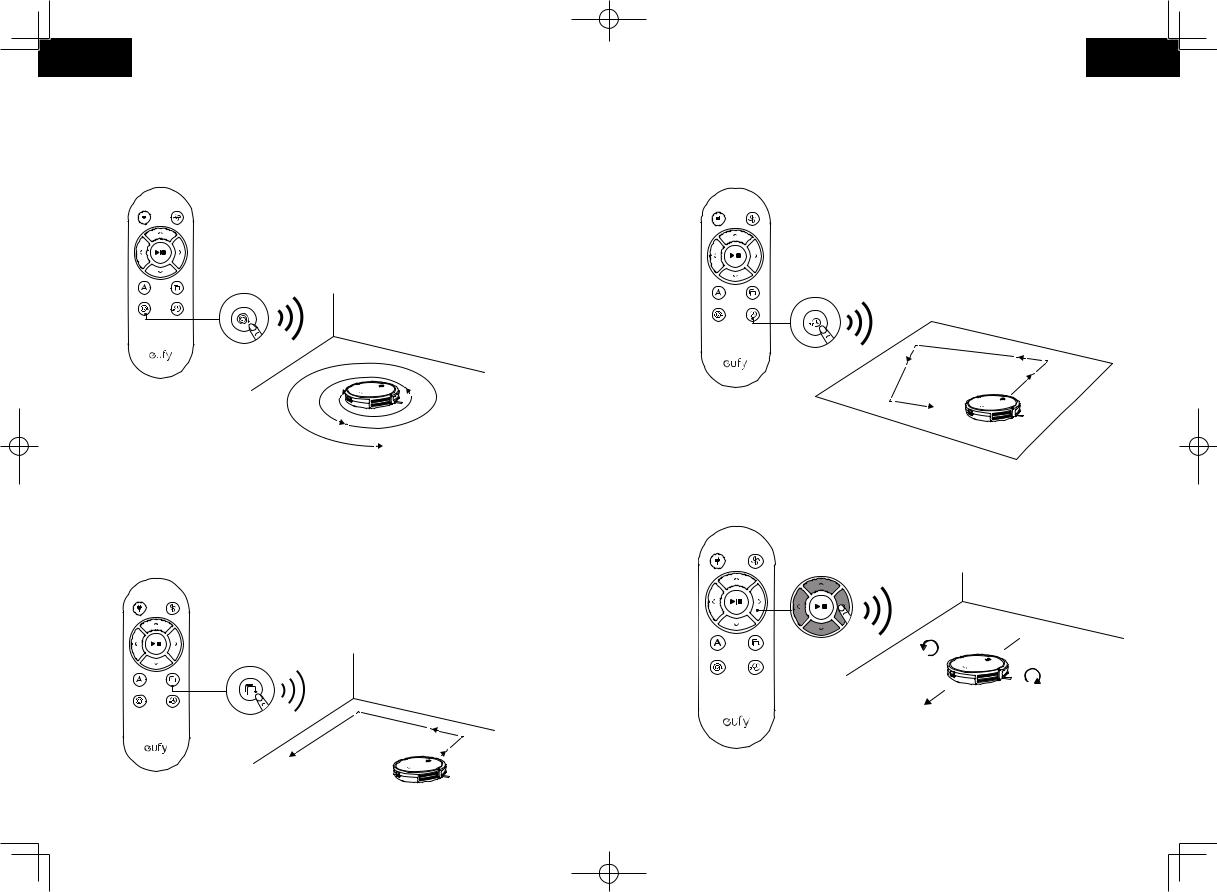
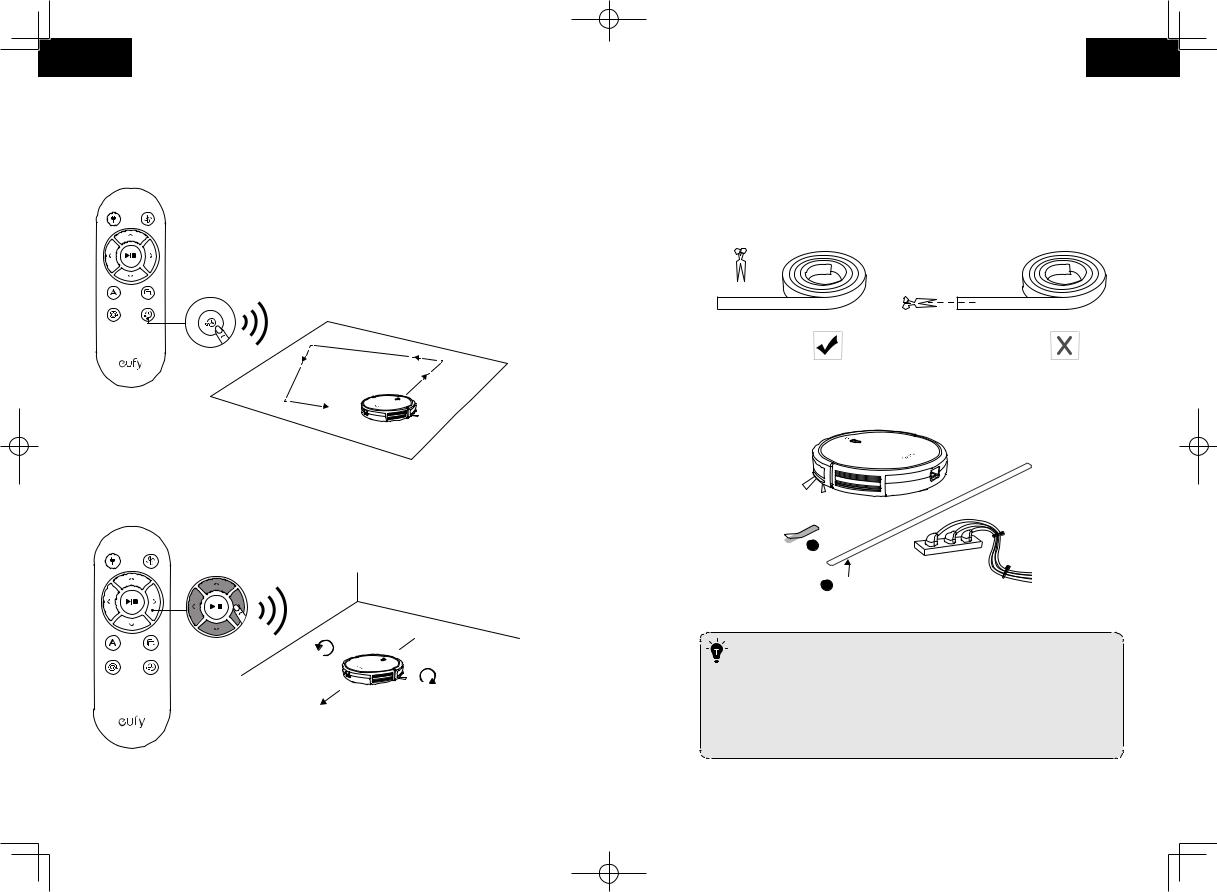
2. Spot cleaning
RoboVac intensively cleans a specific area in a spiral pattern, useful if there is a concentrated area of dust or debris. In Spot mode, RoboVac will stop cleaning after 2 minutes.
Press  on the remote control to start cleaning in Spot Mode.
3. Edge cleaning
RoboVac reduces its speed when it detects a wall and then follows the wall to ensure the edge is cleaned thoroughly. In Edge mode, RoboVac will clean for 20 minutes and return to the Charging Base.
Press on the remote control to start cleaning in Edge Mode.
English
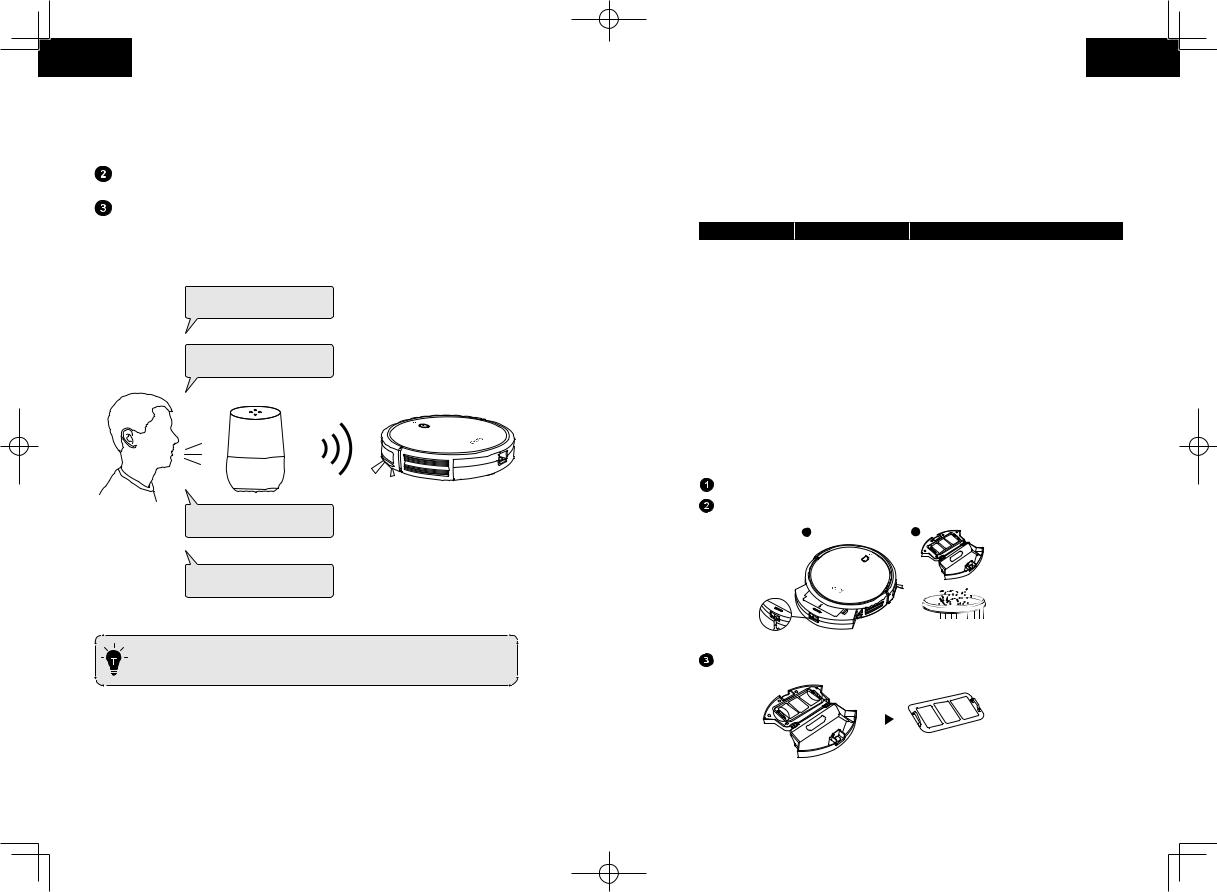
4. Quick cleaning
RoboVac will automatically stop cleaning after 30 minutes and return to the Charging Base in this mode. If any small room or area needs to be cleaned, it is recommended to select this mode to save time and power.
Press  on the remote control to start quick cleaning mode.
5. Manual cleaning
You can direct RoboVac to clean a particular area by using the directional buttons on the remote control.
 Move forward
Turn left
Turn right
Move backward
16 |
17 |
English
Use the Boundary Strip
With the Boundary Strip, you can keep RoboVac away from any area or item you do not want RoboVac to clean. RoboVac will recognize the Boundary Strip and will not cross into the blocked-off area.
1.Identify the area or item you do not want RoboVac to get close to.
2.If necessary, use scissors to cut the Boundary Strip to a shorter length. Be sure to correctly measure the length before cutting.
3. Apply the supplied strips of adhesive tape to lay the Boundary Strip flat on the floor. Make sure the strip is placed FLAT on the floor or under an area rug.
 1
1
2
-If the Boundary Strip is rolled up, remove and then re-apply on the floor with
adhesive tape. Otherwise the Boundary Strip may not work well.
-Make sure the Boundary Strip is placed on the same surface plane RoboVac is used on.
-Be careful not to damage the floor when using adhesive tape. It is not recommended for use on carpets.
-Keep the Boundary Strip away from objects that emit excessive heat.
English
Use Your RoboVac with Amazon Alexa / the Google Assistant
Amazon Alexa or the Google Assistant is a smart voice control device that enables you to control RoboVac with your voice.
Before you start, make sure that:
•RoboVac is attached to the Charging Base to ensure there is enough power.
•RoboVac is connected with the EufyHome app.
•You have an Alexa-enabled device (i.e. eufy Genie, Amazon Echo, Echo Dot and Amazon Tap, Echo Show, Echo Spot) or a device enabled with the Google Assistant (i.e. Google Home, Google Home Mini). These devices are sold separately.
•The Amazon Alexa app or Google Home app is already installed on your smart device, and you have created an account.
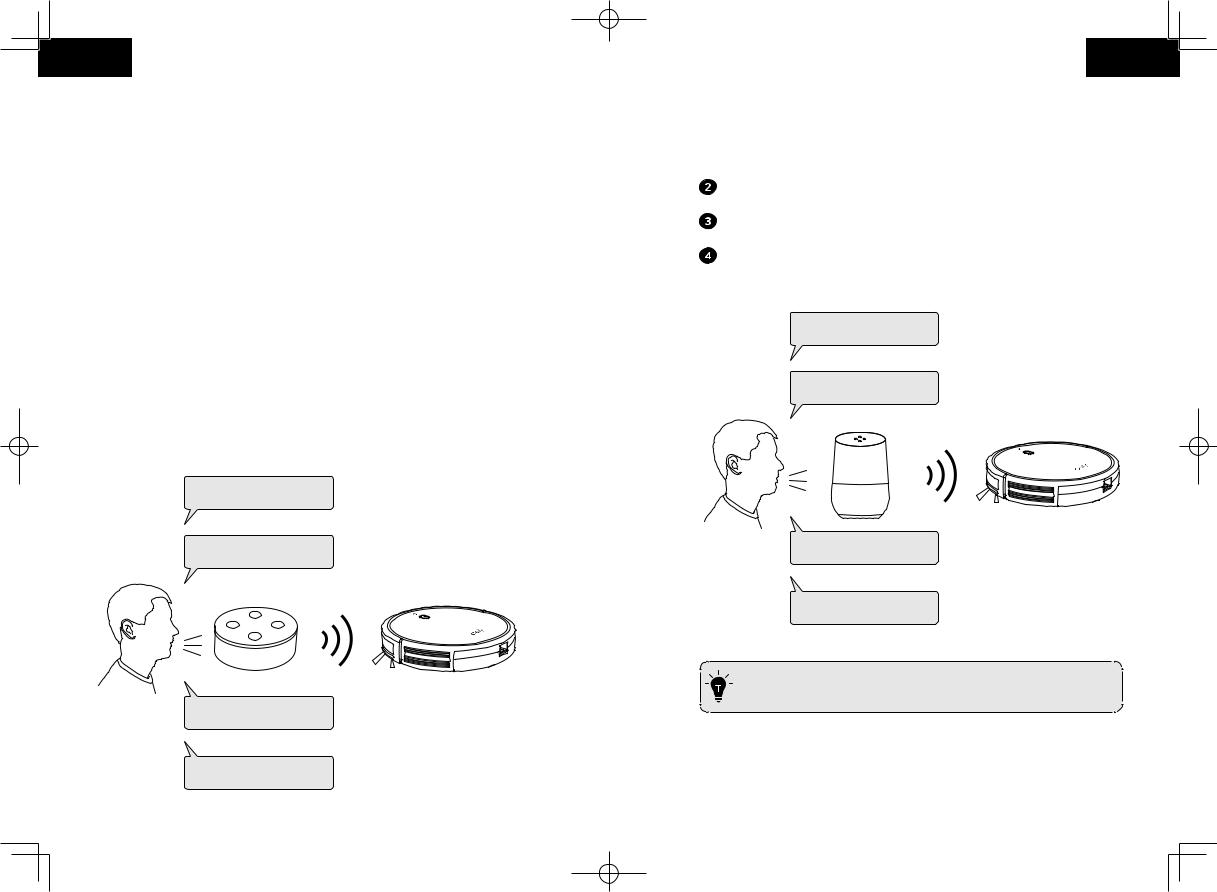
To control RoboVac with Amazon Alexa
 Open the Amazon Alexa app and select “Skills” from the
  menu.
menu.
 On the Skills screen, search for “EufyHome - RoboVac”.
 Once you have found the “EufyHome - RoboVac” skill, tap Enable.
 Login with your EufyHome account so that Alexa can control your RoboVac.
  Say simple commands to Alexa.
Alexa, ask RoboVac to start cleaning.
Alexa, ask RoboVac to stop cleaning.
Alexa, ask RoboVac to go home.
Alexa, ask RoboVac to find my robot.
18 |
19 |
English
To control RoboVac with the Google Assistant
RoboVac now works with the Google Assistant on devices like the Google Home.
 Open the Google Home app.
Say “Ok Google, talk to RoboVac” to the Google Assistant-enabled device to initiate the Google action for RoboVac.
Follow the instructions in the Google Home app to authorize the Google Assistant with your EufyHome account.
 To control RoboVac with your voice, say simple commands to Google Assistant.
Ok Google, ask RoboVac to start cleaning.
Ok Google, ask RoboVac to stop cleaning.
Ok Google, ask RoboVac to go home.
Ok Google, ask RoboVac to find my robot.
- For more information about how RoboVac works with Amazon Alexa / the Google Assistant, visit https://www.eufylife.com and go to PRODUCTS>Cleaning>RoboVac 30C for details.
English
Cleaning and Maintenance
For optimal performance, follow the instructions below to clean and maintain RoboVac regularly. The cleaning/replacement frequency will depend on your usage habits of RoboVac.
Recommended cleaning/replacement frequency
RoboVac Part |
Cleaning Frequency |
Replacement Frequency |
Dust Collector |
After each use |
- |
Filters |
Once every week |
Every 2 months |
Rolling Brush |
Once every week |
Every 6-12 months |
Side Brushes |
Once every month |
Every 3-6 months (or when visibly worn) |
Brush Guard |
Once every month |
Every 3-6 months (or when the silicone |
|
|
rubber strip on the brush guard becomes |
|
|
visibly worn) |
Sensors |
Once every month |
- |
Charging Pins |
Once every month |
- |
Swivel Wheel |
Once every month |
- |
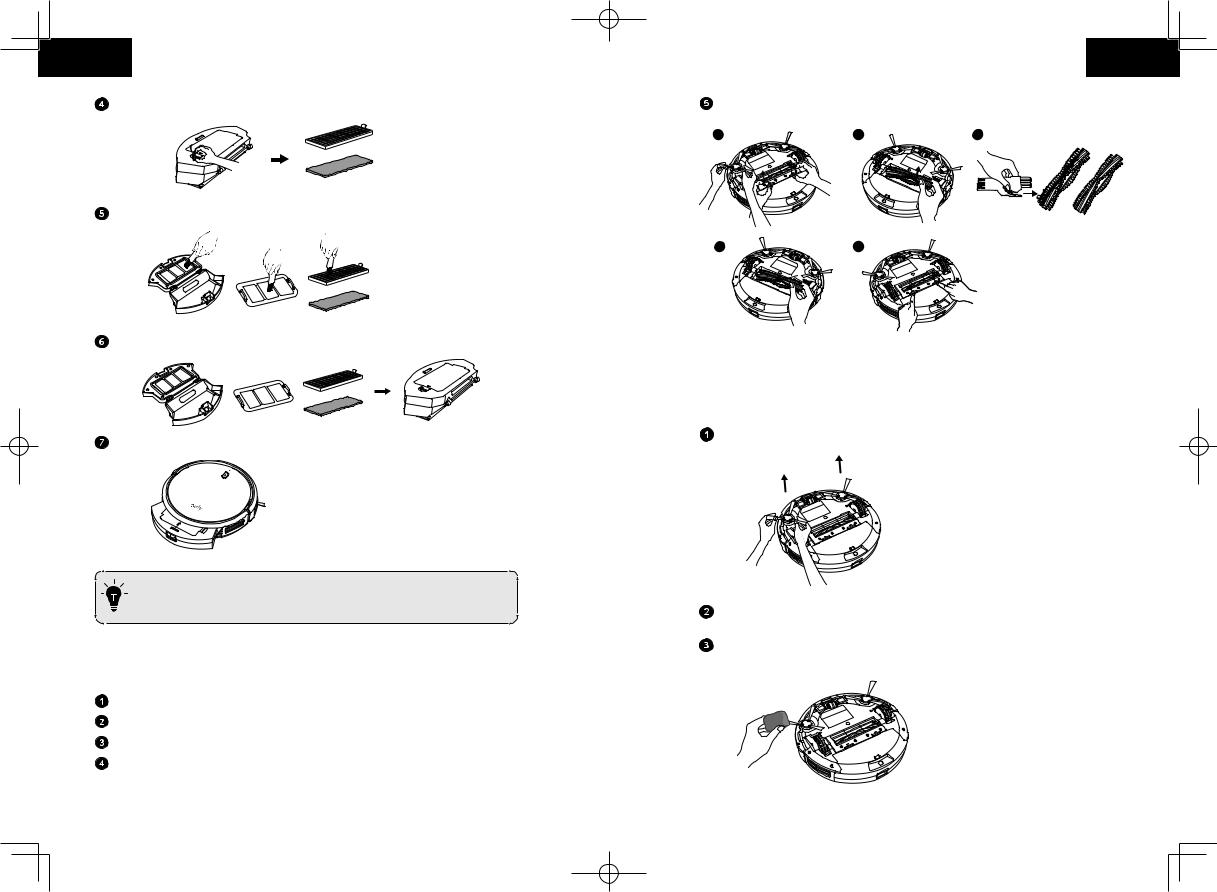
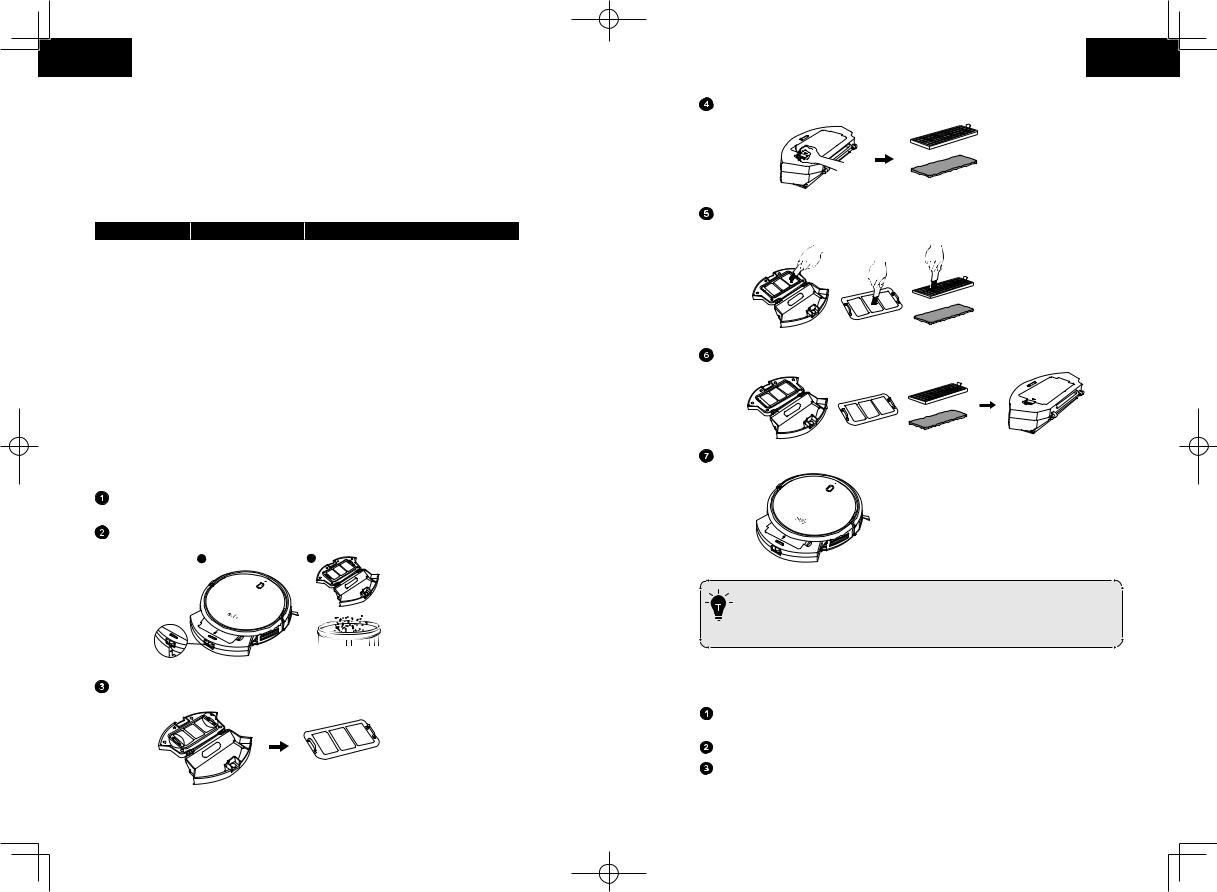
Clean the Dust Collector and Filters
Press the dust collector release button to pull the dust collector out.
Open and empty the dust collector.
1 |
2 |
Remove the pre-filter by pulling the hooks as shown.
20 |
|
21 |
English
Take out the foam filter and high-performance filter.
Clean the dust collector and filters with a vacuum cleaner or a cleaning brush.
Put the filters and pre-filter back together in the dust collector.
Push the dust collector back into the main unit.
You can wash the dust collector, pre-filter and foam filter with water. Be sure to air-dry them thoroughly before reassembling. Do not wash the high-performance filter with water, as it may damage the filter and reduce the suction power.
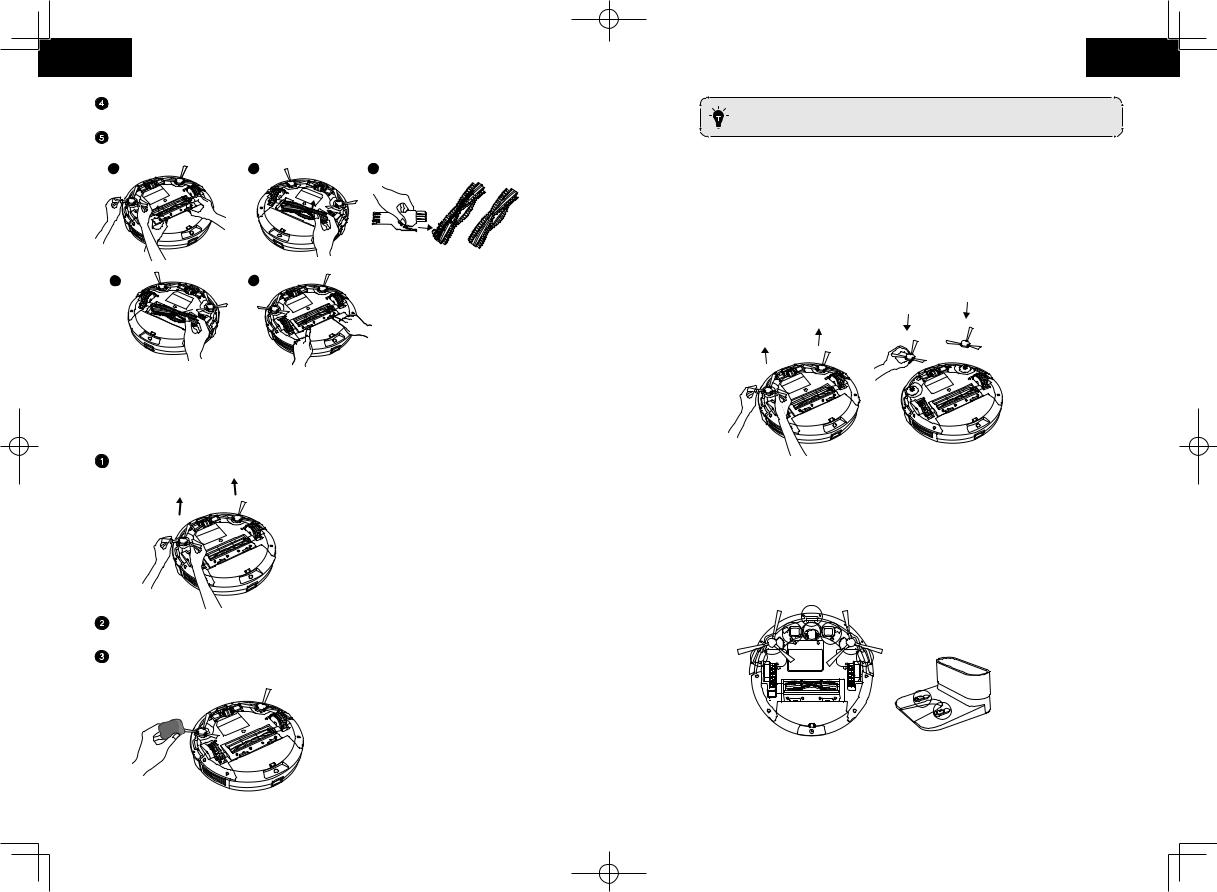
Clean the Rolling Brush
Pull on the release tabs to unlock the brush guard as shown. Lift the rolling brush to remove.
Clean the rolling brush with the provided cleaning tool or a vacuum cleaner.
Reinstall the rolling brush by inserting the fixed protruding end first and then clicking into place.
English
Press down to snap the brush guard into place.
1 |
2 |
3 |
4 |
5 |
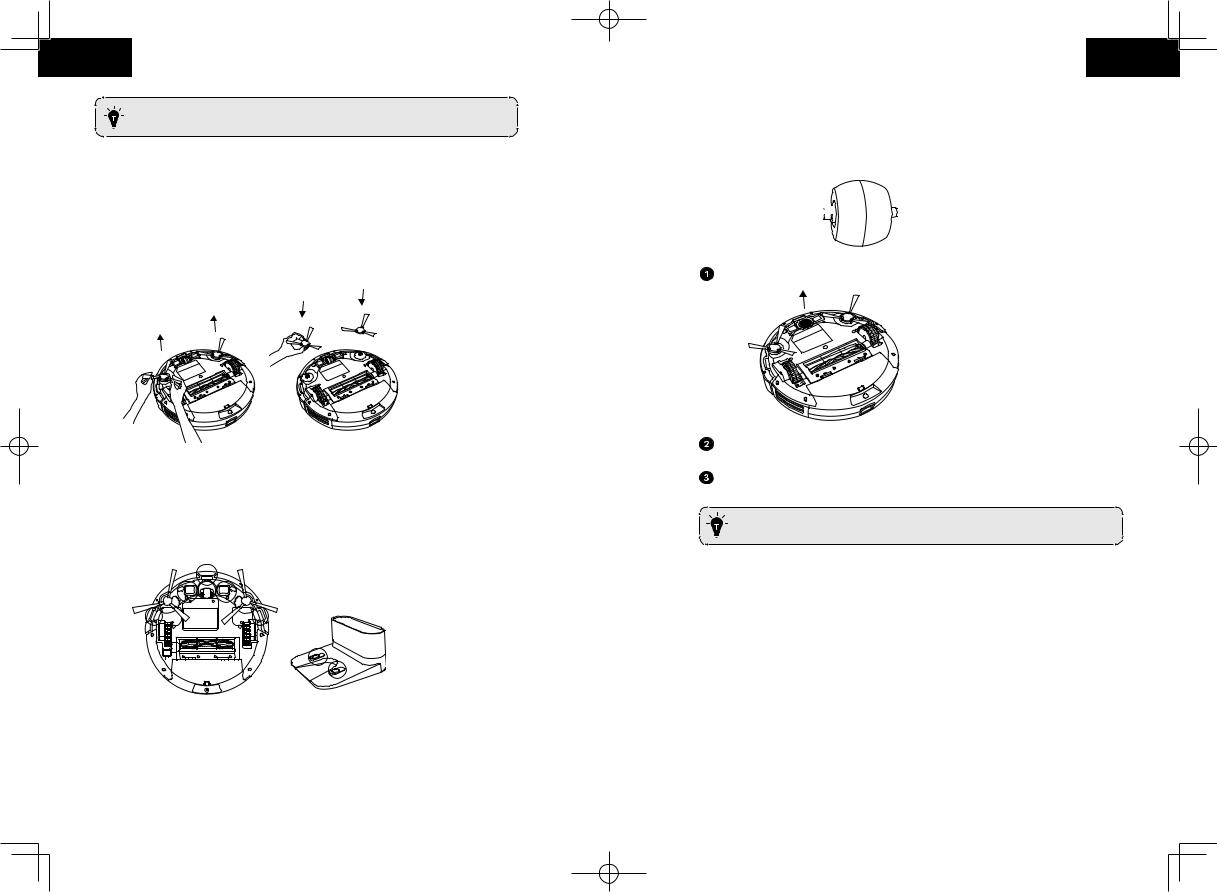
Clean the Side Brushes
Foreign substances, such as hair, can easily get tangled in the side brushes, and dirt may adhere to them. Be sure to clean them regularly.
Remove the side brushes.
Carefully unwind and pull off any hair or string that is wrapped between the main unit and the side brushes.
Use a cloth dampened with warm water to remove dust from the brushes or to gently reshape them.
22 |
23 |
English
Only use the side brushes when they are completely dry.
Replace the Side Brushes
The side brushes may become bent or damaged after being used for a period of time. Follow the instructions below to replace them.
Pull off the old side brushes and snap the new ones into place.
Clean the Sensors and Charging Pins
To maintain the best performance, clean the drop sensors and charging pins regularly.
• Dust off the drop sensors and charging contact pins using a cloth or cleaning brush.
English
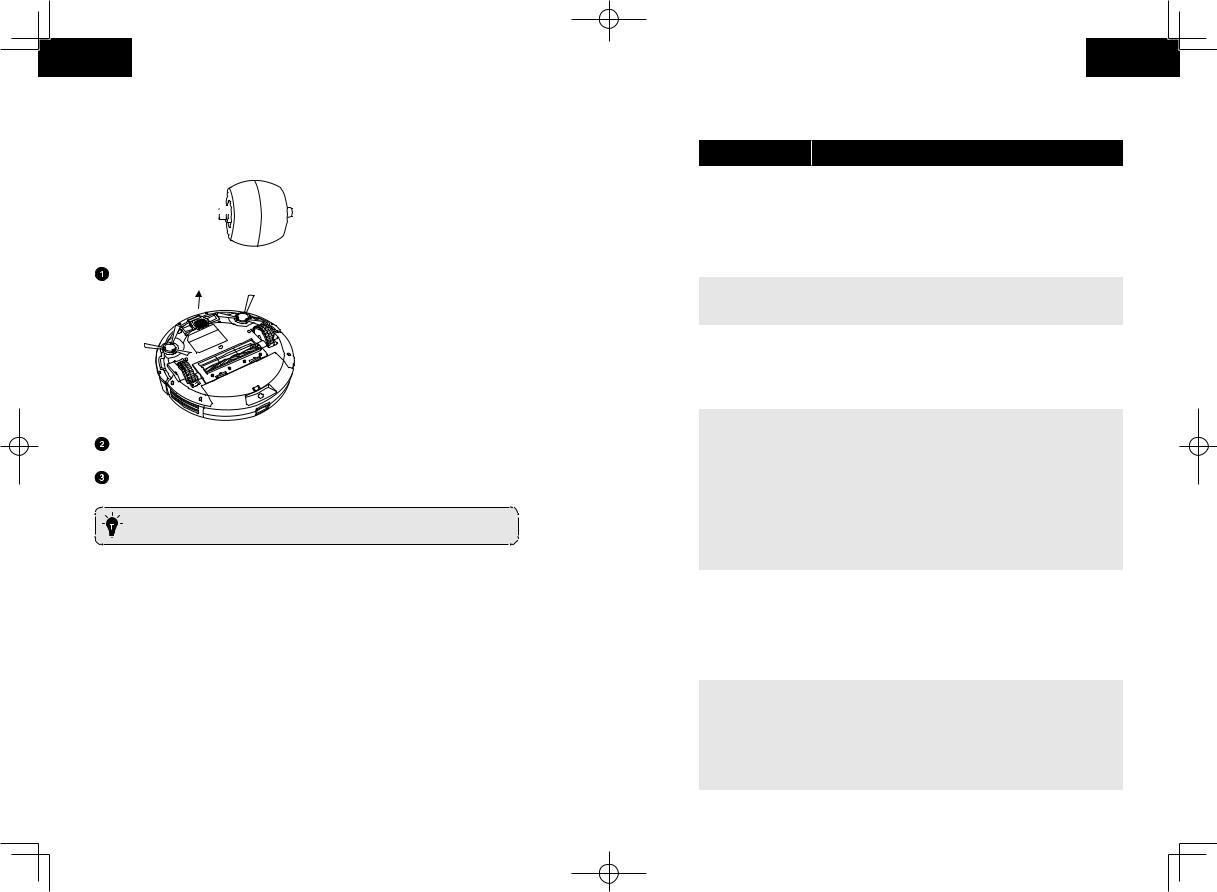
Clean the Swivel Wheel
Hair or dust particles can easily get entangled in the swivel wheel. Be sure to clean the swivel wheel periodically and as needed.
Wheel 

Axle 


Pull out the swivel wheel.
Clean any hair or debris wrapped around the wheel or entangled inside the wheel cavity.
Reinstall the wheel and push in until it clicks into place.
- You can clean the swivel wheel with water.
- Use the swivel wheel only when it is completely dry.
24 |
25 |
English
Troubleshooting
Problems |
Solutions |
|
|
• Make sure the main power switch is in the ON position. |
|
|
||
|
• Make sure the battery is fully charged. |
|
RoboVac cannot be |
• Replace the batteries (2 AAA) in the remote control. |
|
• Make sure the remote control is within range (16 ft/5 m) of |
||
activated. |
||
|
RoboVac. |
|
|
• If you still have trouble, turn off the main power switch and |
|
|
then turn it back on. |
|
|
|
|
The remote control |
• Replace the batteries in the remote control. |
|
does not work. |
• Make sure RoboVac is turned on and fully charged. |
|
|
|
|
|
• Check if RoboVac is trapped or stuck on an obstacle. |
|
RoboVac stops |
• Check if the battery level is too low. |
|
working suddenly. |
• If you still have trouble, turn off the main power switch, wait |
|
|
for 2 seconds, and then turn it back on. |
|
|
|
|
|
• Make sure the main power switch on the bottom of RoboVac |
|
|
is turned on. |
|
|
• You can set the time of day and scheduled cleaning time via |
|
You cannot schedule |
the EufyHome app. |
|
• Make sure the scheduled time has been set correctly. |
||
cleanings. |
• Check if RoboVac’s power is too low to start cleaning. |
|
|
||
|
• Cleaning schedules are erased when RoboVac is powered off. |
|
|
If RoboVac is powered on without Internet access, cleaning |
|
|
schedules will not synchronize and must be reset via the app. |
|
|
|
|
|
• Check if any obstructions are blocking the suction inlet. |
|
Suction power is |
• Empty the dust collector. |
|
• Clean the filters with a vacuum cleaner or a cleaning brush. |
||
weak. |
||
• Check if the filters are wet due to water or other liquid on the |
||
|
||
|
floor. Air-dry the filters completely before use. |
|
|
|
|
|
• Check if the indicator on the Charging Base lights up. If |
|
|
not, contact the eufy service center to repair or replace the |
|
RoboVac cannot be |
Charging Base. |
|
• Dust off the charging contact pins with a dry cloth. |
||
charged. |
||
• Check if you can hear a beep when RoboVac is docked onto |
||
|
||
|
the Charging Base. If not, contact the eufy service center to |
|
|
repair or replace the Charging Base. |
|
|
|
|
|
• Remove objects within 3 ft/1 m to the left and right side and |
|
|
within 6 ft/2 m of the front of the Charging Base. |
|
RoboVac cannot |
• When RoboVac is in the vicinity of the Charging Base, it will |
|
return to the |
return more quickly. However, if the Charging Base is located |
|
Charging Base. |
far away, RoboVac will need more time to return. Please be |
|
|
patient as it works its way back. |
|
|
• Clean the charging contact pins. |
|
|
|
English
Problems |
|
Solutions |
The rolling brush |
|
• Clean the rolling brush. |
|
||
|
• Check if the rolling brush and brush guard have been installed |
|
does not rotate. |
|
|
|
properly. |
|
|
|
|
RoboVac’s |
|
• Clean the sensors carefully with a dry cloth. |
movements or travel |
|
|
path are abnormal. |
|
• Restart RoboVac by turning the power switch off and on. |
|
|
|
RoboVac cannot |
|
• Make sure your Wi-Fi router supports the 2.4GHz and |
|
802.11b/g/n bands; the 5GHz band is not supported. For |
|
connect to a Wi-Fi |
|
|
|
details, refer to the “Troubleshooting > Wi-Fi connection” |
|
network. |
|
|
|
section in this manual. |
|
|
|
|
|
|
• Check if there are any Internet connection problems. |
|
|
• Check whether you have installed the Amazon Alexa app |
|
|
onto your smart device and enabled “EufyHome - RoboVac” |
You cannot control |
|
Skill in the Amazon Alexa app. For details, refer to the “Use |
|
Your RoboVac with Amazon Alexa / the Google Assistant” |
|
RoboVac with |
|
|
|
section in this manual. |
|
Amazon Alexa. |
|
|
|
• Make sure you have an EufyHome account. |
|
|
|
|
|
|
• Make sure you are using correct Alexa voice-commands. |
|
|
• The “EufyHome - RoboVac” Skill for Alexa is currently only |
|
|
available in English. |
|
|
• Check if there are any Internet connection problems. |
|
|
• Check if you have installed the Google Home app onto your |
|
|
smart device and initiated the “EufyHome” action in the |
You cannot control |
|
Google Home app. For details, refer to the “Use Your RoboVac |
|
with Amazon Alexa / the Google Assistant” section in this |
|
RoboVac with the |
|
|
|
manual. |
|
Google Assistant. |
|
|
|
• Check if you are using the proper commands when talking to |
|
|
|
|
|
|
the Google Assistant. When making your request, first say the |
|
|
wake words “Ok Google”. |
|
|
• Repeat your question. Speak clearly to the Google Assistant. |
Error Tones
When RoboVac is in trouble, it will emit a series of short or long beeps and the red indicator on RoboVac will be solid or flashing.
Flashing red indicator light
Error Tone |
Cause |
Solution |
|
|
• RoboVac is stuck and one of the |
|
|
|
|
||
|
wheels is not making contact with |
|
|
One beep |
the floor (hanging in mid-air). |
Restart cleaning in a new location. |
|
• RoboVac may be in an extremely |
|||
|
|
||
|
large room and the bumper is not |
|
|
|
registering obstacles. |
|
|
|
|
Tap RoboVac’s bumper several times |
|
Two beeps |
RoboVac’s bumper is stuck. |
to dislodge any debris that may be |
|
|
|
trapped underneath. |
26 |
27 |
English
Error Tone |
Cause |
|
Solution |
|
|
|
|
• Clean the drop sensors gently |
|
|
|
|
||
|
• RoboVac’s drop sensors are dirty. |
with a dry cloth. |
||
Three beeps |
• RoboVac is stuck on the ledge of a |
• Place RoboVac in a new location. |
||
|
staircase and cannot reverse. |
|
• Use a physical barrier to block off |
|
|
|
|
the problem area. |
|
Four beeps |
RoboVac’s power level is too low. |
|
Manually charge RoboVac for at least |
|
|
5 hours. |
|||
|
|
|
||
Solid red indicator light |
|
|
||
|
|
|
||
Error Tone |
Cause |
Solution |
||
|
|
|
||
One beep |
RoboVac’s left/right wheel is |
Turn off RoboVac and remove any hair or |
||
stuck. |
debris from the left/right wheel. |
|||
|
||||
Two beeps |
RoboVac’s side brush is stuck. |
Turn off RoboVac and remove any hair or |
||
debris from the side brush. |
||||
|
|
|||
|
|
• Turn off RoboVac, then remove and |
||
Three beeps |
RoboVac’s suction fan is stuck. |
empty the dust collector. |
||
• Make sure the suction inlet is not |
||||
|
|
blocked by any hair or debris. |
||
Four beeps |
RoboVac’s rolling brush is stuck. |
Turn off RoboVac and remove any hair or |
||
debris from the rolling brush. |
||||
Wi-Fi Connection
Before Wi-Fi setup, make sure RoboVac and your Wi-Fi network meet the following requirements.
Wi-Fi Setup Requirements
•RoboVac:
-RoboVac is fully charged and the main power switch on the bottom of RoboVac is turned on.
-Wi-Fi status light slowly flashes blue.
•Wi-Fi Network:
-Use the correct password for your network.
-Do not use a VPN (Virtual Private Network) or Proxy Server.
-Your Wi-Fi router supports 802.11b/g/n and IPv4 protocol.
-You are using a 2.4GHz router or a dual-band router that is configured to support a 2.4GHz frequency band. RoboVac does not support 5GHz frequency band.
-If RoboVac cannot connect to the Wi-Fi network and you are using a 2.4/5GHz mixed network, switch to a 2.4GHz network for Wi-Fi setup. You can switch back once your setup is complete.
-When connecting to a hidden network, make sure you enter the correct network name, SSID (case sensitive), and connecting to a 2.4GHz wireless network.
English
-When using a network extender/repeater, make sure the network name (SSID) and password are the same as your primary network.
-The firewall and port settings of your Wi-Fi router allow RoboVac to connect with the Eufy servers.
Network Security Requirement
-WPA and WPA2 using TKIP, PSK, AES/CCMP encryption.
-WEP EAP (Enterprise Authentication Protocol) is not supported. Wi-Fi Channels
-The FCC requires that all wireless devices in the United States operate on the 1-11 wireless spectrum channels.
-Some countries outside North America can use spectrum channels higher than channel 11. Refer to your local regulatory agency to determine which channels are accessible.
-A future software release will support access to channels above 11 for users outside North America. Until then, use channels 1-11.
If you cannot control RoboVac with your smartphone, try the solutions below to solve the problem. If the problem persists, contact the eufy service center for help.
Wi-Fi Status |
Cause |
Solutions |
|||
Light |
|||||
|
|
|
|
||
|
|
|
|
||
Solid blue |
RoboVac has connected |
• |
Check if your router is connected to the |
||
|
to your router, but cannot |
|
Internet. |
||
|
access the Internet. |
• |
Check with your Internet provider to |
||
|
|
|
|||
|
|
|
|
see if there is any Internet connection |
|
|
|
|
|
problem. |
|
Rapidly flashing |
RoboVac cannot connect |
• |
Check if you have modified your |
||
blue |
to your wireless router. |
|
network name and password. |
||
|
|
|
• |
Reset Wi-Fi connection if necessary. |
|
|
|
|
|
Refer to the “Use Your RoboVac with |
|
|
|
|
|
the EufyHome App > Reset the Wi-Fi |
|
|
|
|
|
connection” section in this manual. |
|
Slowly flashing |
Wi-Fi connection is reset |
• |
Set up Wi-Fi connection with RoboVac. |
||
blue |
or has not been set up |
|
Refer to the “Use Your RoboVac with |
||
|
before. |
|
the EufyHome App” section in this |
||
|
|
|
|
manual. |
|
|
|
|
• |
Reset Wi-Fi connection if necessary. |
|
|
|
|
|
Refer to the “Use Your RoboVac with |
|
|
|
|
|
the EufyHome App > Reset the Wi-Fi |
|
|
|
|
|
connection” section in this manual. |
|
Off |
• |
RoboVac is turned off. |
• |
Charge RoboVac by attaching it to |
|
|
• |
RoboVac’s power level |
|
the Charging Base. Make sure the |
|
|
|
is low. |
|
main power switch on the bottom of |
|
|
• |
RoboVac is in Sleep |
|
RoboVac is turned on. |
|
|
|
|
|||
|
|
mode. |
|
|
|
28 |
29 |
English
Specifications
|
Product Model |
T2118 |
|||||||
|
Input |
19 V |
|
|
|
|
|
|
0.6 A |
|
|
|
|
|
|
||||
|
|
|
|||||||
|
Battery Voltage |
DC 14.4 V |
|||||||
|
Power Consumption |
40 W |
|||||||
|
Battery Type |
DC 14.4 V |
|||||||
|
Li-ion 2600 mAh |
||||||||
|
|
||||||||
|
Dust Collector Capacity |
0.6 L |
|||||||
|
Cleaning Time |
Max. 100 mins |
|||||||
|
Charging Time |
300 |
- 360 mins |
||||||
|
|
|
|
|
|
|
|
|
|
|
Input |
19 V |
|
|
|
|
|
|
0.6 A |
|
|
|
|
|
|
|
|||
|
|
|
|
|
|
|
|||
|
Output |
19 V |
|
|
|
|
|
|
0.6 A |
|
|
|
|
|
|
|
|||
|
|
|
|
|
|
|
|||
|
|
|
|
|
|
|
|
|
|
Customer Service
For FAQs and more information, please visit www.eufylife.com.
@EufyO cial  @EufyO cial
  @EufyO cial
  @EufyO cial
Anker Innovations Limited
Room 1318-19, Hollywood Plaza, 610 Nathan Road, Mongkok, Kowloon, Hong Kong
Deutsch
Inhaltsverzeichnis
32 Wichtige Sicherheitsinformationen
36 Über Ihren RoboVac
Im Lieferumfang Aufbau des RoboVac LED-Anzeige
40 Verwendung Ihres RoboVac
Wichtige Tipps vor der Verwendung Vorbereitung
Aufladen Ihres RoboVac
Verwenden Ihres RoboVac mit der EufyHomeApp
Reinigung starten / stoppen Auswählen eines Reinigungsmodus Verwenden des Begrenzungsstreifens
Verwenden Ihres RoboVac mit Amazon Alexa / Google Assistant
52 Reinigung und Wartung
Reinigen von Staubbehältern und Filtern Reinigen der rotierenden Bürste Reinigen der seitlichen Bürsten Auswechseln der seitlichen Bürsten
Reinigen der Sensoren und Ladekontaktstifte Reinigen des Schwenkrads
57 Fehlerbehebung
WLAN-Verbindung
62 Technische Daten
62 Kundenservice
Vielen Dank, dass Sie den RoboVac 30C gekauft haben. Lesen Sie alle Anweisungen, bevor Sie dieses Produkt verwenden, und bewahren Sie sie gut auf.
30 |
31 |
Deutsch
Wichtige Sicherheitsinformationen
Um das Risiko von Verletzungen oder Schäden zu verringern, lesen Sie diese Sicherheitsinformationen sorgfältig durch und halten Sie sie beim Einrichten, Verwenden und Warten des Geräts griffbereit.
VERWENDETE WARNSYMBOLE
Dies ist das Sicherheitswarnsymbol. Dieses Symbol weist Sie auf mögliche Gefahren hin, die zu Sachschäden und/oder schweren Verletzungen oder Todesfällen führen können.
•Dieses Gerät kann von Kindern ab 8 Jahren sowie von Personen mit physischen, sensorischen, psychischen oder geistigen Beeinträchtigungen verwendet werden, sofern sie angemessene Überwachung oder Einweisung in die sichere Verwendung des Geräts erhalten und die damit einhergehenden Risiken richtig einordnen können.
•Kinder sollten beaufsichtigt werden, um sicherzustellen, dass sie nicht mit diesem Gerät spielen.
•Reinigung und Wartung dürfen nicht von Kindern ohne Aufsicht von Erwachsenen durchgeführt werden.
•Dieses Gerät darf nur mit dem im Lieferumfang enthaltenen Netzteil verwendet werden.
•Verwenden Sie zum Aufladen des Akkus nur das abnehmbare Netzteil, das im Lieferumfang des Geräts enthalten ist.
•Der Akku muss aus diesem Gerät entfernt werden, bevor das Gerät entsorgt wird. Zum Entfernen des Akkus aus diesem Gerät entfernen Sie die Schrauben an der Unterseite, entfernen Sie dann die Hauptplatine, und öffnen Sie die Akkuabdeckung mit einem Schraubendreher. Entfernen Sie den Akku, indem Sie die Schnellkupplung trennen.
Deutsch
•Der gebrauchte Akku muss in einem versiegelten Plastikbeutel aufbewahrt und gemäß den örtlichen Umweltvorschriften entsorgt werden.
•Das externe flexible Kabel oder Netzkabel des Netzteils kann nicht ausgetauscht werden. Wenn das Kabel beschädigt ist, muss das Netzteil entsorgt werden.
•Der Adapter darf ausschließlich in Innenbereichen verwendet werden.
•Dieses Gerät ist kein Spielzeug. Setzen oder stellen Sie sich nicht auf das Gerät. Kleine Kinder und Haustiere sollten beaufsichtigt werden, wenn das Gerät in Betrieb ist.
•Lagern und betreiben Sie dieses Gerät nur in Umgebungen mit Raumtemperatur.
•Verwenden Sie zur Reinigung nur ein mit ein wenig Wasser angefeuchtetes Tuch.
•Saugen Sie mit diesem Gerät keine brennenden oder rauchenden Objekte auf.
•Verwenden Sie dieses Gerät nicht zum Aufsaugen von verschütteten Bleichmitteln, Farben, Chemikalien oder Flüssigkeiten.
•Heben Sie vor Verwendung dieses Geräts Objekte wie Kleidung und loses Papier vom Boden auf. Binden Sie Jalousienoder Vorhangkordeln hoch, und entfernen Sie Netzkabel und zerbrechliche Gegenstände vom Boden. Wenn das Gerät über ein Netzkabel rollt und es mitzieht, können die entsprechenden Elektroartikel von Tischen oder Regalen gerissen werden.
•In Räumen mit Balkon sollte eine physische Barriere verwendet werden, um den Zugang zum Balkon zu verhindern und einen sicheren Betrieb zu gewährleisten.
•Stellen Sie keine Gegenstände auf das Gerät.
•Beachten Sie, dass dieses Gerät sich eigenständig bewegt. Gehen Sie beim Betreten des Bereichs, in dem das Gerät
32 |
33 |

Deutsch
betrieben wird, vorsichtig vor, damit Sie nicht versehentlich auf das Gerät treten.
•Betreiben Sie dieses Gerät nicht in Bereichen mit frei liegenden Bodensteckdosen.
•Legen Sie die Elektronik dieses Geräts, des Akkus oder der integrierten Ladestation nicht frei. Keine Teile im Inneren des Geräts können durch den Benutzer gewartet werden.
•Verwenden Sie dieses Gerät nicht auf Rohbeton oder auf unversiegeltem, gewachstem oder rauem Bodenbelag. Andernfalls kann es zu Schäden am Boden und am Gerät kommen. Verwenden Sie das Gerät nur auf Hartbelägen oder Kurzflorteppichen.
•Dieses Gerät wurde für die kratzerfreie Verwendung auf Böden entwickelt. Dennoch empfehlen wir, dieses Gerät in einem kleinen Bereich des zu reinigenden Raums zu testen, um vor dem Reinigen des ganzen Raums sicherzustellen, dass keine Kratzer entstehen.
Hinweis
Dieses Symbol auf dem Gerät oder der Verpackung hat die folgende Bedeutung:
Entsorgen Sie elektrische Geräte nicht im Haushaltsabfall; geben Sie sie bei separaten Sammelstellen ab. Wenden Sie sich an die örtliche Kommunalverwaltung, um Informationen über die verfügbaren Sammelstellen einzuholen. Wenn Elektrogeräte in Mülldeponien entsorgt werden,
können Gefahrstoffe in das Grundwasser und somit in die Nahrungskette gelangen und Ihre Gesundheit und Ihr Wohlbefinden beeinträchtigen. Wenn Sie neue Elektrogeräte kaufen, sind die Einzelhändler gesetzlich verpflichtet, Ihre Altgeräte kostenlos zur Entsorgung anzunehmen.
Deutsch
Konformitätserklärung
Dieses Produkt entspricht den EU-Bestimmungen zur Störfestigkeit. Anker Innovations Limited erklärt hiermit, dass dieses Funkgerät des Typs T2118 der Richtlinie 2014/53/ EU entspricht. Der vollständige Text der EU-Konformitätserklärung ist online unter der folgenden Adresse verfügbar: https://www.anker.com/products.
Max. Ausgangsleistung: 14 dBm
Frequenzband: 2,4 G (2,4000 – 2,4835 GHz)
Markenhinweis
•Amazon, Echo, Alexa und alle zugehörigen Logos sind Marken von Amazon.com, Inc. oder seinen Tochtergesellschaften.
•Apple und das Apple-Logo sind Marken von Apple Inc., die in den USA und anderen Ländern eingetragen sind. App Store ist eine Dienstleistungsmarke von Apple Inc., die in den USA und anderen Ländern eingetragen ist.
•Google Play und das Google Play-Logo sind Marken von Google Inc.
•Google Home ist eine Marke von Google Inc.
34 |
35 |
Deutsch Deutsch
Über Ihren RoboVac |
Aufbau des RoboVac |
Im Lieferumfang |
Oberseite und Seite |
|
Start/Stopp-Taste für automatische Reinigung |
|
WLAN-Statusleuchte |
|
Stoßfänger |
RoboVac 30C |
Ladestation |
Fernbedienung |
|
|
(Zwei AAA-Batterien) |
Netzteil |
Reinigungsdüse |
Seitenbürsten |
|
|
(× 4) |
Zusätzlicher |
Zusätzlicher |
Kabelbinder (x 5) |
Hochleistungsfilter |
Schaumstofffilter |
|
|
Infrarotsensor |
|
Staubbehälter |
|
Entriegelungstaste für Staubbehälter |
Unterseite |
|
Ladekontaktstifte |
Sturzsensoren |
|
Flursensoren |
|
Schwenkrad |
|
Seitliche Bürsten |
Batteriefach |
|
Bürstenschutz |
Räder |
|
|
Rollbürste |
|
Netzschalter (Ein/Aus) |
Staubbehälter |
|
Begrenzungsstreifen |
Klebeband (x 4) |
Gebrauchsanweisung |
2 m Länge (x 2) |
|
und andere Unterlagen |
36 |
37 |
Deutsch
Staubbehälter
Ansaugöffnung
Staubbehälter
Ansaugeinlass
Ladestation
Ladekontaktstifte


 Vorfilter


 Hochleistungsfilter

 Schaumstofffilter
 Statusleuchte
ufbewahrungsfach
 für Netzkabel

 Steckdose
Deutsch
Fernbedienung
1 

 2
2
3 |
4 |
RoboVac zurück zur Ladestation schicken |
|
Saugleistung in automatischen und |
|||
|
|||
|
|
||
|
|
Schnellreinigungsmodi einstellen |
|
5 |
6 |
Automatische Reinigung starten / |
|
Reinigung stoppen |
|||
|
|
||
7 |
8 |
Reinigungsrichtung manuell steuern |
|
|
|
Automatische Reinigung starten |
Kantenreinigung starten
Fleckenreinigung starten
Schnellreinigung starten
Legen Sie 2 AAA-Batterien ein, bevor Sie die Fernbedienung zum ersten Mal verwenden. Beachten Sie beim Einlegen der Batterien das Polaritätsdiagramm im Batteriefach.
LED-Anzeige
Der Status des RoboVac kann an den LEDs abgelesen werden.
(Betriebs-Statusleuchte) |
Status |
|
|
|
|
Langsames Blinken in Orange |
Laden |
|
|
|
|
Leuchtet blau |
Standby / Reinigung / Vollständig geladen |
|
|
|
|
Leuchtet orange |
Niedriger Akkustand und Rückkehr zur Ladestation |
|
|
|
|
|
• |
Der RoboVac ist ausgeschaltet. |
Aus |
• |
Um den Akku zu schonen, schaltet sich das Licht |
|
automatisch aus, wenn der RoboVac nicht an die |
|
|
|
|
|
|
Ladestation angedockt ist und 1 Minute lang inaktiv war. |
|
|
|
Blinkt / leuchtet rot + |
Am RoboVac ist ein Fehler aufgetreten. |
|
Informationen zur weiteren Vorgehensweise finden |
||
Signaltöne |
Sie im Abschnitt „Fehlerbehebung > Fehlerton“ dieser |
|
|
Gebrauchsanweisung. |
|
|
|
|
38 |
39 |
Deutsch
(WLAN-Statusleuchte) |
Status |
|
|
Blinkt langsam blau |
Warten auf Verbindung |
|
|
Blinkt schnell blau |
Verbindung zum Router wird hergestellt |
|
|
Leuchtet blau |
Verbindung zum Router hergestellt |
|
|
Verwendung Ihres RoboVac
Wichtige Tipps vor der Verwendung
a
d
b |
e |
c |
f |
aEntfernen Sie Netzkabel und kleine Gegenstände, in denen der RoboVac sich verfangen könnte, vom Fußboden. Sie können die im Lieferumfang enthaltenen Kabelbinder verwenden, um Kabel und Stromkabel zu organisieren.
bFalten Sie Teppichfransen unter den Teppichrand, damit der RoboVac sich nicht in ihnen verfängt. Vermeiden Sie sehr dunkle Teppiche, hochflorige Teppiche oder
Teppiche von mehr als 26 mm Dicke, denn sie können zu Fehlfunktionen des RoboVac führen.
cSorgen Sie für ausreichenden Abstand des RoboVac von Bereichen mit weniger als 73 mm Höhe, damit RoboVac sich nicht einklemmt. Sperren Sie derartige potenzielle Problembereiche ggf. mit einer physischen Barriere ab.
d Halten Sie den RoboVac von feuchten Bereichen fern.
Deutsch
eDer RoboVac kann auf Objekte bis zu einer Höhe von 16 mm klettern. Entfernen Sie derartige Objekte, sofern möglich.
fSturzsensoren verhindern, dass der RoboVac Treppen und steile Stufen hinunter fällt. Ihre Funktion kann durch Verschmutzung oder stark reflektierende/sehr dunkle Bodenbeläge beeinträchtigt werden. Wir empfehlen daher, einen oder mehrere Begrenzungsstreifen zum Absperren von Bereichen zu verwenden, in denen der RoboVac herunterfallen könnte.
Legen Sie physische Barrieren oder Begrenzungsstreifen vor Kamine und
Bereiche, die zu Schäden am RoboVac führen könnten.
Vorbereitung
 Montieren Sie vor dem Gebrauch des Geräts die seitlichen Bürsten.
 Schalten Sie den Netzschalter an der Unterseite des RoboVac ein.
Entfernen Sie vor dem Gebrauch den Aufkleber neben dem Netzschalter und die Schaumstoffblöcke neben dem Stoßfänger.
40 |
41 |
Deutsch
 Stellen Sie die Ladestation auf einer festen, ebenen Fläche an eine Wand.
Entfernen Sie alle Objekte innerhalb eines Umkreises von 1 m links und rechts neben und 2 m vor der Ladestation vom Boden.
Verbinden Sie den runden Stecker des Adapters mit der Steckdose an der Ladestation und das andere Ende mit einer Wandsteckdose.
•Wenn die Ladestation am Netzstrom angeschlossen ist, leuchtet die LED an der Ladestation weiß.
- Stellen Sie die Ladestation an einem Ort auf, der für den RoboVac leicht zugänglich ist. Es wird empfohlen, die Ladestation an einer Wand und auf einer harten, ebenen Oberfläche aufzustellen, nicht auf Teppichen oder Teppichboden.
- Lassen Sie die Ladestation immer eingesteckt, andernfalls kann der RoboVac nicht automatisch zu ihr zurückkehren.
Aufladen Ihres RoboVac
•Der im RoboVac vorinstallierte wiederaufladbare Akku muss vor dem Gebrauch des Geräts vollständig aufgeladen werden.
•Der RoboVac kehrt zur Ladestation zurück, wenn ein Reinigungszyklus beendet oder der Akku fast leer ist.
Deutsch
Methode 1: Setzen Sie den RoboVac in die Ladestation an, indem Sie die Ladekontaktstifte am Gerät auf die Ladekontaktstifte an der Ladestation ausrichten.
Methode 2: Drücken Sie  auf der Fernbedienung, um RoboVac zurück zur Ladestation zu schicken.
Schalten Sie den Netzschalter aus, wenn der RoboVac für längere Zeit nicht benötigt wird. Um die Akkulebensdauer zu bewahren, sollte er mindestens alle 6 Monate einmal aufgeladen werden.
Verwenden Ihres RoboVac mit der EufyHome-App
Zur Nutzung des gesamten Funktionsumfangs wird empfohlen, den RoboVac über die EufyHome-App zu steuern.
Bevor Sie beginnen, stellen Sie Folgendes sicher:
•Ihr Smartphone oder Tablet ist mit einem WLAN verbunden.
•Ihr Smartphone oder Tablet verfügt über iOS 8.0 (oder höher) oder Android 4.4 (oder höher).
•An Ihrem Router ist das WLAN-Signal im 2,4-GHz-Band aktiviert.
•Die WLAN-Statusleuchte am RoboVac blinkt langsam blau.
42 |
43 |
Deutsch
•Der RoboVac ist in die Ladestation eingesetzt, um zu gewährleisten, dass er während der Einrichtung ausreichend geladen ist.
EufyHome
EufyHome
1.Laden Sie die kostenlose EufyHome-App aus dem App Store (iOS-Geräte) oder bei Google Play (Android) herunter.
2.Öffnen Sie die App und erstellen Sie ein Benutzerkonto.
3.Tippen Sie auf das „+“-Zeichen rechts oben, um den RoboVac zu ihrem EufyHome-Konto hinzuzufügen.
4.Folgen Sie den Anleitungen in der App, um die WLAN-Verbindung einzurichten.
-Nach erfolgter Verbindungsherstellung können Sie den RoboVac über die App steuern.
-Mit der App können Sie einen Reinigungsmodus auswählen, die Uhrzeit einstellen, einen Zeitplan für die Reinigung aufstellen, den Systemstatus anzeigen, Benachrichtigungen empfangen und auf zusätzliche Funktionen zugreifen.
WLAN-Statusleuchte
|
Blinkt langsam blau |
Warten auf Verbindung |
|
|
|
|
Blinkt schnell blau |
Verbindung zum Router wird hergestellt |
|
|
|
|
Leuchtet blau |
Verbindung zum Router hergestellt |
|
|
|
-Falls Sie während der WLAN-Einrichtung auf Probleme stoßen sollten, lesen die den Abschnitt „Fehlerbehebung > WLAN-Verbindung“ dieser Gebrauchsanweisung.
- Falls der RoboVac irgendwo eingeklemmt wird, tippen Sie in der App auf Meinen Roboter finden, um das Gerät zu orten. Diese Funktion ist nur in der App verfügbar.
Zurücksetzen der WLAN-Verbindung
Halten Sie am RoboVac 10 Sekunden lang gedrückt, um die WLAN-Verbindung zurückzusetzen.
-Sie hören einen Signalton, wenn die WLAN-Verbindung zurückgesetzt wurde, und die WLAN-Statusleuchte blinkt langsam blau. Folgen Sie nun den Anleitungen in der EufyHome-App, um die WLAN-Verbindung einzurichten.
Deutsch
Zeitplan für die Reinigung
Mit der EufyHome-App können Sie einen Zeitplan aufstellen, sodass der RoboVac die Reinigung zu einer bestimmten Zeit beginnt.
 • Sie können in der EufyHome-App die Uhrzeit einstellen und tägliche
  Reinigungspläne von Montag bis Sonntag individuell anpassen. Diese Funktion ist nur in der App verfügbar.
Reinigung starten / stoppen
• Stellen Sie sicher, dass der Netzschalter an der Unterseite des RoboVac eingeschaltet ist, bevor Sie ihn verwenden.
•Sie können die Reinigung auch über die EufyHome-App starten oder stoppen.
1.Drücken Sie am RoboVac oder
 /
/ auf der Fernbedienung, um die Reinigung im automatischen Modus zu starten.
2. Drücken Sie  am RoboVac oder
 auf der Fernbedienung, um die Reinigung zu stoppen.
Auswählen eines Reinigungsmodus
Sie können in der EufyHome-App den gewünschten Reinigungsmodus auswählen.
44 |
45 |

Deutsch
1. Automatische Reinigung
RoboVac optimiert den Reinigungsweg durch die automatische Auswahl verschiedener Reinigungsmodi, bis die Reinigung abgeschlossen ist. Dies ist der am häufigsten verwendete Reinigungsmodus.
Drücken Sie  am RoboVac oder
  /
/ 
 auf der Fernbedienung, um die Reinigung im automatischen Modus zu starten.
-Der RoboVac kehrt automatisch zur Ladestation zurück, wenn die Akkuladung schwach oder die Reinigung abgeschlossen ist.
– Der RoboVac startet beim Einschalten standardmäßig im automatischen Reinigungsmodus.
BoostIQ™-Funktion
Wenn die BoostIQ™-Funktion aktiviert ist, erhöht der RoboVac automatisch die Saugkraft, wenn er feststellt, dass zur optimalen Reinigung eine höhere Leistung erforderlich ist. BoostIQ™ ist ideal für die Reinigung von dickeren Teppichen und stärkeren Verschmutzungen und verkürzt die Gesamtreinigungszeit, allerdings bei erhöhtem Geräuschpegel. Wenn Sie den erhöhten Geräuschpegel als störend empfinden, können Sie die BoostIQ-Funktion deaktivieren. Diese Funktion ist nur im automatischen und Schnellreinigungsmodus verfügbar.
Drücken Sie im automatischen und Schnellreinigungsmodus wiederholt |
auf der |
Fernbedienung, um die Saugkraft anzupassen. |
|
• Das entsprechende Symbol wird auf der Fernbedienung angezeigt.
Saugleistungspegel |
Signaltöne |
Standardleistung
BoostIQ™
(Standard, automatisches Wechseln zwischen Standardund erweiterter
Leistung)
Maximale Leistung
Beim nächsten Start im automatischen und Schnellreinigungsmodus reinigt der RoboVac automatisch mit der zuletzt ausgewählte Saugleistung.
Deutsch
2. Fleckenreinigung
Der RoboVac führt eine spiralförmige Intensivreinigung eines bestimmten Bereichs durch. Diese Funktion eignet sich für stark verschmutzte Stellen. Im Fleckenreinigungsmodus beendet der RoboVac die Reinigung nach 2 Minuten.
Drücken Sie  auf der Fernbedienung, um die Reinigung im Fleckenreinigungsmodus zu starten.
3. Kantenreinigung
Der RoboVac verringert seine Geschwindigkeit, wenn er eine Wand erkennt, und fährt dann an der Wand entlang, um für eine gründliche Kantenreinigung zu sorgen. Im Kantenreinigungsmodus reinigt der RoboVac 20 Minuten lang und kehrt dann zur Ladestation zurück.
Drücken Sie auf der Fernbedienung, um die Reinigung im Kantenreinigungsmodus zu starten.
46 |
47 |
Deutsch
4. Schnellreinigung
In diesem Modus beendet der RoboVac die Reinigung automatisch nach 30 Minuten und kehrt zur Ladestation zurück. Durch die Auswahl dieses Modus zur Reinigung kleinerer Räume oder Flächen sparen Sie Zeit und Strom.
Drücken Sie  auf der Fernbedienung, um den Schnellreinigungsmodus zu starten.
5. Manuelle Reinigung
Über die Richtungstasten auf der Fernbedienung können Sie den RoboVac bestimmte Bereiche reinigen lassen.
 Vorwärts
Nach links
Nach rechts
Rückwärts
Deutsch
Verwenden des Begrenzungsstreifens
Mit dem Begrenzungsstreifen können Sie den RoboVac von jedem Bereich oder Gegenstand fernhalten, der nicht vom RoboVac gereinigt werden soll. Der RoboVac erkennt den Begrenzungsstreifen und fährt nicht in den abgesperrten Bereich.
1.Ermitteln Sie den Bereich oder Gegenstand, dem der RoboVac nicht zu nahe kommen soll.
2.Kürzen Sie den Begrenzungsstreifen ggf. mit einer Schere. Messen Sie die erforderliche Länge sorgfältig ab, bevor Sie den Begrenzungsstreifen durchschneiden.
3. Verwenden Sie das im Lieferumfang enthaltene Klebeband, um den Begrenzungsstreifen flach auf den Boden zu legen. Stellen Sie sicher, dass der Streifen FLACH auf dem Boden oder unter einem Teppich platziert ist.
 1
1
2
-Wenn der Begrenzungsstreifen aufgerollt ist, entfernen Sie ihn und verlegen
Sie ihn dann mit Klebeband neu. Andernfalls könnte die Funktion der
Begrenzungsstreifen beeinträchtigt werden.
-Stellen Sie sicher, dass der Begrenzungsstreifen auf derselben Ebene wie der RoboVac verwendet wird.
-Achten Sie darauf, den Bodenbelag nicht mit Klebeband zu beschädigen. Von der Verwendung auf Teppichen wird abgeraten.
-Installieren Sie den Begrenzungsstreifen nicht in der Nähe von Hitzequellen.
48 |
49 |
Deutsch
Verwenden Ihres RoboVac mit Amazon Alexa / Google Assistant
Amazon Alexa oder der Google Assistant sind intelligente Sprachsteuerungsgeräte, über die Sie den RoboVac per Sprachbefehl bedienen können.
Bevor Sie beginnen, stellen Sie Folgendes sicher:
•Der RoboVac ist in die Ladestation eingesetzt, um zu gewährleisten, dass er ausreichend geladen ist.
•Der RoboVac ist mit der EufyHome-App verbunden.
•Sie haben ein Alexa-fähiges Gerät (z. B. eufy Genie, Amazon Echo, Echo Dot und Amazon Tap, Echo Show, Echo Spot) oder ein für den Google Assistant ausgelegtes Gerät (z. B. Google Home, Google Home Mini). Diese Geräte sind separat erhältlich.
•Die Amazon Alexa-App bzw. Google Home-App ist bereits auf Ihrem Smart-Gerät installiert, und Sie haben ein Konto erstellt.
So steuern Sie den RoboVac mit Amazon Alexa
 Öffnen Sie die Amazon Alexa-App und wählen Sie im Menü
  „Skills“ aus.
 Suchen Sie auf dem Skills-Bildschirm nach „EufyHome – RoboVac“.
 Wenn Sie den Skill „EufyHome - RoboVac“ gefunden haben, tippen Sie auf Aktivieren.
 Melden Sie sich mit Ihrem EufyHome-Konto an, damit Alexa Ihre RoboVac steuern kann.
  Erteilen Sie Alexa einfache Sprachbefehle.
Alexa, ask RoboVac to start cleaning.
Alexa, ask RoboVac to stop cleaning.
Alexa, ask RoboVac to go home.
Alexa, ask RoboVac to find my robot.
Deutsch
So steuern Sie den RoboVac mit dem Google Assistant
Sie können den RoboVac nun über den Google Assistant auf Geräten wie dem Google Home steuern.
 Öffnen Sie die Google Home-App.
Sagen Sie “Ok Google, sprich mit dem RoboVac“, damit das Gerät mit dem Google Assistant die Google-Aktion für den RoboVac initiiert.
Befolgen Sie die Anweisungen in der Google Home-App, um den Google Assistant für Ihr EufyHome-Konto zu autorisieren.
Um den RoboVac per Sprachbefehl zu steuern, erteilen Sie dem Google Assistant einfache Anweisungen.
Ok Google, ask RoboVac to start cleaning.
Ok Google, ask RoboVac to stop cleaning.
Ok Google, ask RoboVac to go home.
Ok Google, ask RoboVac to find my robot.
- Weitere Informationen über die Verwendung von Amazon Alexa / Google Assistant zum Steuern des RoboVac finden Sie unter https://www.eufylife.com „PRODUKTE“ > „Reinigung“ > „RoboVac 30C“.
50 |
51 |
Deutsch
Reinigung und Wartung
Beachten Sie die nachstehenden Anweisungen zur regelmäßigen Reinigung und Wartung, um die optimale Leistung des RoboVac zu erzielen. Die Reinigungs- / Austauschhäufigkeit richtet sich danach, wie Sie den RoboVac verwenden.
Empfohlene Reinigungs- / Austauschhäufigkeit
RoboVac-Bauteil |
Reinigungshäufigkeit |
Austauschhäufigkeit |
Staubbehälter |
Nach jedem Gebrauch |
- |
Filter |
Einmal pro Woche |
Alle 2 Monate |
Rotierende Bürste |
Einmal pro Woche |
Alle 6 bis 12 Monate |
Seitliche Bürsten |
Einmal pro Monat |
Alle 3 bis 6 Monate (oder bei sichtbarem |
|
|
Verschleiß) |
Bürstenschutz |
Einmal pro Monat |
Alle 3 bis 6 Monate (oder wenn der |
|
|
Silikonstreifen am Bürstenschutz sichtbaren |
|
|
Verschleiß aufweist) |
Sensoren |
Einmal pro Monat |
- |
Ladekontaktstifte |
Einmal pro Monat |
- |
Schwenkrad |
Einmal pro Monat |
- |
Reinigen von Staubbehältern und Filtern
Drücken Sie die Entriegelungstaste des Staubbehälters, um den Staubbehälter zu entnehmen.
Öffnen und entleeren Sie den Staubbehälter.
1 |
2 |
Entfernen Sie den Vorfilter, indem Sie wie abgebildet an den Haken ziehen.
Deutsch
Nehmen Sie den Schaumstofffilter und den Hochleistungsfilter heraus.
Reinigen Sie den Staubbehälter und die Filter mit einem Staubsauger oder einer Reinigungsbürste.
Setzen Sie Filter und Vorfilter wieder in den Staubbehälter ein.
Setzen Sie den Staubbehälter wieder in das Hauptgerät ein.
Staubbehälter, Vorfilter und Schaumstofffilter können mit Wasser ausgespült werden. Achten Sie darauf, alle Teile vor dem Wiedereinbau vollkommen trocknen zu lassen. Waschen Sie den Hochleistungsfilter nicht mit Wasser, denn dies kann zu Schäden am Filter und somit zur Beeinträchtigung der Saugkraft führen.
Reinigen der rotierenden Bürste
Ziehen Sie an den Entriegelungslaschen, um den Bürstenschutz wie in der Abbildung dargestellt zu entsperren.
Heben Sie die rotierende Bürste ab.
Reinigen Sie die rotierende Bürste mit der Reinigungsdüse aus dem Lieferumfang oder mit einem Staubsauger.
52 |
53 |
Deutsch
Setzen Sie die rotierende Bürste wieder ein, indem Sie die Seite mit dem Fortsatz zuerst einführen und die rotierende Bürste dann einrasten lassen.
Setzen Sie den Bürstenschutz unter sanften Druck nach unten wieder auf.
1 |
2 |
3 |
4 |
5 |
Reinigen der seitlichen Bürsten
In den seitlichen Bürsten können sich Fremdkörper wie Haare und Schmutz verfangen. Aus diesem Grund müssen sie regelmäßig gereinigt werden.
Entfernen Sie die Seitenbürsten.
Lösen und entfernen Sie sorgfältig Haare oder Fäden, die sich zwischen dem Hauptgerät und den seitlichen Bürsten verfangen haben.
Verwenden Sie ein mit warmem Wasser angefeuchtetes Tuch, um Staub von den Bürsten zu entfernen oder um Verformungen vorsichtig zu auszugleichen.
Deutsch
Lassen Sie die seitlichen Bürsten stets vollkommen austrocknen, bevor Sie sie verwenden.
Auswechseln der seitlichen Bürsten
Durch längeren Gebrauch können die seitlichen Bürsten verformt oder beschädigt werden. Gehen Sie zum Auswechseln der seitlichen Bürsten wie nachstehend beschrieben vor.
Ziehen Sie die alten seitlichen Bürsten ab, und lassen Sie die neuen seitlichen Bürsten einrasten.
Reinigen der Sensoren und Ladekontaktstifte
Im Interesse der beeinträchtigungsfreien Leistung sollten die Sturzsensoren und Ladekontaktstifte regelmäßig gereinigt werden.
•Entfernen Sie Staub mit einem Tuch oder einer weichen Reinigungsbürste von den Sturzsensoren und Ladekontaktstiften.
54 |
55 |
Deutsch
Reinigen des Schwenkrads
Haare oder Staubpartikel können sich leicht im Schwenkrad verfangen. Reinigen Sie das Schwenkrad daher regelmäßig und nach Bedarf.
Rad 

Achse 


Ziehen Sie das Schwenkrad ab.
Entfernen Sie Haare oder Rückstände, die sich um das Rad gewickelt oder im Radgehäuse verfangen haben.
Setzen Sie das Rad wieder auf und lassen Sie es unter sanftem Druck einrasten.
- Sie können das Schwenkrad mit Wasser reinigen.
- Lassen Sie das Schwenkrad vollkommen trocknen, bevor Sie es verwenden.
Deutsch
Fehlerbehebung
Probleme |
Lösungen |
|
|
• Stellen Sie sicher, dass der Netzschalter eingeschaltet ist |
|
|
||
|
(Position „ON“). |
|
Der RoboVac kann |
• Vergewissern Sie sich, dass der Akku vollständig aufgeladen ist. |
|
• Ersetzen Sie die Batterien (2 x AAA) in der Fernbedienung. |
||
nicht aktiviert |
||
• Stellen Sie sicher, dass sich die Fernbedienung in Reichweite |
||
werden. |
||
(5 m) des RoboVac befindet. |
||
|
||
|
• Falls das Problem weiterhin besteht, schalten Sie den |
|
|
Netzschalter aus und wieder ein. |
|
Die Fernbedienung |
• Ersetzen Sie die Batterien in der Fernbedienung. |
|
• Stellen Sie sicher, dass der RoboVac eingeschaltet und |
||
funktioniert nicht. |
||
vollständig aufgeladen ist. |
||
|
||
|
|
|
|
• Prüfen Sie, ob der RoboVac an einem Hindernis eingeklemmt |
|
Der RoboVac stellt |
ist. |
|
• Prüfen Sie, ob der Akkustand zu niedrig ist. |
||
plötzlich den Betrieb |
||
ein. |
• Falls das Problem weiterhin besteht, schalten Sie den |
|
Netzschalter aus, warten Sie 2 Sekunden und schalten Sie ihn |
||
|
||
|
dann wieder ein. |
|
|
|
|
|
• Stellen Sie sicher, dass der Netzschalter an der Unterseite des |
|
|
RoboVac eingeschaltet ist. |
|
|
• Sie können die Uhrzeit und die geplante Reinigungszeit über die |
|
|
EufyHome-App einstellen. |
|
Es kann kein Zeitplan |
• Überprüfen Sie, ob die geplante Zeit korrekt eingestellt wurde. |
|
für die Reinigung |
• Prüfen Sie, ob der Akkustand des RoboVac zu niedrig ist, um |
|
mit der Reinigung zu beginnen. |
||
aufgestellt werden. |
||
• Die Reinigungszeitpläne werden gelöscht, wenn der |
||
|
||
|
RoboVac ausgeschaltet wird. Wenn der RoboVac ohne |
|
|
Internetverbindung eingeschaltet wird, werden die |
|
|
Reinigungszeitpläne nicht synchronisiert und müssen über die |
|
|
App zurückgesetzt werden. |
|
|
• Überprüfen Sie, ob der Ansaugeinlass durch Fremdkörper |
|
|
blockiert wird. |
|
Die Saugleistung ist |
• Entleeren Sie den Staubbehälter. |
|
• Reinigen Sie die Filter mit einem Staubsauger oder einer |
||
schwach. |
Reinigungsbürste. |
|
|
• Überprüfen Sie, ob die Filter aufgrund von Wasser oder anderen |
|
|
Flüssigkeiten auf dem Boden feucht sind. Lassen Sie die Filter |
|
|
vor der Verwendung vollständig austrocknen. |
|
|
|
|
|
• Prüfen Sie, ob die Anzeige an der Ladestation leuchtet. Ist dies |
|
|
nicht der Fall, wenden Sie sich an das eufy Service Center, um |
|
Der RoboVac kann |
die Ladestation reparieren oder ersetzen zu lassen. |
|
• Entstauben Sie die Ladekontaktstifte mit einem trockenen Tuch. |
||
nicht aufgeladen |
||
• Überprüfen Sie, ob Sie einen Signalton hören können, wenn |
||
werden. |
||
der RoboVac an der Ladestation angedockt ist. Ist dies nicht |
||
|
||
|
der Fall, wenden Sie sich an das eufy Service Center, um die |
|
|
Ladestation reparieren oder ersetzen zu lassen. |
56 |
57 |
 Loading...