

Page 1
Anker Innovations Limited. All rights reserved. eufy Security and eufy Security Logo are
trademarks of Anker Innovations Limited, registered in the United States and other
countries. All other trademarks are the property of their respective owners.
51005002218 V01
QUICK
START GUIDE
eufy Indoor Cam 2K Pan & Tilt
Page 2
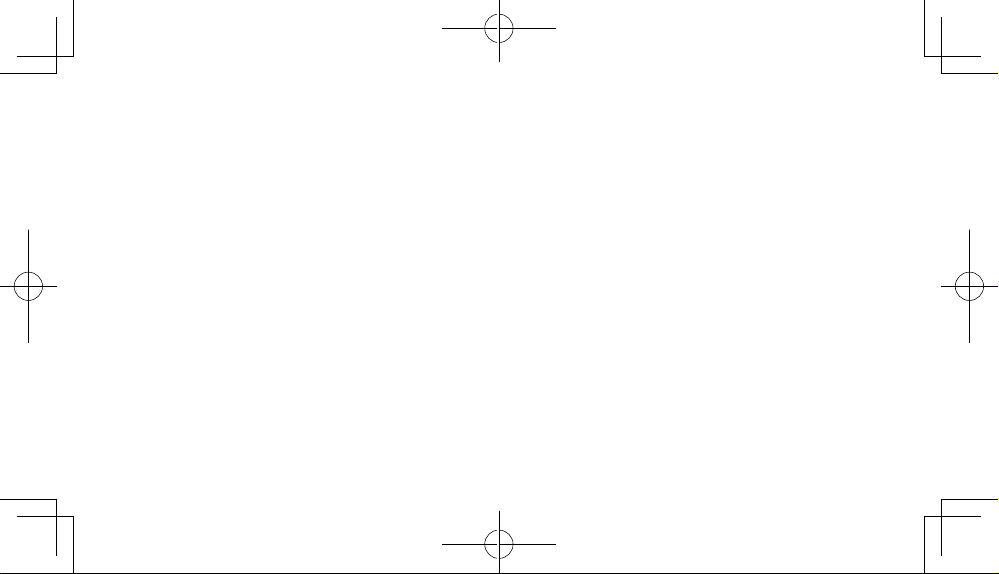
Table of Contents
What’s Included 01
Product Overview 02
Setting up the System 03
Mounting the Indoor Cam 05
Powering on the Indoor Cam 10
Notice 11
Customer Service 16
Page 3
WHAT’S INCLUDED
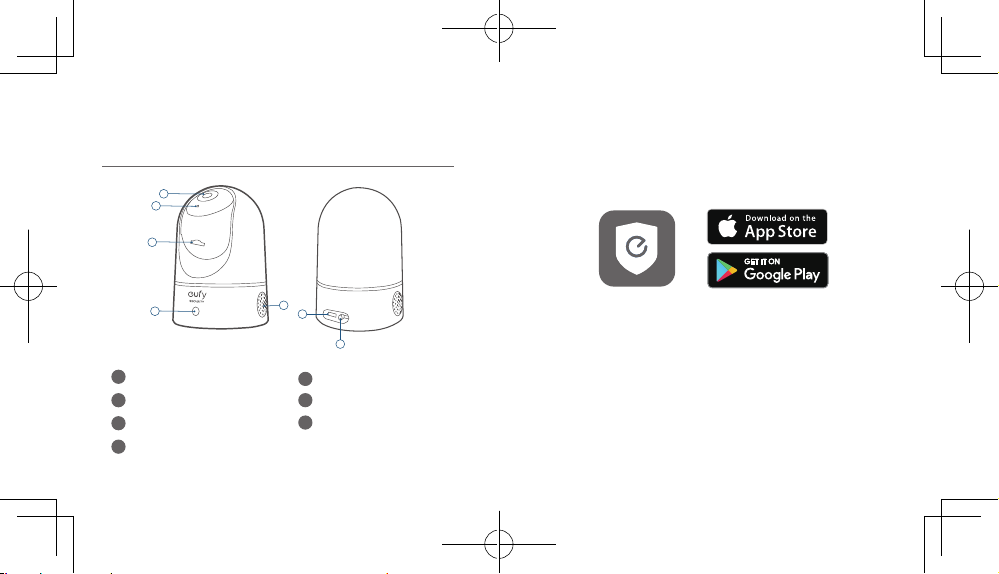
PRODUCT OVERVIEW
eufy Indoor Cam 2K Pan & Tilt × 1
Model: T8410
Mounting Plate × 1
USB Cable × 1
USB Adapter × 1
Mounting Screw Pack × 1
User Manual × 1
English
eufy Indoor Cam 2K Pan & Tilt
1
2
3
5
6
1
Lens
Microphone
2
SD card slot
3
Status LED
4
4
7
Speaker
5
6
Power input
7
SYNC button
English
0201
Page 4
SETTING UP THE SYSTEM
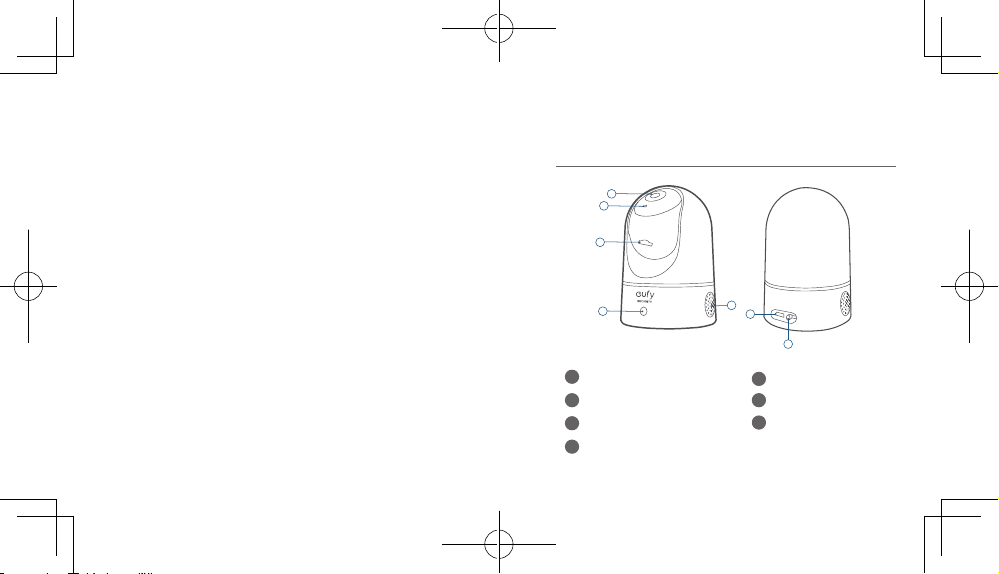
1. Download the eufy Security app from the App Store
(iOS devices) or Google Play (Android devices).
2. Sign up a eufy Security account. Go to the app
homepage. Tap
Pan 2K to your system.
3. Follow the on-screen instructions to complete the
setup.
English
Add Device
, and add the IndoorCam
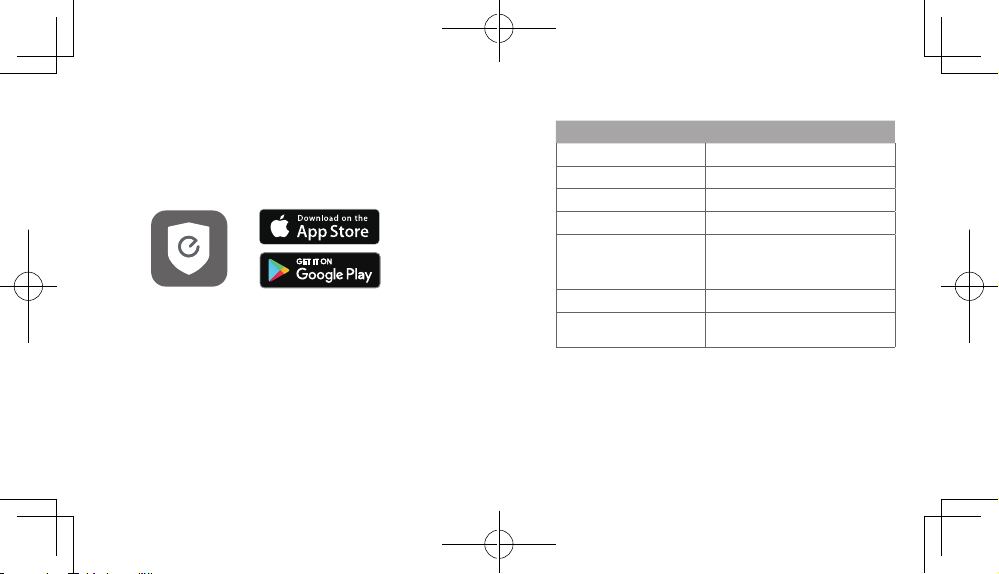
LED Status
LED Status Description
Breathing blue Ready for setup
Solid blue Powered on and working properly
Blinking red Disconnected from the internet
Blinking red once Motion or sound detected
Solid red
Solid bluish violet System is initializing
Flashing blue and red
alternately
Working properly with someone
viewing the live stream or
recording event
Firmware upgrade in progress
English
0403
Page 5
MOUNTING THE INDOOR CAM
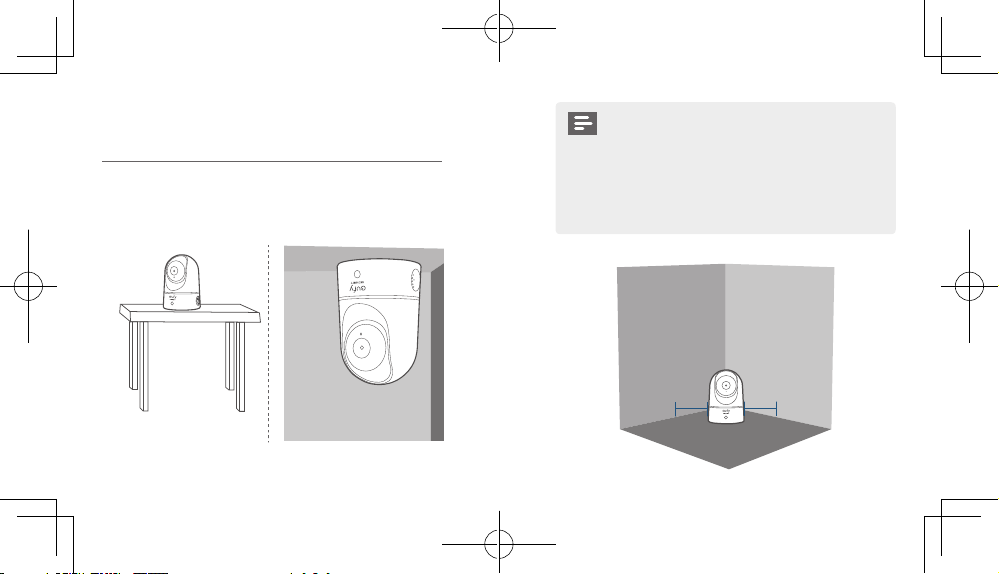
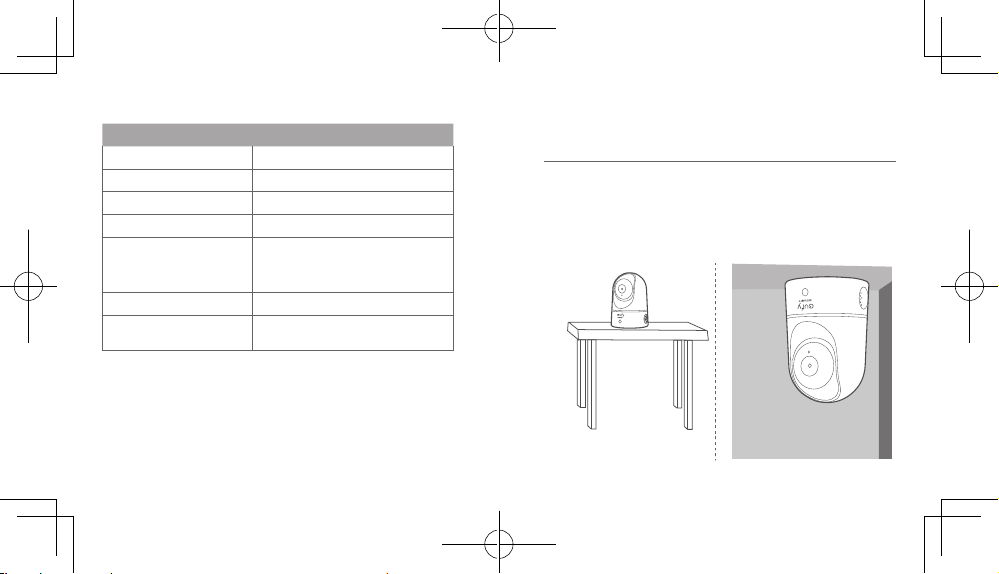
Select a Location for Mounting
The camera can be placed on a table, shelf, or can be mounted
on a wall or ceiling. Select a location and height where you can
get the desired view, and can reach a power outlet easily.
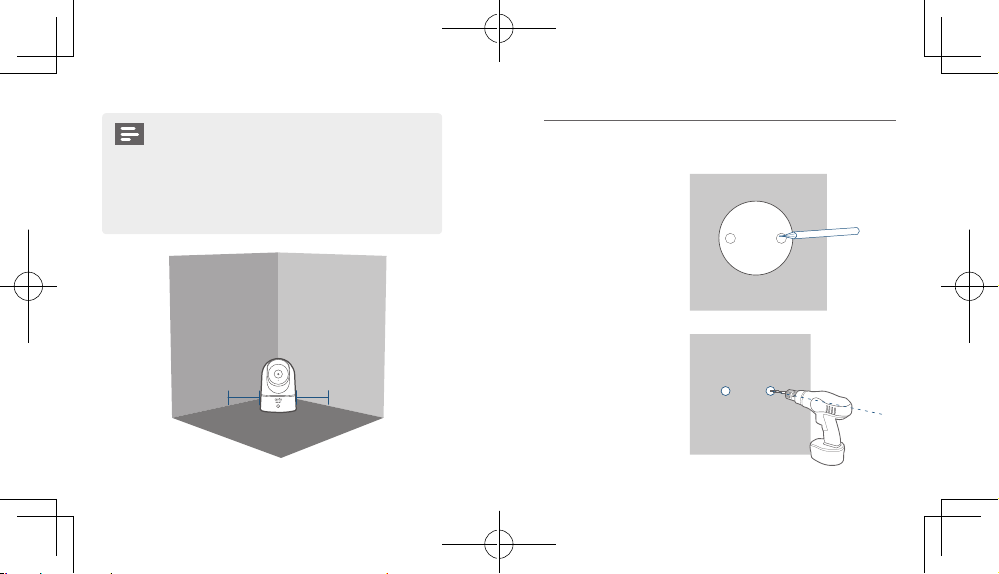
• Disconnect the Indoor Cam from the power
outlet before mounting.
• Keep the eufy Indoor Cam at least 0.7 ft / 20 cm
away from walls or anything that may obstruct the
view. Do this to avoid infrared reection which
can have a negative impact on the night vision
performance.
English
> 20CM
> 20CM
English
0605
Page 6
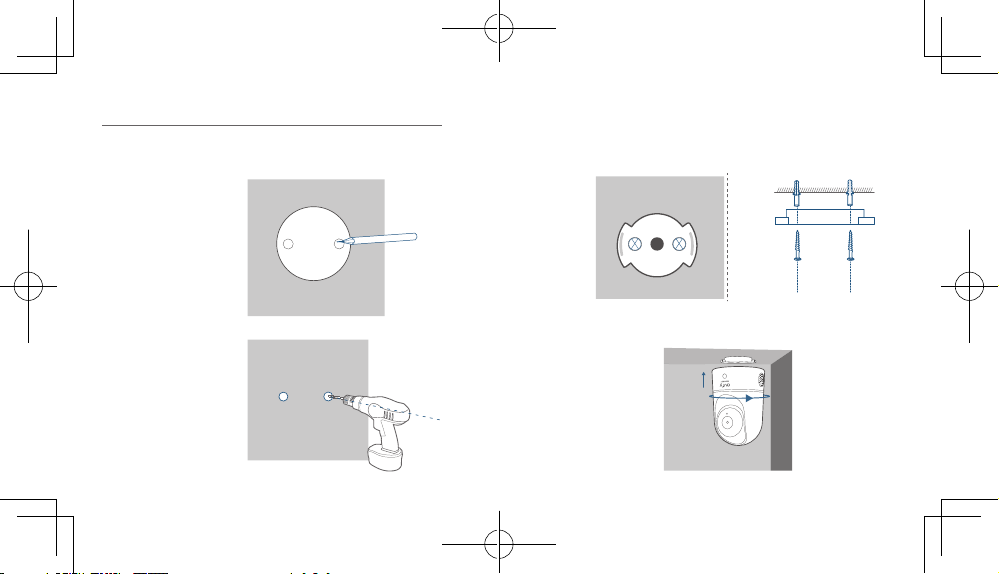
Mount the Indoor Camera
To mount the eufy Indoor Cam on the ceiling, follow the steps
below:
1. Place the positioning
card against the
ceiling and then
mark the points at
which drilling will be
required.
2. Drill holes with a
5/16” (8 mm) drill
bit.
English
Ceiling
Ceiling
3. Align the holes on the mounting plate with those in the
ceiling. Insert the anchors into the holes; anchors are
necessary for walls that are made out of hard materials such
as concrete, brick, or stucco. Fix the screws with a Phillipshead screwdriver to fasten the mounting plate to the ceiling.
Ceiling
4. Align the grooves with the mounting plate and rotate the eufy
Indoor Cam clockwise until it clicks into place.
Ceiling
English
0807
Page 7
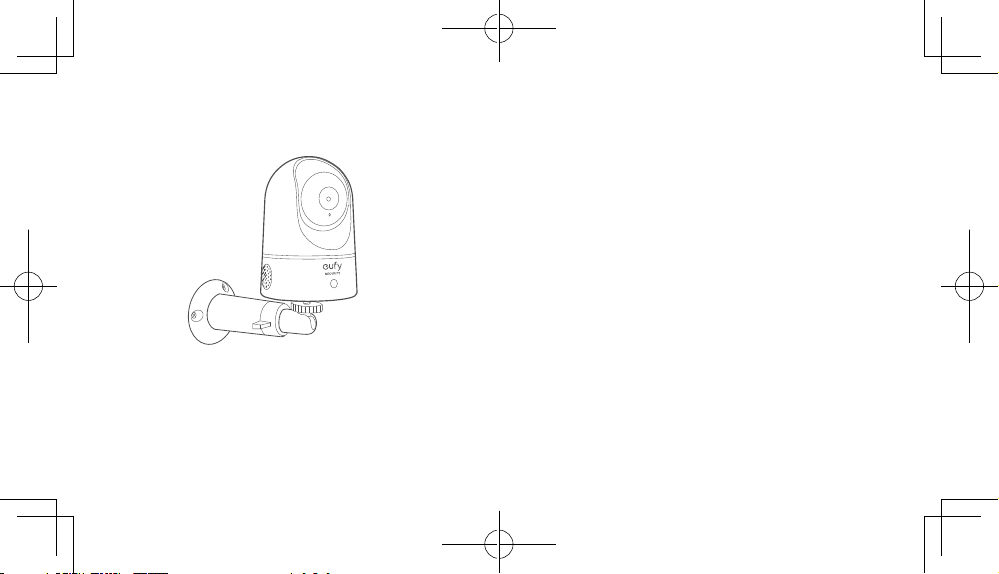
To mount the eufy Indoor Cam on a wall, we recommend using
the mounting bracket (not provided) as the illustration below.
English
POWERING ON THE INDOOR CAM
Connect the eufy Indoor Cam to a power outlet using the
provided USB cable and USB adapter. After being powered on,
the eufy Indoor Cam will be connected to the system. When it
is successfully connected, the status LED will turn solid blue.
Rotate the eufy Indoor Cam to adjust the view and check it
using the live stream which you can access in the eufy Security
app. You are now all set to use your eufy Indoor Cam.
Tip:
For troubleshooting, check Help on the eufy Security app. Refer
to the app page for LED indicator status.
English
1009
Page 8
NOTICE
FCC Statement
This device complies with Part 15 of the FCC Rules. Operation
is subject to the following two conditions: (1) this device may
not cause harmful interference, and (2) this device must accept
any interference received, including interference that may cause
undesired operation.
Warning:
Changes or modications not expressly approved by the
party responsible for compliance could void the user's authority
to operate the equipment.
Note:
This equipment has been tested and found to comply
with the limits for a Class B digital device, pursuant to Part 15 of
the FCC Rules. These limits are designed to provide reasonable
protection against harmful interference in a residential installation.
This equipment generates uses and can radiate radio frequency
energy and, if not installed and used in accordance with
the instructions, may cause harmful interference to radio
communications. However, there is no guarantee that interference
will not occur in a particular installation. If this equipment does
cause harmful interference to radio or television reception, which
can be determined by turning the equipment off and on, the user
is encouraged to try to correct the interference by one or more
of the following measures: (1) Reorient or relocate the receiving
English
antenna. (2) Increase the separation between the equipment and
receiver. (3) Connect the equipment into an outlet on a circuit
different from that to which the receiver is connected. (4) Consult
the dealer or an experienced radio/ TV technician for help.
FCC Radio Frequency Exposure Statement
The device has been evaluated to meet general RF exposure
requirements. The device can be used in xed/mobile exposure
condition. The min separation distance is 20cm.
Notice: Shielded cables
All connections to other computing devices must be made using
shielded cables to maintain compliance with FCC regulations.
The following importer is the responsible party
Company Name: POWER MOBILE LIFE, LLC
Address: 400 108th Ave NE Ste 400, Bellevue, WA 98004-5541
Telephone:1-800-988-7973
This product complies with the radio interference
requirements of the European Community.
Declaration of Conformity
Hereby, Anker Innovations Limited declares that this device is in
compliance with the essential requirements and other relevant
provisions of Directive 2014/53/EU.For the declaration of
conformity, visit the Web site:https://www.eufylife.com/.
1211
English
Page 9
This product can be used across EU member states.
Due to the used enclosure material, the product shall only be
connected to a USB Interface of version 2.0 or higher.
The adapter shall be installed near the equipment and shall be
easily accessible.
Do not use the Device in the environment at too high or too low
temperature, never expose the Device under strong sunshine or
too wet environment.
The suitable temperature for T8410 and accessories is 0°C-40°C.
When charging, please place the device in an environment that has
a normal room temperature and good ventilation.
It is recommended to charge the device in an environment with a
temperature that ranges from 5°C~25°C
Please ensure to use only the charger offered by the manufacturer.
Using unauthorized charger may cause danger and violate the
authorization of the device and the guarantee article.
This charger is for indoor use only.
The charger type is TEKA012-0502000EU , output voltage/current
is 5Vdc/2A. The plug considered as disconnect device of adapter.
RF exposure information: The Maximum Permissible Exposure
(MPE) level has been calculated based on a distance of d=20 cm
between the device and the human body. To maintain compliance
with RF exposure requirement, use product that maintain a 20cm
distance between the device and human body.
English
CAUTION RISK OF EXPLOSION IF BATTERY IS REPLACED
BY AN INCORRECT TYPE. DISPOSE OF USED BATTERIES
ACCORDING TO THE INSTRUCTIONS
Wi-Fi Operating Frequency Range:2412~2472MHz ; Wi-Fi Max
Output Power:14.46dBm(ERIP)
Bluetooth Operating Frequency Range:2402~2480MHz; Bluetooth
Max Output Power:0.64dBm(EIRP)
The following importer is the responsible party (contact for EU
matters only)
Importer: Anker Technology (UK) Ltd
Importer Address: Suite B, Fairgate House, 205 Kings Road, Tyseley,
Birmingham, B11 2AA, United Kingdom
This product is designed and manufactured with high
quality materials and components, which can be recycled
and reused.
This symbol means the product must not be discarded
as household waste, and should be delivered to an
appropriate collection facility for recycling. Proper
disposal and recycling helps protect natural resources,
human health and the environment. For more information
on disposal and recycling of this product, contact your
local municipality, disposal service, or the shop where you
bought this product.
English
1413
Page 10
IC Statement
This device complies with Industry Canada licence-exempt RSS
standard(s). Operation is subject to the following two conditions:
(1) this device may not cause interference, and
(2) this device must accept any interference, including interference
that may cause undesired operation of the device."
Le présent appareil est conforme aux CNR d'Industrie Canada
applicables aux appareils radio exempts de licence. L'exploitation
est autorisée aux deux conditions suivantes:
(1) l'appareil nedoit pas produire de brouillage, et
(2) l'utilisateur de l'appareil doit accepter tout brouillage
radioélectrique subi, même si le brouillage est susceptible d'en
compromettre le fonctionnement."
This Class B digital apparatus complies with Canadian ICES-003.
Cet appareil numérique de la classe B est conforme à la norme
NMB-003 du Canada.
IC RF Statement:
When using the product, maintain a distance of 20cm from the
body to ensure compliance with RF exposure requirements.
Lors de l'utilisation du produit, maintenez une distance de 20
cm du corps an de vous conformer aux exigences en matière
d'exposition RF.
English
CUSTOMER SERVICE
• Warranty
12-month Limited Warranty
• Call Us
United States +1 (800) 988 7973 Mon-Fri 9AM-5PM (PT)
United Kingdom +44 (0) 1604 936 200 Mon-Fri 6AM-11AM
(GMT)
Germany +49 (0) 69 9579 7960 Mon-Fri 6:00-11:00
• Email Us
Customer Support: support@eufylife.com
Anker Innovations Limited
Room 1318-19,Hollywood Plaza,610 Nathan
Road,Mongkok,Kowloon,Hong Kong
English
1615
Page 11
Inhaltsverzeichnis
IM LIEFERUMFANG
Im Lieferumfang 18
Produktübersicht 19
Einrichten des Systems 20
Montage der Indoor Cam 22
Einschalten der Indoor Cam 27
Kundendienst 29
1 eufy Indoor Cam 2K Pan & Tilt
Modell:T8410
1 Montageplatte
1 USB-Ladekabel
1 USB-Netzteil
1 Paket Befestigungsschrauben
1 Benutzerhandbuch
Deutsch 18
Page 12
PRODUKTÜBERSICHT
EINRICHTEN DES SYSTEMS
eufy Indoor Cam 2K Pan & Tilt
1
2
3
4
5
6
7
1. Laden Sie die eufy Security-App aus dem App Store
(iOS-Geräte) oder bei Google Play (Android) herunter.
2. Richten Sie ein eufy Security-Konto ein. Navigieren
Sie zur Startseite der App.Tippen Sie auf "Gerät
hinzufügen", und fügen Sie die IndoorCam Pan 2K zu
1
Objektiv
Mikrofon
2
SD-Kartensteckplatz
3
Status-LED
4
19 Deutsch Deutsch 20
Lautsprecher
5
6
Stromeingang
7
SYNC-Taste
Ihrem System hinzu.
3. Befolgen Sie die Bildschirmanweisungen, um die
Einrichtung abzuschließen.
Page 13
LED-Status
LED-Status Beschreibung
Blau an-/abschwellend Bereit zur Einrichtung
Leuchtet blau Eingeschaltet und in Funktion
Blinkt rot Vom Internet getrennt
Blinkt einmal rot Bewegung oder Geräusch erkannt
Leuchtet rot
Leuchtet blau-violett System wird initialisiert
Blinkt abwechselnd blau
und rot
21 Deutsch Deutsch 22
In Funktion, Live-Stream oder die
Aufzeichnung eines Ereignisses wird
betrachtet
Firmware-Aktualisierung wird
durchgeführt
MONTAGE DER INDOOR CAM
Auswählen des Montageorts
Die Kamera kann auf einem Tisch oder in einem Regal aufgestellt
oder an der Wand oder Decke montiert werden. Wählen Sie einen
Standort nahe an einer Steckdose und eine Höhe aus, von wo aus
Sie die gewünschte Ansicht erhalten.
Page 14
Montage der Indoor Cam
• Trennen Sie die Indoor Cam vor der Montage von
der Steckdose.
• Halten Sie die eufy Indoor Cam mindestens 20 cm
von Wänden oder allen anderen Objekten entfernt,
die die Sicht behindern könnten. Dies ist erforderlich,
um Infrarot-Reexionen zu vermeiden, die sich
negativ auf die Nachtsichtleistung auswirken können.
> 20CM
> 20CM
23 Deutsch Deutsch 24
Um die eufy Indoor Cam an der Decke zu montieren, führen Sie
die folgenden Schritte aus:
1. Halten Sie die
Montageschablone
gegen die Decke und
markieren Sie dann
die Punkte, an denen
gebohrt werden
muss.
2. Bohren Sie die
Löcher mit einem
8-mm-Bohrer.
Ceiling
Ceiling
Page 15

3. Richten Sie die Löcher in der Montageplatte mit denen in der
Decke aus.Setzen Sie die Dübel in die Löcher ein. Dübel sind
für Wände erforderlich, die aus einem harten Material wie
Beton, Ziegel oder Gips bestehen. Ziehen Sie die Schrauben mit
einem Kreuzschlitzschraubendreher an, um die Montageplatte
an der Decke zu befestigen.
Ceiling
4. Richten Sie die Nuten mit der Montageplatte aus und drehen
Sie die eufy Indoor Cam im Uhrzeigersinn, bis sie einrastet.
Ceiling
Zur Montage der eufy Indoor Cam an einer Wand empfehlen wir
die Verwendung der Montagehalterung (nicht mitgeliefert) wie in
der Abbildung unten dargestellt.
25 Deutsch Deutsch 26
Page 16

EINSCHALTEN DER INDOOR CAM
Schließen Sie die eufy Indoor Cam mit dem mitgelieferten USBKabel und dem USB-Adapter an eine Steckdose an. Nach dem
Einschalten wird die eufy Indoor Cam mit dem System verbunden.
Wenn die Verbindung erfolgreich hergestellt wurde, leuchtet die
Status-LED blau.
Drehen Sie die eufy Indoor Cam, um die Ansicht anzupassen und
überprüfen Sie die Einstellung im Live-Stream, auf den Sie in der
eufy Security App zugreifen können. Sie können Ihre eufy Indoor
Cam nun verwenden.
Dieses Produkt ist mit hochwertigen Materialien und
Komponenten für Recycling und Wiederverwertung
konzipiert.
Dieses Symbol bedeutet, dass das Produkt nicht
als Hausmüll entsorgt werden darf, sondern einer
angemessenen Sammelstelle für das Recycling zugeführt
werden muss. Durch das ordnungsgemäße Entsorgen und
Recyceln tragen Sie zum Schutz natürlicher Ressourcen und
zur Vermeidung von Umwelt- und Gesundheitsschäden bei.
Weitere Informationen zum Entsorgen und Recyceln dieses
Produkts erhalten Sie von Ihrer Gemeindeverwaltung, Ihrem
zuständigen Entsorgungsdienst oder dem Geschäft, in dem
Sie dieses Produkt erworben haben.
Tipp:
Tipps zur Fehlerbehebung nden Sie in der Hilfe der eufy SecurityApp. Informationen zum Status der LED-Anzeige nden Sie auf der
App-Seite.
27 Deutsch Deutsch 28
Page 17

KUNDENDIENST
• Garantie
12Monate eingeschränkte Garantie
• Rufen Sie uns an
USA +1 800 988 7973, Mo-Fr 9.00-17.00 Uhr (PT)
Großbritannien +44 1604 936 200, Mo-Fr 06.00-11.00 Uhr (GMT)
Deutschland +49 69 9579 7960, Mo-Fr 6:00–11:00 Uhr
• Senden Sie uns eine E-Mail
Kunden-Support: support@eufylife.com
29 Deutsch
Tabla de contenido
Contenido 31
Descripción del producto 32
Conguración del sistema 33
Instalación de la cámara de interior 35
Encendido de la cámara de interior 40
Servicio de atención al cliente 42
Page 18

CONTENIDO
DESCRIPCIÓN DEL PRODUCTO
1 cámara de interior 2K eufy con desplazamiento vertical y lateral
Model
T8410
o:
1 placa de montaje
1 cable USB
1 adaptador USB
1 paquete de tornillos de montaje
Cámara de interior 2K eufy con desplazamiento
vertical y lateral
1
2
3
1 Manual del usuario
4
1
Lente
Micrófono
2
Ranura para tarjetas SD
3
LED de estado
4
5
6
7
Altavoz
5
6
Entrada de alimentación
7
Botón Sincronizar
31 Español Español 32
Page 19

CONFIGURACIÓN DEL SISTEMA
Estado de LED
Estado de LED Descripción
1. Descargue la aplicación eufy Security desde la
App Store (dispositivos iOS) o Google Play (dispositivos
Android).
2. Regístrese para crear una cuenta eufy Security. Vaya
a la página de inicio de la aplicación.Toque Añadir
dispositivo y añada la cámara de interior 2K al sistema.
Parpadeo azul Listo para congurar
Azul jo
Rojo intermitente Sin conexión a Internet
Rojo intermitente (una vez) Movimiento o sonido detectado
Rojo jo
Violeta jo Inicialización del sistema en curso
Parpadeo azul y rojo
alternativamente
Encendido y en funcionamiento
correcto
Funcionamiento correcto con un
usuario visualizando las imágenes en
tiempo real o grabando un evento
Actualización de rmware en curso
3. Siga las instrucciones en pantalla para completar la
conguración.
33 Español Español 34
Page 20

INSTALACIÓN DE LA CÁMARA DE
INTERIOR
Seleccione una ubicación para la instalación
La cámara se puede colocar sobre una mesa o estantería, o
instalarse en la pared o en el techo. Seleccione una ubicación y
altura desde las que pueda obtener la vista deseada y alcanzar una
toma de corriente sin problemas.
• Desconecte la cámara de interior de la toma de
corriente antes de proceder a la instalación.
• Mantenga la cámara de interior eufy a una distancia
mínima de 20 cm de paredes o cualquier objeto
que pueda obstruir la vista. Realice esto para evitar
el reejo infrarrojo, que puede tener un efecto
negativo sobre el rendimiento de visión nocturna.
> 20CM
35 Español Español 36
> 20CM
Page 21

Instale la cámara de interior
Para montar la cámara de interior eufy en el techo, siga los pasos a
continuación:
1. Coloque la tarjeta
de posicionamiento
contra el techo
y, a continuación,
marque los puntos
donde se deberán
taladrar los oricios.
2. Taladre los oricios
con una broca de
8 mm (5/16”).
Ceiling
Ceiling
3. Alinee los oricios de la placa de montaje con los oricios
taladrados en el techo. Inserte los tacos dentro de los oricios;
es necesario utilizar los tacos en paredes que están hechas con
materiales duros, como hormigón, ladrillo o estuco. Apriete
los tornillos con un destornillador Phillips para jar la placa de
montaje al techo.
Ceiling
4. Alinee las ranuras de la placa de montaje y gire la cámara de
interior eufy en sentido de las agujas del reloj hasta que encaje
en su lugar.
Ceiling
37 Español Español 38
Page 22

Para instalar la cámara de interior eufy en la pared, se recomienda
utilizar el soporte de montaje (no suministrado), como se indica
en la siguiente ilustración.
ENCENDIDO DE LA CÁMARA DE
INTERIOR
Conecte la cámara de interior eufy a una toma de corriente
mediante el uso del cable USB y el adaptador USB suministrados.
Una vez encendida, la cámara de interior eufy se conectará al
sistema. Cuando se haya conectado correctamente, el LED de
estado se iluminará en color azul jo.
Gire la cámara de interior eufy para ajustar la vista y compruébela
mediante las imágenes en tiempo real, que se pueden visualizar
a través de la aplicación eufy Security. Ya está listo para utilizar la
cámara de interior eufy.
Consejo:
Para solucionar problemas, consulte la sección Ayuda de la
aplicación eufy Security. Visite la página de la aplicación para
consultar el estado del indicador LED.
39 Español Español 40
Page 23

Este producto se ha diseñado y fabricado con materiales
y componentes de gran calidad que pueden reciclarse y
reutilizarse.
Este símbolo indica que el producto no debe desecharse
como residuo doméstico, sino que debe depositarse en
unas instalaciones de recogida adecuadas para su reciclaje.
La eliminación y el reciclaje adecuados ayudan a proteger
los recursos naturales, la salud humana y el medio ambiente.
Para obtener más información acerca de la eliminación
y el reciclaje de este producto, póngase en contacto con
su ayuntamiento, el servicio de retirada de desechos o la
tienda donde compró el producto.
SERVICIO DE ATENCIÓN AL CLIENTE
• Garantía
Garantía limitada de 12meses
• Contacto por teléfono
EE. UU.: +1 (800) 988 7973, de lunes a viernes, de 9:00 a 17:00 h (PT)
Reino Unido: +44 (0) 1604 936 200, de lunes a viernes, de 6:00 a
11:00 h (GMT)
Alemania: +49 (0) 69 9579 7960, de lunes a viernes, de 6:00 a 11:00 h
• Contacto por correo electrónico
Servicio de atención al cliente: support@eufylife.com
41 Español Español 42
Page 24

Sommaire
CONTENU
Contenu 44
Présentation du produit 45
Conguration du système 46
Fixation de la caméra intérieure 48
Alimentation de la caméra intérieure 53
Service clientèle 54
eufy Indoor Cam 2K Pan et incl. × 1
Model:T8410
Support de xation × 1
Câble USB × 1
Adaptateur USB × 1
Lot de vis de montage × 1
Manuel utilisateur × 1
Français 44
Page 25

PRÉSENTATION DU PRODUIT
CONFIGURATION DU SYSTÈME
eufy Indoor Cam 2K Pan et incl.
1
2
3
4
5
6
7
1. Téléchargez l'application eufy Security sur l'App Store
(appareils iOS) ou Google Play (Android).
2. Inscrivez-vous à un compte eufy Security. Rendezvous sur la page d'accueil de l'application.Appuyez sur
Ajouter un appareil, puis ajoutez l'IndoorCam Pan 2K à
1
Objectif
Microphone
2
Logement de carte SD
3
LED d'état
4
45 Français Français 46
Haut-parleur
5
6
Entrée d'alimentation
7
Bouton SYNC
votre système.
3. Suivez les instructions à l'écran pour effectuer le
processus de conguration.
Page 26

État LED
État LED Description
Bleu clignotant lentement Prêt pour la conguration
Bleu xe Allumé et fonctionne correctement
Rouge clignotant Déconnecté d'Internet
Rouge clignotant une fois Mouvement ou son détecté
Rouge xe
Bleu-violet xe Initialisation du système
Voyant clignotant en bleu
et rouge alternativement
47 Français Français 48
Fonctionne correctement, une
personne consulte le ux en direct
ou enregistre un événement
Mise à niveau du rmware en cours
FIXATION DE LA CAMÉRA
INTÉRIEURE
Trouver un emplacement pour le montage
La caméra peut être placée sur une table ou une étagère, ou être
xée sur un mur ou au plafond. Sélectionnez un emplacement et
une hauteur vous fournissant la vue de votre choix, à portée d'une
prise.
Page 27

• Déconnectez la caméra intérieure de la prise avant
de la xer.
• Maintenez une distance d'au moins 20 cm/0,7 pi
entre la caméra intérieure eufy et des murs
ou tout élément pouvant obstruer la vue. Cela
permet d'éviter toute réexion infrarouge qui
peut avoir un impact négatif sur les performances
de vision de nuit.
> 20CM
> 20CM
Fixation de la caméra intérieure
Pour monter la caméra intérieure eufy au plafond, suivez les étapes
ci-dessous :
Ceiling
1. Placez la carte de
positionnement
au plafond, puis
marquez les points
où percer.
Ceiling
2. Percez des trous
avec une mèche de
8 mm (5/16 po).
49 Français Français 50
Page 28

3. Alignez les trous sur la plaque de montage à ceux du plafond.
Insérez les ancrages dans les trous ; les ancrages sont
nécessaires pour les murs faits de matériaux durs tels que
le béton, la brique ou le stuc. Fixez les vis avec un tournevis
cruciforme pour xer la plaque de montage au plafond.
Ceiling
4. Alignez les rainures avec la plaque de xation et faites pivoter
la caméra intérieure eufy, jusqu'à ce qu'elle se clipse.
Ceiling
Pour monter la caméra intérieure eufy sur un mur, nous vous
recommandons d'utiliser le support de xation (non fourni)
comme illustré ci-dessous.
51 Français Français 52
Page 29

ALIMENTATION DE LA CAMÉRA
INTÉRIEURE
Branchez la caméra intérieure eufy à une prise de courant à l'aide
du câble et de l'adaptateur d'alimentation USB fournis. Une fois
allumée, la caméra intérieure eufy est connectée au système.
Lorsque la connexion est réussie, le voyant d'état devient bleu xe.
Faites pivoter la caméra intérieure eufy pour ajuster la vue
et vériez à l'aide de la diffusion en direct, accessible depuis
l'application eufy Security. Vous pouvez maintenant utiliser votre
caméra intérieure eufy.
53 Français Français 54
Conseil:
Pour le dépannage, consultez « Aide » sur l'application eufy
Security. Pour connaître l'état du voyant LED, reportez-vous à la
page « App ».
Ce produit a été conçu et fabriqué avec des matériaux et
composants de haute qualité, qui peuvent être recyclés et
réutilisés.
Ce symbole signie que le produit ne doit pas être jeté
avec les déchets ménagers, mais doit être transmis à un
établissement de collecte adapté pour permettre son
recyclage. L'élimination et le recyclage appropriés aident
à protéger les ressources naturelles, la santé humaine et
l'environnement. Pour plus d'informations sur l'élimination
et le recyclage de ce produit, contactez votre municipalité
locale, le service de mise au rebut ou la boutique où vous
avez acheté ce produit.
Page 30

SERVICE CLIENTÈLE
• Garantie
Garantie limitée de 12mois
• Par téléphone
États-Unis +1 (800) 988 7973 du lundi au vendredi 9 h-17 h
(heure du Pacique)
Royaume-Uni +44 (0) 1604 936 200 du lundi au vendredi
6 h-11 h (GMT)
Allemagne +49 (0) 69 9579 7960 du lundi au vendredi 6 h-11 h
• Par e-mail
Support client : support@eufylife.com
54 Français
Indice
Contenuto Della Confezione 56
Panoramica del prodotto 57
Congurazione del sistema 58
Montaggio della telecamera per interni 60
Alimentazione della telecamera per interni 65
Servizio Clienti 67
Page 31

CONTENUTO DELLA CONFEZIONE
PANORAMICA DEL PRODOTTO
Telecamera per interni eufy 2K con funzioni panoramica e
inclinazione × 1
Model:T8410
Piastra di montaggio × 1
Telecamera per interni eufy 2K con funzioni
panoramica e inclinazione
1
2
Cavo USB × 1
Adattatore USB × 1
3
Confezione viti di montaggio × 1
Manuale utente × 1
4
1
Obiettivo
Microfono
2
Slot per scheda SD
3
LED di stato
4
5
6
7
Altoparlante
5
6
Ingresso alimentazione
7
Pulsante SYNC
56 Italiano Italiano 57
Page 32

CONFIGURAZIONE DEL SISTEMA
Stato LED
Stato LED Descrizione
1. Scaricare l’app eufy Security dall’App Store (dispositivi
iOS) o da Google Play (dispositivi Android).
2. Registrarsi per creare un account eufy Security.
Accedere alla home page dell’app.Toccare Aggiungi
dispositivo e aggiungere la telecamera per interni eufy
2K con funzione panoramica al sistema.
Blu intermittente Pronto per la congurazione
Blu sso
Rosso lampeggiante Scollegato da Internet
Rosso lampeggiante una
volta
Rosso sso
Viola bluastro sso Inizializzazione del sistema
Lampeggiamento blu e
rosso alternato
Alimentata e propriamente
funzionante
Movimento o suono rilevato
Funziona correttamente con
qualcuno che visualizza lo streaming
live o che registra
Aggiornamento del rmware in
corso
l’evento
3. Seguire le istruzioni visualizzate sullo schermo per
completare la congurazione.
58 Italiano Italiano 59
Page 33

MONTAGGIO DELLA TELECAMERA
PER INTERNI
Selezionare una posizione per il montaggio
La telecamera può essere posizionata su un tavolo, uno scaffale o
può essere montata su una parete o sul softto. Selezionare una
posizione e un’altezza da cui è possibile ottenere la vista desiderata
e raggiungere facilmente una presa di corrente.
• Scollegare la camma interna dalla presa di corrente
prima del montaggio.
• Tenere la telecamera per interni eufy ad almeno
20 cm dalle pareti o da qualsiasi oggetto che possa
ostruire la vista. Seguire questa indicazione per
evitare il riesso dei raggi infrarossi che può avere
un impatto negativo sulle prestazioni della visione
notturna.
> 20CM
60 Italiano Italiano 61
> 20CM
Page 34

Montaggio della telecamera per interni
Per montare la telecamera per interni eufy sul softto, attenersi
alla seguente procedura:
1. Posizionare
la scheda di
posizionamento
contro il
softto e quindi
contrassegnare i
punti in cui sarà
necessaria la
perforazione.
2. Praticare i fori
con una punta da
trapano da 5/16” (8
mm).
Ceiling
Ceiling
3. Allineare i fori sulla piastra di montaggio con quelli sul softto.
Inserire i tasselli all’interno dei fori, necessari nei casi in cui
le pareti siano in materiali duri come calcestruzzo, mattoni o
stucco. Fissare le viti con un cacciavite a stella per ssare la
piastra di montaggio al softto.
Ceiling
4. Allineare le scanalature con la piastra di montaggio e ruotare
la telecamera per interni eufy in senso orario no a quando
non scatta in posizione.
Ceiling
62 Italiano Italiano 63
Page 35

Per montare la telecamera per interni eufy su una parete, si
consiglia di utilizzare la staffa di montaggio (non fornita) come nella
gura seguente.
ALIMENTAZIONE DELLA
TELECAMERA PER INTERNI
Collegare la telecamera per interni eufy a una presa di corrente
utilizzando il cavo USB e l’adattatore USB forniti. Dopo essere
stata accesa, la telecamera per interni eufy verrà collegata al
sistema. Se collegata correttamente, il LED di stato diventerà blu.
Ruotare la telecamera per interni eufy per regolare la vista e
controllarla con lo streaming live a cui è possibile accedere tramite
l’app eufy Security. Ora è tutto pronto per usare la telecamera per
interni eufy.
Suggerimento:
Per la risoluzione dei problemi, consultare la Guida nell’app eufy
Security. Fare riferimento alla pagina dell’app per informazioni sullo
stato della spia LED.
64 Italiano Italiano 65
Page 36

Il prodotto è progettato e realizzato con materiali e
componenti di alta qualità, riciclabili e riutilizzabili.
Questo simbolo indica che il prodotto non deve essere
smaltito tra i riuti domestici e deve essere consegnato
presso un centro di raccolta per il riciclo. Lo smaltimento
e il riciclaggio effettuati in modo corretto aiutano a
proteggere le risorse naturali, la salute umana e l’ambiente.
Per ulteriori informazioni sullo smaltimento e sul riciclaggio
di questo prodotto, contattare gli ufci comunali preposti, il
servizio per lo smaltimento oppure il negozio in cui è stato
acquistato il prodotto.
SERVIZIO CLIENTI
• Garanzia
Garanzia limitata di 12 mesi
• Telefono
Stati Uniti +1 (800) 988 7973 lun-ven 9:00-17:00 (PT)
Regno Unito +44 (0) 1604 936 200 lun-ven 6:00-11:00 (GMT)
Germania +49 (0) 69 9579 7960 lun-ven 6:00-11:00
• E-mail
Servizio clienti: support@eufylife.com
66 Italiano Italiano 67
Page 37

Inhoudsopgave
WAT ZIT ER IN DE DOOS?
Wat Zit Er In De Doos? 69
Productoverzicht 70
Het systeem instellen 71
De Indoor Cam monteren 73
De Indoor Cam inschakelen 78
Klantenservice 80
eufy Indoor Cam 2K Pan & Tilt × 1
Model:T8410
Montageplaat × 1
USB-kabel × 1
USB-adapter × 1
Montageschroefpakket × 1
Gebruikershandleiding × 1
Nederlands 69
Page 38

PRODUCTOVERZICHT
HET SYSTEEM INSTELLEN
eufy Indoor Cam 2K Pan & Tilt
1
2
3
4
5
6
7
1. Download de eufy Security-app uit de App Store (iOSapparaten) of Google Play (Android-apparaten).
2. Meld u aan voor een eufy Security-account. Ga naar de
startpagina van de app.Tik op Apparaat toevoegen en
voeg de Indoor Cam Pan 2K toe aan uw systeem.
1
Lens
Microfoon
2
SD-kaartsleuf
3
Status-led
4
70 Nederlands Nederlands 71
Luidspreker
5
6
Voedingsingang
7
SYNC-knop
3. Volg de instructies op het scherm om het instellen te
voltooien.
Page 39

Led-status
Led-status Beschrijving
'Ademt' blauw Klaar voor installatie
Brandt blauw
Knippert rood
Knippert één keer rood Beweging of geluid gedetecteerd
Brandt rood
Brandt blauwachtig violet Systeem wordt geïnitialiseerd
Knippert afwisselend blauw
en rood
72 Nederlands Nederlands 73
Ingeschakeld en werkt naar
behoren
Verbinding met het internet is
verbroken
Werkt naar behoren en iemand
bekijkt livestream of neemt
gebeurtenis op
Firmware-upgrade wordt
uitgevoerd
DE INDOOR CAM MONTEREN
Een geschikte montageplek kiezen
De camera kan op een tafel of plank worden geplaatst of aan een
muur of plafond worden gemonteerd. Kies een plek en hoogte
die u het gewenste zicht bieden en van waaruit u eenvoudig een
stopcontact kunt bereiken.
Page 40

• Trek de stekker van de Indoor Cam uit het
stopcontact voordat u de camera monteert.
• Houd de eufy Indoor Cam op minimaal 20 cm
afstand van wanden of andere voorwerpen
die het zicht kunnen belemmeren. Doe dit om
infraroodreectie te vermijden. Infraroodreectie
kan de nachtzichtprestaties negatief kan beïnvloeden.
De Indoor Cam monteren
Volg onderstaande stappen om de eufy Indoor Cam aan het
plafond te monteren:
1. Plaats de
positioneringskaart
tegen het plafond en
markeer vervolgens
de plaatsen waar
moet worden
geboord.
Ceiling
Ceiling
> 20CM
> 20CM
2. Boor gaten met een
boortje van 8 mm.
74 Nederlands Nederlands 75
Page 41

3. Lijn de gaten op de montageplaat uit met de gaten in het plafond.
Inserire i tasselli all’interno dei fori, necessari nei casi in cui
le pareti siano in materiali duri come calcestruzzo, mattoni o
stucco. Gebruik een kruiskopschroevendraaier om de schroeven
vast te draaien en de montageplaat aan het plafond te bevestigen.
Ceiling
4. Lijn de groeven uit met de montageplaat en draai de eufy
Indoor Cam met de klok mee totdat deze op zijn plaats klikt.
Ceiling
Als u de eufy Indoor Cam aan de muur wilt monteren, raden
we aan om gebruik te maken van de montagebeugel (niet
meegeleverd), zoals in de onderstaande afbeelding.
76 Nederlands Nederlands 77
Page 42

DE INDOOR CAM INSCHAKELEN
Sluit de eufy Indoor Cam aan op een stopcontact met de
meegeleverde USB-kabel en USB-adapter. Nadat de eufy Indoor
Cam is ingeschakeld, maakt deze verbinding met het systeem.
Wanneer de camera met succes is verbonden met het systeem,
blijft de status-led blauw branden.
Draai de eufy Indoor Cam om het zicht aan te passen en
controleer het zicht met behulp van de livestream die u in de eufy
Security-app kunt bekijken. U bent nu helemaal klaar om uw eufy
Indoor Cam te gebruiken.
Dit product is ontworpen en gefabriceerd met materialen
en componenten van hoge kwaliteit die kunnen worden
gerecycled en hergebruikt.
Dit symbool betekent dat dit product niet mag worden
weggegooid als huishoudelijk afval en moet worden
ingeleverd bij een daarvoor bestemd inzamelpunt voor
recycling. Door het op de juiste manier weg te gooien en te
recyclen helpt u natuurlijke hulpbronnen, de gezondheid van
de mens en het milieu te beschermen. Voor meer informatie
over het weggooien en de recycling van dit product neemt
u contact op met uw gemeente, de afvalverwerkingsdienst
of de winkel waar u dit product hebt gekocht.
Tip:
Problemen? Raadpleeg de Help van de eufy Security-app. Raadpleeg
de pagina in de app voor informatie over de status van de ledindicator.
78 Nederlands Nederlands 79
Page 43

KLANTENSERVICE
• Garantie
Beperkte garantie van 12 maanden
• Bel ons
Verenigde Staten +1 (800) 988 7973 ma.-vr. 9:00-17:00 (PT)
Verenigd Koninkrijk +44 (0) 1604 936 200 ma.-vr. 6:00-11:00
(GMT)
Duitsland +49 (0) 69 9579 7960 ma.-vr. 6:00-11:00
• Mail ons
Klantenondersteuning: support@eufylife.com
80 Nederlands
Page 44

 Loading...