

EUFAB iBike Miniped User Manual

Page 1 / 16
Art.-no. 14500
iBike Miniped
Content
1. Proper usage 2
2. Scope of supply 2
3. Specifications 2
3.1 Miniped 2
3.2 Motor 2
3.3 Battery 2
3.4 Charging unit 3
3.5 Controls 3
3.6 Electrical wiring diagram, general 3
3.7 Electrical wiring diagram, controls 4
4. Safety notes 4
4.1 General 4
4.2 Charging unit 5
4.3 Battery 5
5. Operating instructions 6
5.1 Assembly 6
5.1.1 Handlebar assembly 6
5.1.2 Pedal assembly 6
5.1.3 Rear mudguard assembly 6
5.1.4 Battery assembly 6
5.1.4 Front light assembly 7
5.2 Overview 7
5.2.1 General 7
5.2.2 Handlebars 8
5.2.3 Digital instrument 8
5.2.4 Remote control 8
5.2.5 Charging unit 8
5.2.6 Battery 9
5.3 Operation 9
5.3.1 Charging the battery 9
5.3.2 Remote contro functions, switching the Miniped on/off 9
5.3.3 Folding mechanism 10
5.3.4 Adjusting the seat height 11
5.3.5 Parking the Miniped 11
6. Maintenance and care 12
6.1 Maintenance 12
6.1.1 Tyre pressure 12
6.1.2 Battery 12
6.1.3 Chain 12
6.1.4 Brakes 12
6.1.5 Replacing the remote control batteries 12
6.2 Inspection and service plan 13
6.3 Care 13
7. Environmental protection notes 14
8. Contact information 14

Page 2 / 16
WARNING
Read through all operating instructions carefully before operating and observe all
safety information!
Non-compliance can lead to personal injury, damage to the device or to your property!
Keep the original packaging, the purchase receipt as well as these instructions for
future reference! When transferring this product pass on these instructions as well.
Before operating, check that the content of the package is intact and complete!
Subject to technical changes!
1. Intended usage
The Miniped is designed for short trips on paved roads in urban areas. It is not suitable for usage where
road and weather conditions are bad (e.g. rain, snow or icy roads). It cannot be used for extreme sports
and demonstrations.
The range of the Miniped is measured at an outdoor temperature of about 25 °C with a load of approx.
70 kg on a smooth road. This can deviate depending on the weight of the driver, driving performance,
outdoor temperature and road condition.
This device is not suitable to be used by children and people with reduced mental capacity or without
the necessary specialised knowledge. Children should keep away from the device.
This device is not intended for commercial usage.
Proper usage also includes observing all the information in these instructions, especially observance of
the safety notes. Any other usage is considered improper and can lead to property damage and personal
injury. EAL GmbH is not liable for damages that occur due to improper usage.
2. Scope of supply
1 x Miniped 1 x connectible front light
2 x keys 1 x back mudguard
2 x remote control 1 x wrench set
1 x charging unit 1 x operating instructions
1 x battery 1 x service booklet
2 x pedals 1 x warranty form
3. Specifications
3.1 Miniped
Wheelbase: 825 mm
L x W x H: 1180 x 1100 x 550 [mm]
L x W x H (folded together): 1130 x 680 x 380 [mm]
Maximum speed: 25 km/h
Max. range: 40 km
Max. load: 120 kg
Noise level: < 60 dB
Weight: 21 kg
3.2 Motor
Nominal voltage: 36 V
Rated power: 250 W
Rotor rated speed: 450 U / min
Max. torque: 28 Nm
Max. efficiency: 80 %
Type: brushless and gearless
3.3 Battery
Voltage: 36V
Capacity: 8.7 Ah
Model: Panasonic 18650 – 2900PF
Service life: over 1,000 loading cycles
Discharge rate: 3 C
Page 3 / 16
Charging time: 4 hours
3.4 Charging unit
Input voltage: 230 V
Output voltage: 42 V
Output current: 2 A
3.5 Controls
Model: Sine wave
Maximum current: 14 A
Minimum voltage 29 V
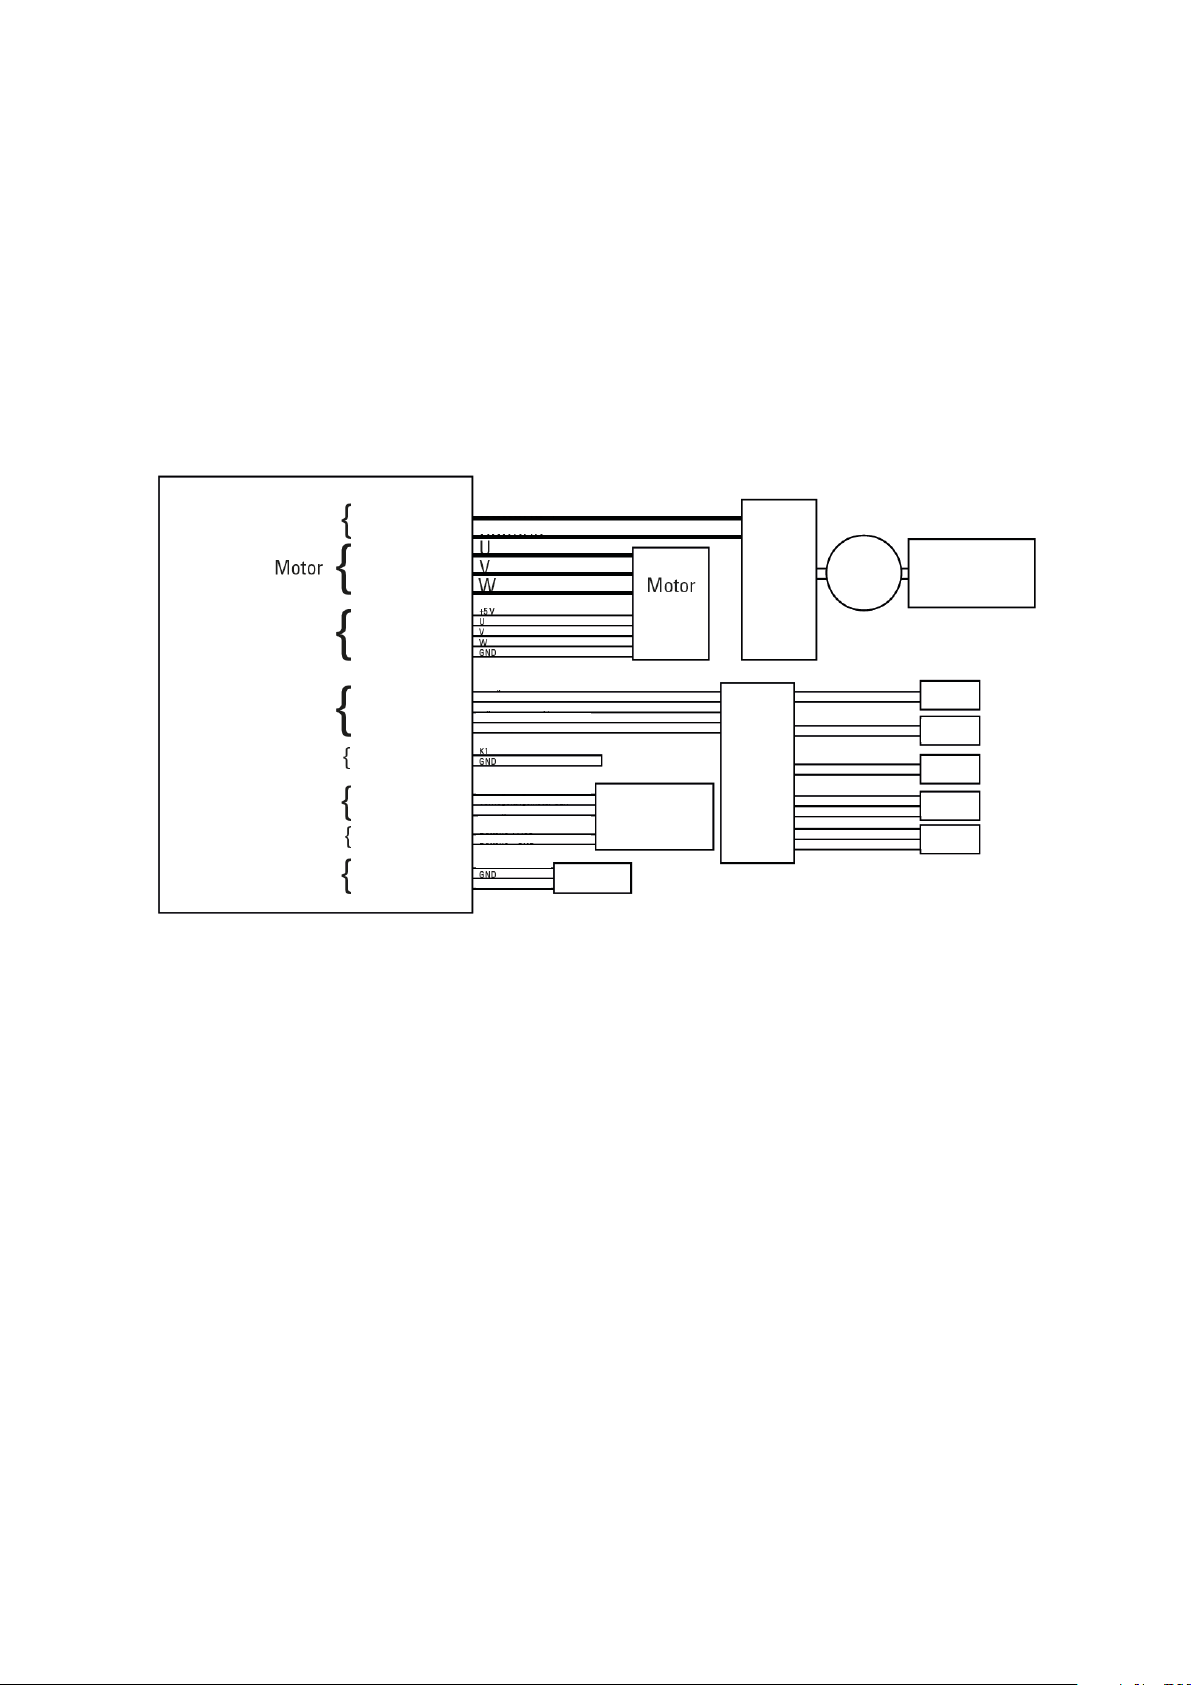
3.6 Electrical wiring diagram, general
bold, red
bold, black
bold, blue
bold green
bold yellow
thin red
thin yellow
thin blue
thin green
thin black
thin red
thin blue
thin green
thin black
thin white
thin orange
thin blue
thin green
thin orange
thin black
thin violet
thin white
thin white
thin red
thin black
Battery
Battery
Speedo-
meter
Anti-theft
alarm
Charging unit
Charging
Connec tion
Battery +
Battery -
Measuring signal speed
Signal throttle valve
Brake signal
Brake signal
Lock ACC
Lock ACC
Lock motor CLK
Line phase detection
Battery – GND
Line FE1
Battery + ACC
GND
Energy
Light
Brakes
Acoustic sign al
generator
Switch
Warn ing li ght
horn
Throttle val ve
LCD measuring
device
Maximum speed
Anti-theft alarm
Anti-theft alarm
Brake light
Reverb
Brake signal

Page 4 / 16
3.7 Electrical wiring diagram, controls
4. Safety information
4.1 General information
• The warning triangle identifies all instructions that are important for safety. Be sure to
always follow these, otherwise you could injure yourself or damage the device.
• Children are not allowed to play with the device.
• Cleaning and user maintenance cannot be performed by children without supervision.
• Do not leave the packaging material lying around. It can be a dangerous toy for children!
• Only use this product for its intended purpose!
• Do not tamper with or disassemble the device!
• For your own safety, only use accessories or replacement parts that are listed in the
instructions or the usage of which is recommended by the manufacturer!
• Adjust the seat height so that you can ride safely and comfortably and are able to place
feet on the ground quickly.
• Before each ride, ensure that the brakes function, the tire pressure is ok, and that all fixtures
are in faultless condition.
• Ensure that accessory parts are mounted at the right positions and familiarise yourself with
the functions.
• When using the Miniped for the first time, first try it out on a short, safe section of road.
Only drive in road traffic when you have good control riding the Miniped.
• A quick-release lever that isn't completely closed can re-open. This can lead to serious
falls. Turning the quick-release lever must be so difficult that the heel of the hand is required
to do so. Only then is the tension strong enough.
• Always wear a helmet.
• Wear bright and noticeable clothing. Be sure not to wear loose clothing that could get stuck
in the chain, handlebars, pedals or wheels.
thin orange
thin blue
thin green
thin orange
thin black
thin violet
thin white
thin white
thin red
thin black
bold, red
bold, black
bold, blue
bold green
bold yellow
Battery
Battery +
Battery -
Measuring signal speed
Signal throttle valve
Brake signal
GND
Energy
Lock ACC
Lock motor CLK
Phase detection line
Line FE1
Battery + ACC
Battery – GND
Lock ACC
Brake signal
thin red
thin blue
thin green
thin black
thin white
LCD measuring device
Maximum speed
Anti-theft alarm
Anti-theft alarm
Brake light
thin red
thin yellow
thin blue
thin green
thin black
red
yellow green blue
black
Reverb

Page 5 / 16
4.2 Charging unit
• Do not use the charging unit in a moist or wet environment.
• Be sure to prevent water from penetrating the device. If liquid should get inside,
immediately separate the charging unit from the power supply and have it checked by an
authorised dealer.
• Place the charging unit on an even surface only so that it stands firmly.
• Do not operate the charging unit with damaged cable or plug.
• Do not operate the charging unit after it has received a strong hit, has fallen or been
damaged in any other way.
• Do not attempt to repair the device yourself. Do not open or disassemble the device. Have
the charging unit checked by your authorised dealer.
• Before cleaning, separate the charging unit from the power supply and from the battery.
4.3 Battery
• The Miniped's charging unit and battery are mutually compatible. Never charge the battery
using a different charging unit.
• Protect the battery from moisture and hard impacts.
• Do not use the battery after it has received a strong hit, has fallen or been damaged in any
other way.
• Do not attempt to repair the device yourself. Do not open or disassemble the casing of the
battery. Have the battery checked by your authorised dealer.
• Do not touch the battery contacts with metal objects.
• Never leave the battery permanently connected to the charging device when not in use for
a long period of time.
• Do not leave the battery unattended during the charging procedure.
 Loading...