

DE Art.-Nr. 21065
und Fahrradreifen,
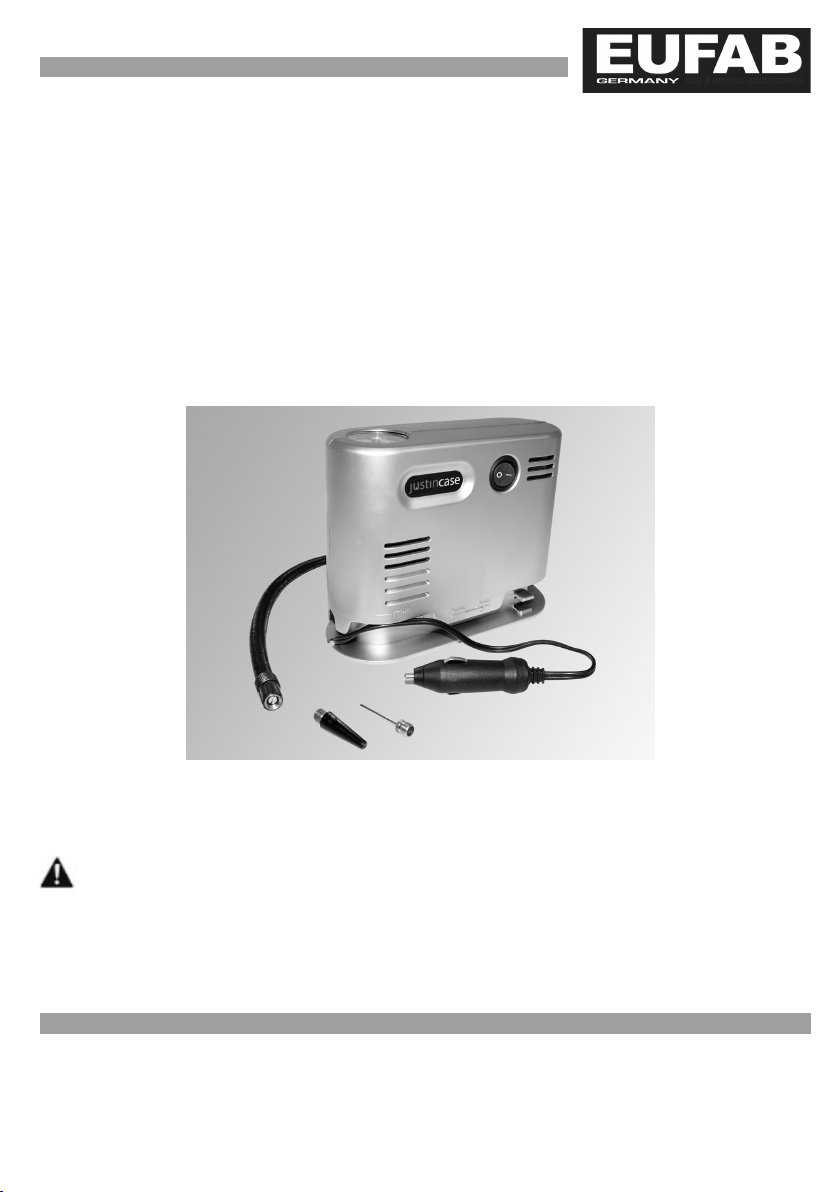
Mini Kompressor
Bedienungsanleitung
Universell einsetzbar z.B. für das Aufpumpen von Auto-, MotorradSportbällen, Luftspielzeugen, Luftmatratzen und Schlauchbooten
• Maximale Leistung 150PSI / 10 bar
• Mit Schalter und Manometer
• Integriertes Aufbewahrungsfach für Kabel und Zubehörteile
• Inkl. Adapter
• Stromversorgung über 12 Volt Zigarettenanzünder
• 3 m Anschlusskabel
WARNUNG
Lesen Sie die Bedienungsanleitung vor Inbetriebnahme sorgfältig durch und
beachten Sie alle Sicherheitshinweise! Bewahren Sie die Originalverpackung, den
Kaufbeleg sowie diese Anleitung zum späteren Nachschlagen auf!
DE GB F I NL CZ SK
EAL GmbH, Postfach 14 41 24, D-42310 Wuppertal
Anwendungsbereich / GB / F / I / NL / CZ / SK
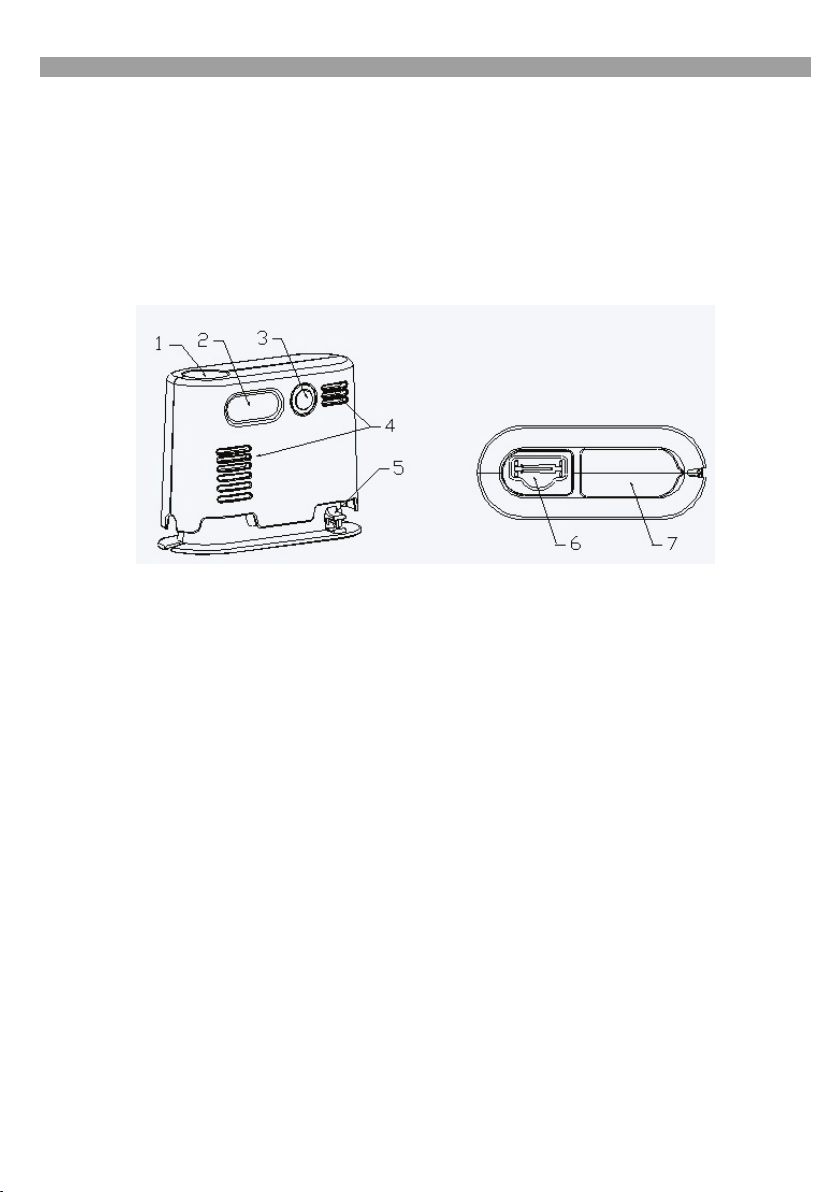
1. Manometer
2. Griff
3. Ein/Aus Schalter
4. Lüftungsschlitze
5. Dr&iak hadi#ky
6. Ballon/Ball Adapter
Adaptateur pour ballon/balle
7. Aufbewahrungsfach
7. Odkladací prie#inok
! Autoreifen / Fahrradreifen / Basketball / Sportgeräte / Partyballons / Luftmatratzen
! Car tyres / bicycle tyres / basket balls / sports equipment / party balloons / air mattresses
! Pneus d'automobiles / pneus de bicyclette / ballon de basket / appareils de sport / ballons
baudruche / matelas pneumatiques
! I Pneumatici di auto / pneumatici di biciclette / palla da basket / attrezzi sportivi / palloncini /
materassini
! Autobanden / fietsbanden / basketbal / sportartikelen / partyballons / luchtmatrassen
! Pneumatiky automobil! / pneumatiky jízdních kol / basketbalov" mí# / sportovní ná$adí /
nafukovací balónky na párty / nafukovací matrace
! Pneumatiky automobilov / pneumatiky bicyklov / basketbalová lopta / %portové náradie /
nafukovacie balóny na party / nafukovacie matrace
1. Manometer
1. Manomètre
1. I Manometro
1. Manometer
1. Manometr
1. Manometer
4. Ventilation slits
4. Fente de ventilation
4. I Feritoie di ventilazione
4. Ventilatiesleuven
4. V'trací otvory
4. Vetracie otvory
7. Storage compartment
7. Boîtier de stockage
7. I Vano di custodia
7. Opbergvak
7. Odkládací p$ihrádka
2. Handle
2. Poignée
2. I Impugnatura
2. Greep
2. Dr&adlo
2. Dr&adlo
5. Schlauchhalter
5. Hose holder
5. Porte-tuyau
5. I Attacco tubo flessibile
5. Slanghouder
5. Dr&ák hadi#ky
3. On/off switch
3. Commutateur Marche/arrêt
3. I Interruttore ON/OFF
3. Aan-/uitschakelaar
3. Spína# Zap/Vyp
3. Spína# Zap/Vyp
6. Balloon/ball adapter
6.
6. I Adattatore per palloncini / palloni
6. Ballon-/baladapter
6. Adaptér pro balóny a mí#e
6. Adaptér pre balóny a lopty

WARNUNG
bitte
Lesen Sie diese Bedienungsanleitung vor Inbetriebnahme sorgfältig durch!
Nichtbeachtung kann zu Personenschäden, Schäden am Gerät oder Ihrem
Eigentum führen!
1. Erhöhen Sie den Luftdruck nicht über die Herstellerempfehlung!
2. Schützen Sie den Kompressor und dessen Komponenten vor Feuchtigkeit!
3. Lassen Sie den Kompressor in Betrieb nicht unbeaufsichtigt!
4. Halten Sie Kinder fern und lassen Sie Kinder dieses Gerät nicht bedienen!
5. Benutzen Sie dieses Produkt nur für die dafür vorgesehene Verwendung!
6. Manipulieren oder zerlegen Sie den Kompressor nicht!
7. Sollte der Kompressor ungewöhnliche Geräusche abgeben oder überhitzen, schalten Sie ihn sofort aus
und lassen ihn mindestens 30 Minuten abkühlen!
8. Überprüfen Sie den Kompressor vor Inbetriebnahme. Beschädigte, gerissene oder gebrochene Bauteile
sollten ausschließlich durch qualifizierte Techniker instandgesetzt werden!
9. Setzen Sie den Kompressor niemals Frost, Regen oder Temperaturen über 30° C oder unter – 30° C
aus!
10. Niemals an Menschen oder Tieren anwenden!
11. Stellen Sie sicher, dass Schlauch und Kabel keinen scharfen Kanten, Öl oder zu heißen Gegenständen
ausgesetzt wird!
12. Warnung! Verwenden Sie zu Ihrer eigenen Sicherheit ausschließlich Zubehör oder Ersatzteile, die in der
Anleitung angegeben sind, oder deren Verwendung durch den Hersteller empfohlen wird!
WARNUNG
Diese Anleitung soll Ihnen Informationen zu Funktion und Leistung geben.
Bewahren Sie diese Anleitung als Nachschlagewerk für die Zukunft auf. Prüfen Sie
vor Inbetriebnahme den Inhalt der Box auf Unversehrtheit und Vollständigkeit!
Bedienungsanleitung
Aufpumpen eines PKW- Reifen und Fahrradreifen
1. Wickeln Sie das 12 Volt Kabel ab und verbinden Sie den 12 Volt Adapter mit dem 12 Volt
Anschluss Ihres Fahrzeuges.
2. Schrauben Sie die Gewindebuchse des Schlauchendes auf das Reifenventil.
3. Starten Sie den Kompressor durch Betätigen des Schalters (3), bis der gewünschte
Reifendruck erreicht ist. Schalten Sie nun den Kompressor ab.
4. Trennen Sie den 12 Volt Anschluss vom Fahrzeug und entfernen Sie den
Gewindeanschluss vom Reifenventil.
Hinweis: Überprüfen Sie den Reifendruck Ihres Fahrzeuges anhand der empfohlenen Werte in
der Bedienungsanleitung, um einen Überdruck zu vermeiden. Fahrradreifen überprüfen Sie
anhand der Reifenkennzeichnung.
Aufpumpen von Sportgeräten (z.B. Basketball) oder Luftballons
1. Wickeln Sie das 12 Volt Kabel ab und verbinden Sie den 12 Volt Adapter mit dem 12 Volt
Anschluss Ihres Fahrzeuges.
2. Schrauben Sie den Ball/ Ballon- Adapter in die Gewindebuchse des Schlauchendes.
3. Fügen Sie den Ball/ Ballon- Adapter in das Ventil des aufzublasenden Objekts ein.
4. Starten Sie den Kompressor durch Betätigen des Schalters (3), bis die gewünschte
Festigkeit erreicht oder das Objekt vollständig aufgeblasen ist. Schalten Sie nun den
Kompressor ab.
5. Entfernen Sie den Adapter aus dem Ventil des aufgeblasenen Objekt und schrauben Sie
die Gewindebuchse des Schlauchendes ab.
6. Trennen Sie den 12 Volt Anschluss vom Fahrzeug und bewahren Sie das Kabel in dem
dafür vorgesehenen Fach auf.

Hinweis: Während des Aufpumpens gibt das Manometer nur einen Schätzwert an und ein genauer
Universal application, e.g. to inflate car, motorcycle and bicycle tyres, sports balls, inflatable
Druckwert ist nicht abzulesen.
VORSICHT
Erzeugen Sie keinen Überdruck , dieser kann zu Personenschäden oder zu Zerstörung
des Gerätes führen. Lassen Sie den Kompressor während des Gebrauchs nicht
unbeaufsichtigt! Lassen Sie den Kompressor nach 10 Minuten Dauerbetrieb mindestens 10
Minuten abkühlen!
Sicherungswechsel
1. Ersetzen der Sicherung im Stecker: öffnen Sie die obere Abdeckung des Steckers durch
drehen.
2. Entfernen Sie die defekte Sicherung und setzen Sie eine neue ein.
3. Drehen Sie die Abdeckung wieder auf den Stecker.
Technische Daten
• Betriebsspannung: 12 Volt
• Zylinder: 19 mm
• Max. Leistung / max. Druck: 150PSI / 10 bar
• Arbeitsdruck: 0,3 – 2,7 bar
• Verdrängung: 10 L/Min+-10%
• Sicherung: 10A
• Netzteil: 12 Volt
• Größe (LxBxH): ca. 17 x 6 x 13,5 cm
• Gewicht: ca. 800 g
Zubehör: 2 Adapter
Hinweise zum Umweltschutz
Elektrogeräte dürfen nicht über den normalen Hausmüll entsorgt werden! Bitte
entsorgen Sie dieses Gerät über die öffentlichen/ kommunalen Sammelstellen.
Die Materialien sind recyclebar, wie durch die Kennzeichnung angegeben. Durch
Recycling, stoffliche Verwertung oder andere Formen der Wiederverwendung von
Altgeräten leisten Sie einen wichtigen Beitrag zum Schutz unserer Umwelt !
GB
Mini Compressor
Art. no. 21065
Operating Instructions
toys, air mattresses and inflatable boats
• Maximum power 150PSI / 10 bar
• With switch and manometer
• Integrated storage compartment for cable and accessories
• Incl. adapter
• Electricity supply via 12 volt cigarette lighter plug
• 3 m power cable

CAUTION
Read the operating instructions carefully before using for the first time and adhere
to all safety instructions! Retain the original packaging, the sales receipt and these
instructions for future reference!
CAUTION
Read the operating instructions carefully before using for the first time! Failure to
do so may result in injury to persons or damage to your property including the
device itself!
1. Do not exceed the maximum air pressure stated by the manufacturer!
2. Do not expose the compressor and any of its components to damp!
3. Do not operate the compressor unsupervised!
4. Keep out of reach of children and do not let children operate this device!
5. Do not use this device for any reason other than its intended use!
6. Do not alter or dismantle the compressor!
7. Should the compressor make unusual noises or start to overheat, turn it off and let it cool down for at
least 30 minutes!
8. Check the compressor before use. Damaged, torn or broken components should be replaced or repaired
by qualified personnel only!
9. Do not expose the compressor to frost, rain or temperatures over 30°C or under –30°C!
10. Never use on people or animals!
11. Ensure that the hose and cable are not exposed to sharp edges, oil or hot objects!
12. Caution! For your own safety, only use those accessories or replacement parts stated in the instructions
or which are recommended by the manufacturer!
CAUTION
These instructions are intended to provide you with information regarding
function and performance. Please retain these instructions for future reference.
Check the contents of the box for damage and completeness before using for the
first time!
Operating Instructions
Inflating car or bicycle tyres
1. Unwind the 12 volt cable and connect the 12 volt adapter with the 12 volt socket of
your vehicle.
2. Screw the threaded connector on the end of the hose onto the tyre valve.
3. Start the compressor by operating the switch (3), until the desired tyre pressure has
been reached. Switch off the compressor.
4. Disconnect the 12 volt connection from the car and remove the threaded connector
from the tyre valve.
Please note: Check the tyre pressure of your vehicle against the recommended values in the
operating instructions to avoid excess pressure. Please check bicycle tyre pressure according
to tyre designation.
Inflating sports equipment (e.g. basket balls) or balloons
1. Unwind the 12 volt cable and connect the 12 volt adapter with the 12 volt socket of
your vehicle.
2. Screw the ball/balloon adapter into the threaded connector on the end of the hose.
3. Attach the ball/balloon adapter to the valve of the object being inflated.
4. Start the compressor by operating the switch (3), until the desired firmness has been
reached or the object is completely inflated. Switch off the compressor.
5. Remove the adapter from the valve of the inflated object and unscrew the threaded
connector on the end of the hose.

6. Disconnect the 12 volt connection from the car and place the cable in the storage
pneus d'auto, de motocyclette et de bicyclette,
compartment.
Please Note: The manometer only provides an estimate of pressure during inflation, an exact
reading cannot be made.
CAREFUL
Do not exceed pressure guidelines as this can lead to personal injury or the destruction of
the device. Do not leave the compressor unsupervised during use! Allow the compressor to cool
for at least 10 minutes after 10 minutes constant use!
Replacing Fuses
1. Replace the fuse in the plug: open the upper covering of the plug by turning it.
2. Remove the defective fuse and replace it with a new one.
3. Turn the plug covering again.
Technical Data
• Operating voltage: 12 volts
• Cylinder: 19 mm
• Max. power/ max. pressure: 150PSI / 10 bar
• Operating pressure: 0.3 – 2.7 bar
• Displacement: 10 l/min+-10%
• Fuse: 10A
• Power adapter: 12 volts
• Dimensions (l x w x h): approx. 17 x 6 x 13.5 cm
• Weight: approx. 800 g
Accessories: 2 adapters
Environmental Protection Notice
Electrical appliances may not be disposed of in regular household waste! Please
dispose of this device by making use of public/official collection points.
The materials are recyclable as stated by the relevant designations. Through
recycling, re-using materials or other means of re-using old devices you are making
an important contribution to the protection of our environment!
F
Mini compresseur
Article n° 21065
Manuel de l'opérateur
Utilisation multiple, par exemple pour gonfler des
des ballons de sport, des ballons baudruche, des matelas et des canots pneumatiques
( Puissance maximale 150PSI / 10 bars
( Avec commutateur et manomètre
( Boîtier de stockage intégré pour le câble et les accessoires
( Y compris adaptateur
( Alimentation en courant via allume-cigares 12 volts
( 3 m de câble de jonction

AVERTISSEMENT
et laissez le refroidir
Avant la mise en service, lisez attentivement le manuel de l'opérateur et respectez
toutes les consignes de sécurité ! Conservez l'emballage d'origine, le document
d'achat ainsi que cette directive pour toute consultation ultérieure
!
AVERTISSEMENT
Avant la mise en service, lisez attentivement ce manuel de l'opérateur !
L'inobservation des consignes peut entraîner des dommages au personnel, des
dégâts à l'appareil ou à vos biens !
1. Ne dépassez pas la pression de l'air indiquée par le fabricant !
2. Protégez le compresseur et ses composants de l'humidité !
3. Ne laissez pas le compresseur en service sans surveillance !
4. Tenez le compresseur hors de portée des enfants et ne les laissez pas se servir de cet appareil !
5. Utilisez ce produit seulement pour l'application prévue !
6. Ne modifiez pas ou ne démontez pas le compresseur !
7. Si le compresseur émet un bruit anormal ou surchauffe, éteignez-le immédiatement au moins 30 minutes !
8. Contrôlez le compresseur avant la mise en service. Les composants endommagés arrachés ou cassés
doivent être réparés exclusivement par des techniciens qualifiés !
9. N'exposez jamais le compresseur au froid, à la pluie ou à des températures supérieures à 30 °C ou
inférieures à -30 °C !
10. Ne jamais utiliser sur des personnes ou des animaux !
11. Assurez-vous que le tuyau flexible et le câble ne sont pas en contact avec un bord aiguisé, de l'huile ou
des objets chauds !
12. Avertissement ! Pour votre propre sécurité, utilisez exclusivement des accessoires ou des pièces de
rechange qui sont listés dans votre directive ou dont l'utilisation est recommandée par le fabricant !
AVERTISSEMENT
Cette directive contient des informations sur le fonctionnement et la puissance.
Conservez-la comme ouvrage de référence pour l'avenir. Avant la mise en service,
contrôlez le contenu du boîtier pour vérifier son intégrité et qu'il n'est pas
endommagé !
Manuel de l’opérateur
Gonfler les pneus d’une voiture et d’un vélo
1. Déroulez le câble 12 volts et connectez l'adaptateur 12 volts au raccord 12 volts de votre
véhicule.
2. Vissez la douille filetée de l'extrémité du tuyau à une valve de pneu.
3. Démarrez le compresseur en actionnant le commutateur (3) jusqu'à ce que la pression de
gonflage souhaitée soit atteinte. Arrêtez alors le compresseur.
4. Démontez le raccord 12 volts du véhicule et retirez la douille filetée de l'extrémité de la
valve du pneu.
Remarque : Contrôlez la pression de gonflage de votre véhicule avec les valeurs
recommandées dans le manuel de l'opérateur afin d'éviter toute surpression. Pour le contrôle
des pneus de bicyclette, veuillez vous référer à la fiche d’identification des pneus.
Gonfler des articles de sport (par exemple, un ballon de basketball) ou des ballons
baudruche
5. Déroulez le câble 12 volts et connectez l'adaptateur 12 volts au raccord 12 volts de
votre véhicule.
6. Vissez l’adaptateur de la balle/du ballon dans la douille filetée de l'extrémité du tuyau.
7. Introduisez l’adaptateur de la balle/du ballon dans la valve de l’objet à gonfler.
8. Démarrez le compresseur en actionnant le commutateur (3) jusqu'à obtenir la pression
voulue ou que l’objet soit entièrement gonflé. Arrêtez alors le compresseur.

9. Retirez l’adaptateur de la valve de l’objet à gonfler et vissez la douille filetée de
t
la destruction de l'appareil. Ne laissez pas le compresseur fonctionner sans surveillance ! Après
Utilizzo universale, p.es. per il gonfiaggio di pneumatici di auto, moto e bici, palloni, giocattoli
l’extrémité du tuyau.
10. Démontez le raccord 12 volts du véhicule et stockez le câble dans le boîtier prévu à ce
effet.
Remarque : Pendant le gonflage, le manomètre n’indique qu’une valeur approchée et il n’est
donc pas possible de pouvoir lire une valeur de pression exacte.
ATTENTION
Ne produisez aucune surpression, celle-ci peut entraîner des dommages au personnel ou
une exploitation continue de 10 minutes, laissez le compresseur refroidir au moins pendant 10
minutes !
Echange de fusible
1. Remplacement du fusible dans la prise : ouvrez le couvercle supérieur de la prise en le
tournant.
2. Retirez le fusible défectueux et remplacez-le par un neuf.
3. Refixez le couvercle sur la prise.
Données techniques
• Tension de service : 12 volts
• Cylindre : 19 mm
• Puissance max. / pression max. : 150PSI / 10 bars
• Pression de travail : 0,3 – 2,7 bars
• Capacité : 10 L/Min+-10%
• Fusible : 10A
• Adaptateur secteur : 12 volts
• Dimensions (LxlxH) : environ 17 x 6 x 13,5 cm
• Poids : environ 800 g
Accessoires : 2 adaptateurs
Consignes relatives à la protection de l’environnement
Les appareils électriques ne doivent pas être jetés avec les ordures ménagères !
Veuillez déposer cet appareil dans une déchèterie communale publique.
Les matériaux sont recyclables, tel qu'indiqué sur la fiche des caractéristiques.
Grâce au recyclage, à une réutilisation des matériaux ou toute autre forme de
réemploi de vieux appareils, vous apportez une contribution importante à la
protection de notre environnement!
I
Mini-compressore
N. art. 21065
Istruzioni per l’uso
gonfiabili, materassini e gommoni
• Potenza massima 150PSI / 10 bar
• Con interruttore e manometro
• Vano di custodia integrato per cavi e accessori

• Incl. adattatore
onfezione originale, la
di ricambio indicati nelle
ni per l’uso. La pressione dei pneumatici delle
• Alimentazione elettrica attraverso accendisigari da 12 volt
• Cavo di collegamento da 3 m
AVVERTENZA
Prima della messa in funzione leggere attentamente le istruzioni per l’uso e
osservare tutte le avvertenze sulla sicurezza! Conservare la c
ricevuta d’acquisto e queste istruzioni per consultazioni successive!
AVVERTENZA
Prima della messa in funzione leggere attentamente queste istruzioni per l’uso!
L’inosservanza può causare danni a persone o cose oppure all’apparecchio!
1. Non superare la pressione dell’aria consigliata dal produttore!
2. Proteggere il compressore e i suoi componenti dall’umidità!
3. Durante il funzionamento non lasciare il compressore incustodito!
4. Tenere il compressore lontano dalla portata dei bambini e impedirne l’uso!
5. Utilizzare il prodotto solo per l’uso previsto!
6. Non manipolare o smontare il compressore!
7. In caso di rumori insoliti o surriscaldamento, spegnere immediatamente il compressore e lasciarlo
raffreddare per almeno 30 minuti!
8. Prima della messa in funzione controllare il compressore. Elementi danneggiati, difettosi o rotti
dovrebbero essere riparati solo da tecnici qualificati!
9. Non esporre mai il compressore a gelo, pioggia o temperature superiori a 30°C oppure inferiori a -30°C!
10. Non usare mai su persone o animali!
11. Evitare assolutamente che il tubo flessibile o il cavo vengano in contatto con spigoli vivi, olio od oggetti
bollenti!
12. Avvertenza! Per la sicurezza personale usare esclusivamente accessori o pezzi
istruzioni o il cui utilizzo viene consigliato dal produttore!
AVVERTENZA
Queste istruzioni forniscono informazioni sul funzionamento e sulle prestazioni.
Conservarle per consultazioni successive. Prima della messa in funzione
controllare l’integrità e la completezza del contenuto della confezione!
Istruzioni per l’uso
Gonfiaggio di pneumatici di auto e biciclette
1. Svolgere il cavo da 12 volt e collegare l’adattatore da 12 volt con il connettore da 12
volt della vettura.
2. Avvitare la boccola filettata dell’estremità del tubo flessibile sulla valvola del
pneumatico.
3. Accendere il compressore azionando l’interruttore (3) e gonfiare il pneumatico fino al
raggiungimento della pressione desiderata, quindi spegnere il compressore.
4. Staccare il collegamento da 12 volt dalla vettura e togliere il raccordo filettato dalla
valvola del pneumatico.
Nota: per evitare una sovrapressione, controllare la pressione del pneumatico della vettura
confrontandola con i valori consigliati nelle istruzio
biciclette deve corrispondere a quella riportata sulla relativa marcatura.
Gonfiaggio di attrezzi sportivi (p.es. palle da basket) o palloncini
1. Svolgere il cavo da 12 volt e collegare l’adattatore da 12 volt con il connettore da 12
volt della vettura.
2. Avvitare l’adattatore per palloni/palloncini nella boccola filettata dell’estremità del tubo
flessibile.
3. Inserire l’adattatore per palloni/palloncini nella valvola dell’oggetto da gonfiare.

4. Accendere il compressore azionando l’interruttore (3) fino al raggiungimento della
en fietsbanden, sportballen,
pressione desiderata oppure finché l’oggetto è gonfiato completamente, quindi
spegnere il compressore.
5. Togliere l’adattatore dalla valvola dell’oggetto gonfiato e svitare la boccola filettata
dell’estremità del tubo flessibile.
6. Staccare il collegamento da 12 volt dalla vettura e riporre il cavo nell’apposito vano.
Nota: durante il gonfiaggio, il manometro fornisce solo un valore orientativo e non è possibile
leggere il valore esatto della pressione.
ATTENZIONE
Non generare sovrapressioni. Possono causare danni a persone o danneggiare
irreparabilmente l’apparecchio. Durante l’uso non lasciare il compressore incustodito! Dopo un
funzionamento continuo di 10 minuti, lasciare raffreddare il compressore per almeno 10 minuti!
Sostituzione del fusibile
1. Sostituzione del fusibile nel connettore: aprire il rivestimento superiore del connettore
girandolo.
2. Togliere il fusibile difettoso e inserirne uno nuovo.
3. Riapplicare il rivestimento sul connettore.
Dati tecnici
• Tensione d’esercizio: 12 volt
• Cilindro: 19 mm
• Potenza max. / pressione max.: 150PSI / 10 bar
• Pressione d’esercizio: 0,3 – 2,7 bar
• Portata: 10 l/min.+-10%
• Fusibile: 10A
• Alimentatore: 12 volt
• Dimensioni (lungh. x largh. x h): ca. 17 x 6 x 13,5 cm
• Peso: ca. 800 g
Accessori: 2 adattatori
Avvertenze sulla tutela dell’ambiente
Gli apparecchi elettrici non devono essere smaltiti con i rifiuti domestici, ma presso i
centri di raccolta pubblici/comunali.
I materiali sono riciclabili, come indicato sui contrassegni. Con il riciclaggio, il
recupero o altre forme di riutilizzo di apparecchiature vecchie, si fornisce un
notevole contributo alla tutela del nostro ambiente.
NL
Minicompressor
Art.-nr. 21065
Gebruiksaanwijzing
Universeel bruikbaar bijv. voor het oppompen van auto-, motorfietsopblaasbaar speelgoed, luchtmatrassen en rubberboten.
• Maximaal vermogen 150 PSI / 10 bar
• Met schakelaar en manometer
• Geïntegreerd opbergvak voor kabel en toebehoren

• Incl. adapter
• Stroomtoevoer via 12-volt-sigarettenaansteker
• 3 m aansluitkabel
WAARSCHUWING
Lees de handleiding voor ingebruikneming aandachtig door en neem alle
veiligheidsvoorschriften in acht! Bewaar de originele verpakking, het
aankoopbewijs en deze handleiding voor latere raadpleging!
WAARSCHUWING
Lees deze handleiding voor ingebruikneming aandachtig door! Niet-naleving kan
lichamelijke letsels, schade aan het apparaat of andere materiële schade
veroorzaken!
1. Zorg ervoor dat de luchtdruk niet boven de aanbeveling van de fabrikant uitkomt!
2. Bescherm de compressor en zijn componenten tegen vocht!
3. Laat de compressor niet onbeheerd achter als hij in gebruik is!
4. Houd de compressor buiten het bereik van kinderen en laat dit apparaat niet door kinderen
bedienen!
5. Gebruik dit product uitsluitend voor de doeleinden waarvoor het ontworpen is!
6. Manipuleer of demonteer de compressor niet!
7. Indien de compressor abnormale geluiden produceert of oververhit raakt, schakel hem dan
onmiddellijk uit en laat hem ten minste 30 minuten afkoelen!
8. Controleer de compressor voor ingebruikneming. Beschadigde, gebarsten of gebroken
onderdelen mogen uitsluitend door gekwalificeerde technici gerepareerd worden!
9. Stel de compressor nooit bloot aan vorst, regen of temperaturen boven 30 °C of onder –
30 °C!
10. Gebruik de compressor nooit bij dieren of mensen!
11. Zorg ervoor dat de slang en de kabel niet beschadigd kunnen worden door scherpe randen,
olie of hete voorwerpen!
12. Waarschuwing! Gebruik voor uw eigen veiligheid uitsluitend toebehoren of
vervangonderdelen die in de handleiding vermeld of door de fabrikant aanbevolen worden!
WAARSCHUWING
Deze handleiding bevat informatie over de werking en de prestaties. Bewaar de
handleiding voor latere raadpleging. Controleer voor de ingebruikneming de
inhoud van de verpakking op beschadigingen en volledigheid!
Gebruiksaanwijzing
Oppompen van autobanden en fietsbanden
1. Wikkel de 12-volt-kabel af en verbind de 12-volt-adapter met de 12-volt-aansluiting van
uw voertuig.
2. Draai de schroefdraadbus van het slanguiteinde op het bandenventiel.
3. Start de compressor door de schakelaar (3) te bedienen tot de gewenste bandendruk
bereikt is. Schakel nu de compressor uit.
4. Koppel de 12-volt-aansluiting los van het voertuig en verwijder de
schroefdraadaansluiting van het bandenventiel.
Opmerking: controleer de bandendruk van uw voertuig aan de hand van de aanbevolen
waarden in de handleiding om een overdruk te vermijden. Fietsbanden controleert u aan de
hand van het nummer.
Oppompen van sportartikelen (bijv. basketbal) of luchtballons
1. Wikkel de 12-volt-kabel af en verbind de 12-volt-adapter met de 12-volt-aansluiting van

uw voertuig.
1. Vervangen van de zekering in de stekker: open de bovenste afdekking van de stekker door te
2. Draai de bal-/ballonadapter in de schroefdraadbus van het slanguiteinde.
3. Steek de bal-/ballonadapter in het ventiel van het op te blazen voorwerp.
4. Start de compressor door de schakelaar (3) in te drukken tot de gewenste stevigheid
bereikt is of het voorwerp volledig opgeblazen is. Schakel nu de compressor uit.
5. Verwijder de adapter uit het ventiel van het opgeblazen voorwerp en draai de
schroefdraadbus van het slanguiteinde.
6. Koppel de 12-volt-aansluiting los van het voertuig en bewaar de kabel in het daarvoor
voorziene vak.
Opmerking: tijdens het oppompen geeft de manometer alleen maar een waarde bij benadering
aan. Een nauwkeurige drukwaarde wordt niet weergegeven.
OPGELET
Zorg ervoor dat er geen overdruk ontstaat, deze kan lichamelijke letsels of beschadiging
van het apparaat veroorzaken. Laat de compressor tijdens het gebruik niet onbeheerd achter!
Laat de compressor na 10 minuten ononderbroken gebruik ten minste 10 minuten afkoelen!
Vervangen van de zekering
draaien.
2. Verwijder de defecte zekering en plaats een nieuwe zekering.
3. Draai de afdekking weer op de stekker.
Technische gegevens
• Bedrijfsspanning: 12 volt
• Cilinder: 19 mm
• Max. vermogen / max. druk: 150 PSI / 10 bar
• Arbeidsdruk: 0,3 – 2,7 bar
• Verdringing: 10 L/Min+-10%
• Zekering: 10 A
• Voedingsapparaat: 12 volt
• Afmetingen (lxbxh): ca. 17 x 6 x 13,5 cm
• Gewicht: ca. 800 g
Toebehoren: 2 adapters
Milieubescherming
Elektrische apparaten mogen niet samen met het gewone huishoudelijke afval
verwijderd worden! Breng het afgedankte apparaat naar de afvalinzamelplaats van
uw gemeente.
De materialen kunnen gerecycled worden conform hun aanduiding. Met het
hergebruik, de stoffelijke verwerking of andere vormen van recycling levert u een
belangrijke bijdrage tot de bescherming van ons milieu!

CZ
a jízdních kol,
Mini kompresor
!. v"r. 21065
Návod k pou#ití
Univerzální pou&ití nap$íklad k nafukování pneumatik automobil!, motocykl!
mí#!, nafukovacích hra#ek, matrací a #lun!
• Maximální v"kon 150PSI / 10 bar
• Se spína#em a manometrem
• Integrovaná p$ihrádka k odkládání kabelu a p$íslu%enství
• V#et. adaptéru
• Napájení p$es 12 V zapalova# cigaret
• P$ípojn" kabel 3 m
VAROVÁNÍ
P$ed uvedením za$ízení do provozu si d%kladn& p$e't&te návod k pou#ití a
respektujte v(echny bezpe'nostní pokyny! Originální obal, pokladní doklad a tento
návod si uschovejte pro p$ípad pozd&j(í pot$eby!
VAROVÁNÍ
P$ed uvedením p$ístroje do provozu si d%kladn& p$e't&te tento návod k pou#ití!
Nedodr#ováním návodu k pou#ití m%#e dojít ke zran&ní osob, po(kození p$ístroje
nebo (kodám na majetku!
1. Tlak vzduchu nikdy nezvy%ujte nad hodnoty doporu#ené v"robcem!
2. Kompresor a jeho komponenty chra)te p$ed vlhkostí!
3. Nikdy nenechávejte kompresor b'&et bez dozoru!
4. P$ístroj ukládejte mimo dosah d'tí a nedovolte d'tem, aby ho obsluhovaly!
5. Tento v"robek pou&ívejte pouze na stanoven" ú#el!
6. Nemanipulujte s kompresorem, ani ho nerozebírejte!
7. Pokud by kompresor vydával neobvyklé zvuky nebo se p$eh$íval, okam&it' ho vypn'te a nechte
minimáln' 30 minut vychladnout!
8. P$ed uvedením do provozu kompresor zkontrolujte. Po%kozené, roztr&ené nebo prasklé konstruk#ní díly
by m'l opravovat pouze kvalifikovan" technik!
9. Kompresor nikdy nevystavujte mrazu, de%ti nebo teplotám vy%%ím ne& 30° C nebo ni&%ím ne& – 30° C!
10. Nikdy nepou&ívejte na #lov'ku nebo zví$atech!
11. Zajist'te, aby hadi#ka a kabel nebyly vystaveny ostr"m hranám, oleji nebo p$íli% hork"m p$edm't!m!
12. Varování! Pro vlastní bezpe#nost pou&ívejte pouze p$íslu%enství nebo náhradní díly, které jsou uvedeny
v návodu, nebo jejich& pou&ití doporu#uje v"robce!
VAROVÁNÍ
Tento návod vám má poskytnou informace o fungování a v"konu p$ístroje. Návod
uchovejte, abyste si ho mohli i v budoucnosti p$e'íst. P$ed uvedením do provozu
zkontrolujte obsah boxu, zda není po(kozen" a zda je kompletní!
Návod k pou#ití
Nafukování pneumatik osobních automobil% a jízdních kol
1. Odvi)te 12 V kabel a spojte 12 V adaptér se 12 V p$ípojkou va%eho vozidla.
2. Na%roubujte závitové pouzdro konce hadi#ky na ventil pneumatiky.
3. Spus*te kompresor stisknutím spína#e (3), dokud se nedosáhne po&adovan" tlak
vzduchu v pneumatice. Poté kompresor vypn'te.
4. Odpojte 12 V p$ípojku vozidla a sejm'te závitovou p$ípojku z ventilu pneumatiky.
Upozorn'ní: Zkontrolujte tlak vzduchu v pneumatikách va%eho vozidla podle hodnoty
doporu#en"ch v návodu, abyste p$ede%li p$ehu%t'ní pneumatiky. Pneumatiky jízdních kol
zkontrolujte podle ozna#ení na pneumatikách.

Nafukování sportovního ná$adí (nap$. basketbalového mí'e) nebo balón%
1. Odvi)te 12 V kabel a spojte 12 V adaptér se 12 V p$ípojkou va%eho vozidla.
2. Adaptér pro mí#e a balóny na%roubujte do závitového pouzdra konce hadi#ky.
3. Zasu)te adaptér pro mí#e a balóny do ventilu nafukovaného objektu.
4. Stisknutím spína#e (3) spus*te kompresor a nechte ho v chodu, dokud nedosáhnete
po&adovanou pevnost nebo dokud nebude objekt úpln' nafouknut". Poté kompresor
vypn'te.
5. Vyjm'te adaptér z ventilu nafukovaného objektu a od%roubujte závitové pouzdro konce
hadi#ky.
6. Odpojte 12 V p$ípojku vozidla a kabel odlo&te do p$íslu%né p$ihrádky.
Upozorn&ní: B'hem nafukování uvádí manometr jen odhadovanou hodnotu; p$esná hodnota
tlaku se nedá ode#íst.
POZOR
Nevytvá$ejte p$etlak, mohl by zp!sobit poran'ní osob nebo zni#it p$ístroj. B'hem
pou&ívání nenechávejte kompresor bez dozoru! Po 10 minutách trvalého provozu nechte
kompresor minimáln' 10 minut vychladnout!
V"m&na pojistky
1. V"m'na pojistky v zástr#ce: otá#ením otev$ete horní kryt zástr#ky.
2. Vyjm'te vadnou pojistku a vlo&te novou pojistku.
3. Otá#ením kryt op't upevn'te na zástr#ce.
Technické údaje
• Provozní nap'tí: 12 V
• Válec: 19 mm
• Max. v"kon / max. tlak: 150PSI / 10 bar
• Pracovní tlak: 0,3 – 2,7 bar
• V"tlak: 10 l/min.+-10%
• Pojistka: 10A
• Sí*ov" zdroj: 12 V
• Velikost (dx%xv): cca 17 x 6 x 13,5 cm
• Hmotnost: cca 800 g
P$íslu%enství: 2 adaptéry
Pokyny pro ochranu #ivotního prost$edí
Elektrické p$ístroje se nesm'jí likvidovat s b'&n"m domovním odpadem! P$ístroj
zlikvidujte prost$ednictvím ve$ejn"ch nebo komunálních sb'ren.
Materiály jsou recyklovatelné, jak je uvedeno na ozna#ení. Recyklací, zhodnocením
surovin nebo jin"mi formami op'tovného vyu&ití pou&it"ch p$ístroj! p$ispíváte
k ochran' &ivotního prost$edí!

SK
itie napríklad na nafukovanie pneumatík automobilov, motocyklov a bicyklov,
nostné pokyny! Originálny obal, doklad o zakúpení ako aj
Mini kompresor
!. v"r. 21065
Návod na pou#itie
Univerzálne pou&
lôpt, nafukovacích hra#iek, matracov a #lnov
• Maximálny v"kon 150PSI / 10 bar
• So spína#om a manometrom
• Integrovan" prie#inok na odkladanie kábla a príslu%enstva
• Vrátane adaptéra
• Napájanie cez 12 V zapa+ova# cigariet
• Prípojn" kábel 3 m
VAROVANIE
Pred uvedením zariadenia do prevádzky si dôkladne pre'ítajte návod na pou#itie a
re(pektujte v(etky bezpe'
tento návod uschovajte pre prípad neskor(ej potreby!
VAROVANIE
1. Tlak vzduchu nikdy nezvy%ujte nad hodnoty odporú#ané v"robcom!
2. Kompresor a jeho komponenty chrá)te pre vlhkos*ou!
3. Nikdy nenechávajte kompresor be&a* bez dozoru!
4. Prístroj uchovávajte mimo dosahu detí a nedovo+te de*om obsluhova* ho!
5. Tento v"robok pou&ívajte iba na stanoven" ú#el!
6. Nemanipulujte s kompresorom, ani ho nerozoberajte!
7. Ak by kompresor vydával neobvyklé zvuky alebo sa prehrieval, okam&ite ho vypnite a nechajte minimálne
30 minút vychladnú*!
8. Pred uvedením do prevádzky kompresor skontrolujte. Po%kodené, roztrhnuté alebo prasknuté
kon%truk#né diely by mal opravova* v"lu#ne kvalifikovan" technik!
9. Kompresor nikdy nevystavujte mrazu, da&,u alebo teplotám vy%%ím ako 30° C alebo ni&%ím ako – 30° C!
10. Nikdy ho nepou&ívajte na #loveka alebo zviera!
11. Zabezpe#te, aby hadi#ka a kábel neboli vystavené ostr"m hranám, oleju alebo príli% horúcim
predmetom!
12. Varovanie! Pre vlastnú bezpe#nos* pou&ívajte v"lu#ne príslu%enstvo alebo náhradné diely, ktoré sú
uvedené v návode, alebo ktor"ch pou&itie odporú#a v"robca!
VAROVANIE
Návod na pou#itie
Nafukovanie pneumatík osobn"ch automobilov a bicyklov
1. Odvi)te 12 V kábel a spojte 12 V adaptér s 12 V prípojkou vá%ho vozidla
2. Naskrutkujte závitové puzdro konca hadi#ky na ventil pneumatiky.
3. Spustite kompresor stla#ením spína#a (3), a& pokia+ sa nedosiahne &elan" tlak
4. Odpojte 12 V prípojku vozidla a zlo&te závitovú prípojku z ventilu pneumatiky.
Upozornenie: Skontrolujte tlak vzduchu v pneumatikách vá%ho vozidla pod+a hodnôt
Pred uvedením prístroja do prevádzky si dôkladne pre'ítajte tento návod na
pou#itie! Jeho nere(pektovanie mô#e vies) k poraneniu osôb, po(kodeniu
prístroja alebo (kodám na majetku!
Tento návod vám má poskytnú) informácie o fungovaní a v"kone prístroja. Návod
uschovajte, aby ste si ho mohli aj v budúcnosti pre'íta). Pred uvedením do
prevádzky skontrolujte obsah boxu, 'i nie je po(koden" a 'i je kompletn"!
vzduchu v pneumatike. Potom kompresor vypnite.

odporú#an"ch v návode, aby ste predi%li prehusteniu pneumatiky. Pneumatiky bicyklov
skontrolujte pod+a ozna#enia na pneumatikách.
Nafukovanie (portového náradia (napr. basketbalovej lopty) alebo balónov
1. Odvi)te 12 V kábel a spojte 12 V adaptér s 12 V prípojkou vá%ho vozidla
2. Adaptér pre lopty a balóny naskrutkujte do závitového puzdra konca hadi#ky.
3. Zasu)te adaptér pre lopty a balóny do ventilu nafukovaného objektu.
4. Spustite kompresor stla#ením spína#a (3), a& k"m nedosiahnete &elanú pevnos* alebo
k"m nebude objekt úplne nafúknut". Potom kompresor vypnite.
5. Vyberte adaptér z ventilu nafukovaného objektu a odskrutkujte závitové puzdro konca
hadi#ky.
6. Odpojte 12 V prípojku vozidla a kábel odlo&te do príslu%ného prie#inku.
Upozornenie: Po#as nafukovania udáva manometer iba odhadovanú hodnotu; presná hodnota
tlaku sa nedá od#íta*.
POZOR
Nevytvárajte pretlak, mohol by spôsobi* poranenie osôb alebo zni#i* prístroj. Po#as
pou&ívania nenechávajte kompresor bez dozoru! Po 10 minútach trvalej prevádzky nechajte
kompresor aspo) 10 minút vychladnú*!
V"mena poistky
1. V"mena poistky v zástr#ke: otá#aním otvorte vrchn" kryt zástr#ky.
2. Vyberte chybnú poistku a zalo&te novú.
3. Otá#aním kryt opä* upevnite na zástr#ke.
Technické údaje
• Prevádzkové napätie: 12 V
• Valec: 19 mm
• Max. v"kon / max. tlak: 150PSI / 10 bar
• Pracovn" tlak: 0,3 – 2,7 bar
• V"tlak: 10 l/min.+-10%
• Poistka: 10A
• Sie*ov" zdroj: 12 V
• Ve+kos* (dx%xv): cca 17 x 6 x 13,5 cm
• Hmotnos*: cca 800 g
Príslu%enstvo: 2 adaptéry
Pokyny pre ochranu #ivotného prostredia
Elektrické prístroje sa nesmú likvidova* s be&n"m domov"m odpadom! Prístroj,
prosím, zlikvidujte prostredníctvom verejn"ch alebo komunálnych zberní.
Materiály sú recyklovate+né, ako je to uvedené na ozna#ení. Recykláciou,
zhodnotením surovín alebo in"mi formami opätovného vyu&itia pou&it"ch prístrojov
prispievate k ochrane &ivotného prostredia!
 Loading...