

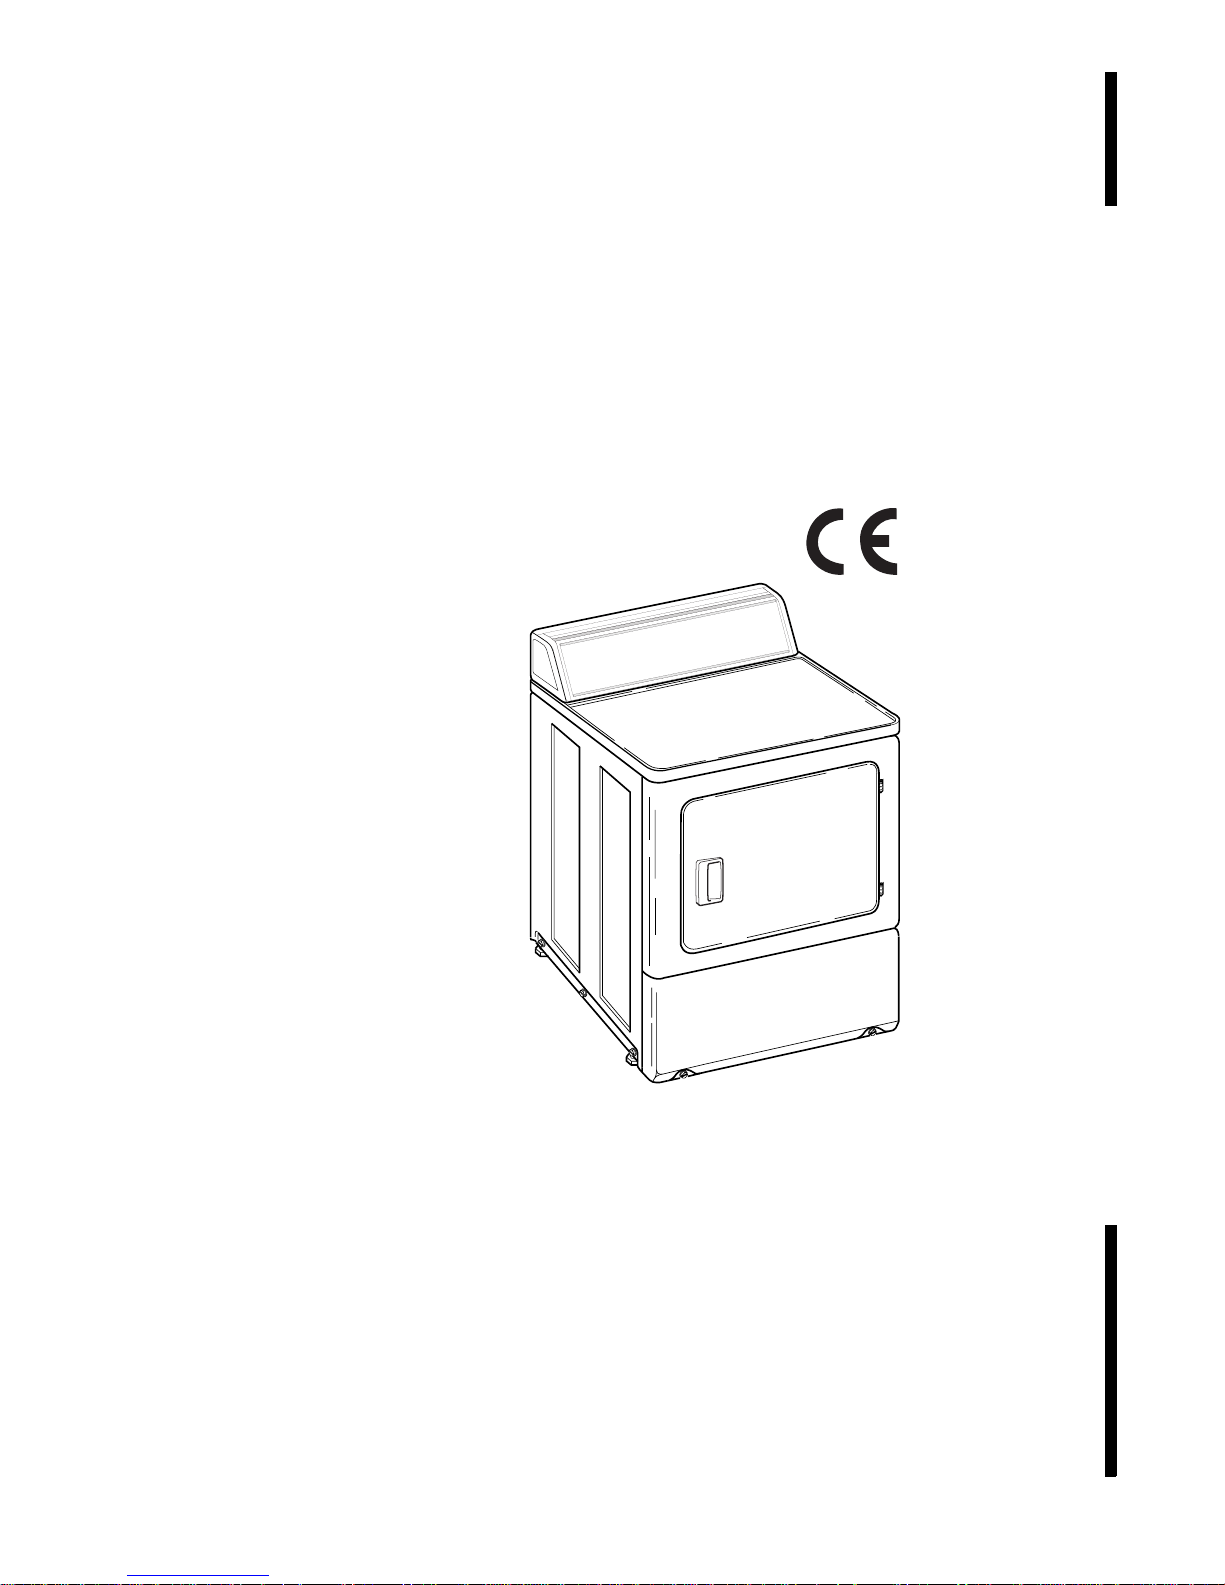
Eudora T11, T24 Installation/operation Supplement

PROFESSIONAL T UMBLE DRY ER
8,5kg
INSTALLATION / OPERATION SUPPLEMENT
511472R2
Publication da te: Decemb er 2007

Installation/Operation Supplement
WARNING
FOR YOUR SAFETY, the information in this manual must be followed to minimize
the risk of fire or explosion or to prevent property damage, personal injury or
death.
• Do not store or use gasoline or other flammable vapors and liquids in the vicinity of this
or any other appliance.
• WHAT TO DO IF YOU SMELL GAS:
– Do not try to light any appliance.
– Do not touch any electrical switch; do not use any phone in your building.
– Clear the room, building or area of all occupants.
– Immediately call your gas supplier from a neighbor’s phone. Follow the gas supplier’s
instructions.
– If you cannot reach your gas supplier, call the fire department.
• Installation and service must be performed by a qualified installer, service agency or the
gas supplier.
IMPORTANT: Purchaser must consult the local gas supplier for suggested instructions to be followed if the
dryer user smells gas. The gas utility instructions plus the SAFETY and WARNING note directly above
must be posted in a prominent location near the dryer for customer use.
W033
W052
FOR YOUR SAFETY
Do not store or use gasoline or other flammable vapors and liquids in the vicinity of
this or any other appliance.
W053
511472 (EN)
© Published by permission of the copyright owner – DO NOT COPY or TRANSMIT
1

Installation/Operation Supplement
Table of
Contents
Safety Information............................................................................3
Explanation of Safety Messages.........................................................3
Important Safety Instructions .............................................................3
Installation.........................................................................................5
Dimensions and Specifications........................................................... 5
Installing the Dryer.............................................................................6
Step 1: Position and Level the Dryer ............................................. 6
Step 2: Connect Dryer Exhaust System......................................... 6
Step 3: Connect Gas Supply Pipe
(Gas Dryer Only).......................................................................... 7
Step 4: Wipe Out Inside of Dryer ..................................................8
Step 5: Connect the Dryer to Electrical Power .............................. 8
Step 6: Check Installation .............................................................. 8
Heat Source Check .............................................................................9
Electric Dryers ............................................................................... 9
Gas Dryers .....................................................................................9
Electrical Requirements...................................................................... 9
Electric Dryers ............................................................................... 9
Gas Dryers ...................................................................................10
Gas Requirements............................................................................. 11
Gas Dryers ...................................................................................11
Location Requirements.....................................................................12
Dryer Exhaust Requirements............................................................13
Exhaust System Materials............................................................13
Make-Up Air Requirements.........................................................13
Exhaust Direction......................................................................... 14
Dryer Airflow............................................................................... 15
Operation.........................................................................................16
Operation Instructions ......................................................................16
Step 1: Clean Lint Filter...............................................................16
Step 2: Load Laundry................................................................... 16
Step 3: Close Loading Door......................................................... 16
Step 4: Select Temperature Setting..............................................16
Step 5: Set Timer Knob................................................................17
Step 6: Start Dryer .......................................................................17
Step 7: Remove Laundry ............................................................. 17
End of Cycle Signal ..................................................................... 17
Disposal of Unit............................................................................... 18
© Published by permission of the copyright owner.
2
© Published by permission of the copyright owner – DO NOT COPY or TRANSMIT
511472 (EN)
Installation/Operation Supplement
Safety Information
Explanation of Safety Messages
Throughout this manual and on machine decals, you
will find precautionary statements (“DANGER,”
“WARNING,” and “CAUTION”) followed by specific
instructions. These precautions are intended for the
personal safety of the operator, user, servicer, and
those maintaining the machine.
DANGER
Indicates an imminently hazardous
situation that, if not avoided, will cause
severe personal injury or death.
WARNING
Indicates a hazardous situation that, if not
avoided, could cause severe personal
injury or death.
CAUTION
Indicates a hazardous situation that, if not
avoided, may cause minor or moderate
personal injury or property damage.
Additional precautionary statements (“IMPORTANT”
and “NOTE”) are followed by specific instructions.
IMPORTANT: The word “IMPORTANT” is used
to inform the reader of specific procedures where
minor machine damage will occur if the procedure
is not followed.
NOTE: The word “NOTE” is used to communicate
installation, operation, maintenance or servicing
information that is important but not hazard
related.
Important Safety Instructions
Save These Instructions
WARNING
To reduce the risk of fire, electric shock,
or injury to persons when using your
dryer, follow these basic precautions:
W034
1. Read all instructions before using the dryer.
2. Refer to the EARTHING INSTRUCTIONS in
the INSTALLATION manual for the proper
earthing of the dryer.
3. Do not dry articles that have been previously
cleaned in, washed in, soaked in, or spotted with
gasoline, dry-cleaning solvents, other flammable
or explosive substances as they give off vapors
that could ignite or explode.
4. Do not allow children to play on or in the dryer.
Close supervision of children is necessary when
the dryer is used near children. This is a safety
rule for all appliances.
5. Before the dryer is removed from service or
discarded, remove the door to the drying
compartment.
6. Do not reach into the dryer if the cylinder is
revolving.
7. Do not install or store the dryer where it will be
exposed to water and/or weather.
8. Do not tamper with the controls.
9. Do not repair or replace any part of the dryer, or
attempt any servicing unless specifically
recommended in the user-maintenance
instructions or in published user-repair
instructions that you understand and have the
skills to carry out.
511472 (EN)
© Published by permission of the copyright owner – DO NOT COPY or TRANSMIT
3

Installation/Operation Supplement
10. Do not use fabric softeners or products to
eliminate static unless recommended by the
manufacturer of the fabric softener or product.
11. To reduce the risk of fire, DO NOT DRY plastics
or articles containing foam rubber or similarly
textured rubberlike materials.
12. ALWAYS clean the lint filter after every load. A
layer of lint in the filter reduces drying efficiency
and prolongs drying time.
13. Keep area around the exhaust opening and
adjacent surrounding area free from the
accumulation of lint, dust and dirt.
14. The interior of the dryer and the exhaust duct
should be cleaned periodically by qualified
service personnel.
15. If not installed, operated and maintained in
accordance with the manufacturer’s instructions
or if there is damage to or mishandling of this
product’s components, use of this product could
expose you to substances in the fuel or from fuel
combustion which can cause death or serious
illness and which are known to the State of
California to cause cancer, birth defects or other
reproductive harm.
16. Dryer will not operate with the loading door
open. DO NOT bypass the door safety switch by
permitting the dryer to operate with the door
open. The dryer will stop tumbling when the door
is opened. Do not use the dryer if it does not stop
tumbling when the door is opened or starts
tumbling without pressing the START
mechanism. Remove the dryer from use and call
the service person.
17. Do not put articles soiled with vegetable or
cooking oil in the dryer, as these oils may not be
removed during washing. Due to the remaining
oil, the fabric may catch on fire by itself.
18. To reduce the risk of fire, DO NOT put clothes
which have traces of any flammable substances
such as machine oil, flammable chemicals,
thinner, etc., or anything containing wax or
chemicals such as in mops and cleaning cloths, or
anything dry-cleaned at home with a drycleaning solvent in the dryer.
19. Use the dryer only for its intended purpose,
drying clothes.
20. Always disconnect the electrical power to the
dryer before attempting service. Disconnect the
power cord by grasping the plug, not the cord.
21. If supply cord is damaged, it must be replaced by
a special cord or assembly available from the
manufacturer or its service agent.
22. Install this dryer according to the
INSTALLATION INSTRUCTIONS. All
connections for electrical power, grounding and
gas supply must comply with local codes and be
made by licensed personnel when required. Do
not do it yourself unless you know how!
23. Remove laundry immediately after the dryer
stops.
24. Always read and follow manufacturer’s
instructions on packages of laundry and cleaning
aids. Heed all warnings or precautions. To reduce
the risk of poisoning or chemical burns, keep
them out of reach of children at all times
(preferably in a locked cabinet).
25. Do not tumble fiberglass curtains and draperies
unless the label says it can be done. If they are
dried, wipe out the cylinder with a damp cloth to
remove particles of fiberglass.
26. ALWAYS follow the fabric care instructions
supplied by the garment manufacturer.
27. Never operate the dryer with any guards and/or
panels removed.
28. DO NOT operate the dryer with missing or
broken parts.
29. DO NOT bypass any safety devices.
30. Failure to install, maintain, and/or operate this
machine according to the manufacturer’s
instructions may result in conditions which can
produce bodily injury and/or property damage.
IMPORTANT: Solvent vapors from dry-cleaning
machines create acids when drawn through the
heater of the drying unit. These acids are corrosive
to the dryer as well as to the laundry load being
dried. Be sure make-up air is free of solvent vapors.
IMPORTANT: Have your dryer installed properly.
Don’t do it yourself unless you know how!
NOTE: The WARNINGS and IMPORTANT
SAFETY INSTRUCTIONS appearing in this
manual are not meant to cover all possible
conditions and situations that may occur. Common
sense, caution and care must be exercised when
installing, maintaining, or operating the dryer.
Always contact your dealer, distributor, service agent
or the manufacturer about any problems or conditions
you do not understand.
4
© Published by permission of the copyright owner – DO NOT COPY or TRANSMIT
511472 (EN)

Installation
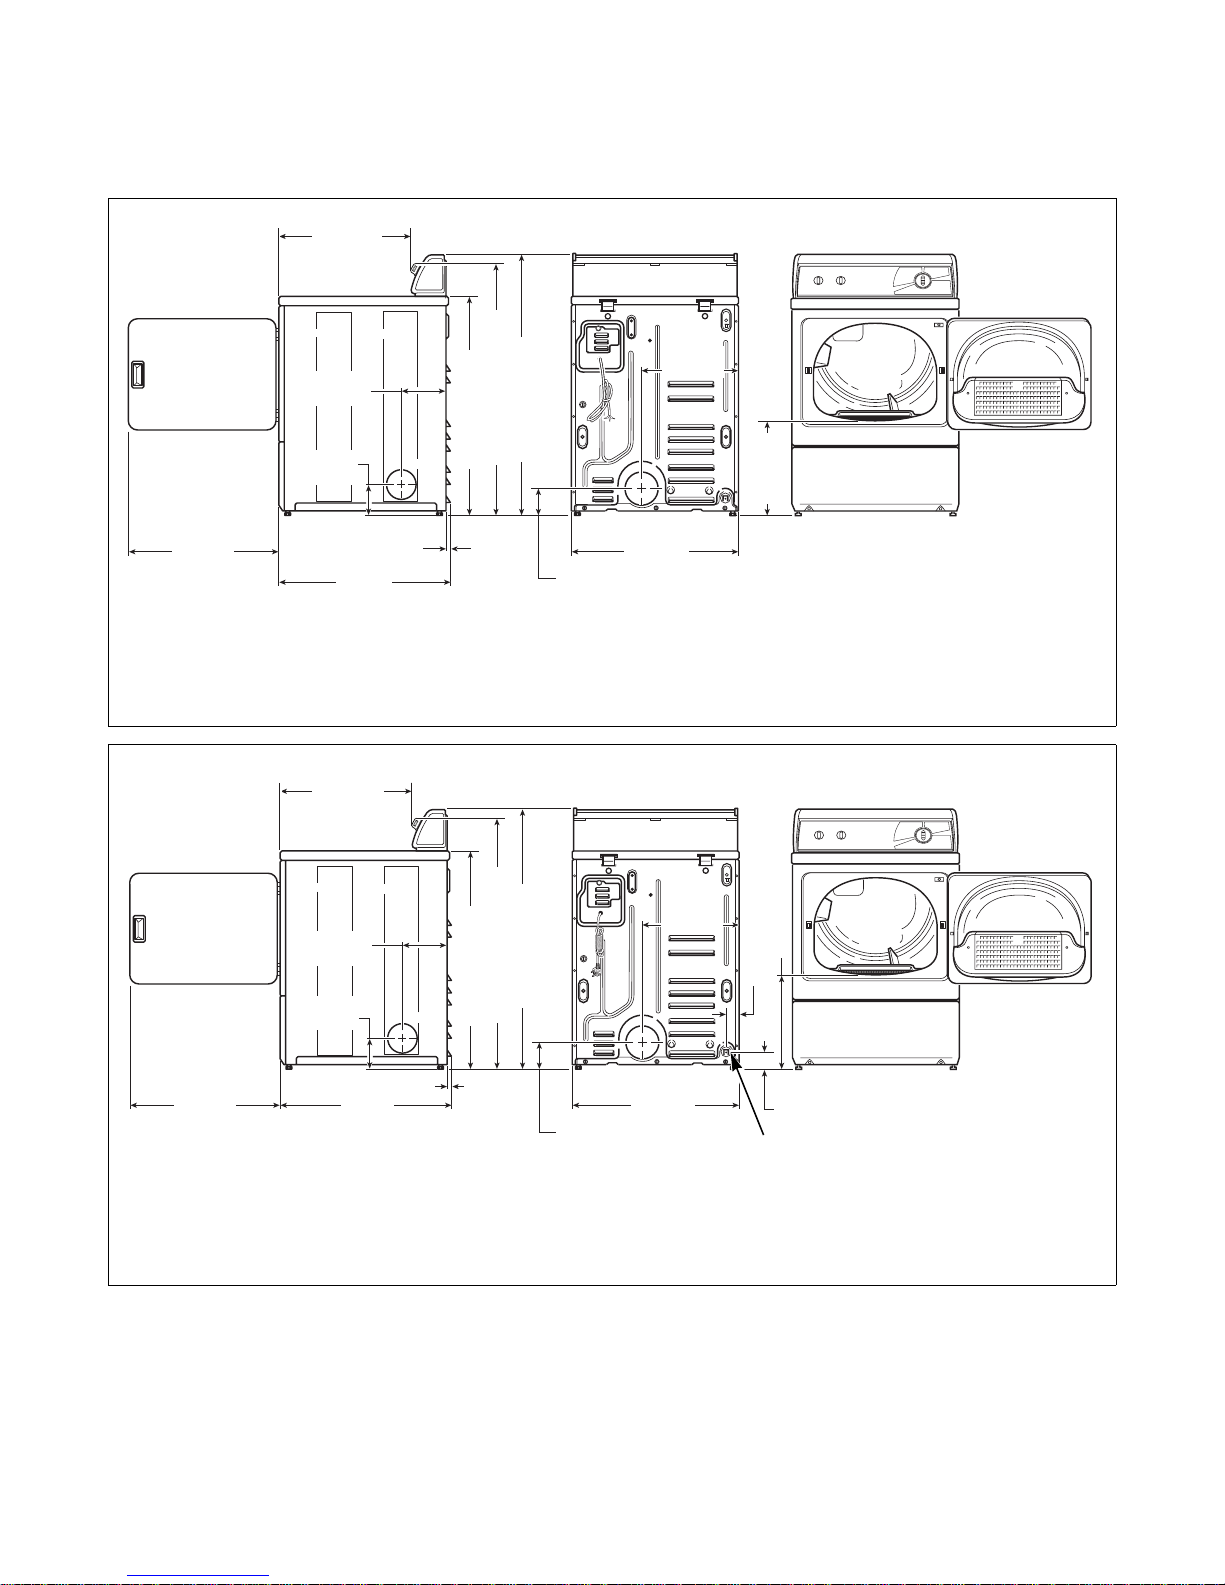
Dimensions and Specifications
569 mm
(22.38 in.)
203 mm
(8.0 in.)
*114 mm
(4.5 in.)
*1022 mm (40.25 in.)
*914 mm (36 in.)
*1092 mm (43 in.)
391 mm
(15.4 in.)
Installation/Operation Supplement
*392 mm
(15.44 in.)
597 mm
(23.5 in.)
711 mm
(28 in.)
*With leveling legs turned into base.
569 mm
(22.38 in.)
203 mm
(8.0 in.)
*114 mm
(4.5 in.)
597 mm
(23.5 in.)
711 mm
(28 in.)
11 mm
(0.4 in.)
*102 mm
(4.0 in.)
ELECTRIC DRYERS
*1092 mm (43 in.)
*1022 mm (40.25 in.)
*914 mm (36 in.)
11 mm
(0.4 in.)
*102 mm
(4.0 in.)
683 mm
(26.9 in.)
(15.4 in.)
683 mm
(26.9 in.)
391 mm
60 mm (2.3 in.)
*70 mm
(2.8 in.)
1
DRY2199N
DRY2199N
*392 mm (15.44 in.)
DRY2200N
*With leveling legs turned into base.
1 3/8 in. NPT Gas Connection
511472 (EN)
© Published by permission of the copyright owner – DO NOT COPY or TRANSMIT
GAS DRYERS
DRY2200N
5
Installation/Operation Supplement
Installing the Dryer
NOTE: This manual is only a supplement. Refer to
installation/operation manual for full instructions.
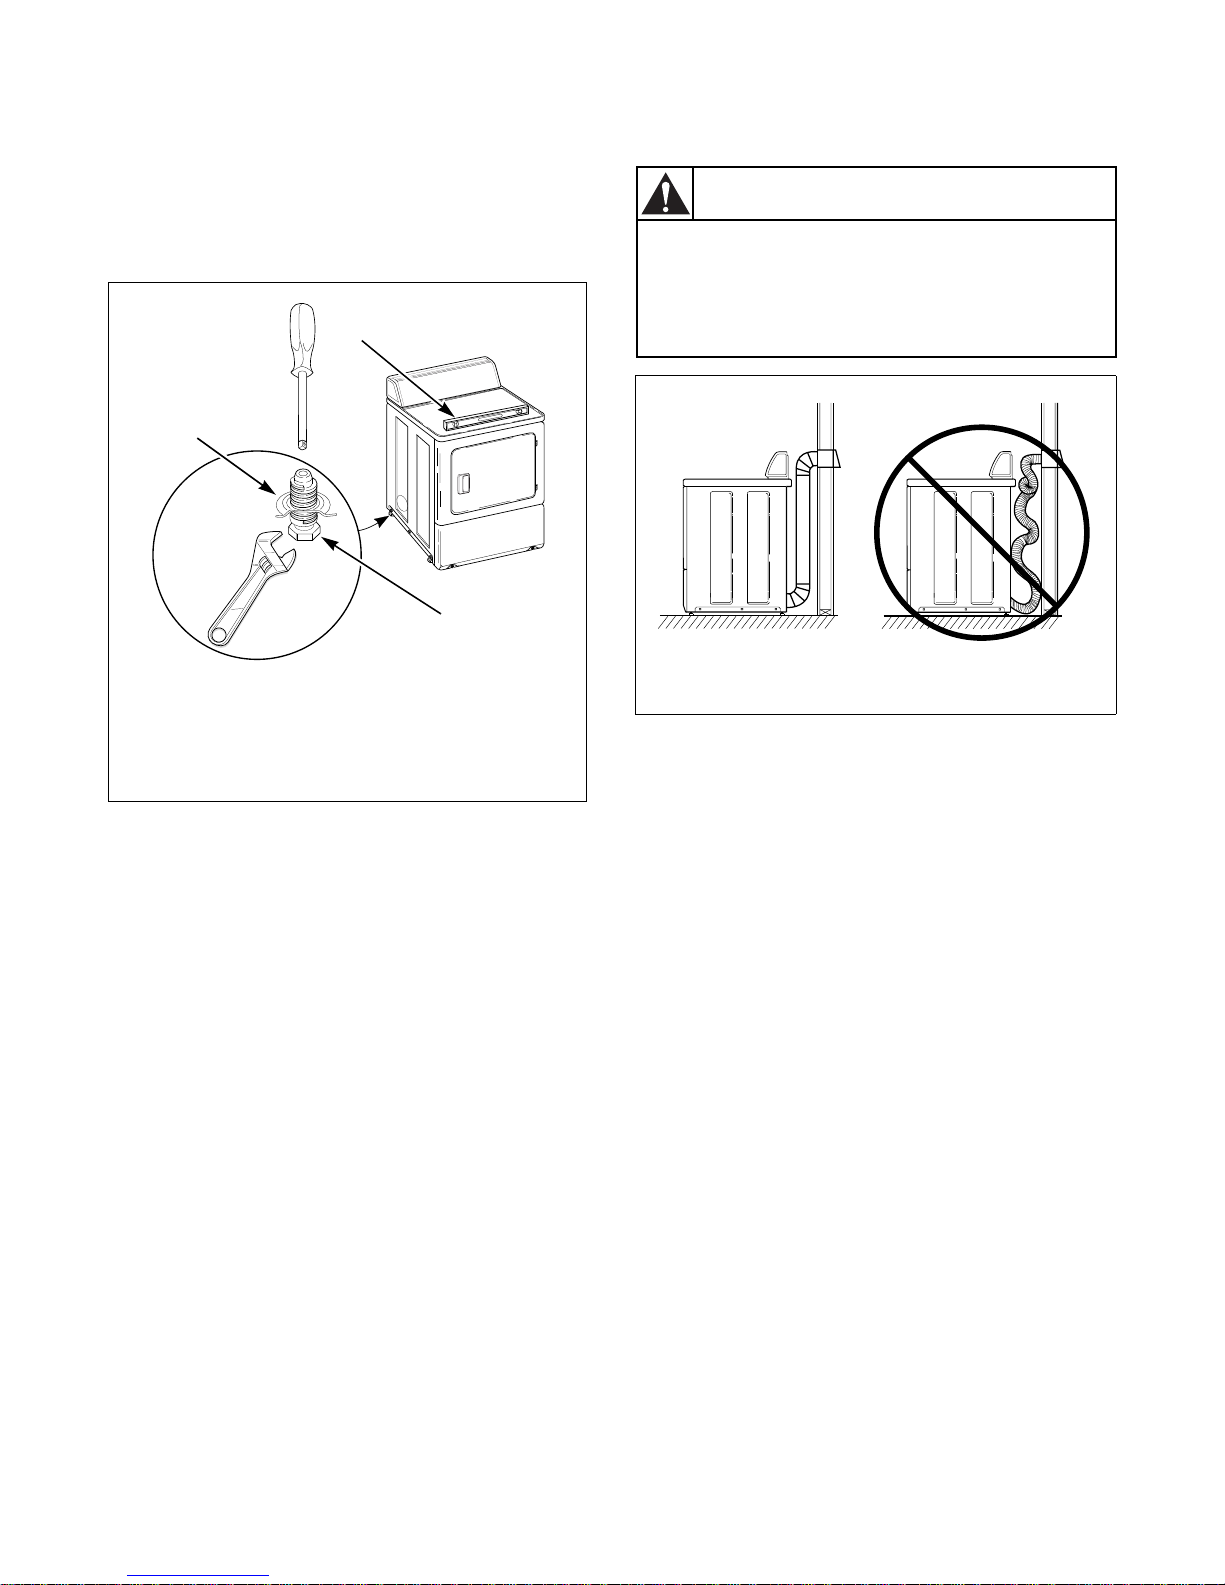
Step 1: Position and Level the Dryer
F
2
1
3
D707I
D707I
1 Dryer Base
2 Level
3 Leveling Leg
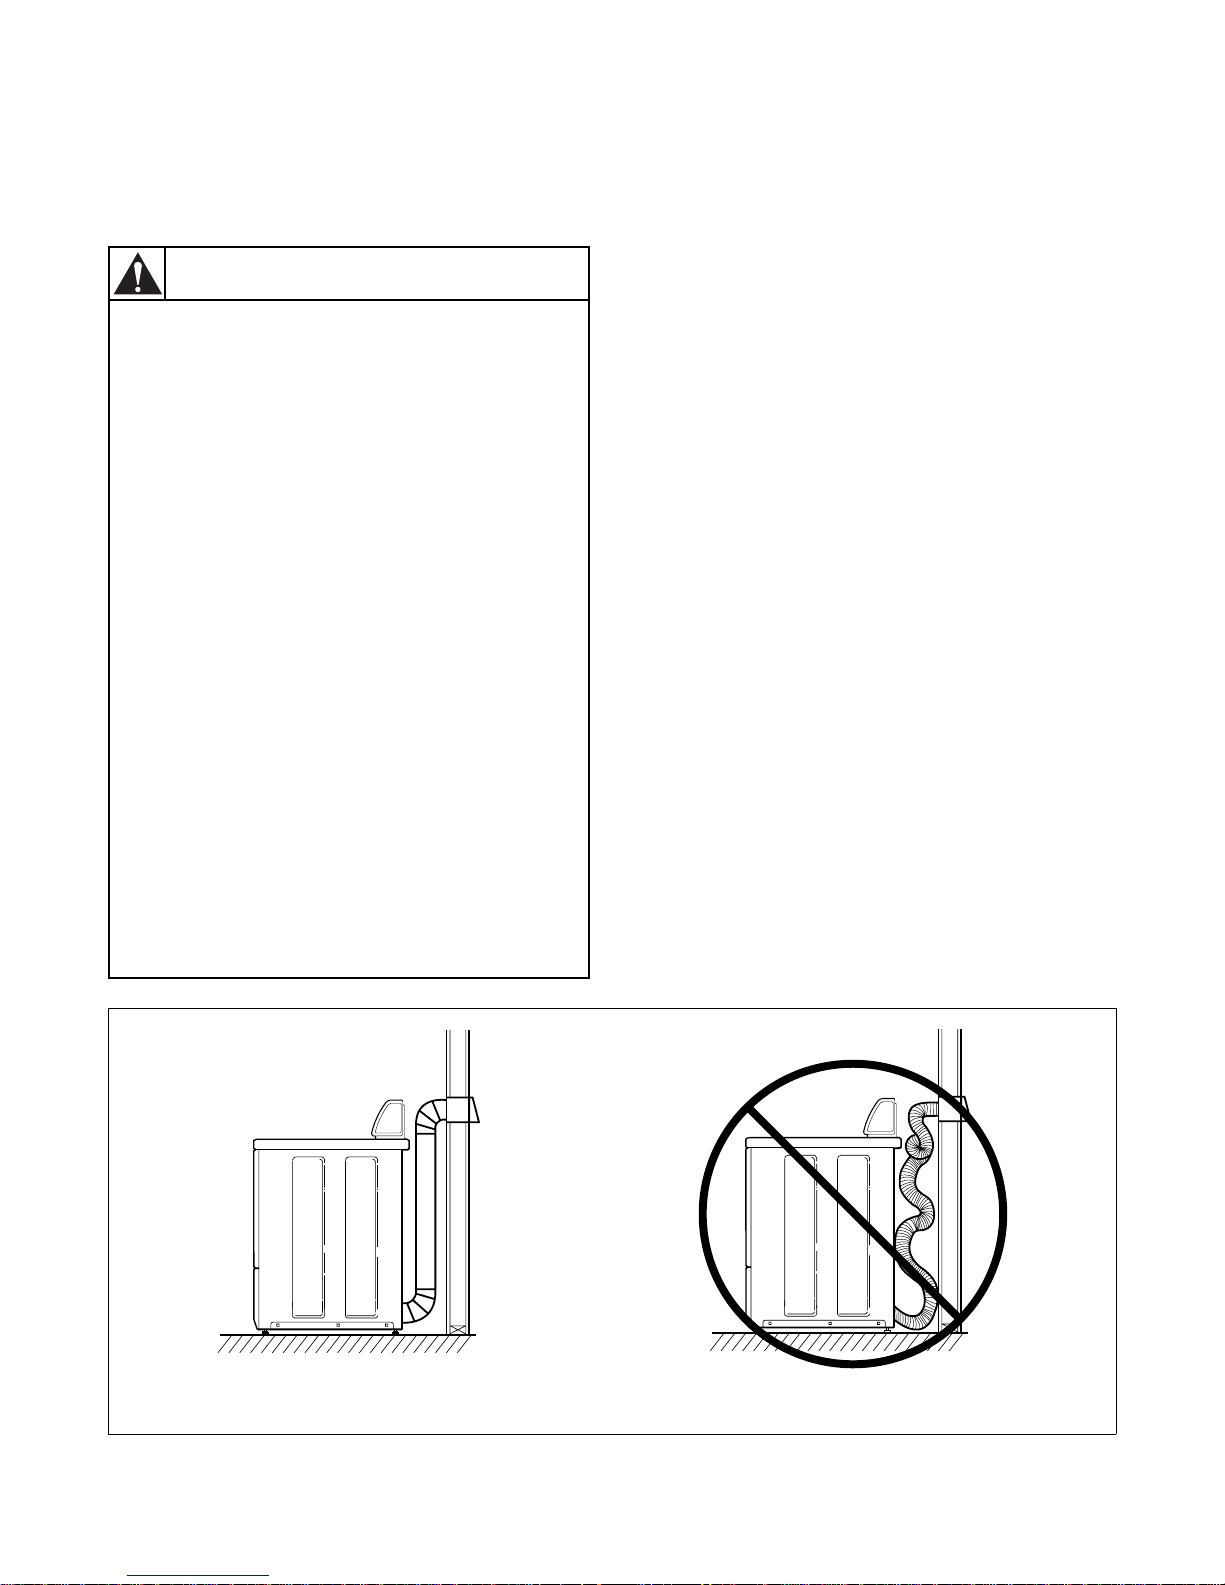
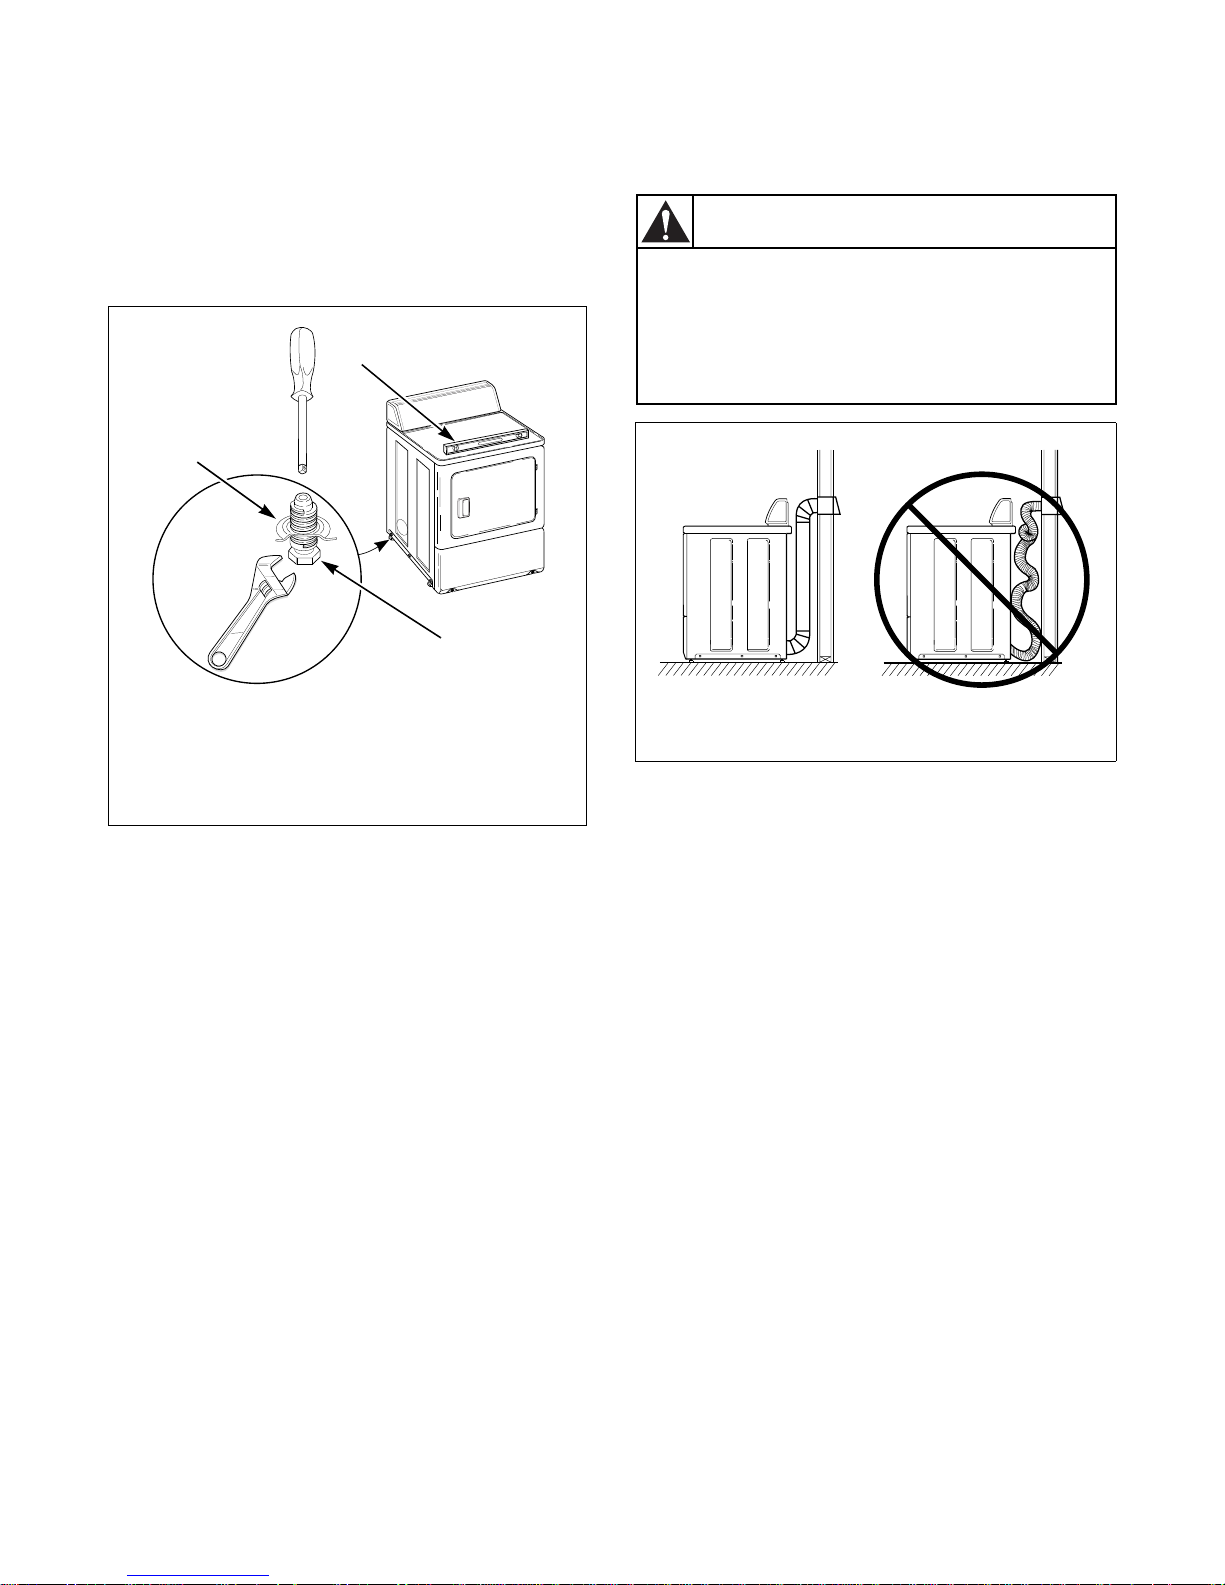
Step 2: Connect Dryer Exhaust System
WARNING
A clothes dryer produces combustible
lint. To reduce the risk of fire and
combustion gas accumulation the dryer
MUST be exhausted to the outdoors.
W116
.
DO DON’T
D314I D315I
Figure 2
Figure 1
6
© Published by permission of the copyright owner – DO NOT COPY or TRANSMIT
511472 (EN)
Installation/Operation Supplement
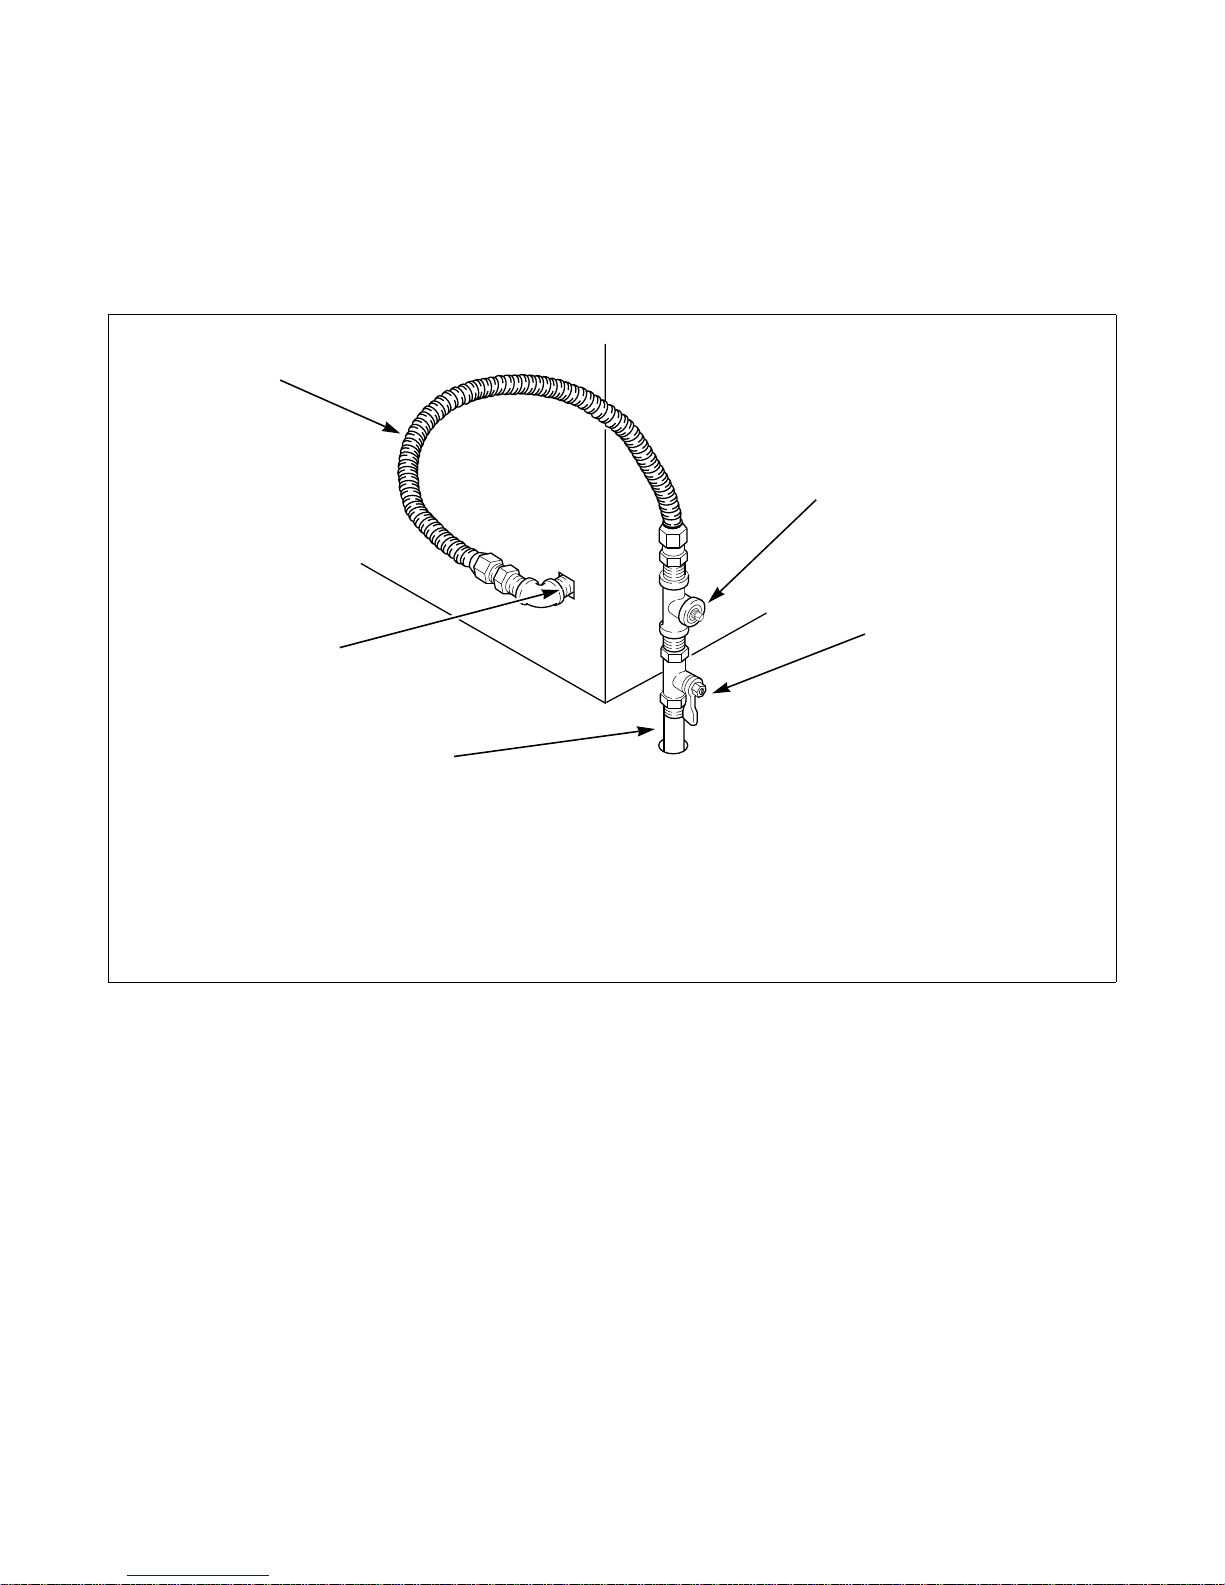
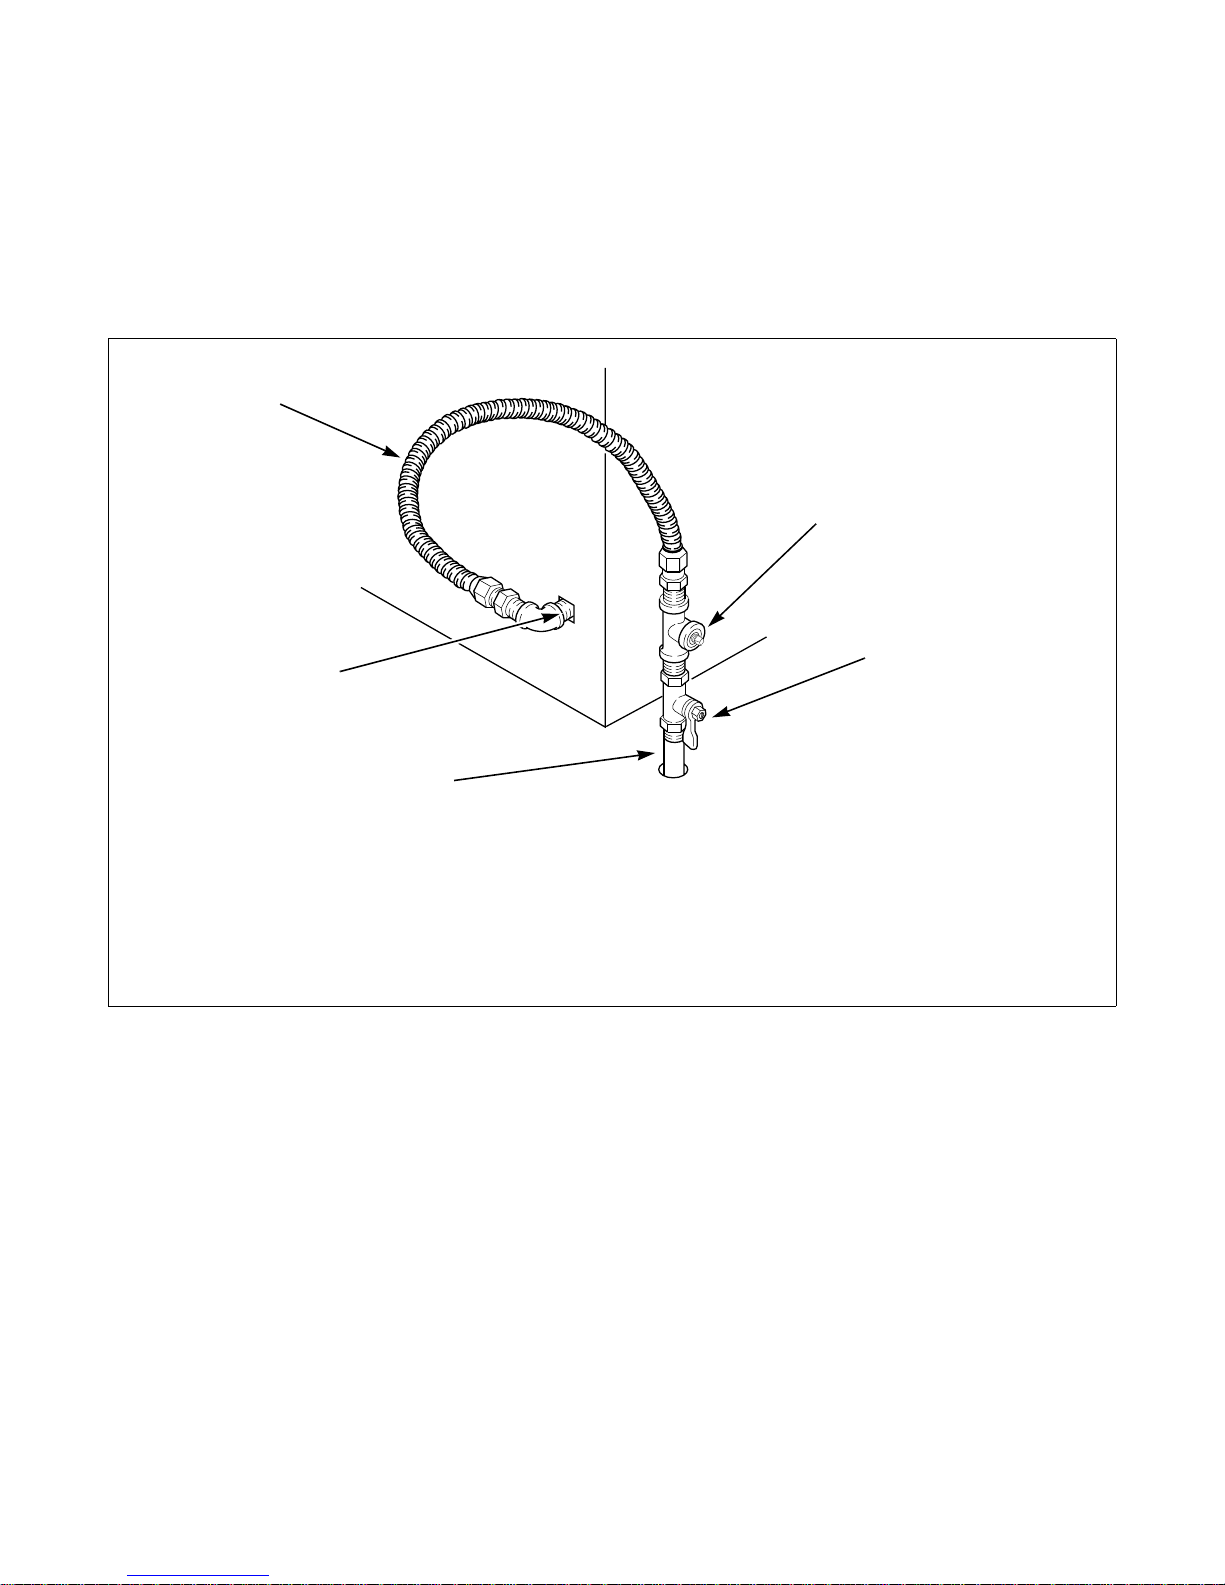
Step 3: Connect Gas Supply Pipe
(Gas Dryer Only)
For further assistance, refer to section on Gas
Requirements.
1. Make certain your dryer is equipped for use with
the type of gas in your laundry room.
1
5
2. Remove the shipping cap from the gas
connection at the rear of the dryer.
3. Connect to gas supply pipe.
4. Tighten all connections securely.
5. For L.P. (Liquefied Petroleum) gas connection,
refer to section on Gas Requirements.
2
3
4
1 New Stainless Steel Flexible Connector –
Use only if allowed by local codes
(Use Design CSA Certified Connector)
2 1/8 in. NPT Pipe Plug
(For checking inlet gas pressure)
3 Equipment Shut-Off Valve – Installed within
1.8 m (6 ft.) of dryer
D233I
D233I
4 Black Iron Pipe
Shorter than 6.1 m (20 ft.) – Use 9.5 mm
(3/8 in.) pipe
Longer than 6.1 m (20 ft.) – Use 12.7 mm
(1/2 in.) pipe
5 3/8 in. NPT Gas Connection
Figure 3
511472 (EN)
© Published by permission of the copyright owner – DO NOT COPY or TRANSMIT
7
Installation/Operation Supplement
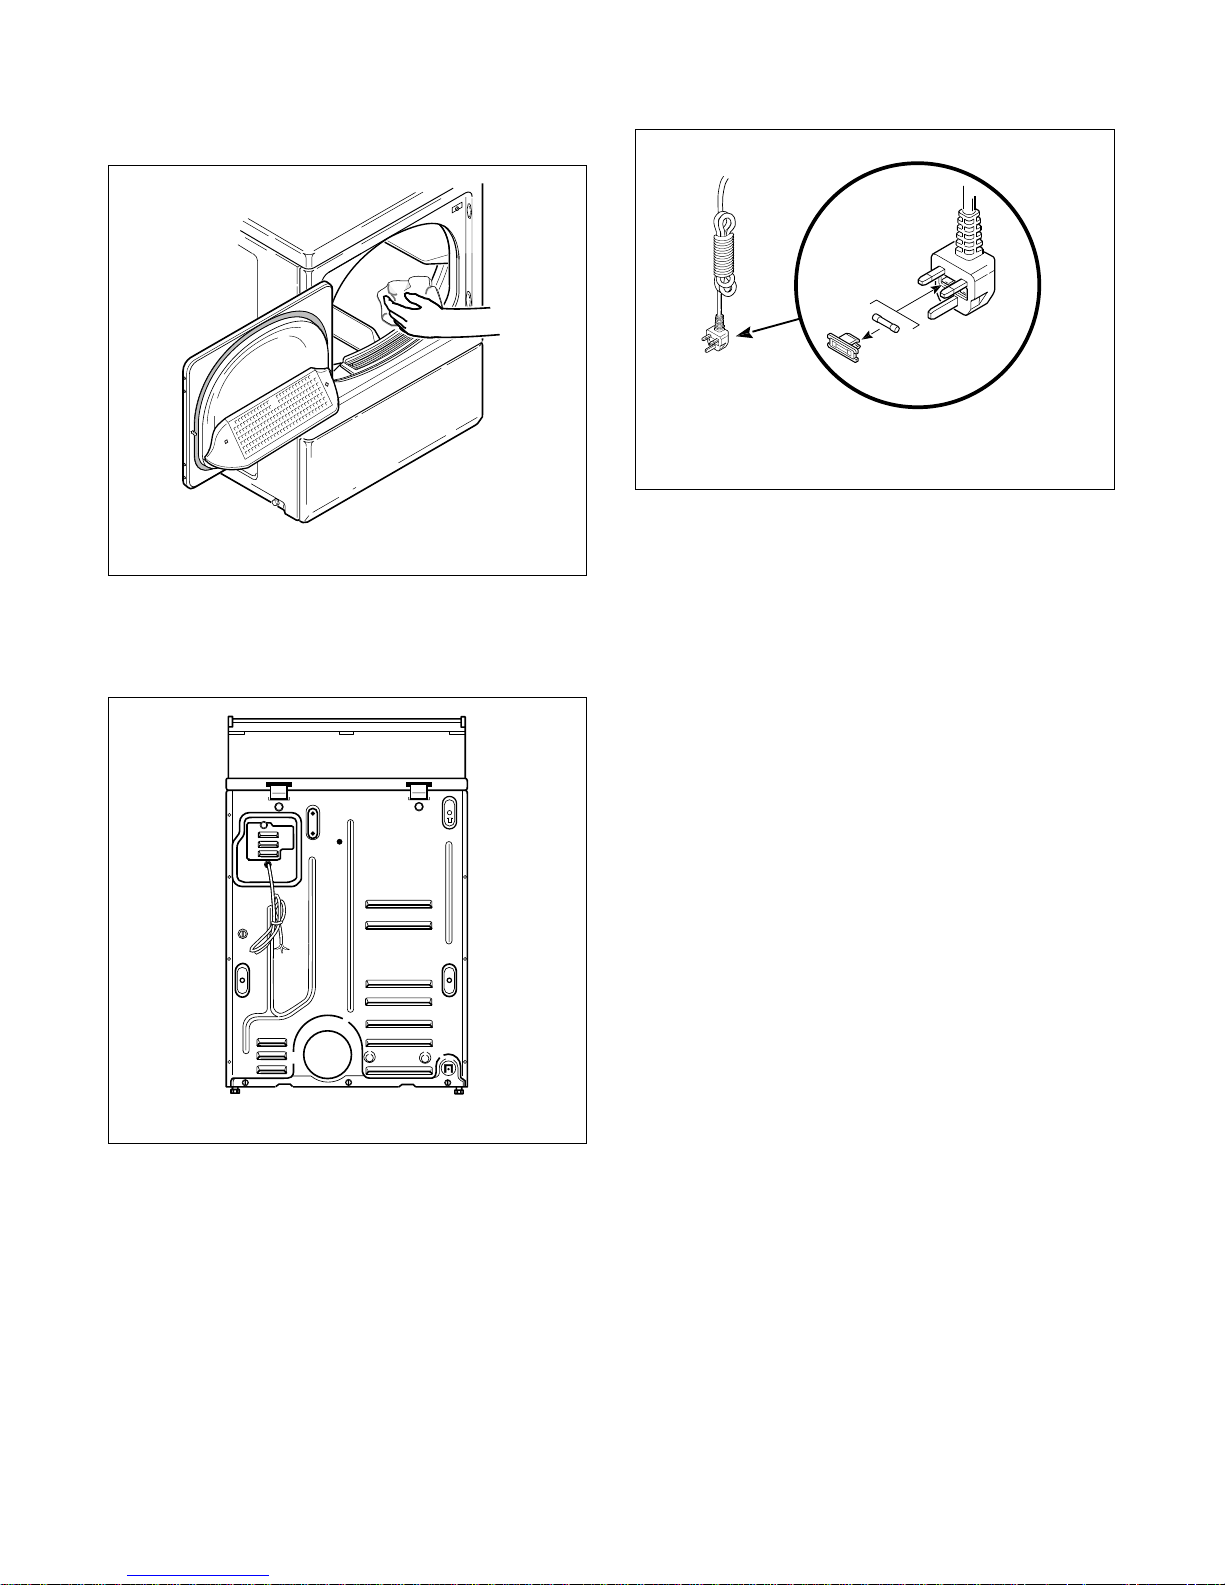
Step 4: Wipe Out Inside of Dryer
D618I
GAS DRYERS
GAS DRYERS
Figure 6
D210IE1C
D210IE1C
Figure 4
Step 5: Connect the Dryer to Electrical
Power
ELECTRIC DRYERS
Figure 5
D618I
D723I
Step 6: Check Installation
8
© Published by permission of the copyright owner – DO NOT COPY or TRANSMIT
511472 (EN)

Installation/Operation Supplement
Heat Source Check
NOTE: This manual is only a supplement. Refer to
installation/operation manual for full instructions.
Electric Dryers
Close the loading door and start the dryer in a heat
setting (refer to Operation section). After the dryer has
operated for three minutes, the exhaust air or exhaust
pipe should be warm.
Gas Dryers
IMPORTANT: This operation is to be conducted
by qualified personnel only.
WARNING
To reduce the risk of serious injury or
death, the lower front panel must be in
place during normal operation.
W158
Electrical Requirements
NOTE: This manual is only a supplement. Refer to
installation/operation manual for full instructions.
Electric Dryers
Refer to serial plate for requirements.
SINGLE-PHASE MODELS
(230 Volt, 50 Hertz, 2 Wire Plus Earth, 30 Amp
Installation)
THREE-PHASE MODELS
(400/240 Volt, 50 Hertz, 4 Wire Plus Earth, 10 Amp
Installation)
NOTE: Refer to Kit 756P3 for Delta to Wye
conversion instructions.
WARNING
To reduce the risk of fire, electric shock,
severe personal injury or death, all wiring
and earthing MUST abide with local
electrical codes. It is the customer’s
responsibility to have the wiring and
fuses checked by a qualified electrician to
make sure the laundry room has adequate
electrical power to operate the dryer.
W458
511472 (EN)
© Published by permission of the copyright owner – DO NOT COPY or TRANSMIT
9
Installation/Operation Supplement
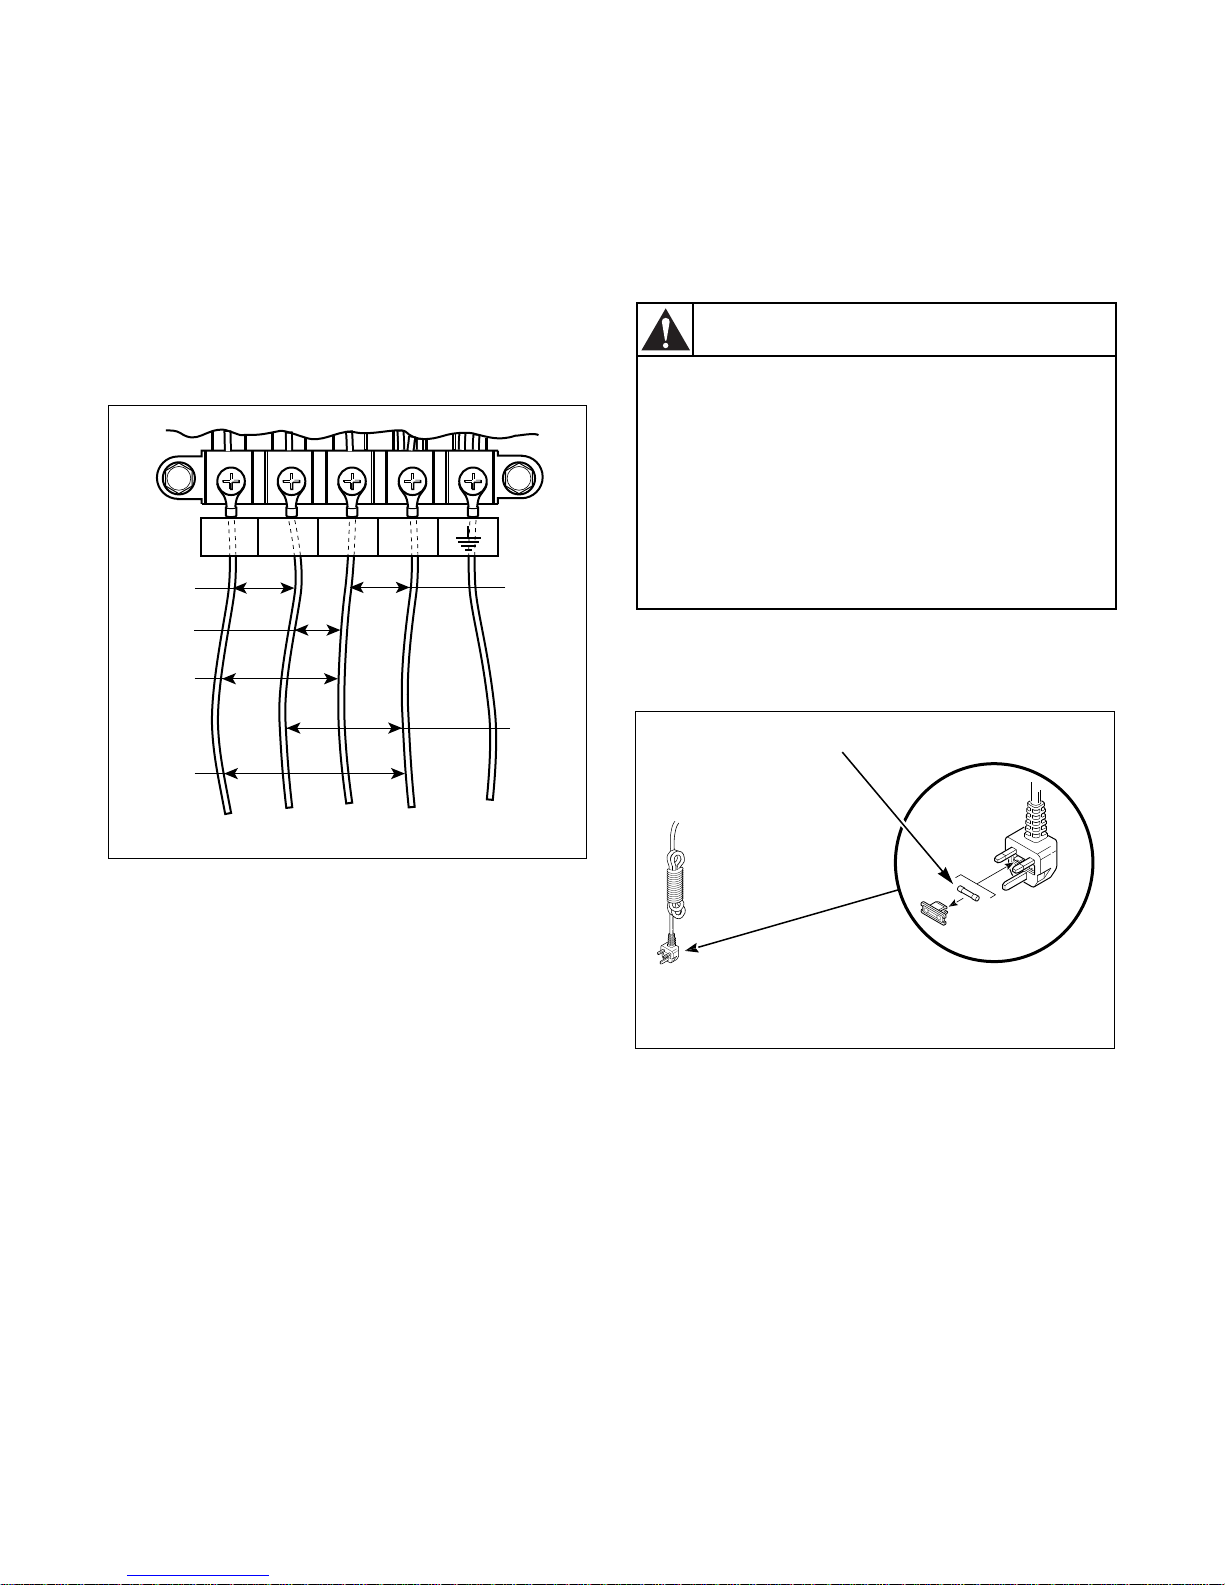
To attach customer-supplied three-phase power cord
(400 Volt WYE):
1. Remove electrical access panel on rear of
machine.
2. Attach power cord wires as shown in Figure 7.
3. Attach strain relief, supplied with machine, to
power cord in accordance with all local codes
and ordinances.
4. Reinstall access panel.
L 1 L 2 L 3 N
400 Volt
400 Volt
400 Volt
230 Volt
Gas Dryers
NOTE: This manual is only a supplement. Refer to
installation/operation manual for full instructions.
(230 Volt, 50 Hertz, 2 Wire Plus Earth, 10 Amp
Installation)
WARNING
To reduce the risk of fire, electric shock,
severe personal injury or death, the
electrical service to a gas dryer must
abide with local electrical codes. The gas
service to a gas dryer must conform with
the local codes and ordinances, or in the
absence of local codes and ordinances,
with the latest edition of the National Fuel
Gas Code ANSI Z223.1.
W238
The dryer is designed to be operated on a two-wire
plus earth, 230 Volt, 50 Hertz, single-phase supply
circuit fused at amperage found on serial plate.
230 Volt
230 Volt
DRY1931N
Figure 7
Grounding and Wiring Instructions
The dryer must be connected to an earthed metal,
permanent wiring system; or an equipment-earthing
conductor must be run with the circuit conductors and
connected to the equipment-earthing terminal or lead
on the dryer.
NOTE: Electrical receptacle must be located so
that it is easily accessible with machine in place. If
machine is hard wired, an intermediate shut-off
box with a 3 mm gap is required [335-1 (22.2)].
1
D210I
1 13 Amp Fuse
Figure 8
NOTE: Electrical receptacle must be located so
that it is easily accessible with machine in place.
10
© Published by permission of the copyright owner – DO NOT COPY or TRANSMIT
511472 (EN)
Installation/Operation Supplement
Gas Requirements
NOTE: This manual is only a supplement. Refer to
installation/operation manual for full instructions.
Gas Dryers
(6.2 kW)
Gas Rate = 0.55 m
NOTE: This appliance must be installed in
accordance with regulations in force.
NOTE: This machine is supplied from the factory
for operation on Natural Gas [2nd Family, Group H
(E)] at nominal inlet pressure of 20 mbar for use in
the countries of GB/IE/PT/ES/IT. For installation in
other EU Countries, and/or for conversion to
L.P. (Liquefied Petroleum) gas, consult the
distributor. DO NOT connect the dryer to L.P. gas
without consulting the distributor and/or without
performing the proper conversion according to the
conversion instructions (Conversion Kit 599P3).
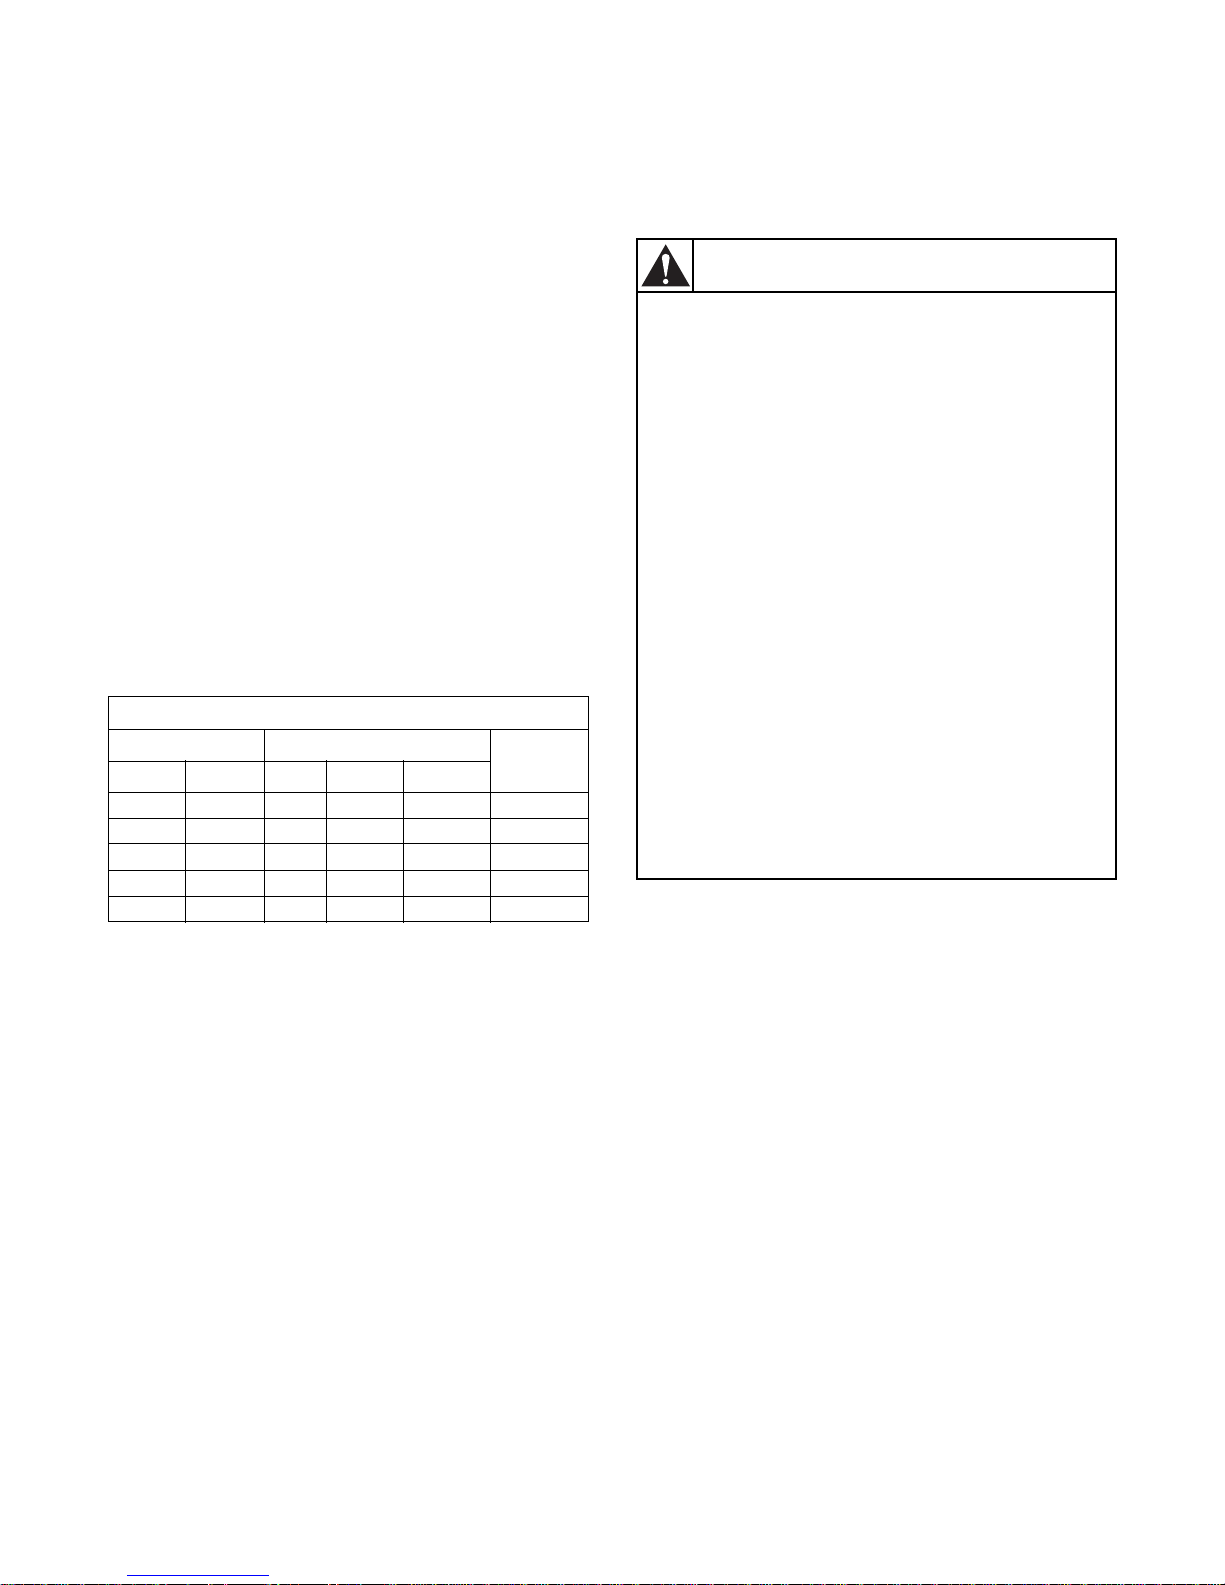
Natural Gas Altitude Adjustments
Altitude Orifice Size
mft.#mmin.
915 3000 43 2.26 0.0890 503778
1830 6000 44 2.18 0.0860 58719
2440 8000 45 2.08 0.0820 503779
2740 9000 46 2.06 0.0810 503780
3050 10,000 47 1.99 0.0785 503781
3
/hr
Part No.
Table 1
The unit must be isolated from the gas supply piping
system by closing the equipment shut-off valve during
any pressure testing of the gas supply piping system at
test pressures equal to or less than 50 mbar.
WARNING
To reduce the risk of gas leaks, fire or
explosion:
• The dryer must be connected to the type
of gas as shown on nameplate located
in the door recess.
• Use a new flexible stainless steel
connector.
• Use pipe joint compound insoluble in
L.P. (Liquefied Petroleum) Gas, or Teflon
tape, on all pipe threads.
• Purge air and sediment from gas supply
line before connecting it to the dryer.
Before tightening the connection, purge
remaining air from gas line to dryer until
odor of gas is detected. This step is
required to prevent gas valve
contamination.
• Do not use an open flame to check for
gas leaks. Use a non-corrosive leak
detection fluid.
• Any disassembly requiring the use of
tools must be performed by a suitably
qualified service person.
W316
511472 (EN)
© Published by permission of the copyright owner – DO NOT COPY or TRANSMIT
11
Installation/Operation Supplement
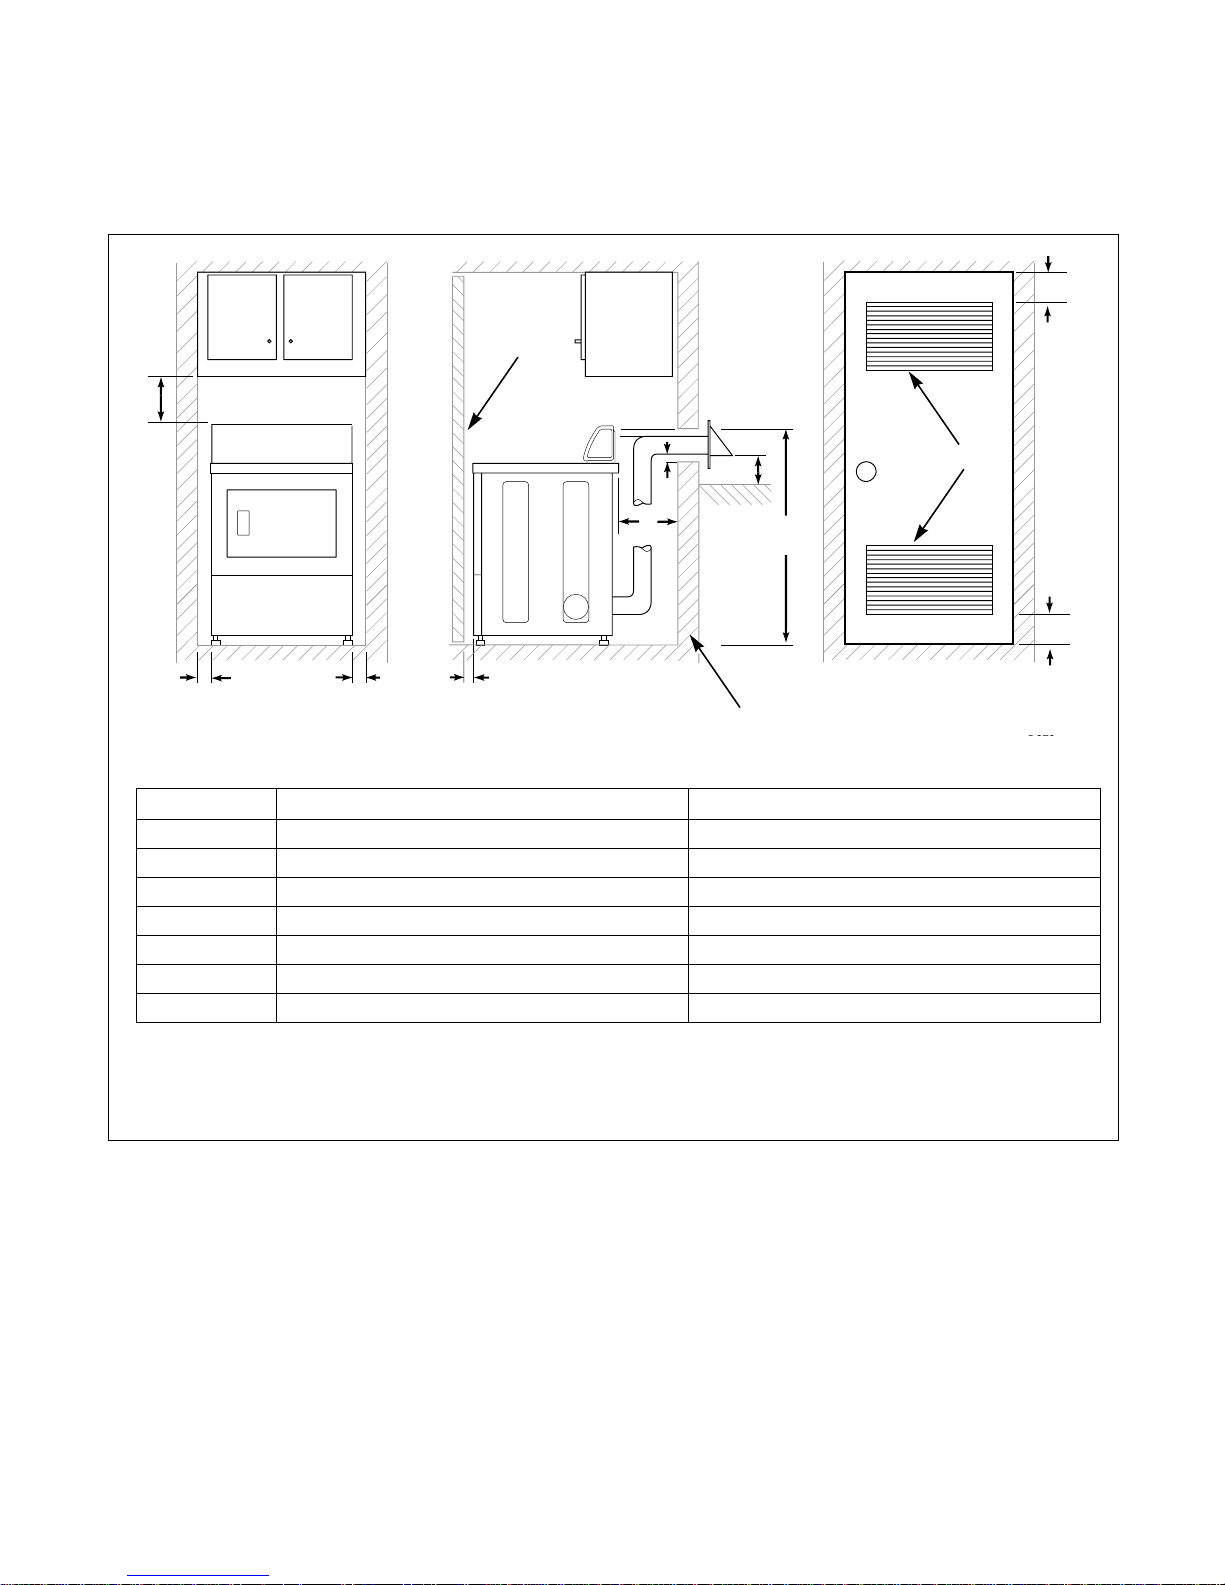
Location Requirements
NOTE: This manual is only a supplement. Refer to
installation/operation manual for full instructions.
1
B
F
2 (G)
FRONT VIEW
(Closet Door)
AA C
FRONT VIEW
(w/o Closet Door)
SIDE VIEW
(Closet Door)
D
A
E
1066.8 mm
(42 in.)
3
Area Free Standing/Alcove Installation Closet Installation
A 0 mm (0 in.) minimum 0 mm (0 in.) minimum
B 304.8 mm (12 in.) minimum 304.8 mm (12 in.) minimum
C Not Applicable 50.8 mm (2 in.) minimum
D 50.8 mm (2 in.) minimum 50.8 mm (2 in.) minimum
E 304.8 mm (12 in.) minimum 304.8 mm (12 in.) minimum
F Not Applicable 76.2 mm (3 in.)
G Not Applicable 1016 mm
2
/open (40 in2)
F
D823I
1 Closet Door 3 Outer Wall of Enclosure
2 Centered Air Openings
(2 openings minimum)
12
© Published by permission of the copyright owner – DO NOT COPY or TRANSMIT
Figure 9
511472 (EN)
Installation/Operation Supplement
Dryer Exhaust Requirements
NOTE: This manual is only a supplement. Refer to
installation/operation manual for full instructions.
WARNING
A clothes dryer produces combustible lint.
To reduce the risk of fire and combustion
gas accumulation the dryer MUST be
exhausted to the outdoors.
W116
This gas appliance contains or produces a
chemical or chemicals which can cause
death or serious illness and which are
known to the State of California to cause
cancer, birth defects, or other reproductive
harm. To reduce the risk from substances
in the fuel or from fuel combustion, make
sure this appliance is installed, operated,
and maintained according to the
instructions in this manual.
W115
To reduce the risk of fire and the
accumulation of combustion gases, DO
NOT exhaust dryer air into a window well,
gas vent, chimney or enclosed,
unventilated area, such as an attic, wall,
ceiling, crawl space under a building or
concealed space of a building.
W045
To reduce the risk of fire, DO NOT use
plastic or thin foil ducting to exhaust the
dryer.
W354
IMPORTANT: Failure to exhaust dryer properly
will void warranty.
Exhaust System Materials
NOTE: Venting materials are not supplied with the
dryer (obtain locally).
Rigid metal duct is recommended. Non-combustible
flexible metal duct is acceptable.
Make-Up Air Requirements
A dryer exhausts 85 liters/second (180 cfm) (measured
at back of dryer) and sufficient make-up air must be
supplied to replace air exhausted by each dryer.
DO DON’T
511472 (EN)
© Published by permission of the copyright owner – DO NOT COPY or TRANSMIT
D314I D315I
Figure 10
13
Installation/Operation Supplement
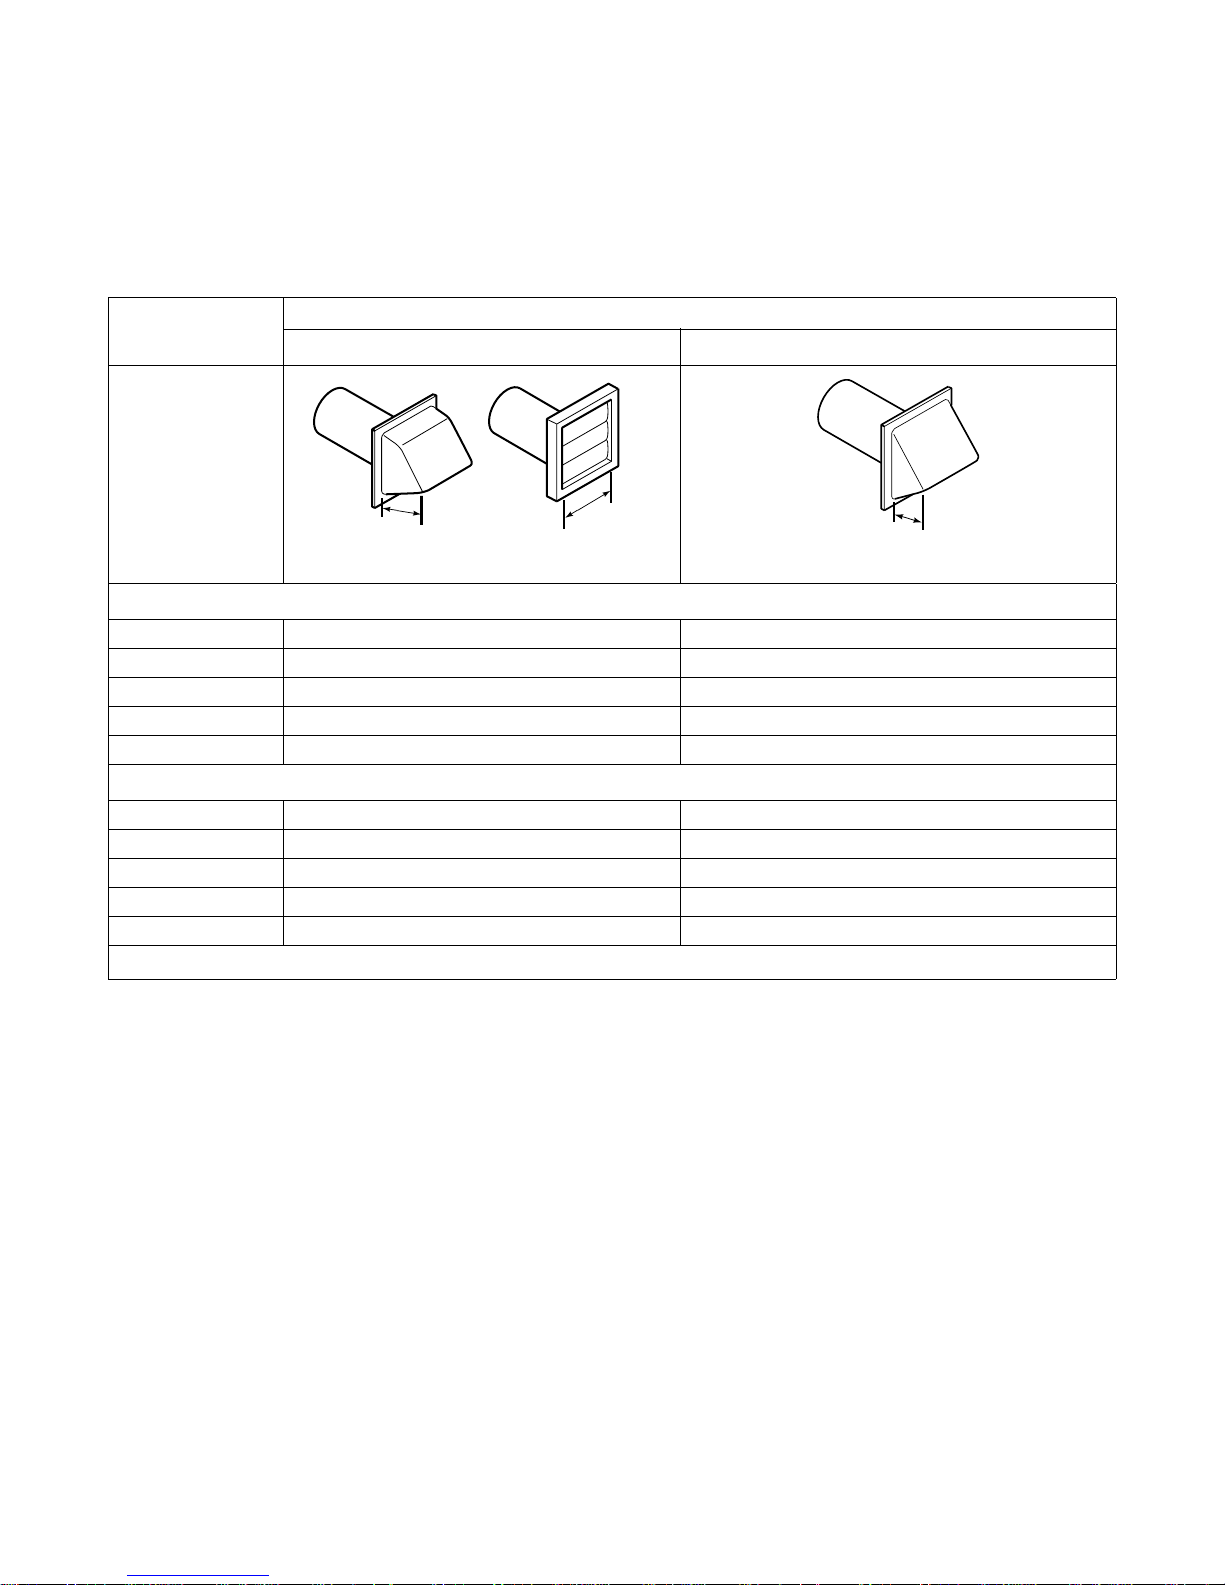
Exhaust Direction
The dryer can be exhausted to the outdoors through the
back, left, right or bottom of the dryer. EXCEPTION:
Gas dryers cannot be vented out the left side
because of the burner housing.
Number of
90° Elbows
102 mm
Recommended Use Only for Short Run Installations
102 mm
(4 in.)
(4 in.)
Maximum length of 102 mm (4 in.) diameter rigid metal duct
0 19.8 m (65 ft.) 16.8 m (55 ft.)
1 16.8 m (55 ft.) 14.3 m (47 ft.)
2 14.3 m (47 ft.) 12.5 m (41 ft.)
3 11.0 m (36 ft.) 9.1 m (30 ft.)
4 8.5 m (28 ft.) 6.7 m (22 ft.)
Maximum length of 102 mm (4 in.) diameter flexible metal duct
0 13.7 m (45 ft.) 10.7 m (35 ft.)
1 10.7 m (35 ft.) 8.2 m (27 ft.)
2 9.1 m (30 ft.) 6.4 m (21 ft.)
3 7.6 m (25 ft.) 5.2 m (17 ft.)
4 6.1 m (20 ft.) 4.5 m (15 ft.)
NOTE: Deduct 1.8 m (6 ft.) for each additional elbow.
Weather Hood Type
D673I
64 mm
(2-1/2 in.)
D802I
14
© Published by permission of the copyright owner – DO NOT COPY or TRANSMIT
Tab le 2
511472 (EN)
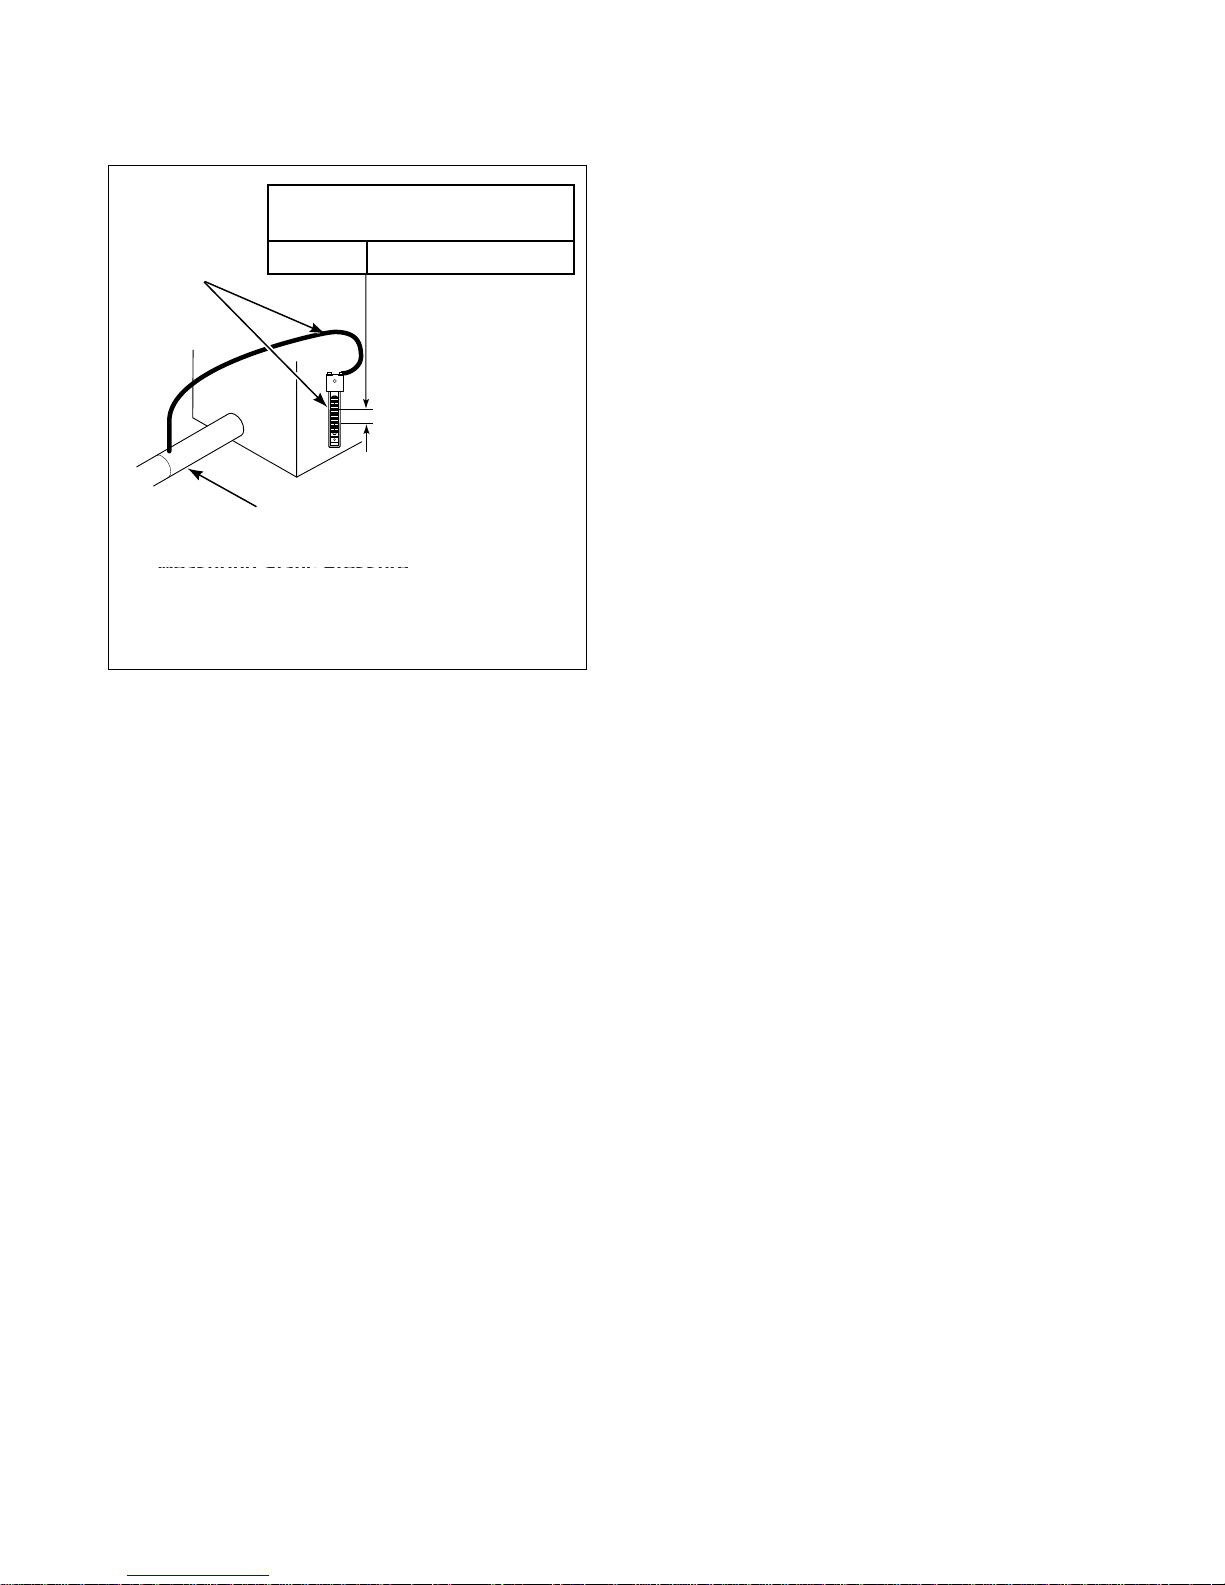
Dryer Airflow
MANOMETER
1
Installation/Operation Supplement
MAXIMUM STATIC PRESSURE
IN WATER COLUMN
50 Hertz 10 mm (0.4 in.)
2
EXHAUST
DUCT
MEASURING STATIC PRESSURE
D012IE0A
1 Manometer
2 Exhaust Duct
Figure 11
D012IE0A
511472 (EN)
© Published by permission of the copyright owner – DO NOT COPY or TRANSMIT
15

Installation/Operation Supplement
Operation
Operation Instructions
NOTE: This manual is only a supplement. Refer to
installation/operation manual for full instructions.
Step 1: Clean Lint Filter
D689I
D689I
Figure 12
Step 2: Load Laundry
Step 3: Close Loading Door
D688I
D688I
Figure 14
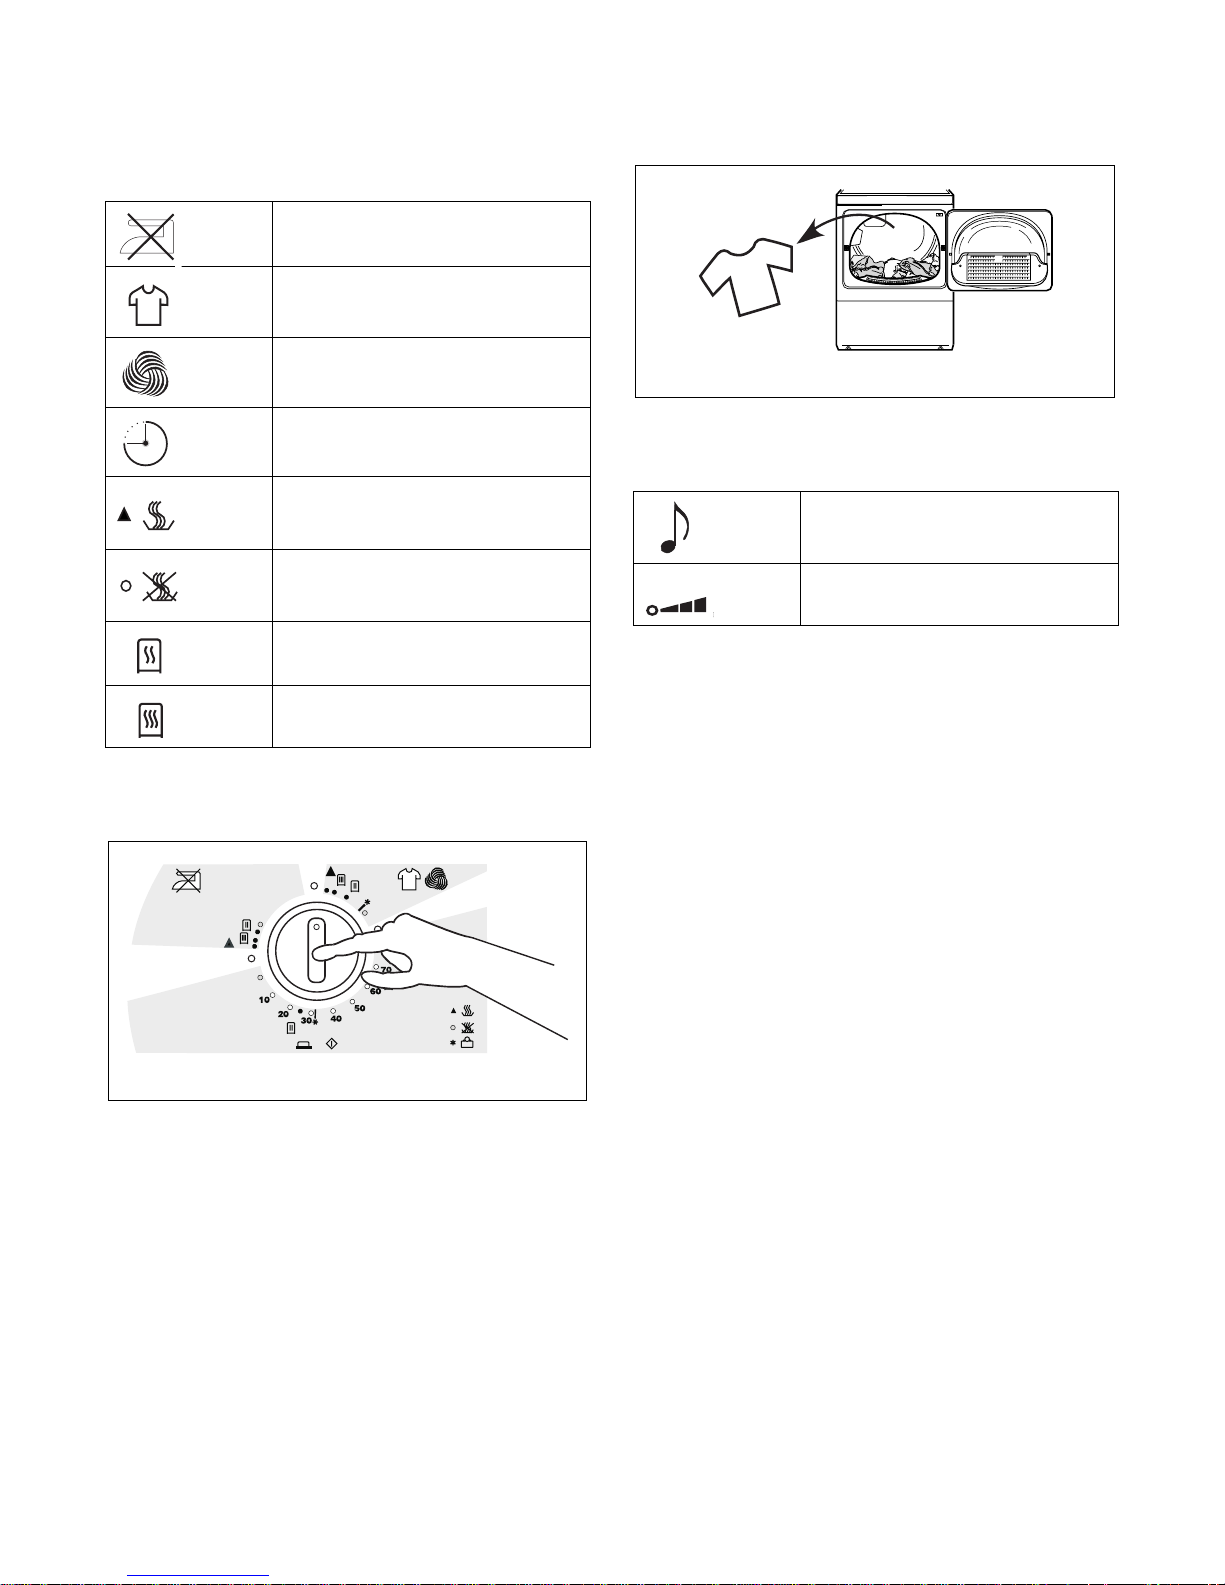
Step 4: Select Temperature Setting
No Heat
DRY472N
Medium Temperature/Delicates
DRY473N
Load dryer half full with laundry (7.8 kg maximum
dry clothes load).
D716i
D716I
Figure 13
DRY474N
High Temperature/Regular –
Permanent Press
16
© Published by permission of the copyright owner – DO NOT COPY or TRANSMIT 511472 (EN)
Installation/Operation Supplement
Step 5: Set Timer Knob
Select Fabric/Temperature setting.
Permanent Press
DRY477N
Normal
DRY481N
Delicates
DRY484N
Time Dry
DRY485N
Heat
DRY478N
No Heat
DRY479N
Less Dry
DRY482N
More Dry
DRY483N
Step 7: Remove Laundry
D718i
D718I
Figure 16
End of Cycle Signal
Sound Level
DRY475N
Sound Range (Low to High)
DRY476N
Step 6: Start Dryer
Press timer knob to start dryer.
Figure 15
CPD608C
511472 (EN)
© Published by permission of the copyright owner – DO NOT COPY or TRANSMIT
17
Installation/Operation Supplement
Disposal of Unit
This appliance is marked according to the European
directive 2002/96/EC on Waste Electrical and
Electronic Equipment (WEEE).
This symbol on the product or on its packaging
indicates that this product shall not be treated as
household waste. Refer to Figure 17. Instead it shall be
handed over to the applicable collection point for the
recycling of electrical and electronic equipment.
Ensuring this product is disposed of correctly will help
prevent potential negative consequences for the
environment and human health which could otherwise
be caused by inappropriate waste handling of this
product. The recycling of materials will help to
conserve natural resources. For more detailed
information about recycling of this product, please
contact the local city office, household waste disposal
service, or the source from which the product was
purchased.
MIX1N
Figure 17
18
© Published by permission of the copyright owner – DO NOT COPY or TRANSMIT 511472 (EN)
Secadoras de ropa
Modelos eléctricos y de gas
Suplemento de instalación/operación
Guarde estas instrucciones para referencia en el futuro.
(Si esta máquina cambia de dueño, asegúrese de que este manual vaya con la misma).
D715I
Pieza No. 511472R2SP
Diciembre 2007


Suplemento de instalación/operación
ADVERTENCIA
PARA SU SEGURIDAD, debe seguir la información contenida en este manual para
minimizar el riesgo de fuego o explosión, o prevenir daños a la propiedad, lesiones
graves, o la muerte.
• No almacenar o usar gasolina u otros vapores y líquidos inflamables cerca de este o de
cualquier otro equipo.
• QUÉ HACER SI SIENTE OLOR A GAS:
– No tratar de encender ningún aparato.
– No tocar ningún interruptor eléctrico; no usar ninguno de los teléfonos de su edificio.
– Evacuar a todos los ocupantes del local, edificio o área afectada.
– Llamar inmediatamente al proveedor de gas, usando un teléfono de vecino. Seguir las
instrucciones del proveedor de gas.
– Si no puede comunicarse con su proveedor de gas, llame a los bomberos.
• La instalación y servicio tienen que ser ejecutados por un instalador cualificado, una
agencia de servicio, o su proveedor de gas.
W033R2SP
W052R3SP
IMPORTANTE: El comprador deberá consultar con el proveedor de gas local para obtener instrucciones a
seguir en el caso de que el usuario perciba un olor a gas. Las instrucciones de la compañía de gas, así como la
nota de SEGURIDAD y ADVERTENCIA situada directamente encima, deberán ubicarse en un lugar
prominente próximo a la secadora para el uso del cliente.
PARA SU SEGURIDAD
No almacene ni use gasolina u otros líquidos o vapores inflamables cerca de éste o de otro
aparato cualquiera.
W053R2SP
511472 (SP)
© Published by permission of the copyright owner – DO NOT COPY or TRANSMIT
1

Suplemento de instalación/operación
Tabla de
contenido
Información de seguridad.................................................................. 3
Explicación de los mensajes de seguridad............................................ 3
Instrucciones importantes de seguridad................................................ 3
Instalación ........................................................................................... 6
Dimensiones y especificaciones ........................................................... 6
Instalación de la secadora ..................................................................... 7
Paso 1: Coloque y nivele la secadora............................................... 7
Paso 2: Conecte el sistema de escape de la secadora....................... 7
Paso 3: Conecte el tubo de suministro de gas
(secadora de gas solamente)........................................................... 8
Paso 4: Limpie el interior de la secadora......................................... 9
Paso 5: Conecte la secadora a la corriente eléctrica......................... 9
Paso 6: Compruebe la instalación.................................................... 9
Compruebe la fuente de calor............................................................... 10
Secadoras eléctricas ......................................................................... 10
Secadoras de gas .............................................................................. 10
Requisitos eléctricos............................................................................. 10
Secadoras eléctricas ......................................................................... 10
Secadoras de gas .............................................................................. 11
Requisitos de gas .................................................................................. 12
Secadoras de gas .............................................................................. 12
Requisitos de localización .................................................................... 13
Requisitos de escape de la secadora ..................................................... 14
Materiales del sistema de escape ..................................................... 14
Requisitos para el aire de complemento .......................................... 14
Dirección del escape ........................................................................ 16
Flujo de aire de la secadora.............................................................. 17
Operación ............................................................................................ 18
Instrucciones de operación ................................................................... 18
Paso 1: Limpie el filtro de pelusa .................................................... 18
Paso 2: Introduzca la colada ............................................................ 18
Paso 3: Cierre la puerta de carga...................................................... 18
Paso 4: Seleccione el ajuste de temperatura .................................... 18
Paso 5: Ajuste el pomo del temporizador ........................................ 19
Paso 6: Arranque la secadora........................................................... 19
Paso 7: Retire la colada.................................................................... 19
Señal del final del ciclo.................................................................... 19
Cómo deshacerse de la unidad........................................................... 20
© Published by permission of the copyright owner.
2
© Published by permission of the copyright owner – DO NOT COPY or TRANSMIT
511472 (SP)
Suplemento de instalación/operación
Información de seguridad
Explicación de los mensajes de
seguridad
En este manual y en las calcomanías de la máquina,
encontrará avisos de precaución (“PELIGRO”,
“ADVERTENCIA” y “PRECAUCIÓN”), seguidos de
instrucciones específicas, Estas precauciones sirven
para proteger la seguridad personal del operador,
usuario, técnico de servicio y aquellas personas
responsables del mantenimiento de la máquina.
PELIGRO
Indica una situación de peligro inminente
que, si no se evita, ocasionará lesiones
personales graves o la muerte.
ADVERTENCIA
Indica una situación de peligro que, si no
se evita, podría ocasionar lesiones
personales graves o la muerte.
Instrucciones importantes de
seguridad
Guarde estas instrucciones
ADVERTENCIA
Para reducir el riesgo de incendios,
electrocución y lesiones graves o
mortales cuando use la secadora, tome
estas precauciones básicas:
W034R1SP
1. Lea las instrucciones antes de utilizar la
secadora.
2. Consulte las INSTRUCCIONES DE PUESTA A
TIERRA en el manual de INSTALACIÓN para
conectar bien a tierra la secadora.
3. No seque artículos que hayan sido previamente
limpiados, lavados, puestos en remojo o
manchados de gasolina, disolventes de tintorería
u otras sustancias explosivas o inflamables, ya
que éstas desprenden vapores que pueden
inflamarse o estallar.
PRECAUCIÓN
Indica una situación de peligro que, si no
se evita, puede ocasionar lesiones
personales leves o moderadas, o daños a
la propiedad.
Otros avisos de precaución, tales como
“IMPORTANTE” y “NOTA”, van seguidos de
instrucciones específicas.
IMPORTANTE: La palabra “IMPORTANTE” se
utiliza para informar al lector sobre
procedimientos específicos donde se producirán
daños menores a la máquina en caso de que no se
siga el procedimiento.
NOTA: La palabra “NOTA” se utiliza para
comunicar información de instalación, operación,
mantenimiento o servicio técnico que sea
importante pero que no se relacione con un riesgo.
4. No permita que haya niños jugando en la
secadora o en sus alrededores. Es necesario
supervisar constantemente a los niños cuando se
utilice la secadora en su presencia. Ésta es una
regla de seguridad pertinente a todos los aparatos.
5. Antes de poner la secadora fuera de servicio o
desecharla, quite la puerta del compartimiento de
secado.
6. No introduzca las manos en la secadora si el
cilindro se encuentra girando.
7. No instale ni guarde la secadora en lugares donde
quede expuesta al agua y/o a las inclemencias del
tiempo.
8. No juegue con los controles.
9. No repare ni reemplace ninguna pieza de la
secadora, ni intente ningún servicio a menos que
se recomiende específicamente en las
instrucciones de mantenimiento del usuario o en
instrucciones publicadas de reparación del
usuario que pueda comprender y siempre que
tenga la habilidad de hacerlo.
511472 (SP)
© Published by permission of the copyright owner – DO NOT COPY or TRANSMIT
3

Suplemento de instalación/operación
10. No utilice productos suavizantes de telas ni
productos que eliminen la electricidad estática, a
menos que lo recomiende el fabricante de dichos
productos.
11. Para reducir el riesgo de incendio, NO SEQUE
plásticos ni artículos que contengan gomaespuma
o materiales de tipo goma de textura similar.
12. Limpie SIEMPRE el filtro de pelusa después de
cada carga. La presencia de una capa de pelusa en
el filtro reduce la eficiencia de secado y prolonga
el tiempo de secado.
13. No deje que se acumule pelusa, polvo y suciedad
en la zona de la abertura de salida y en sus
alrededores.
14. El interior de la secadora y el conducto de escape
deben ser limpiados periódicamente por personal
de servicio cualificado.
15. Si no se ha instalado, operado y mantenido según
las instrucciones del fabricante o si existen daños
o no se han usado debidamente los componentes
del producto, el uso del mismo puede exponerlo a
sustancias presentes en el combustible o
producidas por la combustión del mismo, que
pueden ocasionar la muerte o enfermedades
graves y que al Estado de California le consta que
causan cáncer, defectos de nacimiento o otros
daños de carácter reproductivo.
19. Utilice la secadora solamente en aplicaciones
para las cuales ha sido fabricada: para secar ropa.
20. Desconecte siempre la corriente eléctrica de la
secadora antes de tratar de efectuar el servicio.
Desconecte el cordón de alimentación agarrando
el enchufe, no el cordón.
21. Si el cordón está dañado, debe sustituirse por un
cordón o conjunto especial que se puede
conseguir del fabricante o agente de servicio.
22. Instale la secadora según las INSTRUCCIONES
DE INSTALACIÓN. Todas las conexiones
eléctricas, de puesta a tierra y suministro de gas
deben cumplir con los códigos locales y ser
realizadas por personal autorizado cuando sea
necesario. ¡No lo haga usted mismo a menos que
sepa cómo hacerlo!
23. Saque la ropa inmediatamente después de que se
detenga la secadora.
24. Lea y siga siempre las instrucciones del
fabricante de los paquetes de productos de
limpieza para ropa. Respete todas las
advertencias y precauciones. Para reducir el
riesgo de envenenamiento o quemaduras
causadas por productos químicos, manténgalos
fuera del alcance de los niños en todo momento
(preferentemente, en un armario cerrado con
llave).
16. La secadora no funciona con la puerta de carga
abierta. NO ponga en derivación el interruptor de
seguridad para permitir que la secadora opere con
la puerta abierta. La secadora dejará de funcionar
cuando se abra la puerta. No utilice la secadora si
no deja de funcionar cuando se abra la puerta o si
empieza a funcionar sin pulsar el mecanismo de
ARRANQUE. Desconecte la secadora y llame a
un técnico de servicio.
17. No coloque en la secadora artículos manchados
de aceite de cocina o vegetal, ya que estos aceites
no se quitan durante el lavado. Debido al resto de
aceite presente, la tela puede prenderse fuego por
sí misma.
18. Para reducir el riesgo de incendio, NO ponga en
la secadora ropa que pueda tener restos de
sustancias inflamables, como aceite de máquina,
productos químicos inflamables, diluyentes etc. o
cualquier artículo que contenga cera o productos
químicos, como los presentes en fregonas y
trapos de limpieza, o cualquier artículo que se
haya limpiado en seco en el hogar con disolvente
de limpieza en seco.
25. No seque cortinas ni tapicerías de fibra de vidrio
a menos que la etiqueta diga que puede hacerse.
Si están secas, pase un paño húmedo por el
cilindro para quitar las partículas de fibra de
vidrio.
26. Siga SIEMPRE las instrucciones de cuidado de
las telas proporcionadas por el fabricante de ropa.
27. No opere nunca la secadora si se han quitado los
protectores y/o paneles.
28. NO opere la secadora con piezas que falten o que
estén rotas.
29. NO ponga en derivación ningún dispositivo de
seguridad.
30. Si la instalación, mantenimiento y/o operación de
esta máquina no se realiza según las
instrucciones del fabricante, se pueden producir
lesiones graves, mortales y/o daños materiales.
4
© Published by permission of the copyright owner – DO NOT COPY or TRANSMIT
511472 (SP)

Suplemento de instalación/operación
IMPORTANTE: Los vapores de disolventes de las
máquinas de limpieza en seco producen ácidos
cuando atraviesan el calentador de la unidad de
secado. Estos ácidos son corrosivos para la
secadora así como para la carga de ropa que se está
secando. Asegúrese de que el aire de complemento
no contenga vapores de disolvente.
IMPORTANTE: Solicite que le instalen la secadora
debidamente. ¡No lo haga usted mismo a menos que
sepa cómo hacerlo!
NOTA: Las ADVERTENCIAS y las
INSTRUCCIONES DE SEGURIDAD
IMPORTANTES que aparecen en este manual no
intentan cubrir todas las condiciones y situaciones
posibles que puedan ocurrir. Hay que hacer uso del
sentido común, tomar precauciones y tener cuidado
al instalar, mantener u operar la secadora.
Póngase siempre en contacto con su vendedor,
distribuidor, agente de servicio o fabricante sobre
cualquier problema o condición que no comprenda.
511472 (SP)
© Published by permission of the copyright owner – DO NOT COPY or TRANSMIT
5
Suplemento de instalación/operación
Instalación
Dimensiones y especificaciones
569 mm
(22,38 plg)
203 mm
(8,0 plg)
*114 mm
(4,5 plg)
*914 mm (36 plg)
*1022 mm (40,25 plg)
*1092 mm (43 plg)
391 mm
(15,4 plg)
*392 mm
(15,44 plg)
597 mm
(23,5 plg)
711 mm
(28 plg)
11 mm
(0,4 plg)
SECADORAS ELÉCTRICAS
*Con las patas de nivelación vueltas hacia la base.
569 mm
(22,38 plg)
203 mm
(8,0 plg)
597 mm
(23,5 plg)
*114 mm
(4,5 plg)
711 mm
(28 plg)
*1022 mm (40,25 plg)
*914 mm (36 plg)
11 mm
(0,4 plg)
*1092 mm (43 plg)
*102 mm
(4,0 plg)
*102 mm
(4,0 plg)
683 mm
(26,9 plg)
391 mm
(15,4 plg)
683 mm
(26,9 plg)
60 mm (2,3 plg)
1
*392 mm (15,44 plg)
*70 mm
(2,8 plg)
DRY2199N
DRY2199N
DRY2200N
*Con las patas de nivelación vueltas hacia la base.
1 Conexión de gas NPT de 3/8 plg
6
© Published by permission of the copyright owner – DO NOT COPY or TRANSMIT 511472 (SP)
SECADORAS DE GAS
DRY2200N
Suplemento de instalación/operación
Instalación de la secadora
NOTA: Este manual es solamente un suplemento.
Consulte el manual de instalación/operación si
desea instrucciones completas.
Paso 1: Coloque y nivele la secadora
F
2
1
3
D707I
D707I
1 Base de la secadora
2 Nivel
3 Pata de nivelación
Paso 2: Conecte el sistema de escape de
la secadora
ADVERTENCIA
La secadora de ropa produce pelusa
combustible. Para disminuir el riesgo de
incendio y la acumulación de gas
combustible, el escape de la secadora
DEBERÁ salir al exterior.
W116R2SP
.
HAGA NO HAGA
D314I D315I
Figura 2
Figura 1
511472 (SP)
© Published by permission of the copyright owner – DO NOT COPY or TRANSMIT
7
Suplemento de instalación/operación
Paso 3: Conecte el tubo de suministro de
gas (secadora de gas solamente)
Para obtener asistencia adicional, consulte la sección
de Requisitos de gas.
1. Asegúrese de que la secadora esté equipada para
poder ser utilizada con el tipo de gas de su
lavandería.
1
5
2. Quite la tapa de transporte de la conexión de gas
ubicada en la parte trasera de la secadora.
3. Conecte al tubo de suministro de gas.
4. Apriete bien todas las conexiones de gas.
5. Para las conexiones de gas LP (petroleo licuado),
consulte la sección de Requisitos de gas.
2
3
4
1 Nuevo conector flexible de acero inoxidable –
Utilícelo únicamente si lo permiten los códigos
locales (Use el conector de diseño certificado CSA)
2 Enchufe de tubo NPT de 1/8 plg
(para comprobar la presión de entrada de gas)
3 Válvula de corte del equipo – Instalada a 1,8 m
(6 pies) de la secadora
D233I
D233I
4 Tubo de silomelana
De longitud inferior 6,1 m (20 plg) –
Use un tubo de 9,5 mm (3/8 plg)
De longitud superior 6,1 m (20 plg) –
Use un tubo de 12,7 mm (1/2 plg)
5 Conexión de gas NPT de 3/8 plg
Figura 3
8
© Published by permission of the copyright owner – DO NOT COPY or TRANSMIT
511472 (SP)
 Loading...