

Eudora GSI 6104 User Manual [de]
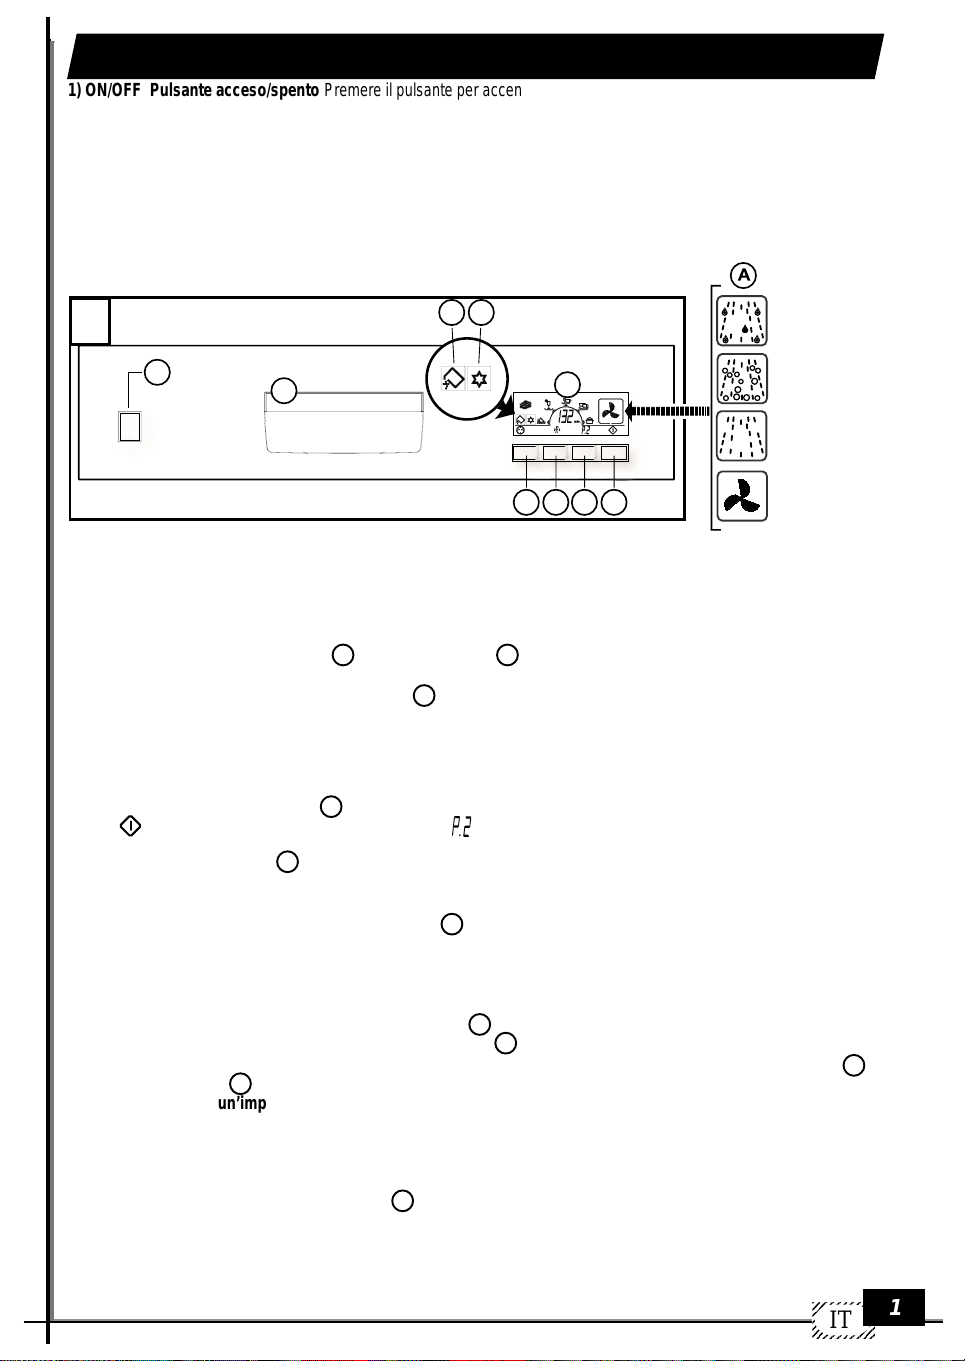
Descrizione elementi di comando e indicazione
1) ON/OFF Pulsante acceso/spento Premere il pulsante per accendere l’apparecchio
2) Indicazione mancanza sale (se previsto)
3) Indicazione mancanza brillantante (se previsto)
4) Selezione ritardo partenza “Delay”
5) Selezione lavaggio rapido / mezzo carico (se previsto)
6) Pulsante selezione programmi
7) Pulsante Start - Stop/pausa programma
8) Display multifunzione
9) Maniglia porta
Per aprire dovete tirare in avanti (una sicurezza elettrica spegne la macchina quando la porta viene aperta).
18
2 3
1
9
8
4 5 6 7
-Prelavaggio
-Lavaggio
-Risciacqui
-Asciugatura
Avviamento
Dopo il controllo della quantità di sale di rigenerazione (solo nella versione con contenitore sale) e br illantante, aprite
completamente il rubinetto dell’acqua, disponete le stoviglie nei cestelli, versate il detersivo nel suo contenitore e il detersivo
per il prelavaggio (se necessario) e chiudete la porta frontale.
Procedete come segue:
• Azionate il pulsante “acceso-spento” , si illumina il display visualizzando l’ultimo programma eseguito.
1
8
Selezione programma
• Selezionate il programma desiderato tramite il tasto (selezione programmi); ad ogni pressione del tasto viene visualizzato
il programma successivo e nel Display compare il relativo tempo di durata.
Scegliete il programma che ritenete più indicato al tipo di stoviglie da lavare.
A questo punto la macchina è pronta per iniziare la fase di lavaggio.
6
Start / Pausa
• Chiudete la porta e premete il tasto , la macchina inizia il ciclo di lavaggio. Nel Display vengono visualizzati il simbolo
di start ed il simbolo del programma selezionato (es. ).Sarà poi mostrato un ciclo di informazione grafica (A) riferito
alla fase di lavaggio che la macchina stà eseguendo.
Una nuova pressione del tasto pone la macchina in pausa; nel Display scompare la visualizzazione della parte grafica
mentre il tempo residuo di lavaggio ed il simbolo dello start lampeggiano.
7
7
Impostazione errate dei programmi (cambio programma o RESET)
• Per modificare un programma in corso, premete il tasto Start/Pausa per circa 6 secondi, nel Display viene visualizzato
un segmento che scorre ad indicare la fase di reset.
N.B. Il segnale acustico del buzzer conferma la fine del RESET, mentre sul display compare la scritta “End”. A questo
punto la macchina è pronta per una nuova impostazione.
• Nel caso in cui abbiate dimenticato di inserire una stoviglia è possibile interrompere il ciclo di lavaggio (preferibilmente solo
se un programma è iniziato da poco): pigiate il tasto pausa , aprite la porta ed inser ite le stoviglie. Per fare ripartire la
macchina chiudete la porta e premete nuovamente il tasto Start ; il ciclo riprenderà dal punto in cui si era interrotto.
• Per ripetere lo stesso lavaggio bisogna confermare il programma visualizzato pigiando il tasto selezione programmi ,
e di seguito il tasto start .
NOTE: se si verifica un’improvvisa interruzione della corrente, il programma di lavaggio ripartirà da dove si era
interrotto.
7
7
7
7
6
Arresto
A fine ciclo la lavastoviglie si arresta automaticamente e di seguito un segnale sonoro di 3 beep per tre volte conferma la fine
del lavaggio. Nel Display viene visualizzata la scritta End.
Per spegnere l’apparecchio premete il pulsante acceso/spento. Dopo ogni ciclo di lavaggio, chiudete assolutamente il
rubinetto dell’acqua per isolare la lavastoviglie dalla rete di approvvigionamento idrico.
1
SUGGERIMENTI: Dopo i segnali acustici di fine ciclo, per accelerare la fase di asciugatura é possibile socchiudere la
porta frontale.
IT
1
1234567890
1
0
1
0
1
0
1
0
1
0
1234567890
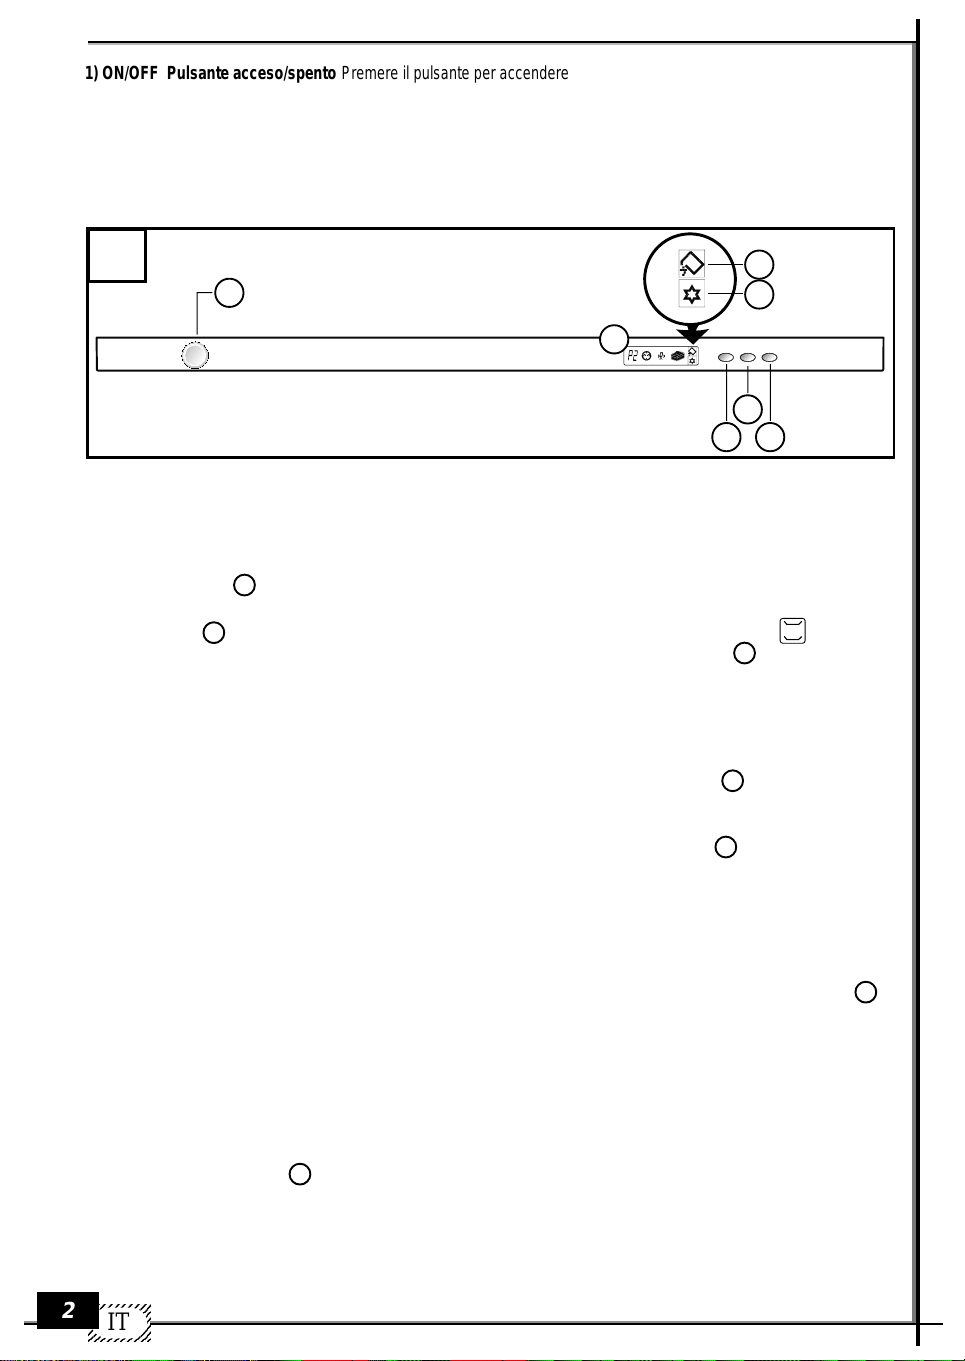
1) ON/OFF Pulsante acceso/spento Premere il pulsante per accendere l’apparecchio
2) Indicazione mancanza sale (se previsto)
3) Indicazione mancanza brillantante (se previsto)
4) Selezione ritardo partenza “Delay”
5) Selezione lavaggio rapido
6) Pulsante selezione programmi
7) Display multifunzione
Per aprire dovete tirare in avanti (una sicurezza elettrica spegne la macchina quando la porta viene aperta).
18a
1
2
3
7
4
6 5
Avviamento
Dopo il controllo della quantità di sale di rigenerazione (solo nella versione con contenitore sale) e br illantante, aprite
completamente il rubinetto dell’acqua, disponete le stoviglie nei cestelli, versate il detersivo nel suo contenitore e il detersivo
per il prelavaggio (se necessario) e chiudete la porta frontale.
Procedete come segue:
• Azionate il pulsante “acceso-spento”, si illumina il display visualizzando l’ultimo programma eseguito.
1
Selezione programma
• Pigiando il tasto (selezione programmi) viene visualizzato il simbolo del lavaggio superiore/inferiore ( ) e dopo circa
3 sec. nel Display compare il tempo di durata del programma scelto. Ad ogni pressione del tasto , viene selezionato il
programma successivo.
Scegliete il programma che ritenete più indicato al tipo di stoviglie da lavare.
A questo punto la macchina é pronta per iniziare la fase di lavaggio.
6
6
Start
• Chiudete la porta frontale, dopo il beep di inizio programma la lavastoviglie svolge automaticamente la fase di lavaggio.
Nota: Per visualizzare il tipo di programma in esecuzione, premete il tasto selezione programmi , questo permettera’ di
6
verificare per 5 secondi il tipo di programma in corso.
Impostazione errate dei programmi (cambio programma o RESET)
• Per modificare un programma in corso aprite la porta e premete il tasto Selezione Programma per circa 6 secondi. Nel
Display viene visualizzato un segmento che scorre ad indicare la fase di reset. Subito dopo chiudete la porta frontale.
N.B. Il segnale acustico del buzzer conferma la fine del RESET, e sul display compare la scritta “End”. A questo
punto la macchina è pronta per una nuova impostazione.
• Nel caso in cui abbiate dimenticato di inserire una stoviglia è possibile interrompere il ciclo di lavaggio (preferibilmente solo
se un programma è iniziato da poco): aprite la porta ed inserite le stoviglie. Per fare ripartire la macchina chiudete la porta e
il ciclo riprenderà dal punto in cui era stato interrotto.
• Per ripetere lo stesso lavaggio bisogna confermare il programma visualizzato pigiando il tasto selezione programmi , e
chiudere la porta.
NOTE: se si verifica un’improvvisa interruzione della corrente, il programma di lavaggio ripartira’ da dove si era
interrotto.
6
6
Arresto
A fine ciclo la lavastoviglie si arresta automaticamente e di seguito un segnale sonoro di 3 beep per tre volte conferma la fine
del lavaggio. Nel Display compare la scritta “End”; quando si apre la porta il Display si illumina e la scritta rimane
visualizzata per 10 secondi, dopo di che resta visualizzato il numero dell’ultimo programma eseguito.
Per spegnerla, premere il tasto acceso/spento. Dopo ogni ciclo di lav aggio, chiudete assolutamente il rubinetto dell’acqua
1
per isolare la lavastoviglie dalla rete di approvvigionamento idrico.
SUGGERIMENTI: Dopo i segnali acustici di fine ciclo, per accelerare la fase di asciugatura é possibile socchiudere
la porta frontale.
23456789
23456789
2
23456789
23456789
IT
23456789
Opzioni
NOTA: Tutte le opzioni devono essere impostate dopo aver selezionato un qualsiasi programma.
• Ritardo di partenza (Delay) Il tasto imposta un tempo di ritardo variabile da 1 a 12 ore. Alla prima pressione del tasto la funzione viene attivata, il
display mostra il simbolo del ritardo ( ) e, nell’area numerica dei programmi la scritta “1H”. Ogni successiva pressione del tasto, incrementa di 1 ora il
tempo di ritardo, fino a 12H una ulteriore pressione del tasto disattiva la funzione; il simbolo “orologio” scompare e sull’area n umerica ricompare il tempo del
programma selezionato. Una volta impostato il tempo di ritardo , chiudete la porta della lavasto viglie, premete il tasto start (se previsto) dopodiche’ si a vviera’
il conteggio del tempo di ritardo; il simbolo dell’orologio iniziera’ a lampeggiare fino alla partenza del programma prescelto. Finchè il progr amma non è partito,
aprendo la porta nel Display viene visualizza sempre il tempo residuo.
P.S. Per disattivare il ritardo bisogna procedere al RESET la macchina.
• Lavaggio rapido (SE PREVISTO):
Premendo il tasto, il simbolo del “LAVAGGIO RAPIDO ( ) compare sul display. A questo punto la macchina è pronta per iniziare la fase di lavaggio.
• Mezzo carico (SE PREVISTO):
Per default la funzione “1/2 CARICO” è disattivata, quindi la macchina lava sia sopra che sotto , Una prima pressione del tasto 1/2 CARICO seleziona il solo
lavaggio superiore, evidenziato dal rispettivo simbolo sul display ( ). Premendo di nuovo il tasto viene selezionato solo il lavaggio inferiore e sul display
sarà acceso solo il simbolo basso ( ).
Un’ulteriore pressione del tasto disattiva la funzione 1/2 CARICO. La funzione 1/2 CARICO è attiv abile su tutti i prog r ammi e viene disattiv ata al termine del
programma.
NOTA: Quando è attiva la funzione di 1/2 carico i tempi di lavaggio vengono ridotti.
• FUNZIONE 3 in 1: Tenendo premuto il tasto LAVAGGIO RAPIDO (o 1/2 CARICO se previsto) per 5 secondi si attiva la funzione “3 in 1” ; il buzzer
emette un beep di conferma e nel display viene visualizzato il simbolo della pasticca ( ). Questa funzione rimarrà attiva per tutti i programmi, fino a
quando non verrà disattivata premendo nuovamente il tasto per 5 secondi ed il simbolo della pasticca sul display si spegne.
L’uso di detersivi combinati (come pasticche “3 in 1” o similari), potrebbe rendere superfluo l’uso del brillantante e del sale. La funzione “3 in 1” è attivabile su
tutti i programmi e la spia del brillantante viene disattivata.
N.B. È buona norma, in ogni caso, seguire le indicazioni riportate sul contenitore per l’utilizzo dei prodotti sopra citati.
- Fino ad una durezza dell’acqua di 21° dH (37° fH) non e’ necessario l’uso del sale; impostare la regolazione della rigenerazione in D1 (vedi paragrafo
“regolazione dell’impianto addolcitore acqua”).
- Con durezza dell’acqua superiore a 21° dH (37° fH) l’impiego del sale e’ necessario.
In questo caso riempire il serbatoio del sale e regolare l’impianto di rigenerazione in posizione D3.
Consigli: I risultati di lavaggio ideale si ottengono comunque con l’impiego di detersivi tradizionali combinati con sale e brillantante.
AVVERTENZA: Con l’uso dei detersivi tradizionali e’ necessario regolare correttamente l’impianto di addolcitore acqua.
5
5
5
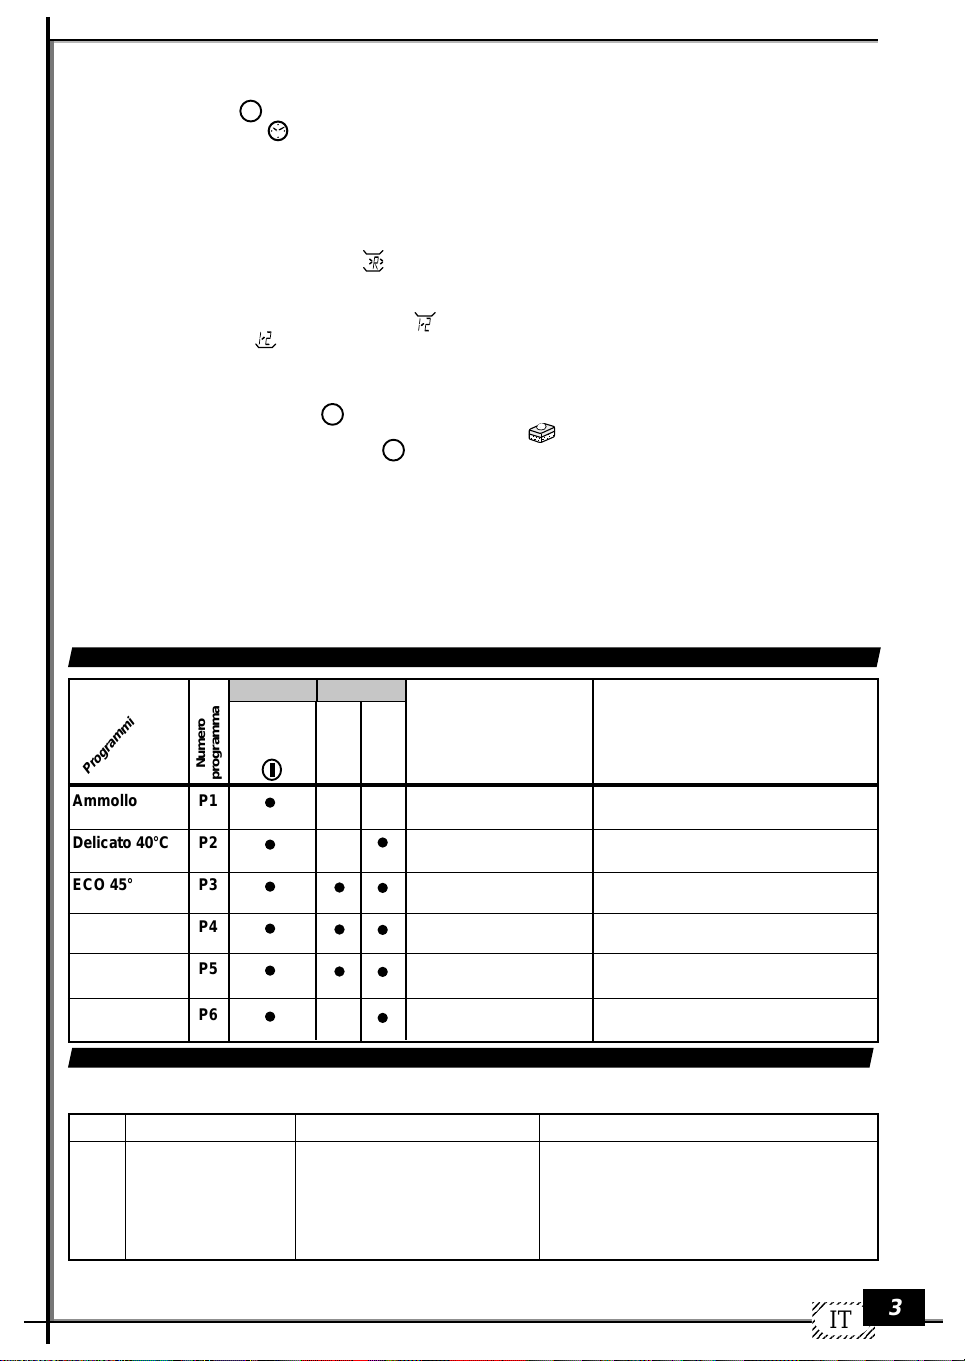
TABELLA PROGRAMMI DI LAVAGGIO (versione display)
Programmi
Ammollo
Delicato 40°C
ECO 45°C
Normale 55°C
(EN 50242)
Intensivo 65°C
(Opzionale)
Rapido 30°C
PULSANTI DETERSIVO
Acceso
Numero
programma
Spento
P1
P2
P3
P4
P5
P6
Pre-
lavaggio
Lavaggio
Stoviglie
e
tipo di
sporco
Pentole e stoviglie fino al
prossimo ciclo di lavaggio
Stoviglie poco sporche
Stoviglie delicate molto sporche
Stoviglie normalmente sporche
Stoviglie molto sporche
(con eccezione di parti delicate)
Stoviglie poco sporche
Lavaggio breve a freddo in modo da non far
attaccare i resti del cibo alle stoviglie
Lavaggio principale
2 risciacqui (1freddo - 1 caldo)
1 Prelavaggio freddo - Lavaggio principale
2 risciacqui (1 freddo - 1 caldo)
1 Prelavaggio freddo - Lavaggio principale
2 risciacqui (1 freddo - 1 caldo)
1 Prelavaggio caldo - Lavaggio principale
3 risciacqui (2 freddi - 1 caldo)
Lavaggio principale
2 risciacqui freddi
Descrizione programmi
TABELLA CODICI DI ERRORE
N.B.: Le anomalie vengono segnalate nel seguente modo:
Beep sonoro con l'indicazione nel Display del tipo di errore.
Errore
E4
Quando si verifica
A inizio ciclo
Controlli da effettuare
- Rubinetto chiuso
- Filtro tubo di carico ostruito
- Tubo di alimentazione acqua piegato
- Insufficiente pressione dell’acqua
- La valvola contalitri non funziona
- Intervento galleggiante di sicurezza
- Resettare la lavastoviglie
- Verificare
- Resettare la lavastoviglie
- Verificare se c’è pressione
- Chiamare il centro di assistenza autorizzato
- Chiamare il centro di assistenza autorizzato
N.B.: Quando si contatta il centro assistenza tecnica autorizzato comunicare sempre il tipo di errore.
Azioni da fare
IT
3
1234567890
1
0
1
0
1
0
1
0
1
0
1234567890
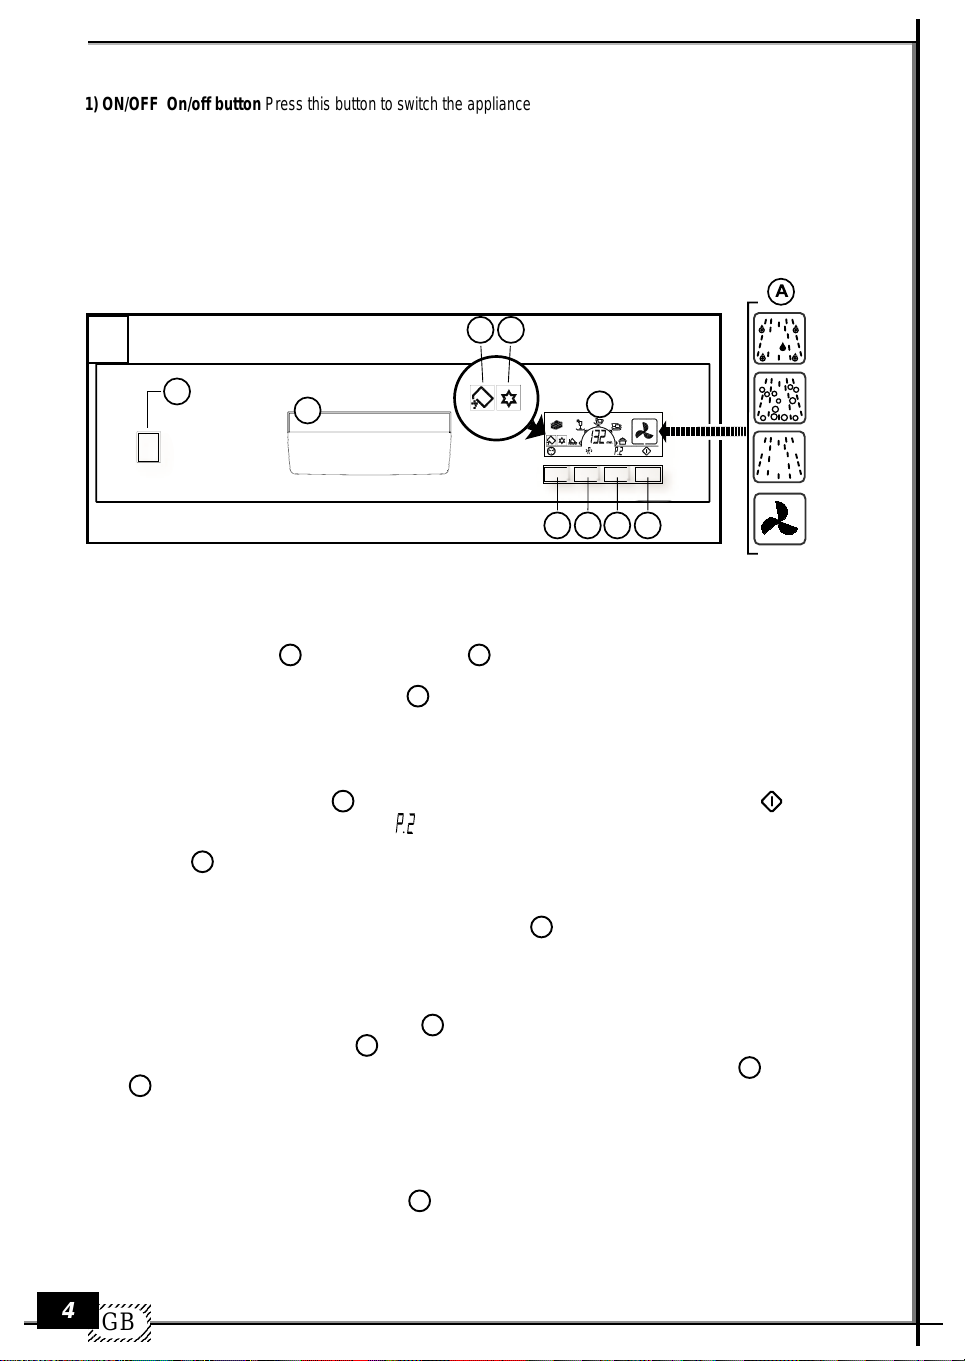
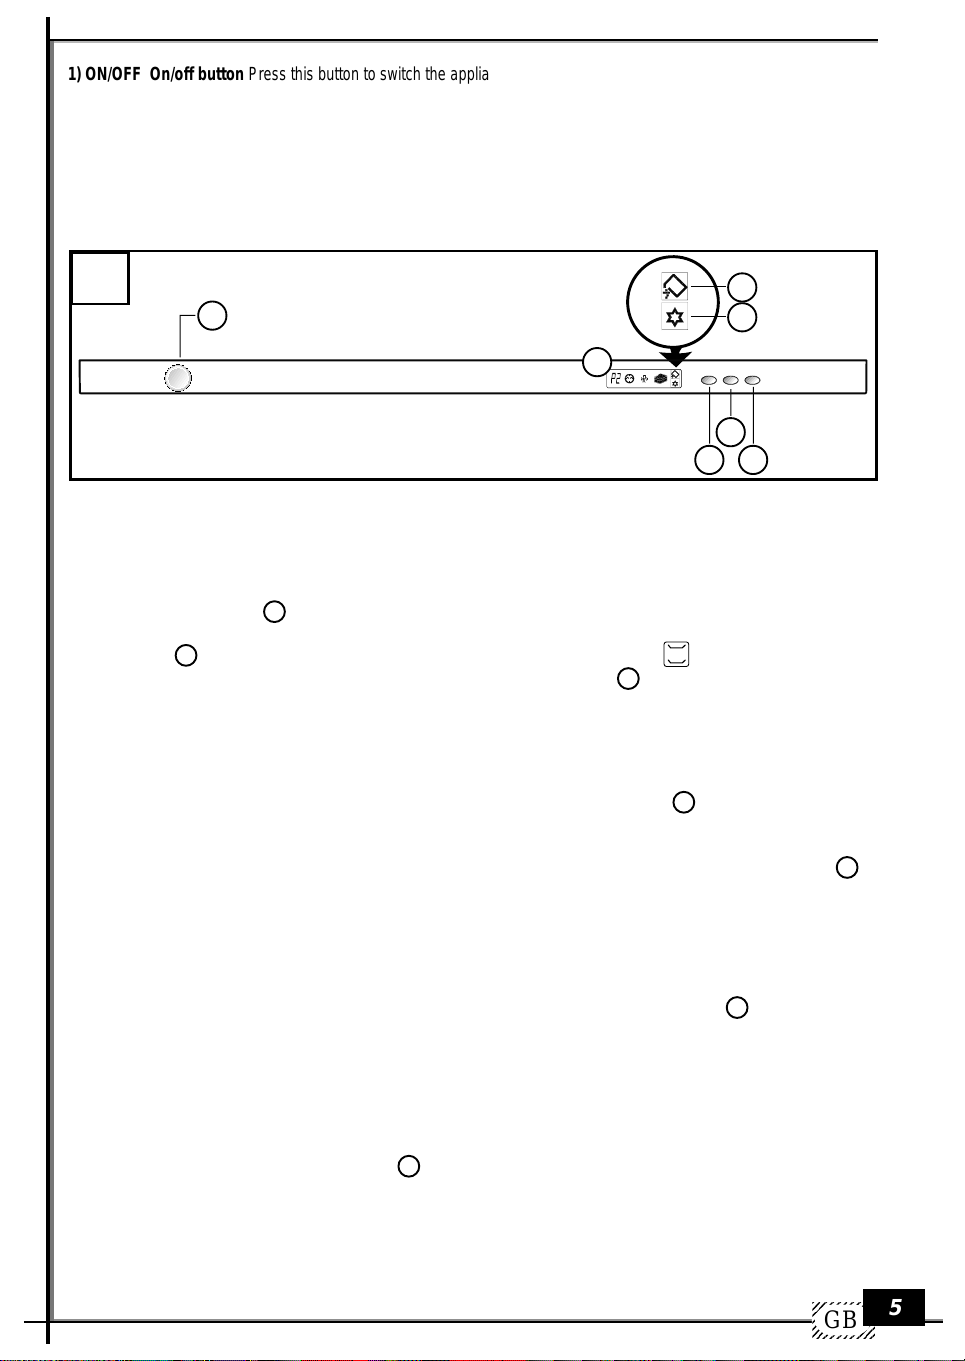
Description of control buttons and indication lights
1) ON/OFF On/off button Press this button to switch the appliance on
2) Low salt indicator light (if fitted)
3) Low rinse aid indicator light (if fitted)
4) “Delay” delayed start selector
5) Quick wash / half load selector (if fitted)
6) Programme selector button
7) Programme Start - Stop/pause button
8) Multifunctional display
9) Door handle
To open the door, pull forwards (an electrical safety device will switch the machine off when the door is opened).
18
2 3
1
9
8
-Pre-wash
-Wash
-Rinses
4 5 6 7
-Dry
Start-up
After checking the quantity of salt (only in models with salt compartment) and rinse aid, open
the water inlet valve completely, place the crockery in the racks, pour the main wash detergent and pre-wash detergent (if
necessary) into the compartment and close the door at the front of the machine.
Proceed as follows:
• Activate the “on-off” button ; the display will light up and show the most recent programme performed
1
8
Programme selection
• Select the desired programme using button (programme selector); each time the button is pressed the following
programme will be shown, and the corresponding duration will appear on the Display . Select the programme most suited to
the type of crockery to be washed.
At this point the machine is ready to start the wash programme.
6
Start / Pause
• Close the door and press button ; the machine will begin the wash cycle. The start symbol and the symbol
corresponding to the selected programme (e.g. )will be shown on the display. A cycle of graphical information (A) will then
be shown, relating to the washing phase the machine is currently performing.
Pressing button again pauses the machine; the graphics disappear from the Display but the time remaining until the end
7
of the wash cycle and the start symbol begin to flash.
7
Incorrect programme settings (changing the programme or using RESET)
• To modify a programme which is already in progress, press button Start/Pause for approximately 6 seconds; a scrolling
segment will appear on the Display, indicating the reset stage is in progress.
N.B. The buzzer sounds to confirm the end of the RESET , while the text “End” is shown on the display. At this point
the machine is ready to be set again.
• If you have f orgotten to place something inside the machine, the wash cycle may be paused (preferably only if the programme
started a short time before): press the pause button , open the door and place the crockery inside. To restart the machine,
close the door and press the Start button again; the cycle will start from the point at which it was interrupted.
7
7
• To repeat the wash, confirm the display ed programme by pressing the programme selector button followed by the start
button .
7
NOTE: if the power supply is suddenly cut off, the wash programme will restart from the point at which it was
interrupted.
7
6
Stopping the machine
At the end of the cycle the dishwasher stops automatically and 3 beeps sound three times to confir m the end of the wash
cycle. The text “End” appears on the Displa y.
To switch off the appliance press the on/off button . After each wash cycle, close the water inlet completely to cut off the
dishwasher from the water supply network.
1
ADVICE: After the beeps signalling the end of the cycle, to accelerate the drying phase the door may be left ajar.
23456789
23456789
4
23456789
23456789
GB
23456789
1) ON/OFF On/off button Press this button to switch the appliance on
2) Low salt indicator light (if fitted)
3) Low rinse aid indicator light (if fitted)
4) “Delay” delayed start selector
5) Quick wash selector
6) Programme selector button
7) Multifunctional display
To open the door, pull forwards (an electrical safety device will switch the machine off when the door is opened).
18a
1
2
3
7
4
6 5
Start-up
After checking the quantity of salt (only in models with salt compartment) and rinse aid, open the water inlet valve completely ,
place the crockery in the racks, pour the main wash detergent and pre-wash detergent (if necessary) into the compartment
and close the door at the front of the machine.
Proceed as follows:
• Activate the “on-off” button ; the display will light up and show the most recent programme performed.
1
Programme selection
• Press button (programme selector) to display the washing symbol above/below ( ) and after approximately 3
seconds the duration time for the selected programme will appear. Ev ery time button is pressed, the following programme
is selected.
Select the programme most suited to the type of crockery to be washed.
At this point the machine is ready to start the wash programme.
6
6
Start
• Close the door; after the beep signalling the start of the programme the dishwasher performs the wash cycle automatically.
Note: To display details of the programme in progress, press the programme selector button ; this will display the type of
programme currently in progress for 5 seconds.
6
Incorrect programme settings (changing the programme or using RESET)
• To modify a programme which is already in progress open the door and press the Prog ramme selector button for
approximately 6 seconds. A scrolling segment on the Display indicates the machine is in reset mode. Close the door immediately .
N.B. The buzzer sounds to confirm the end of the RESET, and the text “End” is shown on the displa y . At this point the
machine is ready to be set again.
• If you have forgotten to place something inside the machine, the wash cycle may be paused (pref erably only if the programme
started a short time before): open the door and place the crock ery inside. To restart the machine, close the door; the cycle will
start from the point at which it was interrupted.
• To repeat the wash, confirm the displayed programme by pressing the programme selector button and close the door.
NOTE: if the power supply is suddenly cut off, the wash programme will restart from the point at which it was
interrupted.
6
6
Stopping the machine
At the end of the cycle the dishwasher stops automatically and 3 beeps sound three times to confir m the end of the wash
cycle. The text “End” appears on the Display; when the door is opened the Display lights up and the text is shown for
a further 10 seconds, after which the number of the most recent programme performed remains visible.
To switch off the machine, press the on/off button . After each wash cycle, close the water inlet completely to cut off the
dishwasher from the water supply network.
ADVICE: After the beeps signalling the end of the cycle, to accelerate the drying phase the door may be left ajar.
1
GB
5
1234567890
1
0
1
0
1
0
1
0
1
0
1234567890
Options
NOTE: All the options must be set after selecting one of the programmes.
• Delayed start (Delay) This button is used to set a delay time between 1 and 12 hours. The first time the button is pressed the function is activated
and the display shows the delay ed start symbol ( ), while the text “1H” is displa yed in the n umerical area. Each subsequent press of the b utton increases
the delay time by 1 hour, up to a maxim um of 12 hours. The next press of the button deactivates the function; the “cloc k” symbol disappears and the duration
of the selected programme reappears in the numerical area. Once the delay time has been set, close the dishwasher door and press the start button (if
necessary); the delay time countdown will begin and the clock symbol will begin to flash until the selected prog ramme begins. Until the programme begins , the
Display will show the remaining time when the door is opened.
To deactivate the delay, RESET the machine.
• Quick wash (IF APPLICABLE):
The “QUICK WASH ( ) symbol appears on the display when the button is pressed. At this point the machine is ready to start the wash programme.
• Half load (IF APPLICABLE):
The “1/2 LOAD” option is deactiv ated b y def ault and the machine therefore washes loads on both upper and lower rac ks. If the “1/2 LOAD” button is pressed
once the wash will be performed using the upper rack only (this will be indicated by the corresponding
symbol on the display, ( )If the button is pressed again the wash will be performed on the lower rack only and the lo w er r ack symbol ( )will be shown.
If the button is pressed once more the “1/2 LOAD” function will be deactivated. The “1/2 LOAD” function may be activated with all programmes and is
deactivated at the end of the programme.
NOTE: When the half load function is activated the duration of the wash cycle is reduced.
• 3 in 1 FUNCTION: Press and hold button QUICK WASH (or 1/2 LOAD if provided) for 5 seconds; the “3 in 1” function is activated, a confirmation beep
is emitted and the tablet symbol ( ). is shown on the display. This function remains active for all programmes, until it is deactiv ated by pressing button for
5 seconds, when the tablet symbol disappears from the display.
The use of combined detergents (such as 3 in 1 tablets or similar products) may remove the need for rinse aid and salt. The “3 in 1” function may be activated for
all programmes; the rinse aid indicator light is deactivated.
N.B. It is good practice to follow the instructions given on the container for the products mentioned above.
- Up to a water hardness of 21° dH (37° f) it is not necessary to use salt; set the regeneration adjustment to D1 (see paragraph entitled “adjusting the water
softening system”).
- Where water hardness is greater than 21° dH (37° f), salt must be used.
In this case fill the salt compartment and adjust the regeneration system to position D3.
Advice: Superior washing results can be achieved with the use of traditional detergents combined with salt and rinse aid.
WARNING: When traditional detergents are used the water softening system must be adjusted accordingly.
5
5
5
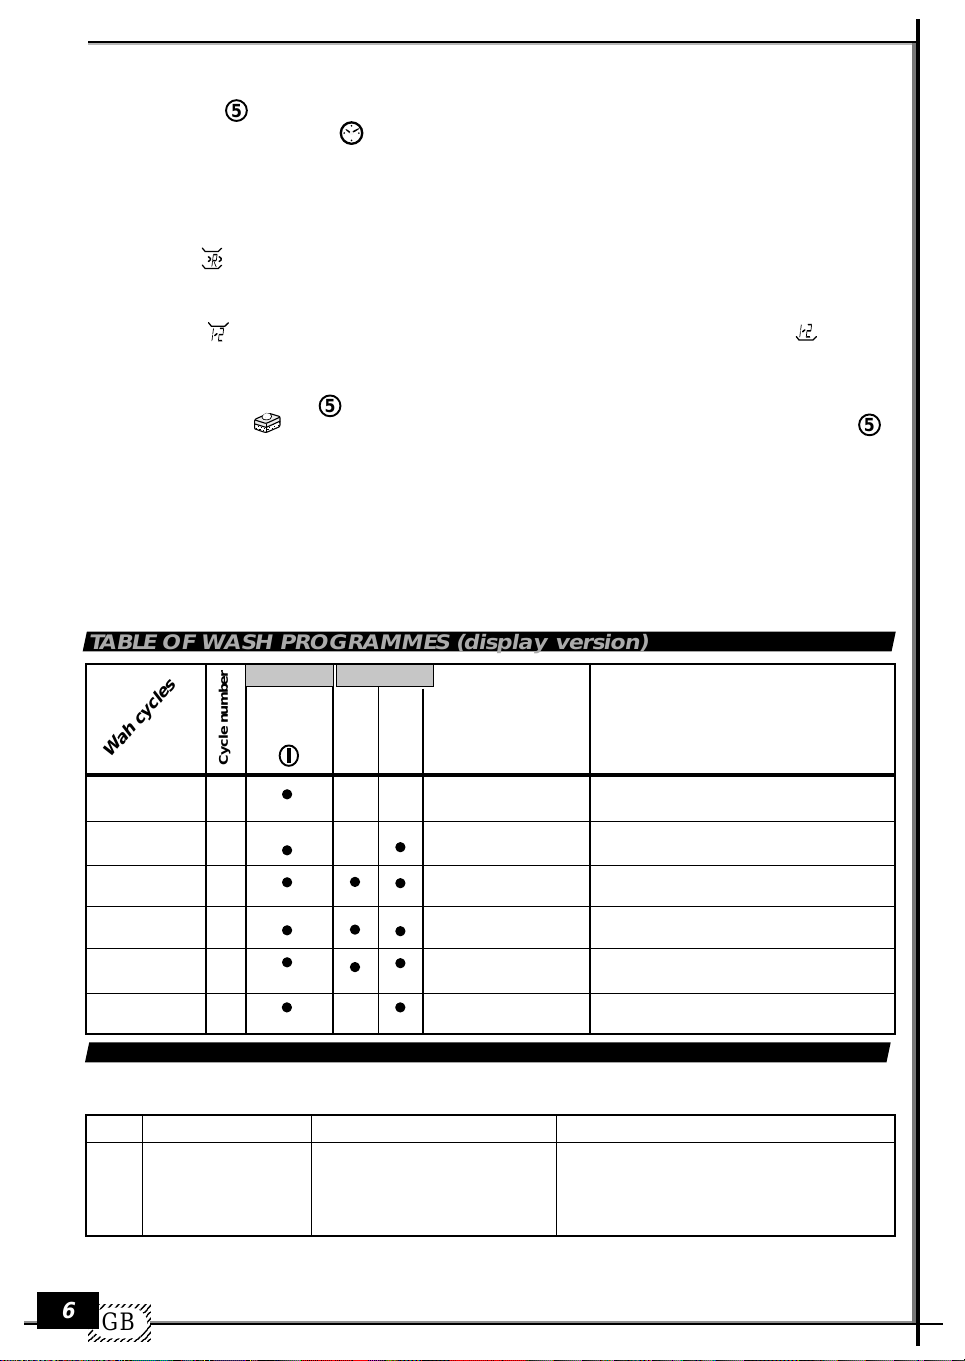
TABLE OF WASH PROGRAMMES (display version)
Wah cycles
Rinse
Rapid 40º C
ECO 45º C
Normal 55º C
(EN 50242)
Intensive 65º C
(Optional)
Rapid 30º C
BUTTONS
Cycle number
P1
P2
P3
P4
P5
ON
OFF
DETERGENT
wash
pre-wash
Dishes
and
degree of dirt
Pans and dishes until
the next wash cycle
Little dirty dishes
Very dirty delicate dishes
Normally dirty dishes
Very dirty dishes (except
delicate pieces)
Little dirty dishes
Cycle
description
Short cold wash to prevent food residue from
drying up and forming crusts on the dishes
Main wash
2 rinses (1 cold – 1 warm)
1 cold pre-wash - Main wash
2 rinses (1 cold – 1 warm)
1 cold pre-wash – Main wash
2 rinses (2 cold – 1 warm)
1 warm Pre-wash – Main wash
3 rinses (2 cold – 1 warm)
Main wash
2 rinses warm
TABLE OF ERROR CODES
N.B.: Anomalies are signalled in the following way:
A continuous beep sounds until the programme with the error is reset.
Error
LED 4
When this occurs
At the beginning
of the cycle
Checks to carry out
- T ap closed
- Filter of loading tube blocked
- Water supply tube bent
- Insufficient water pressure
- Reset the dishwasher
- Check
- Reset the dishwasher
- Verify the water pressure
Action to be taken
N.B.: Upon contacting the authorised technical assistance centre always communicate the type of error
encountered.
23456789
23456789
6
23456789
23456789
GB
23456789
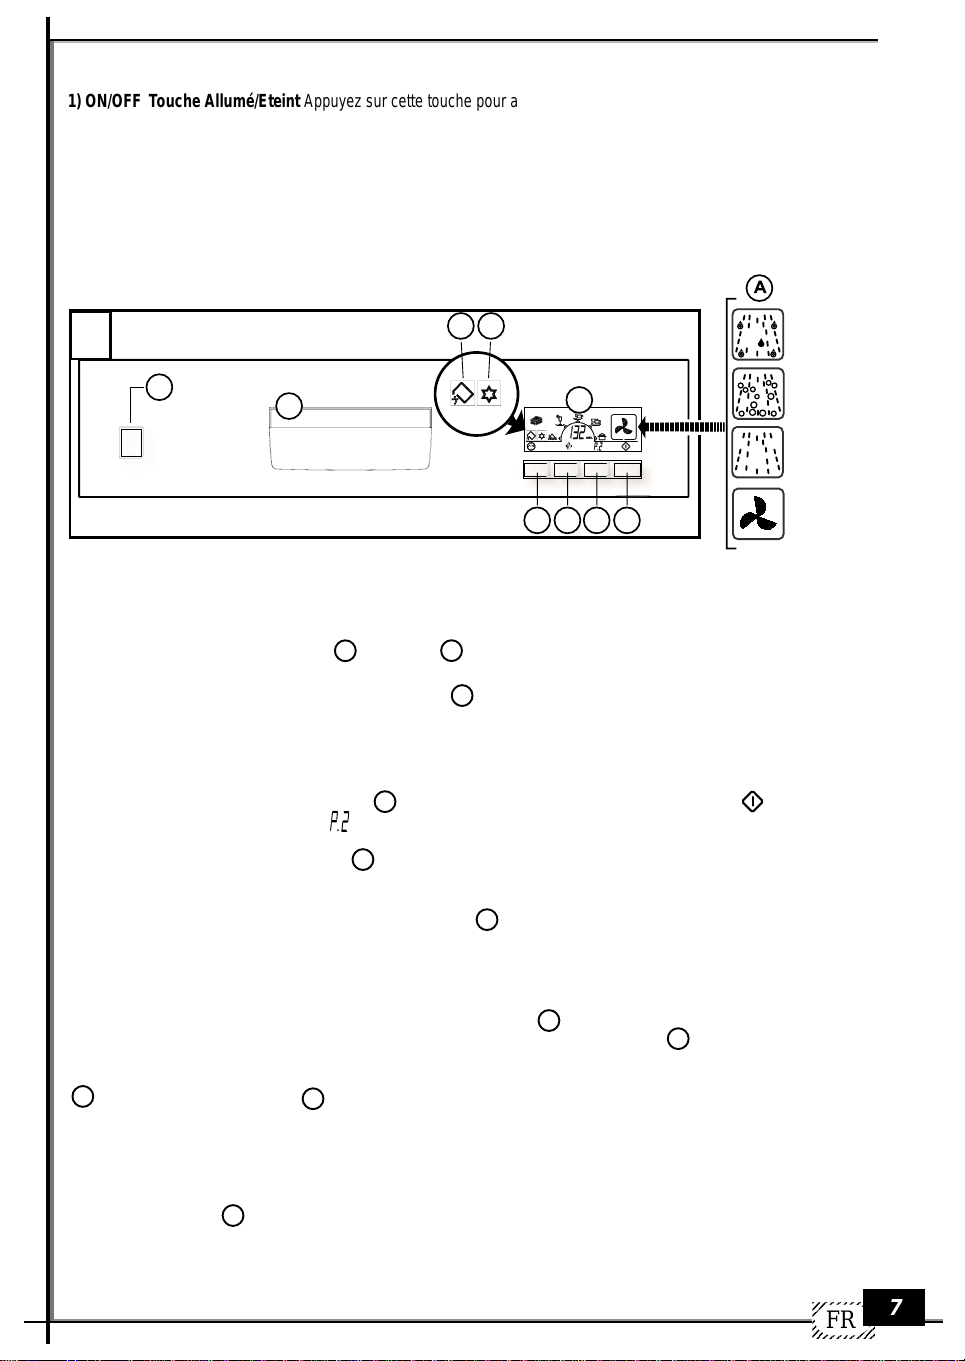
Description des commandes et des indications
1) ON/OFF Touche Allumé/Eteint Appuyez sur cette touche pour allumer l’appareil
2) Indication manque de sel (si prévu)
3) Indication manque de produit de rinçage (si prévu)
4) Sélection départ différé “ Delay ”
5) Sélection lavage rapide / demi-charge (si prévu)
6) Touche sélection programmes
7) Touche Start - Stop/Pause programme
8) Ecran multifonction
9) Poignée porte
Pour ouvrir la porte vous devez tirer vers vous (une sécurité électrique éteint la machine quand la porte est ouverte).
18
2 3
1
9
8
4 5 6 7
-Prélavage
-Lavage
-Rinçages
-Séchage
Démarrage
Après avoir contrôlé la quantité de sel de régénération (seulement dans la version avec distributeur à sel) et de produit de
rinçage, ouvrez complètement le robinet de l’eau, rangez la vaisselle dans les paniers, versez le produit de lavage dans son
distributeur et le produit de prélavage (si nécessaire) et fermez la porte centrale.
Procédez comme suit:
• Appuyez sur la touche “Allumé/Eteint” , l’afficheur s’allume pour montrer le dernier programme exécuté.
1
8
Sélection du programme
• Sélectionnez le programme souhaité grâce à la touche (sélection programmes) ; à chaque pression de la touche le
programme suivant s’affiche et la durée correspondante est montrée à l’écran.
Choisissez le programme le plus approprié au type de vaisselle à laver.
Maintenant la machine est prête pour démarrer la phase de lavage.
6
Start / Pause
• Fermez la porte et appuyez sur la touche , le cycle de lavage démarre. Le symbole de Start et le symbole du
programme sélectionné (par exemple ).sont affichés à l’écran. Un cycle d’informations graphiques (A) se référant à la
phase de lavage que la machine est en train d’exécuter est ensuite affiché.
En appuyant encore une fois sur la touche la machine passe en pause ; l’affichage des informations graphiques disparaît de l’écran tandis que le temps qui reste avant la fin du lavage et le symbole de Start clignotent.
7
7
Erreur de sélection des programmes (changement de programmes ou REMISE A ZERO)
• Pour modifier un programme en cours, appuyez sur la touche Start/Pause pendant 6 secondes environ ; un segment est
affiché et défile à l’écran pour indiquer la phase de remise à zéro.
N.B. Le signal acoustique du buzzer confirme la fin de la REMISE A ZERO et le message “ End ” est affiché à l’écran.
L’appareil est alors prêt pour une nouvelle sélection.
• Si vous avez oublié d’introduire de la vaisselle vous pouvez interrompre le programme de lavage (de préférence s’il n’a
démarré que depuis quelques minutes): appuyez sur la touche Pause , ouvrez la porte et introduisez la vaisselle. Pour
faire redémarrer la machine, fermez la porte et appuyez de nouveau sur la touche Star t ; le cycle va redémarrer de
l’endroit où vous l’avez interrompu.
• Pour répéter le même lavage il f aut confirmer le programme affiché en appuyant sur la touche de sélection des programmes
6
, et ensuite sur la touche Start .
REMARQUES : en cas de panne de courant, le programme de lavage va redémarrer de l’endroit où il a été interrompu.
7
7
7
7
Arrêt
A la fin du cycle, le lave-vaisselle s’arrête automatiquement et un signal sonore de 3 bips répété trois fois confirme la fin du
lavage. Le message “ End ” est affiché à l’écran.
Appuyez sur la touche Allumé/Eteint pour éteindre l’appareil. Après chaque cycle de lavage, n’oubliez absolument pas
de fermer le robinet de l’eau pour isoler le lave-vaisselle de l’alimentation en eau.
1
CONSEILS : Après les signaux acoustiques indiquant la fin du cycle, pour accélérer le séchage vous pouvez laisser
la porte frontale entrouverte.
FR
7
1234567890
1
0
1
0
1
0
1
0
1
0
1234567890
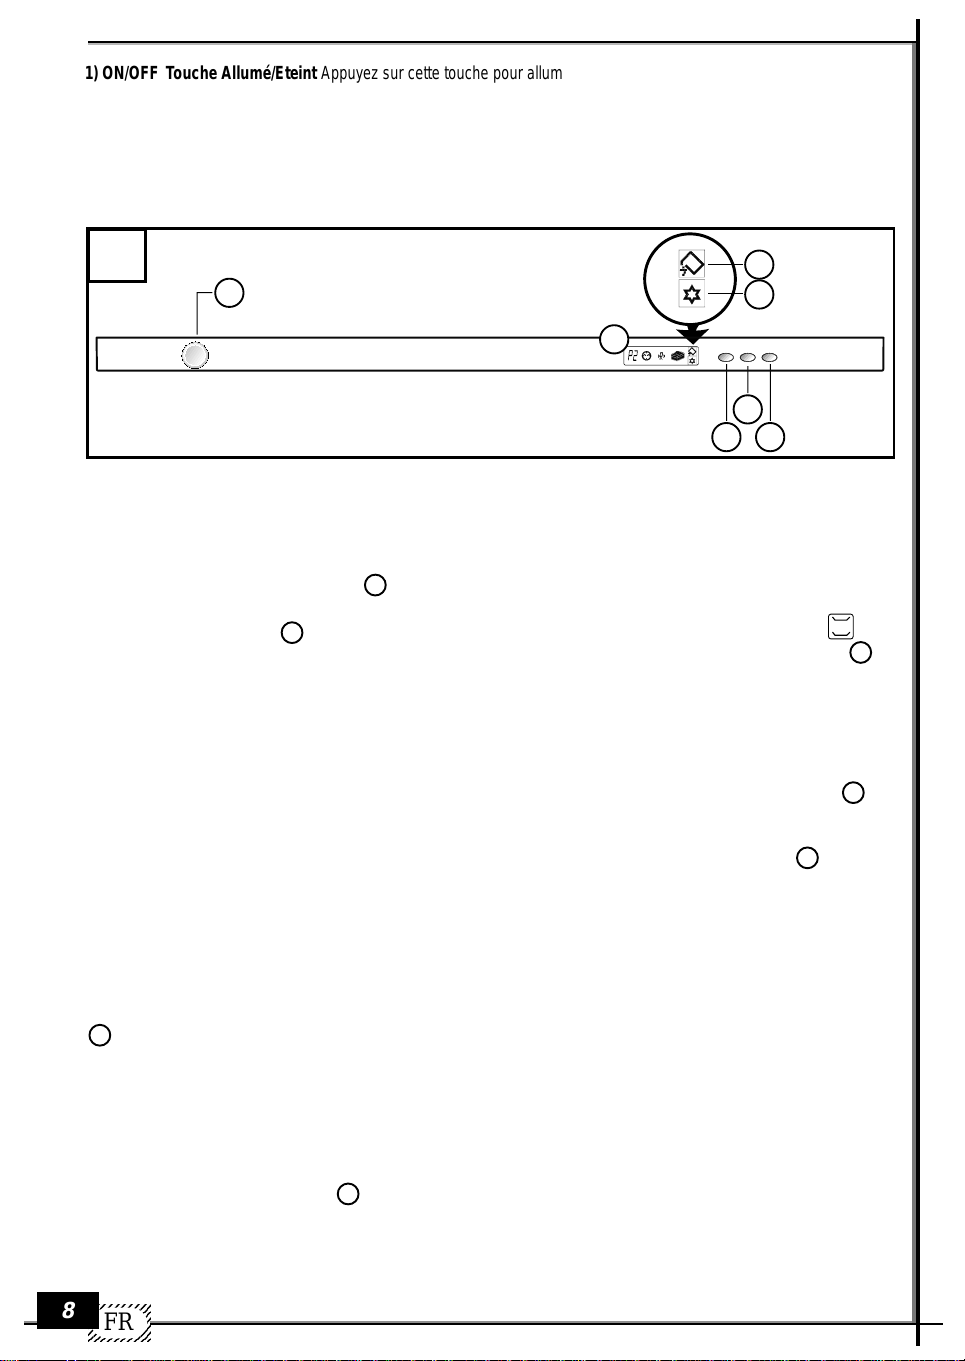
1) ON/OFF Touche Allumé/Eteint Appuyez sur cette touche pour allumer l’appareil
2) Indication manque de sel (si prévu)
3) Indication manque de produit de rinçage (si prévu)
4) Sélection départ différé “ Delay ”
5) Sélection lavage rapide
6) Touche sélection programmes
7) Ecran multifonction
Pour ouvrir la porte vous devez tirer vers vous (une sécurité électrique éteint la machine quand la porte est ouverte).
18a
1
2
3
7
4
6 5
Démarrage
Après avoir contrôlé la quantité de sel de régénération (seulement dans la version avec distributeur à sel) et de produit de
rinçage, ouvrez complètement le robinet de l’eau, rangez la vaisselle dans les paniers, versez le produit de lavage dans son
distributeur et le produit de prélavage (si nécessaire) et fermez la porte centrale.
Procédez comme suit:
• Appuyez sur la touche “ Allumé/Eteint ” , l’afficheur s’allume pour montrer le dernier programme exécuté.
1
Sélection du programme
• En appuyant sur la touche (Sélection programmes) le symbole du lavage supérieur/inférieur est affiché ( ) et 3
secondes après environ, la durée du programme choisie est affichée à l’écran. A chaque pression sur la touche , le
programme suivant est affiché.
Choisissez le programme le plus approprié au type de vaisselle à laver.
Maintenant la machine est prête pour démarrer la phase de lavage.
6
6
Start
• Fermez la porte centrale, après le bip de démarrage du programme le lave-vaisselle réalise automatiquement la phase de
lavage.
Remarque: Pour afficher le type de programme en cours d’exécution, appuyez sur la touche Sélection programmes , qui
6
vous permettra de vérifier pendant 5 secondes le type de programme en cours.
Erreur de sélection des programmes (changement de programmes ou REMISE A ZERO)
• Pour modifier un programme en cours, ouvrez la porte et appuyez sur la touche Sélection programmes pendant 6
secondes environ. un segment est affiché et défile à l’écran pour indiquer la phase de remise à zéro. Fermez la porte frontale
tout de suite après.
N.B. Le signal acoustique du buzzer confirme la fin de la REMISE A ZERO et le message “ End ” est affiché à l’écran.
L’appareil est alors prêt pour une nouvelle sélection.
• Si vous avez oublié d’introduire de la vaisselle vous pouvez interrompre le programme de lavage (de préférence s’il n’a
démarré que depuis quelques minutes): ouvrez la porte et introduisez la vaisselle. P our faire redémarrer la machine, fermez
la porte et le cycle va redémarrer de l’endroit où vous l’avez interrompu.
• Pour répéter le même lavage il f aut confirmer le programme affiché en appuyant sur la touche de sélection des programmes
6
, et fermez la porte.
REMARQUES : en cas de panne de courant, le programme de lavage va redémarrer de l’endroit où il a été interrompu.
6
Arrêt
A la fin du cycle, le lave-vaisselle s’arrête automatiquement et un signal sonore de 3 bips répété trois fois confirme la fin du
lavage. Le message “ End ” est affiché à l’écran ; quand la porte s’ouvre, l’afficheur s’allume et le message est affiché
pendant 10 secondes environ, après quoi ce n’est que le numéro du dernier programme qui reste affiché.
Pour l’éteindre, appuyez sur la touche Allumé/Eteint. Après chaque cycle de lavage , n’oubliez absolument pas de f ermer
1
le robinet de l’eau pour isoler le lave-vaisselle de l’alimentation en eau.
CONSEILS : Après les signaux acoustiques indiquant la fin du cycle, pour accélérer le séchage vous pouvez laisser
la porte frontale entrouverte.
23456789
23456789
8
23456789
23456789
FR
23456789
 Loading...