


Combo Scanner
User Manual
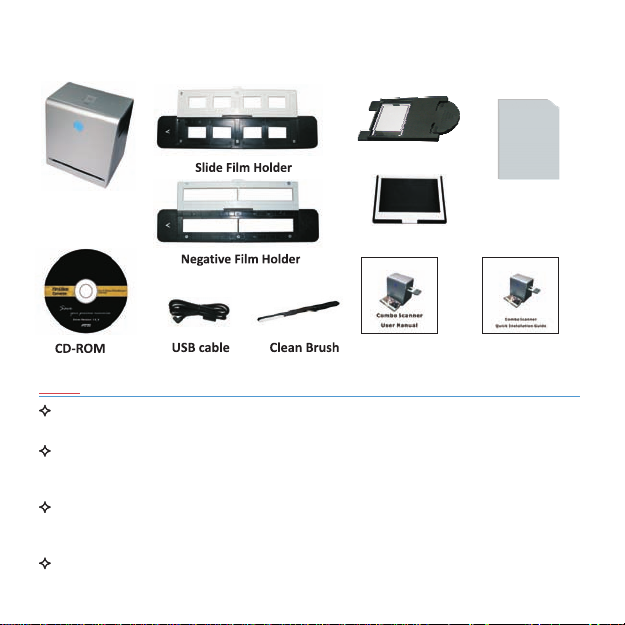
I. Unpack the Combo Scanner
Combo Scanner
Photo/Business Card Holder
Backlight Holder
Business card Fixture
User Manual
Note
Quick Installation Guide
This Combo Scanner supports Windows XP, Vista and Windows7(32/64bits) via USB
2.0 only.
We strongly suggest using a clean, dry, non-alcohol cotton swab to clean the glass
surface on the back-light holder and the business card fixture periodically to
produce a clear image.
Make sure all negative films, slide films, cover trays and photos are free of dust and
dirt before inserting into the as this may affect the image quality when
Scanner
scanning.
When cleaning films, please use a professionally recommended purger from a
photo store to avoid damaging old or precious films.
-1-
II. Driver Installation
scanner Installation
To use the Combo Scanner, please complete the following installation in
advance.
1. Turn on the computer
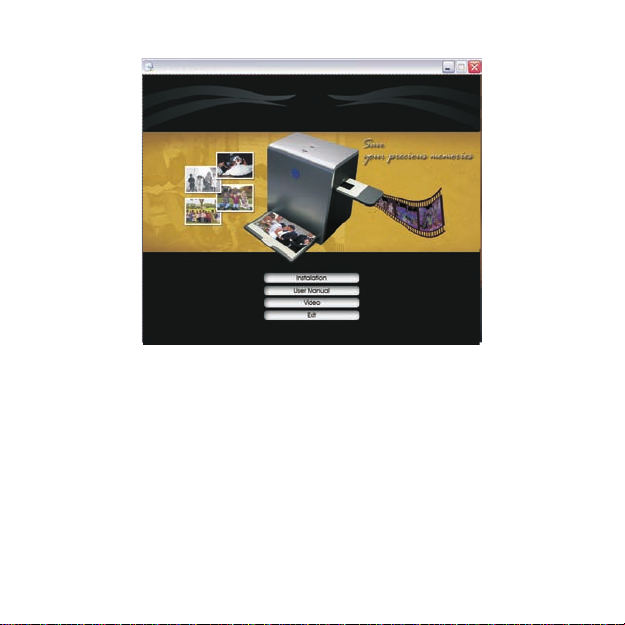
2. Insert the installation CD into the CD-ROM drive and the installation CD
menu will appear
3. Click the “Installation” button to begin.
4. After the installation completed, you can browse the video instructions
and user manual from the CD.
5. Click ''Exit'' to quit the driver installation menu.
-2-
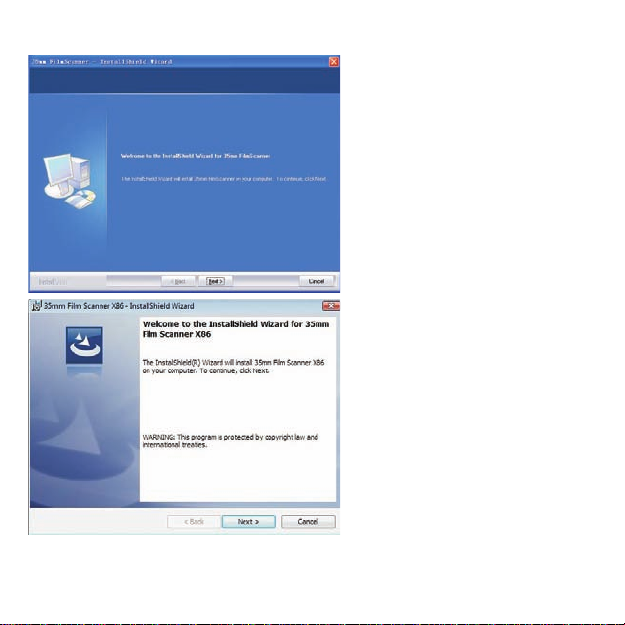
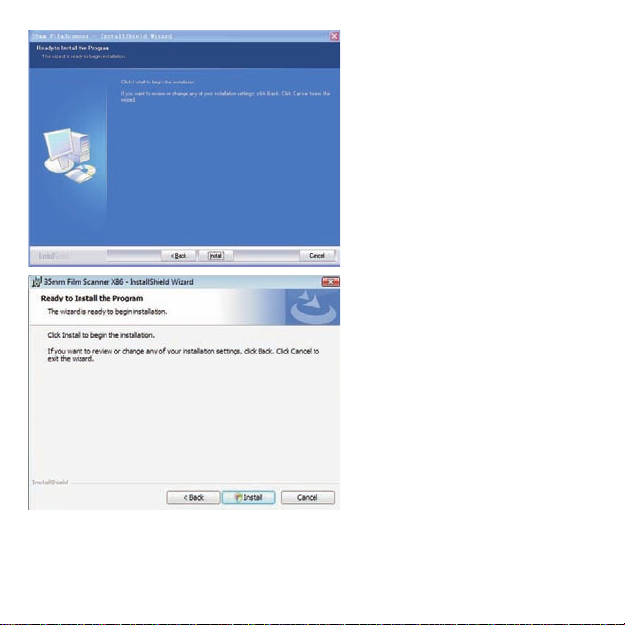
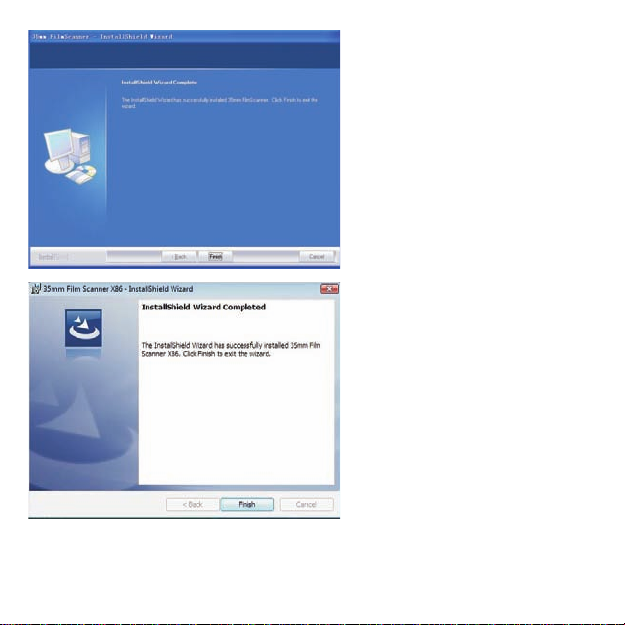
6. Follow the on-screen instructions for installtion. (XP, Vista/Windows7)
-3-
-4-

-5-
-6-

7. After completing software installation, please connect to
Combo Scanner
PC. The New Hardware Wizard will detect a new device.
-7-

8. Select “Yes” in XP or “Locate and install driver software (recommended)” in
Vista/Windows7 OS.
Film and Photo Scanner
Film and Photo Scanner
-8-
9. After completing the installation, the film-scanner is ready to start with
“ Image scan Tool” under program files. (WindowsXP/Vista/Windows7,) It
is recommended (but not required) to restart your PC after installation or
un-installaion.
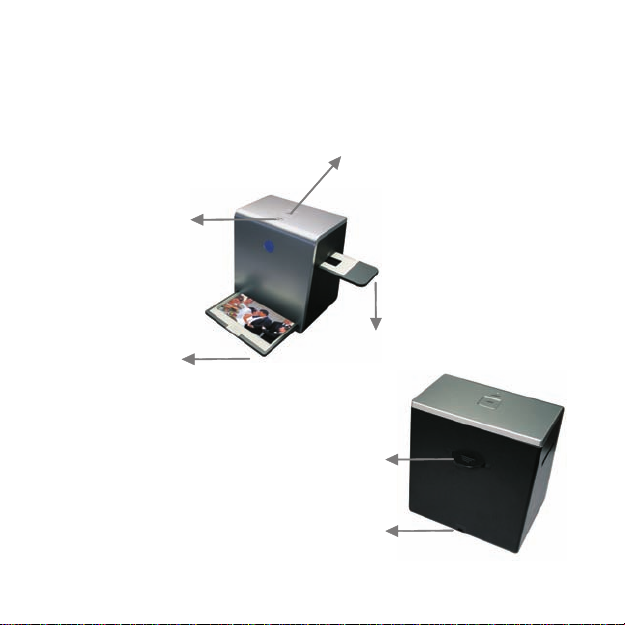
III. Using the Scanne
Power status LED
Photo/Business
Card slot
Slot for Backlight
Copy button
Film/Slide
slot
holder
USB Port
-9-
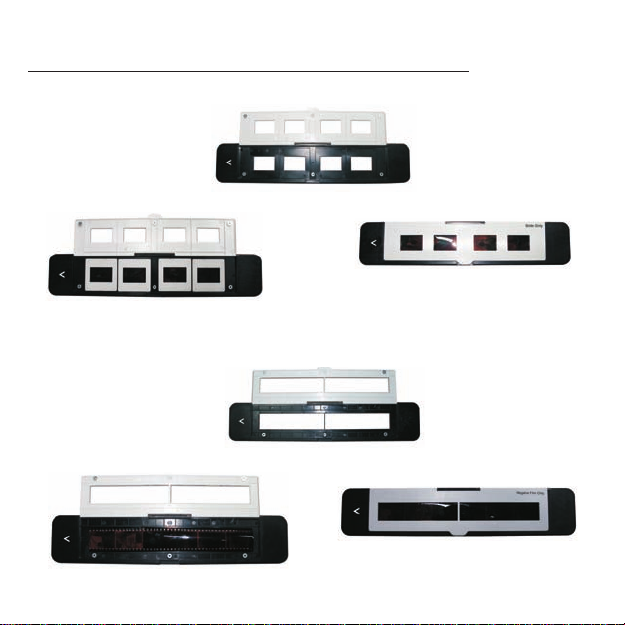
Installing film into the film holder
Install slide Film into the holder entitled “Slides Only”
1. Open the slide holder as illustrated
2. Place slide in recessed slot in holder 3. Close the film holder
Install Negative Film into the holder entitled “Negative Film Only”:
1. Open the film holder as illustrated
2. Install film into negative film slot
3. Close the film holder
-10-
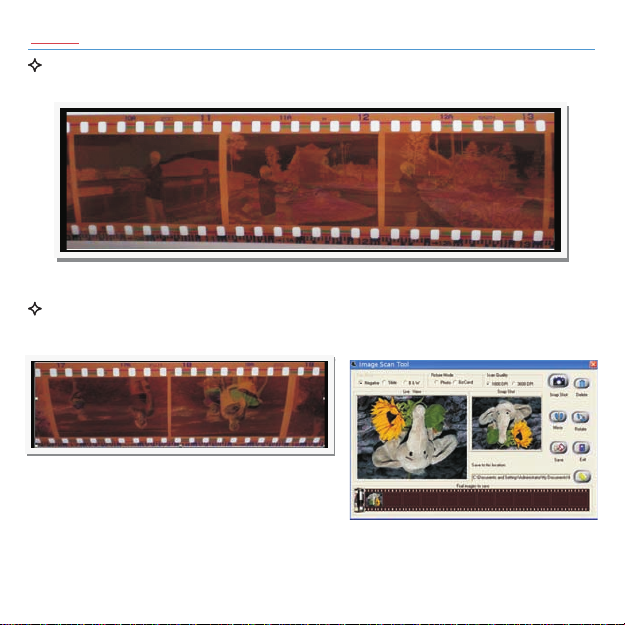
Note
To avoid a mirror image, follow the serial numbers (from left to right) on
top of film when installing negative film into holder.
Figure 1
If the image is upside down [see fig.2], the image can be corrected by
”Rotate” function in after capture [see fig.3].Image scan Tool
Figure 2
Figure 3
-11-

How to use Combo Scanner
Scanning Film/Slide
1. Put Film into film holder
2. Insert the film/slide back light holder at the rear side of the
Scanner
3. Plug in your USB cable to your PC with another side on the
unit.
Combo Scanner
unit.
-12-
Combo

4. Insert the film holder into the right side of the unitCombo Scanner
5. Click “Image Scan Tool” PC program to enter operation interface as below.
The PC program will go into Film/Slide Mode automatically.
-13-

Scanning Photo
1. Remove the film / slide holder as well as the back-light holder from the
Combo Scanner unit if either one is attached.
Remove film /slide holder by sliding
the holder to the left hand side.
Remove back-light holder by press
down the handle and pull it out.
2.Open the photo holder as illustrated, Please the photo on the base of the
photo holder and close the photo holder.
-14-

4. Insert the photo holder into the photo slot of the Combo Scanner unit.
5. Click “Image Scan Tool” PC program to enter operation interface as
below. The program will go into Picture Mode automatically.
-15-

Scanning Business Card
1. Follow Step 1 from Scanning Photo to remove Film/Slide holder as well
as back-light holder in the previous pages.
2.Close the photo holder and Place the business card on the base of the
photo holder follows the engraved guide line on the holder.
3.Put the Business Card fixture on the top of Photo Holder.
4.Insert the entire photo holder with the business card fixture into the
photo slot of the unit,and select "BizCard" mode from the
"Image Scan Tool".
Combo Scanner
-16-

5. Press “Copy” button or press “Snap Shot” button in the PC program to capture
the image
6. Process necessary modification by function buttons in right hand side
-17-

7. Save captured images to PC
8. Get fimal images from PC for further review and edit
-18-

User interface introduction
Film/Slide Mode Picture Mode
When user selects a
“Negative” source, the
image in “Live View”
window will be exactly
like the processed result.
-19-
The will
Image scan Tool
auto select operating mode
(Film/Side Mode & Photo
Mode) automatically by
detecting if the backlight
holder has been attached. If
backlight holder is attached,
it will go into Film/Slide
Mode and vice versus.

If device processes a slide, the “Live View” will show a color image and the
FilmType will remain the same.
This is the live view under black and white negative option.
-20-

User can convert images from traditional film to digital either by “Snap Shot”
button in or the button on top of filmscanner. Then, the
Image scan Tool
capture result will appear in the “Snap Shot” and “Final images to save”
window.
All of the effects in will be ready for instant preview in “Snap
Image scan Tool
Shot” and “Final images to save” window.
-21-

Apply the Mirror function by pressing the “Mirror” icon, that will flip the
image and be shown in the “Snap Shot” window as well as the “Final images
to Save”.
Or apply the Rotate function by pressing “Rotate” button, the image will be
rotated 90 degrees each time. Images can be continuously rotated a full 360
degrees or until desired.
-22-

If the user wishes to delete a specific image from the capture pool, simply
click the image under “Final image to save” again, then the selected image
can be deleted by applying the “Delete” button.
After modification, user can save images to the default location at
“C:\Documents and Settings\Users\My Documents\My Pictures”.
-23-

Or define preferable location for saving captures images by pressing the
directory button. Another window will pop out for user to select required
location.
Once press “Save” key, all of captures images will be saved into defined
location. The “final image” saving window shall be empty after press the
“Save” button.
-24-

Combo Scanner Calibration
When you found your Combo Scanner couldn't get a sharp image, you
need to run the “Scanner Calibration” program to adjust the focus of the
scanner.
Launch the “Scanner Calibration” program from Window's Start Menu
All) Programs Image Scan Tool Scanner Calibration→( → →
You can see there are two options of calibration. They are Film Mode
and Photo Mode. You have to insert the calibration film / sheet in
advance before calibration.
-25-

You can drag the slide bar or type in the value for either Film or
Photo position in order to obtain a clear image. Click “Save to
EERPOM” to save the setting.If you lost the setting, please use
“1023” as Film position default and “0” as Photo position default.
If you want to retrieve the last used value, you can click “Read from
EEPROM” restore to the previous value.
You can also select the Full Resolution Preview by the top radio
buttons to make sure the calibrated image is crystal clear.
-26-

IV. Specification
Image Sensor: 5 mega CMOS sensor
Lens: F no.=2.0, 4 Glass elements,
Focus Range:
Exposure Control:
Color Balance
Scan Quality
Data Conversion
Scan Method
Light Source
Interface:
Power:
Dimensions
Weight
Operating Systems
2x Predefined Focuses
Automatic
Automatic
1,800 dpi /3600 dpi (SW interpolation)
10 bits per color channel
Single pass
Film/Slide Scanning:
Back light (3 White LEDs)
Photo/Business Card Scanning:
Light Bar (8 White LEDs)
USB 2.0
USB port
190X145X205mm
0.9kg
Windows XP/Vista/Windows 7 32/64bit
-27-

V. Cleaning the Combo Scanner
Cleaning the backlight holder
Detach the backlight holder from the Combo Scanner
unit. Using the provided clean brush or a clean, dry,
nonalcohol cotton swab to clean the glass surface
periodically to produce a clear image during operation.
Cleaning the business card fixture
Using the provided clean brush or a clean, dry,
non-alcohol cotton swab to clean the surface
of the business card holder periodically to
produce a clear image during operation.
You can double check the result of cleaning
by removing the film holder from device
and insert the cleaned back-light holder
back into the unit. When you haven't notice
any dust in the live view window that
means you can stop cleaning.
Caution
The back-light holder should be handled with extra care to avoid any
scratching the glass surface in order to maintain the quality of scanned image.
-28-

Combo Scanner Trouble shooting
Question 1. How to instal l Combo Scanner driver?
Solution:
01 Put Film Scan Driver CD ROM into your CD player
02 Open the X CD ROM Driver folder
03 Click mouse right button on setup exe and click “Run as
administrator” to install driver
06 The Install Shield Wizard will show the message of “Install Shield Wizard
Completed once the driver installed ready..
07 Connect Combo Scanner to your PC, the PC will complete the device driver
installation and confirm driver installed successfully
:
.‐.
. ( ‐ ):\ \ .
..,
.
.
.
-29-

Film and Photo Scanner
Question 2. Came up the error message “Cannot Install This Hardware” or
Can not find camera. Please connect your manufacturer” or “Acquire
“
Source Failed…Restart DSM”
Film and Photo scanner
-30-

Solution:
01.Check your USB cable to make sure it is well connected to your PC and
your device.
02.Check your PC to verify if your Windows OS is 32 bit or 64 bit. Make sure
you did not install the wrong version of the driver.
03. Uninstall the existing driver from your system.
a. Using the uninstall program of application
Run start All programs (Vista/Win7) or Program files (XP) 35mm film
scanner 35mm film scanner Uninstall 35mm Film Scanner
→→
→→
Combo Scanner
-31-

b. or Using the tool in device manager
(1) Open Device Manager.
Windows XP
Open Start Setting Control Panel System Hardware Device
→→ →→ →
Manager
Windows Vista
Open Start Control Panel System Device Manager
→→→
Wondows 7
Open Start Control Panel System and Security System Device
→→ →→
Manager
(2) Click the right button of mouse from “Unknown device” and uninstall the
driver.
-32-

04. Re‐install proper driver version again.
-33-

Question 3 If you can t uninstall the driver or came up the error
message Can t find the device you may plug‐in the device and try
.
“, ,
`
`
again.” or “Failed to uninstall the device. The device may be required to
bootup thecomputer.”
Solution:
Please refer to Question 2 solution and reboot your computer, if it still
can’t work, please contact us.
Question 4. Run the combo Scanner application and come up the error
message “Fail to get image data”
OK
Solution
Close the application then re‐start the Combo Scanner application again:.
-34-

Question 5. You can’ t see the pre‐view image from application
Scanner
when you have re‐installed driver and device status is completed.
Film and Photo Scanner
Image scanTool
Reason: Devices confliction. (Such as USB cameras or devices.)
-35-

Solution:
01. Disable the other imaging devices by using bundled program in standard
package first or disable it by the option under Imaging device when press
right button of mouse.
02. Re‐start application again.
Scanner
Question 6. Come up the error message “General failure in transfer bad info
header info. Bad value error”.
OK
Reason: Plug device into USB1.1 port.
Solution:
Scanner
only supports USB 2.0. Please verify if your PC is compatible with
USB2.0.
-36-

01 Open Device Manager.
Windows XP
Open Start Setting Control Panel System Hardware Device Manager
→→ →→ →
Windows Vista
Open Start Control Panel System Device Manager
→→→
Windows 7
Open Start Control Panel System and Security System Device Manager
→→ →→
02 Your computer must with a USB 2.0 Controller in Universal Serial Bus
controllers. The figure below shows the difference between USB1.1 and 2.0.
There must be a “USB2” for USB 2.0 controller.
Note: If there's any abnormal condition cause user special behaviour,
Combo Scanner can be reset by pu ll/in sert US B cable again.
-37-

Instructions shall caution users that modifications not approvedby the party responsible
for compliance could void user's authority to operate theequipment.
The following orequivalent as appropriate:
“NOTE: This equipment has been tested and found to comply with thelimits for a Class B
digital device, pursuant to Part 15 of the FCC Rules. These limits are designed to provide
reasonable protection against harmful interference in a residential installation. This
equipment generates, uses and can radiate radio frequency energy and, if not installed
and used in accordance with the instructions, may cause harmful interference to radio
communications. However, there is no guarantee that interference will not occur in a
particular installation.
If this equipment does cause harmful interference to radio or television reception, which
can be determined by turning the equipment off and on, the user is encouraged to try to
correct the interferenceby oneor moreof thefollowing measures:
Reorient or relocatethe receivingantenna.
●
Increase theseparation between the equipment and receiver.
●
●
Connect the equipment into an outlet on a circuit different from that to which the
receiver is connected.
●
Consult thedealer oran experiencedradio/TV technician for help.”
Statement that the product complies with Part 15 (i.e. “This device complies with Part15
of the FCC Rules. Operation is subject to thefollowing twoconditions: (1) This device may
not cause harmful interference, and (2) this device must accept any interference
received, including interferencethat may cause undesired operation.”)
CALIFORNIA PROP 65WARNING
WARNING : This product contains chemicals known to the State of California to cause
birth defectsor other reproductive harm.For more information on theseregulations and
a list of chemicals, log on the following website address:
http://www.oehha.ca.gov/prop65.html

Driver Revision: 1.0_0
 Loading...