

ContactPool Smart Device
User’s Manual

-1-
Index
I.Getting start ................................................................................ 2
II.Unpack ContactPool Smart Device .................................. 2
III.Setup ContactPool ................................................................. 3
IV. Detail Operation .................................................................... 5
ContactPool Web interface ...................................................... 5
ContactPool PC application ................................................... 12
IV.Specification ........................................................................... 16
-2-
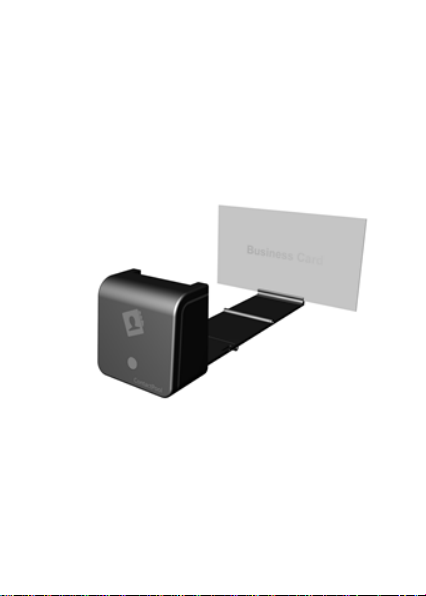
I.Getting start
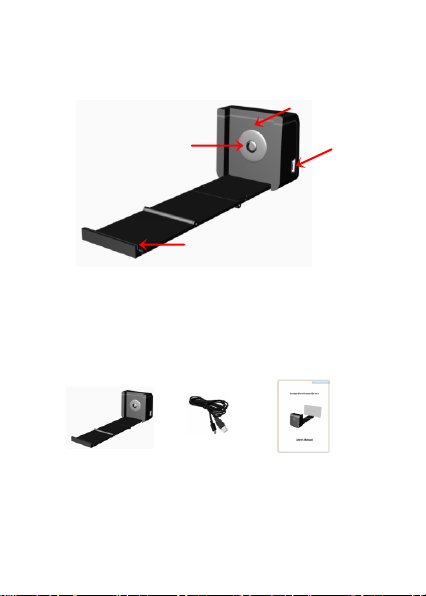
Smart Device
USB cable
Mini USB
LED
USB
Business Card support
Camera
Lighting LED
Quick Guide
II.Unpack ContactPool Smart Device
-3-
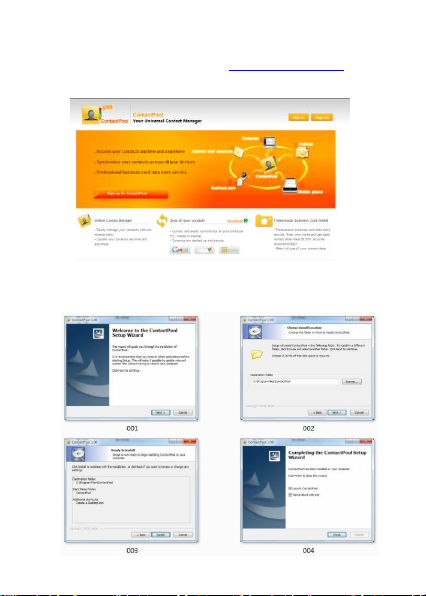
III.Setup ContactPool
1.Go to ContactPool web site at www.contactpool.com to sign
up for ContactPool.
2.Download the ContactPool PC application and complete the
installation in your PC.

-4-
3.Connect ContactPool Smart Device with your laptop
Note: This is a UVC device supports plug-n-play without any
installation.
4. Capture the cards on hand through SmartDevice and start
to upload cards to ContactPool either through web or PC
application to maintain the contacts.
Note: Once you select the on line cards transcribe service,
the uploaded cards will be transcribe at a very low cost and
updated into your existing ContactPool list.
-5-
IV. Detail Operation
ContactPool Web interface
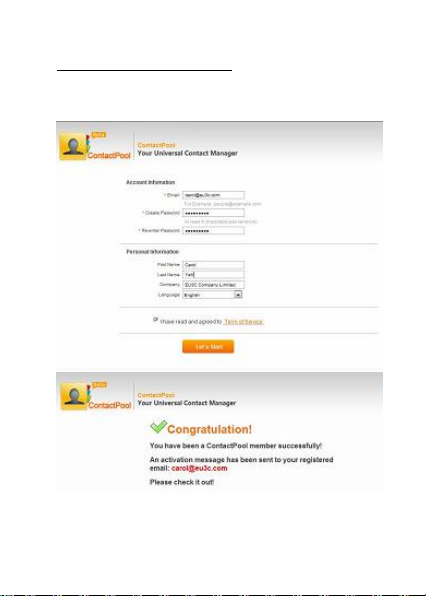
1.Sign up
Enter required account information as following. Then you
can start to use the ContactPool.

-6-
2.Contact
Add contact
To add contact in ContactPool, you can go to the “Contacts”
and click “Add Contact”, a blank format will be pop out for
manual maintenance.
Favorite
Every contact can be added into “Favorite” group or create
the other group name for group management. The favorite
contacts will be group and list in “Favorite” page.
Resents
To see recent editing contacts, select “Recents” in menu and
you will find the recents contact information from the list.

-7-
List View
This is the function to display the ContactPool contacts in
different format. They are “List view”, “Detail view” and
“Business Card” view for
selection.
Recycle Bin
To avoid delete wrong contacts from list, the selected delete
items will be move to “Recycle Bin”.

-8-
Advanced Search
The feature provides quick search for a contact in
ContactPool list by specific key words.
3.Service
Capture the cards on hand through SmartDevice and press
“Upload” to save the cards images into ContactPool.

-9-
ContactPool also provides cards transcribe service. You can
pick up a prefer package from the option below.
Once confirm the selection, the service record will show up in
“My Account”.
You can see the cards image transcribe status at “In Process”
page.

-10-
The cards which completed transcription will be moved to
“Completed” page. If there’s any card image cannot be
recognized by service team, they will be listed at “Rejected”
page instead. These images are required to be resend at
better resolution.
4. Synchronize Contacts
The synchronize page can setup different synchronize points
in ContactPool, such as Gmail, MSN, Outlook or your own
laptop. Follow the instruction below to create new
synchronize item, then, you can keep the completed contacts
in one web location.

-11-
Synchronize point setting for Gmail and MSN:
1. Naming new synchronize point.
2. Enter email account and password.
(MSN synchronize will be continued once sign in MSN)
3. Synchronize preference settings.
4. Set conflict resolution.
Synchronize point setting for Laptop and Outlook:
1. Double click ContactPool Application download in laptop.
2. Add synchronize point name when a pop out window
appears.
3. Go settings in ContactPool Application in laptop to enter
user name and password for access ContactPool Online
contacts management system.
4. Preset the synchronize preference and conflict resolution.
5. Press "Synchronize Server" to synchronize the contacts.
Ex. Synchronize ContactPool with Gmail

-12-
5.Settings
This page allows you to change the account information after
sign in.
ContactPool PC application
1.Installation
Download the ContactPool application to your PC and
completed the installation.
http://www.contactpool.com/static/downloaden.action
2.Using ContactPool
Enter ContactPool and select the function you want to apply.

-13-
Note: If you’re using Vista and Win7, please run as an
administrator by press right button of mouse to make sure all
the function can be worked properly under the safety control.
3.Manage and Sync
When you enter “Manage and Sync.”, you can start to add
new contacts manually or directly sync. up the contacts with
the other existing contact data , such as ContactPool Web,
Gmail, or Outlook.
Press “NewContact” to add new Contact and fill the
information into following format. Or apply the other menu for
further editing.

-14-
To synchronize contacts at Web, please press “Sync. Server”
button and fill the settings which correspond with web
account.
Press OK and start to synchronize server contacts with local
contacts in PC.

-15-
4.Find Contacts
Enter keyword at “Find Contacts”, the contact will be sorted
out from current list.
5.Take Picture
To upload the cards image through PC application, enter
“Take Picture” menu and take the cards images by
SmartDevice.

-16-
IV.Specification
Image Sensor:
2 mega CMOS sensor
Lens:
F no.= 2.0, 4 Glass elements,
Focus Range:
Fixed focus
Exposure Control:
Automatic
Color Balance:
Automatic
Data Conversion
10 bits per color channel
Scan Method
Single pass
Light Source
One white LED
Interface:
USB 2.0 UVC
USB Configuration
Mass Storage Device Class/MSDC
Power:
5V adapter, or USB power
Dimensions
420x235x410mm
Weight
35g
OS
Windows XP/Vista/Windows7(32/64 bits)

-17-
Federal Communication Commission Interference Statement
This equipment has been tested and found to comply with the limits for a
Class B digital device, pursuant to Part 15 of the FCC Rules. These
limits are designed to provide reasonable protection against harmful
interference in a residential installation. This equipment generates, uses
and can radiate radio frequency energy and, if not installed and used in
accordance with the instructions, may cause harmful interference to radio
communications. However, there is no guarantee that interference will
not occur in a particular installation. If this equipment does cause
harmful interference to radio or television reception, which can be
determined by turning the equipment off and on, the user is encouraged to
try to correct the interference by one or more of the following measures:
Reorient or relocate the receiving antenna.
Increase the separation between the equipment and receiver.
Connect the equipment into an outlet on a circuit different
from that to which the receiver is connected.

-18-
Consult the dealer or an experienced radio/TV technician for
help.
FCC Caution: Any changes or modifications not expressly approved by
the party responsible for compliance could void the user's authority to
operate this equipment.
This device complies with Part 15 of the FCC Rules. Operation is subject
to the following two conditions: (1) This device may not cause harmful
interference, and (2) this device must accept any interference received,
including interference that may cause undesired operation.
 Loading...