

Page 1

American Red Cross FR1000 by Etón
Self-Powered AM/FM/NOAA Weather/2-Way GMRS Radio with
Flashlight, Siren and Cell Phone Charger
Owner’s Manual
Ame rica n Re d Cro ss
Radio Line By:
Page 2

Page 3

American Red Cross FR1000 OWNER’S MANUAL
American Red Cross Radio Line By:
DO YOU NEED HELP?
If you need help, please contact us:
Monday-Friday, 8:30 a.m.-4:00 p.m., North American Pacific Time.
1-800-872-2228 from the U.S ; 1-800-637-1648 from Canada
650-903-3866, worldwide ; FAX: 650-903-3867 ; www.etoncorp.com
Etón Corporation, 1015 Corporation Way, Palo Alto, CA 94303, USA
WARNING
• Do not expose this appliance to rain or moisture.
• Do not submerge or expose for extended period to water.
• Protect from high humidity and rain.
• Only operate within specified temperature range (0 °C to 40 °C).
• Unplug immediately if liquid has been spilled or object have fallen into the
apparatus.
• Clean only with a dry cloth. Do not use detergents or chemical solvents as
this might damage the finish.
• Unplug and disconnect external antennas (not included) during lightning
storms.
• Do not remove cover [or back].
• Refer servicing to qualified service personnel.
ENVIRONMENT
Disposal
According to the European Directive 2002/96/EC all
electrical and electronic products must be collected
separately by a local collection system.
Please act according to your local rules and do not dispose of your
old products with your normal household waste.
3
Page 4

American Red Cross FR1000 OWNER’S MANUAL
TABLE OF CONTENTS
1
Introduction............................................................
2
Important Notice, FCC Licensing..................................
3
LCD Display....................................................................
4
Controls.........................................................................
5
Battery Installation........................................................
6
Charging the Battery Pack............................................
7
Low Battery Level Indicator........................... ................
8
Selecting the Power Source..........................................
9
Operating Your Radio............................................ ........
10
External Speaker/Microphone Jack................................
11
USB Jack........................................................................
12
Troubleshooting Guide...................... ...........................
13
Use and Care...........................................................
14
Specifications and Frequency Charts..............................
15
Warranty Registration................. ........................... ....
16
Limited Warranty.......................... .........................
17
Service for your Product.........................................
18
FFC Note...............................................................
5
7
9
10
11
12
13
13
13
23
24
25
25
26
29
29
30
30
4
Page 5

American Red Cross FR1000 OWNER’S MANUAL
WELCOME TO THE WORLD OF ETÓN
ELECTRONICS
Congratulations on your purchase of a high quality ETON product. Your 2way radio represents the state-of-the-art in high-tech
engineering. Designed for GMRS (General Mobile Radio Service)
operation, this compact package is big in performance. It is a
quality piece of electronic equipment, skillfully constructed with
the finest components. The circuitry is all solid-state and mounted
on a rugged printed circuit board. Your two-way radio is designed
for reliable and trouble-free performance for years to come.
5
Page 6

American Red Cross FR1000 OWNER’S MANUAL
FEATURES
- 22 GMRS/FRS Channel
- 121 Privacy Codes (38 CTCSS / 83 DCS)
- AM/FM Receiver
- VOX
- Selectable Call Alert
- NOAA Weather Radio
- NOAA Weather Alert
- Scan Function
- MONITOR Function
- Dual Watch Function
- Roger Beep Tone
- Silent Operation
- Keypad Lock
- Power HI/LO Settings
- Flashlight
- Clock/Alarm Clock Function
- Dynamo Crank Battery Charge Capability
- Phone Charger Jack (For Mobile Phone Charging)
- Speaker / Microphone Jacks
- Battery Meter / Battery Low Indicator
- SOS Function
- Siren Function
6
Page 7

American Red Cross FR1000 OWNER’S MANUAL
FEATURES continued
This device complies with Part 15 of the FCC Rules. Operation is
subject to the following two conditions : (1) this device does not
cause harmful interference, and (2) this radio must accept any
interference that may cause undesired operation. To maintain
compliance with FCC’s RF exposure guidelines, for body-worn
operation, this radio has been tested and meets the FCC RF
exposure guidelines when used with Etón Radio Corp. accessories
supplied or designated for this product. Use of other accessories
may not ensure compliance with FCC RF exposure guidelines.
(Tested with Headset Model: AVP-1)
IMPORTANT NOTICE, FCC LICENSE REQUIRED
FOR GMRS OPERATION
The FR1000 Series operates on GMRS (General Mobile Radio Service) frequencies which require an FCC (Federal Communications
Commission) license. You must be licensed prior to operating on
channels 1 - 7 or 15 - 22, which comprise the GMRS channels of
the FR1000 Series. Serious penalties could result for unlicensed
use of GMRS channels, in violation of FCC rules, as stipulated in
the Communications Act’s Sections 501 and 502 (amended). You
will be issued a call sign by the FCC which should be used for station identification when operating the radio on GMRS channels.
You should also cooperate by engaging in permissible transmissions only, avoiding channel interference with other GMRS users,
and being prudent with the length of their transmission time. To
obtain a license or ask questions about the license application,
contact the FCC at 1-888-CALL FCC or go to the FCC’s website:
http://www.fcc.gov and request form 605.
7
Page 8

American Red Cross FR1000 OWNER’S MANUAL
IMPORTANT NOTICE, FCC LICENSE REQUIRED
FOR GMRS OPERATION continued
Exposure To Radio Frequency Energy
Your Etón radio is designed to comply with the following national
and international standards and guidelines regarding exposure of
human being to radio frequency electromagnetic energy:
• United States Federal Communications Commission, Code of
Federal Regulations: 47 CFR part 2 sub-part J
• American National Standards Institute (ANSI)/Institute of Electri-
cal & Electronic Engineers (IEEE) C95. 1-1992
• Institute of Electrical and Electronic Engineer (IEEE) C95. 1-
1999 Edition
• National Council on Radiation Protection and Measurements
(NCRP) of the United States, Report 86, 1986
• International Commission on Non-lonizing Radiation Protection
(ICNIRP) 1998
To control your exposure and ensure compliance with the general
population or uncontrolled environment exposure limits, transmit
no more than 50% of the time. The radio generates measurable
RF energy exposure only when transmitting.
IMPORTANT: Changes or modifications to this unit not expressly
approved by Etón could void your right to operate this unit. Your
radio is set up to transmit a regulated signal on an assigned frequency. It is against the law to alter or adjust the settings inside
the radio to exceed those limitations. Any adjustment to your
radio must be made by qualified technicians.
8
Page 9

American Red Cross FR1000 OWNER’S MANUAL
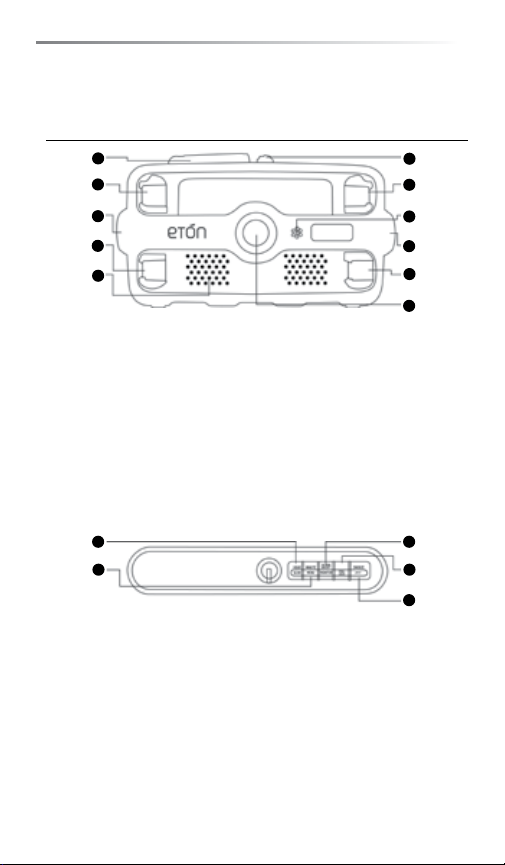
LCD DISPLAY
1
2
3
4
5
6
7
8
9
10
11
12
1. RECEIVER (RX)/TRANSIT(TX) ICON -
Indicates radio is transmitting a signal
(TX) or if the radio is receiving a transmis-
sion (RX).
2. CHANNEL NUMBER - Changes from 1-22
on GMRS/FRS band (1-7 on WX Band).
This is also used to indicate in part the
current AM/FM receiver frequency setting
and the current clock setting.
3. CLOCK AM/PM ICON - Indicates clock is
set in AM or PM.
4. NOAA WEATHER (WX) ALERT ICON- Indi-
cates the WX Alert function is on.
5. AM RECEIVER ICON - Indicates radio is in
AM receiver mode.
6. FM RECEIVER ICON - Indicates radio is in
FM receiver mode.
7. NOAA WEATHER (WX) BAND ICON
- Indicates when the radio is in Weather
Band mode
8. GMRS ICON - Indicates radio is in GMRS
mode
9. FLASHLIGHT ICON - Indicates the Flash-
light is on.
10. S.O.S ICON - Indicates the SOS function
is on.
11. SIREN ICON - Indicates the Siren function
is on.
13
14
15
16
17
18
19
20
21
22
23
12. DUAL WATCH ICON - Indicates the Dual
Watch function is on.
13. TRANSMIT POWER LEVEL ICON - Indi-
cates TX Power setting (HI/LO)
14. PRIVACY CODE ICON - Indicates Privacy
Code setting (CTCSS/DCS).
15. KEY LOCK ICON - Indicates KEY LOCK
mode is on.
16. SCAN ICON - Indicates when the radio is
in Scan mode.
17. NOAA WEATHER (WX) BAND ICON
- Indicates when the radio is in Weather
Band mode
18. ALERT ICON - Indicates the radio has
received a NOAA Weather (WX) ALERT
signal
19. BATTERY METER - Indicates the battery
level.
20. KEY TONE ICON - Indicates radio’s Key
Beep Tone is on.
21. ALARM CLOCK ICON - Indicates when the
ALARM CLOCK
22. ROGER BEEP ICON - Indicates radio’s
Roger Beep Tone is on.
23. VOX ICON - Indicates when VOX mode
is active.
is on.
9
Page 10
American Red Cross FR1000 OWNER’S MANUAL
CONTROLS
24
25
26
27
28
24. ANTENNA
25. BAND SWITCH - Used to switch between
AM/FM/WX/GMRS mode.
26. FLASHLIGHT - Built-in flashlight.
27. FUNCTION SWITCH - Used to switch
between WX Alert/OFF/Flashlight/SOS/Siren function.
28. SPEAKER - Built-in speaker.
29. BATTERY SOURCE SWITCH - Used to
switch the radio OFF or switch between
Alkaline and Rechargeable NiMH
batteries.
35
36
35. SCAN/HOUR BUTTON - Press the set
the Scan mode on/off in GMRS mode.
Press to change the Hour setting in
Clock mode.
36. MENU/MINUTE BUTTON - Press to
access Menu mode in GMRS/FRS and
WX mode. Press to change the Minute
setting in Clock mode.
37. MONITOR/ALARM ON/OFF BUTTON
- Press to turn on the Monitor function
30. TUNING KNOB - Rotate clockwise/coun-
ter-clockwise to make adjustment in the
MENU mode. It can also make adjustment in the CLOCK, WX and AM/FM
receiver mode.
31. MIC - Built-in microphone.
32. DYNAMO CRANK HANDLE - Rotate
clockwise or counter-clockwise to charge
the NiMH battery pack.
33. DYNAMO CRANK HANDLE SHAFT
34. POWER/VOLUME KNOB - Turn clockwise
to increase the volume leve. Turn counter-clockwise to decrease the volume
level and turn the power off.
in GMRS mode. Press and hold to turn
alarm on/off in Clock mode.
38. LOCK/CALL BUTTON - Press and hold
to set the key pad lock on/off in GMRS
mode. Press to send a CALL Alert signal
in GMRS mode.
39. PTT/SNOOZE BUTTON - Press and hold to
transmit voice communication in GMRS
mode. Press to confirm the selection in
MENU and Clock mode. Press to activate
SNOOZE function in Clock mode.
29
30
31
32
33
34
37
38
39
10
Page 11

American Red Cross FR1000 OWNER’S MANUAL
BATTERY INSTALLATION
Your FR1000 Series radio operates with either 4 AA Alkaline batteries or a NiMH battery pack.
To install the batteries:
1. With the back of the radio facing you, remove the Battery
Cover by pressing down the Battery Cover Lock Tab until it
unlocks and lifting it out from the radio.
2. Insert 4 AA batteries observing the polarity as shown. Installing
the batteries incorrectly will prevent the unit form operating
or may damage the unit. Also install the NiMH battery pack as
shown below.
3. Return the Battery Cover by pushing it down into the back of
the radio until the Battery Cover Lock Tab locks into place.
11
Page 12

American Red Cross FR1000 OWNER’S MANUAL
CHARGING THE BATTERY PACK
Your FR1000 Series is equipped for using a rechargeable NiMH
battery pack which can be recharged using an AC wall adapter
(included). Initial charge time is 24 hours with a charge time of
12 hours thereafter. For maximum battery life, we recommend
charging the battery pack when the low battery icon comes
on. Remove the charger from the radio when the charge time
expires. For the location of the CHARGING JACK see page 24.
In order to ensure that the battery pack is fully charged, it is recommended that the battery pack be charged for at least 12 hours
with the radio turned OFF.
You can also charge the rechargeable NiMH battery pack using
the Dynamo Crank. To charge using the Dynamo Crank rotate
rapidly the Dynamo Crank handle clockwise or counter-clockwise.
To get the best charging condition, it is recommended to charge
the battery pack through the Dynamo Crank with the radio
turned OFF.
1. Only use our NiMH battery pack.
2. Do not attempt to charge alkaline batteries or any batteries or
battery packs other than the one indicated in the manual. This
may cause leakage and damage to the radio.
3. For long term storage of the radio, turn the radio OFF and
remove the batteries from the radio.
12
Page 13

American Red Cross FR1000 OWNER’S MANUAL
LOW BATTERY LEVEL INDICATOR
Your FR1000 Series has a BATTERY LEVEL METER
that shows the battery power level. The greater the number of
bars visible, the stronger the battery level. When the battery level
is low, the Battery Shell icon will flash in the display
indicating your batteries should be replaced or recharged if using
a rechargeable battery pack.
SELECTING THE POWER SOURCE
Your FR1000 Series can use either an Alkaline battery or the
rechargeable NiMH battery pack. Just set the BATTERY SOURCE
switch to either “Battery” or “Dynamo-Adapter” (for NiMH
battery pack) position.
OPERATING YOUR RADIO
SETTING THE RADIO TO GMRS/FRS MODE
To set the FR1000 to GMRS/FRS mode, move the BAND switch in
GMRS position. The LCD will show the current GMRS/FRS channel
setting. The GMRS ICON will appear on the display.
POWER ON/OFF AND VOLUME
Turn the BATTERY SOURCE switch and choose between Alkaline
batteries or NiMH Battery Pack to turn the radio on. Rotate the
VOLUME knob clockwise to increase the volume level. Rotate
the control counterclockwise to reduce the volume level. During
Power On, the LCD will display all icons for 1 second and the LCD
display will indicate the last channel/frequency selected.
13
Page 14

American Red Cross FR1000 OWNER’S MANUAL
OPERATING YOUR RADIO continued
TRANSMITTING AND RECEIVING A CALL
To communicate, all radios in your group must be set to the same
channel and Privacy Code.
1. Press and hold the PTT button and speak in a normal voice
into the microphone. The TX icon will appear continuously on
the LCD Display while transmitting.
2. To receive a call, release the PTT button. The RX icon will ap-
pear on the display when your radio is receiving a transmission.
ABOUT RANGE
Your FR1000 Series radios are designed to give you maximum
range under optimum conditions.
Optimum Conditions are:
• Over water
• Open rural areas without obstructions
• Flat areas where you can see the other person
To ensure you get maximum range:
• Be sure to use fresh or fully charged batteries - low batteries
will cause low power conditions
• Be sure you are on a GMRS channel - FRS channels are re-
stricted by the FCC to low power
• Be sure to set your radio to use Hi power.
• Be sure to point the ANTENNA upward.
14
Page 15

American Red Cross FR1000 OWNER’S MANUAL
OPERATING YOUR RADIO continued
FR1000 QUICK REFERENCE CHART
CHANNEL SELECTION (GMRS/FRS BAND)
Turn the TUNING knob clockwise or counter-clockwise to select
one of the 22 GMRS/FRS channels.
MONITOR
Pressing the MONITOR button will let you check activity on your
current channel before transmitting. This could also be used to
adjust the volume level of the radio when it is not receiving a
signal.
Press the MONITOR button again to get out of MONITOR mode.
SCAN
Your FR1000 Series can scan all 22 channels for any activity. To
enter, quickly press the SCAN button. Repeat the same procedure
to exit. Your radio will rapidly scan each of the 22 channels and
stop on any active channel. Your radio will stay on the active
channel as long as the signal is present and will resume scanning
5 seconds after the signal is no longer present. When you press
the PTT button to transmit on an active channel, the scanning
15
Page 16

American Red Cross FR1000 OWNER’S MANUAL
OPERATING YOUR RADIO continued
function will stop and remain on the active channel. To resume
scanning, quickly press the button.
CALL ALERT
Your FR1000 Series can transmit a call alert for a fixed length of
time. To send a call alert, press the CALL/LOCK button. The TX
icon will appear while transmitting a call alert and a tone can be
heard on the speaker for confirmation. The FR1000 has 5 call
alert selections.
KEYPAD LOCK
To avoid accidentally changing the radio setting, press and hold
the CALL/LOCK button for about 4 seconds. The KEY LOCK icon
will appear on the display. The PTT, CALL, and MONITOR function will still be active. Repeat the same procedure to unlock the
keypad.
DISPLAY ILLUMINATION
During Power on, the display illumination will activate for approx.
5 seconds. The display illumination can also be activated when
the MENU, SCAN, and MONITOR button is pressed. It can also be
activated if the TUNING knob is turned.
Note: In Clock Mode (Power Off) the display illumination can
be activated by pressing the MENU, SCAN, and MONITOR button.
SETTING PRIVACY CODES
Your FR1000 Series has 121 Privacy Codes available. The selected
Privacy Code may be different for each channel. To select a Privacy Code for the current channel press the MENU button once,
16
Page 17

American Red Cross FR1000 OWNER’S MANUAL
OPERATING YOUR RADIO continued
and then turn the TUNING knob to select one of the 38 CTCSS
Privacy Code. Press again the MENU button and turn the TUNING
knob to select one of the 83 DCS Privacy Code. The Privacy Code
icon on the display will indicate whether you set your Privacy
Code in CTCSS or DCS mode. To confirm the selection, press the
PTT button or press MENU button again to move to the next
feature setting.
Note: If you select any CTCSS Privacy Code, any pre-selected DCS
Privacy Code will be cancelled and vice-versa. Selecting a Privacy
Code of “oF” will disable the Privacy feature. To communicate
between two FR1000 Series radios, all radios in your group must
be set to the same channel and Privacy Code selections.
TRANSMIT (TX) POWER LEVEL SELECTION
Your FR1000 Series has 2 power level settings. To select the
power level on channels 1~7 and 15~22, press the MENU button
until a “Pr” icon will appear on the display. Then turn the TUNING
knob to select TRANSMIT POWER LEVEL icon (HI/LO). To confirm,
press the PTT button or press MENU button again to move to
the next feature setting. When the Battery Meter drops to 1 bar
, the TX Power will automatically switch from HI to LO
level.
Note: You cannot adjust the power setting on the FRS channels
(8~14). They are set to Low power per FCC regulations.
VOX (Hands-free Transmission)
Your radio has 3 VOX level settings: (oF/1/2/3). To set VOX, press
the MENU button until the display shows “Vo” while on the
right, an “oF” icon appears. Select “1”, “2”, or “3” by turning
17
Page 18

American Red Cross FR1000 OWNER’S MANUAL
OPERATING YOUR RADIO continued
the TUNING knob and push the PTT key, or press MENU button
again to move to the next feature setting. VOX will be more sensitive on the “1” setting than on the “3” setting. To turn VOX
off, press the MENU button until the display shows “Vo” while
on the right, a “1”, “2” or “3” icon appears. Select “oF” by
turning the TUNING knob and push the PTT key, or press MENU
button again to move to the next feature setting.
CALL ALERT SELECTION
Your FR1000 Series has 5 selectable CALL ALERTS (oF/1~5). To
select, press the MENU button until a “CA” icon appears and
to the right of the “CA” icon the current CALL ALERT setting
is displayed. Then turn the TUNING knob to make the CALL
ALERT selections - the radio will emit a corresponding tone for
each selection. To confirm, press the PTT button or press MENU
button to move to the next feature setting.
Note: Setting the CALL Alert to “oF” will disable the CALL
Alert function.
ROGER BEEP (end of transmission) TONE
When the PTT button is released, the radio will beep to confirm
to other users that your transmission has finished. To turn the
ROGER BEEP tone on, press the MENU button until the display
shows an “rb” icon while on the right of the “rb” display, an “oF”
icon appears. Select “on” by turning the TUNING knob and push
the PTT key, or press MENU button to move to the next feature
setting. The ROGER BEEP icon will appear on the display. To turn
the ROGER BEEP tone off, press the MENU button until the display shows an “rb” icon while on the right of the “rb” display, an
“on” icon appears. Select “oF” by turning the TUNING knob and
18
Page 19

American Red Cross FR1000 OWNER’S MANUAL
OPERATING YOUR RADIO continued
push the PTT key, or press MENU button to move to the next feature setting. The ROGER BEEP icon will disappear on the display.
SILENT OPERATION
Your FR1000 Series has a SILENT OPERATION mode. In this mode,
all “beeps” and “tones” are disabled. To turn the SILENT OPERA-
TION mode on, press the MENU button until the display shows
an “bP” icon while on the right of the “bP” display, an “on” icon
appears. Select “oF” by turning the TUNING knob and push the
PTT key to confirm or press the MENU button to move to the next
feature setting. The KEY TONE icon will appear on the display.
To turn the SILENT OPERATION mode off, press the MENU button
until the display shows an “bP” icon while on the right of the “bP”
display, an “oF” icon appears. Select “on” by turning the TUNING
knob and push the PTT key or MENU button. The KEY TONE icon
will disappear on the display.
Note: the SILENT OPERATION is on (“bP” is set to “oF”) by
default.
DUAL WATCH
Your FR1000 Series has a DUAL WATCH function, to enable user
to monitor 2 selected channel/privacy code for any activity. It is
similar with the SCAN function but will only monitor 2 channels
instead of the whole 22 channels. The first channel/privacy code
is the current setting, the second channel/privacy code is the one
you will set on the MENU.
To turn on the DUAL WATCH function, press the MENU button
until the DUAL WATCH icon appear while in the right an “oF” icon
19
Page 20

American Red Cross FR1000 OWNER’S MANUAL
OPERATING YOUR RADIO continued
appears. Select the second channel by turning the TUNING knob.
To select a Privacy Code for the second channel press the MENU
button once, and then turn the TUNING knob to select one of
the 38 CTCSS Privacy Code or press again the MENU button and
turn the TUNING knob to select one of the 83 DCS Privacy Code.
Press the MENU or PTT button to confirm. The DUAL WATCH
icon will remain on the display. The radio will rapidly scan the two
channels selected and stop on any active channel. Your radio will
stay on the active channel as long as the signal is present and will
resume scanning 5 seconds after the signal is no longer present.
To turn off the DUAL WATCH function, press the SCAN button.
The current GMRS/FRS radio setting will be displayed and the
DUAL WATCH icon will disappear on the display.
SETTING THE RADIO TO NOAA WEATHER RADIO MODE
To set the FR1000 to NOAA WEATHER RADIO mode, move the
BAND switch in WX position. The LCD will show the current WX
channel setting, and the NOAA WEATHER (WX) BAND icon will
appear on the display. Turn the TUNING knob to select one of the
7 NOAA WEATHER (WX) BAND channels.
NOAA WEATHER ALERT
Your FR1000 has a NOAA WEATHER ALERT function, to en-
able you to automatically receive weather alert from designated
NOAA stations.
To turn the NOAA WEATHER (WX) ALERT on, turn the FUNC-
TION switch to . The NOAA WEATHER (WX) ALERT icon
will appear on the display. If the radio receives a WX ALERT
signal from a designated NOAA station while on any mode, the
20
Page 21

American Red Cross FR1000 OWNER’S MANUAL
OPERATING YOUR RADIO continued
radio will beep for 20 seconds while the ALERT icon will blink on
the display After which, you can set the BAND switch to WX
position to go to NOAA WEATHER RADIO mode to listen to the
emergency broadcast.
The NOAA WEATHER (WX) ALERT icon will remain blinking
on the display when it receives a WX ALERT signal unless the
BAND switch is set to WX mode or any button is pressed.
This is to remind the user that a WX Alert signal have been
received in case they missed it.
To turn the NOAA WEATHER (WX) ALERT off, move the FUNC-
TION switch from position to other position.
SETTING THE RADIO TO AM/FM RECEIVER MODE
To set the FR1000 to AM/FM RECEIVER mode, move the BAND
switch in AM or FM position. The LCD will show the current AM
or FM channel setting.
CHANNEL SELECTION (AM/FM BAND)
Turn the TUNING knob clockwise or counter-clockwise to select
the AM or FM frequency. Turning and holding the TUNING knob
will make the radio scan for the frequency continuously until it
receives a strong signal.
SETTING THE RADIO TO CLOCK MODE
To set the FR1000 to CLOCK mode, just turn the BATTERY
SOURCE switch to OFF. The display will show the current time
setting.
21
Page 22

American Red Cross FR1000 OWNER’S MANUAL
OPERATING YOUR RADIO continued
CHANGING THE HOUR SETTING
To change the hour setting of the clock, press the SCAN/HOUR
button while in CLOCK mode, and the hour digit of the clock will
blink. Turn the TUNING knob to change the hour setting. Press
the PTT button to confirm.
CHANGING THE MINUTE SETTING
To change the minute setting of the clock, press the MENU/MINUTE button while in CLOCK mode, and the minute digit of the
clock will blink. Turn the TUNING knob to change the hour setting. Press the PTT button to confirm.
SETTING THE ALARM CLOCK
The FR1000 can also function as an ALARM CLOCK. To turn the
ALARM CLOCK on, press the ALARM ON/OFF button while in
CLOCK mode. The ALARM CLOCK icon will appear. To set the
hour setting of the ALARM, press the SCAN/HOUR button while
in CLOCK mode, and the hour digit of the clock will blink. Turn
the TUNING knob to change the hour setting. Press the PTT button to confirm. To set the minute setting of the ALARM, press the
MENU/MINUTE button while in CLOCK mode, and the minute
digit of the clock will blink. Turn the TUNING knob to change
the minute setting. Press the PTT button to confirm. To turn the
ALARM CLOCK off, press the ALARM ON/OFF button while in
CLOCK mode. The ALARM CLOCK icon will disappear.
NOTE: You can only turn on/off the ALARM CLOCK when the
radio is in CLOCK mode. The ALARM ON/OFF button will have
other function when the radio is in another mode.
22
Page 23

American Red Cross FR1000 OWNER’S MANUAL
OPERATING YOUR RADIO continued
ALARM CLOCK SNOOZE
When the ALARM CLOCK goes off, you can activate the SNOOZE
function by pressing the SNOOZE button. Every time the SNOOZE
button is pressed the ALARM CLOCK will go off again after 5
minutes.
USING THE FLASHLIGHT
Your FR1000 Series has a built-in FLASHLIGHT.
To turn the FLASHLIGHT on, turn the FUNCTION switch to .
To turn the FLASHLIGHT off, set the FUNCTION switch to OFF.
NOTE: The FLASHLIGHT will only work when the BATTERY
SOURCE switch is set to BATTERY or DYNAMO-ADAPTER position.
USING THE S.O.S.
Your FR1000 Series has a SOS function. During this, a RED LED
will blink to spell SOS in Morse Code to serve as beacon light. To
turn the SOS on, turn the FUNCTION switch to .
To turn the SOS off, set the FUNCTION switch to OFF.
NOTE: The SOS will only work when the BATTERY SOURCE switch
is set to BATTERY or DYNAMO-ADAPTER position.
USING THE SIREN
Your FR1000 Series has a built-in SIREN. During this function, the
radio will emit a continuous tone. To turn the SIREN on, turn the
FUNCTION switch to . To turn the SIREN off, set the FUNCTION
switch to OFF.
NOTE: The SIREN will only work when the BATTERY SOURCE
switch is set to BATTERY or DYNAMO-ADAPTER position.
23
Page 24

American Red Cross FR1000 OWNER’S MANUAL
EXTERNAL SPEAKER/MICROPHONE JACK
Your FR1000 Series can be used with an optional external speaker/microphone or headset thru the SPEAKER/MICROPHONE
JACK, freeing your hands for other tasks.
To use an optional speaker/microphone or headset:
• Open the SPEAKER/MIC jack rubber cap on the side radio.
• Insert the plug (s) into the SPK/MIC.
• Place the earbud into your ear, and adjust the mic into your
desired position.
PHONE CHARGER JACK
Your FR1000 Series can be used to charge a mobile phone by the
DYNAMO CRANK, or AC Adapter thru the PHONE CHARGER
Jack.
• Set the BATTERY SOURCE switch to DYNAMO-ADAPTER
position.
• Open the PHONE CHARGER jack rubber cap on the side radio.
• Attach a Charging Cable (not included) to the mobile phone.
• Connect the other end of the Charging Cable to the PHONE
CHARGER jack of the FR1000.
• Recharge the mobile phone battery by turning rapidly the
DYNAMO CRANK, or by attaching the AC Adapter in the
Charging Jack.
Note: Charging a mobile phone through the Phone Charger Jack
is intended for emergency purpose only. It is not intended for
recharging fully a discharged battery.
24
Page 25

American Red Cross FR1000 OWNER’S MANUAL
PHONE CHARGER JACK continued
TROUBLESHOOTING GUIDE
No Power
Cannot Receive
Messages
Radio is not
responding to
button presses
Display is dim
Charger not
functioning
- Check battery installation and/or replace batteries
- Confirm the radios have the same channel and
Privacy Code settings.
- Make sure that you are within range of the
other transceivers.
- Buildings and other structures may interfere
with your communication. (See ABOUT
RANGE on Page 14)
- Make sure key lock is not on. See “Keypad
Lock” (Page 16).
- Radio might need to be reset. Turn radio off
then on.
- Ensure accessory microphone is set properly
- Recharge or replace batteries.
- Ensure that the Charger Plug is installed in the
radio properly.
- Ensure the outlet where the charger is plugged
into is functioning properly.
- Check that the battery pack is installed in the
radio properly.
25
Page 26

American Red Cross FR1000 OWNER’S MANUAL
USE AND CARE
1. Use a soft damp cloth to clean the radio
2. Do not use alcohol or cleaning solutions to clean the radio.
3. Do not immerse the radio in water.
4. Dry the radio with dry lint-free cloth should it get wet.
5. Turn off the radio and remove the batteries during long-term
storage.
If you have a problem which you believe requires service, please
call first and speak with a service technician. Many problems
can be remedied over the phone without returning the unit for
service.
SPECIFICATIONS
Channels: 22 GMRS/FRS Channels +121 Privacy Codes, 7 NOAA
Weather (WX) Band Channels.
Operating Frequency: UHF 462.5500 ~ 467.7125 MHz, AM :
520kHz ~ 1710kHz -10kHz steps FM : 87.5MHz ~ 108.0MHz
- 100kHz steps.
Power Source: 4 AA Alkaline or 6.0V Rechargeable Ni-MH battery
pack
26
Page 27

American Red Cross FR1000 OWNER’S MANUAL
SPECIFICATIONS continued
GMRS/FRS FREQUENCY CHART (MHz)
CH. No CH. Freq. CH. No CH. Freq. CH. No CH. Freq.
1 462.5625 9 467.5875 17 462.6000
2 462.5875 10 467.6125 18 462.6250
3 462.6125 11 467.6375 19 462.6500
4 462.6375 12 467.6625 20 462.6750
5 462.6625 13 467.6875 21 462.7000
6 462.6875 14 467.7125 22 462.7250
7 462.7125 15 462.5500
8 467.5625 16 462.5750
* Channels 8~14 are low-power FRS license free channels
NOAA WEATHER (WX) RADIO FREQUENCY CHART (MHz)
CH. No CH. Freq. CH. No CH. Freq.
1 162.400
2 162.425
3 162.450
4 162.475
5 162.500
6 162.525
7 162.550
27
Page 28

American Red Cross FR1000 OWNER’S MANUAL
SPECIFICATIONS continued
PRIVACY CODES FREQUENCY CHART (Hz)
Code Freq. Code Freq. Code Freq. Code Freq. Code Freq.
1
2
3
4
5
6
7
8
Note: Privacy codes can be programmed for use on any channel
67.0
71.9
74.4
77.0
79.7
82.5
85.4
88.5
9
10
11
12
13
14
15
16
91.5
94.8
97.4
100.0
103.5
107.2
110.9
114.8
17
18
19
20
21
22
23
24
118.8
123.0
127.3
131.8
136.5
141.3
146.2
151.4
25
26
27
28
29
30
31
32
156.7
162.2
167.9
173.8
179.9
186.2
192.8
203.5
33
34
35
36
37
38
210.7
218.1
225.7
233.6
241.8
250.3
28
Page 29

American Red Cross FR1000 OWNER’S MANUAL
SPECIFICATIONS continued
DCS PRIVACY CODE CHART
No. CODE No. CODE No. CODE No. CODE
1
2
3
4
5
6
7
8
9
10
11
12
13
14
15
16
17
18
19
20
21
Note: Privacy codes can be programmed for use on any channel
023
025
026
031
032
043
047
051
054
065
071
072
073
074
114
115
116
125
131
132
134
22
23
24
25
26
27
28
29
30
31
32
33
34
35
36
37
38
39
40
41
42
143
152
155
156
162
165
172
174
205
223
226
243
244
245
251
261
263
265
271
306
311
43
44
45
46
47
48
49
50
51
52
53
54
55
56
57
58
59
60
61
62
63
315
331
343
346
351
364
365
371
411
412
413
423
431
432
445
464
465
466
503
506
516
64
65
66
67
68
69
70
71
72
73
74
75
76
77
78
79
80
81
82
83
532
546
565
606
612
624
627
631
632
654
662
664
703
712
723
731
732
734
743
754
29
Page 30

American Red Cross FR1000 OWNER’S MANUAL
WARRANTY REGISTRATION
To ensure full warranty coverage or product updates, registration
of your product should be completed as soon as possible after
purchase or receipt. You may use one of the following options to
register your product:
1. By visiting our website at http://www.etoncorp.com.
2. Mail in enclosed warranty card.
3. Mail your warranty card or information to following address;
include your name, full mailing address, phone number, email
address, model purchased, date purchased, retail vendor name:
Etón Corporation
1015 Corporation Way
Palo Alto, CA 94303 USA
LIMITED WARRANTY
Retain the warranty information from your warranty card with
your proof of purchase or the Limited Warranty information can
also be viewed at www.etoncorp.com.
30
Page 31

American Red Cross FR1000 OWNER’S MANUAL
SERVICE FOR YOUR PRODUCT
To obtain service for your product, we recommend first contacting
an Etón service representative at 1-800-872-2228 US, 1-800-6371648 Canada, (650) 903-3866, customersvc@etoncorp.com or
your respective country distributor in Europe (see enclosed list) for
problem determination and trouble-shooting. If further service is
required, the technical staff will instruct how to proceed based on
whether the radio is still under warranty or needs non-warranty
service.
WARRANTY – If your product is still in warranty and the Etón
service representative determines warranty service is needed,
a return authorization will be issued and instructions will be
given. DO NOT ship your radio back without obtaining the return
authorization.
NON-WARRANTY – If your product is no longer under warranty
and requires service, the Etón service representative will refer you
to the nearest repair facility that will best handle the repair.
For service outside North America, please refer to the distributor
information included at time of purchase/receipt.
FCC NOTE
The manufacturer is not responsible for any radio or tv interference caused by unauthorized modifications to this equipment.
Such modifications could void the user’s authority to operate the
equipment.
31
Page 32

Page 33

GUÍA DE OPERACIÓN DE American Red Cross FR1000
American Red Cross Radio Line By:
¿NECESITA AYUDA?
Si necesita ayuda, contáctenos de
lunes a viernes, de 8:30 a.m. a 4:00 p.m., hora estándar del Pacífico de EE. UU. 1-800-872-2228 desde los EE UU; 1-800-6371648 desde Canadá; 650-903-3866 desde el resto del mundo;
FAX: 650-903-3867; sitio Web, www.etoncorp.com; Etón Corporation, 1015 Corporation Way, Palo Alto, CA 94303, EE UU.
ADVERTENCIA
• No exponga este dispositivo a lluvia o humedad.
• No exponga o sumerja este aparato al agua durante un período largo.
• Proteja el aparato de gran humedad y lluvia.
• Utilice la unidad solamente dentro de un rango de temperatura especificado
(0 °C a 40 °C).
• Desenchufe la unidad inmediatamente si ha caído líquido algún objeto dentro
de la radio.
• Limpie la unidad solamente con un paño seco. No utilice detergentes o disol
ventes que puedan dañar la cubierta del dispositivo.
• Desenchufe y desconecte las antenas externas durante tormentas con relámpa
gos.
• No quite la cubierta [o la parte posterior].
• Si este producto muestra algún problema, póngase en contacto con personal
cualificado de servicio.
-
-
MEDIO AMBIENTE
Eliminación
De acuerdo a la Directiva Europea 2002/96/EC, todos
los aparatos eléctricos y electrónicos deben ser recolectados en forma separada por un sistema local de
recolección.
Por favor, actúe según las normas de su localidad y no elimine los
aparatos antiguos en su basura del hogar usual.
33
Page 34

GUÍA DE OPERACIÓN DE American Red Cross FR1000
TABLA DE CONTENIDO
1
Introducción............................................................
2
Nota importante, licencia FCC.....................................
3
Pantalla LCD............................................................
4
Controles................................................................
5
Instalación de las baterías...........................................
6
Carga del paquete de baterías.....................................
7
Indicador de nivel bajo de baterías................................
8
Selección de fuente de alimentación.............................
9
Uso de su radio........................................................
10
Altoparlantes externos/enchufe para micrófono............ ...
11
Enchufe para USB.....................................................
12
Guía para localización y solución de problemas...............
13
Uso y cuidado.........................................................
14
Especificaciones y esquemas de frecuencia.....................
15
Registro de garantía...............................................
16
Garantía Limitada..................................................
17
Servicio para su producto.......................................
18
Nota FCC .............................................................
69
71
74
75
77
78
79
79
79
90
91
92
93
93
97
97
98
99
34
Page 35

GUÍA DE OPERACIÓN DE American Red Cross FR1000
BIENVENIDOS AL MUNDO DE EQUIPOS ELECTRÓNICOS DE ETÓN
¡Felicitaciones por su compra de un producto Eton de alta
calidad! Su radio de dos vías representa el estado actual de la
ingeniería de alta tecnología. Diseñado para el servicio de GMRS
(General Mobile Radio Service), este equipo compacto tiene
mucho que ofrecer en cuanto al rendimiento. Se trata de un
equipo electrónico de alta calidad, hábilmente construido con los
mejores componentes. El sistema de circuitos es de estado sólido
y se ha montado sobre una tarjeta de circuitos impresos con superficie dura. Su radio de dos vías ha sido diseñada par un trabajo
fiable y sin problemas, durante años por venir.
35
Page 36

GUÍA DE OPERACIÓN DE American Red Cross FR1000
PROPIEDADES
- 22 Canales GMRS/FRS
- 121 Códigos de privacidad (38 CTCSS / 83 DCS)
- Receptor AM/FM
- VOX
- Alerta de llamada seleccionable
- Radio de informe climático NOAA
- Alerta de informe climático NOAA
- Función de escaneo
- Función de MONITOR
- Función de vigilancia doble
- Tono acústico con pitido de cambio
- Operación en silencio
- Bloqueo de teclado
- Ajustes de potencia HI/LO
- Luz parpadeante
- Función de reloj/alarma
- Capacidad de carga de batería con manivela de dinámo
- Enchufe de carga de teléfono (para carga de teléfono móvil)
- Altoparlantes / enchufe para micrófono
- Visualizador de carga de batería / Indicador de batería baja
- Función de llamada de emergencia (SOS)
- Función de sirena
36
Page 37

GUÍA DE OPERACIÓN DE American Red Cross FR1000
PROPIEDADES continuado
Este equipo cumple con la Parte 15 del Reglamento de FCC. La
operación está sujeta a las siguientes dos condiciones: (1) este
equipo no causa inteferencias dañinas, y (2) esta radio debe
aceptar cualquier interferencia que puede causar una operación
no requerida.
Para seguir cumpliendo con las regulaciones de exposición RD de
FCC, esta radio ha sido ensayada para el uso cercano al cuerpo
y cumple con las regulaciones de exposición RF de FCC al usarse
con accesorios de Eton Radio Corp. suministrados o bien diseñados para este producto. El uso de otros accesorios puede no
asegurar el cumplimiento de las regulaciones de exposición RF de
FCC. (Ensayado con modelo de auriculares: AVP-1
NOTA IMPORTANTE, LICENCIA FCC REQUERIDA
PARA OPERACIÓN DE GMRS
La serie FR1000 opera con frecuencias de GMRS (General Mobile
Radio Service) que requieren de una licencia FCC (Federal Communications Commission). Usted debe adquirir previamente la
licencia para operar los canales 1 – 7 ó 15 – 22, que comprenden
los canales GMRS de la serie FR1000S. Surge el riesgo de graves
sanciones en caso de un uso no licenciado de los canales GMRS,
violando así las regulaciones de FCC, tal como se indica en el Acta
de Comunicación, artículos 501 y 502 (enmendados).
Usted obtendrá una señal de llamada por parte de FCC que se
debe usar para la identificación de estación al usar la radio con
37
Page 38

GUÍA DE OPERACIÓN DE American Red Cross FR1000
NOTA IMPORTANTE, LICENCIA FCC REQUERIDA
PARA OPERACIÓN DE GMRS continuado
los canales GMRS. Usted debería cooperar también mediante
aplicación exclusiva de transmisiones permitidas, evitando la
interferencia de canales con otras fuentes GMRS, actuando con
prudencia en cuanto a la duración del tiempo de transmisión.
Para obtener la licencia o para consultar sobre la aplicación de
licencia, recomendamos contactar el FCC bajo 1-888-CALL FCC
o bien visitando la página web de FCC: http://www.fcc.gov ,
pidiendo el formulario Nº 605.
Exposición a energía de frecuencia de radio
Su radio de Eton ha sido diseñada para cumplir con los siguientes
estándares y directivas a nivel nacional e internacional, relacionados con la exposición de personas a la energía electromagnética
de frecuencias de radio.
• Comisión de Comunicación Federal de EE.UU., Código de
Regulaciones Federales: 47 CFR parte 2, sub-parte J
• Instituto de Estándares Nacionales Américanos (ANSI)/Instituto
de Ingenieros Eléctricos y Electrónicos (IEEE) C95. 1-1992
• Instituto de Ingenieros Eléctricos y Electrónicos (IEEE) C95. 11999 Edición
• Consejo Nacional de Protección y Medición de Radiación
(NCRP) para EE.UU., Informe 86, 1986
• Comisión Internacional de Protección de Radiación No Ioni
zante (ICNIRP) 1998
-
-
38
Page 39

GUÍA DE OPERACIÓN DE American Red Cross FR1000
NOTA IMPORTANTE, LICENCIA FCC REQUERIDA
PARA OPERACIÓN DE GMRS continuado
Para controlar su exposición y para asegurar el cumplimiento de
los límites de exposición de la populación general o no controlada
del entorno, no se debe transmitir más del 50% del tiempo. La
radio genera una exposición de energía RF medible, solamente
durante la transmisión.
IMPORTANTE: Cambios o modificaciones en esta unidad están
expresamente no aprobados por ETON y podrían invalidar su
derecho de usar esta unidad. Su radio ha sido diseñada para
transmitir una señal regulada en una frecuencia asignada. La
alteración o el ajuste de la configuración en el interior del radio
con el propósito de sobrepasar estas limitiaciones, resulta un acto
contra la ley. Cualquier tipo de ajuste en la radio debe realizarse
por parte de técnicos cualificados.
39
Page 40

GUÍA DE OPERACIÓN DE American Red Cross FR1000
PANTALLA LCD
1
2
3
4
5
6
7
8
9
10
11
12
1. RECEPTOR (RX) / ICONO DE TRANSMISIÓN (TX) – Indica que la radio está
transmitiendo una señal (TX) o que la radio
está recibiendo una transmisión (RX).
2. NÚMERO DE CANAL – Cambio de 1~22
en la banda GMRS/FRS (1~7 en banda WX).
Se usa también para indicar el ajuste de
frecuencia actual del sintonizador AM/FM y
el ajuste actual de reloj.
3. ÍCONO DE RELOJ AM/PM – Indica si el
reloj está ajustado en AM o PM.
4. ÍCONO DE ALERTA CLIMÁTICA (WX) DE
NOAA – Indica el estado activado de la
función de alerta climática WX.
5. ÍCONO DE SINTONIZADOR AM – Indica
que la radio se encuentra en modo de
sintonización AM (onda media).
6. ÍCONO DE SINTONIZADOR FM – Indica
que la radio se encuentra en modo de
sintonización FM (onda ultra corta).
7. ÍCONO DE BANDA CLIMÁTICA (WX) DE
NOAA – Indica cuando la radio está en
modo de banda de informe climático.
13
14
15
16
17
18
19
20
21
22
23
8. ÍCONO GMRS – Indica que la radio está en
modo GMRS.
9. ÍCONO DE LUZ PARPADEANTE – Indica
que la luz parpadeante está activada.
10. ÍCONO DE S.O.S. – Indica que la función de
llamada de emergencia (SOS) está activada.
11. ÍCONO DE SIRENA – Indica que la función
de sirena está activada.
12. ÍCONO DE VIGILANCIA DOBLE – Indica
que la función de vigilancia doble está
activada.
13. ÍCONO DE NIVEL DE POTENCIA DE
TRANSMISIÓN – Indica el ajuste de poten-
cia TX (HI/LO)
14. ÍCONO DE CÓDIGO DE PRIVACIDAD
– Indica el ajuste de código de privacidad
(CTCSS/DCS).
15. ÍCONO DE BLOQUEO DE TECLAS – Indica
que el modo KEY LOCK (bloqueo de teclas)
está activado.
16. ÍCONO DE ESCANEO – Indica cuando la
radio está en el modo Scan (escaneo).
40
Page 41

GUÍA DE OPERACIÓN DE American Red Cross FR1000
PANTALLA LCD continuado
17. ÍCONO DE BANDA CLIMATICA (WX) DE
NOAA – Indica cuando la radío está en
modo de banda de informe climático.
18. ÍCONO DE ALERTA – Indica que la radio ha
recibido una señal de alerta climática (WX).
19. VISUALIZADOR DE CARGA DE BATERÍA
– Indica el nivel de batería.
20. ÍCONO DE TONO DE TECLA – Indica que
está activado el tono acústico de tecla de la
radio.
CONTROLES
21. ÍCONO DE RELOJ DE ALARMA – Indica
cuando el reloj de alarma está activado.
22. ÍCONO DE PITIDO DE CAMBIO – Indica
que está activado el tono acústico con pitido
de cambio de la radio.
23. ÍCONO VOX – Indica cuando el modo VOX
está activado.
24
25
26
27
28
24. ANTENA
25. CONMUTADOR DE BANDA – Se usa para
conmutar entre los modos AM/FM/WX/
GMRS.
26. LUZ PARPADEANTE – Luz parpadeante
integrada.
27. CONMUTADOR DE FUNCIÓN – Se usa
para conmutar entre las funciones Alerta
WX/OFF/Luz Parpadeante/SOS/Sirena.
28. ALTOPARLANTE – Altoparlante integrado.
29. CONMUTADOR DE FUENTE DE BATERÍA
– Se usa para desactivar la radio (OFF) o para
29
30
31
32
33
34
conmutar entre las baterías de álcali y las
baterías recargables de NiMH.
30. BOTÓN DE SINTONIZACIÓN – Para girar
en sentido/contra el sentido de las agujas del
reloj para aplicar ajustes en el modo MENU.
Se puede usar también para ajustar el reloj,
el modo de sintonización en WX y el modo
de sintonización en AM/FM.
31. MIC – Micrófono integrado.
32. MANIVELA DE DINÁMO – Para girar en
sentido/contra el sentido de las agujas del
reloj para cargar las baterías NiMH.
41
Page 42

GUÍA DE OPERACIÓN DE American Red Cross FR1000
CONTROLES continuado
33. EJE DE MANIVELA DE DINÁMO
34. BOTÓN DE POTENCIA/VOLUMEN – Girar
en sentido de las agujas del reloj para
aumentar el volumen. Girar en contra del
sentido de las agujas del reloj para reducir el
volumen y para apagar la radio.
35. BOTÓN ESCANEO/HORA – Pulsar para
activar/desactivar el modo de escaneo en el
modo GMRS. Pulsar para cambiar el ajuste
de hora en el modo de reloj.
35
36
36. BOTÓN MENU/MINUTO – Pulsar para ac-
ceder al modo Menu en el modo GMRS/FRS
y WX. Pulsar para cambiar el ajuste de
minuto en el modo de reloj.
37. BOTÓN DE ACITVACIÓN/DESACTI-
VACIÓN DE MONITOR / ALARMA – Pulsar
para activar la función de monitor en el
modo GMRS. Pulsar y mantener pulsado
para activar/desactivar la alarma en el modo
de reloj.
42
37
38
39
38. BOTÓN DE BLOQUEO/LLAMADA – Pulsar
y mantener pulsado para activar/desactivar
el bloqueo de teclas en el modo GMRS.
Pulsar para enviar una señal de LLAMADA DE
ALERTA en el modo GMRS.
39. BOTÓN PTT/SNOOZE – Pulsar y mantener
pulsado para transmitir comunicación de voz
en modo GMRS. Pulsar para confirmar la
selección en MENU y el modo de reloj. Pulsar
para activar la función SNOOZE en el modo
de reloj.
Page 43

GUÍA DE OPERACIÓN DE American Red Cross FR1000
INSTALACIÓN DE LA BATERÍA
Su radio de la serie FR1000 trabaja con 4 baterías de álcali del
tipo AA o bien con un paquete de baterías NiMH.
Para instalar las baterías:
1. Con la parte posterior de la radio indicando hacia usted, retire
la cubierta de batería mediante pulsación en la lengüeta de
bloqueo de cubierta de batería, para desbloquearla y sacarla de
la radio.
2. Coloque 4 baterías del tipo AA prestando atención a la polari
dad correcta. La instalación errónea de las baterías impide el
funcionamiento de la radio o bien puede incluso causar daños
en la radio. El paquete de baterías NiMH se instala del modo
indicado a continuación.
3. Coloque luego la cubierta de batería mediante, mediante apli
cación de un leve apriete en la parte posterior de la radio hasta
que la lengüeta de bloqueo de cubierta de batería se enganche
nuevamente en su lugar.
-
-
43
Page 44

GUÍA DE OPERACIÓN DE American Red Cross FR1000
CARGA DEL PAQUETE DE BATERÍAS
Su radio de serie FR1000 está equipada para el uso de un
paquete de baterías recargables del tipo NiMH que se pueden recargar con un adaptador AC (incluido). El tiempo inicial de carga
es de 24 horas con un tiempo posterior de carga de 12 horas.
Para asegurar una vida útil de máxima duración, recomendamos
proceder con la carga del paquete de baterías cuando se activa el
ícono de batería baja. Desconecte el cargador de la radio después
de haber terminado el tiempo de carga. Para la ubicación del
ENCHUFE DE CARGA, véase la página 91.
Para asegurar que el paquete de baterías se haya cargado completamente, se recomienda cargar el paquete de baterías durante
al menos 12 horas, con la radio en estado desactivado (OFF).
También es posible cargar el paquete de baterías recargables
NiMH mediante uso de la manivela de dinánomo.
Para la carga con la manivela de dinánomo, gire rápidamente la
manivela de dinámo en sentido o bien contra el sentido de las
agujas del reloj.
Para obtener las mejores condiciones de carga, se recomienda
cargar el paquete de baterías con la manivela de dinámo con la
radio en estado desactivado (OFF).
1. Use exlcusivamente nuestro paquete de baterías NiMH.
2. No intente cargar baterías de álcali o cualquier otro tipo de
baterías o paquetes de baterías que no coinciden con el tipo de
baterías indicados en este manual. Esto puede causar una fuga
y dañar la radio.
3. Cuando desea almacenar la radio durante un período
prolongado, se recomienda desactivar la radio y extraer las
baterías de ésta.
44
Page 45

GUÍA DE OPERACIÓN DE American Red Cross FR1000
INDICADOR DEL NIVEL DE BATERÍA
Su radio de la serie FR1000 está equipada con un VISUALIZADOR DE CARGA DE BATERÍA que muestra el nivel de
potencia de las baterías. Mientras mayor es la cantidad de barras
visibles, más potente resulta el nivel de potencia de las baterías.
Cuando el nivel de baterías está bajo, el ícono de Batería vacía
se indica parpadeando en la pantalla para mostrar que se
deben reemplazar las baterías o bien recargarlas en caso de usar
un paquete de baterías recargables.
SELECCIÓN DE FUENTE DE ALIMENTACIÓN
Su radio de la serie FR1000 puede trabajar con baterías de álcali o
bien con un paquete de baterías recargables del tipo NiMH. Ajuste
el conmutador de la FUENTE DE ALIMENTACIÓN en el modo
“Batería” o “Dynamo-Adapter” (para el paquete de baterías
NiMH).
USO DE SU RADIO
AJUSTE DE LA RADIO EN EL MODO GMRS/FRS
Para ajustar la radio FR1000 en el modo GMRS/FRS, debe moverse
el conmutador BANDA a la posición GMRS. El LCD muestra luego
el ajuste de canal actual de GMRS/FRS. El ícono GMRS se indica
luego en la pantalla.
ACTIVACIÓN/DESACTIVACIÓN DE RADIO Y VOLUMEN
Accione el botón FUENTE DE BATERÍAS y seleccione entre las baterías de álcali y el paquete de baterías NiMH para activar la radio.
45
Page 46

GUÍA DE OPERACIÓN DE American Red Cross FR1000
USO DE SU RADIO continuado
Gire el botón de VOLUMEN en sentido de las agujas del reloj para
aumentar el volumen. Gire el botón en contra del sentido de las
agujas del reloj para reducir el nivel de volumen. Durante la activación, el LCD muestra durante 1 segundo todos los íconos y la
pantalla de LCD indica el último canal/frecuencia selecciónados.
TRANSMISIÓN Y RECEPCIÓN DE UNA LLAMADA
Para comunicarse, todas las radios en su grupo deben estar
ajustadas en el mismo canal y código de privacidad.
1. Pulse y mantenga pulsado el botón PTT y hable con voz normal
al micrófono. El ícono TX se indica continuamente en la pantalla de LCD durante la transmisión.
2. Para recibir una llamada, suelte el botón PTT. El ícono RX se
indica en la pantalla cuando su radio está recibiendo una
transmisión.
ACERCA DEL RANGO
Su radio de la serie FR1000 ha sido diseñada para asegurar un
rango máximo bajo condiciones óptimas.
Condiciones óptimas son:
• Sobre el agua
• Áreas rurales abiertos sin obstrucciones
• Áreas planos donde puede ver a la otra persona
Para asegurar la obtención del rango máximo:
• Asegúrese de usar baterías nuevas o completamente carga-
das– baterías con potencia baja perjudican las condiciones de
potencia.
• Asegúrese de estar en un canal GMRS – Los canales FRS están
restringidos por FCC para baja potencia.
• Asegúrese de ajustar su radio en el modo de potencia alta.
• Asegúrese de apuntar la ANTENA hacia arriba.
46
Page 47

GUÍA DE OPERACIÓN DE American Red Cross FR1000
USO DE SU RADIO continuado
FR1000 ESQUEMA DE REFERENCIA RÁPIDA
SELECCIÓN DE CANAL (BANDA GMRS/FRS)
Gire el botón de SINTONIZACIÓN en sentido o bien en contra
del sentido de las agujas del reloj para seleccionar uno de los 22
canales de GMRS/FRS.
MONITOR
Mediante pulsación del botón MONITOR se puede realizar un
control de actividad en su canal actual antes de realizar la transmisión. Esta función se debe usar también para ajustar el volumen
de la radio cuando no está recibiendo una señal.
Pulse nuevamente el botón MONITOR para salir del modo MONITOR.
ESCANEO
Su radio de la serie FR1000 puede escanear todos los 22 canales
para detectar cualquier actividad. Para ingresar, pulse brevemente
el botón de escaneo (SCAN). Repita el procedimiento nuevamente
para salir. Su radio realiza un escaneo rápido de cada uno de los
22 canales y se detiene en cada canal activo. Su radio permanece
47
Page 48

GUÍA DE OPERACIÓN DE American Red Cross FR1000
USO DE SU RADIO continuado
en el canal activo mientras la señal esté presente, continuando
con el escaneo 5 segundos después de que la señal ya no esté
presente. Al pulsar el botón PTT para transmitir en un canal
activo, la función de escaneo se detiene y permanece en el canal
activo. Para continuar con el escaneo, pulse brevemente este
botón.
LLAMADA DE ALERTA
Su radio de la serie FR1000 puede transmitir una llamada de
alerta durante una duración determinada de tiempo. Para enviar
una llamada de alerta, pulse el botón LLAMADA/BLOQUEO
(CALL/LOCK). El ícono TX se indica durante la transmisión de la
llamada de alerta y se puede escuchar un tono emitido por el
altoparlante para la confirmación. La radio FR1000 tiene 5 selecciones de llamadas de alerta.
BLOQUEO DE TECLADO
Para evitar un cambio accidental del ajuste de la radi, pulse y
mantenga pulsado el botón LLAMADA/BLOQUEO (CALL/LOCK)
durante aprox. 4 segundos. A continuación se muestra el ícono
BLOQUEO DE TECLADO (KEY LOCK). Las funciones PTT, CALL y
MONITOR siguen todavía activas. Repita el procedimiento para
desbloquear el teclado.
ILUMINACIÓN DE PANTALLA
En la activación de la radio, la iluminación de pantalla se activa
durante aprox. 5 segundos. La iluminación de pantalla se puede
activar también cuando se pulsa el botón del MENÚ, de la SCAN,
y del MONITOR. Se puede activar también accionando el botón
de SINTONIZACIÓN.
48
Page 49

GUÍA DE OPERACIÓN DE American Red Cross FR1000
USO DE SU RADIO continuado
Nota: En el modo de reloj (con la potencia desactivada), la
iluminación de pantalla se puede reactivar mediante pulsación del
botón MENÚ, ESCANEO y MONITOR.
AJUSTE DE CÓDIGOS DE PRIVACIDAD
Su radio de la serie FR1000 cuenta con 121 códigos de privacidad
disponibles. El código de privacidad seleccionado puede resultar
diferente para cada canal. Para seleccionar un código de privacidad para el canal actual, pulse una vez el botón MENU y accione
luego el botón SINTONIZACIÓN para seleccionar uno de los 38
códigos de privacidad CTCSS. Pulse nuevamente el botón MENU y
accione el botón SINTONIZACIÓN para seleccionar uno de los 83
códigos de privacidad DCS. El ícono de código de privacidad en
la pantalla muestra si se ha ajustado el código de privacidad en
el modo CTCSS o bien DCS. Para confirmar la selección, pulse el
botón PTT o bien pulse nuevamente el botón MENU para conmutar al siguiente ajuste funcional.
Nota: En caso de seleccionar un código de privacidad CTCSS,
cualquier código de privacidad DCS previamente seleccionado
será cancelado, y vice versa. La selección de un código de privacidad de “oF” deshabilitará la funcionalidad de privacidad. Para
comunicarse entre dos radios de la serie FR1000, todas las radios
en su grupo deben estar ajustadas en el mismo canal y código de
privacidad.
SELECCIÓN DEL NIVEL DE POTENCIA DE TRANSMISIÓN (TX)
Su radio de la serie FR1000 tiene dos ajustes de nivel de potencia.
Para seleccionar el nivel de potencia en los canales 1~7 y 15~22,
pulse el botón MENU hasta que se indique el ícono “Pr” en la
pantalla. Accione luego el botón SINTONIZACIÓN para seleccionar
49
Page 50

GUÍA DE OPERACIÓN DE American Red Cross FR1000
USO DE SU RADIO continuado
el ícono NIVEL DE POTENCIA DE TRANSMISIÓN HI/LO. Para confirmar la selección, pulse el botón PTT o bien pulse nuevamente
el botón MENU para conmutar al siguiente ajuste funcional. Cuando el visualizador de carga de batería muestra una sola barra
, la potencia TX conmuta automáticamente del nivel alto
HI al nivel bajo LO.
Nota: Usted no puede aplicar un ajuste de potencia en los
canales FRS (8~14). Estos estan ajustados en potencia baja por las
regulaciones FCC.
VOX (transmisión de manos libres)
Su radio tiene 3 ajustes de nivel de VOX: (oF/1/2/3). Para ajustar
VOX, pulse el botón MENU hasta que en la pantalla se indique
“Vo” mientras que en el lado derecho se indica el ícono “oF”.
Seleccione “1”, “2” ó “3” mediante accionamiento del botón
SINTONIZACIÓN y pulse luego la tecla PTT, o bien pulse
nuevamente el botón MENU para conmutar al siguiente ajuste
funcional. VOX tiene mayor sensibilidad en el ajuste “1” que en
el ajuste “3”. Para desactivar VOX, pulse el botón MENU hasta
que en la pantalla se indique “Vo” mientras que en el lado derecho se indica el ícono “1”, “2” ó “3”. Seleccione “oF” mediante
accionamiento del botón SINTONIZACIÓN y pulse luego la tecla
PTT, o bien pulse nuevamente el botón MENU para conmutar al
siguiente ajuste funcional.
SELECCIÓN DE LLAMADA DE ALERTA
Su radio de la serie FR1000 tiene 5 LLAMADAS DE ALERTA
(oF/1~5) seleccionables. Para seleccionar, pulse el botón MENU
hasta que se indique el ícono “CA” y en el lado derecho se
muestre el ícono “CA” para indicar el ajuste actual de LLAMA-
DA DE ALERTA. Accione luego el botón SINTONIZACIÓN para
50
Page 51

GUÍA DE OPERACIÓN DE American Red Cross FR1000
USO DE SU RADIO continuado
seleccionar la LLAMADA DE ALERTA – la radio emitirá luego
un tono correspondiente para cada selección. Para confirmar la
selección, pulse el botón PTT o bien pulse el botón MENU para
conmutar al siguiente ajuste funcional.
Nota: El ajuste de la opción LLAMADA DE ALERTA en “oF” deshabilitará la función de LLAMADA DE ALERTA.
TONO DE PITIDO DE CAMBIO (fin de transmisión)
Al soltar el botón PTT, la radio emite un sonido para confirmar a
los demás usuarios que su transmisión ha sido terminada. Para
activar el tono de PITIDO DE CAMBIO, pulse el botón MENU hasta
que se indique el ícono “rb” mientras que en el lado derecho de la
pantalla se indique “rb”, mostrando también el ícono “oF”. Seleccione “on” mediante accionamiento del botón SINTONIZACIÓN
y pulse luego la tecla PTT, o bien pulse el botón MENU para conmutar al siguiente ajuste funcional. El ícono PITIDO DE CAMBIO
se indica luego en la pantalla. Para desactivar el tono de PITIDO
DE CAMBIO, pulse el botón MENU hasta que se indique el ícono
“rb” mientras que en el lado derecho de la pantalla se indique
“rb”, mostrando también el ícono “on”. Seleccione “oF” mediante
accionamiento del botón SINTONIZACIÓN y pulse luego la tecla
PTT, o bien pulse el botón MENU para conmutar al siguiente
ajuste funcional. El ícono PITIDO DE CAMBIO desaparece luego
de la pantalla.
OPERACIÓN EN SILENCIO
Su radio de la serie FR1000 puede trabajar en modo OPERACIÓN
SILENCIOSA. En este modo, todos los “sonidos” y “tonos” quedan deshabilitados. Para activar el modo de OPERACIÓN SILEN-
CIOSA, pulse el botón MENU hasta que se indique el ícono “bP”
mientras que en el lado derecho de la pantalla se indique “bP”,
51
Page 52

GUÍA DE OPERACIÓN DE American Red Cross FR1000
USO DE SU RADIO continuado
mostrando también el ícono “on”. Seleccione “oF” mediante
accionamiento del botón SINTONIZACIÓN y pulse luego la tecla
PTT para confirmar o bien pulse el botón MENU para conmutar
al siguiente ajuste funcional. El ícono TONO DE TECLA se indica
luego en la pantalla.
Para desactivar el modo de OPERACIÓN SILENCIOSA, pulse el
botón MENU hasta que se indique el ícono “bP” mientras que
en el lado derecho de la pantalla se indique “bP”, mostrando
también el ícono “oF”. Seleeccione “on” accionando el botón
SINTONIZACIÓN y pulse luego la tecla PTT o el botón MENU. El
ícono TONO DE TECLA desaparece luego de la pantalla.
NOTA: LA OPERACIÓN SILENCIOSA ESTÁ ACTIVADA POR DE
FECTO (“BP” AJUSTADO EN “OF”) BY DEFAULT.
VIGILANCIA DOBLE
Su radio de la serie FR1000 tiene una función de VIGILANCIA
DOBLE para habilitar al usuario para el monitoreo de actividades
de dos canales o códigos de privacidad seleccionados. Trabaja
en forma similar a la función de ESCANEO pero monitorea
solamente 2 canales en vez de todos los 22 canales. El primer
canal/código de privacidad es el ajuste actual, mientras que el
segundo canal/código de privacidad se ajusta complementariamente en el MENU.
-
Para activar la función de VIGILANCIA DOBLE, pulse el botón
MENU hasta que se indique el ícono VIGILANCIA DOBLE,
mientras que aparece también el ícono “oF” en el lado derecho.
Seleccione el segundo canal mediante accionamiento del botón
SINTONIZACIÓN. Para seleccionar el código de privacidad para el
segundo canal, pulse una vez el botón MENU y accione luego el
52
Page 53

GUÍA DE OPERACIÓN DE American Red Cross FR1000
USO DE SU RADIO continuado
botón SINTONIZACIÓN para seleccionar uno de los 38 códigos de
privacidad CTCSS o pulse nuevamente el botón MENU y accione
el botón SINTONIZACIÓN para seleccionar uno de los 83 códigos
de privacidad DCS. Pulse el botón MENU o PTT para confirmar.
El ícono VIGILANCIA DOBLE permanece en la pantalla. La radio
realiza rápidamente un escaneo de los dos canales seleccionados
y se detiene en cualquier canal activado. Su radio permanece en
el canal activo mientras la señal esté presente, continuando con el
escaneo 5 segundos después de que la señal ya no esté presente.
Para desactivar la función de VIGILANCIA DOBLE, pulse el botón
ESCANEO. El ajuste actual de GMRS/FRS de la radio se indica
a continuación y el ícono VIGILANCIA DOBE desaparece de la
pantalla.
AJUSTE DE LA RADIO EN EL MODO DE INFORME CLIMÁTICO
DE NOAA
Para ajustar la radio FR1000 en el modo NOAA WEATHER RADIO, debe moverse el conmutador BANDA a la posición WX. La
pantalla de LCD muestra el ajuste actual de canal WX y se indica
el ícono NOAA WEATHER (WX) BAND en la pantalla. Accione
el botón SINTONIZACIÓN para seleccionar uno de los 7 canales
NOAA WEATHER (WX) BAND.
ALERTA DE INFORME CLIMÁTICO DE NOAA
Su radio FR1000 tiene una función de ALERTA CLIMÁTICA DE
NOAA para habilitar automáticamente la recepción de alertas
climáticas desde las estaciones designadas de NOAA.
Para activar la ALERTA CLIMÁTICA (WX) DE NOAA, conmute el
botón FUNCIÓN a . El ícono de ALERTA CLIMÁTICA (WX) DE
53
Page 54

GUÍA DE OPERACIÓN DE American Red Cross FR1000
USO DE SU RADIO continuado
NOAA se indica en la pantalla. Cuando la radio recibe una señal
de ALERTA WX desde una estación NOAA designada mientras
está en cualquier modo, la radio emite un sonido durante 20
segundos mientras el ícono ALERTA parpadea en la pantalla.
Después, usted puede conmutador el botón BANDA en la
posición WX para conmutar al modo RADIO CLIMÁTICA NOAA
para escuchar la emisión de emergencia.
El ícono de ALERTA CLIMÁTICA (WX) DE NOAA permanece
parpadeando en la pantalla mientras recibe la señal ALERTA
WX, hasta conmutar el botón BANDA al modo WX o bien
hasta pulsar cualquier otro botón. Esto es para indicarle
que se haya recibido una señal de Alerta WX en caso de no
haberlo notado a tiempo.
Para desactivar la ALERTA CLIMÁTICA (WX) DE NOAA, conmute
el botón FUNCIÓN desde la posición a cualquier otra posición.
AJUSTE DE LA RADIO EN EL MODO DE SINTONIZACIÓN
AM/FM
Para ajustar la radio FR1000 en el modo de SINTONIZACIÓN AM/
FM, debe moverse el conmutador BAND a la posición AM o FM.
El LCD muestra luego el ajuste de canal actual de AM o FM.
SELECCIÓN DE CANAL (BANDA AM/FM)
Gire el botón SINTONIZACIÓN en sentido o bien contra el sentido
de las agujas del reloj para seleccionar una frecuencia AM o FM.
Pulsando y manteniendo pulsado el botón SINTONIZACIÓN, se
puede realizar un escaneo continuo de frecuencias hasta recibir
una señal fuerte.
54
Page 55

GUÍA DE OPERACIÓN DE American Red Cross FR1000
USO DE SU RADIO continuado
AJUSTE DE LA RADIO EN EL MODO DE RELOJ
Para ajustar la radio FR1000 en el modo de reloj, conmute el
conmutador FUENTE DE BATERÍA a la posición OFF. La pantalla
muestra luego el ajuste actual de tiempo.
CAMBIO DEL AJUSTE DE HORA
Para cambiar el ajuste de hora del reloj, pulse el botón ESCANEO/HORA en el modo RELOJ, luego se indican parpadeando los
dígitos de hora. Gire el botón SINTONIZACIÓN para cambiar el
ajuste de hora. Pulse el botón PTT para confirmar.
CAMBIO DEL AJUSTE DE MINUTOS
Para cambiar el ajuste de minutos del reloj, pulse el botón MENU/
MINUTO en el modo de RELOJ. Los dígitos de minutos se indican
ahora parpadeando. Gire el botón SINTONIZACIÓN para cambiar
el ajuste de minutos. Pulse el botón PTT para confirmar.
AJUSTE DEL RELOJ DE ALARMA
La radio FR1000 funciona también como RELOJ DE ALARMA. Para
activar el RELOJ DE ALARMA, pulse el botón ALARMA ON/OFF
en el modo RELOJ. Se indica luego el ícono RELOJ DE ALARMA.
Para aplicar el ajuste de hora para la función de ALARMA, pulse
el botón ESCANEO/HORA en el modo RELOJ, luego se indican
parpadeando los dígitos de hora. Gire el botón SINTONIZACIÓN
para cambiar el ajuste de hora. Pulse el botón PTT para confirmar.
Para aplicar el ajuste de minuto para la función de ALARMA,
pulse el botón MENU/MINUTO en el modo RELOJ, luego se indican parpadeando los dígitos de minuto. Gire el botón SINTONIZACIÓN para cambiar el ajuste de minuto. Pulse el botón PTT para
confirmar. Para desactivar el RELOJ DE ALARMA, pulse el botón
55
Page 56

GUÍA DE OPERACIÓN DE American Red Cross FR1000
USO DE SU RADIO continuado
ALARMA ON/OFF en el modo RELOJ. Luego desaparece el ícono
RELOJ DE ALARMA.
NOTA:
La función de RELOJ DE ALARMA se puede activar/desactivar solamente cuando la radio está en modo RELOJ. El
botón ALARMA CON/DESC tiene otra función cuando la radio se
encuentra en un modo diferente.
FUNCIÓN DE SNOOZE EN ALARMA
Cuando se apaga el RELOJ DE ALARMA, usted puede activar
la función de SNOOZE mediante pulsación del botón SNOOZE.
Cada vez que se pulse el botón SNOOZE, se apaga el RELOJ DE
ALARMA después de 5 minutos.
UTILIZACIÓN DE LUZ PARPADEANTE
Su radio de la serie FR1000 tiene una LUZ PARPADEANTE integrada.
Para activar la LUZ PARPADEANTE, conmute el botón FUNCIÓN
a .
Para desactivar la LUZ PARPADEANTE, conmute el botón FUNCIÓN a OFF.
NOTA: LA LUZ PARPADEANTE TRABAJA SOLAMENTE CUANDO
EL CONMUTADOR FUENTE DE BATERÍA SE ENCUENTRA EN LA
POSICIÓN BATERÍA O ADAPTADOR DE DINÁMO.
UTILIZACIÓN DE S.O.S.
Su radio de la serie FR1000 cuenta con una función de emergencia SOS. En este estado, un LED ROJO parpadea para emitir
un mensaje de SOS en código Morse, para servir como luz de
baliza. En este estado, un LED ROJO parpadea para servir como
luz de baliza. Para activar la función de SOS, conmute el botón
FUNCIÓN a .
56
Page 57

GUÍA DE OPERACIÓN DE American Red Cross FR1000
USO DE SU RADIO continuado
Para desactivar la función de SOS, conmute el botón FUNCIÓN
a OFF.
NOTA:
La función de SOS trabaja solamente cuando el conmu-
tador FUENTE DE BATERÍA se encuentra en la posición BATERÍA o
ADAPTADOR DE DINÁMO.
UTILIZACIÓN DE LA SIRENA
Su radio de la serie FR1000 tiene una SIRENA integrada. Durante
esta función, la radio emite continuamente un sonido. Para activar la función de SIRENA, conmute el botón FUNCIÓN a . Para
desactivar la SIRENA, conmute el botón FUNCIÓN a OFF.
NOTA: La SIRENA funciona solamente cuando el conmutador
FUENTE DE BATERÍA se encuentra en la posición BATERÍA o
ADAPTADOR DE DINÁMO.
ALTOPARLANTES EXTERNOS/ENCHUFE PARA
MICRÓFONO
Su radio de la serie FR1000 se puede usar con altoparlantes
externos/micrófono o auriculares (headset) mediante el ENCHUFE
DE ALTOPARLANTES/MICRÓFONO, liberando así sus manos para
otras tareas.
Para usar altoparlantes/micrófono o auriculares opcionales:
• Abrir la cubierta de caucho del enchufe para ALTOPARLANTES/
MICRÓFONO en la radio.
• Insertar el enchufe en el zócalo SPK/MIC.
• Colocar los auriculares en las orejas y ajustar el micrófono en la
posición requerida.
57
Page 58

GUÍA DE OPERACIÓN DE American Red Cross FR1000
ZÓCALO DE CARGA DE TELÉFONO
Su radio de la serie FR1000 puede usarse para la carga de un
teléfono móvil con la MANIVELA DE DINÁMO, o la opción de AC
mediante el zócalo CARGADOR DE TELÉFONO.
• Ajuste el conmutador de FUENTE DE BATERÍA en la posición
ADAPTADOR DE DINÁMO.
• Abrir la cubierta de caucho del enchufe para el CARGADOR DE
TELÉFONO en la radio.
• Coloque el cable de carga (no incluido) en el teléfono móvil.
• Conecte el otro extremo del cable de carga en el zócalo CARGADOR DE TELÉFONO de la radio FR1000.
• Cargue la batería del teléfono móvil rápidamente con la
MANIVELA DE DINÁMO, o bien mediante enchufe de AC en el
zócalo de carga.
Nota: La carga del teléfono móvil mediante el zócalo de carga
de teléfono ha sido diseñada exclusivamente para casos de
emergencia, pero no está prevista para la recarga completa de la
batería descargada.
58
Page 59

GUÍA DE OPERACIÓN DE American Red Cross FR1000
GUÍA PARA LOCALIZACIÓN Y SOLUCIÓN DE
PROBLEMAS continuado
Sin potencia
No puede recibir mensajes
La radio no
responde tras
accionar un
botón
Pantalla muy
oscura
Cargador no
funciona
- Controlar las baterías instaladas y/o reemplazar
las baterías.
- Confirmar que las radios estén usando los
mismos ajustes de canal y código de privacidad.
- Asegúrese de estar dentro del rango de los
demás transceptores.
- Edificios y otro tipo de estructuras pueden
interferir en su comunicación. (Véase ACERCA
DEL RANGO en la página 80)
- Asegúrese que no está activado el bloqueo de
teclas. Véase “Bloqueo de teclado” (Página 82).
- Eventualmente se requiere un reset de la
radio. Desactive la radio para luego activarla
nuevamente.
- Asegúrese que el micrófono complementario se
haya conectado correctamente.
- Recargar o reemplazar las baterías.
- Asegúrese que el enchufe cargador esté correctamente instalado en la radio.
- Asegúrese del buen funcionamiento de la salida
en la cual está conectado el cargador.
- Controle que el paquete de baterías esté correctamente instalado en la radio.
59
Page 60

GUÍA DE OPERACIÓN DE American Red Cross FR1000
USO Y CUIDADO
1. Utilice un paño suave para limpiar la radio.
2. No utilice alcohol u otras soluciones para limpiar la radio.
3. La radio no se debe sumergir en agua.
4. En caso de haberse mojado, la radio se debe secar con un
paño sin hilachas.
5. Desactive la radio y retire las baterías en caso de almacenarla
durante un período prolongado.
En caso de tener algún tipo de problemas que requiere un servicio, sírvase llamar primero para hablar con un técnico de servicio.
Muchos problemas se pueden solucionar a través del teléfono, sin
necesidad de retornar la unidad para el servicio.
ESPECIFICACIONES
Canales: 22 canales GMRS/FRS +121 códigos de privacidad, 7
canales de banda de informe climático (WX) de NOAA.
Frecuencia de operación: UHF 462.5500 ~ 467.7125 MHz, AM
: 520kHz ~ 1710kHz -10kHz pasos FM : 87.5MHz ~ 108.0MHz
- 100kHz pasos.
Fuente de alimentación de energía: 4 baterías de álcali del tipo
AA o paquete de baterías recargables de 6.0V del tipo Ni-MH
60
Page 61

GUÍA DE OPERACIÓN DE American Red Cross FR1000
ESPECIFICACIONES continuado
ESQUEMA DE FRECUENCIA GMRS/FRS (MHz)
CH. No CH. Freq. CH. No CH. Freq. CH. No CH. Freq.
1 462.5625 9 467.5875 17 462.6000
2 462.5875 10 467.6125 18 462.6250
3 462.6125 11 467.6375 19 462.6500
4 462.6375 12 467.6625 20 462.6750
5 462.6625 13 467.6875 21 462.7000
6 462.6875 14 467.7125 22 462.7250
7 462.7125 15 462.5500
8 467.5625 16 462.5750
* Los canales 8~14 son canales libres de licencia de FRS para
potencia baja
ESQUEMA DE FRECUENCIA DE INFORME CLIMÁTICO (WX)
DE NOAA (MHz)
CH. No CH. Freq. CH. No CH. Freq.
1 162.400
2 162.425
3 162.450
4 162.475
5 162.500
6 162.525
7 162.550
61
Page 62

GUÍA DE OPERACIÓN DE American Red Cross FR1000
ESPECIFICACIONES continuado
ESQUEMA DE FRECUENCIA DE CÓDIGOS DE PRIVACIDAD (Hz)
Code Freq. Code Freq. Code Freq. Code Freq. Code Freq.
1
2
3
4
5
6
7
8
Nota: Los códigos de frecuencia se pueden programar para el uso
en cualquier canal.
67.0
71.9
74.4
77.0
79.7
82.5
85.4
88.5
9
10
11
12
13
14
15
16
91.5
94.8
97.4
100.0
103.5
107.2
110.9
114.8
17
18
19
20
21
22
23
24
118.8
123.0
127.3
131.8
136.5
141.3
146.2
151.4
25
26
27
28
29
30
31
32
156.7
162.2
167.9
173.8
179.9
186.2
192.8
203.5
33
34
35
36
37
38
210.7
218.1
225.7
233.6
241.8
250.3
62
Page 63

GUÍA DE OPERACIÓN DE American Red Cross FR1000
ESPECIFICACIONES continuado
ESQUEMA DE CÓDIGO DE PRIVACIDAD DCS
No. CODE No. CODE No. CODE No. CODE
1
2
3
4
5
6
7
8
9
10
11
12
13
14
15
16
17
18
19
20
21
Nota: Los códigos de frecuencia se pueden programar para el
uso en cualquier canal.
023
025
026
031
032
043
047
051
054
065
071
072
073
074
114
115
116
125
131
132
134
22
23
24
25
26
27
28
29
30
31
32
33
34
35
36
37
38
39
40
41
42
143
152
155
156
162
165
172
174
205
223
226
243
244
245
251
261
263
265
271
306
311
43
44
45
46
47
48
49
50
51
52
53
54
55
56
57
58
59
60
61
62
63
315
331
343
346
351
364
365
371
411
412
413
423
431
432
445
464
465
466
503
506
516
64
65
66
67
68
69
70
71
72
73
74
75
76
77
78
79
80
81
82
83
532
546
565
606
612
624
627
631
632
654
662
664
703
712
723
731
732
734
743
754
63
Page 64

GUÍA DE OPERACIÓN DE American Red Cross FR1000
REGISTRO DE GARANTÍA
Para asegurar la cobertura completa de la garantía o adquirir actualizaciones del producto, debe registrar su producto tan pronto
posible después de la compra o recibo del producto. Usted puede
utilizar una de las siguientes opciones para registrar su producto:
1. Ya sea visitando nuestro sitio Web en http://www.etoncorp.
com.
2. Enviando por correo la tarjeta de garantía suministrada.
3. Envíe por correo su tarjeta de garantía suministrada o infor-
mación a la dirección siguiente; escriba su nombre, dirección
postal completa, número de teléfono, dirección de e-mail,
modelo comprado, fecha de compra, nombre del distribuidor
del producto donde ha adquirido el producto:
Etón Corporation
1015 Corporation Way
Palo Alto, CA 94303 EE.UU.
GARANTÍA LIMITADA
Conserve la información de garantía de su tarjeta de garantía con
su comprobante de compra. La información de Garantía Limitada
puede ser también leída en www.etoncorp.com.
SERVICIO PARA SU PRODUCTO
Para solicitar algún servicio para su producto, le recomendamos
contactar primero al representante de servicio de Etón llamando al
número de teléfono 1-800-872-2228 para los EE.UU., o al núme-
64
Page 65

GUÍA DE OPERACIÓN DE American Red Cross FR1000
SERVICIO PARA SU PRODUCTO continuado
ro de teléfono 1-800-637-1648 para Canadá ó (650) 903-3866,
customersvc@etoncorp.com o bien su distribuidor respectivo del
país dentro de Europa (véase la lista adjunta) para la localización
y resolución del problema. Si requiere un servicio adicional, el
equipo técnico lo instruirá de como proceder considerando si la
radio aún posee garantía o si necesita servicio técnico para un
producto que ya no posee garantía.
GARANTÍA – Si su producto aún posee garantía y el representante de servicio de Etón determina que el servicio de garantía sea
necesario, se le enviará una autorización de retorno e instrucciones de envío a una unidad de servicio de reparación autorizada
de la garantía. NO ENVÍE su radio de regreso sin haber recibido el
número de autorización de retorno.
SIN GARANTÍA – Si su producto ya no posee garantía y requiere
servicio de nuestro equipo técnico, el representante de servicio de
Etón le indicará la unidad de reparación más cercana de su localidad que pueda ofrecer el mejor servicio de reparación.
Para servicio fuera de América del Norte, por favor, consulte la
información del distribuidor incluido en la fecha de la compra o
del recibo.
NOTA FCC
El fabricante no asume la responsabilidad para cualquier tipo
de interferencia de radio o TV causada por modificaciones no
autorizadas en este equipo. Estas modificaciones podrían anular la
autorización del usuario para operar el equipo.
65
Page 66

American Red Cross Radio Line By:
Etón Corporation
Corporate Headquarters
1015 Corporation Way
Palo Alto, California 94303 USA
tel +1 650-903-3866
tel +1 800-872-2228
fax +1 650-903-3867
Etón Europe/Lextronix Germany
Rosenstrasse 2
D-10178 Berlin, Germany
tel +49 [0]30 243102142
Etón Canada
1 Yonge Street, Suite 1801
Toronto, Ontario M5E 1W7 Canada
tel +1 416-214-6885
Designed by Etón Corporation and assembled in China. I © Copyright 2007 Etón Corporation. All rights reserved.
v. 12-11-07
 Loading...