

Page 1
www.etoncorp.com
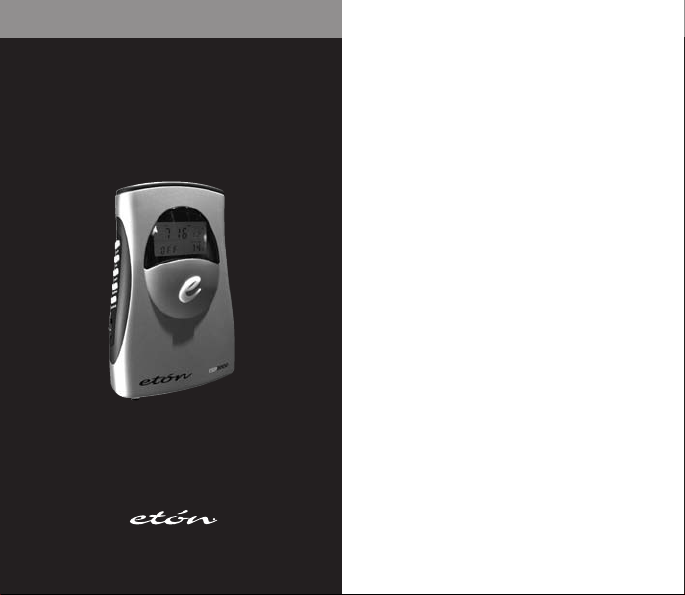
ESP2000
OPERATION MANUAL
AM/FM/ATOMIC CLOCK RADIO
Page 2

DO YOU NEED HELP?
Here’s how to contact us:
• From the United States: (800) 872-2228
• From Canada: (800) 637-1648
• From Everywhere Else: (650) 903-3866
• Email: customersvc@etoncorp.com
• Internet: www.etoncorp.com
ESP 2000 OPERATION MANUAL
TABLE OF CONTENTS
FUNCTIONS .........................................................................
1
CONTROL LOCATION ..........................................................
2
REPLACING BATTERIES .......................................................
3
SETTING NORMAL TIME......................................................
4
YEAR/MONTH/DATE SETTING..............................................
5
TIME SETTING......................................................................
6
SETTING ALARM TIME.........................................................
7
SETTING ALARM ON/OFF.....................................................
8
SELECTING 5-7 DAY ALARMS...............................................
9
12/24 HOUR FORMAT...........................................................
10
SETTING TIME ZONE FOR USA.............................................
11
SETTING SLEEP TIMER..........................................................
12
RADIO OPERATION...............................................................
13
SOOTHING SOUND OPERATION...........................................
14
IMPORTANT NOTE................................................................
15
SPECIFICATIONS ..................................................................
16
FCC STATEMENT...................................................................
17
SERVICE INFORMATION ......................................................
18
ONE YEAR LIMITED WARRANTY .........................................
19
page
4
4
6
6
7
7
8
9
11
11
11
12
12
12
13
13
13
14
15
2
3
Page 3
ESP 2000 OPERATION MANUAL
1 FUNCTIONS
- Normal Time with PM Indicator
- 12/24 Hour Selectable
- Dual Alarm, Snooze, Sleep Timer
- Green LED Backlight Display
- Month and Date Display
- Thermometer (32˚F -122˚F)
- AM/FM Radio Receiver
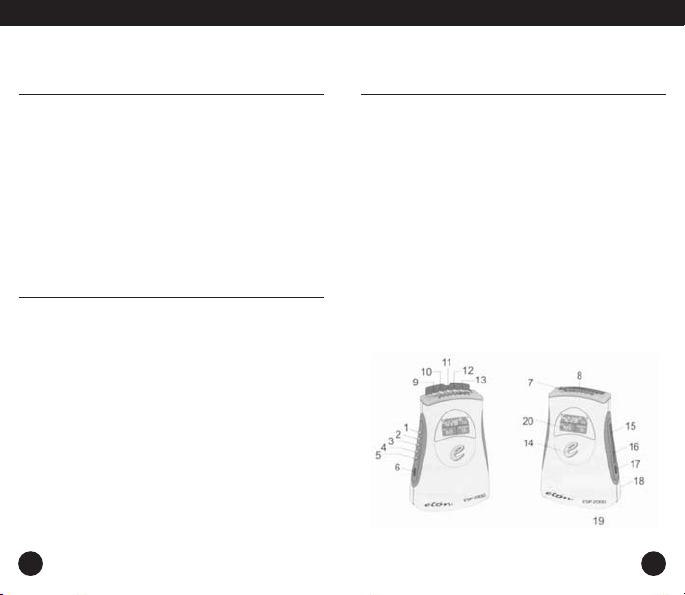
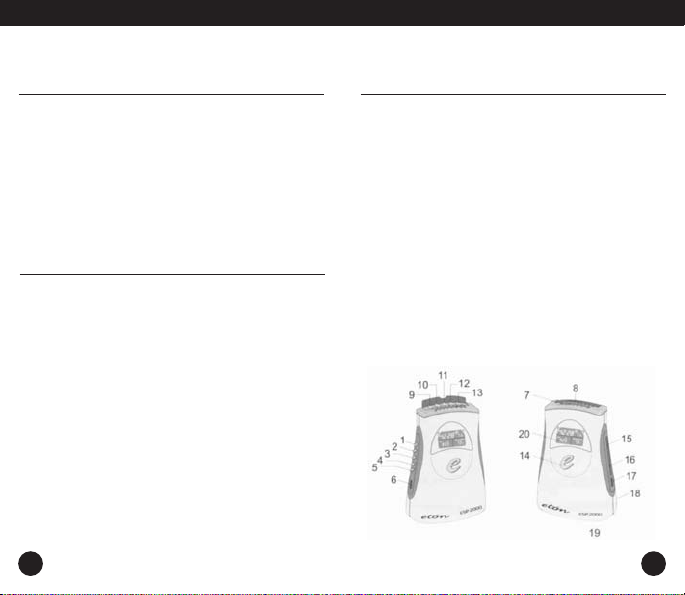
2 CONTROL LOCATION
OCEAN button
1
RAIN button
2
STREAM button
3
HEART BEAT button
4
WOODLANDS button
5
Radio/Sound/Beep function slide switch
6
DIAL scale
7
SNOOZE button
8
MODE button
9
ALARM 1/Up button
10
4
CONTROL LOCATION continued
1-5/1-7/SLEEP button
11
ALARM 2/Down button
12
SET button
13
ON/OFF button
14
Volume knob
15
Tuning knob
16
FM/AM slide switch
17
DC jack
18
Battery compartment
19
LCD display
20
5
Page 4

ESP 2000 OPERATION MANUAL
3 REPLACING BATTERIES
When the low battery symbol shows on the LCD display (20), open
the Battery door (19) at the bottom, replace the exhausted batteries
with three new alkaline "AA"batteries.
NOTE: If the AC/DC adapter is connected to the DC jack,the batteries are used to maintain clock function only.The batteries can
operate the unit with full functions for only a few hours.The unit
should be operated with the included adapter.
4 SETTING NORMAL TIME
When power is on, the clock starts to enter the radio controlled
clock mode.The LCD display (20) initially shows:
- L: 0-5 receiving signal strength, 5 indicates signal level OK, 0-4
signal weak.
- 00-59: a count of seconds
- OFF: Alarm off mode
- The receiving tower symbol starts to blink. It indicates that the unit
has entered the time signal-receiving mode.
- If this unit is within the signal area: after receiving all signals
successfully, the clock shows the correct time and starts to work.
The blinking receiving tower symbol becomes steady.The time
signal is transmitted four times a day to auto-adjust the clock.
- If this unit is out of the signal area: Press MODE button (9) once,
the clock changes to normal clock mode.To set the correct time,
hold SET button (13) for two seconds to enter set mode.
6
5 YEAR/MONTH/DATE SETTING
- The LCD display (20) showing the year digits flashes, press UP
(10) or DOWN (12) button to set the year.
- Press MODE button (9) once to flash the month digits, then press
UP (10) or DOWN (12) button to set the month.
- Press MODE button (9) once again to flash the date digits, then
press UP (10) or DOWN (12) button to set the date.
- Press MODE button (9) once again to finish the setting or press
SET button (13) once to continue time setting.
6 TIME SETTING
- After entering set mode, press SET button (13) once to flash the
hour digits, then press UP (10) or DOWN (12) button to set the hour.
- Press MODE button (9) once to flash the minute digits, then press
UP (10) or DOWN (12) button to set the minute.
- Press MODE button (9) once again to finish the time setting or
press SET button (13) to continue alarm time setting.
7
Page 5

ESP 2000 OPERATION MANUAL
7 SETTING ALARM TIME
(REMARK: please make sure the 'e' ONIOFF switch is in
'OFF' position to set alarm time or operate the alarm function)
TO SET ALARM TIME:
Hold SET button (13) for two seconds to enter set mode, press
SET button (13) twice to show the symbol and flash the alarm
hour digits, then press UP (10) or DOWN (12) button to set alarm l hour.
- Press MODE button (9) once to flash the alarm minute digits,
then press UP (10) or DOWN (12) button to set alarm l minutes
- Press MODE button (9) once again to finish alarm l setting
(all digits steady) or press SET button (13) to continue
alarm 2 setting
TO SET ALARM 2 TIME:
- Hold SET button (13) for two seconds to enter set mode, press
SET button (13) three times to show the symbol and flash the
alarm hour digits, then press UP (10) or DOWN (12) button to
set alarm 2 hour.
- Press MODE button (9) once to flash the alarm minute digits,
then press UP (10) or DOWN (12) button to set alarm 2 minute.
- Press MODE button (9) once again to finish alarm 2 setting (all
digits steady) or press SET button (13) to continue zone setting.
Setting Alarm ON/OFF
To turn alarm l ON: Press ALARM button (10) until the display
shows both the alarm time and symbol. Press MODE button (9)
until it returns to normal month and date display.
8
8 SETTING ALARM ON/OFF
TO TURN ALARM 1 ON:
With the radio turned off,keeping the ALARM button (9) pressed, set
the correct wake up hour and minutes with the HOUR (3) and
MINUTE (4). They can be pressed with quick, short presses to advance
slowly or they can be kept pressed rapidly.When finished, release the
ALARM button and this will cause the loudspeaker symbol appears in
the display.
If you want to deactivate the alarm, press the ALARM button (9)
again and the loudspeaker symbol will disappear from the display.
When the activated alarm turns the radio on, it can be turned off by
pressing the ALARM button (9) again.The Power button (7) cannot be
used for this purpose.
While the radio is playing in alarm mode and without any manual
interruption to deactivate the alarm, it will turn off automatically after
60 minutes.
TO TURN ALARM 1 OFF:
Press ALARM button (10) until the display shows both OFF and
symbol. Press MODE button (9) until it returns to normal month
and date display.
TO TURN ALARM 2 ON:
Press ALARM button (12) until the display shows both the alarm time
and symbol. Press MODE button (9) until it returns to normal month
and date display.
TO TURN ALARM 2 OFF:
Press ALARM button (12) until the display shows both OFF and
symbol. Press MODE button (9) until it returns to normal month and
date display.
9
Page 6

ESP 2000 OPERATION MANUAL
SETTING ALARM ON/OFF continued
WAKE TO RADIO:
If the function slide switch (6) is set to RADIO position, the radio will
come on automatically when the preset alarm time is reached.
WAKE TO SOOTHING SOUND:
If the function slide switch (6) is set to SOUND, the soothing sound
will come on automatically when the preset alarm time is reached.
WAKE TO ALARM:
If the function slide switch (6) is set to BEEP position, the alarm will
come on for two minutes automatically when the preset alarm time
is reached.
SNOOZE:
Press SNOOZE button (8) once within two minutes (or two minutes
later,the alarm will stop automatically) to stop radio or alarm temporarily and give you extra eight minutes of sleep.Within this period,
the symbol 'SNOOZE, shows on the LCD display (20).After eight
minutes, radio or alarm will come on again.It will repeat if you
press the SNOOZE button (8) again within two minutes.
TO STOP THE RADIO OR ALARM:
To stop it, press any control button once except for SNOOZE button,
or just wait for two minutes (the alarm will stop automatically).
10
9 SELECTING 5 DAY ALARM/7 DAY ALARM
Press 1-5 /1-7 button (11) to select 1-5 or 1-7 alarm.
10 12/24 HOUR FORMAT
Hold down the SNOOZE button (8) for five seconds to change from
a 12 hour format to a 24 hour format.
11 SETTING TIME ZONE FOR USA
Hold SET button (13) for two seconds to enter set mode. Press SET
button (13) four times to enter zone setting mode.When the LCD
display (13) shows the map flashing, press UP (10) or DOWN button
(12) to select your US time zone.
1.Daylight Savings Set-Up:Press MODE button (9) once, then press
(10) or (12) button to set summer time on/off.
2.Hour Offset Set-Up:Press MODE button (9) again, then press
(10) or (12) button to set a -1 2 to +1 2 hour offset when
traveling to a differen t time zone.To return to normal clock
display mode, press MODE button (9) or SET (13) once.
11
Page 7

ESP 2000 OPERATION MANUAL
12 SETTING SLEEP TIMER
Set the function switch to RADIO or SOUND and switch the 'ON/OFF
switch to 'OFF' position,then hold the (1-5/1-7)/SLEEP button (3) for
three seconds, the SLEEP symbol will show on the LCD display (20)
and the sleep timer digits start from 60 minutes. It will turn on at
the same time.Then use the buttons (10) or (12) to set the desired
sleep time.The range is from one to 99 minutes. Press MODE button
(9) once to finish timer setting. The digits start to count down. When
the sleep timer counts down to 00, it will turn off the radio or sound
automatically. Or press the SNOOZE button (8) once to stop the
sleep timer.Slide the function switch to RADIO and slide the AM/FM
selector to desired band, press the ON/OFF button to switch it on
and off.The ON/OFF button will light up when the radio is on.
13 RADIO OPERATION
Slide the function switch to RADIO and slide the AM/FM selector to
desired band, press the ON/OFF button to switch it on and off.The
ON/OFF button will light up when the radio is on.
14 SOOTHING SOUND OPERATION
Slide the function switch to SOUND and press the ON/OFF button to
switch it on and off. Select the sound by pressing the corresponding
key.The ON/OFF button and the corresponding key will light up.
12
15 IMPORTANT NOTE
This clock is designed as a consumer use item, NOT as scientific
equipment. The success of time reception is not guaranteed; it is
subject to environmental conditions and the distance from the signal
source.This clock is designed for indoor use only. Please avoid high
humidity, high temperature, vibration, and shock.
16 SPECIFICATIONS
POWER:
Main Supply :AC 12OV/DC 6V Adapter 5OOmA (included)
Battery Backup of Clock and Alarm DC 4.5V (3 x "AA")(included)
RADIO:
AM 530 - 1710 kHz
FM :88 - 108 MHz (Mono)
RADIO CONTROLLED CLOCK:
WWVB: 60 kHz
17 FCC STATEMENT
It is possible, yet highly unlikely, that even your properly operating
radio may cause interference to other radios or televisions. If the
interference goes away after you turn off your radio, it is the cause.
Here are some tips to help elimina te the interference:
13
Page 8

ESP 2000 OPERATION MANUAL
FCC STATEMENT continued
• Rotate or relocate the radio.
• Increase the distance from the equipment being interfered with.
• Contact the manufacturer of your equipment for assistance.
If you cannot eliminate the interference to devises in other households, the FCC requires that you stop using your radio until the
interference can be el iminated.
18 SERVICE INFORMATION
You may contact the Etón Service Department for additional
information:
customersvc@etoncorp.com
Contact us for a Return Authorization prior to shipping your unit.
Should you want to return your unit for service, pack the receiver
carefully using the original carton or other suitable container.Write
your return address clearly on the shipping carton and on an
enclosed cover letter describing the service required, symptoms or
problems.Also, include your daytime telephone number and a copy
of your proof of purchase.The receiver will be serviced under the
terms of the Etón Limited Warranty and returned to you.
14
19 ONE YEAR LIMITED WARRANTY
Etón warrants to the original purchaser this product shall be free
from defects in material or workmanship for one year from the date
of original purchase. During the warranty period Etón or an authorized Etón service facility will provide, free of charge,both parts and
labor necessary to correct defects in material and workmanship.At
their option, Etón may replace a defective unit.
1. Complete and send in the Warranty Registration Card
within ten (10) days of purchase.
2. Call Etón or the nearest authorized service facility,as
soon as possible after discovery of a possible defect.
Have ready:
(a) the model and serial number.
(b) the identity of the seller and the approximate date
of purchase.
(c) a detailed description of the problem, including
details on the electrical connection to associated
equipment and the list of such equipment.
3. Etón will issue a Return Authorization number and the
address to which the unit can be shipped. Ship the unit in its
original container or equivalent, fully insured and shipping
charges prepaid.
15
Page 9

ESP 2000 OPERATION MANUAL
ONE YEAR LIMITED WARRANTY continued
Correct maintenance, repair, and use are important to obtain proper
performance from this product. Therefore carefully read the
Instruction Manual. This warranty does not apply to any defect that
Etón determines is due to:
1. Improper maintenance or repair, including the
installation of parts or accessories that do not conform to the
quality and specification of the original parts.
2. Misuse, abuse, neglect or improper installation.
3. Accidental or intentional damage.
4. Battery leakage.
All implied warranties, if any, including warranties of merchantability
and fitness for a particular purpose, terminate one (1) year from the
date of the original purchase.The foregoing constitutes Etón entire
obligation with respect to this product, and the original purchaser
shall have no other remedy and no claim for incidental or consequential damages, losses,or expenses. Some states do not allow
limitations on how long an implied warranty lasts or do not allow
the exclusions or limitation of incidental or consequential damages,
so the above limitation and exclusion may not apply to you. This
warranty give you specific legal rights and you may also have other
rights which vary from state to state.
16
ONE YEAR LIMITED WARRANTY continued
FOR SERVICE INFORMATION CONTACT:
Etón Corporation
1015 Corporation Way
Palo Alto, CA 94303
U.S.A.
www.etoncorp.com
17
Page 10

VOUS AVEZ BESOIN D’AIDE?
Voici comment nous contacter:
• From the United States: (800) 872-2228
• From Canada: (800) 637-1648
• From Everywhere Else: (650) 903-3866
• Email: customersvc@etoncorp.com
• Internet: www.etoncorp.com
ESP 2000 MANUEL D'OPÉRATION
TABLE DES MATIÈRES
FONCTIONS .................................................................
1
EMPLACEMENT DES COMMANDES ............................
2
REMPLACEMENT DES PILES.........................................
3
RÉGLAGE D’HEURE NORMALE.....................................
4
RÉGLAGE ANNÉE/MOIS/DATE.......................................
5
RÉGLAGE D’HEURE ......................................................
6
RÉGLAGE D’HEURE DE L’ALARME................................
7
RÉGLAGE ON/OFF
8
9
SÉLECTION ALARME 5 JOURS / ALARME 7 JOURS
10
FORMAT 12/24 HEURES ..............................................
11
RÉGLAGE FUSEAU POUR LES ÉTATS-UNIS ...................
12
RÉGLAGE DE LA MINUTERIE DE VEILLE........................
13
FONCTIONNEMENT DE LA RADIO................................
14
FONCTIONNEMENT DU SON APAISANT.......................
15
REMARQUE IMPORTANTE............................................
16
FICHE TECHNIQUE........................................................
17
DÉCLARATION DE LA FCC............................................
18
RENSEIGNEMENTS SUR LES SERVICES.........................
19
LA GARANTIE LIMITÉE DE UN AN................................
(MARCHE/ ARRÊT) DE L’ALARME..........
.......
page
20
20
22
22
23
24
24
26
28
28
28
29
30
30
30
31
31
32
32
18
19
Page 11
ESP 2000 MANUEL D'OPÉRATION
1 FONCTIONS EMPLACEMENT DES COMMANDES continué
Touche SLEEP [Minuterie de veille] 1-5/1-7
- Affichage 12h avec indicateur PM
- Choix de sélection 12 heures ou 24 heures
- Deux Alarmes, Rappel d’Alarme, Minuterie de veille,
Affichage rétroéclairé à LED vert
- Affichage Mois et Date
- Thermomètre (32˚F - 122˚F)
- Récepteur Radio AM/FM
2 EMPLACEMENT DES COMMANDES
Touche OCÉAN
1
Touche PLUIE
2
Touche RUISSEAU
3
Touche BATTEMENT DE CŒUR
4
Touche FORÊT
5
Sélecteur de fonction à glissière Radio/Son/Bip
6
Cadran des Gammes
7
Touche SNOOZE [Rappel d’alarme]
8
Touche MODE
9
Touche ALARM (Add Symbol 1)/ monte
10
11
Touche ALARM (Add Symbol 2)/ descend
12
Touche SET [Réglage]
13
Touche ON/OFF [Marche/Arrêt]
14
Bouton Volume
15
Bouton Tuning [Réglage de la syntonisation]
16
Sélecteur de fonction à glissière FM/AM
17
Prise CC
18
Compartiment à piles
19
Affichage à cristaux liquides
20
20
21
Page 12

ESP 2000 MANUEL D'OPÉRATION
3 REMPLACEMENT DES PILES
Lorsque le symbole « low battery » est indiqué sur l’affichage à
cristaux liquides (20), ouvrez le couvercle du Compartiment à piles
(19) situé en dessous de l’appareil, remplacez les piles usées avec
trois piles alcalines neuves du type « AA »
REMARQUE: Si l’adaptateur CA/CC est branché sur la prise CC
(DC), les piles sont utilisées seulement pour maintenir la fonction de
l’horloge. Les piles peuvent faire marcher l’appareil avec toutes ses
fonctions pendant une durée de quelques heures seulement.
L’appareil doit fonctionner avec son adaptateur fourni.
4 RÉGLAGE D’HEURE NORMALE
Lorsque l’appareil est en marche, l’horloge commence à entrer dans
le mode d’horloge contrôlé par radio. L’affichage à cristaux liquides
(20) commence premièrement à indiquer:
- L: 0-5 puissance du signal de réception, 5 indique que le niveau de
signal est bon, 0-4 indique que le signal est faible.
- 00-59: un compte des secondes
- OFF: Mode Alarme à l’arrêt
- Le symbole d’antenne de réception commence à clignoter. Ceci
indique que l’appareil est entré dans le mode de réception du
signal d’heure.
22
RÉGLAGE D’HEURE NORMALE continué
- Si l’appareil se trouve dans la zone du signal : après avoir reçu
tous les signaux avec succès, l’horloge indique l’heure exacte et
commence à marcher.Le symbole d’antenne de réception s’arrête
de clignoter.Le signal d’heure est transmis quatre fois par jour
pour régler l’horloge automatiquement.
- Si cet appareil se trouve en dehors de la zone du signal : Appuyez
une fois sur la touche MODE (9), l’horloge va dans le mode
d’horloge normale. Pour régler l’heure exacte, appuyez pendant
deux secondes sur la touche SET (13) pour entrer dans le
mode de réglage.
5 RÉGLAGE ANNÉE/MOIS/DATE
- L’affichage à cristaux liquides (20) affichant les chiffres pour
l’année clignote, appuyez sur la touche UP (10) ou DOWN (12)
pour choisir l’année.
- Appuyez une fois sur la touche MODE (9) pour faire clignoter
les chiffres du mois, puis appuyez sur la touche UP (10) ou
DOWN (12) pour choisir le mois.
- Appuyez à nouveau sur la touche MODE (9) pour faire
clignoter les chiffres de la date, puis appuyez sur la touche UP
(10) ou DOWN (12) pour choisir la date.
- Appuyez encore une fois sur la touche MODE (9) pour finir le
réglage ou appuyez une fois sur la touche SET (13) pour
continuer le réglage d’heure.
23
Page 13

ESP 2000 MANUEL D'OPÉRATION
6 RÉGLAGE D’HEURE RÉGLAGE D’HEURE DE L’ALARME continué
- Après être entré dans le mode de réglage, appuyez une fois sur
la touche SET (13) pour faire clignoter les chiffres d’heure, puis
appuyez sur la touche UP (10) ou DOWN (12) pour régler l’heure.
- Appuyez une fois sur la touche MODE (9) pour faire clignoter
les chiffres des minutes, puis appuyez sur la touche UP (10) ou
DOWN (12) pour régler la minute.
- Appuyez encore une fois sur la touche MODE (9) pour finir le
réglage d’heure ou appuyez sur la touche SET (1 3) pour
continuer le réglage d’heure de l’alarme.
7 RÉGLAGE D’HEURE DE L’ALARME
(REMARQUE: Veuillez vous assurer que l’interrupteur 'e' ONIOFF
est sur la position 'OFF' pour régler l’heure de l’alarme ou pour
utiliser les fonctions de l’alarme)
POUR RÉGLER L’HEURE DE L’ALARME:
Appuyez pendant deux secondes sur la touche SET (13) pour entrer
dans le mode de réglage, appuyez deux fois sur la touche SET (13)
pour afficher le symbole et pour faire clignoter les chiffres d’heures
de l’alarme, puis appuyez sur la touche UP [Haut] (10) ou DOWN
[Bas] (12) pour régler l’heure de l’alarme 1.
- Appuyez une fois sur la touche MODE (9) pour faire clignoter les
chiffres des minutes de l’alarme, puis appuyez sur la touche UP
(10) ou DOWN (12) pour régler les minutes de l’alarme 1.
- Appuyez encore une fois sur la touche MODE (9) pour finir le
réglage de l’alarme 1 (tous les chiffres s’arrêtent de clignoter) ou
appuyez sur la touche SET (13) pour continuer le réglage de
l’alarme 2.
POUR RÉGLER L’HEURE DE L’ALARME 2 :
- Appuyez pendant deux secondes sur la touche SET (13) pour
entrer dans le mode de réglage, appuyez trois fois sur la touche
SET (13) pour afficher le symbole et faire clignoter les chiffres
d’heures de l’alarme, puis appuyez sur la touche UP (10) ou
DOWN (12) pour régler l’heure de l’alarme 2.
- Appuyez une fois sur la touche MODE (9) pour faire clignoter les
chiffres des minutes de l’alarme, puis appuyez sur la touche UP
(10) ou DOWN (12) pour régler les minutes de l’alarme 2.
- Appuyez encore une fois sur la touche MODE (9) pour finir le
réglage de l’alarme 2 (tous les chiffres s’arrêtent de clignoter) ou
appuyez sur la touche SET (13) pour continuer le réglage
de la zone.
24
25
Page 14

ESP 2000 MANUEL D'OPÉRATION
8 RÉGLAGE ON/OFF (MARCHE/ ARRÊT)
DE L’ALARME
POUR METTRE L’ALARME 1 EN MARCHE :
Appuyez sur la touche ALARM (add symbol 1) (10) jusqu’à ce que
l’affichage indique l’heure de l’alarme et le symbole (add symbol).
Appuyez sur la touche MODE (9) jusqu’à ce qu’il retourne à l’affichage normal du mois et de la date.
POUR METTRE L’ALARME 1 À L’ARRÊT :
Appuyez sur la touche ALARM (add symbol 1) (1 0) jusqu’à ce que
l’affichage indique OFF et le symbole (add symbol). Appuyez sur la
touche MODE (9) jusqu’à ce qu’il retourne à l’affichage normal du
mois et de la date.
POUR METTRE L’ALARME 2 EN MARCHE :
Appuyez sur la touche ALARM (add symbol 2) (12) jusqu’à ce que
l’affichage indique l’heure de l’alarme et le symbole (add symbol).
Appuyez sur la touche MODE (9) jusqu’à ce qu’il retourne à l’affichage normal du mois et de la date.
POUR METTRE L’ALARME 2 À L’ARRÊT :
Appuyez sur la touche ALARM (add symbol 2) (12) jusqu’à ce que
l’affichage indique OFF et le symbole (add symbol). Appuyez sur la
touche MODE (9) jusqu’à ce qu’il retourne à l’affichage normal du
mois et de la date.
26
RÉGLAGE ON/OFF (MARCHE/ ARRÊT)
DE L’ALARME continué
RÉVEIL PAR RADIO:
Si le sélecteur de fonction à glissière (6) est réglé sur la position
RADIO, la radio se mettra automatiquement en marche lorsque
l’heure préréglée de l’alarme correspondra à l’heure actuelle.
Réveil par Son apaisant :
Si le sélecteur de fonction à glissière (6) est réglé sur la position
SOUND, le son apaisant se mettra en marche automatiquement
lorsque l’heure préréglée de l’alarme correspondra à l’heure
actuelle.
RÉVEIL PAR SONNERIE :
Si le sélecteur de fonction à glissière (6) est réglé sur la position
BEEP, la sonnerie se mettra en marche automatiquement pendant
deux minutes lorsque l’heure préréglée de l’alarme correspondra
à l’heure actuelle.
FONCTION RAPPEL D’ALARME :
Appuyez une fois sur la touche SNOOZE (8) dans un délai de
deux minutes (ou deux minutes plus tard, l’alarme s’arrêtera
automatiquement) pour arrêter temporairement la radio ou la
sonnerie et pour vous donner huit minutes supplémentaires de
sommeil. Dans cette période, le symbole 'SNOOZE,est indiqué
sur l’affichage à cristaux liquides (20). Après huit minutes, la
radio ou la sonnerie se mettra à nouveau en marche. Cela sera
répété si vous appuyez à nouveau sur la touche SNOOZE (8)
dans un délai de deux minutes.
27
Page 15

ESP 2000 MANUEL D'OPÉRATION
RÉGLAGE ON/OFF (MARCHE/ ARRÊT)
DE L’ALARME continué
POUR ARRÊTER LA RADIO OU LA SONNERIE :
Pour l’arrêter, appuyez une fois sur n’importe quelle touche sauf
la touche SNOOZE ou attendez tout simplement deux minutes
(l’alarme s’arrêtera automatiquement)
9 SÉLECTION ALARME 5 JOURS /
ALARME 7 JOURS
Appuyez sur la touche 1-5 / 1-7 (011) pour choisir l’alarme
1-5 ou 1-7.
10 FORMAT 12/24 HEURES
Appuyez sur la touche SNOOZE (8) pendant cinq secondes pour
changer du format 12 heures au format 24 heures.
11 RÉGLAGE FUSEAU POUR
LES ÉTATS-UNIS
Appuyez sur la touche SET (13) pendant deux secondes pour
entrer dans le mode de réglage.Appuyez quatre fois sur la
touche SET (13) pour entrer dans le mode de réglage fuseau
horaire. Lorsque l’affichage à cristaux liquides (13) indique la
carte clignotante, appuyez sur la touche UP (10) ou DOWN (12)
pour choisir votre fuseau horaire américain.
28
RÉGLAGE FUSEAU POUR
LES ÉTATS-UNIS continué
1.Réglage pour l’Heure avancée : appuyez une fois sur la touche
MODE (9), puis appuyez sur la touche _ (10) ou _ (12) pour
mettre la fonction d’heure avancée en marche ou à l’arrêt.
2.Réglage de Décalage horaire : Appuyez encore une fois sur la
touche MODE (9), puis appuyez sur la touche _ (10) ou _
(12) pour régler un décalage entre -1 2 à + 1 2 heures
lorsque vous vous déplacez vers un endroit sur un autre
fuseau horaire. Pour retourner au mode normal d’affichage
d’heure appuyez une fois sur la touche MODE (9) ou SET (13).
12 RÉGLAGE DE LA MINUTERIE
DE VEILLE
Mettez le sélecteur de fonction sur la position RADIO ou SOUND
et mettez l’interrupteur e' ON/OFF sur la position 'OFF', puis
appuyez pendant trois secondes sur la touche (1-5/1-7)/ SLEEP
(3), le symbole SLEEP sera indiqué sur l’affichage à cristaux liquides (20) et les chiffres pour la fonction de minuterie de veille
commenceront à partir de 60 minutes. Elle se mettra en marche
en même temps. Puis utilisez les touches _ (10) ou _ (12) pour
régler la durée de veille.Vous avez le choix entre une et 99 minutes.Appuyez une fois sur la touche MODE (9) pour finir le
réglage de la minuterie. Les chiffres commenceront le compte à
rebours. Lorsque la minuterie de la fonction de veille compte à
rebours et atteint les chiffres 00, elle mettra la radio ou le son à
l’arrêt automatiquement. Ou appuyez une fois sur la touche
SNOOZE (8) pour arrêter la minuterie de veille.
29
Page 16

ESP 2000 MANUEL D'OPÉRATION
13 FONCTIONNEMENT DE LA RADIO
Coulissez le sélecteur de fonction sur la position RADIO et coulissez le sélecteur AM/FM sur la bande désirée,appuyez sur la
touche ON/OFF pour la mettre en marche ou à l’arrêt. La touche
ON/OFF s’allumera lorsque la radio est en marche.
14 FONCTIONNEMENT DU SON APAISANT
Coulissez le sélecteur de fonction sur la position SOUND et
appuyez sur la touche ON/ OFF pour le mettre en marche ou à
l’arrêt. Choisissez le son en appuyant sur la touche correspondante. La touche ON/OFF et la touche du son correspondante à
votre sélection s’allumeront.
15 REMARQUE IMPORTANTE
Cette horloge est un appareil qui est conçu pour une utilisation
par le consommateur,NON PAS pour une utilisation scientifique.
La réussite de la réception d’heure n’est pas garantie; elle
dépend des conditions climatiques et de la distance à partir de
la source du signal. Ce radio réveil est conçu pour une utilisation
à l’intérieur seulement. Veuillez éviter d’exposer cet appareil à la
forte humidité, aux températures élevées,aux vibrations et
au choc.
30
16 FICHE TECHNIQUE
ALIMENTATION:
Alimentation principale : Adaptateur CA 12OV/CC 6V 5OOmA (fourni)
Alimentation de secours à piles pour l’horloge et l’alarme CC 4,5V
(3 x "AA") (fournie)
RADIO:
AM 530 - 1710 kHz
FM :88 - 108 MHz (Mono)
HORLOGE CONTRÔLÉE PAR RADIO :
WWVB : 60 kHz
17 DÉCLARATION DE LA FCC
Il est possible, mais extrêmement improbable,que même si votre
radio réveil fonctionne bien, il peut causer des parasites à d’autres
radios ou télévisions. Si les parasites disparaissent après avoir mis
votre radio réveil à l’arrêt, il en est donc la cause.Voici quelques
conseils pour vous aider à éliminer les parasites :
• Tournez le radio réveil ou placez-le dans un autre endroit.
• Augmentez la distance entre votre radio réveil et l’appareil qui est
brouillé par les parasites.
• Pour l’assistance, contactez le fabricant de votre appareil.
Si vous ne pouvez pas éliminer les parasites qui brouillent les
appareils dans d’autres ménages, la FCC exige que vous arrêtiez
l’utilisation de votre radio jusqu’à ce que les parasites puissent
être éliminées.
31
Page 17

ESP 2000 MANUEL D'OPÉRATION
18 RENSEIGNEMENTS SUR LES SERVICES
Pour obtenir de plus amples renseignements vous pouvez contacter
le Service des réparations de Etón:
customersvc@etoncorp.com
Veuillez nous contacter pour obtenir un Numéro d’autorisation de
retour avant d’expédier votre appareil. Si vous voulez renvoyer votre
appareil pour le faire réparer,emballez soigneusement le récepteur
en utilisant sa boîte d’origine ou une autre boîte appropriée.
Inscrivez lisiblement votre adresse de retour sur la boîte d’expédition
et sur la lettre jointe qui décrit la réparation nécessaire, les symptômes ou les problèmes.Veuillez inclure aussi le numéro de téléphone où l’on peut vous joindre pendant la journée, ainsi qu’une
copie de votre preuve d’achat. Le récepteur sera réparé selon les
modalités de la Garantie limitée de Etón et vous sera retourné.
19 LA GARANTIE LIMITÉE DE UN AN
Etón garantit à l’acheteur initial que ce produit sera exempt de tout
défaut de matériau ou de main-d’oeuvre pendant une année à partir
de la date de l’achat initial.
32
LA GARANTIE LIMITÉE DE UN AN continué
Pendant la durée de la garantie,Etón ou un centre accrédité de
réparation Etón fournira, gratuitement,les pièces et la main-d’oeuvre nécessaires pour corriger les vices de matériau et de main-d’oeuvre. En outre,Etón peut choisir de remplacer un appareil défectueux.
1. Remplissez et envoyez la Fiche d’enregistrement de la
garantie dans les dix (10) jours qui suivent la date de l’achat.
2. Appelez Etón ou le centre accrédité de réparation le
plus proche, aussitôt que possible après la découverte d’une possibilité de vice.
Soyez prêt à donner :
(a) le numéro de modèle et le numéro de série.
(b) le nom du revendeur et la date approximative de
l’achat.
(c) une description détaillée du problème, y compris les
détails sur les branchements électriques à l’équipement associé
et la liste de cet équipement.
3. Etón vous donnera un numéro d’Autorisation de retour
et l’adresse à laquelle vous pouvez envoyer l’appareil.
Envoyez l’appareil dans sa boîte d’origine ou une boîte
équivalente, entièrement assuré et les frais de port payés à l’avance.Un entretien, des réparations et une utilisation corrects
33
Page 18

ESP 2000 MANUEL D'OPÉRATION
LA GARANTIE LIMITÉE DE UN AN continué LA GARANTIE LIMITÉE DE UN AN continué
sont importants pour obtenir un bon fonctionnement de ce produit. Veuillez donc lire soigneusement ce Mode d’emploi. Cette
garantie ne s’applique pas aux défauts qui, selon l’évaluation de
Etón, ont été provoqués par :
1. un entretien ou des réparations incorrects, y compris
l’installation de pièces ou d’accessoires qui ne sont pas con
formes à la qualité et aux spécifications des pièces d’origine.
2. une utilisation incorrecte, abusive ou négligente, ou
une installation incorrecte.
3. des dégâts accidentels ou intentionnels.
4. une fuite des piles.
Toutes les garanties implicites,le cas échéant, y compris les
garanties de valeur marchande et d’aptitude à une utilisation particulière, cessent une (1) année après la date de l’achat initial.
Ce qui précède constitue l’ensemble des obligations de Etón envers
ce produit, et l’acheteur initial n’aura aucun autre recours ni réclamation pour des dommages indirects ou consécutifs, des pertes ou
des dépenses. Certains états n’autorisent aucune limitation sur la
durée d’une garantie implicite ou ne permettent pas les exclusions
ou les limitations sur les dommages indirects ou consécutifs, et donc
les limitations et exclusions ci-dessus peuvent ne pas s’appliquer
à vous.
Cette garantie vous donne des droits juridiques précis, et vous pouvez également avoir d’autres droits qui varient d’état en état.
POUR OBTENIR DE PLUS AMPLES RENSEIGNEMENTS
SUR LES SERVICES, CONTACTEZ :
Etón Corporation
www.etoncorp.com
34
35
Page 19

SIE BENÖTIGEN HILFE?
Hier ist, wie uns zu berühren:
• From the United States: (800) 872-2228
• From Canada: (800) 637-1648
• From Everywhere Else: (650) 903-3866
• Email: customersvc@etoncorp.com
• Internet: www.etoncorp.com
ESP 2000 BENUTZERHANDBUCH
INHALTSVERZEICHNIS
FUNKTIONEN ...............................................................
1
BEDIENELEMENTE ........................................................
2
BATTERIEN AUSWECHSELN ..........................................
3
EINSTELLEN DER NORMALZEIT......................................
4
EINSTELLEN VON JAHR MONAT / DATUM ....................
5
EINSTELLEN DER ZEIT....................................................
6
WECKZEIT EINSTELLEN .................................................
7
WECKZEIT AKTIVIEREN/DEAKTIVIEREN (ON/OFF).........
8
EINSTELLEN VON 5-TAGE-WECKEN/ 7-TAGE-WECKEN......
9
12- BZW. 24- STUNDENFORMAT...................................
10
EINSTELLEN DER ZEITZONE FÜR DIE USA.....................
11
STELLEN DER EINSCHLAFZEIT-AUTOMATIK (SLEEP)......
12
RADIOBETRIEB .............................................................
13
BERUHIGENDE KLÄNGE ...............................................
14
WICHTIGER HINWEIS....................................................
15
TECHNISCHE DATEN......................................................
16
FCC-ANGABE ................................................................
17
INFORMATIONEN ZUR WARTUNG.................................
18
EINJÄHRIGE EINGESCHRÄNKTE GARANTIE ...................
19
page
38
38
40
40
41
42
42
44
46
46
46
47
48
48
48
49
49
50
51
36
37
Page 20

ESP 2000 BENUTZERHANDBUCH
1 FUNKTIONEN
- Normalzeit mit PM-Anzeige
- 12/24-Stundenformat wählbar
- Zwei Weckzeiten, Schlummerfunktion, Einschlafzeit-Automatik
(Sleep), Anzeige mit grüner LED- Hintergrundbeleuchtung
- Anzeige des Monats und Tags
- Thermometer (32˚F - 122˚F)
- UKW/MW Stereo-Empfänger
2 BEDIENELEMENTE
OZEAN-Taste
1
REGEN-Taste
2
STROM-Taste
3
HERZSCHLAG-Taste
4
WALD-Taste
5
Schiebeschalter für die Funktionen Radio/Klang/Weckton
6
Frequenzskala
7
SNOOZE-Taste (Schlummerfunktion)
8
MODUS-Taste
9
Weckzeit 1 (ALARM 1) / Taste auf
10
38
BEDIENELEMENTE
1-5 / 1-7 / SLE EP-Tast e (Einschlafzeit-Automatik)
11
Weckzeit 2 (ALARM 2) / Taste hinunter
12
SET-Taste
13
ON/OFF-Taste (EIN/AUS)
14
Lautstärkenregler
15
Knopf zur Sendereinstellung
16
Schiebeschalter für UKW/MW
17
GS-Buchse
18
Batteriefach
19
LCD-Anzeige
20
fortgesetzt
39
Page 21

ESP 2000 BENUTZERHANDBUCH
3 BATTERIEN AUSWECHSELN
Wenn das Symbol für geringe Batteriespannung auf der LCD-Anzeige
erscheint (20), die Batteriefachabdeckung (19) auf der Unterseite öffnen und die leeren Batterien durch drei neue „AA“-Batterien ersetzen.
ANMERKUNG: Wenn das WS/GS-Netzteil an die GS-Buchse
angeschlossen ist, dienen die Batterien nur der Aufrechterhaltung der
Uhrenfunktion. Die Batterien können die vollen Funktionen des Geräts
nur einige Stunden lang betreiben. Das Gerät sollte mit dem mitgelieferten Netzteil betrieben werden.
4 EINSTELLEN DER NORMALZEIT
Bei eingeschaltetem Gerät beginnt die Uhr den funkgesteuerten
Uhrenmodus zu aktivieren. Auf der LCD-Anzeige (20) erscheint
zunächst:
- L: 0-5 Stärke des Empfangssignals. 5 bedeutet,dass das Signal
ausreichend ist, 4-0 weist auf ein schwaches Signal hin.
- 00-59: Zählen der Sekunden
- OFF (AUS): Die Weckfunktion ist ausgeschaltet
- Das Funkturm-Symbol beginnt zu blinken. Es zeigt an, dass das
Gerät im Signalempfangsmodus ist.
- Wenn sich das Gerät im Signalbereich befindet: Nachdem alle
Signale erfolgreich empfangen wurden, zeigt die Uhr die richtige
Zeit an und beginnt zu laufen. Das Funkturm-Symbol hört auf zu
blinken. Das Zeitsignal wird vier mal täglich ausgesendet und stellt
die Uhr automatisch.
40
EINSTELLEN DER NORMALZEIT
- Wenn sich das Gerät nicht im Signalbereich befindet: Einmal auf
die Taste MODE (9) drücken. Die Uhr wechselt zum normalen
Modus. Zum Einstellen der korrekten Zeit die Taste SET (13) zwei
Sekunden lang gedrückt halten und so den Einstellmodus aktivieren.
fortgesetzt
5 EINSTELLEN VON JAHR
MONAT / DATUM
- Wenn auf der LCD-Anzeige (20) die das Jahr anzeigenden Ziffern
blinken, auf die Tasten UP (10) oder DOWN (12) drücken, bis das
Jahr eingestellt ist.
- Einmal auf die Taste MODE (9) drücken, so dass die den Monat
anzeigenden Ziffern blinken, dann auf die Tasten UP (10) oder
DOWN (12) drücken, bis der Monat eingestellt ist.
- Noch einmal auf die Taste MODE (9) drücken, so dass die das
Datum anzeigenden Ziffern blinken, dann auf die Tasten UP (10)
oder DOWN (12) drücken, bis das Datum eingestellt ist.
- Noch einmal auf die Taste MODE (9) drücken, um die Einstellung
zu beenden oder einmal auf die Taste SET (13) drücken, um mit
der Einstellung fortzufahren.
41
Page 22

ESP 2000 BENUTZERHANDBUCH
6 EINSTELLEN DER ZEIT
- Im Einstellmodus einmal auf die Taste SET (13) drücken, so dass
die die Stunden anzeigenden Ziffern blinken. Dann auf die Tasten
UP (10) oder DOWN (12) drücken, bis die Stunde eingestellt ist.
- Einmal auf die Taste MODE (9) drücken, so dass die die Minuten
anzeigenden Ziffern blinken, dann auf die Tasten UP (10) oder
DOWN (12) drücken, bis die Minuten eingestellt sind.
- Noch einmal auf die Taste MODE (9) drücken, um die
Zeiteinstellung zu beenden oder einmal auf die Taste SET (13)
drücken, um mit der Einstellung der Weckzeit fortzufahren.
7 WECKZEIT EINSTELLEN
(ANMERKUNG: Bitte sicherstellen, dass sich der Schalter ON/OFF
(EIN/AUS) in der Stellung ‚OFF’ (AUS) befindet, wenn die Weckzeit
eingestellt oder die Weckfunktion bedient wird)
EINSTELLEN DER WECKZEIT:
Die Taste SET (13) zwei Sekunden lang gedrückt halten um den
Einstellmodus zu aktivieren. Dann zweimal auf die Taste SET (13)
drücken, bis das Symbol angezeigt wird und die die Stunden
anzeigenden Ziffern für die Weckzeit blinken.Dann auf die Tasten
UP (10) und DOWN (12) drücken, bis die Stunde der Alarmzeit 1
eingestellt ist.
42
WECKZEIT EINSTELLEN
- Einmal auf die Taste MODE (9) drücken, so dass die die Minuten
anzeigenden Ziffern für die Weckzeit blinken,dann auf die Tasten UP
(10) oder DOWN (12) drücken, bis die Minuten der Weckzeit 1
eingestellt sind.
- Noch einmal auf die Taste MODE (9) drücken, um die Einstellung der
Weckzeit 1 zu beenden (alle Ziffern hören auf zu blinken) oder auf
die Taste SET (13) drücken, um mit der Einstellung der Weckzeit 2
fortzufahren.
EINSTELLEN DER WECKZEIT 2:
- Die Taste SET (13) zwei Sekunden lang gedrückt halten um den
Einstellmodus zu aktivieren. Dann drei Mal auf die Taste SET (13)
drücken, bis das Symbol angezeigt wird und die die Stunden
anzeigenden Ziffern für die Weckzeit blinken.Dann auf die Tasten UP
(10) oder DOWN (12) drücken, bis die Stunde der Weckzeit 2
eingestellt ist.
- Einmal auf die Taste MODE (9) drücken, so dass die die Minuten
anzeigenden Ziffern für die Weckzeit blinken,dann auf die Tasten UP
(10) oder DOWN (12) drücken, bis die Minuten der Weckzeit 2
eingestellt sind.
- Noch einmal auf die Taste MODE (9) drücken, um die Einstellung der
Weckzeit 2 zu beenden (alle Ziffern hören auf zu blinken) oder auf
die Taste SET (13) drücken, um mit der Einstellung der Zeitzone
fortzufahren.
fortgesetzt
43
Page 23

ESP 2000 BENUTZERHANDBUCH
8 WECKZEIT AKTIVIEREN/DEAKTIVIEREN
(ON/OFF)
AKTIVIEREN DER WECKZEIT 1 (ON):
Auf die Taste ALARM 1 (Weckzeit 1) (10) drücken, bis auf der
Anzeige sowohl die Weckzeit als auch das Symbol [symbol1]
erscheint. Auf die Taste MODE (9) drücken, bis wieder die normale
Anzeige des Datums und Monats erscheint.
DEAKTIVIEREN DER WECKZEIT 1 (OFF):
Auf die Taste ALARM 1 (Weckzeit 1) (10) drücken, bis auf der
Anzeige sowohl OFF als auch das Symbol [symbol1] erscheint. Auf
die Taste MODE (9) drücken, bis wieder die normale Anzeige des
Datums und Monats erscheint.
Aktivieren der Weckzeit 2 (ON):
Auf die Taste ALARM 2 (Weckzeit 2) (12) drücken, bis auf der
Anzeige sowohl die Weckzeit als auch das Symbol [symbol2]
erscheint. Auf die Taste MODE (9) drücken, bis wieder die normale
Anzeige des Datums und Monats erscheint.
DEAKTIVIEREN DER WECKZEIT 2 (OFF):
Auf die Taste ALARM 2 (Weckzeit 2) (12) drücken, bis auf der
Anzeige sowohl OFF als auch das Symbol [symbol2] erscheint. Auf
die Taste MODE (9) drücken, bis wieder die normale Anzeige des
Datums und Monats erscheint.
WECKEN DURCH DAS RADIO:
Wenn der Funktionsschalter (6) auf der Position RADIO steht, schaltet sich das Radio automatisch ein, wenn die voreingestellte
Weckzeit erreicht ist.
44
WECKZEIT AKTIVIEREN/DEAKTIVIEREN
(ON/OFF)
WECKEN MIT BERUHIGENDEM KLANG:
Wenn der Funktionsschalter (6) auf der Position SOUND steht, schaltet sich automatisch ein beruhigender Klang ein, wenn die voreingestellte Weckzeit erreicht ist.
WECKEN DURCH DEN WECKTON:
Wenn der Funktionsschalter (6) auf der Position BEEP steht, schaltet
sich automatisch zwei Minuten lang der Weckton ein, wenn die voreingestellte Weckzeit erreicht ist.
SCHLUMMERFUNKTION (SNOOZE):
Innerhalb von zwei Minuten einmal auf die Taste SNOOZE (8) drücken (oder zwei Minuten später,der Wecker stoppt automatisch),um
das Radio oder den Weckton vorrübergehend abzuschalten und acht
zusätzliche Minuten Schlafs zu gewährleisten. Innerhalb dieses
Zeitraums erscheint auf der LCD-Anzeige das Symbol ‘SNOOZE’.
Nach acht Minuten schalten sich das Radio oder der Weckton
wieder ein. Er wiederholt sich, wenn innerhalb von zwei Minuten
wiederum auf die Taste SNOOZE (8) gedrückt wird.
AUSSCHALTEN DES RADIOS ODER DES WECKTONS.
Zum Ausschalten auf eine beliebige Bedientaste (außer SNOOZE)
drücken oder einfach zwei Minuten warten, (der Wecker stoppt
automatisch).
fortgesetzt
45
Page 24

ESP 2000 BENUTZERHANDBUCH
9 EINSTELLEN VON 5-TAGE-WECKEN/
7-TAGE-WECKEN
Auf die Taste 1-5 / 1-7 (11) drücken, um 5- bzw. 7-Tage-Wecken
zu wählen.
10 12- BZW. 24- STUNDENFORMAT
Die Taste SNOOZE (8) fünf Sekunden lang gedrückt halten, um vom
12-Stundenformat zum 24-Stundenformat zu wechseln.
11 EINSTELLEN DER ZEITZONE
FÜR DIE USA
Die Taste SET (13) zwei Sekunden lang gedrückt halten um den
Einstellmodus zu aktivieren. Vier Mal auf die Taste SET (13) drücken,
um den Modus zur Zoneneinstellung zu aktivieren. Wenn auf der
LCD-Anzeige (13) eine blinkende Landkarte erscheint, auf die Tas
zu wählen.
1. Einstellen der Sommerzeit: Ein Mal auf die Taste MODE (9)
drücken, dann auf ï (10) oder ñ (12) drücken,um die Sommerzeit
ein- oder auszustellen.
46
EINSTELLEN DER ZEITZONE
FÜR DIE USA
2.Einstellung von Zeitverschiebungen: Erneut auf die Taste MODE
(9) drücken, dann auf ï (10) oder ñ (12) drücken,um bei Reisen in
andere Zeitzonen eine Verschiebung von -12 bis +12 Stunden
einzustellen. Um zum normalen Modus mit der Zeitangabe
zurückzukehren, einmal auf die Taste MODE (9) oder
SET (13) drücken.
fortgesetzt
12 STELLEN DER EINSCHLAFZEIT-
AUTOMATIK (SLEEP)
Den Funktionsschalter auf RADIO oder SOUND (KLANG) stellen und
den Schalter ON/OFF (EIN/AUS) auf die Position ‘OFF’ (AUS) stellen,
dann die Taste (1-5 / 1-7) / SLEEP (3) drei Sekunden lang gedrückt
halten. Auf der LCD-Anzeige (20) erscheinen das Symbol SLEEP und
die die Einschlafzeit anzeigenden Ziffern, beginnend bei 60 Minuten.
Das Gerät schaltet sich gleichzeitig ein. Dann mit den Tasten ï (10)
oder ñ (12) die gewünschte Einschlafzeit einstellen. Es kann aus
einem Bereich von einer bis 99 Minuten gewählt werden. Auf die
Taste MODE (9) drücken,um die Eingabe der EinschlafzeitAutomatik zu beenden. Die Ziffern werden rückwärts gezählt.Wenn
die Einschlafzeit-Automatik 00 erreicht hat, schalten sich das Radio
oder der Klang automatisch ab. Die Einschlafzeit-Automatik kann
auch durch einmaliges Drücken auf die Taste SNOOZE (8) abgeschaltet werden.
47
Page 25

ESP 2000 BENUTZERHANDBUCH
13 RADIOBETRIEB
Den Funktionsschalter auf RADIO schieben und den UKW/MWSchalter auf das gewünschte Band stellen. Zum Ein- und
Ausschalten auf die Taste ON/OFF drücken. Wenn das Radio
eingeschaltet ist, leuchtet die Taste ON/OFF.
14 BERUHIGENDE KLÄNGE
Den Funktionsschalter auf SOUND (Klang) schieben und zum Einund Ausschalten auf die Taste ON/OFF drücken Durch Drücken auf
die entsprechende Taste den gewünschten Klang wählen. Die Taste
ON/OFF und die gewählte Taste leuchten.
15 WICHTIGER HINWEIS
Die Uhr ist als Gebrauchsartikel gedacht, NICHT als wissenschaftliche Ausrüstung. Der Erfolg des Zeitempfangs kann nicht
garantiert werden, er unterliegt Umweltbedingungen und der
Entfernung von der Signalquelle. Diese Uhr ist nur für den Gebrauch
in Innenräumen bestimmt. Bitte hohe Luftfeuchtigkeit, hohe
Temperaturen,Vibrationen und Erschütterungen vermeiden.
48
16 TECHNISCHE DATEN
STROMZUFUHR:
Hauptzufuhr: WS 12O V/GS 6 V -Netzteil 5OO mA (mitgeliefert)
Batterieunterstützung der Uhr und Wecker GS 4,5 V (3 x „AA“)
(mitgeliefert)
RADIO:
MW 530 -1710 kHz
UKW :88 - 108 MHz (Mono)
FUNKGESTEUERTE UHR:
WWVB: 60 kHz
17 FCC-ANGABE
Es ist möglich, jedoch sehr unwahrscheinlich, dass das Radio selbst
bei ordnungsgemäßem Betrieb Störungen bei anderen Radios oder
Fernsehern verursacht.Wenn die Störungen aufhören, nachdem das
Radio abgeschaltet wurde, ist das Radio die Ursache.Hier einige
Tipps zur Beseitigung der Störungen:
• Das Radio drehen oder an einer anderen Stelle aufstellen.
• Die Entfernung von dem Gerät vergrößern, bei dem es
Störungen verursacht.
• Den Hersteller des Geräts kontaktieren.
Wenn die Störungen bei Geräten anderer Haushalte nicht beseitigt
werden können, fordert die FFC, dass das Radio nicht in Betrieb
genommen wird, bis die Störungen beseitigt sind.
49
Page 26

18 INFORMATIONEN ZUR WARTUNG
Sie können den Etón technischen kundendienst für weitere
informationen oder hilfe durch erreichen uns an berühren:
customersvc@etoncorp.com
Vor dem Einschicken des Geräts eine Rückgabegenehmigung
anfordern. Wenn Sie Ihr Gerät zur Wartung einschicken möchten,
den Empfänger sorgfältig im Originalkarton oder einen anderen
geeigneten Behälter verpacken. Den Absender deutlich auf dem
Verpackungskarton und einem beigelegten Begleitschreiben
angeben. In dem Schreiben sollte die Art der notwendigen Wartung,
die Symptome oder die Probleme erwähnt werden. Auch eine
Telefonnummer angeben, unter der Sie tagsüber zu erreichen sind,
sowie eine Kopie des Kaufnachweises. Der Empfänger wird unter
den Bedingungen der eingeschränkten Garantie von Etón gewartet
und an Sie zurückgeschickt.
ESP 2000 BENUTZERHANDBUCH
19 EINJÄHRIGE EINGESCHRÄNKTE
GARANTIE
Etón garantiert dem ursprünglichen Käufer,dass dieses Produkt frei
von Material- oder Verarbeitungsmängeln ist.Diese Garantie gilt für
ein Jahr ab Kaufdatum. Während der Garantieperiode stellt Etón
oder eine von Etón autorisierte Servicestelle kostenlos Teile und
Arbeitszeit bereit, die zur Behebung von Material- und
Verarbeitungsmängeln notwendig sind. Etón kann ein schadhaftes
Gerät nach eigenem Ermessen ersetzen.
1. Füllen Sie die Garantie-Registrierungskarte innerhalb
von zehn (10) Tagen nach Kauf aus.
2. Rufen Sie Etón oder die nächste Servicestelle sobald
wie möglich an, wenn Sie einen Mangel feststellen.
Halten Sie Folgendes bereit:
(a) Modell und Seriennummer.
(b) Namen des Händlers und das ungefähre Kaufdatum.
(c) Eine genaue Beschreibung des Problems,
einschließlich Details über die elektrischen Verbindungen zu
anderen Geräten und eine Liste dieser Geräte.
50
51
Page 27

ESP 2000 BENUTZERHANDBUCH
EINJÄHRIGE EINGESCHRÄNKTE
GARANTIE fortgesetzt
3. Etón stellt eine Rückgabegenehmigungsnummer aus
und teilt die Adresse mit, an die das Gerät geschickt werden
kann. Das Gerät im Originalkarton oder einem anderen
geeigneten Behälter schicken. Eine volle Versicherung abschließen
und das Porto im Voraus bezahlen.
Eine sachgemäße Wartung,Reparatur und der richtige Gebrauch
sind wichtig, damit das Gerät eine entsprechende Leistung bringen
kann. Lesen Sie daher die Gebrauchsanleitung sorgfältig. Diese
Garantie gilt für keine Schäden, die nach Ermessen von Etón auf
folgende Gründe zurückzuführen sind:
1. Unsachgemäße Wartung oder Reparatur, einschließlich
der Installation von Teilen oder Zubehör, die nicht der
Qualität und den Spezifikationen der Originalteile
entsprechen.
2. Unsachgemäße Behandlung, Missbrauch,
Vernachlässigung oder falsche Installation.
3. Versehentliche oder mutwillige Beschädigung.
4. Auslaufende Batterien.
Alle stillschweigenden Garantien, falls solche bestehen, einschließlich Garantien der Marktfähigkeit und der Eignung für einen
bestimmten Zweck, laufen ein (1) Jahr nach dem ursprünglichen
Kaufdatum aus.
52
EINJÄHRIGE EINGESCHRÄNKTE
GARANTIE fortgesetzt
Das oben Erwähnte stellt die vollständige Verpflichtung von Etón
bezüglich dieses Produkts dar.Der ursprüngliche Käufer ist zu keiner
anderen Behebung berechtigt und hat keinen Anspruch für zufällige
oder Folgeschäden,Verluste oder Ausgaben.In manchen Staaten ist
eine Beschränkung der Länge stillschweigender Garantien oder der
Ausschluss beiläufig entstandener bzw. Folgeschäden nicht zulässig.
Die obige Beschränkung trifft also für Sie eventuell nicht zu.
Diese Garantie erkennt Ihnen bestimmte gesetzliche Rechte zu. Sie
haben eventuell auch andere Rechte, die von Staat zu Staat verschieden sind.
FÜR INFORMATIONEN ÜBER UNSEREN SERVICE:
Etón Corporation
www.etoncorp.com
53
Page 28

¿NECESITA AYUDA?
Esta es la forma de comunicarse
con nosotros:
• From the United States: (800) 872-2228
• From Canada: (800) 637-1648
• From Everywhere Else: (650) 903-3866
• Email: customersvc@etoncorp.com
• Internet: www.etoncorp.com
ESP 2000 MANUAL DE OPERACIÓN
ÍNDICE
FUNCIONES.........................................................................
1
UBICACIÓN DE LOS CONTROLES.........................................
2
FORMA DE CAMBIAR LAS BATERÍAS...................................
3
FORMA DE PONER EL RELOJ EN HORA...............................
4
SELECCIÓN DE AÑO/MES/DÍA..............................................
5
SELECCIÓN DE LA HORA......................................................
6
SELECCIÓN DE LA HORA DE ALARMA................................
7
FORMA DE ACTIVAR O DESACTIVAR LA ALARMA.........
8
SELECCIÓN DE ALARMA DE 5 DÍAS O
9
ALARMA DE 7 DÍAS
FORMATO DE 12 Ó 24 HORAS........................................
10
SELECCIÓN DE LA ZONA DE HORA PARA LOS
11
ESTADOS UNIDOS..................................................................
SELECCIÓN DEL TEMPORIZADOR PARA DORMIR................
12
OPERACIÓN DEL RADIO.......................................................
13
OPERACIÓN DEL SONIDO TRANQUILIZADOR......................
14
NOTA IMPORTANTE......................................................
15
ESPECIFICACIONES...............................................................
16
DECLARACIÓN DE LA FCC...................................................
17
INFORMACIÓN DE SERVICIO ..............................................
18
GARANTÍA LIMITADA DE UN AÑO................................
19
.........................................................
page
56
56
58
58
59
60
60
62
64
64
65
65
66
66
67
67
68
69
70
54
55
Page 29

ESP 2000 MANUAL DE OPERACIÓN
1 FUNCIONES
- Reloj con hora normal e indicador PM
- Selección de 12 ó 24 horas
- Alarma doble, temporizador para dormir con luz indicadora LED
verde e iluminación de fondo de la pantalla.
- Indicación de mes y día
- Termómetro (32˚F a 122˚F)
- Radio de AM y FM
2 UBICACIÓN DE LOS CONTROLES
Botón "OCEAN" (Océano)
1
Botón "RAIN" (Lluvia)
2
Botón "STREAM" (Arroyo)
3
Botón "HEART BEAT" (Latido)
4
Botón "WOODLANDS" (Bosque)
5
Selector de función de alarma (Radio / Sonido / "Beeps")
6
Escala "DIAL" (Cuadrante)
7
Botón "SNOOZE" (Dormitar)
8
Botón "MODE" (Modo)
9
Botón "ALARM1" (Alarma 1) y también botón arriba
10
56
UBICACIÓN DE LOS CONTROLES continuación
Botón "1-5 / 1-7 / SLEEP" (Dormir)
11
Botón "ALARM2" (Alarma 2) y también botón abajo
12
Botón "SET" (Preparar)
13
Botón "ON / OFF" (Encender y apagar)
14
Perilla de volumen
15
Perilla de sintonización
16
Selector de FM y AM
17
Conector de CD
18
Compartimiento de las baterías
19
Pantalla de cristal líquido (LCD)
20
57
Page 30

ESP 2000 MANUAL DE OPERACIÓN
3 FORMA DE CAMBIAR LAS BATERÍAS
Cuando el símbolo de baterías bajas aparece en la pantalla LCD
(20), abra la puerta del compartimiento de baterías (19) en la parte
inferior del radio y cambie las tres baterías descargadas con tres
baterías nuevas alcalinas tamaño "AA".
NOTA: Si el adaptador de CA/CD está conectado en el conector de
CD, las baterías se usan para mantener solamente la función del
reloj. Las baterías pueden operar la unidad con todas sus funciones
durante sólo unas pocas horas. La unidad se debe operar con el
adaptador que se incluye con el radio.
4 FORMA DE PONER EL RELOJ EN HORA
Cuando se enciende el radio, el reloj comienza a entrar en el modo
de un reloj controlado por el radio. La pantalla LCD (20) inicialmente
muestra lo siguiente:
- L: Intensidad de la señal recibida de 0 a 5. 5 indica un buen nivel
de señal, 0-4 indica una señal débil.
- 00-59: Un conteo de segundos.
- OFF: Modo de alarma apagada.
- El símbolo de una torre receptora comienza a parpadear. Eso
indica que la unidad ha entrado en el modo de recepción de la
señal de hora.
58
FORMA DE PONER EL RELOJ
EN HORA continuación
- Si esta unidad está dentro del área de la señal: Después de recibir
bien todas las señales, el reloj muestra la hora correcta y
comienza a trabajar.El símbolo de una torre receptora deja de
parpadear,pero sigue en la pantalla. La señal de hora es
transmitida cuatro veces al día para ajustar el reloj
automáticamente.
- Si esta unidad está fuera del área de la señal: Pulse el botón
"MODE" (9) una vez para cambiar el reloj al modo normal de
reloj. Para poner el reloj en la hora correcta,oprima el botón
"SET" (13) durante dos segundos para entrar en el modo para
poner el reloj en hora.
5 SELECCIÓN DE AÑO/MES/DÍA
- La pantalla LCD (20) mostrará los dígitos del año parpadeando.
Pulse el botón "UP" (10) o el botón "DOWN" (12) para poner el
año correcto en la pantalla.
- Pulse el botón "MODE" (9) una vez para que los dígitos del mes
comiencen a parpadear y entonces pulse el botón "UP" (10) o el
botón "DOWN" (12) para poner el mes correcto en la pantalla.
- Pulse el botón "MODE" (9) una vez más para que los dígitos del
día comiencen a parpadear y entonces pulse el botón "UP" (10)
o el botón "DOWN" (12) para poner el día correcto en la
pantalla.
59
Page 31

SELECCIÓN DE AÑO/MES/DÍA continuación
- Pulse el botón "MODE" (9) una vez más para terminar de poner
el día y la fecha en la pantalla, o pulse el botón "SET" (13) una
vez para continuar poniendo la fecha en la pantalla.
6 SELECCIÓN DE LA HORA
- Después de entrar en el modo de poner la hora, pulse el botón
"SET" (13) una vez para que parpadeen los dígitos de la hora y
entonces pulse el botón "UP" (10) o el botón "DOWN" (12) para
poner la hora correcta en la pantalla.
- Pulse el botón "MODE" (9) una vez para que parpadeen los
dígitos de los minutos y entonces pulse el botón "UP" (10) o el
botón "DOWN" (12) para poner los minutos correctos en
la pantalla.
- Pulse el botón "MODE" (9) una vez más para terminar de poner
la hora en la pantalla, o pulse el botón "SET" (13) una vez para
ingresar la hora deseada para la alarma.
7 SELECCIÓN DE LA HORA DE ALARMA
(COMENTARIO: Asegúrese de que el interruptor 'e' ON-OFF esté
en la posición "OFF" para poner la hora de alarma o usar la función
de alarma).
ESP 2000 MANUAL DE OPERACIÓN
SELECCIÓN DE LA HORA
DE ALARMA continuación
PARA PROGRAMAR LA HORA DESEADA PARA
LA ALARMA
Mantenga el botón "SET" (13) oprimido durante dos segundos para
entrar en el modo de selección de la hora de alarma. Entonces pulse
el botón "SET" (13) dos veces para mostrar el símbolo y hacer
parpadear los dígitos de la hora de alarma. Entonces pulse el botón
"UP" (10) o el botón "DOWN" (12) para poner los dígitos de la
hora de alarma1 en la pantalla.
- Pulse el botón "MODE" (9) una vez para que parpadeen los
dígitos de los minutos y entonces pulse el botón "UP" (10) o el
botón "DOWN" (12) para poner los minutos correctos de la
alarma1 en la pantalla.
- Pulse el botón "MODE" (9) una vez más para terminar de poner
en la pantalla la hora seleccionada para la alarma1 (los dígitos ya
no parpadean), o pulse el botón "SET" (13) una vez para
continuar ingresando la hora deseada para la alarma2.
PARA INGRESAR LA HORA DE LA ALARMA2:
- Mantenga el botón "SET" (13) oprimido durante dos segundos
para ingresar en el modo de ajuste de hora, pulse el botón "SET"
(13) tres veces para mostrar el símbolo y hacer parpadear los
dígitos de hora de alarma en la pantalla y entonces pulse el botón
"UP" (10) o el botón "DOWN" (12) para seleccionar la hora
correcta de la alarma2 en la pantalla.
60
61
Page 32

ESP 2000 MANUAL DE OPERACIÓN
SELECCIÓN DE LA HORA
DE ALARMA continuación
- Pulse el botón "MODE" (9) una vez para que parpadeen los
dígitos de los minutos y entonces pulse el botón "UP" (10) o el
botón "DOWN" (12) para poner los minutos correctos de la
alarma2 en la pantalla.
- Pulse el botón "MODE" (9) una vez más para terminar de
seleccionar la hora de la alarma2 en la pantalla (los dígitos ya no
parpadean), o pulse el botón "SET" (13) una vez para continuar
con la selección de zona.
8 FORMA DE ACTIVAR O DESACTIVAR
LA ALARMA
PARA ACTIVAR LA ALARMA1:
Pulse el Botón "ALARM1" (10) hasta que la pantalla muestre la
hora de la alarma y el símbolo Ø1. Pulse el botón "MODE" (9)
hasta que la pantalla vuelva a indicar el día y mes de la fecha.
PARA DESACTIVAR LA ALARMA1:
Pulse el Botón "ALARM1" (10) hasta que la pantalla muestre la
palabra OFF junto al símbolo Ø1. Pulse el botón "MODE" (9) hasta
que la pantalla vuelva a indicar el día y mes de la fecha.
PARA ACTIVAR LA ALARMA2:
Pulse el Botón "ALARM2" (12) hasta que la pantalla muestre la
hora de la alarma y el símbolo Ø2. Pulse el botón "MODE" (9)
hasta que la pantalla vuelva a indicar el día y mes de la fecha.
62
FORMA DE ACTIVAR O DESACTIVAR
LA ALARMA
PARA DESACTIVAR LA ALARMA2:
Pulse el Botón "ALARM2" (12) hasta que la pantalla muestre la
palabra OFF junto al símbolo Ø2. Pulse el botón "MODE" (9) hasta
que la pantalla vuelva a indicar el día y mes de la fecha.
PARA DESPERTAR CON EL RADIO:
Si el interruptor deslizable de función (6) está en la posición
"RADIO", el radio se encenderá automáticamente cuando llegue la
hora programada para la alarma.
PARA DESPERTAR CON UN SONIDO TRANQUILIZADOR:
Si el interruptor deslizable de función (6) está en la posición
"SOUND", el sonido tranquilizador se oirá automáticamente cuando
llegue la hora programada para la alarma.
PARA DESPERTAR CON LA ALARMA:
Si el interruptor deslizable de función (6) está en la posición
"BEEP", la alarma funcionará automáticamente durante dos minutos cuando llegue la hora programada para la alarma.
PARA SEGUIR DURMIENDO UN RATO:
Pulse el botón "SNOOZE" (8) una vez dentro de dos minutos (o dos
minutos más tarde la alarma se apagará automáticamente) para
apagar el radio o la alarma temporalmente y darle otros ocho minutos adicionales para dormir.Dentro de ese período, el símbolo
"SNOOZE" se mostrará en la pantalla LCD (20). Después de ocho
minutos, el radio o la alarma comenzarán a sonar nuevamente. Esto
se repetirá si usted oprime otra vez el botón "SNOOZE" (8) dentro
de dos minutos.
continuación
63
Page 33

ESP 2000 MANUAL DE OPERACIÓN
FORMA DE ACTIVAR O DESACTIVAR
LA ALARMA
PARA APAGAR EL RADIO O LA ALARMA:
Para hacerlo,pulse cualquier botón de control una vez, excepto el
botón "SNOOZE", o espere dos minutos (la alarma cesará
automáticamente).
continuación
9 SELECCIÓN DE ALARMA DE 5 DÍAS O
ALARMA DE 7 DÍAS
Pulse el botón "1-5 / 1-7" (11) para seleccionar la alarma
1-5 ó 1-7.
10 FORMATO DE 12 Ó 24 HORAS
Mantenga oprimido el botón "SNOOZE" (8) durante cinco segundos
para cambiar un formato de 12 horas a un formato de 24 horas.
64
11 SELECCIÓN DE LA ZONA DE HORA
PARA LOS ESTADOS UNIDOS
Mantenga oprimido el botón "SET" (13) durante dos segundos para
entrar en el modo de selección. Pulse el botón "SET" (13) cuatro
veces para ingresar en el modo de selección de zona. Cuando la
pantalla LCD (20) muestre un mapa parpadeando, pulse el botón
"UP" (10) o el botón "DOWN" (12) para seleccionar su zona de
hora en los Estados Unidos.
1.Selección del modo de hora de verano: Pulse el botón "MODE"
(9) una vez y entonces pulse el botón _ (10) o el botón _ (12)
para seleccionar la hora de verano o de invierno.
2.Selección de cambio de hora: Pulse el botón "MODE" (9) otra vez
y entonces pulse el botón _ (10) o el botón _ (12) para
seleccionar un cambio de hora de -12 o +12 horas cuando viaje
a una zona de hora diferente. Para retornar al modo normal de
reloj, pulse el botón "MODE" (9) o el botón "SET" (13) una vez.
12 SELECCIÓN DEL TEMPORIZADOR
PARA DORMIR
Coloque el interruptor selector de función en la posición "RADIO" o
"SOUND" y el interruptor e'ON/OFF en la posición "OFF". Entonces
mantenga oprimido el botón "(1-5/1-7)/SLEEP" (3) durante tres
segundos. El símbolo "SLEEP" se mostrará en la pantalla LCD (20) y
los dígitos del temporizador para dormir comenzarán desde 60 min-
65
Page 34

SELECCIÓN DEL TEMPORIZADOR
PARA DORMIR
utos. El radio se encenderá al mismo tiempo. Entonces use los
botones _ (10) o _ (12) para seleccionar el tiempo deseado de funcionamiento del radio antes de que se apague por sí mismo. La
selección es de 1 a 99 minutos. Pulse el botón "MODE" (9) una vez
para terminar la selección del temporizador.Los dígitos comenzarán
a disminuir.Cuando el conteo llegue a 00, el radio o el sonido tranquilizante se apagarán automáticamente. Si desea apagar el temporizador,pulse el botón "SNOOZE" (8) una vez.
continuación
13 OPERACIÓN DEL RADIO
Deslice el interruptor de función a la posición "RADIO" y el selector
"AM/FM" a la banda deseada. Pulse el botón "ON/OFF" para
encender o apagar el radio. El botón "ON/OFF" estará iluminado
mientras el radio esté en operación.
14 OPERACIÓN DEL SONIDO
TRANQUILIZADOR
Deslice el interruptor de función a la posición "SOUND" y pulse el
botón "ON/OFF" para encender o apagar el sonido tranquilizante.
Seleccione el tipo de sonido pulsando la tecla o botón correspondiente. El botón "ON/OFF" y la tecla correspondiente al sonido seleccionado se iluminarán.
ESP 2000 MANUAL DE OPERACIÓN
15 NOTA IMPORTANTE
Este reloj ha sido diseñado para uso por consumidores y NO como
un equipo científico. La recepción de las señales de hora no son
garantizadas, porque dichas señales están sujetas a condiciones
ambientales y a la distancia entre el reloj y la fuente de esas
señales. El reloj ha sido diseñado para uso bajo techo solamente.
Por favor evite las vibraciones y choques,al igual que las condiciones de alta humedad y alta temperatura.
El reloj ha sido diseñado para uso bajo techo solamente. Por favor
evite las vibraciones y choques, al igual que las condiciones de alta
humedad y alta temperatura.
16 ESPECIFICACIONES
ALIMENTACIÓN ELÉCTRICA:
Suministro principal: 120 V, CA o adaptador de 6 V CD, 500 mA
(incluido).
Batería de respaldo del reloj y de la alarma: 4.5 V CD (3 baterías
"AA") (incluidas).
RADIO:
AM 530 - 1710 kHz
FM: 88 - 108 MHz (monofónico)
RELOJ CONTROLADO POR EL RADIO:
WWVB: 60 kHz.
66
67
Page 35

ESP 2000 MANUAL DE OPERACIÓN
17 DECLARACIÓN DE LA FCC
Es posible, aunque muy poco probable,que su radio pueda causar
interferencia a otros radios o televisores. mientras opera apropiadamente Si la interferencia desaparece cuando apaga el radio, su radio
es la causa. A continuación le damos algunos consejos para ayudar
a eliminar la interferencia:
•Gire o mueva el radio a otro lugar.
•Aumente la distancia entre el radio y el equipo que sufre
la interferencia.
•Comuníquese con el fabricante de su equipo para obtener
asistencia.
Si no puede eliminar la interferencia causada a aparatos fuera de su
casa, la FCC requiere que usted deje de usar su radio hasta que la
interferencia pueda ser eliminada.
68
18 INFORMACIÓN DE SERVICIO
Puede comunicarse con el departamento de servicio de Etón para
obtener más información:
customersvc@etoncorp.com
Escribanos por una Autorización de Devolución antes de enviar su
unidad. Si desea retornar su unidad para obtener servicio,empaque el
receptor cuidadosamente usando la caja original u otra caja apropiada. Escriba su dirección de retorno claramente sobre la caja e incluya
una carta describiendo el servicio requerido, los síntomas o problemas.
También incluya su número de teléfono durante el día y una copia de
su recibo de compra. El radio recibirá servicio bajo los términos de la
garantía limitada de Etón y le será devuelto.
69
Page 36

ESP 2000 MANUAL DE OPERACIÓN
19 GARANTÍA LIMITADA DE UN AÑO
Etón le garantiza al comprador original que este producto está libre
de defectos en el material y mano de obra durante un período de un
año a partir de la fecha de la compra original. Durante el período de
garantía, Etón o un centro autorizado de servicio de Etón suministrará, sin costo alguno,las piezas y mano de obra necesarias para
corregir los defectos en el material o mano de obra. A su opción,
Etón podrá cambiar la unidad defectuosa.
1. Llene y envíe la tarjeta de registración de garantía
dentro de diez (10) días de la compra.
2. Llame a Etón o al centro autorizado de servicio más
cercano tan pronto sea posible después de descubrir
un posible defecto en el radio.
Tenga a mano:
(a) el número de modelo y de serie.
(b) el nombre del vendedor y la fecha aproximada de compra.
(c) una descripción detallada del problema, incluyendo
detalles sobre la conexión eléctrica a los equipos asociados utilizados y una lista de esos equipos.
3. Etón le dará el número de la Autorización de
Devolución y la dirección a donde debe enviar la unidad para que
sea reparada. Envíe la unidad en su caja original o en una caja
equivalente, con un seguro completo que cubra su valor y con el
costo de envío prepagado.
70
GARANTÍA LIMITADA DE UN AÑO continuación
El mantenimiento, reparación y uso correcto son importantes para
obtener un buen rendimiento de este producto. Por lo tanto, lea
cuidadosamente el Manual de Instrucciones. Esta garantía no se aplica a cualquier defecto que Etón determine que es debido a:
1. Un mantenimiento o reparación incorrecto, incluyendo
la instalación de piezas y accesorios que no se conforman a la calidad y especificación de las piezas originales.
2. Mal uso, abuso, maltrato o instalación incorrecta.
3. Daño intencional o accidental.
4. Ruptura con escape del contenido de las baterías.
Todas las garantías implícitas,si existen, incluyendo las garantías de
comerciabilidad y uso para fines específicos, terminan un (1) año
después de la fecha de la compra original.
Lo anterior constituye toda la obligación de Etón con respecto a este
producto y el comprador original no tendrá ningún otro remedio
legal ni podrá reclamar daños incidentales o consecuentes, pérdidas
o gastos. Algunos estados no permiten limitaciones de la duración
de una garantía implícita ni permiten exclusiones o limitaciones
de daños incidentales o consecuentes, así que la anterior
limitación y exclusión puede que no se aplique a usted. Esta garantía le ofrece derechos legales específicos y usted puede tener también otros derechos que varían de estado a estado.
71
Page 37

GARANTÍA LIMITADA DE UN AÑO continuación
PARA INFORMACIÓN SOBRE SERVICIO,
COMUNÍQUESE CON:
Etón Corporation
www.etoncorp.com
ESP 2000 MANUAL DE OPERACIÓN
72
73
Page 38

PER QUESITI E CHIARIMENTI,
Chiamare:
• From the United States: (800) 872-2228
• From Canada: (800) 637-1648
• From Everywhere Else: (650) 903-3866
• Email: customersvc@etoncorp.com
• Internet: www.etoncorp.com
ESP 2000 MANUALE OPERATIVO
INDICE
FUNZIONI........................................................................
1
POSIZIONE DEI COMANDI..............................................
2
SOSTITUZIONE DELLE BATTERIE.....................................
3
IMPOSTAZIONE DELL'ORA STANDARDIZZATA..............
4
IMPOSTAZIONE DELL'ANNO/MESE/DATA.......................
5
IMPOSTAZIONE DELL'ORA..............................................
6
IMPOSTAZIONE DELLA SVEGLIA.....................................
7
IMPOSTAZIONE ON/OFF DELLA SVEGLIA......................
8
SELEZIONE DELL'ALLARME PER 5 O 7 GIORNI...............
9
FORMATO A 12/24 ORE..................................................
10
IMPOSTAZIONE DEL FUSO ORARIO USA.........................
11
IMPOSTAZIONE DELLO SLEEP TIMER...............................
12
FUNZIONAMENTO DELLA RADIO....................................
13
FUNZIONAMENTO DELL'EFFETTO SONORO.....................
14
NOTA BENE.....................................................................
15
SPECIFICHE.....................................................................
16
DICHIARAZIONE FCC......................................................
17
INFORMAZIONI SUL SERVIZIO .......................................
18
GARANZIA LIMITATA DI UN ANNO.................................
19
page
76
76
78
78
79
80
80
82
84
84
84
85
85
86
86
86
87
88
89
74
75
Page 39

ESP 2000 MANUALE OPERATIVO
1 FUNZIONI
- Ora standardizzata con indicatore PM
- Formato selezionabile a 12/24 ore
- Doppia sveglia, Snooze, sleep timer, display a LED verdi
retroilluminato
- Display del mese e della data
- Termometro (32°F – 122°F)
- Radioricevitore AM/FM
2 POSIZIONE DEI COMANDI
Pulsante OCEANO
1
Pulsante PIOGGIA
2
Pulsante RUSCELLO
3
Pulsante PULSAZIONI
4
Pulsante BOSCO
5
Selettore RADIO/SOUND/BEEP [radio/effettosonoro/cicalino]
6
Scala di sintonia
7
Pulsante SNOOZE ["pisolo" o allarme ripetuto]
8
Pulsante MODE [modalità]
9
Pulsante ALARM 1[allarme]/ su
10
76
POSIZIONE DEI COMANDI segue
Pulsante 1-5/1-7/SLEEP [spegnimento differito]
11
Pulsante ALARM 2/ giu
12
Pulsante SET [impostazione]
13
Pulsante ON/OFF
14
Manopola del volume
15
Manopola della sintonia
16
Selettore FM/AM
17
Presa jack CC
18
Scompartimento delle batterie
19
Display LCD
20
77
Page 40

ESP 2000 MANUALE OPERATIVO
3 SOSTITUZIONE DELLE BATTERIE
Quando appare sul display LCD (20) l'icona della batteria scarica,
aprire lo sportello dello scompartimento delle batterie (19) sul fondo
dell'unità e sostituire le batterie scariche con tre batterie alcaline
nuove di tipo ministilo AA.
NOTA: Quando il trasformatore CA/CC è collegato alla presa jack
CC, le batterie alimentano solo l'orologio.Le batterie permettono di
utilizzare tutte le funzioni l'unità solo per poche ore. L'unità deve
essere infatti alimentata dal trasformatore allegato.
4 IMPOSTAZIONE DELL'ORA
STANDARDIZZATA
All'accensione, l'orologio entra in modalità di radiocontrollo. Il display (20) visualizza:
- L La forza 0-5 del segnale in ricezione. 5 indica un buon livello di
ricezione, 0-4 un segnale debole.
- 00-59 Un conteggio di secondi
- OFF Modalità Sveglia OFF
- L'icona del traliccio ricevitore comincia a lampeggiare per
segnalare il passaggio dell'unità in modalità di ricezione del
segnale orario.
- Se l'unità si trova all'interno della zona coperta dal segnale ed i
segnali vengono ricevuti bene, l'orologio visualizza l'ora esatta ed
entra in funzione. L'icona del traliccio rimane illuminata senza
78
IMPOSTAZIONE DELL'ORA
STANDARDIZZATA segue
lampeggiare. Il segnale orario viene trasmesso quattro volte al
giorno per permettere la regolazione automatica dell'orologio.
- Se l'unità si trova all'esterno della zona coperta dal segnale,
premere una sola volta il pulsante MODE (9), l'orologio passa in
modalità ora standardizzata. Per impostare l'ora,premere il
pulsante SET (13) per due secondi per accedere alla modalità
di impostazione.
5 IMPOSTAZIONE
DELL'ANNO/MESE/DATA
- Le cifre dell'anno lampeggiano sul display (20). Premere il pulsante
q (10) o q (12) per impostare l'anno.
- Premere il pulsante MODE (9) per far lampeggiare le cifre del mese
e poi il pulsante q (10) o q (12)per impostare il mese.
- Premere di nuovo il pulsante MODE (9) per far lampeggiare le cifre
della data e poi il pulsante q (10) o q (12) per impostare la data.
- Premere di nuovo il pulsante MODE (9) per finire l'impostazione o
il pulsante SET (13) per continuare con l'impostazione dell'ora.
79
Page 41

ESP 2000 MANUALE OPERATIVO
6 IMPOSTAZIONE DELL'ORA
- Dopo aver attivato la modalità di impostazione, premere il
pulsante SET (13) per far lampeggiare le cifre delle ore e poi il
pulsante q (10) o q (12) per impostare l'ora.
- Premere il pulsante MODE (9) per far lampeggiare le cifre dei
minuti e poi il pulsante q (10) o q (12) per impostare i minuti.
- Premere un'altra volta il pulsante MODE (9) per concludere l'im
postazione dell'ora o il pulsante SET (13) per continuare con
l'impostazione dell'ora della sveglia.
7 IMPOSTAZIONE DELLA SVEGLIA
N.B. Prima di impostare la sveglia o di attivare la funzione di
allarme, accertarsi che l'interruttore di alimentazione ON/OFF sia
nella posizione OFF.
PER IMPOSTARE L'ORA DI RISVEGLIO:
- Premere il pulsante SET (13) per due secondi per accedere alla
modalità di impostazione. Premere due volte il pulsante SET (13)
per visualizzare l'icona della sveglia e far lampeggiare le cifre delle
ore. Successivamente, premere il pulsante q (10) o q (12)per
impostare l'ora dell'allarme 1.
- Premere il pulsante MODE (9) per far lampeggiare le cifre dei
minuti e poi il pulsante q (10) o q (12) per impostare i minuti
dell'allarme 1.
80
IMPOSTAZIONE DELLA SVEGLIA segue
- Premere un'altra volta il pulsante MODE (9) per concludere
l'impostazione dell'allarme 1 (tutte le cifre dell'ora della sveglia
sono illuminate senza lampeggiare) o premere il pulsante SET (13)
per continuare con l'impostazione dell'allarme 2.
PER IMPOSTARE L'ORA DELL'ALLARME 2:
- Premere il pulsante SET (13) per due secondi per accedere alla
modalità di impostazione. Premere tre volte il pulsante SET (13)
per visualizzare l'icona della sveglia e far lampeggiare le cifre delle
ore. Successivamente, premere il pulsante q (10) o q (12) per
impostare l'ora dell'allarme 2.
- Premere il pulsante MODE (9) per far lampeggiare le cifre dei
minuti e poi il pulsante q (10) o p (12) per impostare i minuti
dell'allarme 2.
- Premere un'altra volta il pulsante MODE (9) per concludere
l'impostazione dell'allarme 1 (tutte le cifre dell'ora della sveglia
sono illuminate senza lampeggiare) o premere il pulsante SET (13)
per continuare con l'impostazione della zona.
81
Page 42

ESP 2000 MANUALE OPERATIVO
8 IMPOSTAZIONE ON/OFF
DELLA SVEGLIA
PER ATTIVARE L'ALLARME 1:
- Premere il pulsante ALARM å (10) finché il display non visualizza
sia l'ora che l'icona della sveglia _1.
- Premere il pulsante MODE (9) per rivisualizzare l'indicazione del
mese e della data.
PER DISATTIVARE L'ALLARME 1:
- Premere il pulsante ALARM å (10) finché il display non visualizza
l'indicazione OFF e l'icona della sveglia _1.
- Premere il pulsante MODE (9) per rivisualizzare l'indicazione del
mese e della data.
PER ATTIVARE L'ALLARME 2:
- Premere il pulsante ALARM ç (12) finché il display non visualizza
sia l'ora che l'icona della sveglia _2.
- Premere il pulsante MODE (9) per rivisualizzare l'indicazione del
mese e della data.
PER DISATTIVARE L'ALLARME 2:
- Premere il pulsante ALARM ç (12) finché il display non visualizza
l'indicazione OFF e l'icona della sveglia _2. Premere il pulsante
MODE (9) per rivisualizzare l'indicazione del mese e della data.
RISVEGLIO AL SUONO DELLA RADIO
Se il selettore (6) è impostato sulla posizione RADIO, la radio si
accende automaticamente non appena scatta l'ora preimpostata di
risveglio.
82
IMPOSTAZIONE ON/OFF
DELLA SVEGLIA segue
RISVEGLIO AL SUONO DELL'EFFETTO SONORO SPECIALE
Se il selettore (6) è impostato sulla posizione SOUND, l'unità emette
automaticamente il suono rilassante prescelto non appena scatta
l'ora preimpostata di risveglio.
RISVEGLIO AL SUONO DEL CICALINO
Se il selettore (6) è impostato sulla posizione BEEP, il cicalino squilla
automaticamente per due minuti non appena scatta l'ora preimpostata di risveglio.
SNOOZE
Premere il pulsante SNOOZE (8) entro due minuti dallo squillo della
sveglia (trascorsi due minuti, la sveglia si arresta automaticamente)
per spegnere la radio o arrestare temporaneamente l'allarme, consentendo di prolungare il sonno per altri otto minuti. Nel frattempo,
il display (20) visualizza l'indicazione SNOOZE. Trascorsi otto minuti,
la radio si riaccendo o l'allarme ricomincia a squillare. Il processo
viene ripetuto premendo di nuovo il pulsante SNOOZE (8) entro
due minuti.
SPEGNIMENTO DELLA RADIO O INTERRUZIONE
DELL'ALLARME
Per arrestare l'allarme, premere un pulsante qualsiasi eccetto
SNOOZE, oppure attendere due minuti (l'allarme si interrompe automaticamente).
83
Page 43

ESP 2000 MANUALE OPERATIVO
9 SELEZIONE DELL'ALLARME PER 5 O 7
GIORNI
Premere il pulsante 1-5 / 1-7 (11) per selezionare l'allarme 1-5 o 1-7.
10 FORMATO A 12/24 ORE
Premere il pulsante SNOOZE (8) per cinque secondi passando dal
formato a 12 ore a quello a 24 ore.
11 IMPOSTAZIONE DEL FUSO
ORARIO USA
Premere il pulsante SET (13) per due secondi per accedere alla
modalità di impostazione. Premere quattro volte il pulsante SET (13)
per accedere alla modalità di impostazione della zona. Quando il
display (20) visualizza la mappa lampeggiante, premere il pulsante p
(10) o q (12) per selezionare il fuso orario statunitense.
1.Impostazione dell'ora legale - Premere una volta il pulsante
MODE (9) e poi il pulsante p (10) o q (12) per attivare o
disattivare l'ora legale.
2.Impostazione del fuso orario - Premere di nuovo il pulsante
MODE (9) e poi il pulsante p (10) o q (12) per impostare uno
scarto da -12 a + 12 ore per conformarsi al fuso orario locale
durante i viaggi. Per tornare alla modalità normale di
visualizzazione dell'orologio, premere una volta il pulsante MODE
(9) o il pulsante SET (13).
84
12 IMPOSTAZIONE DELLO
SLEEP TIMER
Impostare il selettore su RADIO o SOUND e far scattare l'interruttore
di alimentazione ON/OFF sulla posizione OFF. Premere il pulsante
(1-5/1-7)/ SLEEP (3) per tre secondi, finché non appare sul display
(20) l'icona SLEEP e lo sleep timer non indica 60 minuti. L'unità si
accende. Usare i pulsanti p (10) o q (12) per impostare il lasso di
tempo intercorrente prima dello spegnimento differito. La gamma va
da 1 a 99 minuti. Premere il pulsante MODE (9) per concludere l'impostazione del timer.Comincia il conteggio alla rovescia. Quando il
conteggio dello sleep raggiunge 00, l'unità spegne automaticamente
la radio o l'effetto sonoro. Oppure, premere il pulsante SNOOZE (8)
per arrestare il conteggio dello sleep timer.
13 FUNZIONAMENTO DELLA RADIO
Far scorrere il selettore sulla posizione RADIO ed impostare il selettore AM/FM sulla banda desiderata. Premere il pulsante ON/OFF per
accendere o spegnere la radio. Il pulsante ON/OFF si illumina quando la radio è accesa.
85
Page 44

14 FUNZIONAMENTO DELL'EFFETTO
SONORO
Far scorrere il selettore sulla posizione SOUND e premere li pulsante
ON/ OFF per attivare o disattivare il suono rilassante.
L'effetto acustico viene selezionato premendo il tasto corrispondente. Il pulsante ON/OFF ed il tasto si illuminano.
15 NOTA BENE
Questo orologio è stato progettato per essere usato come un articolo di consumo, NON come un'attrezzatura scientifica.Il successo
della ricezione dell'ora esatta non è garantito ed è soggetto alle
condizioni ambientali ed alla distanza dalla fonte del segnale.
Questo orologio è destinato esclusivamente all'uso al coperto. Si
consiglia di evitare l'esposizione ad umidità elevata, alte temperature, vibrazioni ed urti.
16 SPECIFICHE
ALIMENTAZIONE
Di rete: Trasformatore 120 V CA/6V CC, 500 mA (fornito)
Backup a batteria dell'orologio e della sveglia : 4,5 V CC (3 x AA)
(fornite)
RADIO
AM: 530 - 1710 kHz
FM: 88 - 108 MHz (monoaurale)
OROLOGIO RADIOCONTROLLATO
WWVB: 60 kHz
ESP 2000 MANUALE OPERATIVO
17 DICHIARAZIONE FCC
Per quanto altamente improbabile, è possibile che la radio causi
interferenze nella ricezione di altre radio o di televisori, nonostante
sia usata in modo corretto. Le interferenza sono attribuibili alla radio
se spariscono una volta spento l'apparecchio. Ecco alcuni suggerimenti utili ad eliminare le interferenze:
•Far ruotare o riposizionare la radio.
•Aumentare la distanza intercorrente tra la radio e le attrezzature
soggette ad interferenze.
•Rivolgersi al fabbricante delle attrezzature e richiederne
l'assistenza.
Se non è possibile eliminare le interferenze nei dispositivi altrui,
l'ente FCC impone agli utenti di sospendere l'uso della radio in attesa di prendere le opportune misure correttive.
86
87
Page 45

ESP 2000 MANUALE OPERATIVO
18 INFORMAZIONI SUL SERVIZIO
E' possibile mettersi in contatto con il Service Department della Etón
per ottenere ulteriori informazioni.
customersvc@etoncorp.com
Richiedere una autorizzazione alla resa prima di spedire l'unità. Ai
fini della spedizione in ditta dell'unità per farla riparare, imballare
con cura il ricevitore usando la scatola originale a un altro contenitore adatto. Scrivere in modo leggibile il proprio indirizzo sulla scatola di spedizione o in una lettera allegata, descrivendo l'intervento
richiesto, i sintomi o i problemi. Inoltre, indicare il proprio numero di
telefono diurno ed allegare una copia della prova di acquisto. Il
ricevitore verrà riparato in conformità alle condizioni della garanzia
limitata Etón e rispedito al mittente.
88
19 GARANZIA LIMITATA DI UN ANNO
La Etón garantisce all'acquirente originale che questo prodotto è
privo di difetti di materiali o di lavorazione per un periodo di un
anno a decorrere dalla data di acquisto originale.
Durante il periodo di garanzia, la Etón o un centro autorizzato di
servizio Etón fornirà a titolo gratuito i pezzi e la manodopera necessari per ovviare ai difetti di materiali o di lavorazione. La Etón può,a
proprio parere insindacabile, sostituire una unità difettosa con una
nuova.
1. Compilare e spedire la scheda di registrazione della
garanzia entro dieci (10) giorni dalla data di acquisto.
2. Una volta scoperto un possibile difetto, telefonare
quanto prima alla Etón o al centro autorizzato di servizio più vicino.
Indicare:
a. il modello ed il numero di serie.
b. l'identità del venditore e la data approssimata
d'acquisto.
c. una descrizione particolareggiata del problema,
compresi i dettagli dei collegamenti elettrici con le associate
attrezzature e l'elenco di tali attrezzature.
89
Page 46

ESP 2000 MANUALE OPERATIVO
GARANZIA LIMITATA DI UN ANNO segue
3. La Etón indicherà il numero di autorizzazione alla resa
e l'indirizzo a cui recapitare l'unità. Spedire l'unità nel
contenitore originale o in un suo equivalente, assicurata ed a
carico del mittente.
Per garantire il rendimento ottimale di questo prodotto è importante
che sia sottoposto a manutenzione, riparato ed usato in modo
appropriato. Di conseguenza, leggere attentamente il manuale operativo. Questo garanzia non si applica ad alcun difetto che la Etón
determini prodotto da:
1. Erronea manutenzione o riparazione, compresa
l'installazione di parti o accessori difformi quanto
a qualità o specifiche dai pezzi originali.
2. Uso erroneo, abuso, incuria o installazione errata.
3. Danni accidentali o intenzionali.
4. Perdita dalle batterie.
90
GARANZIA LIMITATA DI UN ANNO segue
Tutte le eventuali garanzie implicite, comprese quelle di commerciabilità e di idoneità ad uno scopo particolare, scadono dopo un (1)
anno dalla data di acquisto originale.
Quanto esposto sopra costituisce l'intera obbligazione della Etón relativa a questo prodotto e l'acquirente originale non ha altro ricorso
né diritto a rivendicazioni per danni accessori o emergenti, perdite o
spesa alcuna. Alcuni stati non consentono di limitare la durata di
una garanzia implicita o le esclusioni o limitazioni dei danni accessori o emergenti, pertanto i limiti esposti sopra possono non essere
sempre applicabili. Questa garanzia attribuisce all'acquirente specifici diritti. L'acquirente può godere di altri diritti che variano da stato
a stato.
PER INFORMAZIONI SUGLI INTERVENTI DI
RIPARAZIONE E SERVIZIO, RIVOLGERSI A:
Etón Corporation
www.etoncorp.com
91
Page 47

www.etoncorp.com
From the United States: (800) 872-2228
From Canada: (800) 637-1648
From Everywhere Else: (650) 903-3866
Email: customersvc@etoncorp.com
Internet: www.etoncorp.com
Etón Corporation
1015 Corporation Way
Palo Alto, California 94303
USA
v. 04-14-04
 Loading...