

Page 1
© ETNA Coee Equipment b.v.
C O F F E E T E C H N O L O G I E S
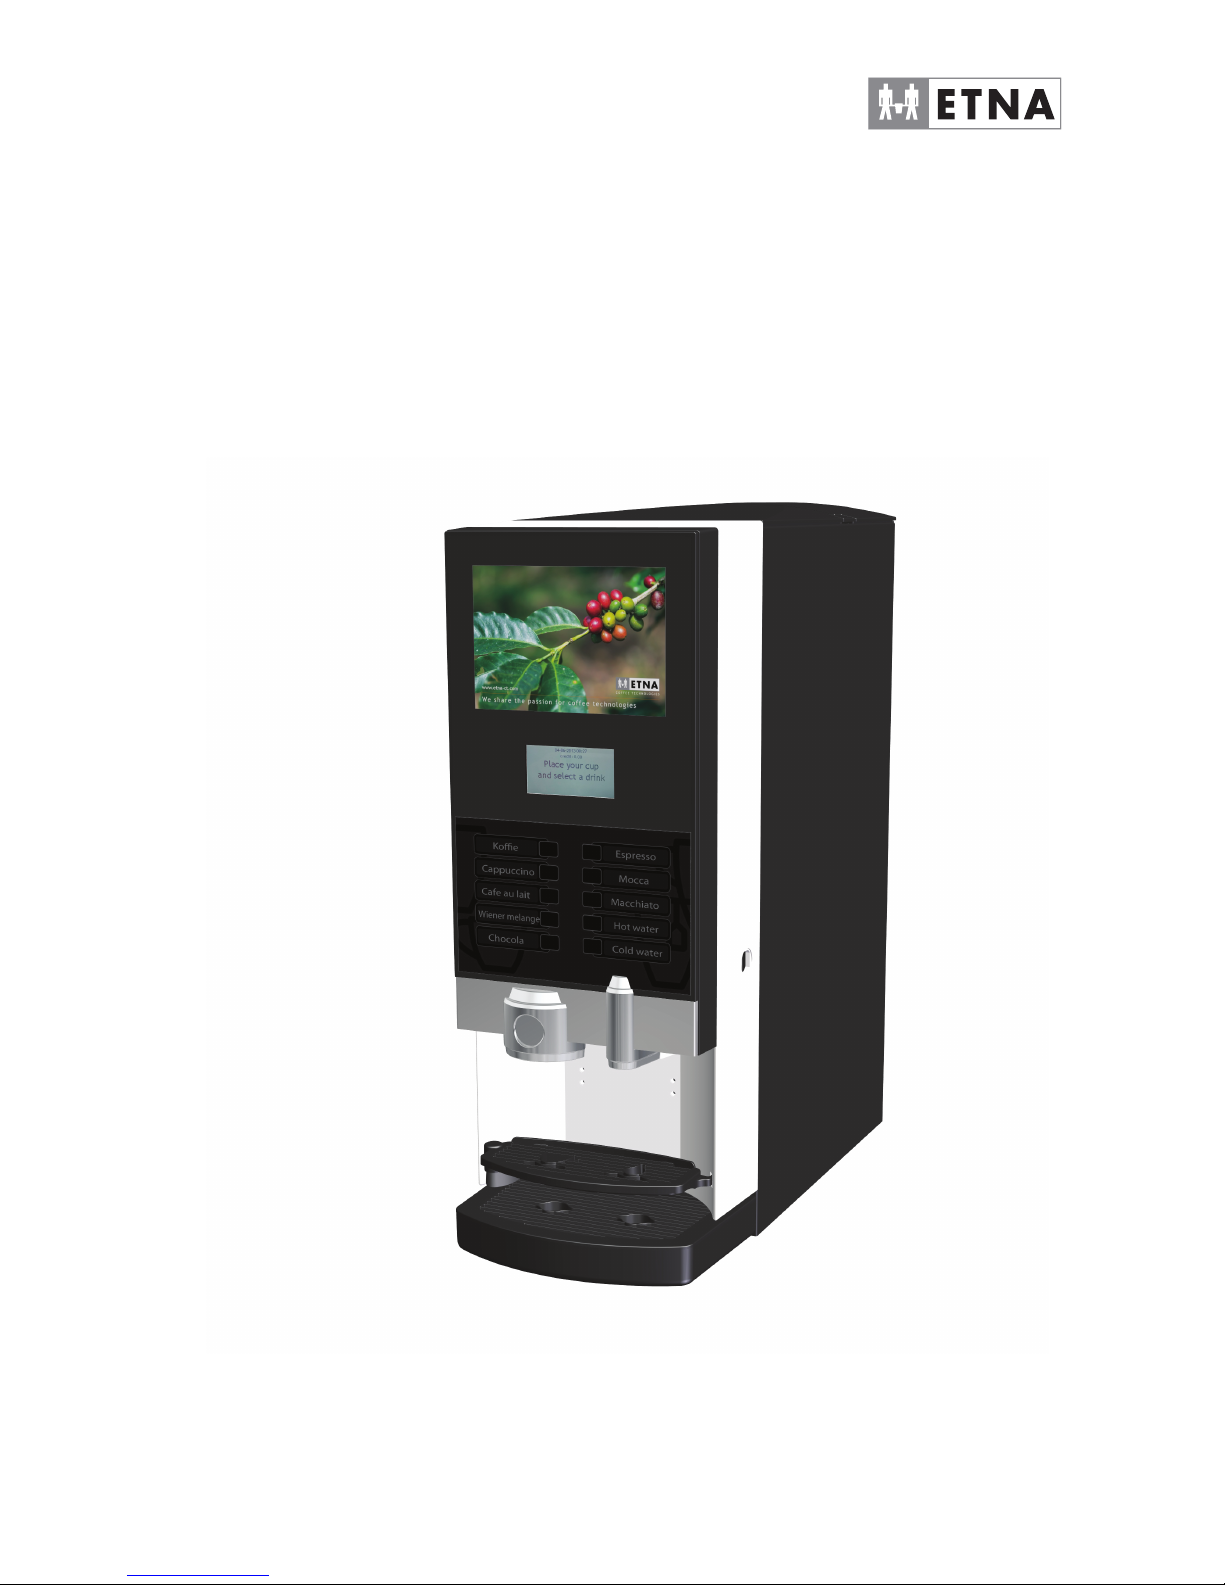
Technical manual Dorado/Tucana Small Instant
Page 2
Technical manual Dorado Small Instant
Manufacturer: ETNA Coffee Equipment b.v.
P.O. Box 146
7000 AC Doetinchem
The Netherlands
Distributor:
© ETNA Coffee Equipment b.v.
Articlecode: Article code
Status: Draft
Revision: D
Page 3

Technical manual Dorado Small Instant
3
© ETNA Coffee Equipment b.v.
CONTENTS
COFFEE TECHNOLOGIES
1 INTRODUCTION . . . . . . . . . . . . . . . . . . . . . . . . . . . . . . . . . . . . . . . . . . . . . . . . . . . . . . . . . . . . . . . . . . 5
1.1 This user manual . . . . . . . . . . . . . . . . . . . . . . . . . . . . . . . . . . . . . . . . . . . . . . . . . . . . . . . . . . . . . 5
1.2 Pictograms and safety symbols on the machine . . . . . . . . . . . . . . . . . . . . . . . . . . . . . . . . . . . 5
1.3 Pictograms and safety symbols in the manual . . . . . . . . . . . . . . . . . . . . . . . . . . . . . . . . . . . . . 6
1.4 Conventions and definitions . . . . . . . . . . . . . . . . . . . . . . . . . . . . . . . . . . . . . . . . . . . . . . . . . . . . 6
1.5 Service and technical support. . . . . . . . . . . . . . . . . . . . . . . . . . . . . . . . . . . . . . . . . . . . . . . . . . . 6
1.6 Machine identification on outside of the machine . . . . . . . . . . . . . . . . . . . . . . . . . . . . . . . . . . 7
1.7 Machine identification inside the machine. . . . . . . . . . . . . . . . . . . . . . . . . . . . . . . . . . . . . . . . . 8
1.8 Used Machinery and the Environment . . . . . . . . . . . . . . . . . . . . . . . . . . . . . . . . . . . . . . . . . . . . 8
1.9 General safety instructions and restrictions . . . . . . . . . . . . . . . . . . . . . . . . . . . . . . . . . . . . . . . 9
1.9.1 Operating and cleaning instructions . . . . . . . . . . . . . . . . . . . . . . . . . . . . . . . . . . . . . . . . . 9
1.9.2 Icons and instructions . . . . . . . . . . . . . . . . . . . . . . . . . . . . . . . . . . . . . . . . . . . . . . . . . . . . 9
1.9.3 Users . . . . . . . . . . . . . . . . . . . . . . . . . . . . . . . . . . . . . . . . . . . . . . . . . . . . . . . . . . . . . . . . . 9
1.9.4 Technical specifications . . . . . . . . . . . . . . . . . . . . . . . . . . . . . . . . . . . . . . . . . . . . . . . . . .9
1.9.5 Modifications . . . . . . . . . . . . . . . . . . . . . . . . . . . . . . . . . . . . . . . . . . . . . . . . . . . . . . . . . . . 9
1.9.6 Intended use . . . . . . . . . . . . . . . . . . . . . . . . . . . . . . . . . . . . . . . . . . . . . . . . . . . . . . . . . . 10
1.10 Available documentation . . . . . . . . . . . . . . . . . . . . . . . . . . . . . . . . . . . . . . . . . . . . . . . . . . . . . . 10
2 DESCRIPTION OF THE MACHINE . . . . . . . . . . . . . . . . . . . . . . . . . . . . . . . . . . . . . . . . . . . . . . . . . . .11
2.1 General description . . . . . . . . . . . . . . . . . . . . . . . . . . . . . . . . . . . . . . . . . . . . . . . . . . . . . . . . . . 11
2.2 Main components . . . . . . . . . . . . . . . . . . . . . . . . . . . . . . . . . . . . . . . . . . . . . . . . . . . . . . . . . . . . 11
2.2.1 Front view . . . . . . . . . . . . . . . . . . . . . . . . . . . . . . . . . . . . . . . . . . . . . . . . . . . . . . . . . . . . 11
2.2.2 Interior view . . . . . . . . . . . . . . . . . . . . . . . . . . . . . . . . . . . . . . . . . . . . . . . . . . . . . . . . . . . 12
2.3 Container layout . . . . . . . . . . . . . . . . . . . . . . . . . . . . . . . . . . . . . . . . . . . . . . . . . . . . . . . . . . . . . 13
2.4 Operating principle. . . . . . . . . . . . . . . . . . . . . . . . . . . . . . . . . . . . . . . . . . . . . . . . . . . . . . . . . . . 13
2.5 Switching on and off . . . . . . . . . . . . . . . . . . . . . . . . . . . . . . . . . . . . . . . . . . . . . . . . . . . . . . . . . 14
2.6 Operating the machine . . . . . . . . . . . . . . . . . . . . . . . . . . . . . . . . . . . . . . . . . . . . . . . . . . . . . . . . 14
2.6.1 Strength selector (if applicable) . . . . . . . . . . . . . . . . . . . . . . . . . . . . . . . . . . . . . . . . . . . . 14
2.6.2 Selecting jug function (if applicable) . . . . . . . . . . . . . . . . . . . . . . . . . . . . . . . . . . . . . . . . 15
2.6.3 Stand by . . . . . . . . . . . . . . . . . . . . . . . . . . . . . . . . . . . . . . . . . . . . . . . . . . . . . . . . . . . . . 15
3 USE . . . . . . . . . . . . . . . . . . . . . . . . . . . . . . . . . . . . . . . . . . . . . . . . . . . . . . . . . . . . . . . . . . . . . . . . . . . 16
3.1 Safety instructions - use . . . . . . . . . . . . . . . . . . . . . . . . . . . . . . . . . . . . . . . . . . . . . . . . . . . . . . 16
3.2 Filling containers . . . . . . . . . . . . . . . . . . . . . . . . . . . . . . . . . . . . . . . . . . . . . . . . . . . . . . . . . . . . 17
3.2.1 Filling the container in the machine. . . . . . . . . . . . . . . . . . . . . . . . . . . . . . . . . . . . . . . . . 17
3.2.2 Filling the ingredient containers outside the machine . . . . . . . . . . . . . . . . . . . . . . . . . . . 17
4 MAINTENANCE AND CLEANING. . . . . . . . . . . . . . . . . . . . . . . . . . . . . . . . . . . . . . . . . . . . . . . . . . . .18
4.1 Safety instructions - maintenance and cleaning . . . . . . . . . . . . . . . . . . . . . . . . . . . . . . . . . . . 18
4.2 Perishable ingredients . . . . . . . . . . . . . . . . . . . . . . . . . . . . . . . . . . . . . . . . . . . . . . . . . . . . . . . . 18
4.3 Service panel. . . . . . . . . . . . . . . . . . . . . . . . . . . . . . . . . . . . . . . . . . . . . . . . . . . . . . . . . . . . . . . . 19
4.4 Maintenance . . . . . . . . . . . . . . . . . . . . . . . . . . . . . . . . . . . . . . . . . . . . . . . . . . . . . . . . . . . . . . . . 19
4.5 Daily maintenance . . . . . . . . . . . . . . . . . . . . . . . . . . . . . . . . . . . . . . . . . . . . . . . . . . . . . . . . . . . 19
4.5.1 Checking the ingredient containers . . . . . . . . . . . . . . . . . . . . . . . . . . . . . . . . . . . . . . . . . 19
Page 4

4
© ETNA Coffee Equipment b.v.
Technical manual Dorado Small Instant
COFFEE TECHNOLOGIES
4.5.2 Cleaning drip tray . . . . . . . . . . . . . . . . . . . . . . . . . . . . . . . . . . . . . . . . . . . . . . . . . . . . . . 20
4.5.3 Clean valves and rinse the mixers.. . . . . . . . . . . . . . . . . . . . . . . . . . . . . . . . . . . . . . . . . 20
4.5.4 Clean the exterior . . . . . . . . . . . . . . . . . . . . . . . . . . . . . . . . . . . . . . . . . . . . . . . . . . . . . . 20
4.6 Weekly maintenance . . . . . . . . . . . . . . . . . . . . . . . . . . . . . . . . . . . . . . . . . . . . . . . . . . . . . . . . . 20
4.6.1 Cleaning mixer parts. . . . . . . . . . . . . . . . . . . . . . . . . . . . . . . . . . . . . . . . . . . . . . . . . . . . 21
4.7 Maintenance overview. . . . . . . . . . . . . . . . . . . . . . . . . . . . . . . . . . . . . . . . . . . . . . . . . . . . . . . . 22
5 RESOLVING PROBLEMS . . . . . . . . . . . . . . . . . . . . . . . . . . . . . . . . . . . . . . . . . . . . . . . . . . . . . . . . . 24
5.1 LCD display on the selection panel . . . . . . . . . . . . . . . . . . . . . . . . . . . . . . . . . . . . . . . . . . . . . 24
5.1.1 Fault messages . . . . . . . . . . . . . . . . . . . . . . . . . . . . . . . . . . . . . . . . . . . . . . . . . . . . . . . 24
5.1.1 Selection panel in programming mode . . . . . . . . . . . . . . . . . . . . . . . . . . . . . . . . . . . . . . 24
5.1.3 User menu (Operator) . . . . . . . . . . . . . . . . . . . . . . . . . . . . . . . . . . . . . . . . . . . . . . . . . . 25
5.1.4 Diagram of user menu . . . . . . . . . . . . . . . . . . . . . . . . . . . . . . . . . . . . . . . . . . . . . . . . . . 26
5.2 Electric diagram . . . . . . . . . . . . . . . . . . . . . . . . . . . . . . . . . . . . . . . . . . . . . . . . . . . . . . . . . . . . . 25
6 TECHNICAL SPECIFICATIONS . . . . . . . . . . . . . . . . . . . . . . . . . . . . . . . . . . . . . . . . . . . . . . . . . . . . . 26
6.1 Electrical system . . . . . . . . . . . . . . . . . . . . . . . . . . . . . . . . . . . . . . . . . . . . . . . . . . . . . . . . . . . . 26
6.2 Water system . . . . . . . . . . . . . . . . . . . . . . . . . . . . . . . . . . . . . . . . . . . . . . . . . . . . . . . . . . . . . . . 26
6.3 Sound level. . . . . . . . . . . . . . . . . . . . . . . . . . . . . . . . . . . . . . . . . . . . . . . . . . . . . . . . . . . . . . . . . 26
6.4 Ambient conditions . . . . . . . . . . . . . . . . . . . . . . . . . . . . . . . . . . . . . . . . . . . . . . . . . . . . . . . . . . 27
6.5 Dimensions and weight. . . . . . . . . . . . . . . . . . . . . . . . . . . . . . . . . . . . . . . . . . . . . . . . . . . . . . . 27
7 SOFTWARE . . . . . . . . . . . . . . . . . . . . . . . . . . . . . . . . . . . . . . . . . . . . . . . . . . . . . . . . . . . . . . . . . . . . 28
7.1 Levels . . . . . . . . . . . . . . . . . . . . . . . . . . . . . . . . . . . . . . . . . . . . . . . . . . . . . . . . . . . . . . . . . . . . . 28
7.2 Software update. . . . . . . . . . . . . . . . . . . . . . . . . . . . . . . . . . . . . . . . . . . . . . . . . . . . . . . . . . . . . 28
8 INSTALLATION. . . . . . . . . . . . . . . . . . . . . . . . . . . . . . . . . . . . . . . . . . . . . . . . . . . . . . . . . . . . . . . . . . 30
8.1 Connect the machine . . . . . . . . . . . . . . . . . . . . . . . . . . . . . . . . . . . . . . . . . . . . . . . . . . . . . . . . 30
8.2 Adjusting the valve . . . . . . . . . . . . . . . . . . . . . . . . . . . . . . . . . . . . . . . . . . . . . . . . . . . . . . . . . . 30
9 REPLACEMENT OF PARTS . . . . . . . . . . . . . . . . . . . . . . . . . . . . . . . . . . . . . . . . . . . . . . . . . . . . . . . 31
9.1 Safety requirements - replacing parts . . . . . . . . . . . . . . . . . . . . . . . . . . . . . . . . . . . . . . . . . . . 31
9.2 Repairs . . . . . . . . . . . . . . . . . . . . . . . . . . . . . . . . . . . . . . . . . . . . . . . . . . . . . . . . . . . . . . . . . . . . 31
9.3 Emptying the boiler . . . . . . . . . . . . . . . . . . . . . . . . . . . . . . . . . . . . . . . . . . . . . . . . . . . . . . . . . . 32
9.4 Restarting . . . . . . . . . . . . . . . . . . . . . . . . . . . . . . . . . . . . . . . . . . . . . . . . . . . . . . . . . . . . . . . . . . 32
9.5 Drink selection labels . . . . . . . . . . . . . . . . . . . . . . . . . . . . . . . . . . . . . . . . . . . . . . . . . . . . . . . . 33
9.6 Replacing the inlet valve . . . . . . . . . . . . . . . . . . . . . . . . . . . . . . . . . . . . . . . . . . . . . . . . . . . . . . 33
9.7 Replacing boiler . . . . . . . . . . . . . . . . . . . . . . . . . . . . . . . . . . . . . . . . . . . . . . . . . . . . . . . . . . . . . 34
9.8 Replacing boiler sensor . . . . . . . . . . . . . . . . . . . . . . . . . . . . . . . . . . . . . . . . . . . . . . . . . . . . . . 36
9.9 Replacing heating element . . . . . . . . . . . . . . . . . . . . . . . . . . . . . . . . . . . . . . . . . . . . . . . . . . . . 36
9.10 Replacing the valve . . . . . . . . . . . . . . . . . . . . . . . . . . . . . . . . . . . . . . . . . . . . . . . . . . . . . . . . . . 37
9.11 Replacing extraction ventilator . . . . . . . . . . . . . . . . . . . . . . . . . . . . . . . . . . . . . . . . . . . . . . . . 38
9.12 Replacing the mixer engine . . . . . . . . . . . . . . . . . . . . . . . . . . . . . . . . . . . . . . . . . . . . . . . . . . . 38
9.13 Replacing drip tray sensor . . . . . . . . . . . . . . . . . . . . . . . . . . . . . . . . . . . . . . . . . . . . . . . . . . . . 39
9.14 Door plate . . . . . . . . . . . . . . . . . . . . . . . . . . . . . . . . . . . . . . . . . . . . . . . . . . . . . . . . . . . . . . . . . . 40
9.15 Replacing cup sensor . . . . . . . . . . . . . . . . . . . . . . . . . . . . . . . . . . . . . . . . . . . . . . . . . . . . . . . . 41
9.16 LCD display and display PCB. . . . . . . . . . . . . . . . . . . . . . . . . . . . . . . . . . . . . . . . . . . . . . . . . . 42
9.17 Replacing the illumination panel . . . . . . . . . . . . . . . . . . . . . . . . . . . . . . . . . . . . . . . . . . . . . . . 42
9.18 Replacing power supply . . . . . . . . . . . . . . . . . . . . . . . . . . . . . . . . . . . . . . . . . . . . . . . . . . . . . . 43
9.19 Replacing the on/off switch . . . . . . . . . . . . . . . . . . . . . . . . . . . . . . . . . . . . . . . . . . . . . . . . . . . 43
9.20 Service panel . . . . . . . . . . . . . . . . . . . . . . . . . . . . . . . . . . . . . . . . . . . . . . . . . . . . . . . . . . . . . . . 44
Page 5
Technical manual Dorado Small Instant
5
© ETNA Coffee Equipment b.v.
COFFEE TECHNOLOGIES
1 INTRODUCTION
1.1 This user manual
Congratulations on the purchase of yourDorado Small Instant.
This machine has been developed and produced using state-of-the-art
technology. This, combined with the ISO 9001 certification that applies
to all our products, means you can rest assured that you are the owner
of a high quality product.
This manual is intended for authorised and trained users and contains
all the information required to operate the machine safely and to carry
out regular maintenance and cleaning tasks. Read the relevant user
manual carefully before using your machine.
☞
Ensure that the user manual is kept with the machine to
ensure that all procedures are carried out correctly.
1.2 Pictograms and safety symbols on the machine
The following pictograms are used on the Dorado Small Instant:
• Electrical hazard
• Risk of fingers being trapped
Figure 1-1
Figure 1-2
WARNING
DISCONNECT THE
MAINS SUPPLY BEFORE
REMOVING COVER
Figure 1-3
DANGER
Follow service
procedure as
in manual.
Page 6

6
© ETNA Coffee Equipment b.v.
Technical manual Dorado Small Instant
COFFEE TECHNOLOGIES
1.3 Pictograms and safety symbols in the manual
These pictograms are used in the manual:
General warning. Damage to the machine or personal
injury can occur.
Ꮨ
Electrical hazard
h
Burning hazard
☞
Remarks, suggestions and advice
1.4 Conventions and definitions
Throughout the document, reference is made to the "left", "right",
"front" and "rear" of the machine. Where a component or specific part
of the machine is referred to, this is described from the user's viewpoint
facing the selection panel.
1.5 Service and technical support
Please contact your dealer for further information on settings,
maintenance and/or repair activities that are not dealt with in this
manual. Your dealer will be pleased to assist you.
If you contact your dealer, always have the following information at
hand:
• model number
• serial number
• software versions
Page 7
Technical manual Dorado Small Instant
7
© ETNA Coffee Equipment b.v.
COFFEE TECHNOLOGIES
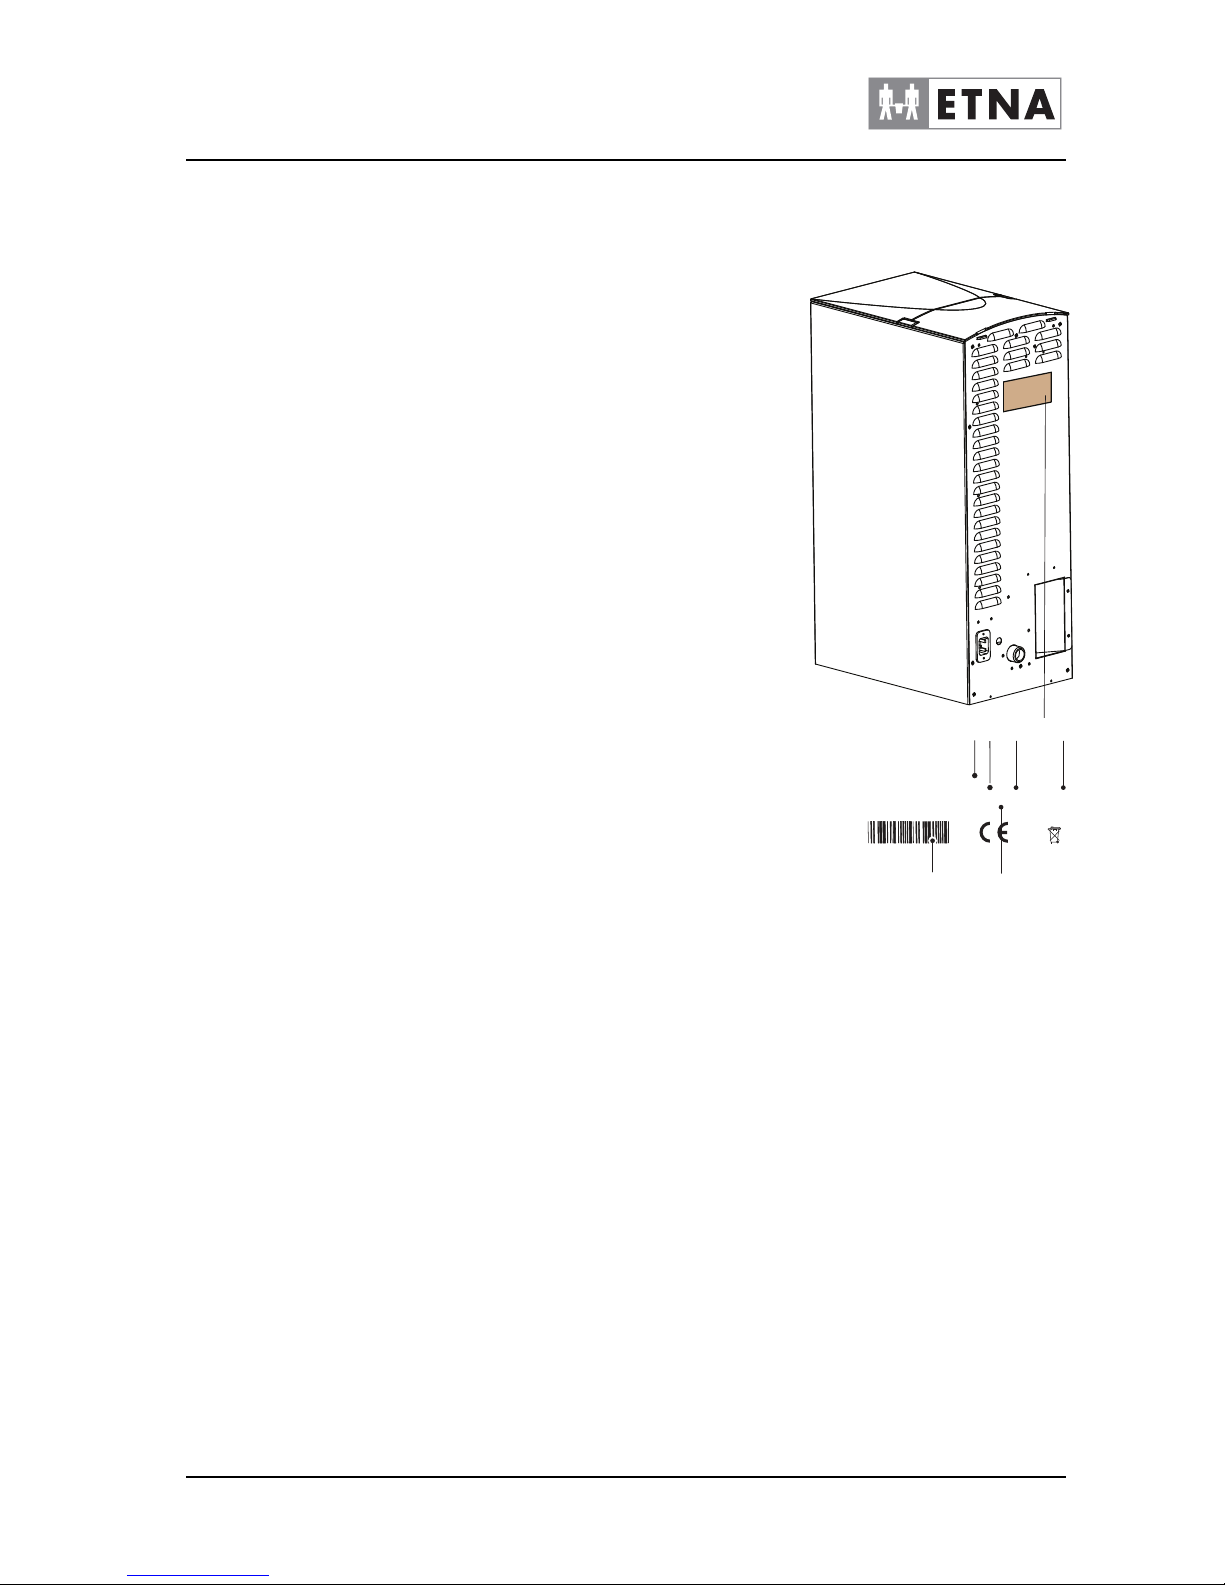
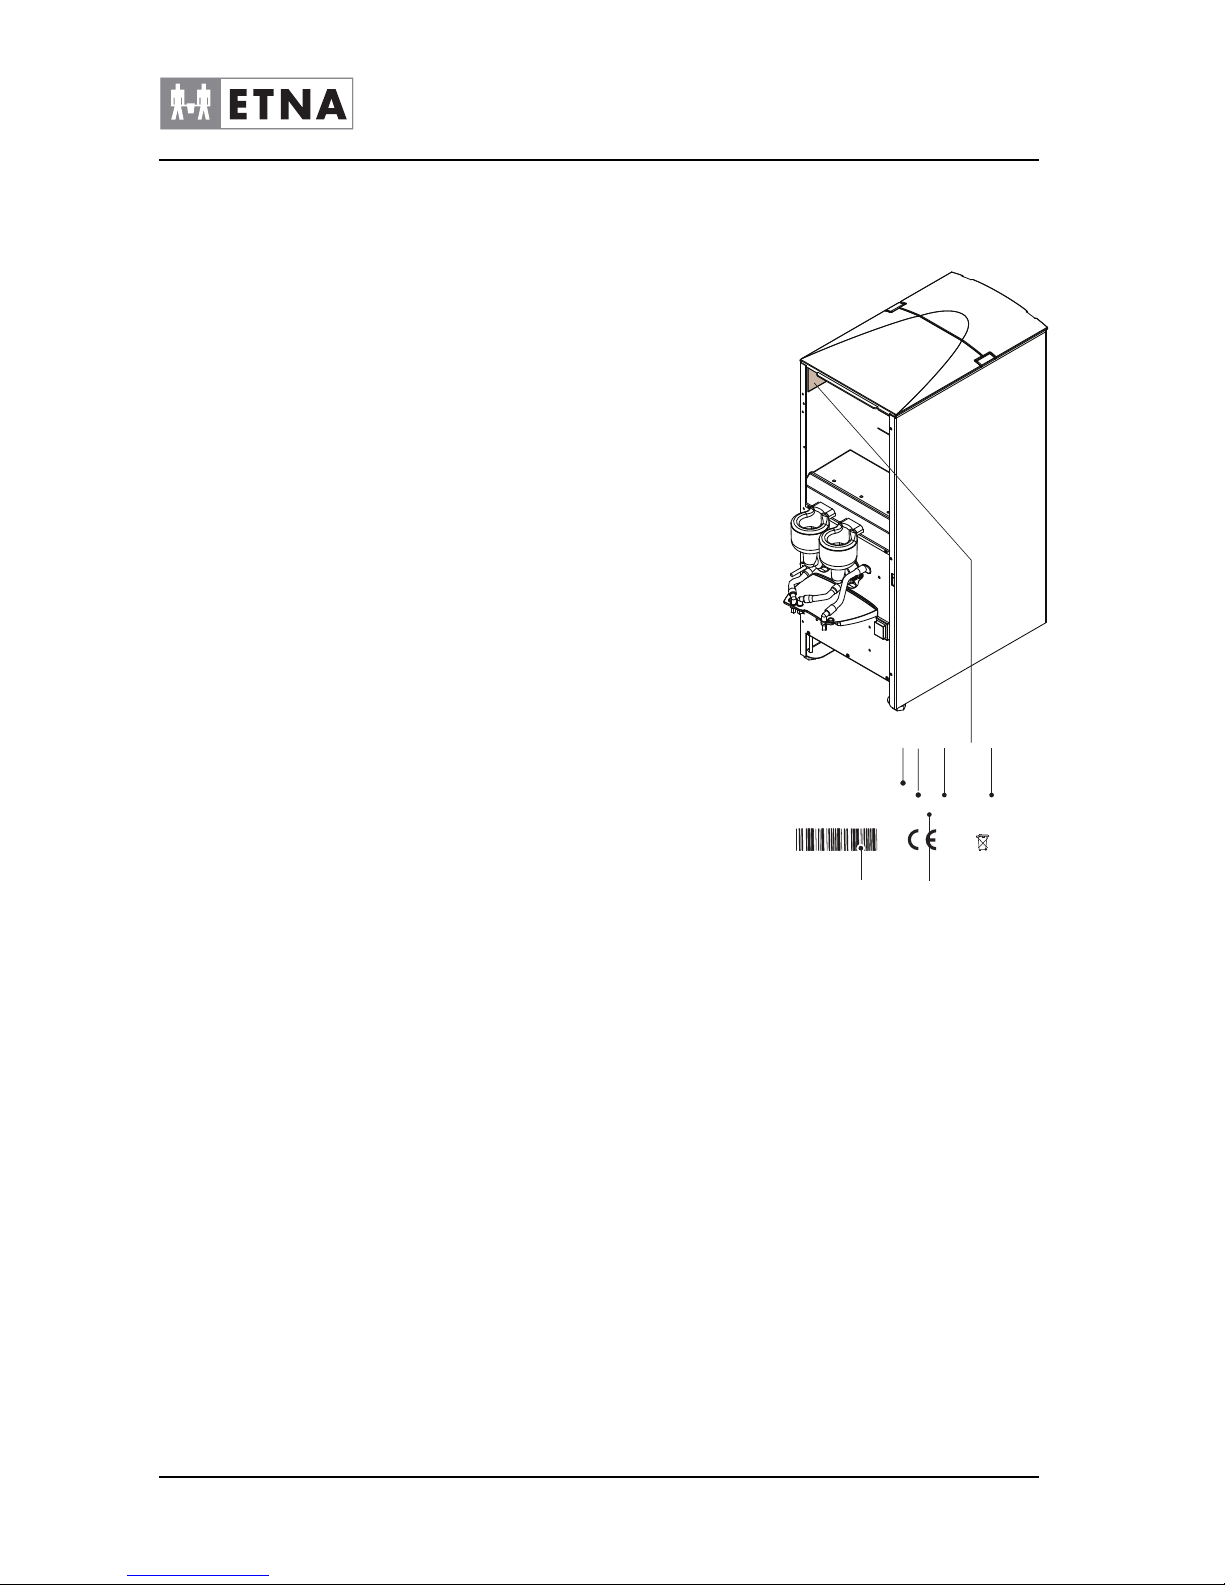
1.6 Machine identification on outside of the machine
1. Model number
2. Voltage
3. Frequency
4. Power rating
5. Serial number
6. Water pressure
The identification plate is on the rear of the machine.
Figure 1-4
5
2
3
6
1
4
Model: xxxxxxx
Voltage: a.c. xxxv xx Hz x kw
Water: xxx - xxx kPa
012540E1
ETNA Coee Technologies BV
Doetinchem Holland
Page 8
8
© ETNA Coffee Equipment b.v.
Technical manual Dorado Small Instant
COFFEE TECHNOLOGIES
1.7 Machine identification inside the machine
1. Model number
2. Voltage
3. Frequency
4. Power rating
5. Serial number
6. Water pressure
The identification plate is on the inside of the left-hand frame plate.
1.8 Used Machinery and the Environment
j
Ask your local authority for information on ways to recycle
materials safely and in an environmentally friendly
manner.
a
Ask your local authority for information on ways to dispose
of materials safely and in an environmentally friendly
manner.
Figure 1-5
2
3
6
1
4
Model: xxxxx
Voltage: a.c. xxxv xx Hz x kw
Water: xxx - xxx kPa
012540E1
ETNA Coee Technologies BV
Doetinchem Holland
5
Page 9

Technical manual Dorado Small Instant
9
© ETNA Coffee Equipment b.v.
COFFEE TECHNOLOGIES
1.9 General safety instructions and restrictions
The manufacturer does not accept liability for any damage caused by
any failure to (strictly) observe the safety instructions or by
carelessness during use and cleaning of the machine and any
associated accessories.
Depending on the specific operating conditions or accessories used,
additional safety instructions may apply. Please contact your dealer
immediately if you encounter any hazards when using the machine.
The user of the machine is fully responsible at all times for
observing locally applicable safety regulations and
guidelines.
1.9.1 Operating and cleaning instructions
• All those using and/or cleaning the machine must be familiar with
and follow the operating and cleaning instructions closely. The
owner must ensure that personnel are informed of the operating
and cleaning instructions contained in this manual and that they
comply with these regulations and instructions.
• Never change the order in which activities are carried out.
• Always keep these instructions in the vicinity of the machine.
1.9.2 Icons and instructions
The icons, symbols and instructions attached to the machine form part
of the safety instructions. Therefore, they must not be covered or
removed. They must be kept within reach and be clearly legible
throughout the entire service life of the machine.
• If icons, symbols or instructions are illegible, ring your supplier
straightaway to rectify this.
1.9.3 Users
The daily, weekly and monthly maintenance and cleaning activities
may only be carried out by users who have received training from the
installer or owner of the machine. These individuals will be familiar with
the potential risks of opening the machine.
1.9.4 Technical specifications
• The technical specifications may not be modified.
1.9.5 Modifications
• Modifications may not be made to the machine (or parts of the
machine).
Page 10

10
© ETNA Coffee Equipment b.v.
Technical manual Dorado Small Instant
COFFEE TECHNOLOGIES
1.9.6 Intended use
The intended use
1
of the machine is designed exclusively for
dispensing beverages as indicated on the selection panel. Use of the
machine for any other purpose falls outside the terms of conditions of
use. The manufacturer does not accept responsibility for any damage
or injury that may result from improper use.
The machine meets current standards and directives.
• The machine may only be used in perfect technical condition for the
purposes indicated above.
1.10 Available documentation
The following documentation is available for this machine:
•User manual
• Technical manual
• Parts book
1. "Intended use" as meant in EN 292-1 is the application for which this technical product has
been made, as specified by the manufacturer – including references in sales brochures. In case
of doubt, use can be derived from the construction, model and functions of the technical product
the assumed normal use. Use of the product within the confines of the intended use also
includes complying with the instructions in the user manual.
Page 11
Technical manual Dorado Small Instant
11
© ETNA Coffee Equipment b.v.
COFFEE TECHNOLOGIES
2 DESCRIPTION OF THE MACHINE
2.1 General description
This machine prepares and dispenses various hot drinks.
The drinks are dispensed in the cups intended for this purpose and
that are placed on the machine cup stand. The cups must be placed on
the cup stand manually.
The display on the machine indicates that:
• a drink can be selected
• a drink is being prepared
• a fault has occurred.
• the machine is performing a function.
2.2 Main components
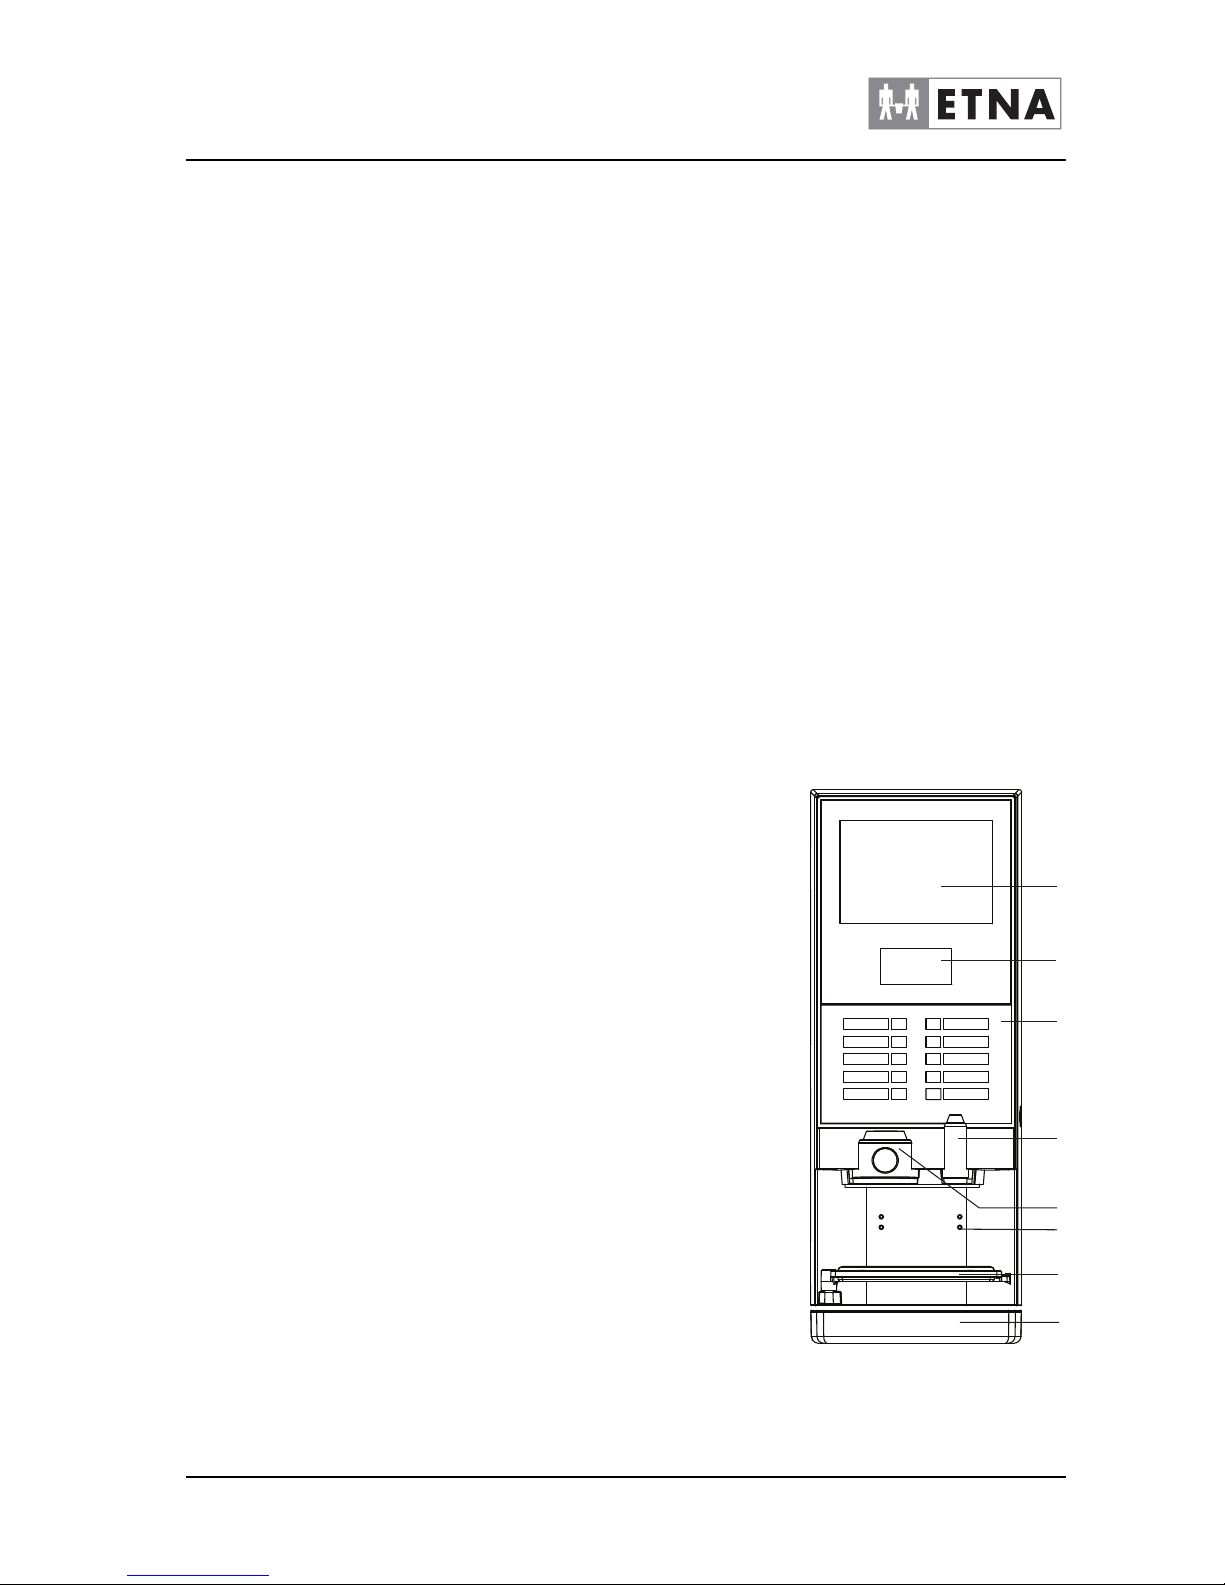
2.2.1 Front view
1. window light
2. Display
3. Selection panel
4. Dispenser water
5. Dispenser hot drinks
6. Cup sensor
7. Cup standard (double)
8. Drip tray
Figure 2-1
6
1
3
4
5
2
7
8
Page 12
12
© ETNA Coffee Equipment b.v.
Technical manual Dorado Small Instant
COFFEE TECHNOLOGIES
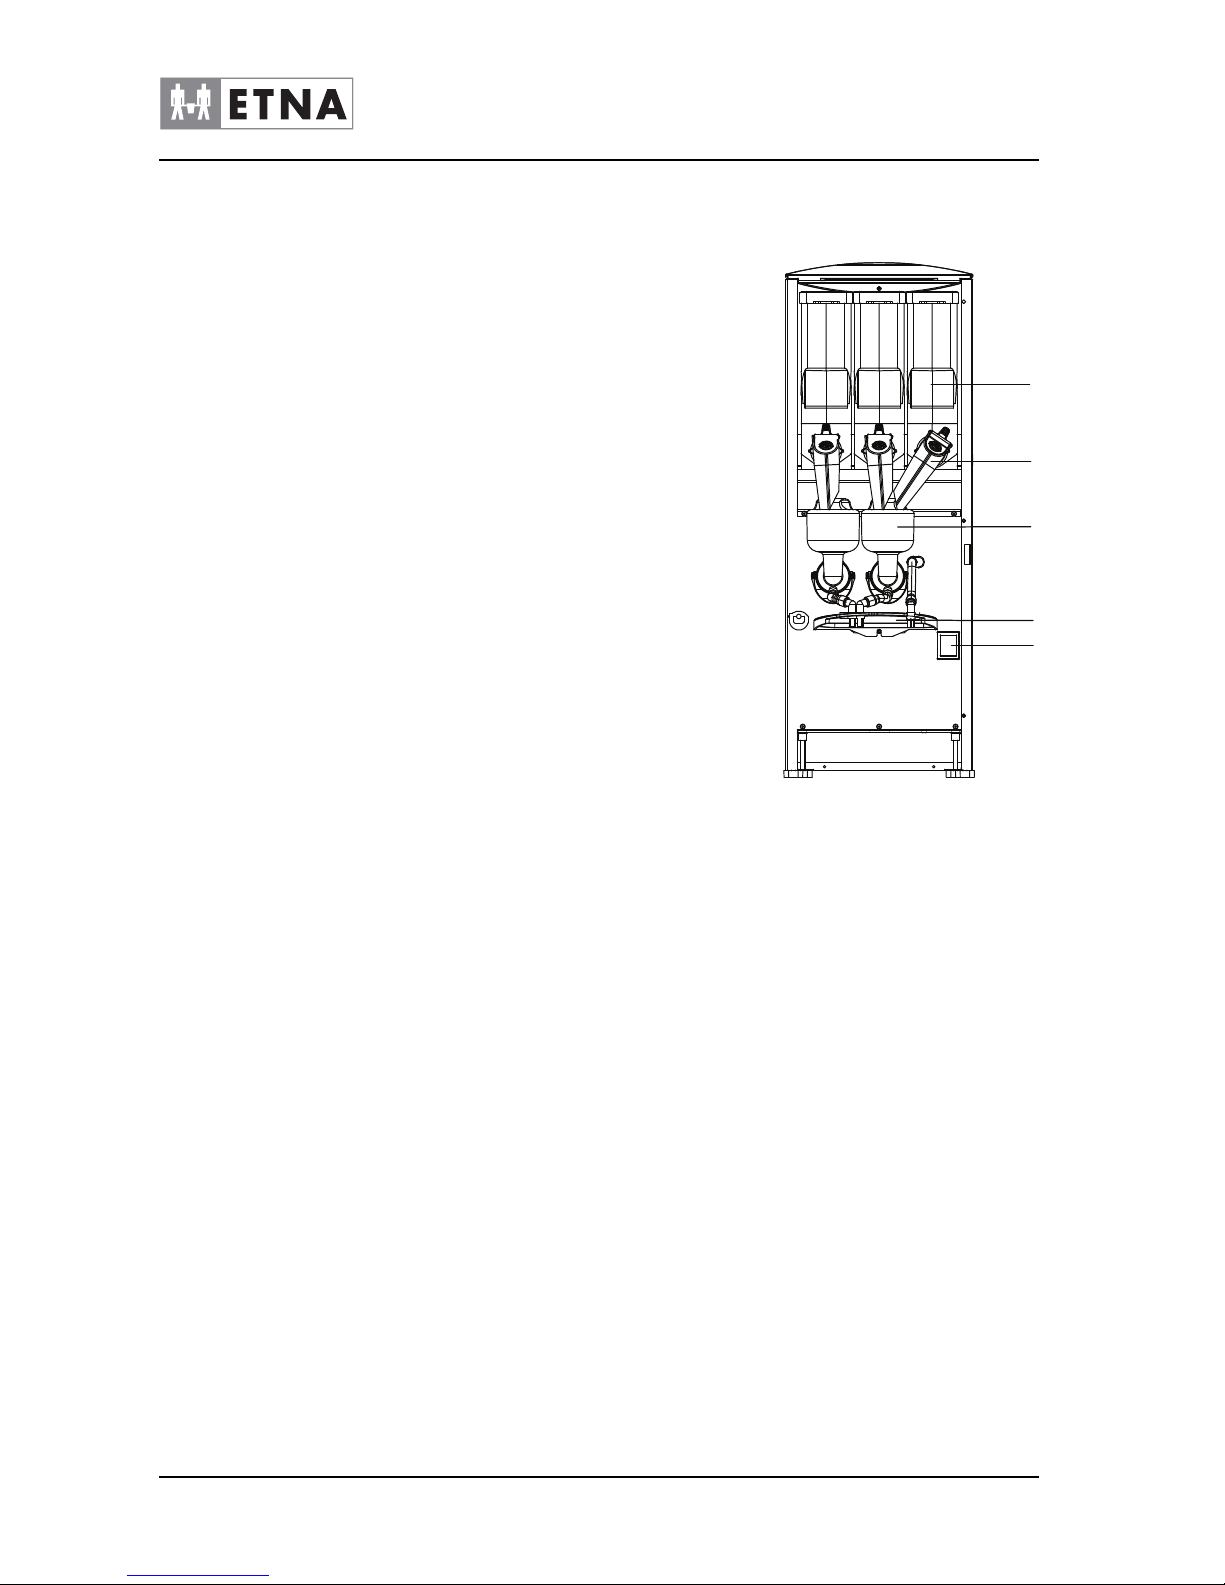
2.2.2 Interior view
1. Ingredient containers
2. Dispensing spout
3. Mixer parts
4. Dispenser holder
5. On/off switch
Figure 2-2
1
2
3
4
5
Page 13
Technical manual Dorado Small Instant
13
© ETNA Coffee Equipment b.v.
COFFEE TECHNOLOGIES
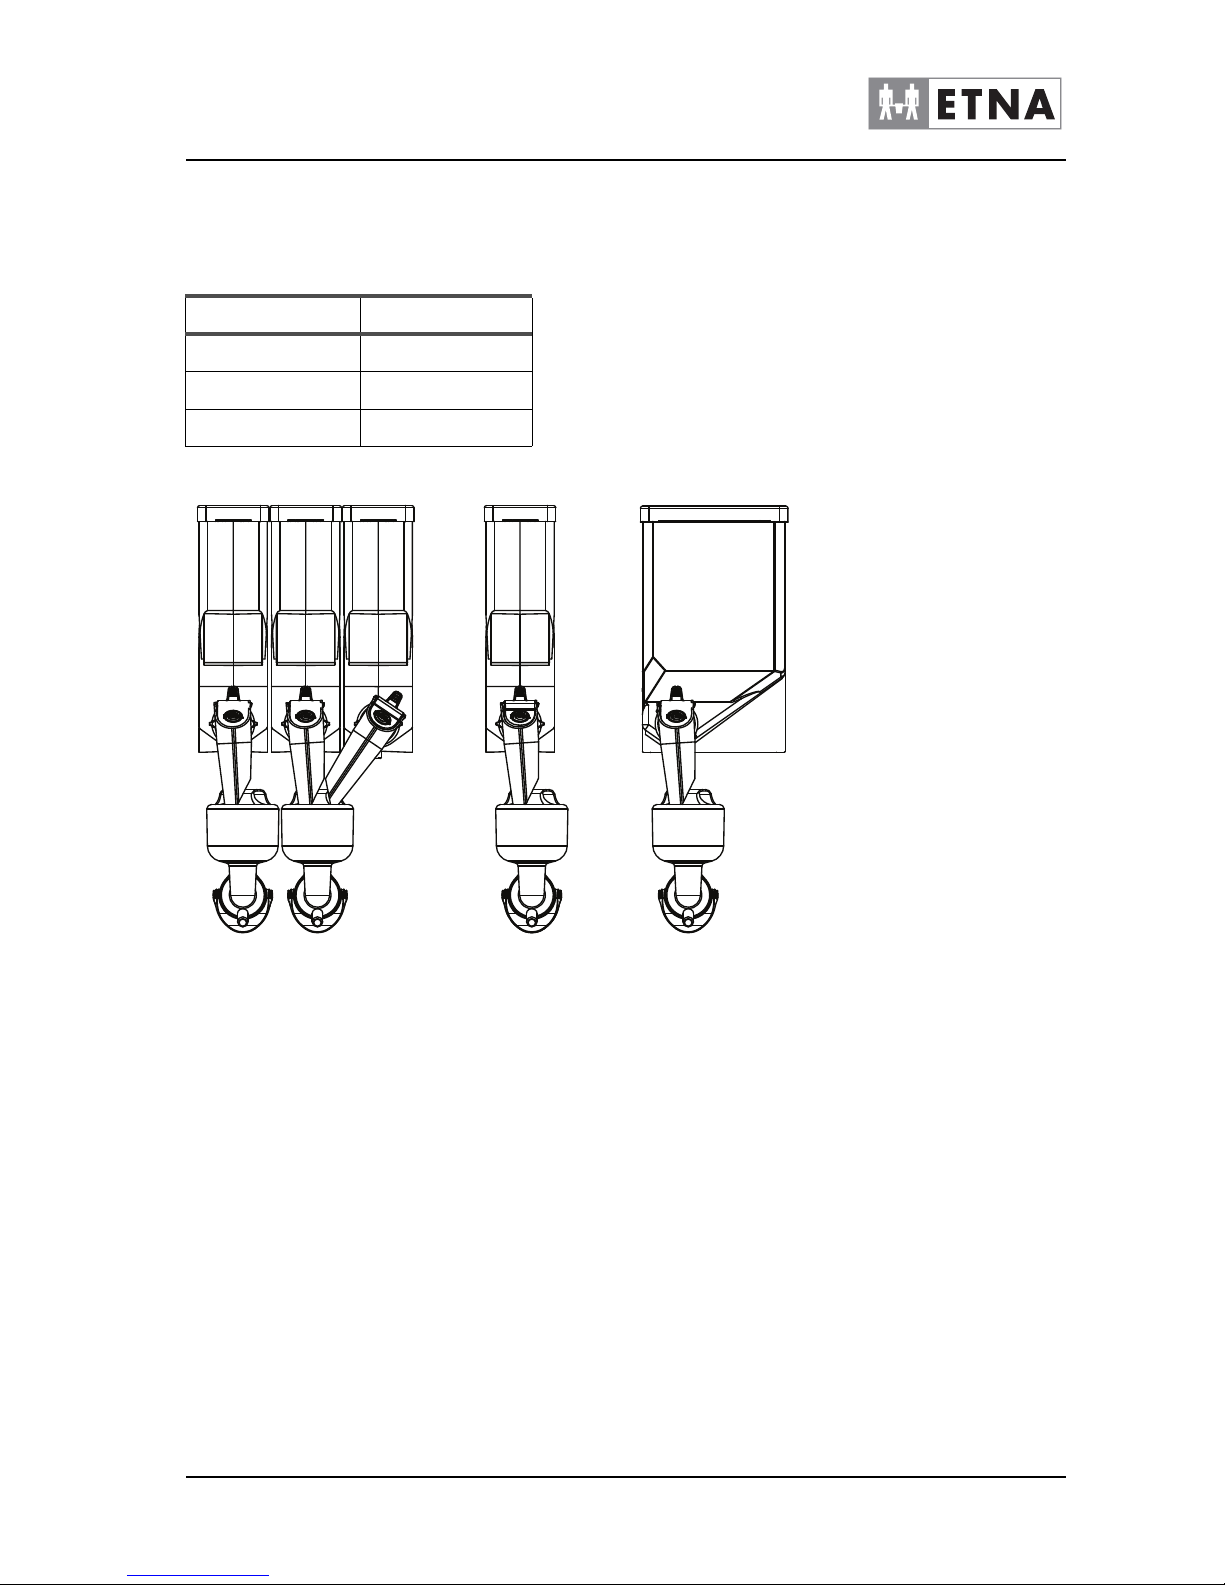
2.3 Container layout
The various types are fitted with the following containers.
2.4 Operating principle
After a selection is made, the machine mixes water with the ingredients
from the containers to dispense the drink.
• The water is supplied via the boiler (heated).
• Instant products or liquid concentrate are dosed from the containers
into the mixer and/or the ground coffee is dosed from the grinder
into the brewer group.
• The water and the ingredients are mixed in the mixer or
compressed by the brewer group.
• The drink is dispensed through the dispenser nozzle into the cup
placed on the cup stand.
Machine Instantcontainer
32 3
11 1
11 1
Figure 2-3
Page 14
14
© ETNA Coffee Equipment b.v.
Technical manual Dorado Small Instant
COFFEE TECHNOLOGIES
2.5 Switching on and off
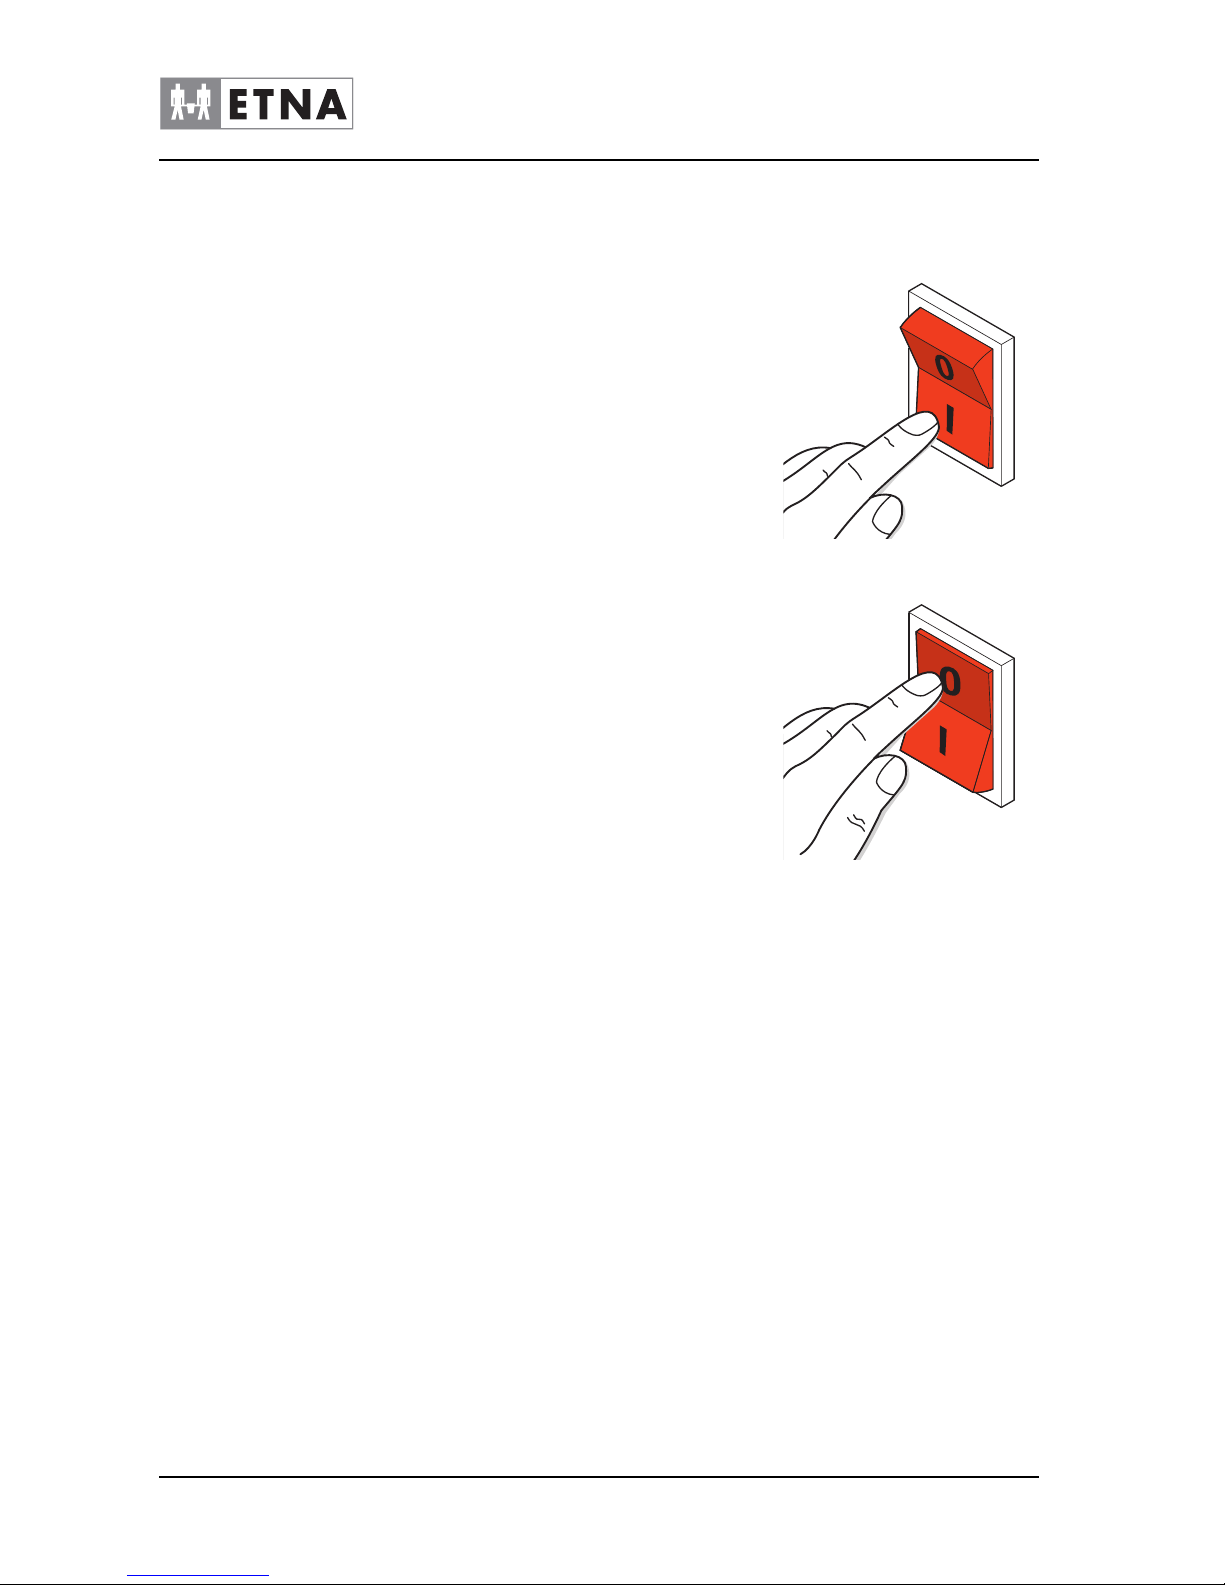
• I pressed in = ON (switch lights up)
• 0 pressed in = OFF
2.6 Operating the machine
The standard version of the machine has no payment mechanism. The
machine can also be optionally fitted with a payment mechanism (for
installation instructions, see the instructions for use supplied with the
payment mechanism).
2.6.1 Strength selector (if applicable)
Select the drink by pressing the button.
The strength can be changed by pressing the selected drink again.
This is also an option when adding items such as sugar and milk, if the
machine allows for this.
Figure 2-4
Figure 2-5
Page 15

Technical manual Dorado Small Instant
15
© ETNA Coffee Equipment b.v.
COFFEE TECHNOLOGIES
2.6.2 Selecting jug function (if applicable)
If the jug function is switched on, the cup sensor is
switched off.
The Jug function button allows you to select several cups at the same
time. This button works with all available drinks. The procedure for
selecting several cups is described below.
1. Push the cup stand up and place a jug under the dispensing spout.
2. Press the Jug button several times for the required number of cups.
3. Press the button for the required drink.
4. Press the START selection button.
If you want to reduce the number of cups while the machine is
dispensing, press the Jug button several times until the required
number is displayed. The machine will then stop after the cup that is
currently being dispensed.
If the machine is equipped with a coin mechanism and a key switch for
the jug function, you can activate the free drink dispensing mode by
placing the key in the slot (the switch) and turning it to the right.
2.6.3 Stand by
Stand by mode is indicated by the following:
• The display shows a standby position.
Press any button to bring the machine out of stand by.
Page 16

16
© ETNA Coffee Equipment b.v.
Technical manual Dorado Small Instant
COFFEE TECHNOLOGIES
3USE
3.1 Safety instructions - use
• Inspect the machine before use and check for any damage and
defects.
Please contact your supplier if there is any damage to the machine.
• Please keep all packaging out of reach of children.
• Put the machine in a horizontal position.
• Put the machine in a location where it can be supervised by trained
staff.
• The machine is not suitable for outdoor use.
• The machine may not be used by persons (including children) with
a physical, mental or emotional handicap, or persons who have
insufficient knowledge and experience to operate the machine
without supervision or instructions, until they have been approved
by a person responsible for their safety.
• Supervision of children must be maintained to ensure they do not
play with the machine.
• Protect the machine from water and/or moisture.
• Do not clean the machine using a high pressure water jet.
• Do not install the machine in an area where a high pressure water
jet may be used.
• Keep the buttons free from dirt and grease and clean them
periodically.
• Use the machine only when the top valves are shut and all the
plates are mounted.
• Never use sharp objects to operate the buttons.
• Only use the cups and pots availabe at reception.
• Make sure that the electricity connection point (wall socket with
earth connection) and the water connection point remain accessible
during use. In case of emergency, the mains plug can then be
removed quickly and the water supply can be shut off immediately.
• When the machine is not used for a long period of time. remove the
holders, disinfect the pipes, clean the machine by hand, clean and
disinfext the mixing parts thoroughly, empty the boiler, disengage
the water supply and the electricity supply. No water should be
present in the machine or its parts.
• When you intend to use the machine after a long period of non-use,
you need to first thoroughly clean the mixing parts and the
preparation group. Place the mixing parts back where they were,
carry out the cleaning programme at least three times and fill all the
holders before using the machine.
h
The drinks prepared by this machine are very hot and
could cause burn wounds.
Ꮨ
In case of danger, disconnect the power supply by
removing the plug from the wall socket. Do not pull the
plug out of the wall socket by the cable.
Disregarding the above instructions can jeopardise the
safe use of the machine.
Page 17
Technical manual Dorado Small Instant
17
© ETNA Coffee Equipment b.v.
COFFEE TECHNOLOGIES
3.2 Filling containers
The containers contain the ingredients for preparing the drinks. There
are 2 ways of filling these containers:
• by opening the top lid and filling the container in the machine;
• by filling the container outside of the machine.
3.2.1 Filling the container in the machine
1. Open the door of the machine.
2. Open the lid on the container that needs refilling. Refill the container
with the correct ingredients.
3. Close the upper lid.
4. If the container was completely empty, the supply will need refilling.
• Hold the container above the waste bucket. Turn the spindle of
the container until the ingredient runs out of it.
3.2.2 Filling the ingredient containers outside the machine
The containers hold the ingredients required to prepare drinks.
Ensure that no fingers are trapped when filling the
containers.
☞
Make sure that the right ingredient is put in the correct
container.
➭
See the label on the inside of the door for an overview of
the maintenance functions.
1. Open the door of the machine.
2. Open the upper lid.
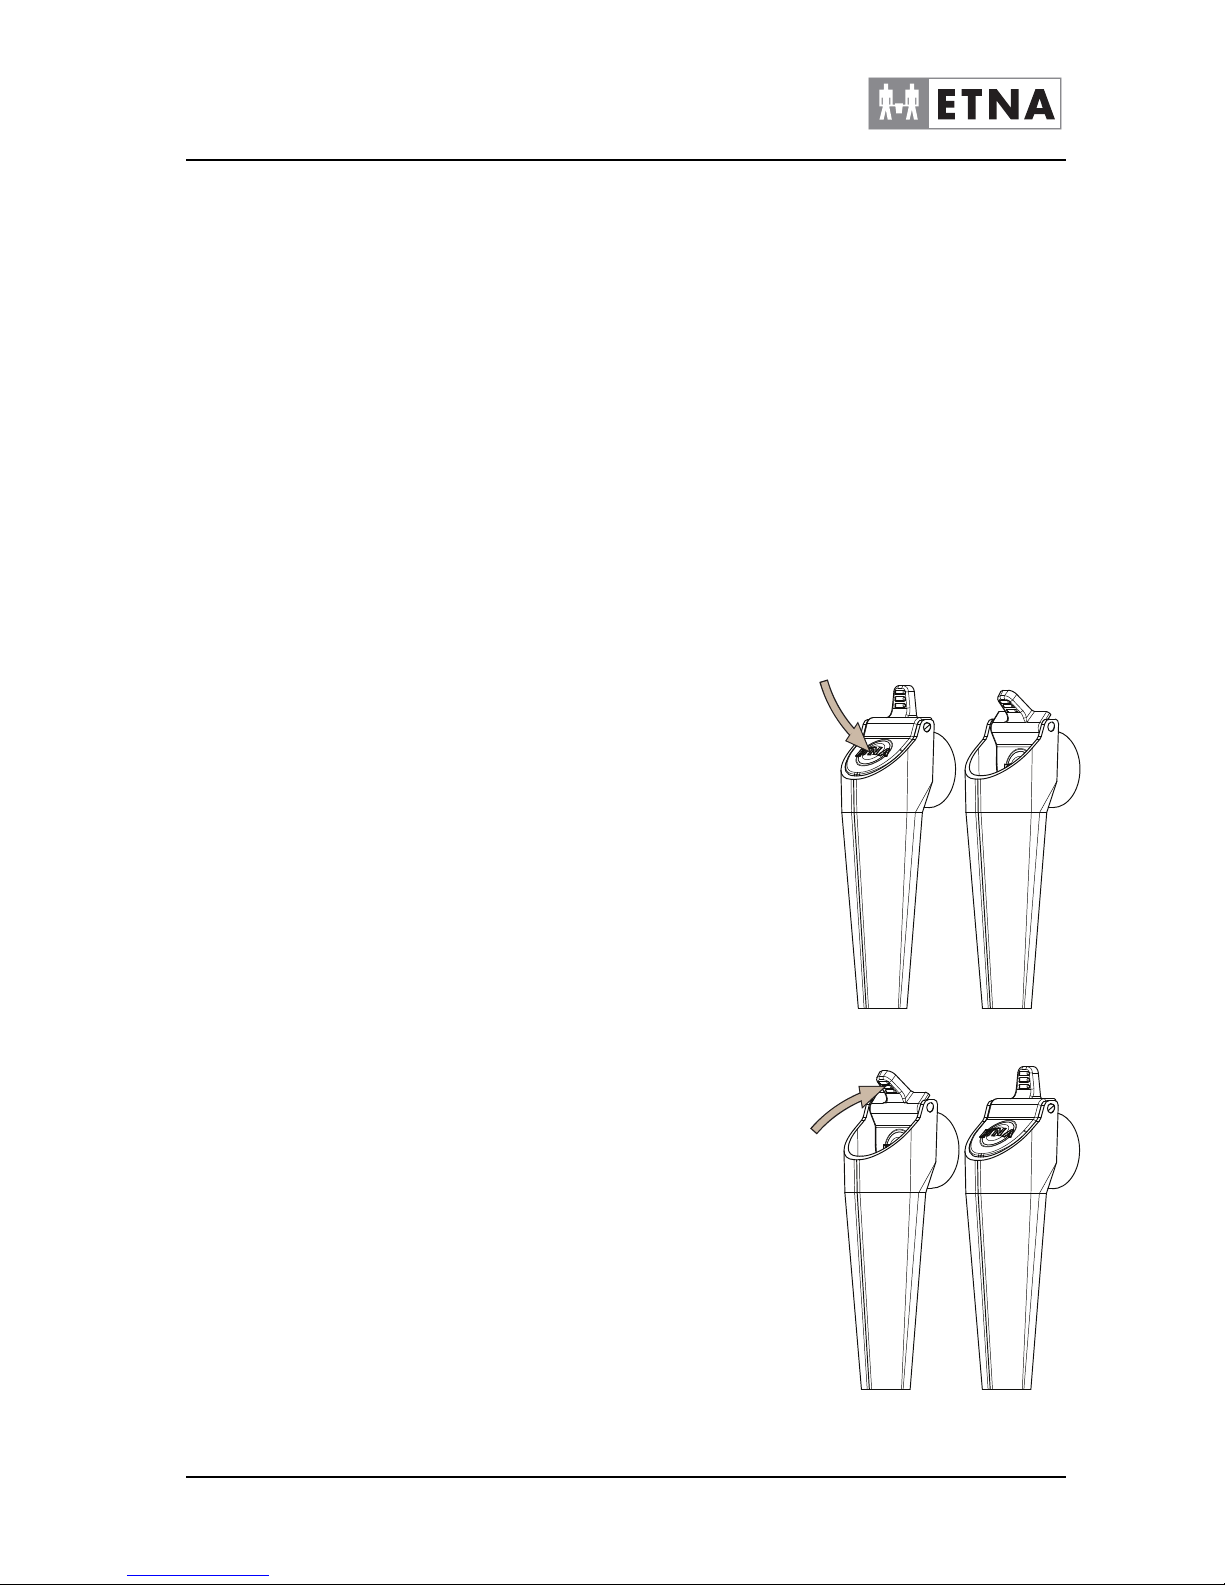
3. Closes the container spout, by pushing the button until it clicks. (zie
figuur 0-1)
4. Lift the containers being filled out of the holder and pull them
towards you.
5. Fill the container with the required ingredient.
6. Replace the container in the machine in its original position. Ensure
that the coupling of the container latches onto the gear.
7. Open the container by pushing the cover down until it clicks open.
(zie figuur 0-2)
8. Repeat this procedure for the other ingredients containers.
9. Close the cover.
10.Place a 1.5 l cup under the dispensing spout.
11.Press button *00* on the service panel; clean valves = rinse mixers.
The valves will be rinsed with water. Repeat if necessary (if
applicable).
12.Close the door of the machine.
Figure 3-1
A
B
Page 18

18
© ETNA Coffee Equipment b.v.
Technical manual Dorado Small Instant
COFFEE TECHNOLOGIES
4 MAINTENANCE AND CLEANING
Accurate maintenance and in particular careful cleaning are basic
conditions for good product quality and smooth operation.
This device is designed so that the owner or license holder is able to
clean and maintain it thoroughly in a relatively short time.
☞
First read paragraph 4.1 before performing any
maintenance work on the device. The maintenance work
described may only be carried out by trained and
authorised users.
4.1 Safety instructions - maintenance and cleaning
• See also par. 3.1.
• Carry out the procedures taking into account the hygiene
regulations.
• Repairs may only be carried out on the machine by trained service
engineers.
• Maintenance work on the electrical system may only be carried out
by trained service engineers with a background in electrical
engineering.
h
Warning with respect to burns: parts within the machine
can be very hot.
• After cleaning or maintenance activities, the machine must not be
used until all the removed parts have been correctly reinstalled.
Then inspect and check the inside of the machine:
• The dispenser holder must be aimed at the middle of the cup.
• The ingredient containers must be correctly placed.
• The mixer components must be in the correct position.
• The waste container must be in the correct position. (if applicable)
• The brewer group must be in the correct position. (if applicable)
4.2 Perishable ingredients
The ingredients have been supplied with a use by date.
The following therefore needs to be taken into account:
• Comply with the use by date printed on the product packaging.
• Do not use ingredients, which are approaching the use by date.
• Replace any ingredients whose use by date has passed.
• Do not use opened ingredients for longer than the use by date
indicated.
• Replace any opened ingredients whose use by date has passed.
• Only use the cleaning agents referred to in the cleaning schedule
and follow the instructions on the packaging.
Page 19
Technical manual Dorado Small Instant
19
© ETNA Coffee Equipment b.v.
COFFEE TECHNOLOGIES
4.3 Service panel
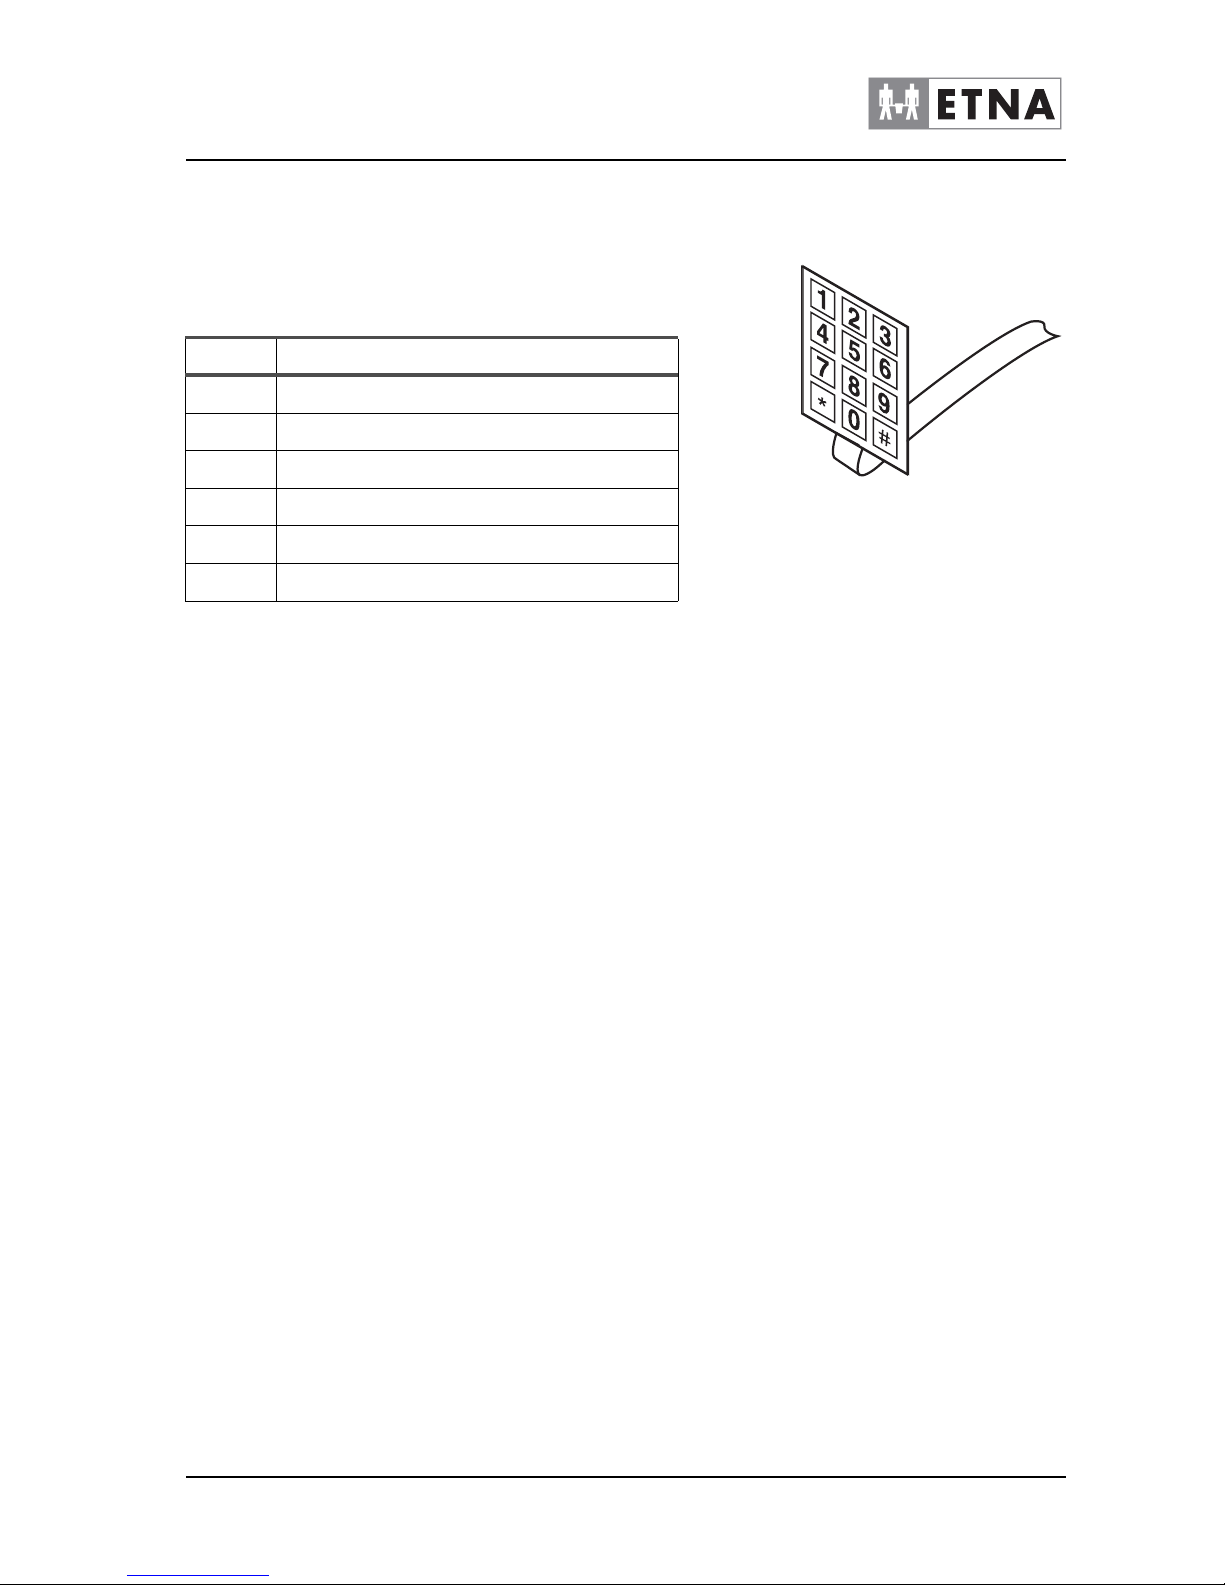
The service panel will become visible when the door is opened. The
following maintenance activities can be carried out via the service
panel (if present):
4.4 Maintenance
The quality of the drinks is only guaranteed if the machine is properly
maintained on a regular basis. A number of essential components in
the machine are highly sensitive to dirt. Use of this machine requires
both daily and weekly maintenance.
4.5 Daily maintenance
Carry out the following operations on a daily basis:
• Check the contents of the ingredient containers and refill them if
necessary.
• Clean and empty the drip tray.
• Rinse the mixers and clean the valves (at least 2x a day).
• Clean the outside of the machine, including the selection panel.
When cleaning, pay attention to the following:
• Clean the machine and parts with a damp, clean cloth or paper
tissue.
• Always put the cleaned parts straight back in the machine.
• Clean the machine more frequently than specified if necessary;
more frequent cleaning will be required when the machine is
subject to heavy use.
4.5.1 Checking the ingredient containers
1. Open the door.
2. Check whether the ingredient containers still contain sufficient
ingredients.
3. If necessary, prime the containers as described in (see chapter
3.2).
4. Shut the door of the machine.
Figure 4-1
Button Function
*00* Clean valves + rinse mixers
*05* Toggle paiment modeg
*07* Read counters
*08* Fill pump (liquid only)
*09* Reset ingredient counters (only liquid)
*10* Change light
Page 20
20
© ETNA Coffee Equipment b.v.
Technical manual Dorado Small Instant
COFFEE TECHNOLOGIES
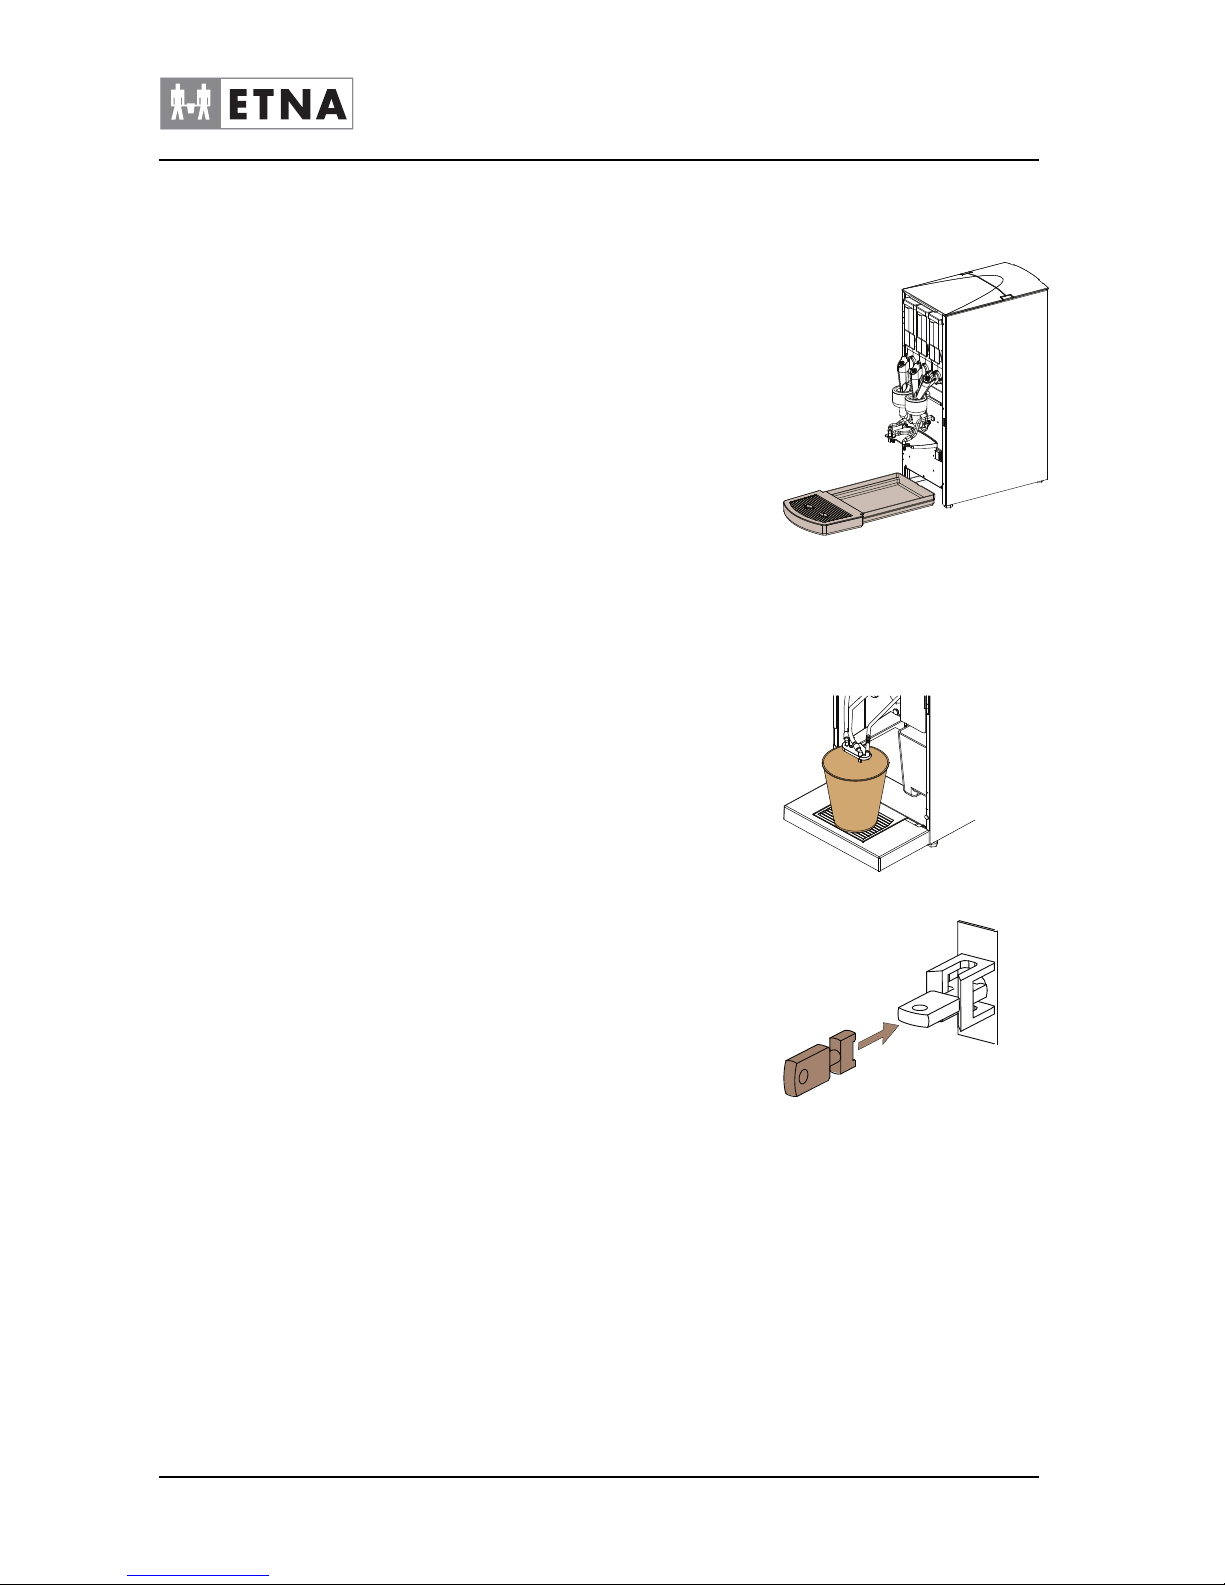
4.5.2 Cleaning drip tray
The drip tray must not be washed in a dishwasher.
1. Take the drip tray out of the machine carefully.
2. Empty the drip tray and clean it with water.
3. Put the drip tray back in the machine.
4.5.3 Clean valves and rinse the mixers.
Rinsing the mixers:
1. Open the door.
2. Use the service key (if available).
3. Place a jug (min. 1,5 l) under the dispenser holder.
4. Press *00* of the service panel (on the inside of the door) to clean
the valves + rinse the mixers.
5. Remove the cup and the service key (if available) and close the
door.
6. Empty the cup.
4.5.4 Clean the exterior
Clean the outside of the machine with a damp, clean cloth or paper
towel. Pay special attention to:
• The selection panel
• The area around the drink dispenser unit.
• The bottom of the door.
4.6 Weekly maintenance
Carry out the following operations on a weekly basis:
• Clean the mixer components
Figure 4-2
Figure 4-3
1,5
L
Figure 4-4
Page 21
Technical manual Dorado Small Instant
21
© ETNA Coffee Equipment b.v.
COFFEE TECHNOLOGIES
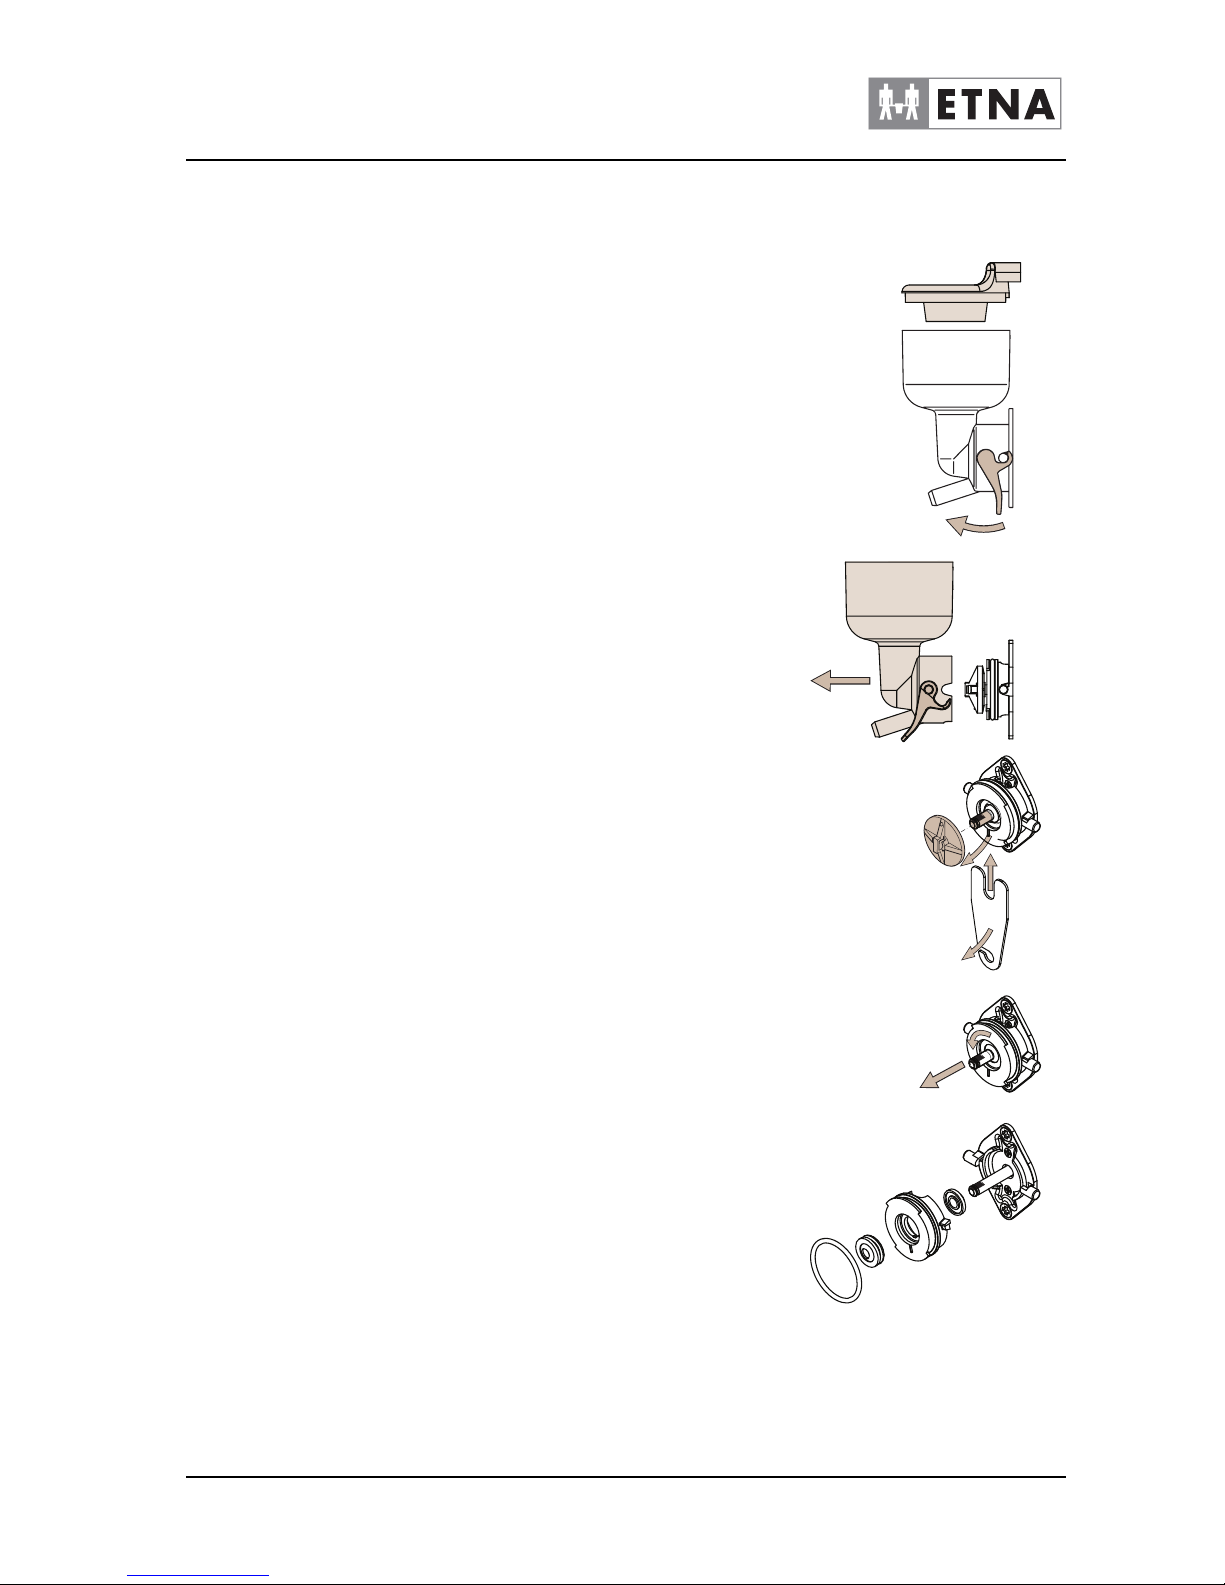
4.6.1 Cleaning mixer parts
Clean the following parts during weekly maintenance:
• Extractors
• Mixing compartments
• Hoses
• Suction filter cover
•Mixer blade
Wash your hands before starting on this procedure.
1. Open the door.
2. Switch the machine off at the on/off switch.
3. Remove the closed ingredient containers from the machine. Store
in a dry, clean place.
4. Disconnect the hoses from the mixing compartments.
5. Disconnect the hoses from the dispenser nozzles.
6. Take the dispensing nozzles out of the dispenser holder.
7. Release the mixing compartment by pulling the green catch on the
underside forwards.
8. Take the mixing compartment out of the machine by carefully
pulling the bottom of the compartment towards you.
9. Use the tool to remove the mixer blade from the shaft of the motor.
Move the tool forwards carefully until it clicks. Then remove the
mixer blade manually.
10.Turn the mixerbase a quater and remove forward.
11.Remove the O-ring, seal and seal ring.
12.Clean all parts in hot water and dry them carefully.
13.Clean the area directly surrounding the mixer in the machine with a
damp cloth.
Figure 4-5
1
2
3
4
5
Page 22
22
© ETNA Coffee Equipment b.v.
Technical manual Dorado Small Instant
COFFEE TECHNOLOGIES
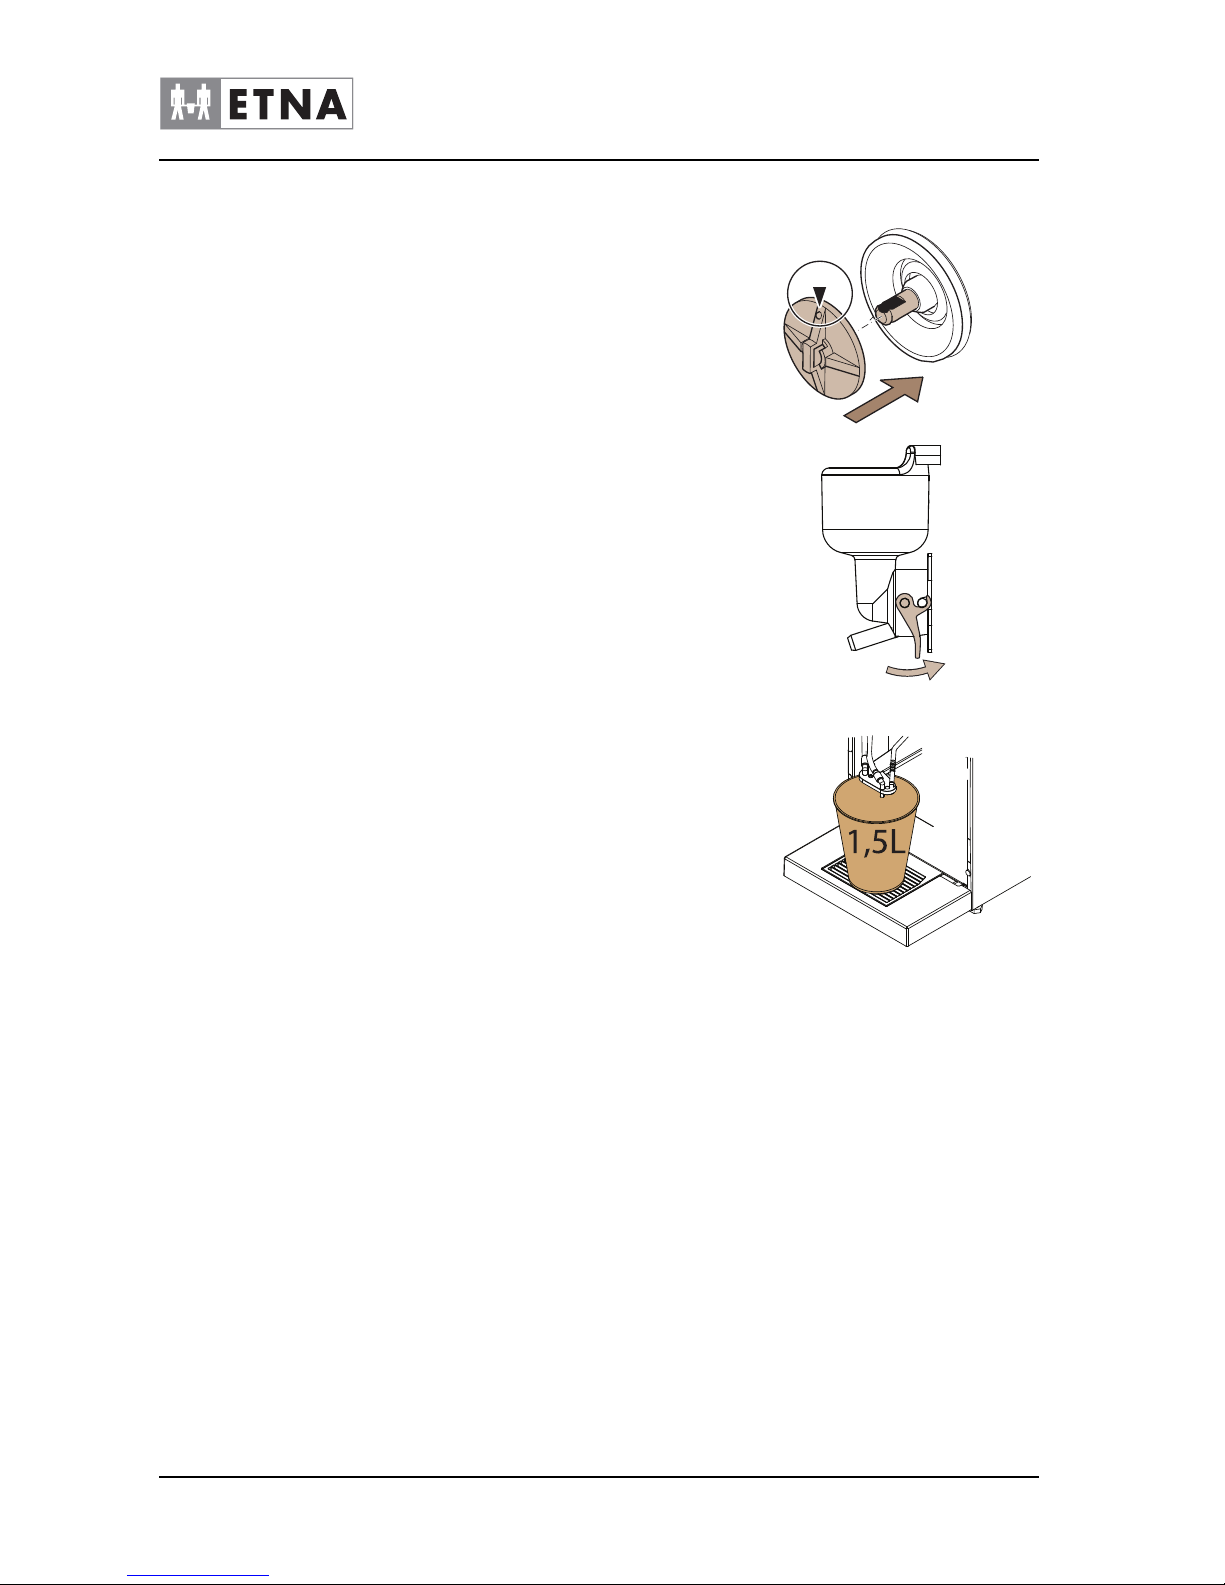
14.Put the mixer blade back in place. Ensure that the marker on the
mixer blade is aligned with the flat part on the motor shaft.
15.Put the other cleaned parts back into the machine and connect the
hoses.
☞
The mixing compartment must latch securely in place to
prevent leaks. Ensure that the green catch snaps back
into place.
16.Switch the machine on at the on/off switch.
17.Place a 1.5 l cup under the dispenser holder.
18.Press button *00* on the service panel; clean valves + rinse mixers.
19.Check that nothing leaks.
20.Close the door of the machine.
4.7 Maintenance overview
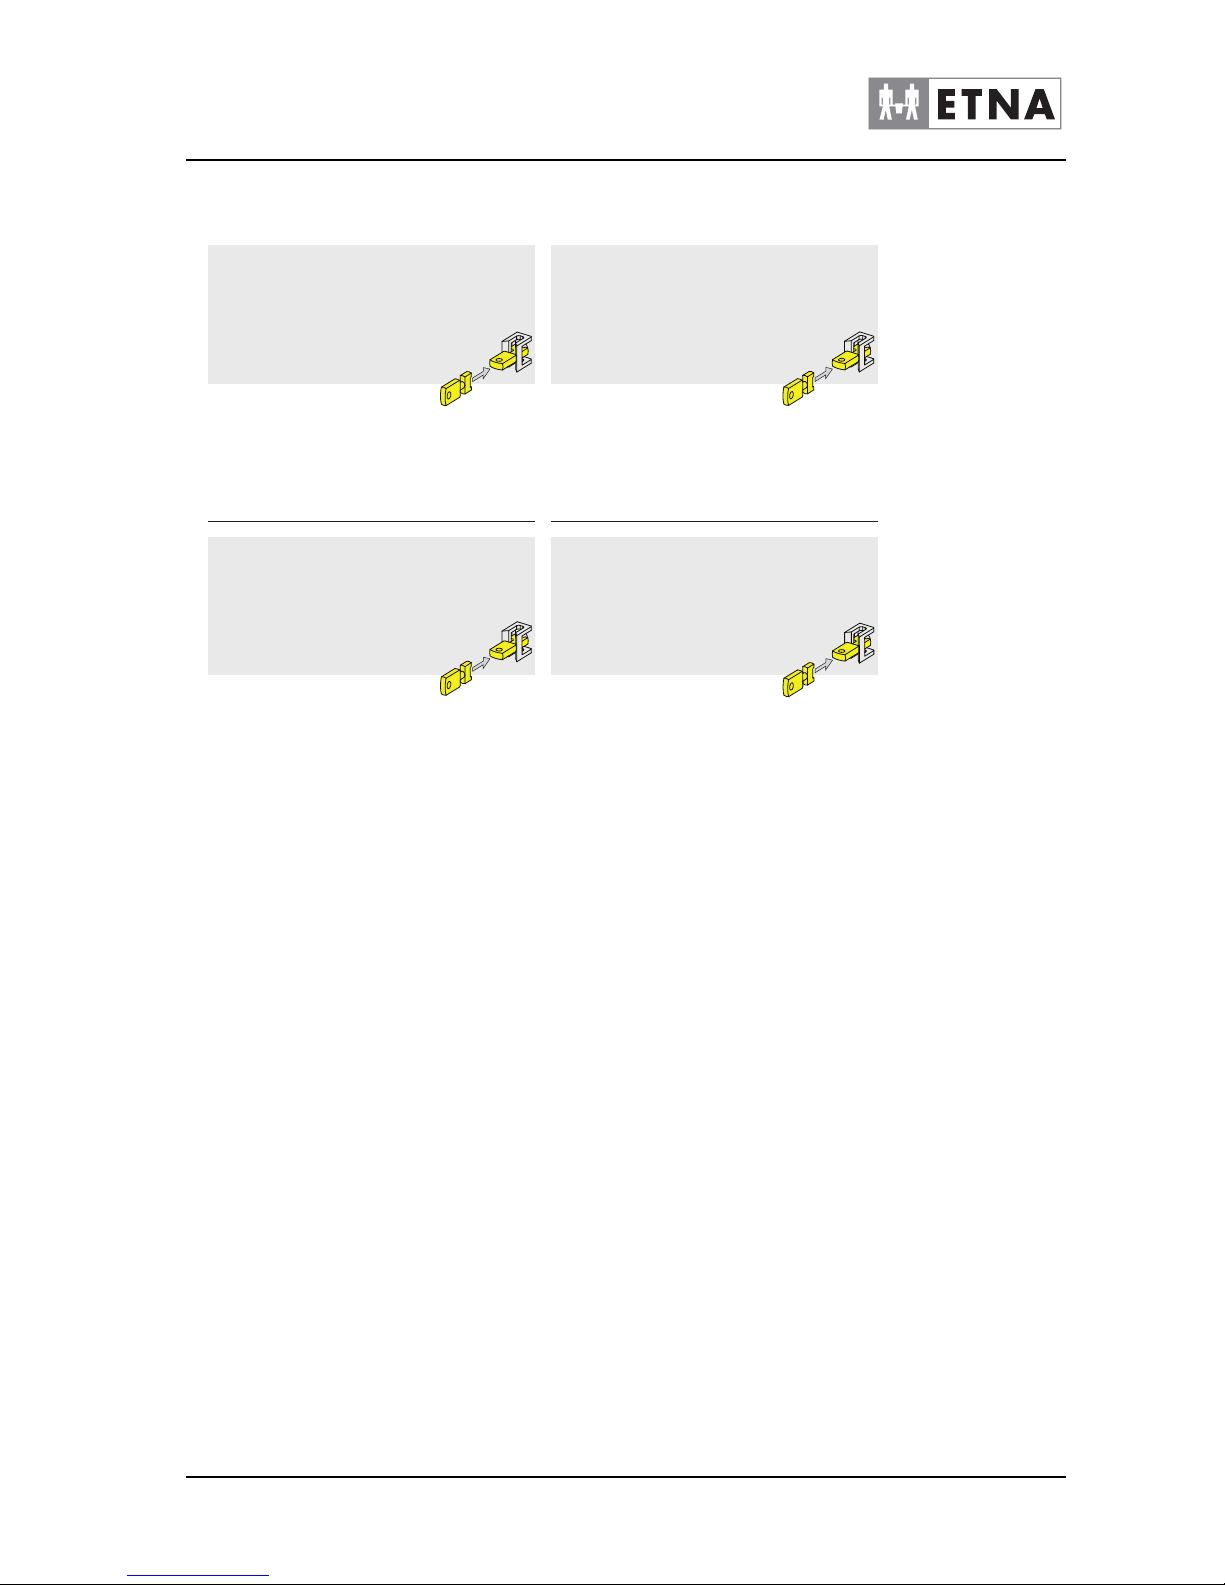
The stickers with an overview of the maintenance activities to be
carried out are affixed on the inside of the door.
Figure 4-6
!
Figure 4-7
Page 23
Technical manual Dorado Small Instant
23
© ETNA Coffee Equipment b.v.
COFFEE TECHNOLOGIES
*00* Reiningen ventielen + spoelen mixers
*05* Gratis / Betaalde uitgifte
*07* Tellers uitlezen
*08* Pomp vullen (alleen liquid)
*09* Reset ingrediënt teller (alleen liquid)
*10* Uitgifteverlichting wijzigen
Dagelijks onderhoud
Controleer de containers, leeg de lekbak en
spoel 2 á 3 maal (toets *00*)
Wekelijks onderhoud
Mixerdelen, afzuigbak (instant-versie) en
slangen uitnemen en reinigen met heet water.
000869393000
*00* Ventil reinigen + Mischer spülen
*05* Gratis / Zahler Produkt Gezahlt
*07* Zählers auslesen
*08* Pumpe füllen (nur liquid)
*09* Behälter zuruck stellen (nur liquid)
*10* Licht ändern
Tägliche Wartung
Kontrolliere die Behälter, reinige der Tropfschale
und Spüle 2 oder 3 mal (*00*)
Wöchentliche Wartung
Mixer(s), Filtergehäuse und Schläuche ausnemen und durchspülen mit heißes wasser.
*00* Clean valves + rinse mixers
*05* Toggle payment mode
*07* Read counters
*08* Fill pump (only liquid)
*09* Reset ingredient counters (only liquid)
*10* Change lightning
Daily maintenance
Check the containers, clean the drip tray and
rinse 2 or 3 times (*00*)
Weekly maintenance
Remove mixer(s), filter housing and hoses and
clean in hot water
*00* Nettoyez les vannes+rincez les mixeurs
*05* Emission/payante libre
*07* Dispositifs de comptage/achever de lire
*08* Remplissage le pompe (seulement liquide)
*09* Pipeau prép/éteint (seulement liquide)
*10* Changez la lumière
Entretien quotidien
Contrôlez les réservoirs, videz le bac
collecteur et rincez 2 ou 3 fois (touche *00*).
Entretien hebdomadaire
Démontez les mixeurs, le filter et les tuyaux
et rincez avec l’eau chaude.
Page 24
24
© ETNA Coffee Equipment b.v.
Technical manual Dorado Small Instant
COFFEE TECHNOLOGIES
5 RESOLVING PROBLEMS
5.1 LCD display on the selection panel
If faults occur in the machine, the LCD display on the selection panel
will display a fault message.
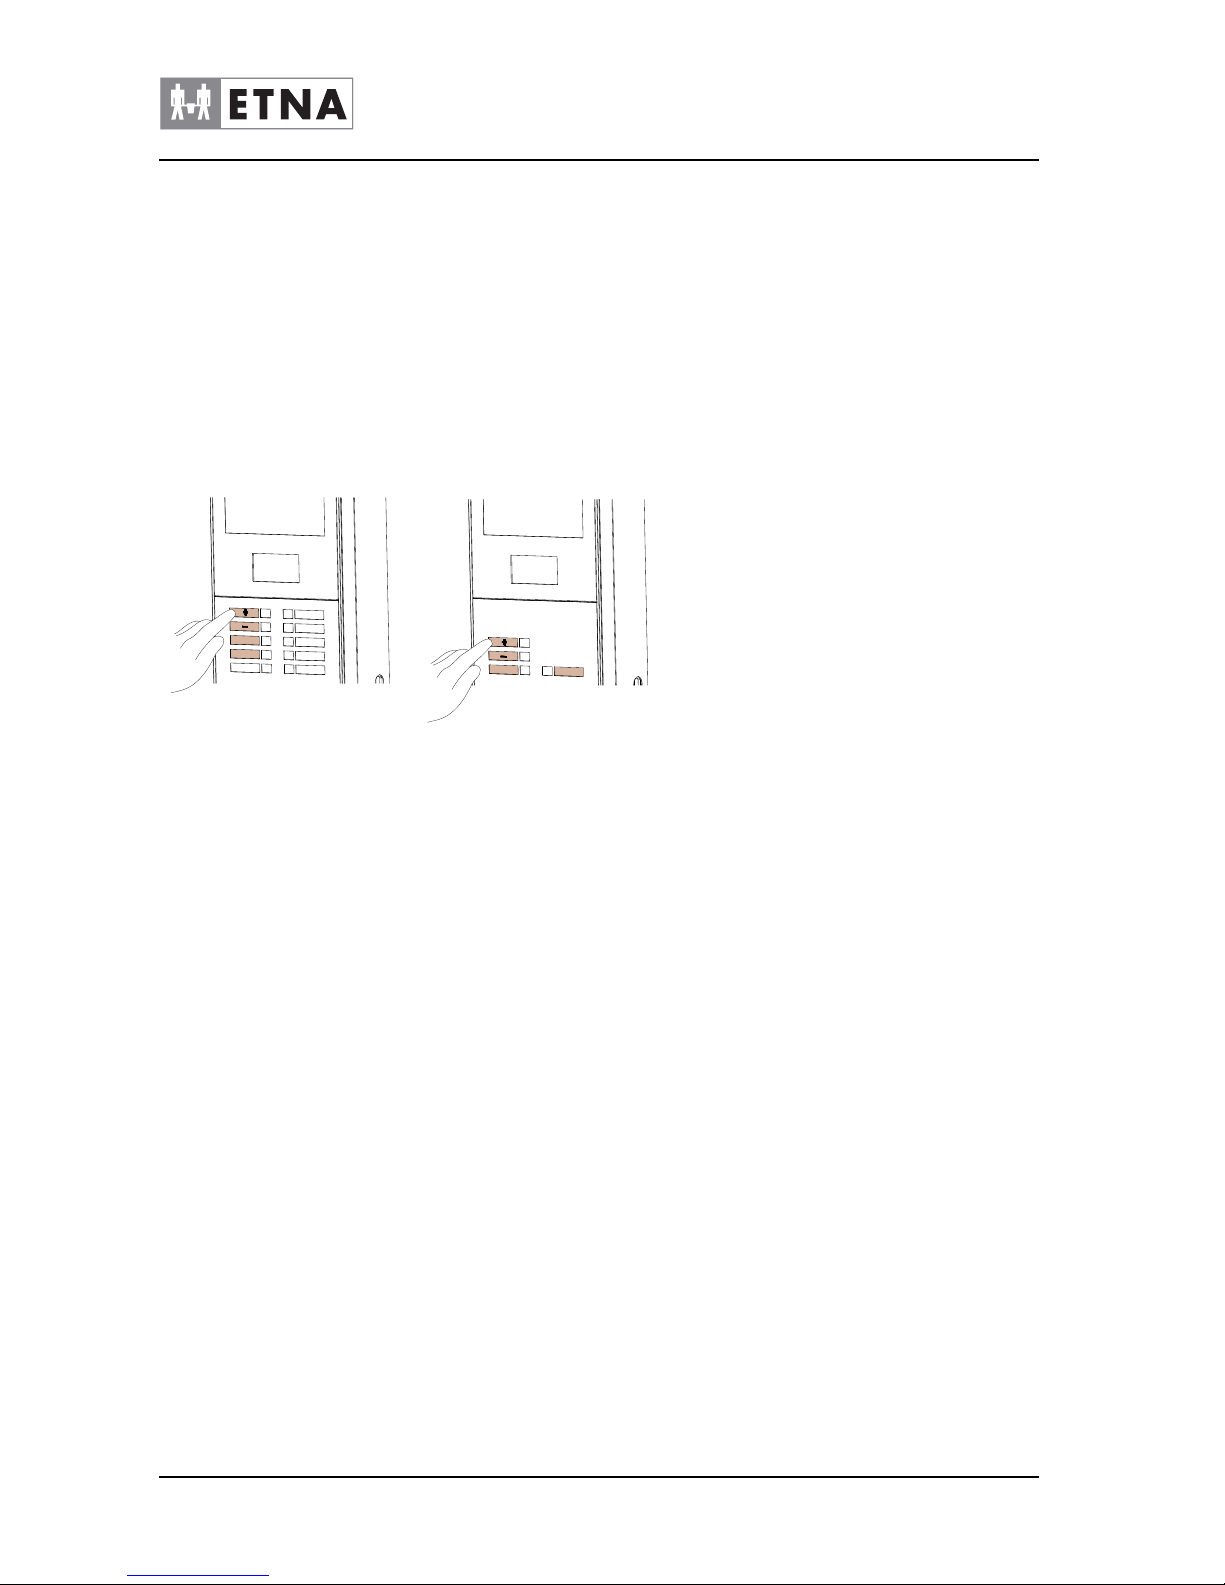
5.1.1 Selection panel in programming mode
When the programming mode is used, the selection panel has the
following functions:
• + or -, these keys are used to navigate the menu, or to increase or
decrease values.
• ENTER, this key confirms the value that is set.
• # (on the service panel), this key is used to navigate back through
the menu.
Figure 5-1
escesc
enterent
er
escesc
enterent
er
Page 25
Technical manual Dorado Small Instant
25
© ETNA Coffee Equipment b.v.
COFFEE TECHNOLOGIES
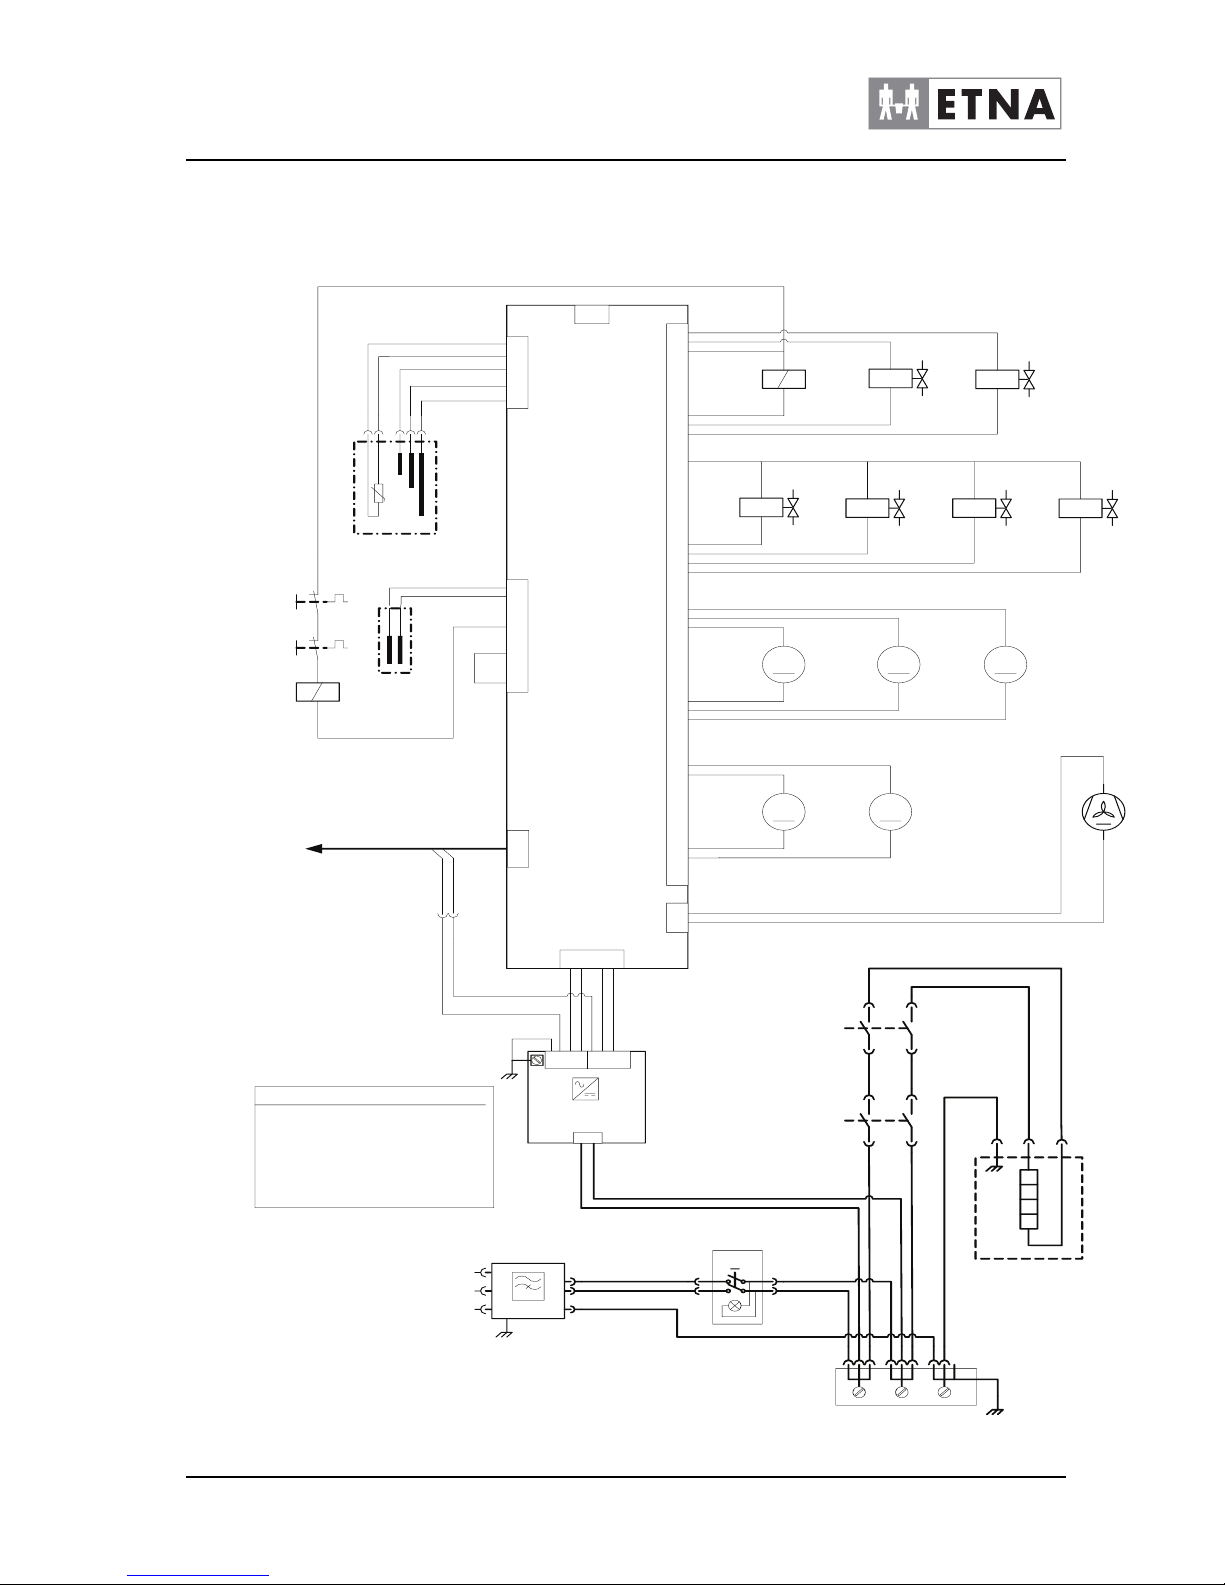
5.2 Electric diagram
Figure 5-2
Mainboard
V3K
868718 000
12
L N P E
K2
PSU 24V DC
865005200
24V +0V
1
2
4
6
12
5
4
3
2
1
Line Filter
CON 10
Drip Tray
CON 9
CON 1
PE
N
L
CON6
MDB
CON 11
CON 13
43 21
brbl
rd
bk
gn
bl
yl
= red
= black
= green
= blue
= yellow
wh
gr
pl
br
or
= white
= grey
= purple
= brown
= orange
Wire Colors
br bl
br
bl
yl
bk
rd rdbk bk
blbr
ntc
Boiler sensors
Heater Configuration :
1 = 2,25k W – 230V AC
2 = 3,3kW – 230V AC
gn
or
wh
gr
br
yl/g r
yl/g r
bk
Electrical Circuit Diagram
Dorado Small Instant 032
Nr: 869335000 R ev.01
brK1bl
bl
br
Power
switch
gn
bk
K2
Boiler overflow
Resetable
thermofuse
t: 90ºC
Boiler lit
Resetable
thermofuse
t : 110ºC
gn
or
24V
Power
User
Interface
User
Interface
11
12
2
3
24
23
4
14
15
16
13
8
6
5
17
18
20
10
9
21
22
M
Inlet valve
M M
MM
Cold Wat er
(option )
Heater K 1
Water 1 Water 2 Hot Water
Contai ner1
Container 2
Container 3
Mixer 1 Mixer 2
rd
rd
rd
gr
wh
bl
rd
bl
rd
rd
bn
gn
rd
pl
gn
rd
or
yl
bk
or
rd
gr
CON 2
2
1
Turbo
(optional)
bn
rd
Electrical configuration:
230V / 50Hz
rd
wh
bk
rd
rd
bk
Page 26
26
© ETNA Coffee Equipment b.v.
Technical manual Dorado Small Instant
COFFEE TECHNOLOGIES
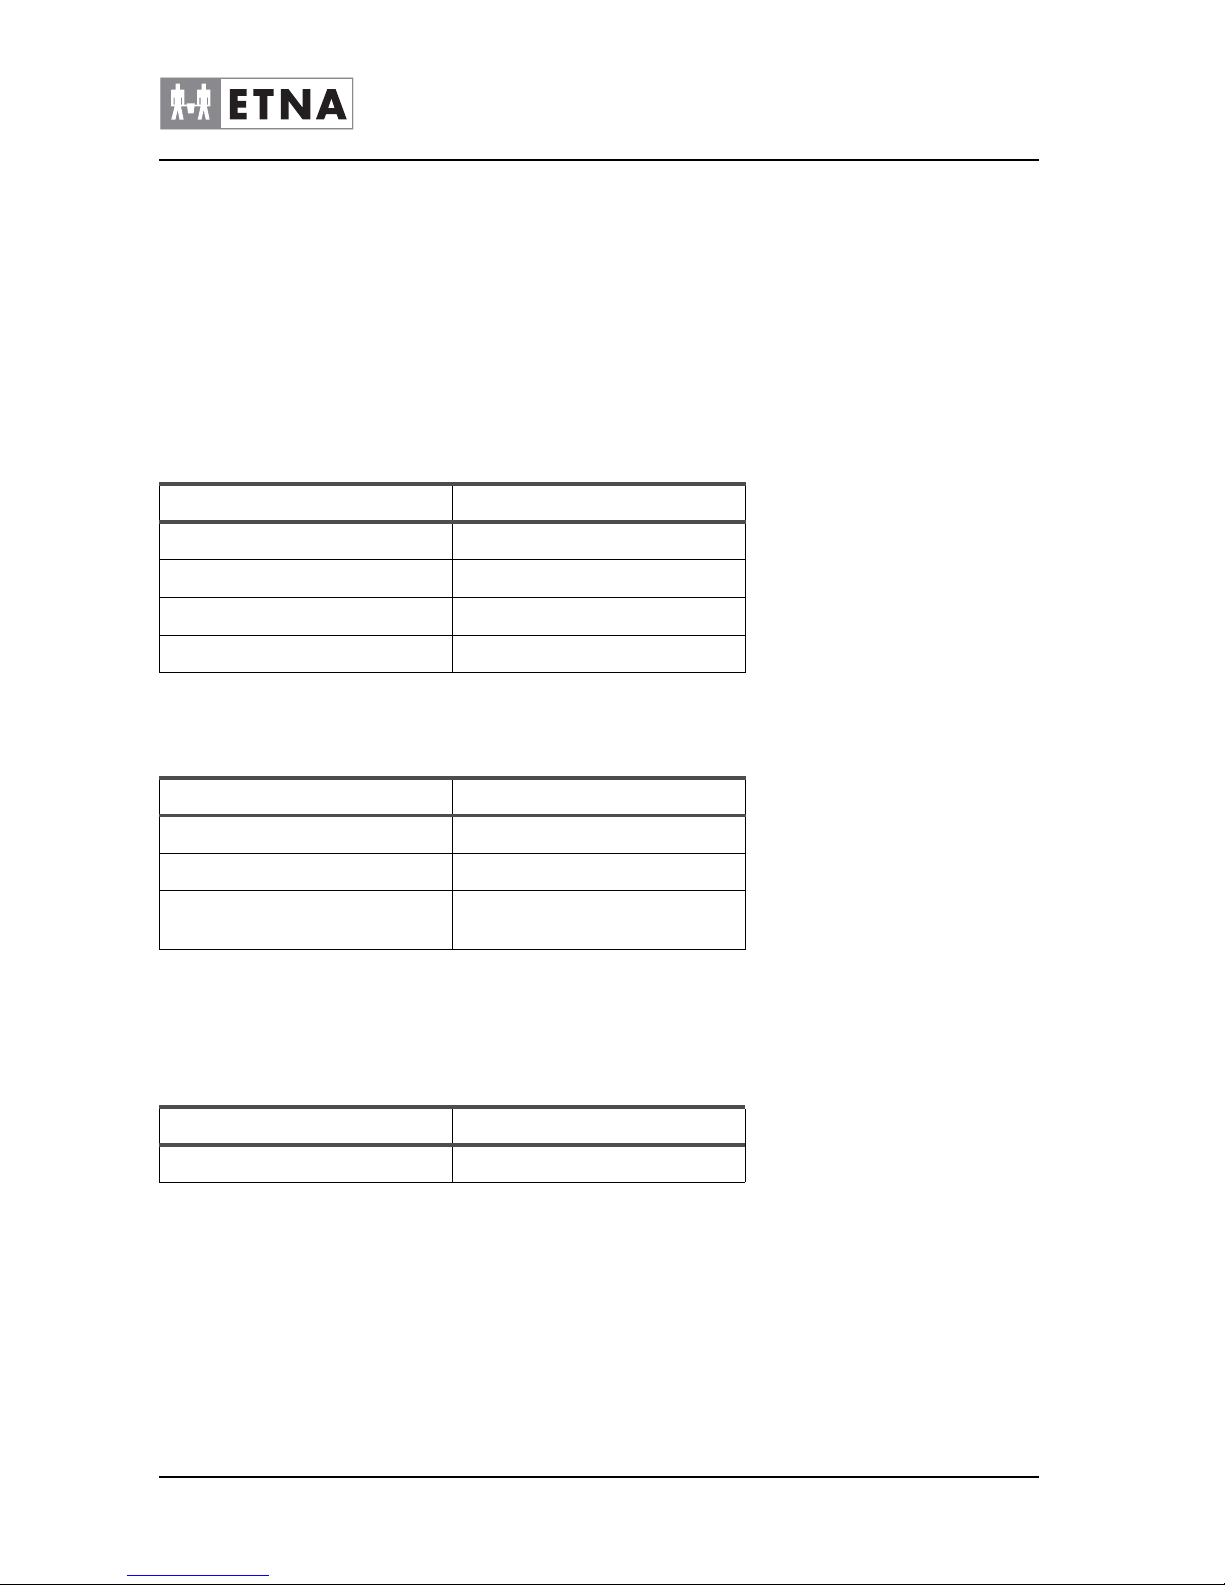
6 TECHNICAL SPECIFICATIONS
6.1 Electrical system
☞
Refer to the machine type plate for the correct
configuration of your machine, see Chapter 1: Machine
identification.
6.2 Water system
6.3 Sound level
☞
Measurements according to DIN 45635, with normal use.
Description Value
Main voltage 230 V
Frequency 50 Hz
Capacity 2.31 kW
Fuse 13 A
Description Value
Water connection G 3/4" - outer ring
Minimum water pressure 1.5 bar (150 kPa)
Maximum permitted water pressure
8 bar (800 kPa)
1
1. It the pressure is higher, a pressure reducer must be
installed.
Description Value
In operation max. 70 dB(A)
Page 27
Technical manual Dorado Small Instant
27
© ETNA Coffee Equipment b.v.
COFFEE TECHNOLOGIES
6.4 Ambient conditions
Never place the machine in a room in which the
temperature may drop below 0°C. This is to keep the
water in the machine from freezing.
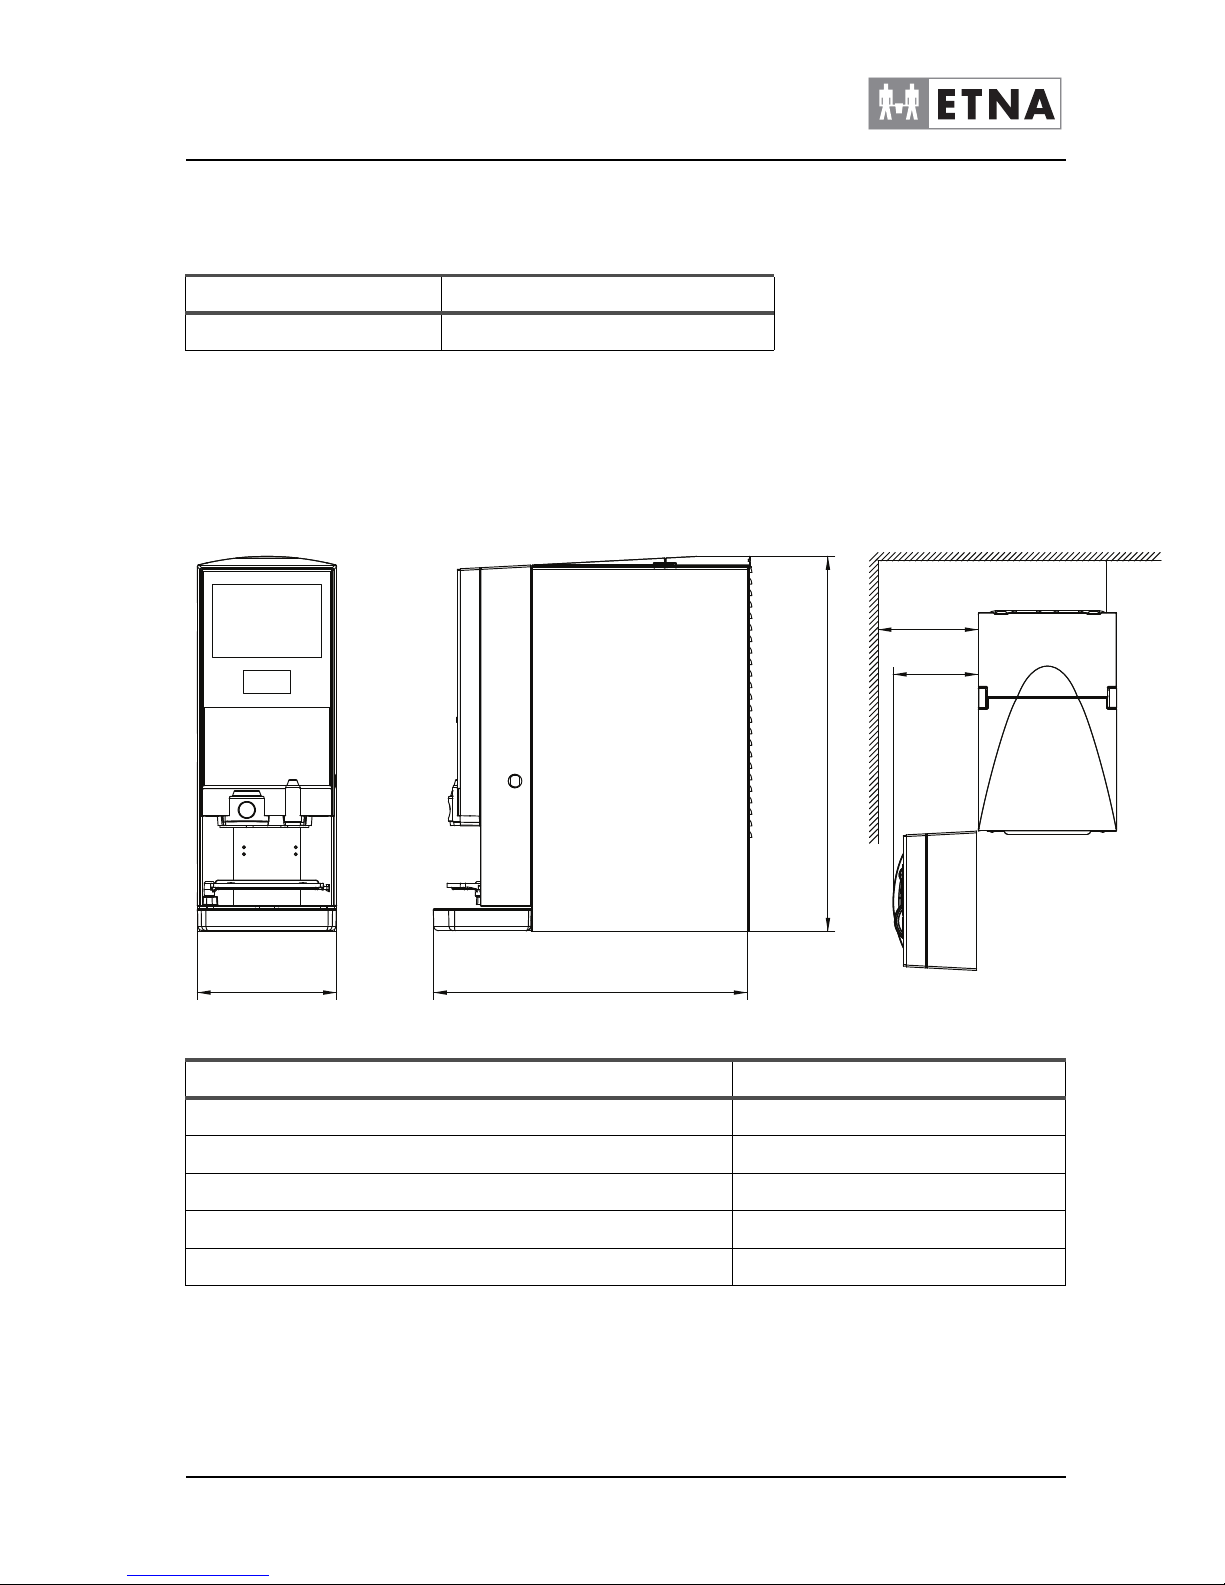
6.5 Dimensions and weight
Description Value
Ambient temperature 5 - 40 °C
Figure 6-1
651
545242
90
175
146
Description Value
Height 651 mm
Width 242 mm
Depth 545 mm
Weight when empty 29,5 kg
Weight when full 41.5 kg
Page 28
28
© ETNA Coffee Equipment b.v.
Technical manual Dorado Small Instant
COFFEE TECHNOLOGIES
7 SOFTWARE
7.1 Levels
The software in the machines has two levels:
• User
• Service engineer
Each level has its own specific choices and options. The level can be
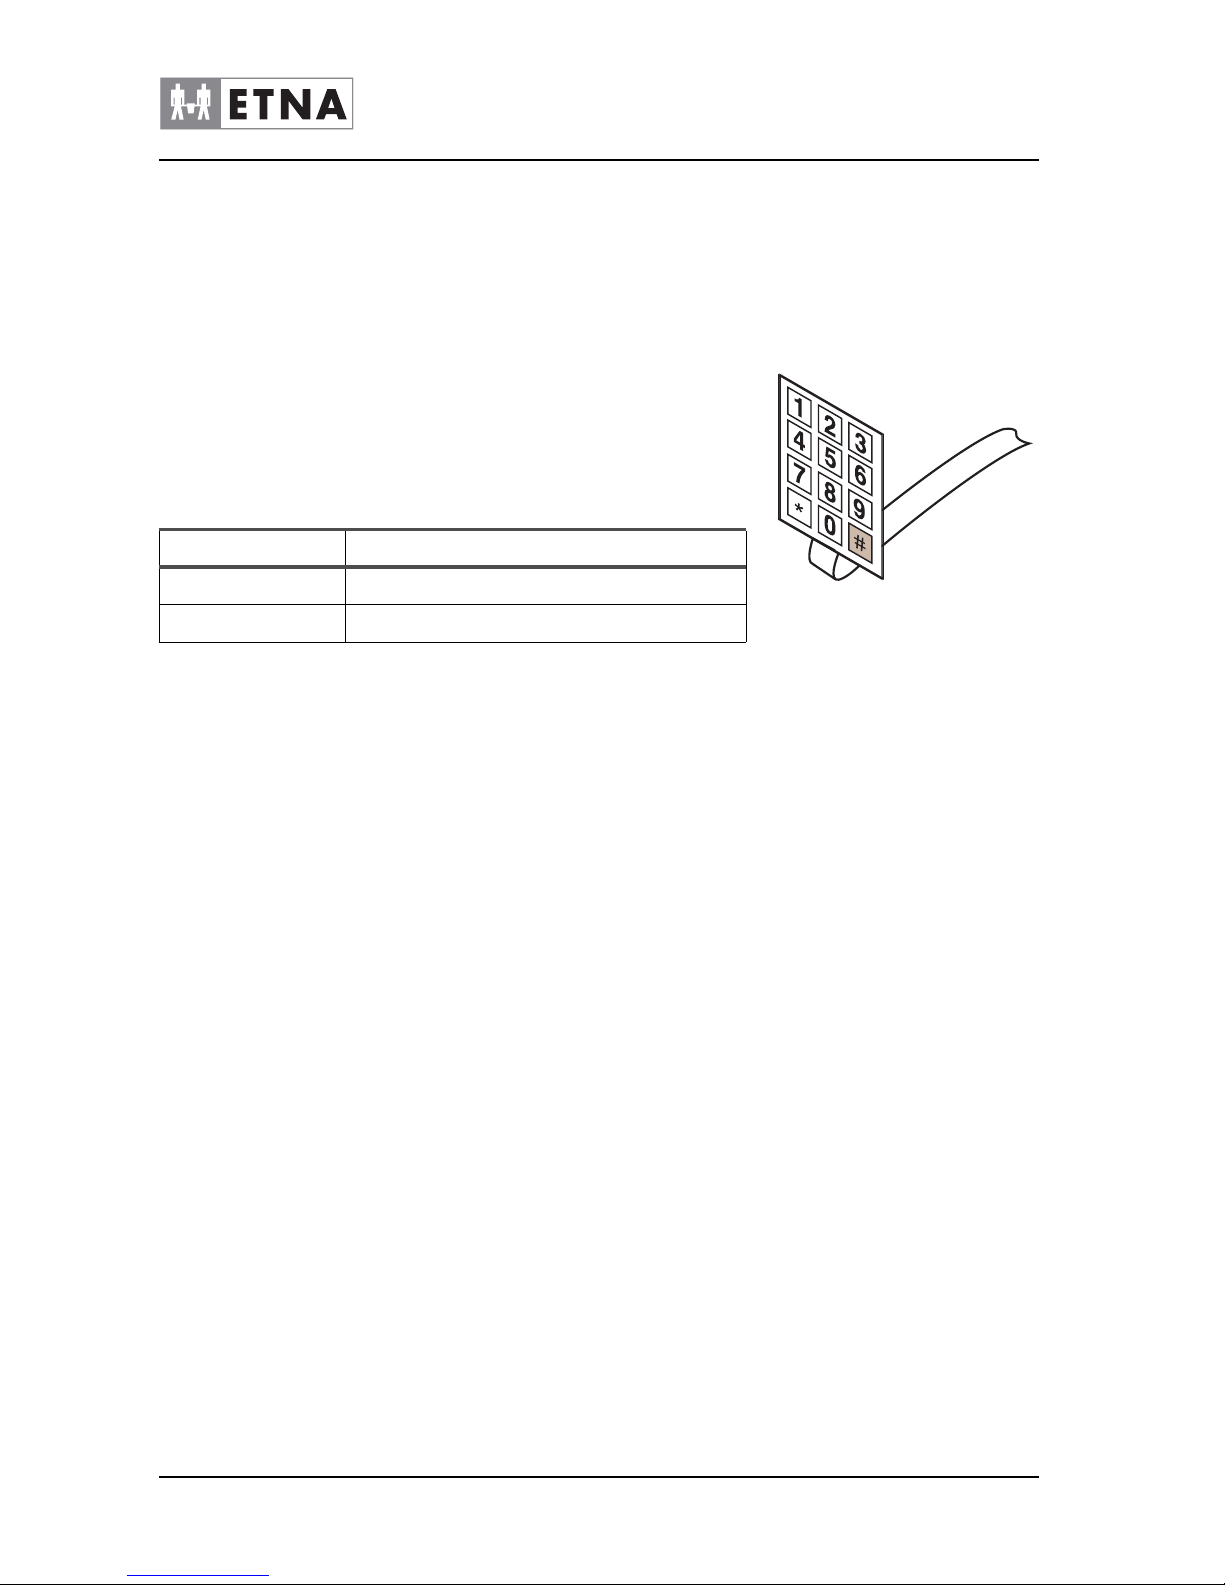
reached by pressing # on the service panel. The standard pin codes for
the operator and service engineer are:
7.2 Software update.
Firmware update:
1 ‘Unzip’ the received files.
2 Put the files on a USB-stick.
3 Turn the machine off with the on / off switch.
4 Open the door and place the USB stick
5 Press # 7 on the service panel simultaneously.
6 # 7 Keep pressed and simultaneously turn the machine ON.
7 The display provides information on progress and completion.
8 Remove the USB-stick and close the door.
9 The machine is ready for use.
User Interface update:
1 ‘Unzip’ the received files.
2 Put the files on a USB-stick.
3 Turn the machine off with the on / off switch.
4 Open the door and place the USB stick
5 Press *75* on the service panel simultaneously.
Figure 7-1
Level Pin code
User 4321
Service engineer 4231
Page 29

Technical manual Dorado Small Instant
29
© ETNA Coffee Equipment b.v.
COFFEE TECHNOLOGIES
6 The display provides information on progress and completion.
7 Remove the USB-stick and close the door.
8 The machine is ready for use.
Enable Demo Mode:
1 Turn the machine off with the on / off switch.
2 Press # 5 on the service panel simultaneously.
3 # 5 Keep pressed and simultaneously turn the machine ON.
4 The machine is now in Demo mode, the display will indicate this.
5 Turn Off Demo Mode: Repeat steps 1 / m 3
When turning ON the machine, the display shows a message when
demo mode is active.
Copy recipes from one machine to another machine:
The entire active recipe list can be copied to another machine (same
type and version). Including adjustments that have been made.
1 Place an empty USB-stick.
2 Successively press # 4231.
3 Navigate the menu to DRINK SETTINGS / COPY RECIPE
LIST..
4 Select "Export recipe list ' and press Enter.
5 The display provides information on progress and completion.
6 Take the USB stick and place it in the other machine (this must
be the same type and model).
7 Navigate the menu to DRINK SETTINGS / COPY RECIPE
LIST..
8 Select "Import recipe list ' and press Enter.
9 The display provides information on progress and completion.
10 Remove the USB-stick and close the door.
11 The machine is ready for use.
Page 30
30
© ETNA Coffee Equipment b.v.
Technical manual Dorado Small Instant
COFFEE TECHNOLOGIES
8 INSTALLATION
8.1 Connect the machine
1. Place the machine on a stable and dry surface.
2. Connect the machine to the tap with a water hose using the
appropriate size screw thread (3/4 inch BSP) and turn on the tap.
Ensure that there are no leaks.
3. Electrical safety can only be ensured when a properly earthed wall
socket is used, as prescribed in the electrical safety instructions.
4. The supplier cannot be held responsible if the wall socket does not
meet the set safety requirements.
In case of doubt with respect to earthing of the wall socket, contact
a specialist.
If the plug cannot be used with the wall socket, the wall socket must
be replaced.
5. The machine must be installed. This requires a password. Your
supplier will take care of this.
6. Close the door.
• Wait until the software is ready.
• The display shows the message when this status is reached.
The supplier is not liable for damage to the machine
resulting from improper or incorrect use.
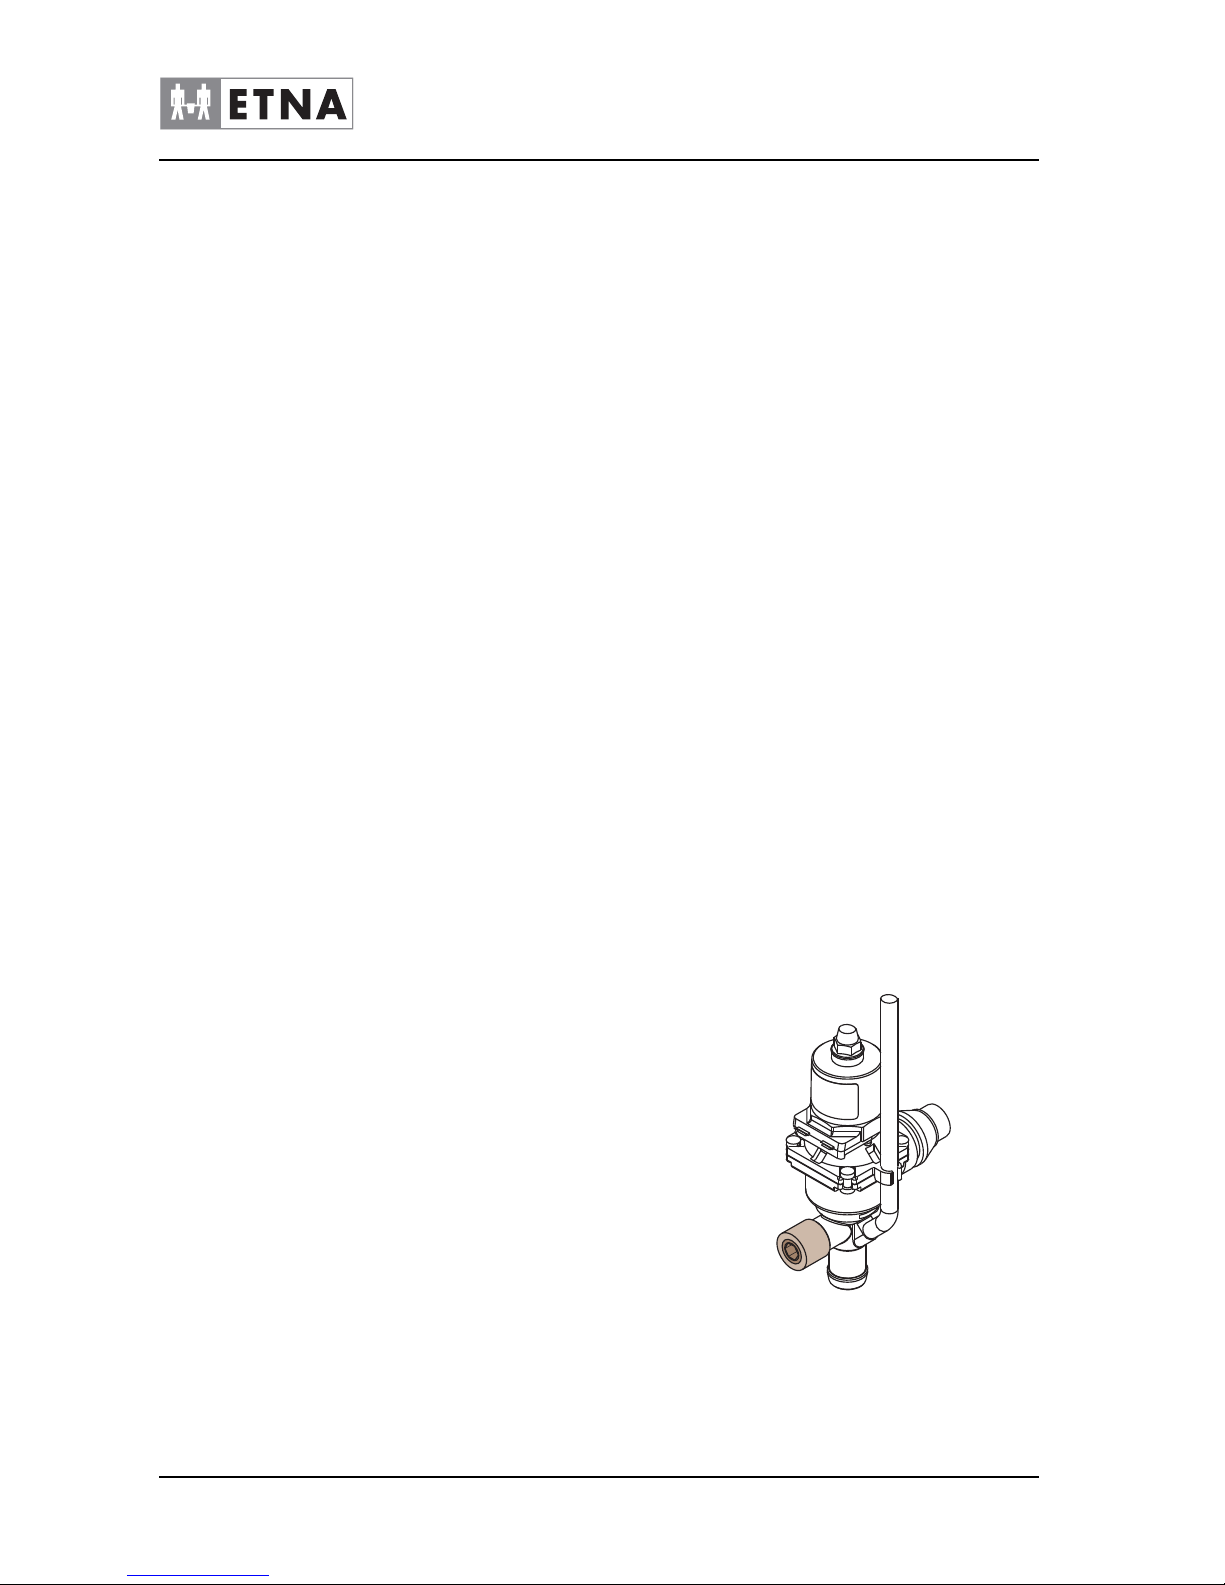
8.2 Adjusting the valve
All boiler parts and the water from the boiler are hot.
1 Open the door.
2 Access the machine; see par. . Remove the rear- or side panel.
3 Twist the adjusting screw on the valve using a 5 mm Allen key.
4 Close the rear or side panel.
5 Close the door.
Figure 8-1
Page 31

Technical manual Dorado Small Instant
31
© ETNA Coffee Equipment b.v.
COFFEE TECHNOLOGIES
9 REPLACEMENT OF PARTS
9.1 Safety requirements - replacing parts
Ꮨ
Remove the plug from the wall socket before repairing or
replacing any part.
• See also par. 3.1.
• Check the wiring for damage before beginning the repair work.
• Do not re-use self-locking materials and hose clips.
• Ensure everything is clean and dry again after the repair work.
9.2 Repairs
Ꮨ
Disconnect the plug from the wall socket before repairing
anything.
Close the water tap and disconnect the water supply
hose, where applicable.
Position the machine so that there is easy access to the
left and right sides and the rear.
Page 32
32
© ETNA Coffee Equipment b.v.
Technical manual Dorado Small Instant
COFFEE TECHNOLOGIES
9.3 Emptying the boiler
h
All boiler parts are hot, including the water from the boiler.
1 Turn off the water tap.
2 Open the door.
3 Access the machine, see par. . Remove the side plate and the
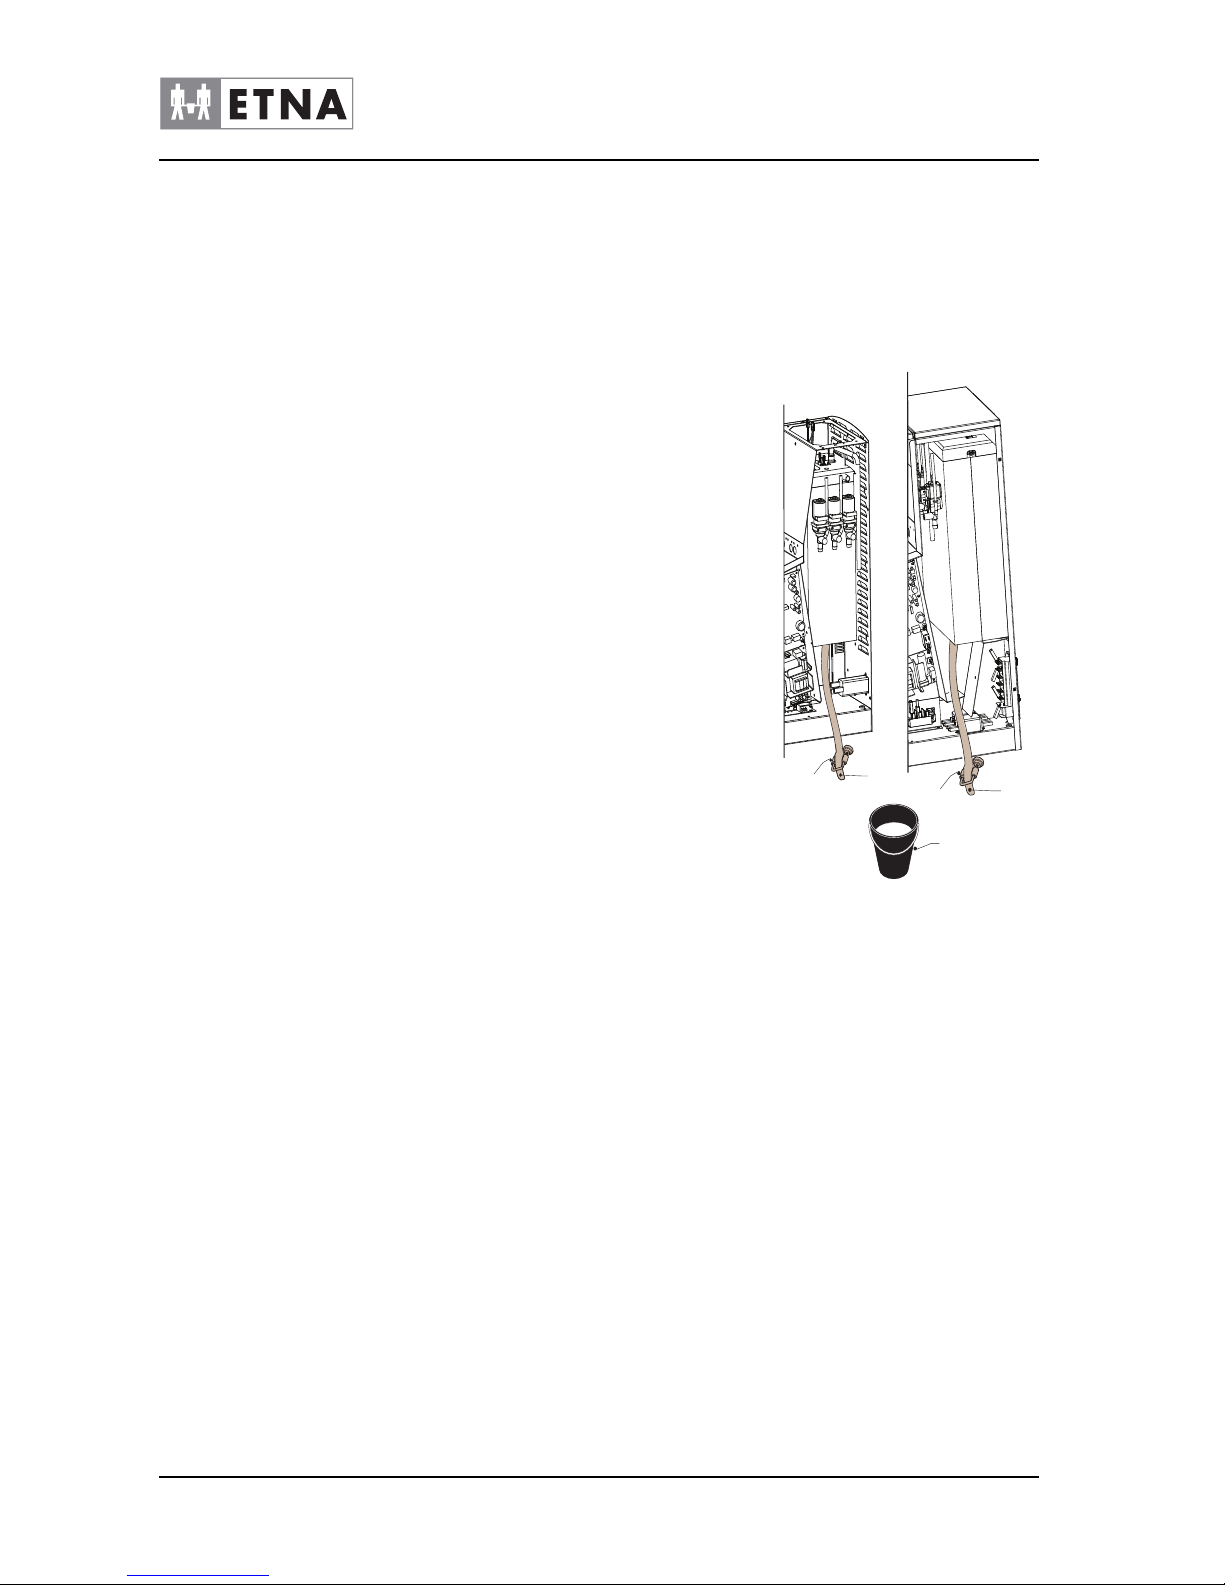
upper plate with cover.
4 Take the drain hose D out of the holder and place it safely in a
bucket E (min. 15 l).
5 Open the hose clamp B and empty the boiler.
6 Place the hose clamp on the drain hose.
7 Put the drain hose back in the holder.
8 Fasten the plates to the machine.
9 Close the door.
9.4 Restarting
1 Check that the wiring has been connected correctly.
2 Check if the hoses and valves have been properly connected.
3 Put the plates back into their original position.
4 Connect the water supply hose again (where applicable) and
open the tap.
5 Reconnect the mains.
Switch the machine on at the on/off switch or insert the service
key.
6 Carry out the daily maintenance activities, see par. 4.5.
7 Close the door.
Wait until the software is ready.
The text indicating that machine is ready will be displayed.
Figure 9-1
D
B
E
D
B
INSTANT SMALL
INSTANT MEDIUM
Page 33
Technical manual Dorado Small Instant
33
© ETNA Coffee Equipment b.v.
COFFEE TECHNOLOGIES
8 Check that nothing leaks.
9 The machine is ready for use.
9.5 Drink selection labels
Be careful when moving the machine. The machine is
heavy, see 6.5.
• Consult the safety regulations, see 9.1.
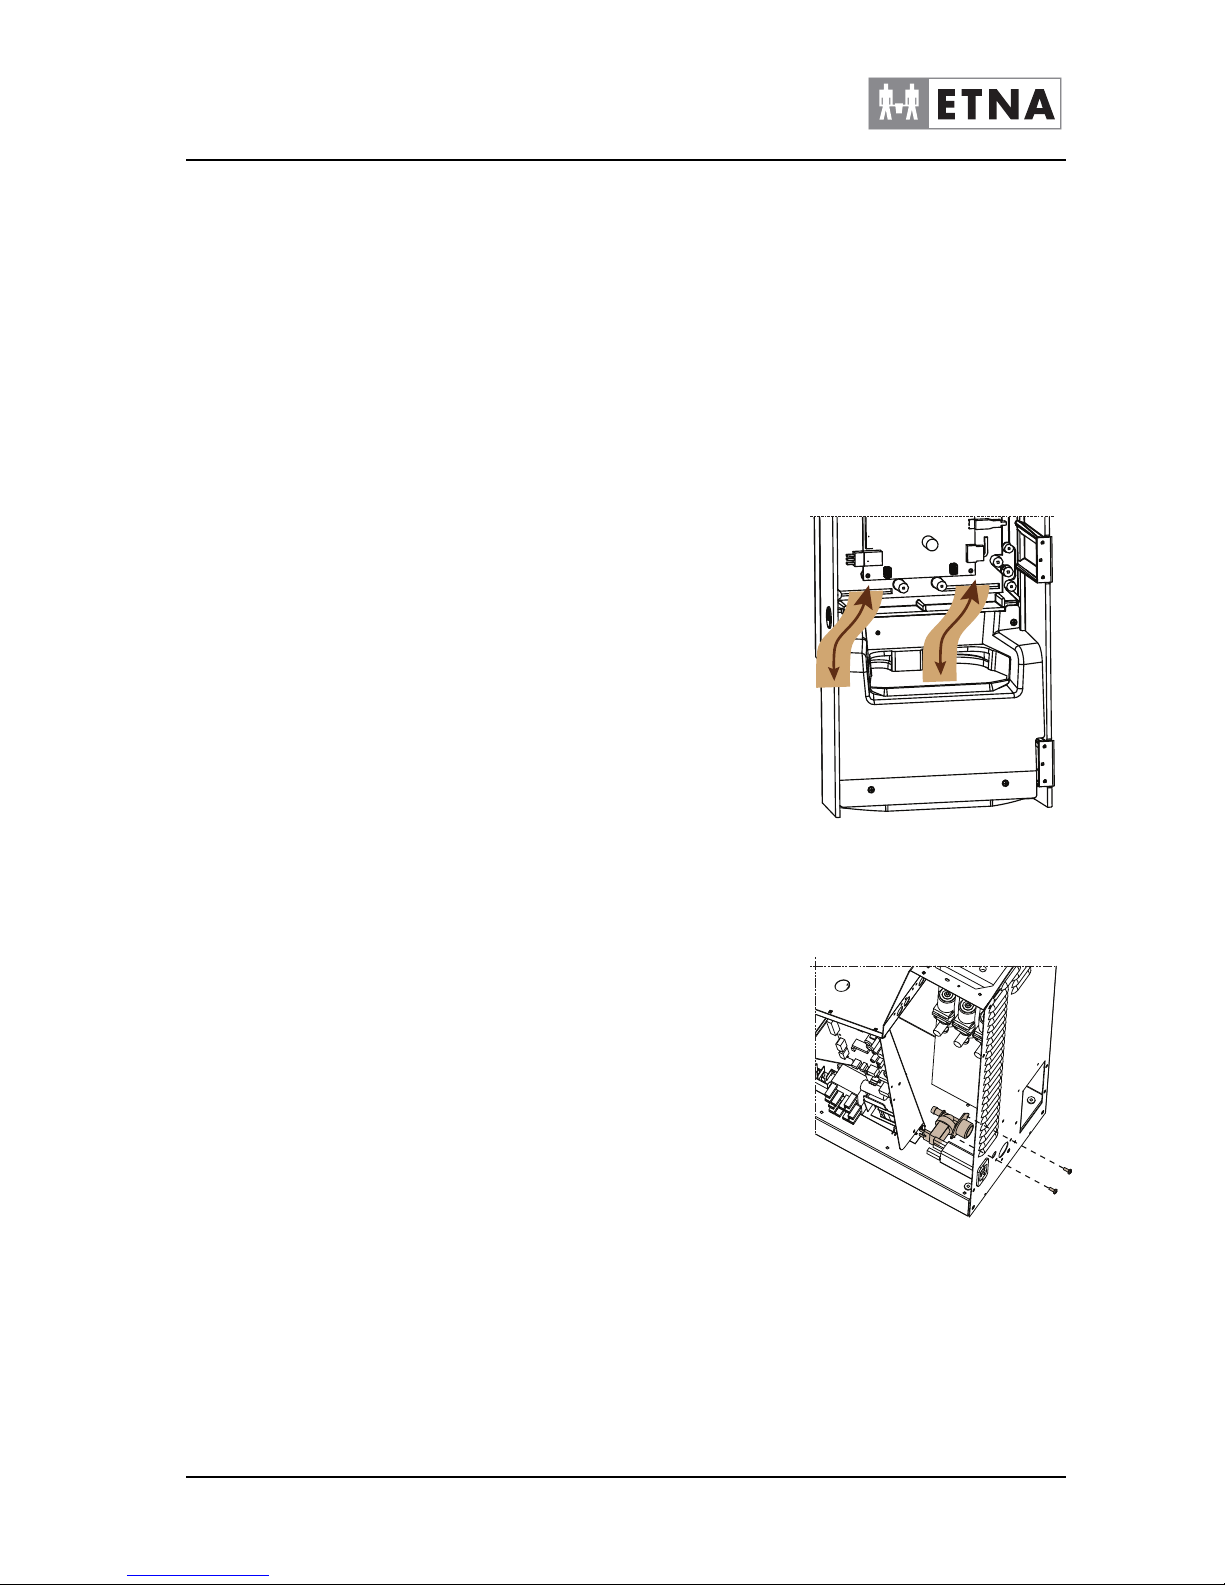
• Remove the plug from the socket.
1 Access the machine.
2 Open the door with the key.
3 Remove the cover plate in the door.
4 The drink label is affixed in the door above the dispensing unit.
5 Remove the existing drink label.
6 Put the new drink label in place.
Ensure that all labels have been positioned correctly.
7 Close the door.
9.6 Replacing the inlet valve
1 Empty the boiler, see par. 9.3.
2 Remove the plate on the right side, see par. .
3 Disconnect the wiring from the inlet valve.
4 Disconnect the water hoses from the inlet valve.
5 Unscrew the two screws from the inlet valve.
6 Replace the inlet valve.
7 Connect the water hose to the inlet valve.
8 Connect the wiring to the inlet valve.
9 Restart the machine; see the restart procedure in par. 9.4.
Figure 9-2
Figure 9-3
Page 34
34
© ETNA Coffee Equipment b.v.
Technical manual Dorado Small Instant
COFFEE TECHNOLOGIES
9.7 Replacing boiler
h
All boiler parts may be hot, including the water from the
boiler.
1 Turn off the water tap.
2 Open the door.
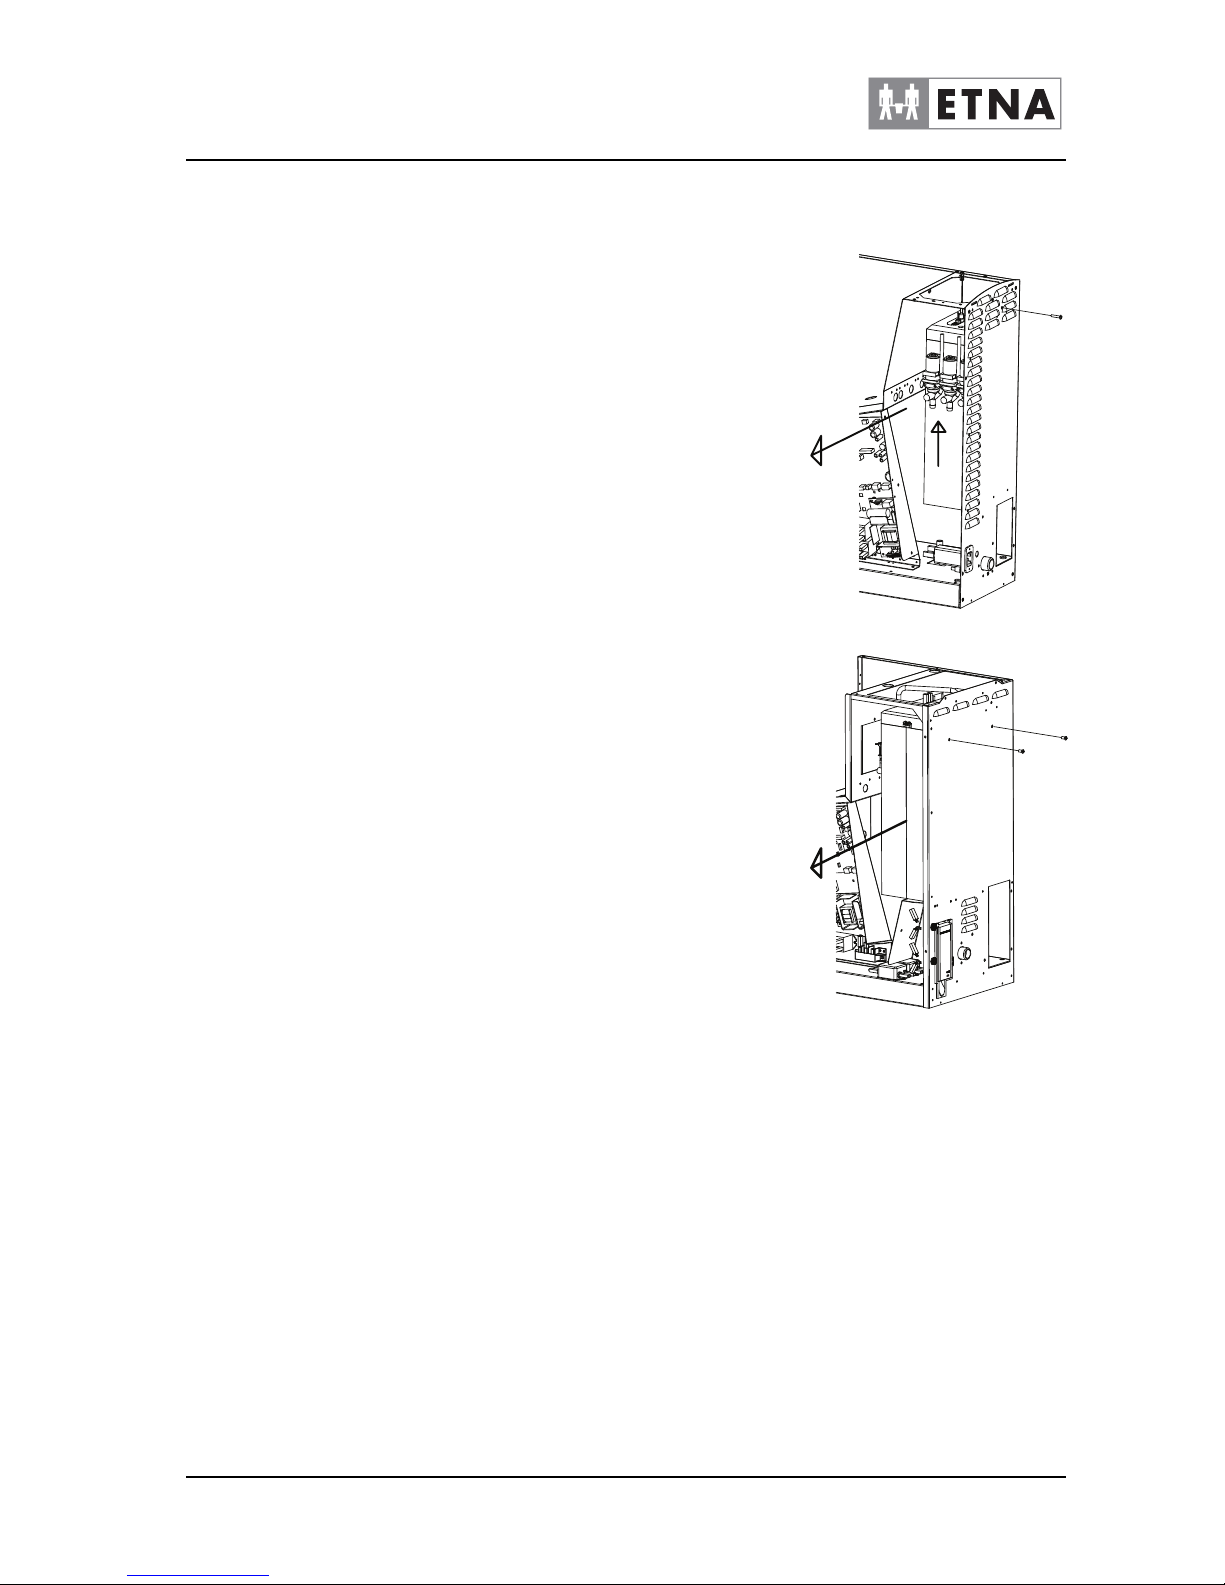
3 Access the machine, see par. and remove the side plate and the
upper plate with cover.
4 Empty the boiler, see par. 9.3.
5 Disconnect the boiler sensor wiring.
6 Disconnect the wiring from the elements.
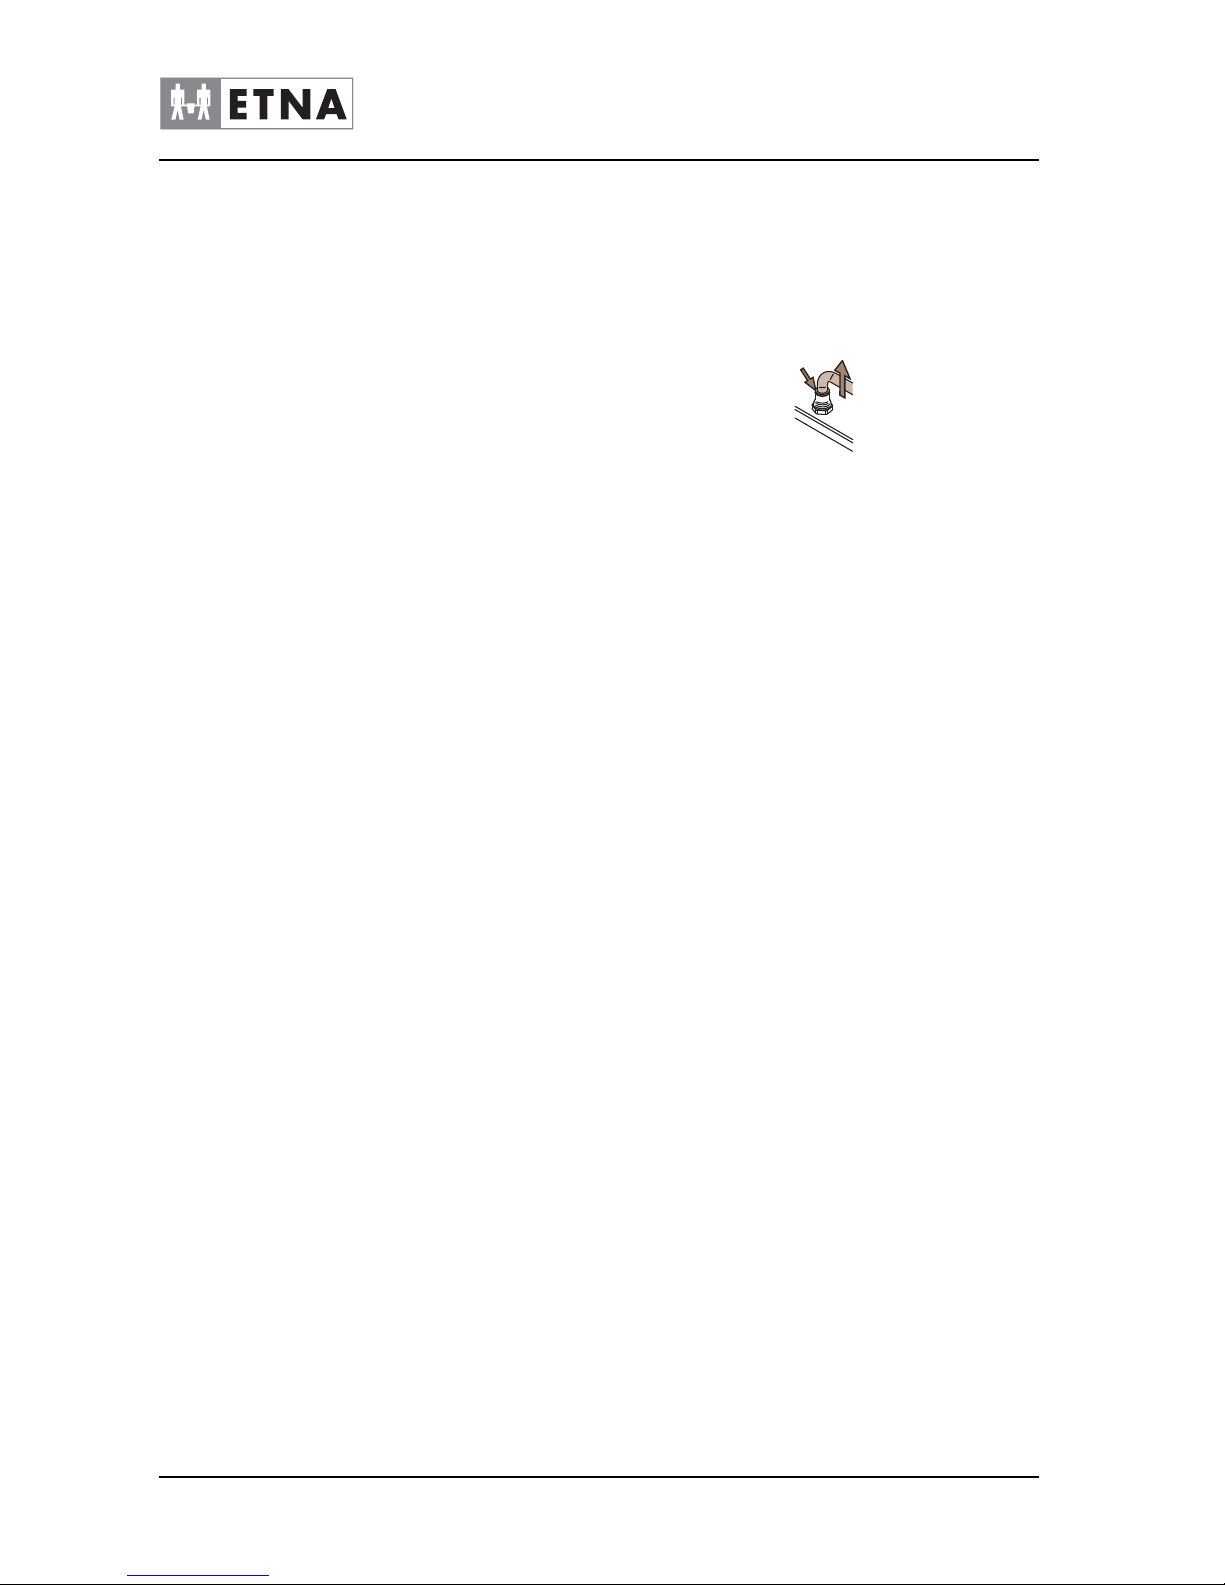
7 Disconnect the inlet pipe from the boiler by pressing the ring on
the coupling downwards and steadily pulling the inlet pipe out of
the coupling.
Figure 9-4
Page 35
Technical manual Dorado Small Instant
35
© ETNA Coffee Equipment b.v.
COFFEE TECHNOLOGIES
8 Remove the valves from the boiler.
9 Disconnect the boiler overflow hose.
10 Remove the fixing screws from the boiler on the rear of the
machine.
11 Take the boiler out of the machine by pulling it out at the side.
12 Replace the boiler and put it back in the machine in the reverse
order.
13 Carry out the restart procedure, see par.9.4.
Figure 9-5
1
2
INSTANT SMALL
INSTANT MEDIUM
Page 36
36
© ETNA Coffee Equipment b.v.
Technical manual Dorado Small Instant
COFFEE TECHNOLOGIES
9.8 Replacing boiler sensor
h
All boiler parts may be hot, including the water from the
boiler.
1 Turn off the water tap.
2 Open the door.
3 Access the machine, see par. and remove the side plate and the
upper plate with cover.
4 Empty the boiler, see par. 9.3.
5 Disconnect the boiler sensor wiring.
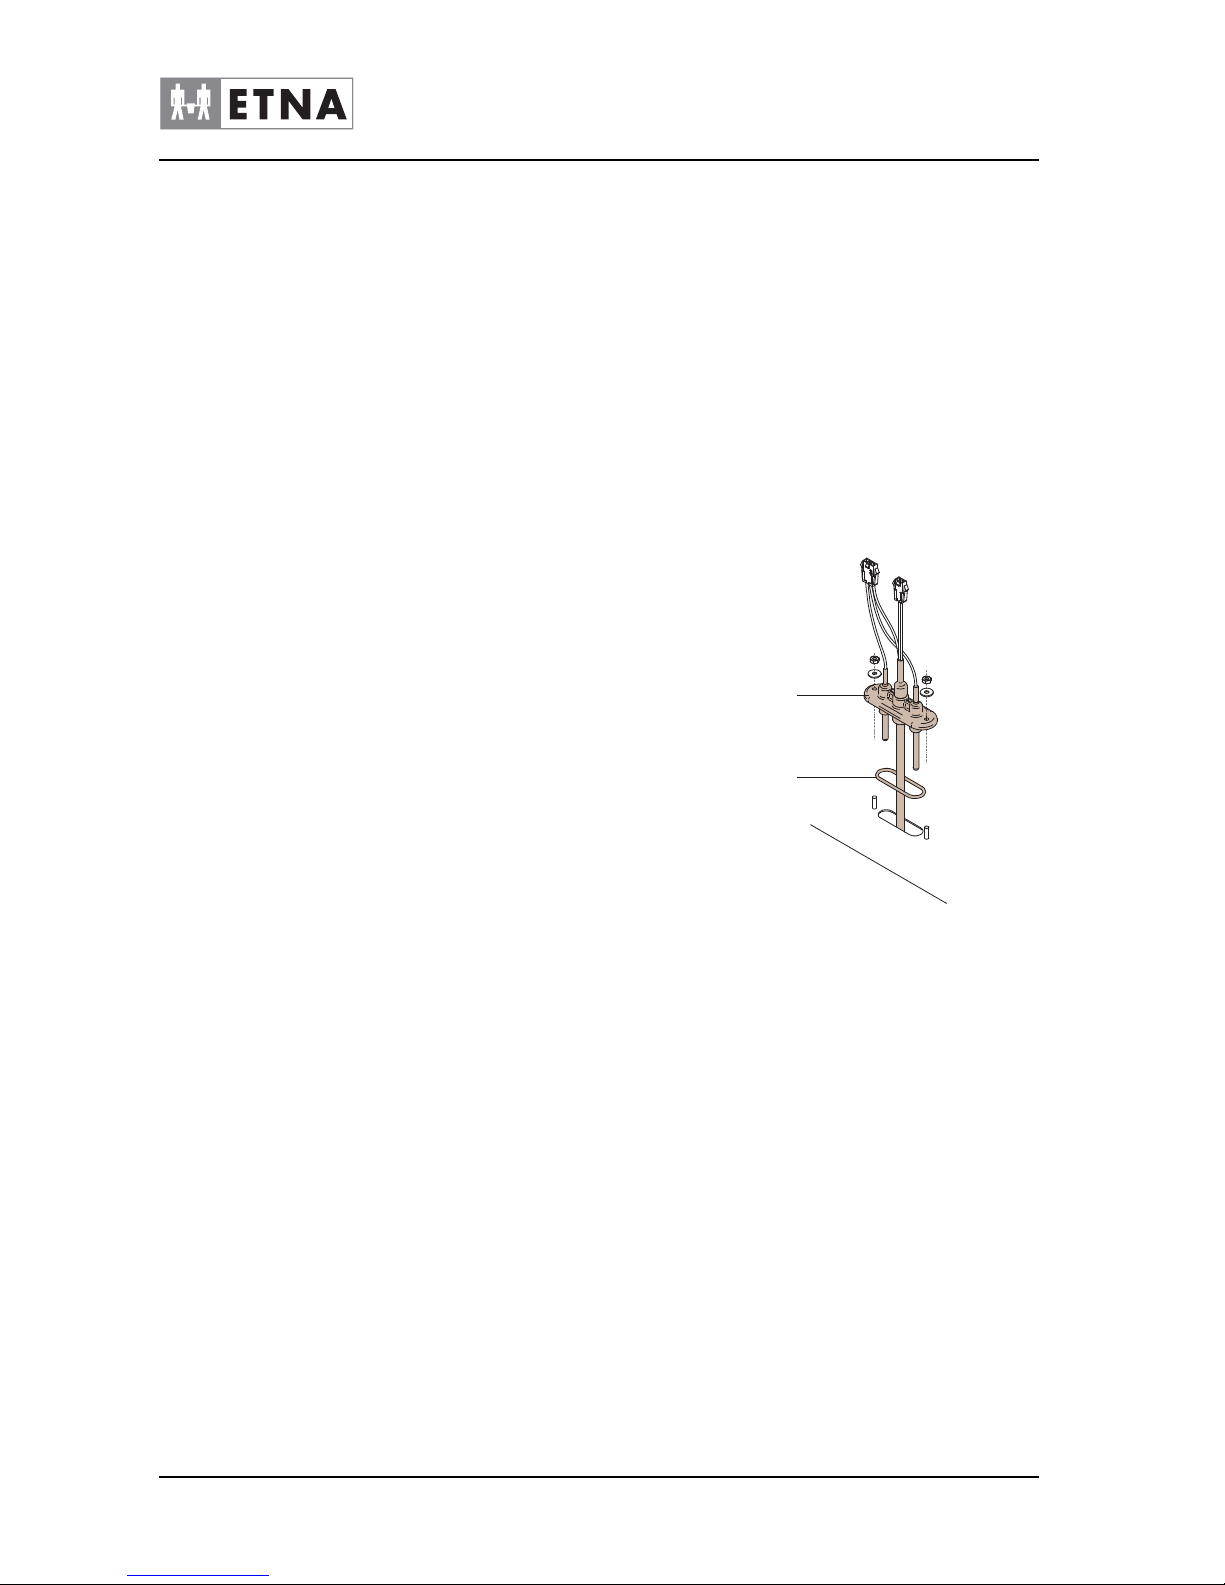
6 Remove both nuts and spring washers and take the boiler
sensor out of the boiler.
7 Fasten the new boiler sensor (1) to the boiler cover, paying
attention to the seal (2).
8 Connect the boiler's electrical wiring.
9 Carry out the restart procedure, see par. 9.4.
9.9 Replacing heating element
h
All boiler parts may be hot, including the water from the
boiler.
1 Turn off the water tap.
2 Open the door.
3 Access the machine, see par. and remove the side plate and the
upper plate with cover.
4 Empty the boiler, see par. 9.3.
5 Disconnect the boiler sensor wiring.
6 Disconnect the wiring from the elements.
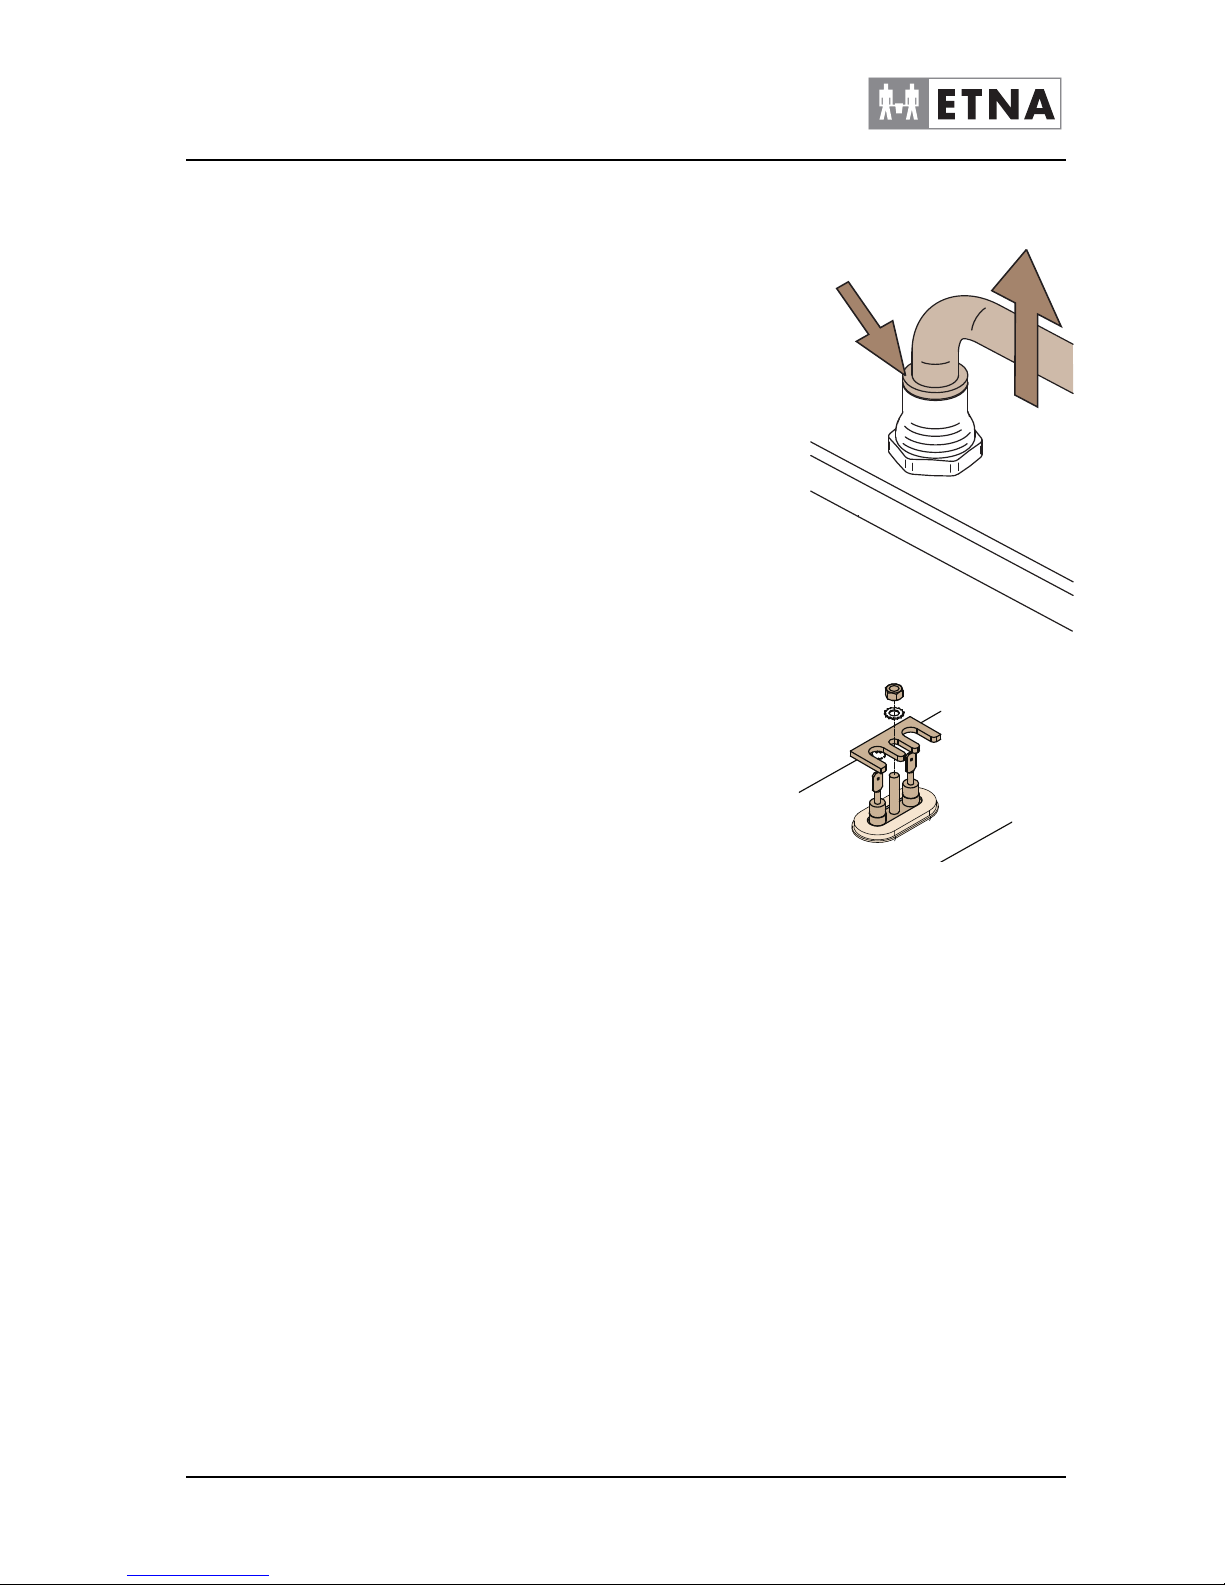
7 Disconnect the inlet pipe from the boiler by pressing the ring on
the coupling downwards and pulling the inlet pipe out of the
coupling at the same time.
Figure 9-6
1
2
Page 37
Technical manual Dorado Small Instant
37
© ETNA Coffee Equipment b.v.
COFFEE TECHNOLOGIES
8 Remove the fixing screws from the boiler on the rear of the
machine.
9 Remove the boiler insulation on the boiler cover.
10 Remove the boiler cover screws.
11 Remove the boiler cover.
12 Remove the nut, spring washer and clamping plate.
13 Replace the heating element.
14 Fasten the boiler cover.
15 Put the insulation back on the boiler cover.
16 Remove the valves from the boiler, leaving the wiring and hoses
attached.
17 Tighten the fixing screws of the boiler on the rear of the
machine.
18 Fasten the inlet pipe to the boiler cover by pressing it firmly into
the coupling.
19 Connect the boiler sensor's electrical wiring.
20 Connect the heating elements' electrical wiring.
21 Carry out the restart procedure, see par. 9.4.
9.10 Replacing the valve
h
All boiler parts can be hot and the water from the boiler is
hot.
1 Empty the boiler, see par. 9.3.
2 Remove the plug from the wall socket so that the machine
carries no voltage.
3 Close the water tap.
4 Remove the plate; see par. .
Figure 9-7
Figure 9-8
Page 38
38
© ETNA Coffee Equipment b.v.
Technical manual Dorado Small Instant
COFFEE TECHNOLOGIES
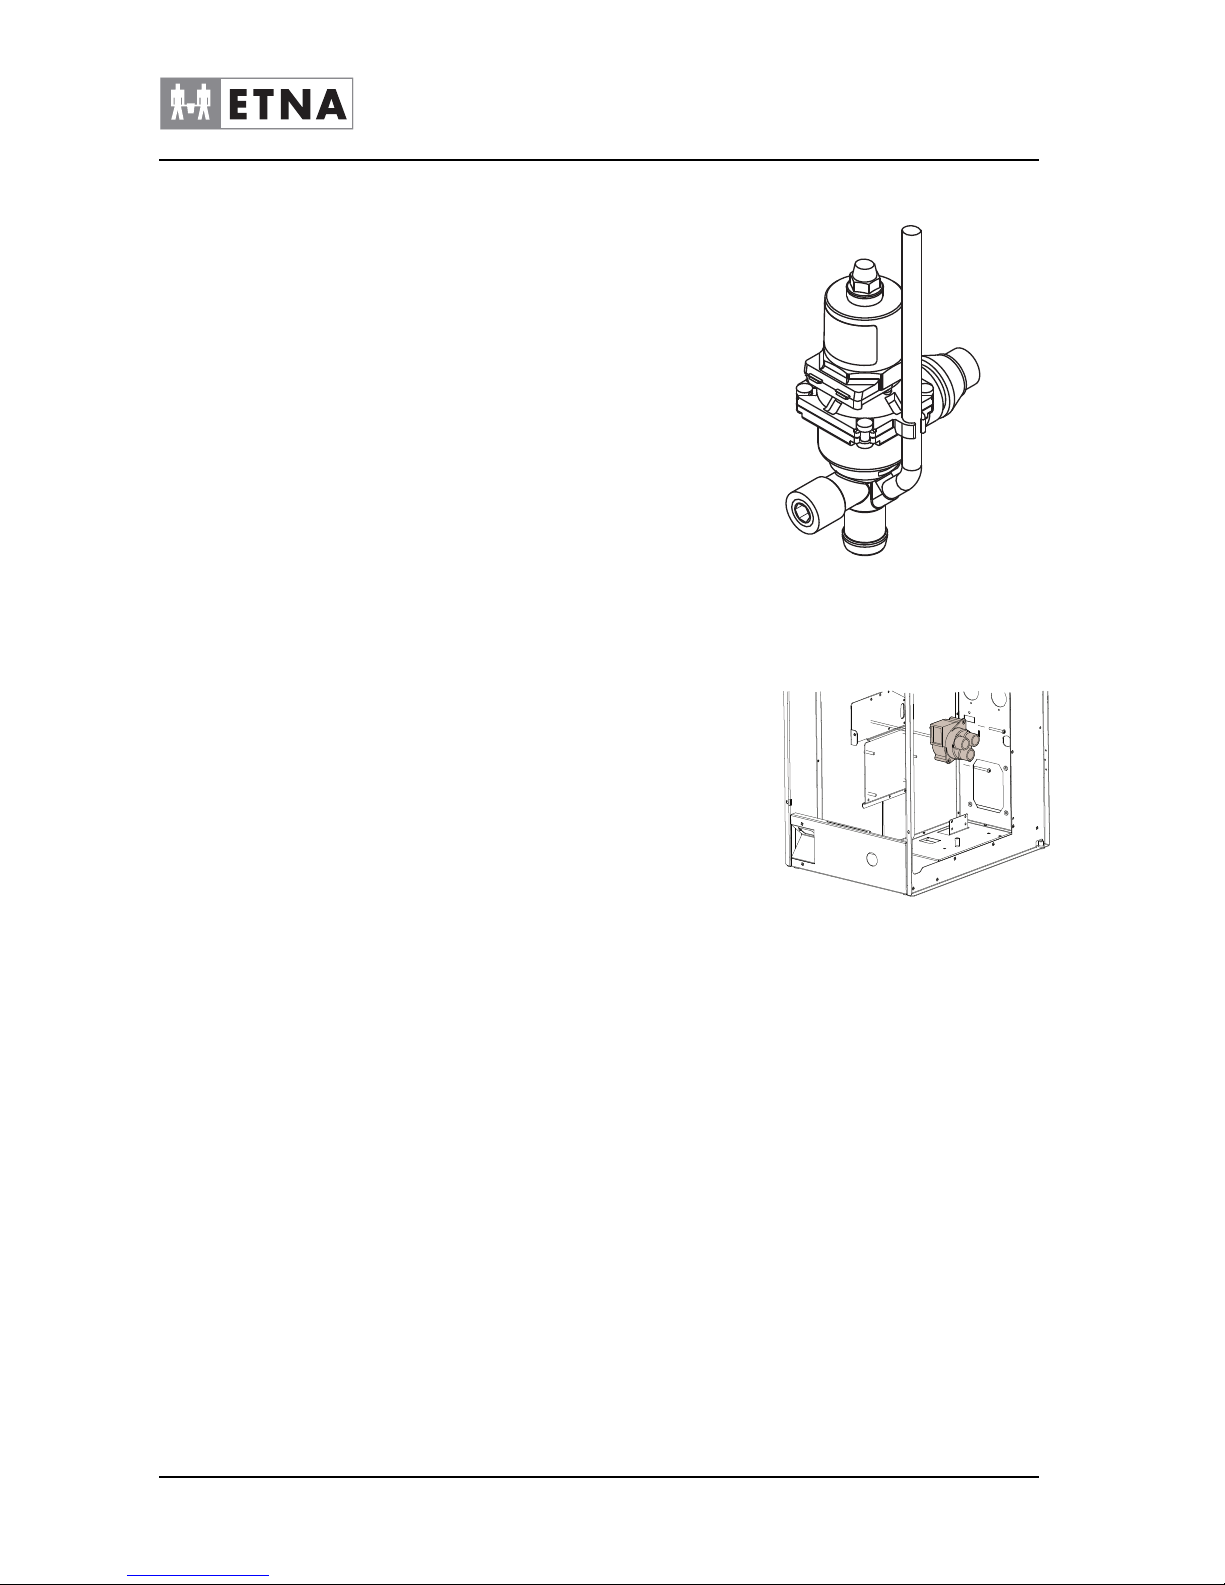
5 Remove the valve from the boiler; leave the wiring and hoses in
place.
6 Disconnect the wiring from the valve.
☞
Make a note of how the wiring is connected.
7 Disconnect the hoses from the valve.
8 Connect the hoses for the valve.
9 Connect the wiring for the valve.
10 Position the valve on the boiler, ensuring that the wiring and
hoses are securely attached and not kinked.
11 Calibrate the valves; see procedure par. 7.15.
9.11 Replacing extraction ventilator
1 Remove the plate on the back side, see par. 9.2.
2 Disconnect the wiring from the ventilator.
3 Loosen the two screws of the ventilator fastener.
4 Loosen the two screws of the hood.
5 Loosen the two screws of the hose.
6 Remove the vacuum hose.
7 Replace the ventilator.
8 Put the vacuum hoses back in place.
9 Reattach the hose with the two screws.
10 Reattach the hood with the two screws.
11 Fix the ventilator fastener in place with the two screws.
12 Connect the wiring.
13 Restart the machine, see restart procedure par. 9.4.
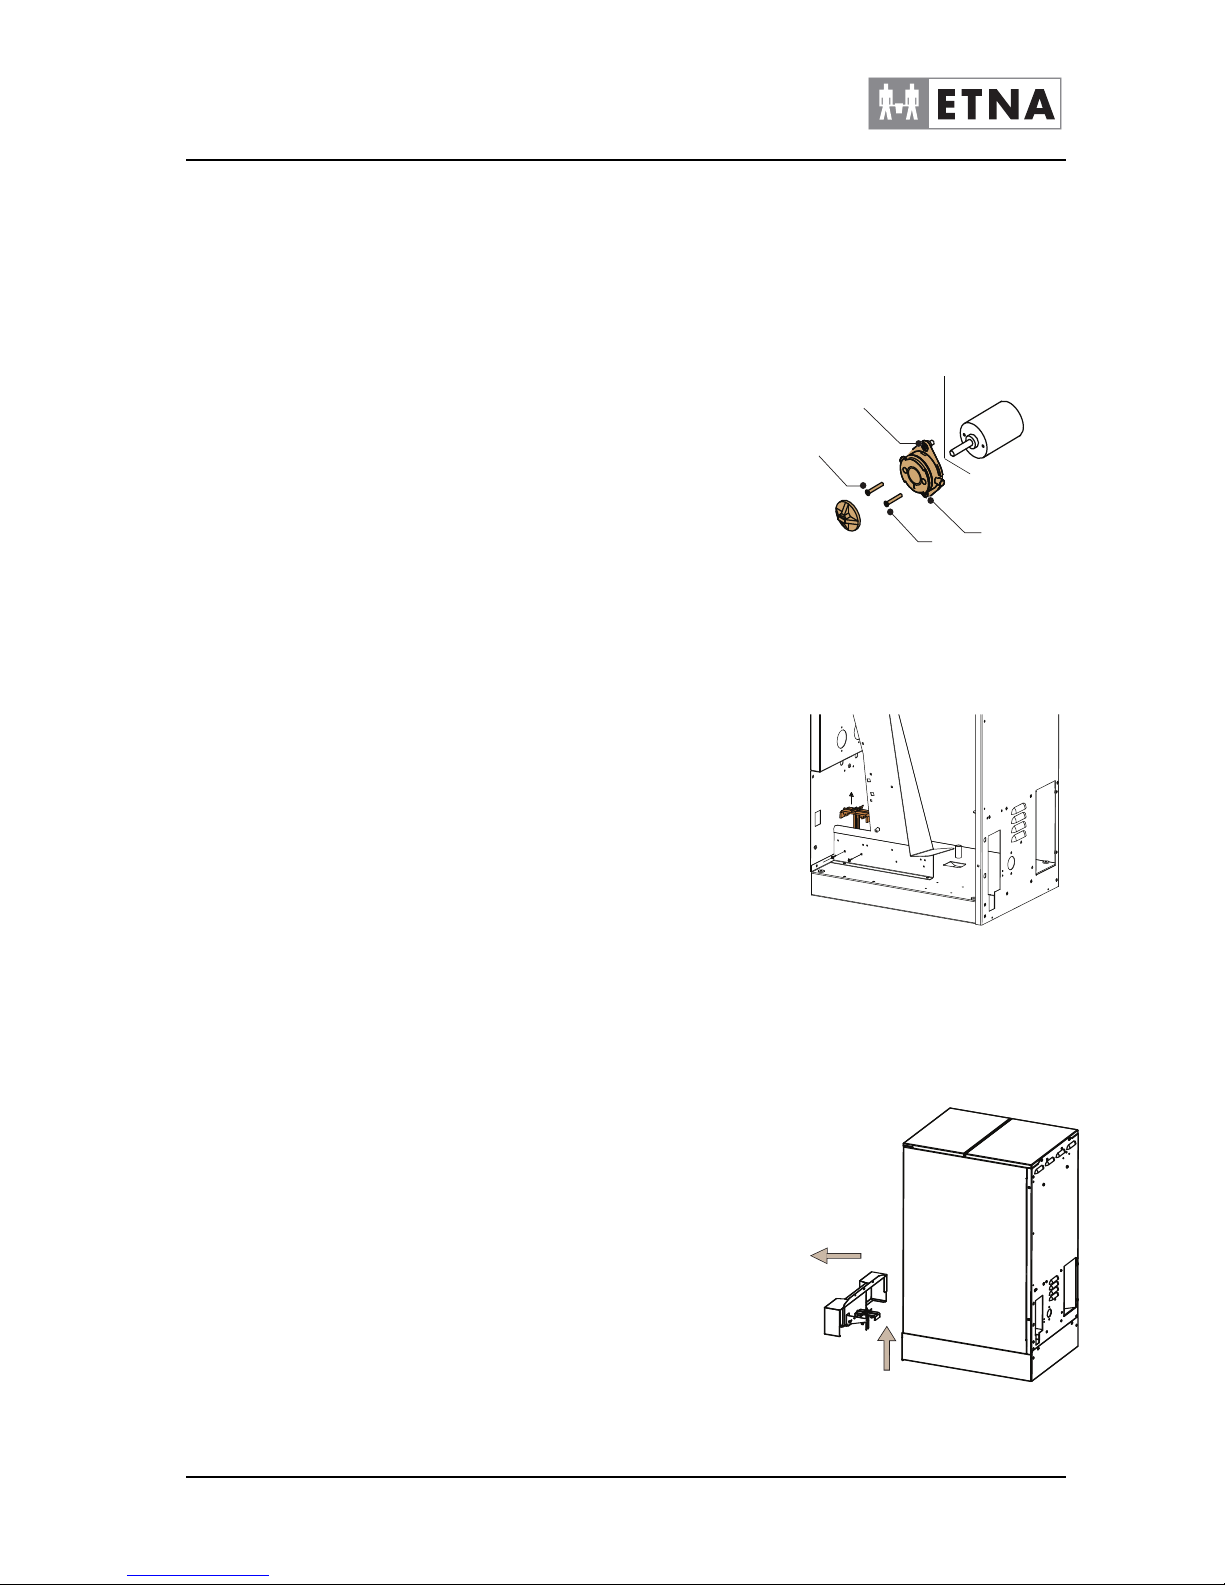
9.12 Replacing the mixer engine
1 Open the door.
2 Access the machine, see par. 9.2.
3 Loosen the screws (A) to take out the mixer base and motor.
4 Disconnect the wiring.
Figure 9-9
Figure 9-10
Page 39
Technical manual Dorado Small Instant
39
© ETNA Coffee Equipment b.v.
COFFEE TECHNOLOGIES
5 Loosen the screws (B) to remove the motor.
6 Replace the motor.
7 Connect the wiring.
8 Fasten everything back in the machine in reverse order.
9 Restart the machine, see restart procedure par.9.4.
9.13 Replacing drip tray sensor
Replacing the drip tray sensor in the machine:
1 Access the machine, see par. .
2 Disconnect the sensor wiring.
3 Loosen the two screws of the sensor fastener.
4 Replace the drip tray sensor.
5 Connect the wiring.
6 Restart the machine, see restart procedure par. 9.4.
Replacing the drip tray sensor in the console (if applicable):
7 Lift the front of the console up and then move it forwards.
8 Disconnect the drip tray sensor wiring.
9 Replace the drip tray sensor.
10 Connect the drip tray sensor wiring.
11 Fasten the front of the console onto the machine.
12 Restart the machine, see restart procedure par. 9.4.
Figure 9-11
A
A
B
B
Figure 9-12
Figure 9-13
Page 40
40
© ETNA Coffee Equipment b.v.
Technical manual Dorado Small Instant
COFFEE TECHNOLOGIES
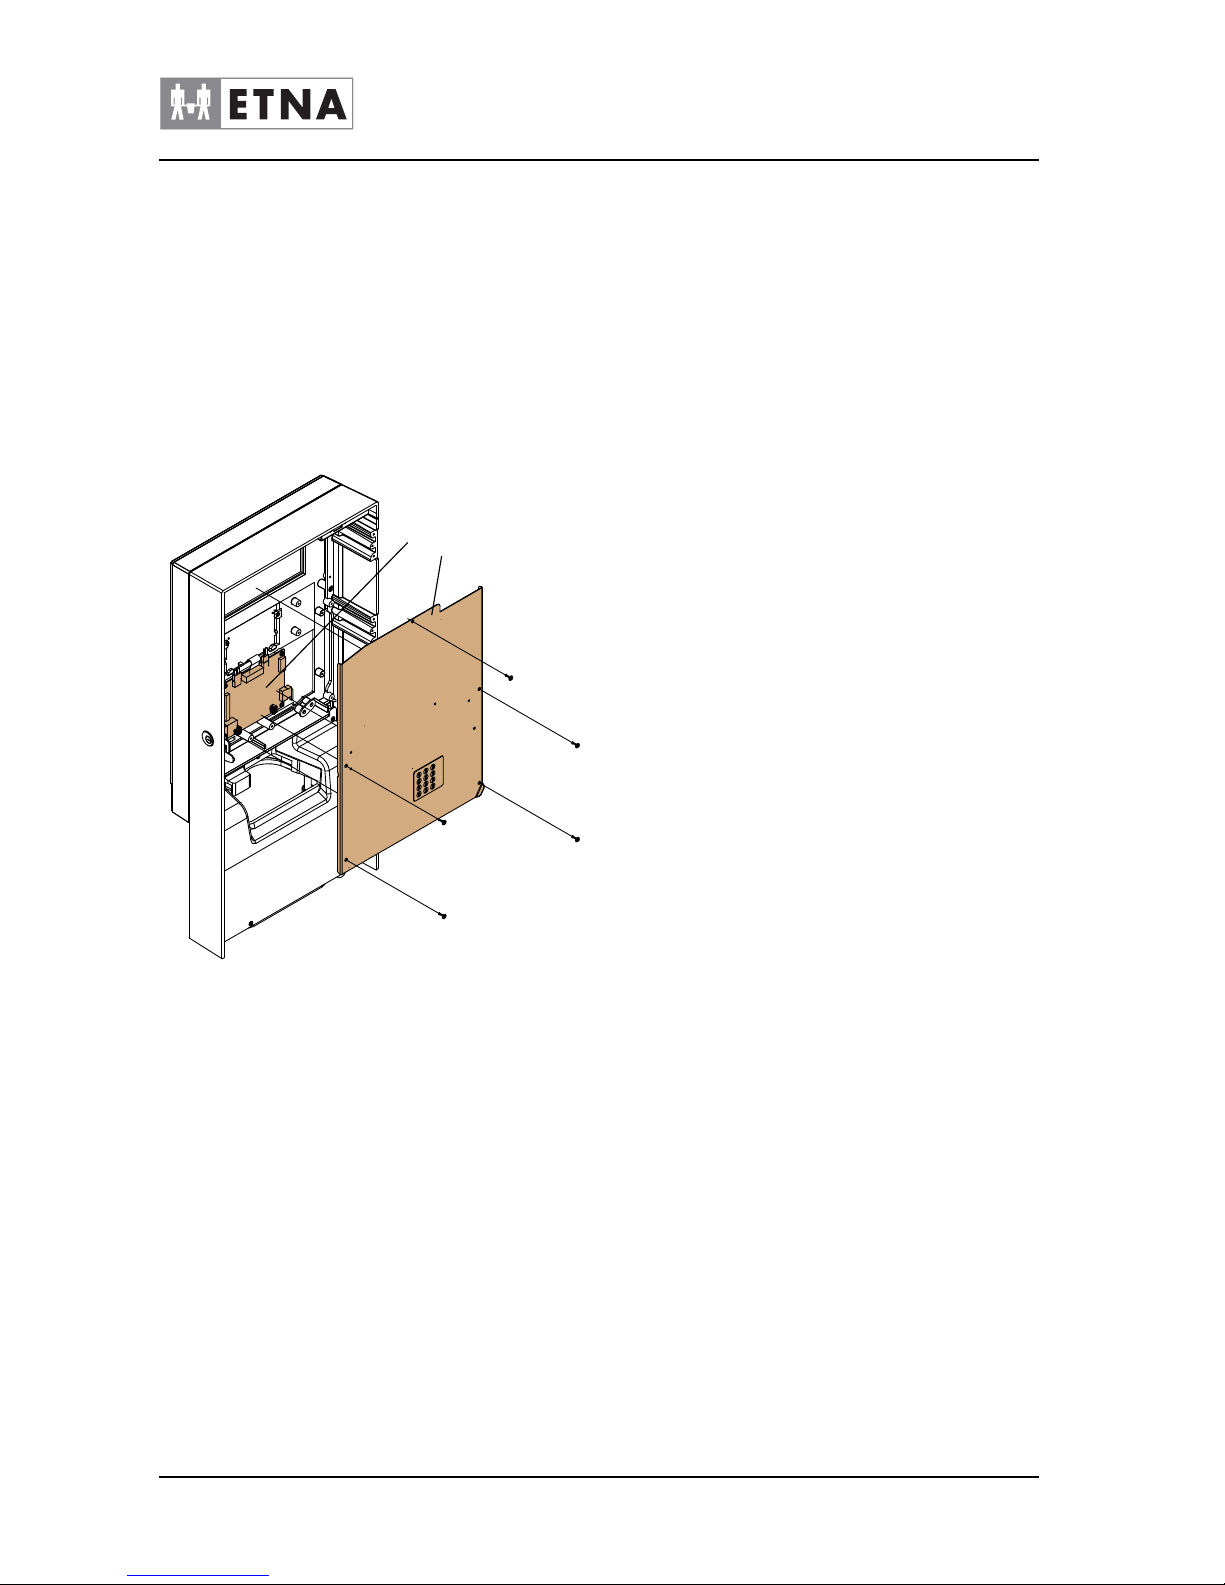
9.14 Door plate
Be careful! : PCBs are ESD-sensitive. Put on an ESD
wrist strap and connect it to the machine frame.
Be careful when moving the machine. The machine is heavy, see par.
6.5.
• Read the safety instructions, see par. 9.1.
• Disconnect the plug from the wall socket.
Removing door plate top
1 Open the door.
2 Loosen the plate (A).
3 Disconnect the ribbon cable of the service panel from the display
PCB (B).
4 Remove the plate.
Fixing door plate top in place
1 Connect the ribbon cable of the service panel to the display PCB
(B).
2 Fix the plate (A) in place.
3 Test service and selection buttons.
4 Restart the machine, see restart procedure par. 9.4.
Figure 9-14
BB
A
Page 41
Technical manual Dorado Small Instant
41
© ETNA Coffee Equipment b.v.
COFFEE TECHNOLOGIES
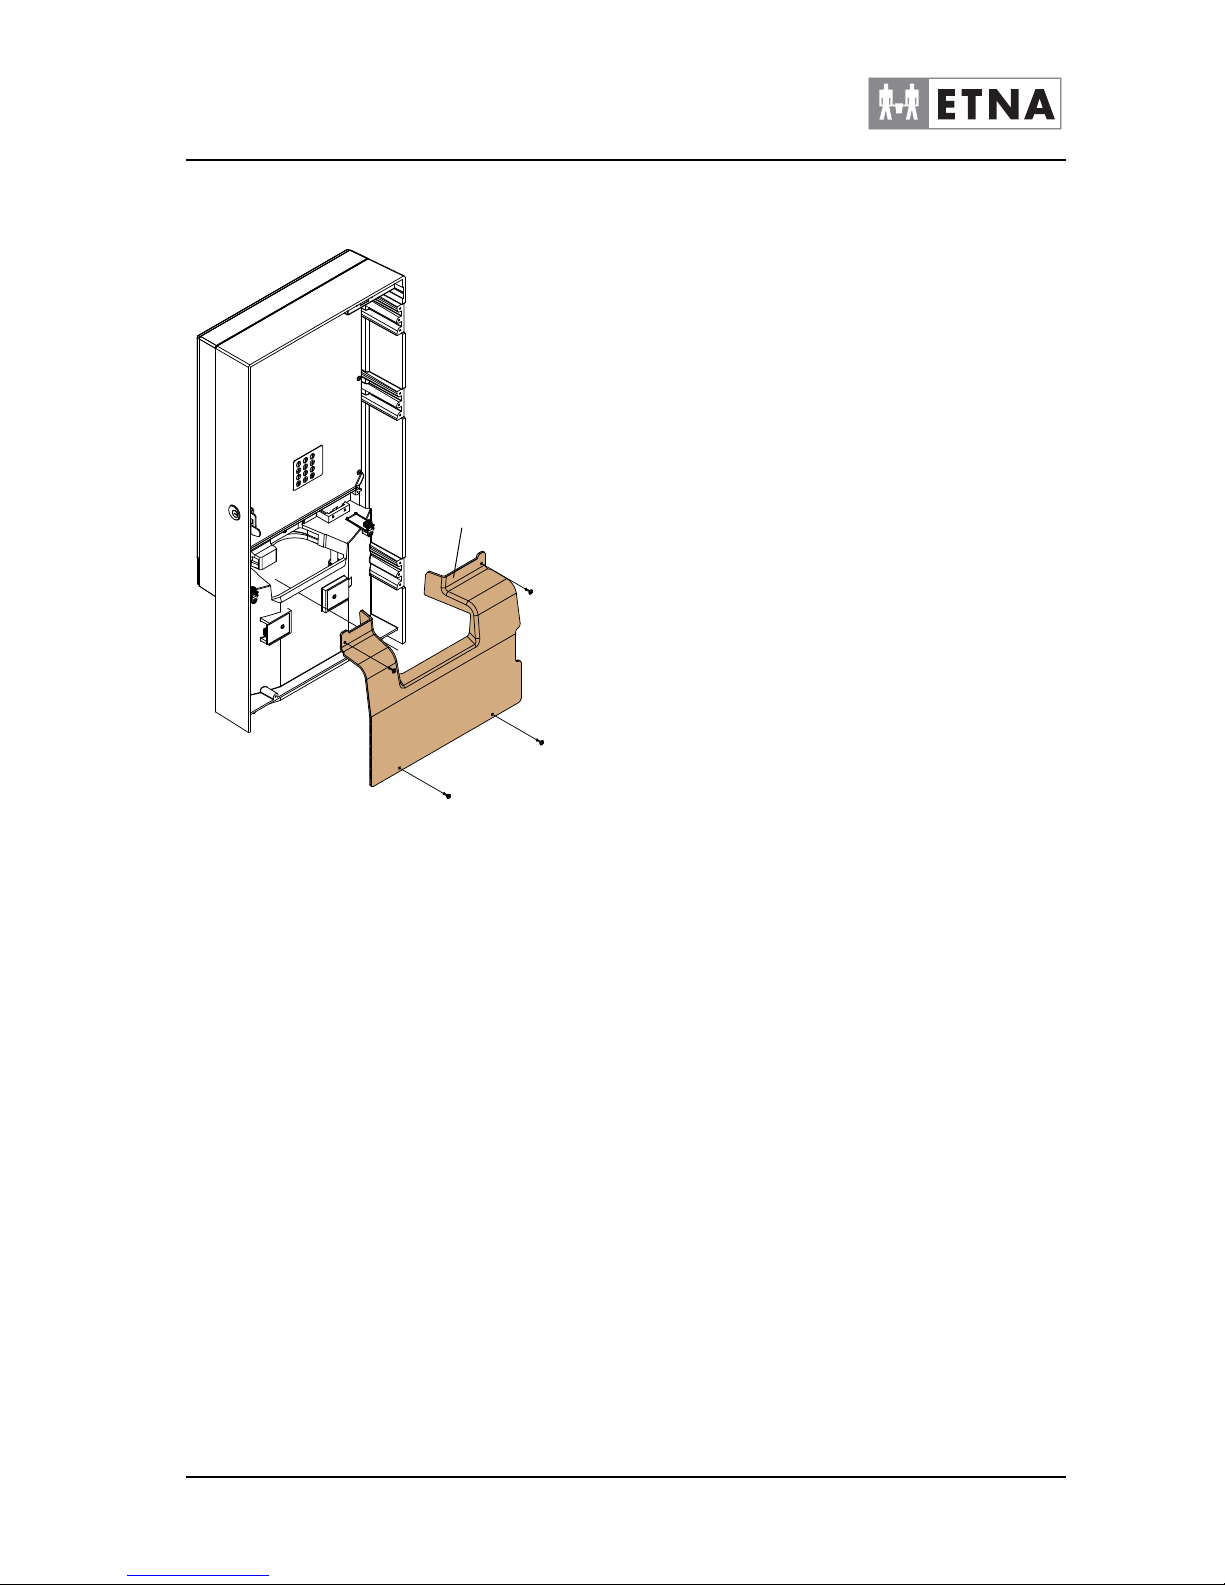
Removing door plate top
1 Open the door.
2 Loosen the plate (C).
3 Remove the plate.
9.15 Replacing cup sensor
Be careful! : PCBs are ESD-sensitive. Put on an ESD
wrist strap and connect it to the machine frame.
Figure 9-15
C
Page 42
42
© ETNA Coffee Equipment b.v.
Technical manual Dorado Small Instant
COFFEE TECHNOLOGIES
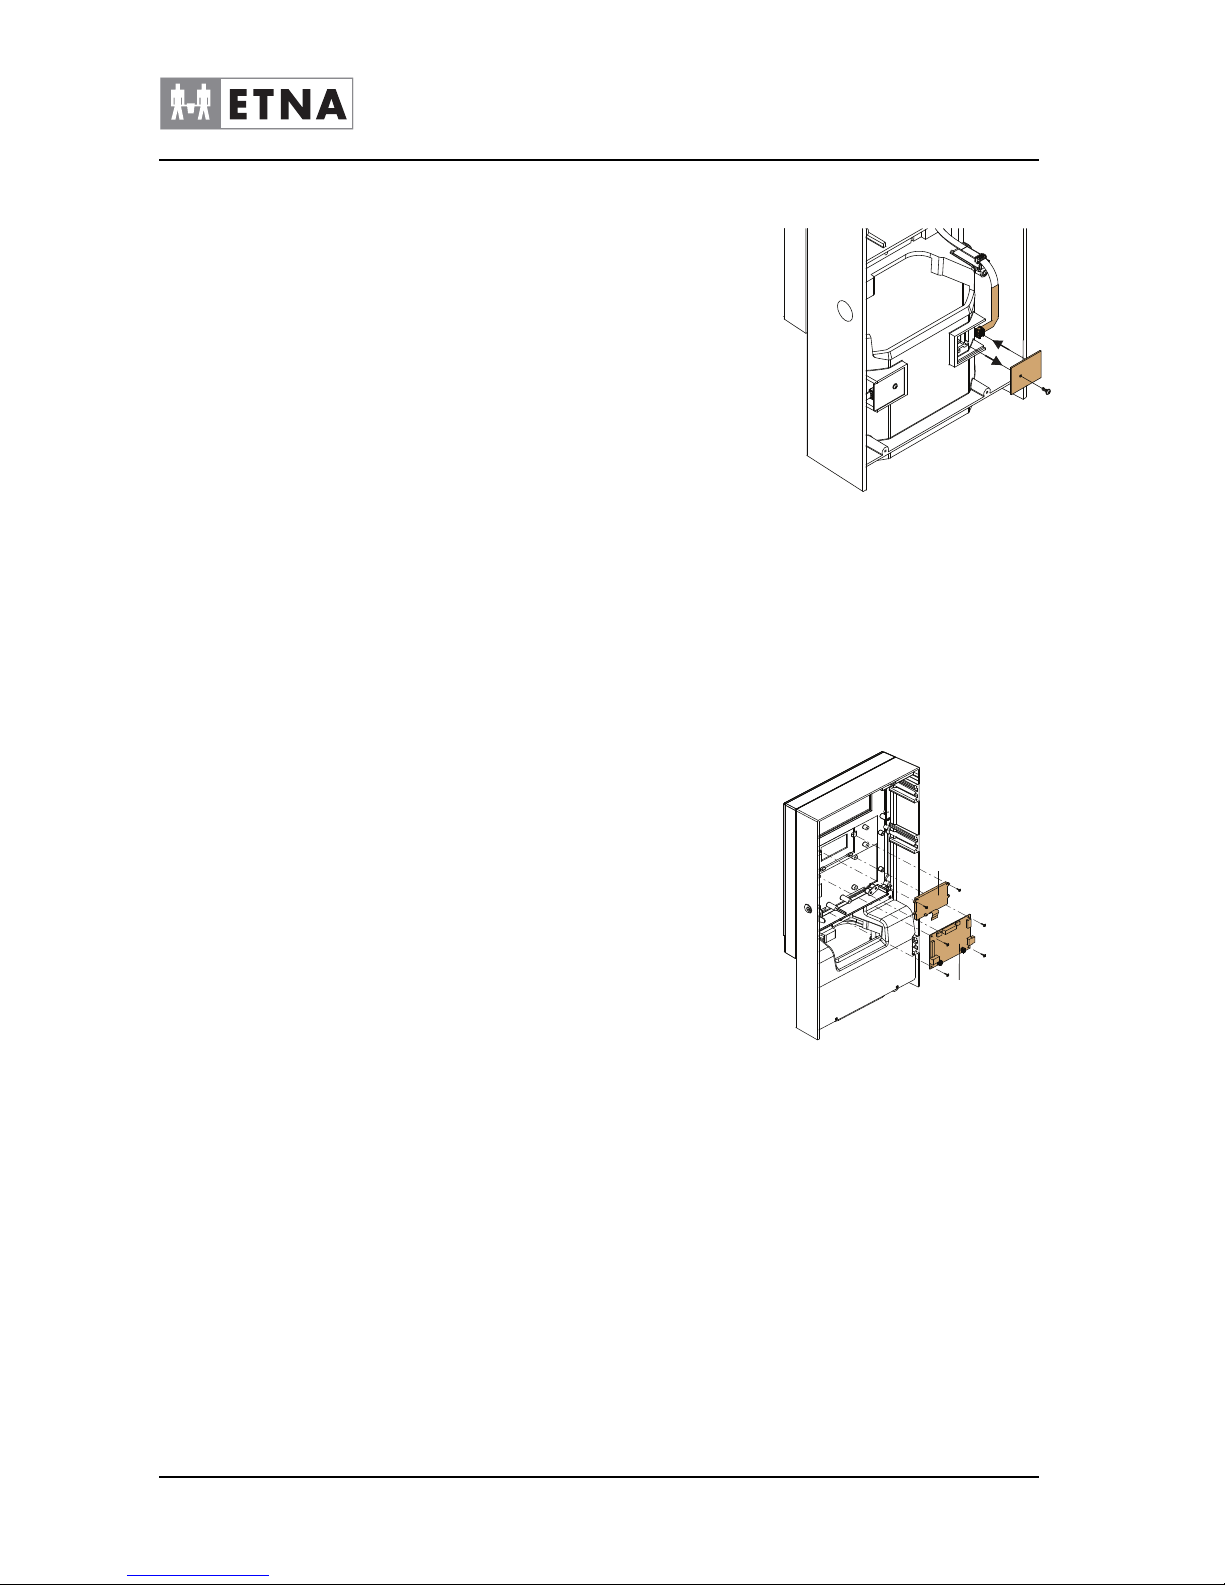
1 Remove the door plate, see par. 9.14.
2 Loosen the screw of the sensor PCB (1).
3 Disconnect the sensor connector (2).
4 Replace the whole sensor.
5 Connect the sensor connector.
6 Fix the sensor fastener in place with the screw.
7 Fix the door plate in place, see par. 9.14.
9.16 LCD display and display PCB
Be careful! : PCBs are ESD-sensitive. Put on an ESD
wrist strap and connect it to the machine frame.
Replacing the LCD display
1 Remove the door plate, see (see paragraph 9.14)
2 Remove the 2 screws from the LCD display (C).
3 Replace the LCD display.
4 Fix the door plate in place.
Replacing the display PCB
1 Remove the door plate, see (see paragraph 9.14)
2 Remove the 4 screws from the display PCB (B).
3 Replace the display PCB.
4 Connect the connectors to the display PCB (B).
5 Fix the door plate in place.
9.17 Replacing the illumination panel
Be careful! : PCBs are ESD-sensitive. Put on an ESD
wrist strap and connect it to the machine frame.
Figure 9-16
1
2
Figure 9-17
C
B
Page 43
Technical manual Dorado Small Instant
43
© ETNA Coffee Equipment b.v.
COFFEE TECHNOLOGIES
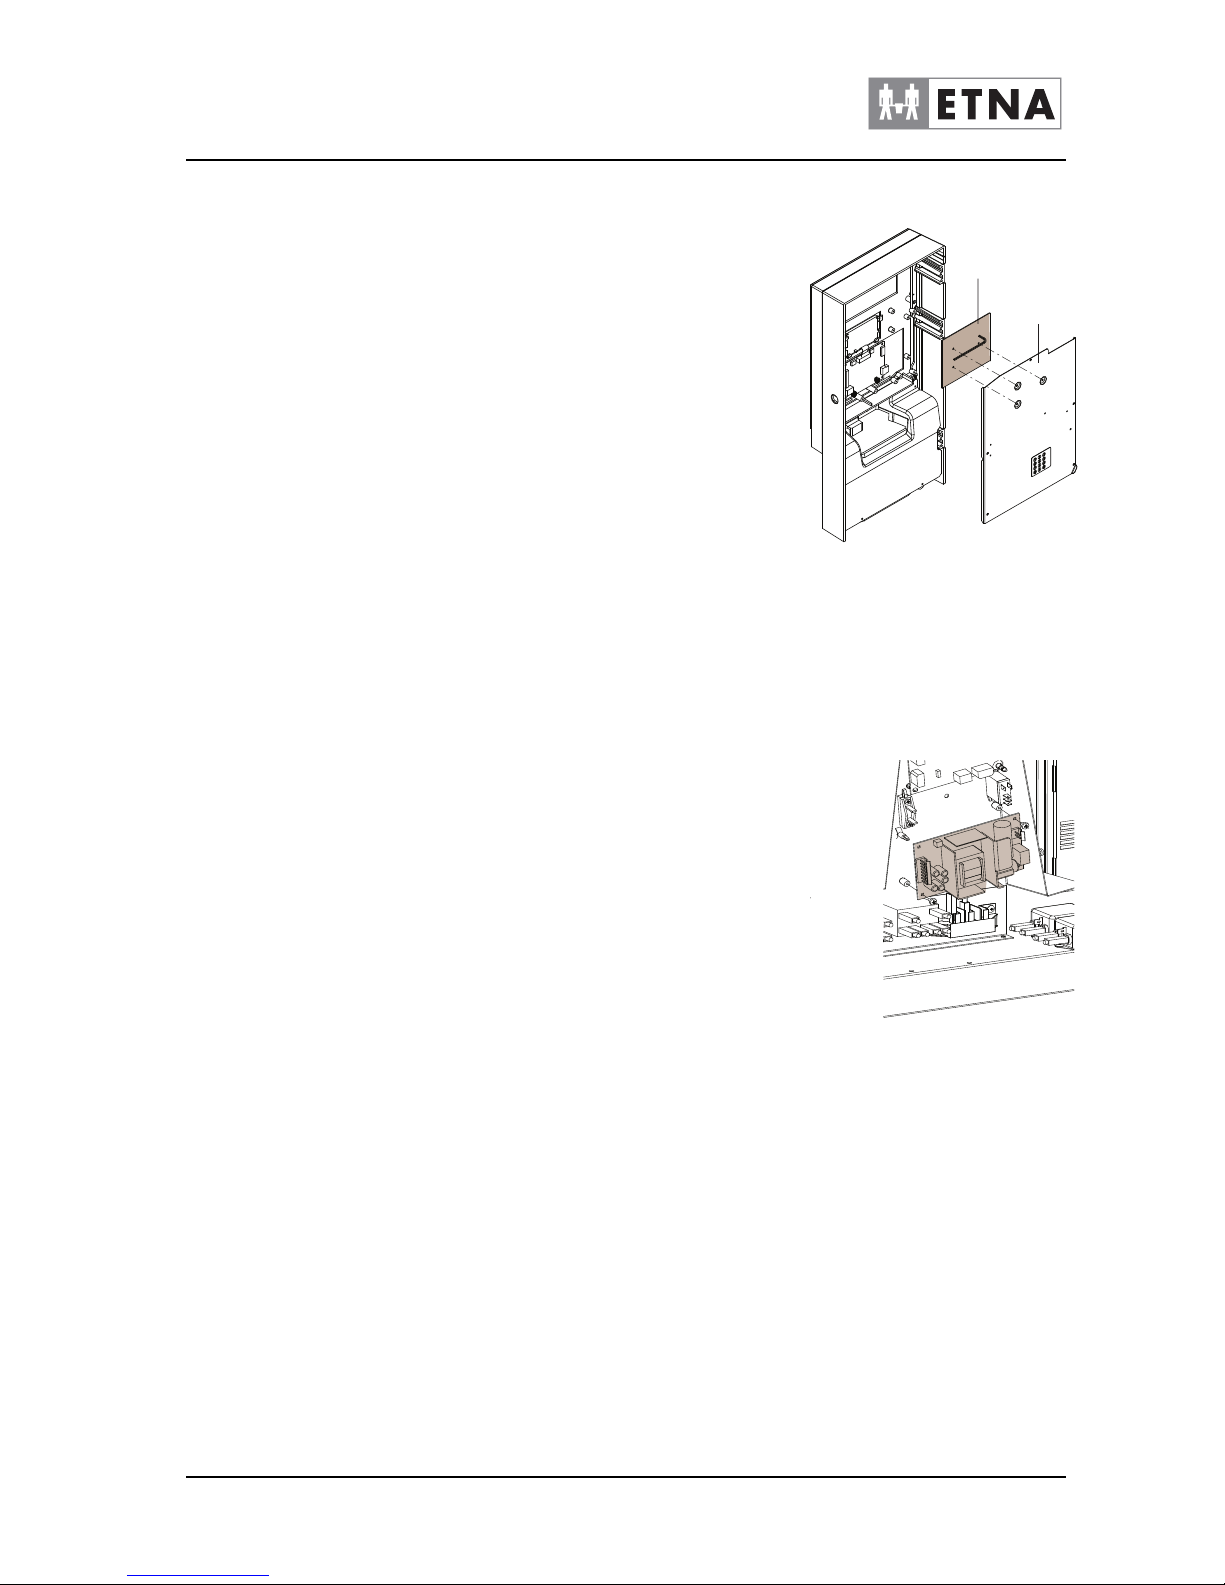
1 Remove the door plate; see par. 9.14.
2 Detach the illumination panel (E) from the 3 clamping pins that
attach it to the door plate (A).
3 Disconnect the wiring from the illumination panel.
4 Replace the illumination panel.
5 Connect the wiring for the illumination panel.
6 Position the illumination panel by pressing it onto the three
clamping pins on the door plate.
7 Fit the door plate; see par. 9.14.
9.18 Replacing power supply
Be careful! : PCBs are ESD-sensitive. Put on an ESD
wrist strap and connect it to the machine frame.
1 Open the door.
2 Access the machine, see par. 9.2 and remove the back plate.
3 Disconnect the power supply wiring.
4 Replace the power supply.
5 Fasten the power supply in the machine.
6 Connect the power supply wiring.
7 Restart the machine, see restart procedure par. 9.4.
9.19 Replacing the on/off switch
1 Access the machine; see par. 9.2.
2 Remove the connectors from the on/off switch.
3 Replace the on/off switch.
4 Reconnect the connectors of the on/off switch.
5 Restart the machine; see the restart procedure in par. 9.4.
Figure 9-18
E
A
Figure 9-19
Page 44
44
© ETNA Coffee Equipment b.v.
Technical manual Dorado Small Instant
COFFEE TECHNOLOGIES
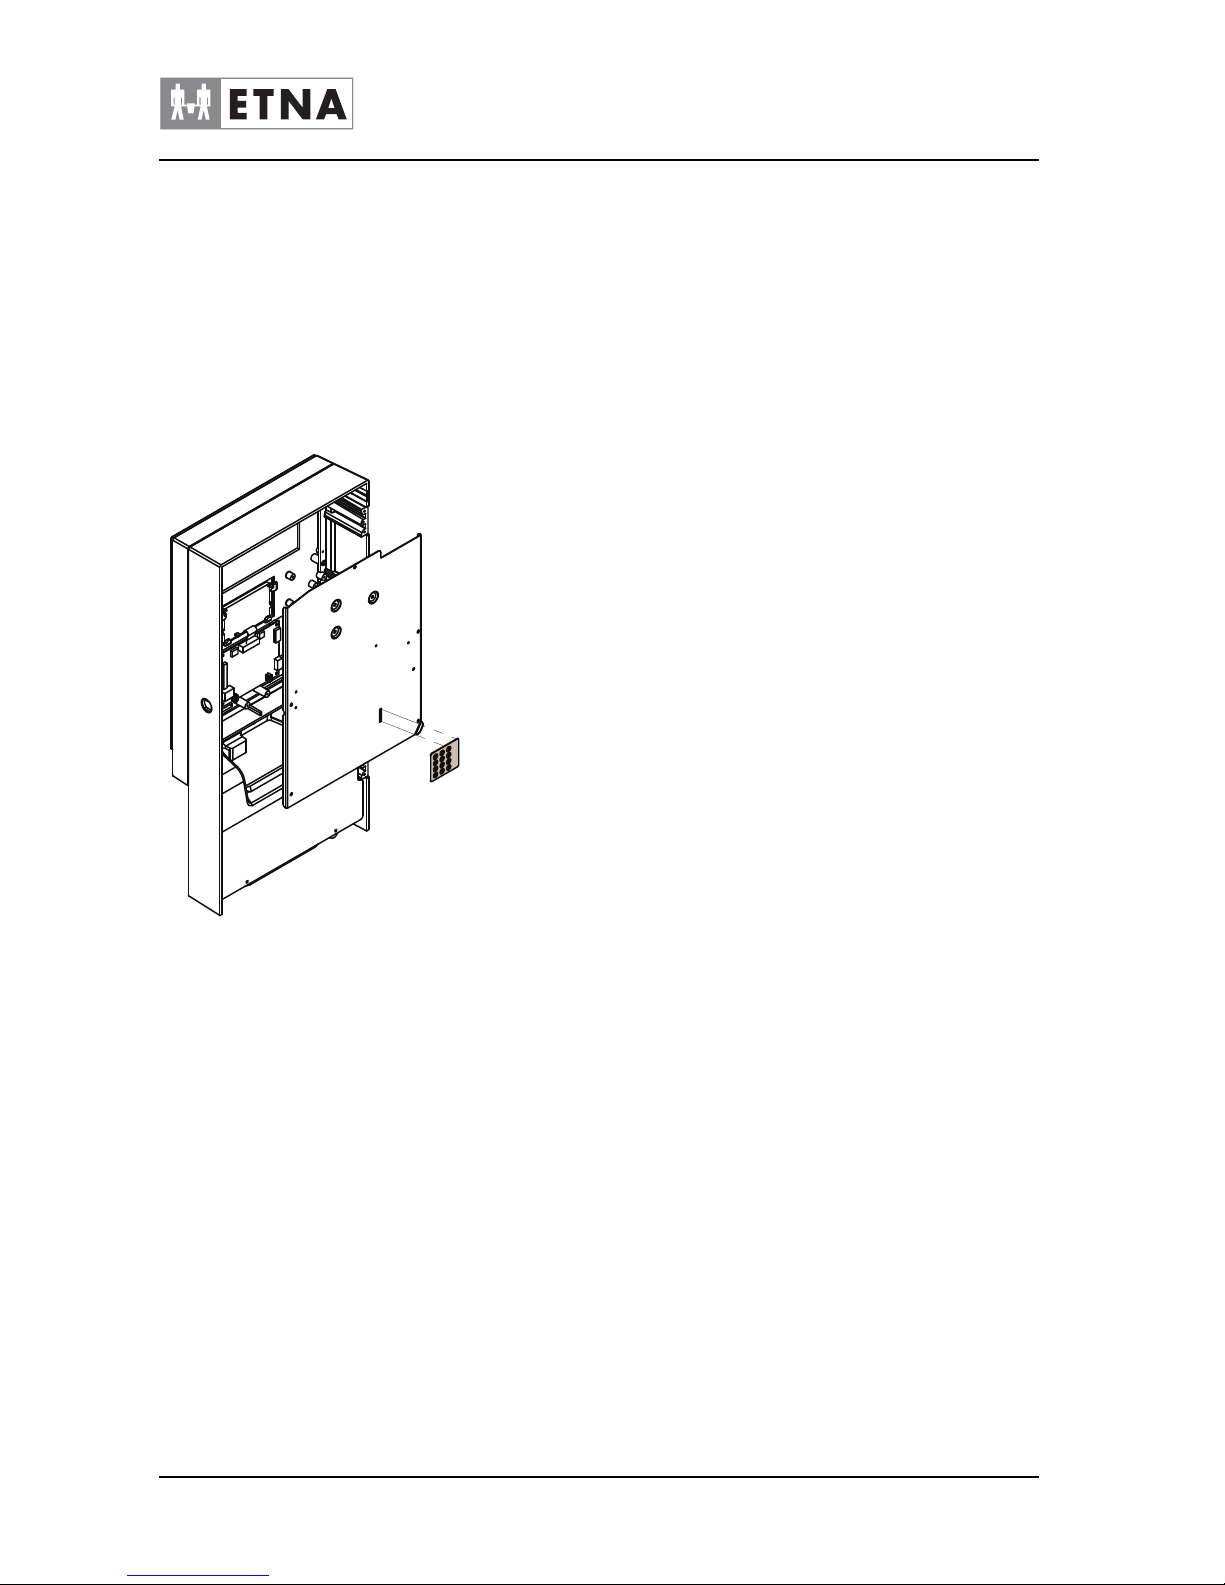
9.20 Service panel
Be careful! : PCBs are ESD-sensitive. Put on an ESD
wrist strap and connect it to the machine frame.
1 Remove the door plate, see par. 9.14
2 Remove the service panel.
3 Thoroughly clean and degrease the surface of the door plate.
4 Replace the service panel.
5 Fix the door plate in place, see par.9.14
Figure 9-20
 Loading...