

Page 1
GEBRUIKSAANWIJZING
INSTRUCTIONS FOR USE
Side by Side KOELKAST
Side by Side REFRIGERATOR
AKV378IRVS
AKV378IZWA
Page 2
INHOUDSOPGAVE
Uw koelkast
Inleiding 4
Link naar de EPREL-database van de EU 4
Veiligheidsvoorschriften 5
Voor het eerste gebruik
Voordat u het toestel de eerste keer gebruikt 11
Advies om energie te besparen 11
Installeren en aansluiten
De keuze van de ruimte 13
Toestel aansluiten 14
Deur(en) afstellen 15
Toestelbeschrijving
Toestel 16
Bediening van het toestel
NL 2
Bedieningspaneel 17
Kinderslot 18
Temperatuur instellen 18
Intensief koelen 18
Intensief vriezen 19
ECO-functie 20
Vakantiefunctie 21
Alarm bij open deur 21
Water- en ijsdispenser 22
De ijsmaker uitschakelen 23
Page 3
INHOUDSOPGAVE
Voedsel bewaren en invriezen
Aanbevolen indeling 24
Voorkom het bederven van voedsel 25
Vers voedsel bewaren in de koelkast 25
Invriezen en bewaren van voedsel in de vriezer 26
Bevroren voedsel ontdooien 27
Onderhoud
Het toestel ontdooien 28
Het toestel reinigen 28
De water-en ijsdispenser reinigen 29
Het ijsreservoir verwijderen en schoonmaken 30
Storingen
Storingstabel 32
Milieuaspecten
Verpakking en toestel afdanken 34
Gebruikte pictogrammen
Belangrijk om te weten
Tip
Waarschuwing; Brandgevaar / ontvlambare materialen
NL 3
Page 4
UW KOELKAST
Inleiding
Gefeliciteerd met uw keuze voor deze koelkast van Etna. In het ontwerp van dit product heeft
eenvoudige bediening en optimale gebruiksvriendelijkheid centraal gestaan.
In deze handleiding leest u hoe u dit toestel het best kunt gebruiken. Naast informatie over de
bediening, vindt u hier ook achtergrondinformatie die u tijdens het gebruik van het toestel van
pas kan komen.
Lees eerst de veiligheidsvoorschriften voordat u het toestel
gebruikt!
Lees deze handleiding door voordat u het toestel in gebruik neemt, en berg de handleiding
daarna veilig op voor toekomstig gebruik.
Link naar de EPREL-database van de EU
De QR-code op het energielabel dat bij het apparaat wordt geleverd, biedt een weblink naar de
registratie van dit apparaat in de EPREL-database van de EU. Bewaar het energielabel samen
met de gebruikershandleiding en alle andere documenten die bij dit apparaat zijn geleverd ter
referentie.
Het is mogelijk om informatie over de prestaties van het product te vinden in de EU EPRELdatabase met behulp van de link https://eprel.ec.europa.eu en de modelnaam en het
productnummer op het typeplaatje van het apparaat.
Kijk voor meer informatie over het energielabel op www.theenergylabel.eu.
NL 4
Page 5
VEILIGHEIDSVOORSCHRIFTEN
Lees zorgvuldig de meegeleverde instructies voor installatie en
gebruik van het apparaat. De fabrikant is niet verantwoordelijk
voor letsel en schade veroorzaakt door een foutieve installatie.
Bewaar de instructies van het apparaat voor toekomstig gebruik.
Veiligheid van kinderen en kwetsbare mensen
• Het apparaat is niet bedoeld voor gebruik door personen
(waaronder kinderen) met een lichamelijke, zintuiglijke of
verstandelijke beperking of personen met te weinig kennis
en ervaring, tenzij iemand die verantwoordelijk is voor hun
veiligheid toezicht houdt of hun instructies heeft gegeven over
het gebruik van het apparaat.
• Houd toezicht op kinderen om ervoor te zorgen dat ze niet met
het apparaat spelen.
• Reiniging en onderhoud mogen niet door kinderen worden
uitgevoerd zonder toezicht.
• Houd alle verpakkingsmaterialen uit de buurt van kinderen.
Alleen voor Europese markten
• Dit apparaat kan worden gebruikt door kinderen van 8jaar
en ouder, mensen met een lichamelijke, zintuiglijke of
verstandelijke beperking of mensen die weinig ervaring met
en kennis van het apparaat hebben, mits zij onder toezicht
staan of zijn geïnstrueerd hoe zij het apparaat veilig moeten
gebruiken en zij de mogelijke gevaren begrijpen.
• Laat kinderen niet met het apparaat spelen.
• Reiniging en onderhoud mogen niet door kinderen worden
uitgevoerd als er geen toezicht is.
• Kinderen van 3 tot 8 jaar mogen producten in toestellen
met een koelfunctie leggen en ook eruit halen.
Vertaling van originele instructie
NL 5
Page 6
VEILIGHEIDSVOORSCHRIFTEN
Algemene veiligheid
• De lamp in dit huishoudelijke apparaat is uitsluitend bedoeld
voor verlichting van dit apparaat. De lamp is niet geschikt
voor de verlichting van een huishoudelijke ruimte.
• WAARSCHUWING! Dit apparaat is bestemd voor
huishoudelijk of daarmee vergelijkbaar gebruik, zoals:
– in personeelskeukens in winkels, kantoren en andere
werkomgevingen;
– voor gasten in gastboerderijen, hotels, motels en andere
overnachtingsgelegenheden;
– in bed & breakfast-achtige omgevingen;
– voor catering en vergelijkbare niet-zakelijke doeleinden.
• WAARSCHUWING! Houd de ventilatieopeningen altijd vrij van
obstructies; dit geldt zowel voor vrijstaande als ingebouwde
modellen.
• WAARSCHUWING! Gebruik geen mechanische of andere
middelen om het ontdooiproces te versnellen, behalve die
middelen die door de fabrikant zijn aanbevolen.
• WAARSCHUWING! Let op dat u het koelcircuit niet beschadigt.
• WAARSCHUWING! Gebruik geen elektrische apparaten in de
koelkast, tenzij deze door de fabrikant worden aanbevolen.
• WAARSCHUWING! Gebruik geen waterstralen of stoom om
het apparaat te reinigen.
• WAARSCHUWING! Maak het apparaat schoon met
een vochtige, zachte doek. Gebruik alleen neutrale
schoonmaakmiddelen. Gebruik geen schuurmiddelen,
schuursponsjes, oplosmiddelen of metalen voorwerpen.
• WAARSCHUWING! Bewaar geen explosieve substanties
zoals spuitbussen met drijfgas in dit apparaat.
• WAARSCHUWING! Als het netsnoer beschadigd is, moet het
vervangen worden door de fabrikant, een servicemedewerker
of personen met vergelijkbare kwalificaties om gevaarlijke
situaties te voorkomen.
NL 6
Page 7
VEILIGHEIDSVOORSCHRIFTEN
Installatie
• WAARSCHUWING! Dit apparaat mag uitsluitend door een
erkende monteur worden geïnstalleerd.
• Verwijder alle verpakkingsmaterialen.
• Controleer het apparaat op transportschade. Sluit het apparaat
niet aan als het beschadigd is.
• Volg altijd de installatie-instructies in de bijgeleverde
installatiehandleiding.
• Wees voorzichtig met het verplaatsen van het apparaat, het is
zwaar. Draag altijd veiligheidshandschoenen.
• Zorg ervoor dat rond het apparaat lucht kan circuleren.
• Wacht ten minste 4 uur alvorens het apparaat aan de
netstroom aan te sluiten. Hierdoor kan de olie terug in de
compressor stromen.
• Installeer het apparaat niet in de nabijheid van radiators,
fornuizen, ovens of kookplaten.
• Installeer het apparaat niet op een plaats met direct zonlicht.
• Gebruik dit apparaat niet in gebieden die te vochtig of te koud
zijn, zoals bijgebouwen, garages of kelders.
• Til de voorkant van het apparaat op als u hem wilt verplaatsen,
om krassen op de vloer te voorkomen.
• WAARSCHUWING! Zorg er bij het plaatsen van het apparaat
voor dat het netsnoer niet bekneld of beschadigd raakt.
NL 7
Page 8
VEILIGHEIDSVOORSCHRIFTEN
Elektrische aansluiting
• WAARSCHUWING! Gevaar voor brand en elektrische
schokken.
• Dit apparaat moet worden aangesloten op een geaard
stopcontact.
• Alle elektrische aansluitingen moeten door een gediplomeerd
elektromonteur worden gemaakt.
• Controleer of de elektrische informatie op het typeplaatje
overeenkomt met de stroomvoorziening. Zo niet, neem dan
contact op met een elektromonteur.
• Gebruik altijd een correct geïnstalleerd, schokbestendig
stopcontact.
• Gebruik niet meerdere stekkers of verlengsnoeren.
• Zorg dat u de elektrische onderdelen (hoofdstekker,
kabel, compressor) niet beschadigt. Neem contact met de
Servicedienst of een elektrotechnicus om de elektrische
onderdelen te wijzigen.
• De stroomkabel moet lager blijven dan het niveau van het
stopcontact.
• Steek de stekker pas in het stopcontact als de installatie is
voltooid. Zorg ervoor dat het netsnoer na installatie bereikbaar is.
• Pak altijd de stekker vast als u de kabel uit het stopcontact wilt
halen. Trek nooit aan de voedingskabel.
• WAARSCHUWING! Plaats geen meervoudige stekkerdozen of
draagbare voedingen aan de achterkant van het apparaat.
• Als een vast apparaat niet is voorzien van een netsnoer en
een stekker, of van een andere manier om de verbinding met
het elektriciteitsnet te verbreken, waarbij sprake is van een
contactverbreker in alle polen die volledige verbreking biedt
in de situaties die onder overspanningscategorie III vallen,
moet er in de vaste elektriciteitskabel een verbreker worden
aangebracht volgens de geldende richtlijnen. Bij gebruik van
een omnipolaire schakelaar met een contactafstand van ten
minste 3 mm in het netsnoer wordt aan deze eis voldaan.
NL 8
Page 9
VEILIGHEIDSVOORSCHRIFTEN
Gebruik
• WAARSCHUWING! Gevaar voor letsel, brandwonden,
elektrische schokken of brand.
• De specificatie van het apparaat mag niet worden veranderd.
• Plaats geen elektrische apparaten (bijv. ijsmachines) in
het apparaat tenzij uitdrukkelijk geschikt verklaard door
de fabrikant.
• Zorg ervoor dat u het koelcircuit niet beschadigt. Het bevat
isobutaan (R600a), aardgas met een hoge ecologische
compatibiliteit. Dit gas is ontvlambaar.
• Als er schade aan het koelcircuit optreedt, zorg er dan voor
dat er zich geen vlammen en andere ontstekingsbronnen in
de kamer bevinden. Ventileer de kamer goed.
• Zet geen hete items op de kunststofonderdelen van het
apparaat.
• Bewaar geen ontvlambare gassen en vloeistoffen in het
apparaat.
• Plaats geen ontvlambare producten of items die vochtig zijn
door ontvlambare producten in, bij of op het apparaat.
• Raak de compressor of condensator niet aan. Ze zijn heet.
Onderhoud en reiniging
• WAARSCHUWING! Gevaar voor letsel of schade aan het
apparaat.
• Schakel het apparaat uit en trek de stekker uit het stopcontact
voordat u onderhoudshandelingen verricht.
• Het koelcircuit van dit apparaat bevat koolwaterstoffen.
Enkel bevoegde personen mogen de eenheid onderhouden
en herladen.
• Controleer regelmatig de afvoer van het apparaat en reinig het
indien nodig. Indien de afvoer verstopt is, zal er water op de
bodem van het apparaat liggen.
NL 9
Page 10
VEILIGHEIDSVOORSCHRIFTEN
Verwijdering
• WAARSCHUWING! Gevaar voor letsel of verstikking.
• Haal de stekker uit het stopcontact.
• Snij het netsnoer van het apparaat af en gooi dit weg.
• Verwijder de deur(en) om te voorkomen dat kinderen en
huisdieren opgesloten raken in het apparaat.
• Het koelcircuit en de isolatiematerialen van dit apparaat zijn
ozonvriendelijk.
• Het isolatieschuim bevat ontvlambare gassen. Neem contact
met uw plaatselijke overheid voor informatie m.b.t. correcte
afvalverwerking van het apparaat.
• Veroorzaak geen schade aan het deel van de koeleenheid dat
zich naast de warmtewisselaar bevindt.
NL 10
Page 11
VOOR HET EERSTE GEBRUIK
Voordat u het toestel de eerste keer gebruikt
Sluit het toestel pas aan op het elektriciteitsnet nadat u de aanwijzingen over een correct en
veilig gebruik van het toestel zorgvuldig hebt doorgelezen. De aanwijzingen zijn van toepassing
op verschillende types en modellen; dat betekent dat de gebruiksaanwijzing instellingen of
onderdelen kan bevatten die niet beschikbaar zijn op uw toestel. We raden u aan om deze
instructies te bewaren voor toekomstig gebruik en deze bij het toestel te voegen wanneer dit
in de toekomst wordt verkocht.
Controleer het toestel op beschadigingen of onregelmatigheden. Wanneer het toestel
beschadigd is, stelt u de winkel waar u het toestel hebt gekocht hiervan op de hoogte.
Laat het toestel minimaal 4 uur in verticale positie stilstaan, voordat u het toestel op het
elektriciteitsnet aansluit. Dit verkleint de kans op storingen als gevolg van de invloed van
het transport op het koelsysteem.
Voordat u het toestel voor de eerste keer gaat gebruiken, moeten de binnenzijde en alle
accessoires schoongemaakt worden met lauw water met een neutraal reinigingsmiddel. Neem na
het reinigen de delen af met schoon water en droog ze zorgvuldig.
Als u het toestel voor de eerste keer gaat gebruiken, plaats dan geen voedsel in het toestel
voordat de temperatuur tot de gekozen instelling is gedaald.
Advies om energie te besparen
• Installeer het toestel zoals in de gebruiksaanwijzing aangegeven.
• Open de deur niet vaker dan noodzakelijk.
• Houd de ventilatieluchtopeningen altijd vrij.
• Wanneer het deurrubber is beschadigd of niet meer volledig afsluit, moet deze zo snel
mogelijk worden vervangen.
• Bewaar voedsel in goed sluitende bakjes of een geschikte verpakking.
• Laat voedsel afkoelen tot kamertemperatuur voordat u het in het toestel plaatst.
• Ontdooi voedsel in het koelcompartiment.
• Ontdooi een conventionele vriezer wanneer zich een laag rijp of ijs van ongeveer
2 tot 3 millimeter aan de binnenzijde heeft gevormd.
• Zorg voor een gelijkmatige verdeling van de plateaus in het koelcompartiment.
Plaats het voedsel zo dat de lucht vrij door de binnenkant van het toestel kan circuleren
(houd u aan de aanbevolen plaatsing van voedsel in de instructies).
NL 11
Page 12
VOOR HET EERSTE GEBRUIK
• Als het toestel is voorzien van een ventilator, zorg er dan voor dat de openingen niet
geblokkeerd raken.
• Hoe lager de temperatuur wordt ingesteld, hoe hoger het energieverbruik zal zijn.
• Hoge omgevingstemperaturen beïnvloeden het energieverbruik nadelig. Ook direct
zonlicht of andere warmtebronnen in de buurt van het toestel hebben een ongunstige
invloed op het energieverbruik.
• Zorg voor voldoende ruimte rondom het toestel zodat een goede ventilatie en
luchtstroming rondom het toestel mogelijk is.
• De condensor aan de achterwand moet altijd schoon en vrij van stof of ongerechtigheden
worden gehouden.
NL 12
Page 13
INSTALLEREN EN AANSLUITEN
De keuze van de ruimte
• Dit koelapparaat is niet bedoeld om te worden gebruikt als inbouwapparaat.
• Plaats het toestel niet in de buurt van warmtebronnen, bijvoorbeeld een gasfornuis,
verwarming, boiler enz. en stel het niet bloot aan directe zonnestraling.
• Plaats het toestel in een droge en regelmatig geventileerde ruimte. De toegestane
temperatuur van de omgeving voor de juiste werking van het toestel is afhankelijk van de
uitvoering (klasse) van het toestel, die op het typeplaatje van het toestel vermeld is.
Beschrijving Klasse Omgevingstemperatuur °C Relatieve vochtigheid
Uitgebreid gematigd SN +10 tot +32
Gematigd N +16 tot +32
Subtropisch ST +16 tot +38
Tropisch T +16 tot +43
Plaats het toestel niet in een ruimte waar de temperatuur kan dalen tot onder de laagst
toegestane omgevingstemperatuur, want dit kan een onjuiste werking veroorzaken!
Plaats het toestel niet in een ruimte waar de temperatuur kan dalen tot onder 5 °C, want
dit kan een storing veroorzaken!
Het toestel is niet geschikt voor buitengebruik en het mag niet bloot worden gesteld aan
regen.
≤ 75%
Plaats het toestel in een ruimte die groot genoeg is. Er moet ten minste 1 m
8 gram koelmiddel zijn. De hoeveelheid koelmiddel is aangegeven op het typeplaatje aan
de binnenzijde van het toestel.
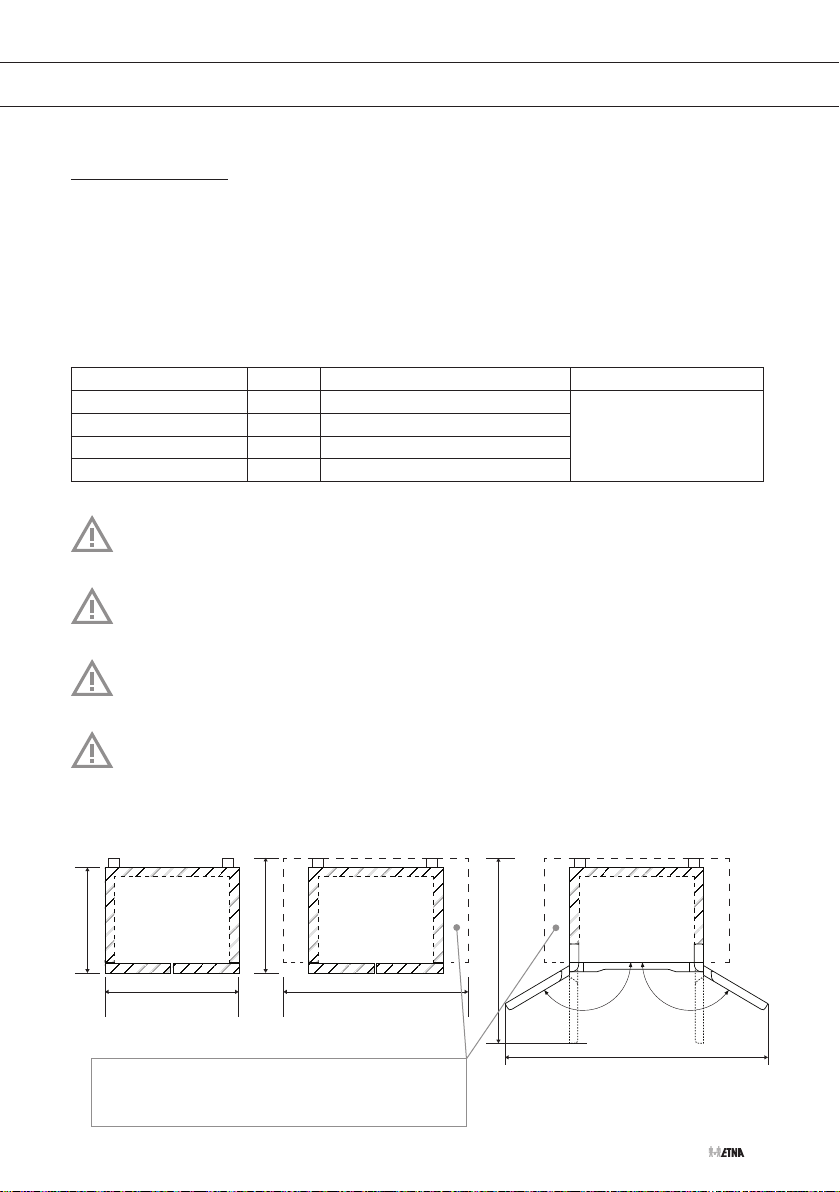
Totale afmetingen
646
910
Zorg voor voldoende ruimte rondom het
toestel zodat een goede ventilatie en
luchtstroming rondom het toestel mogelijk is.
Benodigde ruimte in gebruik Totale benodigde ruimte in gebruik
696
1176
1110
1733
3
ruimte per
NL 13
Page 14
INSTALLEREN EN AANSLUITEN
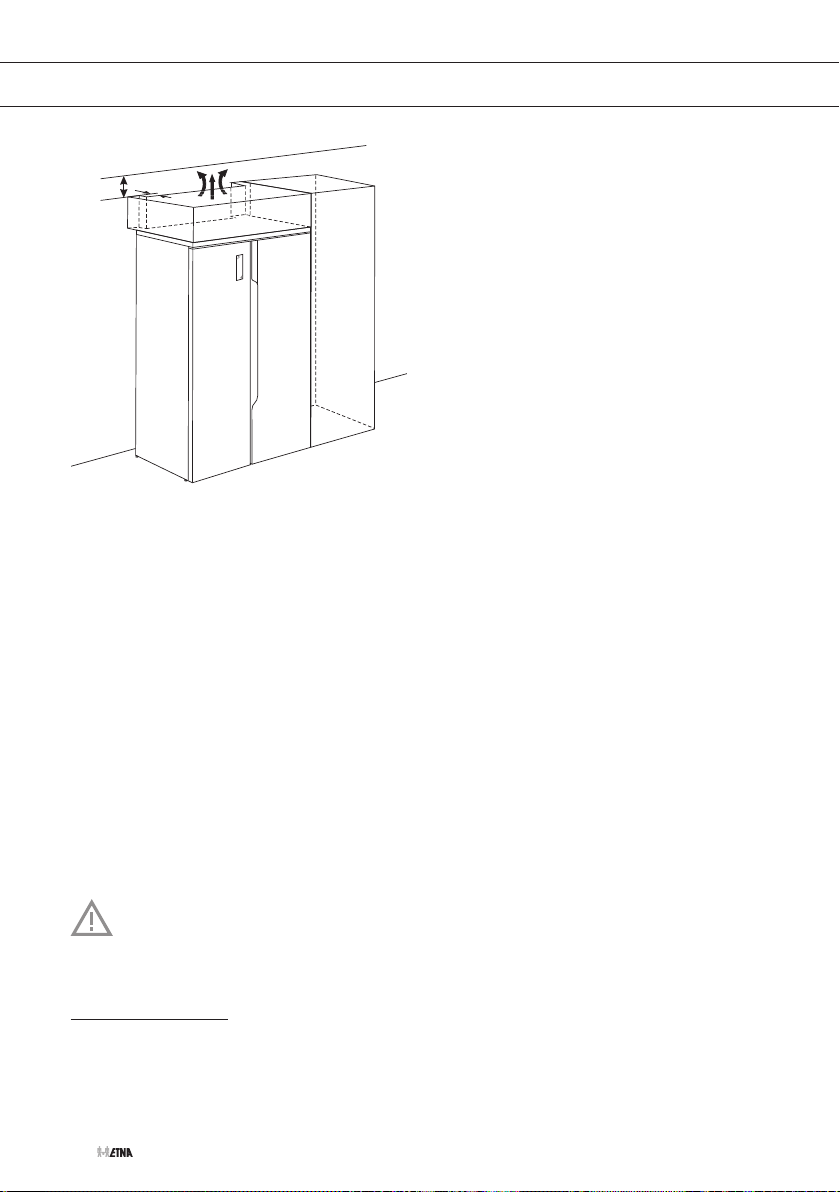
min.
100 mm
min. 50 mm
• Het toestel moet tenminste 5 cm van het elektrisch of gasfornuis respectievelijk 30 cm
van de verwarming of kachel worden geïnstalleerd. Bij kleinere afstanden moet er een
isolatieplaat worden gebruikt.
• Na installatie moet de stekker toegankelijk zijn!
• De luchtuitlaat van het toestel bevindt zich bovenaan aan het toestel; voorkom blokkering
van de luchtstroom. Door blokkering kan het toestel beschadigd raken.
• Het toestel moet door minimaal twee personen worden verplaatst en geïnstalleerd.
• Wees voorzichtig bij het verplaatsen van het toestel om te voorkomen dat de vloer
beschadigd raakt.
• Zorg ervoor dat het toestel tijdens de installatie de voedingskabel niet beschadigd.
• Plaats het toestel op een vlakke, stabiele ondergrond.
• Met de stelvoeten kunt u het toestel waterpas zetten.
• Om de deuren zelf te laten sluiten, kantelt u de bovenkant ongeveer 10 mm of 0,5 ° naar
achteren door aan de stelvoeten te draaien.
De wieltjes zijn geen zwenkwieltjes en derhalve alleen geschikt om voor- en/of
achteruit te bewegen. Zijdelings verplaatsen van het toestel kan uw vloer en de wieltjes
beschadigen.
Toestel aansluiten
• Sluit het toestel met het netsnoer aan op het elektriciteitsnet. Het stopcontact moet geaard
zijn. De nominale spanning en de frequentie van het toestel vindt u op het typeplaatje/label
met basisinformatie op het toestel.
NL 14
Page 15
INSTALLEREN EN AANSLUITEN
• Het toestel moet in overeenstemming met de geldende normen en regels op het
elektriciteitsnet worden aangesloten en geaard. Het toestel is bestand tegen kortstondige
afwijkingen in de nominale spanning, echter niet meer dan +/- 6%.
Wanneer u het toestel langere tijd niet gebruikt, schakelt u het uit door het los te
koppelen van de stroomvoorziening. Maak het toestel leeg, ontdooi het, maak het
schoon en laat de deur(en) op een kier staan.
Gevaar van bevriezing
Steek bevroren voedsel nooit in uw mond en voorkom aanraking van bevroren voedsel,
omdat dit bevriezing kan veroorzaken.
Open het vriescompartiment niet als er een fout is opgetreden of de stroomvoorziening is
uitgevallen, tenzij het toestel langer buiten werking is dan de uren die staan aangegeven
op het typeplaatje (temperatuurstijgingstijd). Na die periode moet u het ingevroren
voedsel gebruiken of zorgen voor voldoende koeling (in een vervangend toestel).
Deur(en) afstellen
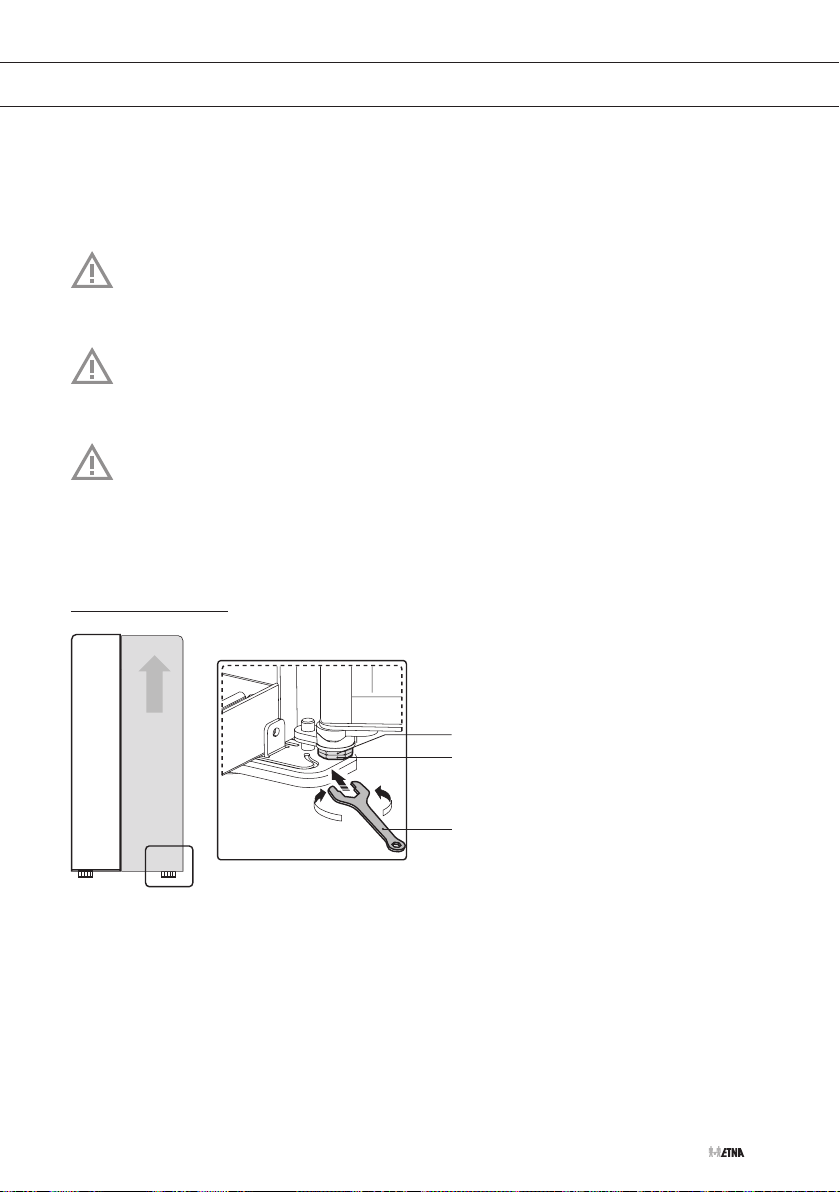
1
2
3
• Wanneer de beide deuren aan de boven- en onderzijde niet in lijn liggen, dan kan de
rechterdeur worden afgesteld door met een steeksleutel (3) de bout (1) van het onderste
scharnier te verdraaien.
• Door de bout tegen de klok in te draaien kunt u de deur omhoog stellen.
Na het afstellen de bout (1) borgen met moer (2).
NL 15
Page 16
TOESTELBESCHRIJVING
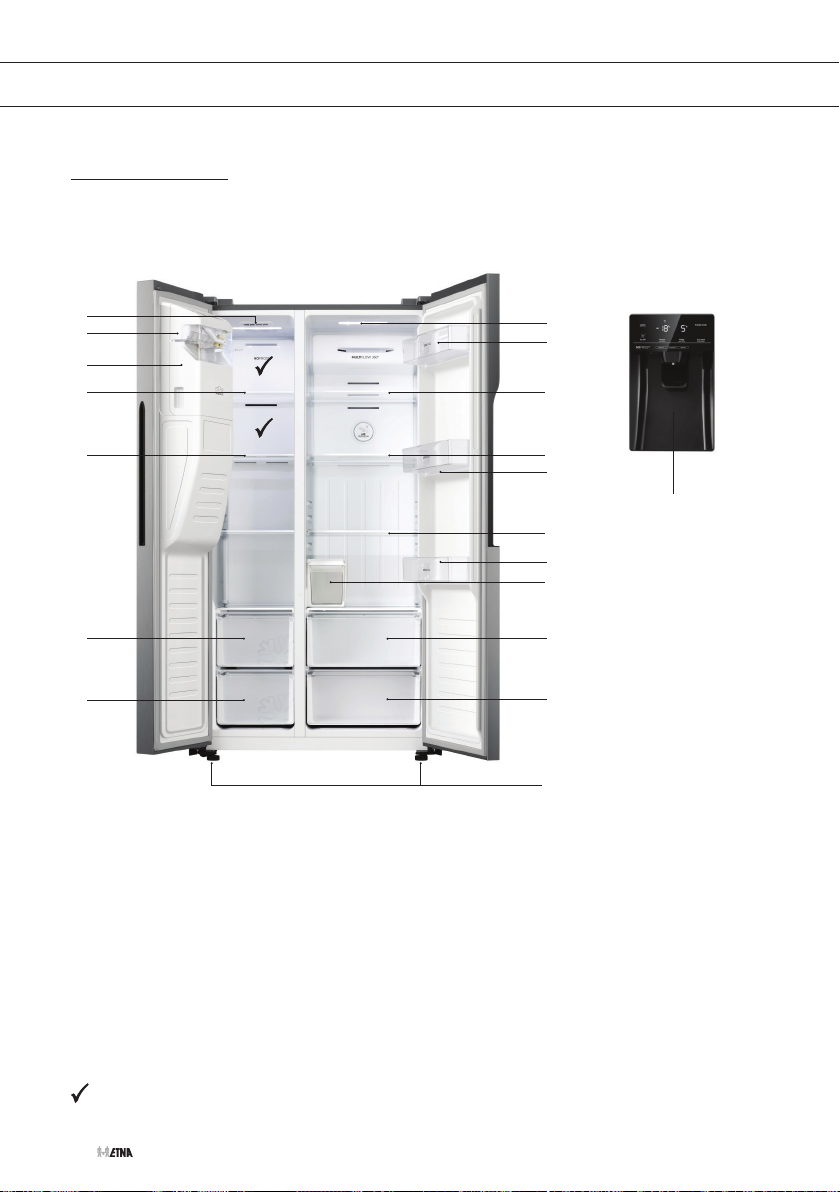
Toestel
Deze handleiding behandelt verschillende modellen. Hierdoor kan het voorkomen
dat bepaalde opties of accessoires voor uw toestel niet van toepassing zijn.
1
2
3
4
4
5
5
Vriezer
1. Interieurverlichting
2. IJsmaker
3. IJsreservoir
4. Draagplateau
5. Vrieslade
6
7
8
8
7
12
8
7
9
10
10
11
Koelkast
6. Interieurverlichting
7. Deurvak
8. Draagplateau
9. Waterreservoir
10. Groentelade
11. Stelvoeten
12. Water- en ijsdispenser
Beste locatie voor het invriezen van vers voedsel.
NL 16
Page 17
BEDIENING VAN HET TOESTEL
Bedieningspaneel
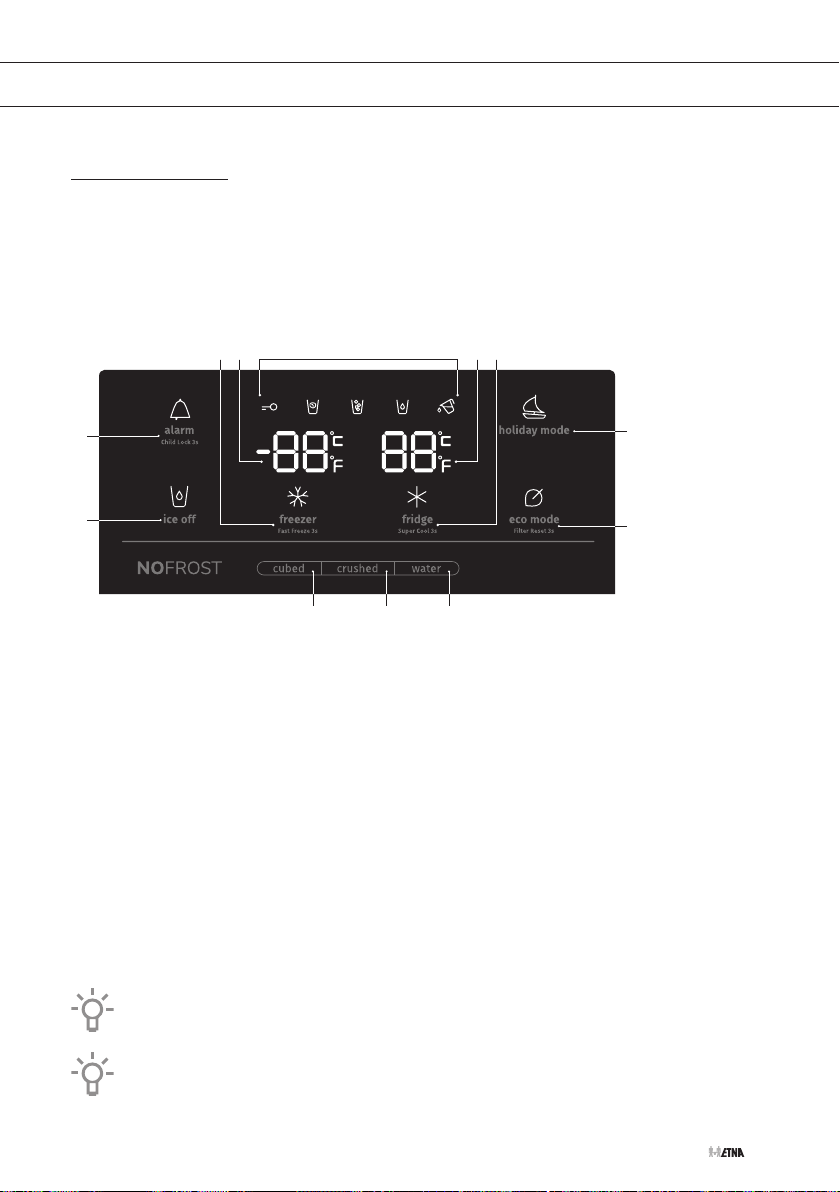
Op de deur van het vriesgedeelte van de SBS-koelkast bevindt zich het bedieningspaneel.
Wanneer het toestel voor de eerste keer wordt ingeschakeld, zal de achtergrondverlichting van
de pictogrammen gaan branden. Als er geen toetsen worden bediend en de deuren gesloten
blijven zal de verlichting na 60 seconden worden uitgeschakeld. De achtergrondverlichting gaat
iedere keer weer aan als de deur wordt geopend of als er een toets wordt bediend.
54 73 6
2
1
101112
1. IJsmakertoets
2. Alarm-/kinderslottoets
3. Insteltoets voor de temperatuur (vriescompartiment) en intensieve vriesfunctie
4. Weergave temperatuur (vriescompartiment)
5. Pictogrammen
▷ Kinderslot / IJsblokjes / Gemalen ijs / Water / Waterreservoir
6. Weergave temperatuur (koelcompartiment)
7. Insteltoets voor de temperatuur (koelcompartiment) en intensieve koelfunctie
8. Vakantiefunctietoets
9. ECO-toets
10. Watertoets
11. Crushed-toets (gemalen ijs)
12. Cubed-toets (ijsblokjes)
De aanbevolen temperatuur is 4 °C voor het koelcompartiment en -18 °C voor het
vriescompartiment.
8
9
Als u het apparaat wilt uitschakelen, trekt u de stekker uit het stopcontact.
NL 17
Page 18
BEDIENING VAN HET TOESTEL
Kinderslot
Gebruik deze functie om onbedoelde wijzigingen in de instellingen van het toestel te voorkomen.
Alle toetsen worden vergrendeld.
• Alle toetsen zijn vergrendeld als het kinderslotpictogram brandt.
• Door gedurende 3 seconden op de alarm-/kinderslottoets te drukken worden de toetsen
ontgrendeld.
Als er geen toetsen worden bediend, zal het bedieningspaneel na 20 seconden weer
worden vergrendeld.
Temperatuur instellen
1. Ontgrendel het bedieningspaneel; druk 3 seconden op de alarm-/kinderslottoets.
2. Druk (meerdere keren) op de insteltoets voor de temperatuur (koelcompartiment of
vriescompartiment) om de temperatuur in te stellen.
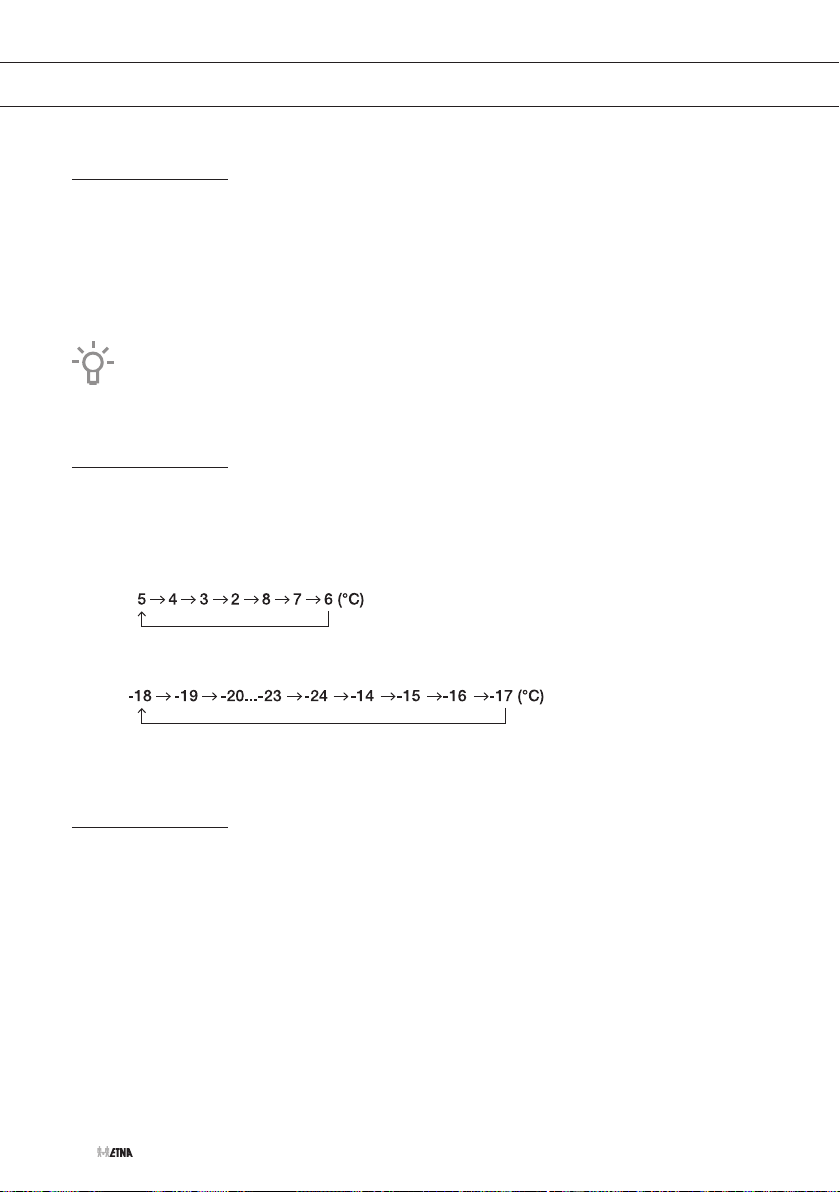
▷ De temperatuur van de koelkast zal in de onderstaande volgorde worden ingesteld:
▷ De temperatuur van de vriezer zal in de onderstaande volgorde worden ingesteld:
Intensief koelen
Dit toestel beschikt over een intensieve koelfunctie. Deze functie zorgt ervoor dat de temperatuur
in het koelcompartiment zo snel mogelijk daalt. Dit is ideaal voor de afkoeling van recent in de
koelkast geplaatste producten. Gebruik deze instelling wanneer u een grote hoeveelheid voedsel
in het toestel legt.
NL 18
Page 19
BEDIENING VAN HET TOESTEL
De intensieve koelfunctie in-/uitschakelen
1. Ontgrendel het bedieningspaneel; druk 3 seconden op de alarm-/kinderslottoets.
2. Druk gedurende 3 seconden op de insteltoets voor de temperatuur (koelcompartiment)
totdat het intensief koelen pictogram en de temperatuur 2 °C verlicht worden.
▷ De functie is ingeschakeld.
3. Druk gedurende 3 seconden op de insteltoets voor de temperatuur (koelcompartiment)
totdat het intensief koelen pictogram niet meer verlicht is.
▷ De functie is uitgeschakeld.
Als de intensieve koelfunctie niet handmatig wordt uitgeschakeld, wordt de functie
(na ongeveer 3 uur) automatisch uitgeschakeld.
Wanneer u de ECO-functie of vakantiefunctie kiest terwijl de intensieve koelfunctie actief
is, wordt intensief koelen onmiddellijk uitgeschakeld.
Intensief vriezen
Dit toestel beschikt over een intensieve vriesfunctie. Deze functie zorgt ervoor dat de
temperatuur in het vriescompartiment zo snel mogelijk daalt. Schakel deze functie 24 uur van
tevoren in voordat u een grote hoeveelheid vers voedsel in het toestel legt.
De intensieve vriesfunctie in-/uitschakelen
1. Ontgrendel het bedieningspaneel; druk 3 seconden op de alarm-/kinderslottoets.
2. Druk gedurende 3 seconden op de insteltoets voor de temperatuur (vriescompartiment)
totdat het intensief vriezen pictogram en de temperatuur -24 °C verlicht worden.
▷ De functie is ingeschakeld.
3. Druk gedurende 3 seconden op de insteltoets voor de temperatuur (vriescompartiment)
totdat het intensief vriezen pictogram niet meer verlicht is.
▷ De functie is uitgeschakeld.
Als de intensieve vriesfunctie niet handmatig wordt uitgeschakeld, wordt de functie
(na ongeveer 2 dagen) automatisch uitgeschakeld.
Wanneer u de ECO-functie of vakantiefunctie kiest terwijl de intensieve vriesfunctie actief
is, wordt intensief vriezen onmiddellijk uitgeschakeld.
NL 19
Page 20
BEDIENING VAN HET TOESTEL
ECO-functie
Dit toestel beschikt over een ECO-functie. De ECO-functie heeft geen tijdslimiet en blijft actief
totdat de functie wordt uitgeschakeld.
De ECO-functie in-/uitschakelen
1. Ontgrendel het bedieningspaneel; druk 3 seconden op de alarm-/kinderslottoets.
2. Druk op de ECO-toets.
▷ Het pictogram wordt verlicht.
▷ De temperaturen -17 °C en 6 °C worden weergegeven.
▷ De functie is ingeschakeld.
3. Druk op de ECO-toets.
▷ Het pictogram gaat uit.
▷ De functie is uitgeschakeld.
▷ De temperatuur keert terug naar de meest recent ingestelde waarde.
De ECO-functie is niet geschikt om vers voedsel in te vriezen of om ijsblokjes te maken.
Let op!
Het inschakelen van de ECO-functie schakelt de functies intensief koelen en intensief
vriezen uit.
NL 20
Als de ECO-functie actief is, kan de bewaartijd van voedsel korter worden.
Schakel de ECO-functie niet in tijdens het invriezen van vers voedsel.
Wanneer u een andere temperatuur instelt terwijl de ECO-functie actief is, wordt de ECOfunctie onmiddellijk uitgeschakeld.
Page 21
BEDIENING VAN HET TOESTEL
Vakantiefunctie
Dit toestel beschikt over een vakantiefunctie. Als u voor langere tijd weg bent, kunt u deze
functie activeren. De temperatuur van de koelkast wordt dan automatisch op 15 °C gezet en de
temperatuur van de vriezer op -18 °C.
Bewaar gedurende deze tijd geen etenswaren in de koelkast.
De vakantiefunctie in-/uitschakelen
1. Ontgrendel het bedieningspaneel; druk 3 seconden op de alarm-/kinderslottoets.
2. Druk op de vakantiefunctietoets.
▷ Het pictogram wordt verlicht.
▷ De temperatuur -18 °C (vriescompartiment) en ‘—’ (koelcompartiment) worden
weergegeven.
▷ De functie is ingeschakeld.
3. Druk op de vakantiefunctietoets.
▷ Het pictogram gaat uit.
▷ De functie is uitgeschakeld.
Let op!
Het inschakelen van de vakantiefunctie schakelt de functies intensief koelen en intensief
vriezen uit.
Als de vakantiefunctie actief is, schakelt de ijsdispenser automatisch uit.
Alarm bij open deur
Als de deur van een compartiment te lang open staat, hoort u een geluidssignaal en ‘dr’
verschijnt in de display.
Het alarm uitschakelen
1. Ontgrendel het bedieningspaneel; druk 3 seconden op de alarm-/kinderslottoets.
2. Druk nogmaals op de alarm-/kinderslottoets.
▷ Het geluidssignaal stopt. Het pictogram blijft verlicht.
Door meteen de deur te sluiten wordt het alarm ook uitgeschakeld.
Indien na 10 minuten de deur nog niet gesloten is, stopt het geluidssignaal automatisch.
NL 21
Page 22
BEDIENING VAN HET TOESTEL
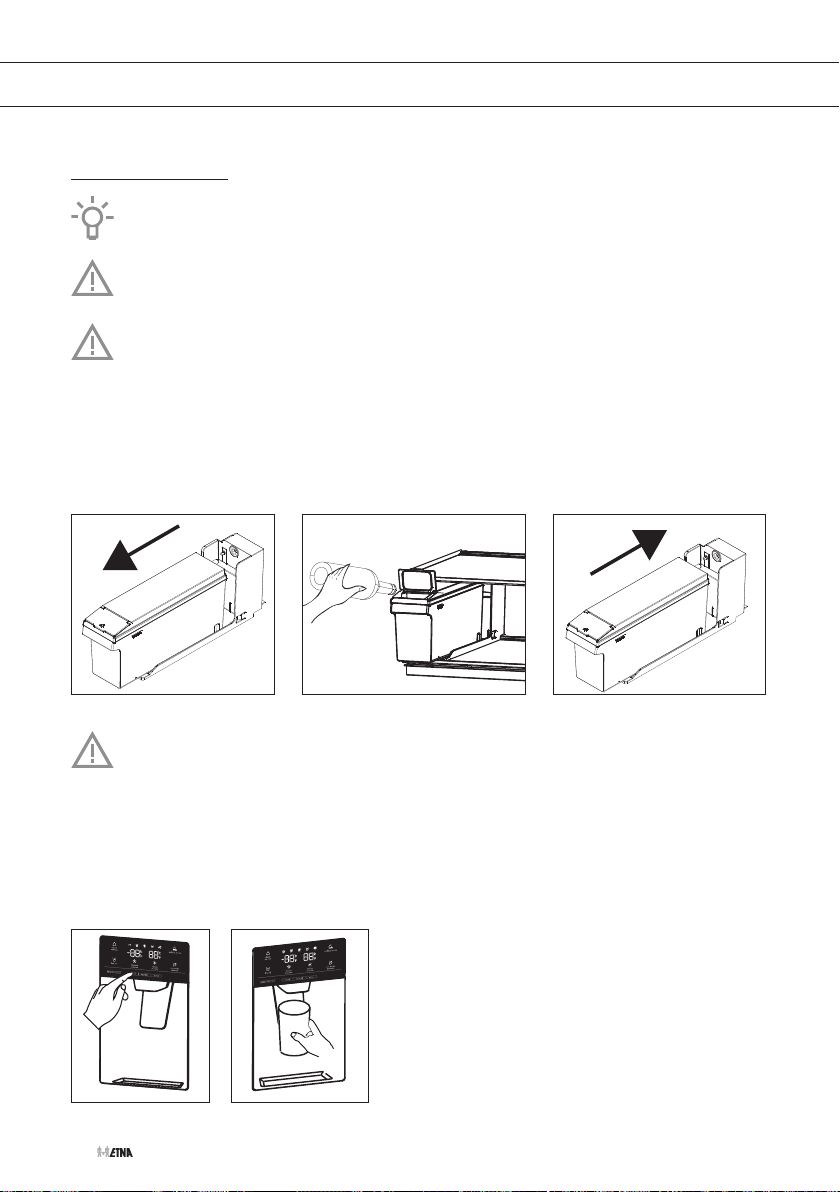
Water- en ijsdispenser
Maak de water- en ijsdispenser eerst schoon voordat u deze voor de eerste keer gaat
gebruiken (zie ‘Onderhoud’).
Als het kinderslot geactiveerd is of de deur open is, dan werkt de dispenser niet.
Let op
Als het pictogram van het waterreservoir verlicht is, is het waterreservoir niet correct
geplaatst of helemaal niet geplaatst. Zorg ervoor dat het waterreservoir correct geplaatst
is. Schakel daarna het pictogram uit door gedurende 3 seconden op de ECO-toets te
drukken.
1. Zorg ervoor dat het waterreservoir correct geplaatst is.
2. Vul het waterreservoir met maximaal 4,5 liter water.
Gebruik schoon, koud leidingwater, flessenwater zonder toevoeging van mineralen of
gedistilleerd water dat geschikt is voor consumptie. Gebruik geen warm water.
3. Druk op de watertoets, de crushed-toets (gemalen ijs) of de cubed-toets (ijsblokjes).
▷ Het pictogram wordt verlicht.
4. Plaats een glas onder de water- en ijsuitgang en druk voorzichtig met uw glas tegen de
hendel. Let erop dat het glas zich onder de dispenser bevindt om te voorkomen dat het
water eruit spat of dat het ijs eruit schiet.
NL 22
Page 23
BEDIENING VAN HET TOESTEL
Als u na gebruik van de crushed-toets op de cubed-toets drukt, dan kan er een kleine
hoeveelheid overgebleven gemalen ijs in uw glas vallen.
Als u geen ijs nodig hebt, kunt u de ijsmaker uitschakelen om water en energie te
besparen.
Als er ijsblokjes in het reservoir vallen, is het normaal dat u geluiden hoort.
De eerste batch ijsblokjes na installatie kan klein zijn, omdat er lucht in de waterleiding is
gekomen. Bij normaal gebruik wordt alle lucht verwijderd. Als de ijsblokjes nog klein zijn,
controleer dan of het water wel in de leiding circuleert en of het water goed onder hoge
druk staat.
Als het toestel te lang is uitgeschakeld, smelt het ijs in het reservoir en stroomt het
water op de vloer. Om dit te voorkomen, moet u al het ijs in het reservoir verwijderen (zie
‘Onderhoud’).
Als er geen ijs uit de dispenser komt, controleer dan of er ijs vastzit in de uitlaat en
verwijder het. Of controleer of er ijsblokjes klonteren in het reservoir en verwijder ze (zie
‘Onderhoud’). Ook als u gedurende lange tijd geen ijs uit de dispenser haalt, kan het ijs in
het reservoir gaan klonteren.
Gebruik de dispenser niet langer dan 1 minuut aaneengesloten voor het leveren van ijs.
Zo voorkomt u dat de temperatuur van de motor van de ijsmaker te hoog wordt.
De ijsmaker uitschakelen
Als u geen ijs nodig hebt, kunt u de ijsmaker uitschakelen om water en energie te besparen.
1. Druk op de ijsmakertoets.
▷ Het pictogram wordt verlicht.
▷ De ijsmaker is uitgeschakeld.
Alleen de ijsmaker is uitgeschakeld; de dispenser levert nog wel water.
NL 23
Page 24
VOEDSEL BEWAREN EN INVRIEZEN
Aanbevolen indeling
Delen van het koelcompartiment
• Bovenste deel: voedsel in blik, brood, wijn, deegwaren etc.
• Middelste deel: zuivel, kant-en-klaarmaaltijden, toetjes, frisdrank, bier, gekookt voedsel etc.
• Onderste deel: vlees, vleeswaren, zuivel.
• Groentelade: groenten en vers fruit
Delen van de koelkastdeur
• Bovenste/middelste deurrek: eieren, boter, kaas, sauzen etc.
• Onderste deurrek: dranken, blikjes, flessen etc.
Bewaar snel bedervend voedsel achteraan op een draagplateau of achter in een lade
waar de temperatuur het laagst is.
Let op; het bewaren van groente met een hoog watergehalte kan condensvorming
veroorzaken op de glazen schappen van de groenten- en fruitlade: dit beïnvloedt het
correct functioneren van het toestel niet.
Bewaar fruit (bananen, ananas, papaja, citrusvruchten) en groenten (courgettes, tomaten,
aubergines, komkommers, paprika’s en aardappelen) die gevoelig zijn
voor lage temperaturen niet in de koelkast.
Delen van het vriescompartiment
• Bovenste deel: restjes eten, ijs, pizza.
• Middelste deel: vlees, vis, brood.
• Onderste deel: standaard vriezer, groente en fruit.
NL 24
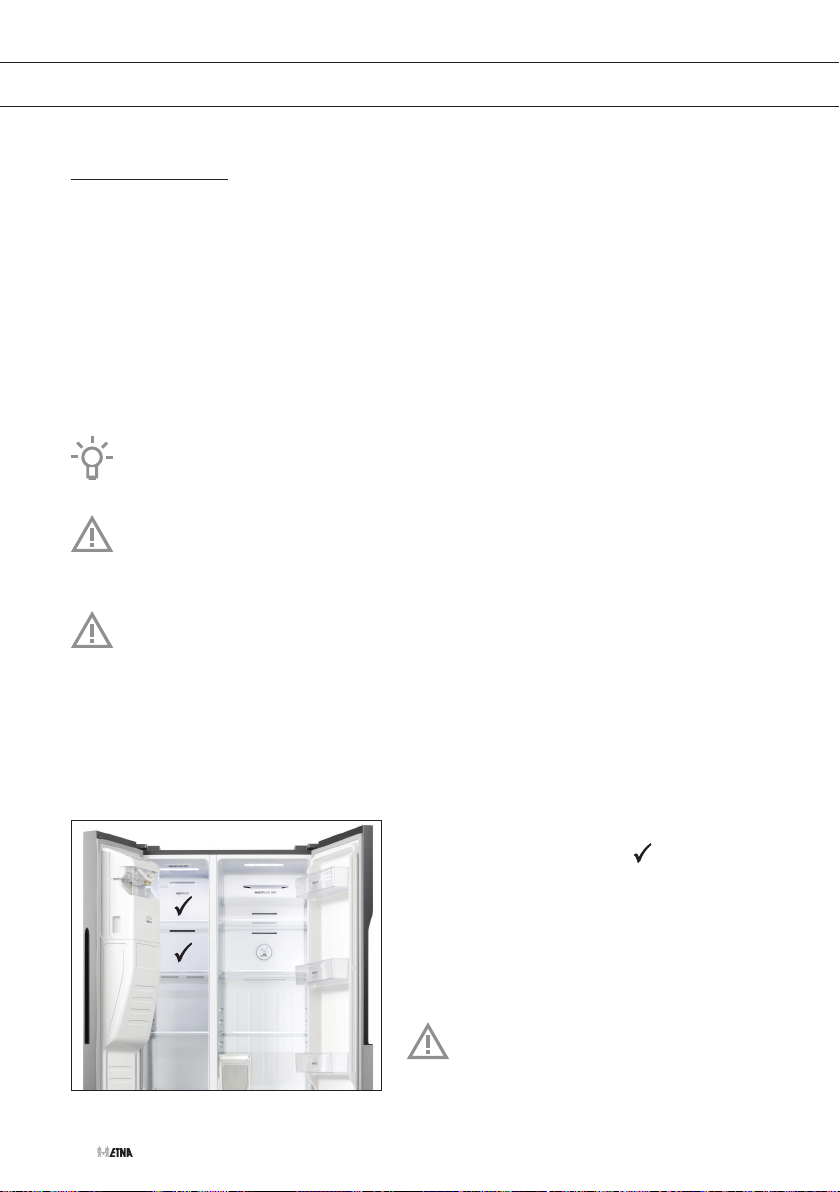
De beste locatie voor het invriezen van vers
voedsel is gemarkeerd met een .
Bewaar sla, eieren, appels, peren, druiven,
perziken, yoghurt, karnemelk, zure room
en mayonaise niet in de vriezer.
Page 25
VOEDSEL BEWAREN EN INVRIEZEN
Voorkom het bederven van voedsel
Volg de onderstaande instructies om het bederven van voedsel te voorkomen:
• Als u de deur gedurende lange tijd opent, kan de temperatuur in de compartimenten van het
toestel aanzienlijk stijgen.
• Reinig regelmatig de oppervlakken die in contact kunnen komen met voedsel. Reinig ook
regelmatig het afvoergootje.
• Bewaar rauw vlees en vis in geschikte bakjes in de koelkast, zodat het niet in contact komt
met of druppelt op ander voedsel.
• Als het toestel met koelfunctie gedurende een lange periode leeg blijft, schakelt u het
uit. Ontdooi het toestel, maak het schoon en laat het drogen. Laat de deur open om
schimmelvorming in het toestel te voorkomen.
Vers voedsel bewaren in de koelkast
Belangrijke aanwijzingen bij het bewaren van vers voedsel
• Om de kwaliteit van het verse voedsel te waarborgen, is het belangrijk dat:
▷ het voedsel goed verpakt is;
▷ het toestel de juiste temperatuur heeft;
▷ het toestel schoon is.
• Let op de houdbaarheidsdatum op de verpakking van het voedsel.
• Plaats voedsel in de koelkast in gesloten bakjes of in een geschikte verpakking. Dit
voorkomt besmetting door of verspreiding van geuren en het houdt het voedsel droog.
• Bewaar geen ontvlambare, instabiele of explosieve materialen in de koelkast.
• Bewaar flessen die al een keer zijn geopend rechtop en sluit ze goed af.
• Sommige organische oplossingen, essentiële oliën in schillen van citroenen en
sinaasappelen, boterzuur etc. kunnen plastic oppervlakken bij langdurig contact
beschadigen, waardoor het materiaal vroegtijdig veroudert.
• Een onprettige geur is een indicatie dat het toestel onvoldoende schoon wordt gehouden of
van bedorven voedsel (zie het hoofdstuk ‘Onderhoud’).
• Wanneer u langere tijd niet thuis bent, haalt u bederfelijke artikelen uit de koelkast.
NL 25
Page 26
VOEDSEL BEWAREN EN INVRIEZEN
Invriezen en bewaren van voedsel in de vriezer
Belangrijke aanwijzingen bij het invriezen van vers voedsel
• De maximale hoeveelheid vers voedsel die u in een keer in de vriezer kunt plaatsen, is op
het typeplaatje aangegeven. Wanneer de hoeveelheid in te vriezen voedsel groter is dan
de aangegeven hoeveelheid, neemt de kwaliteit van het invriezen af. Daarnaast zal ook de
kwaliteit van het al ingevroren voedsel dalen.
• Gebruik alleen vers voedsel van een goede kwaliteit dat geschikt is om in te vriezen.
• Laat warm voedsel eerst afkoelen naar kamertemperatuur.
• Het is belangrijk om het voedsel snel in te vriezen. Daarom wordt gebruik van kleine
verpakkingen aanbevolen.
• Gebruik een lucht- en waterdichte verpakking, zodat het voedsel niet uitdroogt en zijn
vitamines verliest.
• Noteer het soort voedsel, de hoeveelheid en de invriesdatum op de verpakking.
• Laat vers voedsel niet in contact komt met voedsel dat al ingevroren is.
• U mag alle laden verwijderen om het totale volume van het vriescompartiment te gebruiken.
Plaats het voedsel direct op een plateau en op de bodem van de vriezer.
Invriezen van kleine hoeveelheden vers voedsel / ijsblokjes maken
Zie hoofdstuk ‘Aanbevolen indeling’ voor de beste locatie voor het invriezen van vers voedsel
(1 à 2 kilo) en het maken van ijsblokjes.
Invriezen van grote hoeveelheden vers voedsel
• Activeer de intensieve vriesfunctie 24 uur voordat u voedsel gaat invriezen.
• Verdeel het verse voedsel evenredig over alle laden in het vriescompartiment.
• Na 24 uur kunt u het voedsel verplaatsen naar een ander vak in de vriezer en kunt u ander
voedsel gaan invriezen.
Belangrijke aanwijzingen bij het bewaren van bevroren voedsel
• Houdt u bij het bewaren of gebruik van ingevroren voedsel aan de instructies van de
fabrikant. Let op de aanbevolen bewaartemperatuur en de houdbaarheidsdatum op de
verpakking.
• Gebruik alleen voedsel waarvan de verpakking onbeschadigd is en dat bewaard wordt bij
een temperatuur van -18 °C of lager.
• Koop geen voedsel dat bedekt is met rijp. Dat betekent namelijk dat het voedsel meerdere
keren gedeeltelijk is ontdooid en daarom van inferieure kwaliteit is.
• Voorkom dat het voedsel tijdens het vervoer ontdooit. Bij een toename van de temperatuur
wordt de bewaartijd korter en neemt de kwaliteit af.
NL 26
Page 27
VOEDSEL BEWAREN EN INVRIEZEN
Aanbevolen bewaartijd van ingevroren voedsel in de vriezer
Soort voedsel Bewaartijd
Fruit, rundvlees 10 tot 12 maanden
Groenten, kalfsvlees, gevogelte 8 tot 10 maanden
Hert 6 tot 8 maanden
Varkensvlees 4 tot 6 maanden
Fijngesneden of gemalen vlees 4 maanden
Brood, deegwaren, gekookte gerechten, magere vis 3 maanden
Ingewanden 2 maanden
Gerookte worst, vette vis 1 maand
Bevroren voedsel ontdooien
• Ontdooien is een belangrijke stap in het bewaren van voedsel door bevriezing. Het is van
belang dat het voedsel op de juiste manier wordt ontdooid.
• Geschikte manieren om voedsel te ontdooien:
▷ in de koelkast;
▷ in koud water;
▷ in een magnetron of oven met een geschikt ontdooiprogramma.
• Sommige bevroren producten kunnen bereid worden zonder het eerst te ontdooien. Dit is
aangegeven door de fabrikant op de verpakking.
• Het is belangrijk dat het voedsel is verpakt in kleine porties. Op deze manier gaat het
ontdooien een stuk sneller.
• Gebruik gedeeltelijk of geheel ontdooid voedsel zo snel mogelijk. Nadat het voedsel is
ontdooid, worden bacteriën weer actief en bederft voedsel snel. Dat geldt met name voor
fruit, groenten en kant-en-klaar voedsel.
• Vries gedeeltelijk of geheel ontdooid voedsel niet meer in.
NL 27
Page 28
ONDERHOUD
Het toestel ontdooien
Automatisch ontdooien van het koelcompartiment
Het koelcompartiment ontdooit van tijd tot tijd geheel automatisch.
Ontdooien van de NoFrost vriezer
Ontdooien van de NoFrost vriezer gaat automatisch. Rijp dat zich af en toe afzet zal vanzelf
verdwijnen.
Als er toch ijs of rijpafzetting in de vriesruimte aanwezig is, kan dat het gevolg zijn van een
ongewoon gebruik van het toestel (te vaak en te lang de deur openen, slechte sluiting van de
deur, etc.). Ontdooi in dit geval de vriezer handmatig.
Zet bij extreme ijsvorming het toestel uit. Neem de etenswaren uit de vriezer en
bescherm ze zodat ze niet (deels) kunnen ontdooien. Reinig en droog het interieur van
de vriezer. Zet, voordat u de etenswaren in de vriezer doet, het toestel aan en kies de
gewenste instelling.
Het toestel reinigen
Schakel het toestel uit en haal de stekker uit het stopcontact voordat u het gaat
schoonmaken.
Gebruik geen reinigingsmiddelen die schurende bestanddelen bevatten; hierdoor kan het
oppervlak beschadigd raken.
Activeer de intensieve vriesfunctie 24 uur voordat u de vriezer gaat schoonmaken.
• Voor het schoonmaken moeten de levensmiddelen uit het vriesvak in diverse lagen dekens
of kranten worden gewikkeld en op een koele plaats worden bewaard. De niet te voorkomen
temperatuurstijging van de bevroren levensmiddelen zal de bewaartijd doen verkorten.
Denk er aan deze levensmiddelen binnen niet al te lange tijd te consumeren.
• Maak regelmatig de binnenzijde van het toestel schoon met lauw water met eventueel een
neutraal reinigingsmiddel of speciale koelkastreiniger. Maak alle oppervlakken schoon met een
zachte doek. Neem na het reinigen de delen af met schoon water en droog ze zorgvuldig.
• Plaats geen onderdelen van het toestel in de vaatwasser; hierdoor zouden ze beschadigd
kunnen raken.
NL 28
Page 29
ONDERHOUD
• Droog het interieur van het toestel. Schakel het toestel pas in als ook de deurrubbers
helemaal droog zijn en met het toestel op de laagste temperatuurstand. Na 24 uur kunt u de
temperatuur terug op de normale stand zetten.
• Reinig de buitenkant met een zachte doek.
• Reinig regelmatig de ventilatieroosters aan de achterkant van het toestel met een stofzuiger
of een borstel.
Wanneer u het toestel langere tijd niet gebruikt, schakelt u het uit en koppelt u het los van
de stroomvoorziening. Maak het toestel leeg, ontdooi het, maak het schoon en laat de
deur op een kier staan.
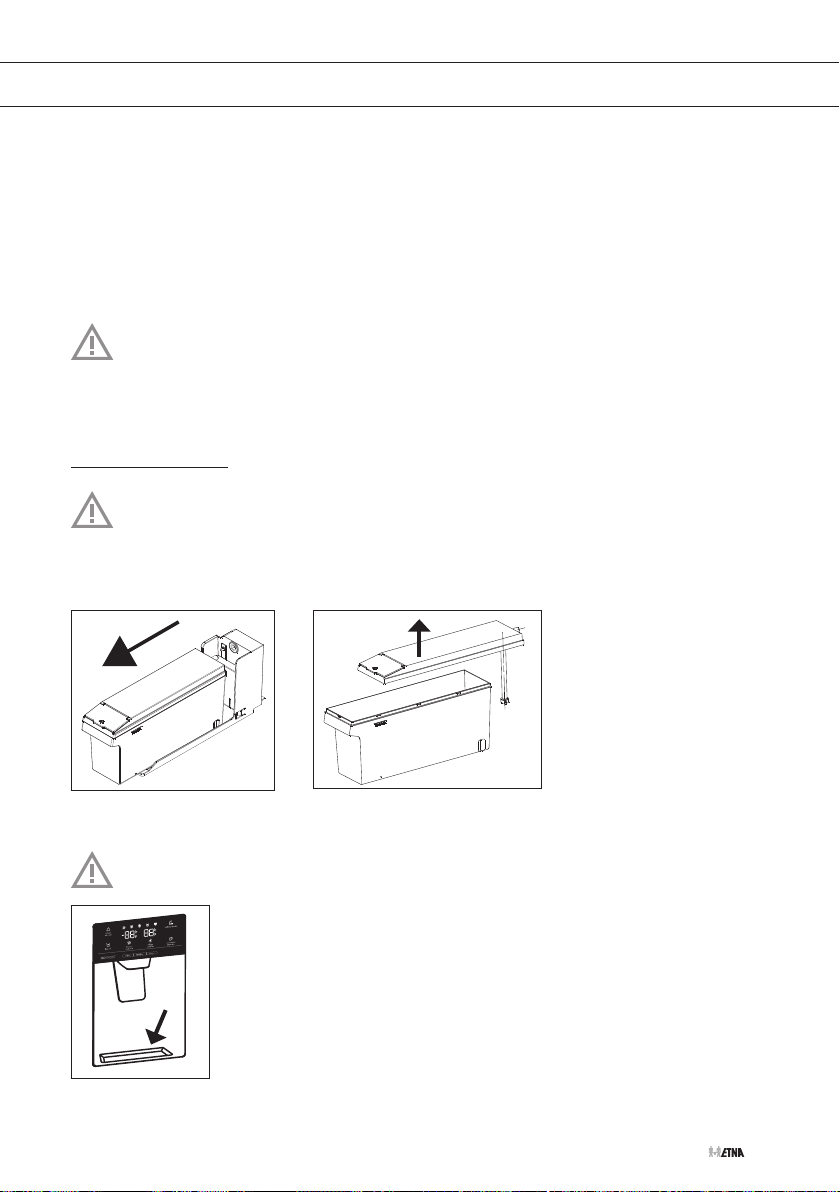
De water- en ijsdispenser reinigen
Schakel het toestel uit en haal de stekker uit het stopcontact voordat u de water- en
ijsdispenser gaat schoonmaken.
1. Haal het waterreservoir voorzichtig uit de deur.
2. Maak de onderdelen schoon met water en droog ze goed af.
3. Plaats het waterreservoir weer terug.
Als u de water- en ijsdispenser regelmatig gebruikt, moet u het lekbakje leeg maken met
een droge doek.
NL 29
Page 30
ONDERHOUD
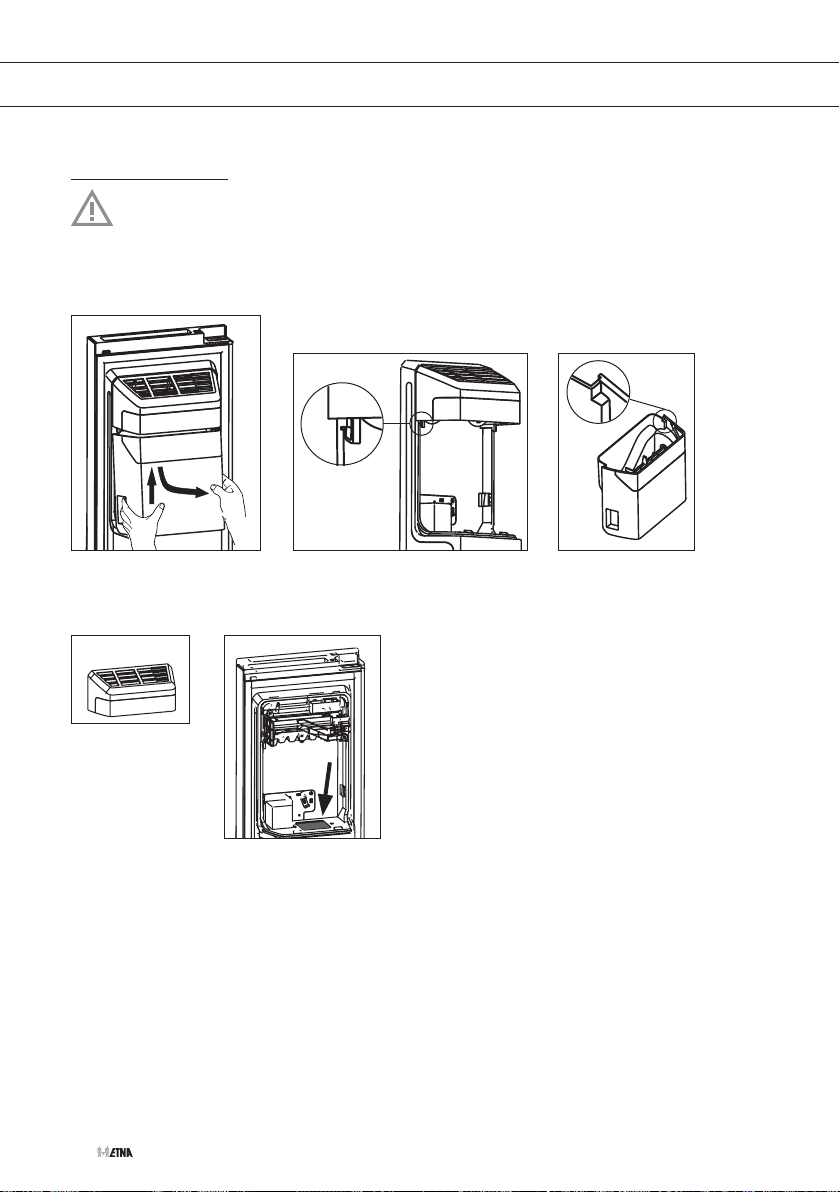
Het ijsreservoir verwijderen en schoonmaken
Schakel het toestel uit en haal de stekker uit het stopcontact.
1. Til het reservoir iets op.
2. Haal het met een neerwaartse beweging uit de houders.
2
1
3. Haal de deksel van de ijsmaker als u deze ook wilt schoonmaken.
4. Controleer of de uitlaat niet verstopt zit met ijs (zie pijl).
5. Maak de onderdelen schoon met water en droog ze goed af.
6. Plaats de deksel weer terug.
NL 30
Page 31
ONDERHOUD
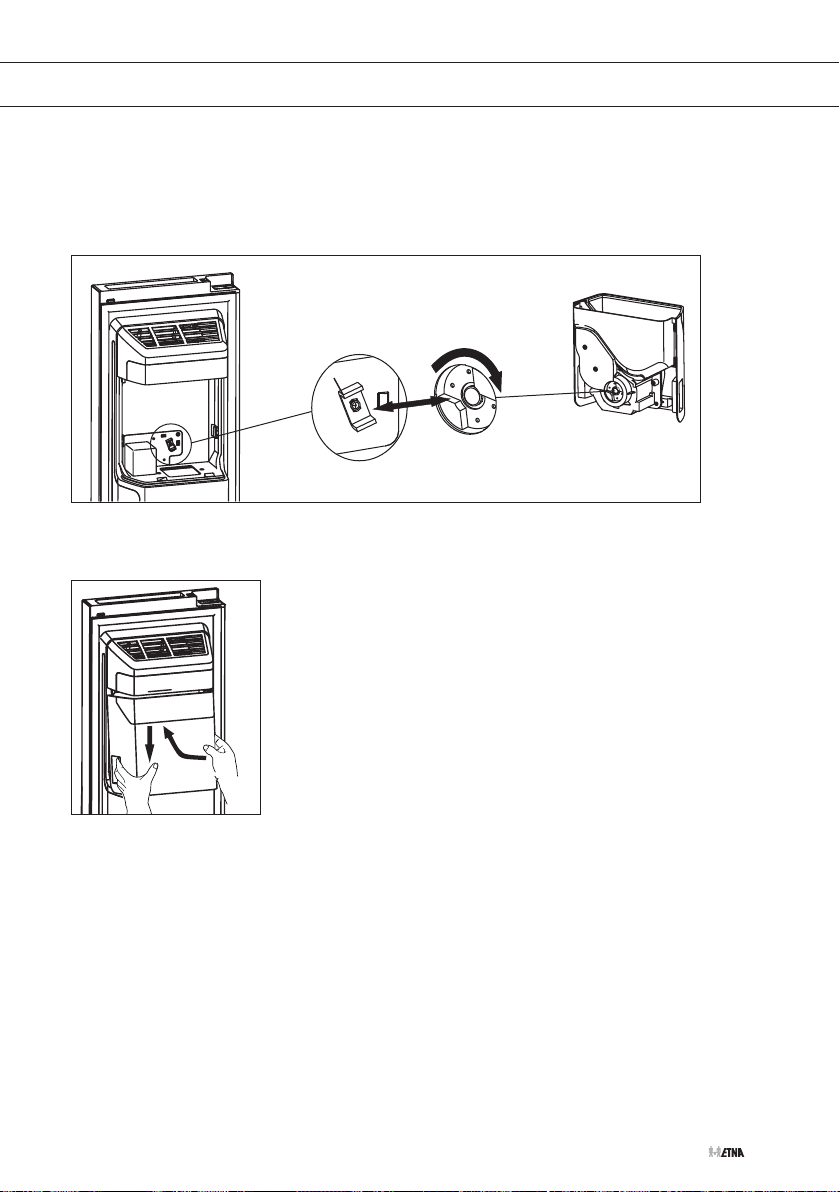
7. Controleer voordat u het ijsreservoir weer terug plaatst, of de twee koppelingen zich in een
geschikte hoek bevinden om een correcte aansluiting te maken. Als dit niet het geval is,
draai dan de koppeling van het ijsreservoir in de juiste hoek zodat deze overeenkomt met de
motorkoppeling.
8. Plaats het ijsreservoir weer terug in de houders.
2
1
NL 31
Page 32
STORINGEN
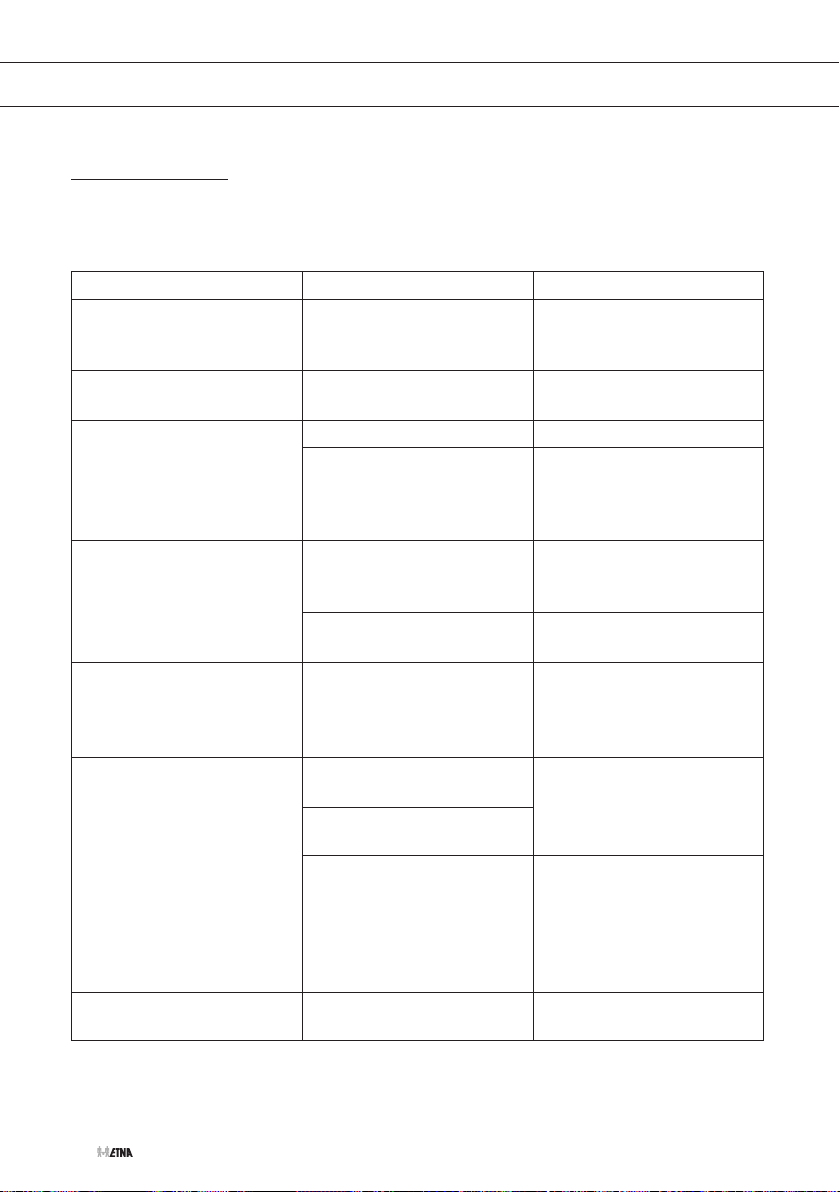
Storingstabel
Wanneer u twijfelt over de goede werking van uw toestel betekent dit niet automatisch dat er een
defect is. Controleer in elk geval de volgende punten in onderstaande tabel.
Probleem Mogelijk oorzaak Oplossing
Het toestel geeft bij het eerste
gebruik een lichte geur af.
Het apparaat werkt niet; de
verlichting is uit.
De temperatuur is te hoog of
te laag.
Toestel maakt lawaai. Onjuiste plaatsing van
De LED verlichting werkt niet. LED-verlichting stuk. Wanneer de LED verlichting
Er is veel ijsvorming in de
vriezer.
Nieuw toestel. Dit is normaal en verdwijnt
wanneer het toestel gaat
koelen.
Stekker niet in het
stopcontact.
Thermostaat foutief ingesteld. Stel de thermostaat goed in.
Deurrubbers vervuild of
beschadigd.
levensmiddelen in het koel- of
vriescompartiment.
Er ligt een voorwerp tegen het
toestel.
De deur is te lang of te vaak
geopend.
De deur is niet goed gesloten.
Steek de stekker in het
stopcontact.
Reinig de deurrubbers.
Neem contact op met het
servicecentrum als de
deurrubbers beschadigd zijn.
Plaats levensmiddelen op
de juiste wijze in het koel- of
vriescompartiment.
Verwijder het voorwerp.
niet werkt, raadpleegt u een
servicemonteur. U mag niet
zelf LED verlichting repareren.
Zorg dat de deur goed
gesloten is.
De deur sluit niet goed
(vervuiling op de afdichting,
de deur zit scheef, de
afdichting is beschadigd,
etc.).
Er staat ‘dr’ in de display. De deur staat te lang open. Zorg dat de deur goed
NL 32
Zorg dat de deur goed
gesloten is. Reinig de
deurrubbers. Neem contact
op met het servicecentrum
als de deurrubbers
beschadigd zijn.
gesloten is.
Page 33
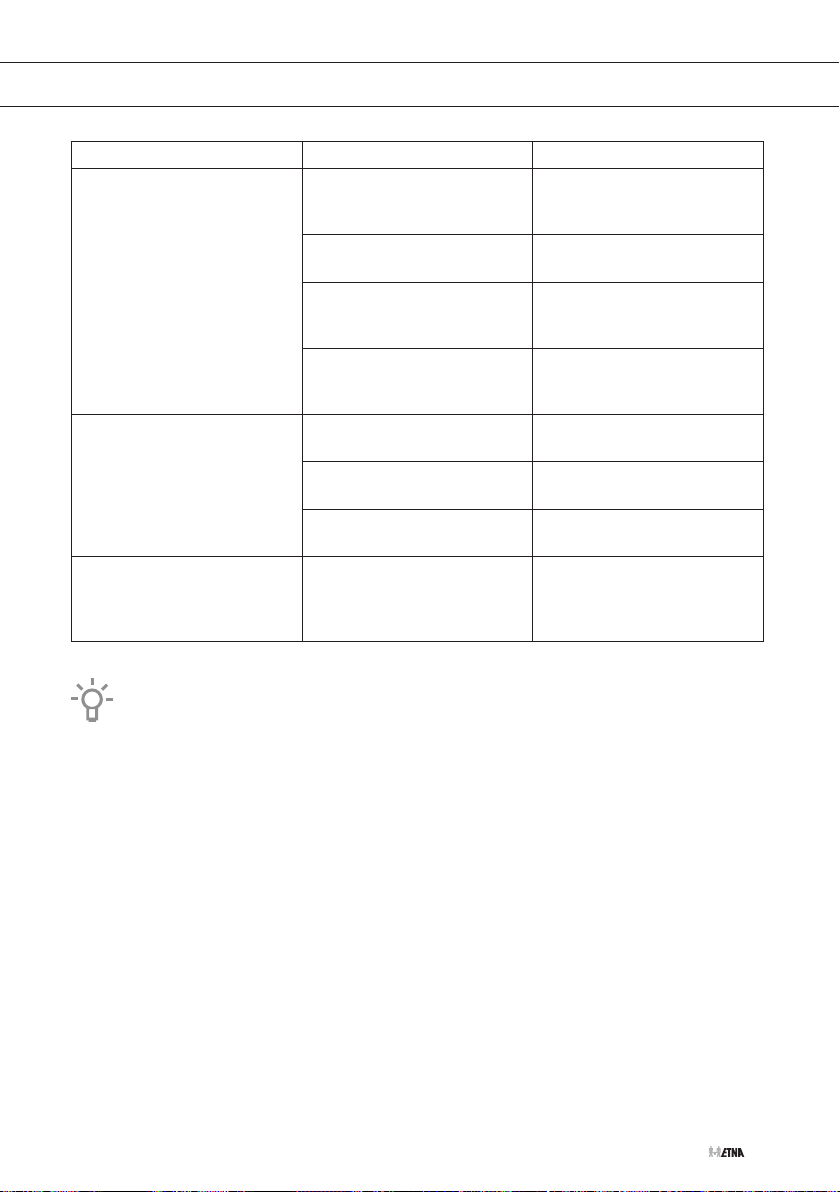
STORINGEN
Probleem Mogelijk oorzaak Oplossing
De water- en ijsdispenser
werkt niet.
Er komt geen ijs uit de
dispenser.
Het waterreservoir is niet
correct geplaatst.
Er zit niet voldoende water in
het waterreservoir.
De watertoevoerslang is
verstopt of gebogen.
Het water in de toevoerslang
of in het waterreservoir is
bevroren.
De ijsmaker is uitgeschakeld. Schakel de ijsmaker in.
Er zit ijs in de uitlaat. Verwijder het ijs uit de uitlaat.
Zorg ervoor dat het
waterreservoir correct
geplaatst is.
Zorg ervoor dat er voldoende
water in het waterreservoir zit.
Zorg ervoor dat de
toevoerslang niet
geblokkeerd wordt.
Stel een hogere temperatuur
in voor het toestel.
Het ijs in het reservoir is gaan
klonteren.
Er drupt water op de vloer. Het toestel is te lang
uitgeschakeld en het ijs in het
reservoir is gesmolten.
Let op
Het koelcircuit kan borrelen of expansiegeluiden maken; dat is normaal.
Wanneer het probleem blijft bestaan, neemt u contact op met het servicecentrum en geeft u het
type, model en het serienummer door die op het typeplaatje of het label aan de binnenzijde van
het toestel worden vermeld.
Verwijder het ijs uit het
ijsreservoir.
Verwijder al het ijs in het
reservoir als u van plan bent
om het toestel voor lange tijd
uit te schakelen.
NL 33
Page 34
MILIEUASPECTEN
Verpakking en toestel afdanken
Dit toestel is gemaakt van duurzame materialen. Het toestel moet aan het einde van zijn
levensduur op verantwoorde wijze worden afgedankt. Informeer bij de plaatselijke autoriteiten
hoe u dit kunt doen.
Zie ook het hoofdstuk ‘Verwijdering’ in de veiligheidsvoorschriften.
De verpakking van het toestel is recyclebaar. Mogelijk zijn de volgende materialen gebruikt:
• Karton.
• Polyethyleenfolie (PE).
• CFC-vrij polystyreen (hard PS-schuim).
Deze materialen moeten op verantwoorde wijze en conform de overheidsvoorschriften worden
afgedankt.
Het toestel is gemarkeerd met een vuilnisbaksymbool met een kruis
erdoor om u erop te wijzen dat elektrische huishoudelijke apparaten
afzonderlijk moeten worden afgedankt. Dit houdt in dat het toestel aan
het einde van zijn levensduur niet met het gewone huisvuil mag
worden meegegeven. Het toestel moet naar een speciale gemeentelijke
afvalverwerkingslocatie voor gescheiden afval worden gebracht of naar
een dealer die deze service verleent.
NL 34
Negatieve gevolgen voor mens en milieu worden voorkomen door
huishoudelijke apparaten apart in te zamelen en op de juiste wijze af te
danken. Dit zorgt ervoor dat de materialen waaruit het apparaat
bestaat, kunnen worden teruggewonnen en aanzienlijke besparingen op
energie en grondstoffen kunnen worden gerealiseerd.
Verklaring van conformiteit
Wij verklaren dat onze producten voldoen aan de van toepassing zijnde
Europese richtlijnen, verordeningen en voorschriften, evenals aan de
eisen die staan beschreven in de normen waarnaar wordt verwezen.
Page 35
NL 35
Page 36
CONTENTS
Your refrigerator
Introduction 4
Link to the EU EPREL database 4
Safety instructions 5
Before using the appliance for the first time
Before you use the appliance for the first time 11
Energy-saving advice 11
Installation and connection
Selecting the location 13
Connecting the appliance 14
Adjusting the door(s) 15
Description of the appliance
Appliance 16
Operating the appliance
EN 2
Control panel 17
Child lock 18
Setting the temperature 18
Intensive cooling 18
Intensive freezing 19
ECO function 20
Holiday function 21
Open door alarm 21
Water and ice dispenser 22
Switching off the ice maker 23
Page 37
CONTENTS
Storing and freezing food
Recommended distribution 24
Avoid contamination of food 25
Storing fresh food in the refrigerator 25
Freezing and storing foods in the freezer 26
Defrosting frozen food 27
Maintenance
Defrosting the appliance 28
Cleaning the appliance 28
Cleaning the water and ice dispenser 29
Removing and cleaning the ice reservoir 30
Faults
Faults table 32
Environmental aspects
Disposal of packaging and appliance 34
Pictograms used
Important information
Tip
Warning; Risk of fire / flammable materials
EN 3
Page 38
YOUR REFRIGERATOR
Introduction
Congratulations on choosing this Etna refrigerator with freezer. This product is designed with
simple operation and optimum comfort in mind.
These instructions for use explain how you can make best use of this appliance. These
instructions contain information about the operation of the appliance and background information
that may be of help to you during its use.
Read the safety instructions before using the appliance!
Read these instructions thoroughly before you first use the appliance, and keep the
instructions for future use.
Link to the EU EPREL database
The QR code on the energy label supplied with the appliance provides a web link to the
registration of this appliance in the EU EPREL database. Keep the energy label for reference
together with the user manual and all other documents provided with this appliance.
It is possible to find information related to the performance of the product in the EU EPREL
database using the link https://eprel.ec.europa.eu and the model name and product number that
you can find on the rating plate of the appliance.
For more detailed information about the energy label, visit www.theenergylabel.eu.
EN 4
Page 39
SAFETY INSTRUCTIONS
Before the installation and use of the appliance, carefully read
the supplied instructions. The manufacturer is not responsible if
an incorrect installation and use causes injuries and damages.
Always keep the instructions with the appliance for future
reference.
Safety of children and vulnerable people
• The appliance is not intended for use by persons (including
children) with reduced physical, sensory or mental capabilities,
or lack of experience and knowledge, unless they have
been given supervision or instruction concerning use of the
appliance by a person responsible for their safety.
• Children should be supervised to ensure that they do not play
with the appliance.
• Cleaning and user maintenance shall not be made by children
without supervision.
• Keep all packaging away from children.
For European markets only
• This appliance can be used by children aged from 8 years and
above and persons with reduced physical, sensory or mental
capabilities or lack of experience and knowledge if they have
been given supervision or instruction concerning use of the
appliance in a safe way and understand the hazards involved.
• Children shall not play with the appliance.
• Cleaning and user maintenance shall not be made by children
without supervision.
• Children aged from 3 to 8 years are allowed to load and unload
refrigerating appliances.
Original instruction
EN 5
Page 40
SAFETY INSTRUCTIONS
General safety
• The lamp in this household appliance is only suitable for
illumination of this appliance. The lamp is not suitable for
household room illumination.
• WARNING! This appliance is intended to be used in household
and similar applications such as
– staff kitchen areas in shops, offices and other working
environments;
– farm houses and by clients in hotels, motels and other
residential type environments;
– bed and breakfast type environments;
– catering and similar non-retail applications.
• WARNING! Keep ventilation openings, in the appliance
enclosure or in the built-in structure, clear of obstruction.
• WARNING! Do not use mechanical devices or other means
to accelerate the defrosting process, other than those
recommended by the manufacturer.
• WARNING! Do not damage the refrigerant circuit.
• WARNING! Do not use electrical appliances inside the food
storage compartments of the appliance, unless they are of the
type recommended by the manufacturer.
• WARNING! Do not use water spray and steam to clean the
appliance.
• WARNING! Clean the appliance with a moist soft cloth. Only
use neutral detergents. Do not use abrasive products, abrasive
cleaning pads, solvents or metal objects.
• WARNING! Do not store explosive substances such as aerosol
cans with a flammable propellant in this appliance.
• WARNING! If the supply cord is damaged, it must be replaced
by the manufacturer, its service agent or similarly qualified
persons in order to avoid a hazard.
EN 6
Page 41
SAFETY INSTRUCTIONS
Installation
• WARNING! This appliance should only be connected by a
registered installer.
• Remove all the packaging.
• Do not install or use a damaged appliance.
• Obey the installation instruction supplied with the appliance.
• Always be careful when you move the appliance because it is
heavy. Always wear safety gloves.
• Make sure the air can circulate around the appliance.
• Wait at least 4 hours before connecting the appliance to
the power supply. This is to allow the oil to flow back in the
compressor.
• Do not install the appliance close to radiators or cookers, oven
or hobs.
• Do not install the appliance where there is direct sunlight.
• Do not install this appliance in areas that are too humid or too
cold, such as the construction appendices, garages or wine
cellars.
• When you move the appliance, lift it by the front edge to avoid
scratching the floor.
• WARNING! When positioning the appliance, ensure the supply
cord is not trapped or damaged.
EN 7
Page 42
SAFETY INSTRUCTIONS
Electrical connection
• WARNING! Risk of fire and electrical shock.
• The appliance must be earthed.
• All electrical connections should be made by a qualified
electrician.
• Make sure that the electrical information on the rating plate
agrees with the power supply. If not, contact an electrician.
• Always use a correctly installed shockproof socket.
• Do not use multi-plug adapters and extension cables.
• Make sure not to cause damage to the electrical components
(e.g. mains plug, mains cable, compressor). Contact the
Service or an electrician to change the electrical components.
The mains cable must stay below the level of the mains
•
plug.
• Connect the mains plug to the mains socket only at the end
of the installation. Make sure that there is access to the mains
plug after the installation.
• Do not pull the mains cable to disconnect the appliance.
Always pull the mains plug.
• WARNING! Do not locate multiple portable socket-outlets or
portable power supplies at the rear of the appliance.
• If a stationary appliance is not fitted with a supply cord and a
plug, or with other means for disconnection from the supply
mains having a contact separation in all poles that provide full
disconnection under overvoltage category III conditions, the
means for disconnection must be incorporated in the fixed
wiring in accordance with the wiring rules. Using an omnipolar
switch with a contact separation of at least 3 mm fitted in the
supply cable will fulfill this requirement.
EN 8
Page 43
SAFETY INSTRUCTIONS
Use
• WARNING! Risk of injury, burns, electrical shock or fire.
• Do not change the specification of this appliance.
• Do not put electrical appliances (e.g. ice cream makers)
in the appliance unless they are stated applicable by the
manufacturer.
• Be careful not to cause damage to the refrigerant circuit. It
contains isobutene (R600a), a natural gas with a high level of
environmental compatibility. This gas is flammable.
• If damage occurs to the refrigerant circuit, make sure that there
are no flames and sources of ignition in the room. Ventilate the
room.
• Do not let hot items to touch the plastic parts of the appliance.
• Do not store flammable gas and liquid in the appliance.
• Do not put flammable products or items that are wet with
flammable products in, near or on the appliance.
• Do not touch the compressor or the condenser. They are hot.
Care and cleaning
• WARNING! Risk of injury or damage to the appliance.
• Before maintenance, deactivate the appliance and disconnect
the mains plug from the mains socket.
• This appliance contains hydrocarbons in the cooling unit.
Only a qualified person must do the maintenance and the
recharging of the unit.
• Regularly examine the drain of the appliance and if necessary,
clean it. If the drain is blocked, defrosted water collects in the
bottom of the appliance.
EN 9
Page 44
SAFETY INSTRUCTIONS
Disposal
• WARNING! Risk of injury or suffocation
• Disconnect the appliance from the mains supply.
• Cut off the mains cable and discard it.
• Remove the door to prevent children and pets to be closed
inside of the appliance.
• The refrigerant circuit and the insulation materials of this
appliance are ozone friendly.
• The insulation foam contains flammable gas. Contact your
municipal authority for information on how to discard the
appliance correctly.
• Do not cause damage to the part of the cooling unit that is
near the heat exchanger.
EN 10
Page 45
BEFORE USING THE APPLIANCE FOR THE FIRST TIME
Before you use the appliance for the first time
Do not connect the appliance to the mains until you have carefully read the instructions for the
correct and safe use of the appliance. As these instructions are for various types and models,
it is possible that the instructions for use refer to settings or parts that are not available on
your appliance. We recommend that you keep these instructions for future use. If you sell the
appliance, enclose them with the appliance.
Inspect the appliance for damage and/or irregularities. If the appliance is damaged, contact the
store that sold you the appliance.
Allow the appliance to stand upright for at least 4 hours before you connect the appliance to the
mains.
This reduces the risk of malfunctions resulting from transport effects on the refrigerant unit.
Before using the appliance for the first time, the interior and all internal accessories should be
cleaned with lukewarm water and a neutral cleaning agent. Wipe the cleaned parts with a cloth
with clean water and then dry them thoroughly.
If you use the appliance for the first time, do not put food into the appliance until the temperature
has decreased to the set temperature.
Energy-saving advice
• Install the appliance as stated in the instructions for use.
• Do not open the door more than necessary.
• Never cover or obstruct the ventilation openings.
• Replace a door seal that is damaged or no longer seals properly as quickly as possible.
• Store food in well-sealed containers or suitable packaging.
• Allow food to cool to room temperature before you put it in the appliance.
• Defrost food in the refrigerator compartment.
• Defrost a conventional freezer once a layer of about 2 to 3 millimetres of frost or ice has
formed on the inside.
• Space the shelves evenly in the refrigerator compartment.
Place the food so that the air can circulate freely in the appliance (follow the
recommendations for the location of foods enclosed in the instructions).
EN 11
Page 46
BEFORE USING THE APPLIANCE FOR THE FIRST TIME
• When the appliance is equipped with a fan then make sure that the ventilation openings are
kept clear.
• The lower the set temperature, the higher the power consumption.
• High ambient temperatures have an adverse effect on the energy consumption. Direct
sunlight or other heat sources in the vicinity of the appliance also have an adverse effect on
the energy consumption.
• Provide sufficient space around the appliance to allow for proper ventilation and air flow
around the appliance.
• The condenser on the back wall must always be kept clean and free of dust and foreign
matter.
EN 12
Page 47
INSTALLATION AND CONNECTION
Selecting the location
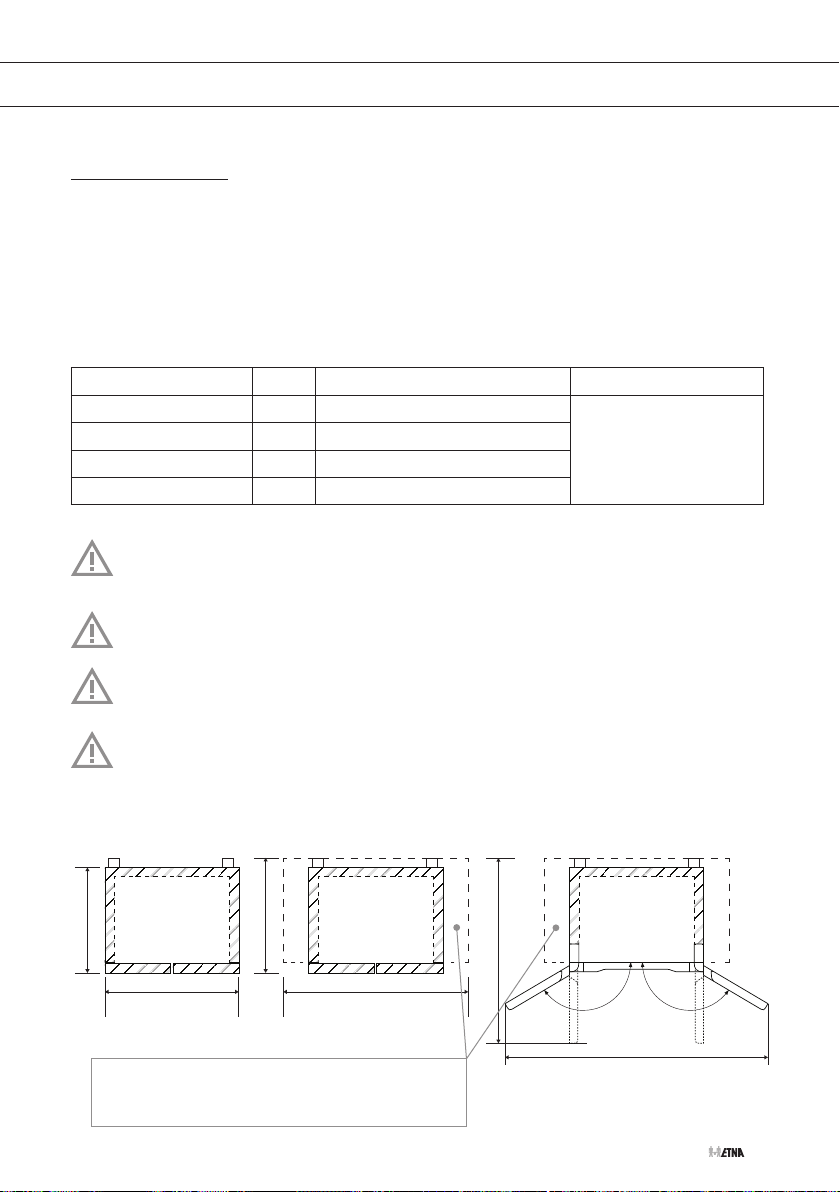
• This refrigerating appliance is not intended to be used as a built-in appliance.
• Do not place the appliance near a source of heat, such as a gas cooker, radiator or boiler,
etc., and do not expose it to direct sunlight.
• Place the appliance in a dry and well aired room. The permitted ambient temperature range
for the appliance depends on the appliance’s climate class, which is shown on the type
plate.
Description Class Ambient temperature range °C Relative humidity
Extended temperate SN +10 to +32
Temperate N +16 to +32
Subtropical ST +16 to +38
Tropical T +16 to +43
Do not place the appliance in a room where the temperature can fall below the lowest
permitted ambient temperature: the appliance may not work properly!
Do not place the appliance in a room where the temperature can fall below 5 °C: the
appliance may become defective!
≤ 75%
The appliance is not suitable for outdoor use and may not be exposed to rain.
Place the appliance in a room with a sufficient volume of air. The room must have a
volume of at least 1 m
shown on the type plate on the inside of the appliance.
Overall dimensions
646
910
Provide sufficient space around the appliance
to allow for proper ventilation and air flow
around the appliance.
3
of air for every 8 grams of refrigerant. The quantity of refrigerant is
Required space in use Total space required in use
696
1176
1110
1733
EN 13
Page 48
INSTALLATION AND CONNECTION
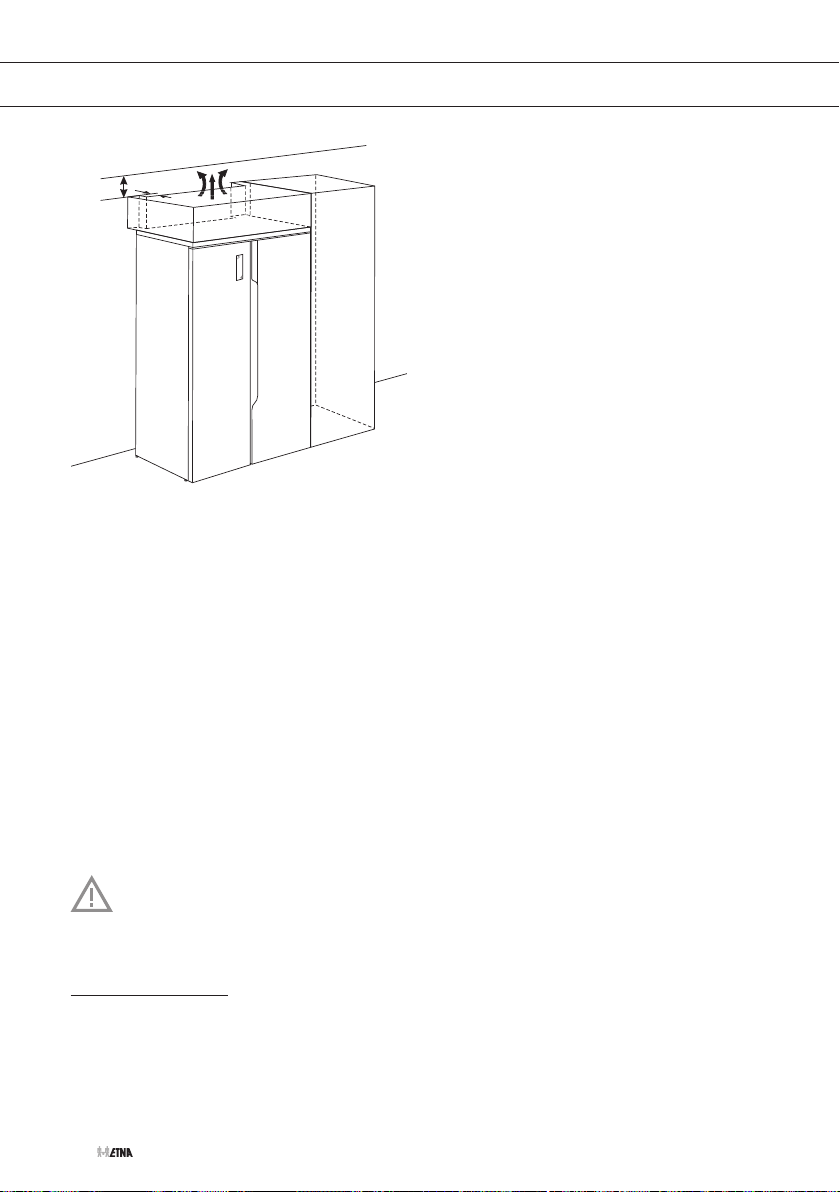
min.
100 mm
min. 50 mm
• The appliance must be placed at a distance of at least 5 cm from an electric or gas cooker
and at least 30 cm from a radiator or heater. An insulation panel must be fitted when these
distances cannot be achieved.
• The plug of the installed appliance must remain accessible!
• The appliance's air outlet is at the top. Make sure that the outlet is not blocked. Blocking the
outlet can result in damage to the appliance.
• The appliance must be moved and installed by at least two people.
• Use caution when moving the appliance, to avoid damaging the floor.
• Make sure the appliance does not damage the power cable during installation.
• Place the appliance on a flat, stable surface.
• The adjustable feet allow you to level the appliance.
• To allow the doors to self-close, tilt the top backwards for about 10 mm or 0.5° by turning
the adjustable feet.
The wheels are not swivel castors and are therefore only suitable for moving forwards
and backwards. Moving the appliance sideways can damage your floor and the wheels.
Connecting the appliance
• Connect mains lead of the appliance to the mains supply. The socket must be earthed. The
nominal voltage and frequency required for the appliance are shown on the appliance's type
plate/label with basic information.
EN 14
Page 49
INSTALLATION AND CONNECTION
• The appliance must be connected to the mains and earthed in accordance with the
prevailing standards and regulations. The appliance can withstand small variations in the
mains voltage to a maximum of plus or minus 6%.
When you are not going to use the appliance for a longer period, switch it off by
disconnecting it from the mains. Empty, defrost and clean the appliance, and leave the
door(s) ajar.
Freeze burn hazard
To avoid freeze burn, never put frozen food in your mouth and do not touch frozen food.
In the event of a defect or power cut, do not open the freezer compartment unless
the appliance has been out of operation for longer than the hours indicated on the
appliance’s type plate (temperature rise time). After this time, you must either use the
frozen food or make sure that it is properly cooled (for example, by transferring it to
another appliance).
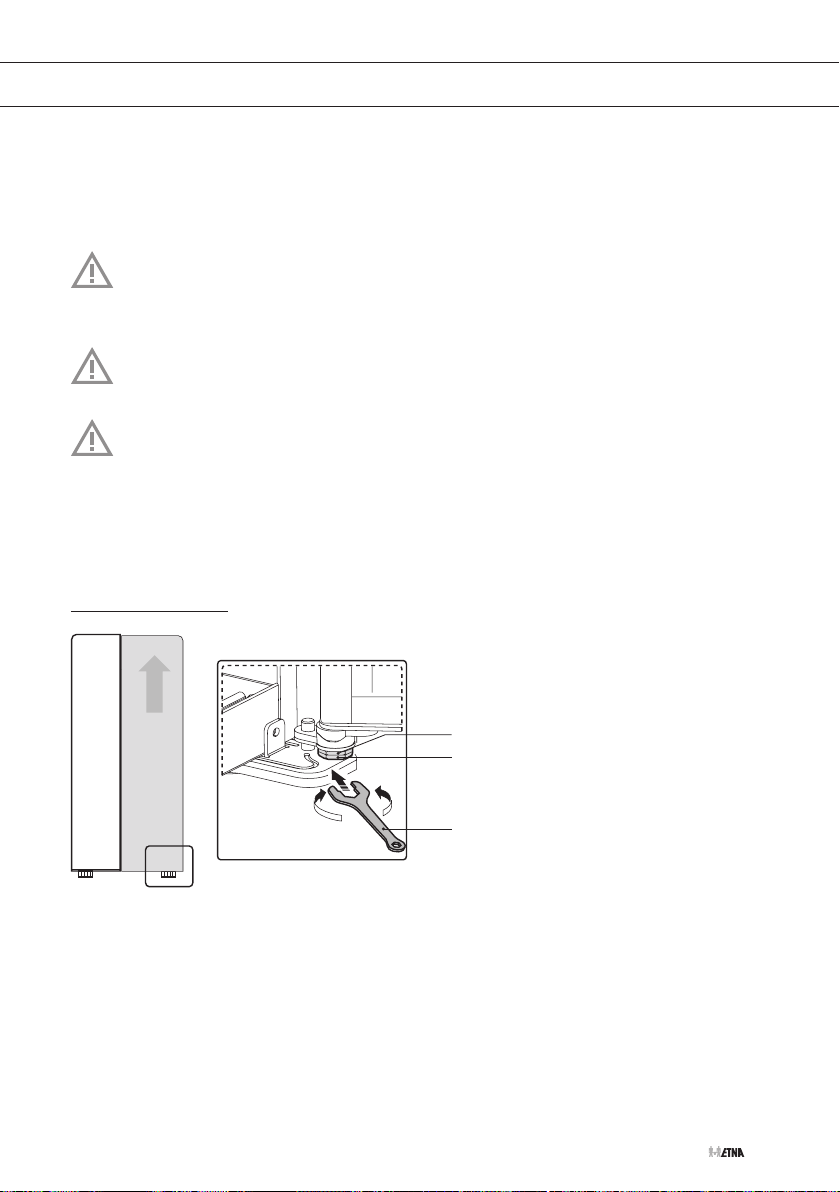
Adjusting the door(s)
1
2
3
• If the doors are not aligned at the top and bottom, the right door can be adjusted by turning
the bolt (1) of the lower hinge with an open-end spanner (3).
• You can raise the door by turning the bolt anticlockwise.
After adjustment, secure the bolt (1) with the nut (2).
EN 15
Page 50
DESCRIPTION OF THE APPLIANCE
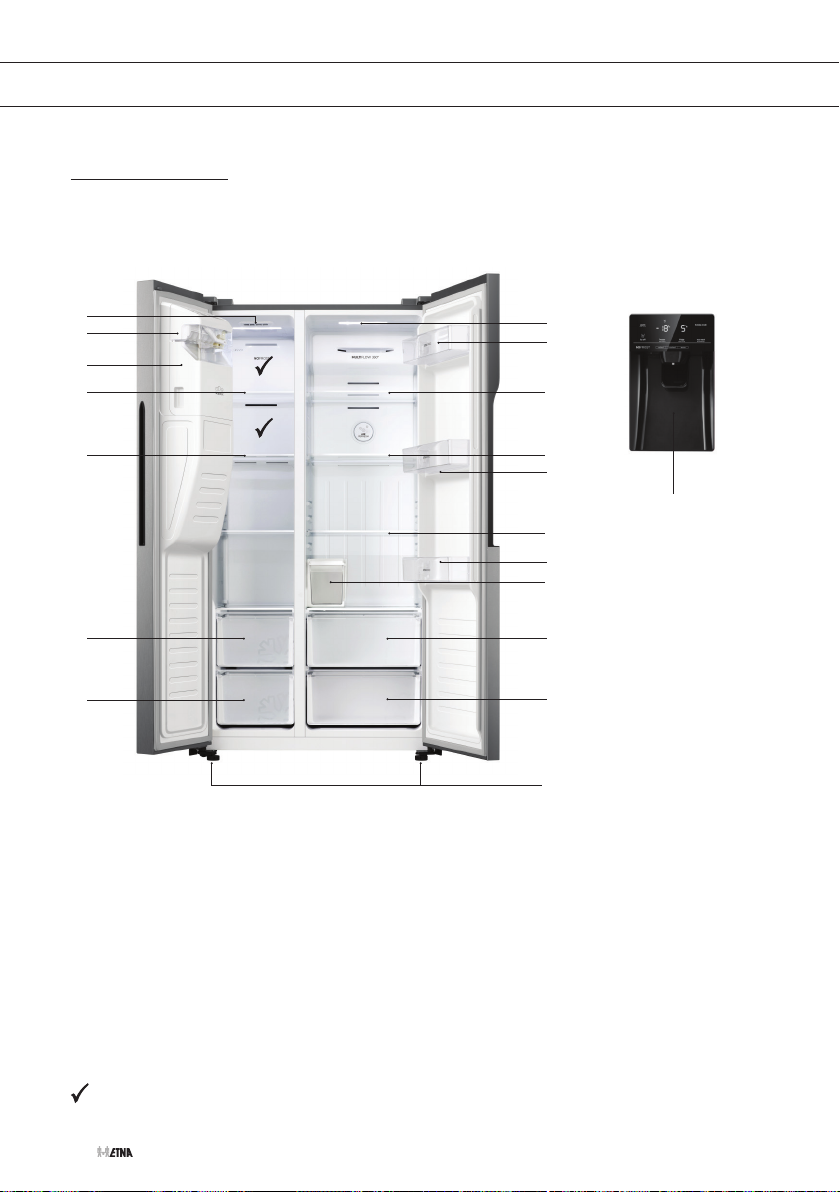
Appliance
This manual covers various models. This may result in certain options or accessories not being
applicable to your appliance.
1
2
3
4
4
5
5
Freezer
1. Interior lighting
2. Ice maker
3. Ice reservoir
4. Shelf
5. Freezer drawer
6
7
8
8
7
12
8
7
9
10
10
11
Refrigerator
6. Interior lighting
7. Door compartment
8. Shelf
9. Water reservoir
10. Vegetable drawers
11. Adjustable feet
12. Water and ice dispenser
Best location for freezing fresh food.
EN 16
Page 51
OPERATING THE APPLIANCE
Control panel
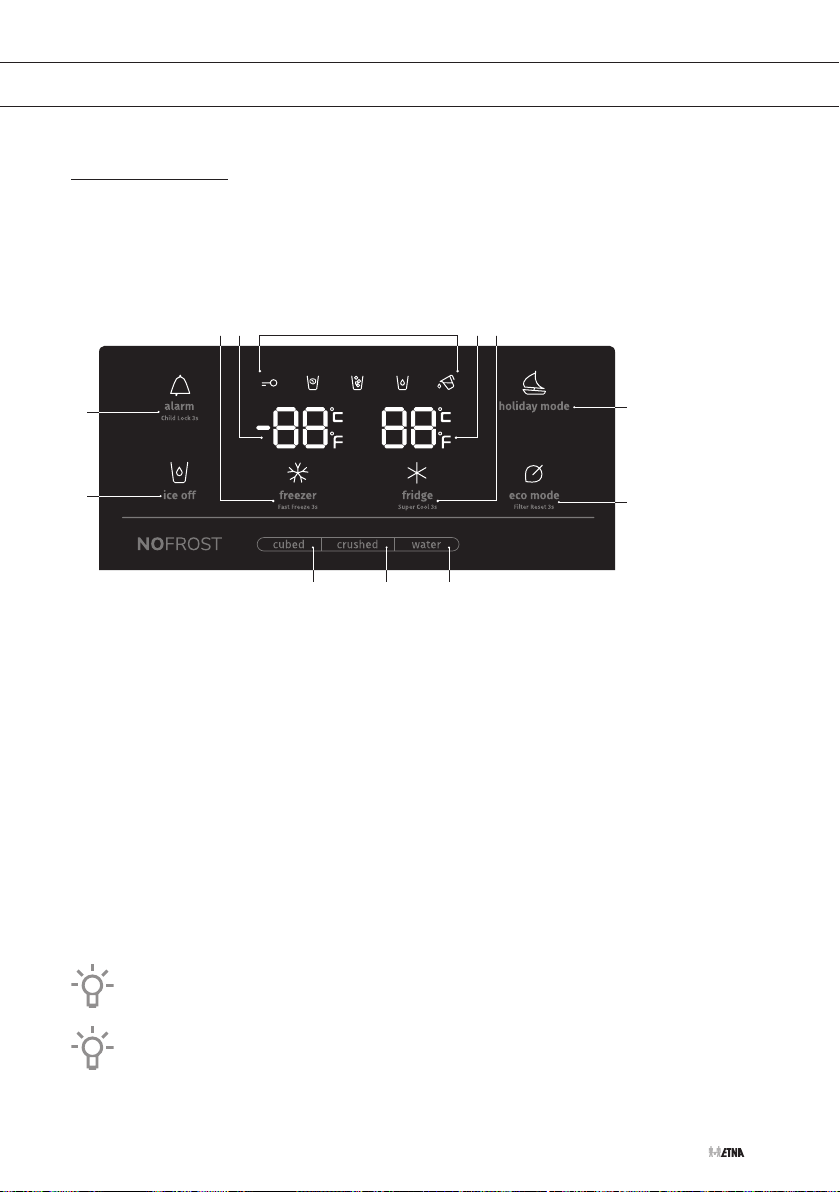
The control panel is located on the door of the freezer section of the SBS refrigerator. When the
appliance is switched on for the first time, the backlight for the pictograms lights up. If no keys
are operated and the doors remain closed, the light will turn off after 60 seconds. The backlight
switches on again every time the door is opened or when a key is touched.
54 73 6
2
1
101112
1. Ice maker key
2. Alarm/child lock key
3. Temperature adjustment key (freezer compartment) and intensive freezing function
4. Temperature display (freezer compartment)
5. Pictograms
▷ Child lock / Ice cubes / Crushed ice / Water / Water reservoir
6. Temperature display (refrigerator compartment)
7. Temperature adjustment key (refrigerator compartment) and intensive cooling function
8. Holiday function key
9. ECO key
10. Water key
11. Crushed key (crushed ice)
12. Cubed key (ice cubes)
The recommended temperature is 4 °C for the refrigerator compartment and -18 °C for
the freezer compartment.
8
9
Disconnect from the power mains; the appliance is off.
EN 17
Page 52
OPERATING THE APPLIANCE
Child lock
This function can be used to prevent unintended adjustments of the appliance's settings. All keys
are locked.
• All keys are locked when the child lock pictogram is illuminated.
• Pressing the alarm/child lock key for 3 seconds unlocks the keys.
If no keys are operated, the control panel will lock again after 20 seconds.
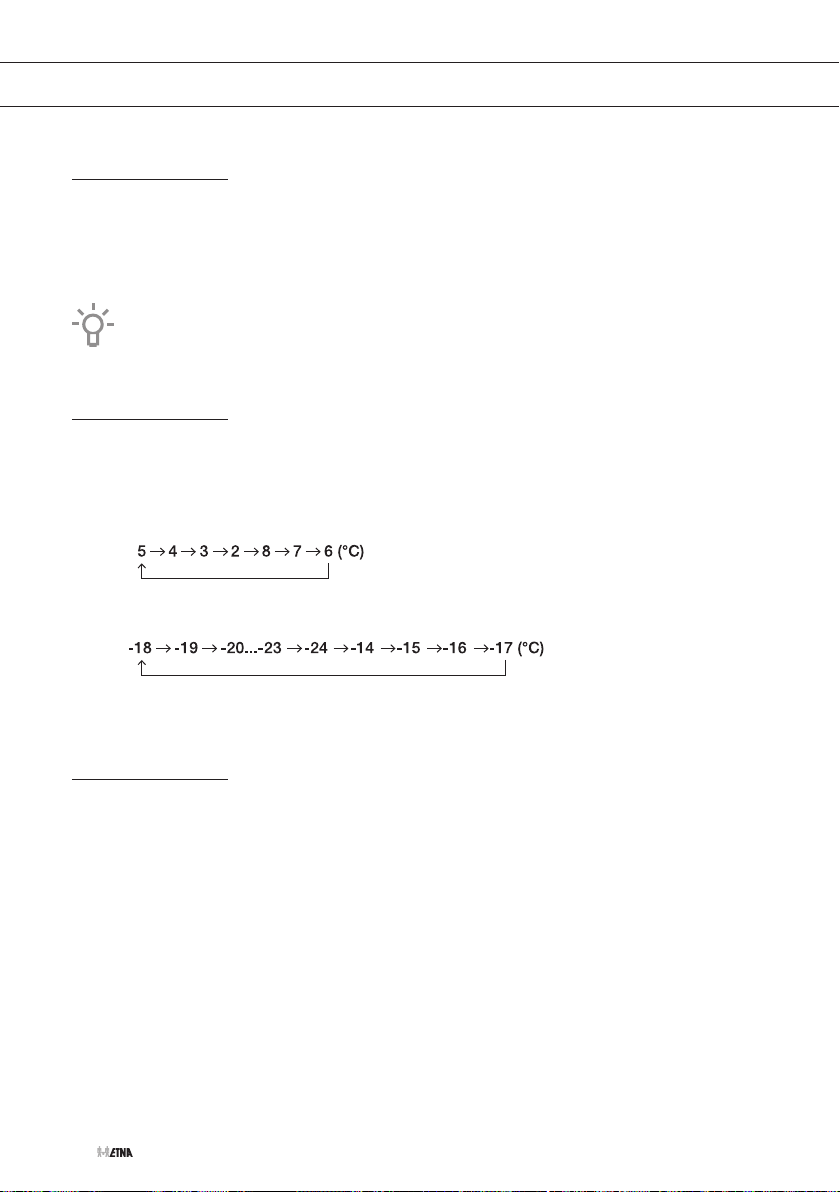
Setting the temperature
1. Unlock the control panel; press the alarm/child lock key for 3 seconds.
2. Touch (several times) the temperature adjustment key (refrigerator compartment or freezer
compartment) to set the temperature.
▷ The temperature of the refrigerator will be set in the following order:
▷ The temperature of the freezer will be set in the following order:
Intensive cooling
This appliance has an intensive cooling function. This function decreases the temperature in the
refrigeration compartment as quickly as possible. This is ideal for cooling products that have
just been put into the refrigerator. Use this function when you put a large quantity of food in the
appliance.
EN 18
Page 53
OPERATING THE APPLIANCE
Activating/disabling the intensive cooling function
1. Unlock the control panel; press the alarm/child lock key for 3 seconds.
2. Touch the temperature adjustment key (refrigerator compartment) for three seconds until the
intensive cooling pictogram and temperature 2 °C are illuminated.
▷ The function is activated.
3. Touch the temperature adjustment key (refrigerator compartment) for three seconds until the
intensive cooling pictogram is not illuminated any more.
▷ The function is disabled.
When the intensive cooling function is not switched off manually, the function will be
switched off automatically after about three hours.
Selecting the ECO function or holiday function while the intensive cooling function is
activated immediately deactivates intensive cooling.
Intensive freezing
This appliance has an intensive freezing function. This function decreases the temperature in
the freezer compartment as quickly as possible. Activate this function 24 hours before you put a
large quantity of fresh food in the appliance.
Activating/disabling the intensive freezing function
1. Unlock the control panel; press the alarm/child lock key for 3 seconds.
2. Touch the temperature adjustment key (freezer compartment) for three seconds until the
intensive freezing pictogram and temperature -24 °C are illuminated.
▷ The function is activated.
3. Touch the temperature adjustment key (freezer compartment) for three seconds until the
intensive freezing pictogram is not illuminated any more.
▷ The function is disabled.
When the intensive freezing function is not switched off manually, the function will be
switched off automatically (after about 2 days).
Selecting the ECO function or holiday function while the intensive freezing function is
activated immediately deactivates intensive freezing.
EN 19
Page 54
OPERATING THE APPLIANCE
ECO function
This appliance has an ECO function. The ECO function has no time limit and remains activated
until the function is disabled.
Activating/disabling the ECO function
1. Unlock the control panel; press the alarm/child lock key for 3 seconds.
2. Touch the ECO key.
▷ The pictogram is illuminated.
▷ The temperatures -17 °C and 6 °C are displayed.
▷ The function is activated.
3. Touch the ECO key.
▷ The pictogram goes out.
▷ The function is disabled.
▷ The temperature returns to the latest temperature setting.
The ECO function is not suitable for freezing fresh food or making ice cubes.
Note!
Activating the ECO function deactivates the intensive cooling and intensive freezing
functions.
EN 20
The storage life of food may be shorter when the ECO function is active.
Do not activate the ECO function when freezing fresh food.
Adjusting the temperature while the ECO function is activated will immediately disable
the ECO function.
Page 55
OPERATING THE APPLIANCE
Holiday function
This appliance has a holiday function. If you are going to be away for a long period of time, you
can activate this function. The temperature of the fridge is automatically set to 15 °C and the
temperature of freezer to -18 °C.
Do not store any food in the fridge during this time.
Activating/disabling the holiday function
1. Unlock the control panel; press the alarm/child lock key for 3 seconds.
2. Press the holiday function key.
▷ The pictogram is illuminated.
▷ The temperatures -18 °C (freezer compartment) and ‘—’ (refrigerator compartment) are
displayed.
▷ The function is activated.
3. Press the holiday function key.
▷ The pictogram goes out.
▷ The function is disabled.
Note!
Activating the holiday function deactivates the intensive cooling and intensive freezing
functions.
When the holiday function is active, the ice dispenser switches off automatically.
Open door alarm
When a compartment door is open for too long, an alarm signal sounds and ‘dr’ shows on the
display.
Stopping the alarm
1. Unlock the control panel; press the alarm/child lock key for 3 seconds.
2. Press the alarm/child lock key again.
▷ The alarm will stop sounding. The pictogram will remain illuminated.
Immediately closing the door will also switch off the alarm.
If the door is still open after 10 minutes, the alarm will stop automatically.
EN 21
Page 56
OPERATING THE APPLIANCE
Water and ice dispenser
Clean the water and ice dispenser before using it for the first time (see ‘Maintenance’).
If the child lock is activated or the door is open, the dispenser will not operate.
Note
If the water reservoir pictogram is illuminated, the water reservoir has not been positioned
correctly or is not present at all. Make sure the water reservoir is positioned correctly.
Then switch off the pictogram by pressing the ECO key for 3 seconds.
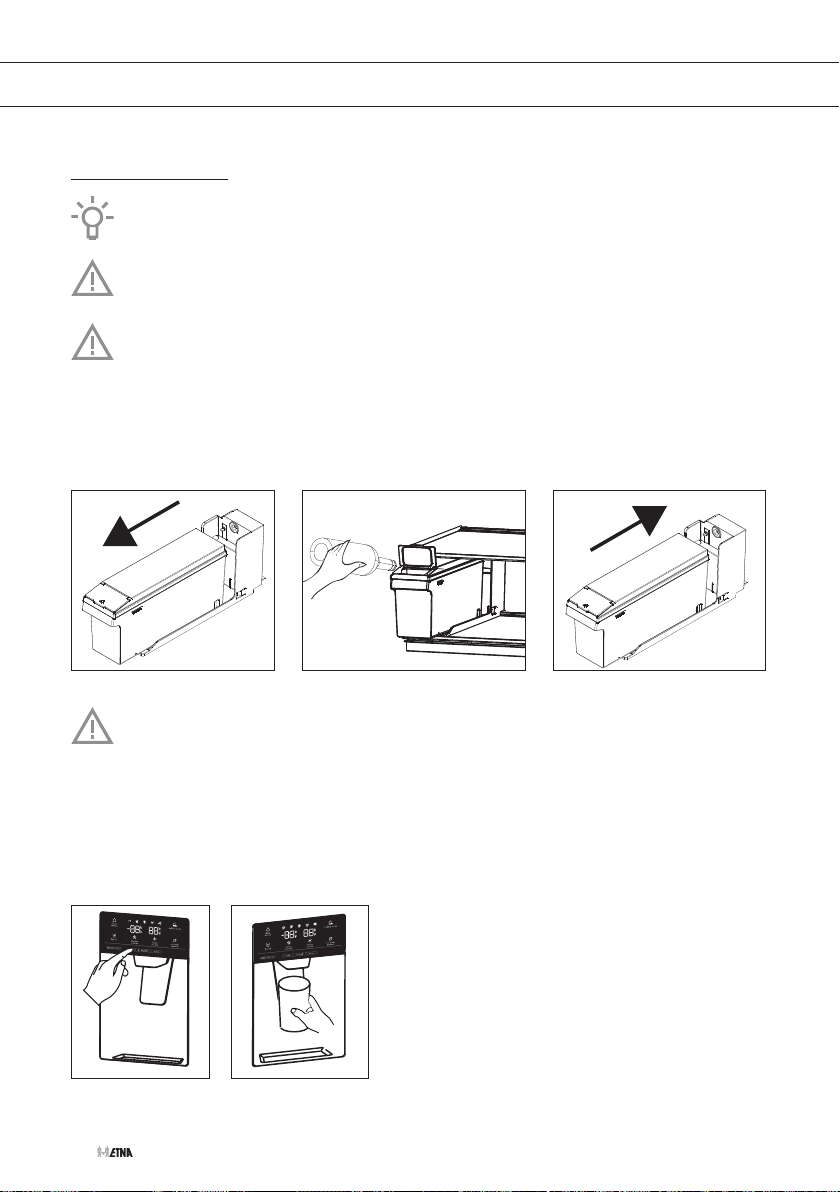
1. Make sure the water tank is installed correctly.
2. Fill the water tank up to max. 4.5 liters of water.
Use clean and cold tap water, bottled water without added minerals or distilled
watersuitable for consumption. Do not use warm water.
3. Press the water key, crushed key (crushed ice) or cubed key (ice cubes).
▷ The pictogram is illuminated.
4. Place your glass underneath the water and ice outlet and push gently against the dispenser
lever with your glass. Make sure the glass is in line with the dispenser to prevent the water
from splashing out or the ice from bouncing out.
EN 22
Page 57
OPERATING THE APPLIANCE
If you press the cubed key after using the crushed key, a small amount of remaining
crushed ice may fall into your glass.
If you do not need ice, you can switch off the ice maker to save water and energy.
When ice cubes fall into the reservoir, it is normal to hear noises.
The first batch of ice cubes after installation may be small, because air has entered the
water pipe. In normal use, all air is removed. If the ice cubes are still small, check that the
water is circulating in the pipe and that the water pressure is high.
If the appliance is switched off for too long, the ice in the reservoir melts and the water
drips onto the floor. To prevent this, you must remove all the ice from the reservoir (see
‘Maintenance’).
If no ice comes out of the dispenser, check whether there is ice stuck in the outlet and
remove it. Or check whether there are ice cubes clumped together in the reservoir and
remove them (see ‘Maintenance’). Also, if you do not remove ice from the dispenser for a
long period of time, the ice in the reservoir may start to clump.
Do not use the dispenser for ice delivery for more than 1 minute at a time. This prevents
the ice maker’s motor from getting too hot.
Switching off the ice maker
If you do not need ice, you can switch off the ice maker to save water and energy.
1. Press the ice maker key.
▷ The pictogram is illuminated.
▷ The ice maker is switched off.
Only the ice maker is switched off; the dispenser still delivers water.
EN 23
Page 58
STORING AND FREEZING FOOD
Recommended distribution
Sections of the refrigeration compartment
• Upper section: canned food, bread, wine, pastas etc.
• Middle section: dairy products, ready-to-cook meals, desserts, soft drinks, beer, cooked food etc.
• Lower section: meat, meat products, dairy.
• Vegetable drawer: vegetables and fresh fruit.
Sections of the refrigerator door
• Top/middle door shelf: eggs, butter, cheese, sauces etc.
• Bottom door shelf: drinks, cans, bottles etc.
Store food that spoils rapidly at the back of a shelf or at the back of the drawer at the
lowest temperature.
Please note that the storage of vegetables with a high water content can cause
condensation on the glass shelves of the fruit and vegetable drawer; this will not affect
the proper operation of the appliance.
Do not store fruit (bananas, pineapples, papaya, citrus fruits) and vegetables (courgettes,
tomatoes, aubergines, cucumber, sweet peppers and potatoes) that are sensitive to low
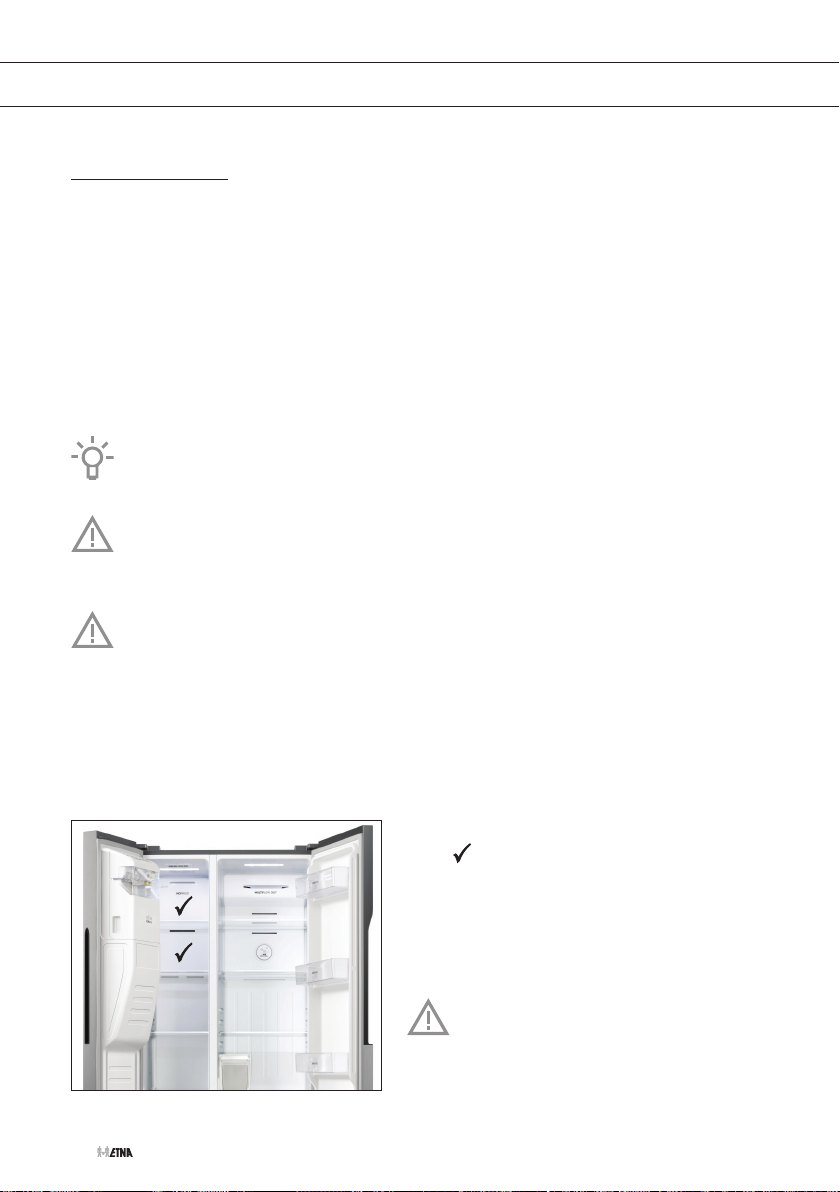
temperatures in the refrigerator.
Sections of the freezer compartment
• Top section: leftovers, ice, pizza.
• Middle section: meat, fish, bread.
• Bottom section: standard freezer, vegetables and fruit.
EN 24
The best location for freezing fresh food is marked
with a .
Do not store lettuce, eggs, apples, pears,
grapes, peaches, yoghurt, buttermilk, sour
cream or mayonnaise in the freezer.
Page 59
STORING AND FREEZING FOOD
Avoid contamination of food
To avoid contamination of food, please respect the following instructions:
• Opening the door for long periods can cause a significant increase of the temperature in the
compartments of the appliance.
• Regularly clean surfaces that can come in contact with food and accessible drainage
systems.
• Store raw meat and fish in suitable containers in the refrigerator, so that it is not in contact
with or drip onto other food.
• If the refrigerating appliance is left empty for long periods, switch off, defrost, clean, dry, and
leave the door open to prevent mould developing within the appliance.
Storing fresh food in the refrigerator
Important recommendations for storing fresh food
• To ensure the quality of fresh food, it is important that:
▷ the food is well-packaged;
▷ the appliance is at the correct temperature;
▷ the appliance is clean.
• Take good note of the use-by date stated on the food packaging.
• Put food in the refrigerator in sealed containers or in suitable packaging. This will prevent the
food from picking up or spreading odours and will keep it dry.
• Do not store flammable, unstable or explosive materials in the refrigerator.
• Store bottles that have been opened upright and close them tightly.
• Some organic solutions, such as essential oils, in the skin of lemons and oranges, and butyric
acid, that come into long-term contact with plastics can eat into the material and cause
premature ageing.
• A disagreeable odour is an indication that the appliance is not clean or that it contains food
that has spoiled (see the chapter ‘Maintenance’).
• Take perishable foods out of the refrigerator when you will be away from home for a longer
time.
EN 25
Page 60
STORING AND FREEZING FOOD
Freezing and storing foods in the freezer
Important recommendations for freezing fresh food
• The maximum quantity of food that you can put in the freezer in one go is stated on the type
plate. Putting more than this maximum quantity of food into the freezer will slow the freezing
process and reduce the quality. Moreover, this will also degrade the quality of frozen food
already stored in the freezer.
• Use only good-quality fresh food that is suitable for freezing.
• Allow hot food to cool to room temperature.
• Food needs to be frozen quickly. It is recommended that you use small packs.
• Use air and watertight packaging to prevent the food from drying out and lose its vitamins.
• Note the type and quantity of the food on the packaging, together with the date on which it
was frozen.
• Do not allow fresh food to come into contact with frozen food.
• You can remove all the drawers to make use of the total volume of the freezer compartment.
Put the food directly on a shelf and on the base of the freezer.
Freezing small quantities of fresh food/making ice cubes
See the chapter ‘Recommended distribution’ for the best location for freezing fresh food
(1 to 2 kilograms) and making ice cubes.
Freezing large quantities of fresh food
• Activate the intensive freezing function 24 hours before you plan to freeze the food.
• Distribute the fresh food equally between all the drawers in the freezer compartment.
• After 24 hours, you can transfer the food to another compartment in the freezer and then
freeze a new batch of food.
Important recommendations for storing frozen food
• Follow the manufacturer’s instructions for the storage and use of frozen food. Take note of
the recommended storage temperature and use-by date stated on the packaging.
• Use only food in undamaged packaging that has been stored at a temperature of -18 °C or
lower.
• Do not buy food covered in frost. This indicates that the food has thawed or partially thawed
several times and, as a result, is of inferior quality.
• Make sure that the food does not thaw during transport. An increase in its temperature will
shorten the storage life and harm the quality of the food.
EN 26
Page 61
STORING AND FREEZING FOOD
Recommended storage times of frozen food in the freezer
Type of food Storage life
Fruit, beef 10 to 12 months
Vegetables, veal, poultry 8 to 10 months
Venison 6 to 8 months
Pork 4 to 6 months
Finely chopped or minced meat 4 months
Bread, pastas, cooked dishes, whitefish 3 months
Offal 2 months
Smoked sausage, bluefish 1 month
Defrosting frozen food
• Thawing is an important step in storing food preserved by freezing. Food must be thawed in
the correct way.
• Suitable methods of thawing food are:
▷ in the refrigerator;
▷ in cold water;
▷ in a microwave or conventional oven with a suitable thaw program.
• Some frozen products can be prepared without needing to thaw them first. The manufacturer
will state this on the packaging.
• The food needs to be packed in small portions. In this way the food thaws faster.
• Use partially or completely thawed food as quickly as possible. The bacteria in thawed food
are reactivated and the food will spoil rapidly. This applies in particular to fruit, vegetables
and ready-made food.
• Do not refreeze partially or completely thawed food.
EN 27
Page 62
MAINTENANCE
Defrosting the appliance
Automatic defrost of the refrigeration compartment
The refrigeration compartment defrosts automatically from time to time.
Defrosting of the NoFrost freezer
The NoFrost freezer defrosts automatically. Any frost deposits will then disappear.
Any ice or frost deposits that nevertheless form in the freezer compartment can be caused by
unusual use of the appliance (opening the door too often and too long or poorly sealing door,
etc.). The freezer will then need to be defrosted manually.
Switch off the appliance in the event of extreme ice formation. Remove the food in the
freezer and protect it so that it cannot partially or completely thaw. Clean and dry the
interior of the freezer. Switch on the appliance and adjust the temperature to the required
setting before you put the food back into the freezer.
Cleaning the appliance
Switch off the appliance and remove the plug from the socket before you start cleaning it.
Do not use abrasive cleaning agents, as they can damage the surface.
Activate the intensive freezing function 24 hours before you plan to clean the freezer.
• Before cleaning, frozen foods should be wrapped in several layers of paper and kept in a
cool place. The inevitable rise in temperature will shorten their storage life.
Remember to use these foods within a relatively short period of time.
• Regularly clean the interior of the appliance with lukewarm water. If so required, add a
neutral cleaning agent or special refrigerator cleaner to the water. Clean all surfaces with
a soft cloth. Wipe the cleaned parts with a cloth with clean water and then dry them
thoroughly.
• Do not put parts of the appliance in a dishwasher: this could damage them.
EN 28
Page 63
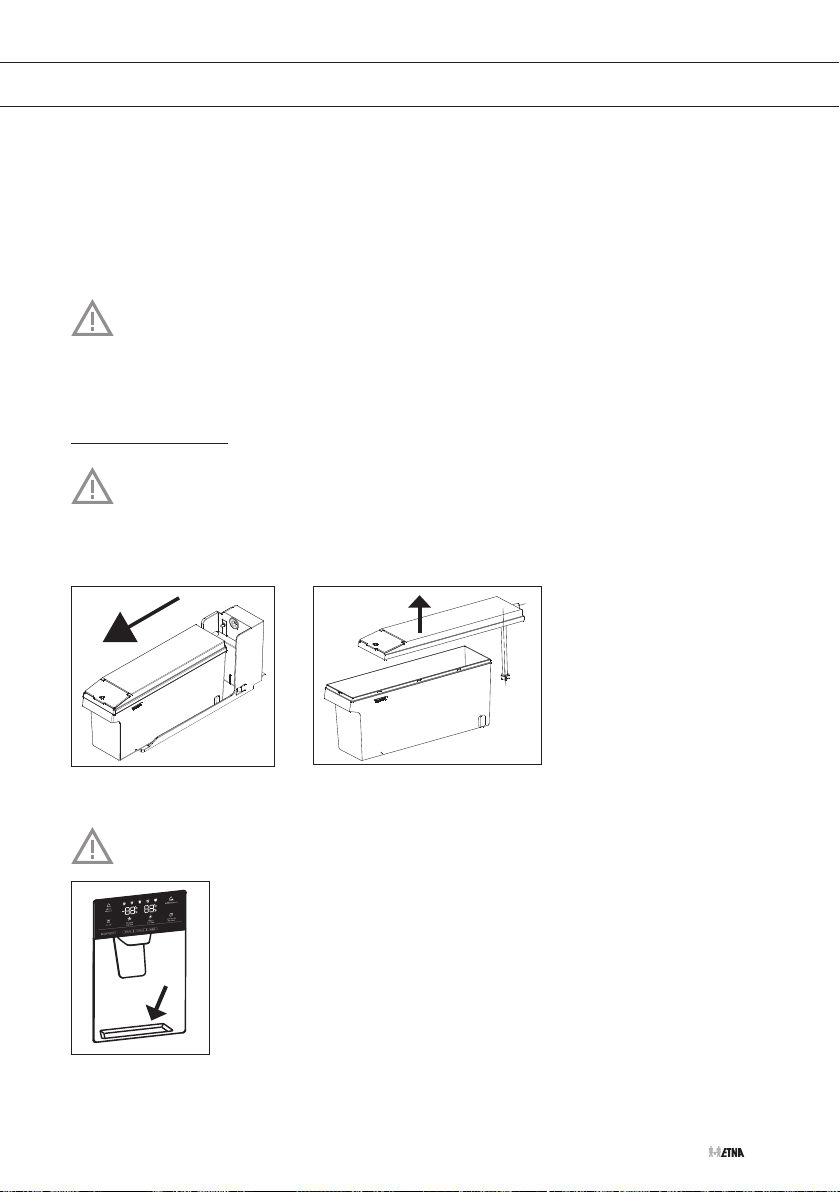
MAINTENANCE
• Dry the interior of the appliance. Do not switch on the appliance until the door seals are
completely dry. Start the appliance at the lowest temperature setting. After 24 hours, set the
thermostat to the normal temperature.
• Clean the exterior with a soft cloth.
• Regularly clean the vents on the back of the appliance with a vacuum cleaner or a brush.
When you are not going to use the appliance for a longer period then switch it off with
the appropriate key and disconnect it from the mains. Empty, defrost and clean the
appliance, and leave the door ajar.
Cleaning the water and ice dispenser
Switch off the appliance and remove the plug from the mains socket before you start
cleaning the water and ice dispenser.
1. Carefully remove the water tank from the door.
2. Clean the parts with water and dry them well.
3. Replace the water tank.
If you use the water and ice dispenser regularly, you should empty the drip tray with a dry
cloth.
EN 29
Page 64
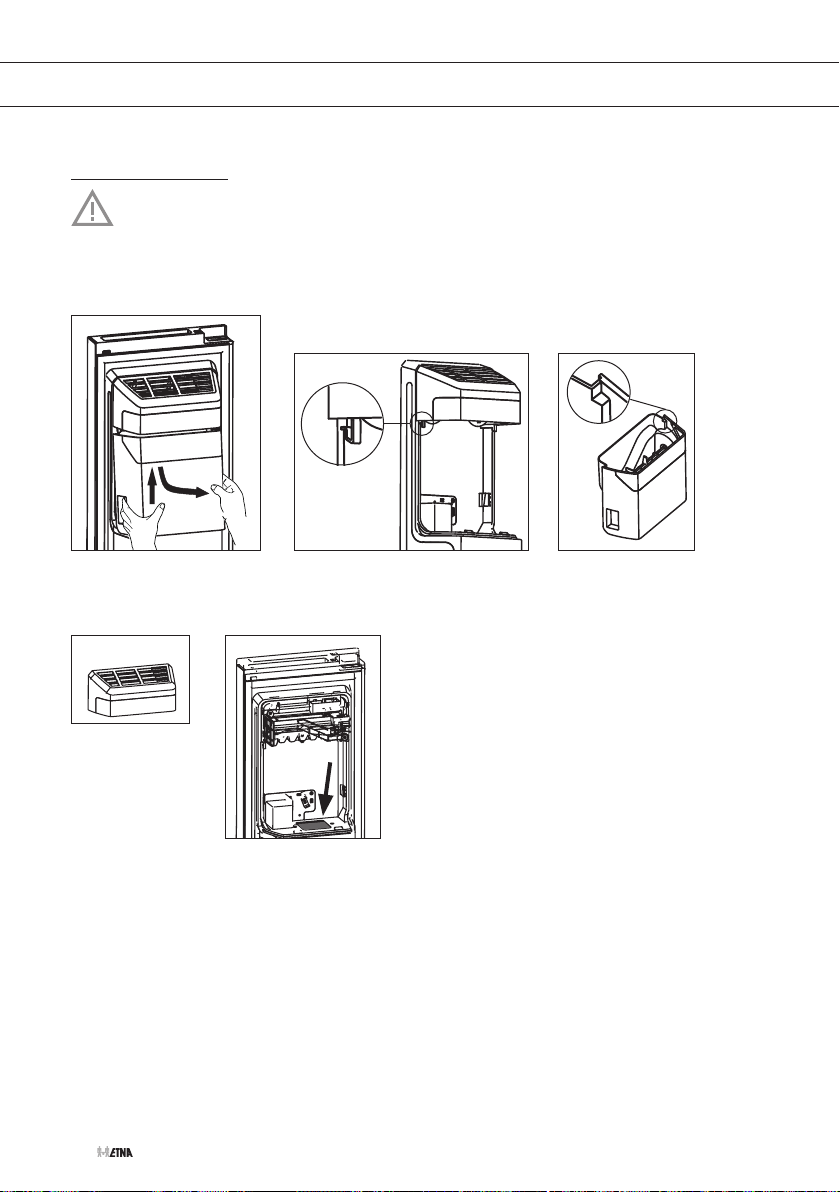
MAINTENANCE
Removing and cleaning the ice reservoir
Switch off the appliance and remove the plug from the mains socket.
1. Lift the reservoir slightly.
2. Remove it from the holders with a downward movement.
2
1
3. Remove the lid of the ice maker if you want to clean it too.
4. Check that the outlet is not blocked by ice (see arrow).
5. Clean the parts with water and dry them well.
6. Replace the lid.
EN 30
Page 65
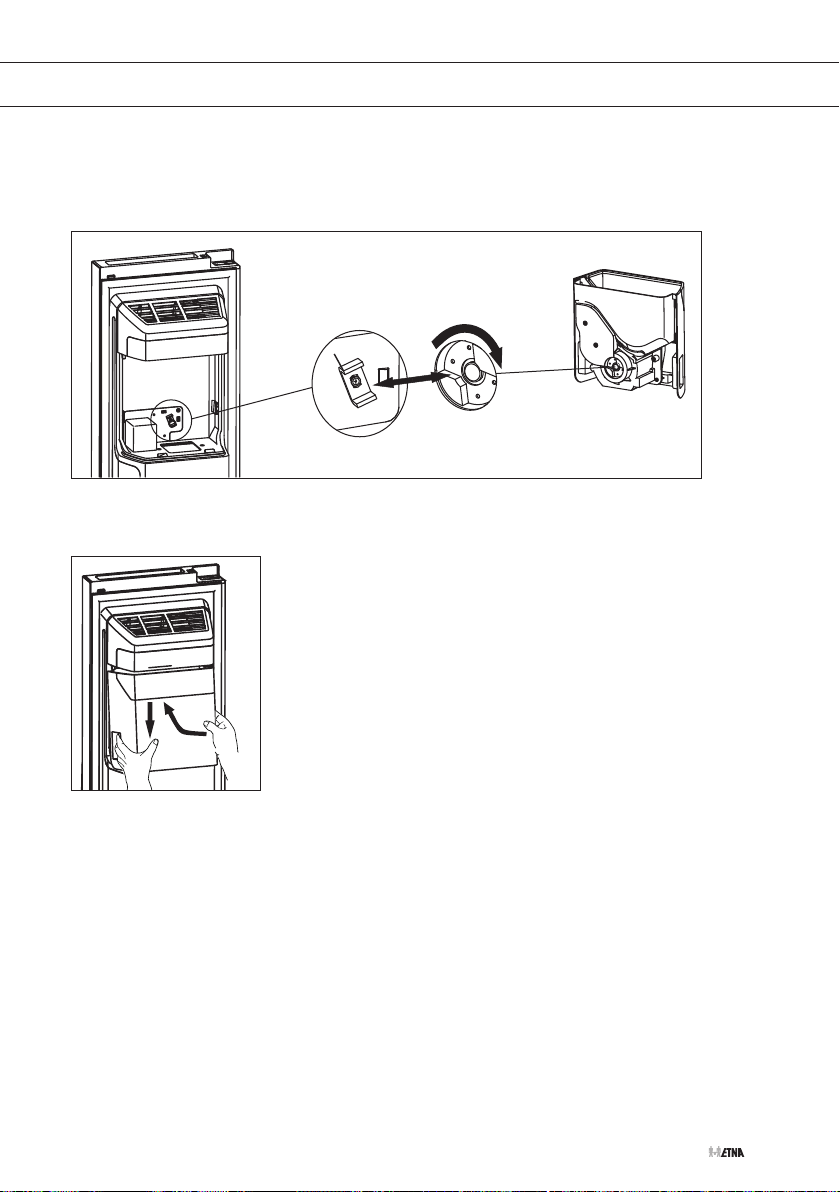
MAINTENANCE
7. Before you put the ice reservoir back, check that the two couplings are at the correct angle
so they will align properly. If not, turn the ice reservoir coupling to the correct angle so it is
aligned with the motor coupling.
8. Put the ice reservoir back in the holders.
2
1
EN 31
Page 66
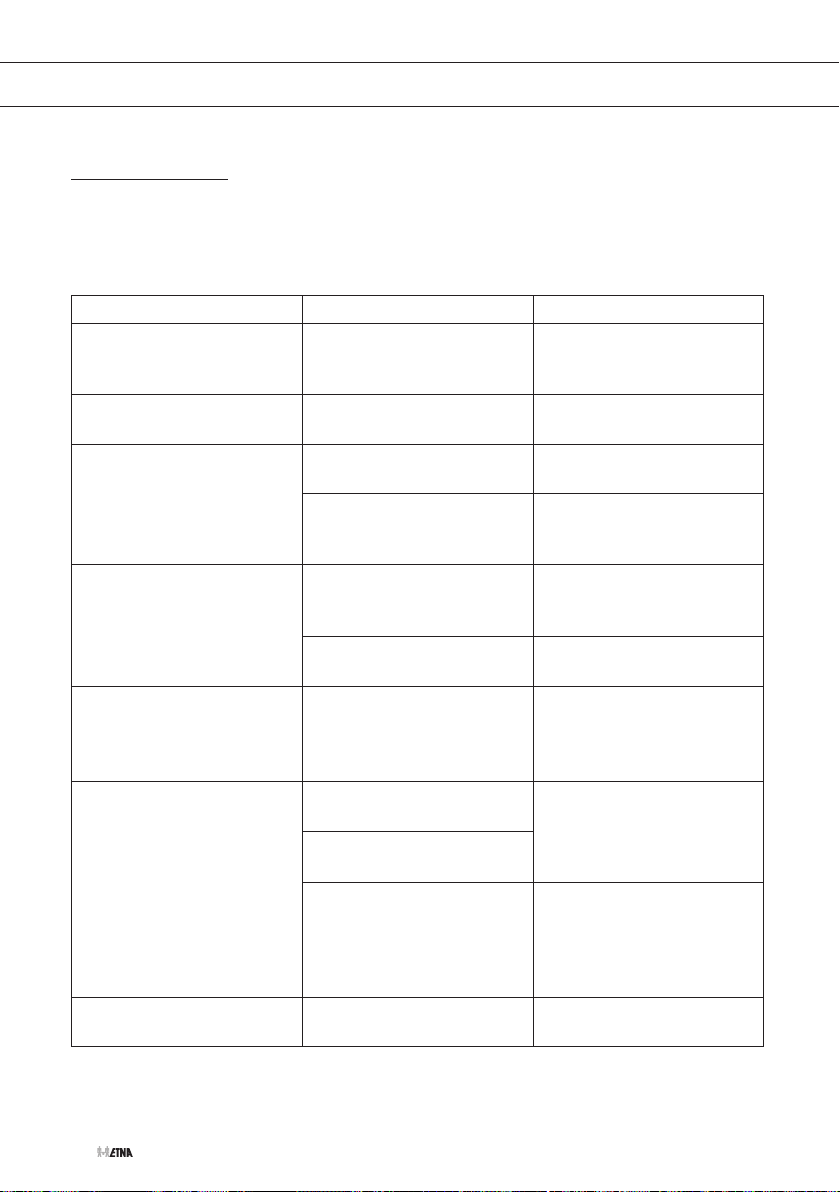
FAULTS
Faults table
When you have any doubts about whether your appliance is working properly you should not
immediately assume that it is defective. We recommend that you should in any case check the
points in the following table.
Symptom Possible cause Solution
The appliance emits a slight
odour when used for the first
time.
The appliance does nothing;
the lighting is not lit.
Temperature inside
refrigerator too high or too
low.
Appliance makes a noise. Incorrect positioning of food
The LED lighting does not
work.
Excessive ice formation in the
freezer.
‘dr’ shows on the display. The door has been opened
New appliance. This is normal and disappears
when the appliance starts
cooling.
Plug not in socket. Insert the plug in the socket.
Thermostat setting incorrect. Adjust the thermostat
properly.
The door seals are dirty or the
seals are damaged.
in the refrigerator (or freezer).
There is an object against the
appliance.
LED lamp faulty. Call an authorized service
The door has been opened for
too long or too frequently.
The door is not closed
properly.
The door does not seal
properly (the seal is dirty, the
door is misaligned or the seal
is damaged, etc.).
for too long.
Clean the door seals. Call
the service centre if the door
seals are damaged.
Place foods in the proper
manner in the refrigerator or
freezer.
Remove the object.
technician. Do not attempt
to replace the LED lighting
yourself.
Make sure that the door is
closed properly.
Make sure that the door is
closed properly. Clean the
door seals. Call the service
centre if the door seals are
damaged.
Make sure that the door is
closed properly.
EN 32
Page 67
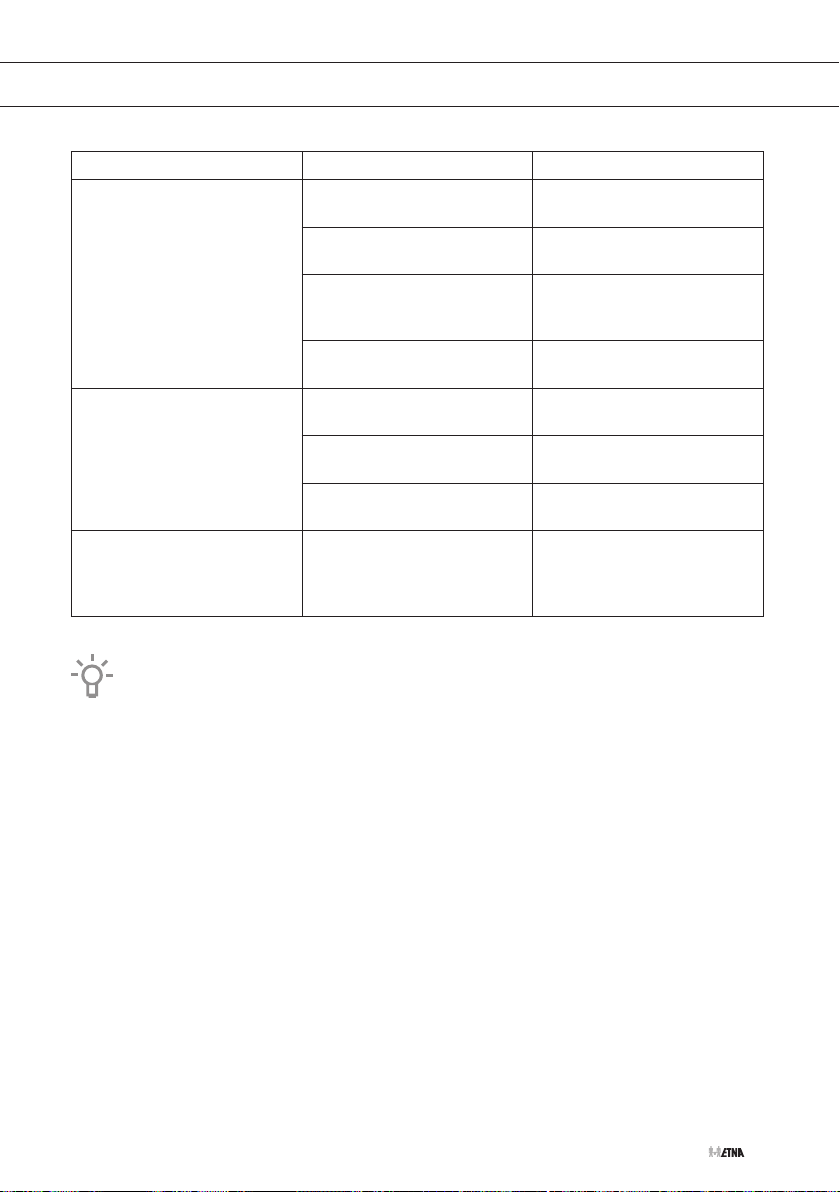
FAULTS
Symptom Possible cause Solution
The water and ice dispenser
does not work.
No ice comes out of the
dispenser.
Water is dripping on the floor. The appliance has been
Warning
It is normal for the cooling circuit to make gurgling or expansion noises.
The water tank is not installed
correctly.
There is not enough water in
the water tank.
The water supply hose is
blocked or bent.
The water in the supply hose
or in the water tank is frozen.
The ice maker is switched off. Switch on the ice maker.
There is ice in the outlet. Remove the ice from the
The ice in the reservoir has
started to clump.
switched off for too long and
the ice in the reservoir has
melted.
Make sure the water tank is
installed correctly.
Make sure there is enough
water in the water tank.
Make sure the water supply
hose is unblocked and clear
of any obstruction.
Set the appliance to a higher
temperature.
outlet.
Remove the ice from the ice
reservoir.
Remove all the ice in the
reservoir if you intend to
switch off the appliance for a
long period of time.
If you are unable to solve the problem then contact the service centre. When you do so, state the
type, model and serial number shown on the type plate or label on the inside of the appliance.
EN 33
Page 68
ENVIRONMENTAL ASPECTS
Disposal of packaging and appliance
This appliance is made from sustainable materials. This appliance must be disposed of in a
responsible manner at the end of its service life. Contact the local authorities for information
about the method.
See also the ‘Disposal’ chapter in the Safety instructions.
The packaging of the appliance is recyclable. The following materials may have been used:
• Cardboard.
• Polyethylene film (PE).
• CFC-free polystyrene (hard PS foam).
These materials must be disposed of in a responsible manner and in accordance with
government regulations.
The appliance is marked with a crossed out wheeled bin symbol to
draw your attention to the requirement for the separate disposal of
domestic electrical appliances. This means that the appliance may not
be disposed of in unsorted household waste
at the end of its service life. The appliance must be taken to a special
municipal waste processing location for separated waste or to a dealer
who provides this service.
EN 34
Collecting and disposing of domestic appliances separately avoids
detrimental consequences for humans and the environment. This
ensures that the materials used to make the appliance
can be recovered and that substantial savings in the use of energy and
raw materials can be achieved.
Declaration of conformity
We hereby declare that our products conform to the applicable
European Directives, Regulations and requirements, as well as all
requirements in the standards to which reference is made.
Page 69
EN 35
Page 70
EN 36
Page 71
EN 37
Page 72

De gebruiksaanwijzing is ook te vinden op onze website:
The instructions for use can also be found on our website:
www.etna.nl
www.etna.be
*860980*
860980
860980 / VER 1 / 15-04-2021
Page 73
MODE D’EMPLOI
BEDIENUNGSANLEITUNG
RÉFRIGÉRATEUR Américain
Side by Side KÜHLSCHRANK
AKV378IRVS
AKV378IZWA
Page 74
SOMMAIRE
Votre réfrigérateur
Introduction 4
Lien vers la base de données EPREL de l’UE 4
Consignes de sécurité 5
Avant la première utilisation de l’appareil
Avant d’utiliser l’appareil pour première fois 11
Conseils pour faire des économies d’énergie 11
Installation et raccordement
Choix de l’emplacement 13
Branchement de l’appareil 14
Nettoyage de la (des) porte(s) 15
Description de l’appareil
Appareil 16
Utilisation de l’appareil
FR 2
Panneau de commande 17
Sécurité enfants 18
Réglage de la température 18
Refroidissement rapide 18
Congélation rapide 19
Fonction ECO 20
Fonction vacances 21
Alarme d’ouverture de porte 21
Distributeur d‘eau et de glace 22
Éteindre la machine à glaçons 23
Page 75
SOMMAIRE
Conservation et congélation d’aliments
Répartition recommandée 24
Éviter la contamination des aliments 25
Conservation d’aliments frais dans le réfrigérateur 25
Congélation et stockage des aliments dans le congélateur 26
Décongélation des aliments congelés 27
Entretien
Dégivrage de l’appareil 28
Nettoyage de l’appareil 28
Nettoyage du distributeur d‘eau et de glace 29
Retrait et nettoyage du réservoir à glace 30
Problèmes
Tableau des problèmes 32
Aspects environnementaux
Mise au rebut de l’appareil et de l’emballage 34
Pictogrammes utilisés
Information importante
Conseil
Mise en garde ; risque d’incendie / matériaux inflammables
FR 3
Page 76
VOTRE RÉFRIGÉRATEUR
Introduction
Nous vous félicitons pour l’acquisition de ce réfrigérateur Etna. La souplesse et la simplicité de
l’utilisation sont les principes qui ont guidé son développement.
Ce mode d’emploi vous explique comment utiliser votre appareil de manière optimale. Il contient
des informations relatives au fonctionnement de l’appareil ainsi que des informations d’ordre
général susceptibles d’en faciliter l’utilisation.
Veuillez lire les consignes de sécurité avant toute utilisation
de l’appareil !
Veuillez lire attentivement ces consignes avant toute utilisation de l’appareil et conservez-
les avec l’appareil pour consultation ultérieure.
Lien vers la base de données EPREL de l’UE
Le code QR sur l’étiquette énergétique accompagnant l’appareil fournit un lien Web vers
l’enregistrement de cet appareil dans la base de données EPREL de l’UE. Conservez l’étiquette
énergétique pour référence avec le manuel d’utilisation et tous les autres documents fournis avec
cet appareil.
Des informations relatives aux performances du produit peuvent être trouvées dans la base de
données EPREL de l’UE en utilisant le lien https://eprel.ec.europa.eu et le nom du modèle et le
numéro de produit que vous trouverez sur la plaque signalétique de l’appareil .
Pour plus d’informations sur l’étiquette énergétique, rendez-vous sur www.theenergylabel.eu.
FR 4
Page 77
CONSIGNES DE SÉCURITÉ
Veuillez lire attentivement toutes les consignes fournies avant
l’installation et l’utilisation de l’appareil. Le fabricant décline
toute responsabilité en cas de blessures et de dommages
résultant d’une installation et d’une utilisation inappropriées.
Conservez toujours ces consignes avec l’appareil pour
consultation ultérieure.
Sécurité des enfants et personnes vulnérables
• L’appareil ne doit pas être utilisé par les personnes (y compris
les enfants) ayant des capacités physiques, sensorielles
ou mentales réduites, ou manquant d’expérience et de
connaissances, sauf si elles sont surveillées ou dirigées par
la personne responsable de leur sécurité.
• Les enfants doivent être surveillés pour s’assurer qu’ils ne
jouent pas avec l’appareil.
• Les enfants ne peuvent en aucun cas nettoyer ou entretenir
cet appareil sans être supervisés.
• Tenez tous les emballages hors de portée des enfants.
Pour le marché européen uniquement.
• Cet appareil peut être utilisé par des enfants de plus de 8ans
et des personnes ayant des capacités physiques, sensorielles
ou mentales réduites, ou manquant d’expérience et de
connaissances, à condition d’être supervisés ou d’avoir reçu
les instructions nécessaires pour un usage de l’appareil en
toute sécurité et d’en avoir compris les dangers.
• Ne laissez pas les enfants jouer avec cet appareil.
• Les enfants ne peuvent en aucun cas nettoyer ou entretenir
cet appareil sans être supervisés.
• Les enfants âgés de 3 à 8 ans sont autorisés à charger et
décharger les appareils frigorifiques.
Traduction des consignes d’origine
FR 5
Page 78
CONSIGNES DE SÉCURITÉ
Sécurité d’ordre général
• La lampe intégrée dans cet appareil ménager sert uniquement
pour l’éclairage de ce dernier. Elle n’est pas conçue pour
éclairer une pièce.
• MISE EN GARDE! Cet appareil a été conçu pour un usage
domestique ou similaire, notamment:
– cuisines réservées au personnel dans les magasins, bureaux
et autres environnements de travail;
– habitations rurales et par les clients dans des hôtels, motels
et autres environnements de type résidentiel;
– environnements de type chambre d’hôtes;
– restauration et applications similaires hors vente au détail.
• MISE EN GARDE! Maintenir dégagés les orifices de
ventilation situés dans l’enceinte de l’appareil ou dans la
structure d’encastrement.
• MISE EN GARDE! Ne pas utiliser de dispositifs mécaniques
ou d’autres moyens pour accélérer le processus de dégivrage
en dehors de ceux recommandés par le fabricant.
• MISE EN GARDE! Ne pas endommager le circuit de
réfrigération.
• MISE EN GARDE! Ne pas utiliser d’appareils électriques à
l’intérieur du compartiment de stockage des denrées, à moins
qu’ils ne soient du type recommandé par le fabricant.
• MISE EN GARDE! Ne pas utiliser un pulvérisateur d’eau ou un
nettoyant à vapeur pour nettoyer l’appareil.
• MISE EN GARDE! Nettoyer l’appareil avec un chiffon doux
humide. Utiliser uniquement des détergents neutres. Ne
pas utiliser de produits et tampons abrasifs, de solvants ou
d’objets en métal.
• MISE EN GARDE! Ne pas stocker de substances explosives
telles que des aérosols contenant un gaz propulseur
inflammable dans cet appareil.
FR 6
Page 79
CONSIGNES DE SÉCURITÉ
• MISE EN GARDE! Si le câble d’alimentation est endommagé,
il doit uniquement être remplacé par le fabricant ou son agent
de maintenance ou une autre personne qualifiée afin d’éviter
toute situation dangereuse.
Installation
• MISE EN GARDE! Seul un installateur agréé est autorisé à
brancher cet appareil.
• Enlevez l’intégralité de l’emballage.
• Abstenez-vous d’installer ou d’utiliser un appareil endommagé.
• Respectez scrupuleusement les consignes du guide
d’installation fourni avec l’appareil.
• Faites toujours preuve de prudence lorsque vous déplacez
l’appareil, car il est lourd. Portez toujours des gants de
sécurité.
• Assurez-vous que l’air circule autour de l’appareil.
• Attendez au moins 4heures avant de brancher l’appareil sur
secteur. Ceci afin de permettre à l’huile de refouler dans le
compresseur.
• N’installez pas l’appareil à proximité d’un radiateur, d’une
cuisinière, d’un four ou d’une table de cuisson.
• N’installez pas l’appareil dans un endroit où il serait
directement exposé aux rayons du soleil.
• N’installez pas l’appareil dans des endroits trop humides ou
trop froids, tels qu’une dépendance, un garage ou une cave.
• Lorsque vous déplacez l’appareil, soulevez-le par le bord avant
afin d’éviter de rayer le sol.
• MISE EN GARDE! Lorsque vous positionnez l’appareil,
assurez-vous que le câble d’alimentation n’est pas coincé
sous l’appareil ou endommagé.
FR 7
Page 80
CONSIGNES DE SÉCURITÉ
Branchement électrique
• MISE EN GARDE! Risque d’incendie et d’électrocution.
• L’appareil doit être mis à la terre.
• Tous les branchements électriques doivent être réalisés par un
électricien qualifié.
• Assurez-vous que les caractéristiques électriques figurant sur
la plaque signalétique de l’appareil sont compatibles avec
celles du réseau électrique. Si ce n’est pas le cas, faites appel
à un électricien.
• Utilisez toujours une prise antichoc correctement installée.
• N’utilisez pas d’adaptateurs multiprises ni de rallonges.
• Veillez à ne pas endommager les composants électriques
(p.ex. la fiche secteur, le câble d’alimentation ou le
compresseur). Contactez le service après-vente ou faites appel
à un électricien pour remplacer les composants électriques.
Le câble d’alimentation doit toujours se trouver en dessous
•
du niveau de la fiche secteur.
• Branchez la fiche secteur dans la prise de courant uniquement
à la fin de l’installation. Assurez-vous que la fiche secteur est
accessible une fois l’appareil installé.
• Abstenez-vous de tirer sur le câble d’alimentation pour
débrancher l’appareil. Tirez toujours sur la fiche.
• MISE EN GARDE! Ne placez pas de prises de courant ou
blocs d’alimentation portables multiples à l’arrière de l’appareil.
• Si un appareil stationnaire n’est pas équipé d’un câble
d’alimentation et d’une fiche, ou d’un autre moyen permettant
de débrancher l’appareil de manière à obtenir une séparation
de contact de tous les pôles afin de garantir le débranchement
complet selon les conditions de survoltage de catégorieIII,
les moyens de débranchement doivent être prévus dans
le câblage, conformément aux règles de câblage. Avec un
interrupteur omnipolaire, dont la distance de contact sera d’au
moins 3mm, vous remplirez cette condition.
FR 8
Page 81
CONSIGNES DE SÉCURITÉ
Utilisation
• MISE EN GARDE! Risque de blessures, de brûlures,
d’électrocution ou d’incendie.
• Ne modifiez pas les caractéristiques de cet appareil.
• Ne placez pas d’appareils électriques (tels qu’une sorbetière)
dans l’appareil, sauf indication expresse du fabricant.
• Veillez à ne pas endommager le circuit de réfrigération.
Il contient de l’isobutane (R600a), un gaz naturel présentant
un niveau élevé de compatibilité environnementale.
Ce gaz est inflammable.
• Si le circuit de réfrigération est endommagé, assurez-vous de
l’absence de flammes et de sources d’ignition dans la pièce.
Aérez la pièce.
• Évitez tout contact d’éléments chauds avec les parties en
plastique de l’appareil.
• Ne stockez pas de gaz ou de liquide inflammable dans
l’appareil.
• Ne placez pas de produits inflammables ou d’éléments
imbibés de produits inflammables à l’intérieur ou à proximité
de l’appareil, ou sur celui-ci.
• Ne touchez pas le compresseur ou le condenseur. Ils sont
chauds.
Entretien et nettoyage
• MISE EN GARDE! Risque de blessures corporelles ou de
dommages matériels.
• Avant toute opération d’entretien, éteignez l’appareil et
débranchez la fiche de la prise secteur.
• Le groupe de refroidissement de cet appareil contient des
hydrocarbures. L’entretien et la recharge du groupe doivent
être effectués par un professionnel qualifié.
FR 9
Page 82
CONSIGNES DE SÉCURITÉ
• Inspectez régulièrement l’écoulement de l’appareil et
nettoyez-le si nécessaire. Si l’orifice est bouché, l’eau
provenant du dégivrage s’écoulera dans le bas de l’appareil.
Mise au rebut
• MISE EN GARDE! Risque de blessure ou d’asphyxie
• Débranchez l’appareil de la prise secteur.
• Coupez le câble d’alimentation et mettez-le au rebut.
• Retirez la porte pour empêcher que les enfants et les animaux
ne s’enferment à l’intérieur de l’appareil.
• Le circuit de réfrigération et les matériaux isolants de cet
appareil ne sont pas néfastes pour la couche d’ozone.
• La mousse isolante contient un gaz inflammable. Contactez
votre service municipal pour obtenir des informations sur la
marche à suivre pour la mise au rebut correcte de l’appareil.
• N’endommagez pas la partie du groupe de refroidissement
situé à proximité du condenseur thermique.
FR 10
Page 83
AVANT LA PREMIÈRE UTILISATION DE L’APPAREIL
Avant d’utiliser l’appareil pour première fois
Ne raccordez pas l’appareil à l’alimentation secteur avant d’avoir lu attentivement toutes les
instructions afin de vous garantir une utilisation correcte et en toute sécurité de l’appareil. Ces
instructions s’appliquent à des types et modèles d’appareils différents, il est donc possible
qu’elles fassent référence à des réglages ou des composants qui ne sont pas disponibles
sur votre appareil. Nous vous recommandons de conserver ces instructions en lieu sûr pour
consultation ultérieure. Si vous vendez l’appareil, assurez-vous de fournir toutes les instructions.
Vérifiez si l’appareil présente de quelconques dommages et/ou anomalies. Si l’appareil est
endommagé, prenez contact avec le magasin qui vous l’a vendu.
Après la mise en place de l’appareil en position verticale, attendez au moins 4 heures avant de le
raccorder à l’alimentation secteur. Ceci afin de minimiser le risque de dysfonctionnement lié aux
effets du transport sur le système de réfrigération.
Avant d’utiliser l’appareil pour la première fois, l’intérieur et tous les accessoires internes doivent
être nettoyés à l’eau tiède et un détergent neutre. Essuyez les parties nettoyées avec un chiffon
imbibé d’eau claire, puis séchez-les soigneusement.
Si vous utilisez l’appareil pour la première fois, n’introduisez pas d’aliments dans l’appareil tant
que la température n’est pas descendue à la température programmée.
Conseils pour faire des économies d’énergie
• Installez l’appareil comme indiqué dans le mode d’emploi.
• N’ouvrez pas la porte inutilement.
• Ne recouvrez et n’obstruez jamais les orifices de ventilation.
• Remplacez le joint de porte aussitôt que possible s’il est endommagé ou ne ferme plus
correctement.
• Conservez les aliments dans des récipients ou des emballages étanches adaptés pour la
congélation.
• Laissez les aliments refroidir à température ambiante avant de les placer dans l’appareil.
• Décongelez les aliments dans le compartiment réfrigérateur.
• Dégivrez un congélateur standard dès qu’une couche de givre ou de glace de 2 à 3
millimètres s’est formée à l’intérieur.
• Espacez les clayettes régulièrement dans le compartiment réfrigérateur.
Placez les aliments de manière à faciliter la circulation de l’air dans l’appareil (respectez les
recommandations concernant l’emplacement des aliments fournies avec les instructions).
FR 11
Page 84
AVANT LA PREMIÈRE UTILISATION DE L’APPAREIL
• Lorsque l’appareil est équipé d’un ventilateur, veillez à ce que les orifices de ventilation
soient maintenus dégagés.
• Plus la température réglée est basse et plus la consommation d’électricité est élevée.
• Une température ambiante élevée a un effet néfaste sur la consommation d’énergie.
La lumière directe du soleil ou d’autres sources de chaleur à proximité de l’appareil ont
également un effet néfaste sur la consommation d’énergie.
• Prévoyez suffisamment d’espace autour de l’appareil pour permettre une ventilation et une
circulation d’air correctes autour de celui-ci.
• Le condenseur à l’arrière doit toujours être propre et exempt de poussière ou autres objets
étrangers.
FR 12
Page 85
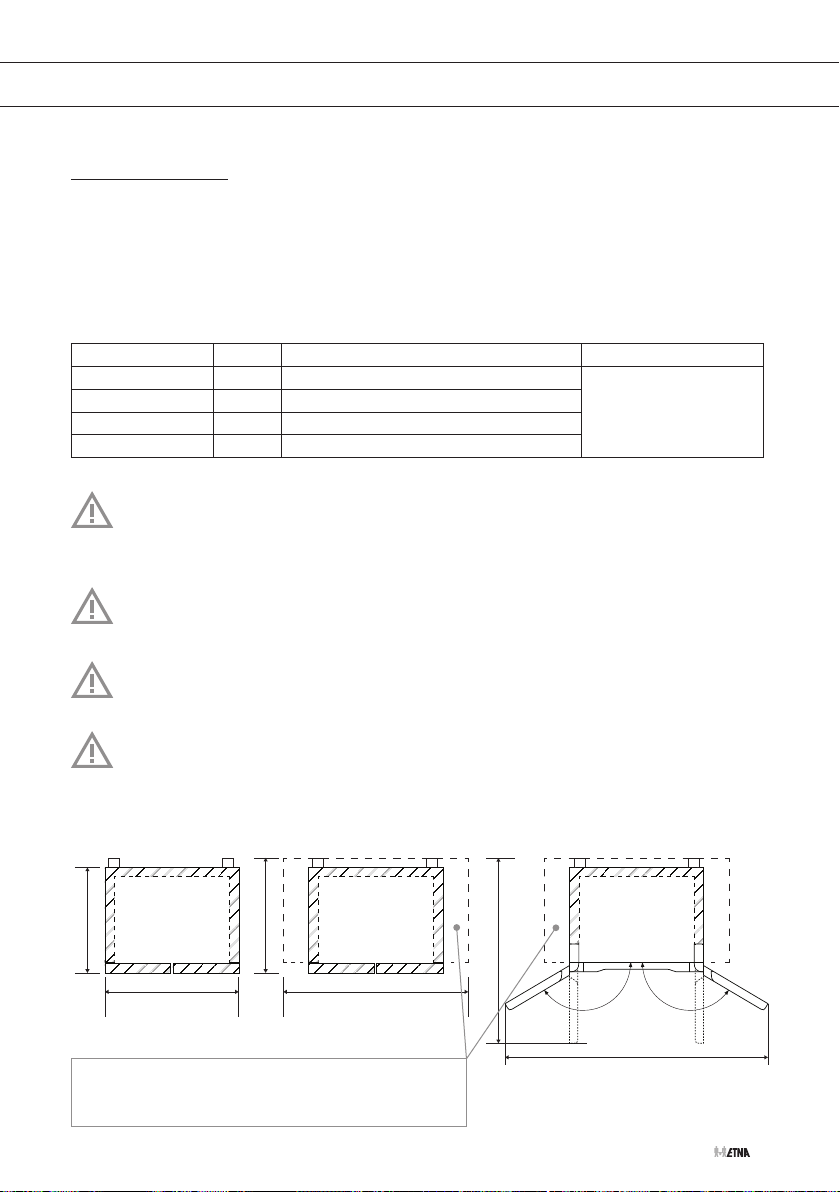
INSTALLATION ET RACCORDEMENT
Choix de l’emplacement
• Cet appareil de réfrigération n’est pas destiné à être utilisé comme un appareil intégrable.
• Ne placez pas l’appareil à proximité d’une source de chaleur telle qu’une cuisinière,
un radiateur, une chaudière, etc. et ne l’exposez pas aux rayons directs du soleil.
• Placez l’appareil dans un lieu sec et bien ventilé. La plage de températures ambiantes
autorisée pour l’appareil dépend de sa classe climatique qui est indiquée sur la plaque
signalétique.
Description Classe Plage de températures ambiantes °C Humidité relative
Tempérée élargie SN +10 à +32
Tempérée N +16 à +32
Subtropicale ST +16 à +38
Tropicale T +16 à +43
Ne placez pas l’appareil dans une pièce où la température peut descendre en dessous
de températures les plus basses ambiantes autorisée: l’appareil risque de ne pas
fonctionner correctement!
Ne placez pas l’appareil dans une pièce où la température peut descendre en dessous
de 5°C: l’appareil risque de devenir défectueux!
L’appareil n’est pas conçu pour un usage en extérieur et ne doit pas être exposé à
la pluie.
≤ 75%
Placez l’appareil dans une pièce avec un volume d’air suffisant. La pièce doit avoir un
volume minimal de 1m
La quantité de réfrigérant est indiquée sur la plaque signalétique à l’intérieur de l’appareil.
Dimensions globales
646
910
Prévoyez suffisamment d’espace autour de
l’appareil pour permettre une ventilation et une
circulation d’air correctes autour de celui-ci.
3
d’air pour chaque quantité de 8grammes de réfrigérant.
Espace requis en
fonctionnement
696
1110
Espace total requis en
fonctionnement
1176
1733
FR 13
Page 86
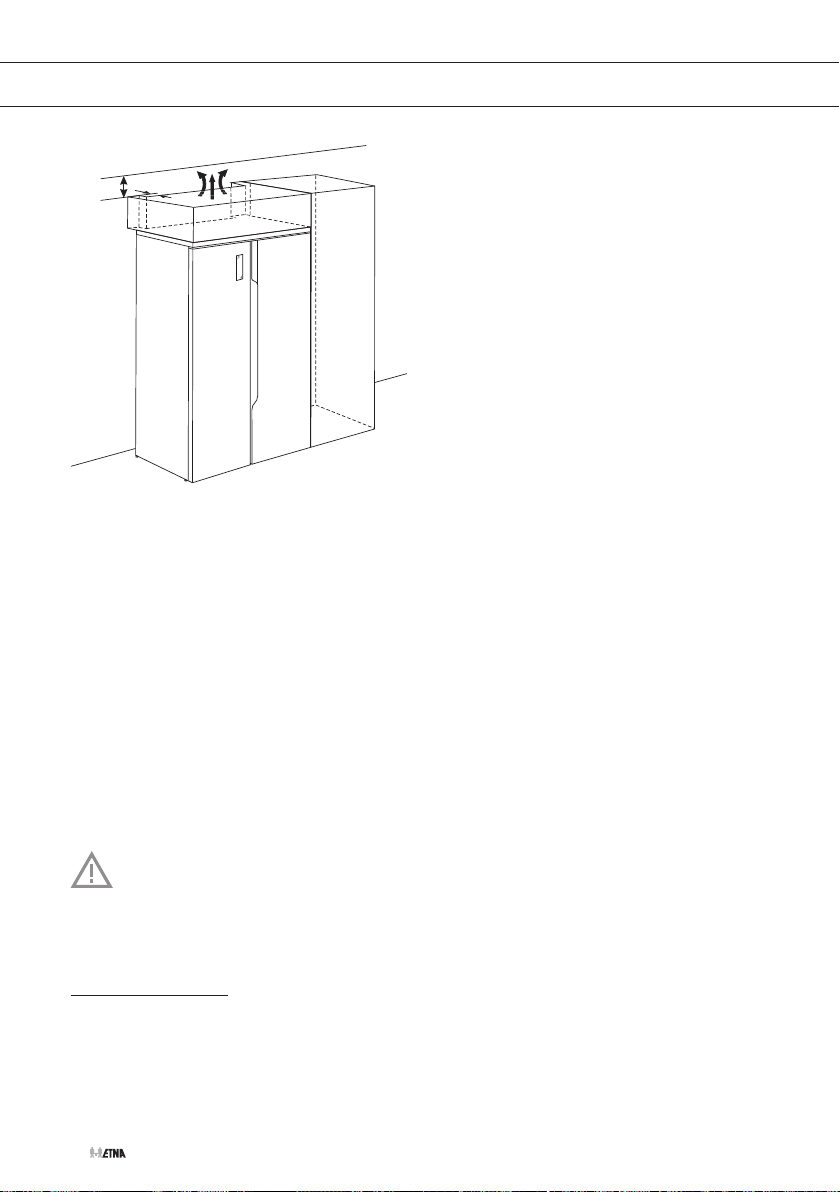
INSTALLATION ET RACCORDEMENT
min.
100 mm
min. 50 mm
• Placez l’appareil à une distance d’au moins 5cm d’une cuisinière électrique ou à gaz et d’au
moins 30cm d’un radiateur ou élément chauffant. Vous devrez prévoir l’installation d’un
panneau isolant si ces distances s’avèrent impossibles à respecter.
• La fiche de l’appareil installé doit rester accessible !
• La sortie d’air se situe dans le haut de l’appareil. Assurez-vous qu’elle n’est pas obstruée.
L’obstruction de la sortie pourrait endommager l’appareil.
• L’appareil doit être déplacé et installé par au moins deux personnes.
• Soyez prudent en déplaçant l’appareil afin de ne pas abîmer le sol.
• Assurez-vous que l’appareil n’endommage pas le câble d’alimentation pendant l’installation.
• Placez l'appareil toujours sur une surface plane et stable.
• Pour que les portes se ferment automatiquement, inclinez le haut vers l’arrière d’environ
10 mm ou 0,5 ° en tournant les pieds de nivellement.
Les roues ne sont pas des roulettes pivotantes et conviennent donc uniquement pour
avancer et reculer. Si vous essayez de déplacer l’appareil latéralement, cela pourrait
endommager votre sol, mais aussi les roues.
Branchement de l’appareil
• Raccordez le câble d’alimentation de l’appareil au secteur. La prise doit être mise à la terre.
La tension et la fréquence nominales requises ainsi que des informations de base sont
indiquées sur la plaque signalétique/l’étiquette de l’appareil.
FR 14
Page 87
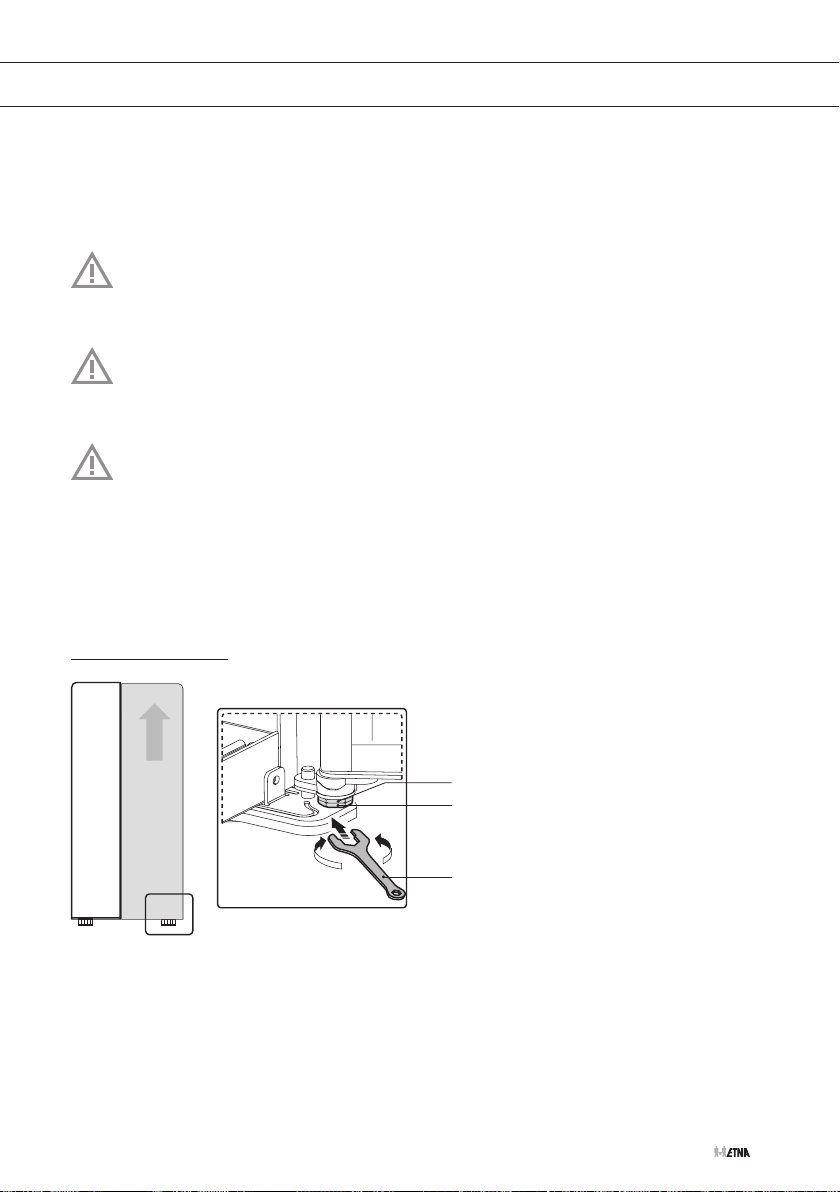
INSTALLATION ET RACCORDEMENT
• L’appareil doit être raccordé au secteur et relié à la terre conformément aux normes et
réglementations en vigueur. L’appareil peut supporter des variations de tension secteur de
l’ordre de plus ou moins 6% maximum.
Si vous prévoyez de ne pas utiliser votre appareil pendant une période prolongée,
éteignez-le en le débranchant de l’alimentation secteur. Videz, dégivrez et nettoyez
l’appareil, puis laissez la (les) porte(s) entrouverte(s).
Danger de brûlure par le froid
Afin d’éviter les brûlures par le froid, ne placez jamais des aliments congelés dans votre
bouche et abstenez-vous d’y toucher.
En cas de dysfonctionnement ou de coupure de courant, n’ouvrez pas le compartiment
congélateur sauf si l’appareil a été hors service pendant plus longtemps que le nombre
d'heures indiqué sur la plaque signalétique de l’appareil (délai d’augmentation de la
température). Au-delà de cette durée, vous devez soit consommer les aliments congelés,
soit vous assurer qu’ils sont tenus au frais de manière adéquate (par exemple, en les
transférant dans un autre appareil).
Nettoyage de la (des) porte(s)
1
2
3
• Si les portes ne sont pas alignées en haut et en bas, la porte droite peut être ajustée en
tournant le boulon (1) de la charnière inférieure avec une clé plate (3).
• Vous pouvez remonter la porte en tournant le boulon dans le sens anti-horaire.
Une fois alignée, fixez le boulon (1) avec l’écrou (2).
FR 15
Page 88
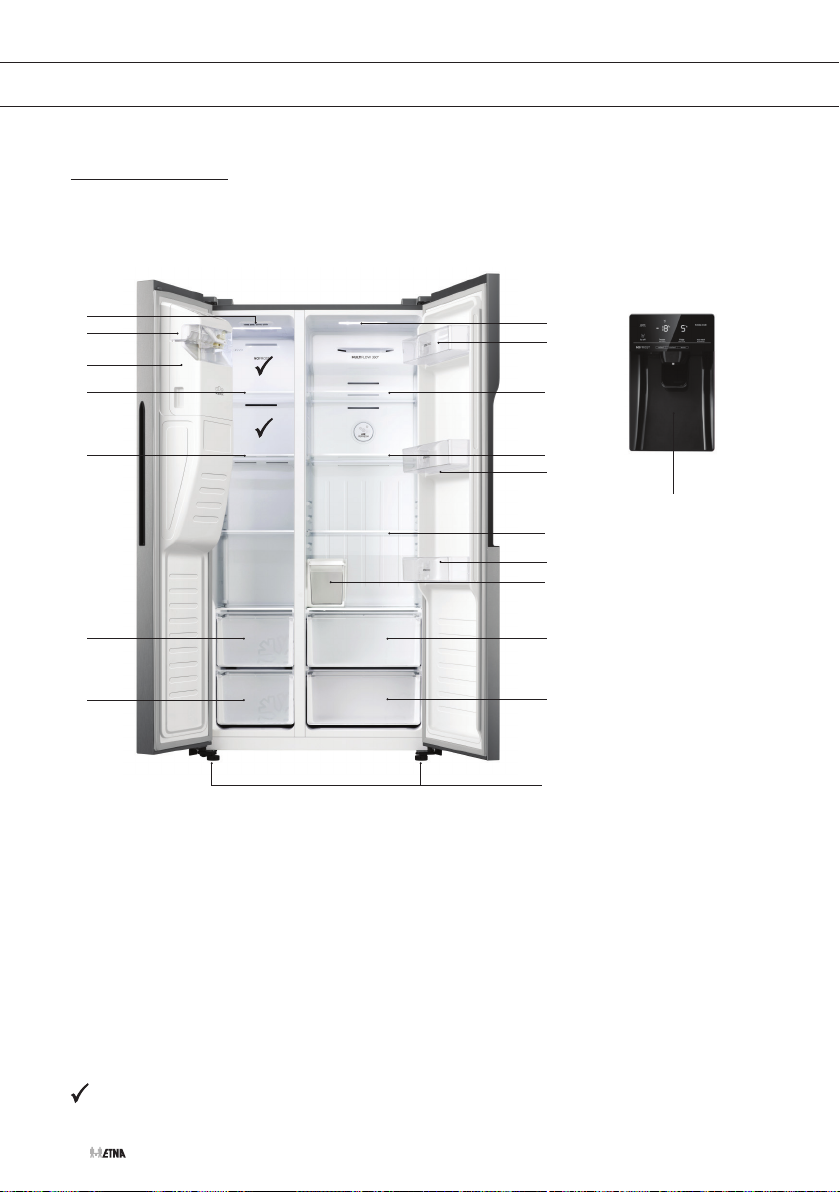
DESCRIPTION DE L’APPAREIL
Appareil
Ce manuel couvre plusieurs modèles. Ainsi, il se peut que certaines options ou certains
accessoires ne soient pas disponibles sur votre appareil.
1
2
3
4
4
5
5
Congélateur
1. Éclairage intérieur
2. Machine à glaçons
3. Réservoir à glace
4. Niveau
5. Tiroir du congélateur
6
7
8
8
7
12
8
7
9
10
10
11
Réfrigérateur
6. Éclairage intérieur
7. Balconnet de porte
8. Niveau
9. Réservoir d’eau
10. Bac à légumes
11. Pieds de nivellement
12. Distributeur d’eau et de glace
Zones optimales pour congeler les aliments frais.
FR 16
Page 89
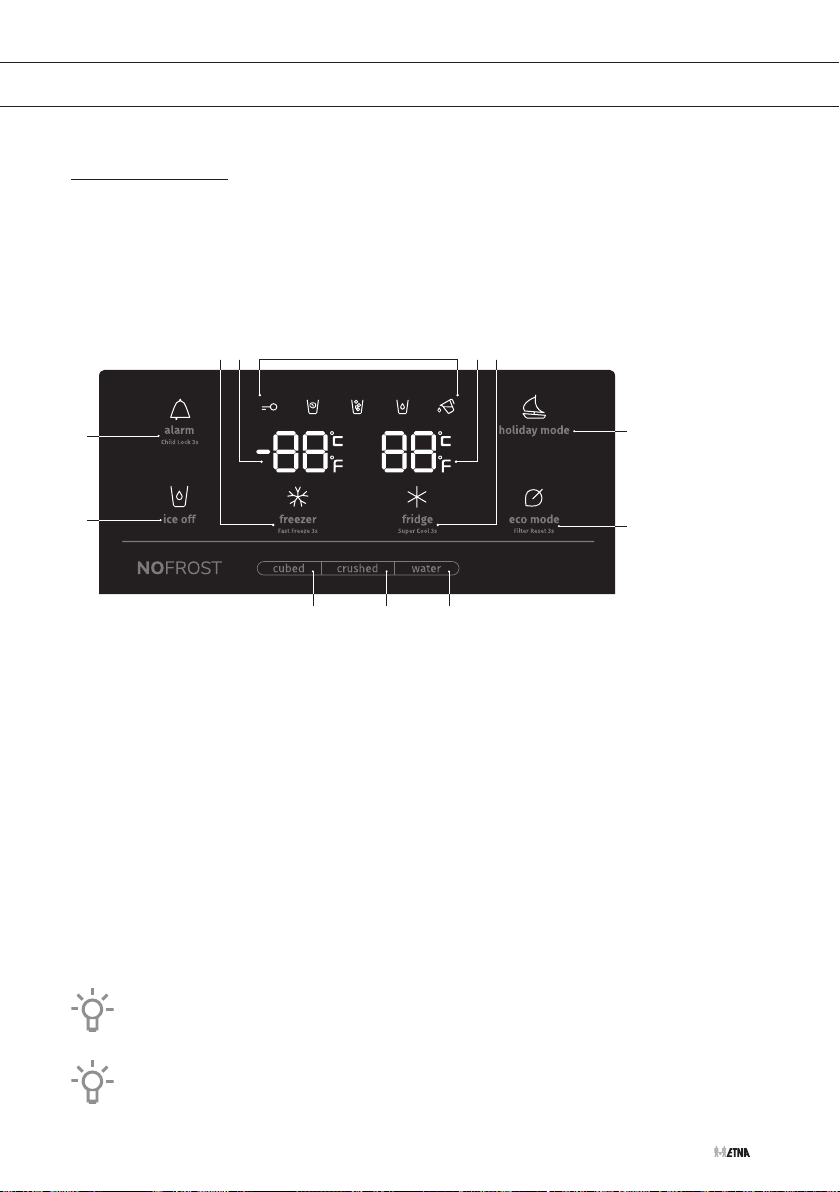
UTILISATION DE L’APPAREIL
Panneau de commande
Le panneau de commande est situé sur la porte de la section congélateur du réfrigérateur
SBS. Quand vous branchez l'appareil au secteur pour la première fois, le rétroéclairage des
pictogrammes s'allume. Si aucune touche n’est activée et les portes restent fermées, l’éclairage
s’éteint après 60 secondes. Le rétroéclairage se rallume chaque fois que la porte est ouverte ou
que l’on appuie sur une touche.
54 73 6
2
1
101112
1. Touche de la machine à glaçons
2. Touche d’alarme/de sécurité enfants
3. Touche de réglage de la température (compartiment congélation) et congélation rapide
4. Affichage de la température réglée (compartiment congélation)
5. Pictogrammes
▷ Sécurité enfants / Glaçons / Glace pilée / Eau / Réservoir d’eau
6. Affichage de la température réglée (compartiment réfrigération)
7. Touche de réglage de la température (compartiment réfrigération) et refroidissement rapide
8. Touche de fonction de vacances
9. Touche ECO
10. Touche Eau
11. Touche Crushed (glace pilée)
12. Touche Cubed (glaçons)
La température recommandée pour le compartiment réfrigérateur est de 4°C et pour le
compartiment congélateur, elle est de -18°C.
8
9
Débranchez l’appareil du réseau électrique ; l’appareil est maintenant éteint.
FR 17
Page 90
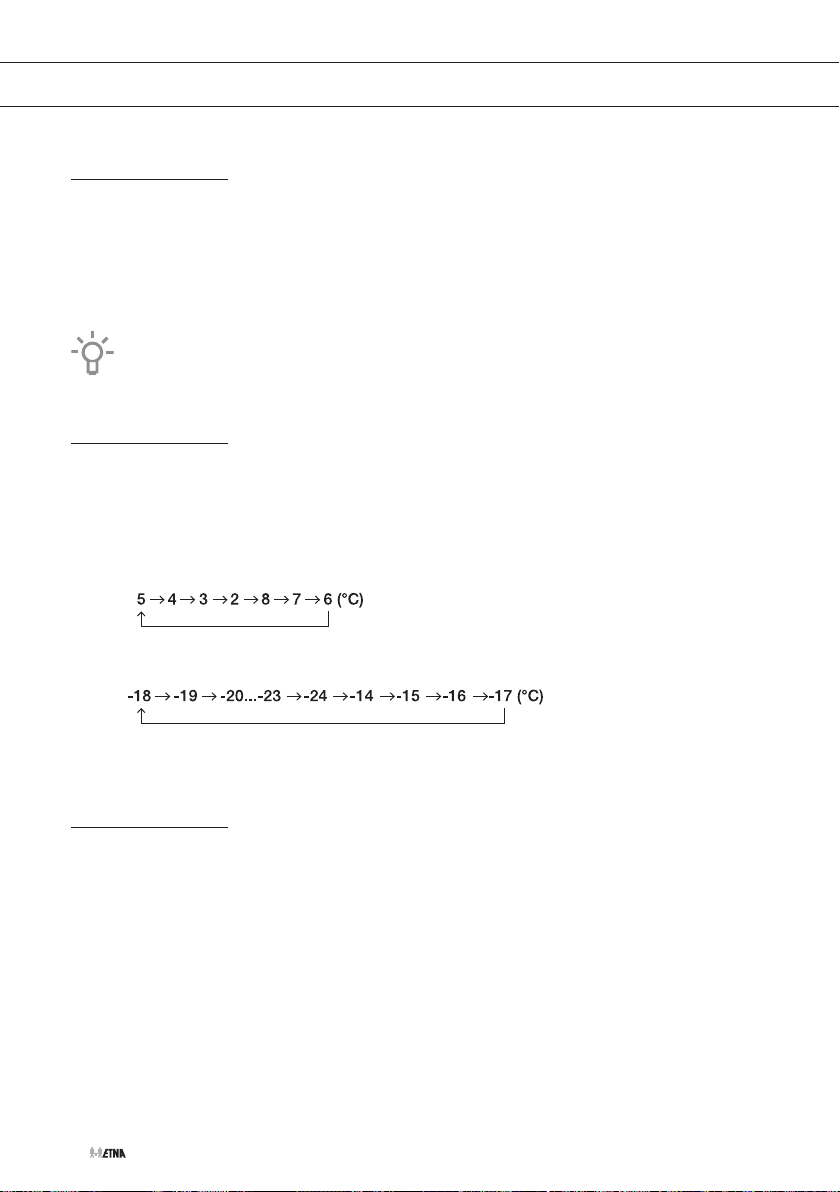
UTILISATION DE L’APPAREIL
Sécurité enfants
Cette fonction est utilisée pour empêcher tout ajustement involontaire des réglages de l’appareil.
Toutes les touches sont verrouillées.
• Toutes les touches sont verrouillées lorsque le pictogramme de sécurité enfants est allumé.
• Une pression de 3 secondes sur la touche d’alarme/de sécurité enfants déverrouille les
touches.
Si aucune touche n’est activée, se verrouillera de nouveau après 20 secondes.
Réglage de la température
1. Déverrouillez le panneau de commande ; appuyez sur la touche d’alarme/de sécurité enfants
pendant 3 secondes.
2. Appuyez (plusieurs fois) sur la touche de réglage de la température (compartiment
réfrigération ou compartiment congélation) pour régler la température.
▷ La température du réfrigérateur sera réglée dans l’ordre suivant:
▷ La température du congélateur sera réglée dans l’ordre suivant :
Refroidissement rapide
Cet appareil possède une fonction de refroidissement rapide (intense). Cette fonction abaisse
la température dans le compartiment réfrigérateur le plus rapidement possible. Ce qui est idéal
pour refroidir des produits tout juste placés dans le réfrigérateur. Utilisez cette fonction lorsque
vous introduisez une grande quantité d’aliments dans l’appareil.
FR 18
Page 91
UTILISATION DE L’APPAREIL
Activation/désactivation de la fonction refroidissement rapide
1. Déverrouillez le panneau de commande ; appuyez sur la touche d’alarme/de sécurité enfants
pendant 3 secondes.
2. Appuyez sur la touche de réglage de la température (compartiment réfrigération) pendant
3 secondes, jusqu’à ce que le pictogramme de refroidissement rapide et la température 2 °C
s’allume.
▷ La fonction est activée.
3. Appuyez sur la touche de réglage de la température (compartiment réfrigération) pendant
3 secondes, jusqu’à ce que le pictogramme de refroidissement rapide ne soit plus allumée.
▷ La fonction est désactivée.
Si la fonction de refroidissement rapide n’est pas désactivée manuellement, elle le sera
automatiquement au bout de trois heures environ.
La sélection de la fonction ECO ou de la fonction vacances alors que la fonction de
refroidissement rapide est activée désactive immédiatement le refroidissement rapide.
Congélation rapide
Cet appareil possède une fonction de congélation rapide (intense). Cette fonction abaisse
la température dans le compartiment congélation le plus rapidement possible. Activez cette
fonction 24heures avant d’introduire une grande quantité d’aliments frais dans l’appareil.
Activation/désactivation de la fonction congélation rapide
1. Déverrouillez le panneau de commande ; appuyez sur la touche d’alarme/de sécurité enfants
pendant 3 secondes.
2. Appuyez sur la touche de réglage de la température (compartiment congélation) pendant
3 secondes, jusqu’à ce que le pictogramme de congélation rapide et la température -24 °C
s’allume.
▷ La fonction est activée.
3. Appuyez sur la touche de réglage de la température (compartiment congélation) pendant
3 secondes, jusqu’à ce que le pictogramme de congélation rapide ne soit plus allumée.
▷ La fonction est désactivée.
Si la fonction de congélation rapide n’est pas désactivée manuellement, elle le sera
automatiquement au bout de deux jours environ.
La sélection de la fonction ECO ou de la fonction vacances alors que la fonction de
congélation rapide est activée désactive immédiatement la congélation rapide.
FR 19
Page 92
UTILISATION DE L’APPAREIL
Fonction ECO
Cet appareil possède une fonction ECO. La fonction ECO n’est pas limitée dans le temps et reste
active jusqu’à sa désactivation.
Activation/désactivation de la fonction ECO
1. Déverrouillez le panneau de commande ; appuyez sur la touche d’alarme/de sécurité enfants
pendant 3 secondes.
2. Appuyez sur la touche ECO.
▷ Le pictogramme est éclairé.
▷ Les températures -17°C et 6°C sont affichées.
▷ La fonction est activée.
3. Appuyez sur la touche ECO.
▷ Le pictogramme s’éteint.
▷ La fonction est désactivée.
▷ La température reviendra au dernier réglage effectué.
La fonction ECO n’est pas adaptée à la congélation d’aliments frais ou à la fabrication de
glaçons.
Remarque!
L’activation de la fonction ECO désactive les fonctions de refroidissement rapide et de
congélation rapide.
FR 20
Lorsque la fonction ECO est activée, la durée de conservation des aliments peut être réduite.
N’activez pas la fonction ECO lors de la congélation d’aliments frais.
Le réglage de la température pendant que la fonction ECO est activée, désactivera
immédiatement la fonction ECO.
Page 93
UTILISATION DE L’APPAREIL
Fonction vacances
Cet appareil possède une fonction vacances. Si vous prévoyez de vous absenter pendant
une longue période, vous pouvez activer cette fonction. La température du réfrigérateur est
automatiquement réglée à 15 °C et la température du congélateur à -18 °C.
Ne conservez aucun aliment au réfrigérateur pendant cette période.
Activation/désactivation de la fonction vacances
1. Déverrouillez le panneau de commande ; appuyez sur la touche d’alarme/de sécurité enfants
pendant 3 secondes.
2. Appuyez sur la touche de fonction de vacances.
▷ Le pictogramme est éclairé.
▷ Les températures -18°C (compartiment congélateur) et ‘—’ (compartiment réfrigérateur)
sont affichées.
▷ La fonction est activée.
3. Appuyez sur la touche de fonction de vacances.
▷ Le pictogramme s’éteint.
▷ La fonction est désactivée.
Remarque!
L’activation de la fonction vacances désactive les fonctions de refroidissement rapide et
de congélation rapide.
Lorsque la fonction vacances est active, le distributeur de glace s’éteint
automatiquement.
Alarme d’ouverture de porte
Un signal d’alarme est émis et «dr» s’affiche à l’écran lorsque la porte d’un compartiment reste
ouverte trop longtemps.
Arrêt de l’alarme
1. Déverrouillez le panneau de commande ; appuyez sur la touche d’alarme/de sécurité enfants
pendant 3 secondes.
2. Appuyez de nouveau sur la touche d’alarme/de sécurité enfants.
▷ L’alarme cesse de retentir. Le pictogramme restera allumé.
La fermeture immédiate de la porte désactivera également l’alarme.
Si la porte est encore ouverte au bout de 10 minutes, l’alarme s’arrêtera
automatiquement.
FR 21
Page 94
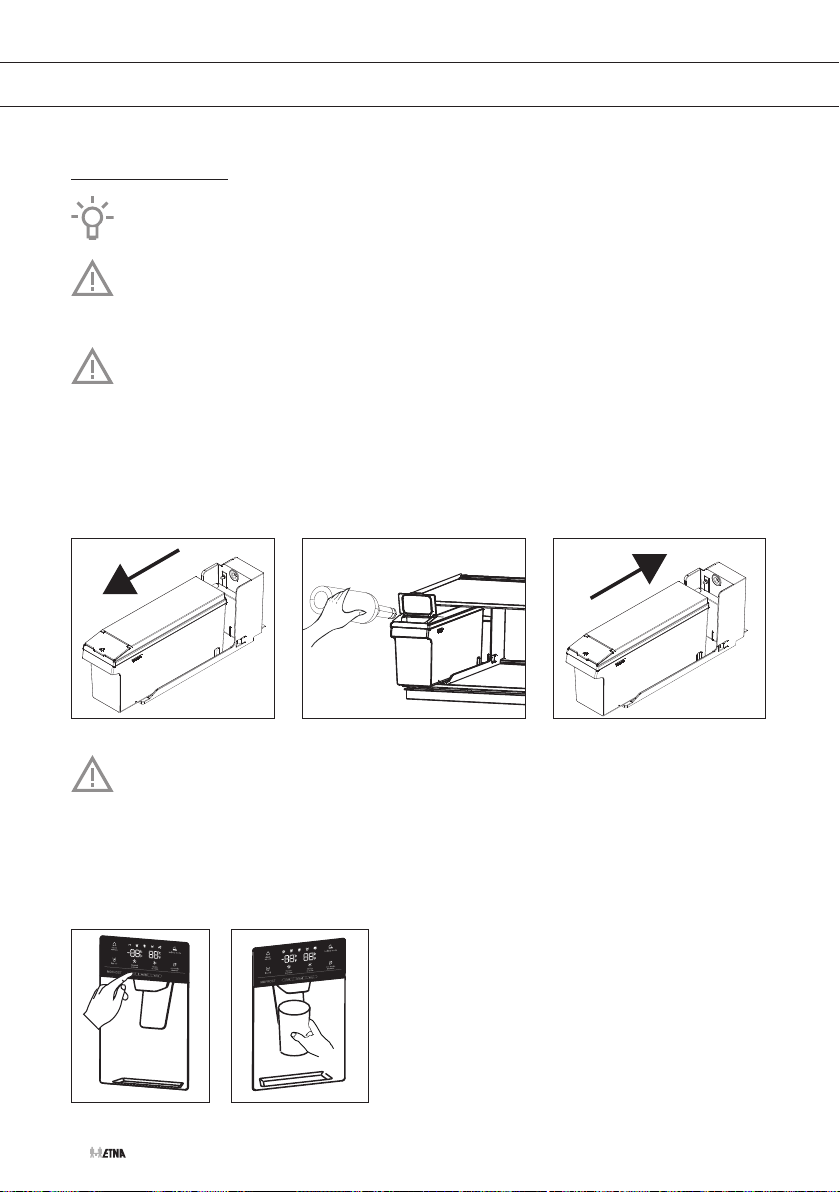
UTILISATION DE L’APPAREIL
Distributeur d’eau et de glace
Nettoyez le distributeur d’eau et de glace avant de l’utiliser pour la première fois (voir le
chapitre «Entretien»).
Si la sécurité enfants est activée ou si la porte est ouverte, le distributeur ne fonctionnera
pas.
Remarque
Si le pictogramme du réservoir d’eau est allumé, le réservoir d’eau n’a pas été positionné
correctement ou n’est pas présent du tout. Assurez-vous que le réservoir d’eau est
correctement positionné. Éteignez ensuite le pictogramme en appuyant sur la touche
ECO pendant 3 secondes.
1. Assurez-vous que le réservoir d’eau est correctement installé.
2. Remplissez le réservoir d’eau avec un max. de 4,5 litres d’eau.
Remplissez toujours le réservoir d’eau du robinet froide et propre, d’eau en bouteille non
gazeuse ou d’eau distillée propre à la consommation. N’utilisez pas d’eau chaude.
3. Appuyez sur la touche Water (eau), Crushed (glace pilée) ou Cubed (glaçons).
▷ Le pictogramme est éclairé.
4. Placez un verre sous le distributeur et appuyez délicatement sur la manette. Placez
correctement le verre sous le distributeur pour éviter toute projection d’eau ou de glace.
FR 22
Page 95
UTILISATION DE L’APPAREIL
Si vous appuyez sur la touche Cubed (glaçons) après avoir utilisé la touche Crushed
(glace pilée), une petite quantité de glace pilée restante peut tomber dans votre verre.
Si vous n’avez pas besoin de glace, vous pouvez éteindre la machine à glaçons pour
économiser de l’eau et de l’énergie.
Lorsque des glaçons tombent dans le réservoir, il est normal d’entendre des bruits.
Le premier lot de glaçons après l’installation peut être petit, car de l’air est entré dans
le tuyau d’eau. En utilisation normale, tout l’air est éliminé. Si les glaçons sont toujours
petits, vérifiez que l’eau circule dans le tuyau et que la pression de l’eau est élevée.
Si l’appareil est éteint trop longtemps, la glace du réservoir fond et l’eau s’écoule sur
le sol. Pour éviter cela, vous devez retirer toute la glace du réservoir (voir le chapitre
«Entretien»).
Si aucune glace ne sort du distributeur, vérifiez si de la glace est coincée dans la sortie
et retirez-la. Ou vérifiez si des glaçons sont agglutinés dans le réservoir et retirez-les (voir
le chapitre «Entretien»). En outre, si vous ne retirez pas de glace du distributeur pendant
une période prolongée, la glace du réservoir peut commencer à s’agglutiner.
N’utilisez pas le distributeur pour la distribution de glace pendant plus d’une minute à la
fois. Cela évite que le moteur de la machine à glaçons ne devienne trop chaud.
Éteindre la machine à glaçons
Si vous n’avez pas besoin de glace, vous pouvez éteindre la machine à glaçons pour
économiser de l’eau et de l’énergie.
1. Appuyez sur la touche de la machine à glaçons.
▷ Le pictogramme est éclairé.
▷ La machine à glaçons est éteinte.
Seule la machine à glaçons est éteinte; le distributeur délivre toujours de l’eau.
FR 23
Page 96
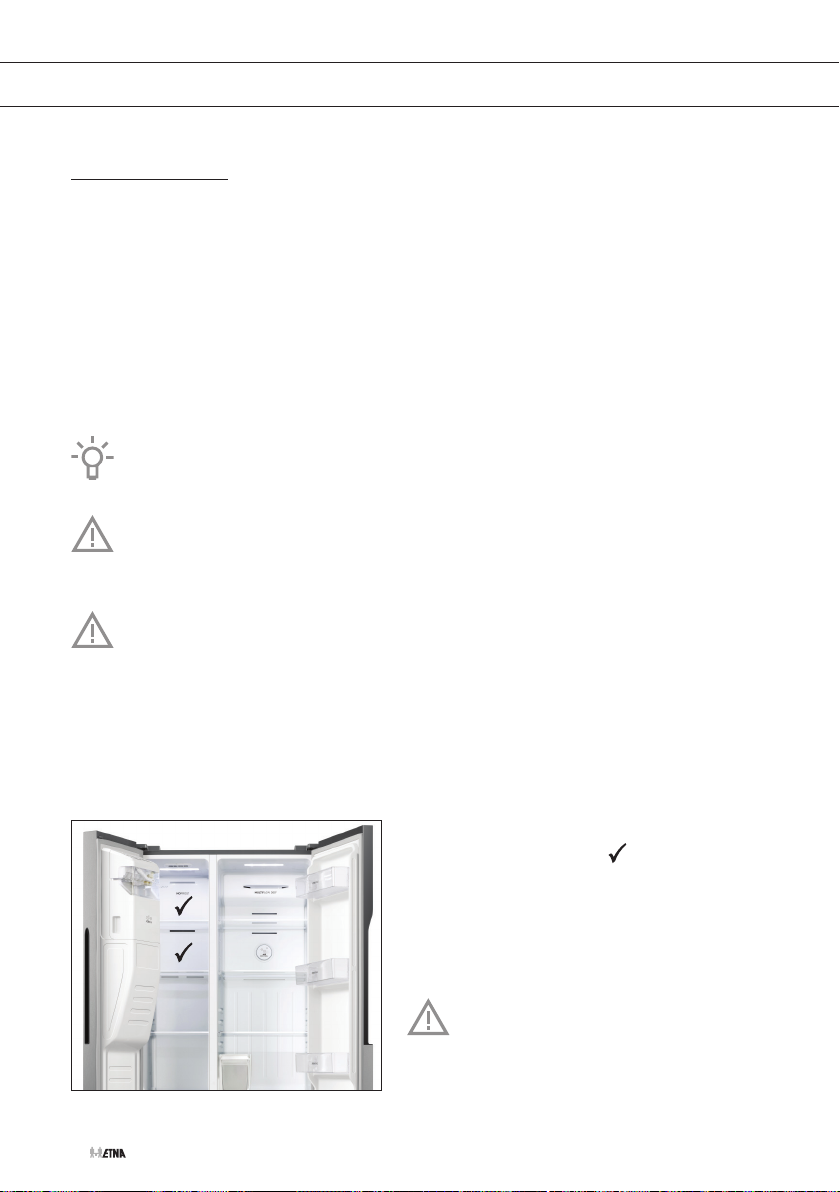
CONSERVATION ET CONGÉLATION D’ALIMENTS
Répartition recommandée
Sections du compartiment réfrigérateur
• Section du haut: conserves, pain, vin, pâtes etc.
• Section du milieu: produits laitiers, plats tout prêts, desserts, sodas, bière, aliments cuisinés etc.
• Section du bas: viande, charcuterie, produits laitiers
• Tiroir de légumes : légumes et fruits frais.
Sections de la porte du réfrigérateur
• Balconnet de porte du haut/milieu: œufs, beurre, fromage, sauces etc.
• Balconnet de porte du bas: boissons, canettes, bouteilles etc.
Conservez les aliments qui se gâtent rapidement à l’arrière de la clayette ou du tiroir à la
température la plus basse.
Veuillez noter que la conservation de légumes ayant une forte teneur en eau peut
provoquer de la condensation sur les plateaux en verre du bac à fruits et légumes; cela
n’affectera pas le bon fonctionnement de l’appareil.
Ne conservez pas les fruits (bananes, ananas, papayes, agrumes) et les légumes
(courgettes, tomates, aubergines, concombres, poivrons et pommes de terre) sensibles
aux basses températures dans le réfrigérateur.
Sections du compartiment congélation
• Section du haut : restes, glace, pizza.
• Section du milieu : viande, poisson, pain.
• Section du bas : congélateur standard, légumes et fruits.
FR 24
Les zones optimales pour congeler les aliments
frais sont indiquées par une .
Ne stockez pas la laitue, les œufs, les
pommes, les poires, le raisin, les pêches,
le yaourt, le babeurre, la crème aigre ou la
mayonnaise dans le congélateur.
Page 97
CONSERVATION ET CONGÉLATION D’ALIMENTS
Éviter la contamination des aliments
Pour éviter la contamination des aliments, veuillez respecter les instructions suivantes :
• L’ouverture de la porte pendant de longues périodes peut provoquer une augmentation
significative de la température dans les compartiments de l’appareil.
• Nettoyer régulièrement les surfaces qui peuvent entrer en contact avec les aliments et les
systèmes de drainage accessibles.
• Conservez la viande et le poisson crus dans des contenants appropriés au réfrigérateur, de
façon à ce qu’ils ne soient pas en contact avec d’autres aliments ou ne s’égouttent pas sur
eux.
• Si l’appareil frigorifique est laissé vide pendant de longues périodes, éteignez-le, dégivrez-le,
nettoyez-le et laissez la porte ouverte pour éviter l’apparition de moisissures dans l’appareil.
Conservation d’aliments frais dans le réfrigérateur
Recommandations importantes pour la conservation d’aliments frais
• Pour garantir la qualité des aliments frais, il est important que :
▷ les aliments soient bien emballés,
▷ la température de l’appareil soit adéquate,
▷ l’appareil soit propre.
• Tenez compte de la date de péremption indiquée sur l’emballage des aliments.
• Conservez les aliments dans des récipients ou des emballages hermétiques adaptés pour
la réfrigération. Cela évitera que les aliments prennent du goût ou donnent des odeurs et les
gardera au sec.
• N’entreposez pas de matières inflammables, instables ou explosives dans le réfrigérateur.
• Stockez les bouteilles ouvertes debout et assurez-vous qu’elles sont bien fermées.
• Certaines solutions organiques, telles que les huiles essentielles contenues dans la peau
des citrons et oranges, et l’acide butyrique qui sont en contact prolongé avec les plastiques
peuvent avoir un effet corrosif sur le matériau et provoquer un vieillissement prématuré.
• Une odeur désagréable est une indication que l’appareil n’est pas propre et contient des
aliments gâtés (voir le chapitre «Entretien»).
• Sortez les aliments périssables du réfrigérateur lorsque vous vous absentez de votre domicile
pendant une durée prolongée.
FR 25
Page 98
CONSERVATION ET CONGÉLATION D’ALIMENTS
Congélation et stockage des aliments dans le congélateur
Recommandations importantes pour la congélation d’aliments frais
• La quantité maximale d’aliments que vous pouvez introduire en même temps dans le
congélateur est indiquée sur la plaque signalétique. Au-delà de cette quantité, le processus
de congélation est ralenti et la qualité des aliments est moindre. Qui plus est, la qualité des
aliments déjà stockés dans le congélateur sera dégradée.
• Utilisez uniquement des aliments frais de bonne qualité adaptés pour la congélation.
• Faites refroidir les aliments chauds à température ambiante.
• Il est important que les aliments soient congelés rapidement. Nous vous recommandons
d’utiliser des contenants de petite taille.
• Utilisez des contenants hermétiques et étanches pour éviter le dessèchement des aliments et
la perte vitaminique.
• Notez le type et la quantité d’aliments sur le contenant ainsi que la date de congélation.
• Évitez tout contact entre les aliments frais et les aliments congelés.
• Vous pouvez retirer tous les tiroirs afin d’utiliser le volume total du compartiment congélation.
Placez les aliments directement sur une clayette et tout en bas du congélateur.
Congélation de petites quantités d’aliments frais / fabrication de glaçons
Voir le chapitre « Répartition recommandée » pour en savoir plus sur les zones optimales pour
congeler des aliments frais (1 à 2 kg) et faire des glaçons.
Congélation de grandes quantités d’aliments frais
• Activez la fonction de congélation rapide 24 heures avant de congeler les aliments.
• Répartissez les aliments frais de manière égale dans tous les tiroirs du compartiment
congélation.
• Au bout de 24 heures, vous pourrez transférer les aliments dans une autre zone du
congélateur, puis congeler un nouveau lot d’aliments frais.
Recommandations importantes pour le stockage d’aliments congelés
• Respectez les instructions du fabricant pour le stockage et l’utilisation d’aliments congelés.
Tenez compte de la température de stockage recommandée et de la date de péremption
indiquée sur l’emballage.
• Utilisez uniquement des aliments dont l’emballage n’a pas subi de dommages et qui ont été
stockés à une température de -18°C ou inférieure.
• N’achetez pas d’aliments couverts de givre. Cela indique que les aliments ont décongelé ou
partiellement décongelé à plusieurs reprises et, par conséquent, sont de qualité médiocre.
• Assurez-vous que les aliments congelés ne décongèlent pas durant le transport. Une
augmentation de leur température raccourcira leur durée de conservation et nuira à leur
qualité.
FR 26
Page 99
CONSERVATION ET CONGÉLATION D’ALIMENTS
Durée recommandée pour la conservation d’aliments congelés dans le
congélateur
Type d’aliments Durée de conservation
Fruits, bœuf 10 à 12 mois
Légumes, veau, volaille 8 à 10 mois
Chevreuil 6 à 8 mois
Porc 4 à 6 mois
Viande émincée ou hachée 4 mois
Pain, pâtes, plats cuisinés, poisson blanc 3 mois
Abats 2 mois
Saucisses fumées, poisson bleu 1 mois
Décongélation des aliments congelés
• La décongélation est une étape importante dans le stockage des aliments conservés par
congélation. Les aliments doivent décongeler de manière appropriée.
• Les méthodes de décongélation recommandées sont les suivantes :
▷ dans le réfrigérateur,
▷ dans de l’eau froide,
▷ dans un four à micro-ondes ou un four conventionnel possédant un programme de
décongélation adéquat.
• Certains produits congelés peuvent être préparés sans décongélation préalable. Le
producteur l’indiquera sur l’emballage.
• Les aliments doivent être emballés en petites portions. Ainsi, ils décongèlent plus
rapidement.
• Utilisez les aliments complètement ou partiellement décongelés le plus rapidement possible.
Les bactéries présentes dans les aliments décongelés sont réactivées et les aliments se
gâtent rapidement. C’est notamment le cas des fruits, légumes et plats tout prêts.
• Ne recongelez pas des aliments partiellement ou complètement décongelés.
FR 27
Page 100
ENTRETIEN
Dégivrage de l’appareil
Dégivrage automatique du compartiment réfrigérateur
Le compartiment réfrigérateur dégivre automatiquement de temps en temps.
Dégivrage du congélateur NoFrost
Le congélateur NoFrost se dégivre automatiquement. Tout dépôt de givre est alors éliminé.
Tout dépôt de glace ou de givre se formant néanmoins dans le compartiment congélation
peut résulter d’un usage anormal de l’appareil (ouverture de la porte trop fréquemment ou trop
longtemps, ou mauvaise fermeture de la porte, etc.). Il faut alors procéder à un dégivrage manuel
du congélateur.
Éteignez l’appareil en cas de formation de glace excessive. Enlevez les aliments du
congélateur et protégez-les afin d’éviter leur décongélation partielle ou totale. Nettoyez
et séchez l’intérieur du congélateur. Allumez l’appareil et réglez la température requise
avant de remettre les aliments au congélateur.
Nettoyage de l’appareil
Éteignez l’appareil et retirez la fiche de la prise murale avant d’entreprendre le nettoyage.
N’utilisez pas de détergents abrasifs, car ils peuvent endommager la surface.
Activez la fonction de congélation rapide 24 heures avant de nettoyer le congélateur.
• Pendant le nettoyage, les aliments congelés doivent être emballés dans plusieurs couches
de papier et conservés dans un endroit froid. La hausse inévitable de la température
raccourcira leur durée de conservation.
Ne pas oublier d’utiliser ces aliments dans une période de temps relativement courte.
• Nettoyez l’intérieur de l’appareil régulièrement avec de l’eau tiède. Ajoutez au besoin un
produit nettoyant neutre ou spécial congélateur dans l’eau. Nettoyez toutes les surfaces
avec un chiffon doux. Essuyez les parties nettoyées avec un chiffon imbibé d’eau claire, puis
séchez-les soigneusement.
• Ne passez pas une quelconque partie du congélateur au lave-vaisselle. Cela pourrait
l’endommager.
FR 28
 Loading...