


P300 Quick Start Guide
PACKAGE CONTENTS_________________________________________3
APPEARANCES______________________________________________4
P300 Front ______________________________________________4 P300B Front _____________________________________________5 Top ____________________________________________________6 Bottom _________________________________________________6 Back ___________________________________________________7
USE FOR THE FIRST TIME _____________________________________8
Charging and Power Supply ________________________________8 Replacing Battery_________________________________________9 Power __________________________________________________10 Backlight________________________________________________10 Screen Alignment _________________________________________11 Turn on Screen ___________________________________________11
POWER ON AND OFF _________________________________________11
Sleep Mode ______________________________________________11 Reboot__________________________________________________12
DIGITAL CAMERA USE _____________________________________13 CELL PHONE USE ___________________________________________14
Turn the Phone On and Off _________________________________15
MICROSOFT ACTIVESYNC _____________________________________16
USB Cradle Installation ____________________________________16
Installing and Using ActiveSync______________________________17
1

CONNECT TO THE INTERNET ___________________________________18
Configure GPRS Connection ________________________________18 Start GPRS Connection ____________________________________20 Disconnect GPRS _________________________________________20
WIRELESS COMMUNICATION TOOLS _____________________________21
Pocket IE _______________________________________________21 Inbox___________________________________________________22
Setting up E-mail Service_________________________________23 Using E-mail and Mobile Phone Messages ___________________24
MSN Messenger __________________________________________27
Setting Up_____________________________________________27 Chatting with Contacts ___________________________________28 COMPANION PROGRAMS ______________________________________29
Pocket Word _____________________________________________29 Pocket Excel _____________________________________________30 Media Player ____________________________________________31
BLUETOOTH WIRELESS TRANSMISSION ________________________32
Bluetooth Connection Function Setup _________________________33 Pair____________________________________________________34 Serial Port ______________________________________________35 Bluetooth Headset ________________________________________36
FAQ _____________________________________________________37  In this guide, the sections marked with “ ” indicate that whether the
features described here are supported or not depends on the actual product specifications.
2

Thank you very much for purchasing this product. This document mainly provides you with the references needed when you use this product for the first time. Meanwhile, hardware descriptions will also help you to get familiar with every basic function quickly.
Package Contents
Pocket PC, stylus, USB cradle, USB cable, AC adapter, headset, companion CD, leather case, and user manual.


Pocket PC Headset USB cable AC adapterUSB cradle (supporting backboard installed)
USB cradle (supporting backboard folded down)
 When this product was shipped, the charger’s supporting backboard and cradle were packaged separately. After opening the package, please install backboard into the locking pawl on the cradle as shown in figure . When Charger and USB cradle is not in use or when you need to carry it around, you can fold down the backboard as shown in figure .
3
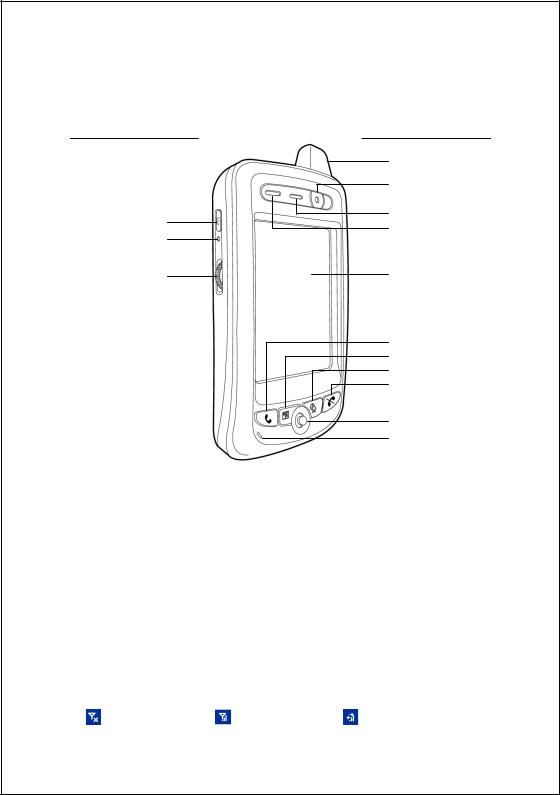
Appearances
P300 Front
1
2
3
4
5
6
7
8
9
10
11
1 Antenna |
2 Built-in Digital Camera Lens |
|||
3 Speaker |
4 Indicator |
|
||
5 Touch Panel |
6 Send Button |
|
||
7 “Contact” Hot Key |
8 “Today Screen” Hot Key |
|||
9 End Button |
10 |
Joystick, controlling browsing direction. |
||
|
|
|
Pressing down joystick directly will |
|
|
|
|
make it function as an “Action” key. |
|
|
|
|
(such as camera shutter ) |
|
11 Microphone |
12 |
Depending on the program that is |
||
|
|
|
running at the time, it can be used to |
|
|
|
|
adjust the volume or as a windows |
|
|
|
|
scrolling button. |
|
13 Reset Button |
14 |
Power Button |
|
|
|
Status icons on the navigation bar: |
|
||
|
|
|||
|
Cell Phone Off |
Cell Phone On |
GPRS is Online |
|
4
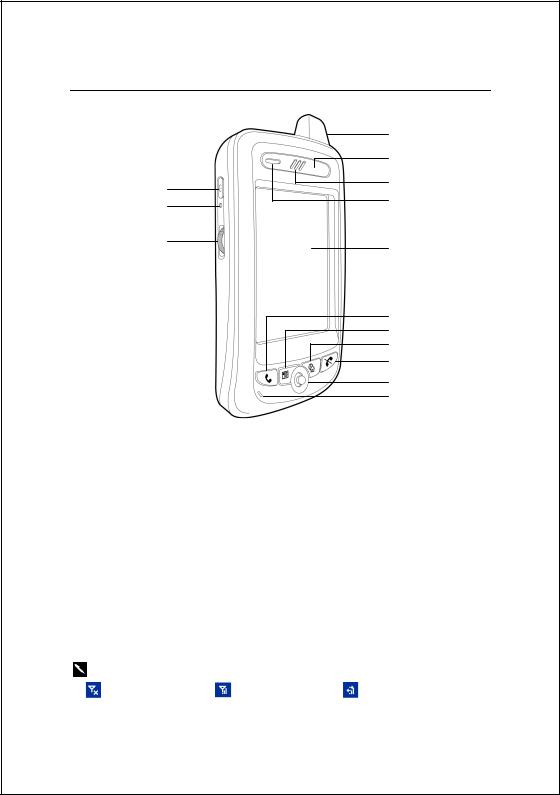
P300B Front
14
13
12
1 Antenna
3 Speaker
5 Touch Panel
7 “Contact” Hot Key
9 End Button
11 Microphone
13 Reset Button
1
2
3
4
5
6
7
8
9
10
11
2 Bluetooth Indicator
4 Indicator
6 Send Button
8 “Today Screen” Hot Key
10Joystick, controlling browsing direction. Pressing down joystick directly will make it function as an “Action” key.
12Depending on the program that is running at the time, it can be used to adjust the volume or as a windows scrolling button.
14 Power Button
Status icons on the navigation bar: |
|
|
Cell Phone Off |
Cell Phone On |
GPRS is Online |
5
Top
1 |
Headset Jack |
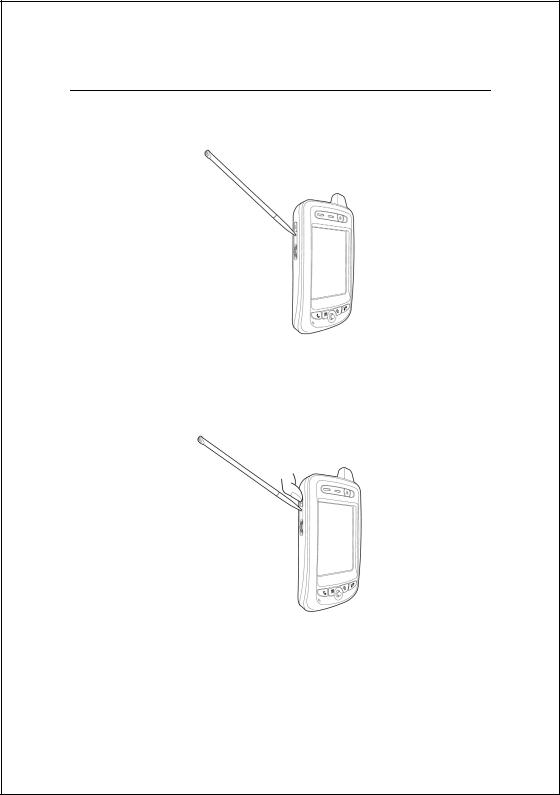
2 Infrared Port |
||||
3 |
Stylus slot, pull to take out stylus. |
|||||
|
|
|
1 |
2 |
|
3 |
|
|
|
|
|
|
|
|
|
|
|
|
||
|
|
|
|
|
|
|
|
|
|
|
|
|
|
Bottom
1 Cradle connection port |
2 SD/MMC card slot |
1
2
6
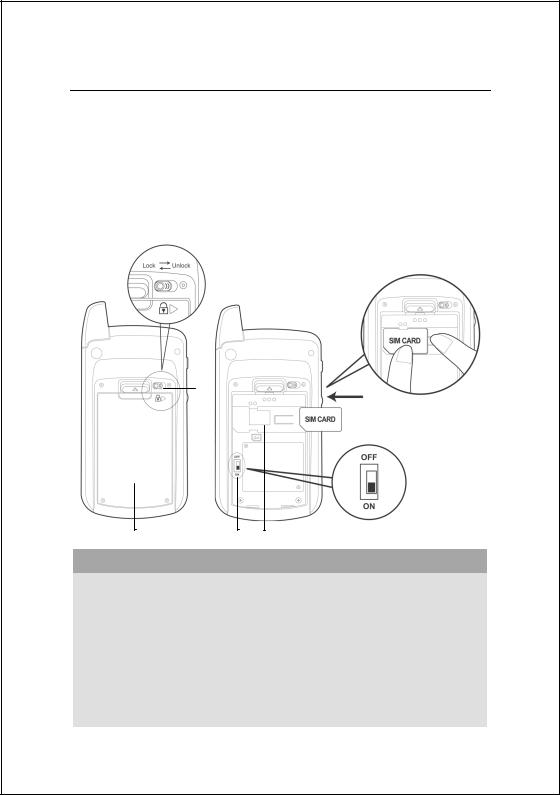
Back
1Main battery lock, follow the illustrations on Pocket PC to use.
3Back-up power switch, follow the illustrations on Pocket PC to use.
2Main battery. Merchandise label on the top of battery cover.
4SIM card slot, follow the illustrations indicated on Pocket PC to use.
5To remove SIM card: use one hand to press down locking pawl, use the other hand to push SIM card.
1
 5
5
23 4
Please note carefully!
1.You need to turn on back-up power switch when you use this Pocket PC the first time. When back-up power switch is set to “ON”, the system operation will temporarily rely on back-up battery to supply its power if you need to pull out or replace main battery. Back-up battery is charged by main battery.
2.If back-up power switch is set to “OFF”, the back-up battery will not function. Once the main battery is taken out, the Pocket PC will only retain Microsoft Windows and manufacture’s pre-installed programs. Any other data input, programs newly installed, and customised settings setup by you will be lost.
7
Use for the First Time
Charging and Power Supply
Please note carefully!
Manufacturer’s Instructions: Don’t recharge the battery under a
temperature higher than 45ºC and don’t store or use it under a temperature
higher than 60ºC; otherwise, expansion or leakage of the battery may
occur.
USB port: use the USB cable comes with this product to connect to the PC
USB host port: can be used with common retail mice and USB thumb drives. This function is only available for P300.
Power Jack |
|
|
|
|
|
|
|
|
|
||||
|
|
|
|
|
|
|
|
|
|
|
|
|
|
1.Unlock main battery lock and release the main battery. (If you just unpack the package, please omit this step. Main battery and Pocket PC are packed separately when the phone was shipped.)
2.Use stylus to set back-up power switch on the back of the Pocket PC to be On. We remind you that, you only need to turn on back-up power switch when you use this Pocket PC for the first time. You will not need to touch this switch again in any other situation.
3.Install the main battery and lock the main battery lock.
8

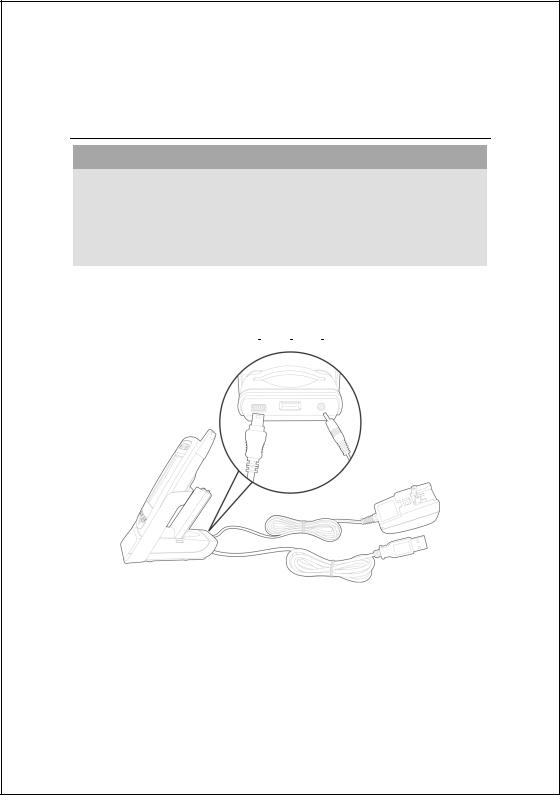
4.Plug the AC adapter’s (specifically for this product) round connector into the power jack located in the back of the charging cradle. Then plug the other end of the AC adapter into a normal home-use wall outlet. The Pocket PC will then start charging automatically.
5.Cold Boot: Use one finger to press and hold the “Power” button on the top of the Pocket PC, meanwhile, use the tip of the stylus to press down the “Reset” button located on the left side of the Pocket PC. Then release the “Power” button and the “Reset” button simultaneously. After rebooting, follow the instructions on the screen to finish screen alignment…etc, tasks.
6.A brand new Pocket PC takes approximately 8 hours to be fully charged. It takes about 3 hours to be charged in full thereafter. After charging is finished, you can then unplug the AC adapter and carry around the Pocket PC freely. Please charge the Pocket PC regularity in the future to keep the Pocket PC functioning smoothly.
7.“Indicator on the top left of this Pocket PC” will indicate charging or various other functions in-use.
Charging |
Charging is Finished |
Low Power |
|
|
|
Red light glows |
Red light off |
Red light blinks |
|
|
|
Cell phone on |
Reminder or warning |
|
|
|
|
Green light blinks |
Orange light blinks quickly |
|
|
|
|
 If secondary main battery is purchased, it can be charged by plugging in the charging slot located on the back of the charging cradle. “Indicator on the side of the charging cradle” will indicate the charging status.
Charging |
Charging is Finished |
No Battery |
|
|
|
Red light glows |
Green light glows |
Indicator off |
|
|
|
Replacing Battery
1.If cell phone or GPRS connecting fuction has been turned on, you should turn them off first before going on to the next step. Otherwise, the connection will be shut down improperly.
2.Unlock the main battery lock located on the back of this Pocket PC and take out the battery.
3.Replace the main battery and lock the main battery lock. When the main battery is taken out, system power will be supplied temporarily by back-up battery. However, if you do not install the main battery back within 1 minute, data will be lost.
4.Remember to press the “Power” button to turn on the screen. Otherwise, the Pocket PC will be supplied by the back-up battery continuously and data may lose when the back-up battery is exhausted.
9
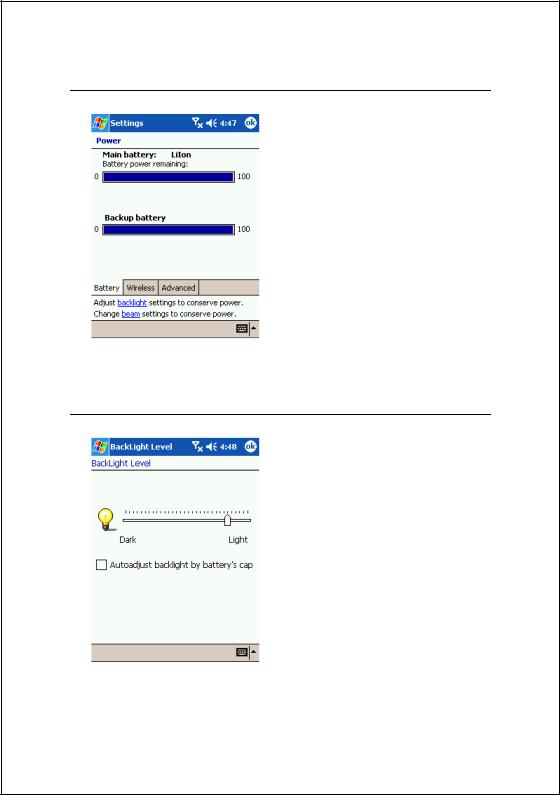
Power
1. You can tap on  and then
Settings. On the System tab, tap
Power to check the power status and configure power related settings.
2. Advanced tab: to configure automatic shutdown when the Pocket PC is in stand-by for a certain duration.
Backlight
1. If backlight is desired, tap on  ,
,
Settings, System tab, and then
Backlight.
2. Tap on  , Settings, System tab, and then Backlight Control to adjust the backlight brightness level.
10
Screen Alignment
When you use this Pocket PC for the first time or cold-boot it, system will require you to do screen alignment. When the Pocket PC doesn’t respond properly to screen taps, you can also redo screen positioning by following the instructions in this section.
1.Tap on  and then Settings. On the
System tab, tap Screen to align the screen.
2.Tap on the “Align Screen” button. When the screen adjustment window appears, use stylus to tap the center of the cross (+) until the next cross appears. Please follow the instructions on screen to finish the rest of the operations. Tap “ok” button to exit.
Turn on Screen
This product is designed to provide you with power-save functions. When the screen is off, you can turn the screen back on by pressing the “Power” button on the left side of the Pocket PC.
Power On and Off
Sleep Mode
1.Press the “Power” button on the left side of the Pocket PC to enter Sleep mode. During the Sleep mode, screen is off and some peripherals will enter power-save mode. But if the cell phone is already turned on, it will remain on stand-by status.
2.Press the “Power” button again to turn the screen back on.
 You can also tap on
  and then Settings. On the System tab, tap Power and then Advance tab to configure “automatically turn off the device” when the Pocket PC is in stand-by for a certain duration.
11
Reboot
Warm-boot (Reset): Use the tip of the stylus to press down the “Reset” button located on the left side of the Pocket PC.
Cold-boot: Use one finger to press and hold the “Power” button on the top of the Pocket PC, meanwhile, use the tip of the stylus to press down the “Reset” button located on the left side of the Pocket PC. Then release the “Power” button and the “Reset” button simultaneously. After rebooting, follow the instructions on the screen to finish screen alignment…etc, tasks.
12
 Loading...