


GGPPSS PPoocckkeett PPCC PPhhoonnee UUsseerr MMaannuuaal
l
Safety Instructions
Please Read Before Proceeding.
U
Avoid heavily pressing on the touch screen.
U
Avoid heavily pressing on the touch screen with the stylus or your fingers.
U
This product is not charged when shipped from the factory. When you use
U
this product the first time, we recommend that you install the battery as
illustrated and fully charge it for about 8 hours before use.
Do not remove the battery while charging.
U
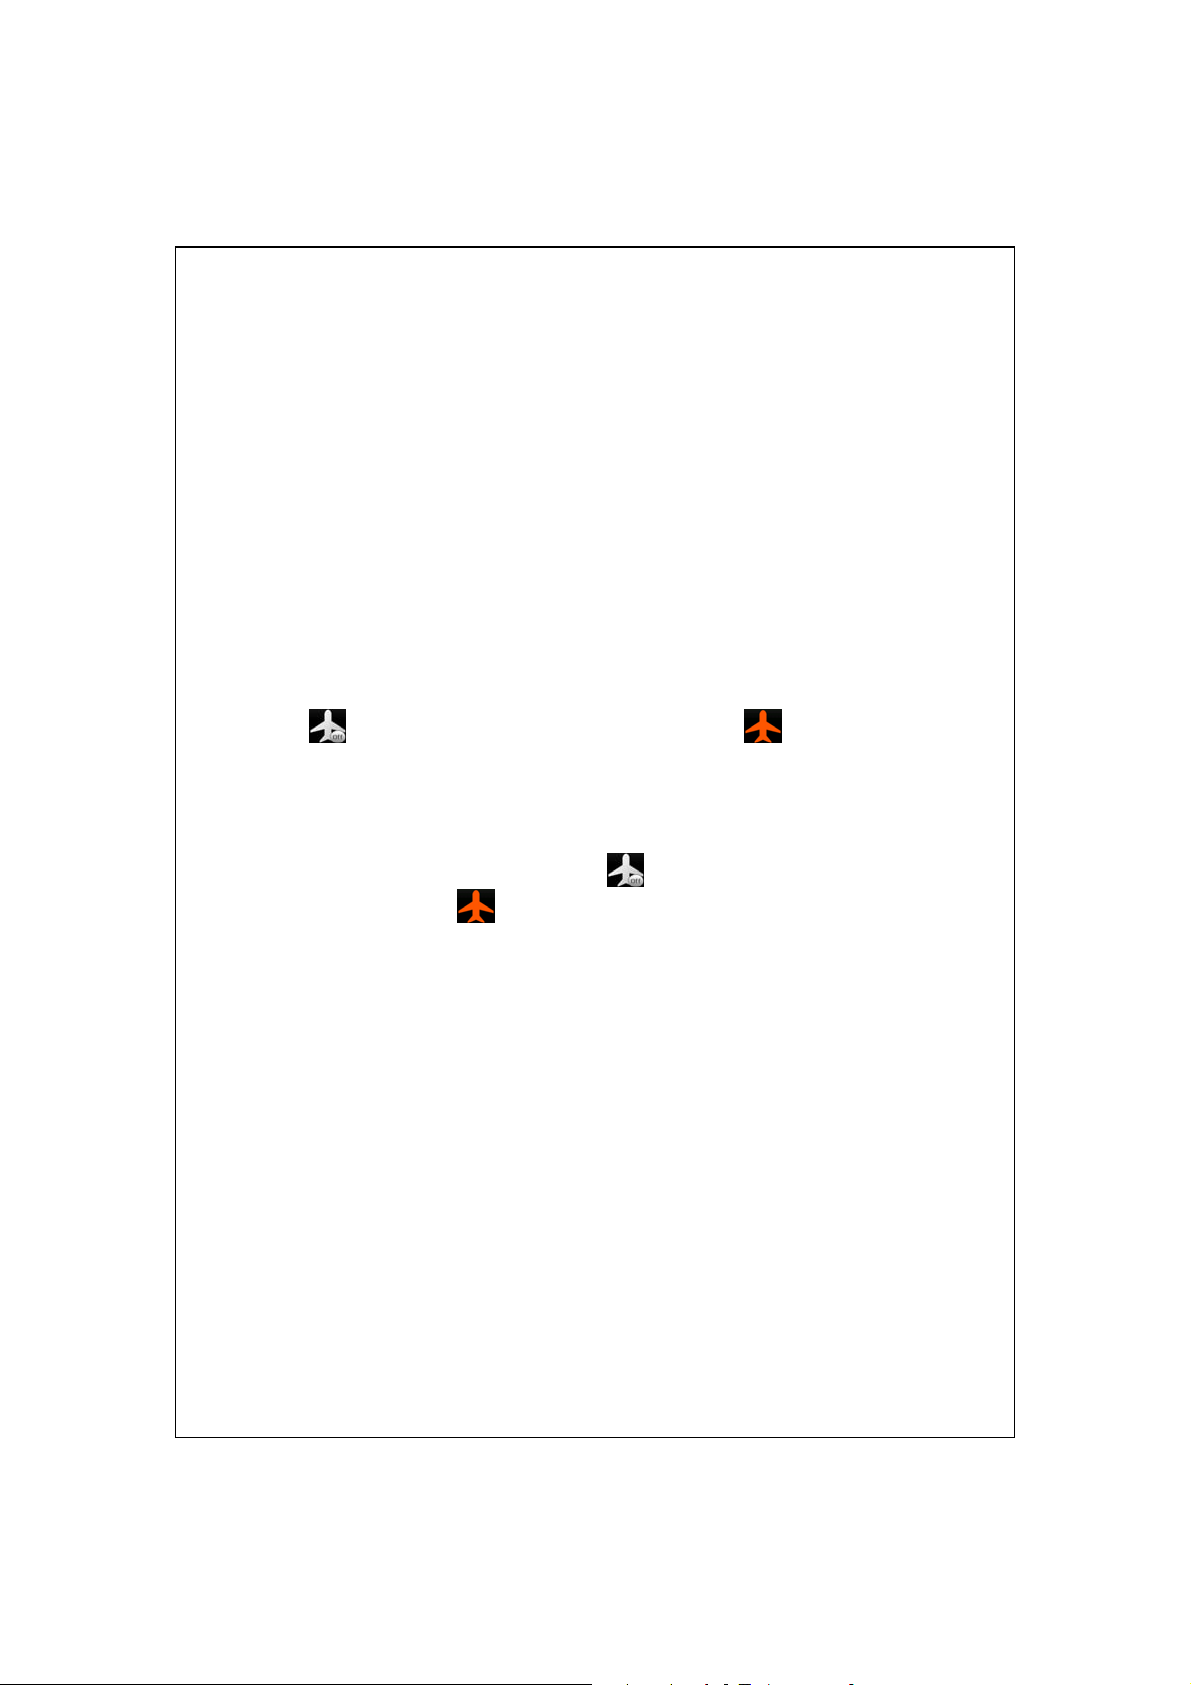
Before installing the SIM card, launch
U
button. When the color of the icon turns orange , this indicates
that the wireless connection of the Pocket PC is disabled.
When aboard an aircraft, at a medical facility, or at the gas pump where
U
wireless communication devices are prohibited, please launch the
Wireless Manager
icon turns orange
connection of the Pocket PC is disabled.
In case the Pocket PC is damaged, send it back to the dealer for repair. Do
U
not attempt to disassemble the Pocket PC on your own; otherwise the
warranty will be void.
and then tap the
, the Flight Mode is activated and the wireless
Wireless Manager
button. When the color of the
, then tap the
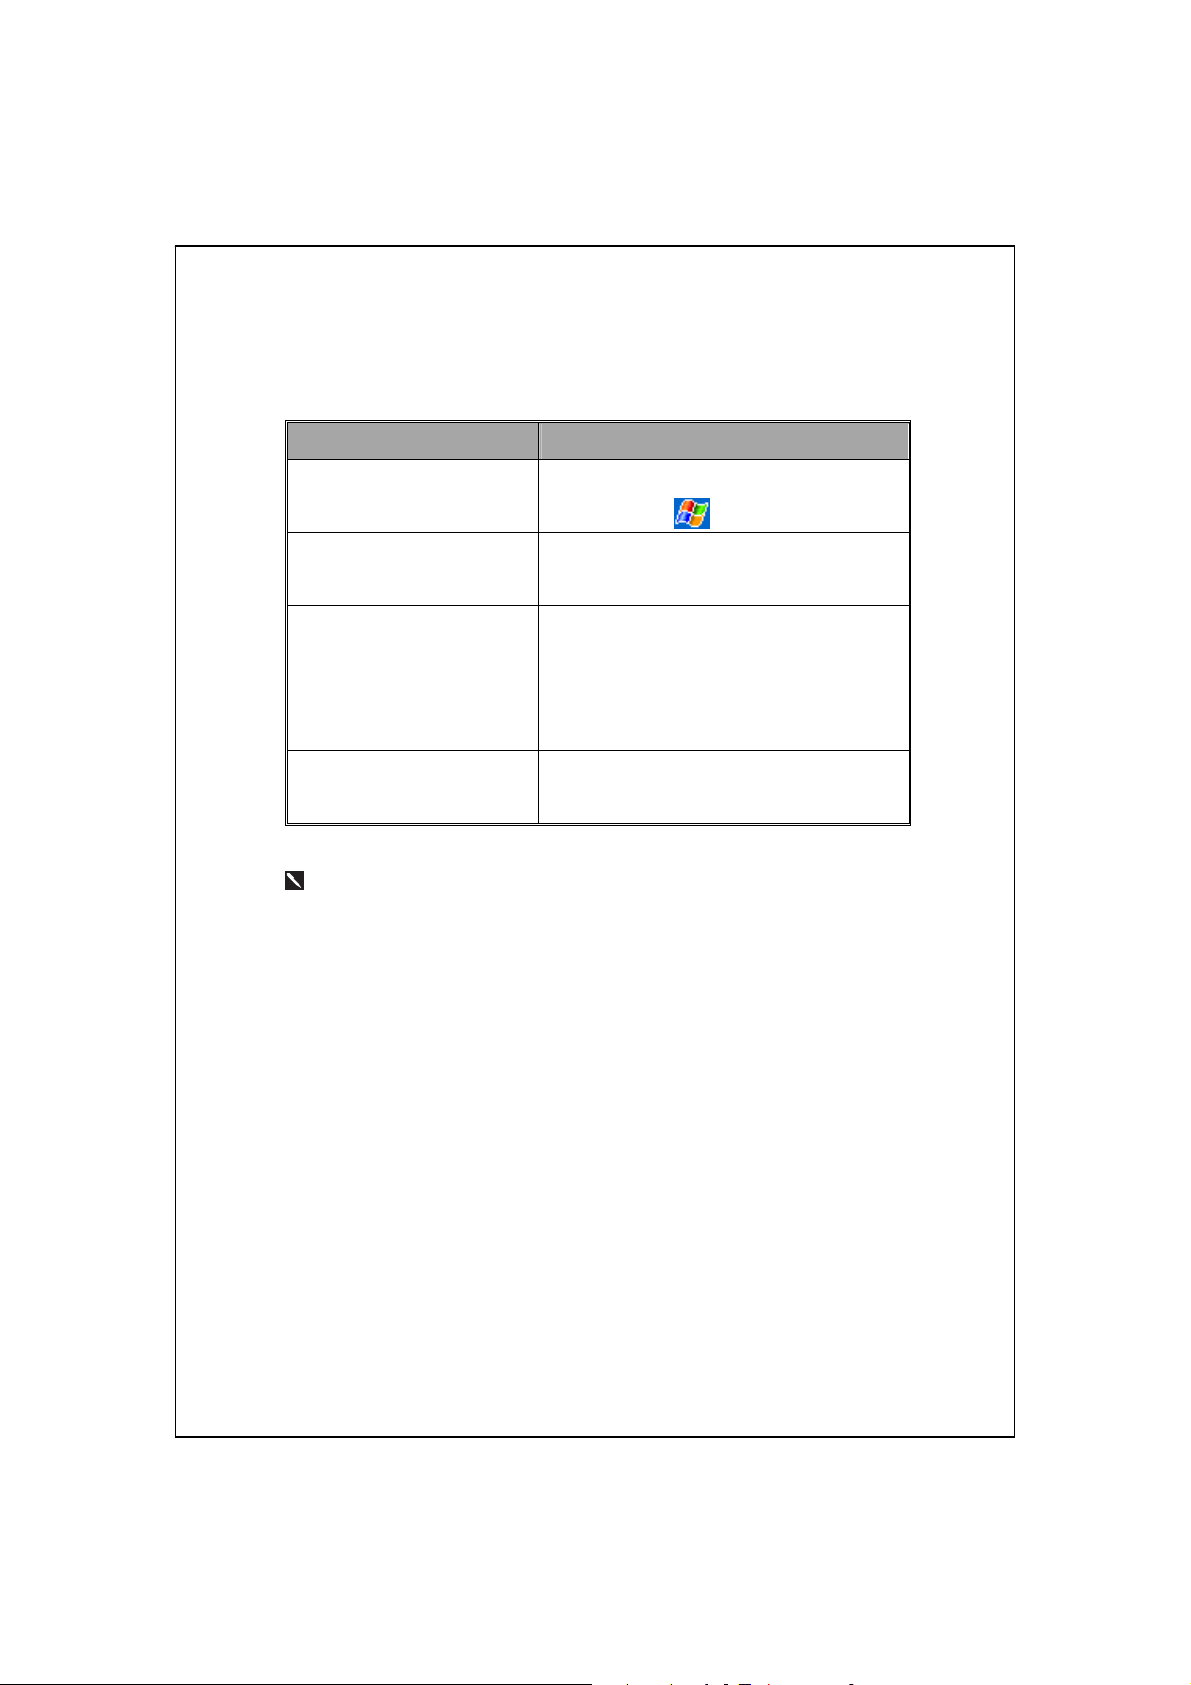
Where to Find Information
For information on: See this source:
Programs on your Pocket PC This User’s Guide and Pocket PC Help. To
view Help, tap
Additional programs that can
be installed on the Pocket PC
Connecting to and
synchronizing with a desktop
computer
Up-to-date information on
your Pocket PC
This document lists the functions, specifications, and illustrations for
reference only. The actual purchased product should be taken as the
standard. Supported features for this product is subject to version
differences. We reserve the right to make modifications to the features and
contents contained in the instruction manual and the product.
The Pocket PC Getting Started CD.
Check the user’s guide that comes with this
product or look for the online help relevant
to synchronization tools on the desktop PC
or the Pocket PC.
http://www.microsoft.com/windowsmobile/
and then Help.

Trademarks
Trademarks and names of products contained in this manual are the
properties respective registered companies.
Java and other Java related trademarks are the registered
trademarks of Sun Microsystems, Inc.
Digital Rights Management
This product supports Digital Rights Management (DRM) technologies.

UUsseerr MMaannuuaall
AFETY INSTRUCTIONS
S
HERE TO FIND INFORMATION
W
RADEMARKS
T
IGITAL RIGHTS MANAGEMENT
D
Getting Started /......................................................................1-1
1
ACKAGE CONTENT
P
XTERNAL VIEWS
E
QWERTY Keyboard......................................................................1-4
Hardware Hotkey Functions........................................................1-4
SING THE POCKET PC FOR THE FIRST TIME
U
Get your Pocket PC ready to go...................................................1-6
Charging Power and Power Supply.............................................1-7
...................................................................................... 4
........................................................................ 2
............................................................ 3
.......................................................... 4
..........................................................................1-1
.............................................................................1-2
....................................1-6
Re-installation or Replacing the Battery......................................1-9
OWER ON AND OFF
P
Power Off Mode.........................................................................1-10
Sleep Mode................................................................................. 1-11
Turn on the Screen.....................................................................1-12
Restarting the Pocket PC........................................................... 1-13
Reset.......................................................................................1-14
Default Settings......................................................................1-15
Clean Boot ............................................................................. 1-16
.......................................................................1-10
X-1

Using the Pocket PC /..............................................................2-1
2
TART
S
...............................................................................................2-1
Screen...........................................................................................2-1
Today Scree n................................................................................2-3
Programs......................................................................................2-6
System Application Programs......................................................2-9
PB MOBILE SHELL
S
Configure Your Spb Mobile Shell ...............................................2-14
IRELESS MANAGER
W
UICKBAR
Q
M-D
NTER INFORMATI ON ON YOUR POCKET
E
Using QWERTY Keyboard .........................................................2-23
Enter Text Using the Input Panel ...............................................2-27
......................................................................................2-19
ESK
..........................................................................................2-20
Type with the Soft Keyboard .................................................2-29
Use Letter Recognizer............................................................2-29
Use Block Recognizer............................................................2-29
Use Transcriber......................................................................2-30
Select T yped Text...................................................................2-30
........................................................................2-12
......................................................................2-16
PC...................................2-22
X-2
Write on the Screen .................................................................... 2-31
Write on the Screen................................................................2-31
Select Writing.........................................................................2-32
Draw on the Screen....................................................................2-33
Create a Drawing ...................................................................2-33
Select a Drawing.................................................................... 2-34
Record a Message......................................................................2-34
Create a Recording................................................................. 2-35
Voice Commander ......................................................................2-36

Voice Command Satellite Navigation /..................................3-1
3
AVIGATION DEVICE INSTALLATION
N
AVIGATION SOFTWARE INSTALLATION
GPS N
ONDITIONS FOR USING
C
ATELLITE DATA UPDATE (NOT SUPPORTED IN
S
OCATION
L
GPS V
Using the Phone /.....................................................................4-1
4
SMS ................................................................................3-7
IEWER
....................................................................................3-9
GPS C
.................................................3-1
....................................3-2
AR NAVIG ATI ON
...............................3-2
USA) ....................... 3-4
NST ALLING AND REMOVING THE
I
SING THE PHONE
U
Adjusting the Phone Volume.........................................................4-4
URNING THE PHONE ON OR OFF AND MAKING CALLS
T
Video Call (Applies to M810)...................................................4-7
Toolbar.........................................................................................4-9
Call from Contacts..................................................................... 4-11
Call from Speed Dial (Applies to M750) ................................ 4-11
Call from the Call History..........................................................4-12
USTOMIZE YOUR PHONE
C
Add Ringtone..............................................................................4-14
HONE APPLICATION PROGRAMS
P
SIM Manager.............................................................................4-15
Standard Display....................................................................4-15
Full-Screen Display................................................................4-16
Copy Phonebook Information................................................4-17
SMS Management..................................................................4-18
............................................................................4-3
...............................................................4-13
ARD
SIM C
....................................................4-15
....................................4-2
.............................4-5
SIM Value Add Service...............................................................4-19
SMS Sender................................................................................ 4-20
X-3

Speed Dial..................................................................................4-21
Hot Key Switch......................................................................4-21
Frequently Dialed Screen.......................................................4-22
Index Dial...............................................................................4-23
Call Filter *................................................................................4-24
Customize Your Pocket PC /...................................................5-1
5
DJUSTING SETTINGS
A
OTIFICATIONS
N
OWER PREFERENCE SETTINGS
P
ACKLIGHT
B
ICROPHONE
M
EADSET VOLUME LIMITER
H
DJUST VOLUME
A
CENARIOS
S
ASK MANAGER
T
IND AND ORGANIZE INFORMATION
F
AVIGATION BAR AND COMMAND BAR
N
UP MENUS
POP-
EDEFINE HOT KEYS
R
......................................................................................5-4
....................................................................................5-5
.......................................................................................5-8
.......................................................................5-1
.................................................................................5-2
........................................................5-3
.............................................................5-6
..............................................................................5-7
...............................................................................5-9
...............................................5-10
..........................................5-11
................................................................................5-12
......................................................................5-13
X-4
Synchronization /.....................................................................6-1
6
INDOWS VISTA PART
W
INDOWS
W
NST ALLING AND USING ACTIVESYNC
I
FAQ About Synchronization.........................................................6-6
USB S
YNCHRONIZATION TOOL ON POCKET
S
YNCHRONIZING USING BLUETOOTH
S
XP/2000/98 P
YNCHRONIZATION
......................................................................6-1
ART
............................................................6-3
..............................................6-4
..................................................................6-6
PC.........................................6-9
..............................................6-10

Connections /...........................................................................7-1
7
ONNECTING TO THE INTERNET
C
........................................................7-1
Connection Wizard.......................................................................7-1
Setting the GPRS Connection.......................................................7-3
Starting GPRS Connection...........................................................7-5
Disconnecting GPRS....................................................................7-6
GPRS Settings.............................................................................. 7-7
Band Selection (Applies to M810)............................................7-8
SING BLUETOOTH
U
Setup the Bluetooth Connection.................................................7-10
NTERNET SHARING
I
INE TYPE
CSD L
ONNECTING WITH A PERSONAL COMPUTER
C
IRELESS
W
Using Wireless LAN /..............................................................8-1
8
ONNECTING TO WIRELESS
C
ONFIGURE YOUR WIRELESS NETWORK
C
WLAN Setup Scenarios ................................................................8-3
LAN T
...........................................................................7-9
........................................................................7-13
..............................................................................7-14
..................................7-15
RANSMISSION
.....................................................7-15
LAN .....................................................8-1
..........................................8-3
Configure Your Wireless Network (Reference for
a normal network setup)...........................................................8-4
Configure Your Wireless Network (Reference for
Proxy setup).............................................................................8-7
Sending and Receiving Messages /.........................................9-1
9
MAILS AND
E-
Synchronizing E-mail Messages...................................................9-3
Connecting Directly to the Mail Server .......................................9-4
SMS M
ESSAGES
.........................................................9-2
X-5

E-mail Server Setup .....................................................................9-5
Using E-mails and SMS ...............................................................9-7
Direct Push Technology Alert.....................................................9-10
Direct Push Technology Alert Settings ..................................9-10
INDOWS LIVE™ MESSENGER
W
Setting Up...................................................................................9-13
Working with Contacts ...............................................................9-14
Chatting with Contacts...............................................................9-15
MMS M
B
10
U
ESSAGE
Create and Edit MMS.................................................................9-16
IRTHDAY REMINDER
Multimedia /.......................................................................10-1
SING CAMERA
Pocket PC Exterior and Photograph Functions.........................10-1
Pocket PC Exterior and V ideo Functions...................................10-2
How to Use the Camera?...........................................................10-3
..............................................................................9-16
* ..................................................................9-19
..............................................................................10-1
......................................................9-12
X-6
Common Tools for Photograph.................................................. 10-7
Common Tools for Video............................................................ 10-8
Advanced Setup for Photograph or Video..................................10-9
ULTIMEDIA MANAGER
M
Preview Multimedia Information.............................................10-11
Slide Show Function.................................................................10-12
Multimedia Manager Tools ......................................................10-13
MAGE MAKER
I
MAGE WIZARD
I
UNER
FM T
AMECARD MANAGER
N
Digitize New Name Cards........................................................ 10-20
Name Cards Management........................................................10-23
*...........................................................................10-14
*..........................................................................10-16
....................................................................................10-18
...............................................................10-11
.................................................................10-20

Companion Programs /.....................................................11-1
11
ALENDAR: SCHEDULING APPOINTMENTS AND MEETINGS
C
.............11-2
Create an Appointment...............................................................11-3
Use the Summary Screen............................................................ 11-4
Create Meeting Requests............................................................11-4
Schedule a Meeting................................................................11-5
ONTACTS: TRACKING FRIENDS AND COLLEAGUES
C
Create a Contact........................................................................ 11-7
Find a Contact ........................................................................... 11-8
Use the Summary Screen............................................................ 11-9
ASKS: KEEPING A TO DO LIST
T
Create a Task.............................................................................11-11
Use the Summary Screen.......................................................... 11-12
OTES: CAPTURING THOUGHTS AND IDEAS
N
Create a Note........................................................................... 11-14
ORD MOBILE
W
XCEL MOBILE
E
Tips for Working in Excel Mobile............................................. 11-20
OWERPOINT MOBILE
P
INDOWS MEDIA PLAYER
W
TREAMING PLAYER
S
NTERNET EXPLORER
I
.............................................................................11-15
.............................................................................11-18
..................................................................11-21
.....................................................................11-24
....................................................................11-26
.....................................................11-10
..................................11-13
............................................................11-22
........................11-6
Using Internet Explorer........................................................... 11-26
Browse the Internet.............................................................. 11-27
View Mobile Favorites and Channels .................................. 11-28
The Mobile Favorites Folder................................................... 11-28
Favorite Links.......................................................................... 11-29
X-7

Synchronize Mobile Favorites.................................................. 11-29
Create a Mobile Favorite...................................................... 11-29
Save Pocket PC Memory .....................................................11-30
AVA
J
..............................................................................................11-31
Maintaining the Pocket PC /............................................12-1
12
ACKUP UTILITY
B
Storage Space.............................................................................12-1
Backup Files...............................................................................12-2
Wizard Mode..........................................................................12-2
Standard Mode.......................................................................12-2
Advanced Settings Options.........................................................12-3
Restore Files ..............................................................................12-5
Wizard Mode..........................................................................12-5
Standard Mode.......................................................................12-6
DDING OR REMOVING PROGRAMS
A
Add Programs Using Synchronization Tools..............................12-7
............................................................................12-1
................................................12-7
X-8
Add a Program Directly from the Internet .................................12-8
Add a Program to the Start Menu ..............................................12-9
Remove Programs....................................................................12-10
ANAGE MEMORY
M
View Memory Status................................................................. 12-11
Find Available Memory............................................................12-12
YSTEM INFORMATION
S
.......................................................................12-11
.................................................................12-15

Voice Commander /...........................................................13-1
13
T ARTING VOICE COMMANDER
S
OICE COMMAND FORMAT
V
OICE COMMANDER SETTINGS
V
......................................................13-2
.............................................................13-3
.......................................................13-5
Contacts Settings Page...............................................................13-5
Application Settings Page.......................................................... 13-8
Music Settings Page.................................................................13-10
Advanced Settings Page...........................................................13-12
FAQ..............................................................................................13-13
Specifications /...................................................................14-1
14
Regulation Notice and Safety Declaration /....................15-1
15
NFORMATION
SAR I
EAL TH AND SAFETY INFORMATION
H
FAQ /..................................................................................16-1
16
Index /.................................................................................17-1
17
.........................................................................15-1
...............................................15-2
X-9

X-10
GGeettttiinngg SSttaarrtteedd
11
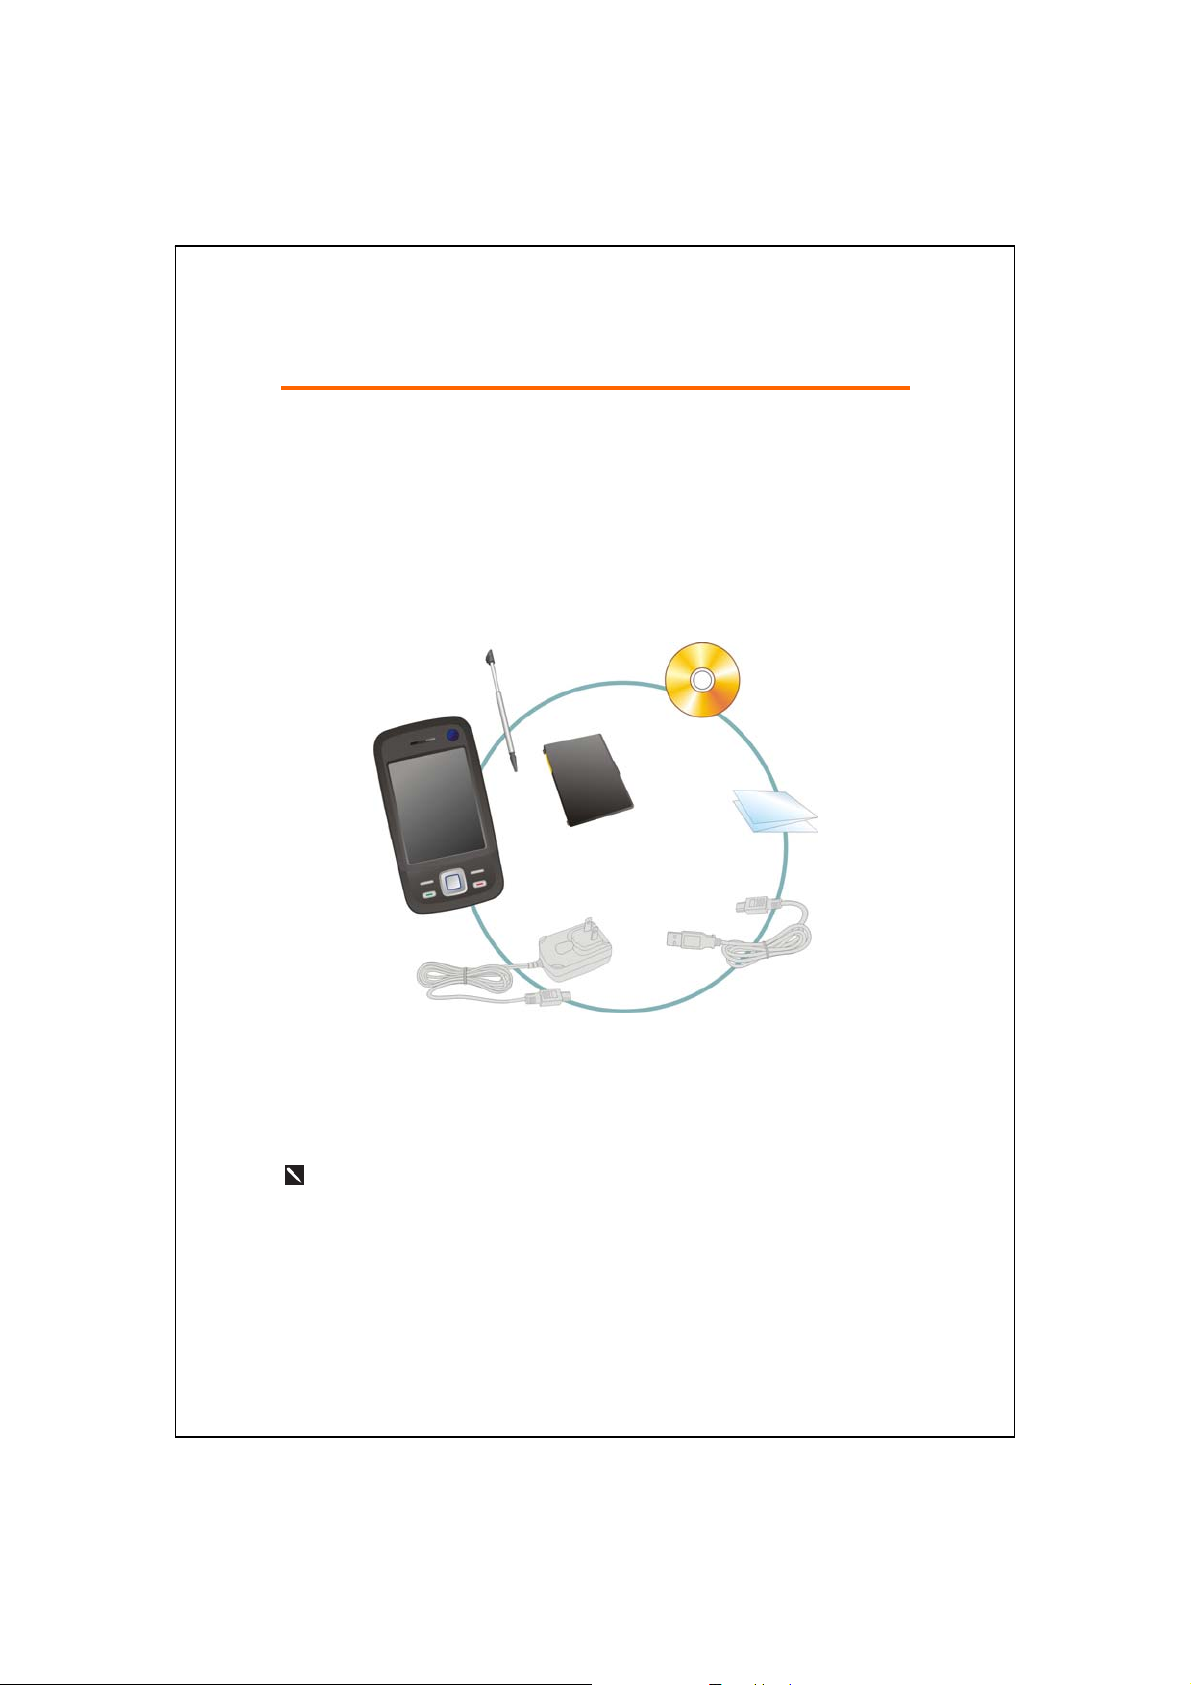
Package Content
Pocket PC, stylus, battery, Getting Started CD, user guide, AC adapter,
USB cable, headset, leather case, Mobile phone strap.
/
/
n
o
q
p
r
t
Pocket PC
n
User Guide sUSB Cable
r
Only the M810 has a video conference camera. The M750 does not
support the video conference camera and the related features; otherwise it
is identical in appearance to the M810.
o
Stylus
Battery
p
AC Adapter
t
s
Getting Started CD
q
Getting Started 1-1
5
4
13 19 17
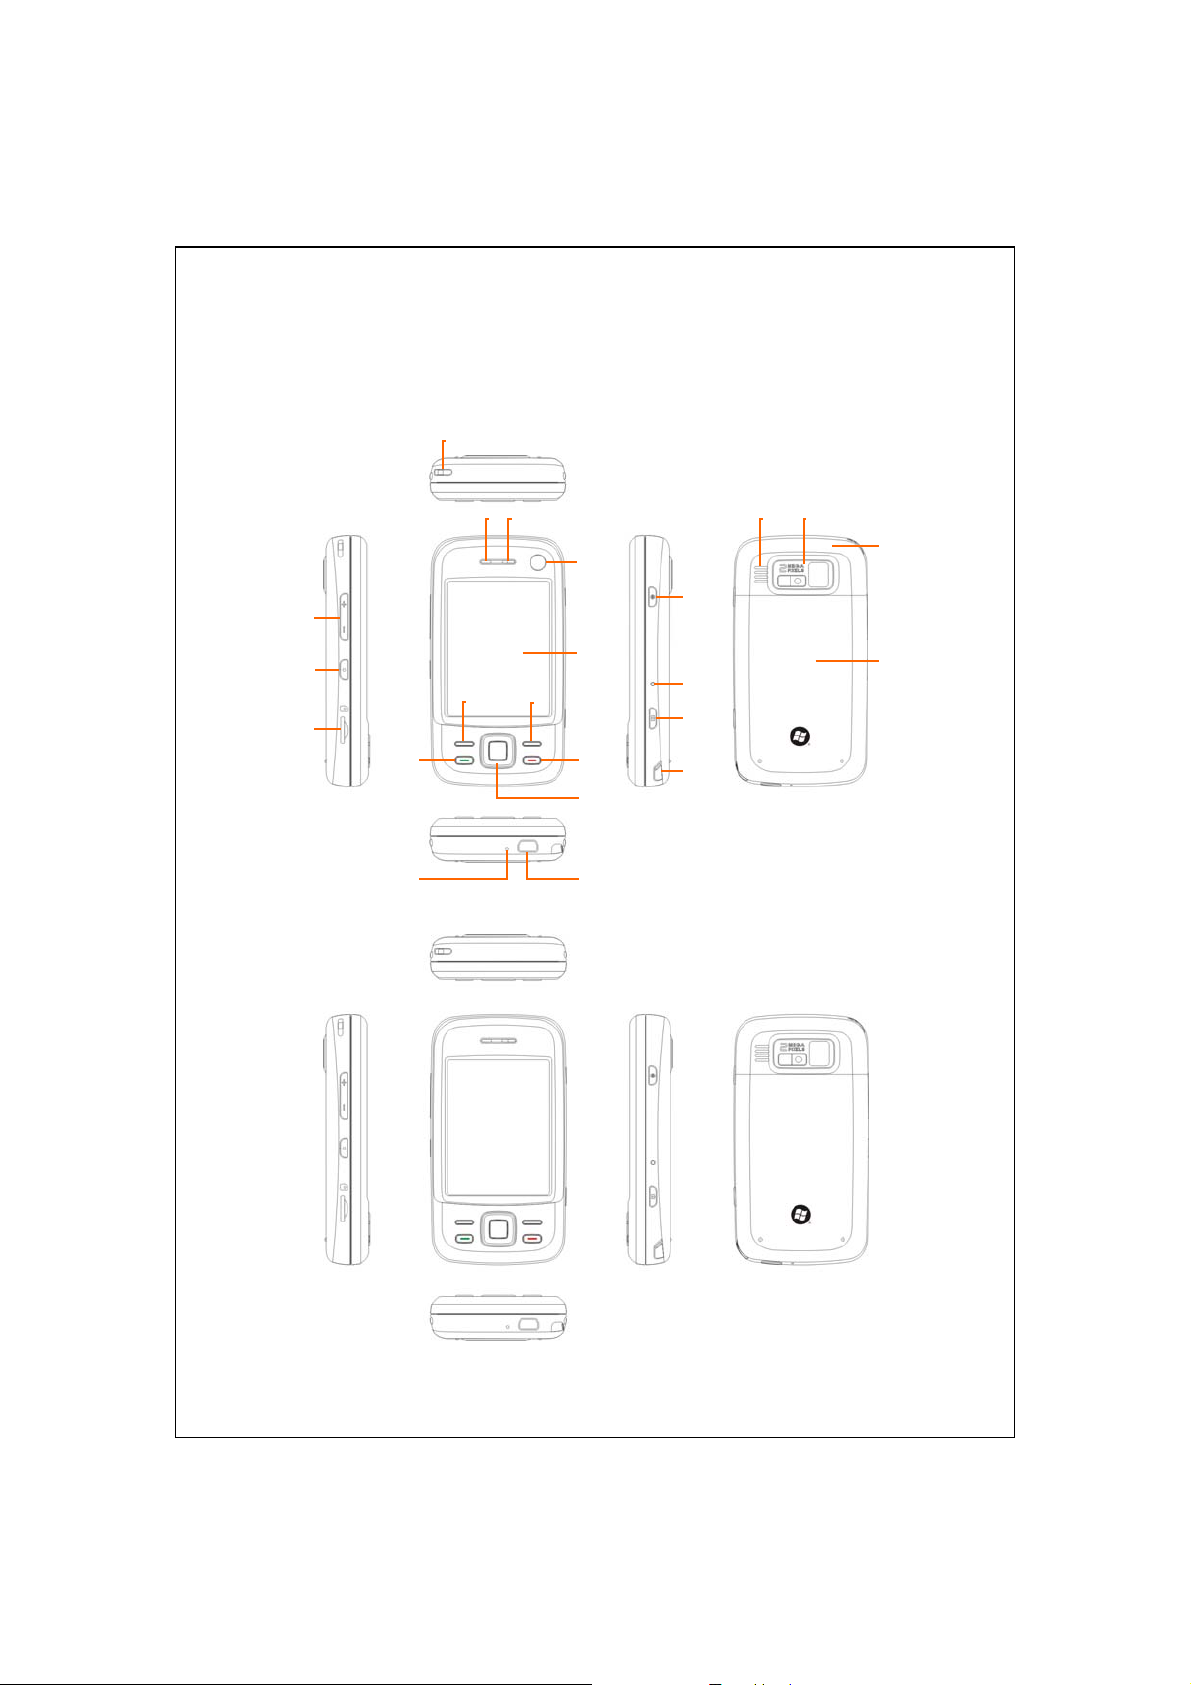
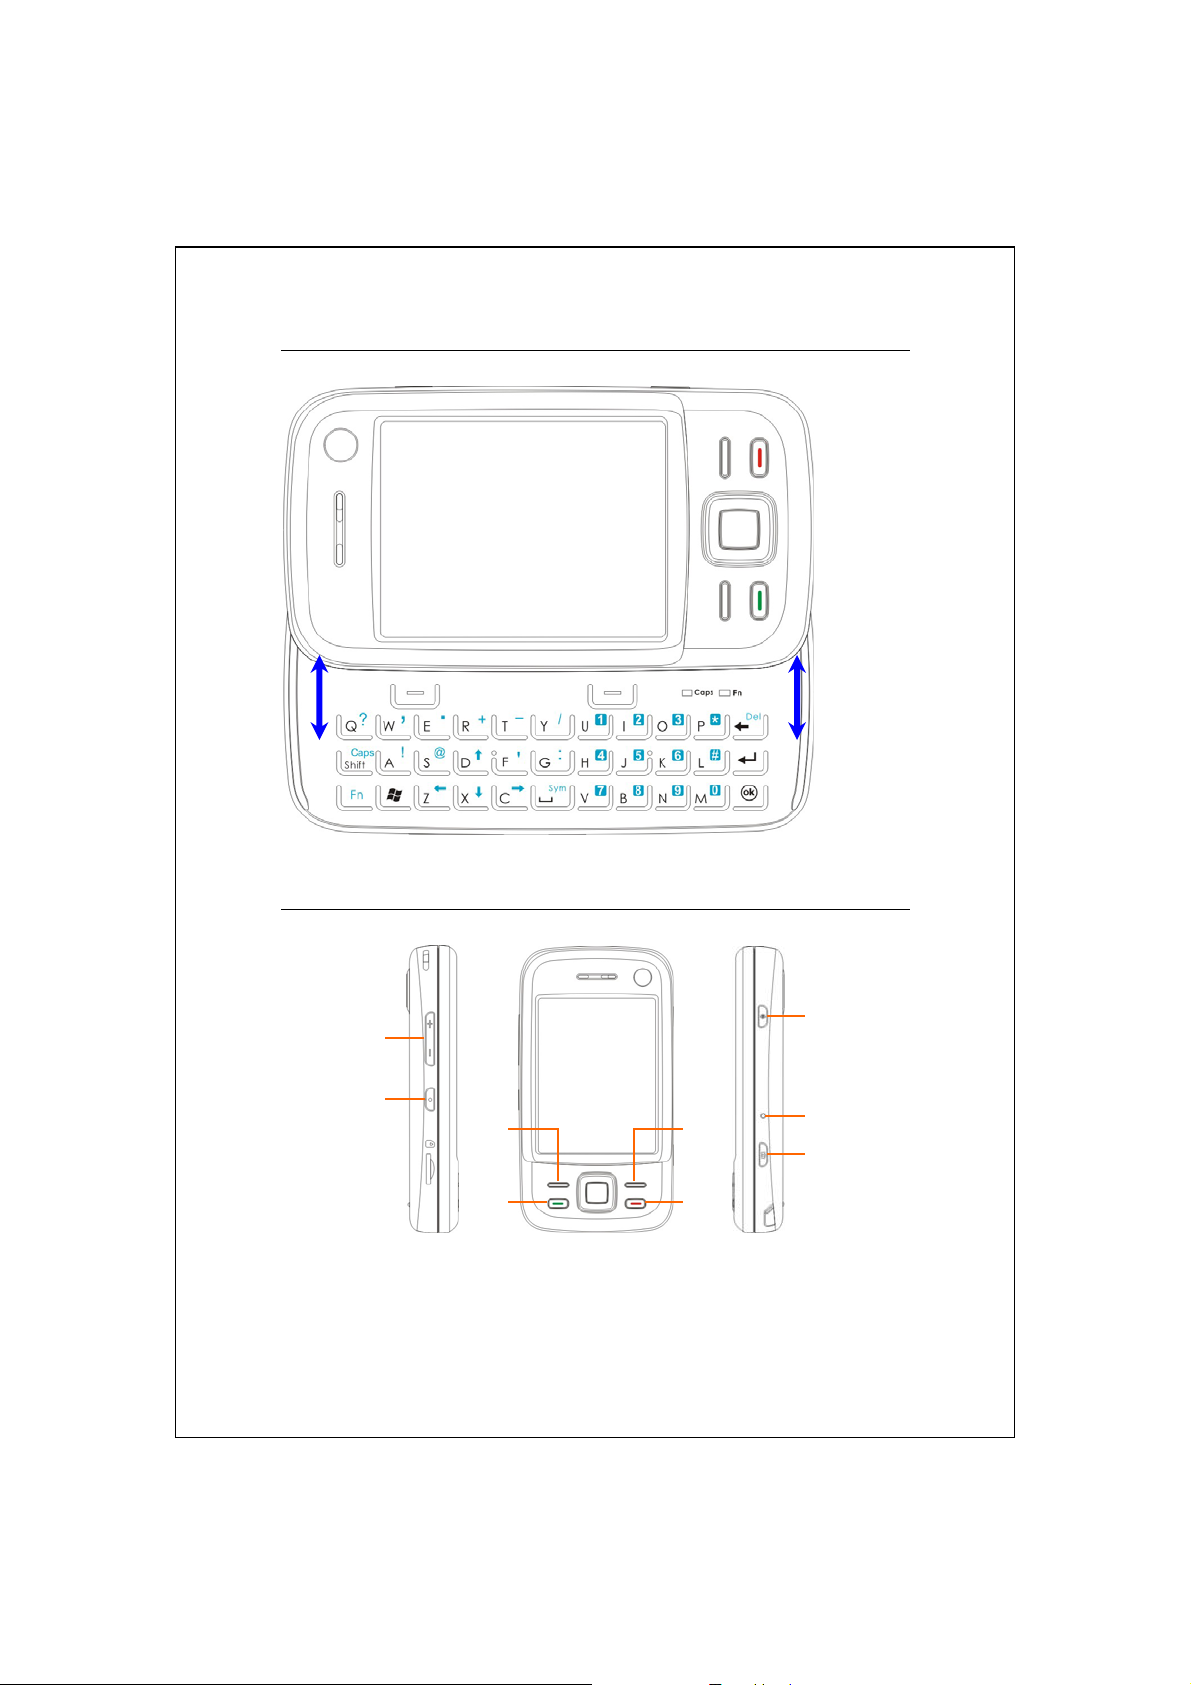
External Views
M810 Model
1
2
3
11
1
M750 Model
4
9 10
6
7
8
12
15
20 21
22
16
23
18
1-2

Volume control key
1.
MicroSD slot
3.
Phone Receiver
5.
Video conference camera
7.
(Applies to M810)
Left Soft-Key
9.
Send button
11.
Navigation button. Press the
13.
center of the button to set as
launch key.
Mini USB connector, Headset
15.
connector
Reset button
17.
Stylus holder
19.
Voice Commander
2.
Hanging hole for Mobile phone
4.
strap
Charging / Mobile Phone /
6.
Bluetooth / WLAN / GPS LED
indicator
Display , Touch screen
8.
Right Soft-Key
10.
End button
12.
Phone Speaker
14.
Power button
16.
Camera
18.
Speaker
20.
hot key or Camcorder
hot key
Built-in camera lens, flashlight
21.
LED, preview mirror
Back cover, Battery is inside
23.
Only the M810 has a video conference camera. The M750 does not
support the video conference camera and the related features; otherwise it
is identical in appearance to the M810.
Hidden antenna for Cell Phone
22.
Getting Started 1-3
p
QWERTY Keyboard
Close
Hardware Hotkey Functions
n
o
p
r
q
s
O
t
u
v
en
1-4
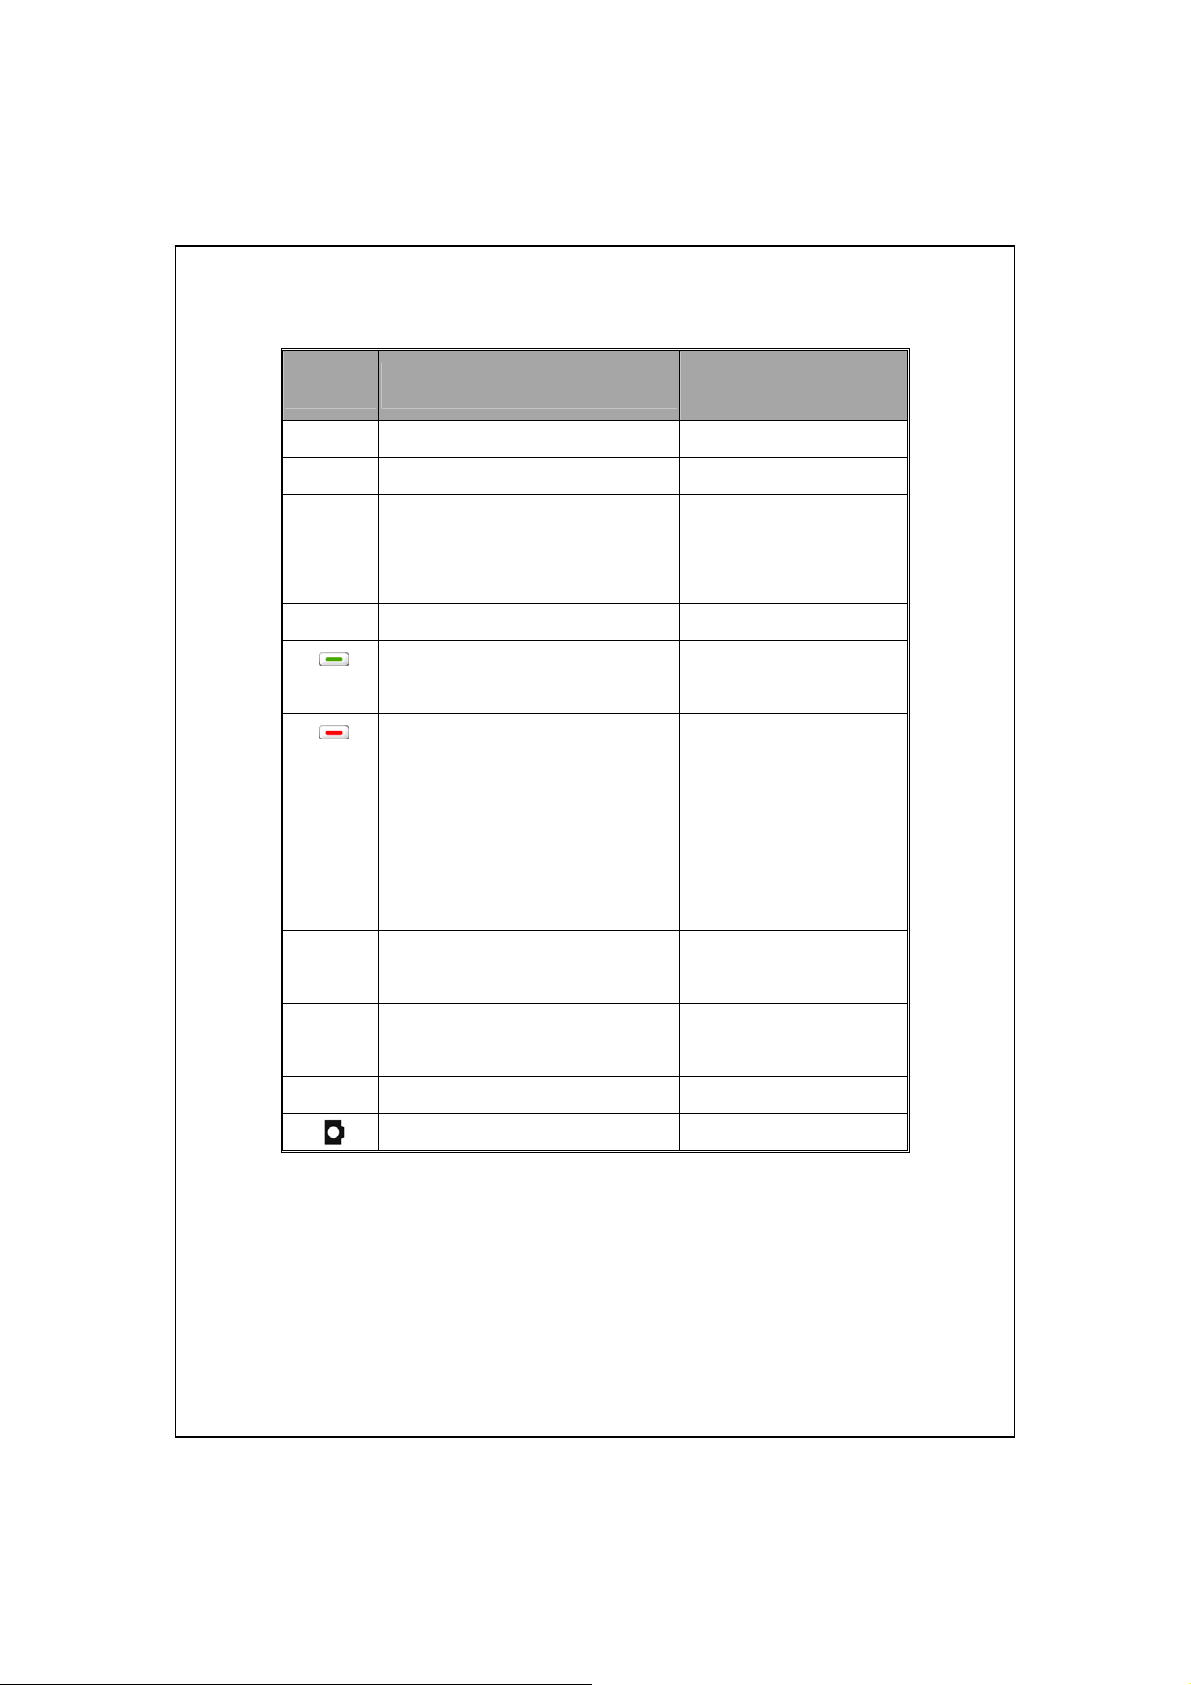
Hardware
Button
-
+/
n
o
z
Short Press
(Press once and release)
Adjust volume -Connect to
Voice Commander
(Press and hold for a few
Connect to
Long Press
seconds and release)
Notes
p
q
r
s
t
t+u
Left Soft-Key. Soft-keys on left
and right to operate function
buttons at bottom of display.
Right Soft-Key
Connect to
answer
Hang up during call
Disconnect during GPRS
connection
Skip to Today screen while in
other programs
Turn on/off screen, enter the Sleep
mode
Power Button + Reset Button
= Cold boot
Phone
/ dial / redial /
Appropriate GPS
application will be linked
for different versions
Connect to
Telephone hold
Turns off the phone
function when it is
activated
Turns on the phone
function when it is
disabled
Enter Power off mode for
the Pocket PC
--
QuickBar
u
v
Reset Button --
Camera
or Camera Shutter
--
Getting Started 1-5
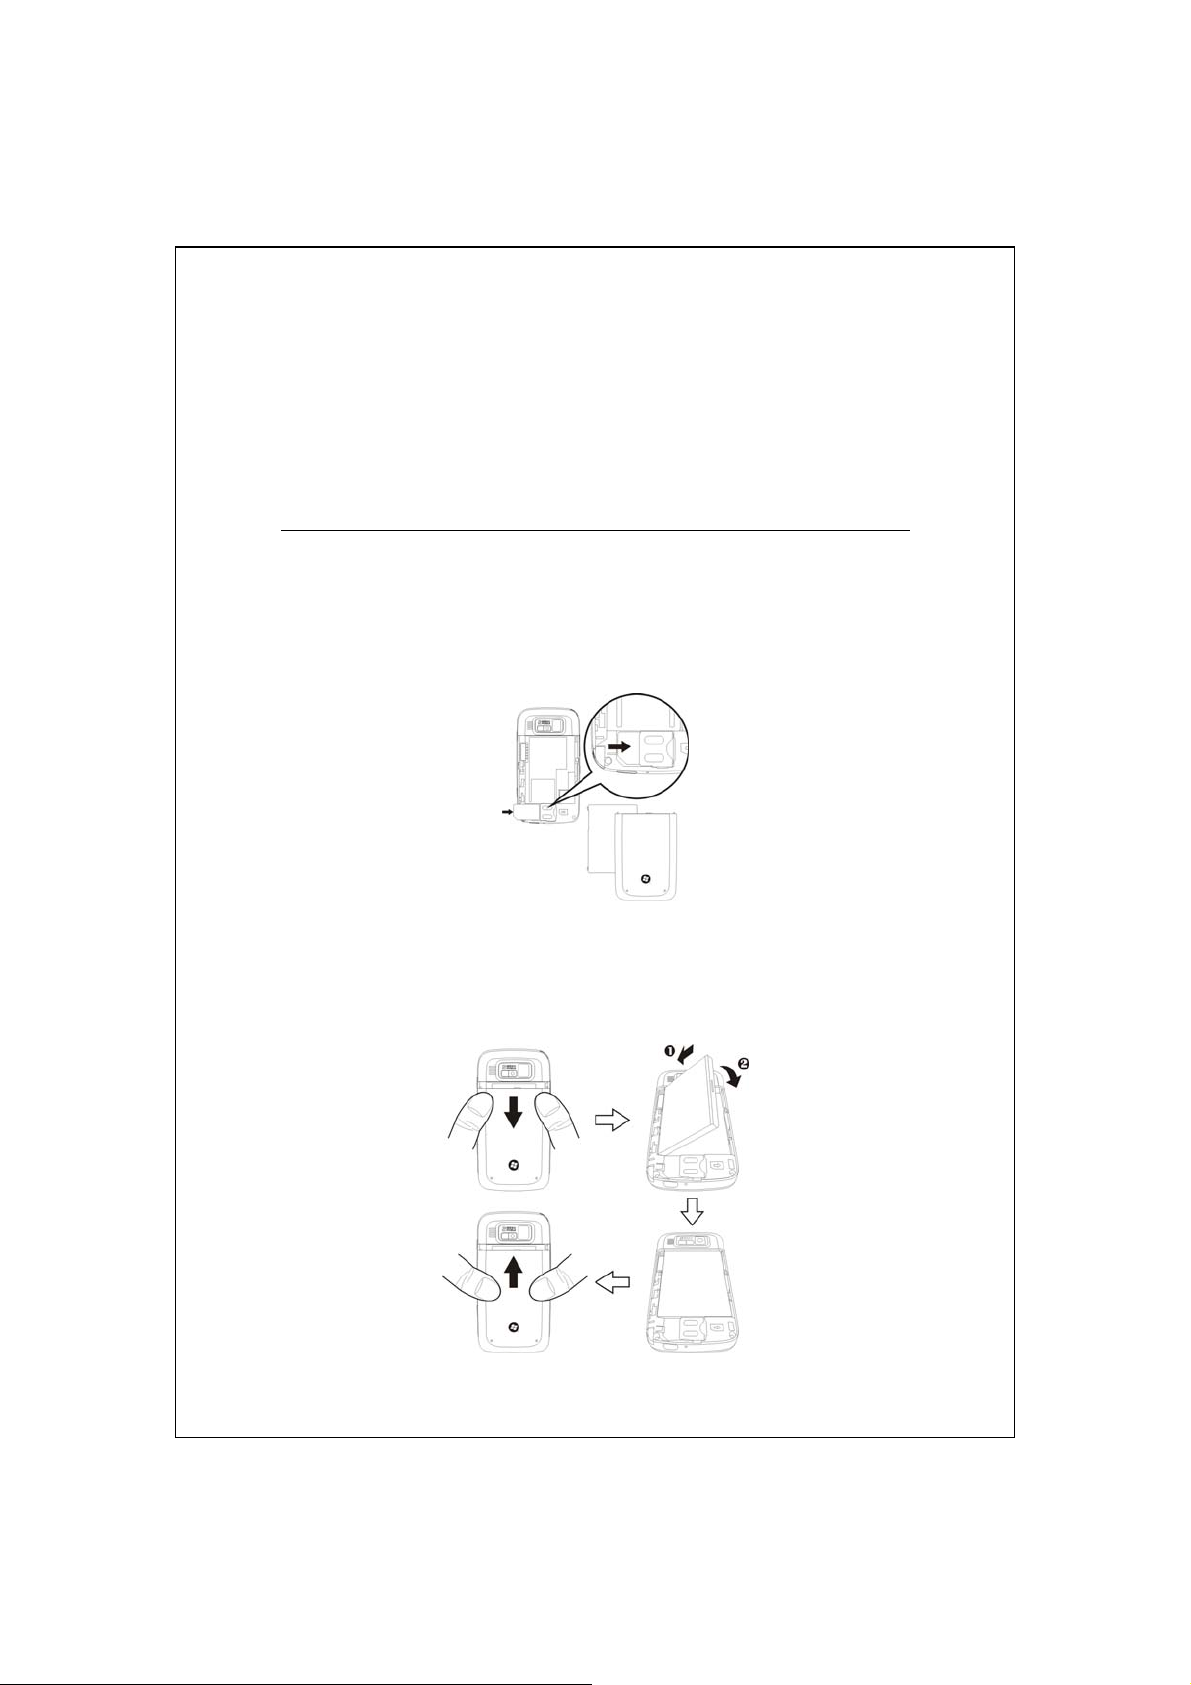
Using the Pocket PC for the First Time
If you are opening this product for the first time, the main battery and
the Pocket PC are packed separately inside the product package.
Get your Pocket PC ready to go
Installing the SIM Card
1.
Turn over your Pocket PC and remove the back cover. Please pay attention
to the direction of the missing corner of the SIM card, and then insert the
SIM card into the slot.
Installing the Battery
2.
Place the battery in the back of Pocket PC. Make sure that the golden
contacts are aligned to the battery box; gently insert the battery until it
clicks. Then replace the back cover.
1-6
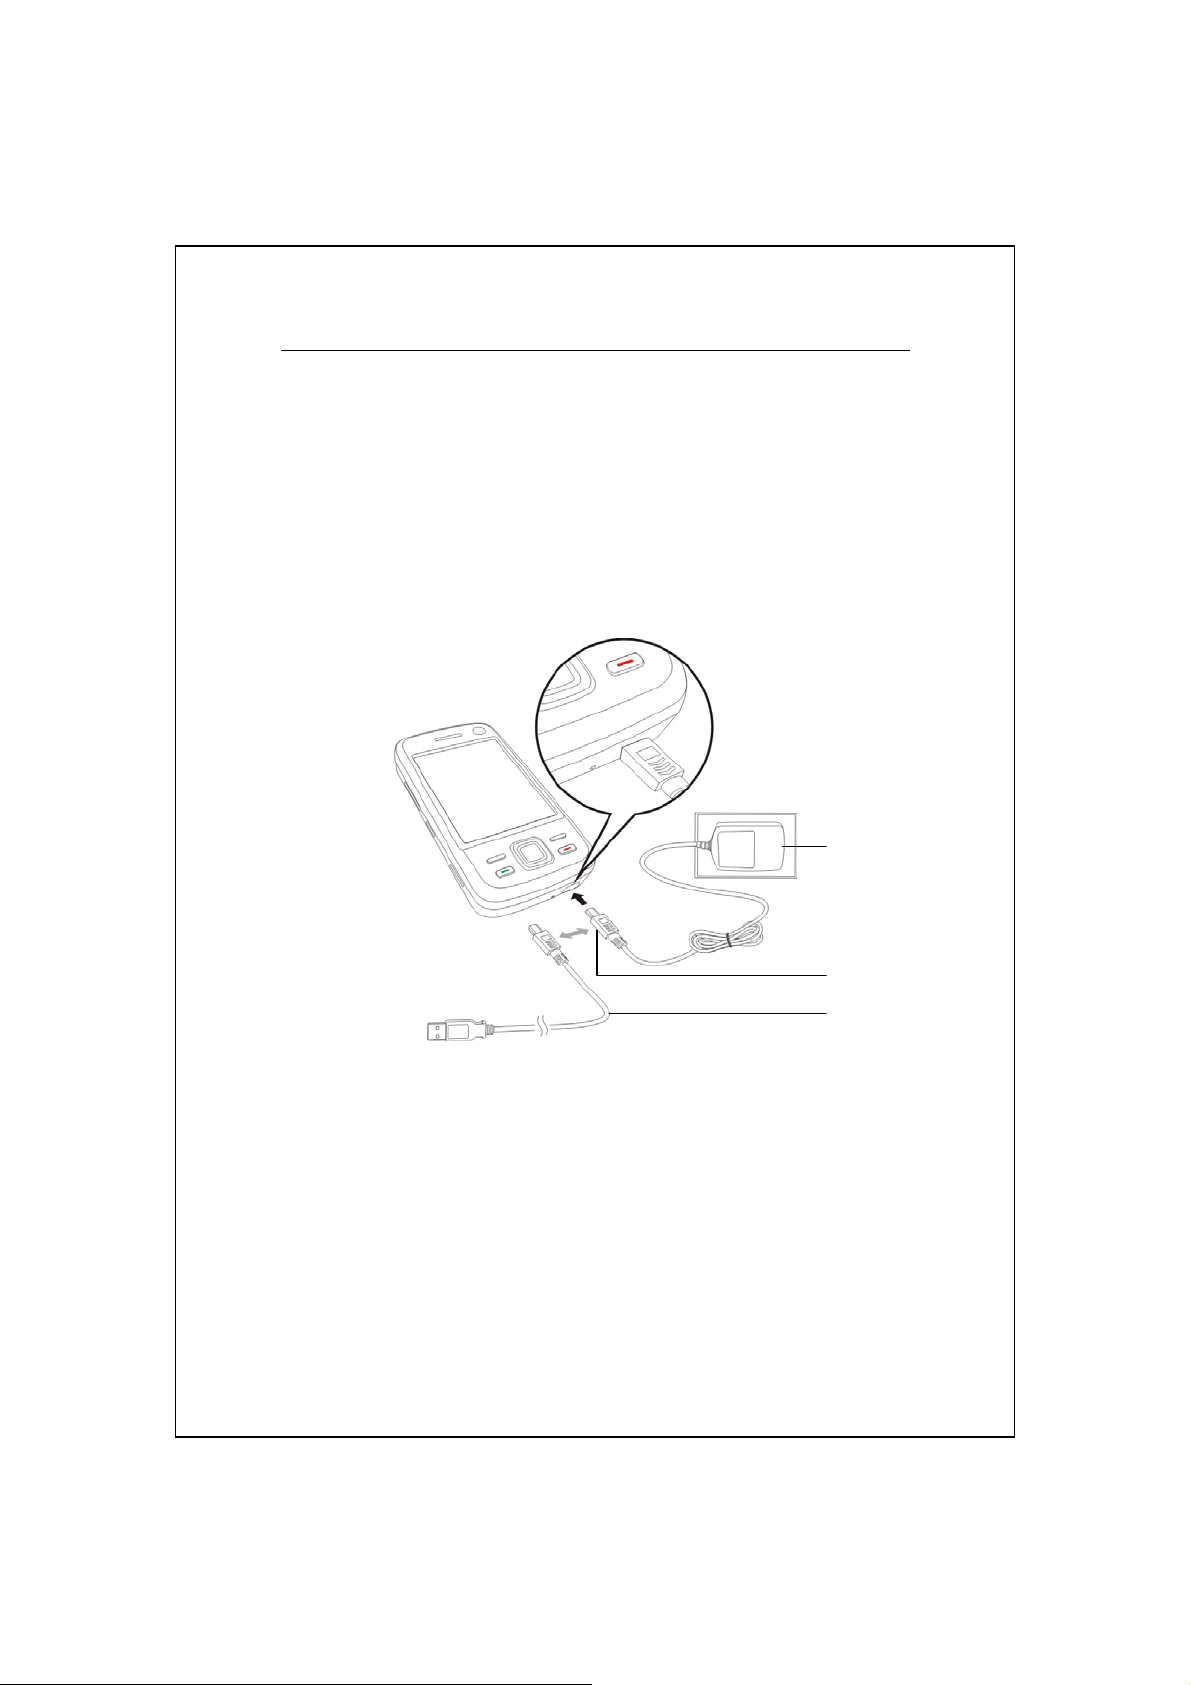
Charging Power and Power Supply
Connect the AC adapter plug to any household power outlet.
n
Connect the other plug from the AC adapter to the USB port. The Pocket
o
PC starts to charge automatically.
If you need to connect Pocket PC and desktop computer, you could
p
connect the USB cable to the USB port. And then connect the other end
of the USB cable to the USB port on the desktop computer. Your Pocket
PC will also charge at the same time.
n
o
p
Getting Started 1-7
It will take about 8 hours to fully charge the battery after the first time you
1.
open the package. Subsequent charging will only take about 3 hours. After
charging, you can disconnect the AC adapter and carry the Pocket PC
around portably. To maintain smooth operation, charge the power
regularly.
View the battery icon
2.
on the upper right corner to check the power
usage condition.
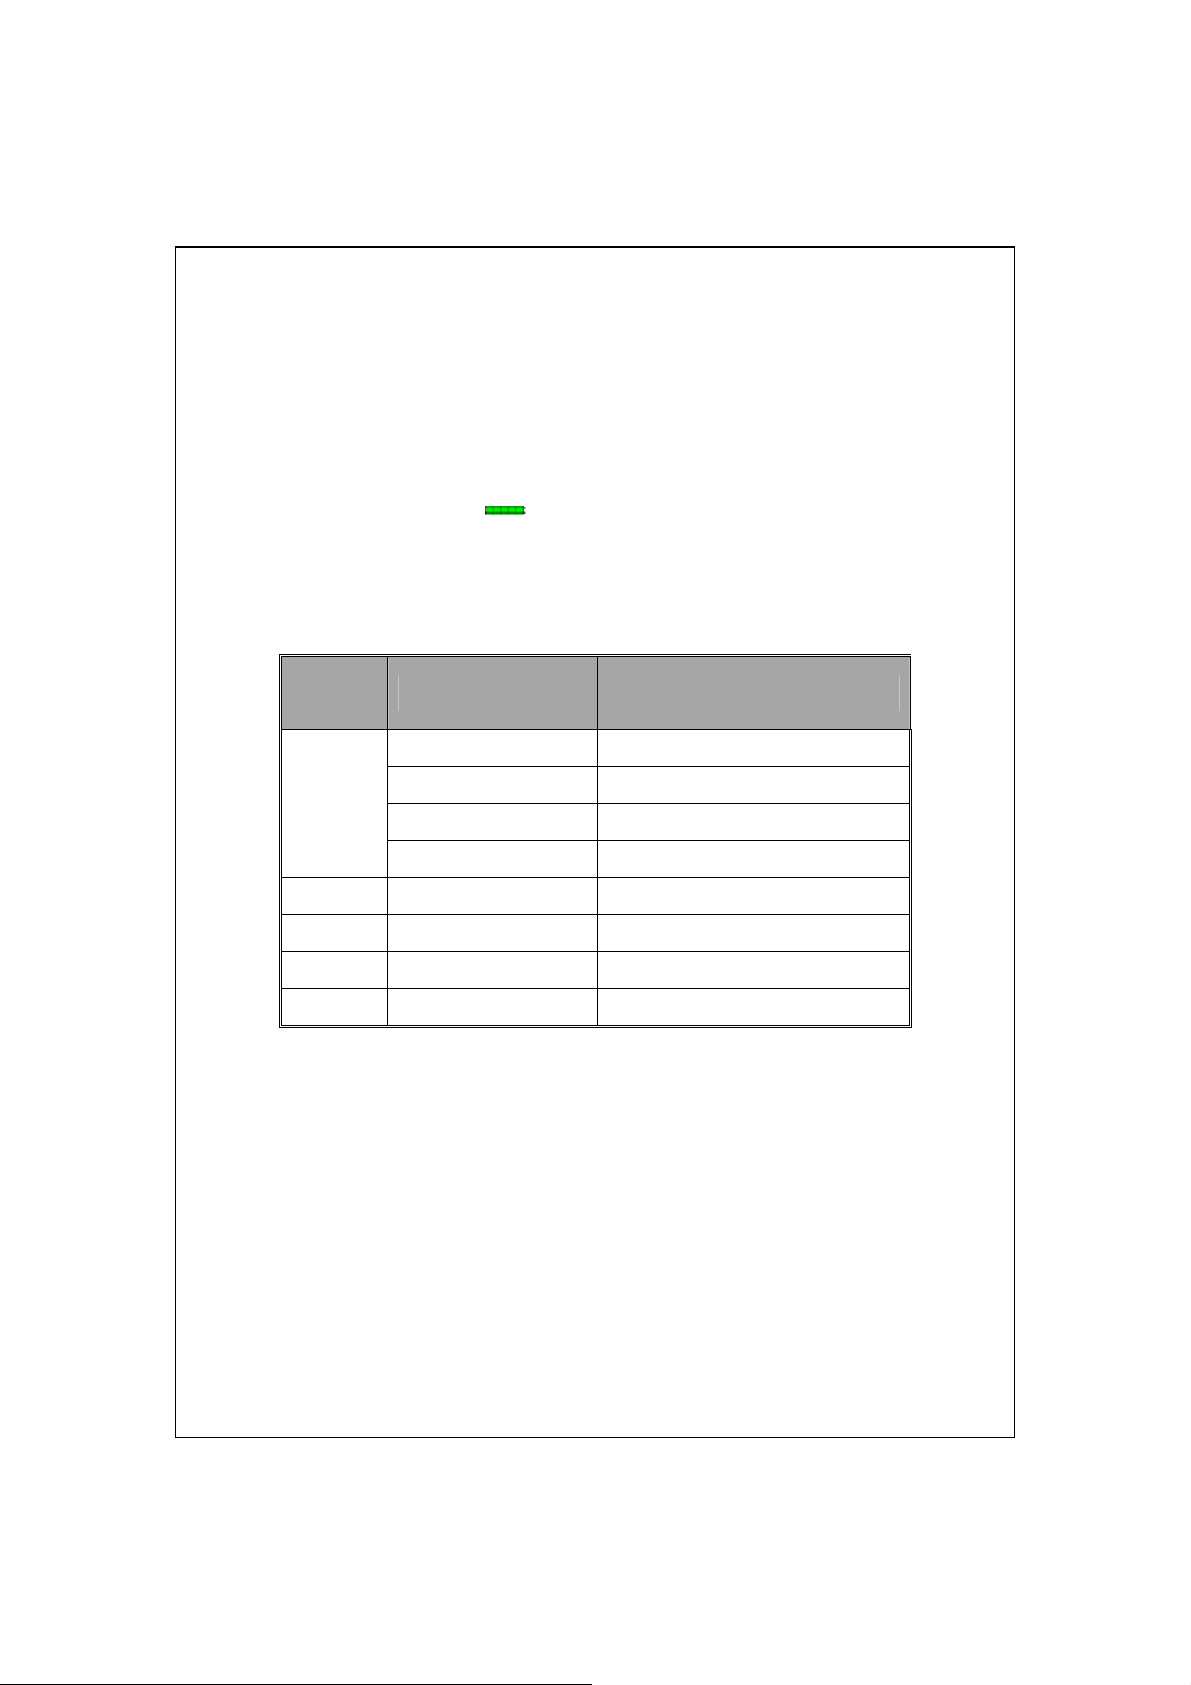
The LED indicator on the top of the Pocket PC will indicate the various
3.
functions that are currently in use.
LED
Behavior Meaning
indicators
Red always lights Charging
Red is off Charging complete
Red
Red blinks repeatedly Low battery warning
Red blinks Missed calls or unread messages
Green Green blinks Mobile phone is turned on
Blue Blue blinks Bluetooth is activated
Amber Amber blinks Wireless network is activated
Purple Purple blinks GPS is activated
1-8
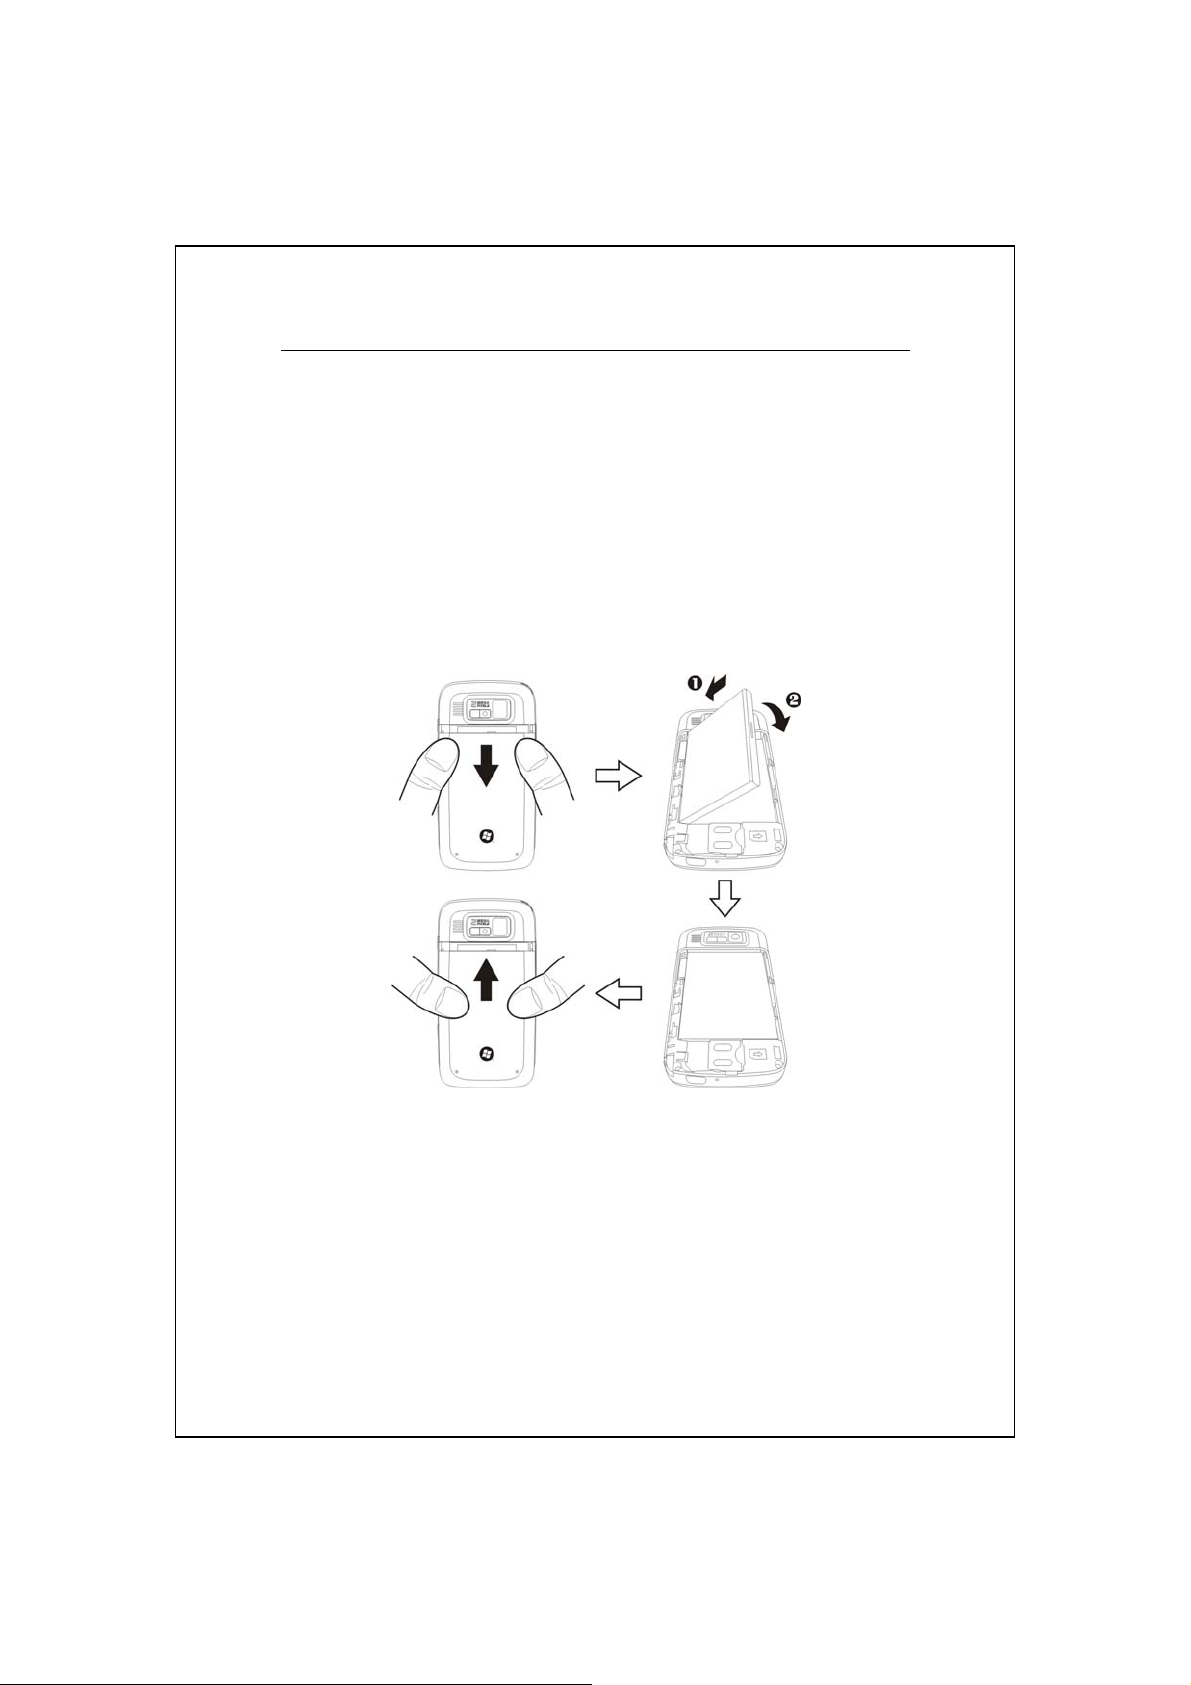
Re-installation or Replacing the Battery
If the phone, GPRS or wireless LAN connection function is already
activated, deactivate it first and then replace the battery.
Turn over your Pocket PC and remove the back cover. Place the battery
in the back of Pocket PC. Make sure that the golden contacts are aligned to
the battery box; gently insert the battery until it clicks. Then replace the back
cover.
Getting Started 1-9
Power On and Off
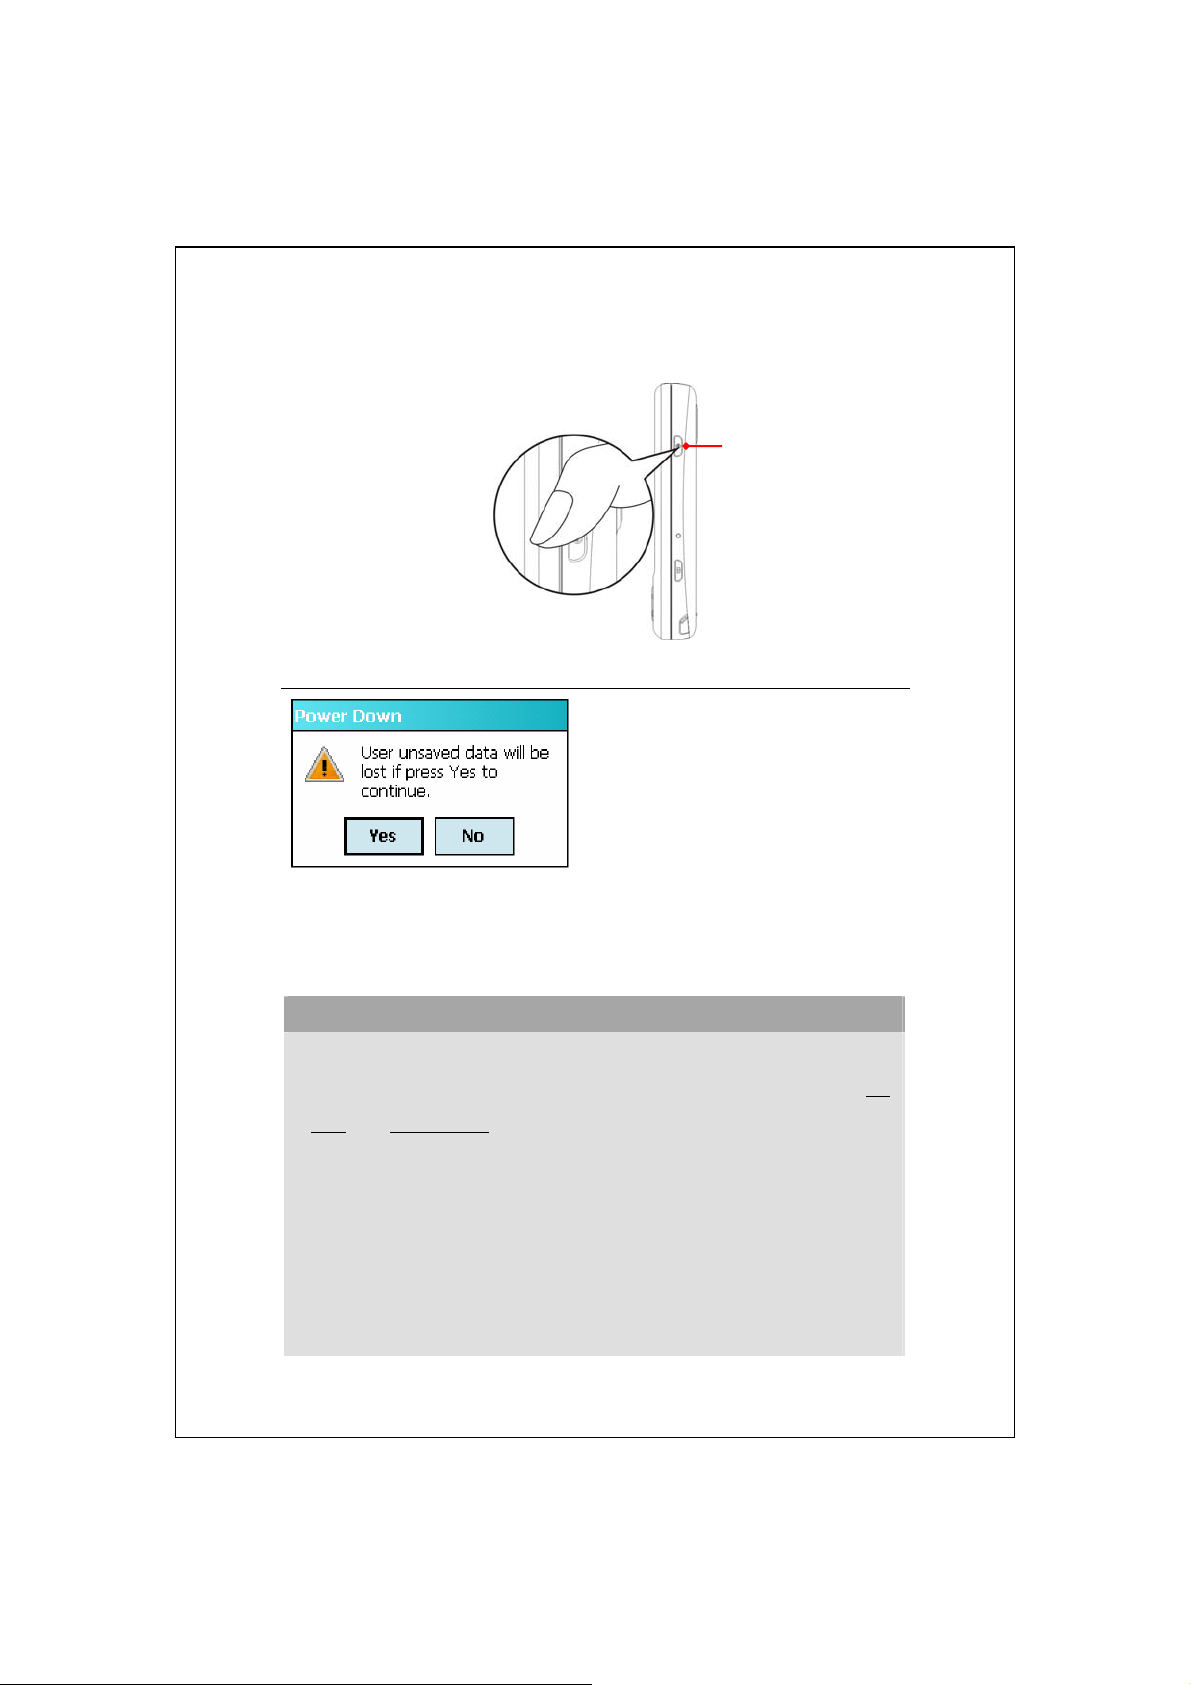
Power Button
Power Off Mode
Press and hold the “Power
1.
Button” on the Pocket PC and
then tap
PC. All functions will be
disabled; this is not the same as
entering Sleep mode.
To turn on, simply press the
2.
“Power Button” once.
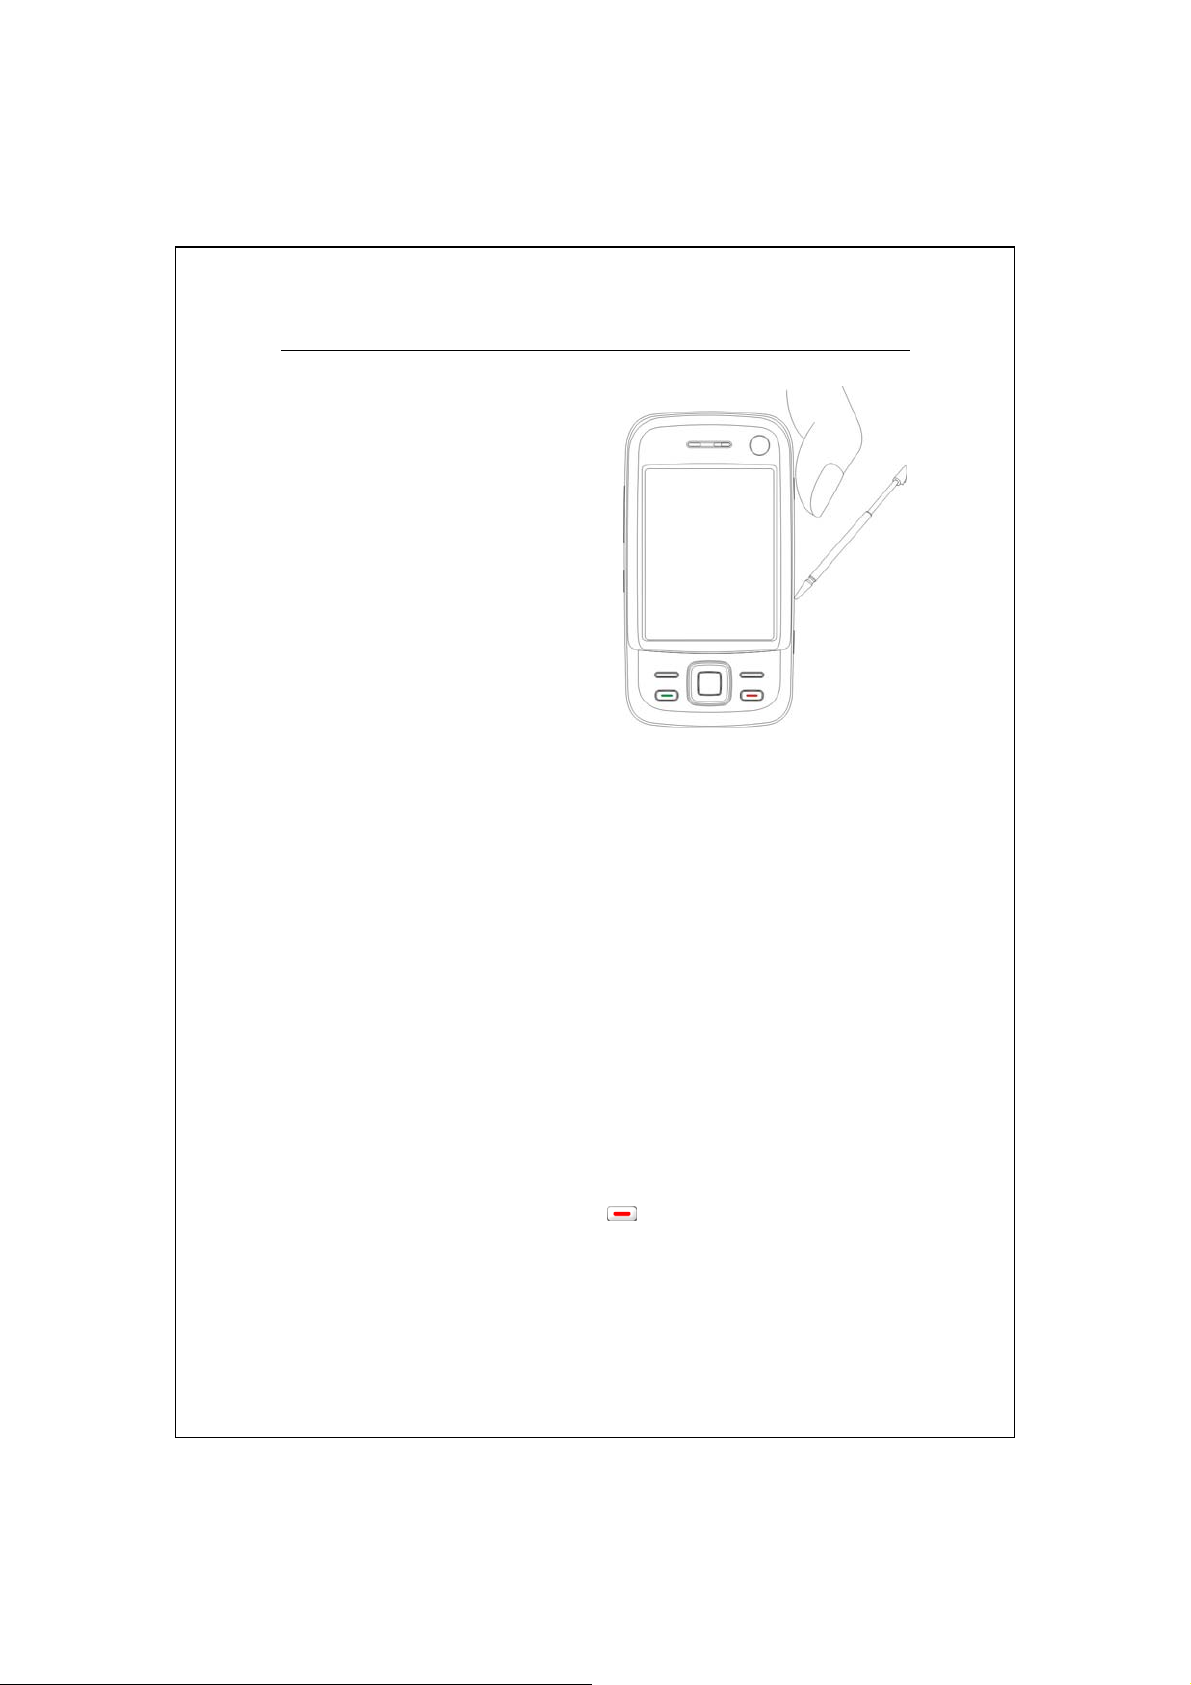
Using the Stylus to Touch the Screen
Your Pocket PC is designed for graphics-based operation. Generally
speaking, we usually “use the stylus to perform basic actions such as tap,
drag, and tap and hold” on the touch screen. Other actions such as reset
and cold boot will require the use of the stylus tip.
Pull the stylus to full-length to make it easier to tap the screen during
to turn off the Pocket
Yes
operation. When kept completely in the stylus holder, the stylus length
shortens.
Avoid heavily pressing on the touch screen with the stylus or your
fingers.
1-10
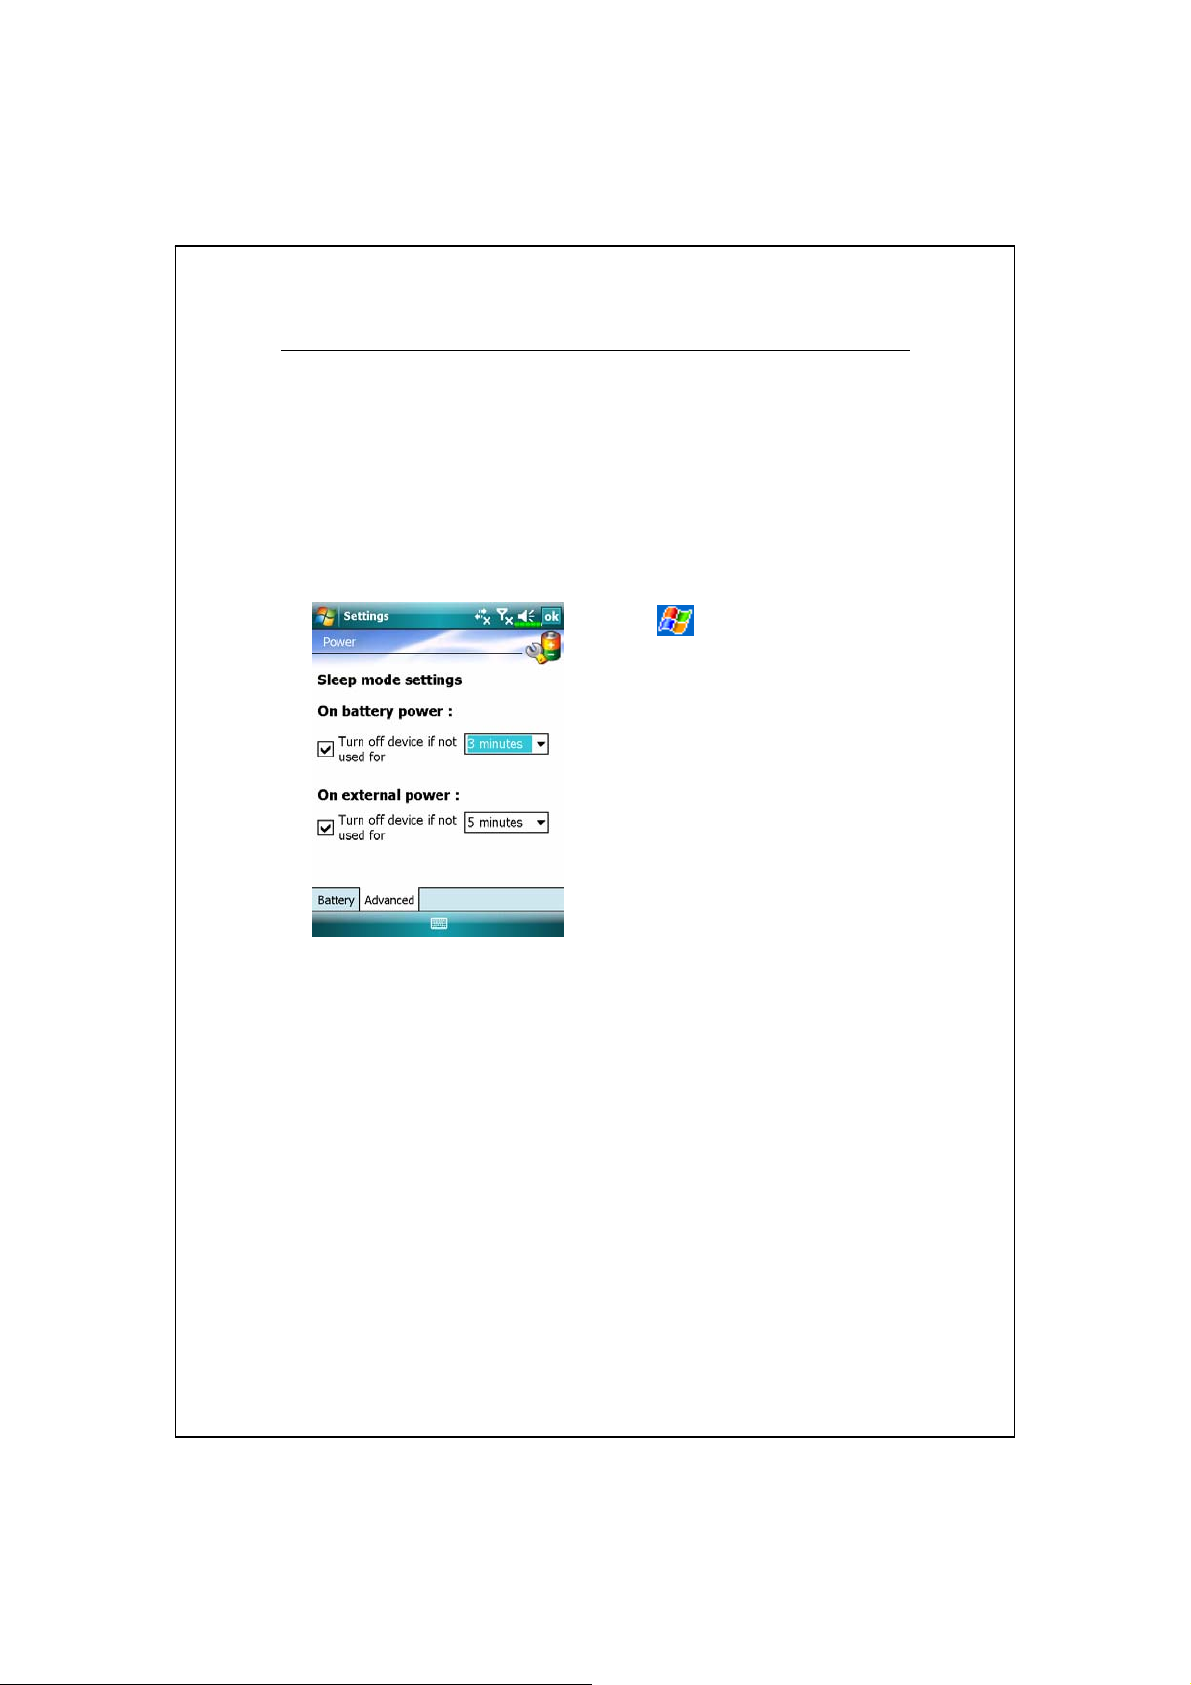
Sleep Mode
Press the “Power Button” of the Pocket PC to enter the Sleep mode. At this
1.
time, the screen is turned off and all peripheral devices enter the
power-saving mode. But if the phon e is turned on, it is still in the call
waiting mode.
To turn on the screen later, just press the “Power Button.”
2.
Tap
3.
Power
to set the device to turn off
automatically after waiting for a
certain time period.
,
Settings
and then the
, the
System
Advanced
tab,
tab
Getting Started 1-11
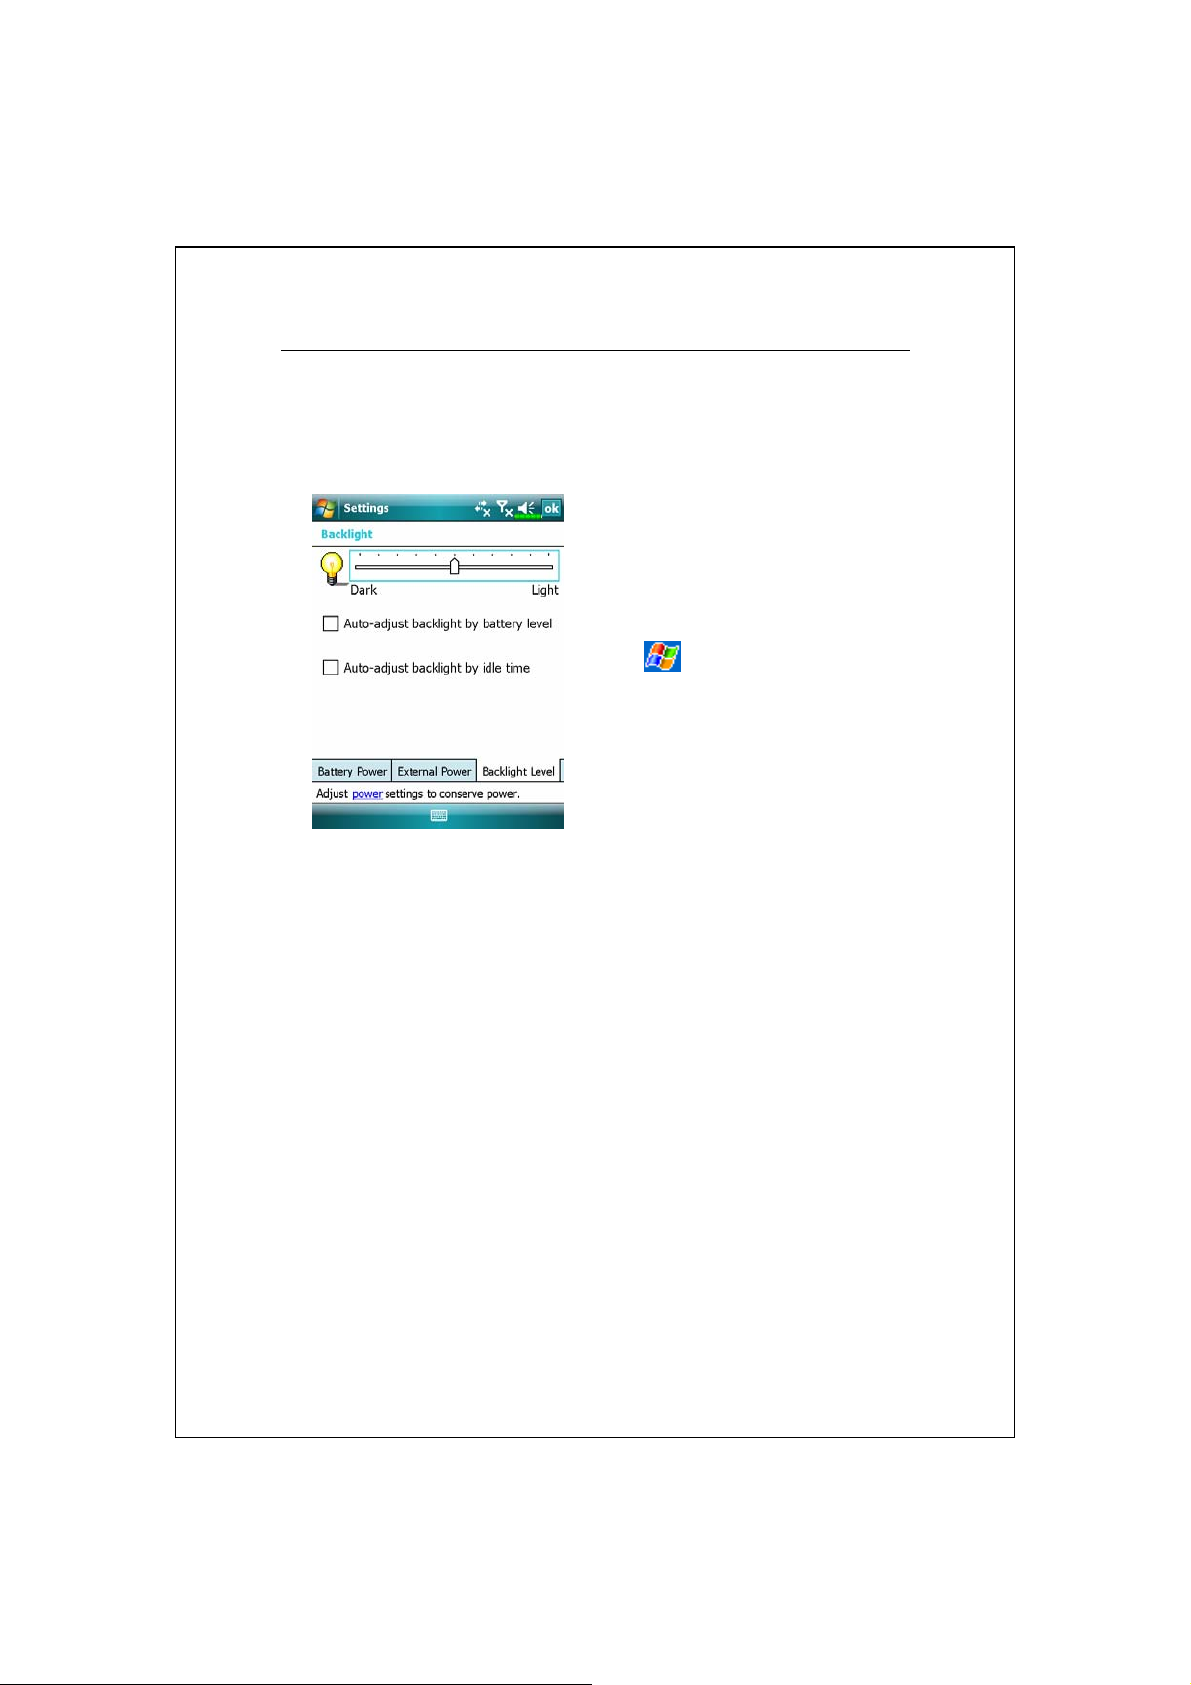
Turn on the Screen
This product is designed with a power-saving feature. If the screen is
turned off, press the “Power Button” of the Pocket PC to turn it on.
If the screen is too dark and you
cannot see clearly, set the proper
brightness level for the backlight.
Tap
Backlight
Level
,
Settings
and then the
tab.
, the
System
Backlight
tab,
1-12
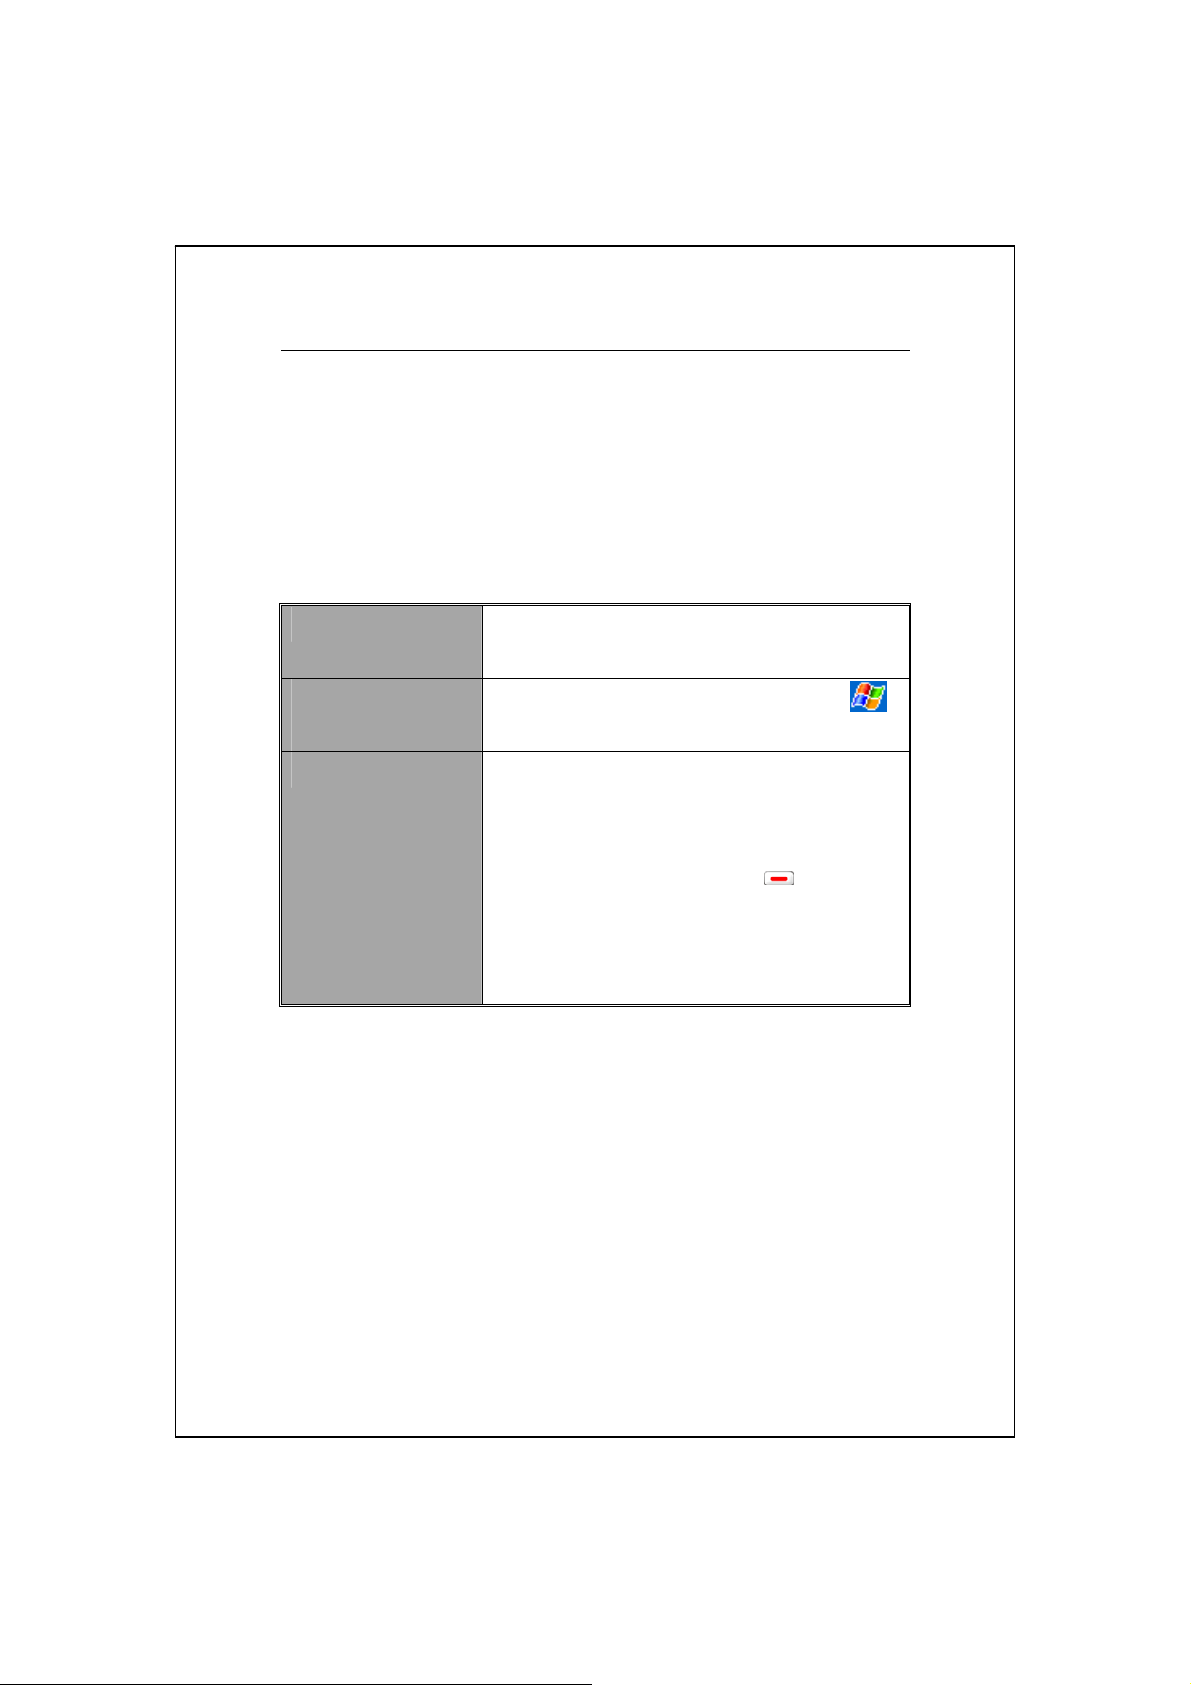
Restarting the Pocket PC
Appropriate situation: If the Pocket PC is unable to maintain normal
operation, has no response, or if the screen is frozen.
For your consideration, factoring into your safety and convenience,
please refer to the following instructions in order:
Reset
1.
Default Settings
2.
procedures
Clean Boot
3.
Press the “Reset Button” of Pocket PC with the
tip of the stylus.
If the touch screen is functional, please tap
Programs, Utilities
Hold the “Power Button” and press once on the
“Reset Button” with the tip of the stylus, and
release both buttons simultaneously. Next,
continually hold the End Button
system inquiry screen is displayed, then release
the End Button. Press Soft-Key to answer the
question.
, and then
Default Settings
until the
,
.
Getting Started 1-13

Reset method: Press the “Reset
V
Button” of Pocket PC with the tip of
the stylus.
Reset
Appropriate situation: If the Pocket PC is unable to maintain normal
V
operation, has no response, or if the screen is frozen.
Result: In a moment, when Pocket PC automatically completes the system
V
startup process, the last display will be the Today screen. This will retain
the Microsoft Windows, factory pre-installed applications, user’s inpu t
data, newly installed programs, and user custom settings.
1-14
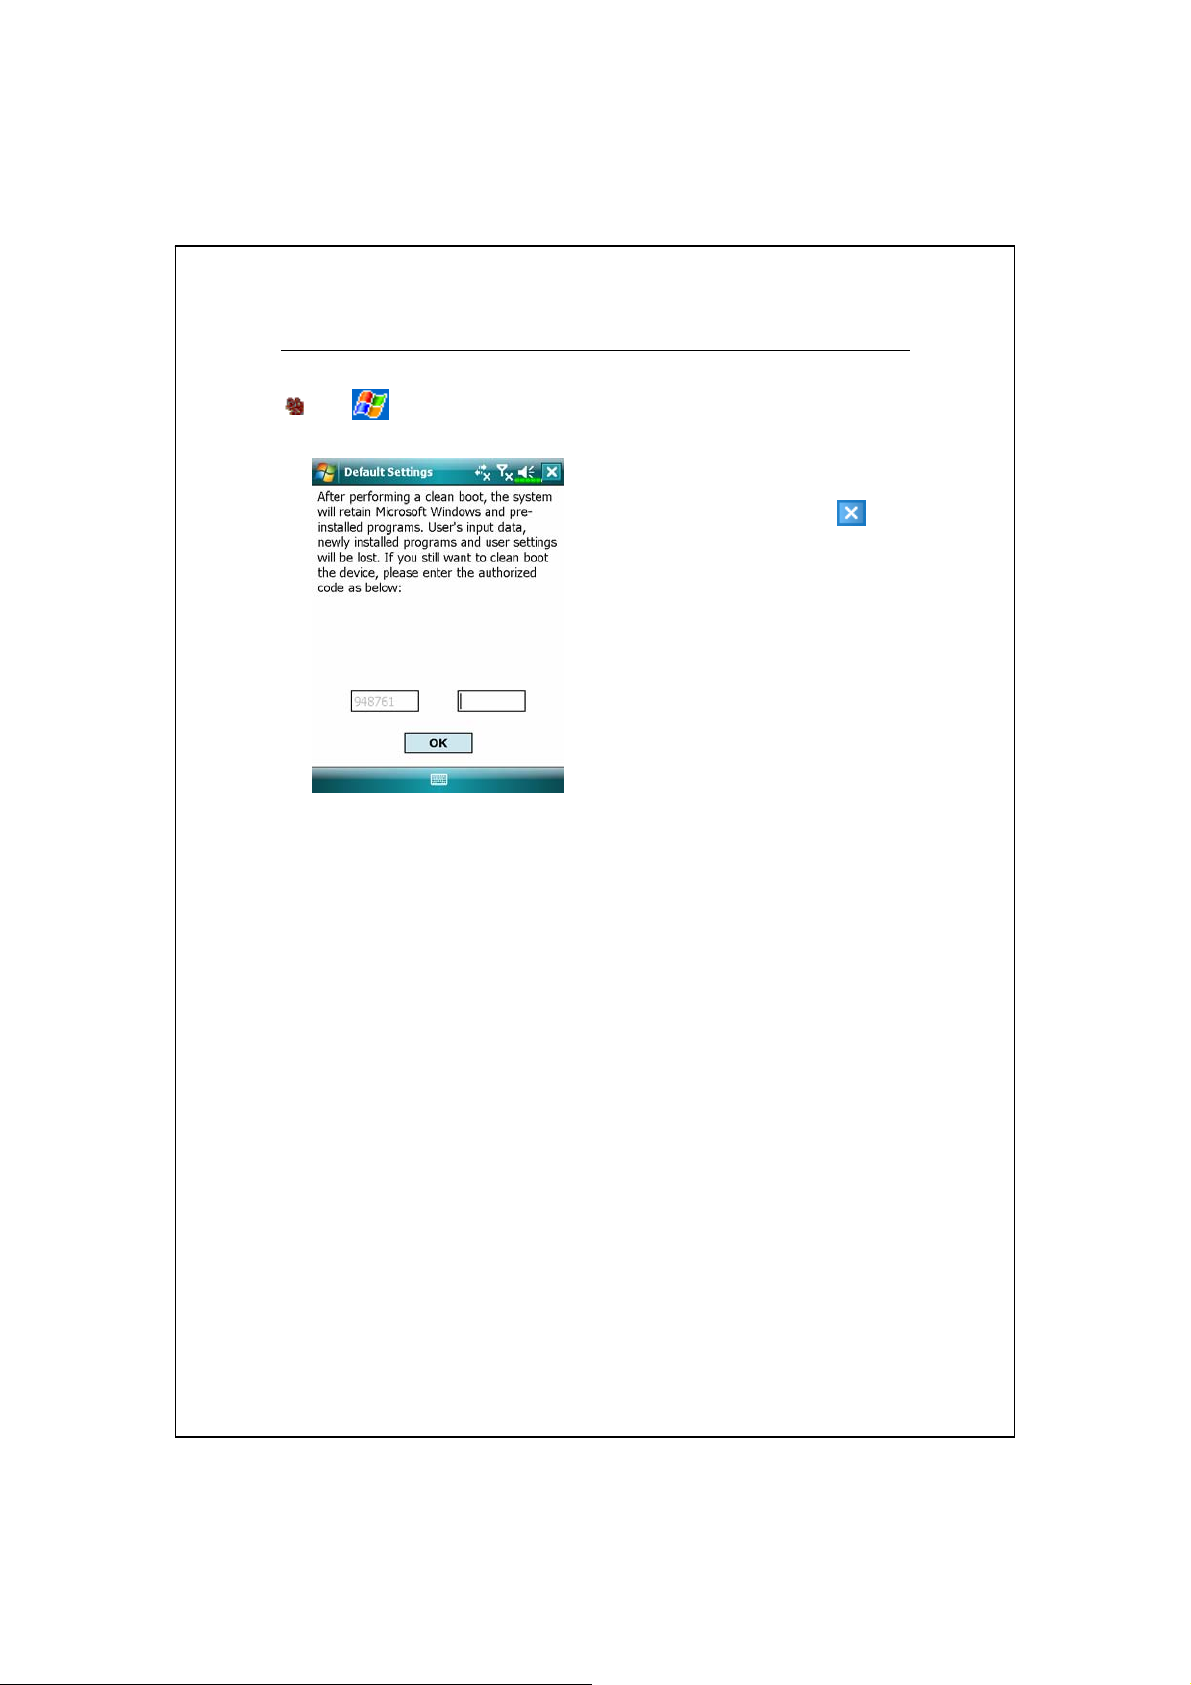
Default Settings
Tap ,
Appropriate situation: If the Pocket PC is unable to maintain normal
V
operation, but the touch screen is functional. Please refer to the
instructions in this section to troubleshoot.
Result: This will retain only the Microsoft Windows, and factory
V
Programs, Utilities
, and then
Default Settings
If this application is inadvertently
1.
accessed, please select the
the upper right of the screen to exit,
the system will not be affected.
If you are certain that you wish to
2.
perform this action, please select
the data input block on the right,
and enter the authorized code in the
block to the left. Then tap the OK
button.
.
to
pre-installed applications. Other settings such as user’s input data, newly
installed programs, and user custom settings will all be cleared.
Getting Started 1-15
Clean Boot
Cold boot method: Hold the “Power
V
Button” of the Pocket PC with one
hand while holding the stylus tip to
push in the “Reset Button” with the
other. Simultaneously release both the
“Power Button” and “Reset Button”.
Appropriate situation: If a previous reset has already been attempted and
V
the Pocket PC is still unable to maintain normal operations, has no
response, or if the screen is frozen.
Before executing the preceding “Cold boot method”, please carefully
V
consider the following instructions and then decide on the cold boot
method.
After a cold boot is performed, if no buttons are pressed, when Pocket PC
1.
automatically completes the system startup process, the last display will be
the Today screen. This is identical to the reset result.
If a previous reset has already been attempted but the Pocket PC is still
2.
unable to maintain normal operation, consider the following solution:
After cold boot, hold the End Button
PC until the system inquiry screen is shown, and then release the End
Button. Next, please read thoroughly through the instructions on cold
on the bottom right of Pocket
booting before continuing carefully.
1-16

Perform cold boot and hold the End Button . Please refer to the
following instructions before careful consideration.
Erase all data and load default?
Á
The default is “No.” If Yes or No was not
selected, after a few seconds the system will
automatically execute the default No.
If you long press Left Soft-Key for a few
seconds to select “Yes,” then the system will
erase all data and load default. After your
Pocket PC restarts, follow the instructions on
the screen to complete.
Caution!
After performing a cold boot, the system will retain Microsoft Windows
1.
and pre-installed programs. If you answer “Yes” to the question displayed
after a cold boot, other items such as the user’s input data, newly installed
programs and user settings will be lost.
There are two ways to retain your data, loaded default and registry:
2.
Perform a Reset
n
Performing a Cold Boot, and answer “No” when the above question
o
displays.
.
Getting Started 1-17

1-18

Screen
UUssiinngg tthhee PPoocckkeett PPCC
22
Start
/
/
Tap ,
The first time you use or cold boot the pocket PC, the system will ask
you to align the screen. Kindly continue to tap the center of each cross (+)
that appears and follow the screen instructions to complete the operation. If
you feel that the position is not quite accurate while tapping on the screen,
you follow the help for this section to align the screen again.
Settings
, the
System
tab, and then
Orientation:
n
n
o
p
Portrait (default)
Landscape (right-handed)
Landscape (left-handed)
Tap the
o
calibrate the screen. When Align
Screen appears, use the stylus to
tap the center of the cross (+) until
the next cross appears, then follow
the screen instructions to complete
.
Screen
Align Screen
button to
the operation. Finally, tap
exit.
Text Size
p
desired text size.
tab: For selecting the
Using the Pocket PC 2-1
to

The following steps will bring you into the touch screen calibration
mode. These steps provide a faster and mo re efficacious way to enter the
touch screen calibration mode. And they also provide a method of getting
into
you completely cannot select or do anything using the stylus.
Simultaneously press the
1.
PC and the execution button in the center of the navigation pad.
Release these two buttons at the same time, and you will enter the
2.
calibration screen.
program for when the touch screen dislocation is so severe that
Screen
Left Soft-Key
on the bottom-left of the Pocket
2-2

Today Screen
When you turn on your Pocket PC for the first time each day (or after 4
hours of inactivity), you will see the “Today screen”. You can also display it
by tapping
glance the important information for the day.
n
and then
o p r
q
. On the “Today screen”, you can see at a
Today
Start. Tap to switch to a
n
s
program.
Tap to enable or disable the GPRS
o
connection feature.
t
Antenna icon. Tap to turn the
p
phone on or off.
Speaker icon. For adjusting
q
volume.
u
v
Time. Tap to display the current date and time, and the upcoming
r
appointments. Tap and hold the time area to select analog or digital clock
display from the list.
Spb Mobile Shell
s
Today screen. Displays important information for the day. Tap on any ite m
t
to enter its relevant setup screen.
The icons mean you can tap to quick link to programs, such as
u
Manager, Call Filter
Tap to quick link to
v
.
status, etc.
Speed Dial
. Tap to quick link to
Contacts
Task
.
Using the Pocket PC 2-3

The following table lists the icons that you may see on the Navigation
Bar. Kindly refer to the “Meaning” column for explanation or tap on the icon
to access the instant message.
Icon
Meaning
(Located on the Navigation Bar at the top of the screen)
Speaker is on
Ringer off
Pending alarm
Battery charging
Battery level
Low battery
Battery power is very low
Battery is fully charged
No battery
New instant message
New e-mail or text message (SMS)
New voice mail
If there is not enough space on the screen to display all
notification icons, tap this icon to view all icons.
Active connection to computer
Synchronizing
Sync error
PowerPoint slide show
Bluetooth
Missing SIM card
The phone is turned off. Flight mode in use.
The phone is turned on. Signal strength.
Radio connected
2-4

Meaning
Icon
(Located on the Navigation Bar at the top of the screen)
No signal. No service. The device has not yet connected to a
network.
Lost signal. The device is searching for a signal.
Missed call
Voice call in progress
Data call in progress
Calls are forwarded
Call on hold
Missed call
Roaming
GPRS not in use
GPRS available
GPRS connected
Synchronizing over GPRS in use
EDGE available
EDGE connected
Synchronizing over EDGE in use
3G network available
3G connected
Synchronizing over 3G in use
3.5 G network available
3.5 G connected
Synchronizing over 3.5 G in use
are icons related to connection features. They are
shown according to your monthly plans, telecom service provider, and
network distribution conditions or effective system coverage area. To
make modifications to your monthly plans, please contact your telecom
service provider.
Using the Pocket PC 2-5

Icon
(Located on the Navigation Bar at the top of the screen)
Wireless LAN Active
Wireless LAN Data Calling
Wireless LAN in use
Meaning
Programs
Download Programs
For effective use of memory, the programs marked with an asterisk “*”,
are posted on our website: http://www.glofiish.com for downloading.
Refer to further instructions for use after downloading these programs.
You can switch from one program to another by selecting it from the
menu. (You can customize which programs you see on this menu. For
information, see “Adjusting Settings” section.) To access some programs,
you’ll need to tap
Icon Programs Description
Games Group Bubble Breaker, Solitaire
Multimedia Group Camera, FM Tuner, Image Maker *,
Office Mobile Group Excel Mobile, PowerPoint Mobile,
Phone Group Add Ringtone, Call Filter *, MMS
,
Programs
, and then the program name.
Image Wizard *, Multimedia Manager,
Namecard Manager
Word Mobile
Message, Scenarios, SIM Manager,
SMS Sender, Speed Dial
2-6

Icon Programs Description
Utilities Group Application Recovery, Backup Utility,
Birthday Reminder *, Default Settings,
M-Desk, Task Manager, WLAN
Utility
Voice Commander
Group
GPS Group GPS Viewer, Location SMS, Satellite
ActiveSync Synchronize information between your
Calendar Keep track of your appointments and
Contacts
Voice Commander, Voice Commander
Settings
Data Update
Pocket PC and desktop computer.
create meeting requests.
Keep track of your friends and
colleagues.
Notes Create handwritten or typed notes,
drawings, and recordings.
Tasks Keep track of your tasks.
Messaging Send and receive e-mail messages.
Internet Explorer Browse Web and WAP sites, and
download new programs and files from
the Internet.
Windows Live MSN related programs.
Messenger Send and receive instant messages with
your MSN contacts.
Calculator Performs basic calculations.
Pictures & Videos Take, view, and edit pictures.
Windows Media Player Plays movies or sound files.
Streaming Player Playback video or audio files from
RTSP, HTTP etc.
Using the Pocket PC 2-7

Icon Programs Description
Java Supports Java; legal download and use
of applications.
Internet Sharing Simulate Pocket PC as a modem for
the PC to surf the Internet.
Search Quickly find the information you need.
File Explorer Manages files or folders.
Wireless Manager Manage wireless connections and
related functions.
You can also switch to some programs by pressing a program button.
Your Pocket PC has one or more program buttons located on the front or side
of the Pocket PC. The icons on the buttons identify the programs they switch
to. For more information, refer to “Redefine Hot Keys” section.
2-8

System Application Programs
,
Settings
Program Description
Buttons Set the hot key for Pocket PC hardware button.
Input Set the details about the input method.
Lock Set the access rights and password of Pocket PC.
Menus
Owner Information Input owner information.
Phone Set the details about the phone.
Sounds &
Notifications
Today Set the look of Today screen and display
, the
Personal
Set the items displaying on the
Set the volume and notification method.
information.
tab
Start menu.
Using the Pocket PC 2-9

,
Settings
Program Description
About Display the important information about the Pocket
Backlight Set the details about the backlight and brightness.
Certificates For network identification to prevent unauthorized
Clock & Alarms Set the time and alarms.
Headset Volume
Limiter
Memory View the memory usage, and the list of running
Microphone Set the microphone volume.
Power View the power usage condition, whether or not to
, the
System
tab
PC.
access.
Set the highest output decibels for the headset
volume.
programs, etc.
power off after a waiting period.
Regional Settings Set the region and information display formats such
as date, time, etc.
Remove Programs Remove programs that are no longer used.
Screen Aligning the screen is helpful in determining the
touch accuracy. You can select the portrait or
landscape orientation.
Spb Mobile Shell Set the details about Spb Mobile Shell.
System Information View the system information.
2-10

,
Settings
Program Description
Band Selection Set the security validation method for the GPRS
Beam Set if receiving end will accept beam data
Bluetooth Establish the connection between the Pocket PC and
Connection Wizard Select the appropriate country and carrier name.
Connections Set the network connection.
CSD Line Type Set Pocket PC to simulate a modem and access the
GPRS Settings Use the channel type provided by your telecom
USB to PC Change the type of USB connection.
, the
Connections
connection. (Applies to M810)
automatically or not.
other Bluetooth capable devices.
Internet through the built-in GSM device.
service provider.
tab
Using the Pocket PC 2-11

Spb Mobile Shell
Spb Mobile Shell
Today screen, you just need one touch at
the electric power condition, the date, the time, the weather forecast, and
even easily using photo Speed Dial.
helps you smoothly to start a day-long life. On the
Spb Mobile Shell
Touch or tap tabs to switch to other
1.
categories.
Tap and hold to display a pop-up
2.
menu of actions.
If you check
n
you just need touch or tap the tabs
to display the details. And tap on
any empty space to close the details
window.
Select
o
settings.
Home Tab
3.
Options
. Quickly show
Auto-Hide Mode
to change the
: Display the power
,
2-12
usage condition.
Tap a shortcut to run the program
Á
you used.

Time Tab
4.
selected cities and next alarm
information.
Weather Tab
5.
forecast for the next four days.
: Display time in three
: Display weather
Tap and hold to display a pop-up
Á
menu of actions.
n
o
Photo Speed Dial Tab
6.
using Photo Speed Dial gives you
the most pleasant way to dial.
Tap a not defined button to add
n
your contact from
Tap a defined button to call this
o
contact. On the other hand, you can
tap and hold to display a pop-up
menu of actions.
: Easily
Contacts
.
Using the Pocket PC 2-13

Configure Your Spb Mobile Shell
Tap and hold on the Spb Mobile Shell to display a pop-up menu, and then
select
Options
Tap ,
to change the settings.
Settings
, the
System
tab, and then
n
n
o
p
o
p
Á
Spb Mobile Shell
Move Up
arrange the display order of these
items in the Today screen.
Options
have customizable options.
Replace
from the standard listing.
Add
Remove
Show and hide the tab content.
Update automatically or manually.
Consider carefully before you
check this option. Once the data is
updated automatically when online,
or
Move Down
: Some of the tabs may
: Replace the existing tabs
: Add a new tab.
: Remove the selected tab.
.
: Tap to
2-14
costs will be incurred.

Note: either of the following connections allows your Pocket PC to
download the weather forecast data. If there is more than one connection
available, the system will automatically select the best connection, in the
following order:
Synchronization connection
1.
or Notebook). Please note that your PC must be online.
Wireless LAN connection.
2.
GPRS connection
3.
automatically. If necessary, change to manual mode.
: Roaming mode cannot update GPS data
: Connect your Pocket PC to a PC (Desktop
Tap ,
tab,
Today
then check
Make sure that
checked so that the Today screen
will display this item.
Settings
, the
Spb Mobile Shell
, the
Personal
tab, and
Items
Spb Mobile Shell
.
is
Using the Pocket PC 2-15

Wireless Manager
On the Today screen, tap to launch
T
ap the
Manager.”
Tap ,
Wireless Manager
of the Pocket PC. The
connections of the Pocket PC, and to enter the Flight Mode either for when
you require power conservation, take an airplane, at a medical facility, or at a
gas pump where wireless connection devices are prohibited.
icon. When the message window appears, tap “Wireless
Programs
and then
will assist you to manage the wireless connections
Wireless Manager
Wireless Manager
Wireless Manager
.
can be used to turn off the wireless
On the Today screen, tap
1.
launch
Wireless Manager
.
to
.
2-16

Enter the
n
2.
screen.
Single tap on these buttons to
n
activate or disable each individual
Wireless Manager
o
p
Indicates whether the
o
running.
If these buttons have a
is currently not running.
If the color of the icon turns orange, this indicates that the function is
activated.
Select this button to activate or disable the Flight Mode. When the color of
p
FM Tuner
icon, this indicates that the associated button
functions. The
that the associated function is
currently in the off state.
Tapping these buttsons will turn the
icons orange, indicating that these
functions are newly activated.
To turn off these functions, simply
tap on the buttons once again.
Tap . When it becomes ,
the GPRS connection is available.
and GPS applications are currently
icon indicates
the icon changes to orange
Flight Mode, and all related applications are disabled.
, this indicates the device is currently in
Using the Pocket PC 2-17

Managing wireless connectivity.
3.
Manager
n
n
o
p
Flight Mode Manager
p
network, Bluetooth, GPRS functions is activated, tapping this button will
quickly turn off the wireless functions.
Generally speaking, when you are aboard an aircraft, at a medical facility,
or at the gas pump where wireless communication devices are prohibited,
please launch the
the color of the icon turns orange
: If any single one of the mobile phone, wireless
Wireless Manager
seconds, and then release the
button to enter the setup page.
As indicated to the left, when the
o
color of the icons turns orange, this
indicates that the function is
activated.
Tapping these buttons again can
quickly turn off the
GPS applications.
and then tap the
, the Flight Mode is activated and
: Tap and hold for a few
FM Tuner
button. When
and
the wireless connection of the Pocket PC is disabled.
2-18

QuickBar
Press and hold the Right Soft-Key to launch
Tap ,
You can launch programs from the Quick Bar.
Programs, Utilities
, and then
Á
QuickBar
QuickBar
Touch or tap any icon to launch a
program.
If you do not select, Quick Bar will
quit after several seconds.
.
.
Using the Pocket PC 2-19

M-Desk
Tap ,
You can categorize programs on the panel according to your personal
preferences. Categorizing, renaming, deleting or editing the text color of
program names under
PC.
Enable or disable the speakerphone.
r
Enable or disable the Bluetooth earphone function.
Enter Categories Setup screen.
s
Programs, Utilities
M-Desk
, and then
will not affect the default setting of the Pocket
n
o
p
q
r
s
M-Desk
Tap
n
switch to other categories.
Tap and hold the tab to display a
pop-up menu that allows you to
Rename, Move forward or Move
back.
The program icon selected for this
o
category. Tap to run this program.
Tap and hold program. A pop-up
p
menu appears and allows you to
Rename, Delete, Cut, or edit the
text color of the program name.
Tap on empty space and the pop-up
q
menu allows you to add New or
Paste.
.
Phone, PDA
or other tabs to
2-20

System category screen
Á
This category already has these
n
n
o
p
n
o
p
q
programs that are automatically
selected by the system which you
cannot move or delete. All relevant
information is updated
automatically.
If no storage card is installed, its
o
icon changes to gray and will be
marked with a red X.
Change screen orientation.
p
Categories Setup screen
Á
Exit the Categories Setup screen.
n
Tap
Phone, PDA
o
select preferred programs. A
maximum of 12 programs are
allowed for each category.
Icons for programs selected under
p
this category.
Program selection area:
q
Tap to check ; the program name
to confirm selection.
Tap on ; again to change it back
to □ to cancel selection.
If it is already checked in other
categories, the icon is in gray and
you cannot select this item.
or other tabs to
Using the Pocket PC 2-21

Enter Information on Your Pocket PC
You have several options for entering new information:
Use the input panel to enter typed text, either by using the soft keyboard or
1.
other input method.
Write directly on the screen.
2.
Draw pictures on the screen.
3.
Speak into your Pocket PC microphone to record a message.
4.
Use synchronization tools to synchronize or copy information from your
5.
desktop computer to your Pocket PC. For more information, see Help on
your desktop computer.
2-22

p
Using QWERTY Keyboard
The keyboard layout of this product is standard US keyboard (as used on
PCs). The keyboard is located underneath the screen of the Pocket PC. You
can slide the display to access the keyboard. The screen automatically
switches to landscape display at the same time to facilitate data input in the
Notepad, Word Mobile, Excel Mobile and other applications. The display
automatically switches back to portrait display as you close the keyboard.
Close
O
en
X
Y
Symbols or numbers (blue): By pressing the
X
function key
numbers in blue indicated on the right upper
section of the keys.
Press to switch to and from lower and
Y
upper cases.
, you can input the symbols or
Using the Pocket PC 2-23

Standard Keyboard
Functions
Operation
Lower Case of
Letters
Upper Case of
Letters
Press
the
indicator will light
up.
Numbers or
Symbols
Press
the
indicator will light
up.
, and
, and
You can input data in the lower case when no
function key is activated.
If you want to input the upper case of a letter,
1.
press and then release
key, the first letter
you input will be in upper case, while the rest of
will be in lower case.
If you want all letters in upper case: Press
2.
key twice to lock the key. Every letter you type
will be in upper case. Press
key twice
again to unlock the key.
If you want to input a number or symbol: press
1.
and then release
key, the first character
you input will be a number or symbol.
If you want a series of numbers or symbols:
2.
Press
key twice to lock the key. Every
character you type will be a number or symbol.
Press
twice again to unlock the key.
Arrow Keys
2-24
Press arrow keys
yzwx
to move the cursor
to corresponding direction.
If symbols appear on the screen after pressing
the arrow keys, press
twice again to
unlock the key and try again.

Standard Keyboard
Functions
Operation
Delete 1.
Latin 1 Letters
Start Menu
Exit Current
Program
Press
key to delete the character ahead of
cursor.
2.
Press
key, and then press key to
delete a character after the cursor.
3.
Press
key twice, and then press
key to delete characters after the cursor
continuously.
Input a letter and press
and keys at
the same time. The system will convert the letter
into the corresponding Latin 1 letters. Press both
keys continually until the desired letter appear on
the screen. Release both keys.
Press
Press
key to cascade the Start menu.
key. This is the same function as the
button on the right upper corner.
Using the Pocket PC 2-25

Standard Keyboard
Functions
Operation
Left Soft-Key
Right Soft-Key
The two hotkeys are located at the top row
of the physical keyboard, above the W, E, 1, 2
keys. You can use these keys to run the function
buttons at the bottom of the screen. For example,
press the Left Soft-Key to run the
View
function at
the bottom of the operating screen as shown below;
while the Right Soft-Key calls the
Menu
function.
Moreover, these two hotkeys work exactly the
same as the two hotkeys at the bottom of the
Pocket PC.
2-26

Enter Text Using the Input Panel
Use the input panel to enter information in any progr a m on your Pocket
PC. You can either type using the soft keyboard or write using
Recognizer, Block Recognizer
characters appear as typed text on the screen.
To show or hide the input panel, tap the Input Panel button. Tap the
arrow next to the Input Panel button to see your choices.
, or
Transcriber
n
o
p
. In either case, the
Select an input method.
Tap to see your choices.
Input Panel button.
n
o
p
Letter
When you use the input panel, your Pocket PC anticipates the word you
are typing or writing and displays it above the input panel. When you tap the
displayed word, it is inserted into your text at the insertion point. The more
you use your Pocket PC, the more words it learns to anticipate.
Using the Pocket PC 2-27

Tap here if this is the right word.
n
n
To change word suggestion options, such as the number of words
suggested at one time, tap
then the
Word Completion
tab.
,
Settings
, the
Personal
tab,
Input
, and
2-28

Type with the Soft Keyboard
Tap the arrow next to the Input Panel button and then
1.
On the soft keyboard that is displayed, tap the keys with your stylus.
2.
Keyboard
Use Letter Recognizer
With Letter Recognizer you can write letters using the stylus just as you
would on paper.
Tap the arrow next to the Input Panel button and then
1.
Write a letter in the box.
2.
When you write a letter, it is converted to typed text that appears on the
screen. For specific instructions on using
Recognizer
open, tap the question mark next to the writing area.
Letter Recognizer
Letter Recognizer
, with
Use Block Recognizer
.
.
Letter
With Block Recognizer you can input character strokes using the stylus
that are similar to those used on other Pocket PCs.
Tap the arrow next to the Input Panel button and then
1.
Write a letter in the box.
2.
When you write a letter, it is converted to typed text that appears on the
screen. For specific instructions on using
Recognizer
open, tap the question mark next to the writing area.
Block Recognizer
Block Recognizer
, with
Using the Pocket PC 2-29
.
Block

Use Transcriber
With
Transcriber
just as you would on paper. Unlike
Recognizer
and let
Tap the arrow next to the Input Panel button and then
1.
Write anywhere on the screen.
2.
tap the question mark in the lower right hand corner of the screen.
, you can write a sentence or more of information. Then, pause
Transcriber
For specific instructions on using
you can write anywhere on the screen using the stylus
Letter Recognizer
change the written characters to typed characters.
Transcriber
and
Transcriber
, with
Block
.
Transcriber
open,
Select Typed Text
If you want to edit or format typed text, you must select it first. Drag the
stylus across the text you want to select. You can cut, copy, and paste text by
tapping and holding the selected words and then tapping an editing command
on the pop-up menu, or by tapping the com mand on the
Menu
menu.
2-30

Write on the Screen
In any program that accepts writing, such as the
the
write directly on the screen. Write the way you do on paper. You can edit and
format what you’ve written and convert the information to text at a later time.
Notes
tab in
Calendar, Contacts
, and
, you can use your stylus to
Tasks
program, and in
Notes
Write on the Screen
Tap
displays lines on the screen to help you write.
and then check
Menu
to switch to writing mode. This action
Draw
Tap
n
Use your stylus like a pen now.
and then check
Menu
Draw
.
n
Some programs that accept writing may not have the
the documentation for that program to find out how to switch to writing
mode.
function. See
Draw
Using the Pocket PC 2-31

Select Writing
If you want to edit or format writing, you must select it first.
Tap and hold the stylus next to the text you want to select until the
1.
insertion point appears.
Without lifting, drag the stylus across the text you want to select.
2.
If you accidentally write on the screen, tap
again. You can also select text by tapping
and then dragging the stylus across the screen.
You can cut, copy, and paste written text in the same way you work with
typed text: tap and hold the selected words and then tap an editing command
on the pop-up menu, or tap the command on the
Menu
, then
Menu
and then
menu.
Menu
Undo
to deselect it
Draw
and try
2-32

Draw on the Screen
You can draw on the screen in th e same way that you write on th e screen.
The difference between writing and drawing on the screen is how you select
items and how they can be edited. For example, selected drawings can be
resized, while writing cannot.
Create a Drawing
Cross three ruled lines on your first stroke. A drawing box appears.
Subsequent strokes in or touching the drawing box become part of the
drawing. Drawings that do not cross three ruled lines will be treated as
writing.
The drawing box indicates the
n
boundaries of the drawing.
n
o
You may want to change the zoom level so that you can more easily work
on or view your drawing. Tap
Menu, Zoom
o
Tap
and then check
Menu
and then a zoom level.
Draw
.
Using the Pocket PC 2-33

Select a Drawing
If you want to edit or format a drawing, you must select it first. Tap and
hold the stylus on the drawing until the selection handle appears. To select
multiple drawings, tapping
to select the drawings you want.
You can cut, copy, and paste selected drawings by tapping and holding
the selected drawing and then tapping an editing command on the pop-up
menu, or by tapping the command on the
make sure the
function is not selected, and drag a selection handle.
Draw
Menu
and then
to deselect it and then drag
Draw
menu. To resize a drawing,
Menu
Record a Message
In any program where you can write or draw on the screen, you can also
quickly capture thoughts, reminders, and phone numbers by reco rding a
message. In
the
Notes
Calendar, Tasks
tab. Refer to “Voice Recording Format” section.
In the Notes program, you can either create a stand-alone recording or
, and
Contacts
, you can include a recording in
include a recording in a written note. If you want to include the recording in a
note, open the note first. In the Inbox program, you can add a recording to an
e-mail me s sage.
2-34

Create a Recording
Hold your Pocket PC’s microphone near your mouth or other source of
1.
sound.
Press and hold the Record hardware button on your Pocket PC until you
2.
hear a beep.
While holding down the Record button, make your recording.
3.
T o stop recording, release the Record button. Two beeps will sound. The
4.
new recording appears in the note list or as an embedded icon.
You can also make a recording by tapping the
Recording toolbar.
To play a recording, tap it in the list or tap its icon in the note.
n
n
o
p
q
Record
Indicates an embedded recording.
Tap to begin recording.
Recording toolbar.
Tap
Menu
Recording Toolbar
button on the
and then check
.
o
p
q
View
Using the Pocket PC 2-35

Voice Commander
By default, the system sets the button on
the side of the Pocket PC as the “Voice
Commander Button.” Press this button
to launch the Voice Commander. For
details on how to use this function,
please refer to the Voice Commander
section.
Voice Commander Button
2-36

/
/
VVooiiccee CCoommmmaanndd SSaatteelllliittee
33
NNaavviiggaattiioonn
Navigation Device Installation
n
o
Pocket PC
n
Car Charger (* optional): when Pocket PC is low on power, recharge by
o
connecting one end to the car cigarette lighter/12 volt power outlet and the
other end to the socket on base of Pocket PC.
Attention
: The GPS signal receiver is built into the Pocket PC. If car
windscreen has heat reflective metallic film, or Pocket PC is
obstructed by objects, then the receptivity of the GPS will be
adversely affected.
Voice Command Satellite Navigation 3-1

GPS Navigation Software Installation
Please follow your car navigation system operating manual’s
instructions on software installation in order to use the navigation function.
Conditions for Using GPS Car Navigation
By using this system you are agreeing to the following conditions:
When using this device, please use with matching car mount. Affix device
1.
securely to the car mount. Please be aware that installation in the areas
depicted below is forbidden and is strictly prohibited.
n
Do not place where it will obstruct driver vision
n
Do not place over air bag
o
o p q
Do not place where it can not be securely attached
p
Do not place in path of activated air bag
q
3-2

Please set navigation destination before driving. Do not operate this system
2.
while driving.
Please use this system with care. If any harm results from careless use of
3.
this system, the responsibility for safe driving resides with the driver.
GPS positioning is limited by weather and usage location (tall buildings,
4.
tunnels, underpasses, trees, bridges). Most GPS do not work indoors, nor
can GPS signals penetrate buildings, car sun shades and heat reflective
film with metallic content. Please install GPS outdoors with clear line of
sight. Beneath the windscreen at the front of the car is a common choice,
and the windscreen should be free of heat reflective film.
The GPS system is built and operated by the U.S. Department of Defense
5.
which is also responsible for its maintenance and calibration. Any changes
made by them may affect the operation and accuracy of the GPS system.
Wireless devices (mobile phones, speed radar detectors) will all interfere
6.
with the satellite signal and cause unreliable signal reception.
The GPS position fix is provided only for the driver’s reference and should
7.
not affect actual driver behavior.
The electronic map data provided in the navigation system is for normal
8.
reference only and not intended for high precision applications. The user
should determine their exact location based on actual road conditions.
The route provided by the navigation system, the audio cues and
9.
intersection data are derived from recommended optimal route calculated
using the electronic map data. This is provided for the driver’s reference
only , t he drive r shoul d decide their chosen route according to actual road
conditions.
When not in use, please do not leave the device inside the car. If exposed
10.
directly to sunlight, the battery may overheat and cause damage to this
device. This may endanger the vehicle as well.
Voice Command Satellite Navigation 3-3

Satellite Data Update
Tap ,
Login to the provider’s server to download instant satellite data and
enable the GPS function. Note: either of the following connections allows
your Pocket PC to download the latest GPS data. If there is more than one
connection available, the system will automatically select the best connection,
in the following order:
Synchronization connection
1.
or Notebook). Please note that your PC must be online.
Wireless LAN connection.
2.
GPRS connection
3.
If necessary, change to manual mode.
Programs, GPS
: Roaming mode cannot update GPS data automatically.
, and then
: Connect your Pocket PC to a PC (Desktop
(Not supported in USA)
Satellite Data Update
The system will update GPS data
Á
.
3-4
n
o
p
[
automatically based on a schedule.
Follow these steps:
Check the automatic update
n
checkbox.
Set the date.
o
Set the time.
p
The text shows the expiration date
[
of the GPS data. On the due date,
the system will pop up a warning
message. Refer to the following
instruction about the
Today
screen.

Tap the
Á
update the GPS data manually. The
figure on the left shows how to
download using the
synchronization connection.
After setting your Pocket PC to the following connection mode and
n
o
Tap the
Á
Satellite Data Update
to open the dialog in the left figure.
Check the expiration checkbox to
n
activate the reminder function on
the due date.
The default value is checked. The
o
system will automatically update
the data when online.
Costs will be incurred when
connecting over the GPRS, so
consider carefully before activating
this function.
Download
Setting
Button to
Button in the
main screen
activating the automatic update and Internet connection functions, the system
will automatically download the latest GPS information periodically.
Synchronization connection.
1.
connected to the PC, and that the PC is online.
Wireless LAN connection.
2.
GPRS connection.
3.
Make sure that your Pocket PC is
Voice Command Satellite Navigation 3-5

When the GPS data has expired,
Á
n
the relevant message displays on
the top of the screen.
The icon reminds you that your
n
GPS data has expired.
Tap the
o
o
open the message window.
p
Tap to close the message window.
p
Notification
Button to
3-6

Location SMS
Tap ,
You can utilize the GPS function offered by your Pocket PC, to send the
matching location automatically found by this program and the necessary
message to your contacts. This could be helpful in preventing kidnapping,
reporting disastrous situations, calling for help in emergencies or locating an
individual. In addition, we have formulated many SMS templates based on
different situations for your convenience.
Programs, GPS
, and then
n
1.
o
p
n
[
\
o
Location SMS
It is better to execute this program
at a location with clear signal.
Tap to open the
set up in advance, you can choose
contacts directly.
You can directly enter mobile
phone number in the To area. If
there is more than one recipient,
.
Contacts
screen, if
please use “;” to separate
]
recipients.
You can directly enter your message in this area, such as landmarks,
p
features or street names.
Automatically searches for GPS information.
[
Tap to allow you to select, add, edit, or delete your most used messages.
\
Tap to allow you to send SMS messages and report your location.
]
Voice Command Satellite Navigation 3-7

2.
Select
in the main screen,
once in the screen shown on the
left, tap on any message and tap
Button to select.
OK
Further, by pressing and holding
anywhere on the screen, together
with the pop-up menu, you can
add, edit or delete your most used
messages.
The content of the message that
3.
your recipient views looks similar
to what is shown on the left. Actual
messages differ depending on the
recipient’s de vice.
3-8

GPS Viewer
Tap ,
You may use this Pocket PC to automatically search the GPS
coordinates of your location and check if the GPS functions work properly.
Programs, GPS
, and then
1.
n
n
o
p
o
p
[
[
2.
n
n
o
o
p
p
q
q
GPS Viewer
Run this program in a location with
good signal reception.
Greenwich Mean Time (GMT):
After connecting to a satellite and
obtaining the GMT, it will be
displayed on the screen.
Tap to set the satellite time as the
system time.
Report GPS tracking information.
Tap to change the unit.
Switch to Satellite mode.
Tap
Satellite
mode.
Red: Satellite detected (In View).
Blue: Satellite data detected (Data
Valid).
Green: Tracking completed
(Tracker).
Signal strength: The larger the
figures, the stronger the signal.
Satellite ID: The IDs expressed in
numbers in this field correspond to
the IDs on the earth image above.
Switch to Compass mode.
.
to switch to Satellite
Voice Command Satellite Navigation 3-9

3-10

UUssiinngg tthhee PPhhoonnee
44
The Phone feature on the Pocket PC allows you to perform the
following tasks:
3.5 G video telephony. (Applies to M810)
V
Make and receive calls.
V
Quickly make calls or listen to voice mail without entering phone numbers
V
/
/
using
Contacts, Speed Dial
Check the
V
new number to
Receive calls and easily take notes during the call.
V
Send SMS messages.
V
Customize how your phone rings.
V
To switch to the Phone function, press the
of the Pocket PC or tap
To avoid distraction and affecting driving safety, never use your Pocket
PC while driving an automobile or any other moving vehicle.
Make sure that the SIM card is properly installed in your Pocket PC and
the Phone is already turned on before you use the functions described in
this section.
When aboard an aircraft, at a medical facility, or at the gas pump where
wireless communication devices are prohibited, please launch the
Wireless Manager
icon turns orange , the Flight Mode is activated and the wireless
connection of the Pocket PC is disabled.
The Phone function relies on the Pocket PC main battery for power.
Maintain the main battery power level to assure call quality and the
normal operation.
Call Log
to see who has called, whom you have called, add a
Contacts
and then tap the
, or your
, and access notes taken while you were on a call.
and then
Call Log
Phone
Caution!
.
button on the lower part
.
button. When the color of the
Using the Phone 4-1

Installing and Removing the SIM Card
Before installing the SIM card, launch
1.
button. When the color of the icon turns orange , this indicates
that the wireless connection of the Pocket PC is disabled.
Press the “Power Button” of the Pocket PC to turn off the screen.
2.
Installing the SIM Card
3.
Turn over your Pocket PC and remove the back cover. Please pay attention
to the direction of the missing corner of the SIM card, and then insert the
SIM card into the slot.
Wireless Manager
, then tap the
Installing the Battery
4.
Place the battery in the back of Pocket PC. Make sure that the golden
contacts are aligned to the battery box; gently insert the battery until it
clicks. Then replace the back cover.
4-2

Using the Phone
p
n
o
q
Microphone
n
Phone Receiver qPhone Speaker (Bottom of Pocket PC)
p
Combination
Method
Hold the
Pocket PC
manually
for calls
Install the
external
headset
Hold the Pocket
PC and position
the receiver close
to your ear and the
speaker close to
your lips.
Place the earphone
in your ear and
position the
microphone to
your lips.
Earphone
o
Operation
Answer or
End a Call
Press Send Button
or
End Button on
the lower part of the
Pocket PC.
The Bluetooth headset
does not support the
following functions.
Use the in-line control
button on the
microphone for the
following:
Incoming call: Quickly
1.
press to answer the
call.
Incoming call: Press
2.
and hold to reject the
call.
During a call: Press
3.
and hold to hang up.
During a call: Quickly
4.
press for call waiting;
press again to cancel
call waiting.
Adjust Earphone
Volume
While answering a
call, push the volume
control key on the
side of the Pocket
PC to test the
earphone volume.
--
Using the Phone 4-3

Adjusting the Phone Volume
Tap
programs’ sound functions under
under
When there is no call, you can push
1.
the volume control key on the side
of the Pocket PC or use the stylus
to tap the speaker icon
Tap
ring volume of the incoming call.
Push the volume control key on the
2.
side of the Pocket PC or tap
and then
volume. You can only do this
during a call.
Vibration mode
3.
: The speaker icon
on the top changes to .
on the top and adjust all
. Adjust the phone sound volume
.
and then to adjust the
to adjust the phone
Mute mode
4.
Here is how to adjust the proper volume:
If earphones are used with the Pocket PC to make calls, set the volume
1.
according to actual personal needs.
If earphones are not used with the Pocket PC and not held close to the ear
2.
for calls but similar to hands-free operation, it is recommended to set the
sound volume for the top two levels.
For holding the Pocket PC close to the ear directly for calls, it is
3.
recommended that you set the volume to the lower four levels. It is
recommended not to use the top two levels because the volume is high and
may affect your hearing.
Turn on or turn off the speakerphone:
Enable the speakerphone: While answering a call, tap
1.
on.
Disable the speakerphone: Tap
2.
: The speaker icon
on the top changes to .
Speaker off
to turn off.
Speaker on
to turn
4-4

Turning the Phone On or Off and Making Calls
Comparison of Product Features
Only the M810 has a video conference camera. The M750 does not
support the video conference camera and the related features; otherwise it
is identical in appearance to the M810.
The
Speed Dial
M750.
n
o
p
q
r
Button on the
main screen only applies to the
Phone
Camera for Video call
n
Adjust earphone volume
o
Rear side: The SIM card is located
p
below the battery.
Send Button
q
End Button
r
Using the Phone 4-5

Turn on the phone
1.
On the Today screen, tap to
n
launch
Wireless Manager
Or tap the icon. When the
o
message window appears, tap
“Wireless Manager.”
Tap to enable GSM.
p
Input the PIN and wait for the
q
phone to turn on.
changes to .
r
And the
icon changes to .
.
: Press
Dial
2.
telephone number and then tap the
Answer a call
3.
End a call
4.
Turn off the phone
5.
On the Today screen, tap to launch
n
Tap to disable GSM.
o
to enter the Phone screen. Use the stylus to tap the
: Press
: Press
.
.
4-6
Button.
Talk
Wireless Manager
.

Video Call
If both parties of the call wish to enable the instant video
communication function, the person you are calling must be equipped with a
video enabled mobile phone and service system. Are you ready? Smile and
say “Hello,” when you start a video call.
(Applies to M810)
First select your contact or enter the
1.
number to call, and then tap the
Video Call
To end the call, simply tap
2.
the Video Call main menu. Don’t
forget to say goodbye.
Video Call main menu.
3.
button.
on
n
o
p
Call status.
n
(Defaults) Video window for your
o
contact.
(Defaults) Video window for
p
yourself.
Toolbar for Video Call.
[
Provides the relevant menu.
\
q
\
s
For example, select
Options
picture, ring tone etc.
Return to the voice call keypad.
s
to modify the display
Using the Phone 4-7
Video Call

Icon Meaning
Set the contrast level.
Accept or hide the video information of the callee.
Use either front camera, rear camera, or close the camera.
Mute or turn on the sound.
Switch the video window display method.
End call.
Important!
If the video call dial out is unsuccessful, it is possible to switch to normal
voice calls.
are icons related to connection features. They are
shown according to your monthly plans, telecom service provider, and
network distribution conditions or effective system coverage area. To
make modifications to your monthly plans, please contact your telecom
service provider.
4-8

Toolbar
Smart Dialing
n
you remember and the system will
n
o
p
q
use the fuzzy comparison method
to list the matching contacts at area
on the figure.
o
Please refer to the keyboard shown
on the screen to enter information
including the phone number and
letters.
Tap a contact to view contents.
o
Provides the relevant menu. For
p
example, select
the phone setup such as ring tone,
vibration mode, PIN code, etc. Or
select
Send Text Message
SMS message.
Hide Keyboard
[
expand the contacts display area,
and then tap
restore the keyboard.
Speaker on
\
answering a call, tap to enable the
speakerphone.
Keypad
s
the keypad.
: Enter the portion
Options
Button: Tap to
Keyboard
to change
to send
Button to
Button: While
Button: Tap to return to
\
s
Using the Phone 4-9

The following table shows the icons that you may see on the Navigation
Bar on the top of the screen.
Signal Indicator Description
SIM card unavailable.
The phone is turned off. To turn it on, tap this icon.
Network is searching or unavailable.
Phone connection unavailable or network error. To turn
it off, tap this icon.
The phone is turned on and signal reception is normal.
To turn it off, tap this icon.
Active call. To switch back from other programs, tap
this icon.
Call forwarding active
Calls are forwarded
Missed call
Roaming mode
4-10

Call from Contacts
Phone numbers entered in Contacts can be used to quickly locate phone
numbers and make calls.
In the contact list, tap and hold the
1.
contact to display a pop-up menu.
Call from Speed Dial
On the Phone screen, tap
screen.
Tap
Call Mobile
2.
the pop-up menu.
Tap a contact to display the details.
3.
(Applies to M750)
Speed Dial
n
o
p
Button to enter the following
Tap and hold on a certain contact.
n
The pop-up menu provides the
and
Delete
setup.
Tap to redial this number.
o
Remember that this code (for
example, “2”) you want to dial can
also be dialed from the number
area in the Phone screen by tapping
on “2”.
Tap
Menu
p
the Contacts list. Tapping a
Contacts name and number will
add it to the Speed Dial list. A
maximum of 99 numbers are
allowed.
Edit
and then
or
Call Work
options for phone
New
on
to show
Using the Phone 4-11

Call from the Call History
Tap
screen.
Call History
Button on the Phone screen to enter the following
o pn
Tap
n
the categories. To search, tap
Caller
instructions to complete the
operation.
Tap this icon to redial this number
o
immediately.
Tap and hold the phone number
p
area and tap the option you need on
the pop-up menu. For example, tap
Call
to Contacts
the Phonebook.
Tap
q
Calls
tap
number of calls, call time and
manage call records as shown in
the figure on the left.
and then
Menu
and follow the screen
to redial this number, tap
to add this number to
and then
Menu
to delete all call records. Or
Call Timers
to view the
q
to list
Filter
Delete All
By
Save
4-12

Customize Your Phone
Tap
Menu, Options
modify the relevant service setup. Note that the setup values you can change
here depend on the services provided by your telephone company.
Tap
Menu, Options
, and then the
, and then the
n
o
p
q
Phone, Services, Network
tab.
Phone
You can set the ring type as ring,
n
vibration or mute.
If you want to use a customized
o
ring tone file, use the
synchronization program on your
desktop computer to copy the .wav
ring tone file to the
/Windows/Rings folder on the
Pocket PC. You can then select this
ring tone from the Ring tone list.
Set the key sound for dialing.
p
… tabs to
You can set a PIN (Personal
q
Identity Number) to block
unauthorized access to your phone.
Your first PIN is provided by your
phone service provider.
Using the Phone 4-13

Tap
Menu, Options
Add Ringtone
Tap ,
Programs, Phone
, and then the
, and then
Appreciation software
Make sure that you have checked
1.
“Zoom SMS.” When you receive
an SMS, a large mail icon will
appear on the upper right of the
Today screen, and you can open
your newly received message by
tapping on this icon.
If you check “Call Filter,” the
2.
representing icon will appear on the
lower right of the Today screen.
Add Ringtone
All of the music files stored in your
1.
Pocket PC or storage card will be
listed, please select the new
ringtones which you would like to
add.
Tap
Add Ringtone
2.
you can enter the
telephone environment settings and
select your ringtone files from the
Ring tone list.
tab.
.
Button, then
Phone
tab for
4-14

Phone Application Programs
Caution!
Before you can use the functions described in the
that the SIM card is properly installed in your Pocket PC and the Phone is
already turned on.
SIM Manager
If your Pocket PC does not include this function, it means it is not
Group. Make sure
Phone
supported and you can skip this chapter.
Tap ,
Programs, Phone
, and then
Standard Display
SIM Manager
Phonebook entries.
manages the SIM Phonebook and duplicates the
n
o
p
q
r
s
^
SIM Manager
SIM Phonebook
n
or
Name
o
the columns, and when the
button appears it is possible to sort.
Tap and hold a Phonebook entry to
p
duplicate it to
Contacts
q
number will be displayed in this
column. If none is available, then
the office number will be
displayed.
Tap and hold a Contacts entry to
r
duplicate it to the
Phonebook
.
: Tap on the title of
Pos.
▲▼
Contacts
: The contact’s mobile
.
.
SIM
Using the Phone 4-15

The following are the shared functions for standard screen or full screen
display:
Button: Provides the appropriate function table.
Menu
s
SMS Management
New SIM Contact
Refresh
after the Contacts are updated.
Standard
t
modes.
: Tap to refresh the displayed contacts and SIM card information,
Button: Provides
: Enter the SMS management screen.
: Add a new phonebook entry to the SIM card.
Standard, SIM, Contacts
three switching
Full-Screen Display
When switching to full screen display, the full screen display for SIM
card phonebook or Contacts will be as shown as per the illustration below.
This will enable the phonebook contacts to be easier to read and more precise
management can be conveniently performed.
Tap and hold a Phonebook entry.
1.
Then, tap
to call this contact.
on the pop-up menu
Dial
4-16
Choose
2.
enter the preparation screen for
sending SMS.
Tap and hold a Phonebook entry to
3.
be duplicated. Then, tap
Contacts
copy to
Send SMS
on the pop-up menu to
Contacts
from the list, to
.
Copy to

Copy Phonebook Information
The function descriptions of this section are for standard screen and
fullscreen display. Copying phonebook information between the SIM card
and Contacts is either by “select one, select multiple, or select all” methods.
For precise management of your phonebook that can be conveniently
performed.
Select all
Select one
Select multiple
Tap on the □ in the title to select
n
all.
n
Tap on the □ in front of a
o
phonebook data entry to select this
singl entry.
o
p
It is also possible to select multiple
p
phonebook data entries.
In the
q
r
SIM Phonebook
and hold the selected phonebook
data to select the function and copy
to
Contacts
In the
the selected phonebook data to
select the function and copy to
SIM Phonebook
.
Contacts
area, tap and hold
area, tap
.
[
r
Using the Phone 4-17

SMS Management
Tap
screen and to display the original SMS contents on the SIM card.
Menu
and then
SMS Management
Double tap the number in the
n
column to view the corresponding
SMS contents.
n
o
p
Tap the SMS you want to delete.
o
When it is highlighted, tap
selected SMS
message from the SIM card.
Return to the
p
screen.
to enter the SMS management
Button to delete this
SIM Manager
Del
Pos.
4-18

SIM Value Add Service
Tap ,
Please install the SIM card that supports the SIM Toolkit function and
the appropriate application will show up in
name of the application shown will differ from the services provided by the
telecom service provider.
Programs
, and then
n
o
SimTKUI
(SIM Tool Kit).
Programs
This screen is for reference only.
Á
The actual screen is based on the
service items provided by your
telecom company.
Tap any service item.
n
Select
o
Follow the screen or voice
instructions.
. Furthermore, the
Button: Launch service item.
Using the Phone 4-19

SMS Sender
Tap ,
Tap ,
Press to bring up the
Message
Enter the composing SMS screen in
Programs, Phone
Messaging
.
, and then
, and then
Phone
n
o
p
q
r
Menu
.
and then
.
and then
SMS Sender
.
New
screen. Tap
Messaging
“Text Messages” means you are
n
editing SMS.
Input the mobile phone number.
o
Input the messages you want to
p
send.
Tap
Menu
q
select canned messages or to edit
your Text Messages.
Tap to send SMS message.
r
Send Text
My Text
to
4-20

b
Speed Dial
Tap ,
Programs, Phone
Hot Key Switch
, and then
n
o
p
n
o
p
q
Speed Dial
Tap the box according to the
n
functions provided by the system.
Tap to switch between these
o
functions:
Index Dial
Tools
p
menu. For example, select
to set the interface as
or
Dial
on/off
the screen.
Tap
Tools
Á
to enter the Setting screen
Text
shown on the left. You can set the
text font, text color and button
ackground color according to your
.
Frequency Dial
.
Button: Provides the relevant
Index Dial
to set the sound for tapping
and then
. Select
→
Settings
Frequency
Sound
Color and
personal preferences.
Font
n
Text color
o
Button background
p
Preview area
q
Using the Phone 4-21

Frequently Dialed Screen
Frequency Dial screen
Á
n
Tap any phone entry box to speed
n
dial.
o
p
q
r
Tap and hold the box, then select
o
appropriate command from the
pop-up menu.
Sort according to the number of
p
calls in descending order. The
upper left corner has the most
number of calls while the lower
right corner has the least number.
: Tap to view the previous or
§ ¨
q
next page.
Tap to switch to the
r
screen as shown on the left.
Dial
Frequency
4-22
 Loading...