

Page 1

MOTION TECHNOLOGY
MOTION TECHNOLOGY
MOTION TECHNOLOGYMOTION TECHNOLOGY
MOTION TECHNOLOGY
MOTION TECHNOLOGY
MOTION TECHNOLOGYMOTION TECHNOLOGY
Digital servo amplifier
DSB2-P
DSB2P 904 ver. D
Copyright ETEL SA. All rights reserved. Reproduction, adaptation or translation of this document is prohibited without prior written permission.
ETEL SA. makes no warranty for the use of its products and assume no responsibility for any errors which may appear in this document.
ETEL SA retains the right to make any change to these specifications at any time, without notice.
Hardware manual
HEADQUARTERS
ETEL S.A.
CH-2112 Môtiers
Switzerland
Phone : +41 32 862 01 23
Fax : +41 32 862 01 01
E-mail : [email protected]
http://www.etel.ch
ETEL G.m.b.H
Schillgasse 14
D-78661 Dietingen
Germany
Phone : +49 741 17453-0
Fax : +49 741 17453-99
E-mail : [email protected]
ETEL Inc.
333 E. State Parkway,
USA - Scha u mburg
Illinois 60173-5337,
Phone : +1 847 519 3380
Fax : +1 847 490 0151
E-mail : [email protected]
http://www.etelusa.com
ETEL B.V.
Landjuweel 20
NL-3905 PG Veenendaal
The Netherlands
Phone : +3 1 318 495 200
Fax : +31 318 495 210
E-mail : [email protected]
Page 2

THIS PAGE IS INTENTIONALLY LEFT BLANK
Page 3

Hardware manual DSB2-P
Direct Drives & Systems
MOTION TECHNOLOGY
Table of contents
1. Introduction . . . . . . . . . . . . . . . . . . . . . . . . . . . . . . . . . . . . . . . . . . . . . . 6
1.1 Safety . . . . . . . . . . . . . . . . . . . . . . . . . . . . . . . . . . . . . . . . . . . . . . . . . . . . . . . . . . 6
1.2 DSB2-P presentation . . . . . . . . . . . . . . . . . . . . . . . . . . . . . . . . . . . . . . . . . . . . . 7
1.2.1 Working principle . . . . . . . . . . . . . . . . . . . . . . . . . . . . . . . . . . . . . . . . . . . . . . . . . . . . . . . . . 7
1.2.2 Applications . . . . . . . . . . . . . . . . . . . . . . . . . . . . . . . . . . . . . . . . . . . . . . . . . . . . . . . . . . . . . 7
1.2.3 General operating conditions . . . . . . . . . . . . . . . . . . . . . . . . . . . . . . . . . . . . . . . . . . . . . . .7
1.2.4 Interfaces possibilities . . . . . . . . . . . . . . . . . . . . . . . . . . . . . . . . . . . . . . . . . . . . . . . . . . . . . 7
2. Models characteristics . . . . . . . . . . . . . . . . . . . . . . . . . . . . . . . . . . . . . 9
2.1 Modules main features . . . . . . . . . . . . . . . . . . . . . . . . . . . . . . . . . . . . . . . . . . . . 9
2.2 Rack module . . . . . . . . . . . . . . . . . . . . . . . . . . . . . . . . . . . . . . . . . . . . . . . . . . . . 10
2.2.1 Outline and dimensions . . . . . . . . . . . . . . . . . . . . . . . . . . . . . . . . . . . . . . . . . . . . . . . . . . . . 10
3
2.2.2 Block schematics . . . . . . . . . . . . . . . . . . . . . . . . . . . . . . . . . . . . . . . . . . . . . . . . . . . . . . . . . 11
2.2.3 Specifications . . . . . . . . . . . . . . . . . . . . . . . . . . . . . . . . . . . . . . . . . . . . . . . . . . . . . . . . . . . . 12
2.2.4 Mounting systems – Installation requirements . . . . . . . . . . . . . . . . . . . . . . . . . . . . . . . . . 13
2.3 Rack module with heat sink . . . . . . . . . . . . . . . . . . . . . . . . . . . . . . . . . . . . . . . . 15
2.3.1 Outline and dimensions . . . . . . . . . . . . . . . . . . . . . . . . . . . . . . . . . . . . . . . . . . . . . . . . . . . . 15
2.3.2 Block schematics . . . . . . . . . . . . . . . . . . . . . . . . . . . . . . . . . . . . . . . . . . . . . . . . . . . . . . . . . 16
2.3.3 Specifications . . . . . . . . . . . . . . . . . . . . . . . . . . . . . . . . . . . . . . . . . . . . . . . . . . . . . . . . . . . . 17
2.3.4 Mounting systems – Installation requirements . . . . . . . . . . . . . . . . . . . . . . . . . . . . . . . . . 18
2.4 Housed module without power supply . . . . . . . . . . . . . . . . . . . . . . . . . . . . . . . 20
2.4.1 Outline and dimensions . . . . . . . . . . . . . . . . . . . . . . . . . . . . . . . . . . . . . . . . . . . . . . . . . . . . 20
2.4.2 Block schematics . . . . . . . . . . . . . . . . . . . . . . . . . . . . . . . . . . . . . . . . . . . . . . . . . . . . . . . . . 21
2.4.3 Specifications . . . . . . . . . . . . . . . . . . . . . . . . . . . . . . . . . . . . . . . . . . . . . . . . . . . . . . . . . . . . 22
2.4.4 Mounting systems - installation requirements . . . . . . . . . . . . . . . . . . . . . . . . . . . . . . . . . 23
2.5 Housed module with power supply . . . . . . . . . . . . . . . . . . . . . . . . . . . . . . . . . . 24
2.5.1 Outline and dimensions . . . . . . . . . . . . . . . . . . . . . . . . . . . . . . . . . . . . . . . . . . . . . . . . . . . . 24
2.5.2 Block schematics . . . . . . . . . . . . . . . . . . . . . . . . . . . . . . . . . . . . . . . . . . . . . . . . . . . . . . . . . 25
2.5.3 Specifications . . . . . . . . . . . . . . . . . . . . . . . . . . . . . . . . . . . . . . . . . . . . . . . . . . . . . . . . . . . . 26
2.5.4 Mounting systems - installation requirements . . . . . . . . . . . . . . . . . . . . . . . . . . . . . . . . . 27
3. Electrical interface . . . . . . . . . . . . . . . . . . . . . . . . . . . . . . . . . . . . . . . . 28
3.1 Encoders connectors . . . . . . . . . . . . . . . . . . . . . . . . . . . . . . . . . . . . . . . . . . . . . 29
3.1.1 Connector J10: TTL position encoder . . . . . . . . . . . . . . . . . . . . . . . . . . . . . . . . . . . . . . . . 29
3.1.2 Connector J1: Analog position encoder (1Vptp, 11µAptp) . . . . . . . . . . . . . . . . . . . . . . . . 31
3.1.3 Connector J9: Digital Hall encoder & over temperature protection . . . . . . . . . . . . . . . . 32
3.2 Inputs / outputs connector . . . . . . . . . . . . . . . . . . . . . . . . . . . . . . . . . . . . . . . . . 34
3.2.1 Connector J2: Customers inputs / outputs . . . . . . . . . . . . . . . . . . . . . . . . . . . . . . . . . . . . 34
3.3 Communication connectors . . . . . . . . . . . . . . . . . . . . . . . . . . . . . . . . . . . . . . . 37
ETEL Doc. - Hardware manual # DSB2P 904 / Ver D / 4/11/02
Page 4

Hardware manual DSB2-P
4
Direct Drives & Systems
MOTION TECHNOLOGY
3.3.1 Connector J3: ETEL-Bus output . . . . . . . . . . . . . . . . . . . . . . . . . . . . . . . . . . . . . . . . . . . . 38
3.3.2 Connector J4: ETEL-Bus input . . . . . . . . . . . . . . . . . . . . . . . . . . . . . . . . . . . . . . . . . . . . . . 38
3.3.3 Connector J5: ETEL-Bus-Lite serial communication . . . . . . . . . . . . . . . . . . . . . . . . . . . . 38
3.3.4 Connector J6: Download key and EB-RS232 . . . . . . . . . . . . . . . . . . . . . . . . . . . . . . . . . . 39
3.4 Motor connectors . . . . . . . . . . . . . . . . . . . . . . . . . . . . . . . . . . . . . . . . . . . . . . . 40
3.4.1 ETEL motor cables numbering system . . . . . . . . . . . . . . . . . . . . . . . . . . . . . . . . . . . . . . . 40
3.4.2 Connector J7: Standard motor connection . . . . . . . . . . . . . . . . . . . . . . . . . . . . . . . . . . . . 40
3.4.3 Connector J7B: Motor connection with short circuit relay option . . . . . . . . . . . . . . . . . 40
3.4.4 Connector J16: Short circuit relay control . . . . . . . . . . . . . . . . . . . . . . . . . . . . . . . . . . . . 41
3.5 Power connectors . . . . . . . . . . . . . . . . . . . . . . . . . . . . . . . . . . . . . . . . . . . . . . . 42
3.5.1 Connector J11: Rack modules power supply input . . . . . . . . . . . . . . . . . . . . . . . . . . . . . 42
3.5.2 Connector J15: Housed module auxiliary and power supply input . . . . . . . . . . . . . . . . 43
3.5.3 Connector J14: Housed module power supply input . . . . . . . . . . . . . . . . . . . . . . . . . . . . 43
3.5.4 Connector J13: Housed module auxiliary supply input . . . . . . . . . . . . . . . . . . . . . . . . . . 44
3.5.5 Connector J12: External regeneration resistor . . . . . . . . . . . . . . . . . . . . . . . . . . . . . . . . 44
3.6 Optional board connector . . . . . . . . . . . . . . . . . . . . . . . . . . . . . . . . . . . . . . . . 45
3.6.1 Connector J8: Depends on the type of board . . . . . . . . . . . . . . . . . . . . . . . . . . . . . . . . . . 45
3.7 EMC cables connection . . . . . . . . . . . . . . . . . . . . . . . . . . . . . . . . . . . . . . . . . . 45
3.7.1 Cables manufacturing . . . . . . . . . . . . . . . . . . . . . . . . . . . . . . . . . . . . . . . . . . . . . . . . . . . . . 45
3.7.2 Connecting the short-circuit relay power cable's shield (J16) . . . . . . . . . . . . . . . . . . . . 47
3.7.3 Connecting the external regeneration resistor cable's shield (J12) . . . . . . . . . . . . . . . . 47
3.7.4 Cables installing . . . . . . . . . . . . . . . . . . . . . . . . . . . . . . . . . . . . . . . . . . . . . . . . . . . . . . . . . 47
ETEL Doc. - Hardware manual # DSB2P 904 / Ver D / 4/11/02
Page 5

MOTION TECHNOLOGY
Hardware manual DSB2-P
Direct Drives & Systems
Record of revisions, document # DSB2P 904 x
Document revisions
Issue (x) Date Modified
1.0 - First edition (French)
1.1 23/06/98 Document updated and translated in English
A 14/10/98 Document completed and updated, doc. numbering system modified
B 01/02/99 Document updated (minor changes and some errors corrected)
5
C
D
03/03/00 Document updated (minor changes and guideline for EMC & shielding added)
04/11/02 Document updated (housed module updated and some errors corrected)
Documentation concerning the DSB2-P
• Hardware manual DSB2-P
• Operation & software manual (DSB2-P programming & regulation description) # DSB2P 906 x
• EBL Communication manual (Communication interface protocol) # DSB2P 908 x
(Specifications & electrical interfaces)
# DSB2P 904 D
ETEL Doc. - Hardware manual # DSB2P 904 / Ver. D / 4/11/02
Page 6

6
1. Introduction
This document concerns the following ETEL digital servo amplifier: the DSB2 position controller or DSB2-P,
also called 'drive’ in this document.
The purpose of this manual is to give details regarding spec ifications, installatio n, interfacing and hardware
items. All details for proper connections (power supply, motor, encoder connection, etc...) are provided herein.
Detailed information concerning the programming of the drive is provided in the «Operation & software
manual».
1.1 Safety
Please, read all safety precautions listed below before handling the DSB2-P:
• Never use the DSB2-P for purposes other than those described in this manual.
• A competent and trained technician must install and operate the DSB2-P, respecting all specific
regulations of the respective country concerning both safety and EMC aspects.
• Troubleshooting and servicing are permitted only for ETEL technicians and agreed distributors.
Hardware manual DSB2-P
Direct Drives & Systems
MOTION TECHNOLOGY
• Operating the DSB2-P will make the motor move.
Keep away from all moving parts to avoid
injuries!
• The safety symbols placed on the DSB2-P or written in this manual must be respected.
Danger
Can be fatal for a person.
Caution
A danger for the operator can result from this.
Caution
The components must be handled in an ESD protected environment, only.
: Signals a danger of electrical shock to the operator.
: Signals a danger for the DSB2-P. Can be destructive for the material.
: Indicates electrostatic discharges (ESD), dangerous for the DSB2-P.
ETEL Doc. - Hardware manual # DSB2P 904 / Ver. D / 4/11/02
Page 7

Hardware manual DSB2-P
MOTION TECHNOLOGY
1.2 DSB2-P presentation
1.2.1 Working principle
The DSB2-P is a posi tion, pseudo-spee d1 and torque/force digital controller. It has been designed for dir ect
drive applications. Its power bridge PWM switching is determined by the motor position encoder.
The rack module includes on a single board the control circuits, the power bridge and all necessary interfaces
for the communication, the encoder and the inputs/outputs.
The housed model includes also the power supplies on a second board inside the same housing.
1.2.2 Applications
The DSB2-P can drive mono-phase, two-phase and three-phase motors.
You may obtain brushless torque and linear motors from ETEL, as well as moving coils and moving magnets.
The DSB2-P can drive these motors and also the brushless motors, DC motors, steppers (if they are
implemented with incremental encoders available on the market).
1.2.3 General operating conditions
Direct Drives & Systems
7
The DSB2-P is desi gne d to operate in a non-ag gres si v e en vir onm ent, wit h normal conditions o f te mpe ra tur e,
humidity, pressure and cleanliness. More specific information is given for each model in §2.
The DSB2-P is not desi gned or intended for use in the on-line control of air traffic, aircraft navigation and
communications or in the design, construction, operation and maintenance of any nuclear facility.
1.2.4 Interfaces possibilities
Motor and its position encoder:
To control the position of a rotary or linear motor, the DSB2-P needs the signal coming from an analog or TTL
encoder linked to this motor.
Communication:
The user can set the DSB2-P wi th a PC (W in9x/2000/NT/X P) using ETE L Tools (E TT) software through the
ETEL-Bus-Lite (RS 232 / RS422) communicatio n port. See the «ETT Setup software man ual» and the «EBL
Communication manual» for more information.
After the drive setting, an 'host' (a PC, a CNC
to send 'on-line' commands to the DSB2-P or / and to continuously check its status. See the «DSB2-P
Operation & software manual» for more details.
The user can daisy chain up to 32 DSB2-Ps (up to 31 slaves per master) on the ETEL-Bus (EB) communication
bus.
Inputs / Outputs:
The customer's inputs / outputs can be digital and analog signals coming from a CNC machine-tool, a PLC or
a joystick for example (see the diagram on next page).
2
machine-tool, or a PLC3, f.e.) may be linked to the same interface
The electrical interface details are given in §3.
1.If you specifically need a
2.Computer Numerical Control
3.Programmable Logic Controller
ETEL Doc. - Hardware manual # DSB2P 904 / Ver. D / 4/11/02
speed
control, use a
drive (refer to the DSB2-S specific documentation).
DSB2-S
Page 8

Hardware manual DSB2-P
8
Direct Drives & Systems
MOTION TECHNOLOGY
The solutions used in most applications are outlined below:
Rotary / linear analog
encoder or ETEL
magnetic encoder
Customers inputs / outputs
(CNC, PLC or joystick, f.e.)
Digital Hall
sensor and
temperature
protection
ETEL DSB2-P
(up to 31 slaves)
Linear /
rotary TTL
encoder
Communication with PC /
CNC / PLC (setup with ETT
software or 'host' commands)
Rotary or linear motor
ETEL Doc. - Hardware manual # DSB2P 904 / Ver. D / 4/11/02
Page 9

Hardware manual DSB2-P
MOTION TECHNOLOGY
2. Models characteristics
Four models of the DSB2-P are available, according to the needs:
1. Rack module (see §2.2)
2. Rack module with heat sink (see §2.3)
These 2 modules are dedicated to be mounted inside a standard 6U rack (19 in). They do not include any power
supply board and need to be powered through their DC power connector (J11) by an ex ternal power supply
(the ETEL DSO-PWR, f.e.), ideally installed inside of the rack.
3. Housed module without power supply (see §2.4)
4. Housed module with power supply (see §2.5)
These two modules are a 'stand alone' drive. They includes a complete drive with either its power supply or an
external power connecto r inside the same housing. The ma in difference between the rac k modules and the
housed module outlines concerns the power supply connectors.
2.1 Modules main features
Direct Drives & Systems
9
Rack module
Rack module with heat sink
Housed module
without power supply
Standard (10F wide / 6U high) rack module.
Up to 21 A output current (2 secs.) depending on the model.
Needs a regulated 24 - 340 Volts DC supply input. An ETEL power supply is available: DSO-PWR.
Position, pseudo-speed, or force reference. Pulse/direction mode available.
Two 16 bits microprocessors.
Communication with PC / CNC / PLC through RS232 / RS422, up to 115'200 bauds (EBL open protoc).
Multi-axis communication, up to 32 drives daisy-chained (ETEL-BUS, closed protocol).
Analog or TTL position encoder interface.
Optional interfaces: DSO-SIO, DSO-PRO, DSO-CAN and DSO-MAC.
User programmable sequences.
Specific ETEL graphical interface for setup, tuning and monitoring called ETEL Tools (ETT).
Standard (14F wide / 6U high) rack module.
Up to 42 A (2 secs.) / 56 A (1 sec) output current, depending on the model.
Needs a regulated 24 - 340 Volts DC supply input. An ETEL power supply is available: DSO-PWR.
Position, pseudo-speed, or force reference. Pulse/direction mode available.
Two 16 bits microprocessors.
Communication with PC / CNC / PLC through RS232 / RS422, up to 115'200 bauds (EBL open protoc).
Multi-axis communication, up to 32 drives daisy-chained (ETEL-BUS, closed protocol).
Analog or TTL position encoder interface.
Optional interfaces: DSO-SIO, DSO-PRO, DSO-CAN and DSO-MAC.
User programmable sequences.
Specific ETEL graphical interface for setup, tuning and monitoring called ETEL Tools (ETT).
'Stand alone' housed model (65.2 x 168.7 x 318 [mm]).
Up to 21 A output current (2 secs.) depending on the model.
Needs a regulated 24 - 340 Volts DC supply input.
Position, pseudo-speed, or force reference. Pulse/direction mode available.
Two 16 bits microprocessors.
Communication with PC / CNC / PLC through RS232 / RS422, up to 115'200 bauds (EBL open protoc).
Multi-axis communication, up to 32 drives daisy-chained (ETEL-BUS, closed protocol).
Analog or TTL position encoder interface.
Optional interfaces: DSO-SIO, DSO-PRO, DSO-CAN and DSO-MAC.
User programmable sequences.
Specific ETEL graphical interface for setup, tuning and monitoring called ETEL Tools (ETT).
Housed module
with power supply
ETEL Doc. - Hardware manual # DSB2P 904 / Ver. D / 4/11/02
'Stand alone' housed model (96 x 222 x 306 [mm]).
Up to 42 A (2 secs.) / 56 A (1 sec) output current, depending on the model.
Supplied from mains: 84 - 240 Vac (50-60 Hz).
Power supply and fan integrated.
Position, pseudo-speed, or force reference. Pulse/direction mode available.
Two 16 bits microprocessors.
Communication with PC / CNC / PLC through RS232 / RS422, up to 115'200 bauds (EBL open protoc).
Multi-axis communication, up to 32 drives daisy-chained (ETEL-BUS, closed protocol).
Analog or TTL position encoder interface.
Optional interfaces: DSO-SIO, DSO-PRO, DSO-CAN and DSO-MAC.
Options: Phases short-circuit relay - Output for external regeneration resistor.
User programmable sequences.
Specific ETEL graphical interface for setup, tuning and monitoring called ETEL Tools (ETT).
Page 10

10
2.2 Rack module
Type # : D S B 2 P x x 1 – x x x E
2.2.1 Outline and dimensions
Refer to the following chapters for details about the connectors:
J1 see §3.1.2 J7 see §3.4.1
J2 see §3.2.1 J8 see §3.6.1
J3 see §3.3.1 J9 see §3.1.3
J4 see §3.3.2 J10 see §3.1.1
J5 see §3.3.3 J11 see §3.5.1
J6 see §3.3.4
Hardware manual DSB2-P
Direct Drives & Systems
MOTION TECHNOLOGY
164.00
J11
261.80
SERVO
ERROR
SERVO
ON
Standard 6U 10F
DANGER
Unit: [mm]
Weight: 1.1 Kg
HIGT
VOLTAGE
50.60
ETEL Doc. - Hardware manual # DSB2P 904 / Ver. D / 4/11/02
Page 11

MOTION TECHNOLOGY
2.2.2 Block schematics
In the DSB2-P rack module, all parts are on a single board called the servo board.
It needs to be powered by an external power su pply. The power supply developed by ETEL (refe r to the
DSO-PWR User's manu al) is d es ign ed t o fit mos t ap pl icati ons . If you us e an othe r p ower s upp ly , i t must m eet
all the specifications given on the next page.
On the servo board, the power par t and the control part are galvanic ally separated. Al so, some inputs a nd
outputs are insulated from the control part by optocouplers.
Hardware manual DSB2-P
Direct Drives & Systems
EXTERNAL POWER SUPPLY
11
insulated
6
3
insulated
Fly-
back
DC / DC
(
)
POWER
galvanic
insulation
(
CONTROL
Digital
inputs
Digital
outputs
Digital hall
encoder input
Temp
protection
input
A / D
conversion
Analog
input
dI / dt
limitor
SERVO
BOARD
GNDpwr
IGBT power bridge
+Vpwr
(
)
+15V*
+15V
0V
-15V
+5V
)
0V
Digital
control
Overcurrent
detection
Digital
current
loop
Over /
under
voltage
IGBT
drive
unit
Current meas.
ph 1 & 3
#
~
POWER
galvanic
insulation
(
CONTROL
PH2
PH1
PH3
)
A / D
conversion
#
~
ETEL-
bus-lite
+
-
/
IN
OUT
Analog
encoder
input
Optional
board
Digital
encoder
input
ETEL-
bus
/
IN
OUT
)
)
POWER
(
CONTROL
galvanic
(
insulation
Caution: Auxiliary GND (marked 0V in the control part) is internally connected to the front panel
of the drive.
Power GND (marked GNDpwr in the power part) is conne cted to the front panel o f the drive
through a 22nF capacitor.
ETEL Doc. - Hardware manual # DSB2P 904 / Ver. D / 4/11/02
PH1
PH2
PH3 PH4
TO MOTOR
Page 12

12
2.2.3 Specifications
To meet the specificati ons li ste d bel ow, it is re co mme nde d to use an ET EL power supply with these 10F rack
modules.
There are two t ypes of 10F wide rack modules , according to your power nee ds. The DSB2-PX21 and the
DSB2-PX31. Their auxiliary circuits can be supplied with 96-340Vdc (option -X1) or with 24-55Vdc (option -X2).
All specifications are given at 25°C ambient temperature:
Output to the motor
Power supply input
Auxiliary supply input
for DSB2-PXX1-X1
Auxiliary supply input
for DSB2-PXX1-X2
Hardware manual DSB2-P
Direct Drives & Systems
MOTION TECHNOLOGY
DSB2-PXX1 POWER FEATURES
Characteristics -PX21- -PX31-
Voltage (up to) 340 Vdc
3-phase motor
Continuous current
3-phase motor
Max. current during 2 seconds
2-phase motor
Continuous current
2-phase motor
Max. current during 1 second
PWM switching frequency
Current ripple frequency
DC voltage 24 - 340Vdc
Max. DC current at 24 - 340 Vdc 8 A / 16 A peak 15 A / 30 A peak
DC voltage 96-340 Vdc
Max. DC current at 96 Vdc
Max. DC current at 340 Vdc
DC voltage 24-55 Vdc
Max. DC current at 24 Vdc
Max. DC current at 55 Vdc
4.9 A 4.9 A
(1)
3.5
Arms 3.5
11 A 21 A
7.5 Arms 15 Arms
4 A 4 A
(1)
2.8
Arms 2.8
11 A 21 A
7.5 Arms 15 Arms
12 / 24 kHz
24 / 48 kHz
(3)
A
0.5
(3)
A
0.15
(3)
A
0.6
(3)
A
0.25
(1)
Arms
(1)
Arms
(2)
(2)
(1)
: Continuous current can be reached only with forced cooling (external fan necessary).
(2)
: If the firmware is 3.xx, PWM at 24kHz only.
(3)
: No optional board mounted within the drive, no external device connected to the I/O.
DSB2-PXX1 CONTROL FEATURES
Characteristics All models
Digital current loop sampling time 41.6 µs
General
Position references
Phases commutation with encoder position or digital hall effect
Motion profiles Trapezoidal / S-curve / Step / look-up table
Two 16 bits microprocessors Dual 80296
Position loop sampling time 166.67 µs
Position, pseudo-speed or force reference ± 10 V
ETEL Doc. - Hardware manual # DSB2P 904 / Ver. D / 4/11/02
Page 13

MOTION TECHNOLOGY
Standard interfaces
Position
encoders interfaces
User's
inputs / outputs
Software /
Programmability
Hardware manual DSB2-P
Direct Drives & Systems
DSB2-PXX1 CONTROL FEATURES
Characteristics All models
ETEL-BUS-LITE host (PC) communication RS232 or RS422 / 9'600 to 115'200 bauds
ETEL-BUS multi-axis communication
Pulse/direction mode available Max. 3 MHz
CAN bus interface option with DSO-CAN board
PROFIBUS interface option with DSO-PRO board
MACRO bus interface option with DSO-MAC board
Analog 1Vptp or 11uAptp Max. 320kHz in. / Up to 2'048 (x4) interpolation factor
Digital TTL (RS422) Max. 10 MHz input frequency
Digital inputs, insulated 6 (+ 8 with DSO-SIO option)
Digital outputs, insulated 3 (+ 8 with DSO-SIO option)
Analog outputs 1 (+ 2 with DSO-SIO option)
Analog outputs 0 (+ 2 with DSO-SIO option)
Setup software 'ETEL Tools' Windows 9x / 2000 / NT / XP
DLL files Windows 9x / 2000 / NT / XP / QNX4
User's programmable sequence (# of lines) 5'420
Liquid Crystal Display (# of characters) 16
Firmware update through serial link RS232
RS422 / 460'000 bauds or RS232 / 115‘200 (up to 32 axis)
13
2.2.4 Mounting systems – Installation requirements
The rack modules are mounted vertically inside a sub-rack:
483.00 (19'')
426.72 (84F)
265.90
261.80 (6U)
190.50
Sub-rack depth: 239.24
In the solution outlined above, seven DSB2-PXX1 are powered by a DSO-PWR (ETEL's power supply).
ETEL Doc. - Hardware manual # DSB2P 904 / Ver. D / 4/11/02
465.10
Unit: [mm]
Page 14

14
Hardware manual DSB2-P
Direct Drives & Systems
MOTION TECHNOLOGY
The sub-rack systems shall be protected against any splashes of liquid and any contacts with smoke and dust.
It is strongly recommended to install them inside a closed cabinet and to screw them on a metallic plate, where
no vibrations will occur.
Fresh air is necessary to cool them (the flow depends of the user application). It is recommended to install fans
on the sub-rack or in the cabinet to guarantee an air flow (fan power depends on the user application).
This drawing shows a sub-rack with rack modules, inside a cabinet:
The following distances are recommended: A = 100 [mm], B = 0 [mm] (drawing out of scale).
ETEL Doc. - Hardware manual # DSB2P 904 / Ver. D / 4/11/02
Page 15

Hardware manual DSB2-P
Direct Drives & Systems
MOTION TECHNOLOGY
2.3 Rack module with heat sink
Type # : D S B 2 P x x 2 – x x x E
2.3.1 Outline and dimensions
Refer to the following chapters for details about the connectors:
J1 see §3.1.2 J7 see §3.4.1
J2 see §3.2.1 J8 see §3.6.1
J3 see §3.3.1 J9 see §3.1.3
J4 see §3.3.2 J10 see §3.1.1
J5 see §3.3.3 J11 see §3.5.1
J6 see §3.3.4
15
164.00
261.80
SERVO
ERROR
50.60
SERVO
ON
DANGER
HIGT
VOLTAGE
J11
Standard 6U 14F
Unit: [mm]
Weight: 2 Kg
ETEL Doc. - Hardware manual # DSB2P 904 / Ver. D / 4/11/02
Page 16
16
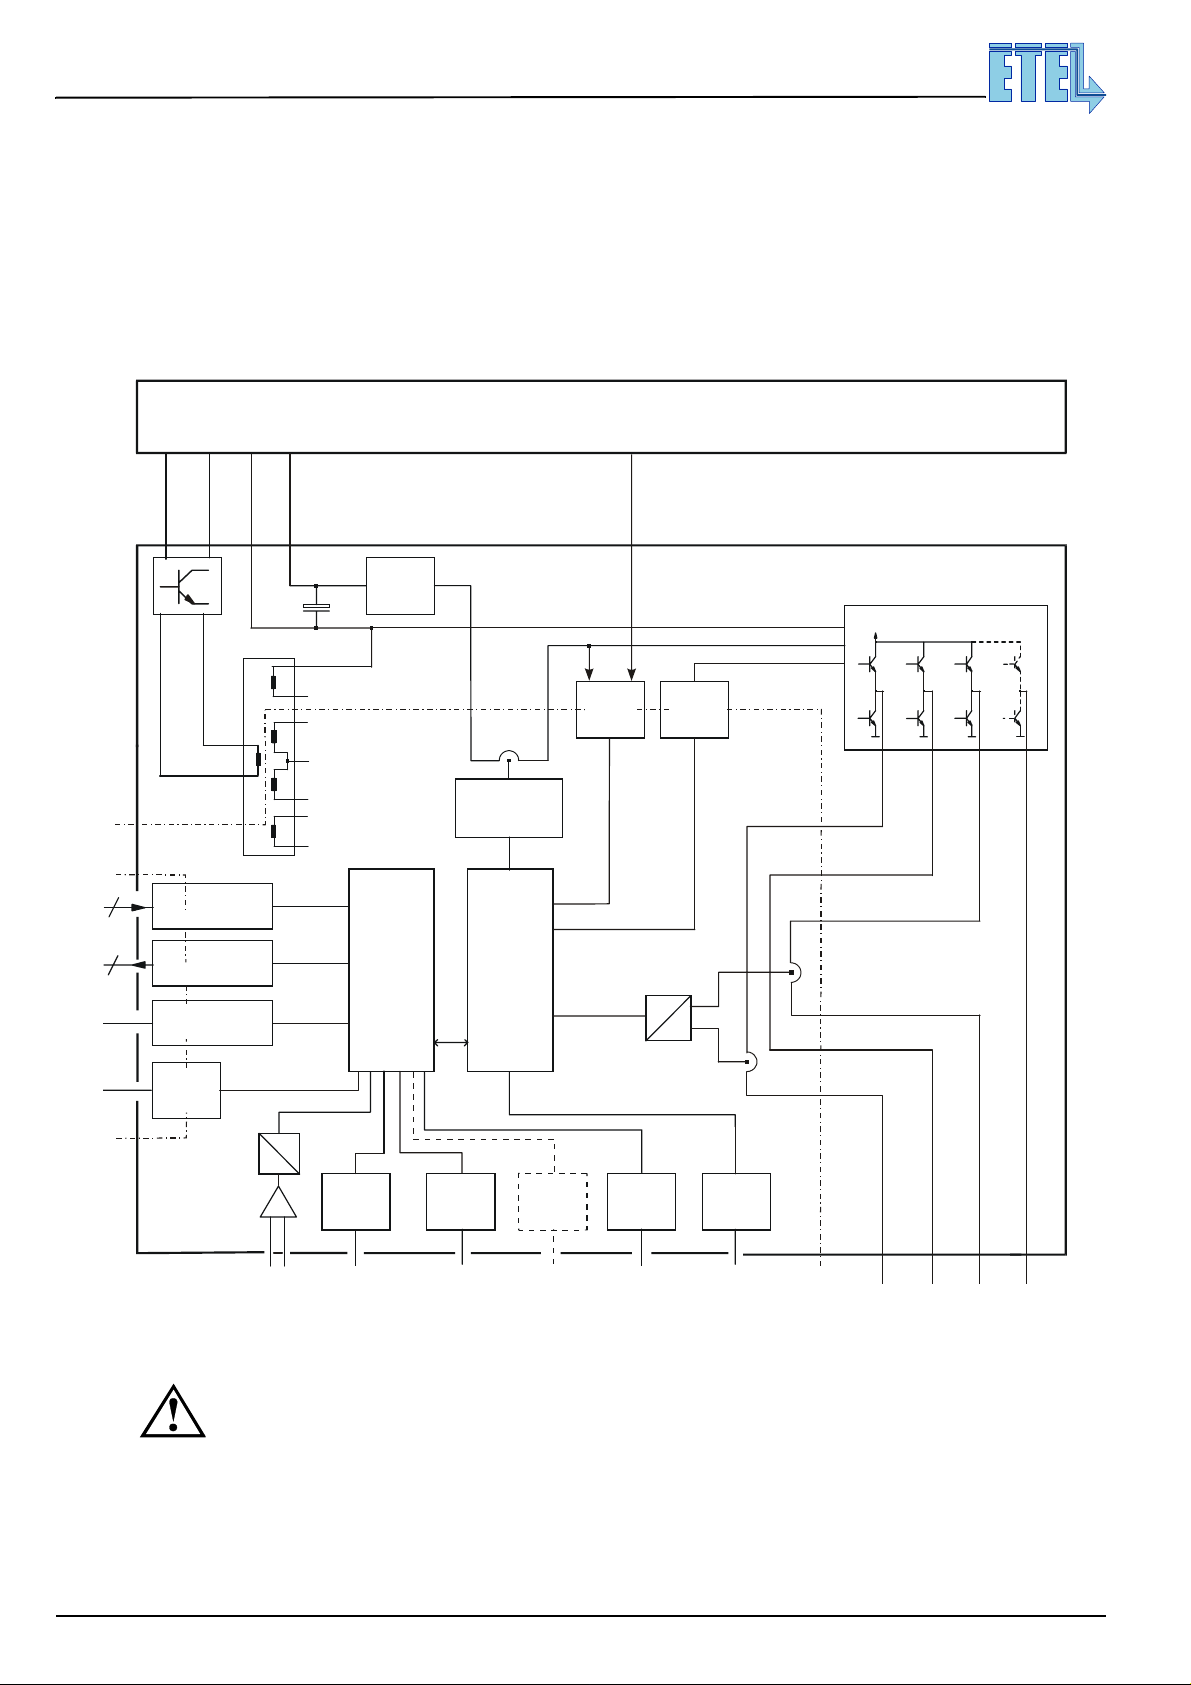
2.3.2 Block schematics
In the DSB2-P rack module, all parts are on a single board called the servo board.
It needs to be powered by an external power supply. The power supply developed by ETEL (refer to the DSO-
PWR User's manual) is designed to fit most applications. If you use another power supply, it must meet all the
specifications given on the next page.
On the servo boa rd, the power part a nd the control pa rt are galvanically separated. Also, som e inputs and
outputs are insulated from the control part by optocouplers.
Hardware manual DSB2-P
Direct Drives & Systems
MOTION TECHNOLOGY
EXTERNAL POWER SUPPLY
insulated
6
3
insulated
Fly-
back
DC / DC
)
(
POWER
galvanic
insulation
(
CONTROL
)
Digital
inputs
Digital
outputs
Digital hall
encoder input
Temp
protection
input
A / D
conversion
Analog
input
dI / dt
limitor
SERVO
BOARD
GNDpwr
IGBT power bridge
+Vpwr
(
)
+15V*
+15V
0V
-15V
+5V
0V
Digital
control
Overcurrent
detection
Digital
current
loop
Over /
under
voltage
Current meas.
IGBT
drive
unit
ph 1 & 3
#
~
POWER
galvanic
insulation
(
CONTROL
PH2
PH1
PH3
)
A / D
conversion
#
~
ETEL-
bus-lite
+
-
/
IN
OUT
Analog
encoder
input
Optional
board
Digital
encoder
input
ETEL-
bus
/
IN
OUT
)
CONTROL
(
)
POWER
(
galvanic
insulation
PH1
PH2
PH3 PH4
TO MOTOR
Caution: Auxiliary GND (marked 0V in the control part) is internally connected to the front panel
of the drive.
Power GND (marked GN Dpwr in the power part) is con nected to the front panel o f the drive
through a 22nF capacitor.
ETEL Doc. - Hardware manual # DSB2P 904 / Ver. D / 4/11/02
Page 17
MOTION TECHNOLOGY
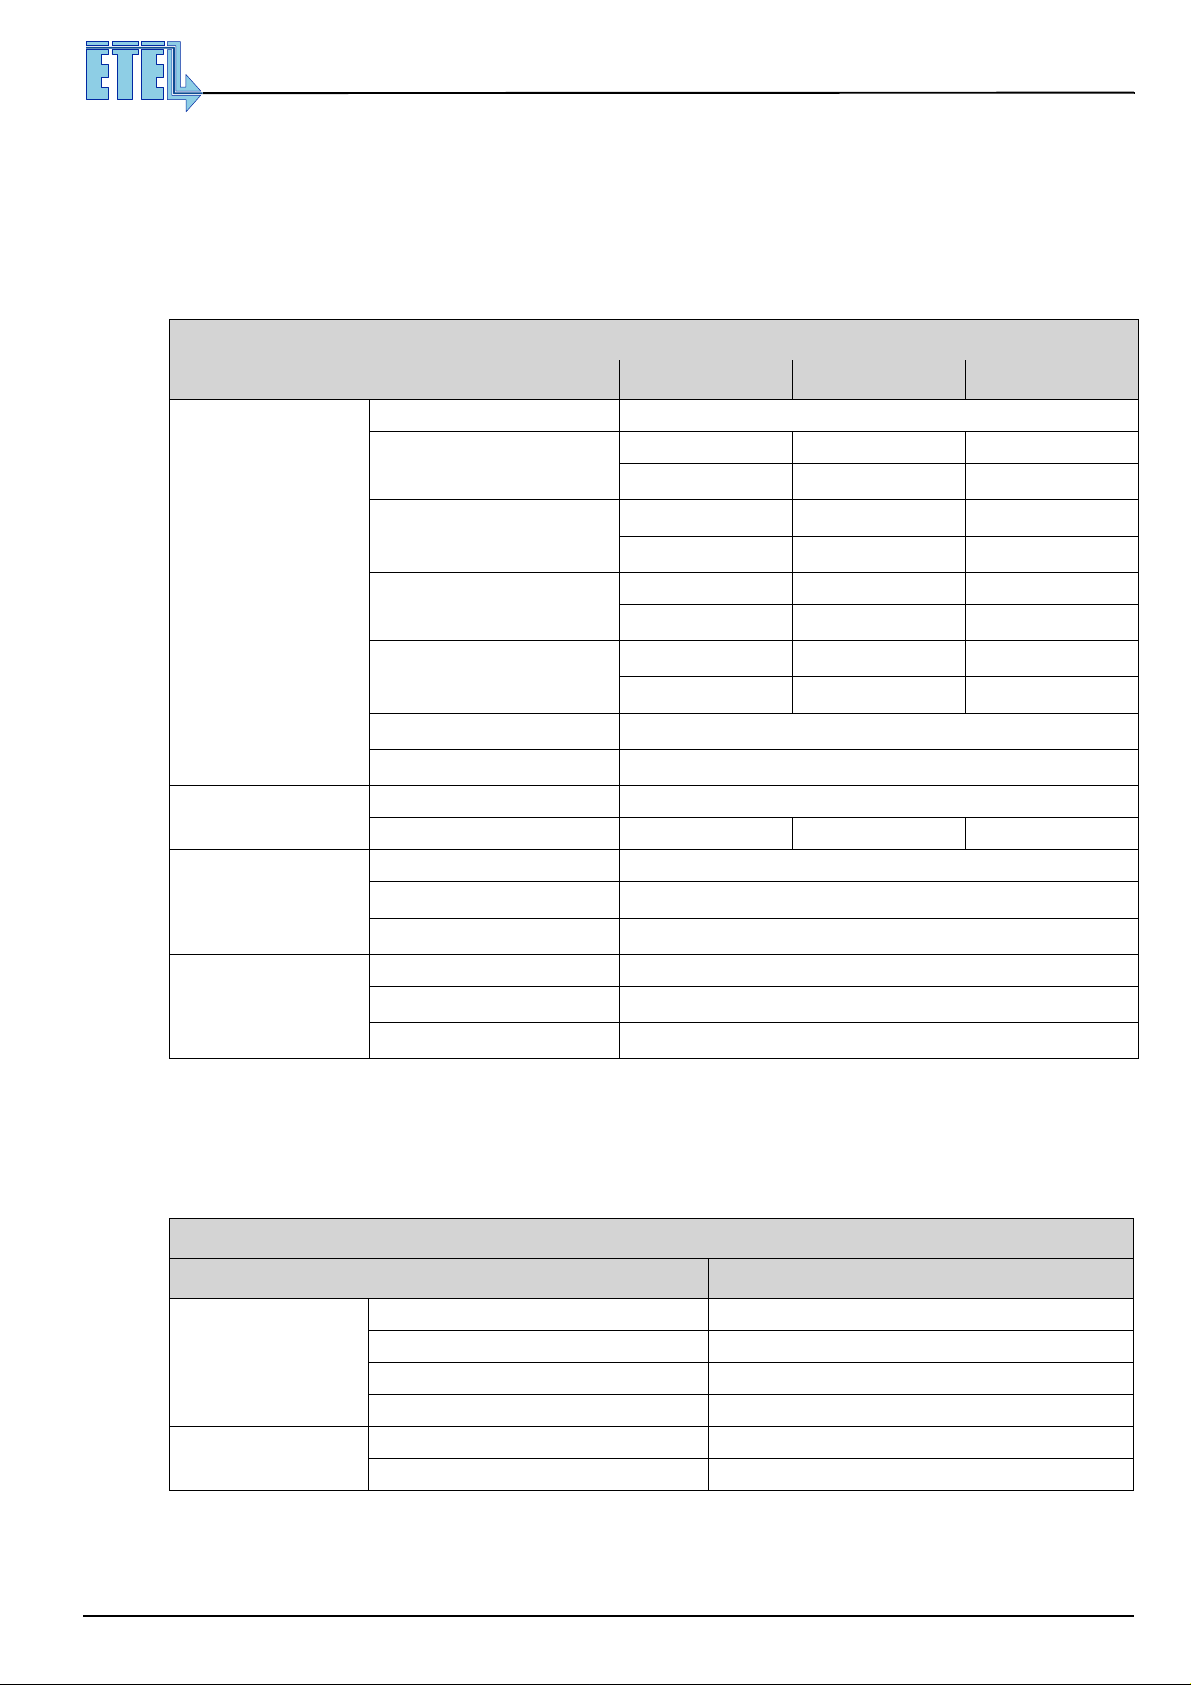
2.3.3 Specifications
To meet the specifications li ste d bel ow, it is reco mm ende d to us e an ET EL p owe r suppl y wi th thes e 10 F rac k
modules.
There are 3 types of rack modules with heat sink (14F), according to your power needs. The DSB2-PX32, the
DSB2-PX42 and the DSB2-PX52. Their auxiliary circuits can be supplied with 96-340Vdc (opt. -X1) or with 2455Vdc (opt. -X2). All specifications are given at 25°C ambient temperature:
Output to the motor
Power supply input
Auxiliary supply input
for DSB2-PXX2-X1
Auxiliary supply input
for DSB2-PXX2-X2
Hardware manual DSB2-P
Direct Drives & Systems
DSB2-PXX2 POWER FEATURES
Characteristics -PX32- -PX42- -PX52-
Voltage (up to) 340 Vdc
3-phase motor
Continuous current
3-phase motor
Max. current during 2 seconds
2-phase motor
Continuous current
2-phase motor
Max. current during 1 second
PWM switching frequency
Current ripple frequency
DC voltage 24 - 340Vdc
Max. DC current at 24 - 340 Vdc 15A / 30 A peak 30 A / 60 A peak 30 A / 60 A peak
DC voltage 96-340 Vdc
Max. DC current at 96 Vdc
Max. DC current at 340 Vdc
DC voltage 24-55 Vdc
Max. DC current at 24 Vdc
Max. DC current at 55 Vdc
11 A 21 A 21 A
(1)
7.5
Arms 15
(1)
Arms 15
21A 42 A
15 Arms 30 Arms
8.9 A 17 A 17 A
(1)
Arms 12
6.1
(1)
Arms 12
21 A 42 A
15 Arms 30 Arms
0.5
0.6
(3)
(3)
(4)
A
(4)
A
(4)
A
(4)
A
12 / 24 kHz
24 / 48 kHz
0.15
0.25
(1)
Arms
56 A
40 Arms
(1)
Arms
56 A
40 Arms
(2)
(2b)
17
(2)
(2b)
(1)
: Continuous current can be reached only with forced cooling (external fan necessary)
(2)
: For -PX52- the highest peak current is of 56 A or 40 Arms during 1.0 sec only (not 2 sec).
(2b)
:For -PX52- the highest peak current is of 56 A or 40 Arms during 0.5 sec (not 1 sec).
(3)
: If the firmware is 3.xx, PWM at 24kHz only
(4)
: No optional board mounted within the drive, no external device connected to the I/O.
DSB2-PXX2 CONTROL FEATURES
Characteristics All models
Digital current loop sampling time 41.6 µs
Phases commutation with encoder position or digital hall effect
General
Motion profiles Trapezoidal / S-curve / Step / look-up table
Two 16 bits microprocessors Dual 80296
Position loop sampling time 166.67 µs
Position references
ETEL Doc. - Hardware manual # DSB2P 904 / Ver. D / 4/11/02
Position, pseudo-speed or force reference ± 10 V
Page 18
18
Standard interfaces
Position
encoders interfaces
User's
inputs / outputs
Software /
Programmability
Hardware manual DSB2-P
Direct Drives & Systems
MOTION TECHNOLOGY
DSB2-PXX2 CONTROL FEATURES
Characteristics All models
ETEL-BUS-LITE host (PC) communication RS232 or RS422 / 9'600 to 115'200 bauds
ETEL-BUS mutli-axis communication RS422 / 460'000 bauds or RS232 / 1 15‘200 (up to 32 axis)
Pulse/direction mode available Max. 3 MHz
CAN bus interface option with DSO-CAN board
PROFIBUS interface option with DSO-PRO board
MACRO bus interface option with DSO-MAC board
Analog 1Vptp or 11uAptp Max. 320kHz in. / Up to 2'048 (x4) interpolation factor
Digital TTL (RS422) Max. 10 MHz input frequency
Digital inputs, insulated 6 (+ 8 with DSO-SIO option)
Digital outputs, insulated 3 (+ 8 with DSO-SIO option)
Analog outputs 1 (+ 2 with DSO-SIO option)
Analog outputs 0 (+ 2 with DSO-SIO option)
Set-up software 'ETEL Tools' Windows 9x / 2000 / NT / XP
DLL files Windows 9x / 2000 / NT / XP / QNX4
User's programmable sequence (# of lines) 5'420
Liquid Crystal Display (# of characters) 16
Firmware update through serial link RS232
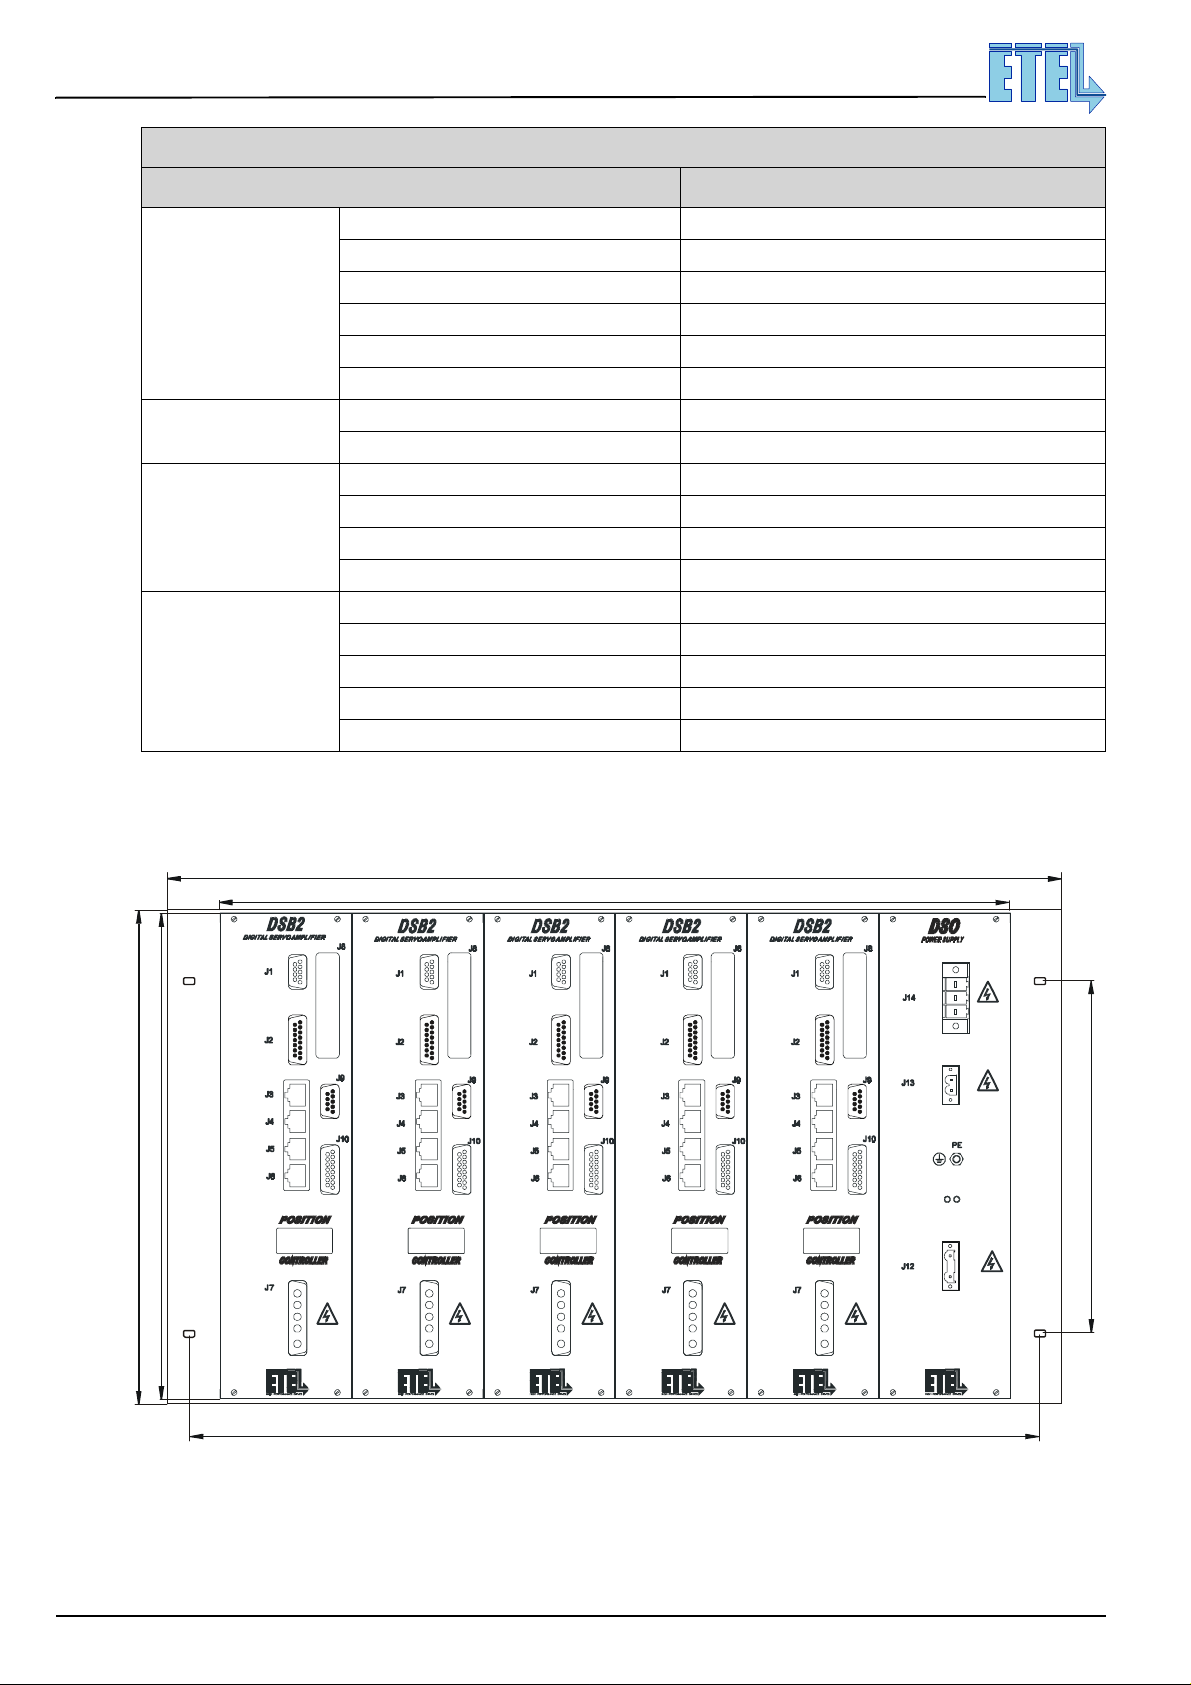
2.3.4 Mounting systems – Installation requirements
The rack modules with heat sink are mounted vertically inside a sub-rack, example:
483.00 (19'')
426.72 (84F)
265.90
261.80 (6U)
190.50
465.10
Unit: [mm]Sub-rack depth: 239.24
In the solution outlined above, fiv e DSB2-PXX2 are powered by a DSO-PWR (ETEL's power supply).
ETEL Doc. - Hardware manual # DSB2P 904 / Ver. D / 4/11/02
Page 19
MOTION TECHNOLOGY
Hardware manual DSB2-P
Direct Drives & Systems
19
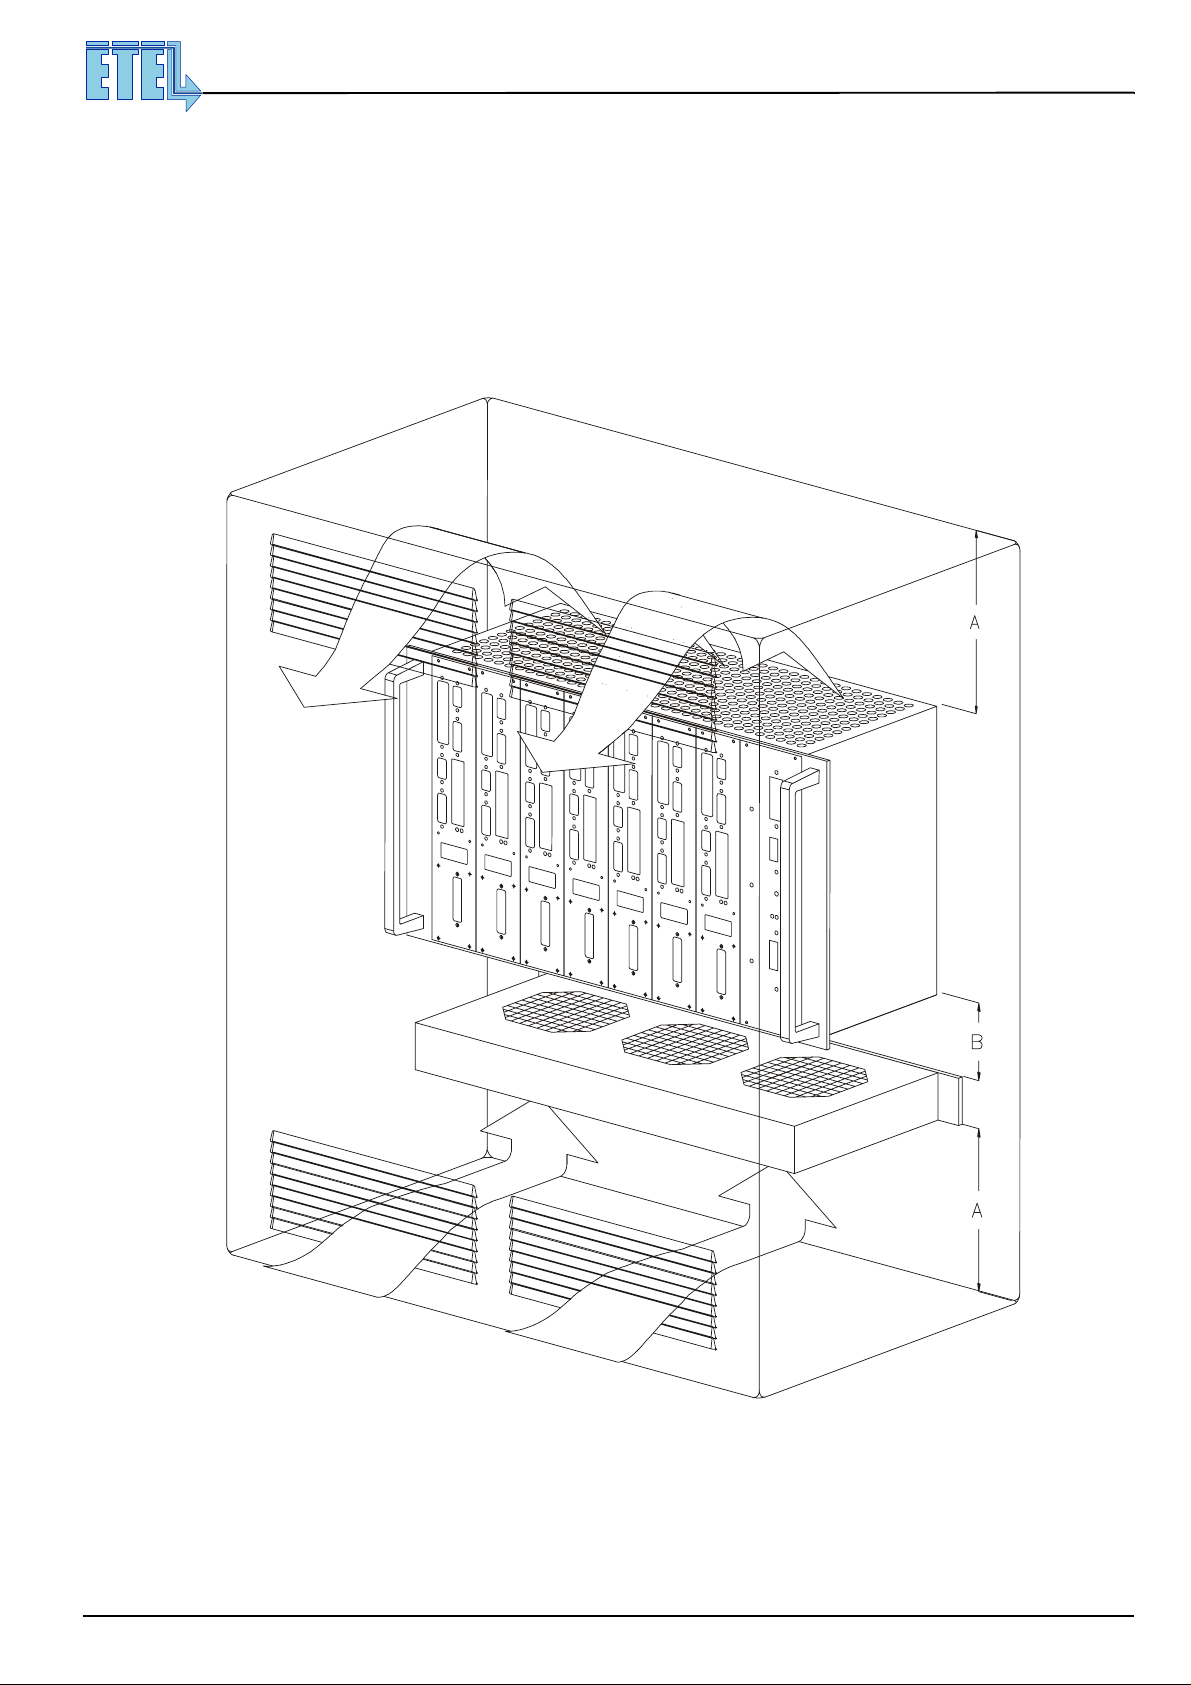
The sub-rack systems must be protected against any splashes of liquid and any contacts with smoke and dust.
It is strongly recommended to install them inside a closed cabinet and to screw them on a metallic plate, where
no vibrations will occur.
Fresh air is necessary to cool them (the flow depends on the user application). It is recommended to install fans
on the sub-rack or in the cabinet to guarantee an air flow (the fan power depends on the user application).
This drawing shows a sub-rack with rack modules, inside a cabinet:
The following distances are recommended: A = 100 [mm], B = 0 [mm] (drawing out of scale).
ETEL Doc. - Hardware manual # DSB2P 904 / Ver. D / 4/11/02
Page 20
Hardware manual DSB2-P
20
Direct Drives & Systems
2.4 Housed module without power supply
Type # : D S B 2 P x x 3 – x x x E
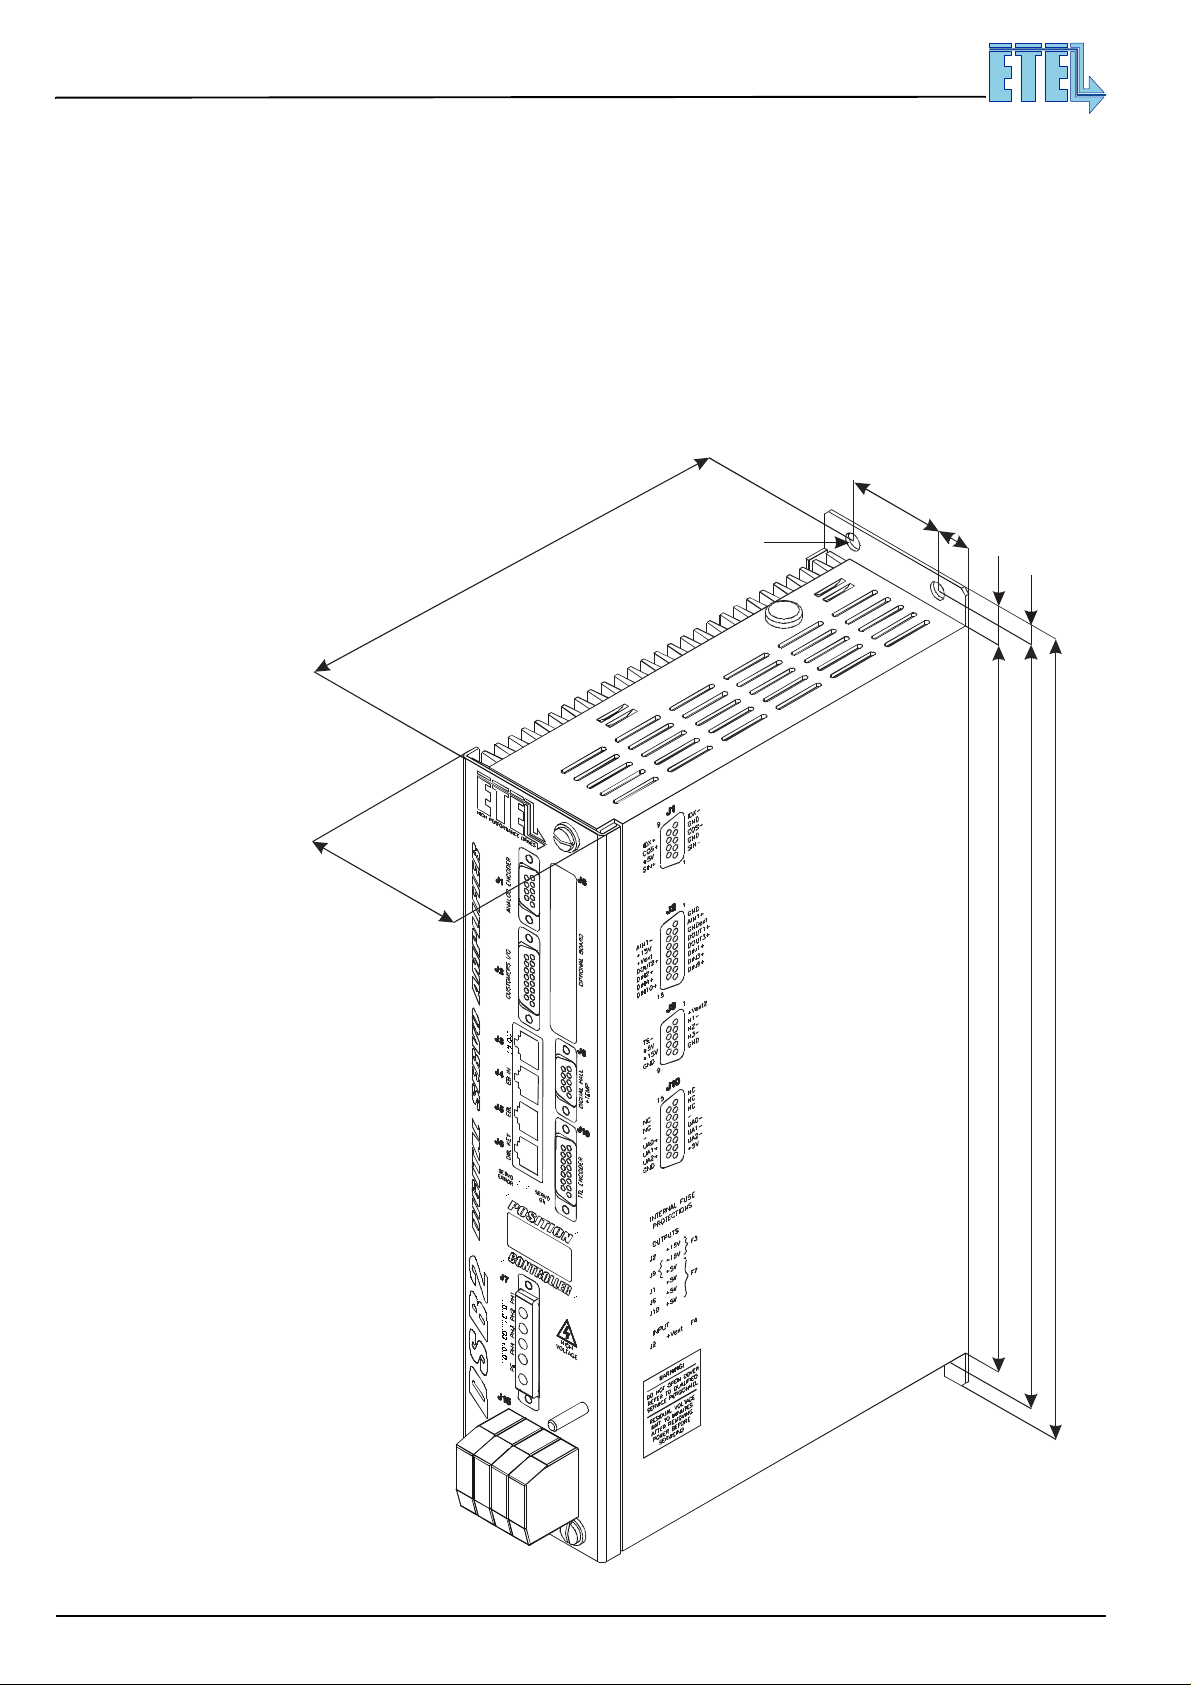
2.4.1 Outline and dimensions
Refer to the following chapters for details about the connectors:
J1 see §3.1.2 J6 see §3.3.4
J2 see §3.2.1 J7 see §3.4.1
J3 see §3.3.1 J8 see §3.6.1
J4 see §3.3.2 J9 see §3.1.3
J5 see §3.3.3 J10 see §3.1.1
J15 see §3.5.2
168.7
(4x) ∅6.5
39
13
MOTION TECHNOLOGY
14
6.5
65.2
290
305
318
Unit: [mm]
Weight: 2.8 Kg
ETEL Doc. - Hardware manual # DSB2P 904 / Ver. D / 4/11/02
Page 21
MOTION TECHNOLOGY
i
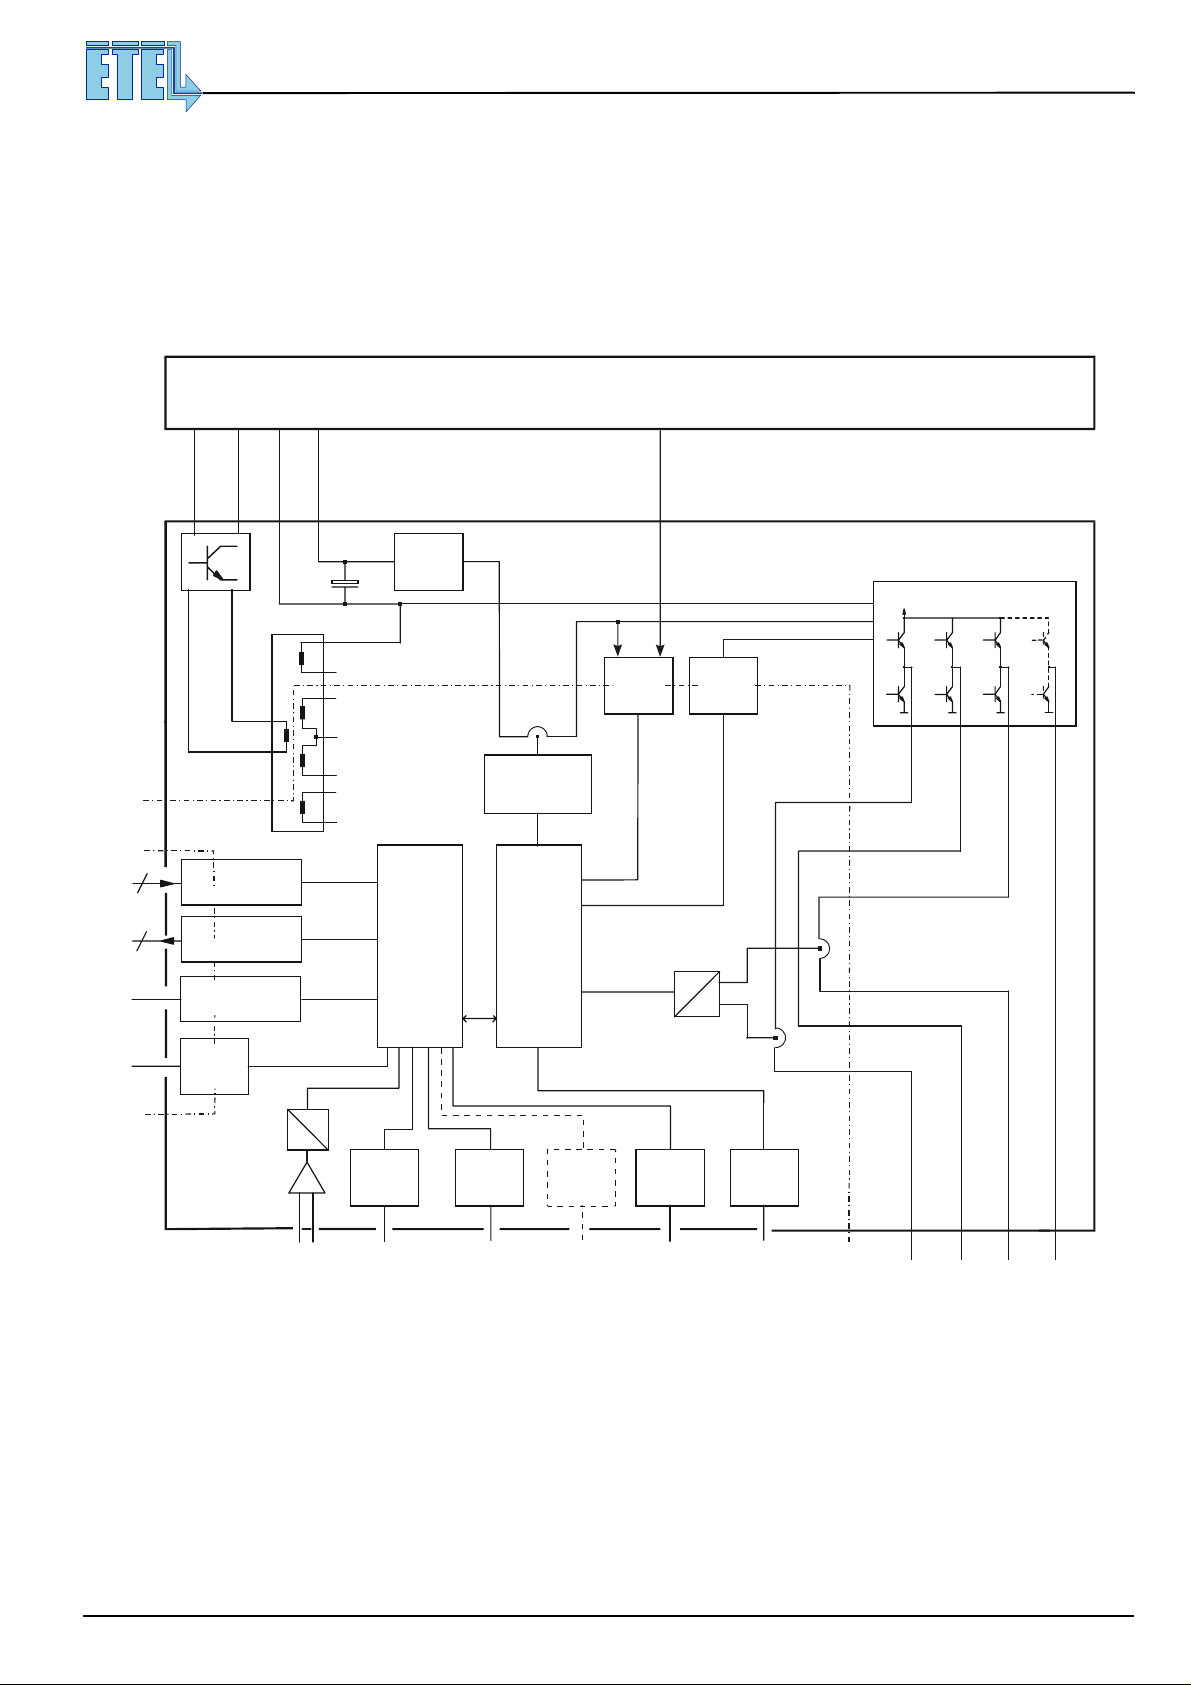
2.4.2 Block schematics
In this housed module, all parts are on a single board: the servo board. It includes an external power connector
and then it needs to be powered by an external power supply.
On the servo board, the power par t and the control part are galvanic ally separated. Al so, some inputs a nd
outputs are insulated from the control part by opto-couplers.
Hardware manual DSB2-P
Direct Drives & Systems
EXTERNAL POWER SUPPLY
21
insulated
6
3
nsu-
lated
Fly-
back
DC / DC
)
(
POWER
galvanic
insulation
(
CONTROL
Digital
inputs
Digital
outputs
Digital hall
encoder input
Temp
protection
input
A / D
conversion
Analog
input
dI / dt
limitor
SERVO
BOARD
GNDpwr
IGBT power bridge
+Vpwr
(
)
+15V*
+15V
0V
-15V
+5V
)
0V
Digital
control
Overcurrent
detection
Digital
current
loop
Over /
under
voltage
IGBT
drive
unit
Current meas.
ph 1 & 3
#
~
POWER
galvanic
insulation
(
CONTROL
PH2
PH1
PH3
)
A / D
conversion
#
~
ETEL-
bus-lite
+
-
/
IN
OUT
Analog
encoder
input
Optional
board
Digital
encoder
input
ETEL-
bus
/
IN
OUT
)
)
POWER
(
CONTROL
galvanic
(
insulation
PH1
PH2
PH3 PH4
TO MOTOR
ETEL Doc. - Hardware manual # DSB2P 904 / Ver. D / 4/11/02
Page 22
22
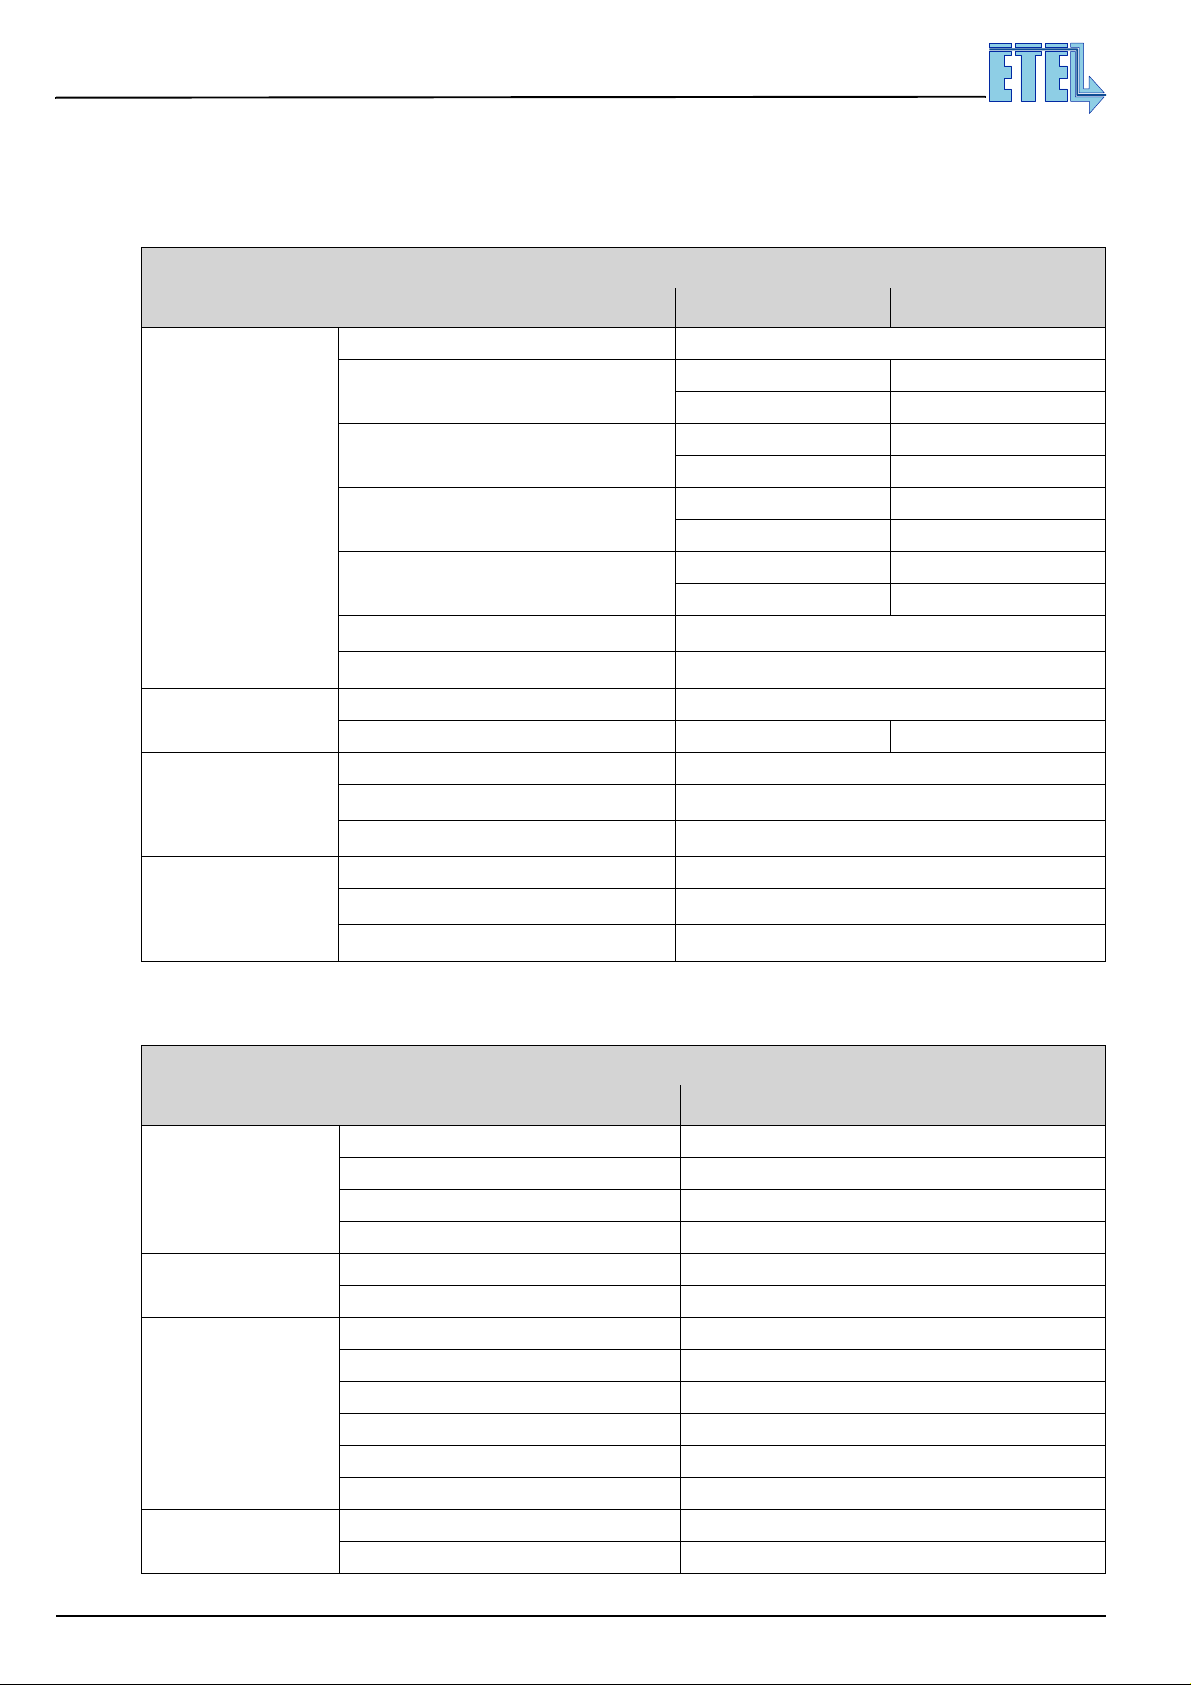
2.4.3 Specifications
There are two types of housed modules without power supply, according to your power needs.
All specifications are given at 25°C ambient temperature:
Output to the motor
Power supply input
Auxiliary supply input
for DSB2-PXX3-X1
Auxiliary supply input
for DSB2-PXX3-X2
Hardware manual DSB2-P
Direct Drives & Systems
MOTION TECHNOLOGY
DSB2-PXX3 POWER FEATURES
Characteristics -PX23- -PX33-
Voltage (up to) 340 Vdc
3-phase motor
Continuous current
3-phase motor
Max. current during 2 seconds
2-phase motor
Continuous current
2-phase motor
Max. current during 1 second
PWM switching frequency
Current ripple frequency
DC voltage 24 - 340Vdc
Max. DC current at 24 - 340 Vdc 8 A / 16 A peak 15 A / 30 A peak
DC voltage 96-340 Vdc
Max. DC current at 96 Vdc
Max. DC current at 340 Vdc
DC voltage 24-55 Vdc
Max. DC current at 24 Vdc
Max. DC current at 55 Vdc
4.5 A 4.5 A
3.2 Arms 3.2 Arms
11 A 21 A
7.5 Arms 15 Arms
3.5 A 3.5 A
2.5 Arms 2.5 Arms
11 A 21 A
7.5 Arms 15 Arms
0.5
0.6
(1)
(1)
(2)
A
(2)
A
(2)
A
(2)
A
12 / 24 kHz
24 / 48 kHz
0.15
0.25
(1)
: If the firmware is 3.xx, PWM at 24kHz only.
(2)
: No optional board mounted within the drive, no external device connected to the I/O.
DSB2-PXX3 CONTROL FEATURES
Characteristics All models
Digital current loop sampling time 41.6 µs
General
Position references
Standard interfaces
Position
encoders interfaces
Phases commutation with encoder position or digital hall effect
Motion profiles Trapezoidal / S-curve / Step / look-up table
Two 16 bits microprocessors Dual 80296
Position loop sampling time 166.67 µs
Position, pseudo-speed or force reference ± 10 V
ETEL-Bus-Lite host (PC) communication RS232 or RS422 / 9'600 to 115'200 bauds
ETEL-Bus mutli-axis communication
Pulse/direction mode available Max. 3 MHz
CAN bus interface option with DSO-CAN board
PROFIBUS interface option with DSO-PRO board
MACRO bus interface option with DSO-MAC board
Analog 1Vptp or 11uAptp Max. 320kHz in. / Up to 2'048 (x4) interpolation factor
Digital TTL (RS422) Max. 10 MHz input frequency
RS422 / 460'000 bauds or RS232 / 115‘200 (up to 32 axis)
ETEL Doc. - Hardware manual # DSB2P 904 / Ver. D / 4/11/02
Page 23
Hardware manual DSB2-P
Direct Drives & Systems
MOTION TECHNOLOGY
DSB2-PXX3 CONTROL FEATURES
Characteristics All models
Digital inputs, insulated 6 (+ 8 with DSO-SIO option)
User's
inputs / outputs
Software /
Programmability
Digital outputs, insulated 3 (+ 8 with DSO-SIO option)
Analog outputs 1 (+ 2 with DSO-SIO option)
Analog outputs 0 (+ 2 with DSO-SIO option)
Setup software 'ETEL Tools' Windows 9x / 2000 / NT / XP
DLL files Windows 9x / 2000 / NT / XP / QNX4
User's program (# of lines) 5'420
Liquid Crystal Display (# of characters) 16
Firmware update through serial link RS232
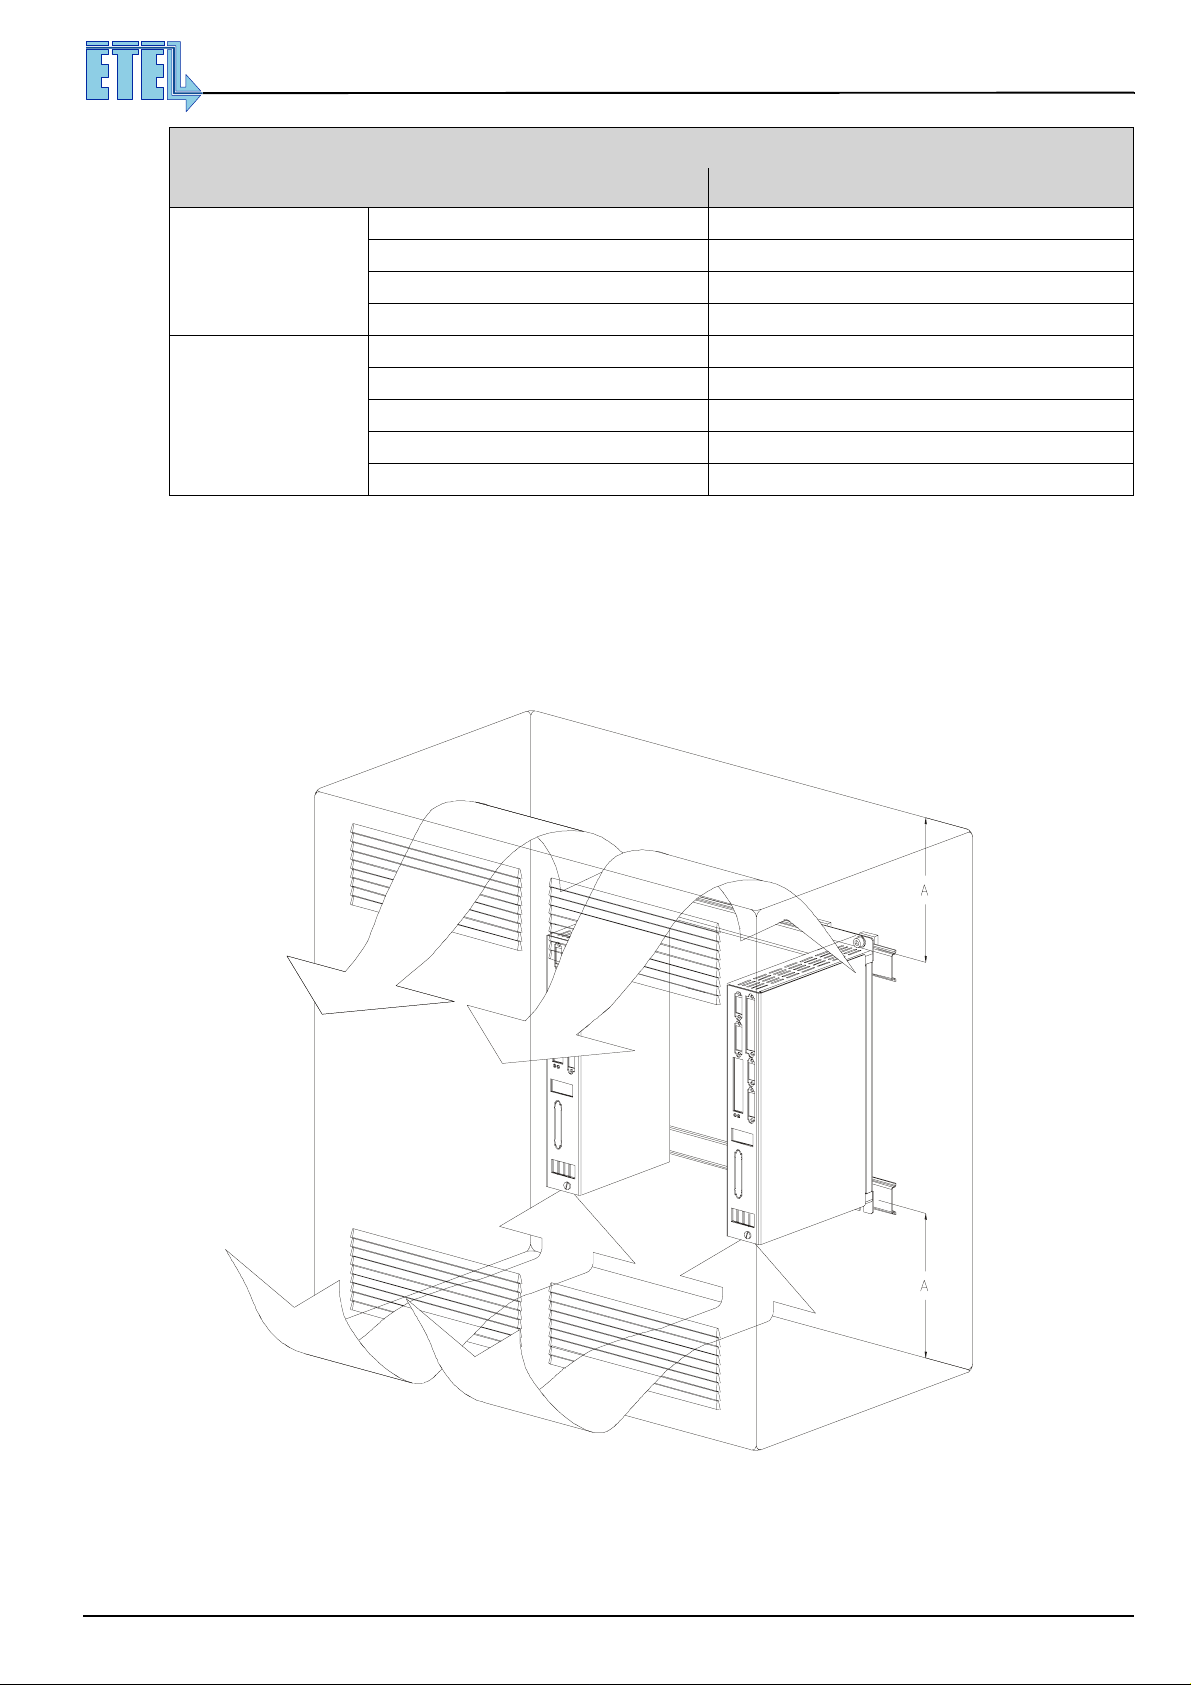
2.4.4 Mounting systems - installation requirements
The sub-rack systems must be protected against any splashes of liquid and any contacts with smoke and dust.
It is strongly recommended to install them inside a closed cabinet and to screw them on a metallic plate, where
no vibrations will occur. Fresh air is necessary to cool them (the flow depends on the user application).
23
This drawing shows 2 housed modules inside a cabinet:
The following distance is recommended: A = 100 [mm] (drawing out of scale).
ETEL Doc. - Hardware manual # DSB2P 904 / Ver. D / 4/11/02
Page 24
Hardware manual DSB2-P
24
Direct Drives & Systems
2.5 Housed module with power supply
Type # : D S B 2 P x x 4 – x x x E
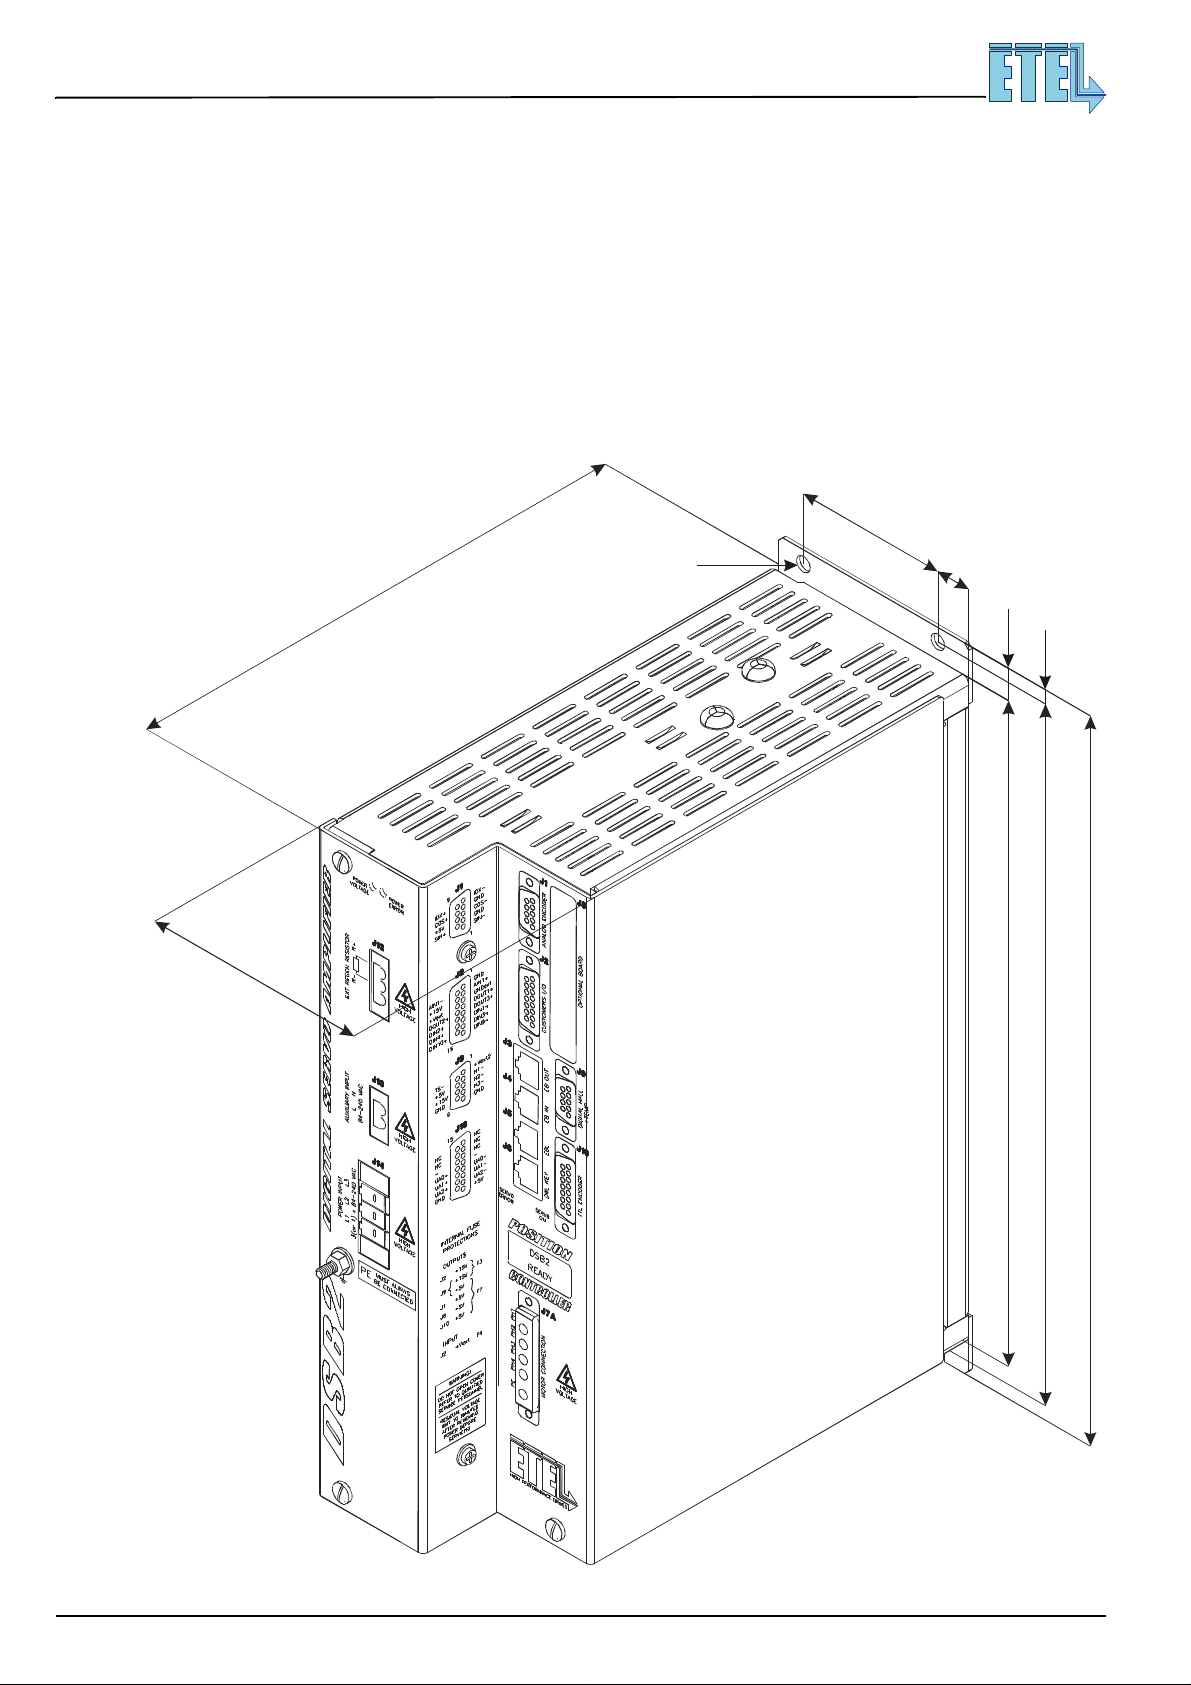
2.5.1 Outline and dimensions
Refer to the following chapters for details about the connectors:
J1 see §3.1.2 J8 see §3.6.1
J2 see §3.2.1 J9 see §3.1.3
J3 see §3.3.1 J10 see §3.1.1
J4 see §3.3.2 J12 see §3.5.5
J5 see §3.3.3 J13 see §3.5.4
J6 see §3.3.4 J14 see §3.5.3
J7 see §3.4.1 J16 see §3.4.4
J7B see §3.4.1
MOTION TECHNOLOGY
65
96
222
(4x) ∅6.5
15
13.5
279
6
294
306
Unit: [mm]
Weight: 5.3 Kg
ETEL Doc. - Hardware manual # DSB2P 904 / Ver. D / 4/11/02
Page 25
MOTION TECHNOLOGY
2.5.2 Block schematics
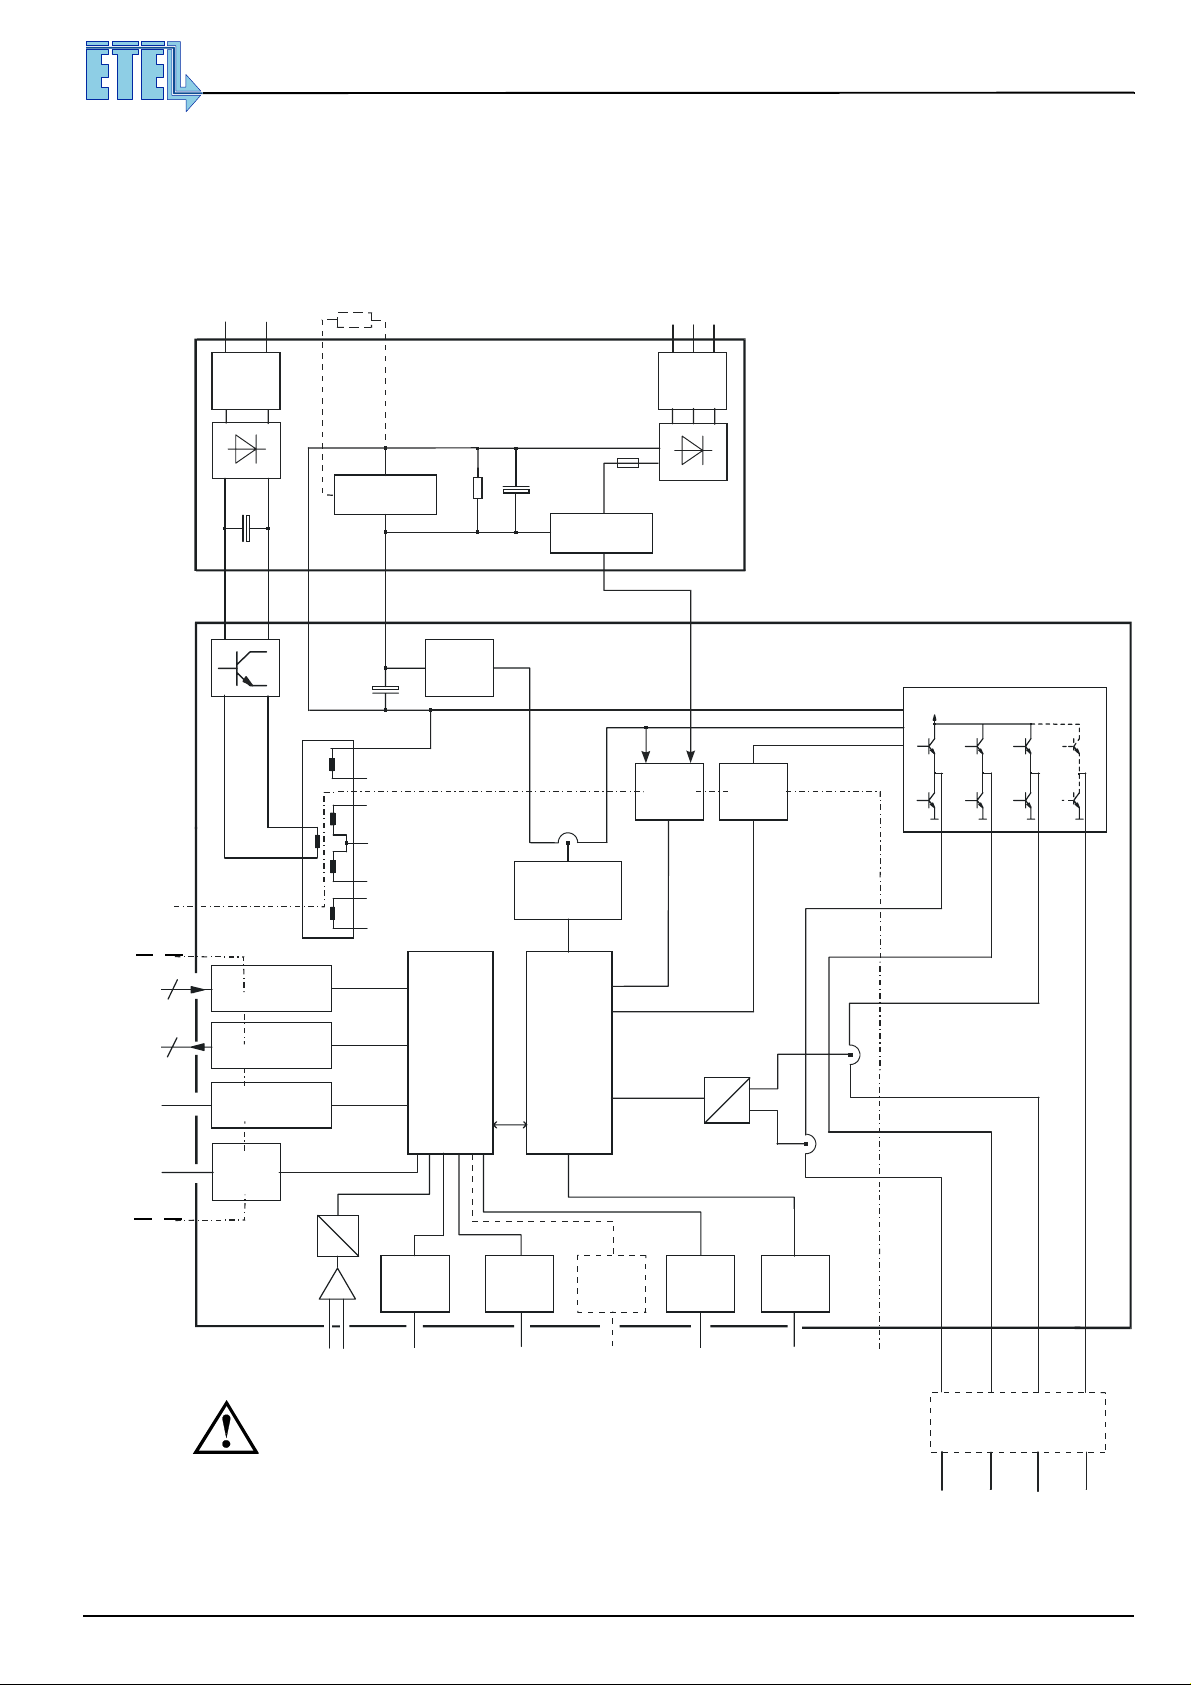
This housed module contains two boards: the servo board and the power supply board.
On the servo board, the power par t and the control part are galvanic ally separated. Al so, some inputs a nd
outputs are insulated from the control part by optocouplers.
Hardware manual DSB2-P
Direct Drives & Systems
25
insulated
6
3
insulated
L N
Filter
Fly-
back
DC / DC
)
(
POWER
galvanic
insulation
(
CONTROL
Digital
inputs
Digital
outputs
Digital hall
encoder input
Temp
protection
input
A / D
conversion
Analog
input
OPTIONAL EXT REGEN
RESISTOR
Overvoltage
protection
+15V*
+15V
0V
-15V
+5V
)
0V
#
~
ETEL-
bus-lite
+
-
/
IN
OUT
dI / dt
limitor
Digital
control
POWER
SUPPLY
BOARD
GNDpwr
+Vpwr
Analog
encoder
input
Inrush
protection
Overcurrent
detection
Digital
current
loop
Optional
board
L1 L2 L3
Filter
Over /
under
voltage
Current meas.
conversion
Digital
Digital
encoder
encoder
input
input
IGBT
drive
unit
ph 1 & 3
#
~
A / D
SERVO
BOARD
(
galvanic
insulation
(
CONTROL
PH1
ETEL-
bus
/
IN
OUT
GNDpwr
POWER
PH2
+Vpwr
)
)
PH3
)
CONTROL
(
IGBT power bridge
)
POWER
(
galvanic
insulation
Caution: Motor outputs (PH1-PH2-PH3-PH4) are not
galvanically insulated from the main lines (L1-L2-L3).
Auxiliary GND (marked 0V in the control part) is internally
connected to the drive's housing (PE screw).
Power GND (marked GNDpwr in the power part) is connected to
the drive's housing through a 47nF capacitor.
ETEL Doc. - Hardware manual # DSB2P 904 / Ver. D / 4/11/02
PH1 PH2 PH3 PH4
OPTIONAL SHORT-
CIRCUIT RELAYS
PH1 PH2 PH3 PH4
TO MOTOR
Page 26
26
2.5.3 Specifications
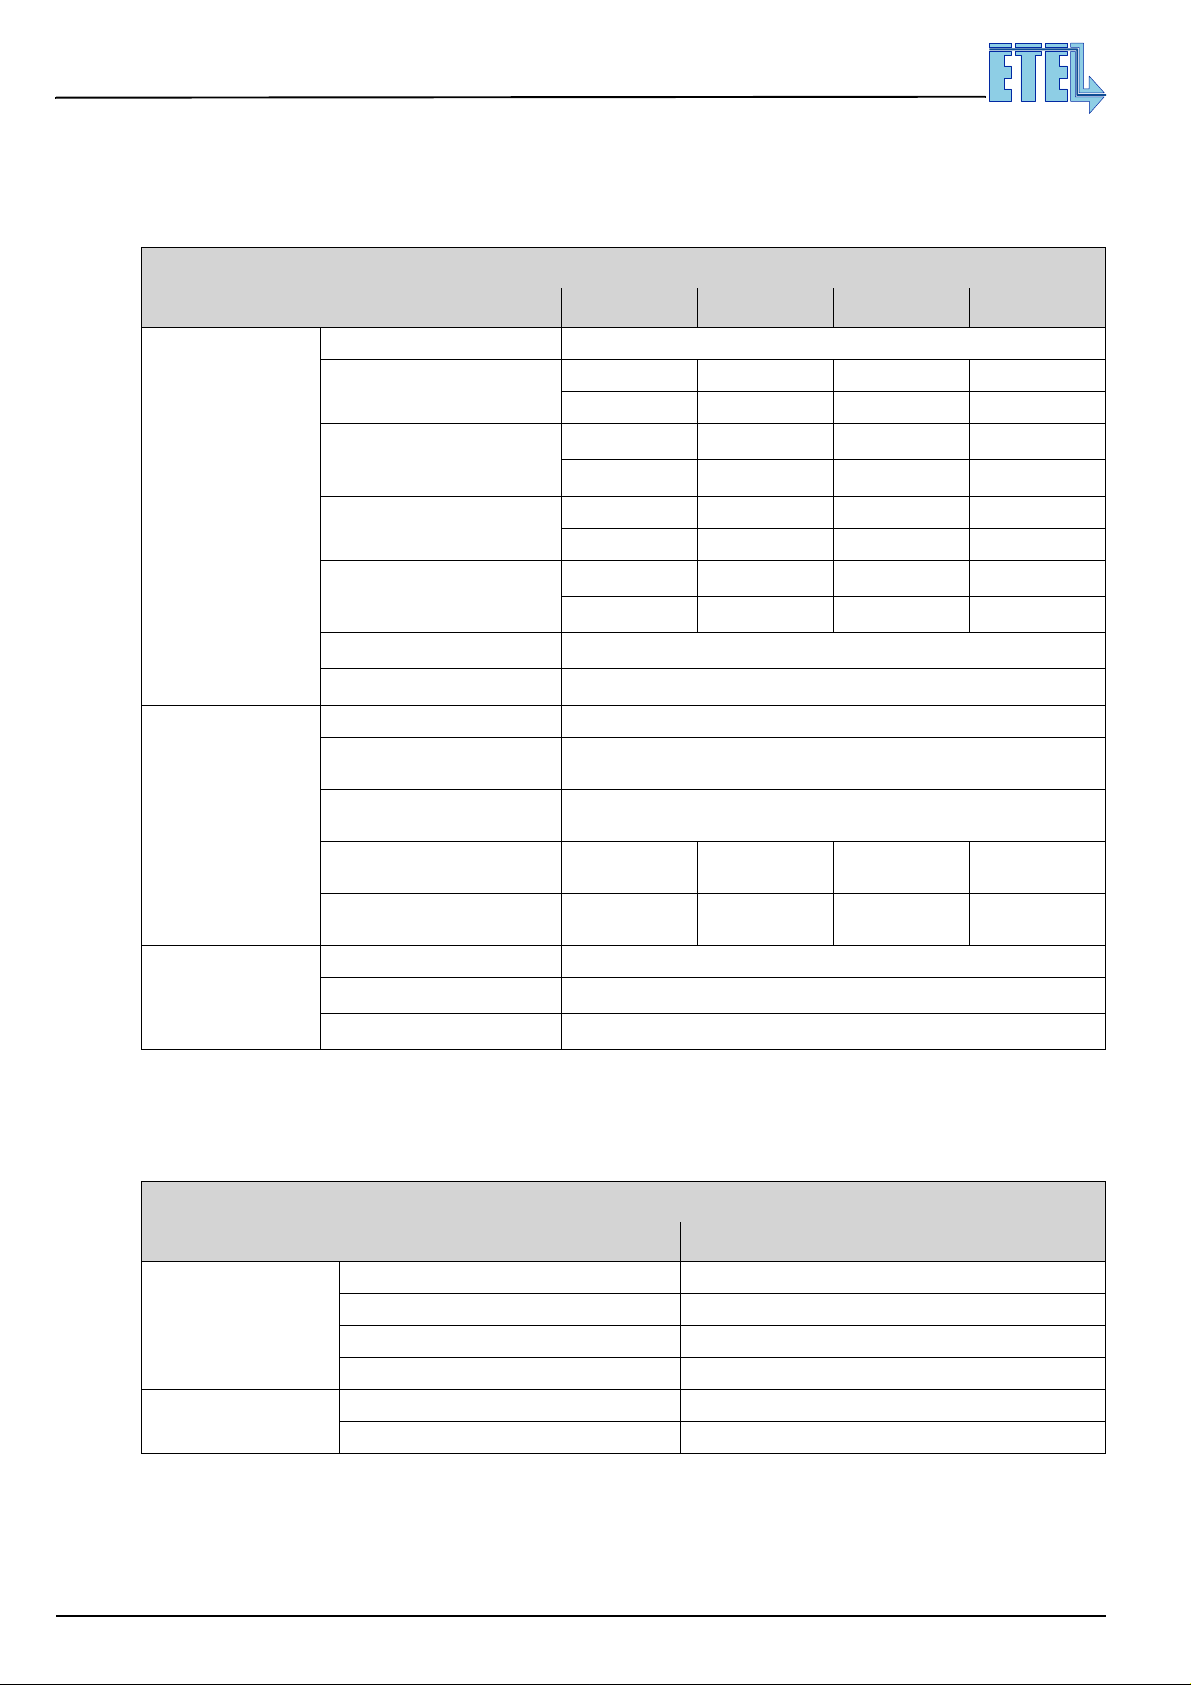
There are four types of housed modules, according to your power needs.
All specifications are given at 25°C ambient temperature:
Output to the motor
Power supply input
Auxiliary supply
input for DSB2-PXX4-
Hardware manual DSB2-P
Direct Drives & Systems
MOTION TECHNOLOGY
DSB2-PXX4 POWER FEATURES
Characteristics -PX24- -PX34- -PX44- -PX54-
Voltage (up to) 340 Vdc
3-phase motor
Continuous current
3-phase motor
Max. current during 2 seconds
2-phase motor
Continuous current
2-phase motor
Max. current during 1 second
PWM switching frequency
Current ripple frequency
AC voltage (1or 3 phases) 84 - 240 Vac (50 - 60 Hz)
Max. AC current at 1 x 84 - 240
Vac
Max. AC current at 3 x 84 - 240
Vac
Max. continuous power at
3 x 120 Vac
Max. continuous power at
3 x 230 Vac
AC voltage 84 - 240 Vac (50 - 60 Hz)
Max. AC current at 120 Vac
Max. AC current at 240 Vac
4.9 A 11 A 21 A 21 A
3.5 Arms 7.5 Arms 15 Arms 15 Arms
11 A 21 A
7.5 Arms 15 Arms 30 Arms
4.9 A 11 A 17 A 17 A
3.5 Arms 7.5 Arms 12 Arms 12 Arms
11 A 21 A
7.5 Arms 15 Arms
12 / 24 kHz
24 / 48 kHz
1 x 13 A
3 x 13 A
0.6kVA 1.2kVA 2.5 kVA 2.5 kVA
1.2kVA 2.5kVA 5 kVA 5 kVA
150
100
42 A 56 A
42 A 56 A
30 Arms 40 Arms
(2)
(2)
(3)
mA
(3)
mA
40 Arms
(1b)
(1)
(1)
(1b)
(1)
: For -PX54- the highest peak current is of 56 A or 40 Arms during 1sec only (not 2 sec).
(1b)
:For -PX54- the highest peak current is of 56 A or 40 Arms during 0.5 sec only (not 1sec).
(2)
: If the firmware is 3.xx, PWM at 24kHz only
(3)
: No optional board mounted in the drive.
DSB2-PXX4 CONTROL FEATURES
Characteristics All models
Digital current loop sampling time 41.6 µs
General
Position references
Phases commutation with encoder position or digital hall effect
Motion profiles Trapezoidal / S-curve / Step / look-up table
Two 16 bits microprocessors Dual 80296
Position loop sampling time 166.67 µs
Position, pseudo-speed or force reference ± 10 V
ETEL Doc. - Hardware manual # DSB2P 904 / Ver. D / 4/11/02
Page 27
MOTION TECHNOLOGY
Standard interfaces
Position
encoders interfaces
User's
inputs / outputs
Software /
Programmability
Hardware manual DSB2-P
Direct Drives & Systems
DSB2-PXX4 CONTROL FEATURES
Characteristics All models
ETEL-Bus-Lite host (PC) communication RS232 or RS422 / 9'600 to 115'200 bauds
ETEL-Bus mutli-axis communication
Pulse/direction mode available Max. 3 MHz
CAN bus interface option with DSO-CAN board
PROFIBUS interface option with DSO-PRO board
MACRO bus interface option with DSO-MAC board
Analog 1Vptp or 11uAptp Max. 320kHz in. / Up to 2'048 (x4) interpolation factor
Digital TTL (RS422) Max. 10 MHz input frequency
Digital inputs, insulated 6 (+ 8 with DSO-SIO option)
Digital outputs, insulated 3 (+ 8 with DSO-SIO option)
Analog outputs 1 (+ 2 with DSO-SIO option)
Analog outputs 0 (+ 2 with DSO-SIO option)
Setup software 'ETEL Tools' Windows 9x / 2000 / NT / XP
DLL files Windows 9x / 2000 / NT / XP / QNX4
User's program (# of lines) 5'420
Liquid Crystal Display (# of characters) 16
Firmware update through serial link RS232
RS422 / 460'000 bauds or RS232 / 115‘200 (up to 32 axis)
27
2.5.4 Mounting systems - installation requirements
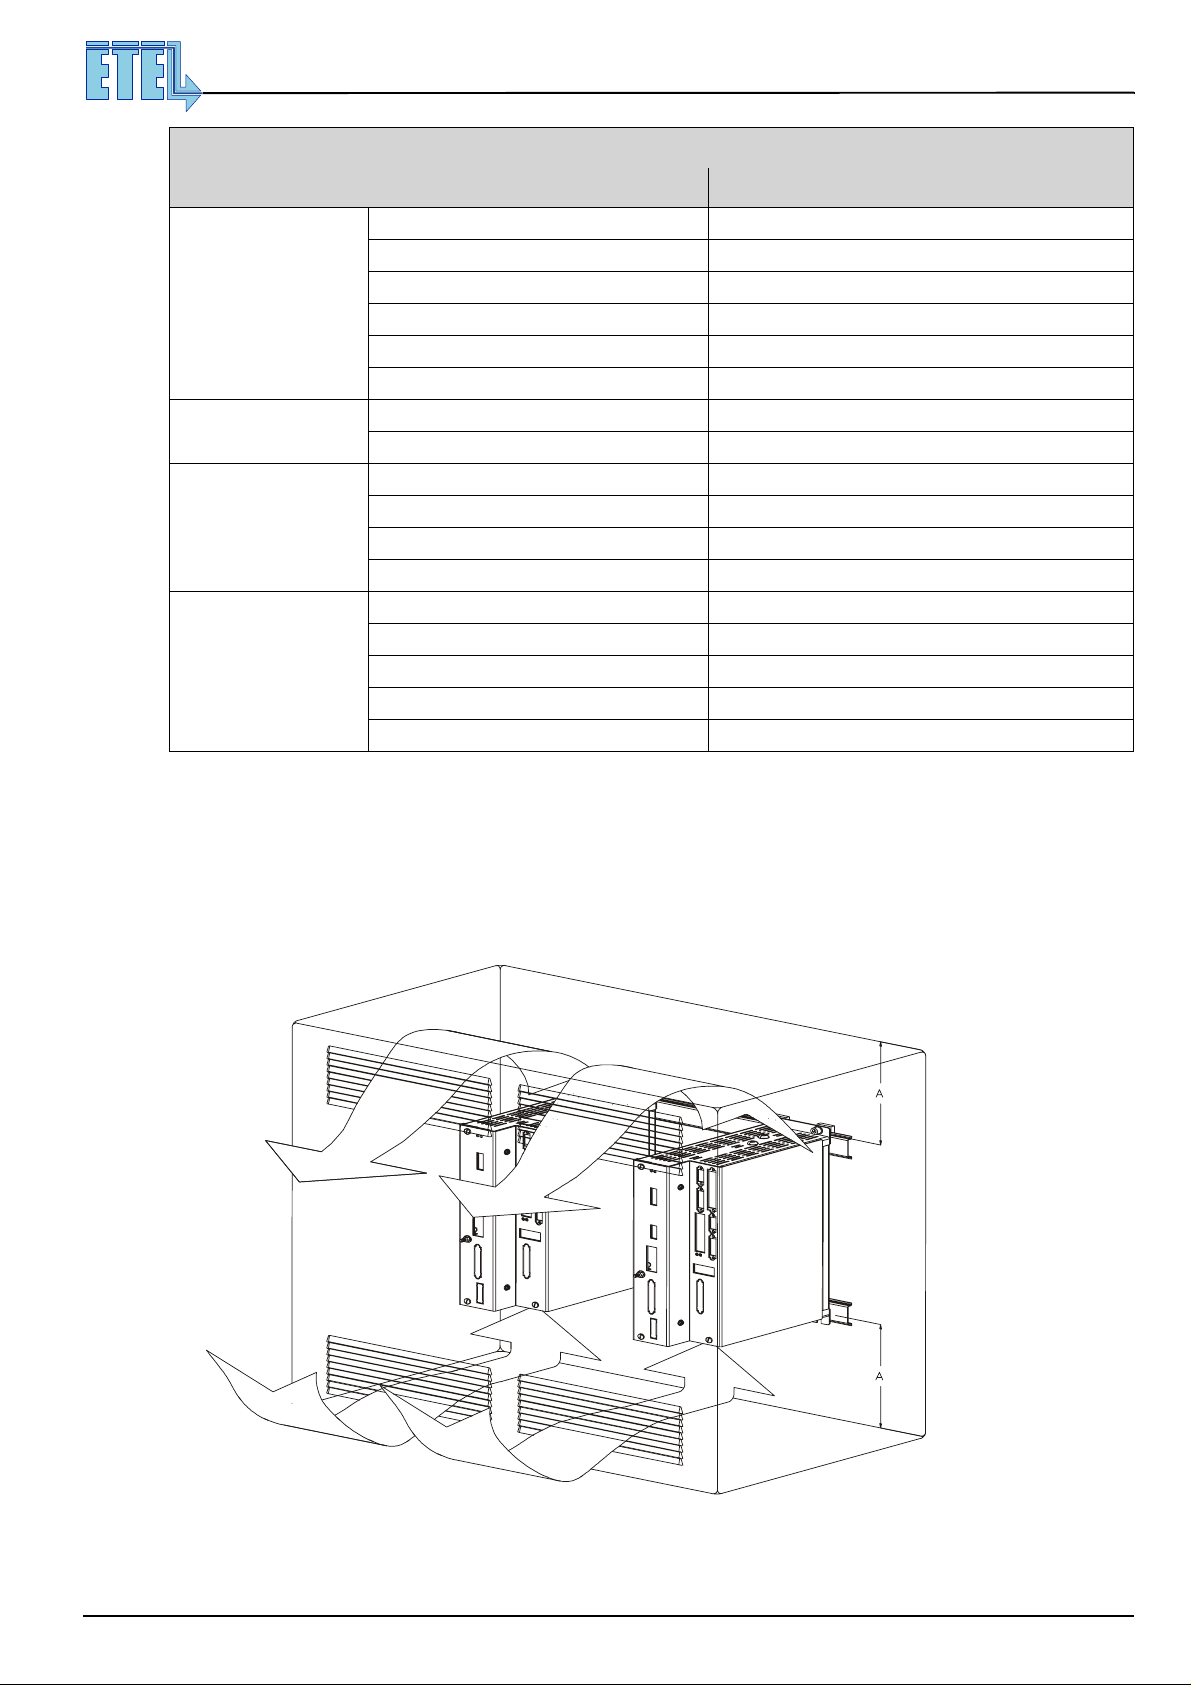
The sub-rack systems must be protected against any splashes of liquid and any contacts with smoke and dust.
It is strongly recommended to install them inside a closed cabinet and to screw them on a metallic plate, where
no vibrations will occur. Fresh air is necessary to cool them (the flow depends on the user application).
This drawing shows 2 housed modules inside a cabinet:
The following distance is recommended: A = 100 [mm] (drawing out of scale). As a fan is already included into
the drives, no additional fan is necessary for most applications.
ETEL Doc. - Hardware manual # DSB2P 904 / Ver. D / 4/11/02
Page 28
28
3. Electrical interface
This chapter describes the pin assignment for every connector. More detailed explanations for proper
connections are given fro m case to case. However, one may refer to the DSB2-P Operation & softwa re
manual for more information on some specific functions, such as digital and analog inputs and outputs.
There are six groups of connectors, according to their function:
Encoders connectors (see §3.1)
Inputs / outputs connector (see §3.2)
Communication connectors (see §3.3)
Motor connector (see §3.4)
Power connectors (see §3.5)
Option board connector (see §3.6)
Hardware manual DSB2-P
Direct Drives & Systems
MOTION TECHNOLOGY
Danger: High voltage may be present on all power connectors.
Turn off all power supplies and wait 10 minutes to allow the internal DC bus capacitors to
discharge before installing or disconnecting a cable on one of these connectors.
The motor connectors must always be screwed or correctly fastened on the drive.
It is also recommended to fasten the cables on the system.
Danger: All input and output signals must be insulated from the power and mains lines.
Some inputs / outputs are galvanically insulated by opto-couplers.
The voltage applied between these insulated I/O and the PE must not exceed 42 Vdc max.
Caution: Most inputs and outputs are not galvanically insulated from the GND.
Caution: The encoder, input/output and communication connectors shall be handled in an
ESD protected environment, only.
Convention: In the next chapters, c onnectors with male pins a re indicated wi th the
(full) and female pins are represented with the
symbol (empty).
ο
symbol
•
ETEL Doc. - Hardware manual # DSB2P 904 / Ver. D / 4/11/02
Page 29
Hardware manual DSB2-P
Direct Drives & Systems
MOTION TECHNOLOGY
3.1 Encoders connectors
3.1.1 C onnector J10: TTL position encoder
Danger: All input and output signals must be insulated from the power and mains lines.
Caution: These inputs and outputs are not galvanically insulated from the GND.
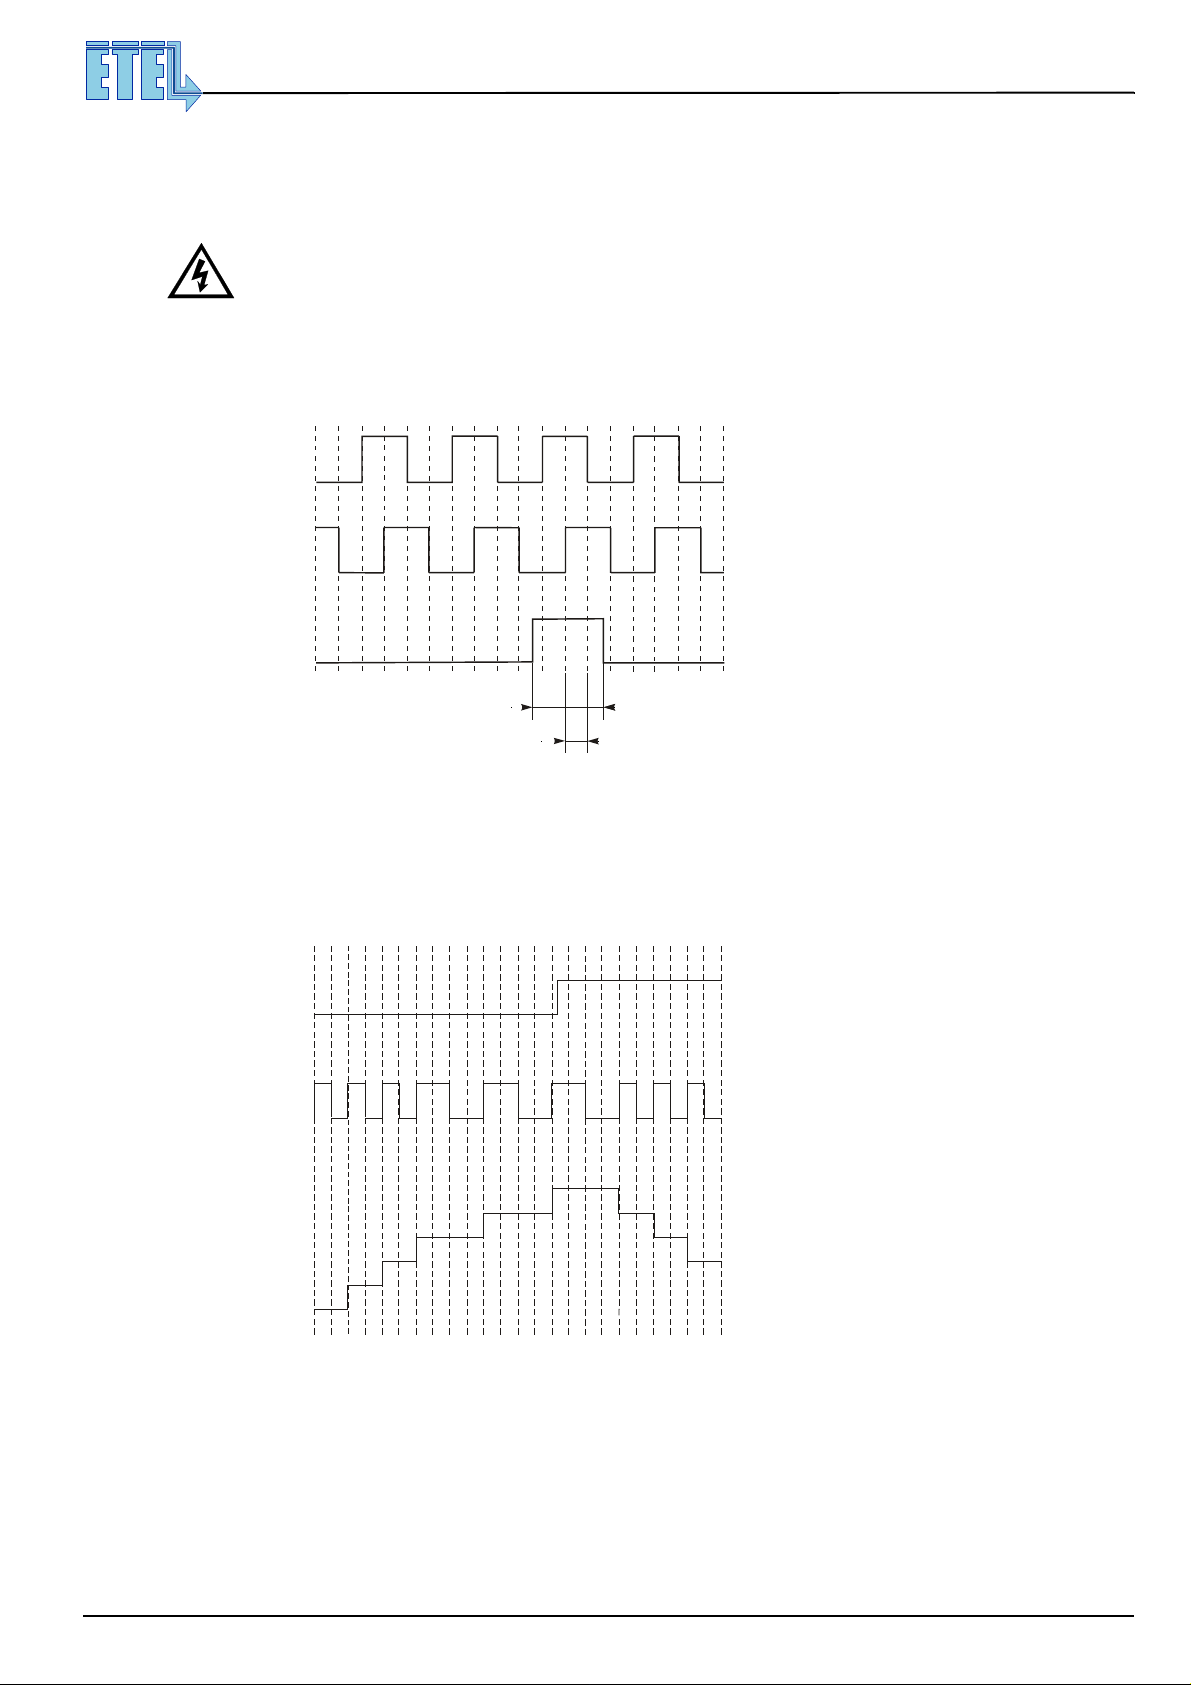
TTL encoders measure the motor position with 2 phase-shifted TTL signals. Each change of state of one of the
signals corresp ond s to one motor positi on inc r em ent. A t hir d si gna l (inde x) g iv es the mo tor ab so lut e po si ti on.
The encoder TTL s ignals ha ve to be c ompatible with the EI A standa rd norm RS4 22. These signals have the
following form:
29
Signal TTL 1 (UA1)
Signal TTL 2 (UA2)
3.1.1.1 Pulses / direction mode
The pulse/directio n mode i s especi ally useful whe n the dr ive is c ontrol led by an axis board because most of
them can send pulses/direction signals. Both TTL logical signals are given as a reference to the motor. One of
them, A (direction ), input in UA2, determines the movement direction. The second one, B (pulse s), input in
UA1, creates a jump movement on the motor position reference. The signals have the following form:
Index (UA0)
270° to 360°
Trigged here
UA2 (Direction)
UA1 (Pulses)
ETEL Doc. - Hardware manual # DSB2P 904 / Ver. D / 4/11/02
Motor position reference
Page 30
30
DSB2-P
AM26LS32
Differential line
receiver
UA2UA1UA0-
UA2+
UA1+
UA0+
R
Hardware manual DSB2-P
Direct Drives & Systems
MOTION TECHNOLOGY
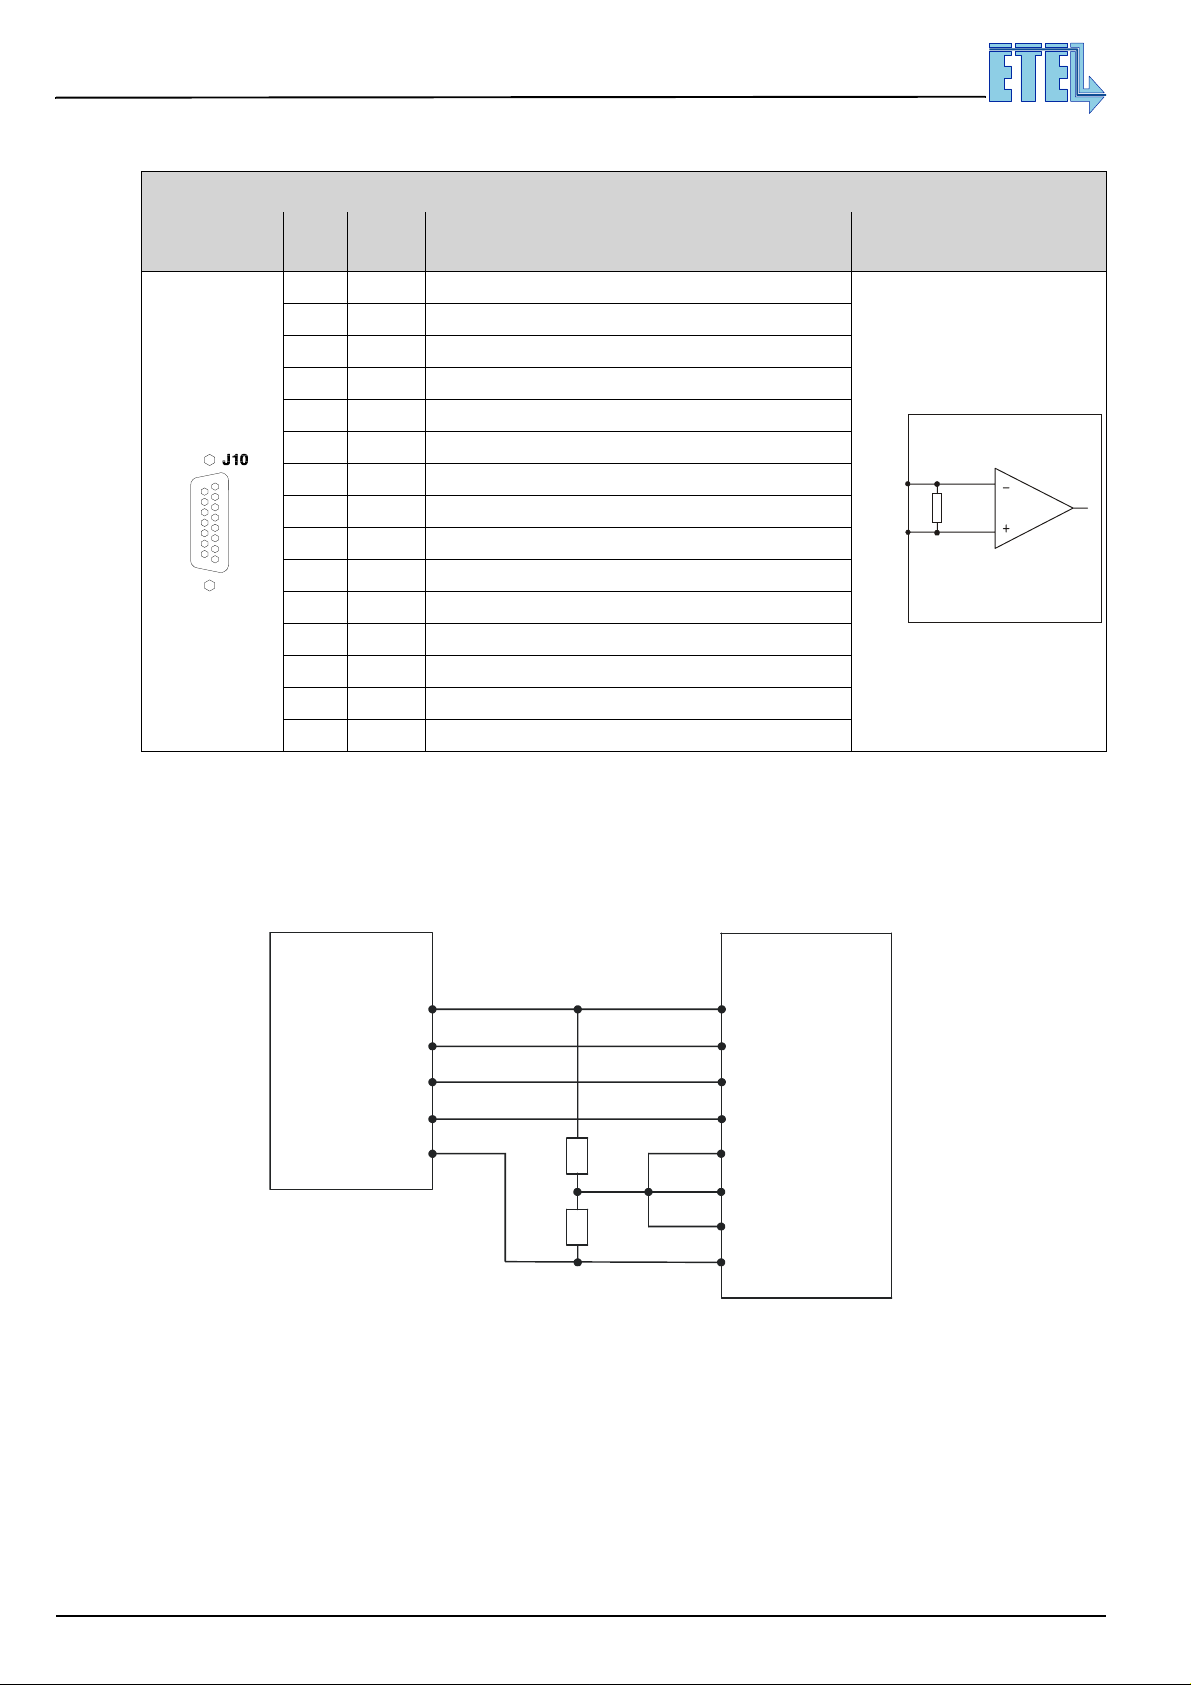
The +5V encoder supply output is protected by F7 (500mA fuse) shared with +5V encoder supply on J1and J9.
D-SUB, 15 pins, female
TTL
ENCODER
15
9
Pin # Signal Function Interface
1 +5V E n coder supply output (F7 500mA, share with J1, J6, J9)
2 UA2 - TTL 2 - signal (or direction in pulses / direction mode)
3 UA1 - TTL 1 - signal (or pulses in pulses / direction mode)
4 UA0 - TTL 0 - signal
56 NC Not connected in drive
8
TTL ENCODER
1
7 NC Not connected in drive
8 NC Not connected in drive
9 GND Encoder supply output (0V)
10 UA2 + TTL 2 + signal
11 UA1 + TTL 1 + signal
12 UA0 + TTL 0 + signal
13 14 NC Not connected in drive
15 NC Not connected in drive
Do not connect
Do not connect
Caution: This connector must be handled in an ESD protected environment, only!
3.1.1.2 Non-differential TTL encoder on connector J10
If you are using a non -differential TTL encoder (U A0- , UA 1- and UA2- are not pres en t i n th e en co der and not
connected on DSB2-P), an external resistors must be added and connected as follows:
NON-DIFFERENTIAL
TTL ENCODER
+ 5V IN
TTL2 OUT
TTL1 OUT
INDEX OUT
GND IN
1 K
1 K
Ω
Ω
DSB2-P
+ 5V
UA2 +
UA1 +
UA0 +
UA2 UA1 -
UA0 GND
ETEL Doc. - Hardware manual # DSB2P 904 / Ver. D / 4/11/02
Page 31
Hardware manual DSB2-P
SIN+
COS+
IDX+
SINCOSIDX-
SIN+
COS+
IDX+
SINCOSIDX-
DSB2-P
DSB2-P
R
R
R
R
R
C
C
C
C
1 Vptp
11 µAptp
Direct Drives & Systems
MOTION TECHNOLOGY
3.1.2 Connector J1: Analog position encoder (1Vptp, 11µAptp)
Danger: All input and output signals must be insulated from the power and mains lines.
Caution: These inputs and outputs are not galvanically insulated from the GND.
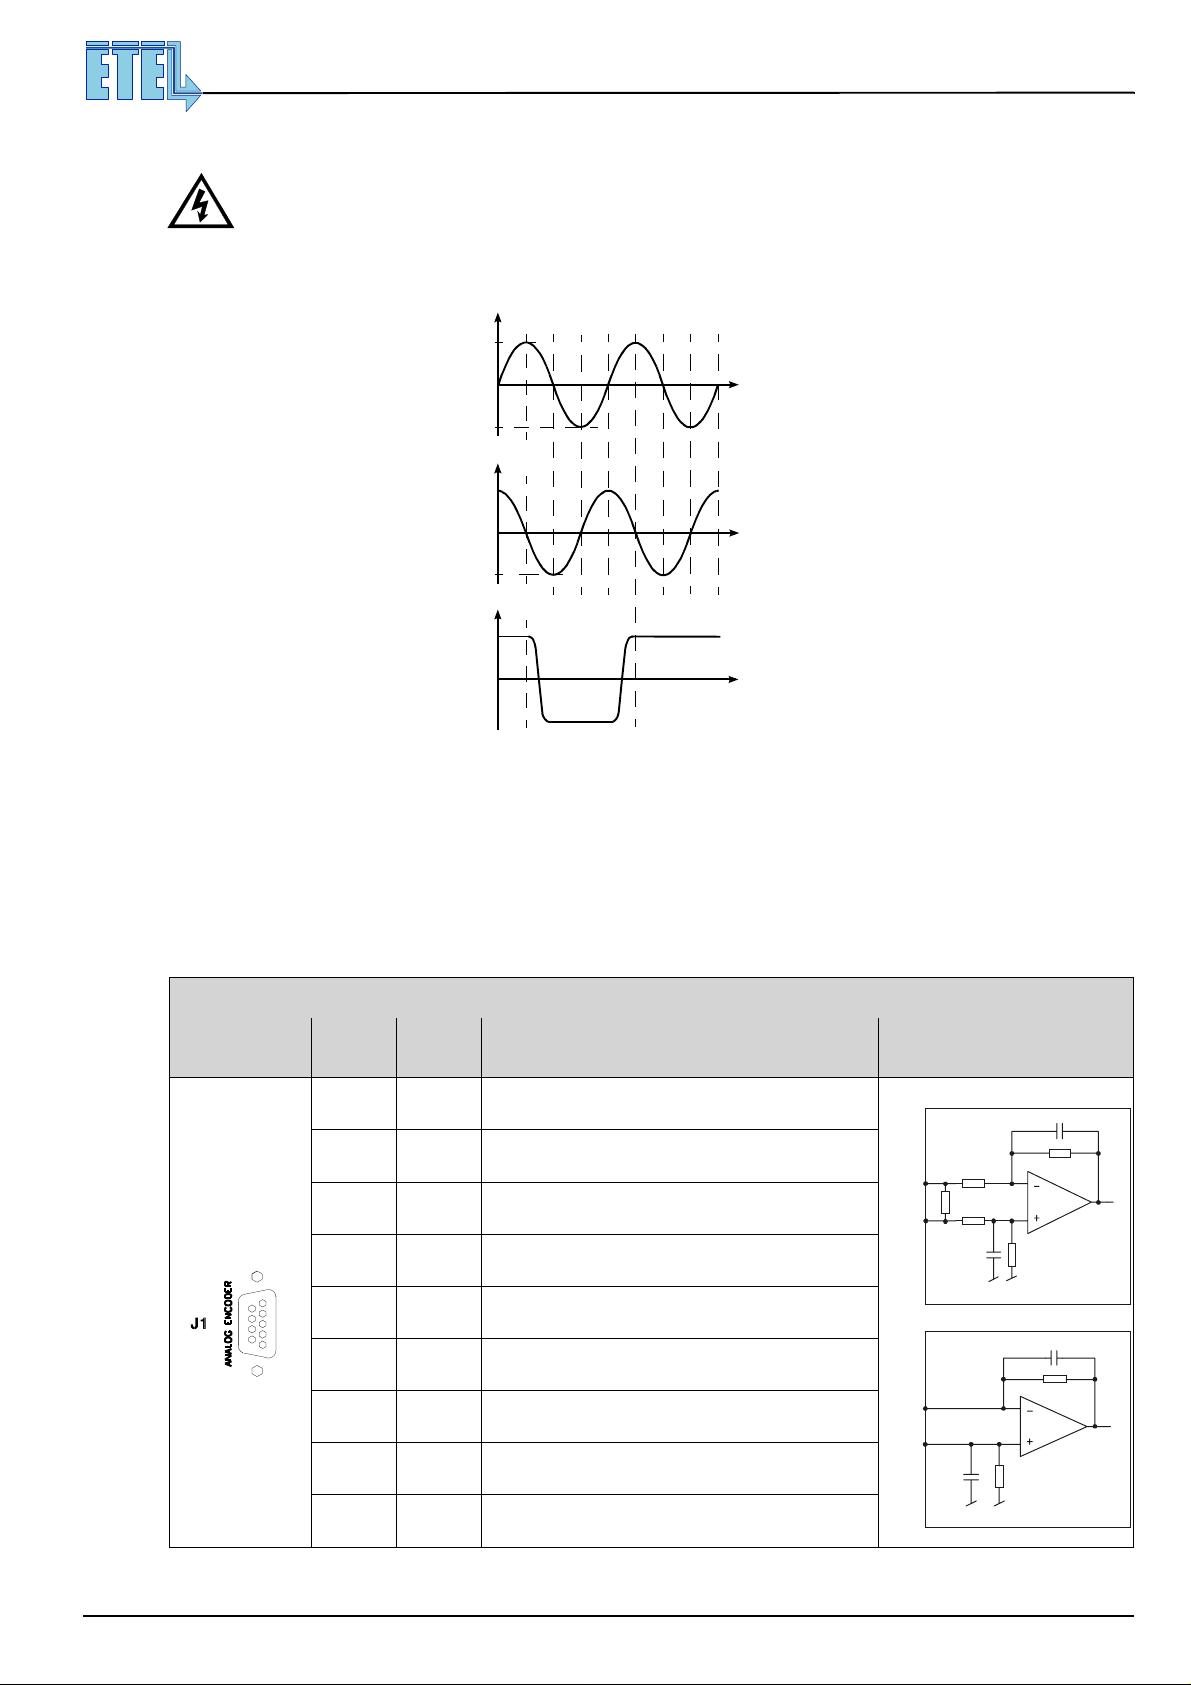
The analog encoder s can determ ine the motor positio n thanks to two s inusoid al signals with a phase-s hift of
90°. A third signal (index) gives the absolute motor position. These signals have the following form:
Sinus (I1)
+0.5V
31
0V
-0.5V
Cosinus (I2)
+0.5V
0V
-0.5V
Index (I0)
270°<index<360°
Position
Position
Position
Two kinds of analog encoders may be used. They differ in their respective signals. The first one has a sine and
cosine signal amplitu de of 1V peak to peak with a l oad resistor R
=120Ω: it is called a 1Vptp enco der. The
0
second one has a n a mpl it ude of 11µA p eak to p eak : i t i s c all ed a 11µA ptp en co der . Th e + 5V e nc oder su ppl y
output is protected by F7 (500mA fuse), shared with +5V encoder supply on J9 and J10.
Remark: If a drive is built to be used with a 1Vptp enc oder, it will not be possibl e to use afterwards an
11µAptp encoder and contrariwise. This difference is identified in the drive's type number:
# D S B 2 P 1 x x - x x x E for a 1 Vptp encoder configuration.
# D S B 2 P 2 x x - x x x E for a 11µAptp encoder configuration.
D-SUB, 9 pins, female
A
NALOG
ENCODER
9
6
1
Pin # Signal Function Interface
1 SIN - Sine - signal input
2 GND Encoder supply output (0V)
3 COS - Cosine - signal input
4 GND Encoder supply output (0V)
5
5 IDX - Index - signal input
6 SIN + Sine + signal input
7+5V
8 COS + Cosine + signal input
9 IDX + Index + signal input
Caution: This connector must be handled in an ESD protected environment, only!
ETEL Doc. - Hardware manual # DSB2P 904 / Ver. D / 4/11/02
Encoder supply output (fuse F7 500mA, shared with
J6, J9 and J10)
Page 32
Hardware manual DSB2-P
32
Direct Drives & Systems
3.1.3 Connector J9: Digital Hall encoder & over temperature protection
Danger: All input and output signals must be insulated from the power and mains lines.
Caution: These inputs are galvanically insulated by opto-couplers.
The voltage applied between these insulated inputs and the PE must not exceed 42 Vdc max.
Connections for both digital Hall encoder and overtemperature protection are present on this connector.
These inputs are opto-couplers whose voltage input ranges from 5 Vdc (min.) to 15 Vdc (max.)
Digital hall encoder:
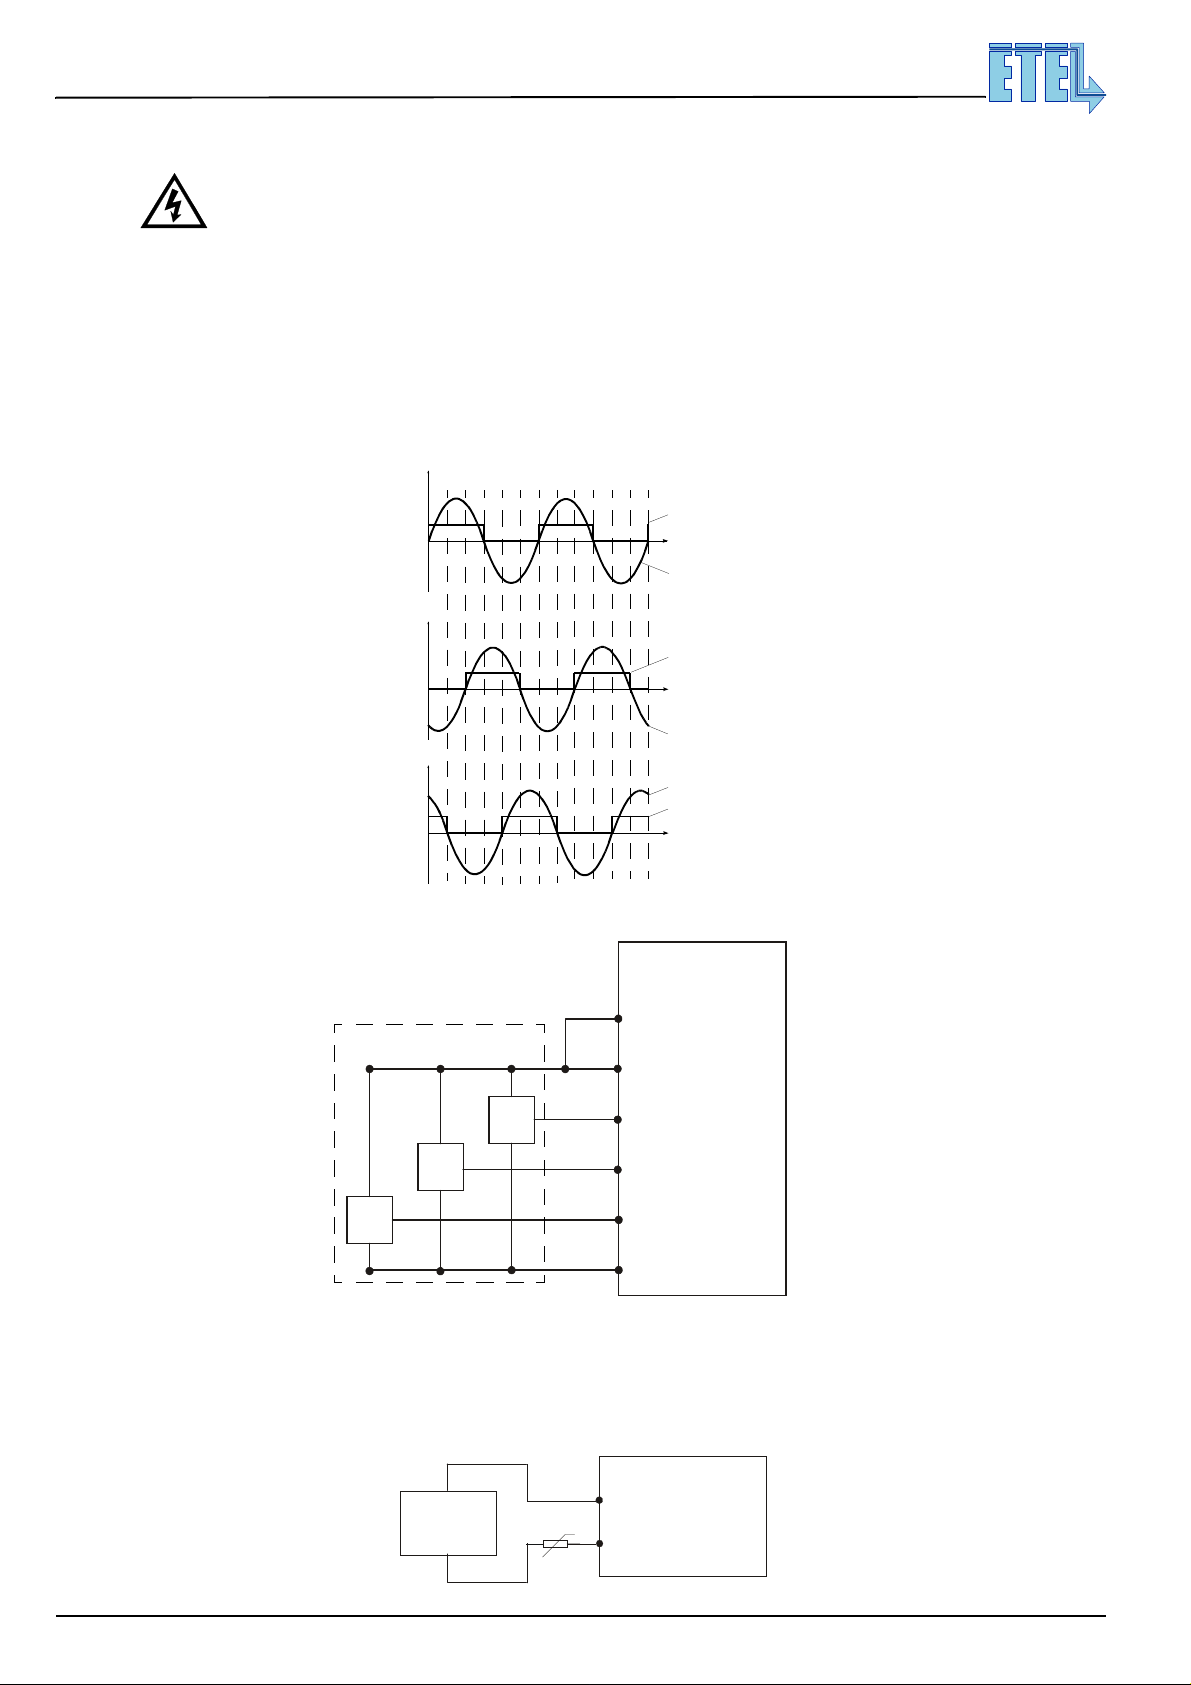
The digital Hall effect en coders can determi ne the moto r posi tion tha nks to three digital si gnals (one for eac h
Hall effect sensor). On the following graph, the Hall signals of the sinusoidal voltages between the motor phase
are displayed:
H1-
Position
V1-2
MOTION TECHNOLOGY
H2-
Position
V2-3
V3-1
H3-
Position
The digital hall encoder sensors (X) must be connected as follows:
DSB2-P
8
+15V
HALL ENCODER
1
+Vext2
2
H1-
X
3
H2-
X
4
H3-
X
9
GND
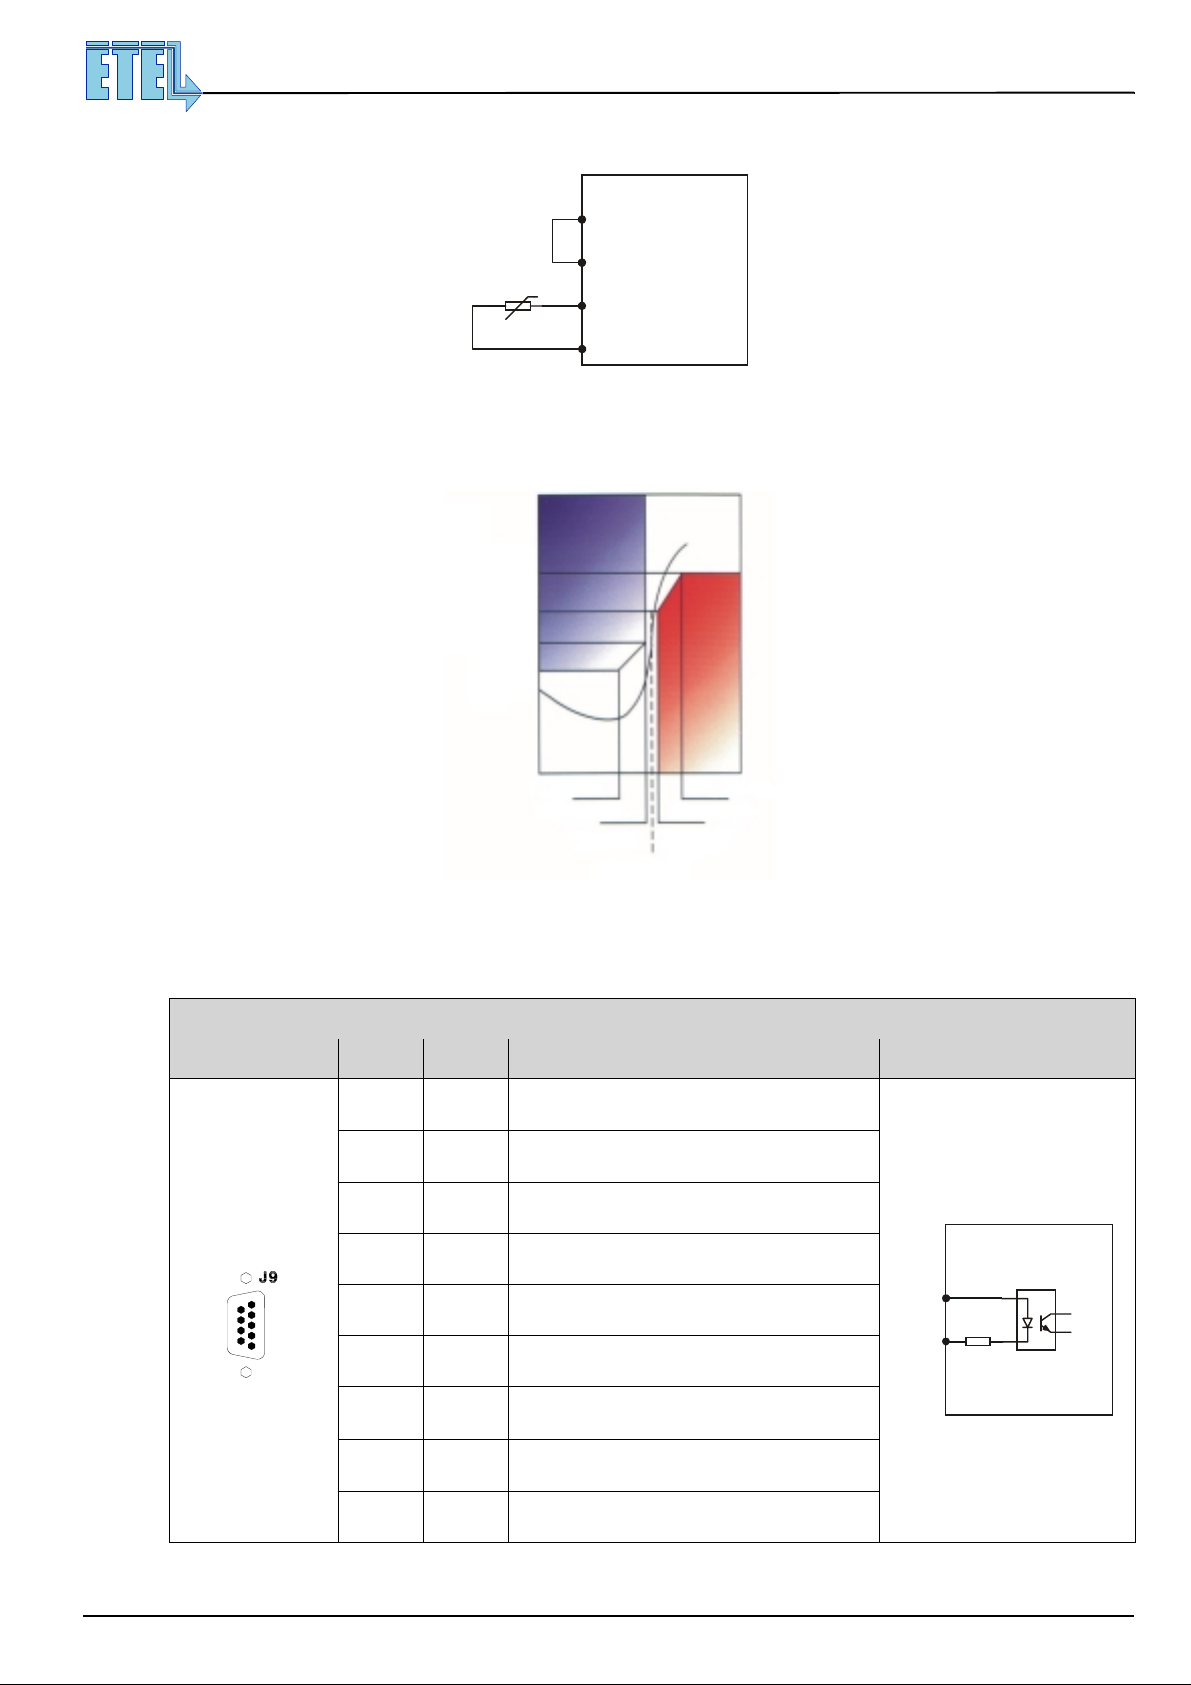
Overtemperature protection :
When a motor sh ould be protected against overheating , ETEL includes an optional PTC res istor (positive
temperature coefficient) inside its windings. If you have asked for this option, connect your temperature
protection as follows:
+
External
supply
-
1
PTC
6
θ+
DSB2-P
+Vext2
TS-
ETEL Doc. - Hardware manual # DSB2P 904 / Ver. D / 4/11/02
Page 33
MOTION TECHNOLOGY
DSB2-P
ILD213
+Vext2
R
H1H2H3TS-
Hardware manual DSB2-P
Direct Drives & Systems
33
One may also use the auxiliary DC supply available on this connector, but the opto-couplers advantage would
be lost, example:
DSB2-P
8
+15V
1
+Vext2
PTC
6
θ+
TS-
5
GND
Remark: The diagram above shows the connection of a Positive Temperature Coefficient sensor (PTC).
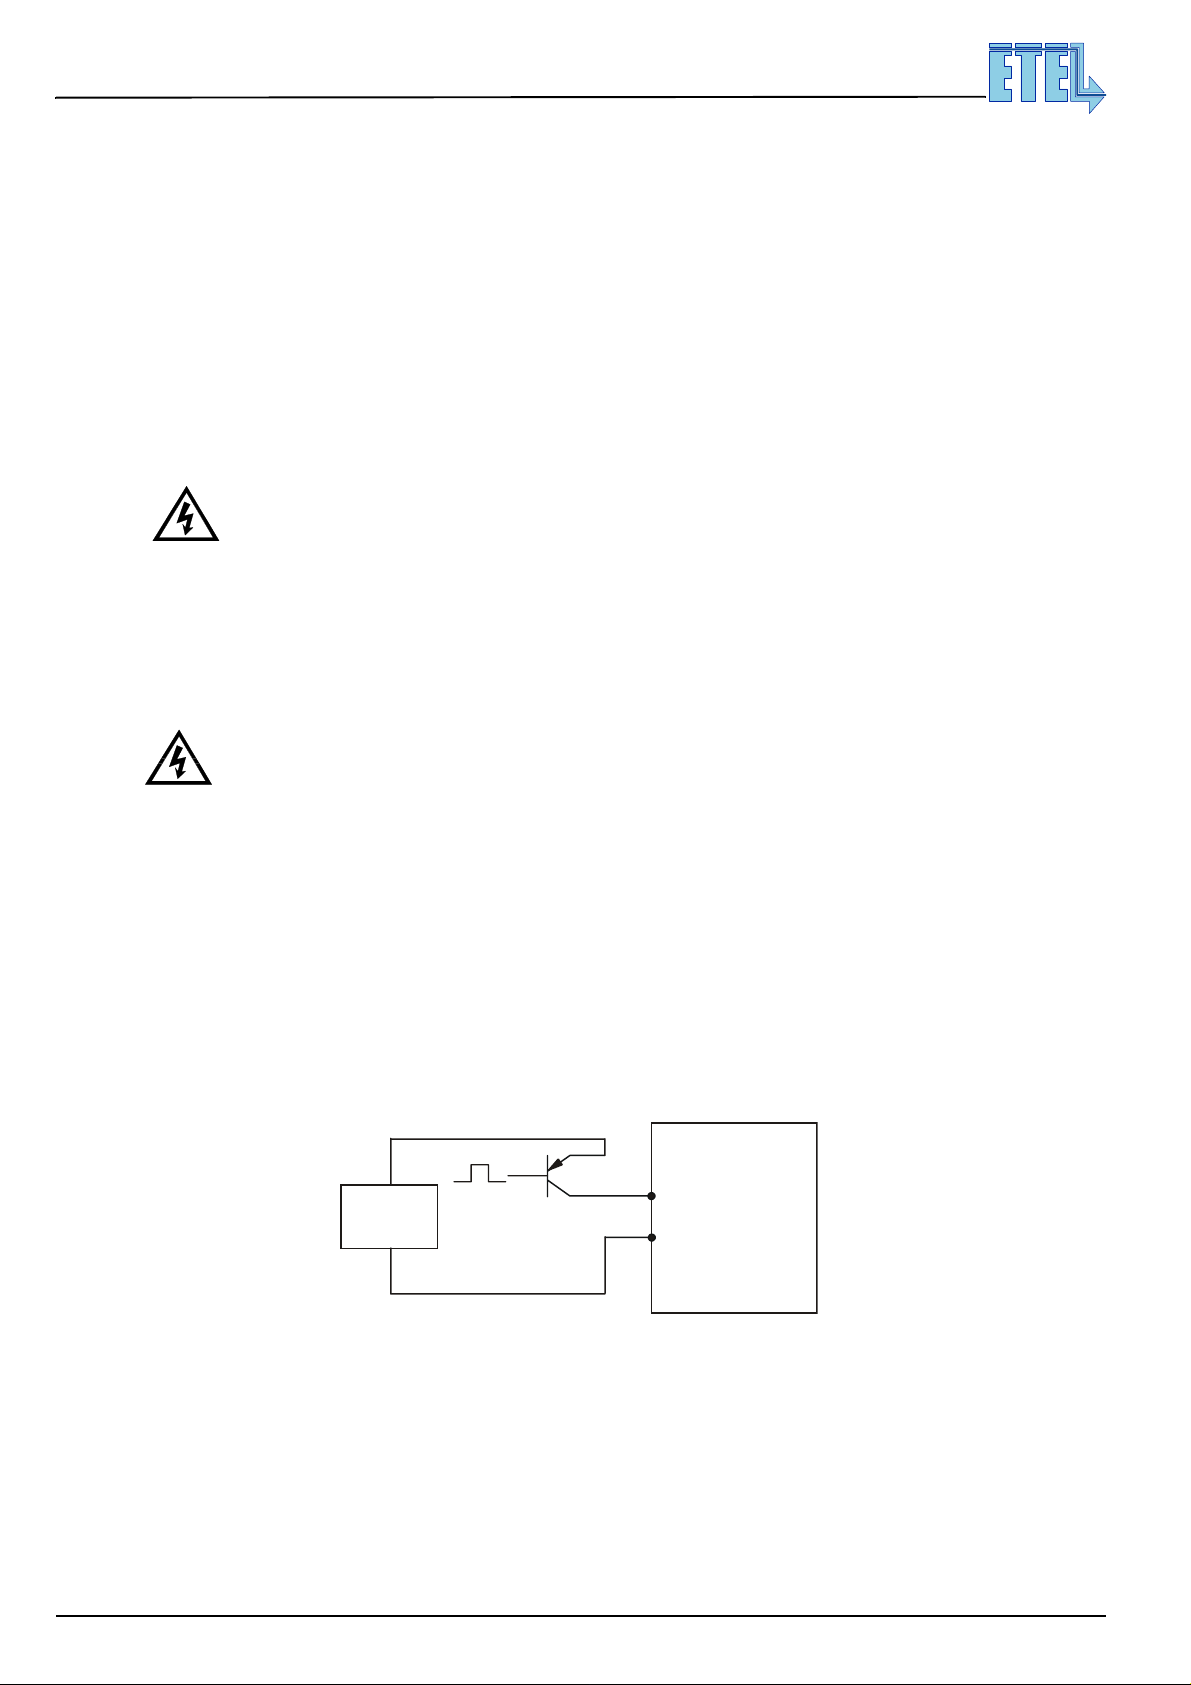
A 'normally closed' thermostat may also be connected to the TS- input. Below, the PTC sensor
characteristic use d by ETE L (for E TEL ILx motors: T
= 100°C / LMx and TMx m otors : T
NF
NF
120°C).
)
Ω
(
e
c
n
a
4000
t
s
i
s
e
1330
R
550
250
=
T + 15 K
NF
T + 5 K
NF
T
Temperature
NF
-20°C
NF
T + 5 K
NF
T + 5 K
The +5V encode r supp ly o utpu t i s pr ot ected by F7 (500mA fu se ), s hared wi th + 5V en co der s up pl y on J 1 a nd
J10. The +15V enco der supply output is protected by F3 (250m A fuse), shared with +15V auxiliary su pply
output on J2.
D-SUB, 9 pins, male
D
IGITAL HALL
6
9
DIGITAL HALL
+
1
+TEMP
TEMP
5
Pin # Signal Function Interface
1 +Vext2
2 H1 - Digital Hall sensor input 1
3 H2 - Digital Hall sensor input 2
4 H3 - Digital Hall sensor input 3
5 GND Encoder supply output (0V)
6 TS - PTC or thermostat input
External supply input for digital Hall encoder and
motor temperature protection
7+5V
8 +15V
9 GND Encoder supply output (0V)
Caution: This connector must be handled in an ESD protected environment, only!
ETEL Doc. - Hardware manual # DSB2P 904 / Ver. D / 4/11/02
Encoder supply output (fuse F7 500mA, shared
with J1, J6 and J10)
Encoder supply output (F3 250mA, shared with
J2 auxiliary supply output)
Page 34
Hardware manual DSB2-P
34
Direct Drives & Systems
3.2 Inputs / outputs connector
3.2.1 Co nnector J2: Customers inputs / outputs
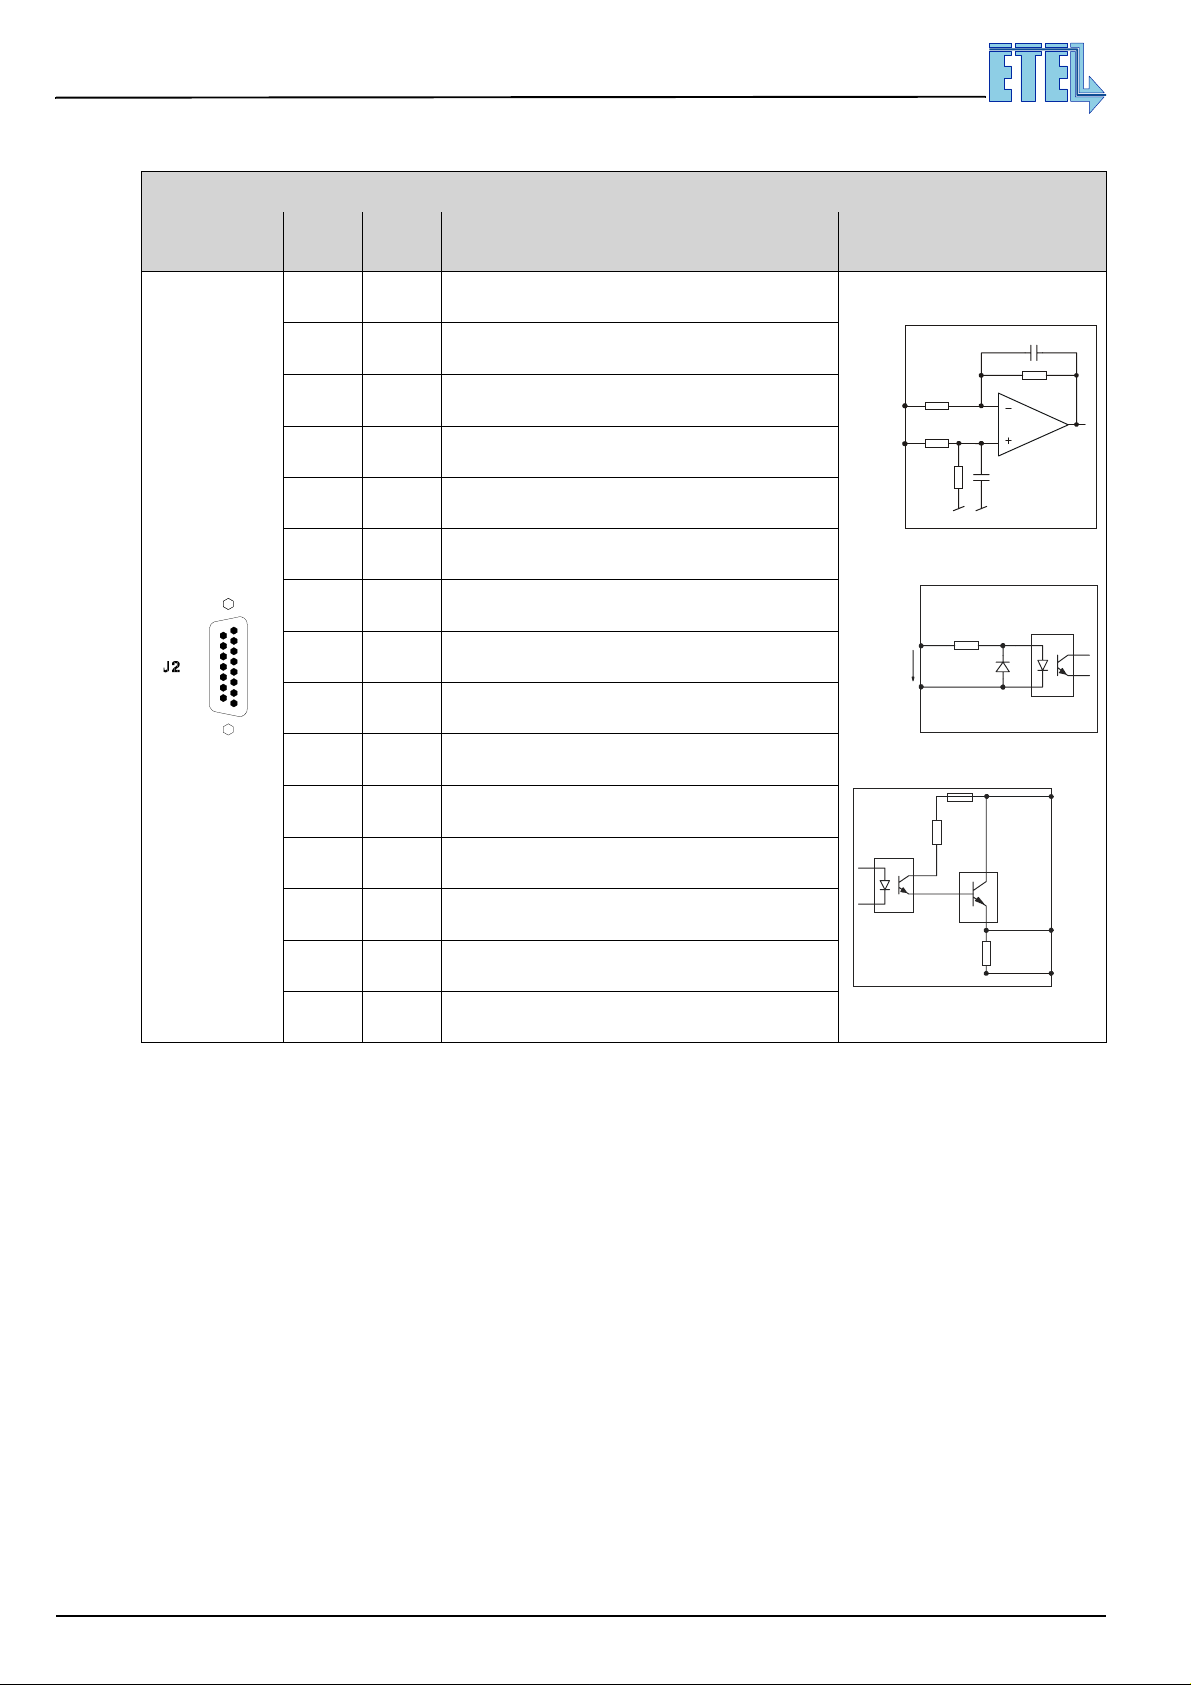
The DSB2-P owns 6 digital inputs (DIN1 to DIN4, DIN9 and DIN10) and 3 digital outputs (DOUT1 to DOUT3).
Every digital input and output are opto-coupl ed (ILD213 circu it). The drive has also one an alog input (AIN1).
The A/D converter used is an AD7863. It has a 14 bits resolution and can conve rt analog signals ranging
between +10V and -10V.
Only inputs and outputs interfacing is considered here. Refer to the DSB2-P Operation & software manual
for further information about the use of the different devices.
3.2.1.1 Analog input:
Danger: The analog output signal must be insulated from the power and mains lines.
Caution: The analog output is not galvanically insulated from the GND.
To use the analog input (AIN1), a voltage ranging from +10V to -10V is applied between pins 2 (AIN1+) and 9
(AIN1-).
MOTION TECHNOLOGY
Remark: If AIN1 = + 10 V ⇒ parameter M51 = - 8192 and if AIN1 = - 10 V ⇒ M51 = + 8191.
3.2.1.2 Digital inputs:
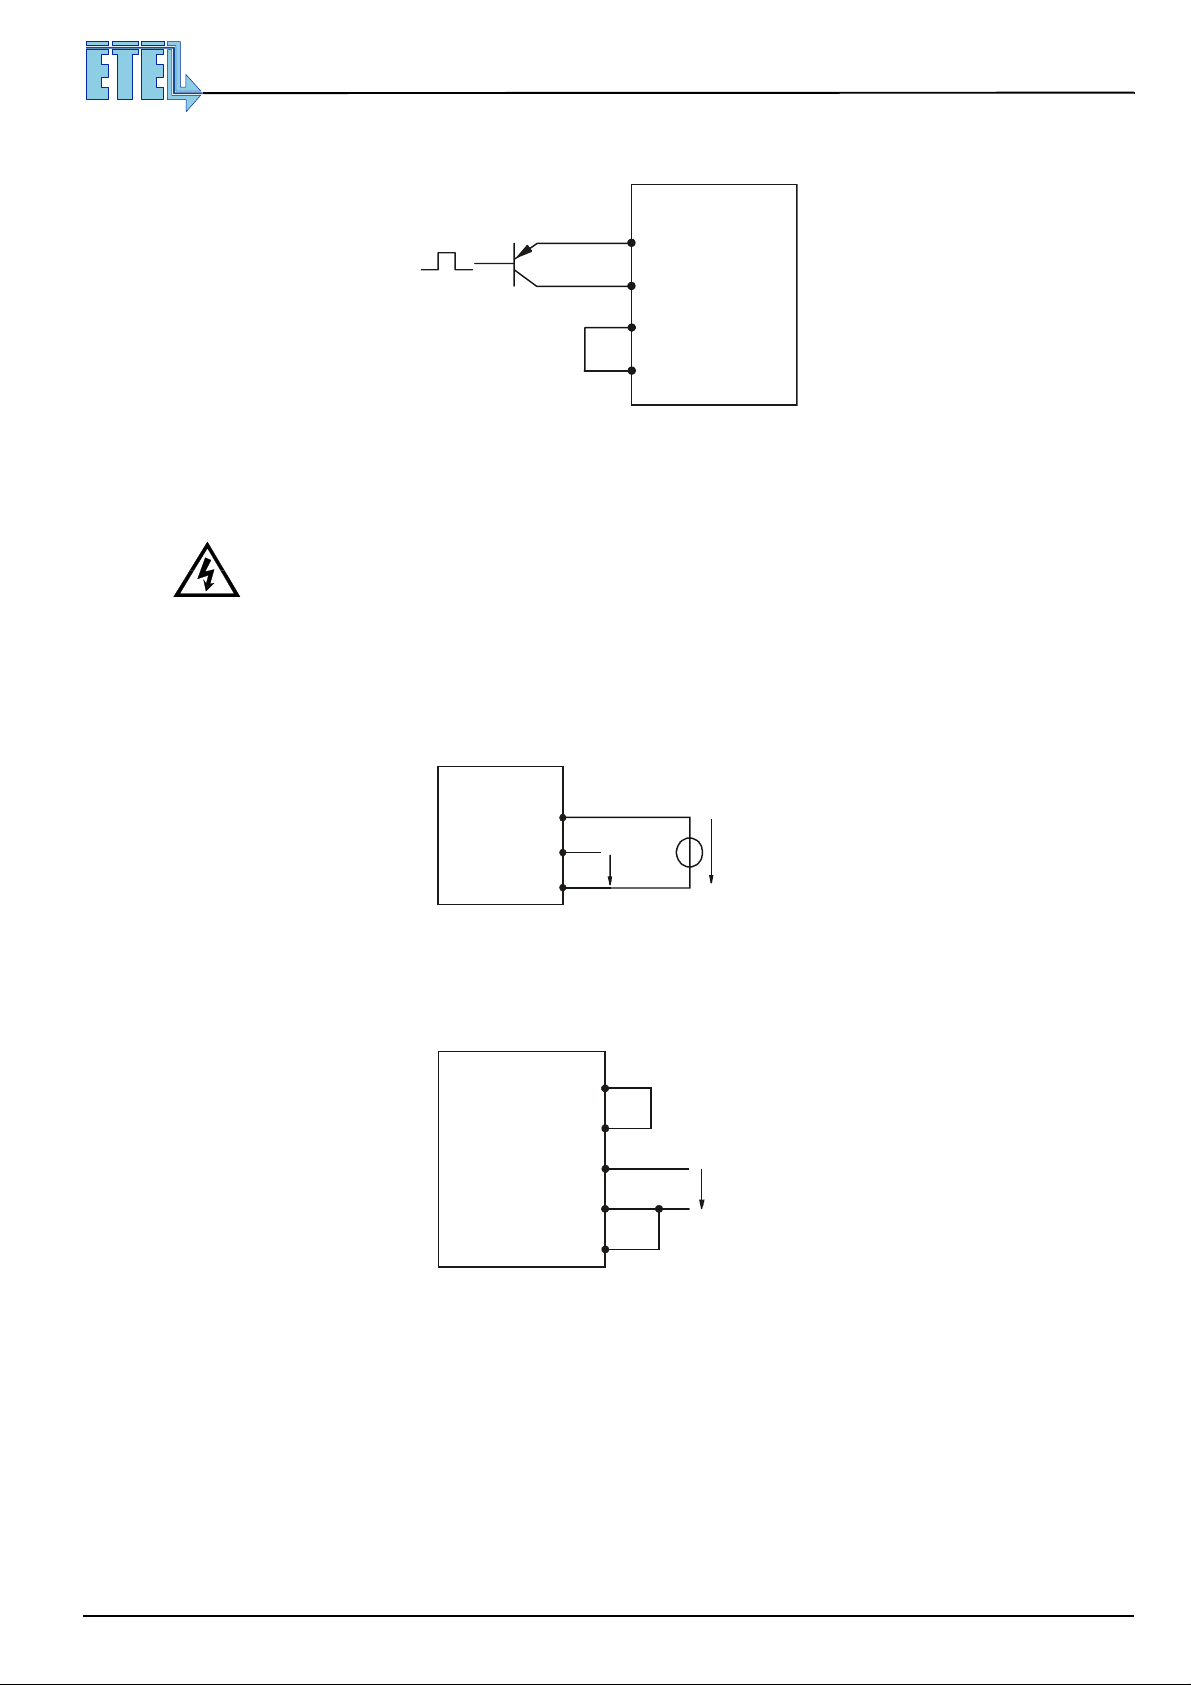
Digital inputs switch to ’1’ when a voltage ranging between +15V and +28V is applied between pins DIN+ and
DIN- of the corresponding input. These inputs are opto-couplers.
Internal resistor R
The input switches to ‘0’ when a nil voltage is applied between pins DIN+ and DIN-.
Remark: When using a ‘positive limit switch’, connect it to DIN10.
The auxiliary supply can be external to the drive, as shown below:
Danger: The digital inputs signals must be insulated from the power and mains lines.
The digital inputs are galvanically insulated by opto-couplers.
The voltage applied between these insulated inputs and the PE must not exceed 42 Vdc max.
of the external auxiliary supply must not be higher than 15kΩ for an adequate functioning.
max
When using a ‘negative limit switch’, connect it to DIN9.
When using a ‘home swi tch’ , conne ct it to DIN2. ( Refer to the DSB2-P Opera tion & software
manual for more information).
DSB2-P
6
External
supply
UDN2987
DIN1
3
GNDext
ETEL Doc. - Hardware manual # DSB2P 904 / Ver. D / 4/11/02
Page 35
MOTION TECHNOLOGY
It is also possible to use the auxi liary DC supply (+15V) available on t his connector, but the opto-couplers
advantage would be lost; example:
Remark: For both solutions, a bounce-free contact may be used instead of a transistor.
3.2.1.3 Digital outputs:
Hardware manual DSB2-P
Direct Drives & Systems
10
6
UDN2987
3
1
DSB2-P
+15V
DIN1
GNDext
GND
35
Danger: The digital outputs signals must be insulated from the power and mains lines.
The digital outputs are galvanically insulated from the GND by opto-couplers.
The voltage applied between these insulated outputs and GND must not exceed 42 Vdc max.
A digital output cannot be used as such. A voltage should previously be supplied to the external auxiliary supply
+Vext. This voltage should range between +15V and +28V.
It is recommended to use an external auxiliary supply for voltage Vext, as shown below (in this case, the logical
value ‘1’ will correspond to Vext and ‘0’ to GND ext).
DSB2-P
11
+Vext
DOUT1
GNDext
4
DOUT1
3
+Vext
(+15V to +28V)
Remark: This diagram shows the use of the output DOUT1 but it is the same with the other outputs.
Like with digital inputs, it is also possible to use the auxiliary DC supply (+15V) available on this connector, but
the opto-couplers advantage would be lost, example:
DSB2-P
DOUT1
GNDext
+15V
+Vext
GND
1
10
11
3
4
DOUT1 = +15V => '1'
= 0V => '0'
Remarks: The opto-couplers advantage will be lost with the above diagram.
This diagram shows the use of the output DOUT1 but it is the same with the other outputs.
3.2.1.4 Auxiliary DC supply:
On top of all inputs and outputs, an auxiliary DC supply output (+15V ) is av ai lab le o n t his co nne ctor. It can
be freely used to supply an external source to the drive. However, beware not to get over the maximum current
indicated when using thi s power supply. It is protected by F7 (500mA fuse) shared with +1 5V Hall encoder
supply on J9.
ETEL Doc. - Hardware manual # DSB2P 904 / Ver. D / 4/11/02
Page 36
36
Digital Output
Digital Input
Analog Input
DSB2-P
DSB2-P
DSB2-P
C
C
R
R
R
R
R
AIN1+
AIN1-
ILD213
DIN
GNDext
Vmax=28V
ILD213
R
+Vext
DOUT
GND
ext
D-SUB, 15 pins, male
C
USTOMERS
I / O
Hardware manual DSB2-P
Direct Drives & Systems
MOTION TECHNOLOGY
Pin # Signal Function Interface
1 GND Auxiliary supply output (0V)
2 AIN1 + Analog input 1 +
Caution: This connector must be handled in an ESD protected environment, only!
15
3 GNDext
External supply input (0V) for the digital outputs
Also DIN - and DOUT -
4 DOUT1 Digital output 1 +
5 DOUT3 Digital output 3 +
6 DIN1 Digital input 1 +
7 DIN3 Digital input 3 +
9
1
8 DIN9 Digital input 9 +
CUSTOMERS I/O
8
9 A IN1 - Analog input 1 -
10 +15V
11 +Vext
Auxiliary supply output (fuse F3 250mA shared with
J9 +15V Hall encoder supply output)
External supply input for digital outputs
(fuse F4, 250mA - limits user's input current)
12 DOUT2 Digital output 2 +
13 DIN2 Digital input 2 +
14 DIN4 Digital input 4 +
15 DIN10 Digital input 10 +
ETEL Doc. - Hardware manual # DSB2P 904 / Ver. D / 4/11/02
Page 37
Hardware manual DSB2-P
Direct Drives & Systems
MOTION TECHNOLOGY
3.3 Communication connectors
Danger: All input and output signals must be insulated from the power and mains lines.
Caution: These inputs and outputs are not galvanically insulated from the GND.
The communication between a host (PC) and a drive is obtained via ETEL-Bus-Lite (EBL) protocol (refer to
EBL Communication manual for more information) a nd the commu nication between the drives i s obtained
via ETEL-Bus (EB) protocol (refer to the DSB2-P Operation & software manual).
ETEL-Bus-Lite protocol is open to the user:
37
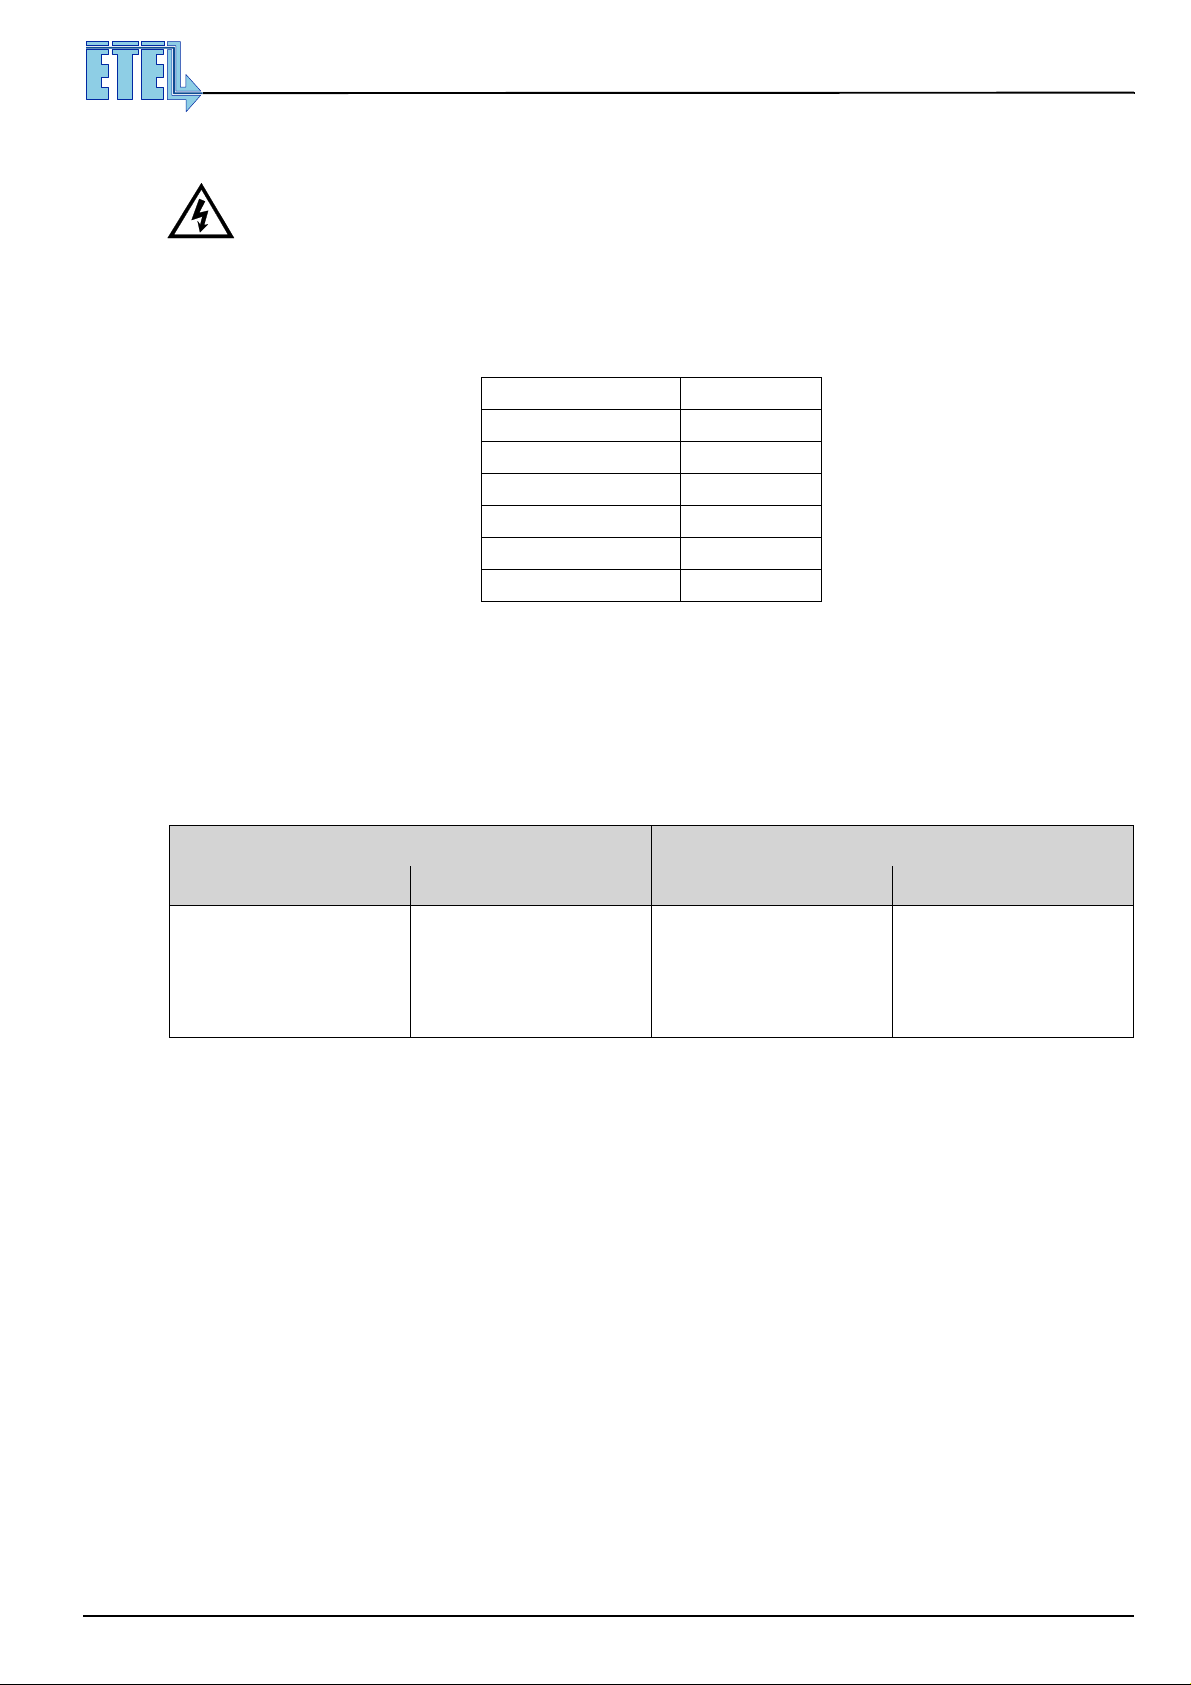
Max. transmission rate
Min. transmission rate
Data length
Start bit
Stop bit
Parity
Handshaking
115'200 bauds
9'600 bauds
8 bits
1
1
No
No
The EBL transmission rate can be selected with the parameter K195 (refer to the DSB2-P operation &
software manual).
ETEL-BUS protocol is closed to the user who cannot have direct access to it.
The table below shows two different types of communications available for EBL and EB:
ETEL-Bus-Lite (communication between a PC and a drive) ETEL-Bus (communication between drives)
RS 232 RS 422 (by default) RS 422 (by default) RS 232
For example, for the use of an
Normal connection between a
PC and a drive for
communication purposes (with
ETEL Tools
software, f.e).
'on-line' control system with a
communication system other
than RS232, or if the PC comes
with a RS422 board and its
RS 232 port is already used.
Normal EB connection between
drives at 460'000 bauds.
Better solution because
less sensitive to EMC.
Second EB connection
possibility between
drives, at
115'200 bauds.
It is possible to select the RS232 type for ETEL-Bus-Lite communication by connecting the pin
EBL_select_232/422 to GND (0V). If this connection is not done, RS422 type is automatically selected (default
status).
It is possible to select the RS232 type for ETEL-Bus communication by connecting the pin EB_select_422/232
to GND (0V). If this connection is not done, RS422 type is automatically selected (default status).
Caution: When the type of comm unica tion is chan ged as a bove-me ntione d, the dr ive m ust be swi tched
off and then on in order to take the changes into account.
The communication connectors are J3, J4, J5 and J6 (see the following tables).
Connector J3 is for ETEL-Bus data output (RS422) and J4 is for ETEL-Bus data input (RS422). They are used
to make a daisy -chain between the drives with stand ard RJ-45 cables. Connector J5 allo ws both types of
ETEL-Bus-Lite com munications ( RS232 or RS42 2) and the sel ection betwee n them. Connec tor J6 is fo r the
download key to set the dr ive into the 'w ait for pr ogra m' mode. It can als o be u sed for t he ET EL-Bus (RS2 32
type) communication and its selection.
ETEL Doc. - Hardware manual # DSB2P 904 / Ver. D / 4/11/02
Page 38
Hardware manual DSB2-P
38
Direct Drives & Systems
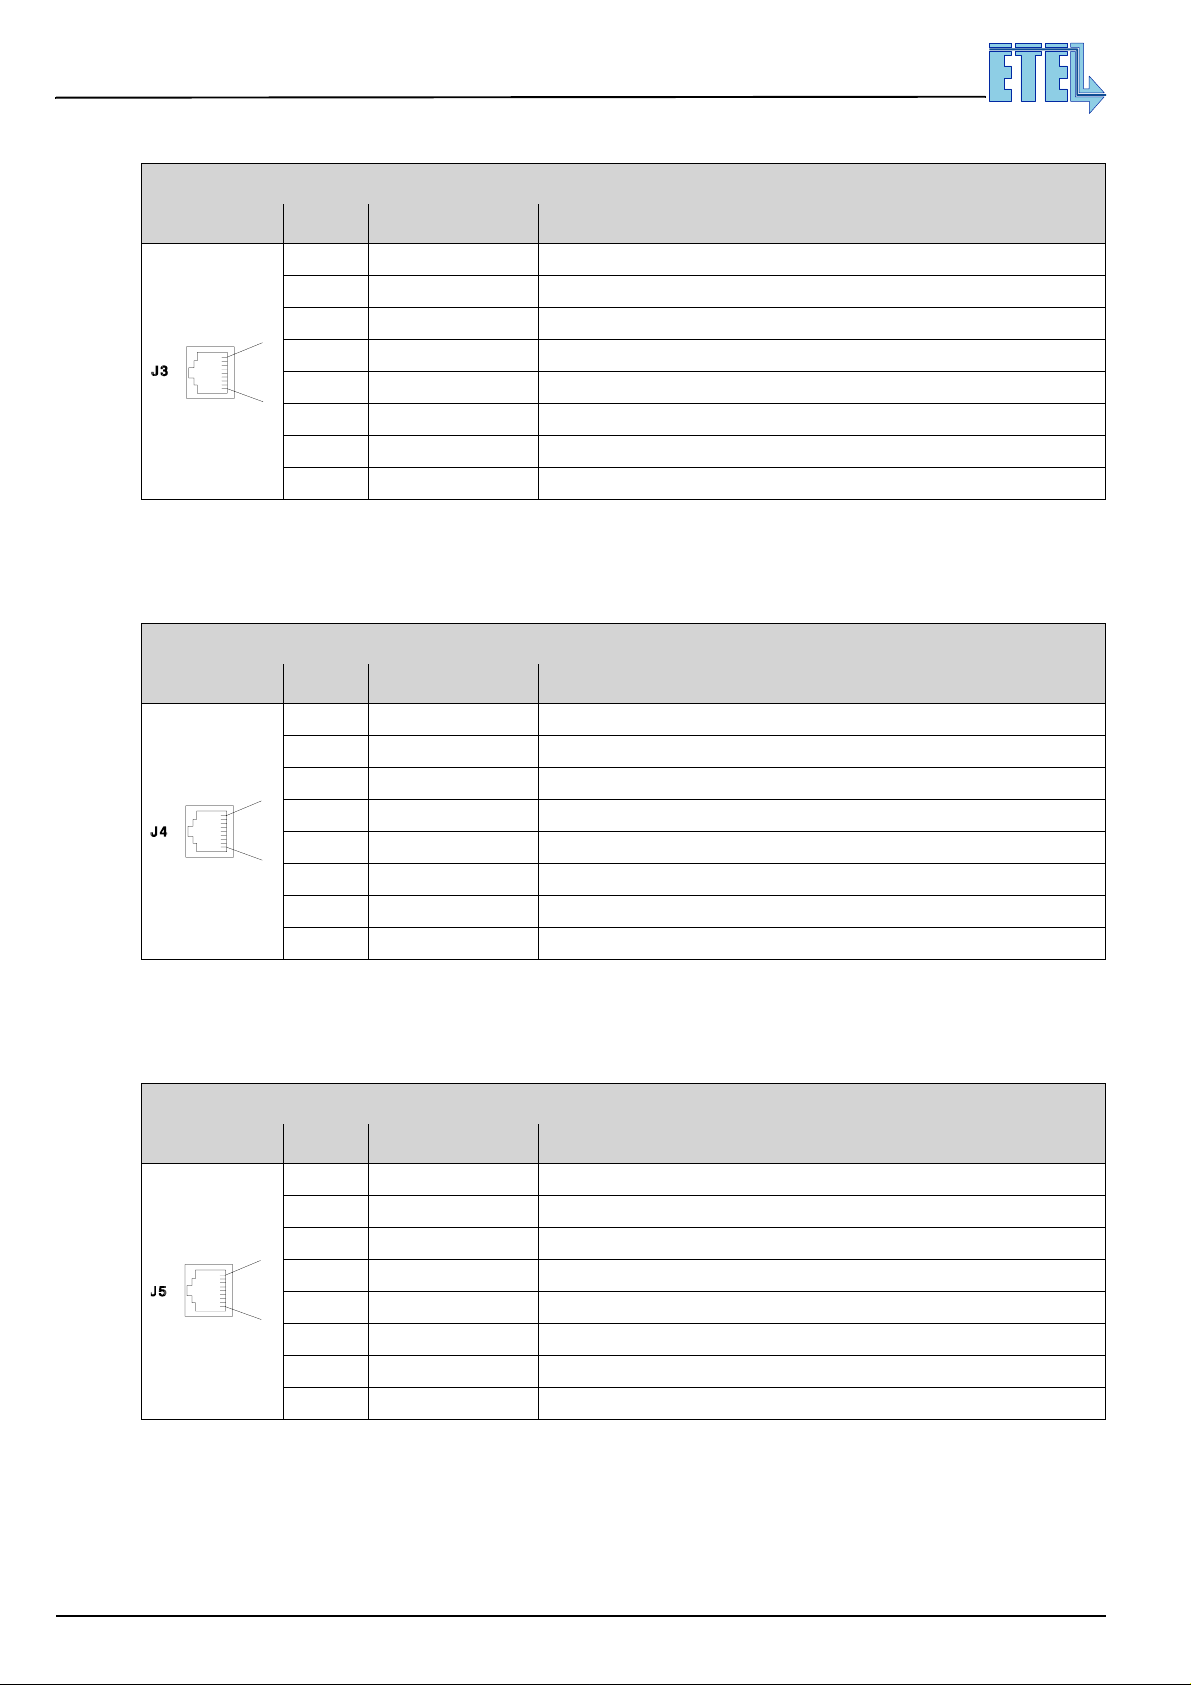
3.3.1 Co nnector J3: ETEL-Bus output
RJ-45, 8 pins, female
MOTION TECHNOLOGY
EB
EB OUT
OUT
Pin # Signal Function
1 EB_Synchro +
2 EB_TXD422 + Data transmission RS422 +
3 EB_TXD422 - Dat a transmission RS422 -
1
4
5
8
6
7
8 EB_Synchro -
Reserved Do not connect
Reserved Do not connect
Reserved Do not connect
Reserved Do not connect
Caution: Work in an ESD safe environment if you touch this connector!
3.3.2 Connector J4: ETEL-Bus input
RJ-45, 8 pins, female
EB
IN
EB IN
Pin # Signal Function
1 EB_Synchro +
2 EB_RXD422 + Data receipt RS422 +
1
3 EB_RXD422 - Data receipt RS422 4 EB_TXD422 +
5 EB_TXD422 -
8
6
7
8 EB_Synchro -
Reserved Do not connect
Reserved Do not connect
Do not connect
Do not connect
Do not connect
Do not connect
Do not connect
Do not connect
(reserved for a future application)
(reserved for a future application)
(reserved for a future application)
(reserved for a future application)
(reserved for a future application)
(reserved for a future application)
Caution: Work in an ESD safe environment when you touch this connector!
3.3.3 Connector J5: ETEL-Bus-Lite serial communication
RJ-45, 8 pins, female
EBL Pin # Signal Function
1 EBL_select_422/232 Select transmission type (open ⇒ RS422 / connected to GND ⇒ RS232)
2 EBL_RXD422 + Data receipt RS422 + from the PC (host)
1
EBL
8
Caution: Work in an ESD safe environment if you touch this connector!
Use the cable delivered by ETEL to establish the EBL communication between your PC and the drive.
3 EBL_R XD422 - Data receipt RS422 - from the PC (host)
4 EBL_TXD422 + Data transmission RS422 + to the PC (host)
5 EBL_TXD422 - Data transmission RS422 - to the PC (host)
6 EBL_TXD232 Data transmission RS232 to the PC (host)
7 EBL_RXD232 Data receipt RS232 from the PC (host)
8 GND Auxiliary supply output (0V)
ETEL Doc. - Hardware manual # DSB2P 904 / Ver. D / 4/11/02
Page 39
MOTION TECHNOLOGY
Hardware manual DSB2-P
Direct Drives & Systems
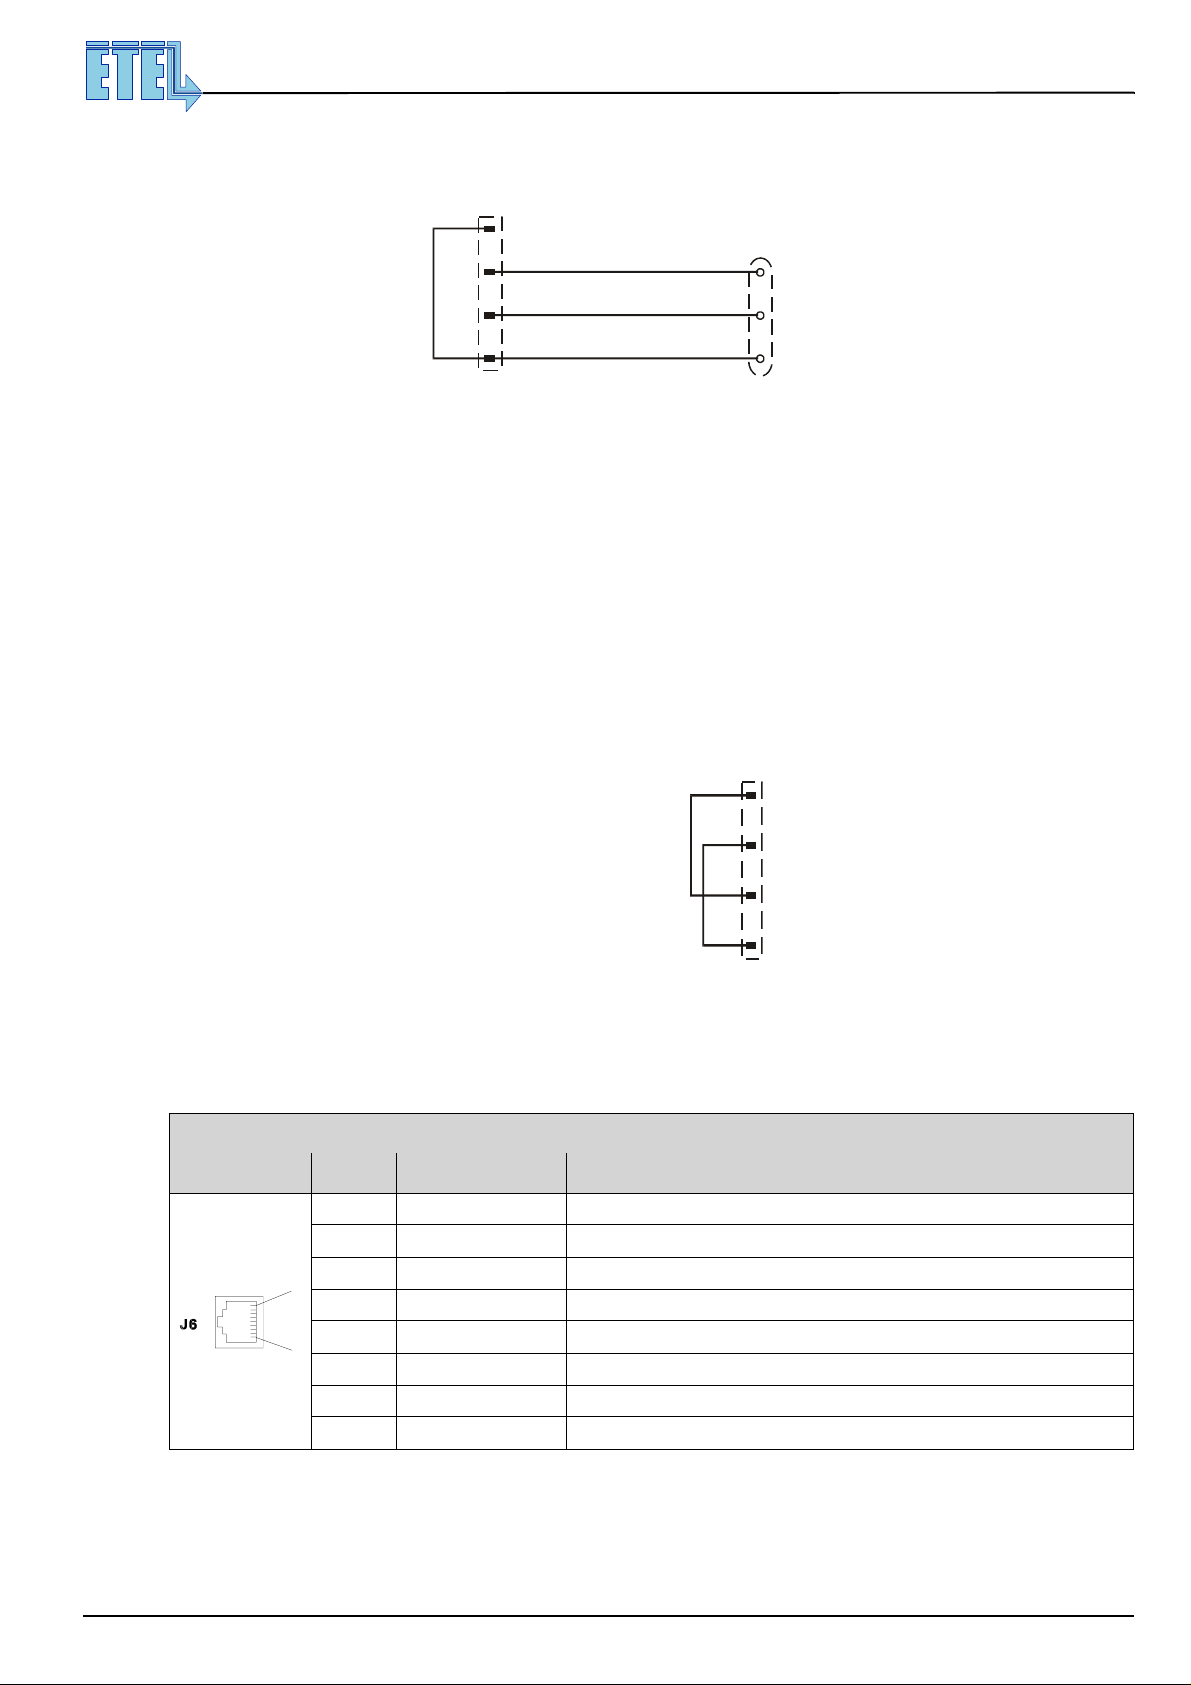
If you want to manufacture your own RS-232 communication cable, wire it as shown below:
39
To the drive (J5):
RJ-45 connector,
8 pins, male
1
6
73
85
3.3.4 Connector J6: Download key and EB-RS232
This connector can be used for two purposes:
3.3.4.1 D own loa d key plu ggi ng
If you do not know what is a firmware download, refer to the DSB2-P Operation & software manual.
If the drive does not switch to 'wait for program', there is an hardware override possibility to force this mode.
Simply plug the download key in the connector J6 and the drive will switch to 'wait for program' and the
download of a new firmware into the drive will be possible.
A download key is a 8 pins RJ-45 male connector with bridges between pins 4-8 and 5-2:
To the PC (s erial port) :
D-SUB connector,
2
9 pins, female
Download Key (J6):
RJ-45 connector,
8 pins, male
3.3.4.2 EB-232 serial communication
If you want an EB with an RS232 communication on connector J6, connect together pins 1 and 8:
EB with an RS422 communication through connectors J3 and J4 will be deactivated.
RJ-45, 8 pins, female
DWL
DWL KEY
KEY
Pin # Signal Function
1 EB_select_422/232 Select transmission type (open ⇒ 422 on J3+J4 / connect to GND ⇒ 232 - J6)
2 +5V Auxiliary supply output (fuse F7 500mA, shared with J1, J9 and J10)
3
1
4 DWL_B - Sets the DSB2-P to 'wait for program' (download) if connected to GND
5 DWL_B + Sets the DSB2-P to 'wait for program' (download) if connected to +5V
8
6 EB_TXD232 Data transmission RS232
7 EB_RXD232 Data receipt RS232
8 GND Auxiliary supply output (0V)
2
4
5
8
Reserved Do not connect
Caution: Work in an ESD safe environment if you touch this connector!
ETEL Doc. - Hardware manual # DSB2P 904 / Ver. D / 4/11/02
Page 40
Hardware manual DSB2-P
40
Direct Drives & Systems
3.4 Motor connectors
Danger: Before installing or disconnecting the motor cables: Turn off all power supplies
and wait 10 minutes to allow the internal DC bus capacitors to discharge.
The motor connectors must always be screwed correctly on the drive.
It is also recommended to fasten the cables on the system.
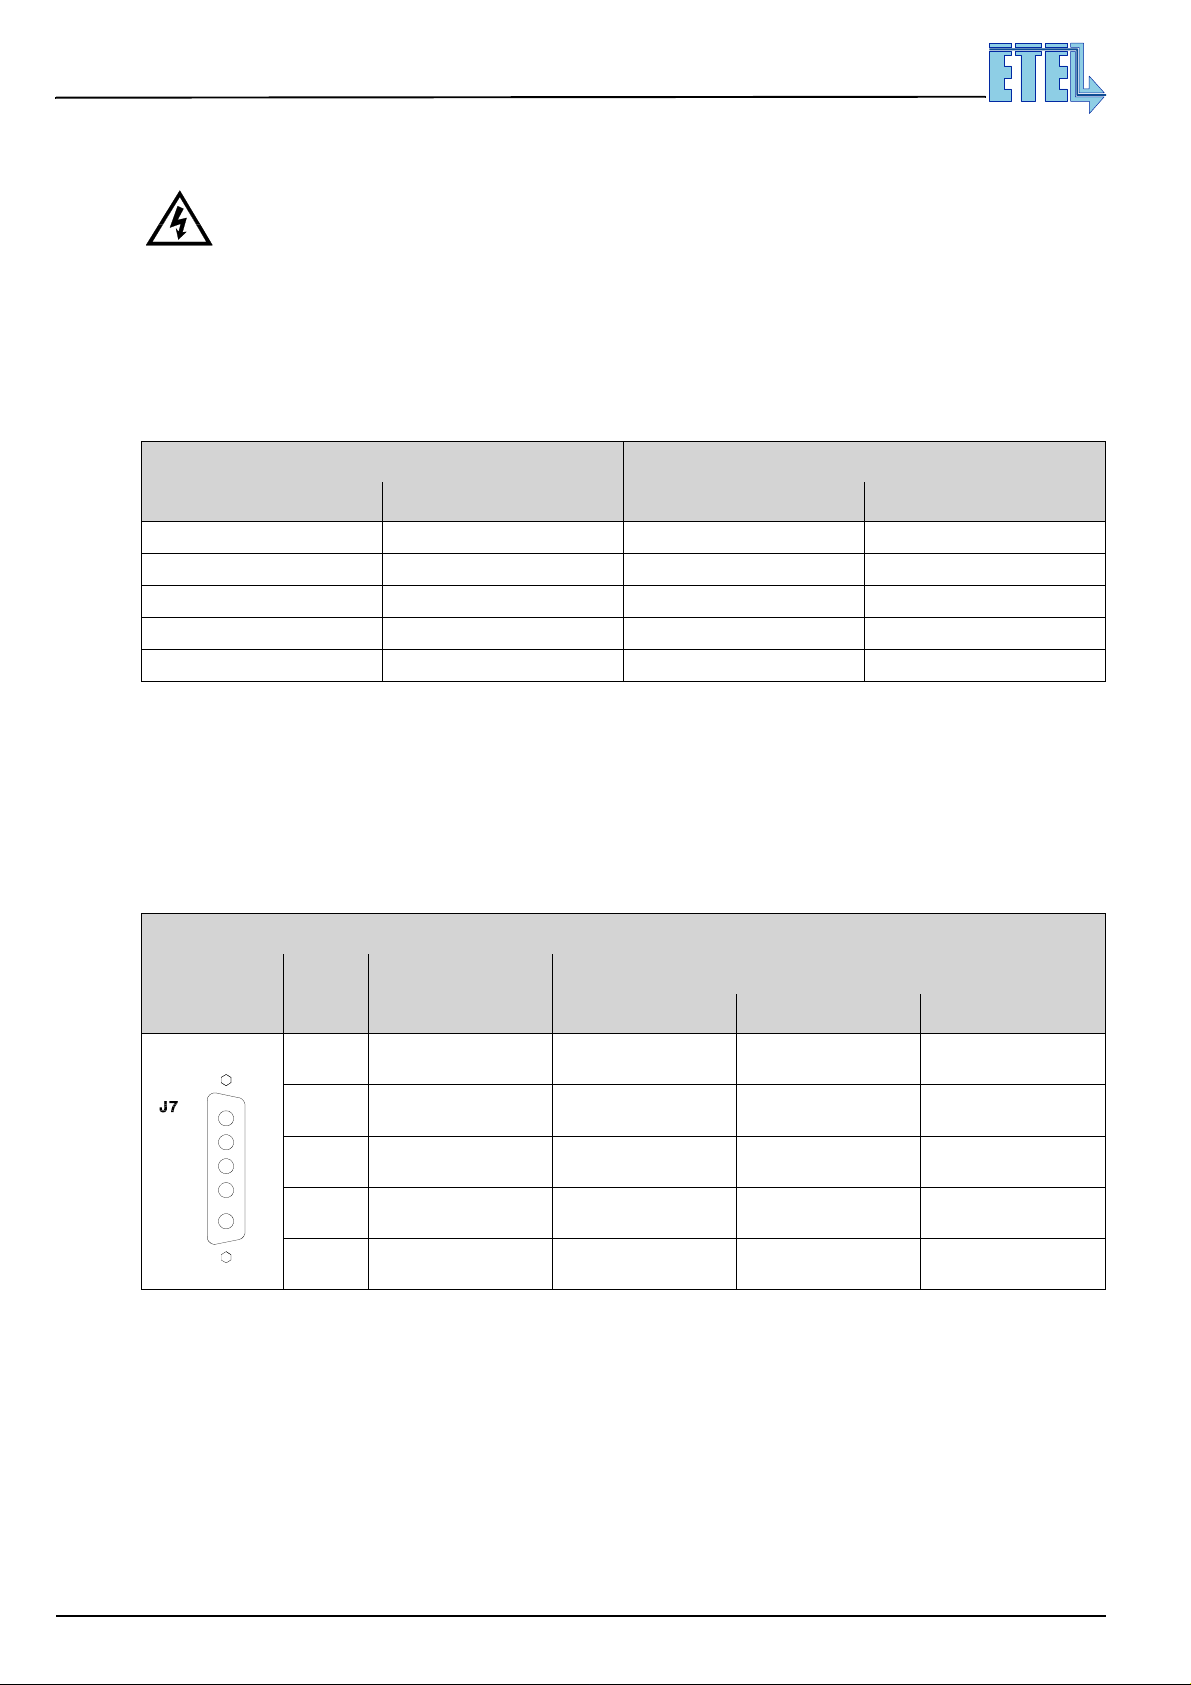
3.4.1 ETEL motor cables numbering system
ETEL standard motors cables are numbered according to the following system:
T wo-phase motors Three-phase motors
Designation Function Designation Function
1 Motor phase 1 + 1 Motor phase 1
2 Motor phase 1 - 2 Motor phase 2
3 Motor phase 2 + 3 Motor phase 3
4 Motor phase 2 - - -
Green / Yellow Protective earth Green / Yellow Protective earth
MOTION TECHNOLOGY
3.4.2 Connector J7: Standard motor connection
The DSB2-P can drive mono-phase, two-phase and three-phase motors. Connector J7 allows the supply of the
motor phase(s) adequately.
The motor connector J7 is placed under the liquid crystal display.
This standard motor output is identified by the drive type # : D S B 2 P x x x - 1 x x E
Power D-SUB, 5 pins (5W5), female
M
OTOR
CONNECTION
MOTOR CONNECTION
PE PH4 PH3 PH2 PH1
Pin # Signal
Single-phase motor Two-phase motor Three-phase motor
1 PH1 Motor phase + Motor phase 1 + Motor phase 1
2 PH2 Motor phase - Motor phase 1 - Motor phase 2
3PH3
4PH4
5A PE Protective earth Protective earth Protective earth
Do not connect
Do not connect
Functions
Motor phase 2 + Motor phase 3
Motor phase 2 -
Do not connect
3.4.3 Co nnector J7B: Motor connection with short circuit relay option
The housed modules may include an optional short circuit relay on the motor output.
This option is identified by the drive type # : D S B 2 P x x x - 2 x x E
When the short circuit relay option is present, the motor connector J7B is placed under the connector J14.
ETEL Doc. - Hardware manual # DSB2P 904 / Ver. D / 4/11/02
Page 41
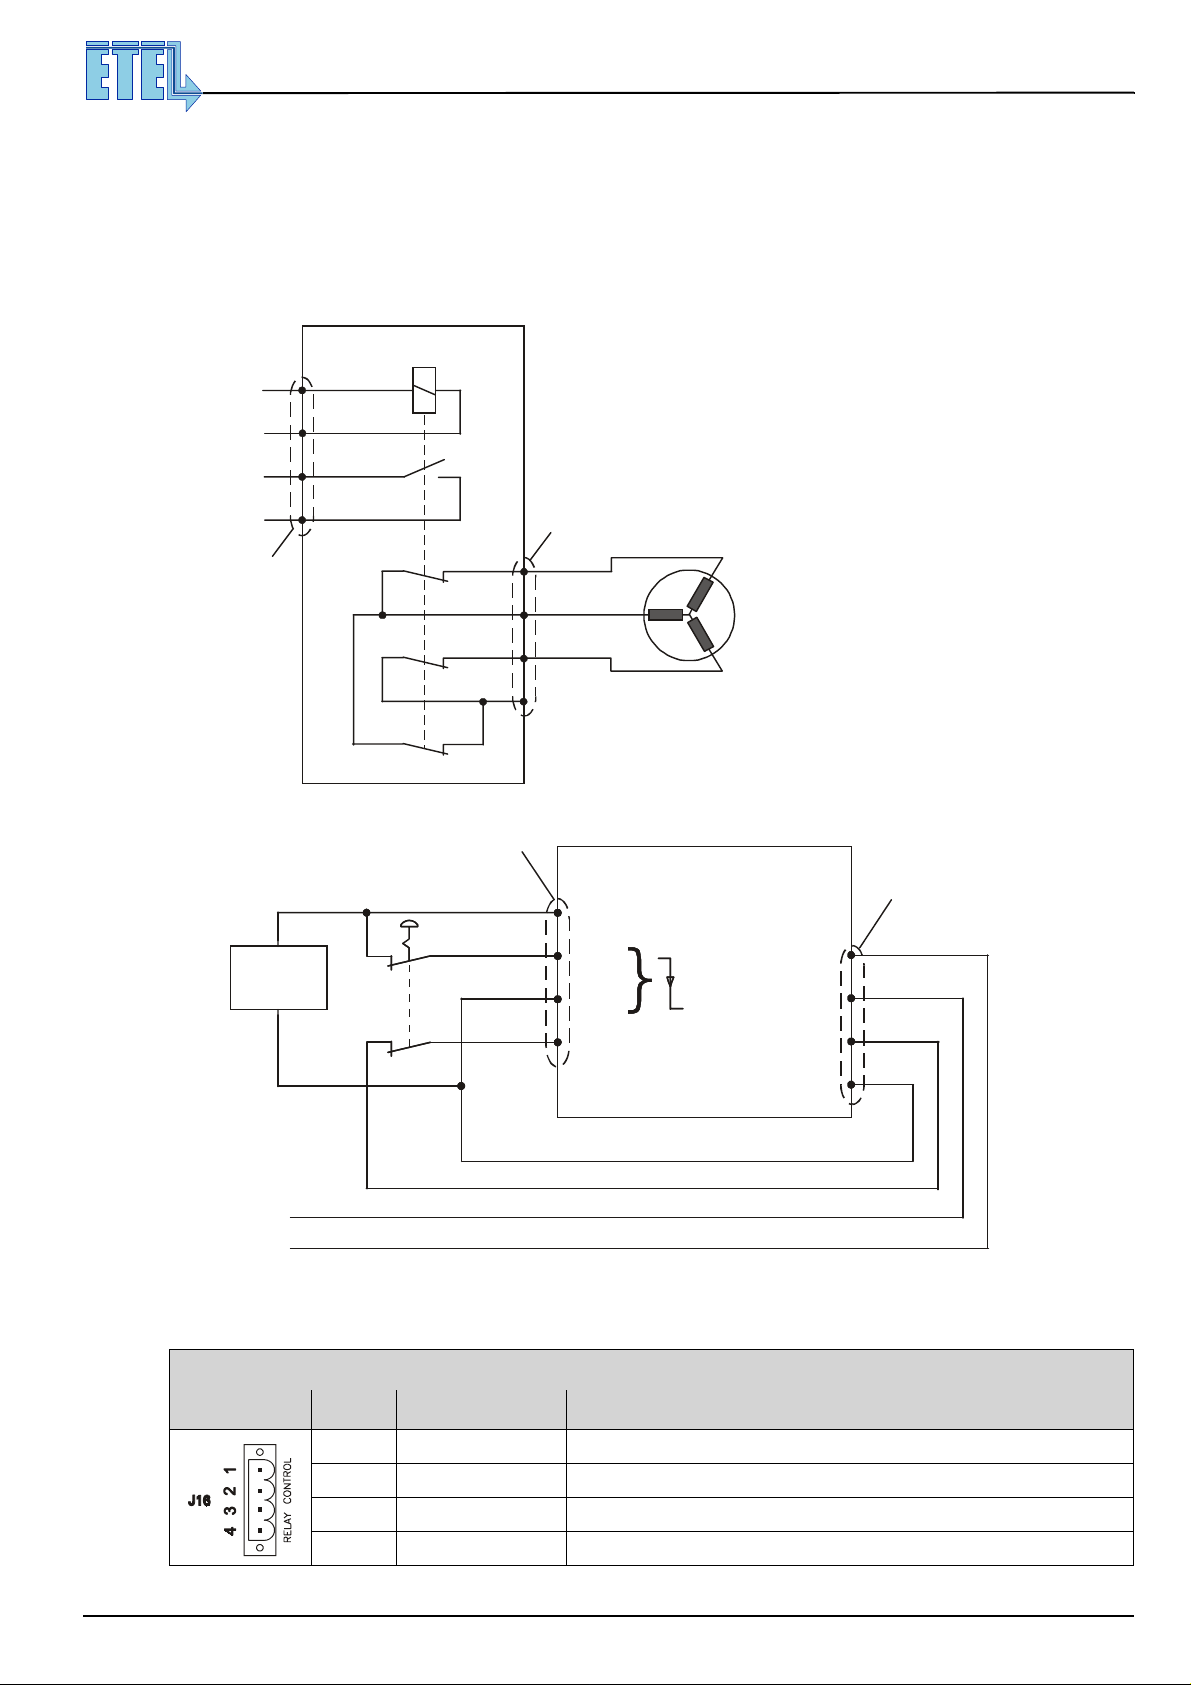
Hardware manual DSB2-P
Direct Drives & Systems
MOTION TECHNOLOGY
3.4.4 Connector J16: Short circuit relay control
This connector is only present on the DSB2Pxx4-xxx module and identified by the number 2 (DSB2Pxx4-2xx)
Single, two or three-phase motors can be short-circuited. The magnetic brake which has been produced
generates a force opposite to the motor movement (but does not stop it completely!). The short-circuit contacts
(located on the phases outputs toward the motor) are normally sh ut and must be opened when the motor
works. The relay coil is powered separate of the DSB2-S circuits. The contact CON1-2 (normally open) allows
the possibility to have a look at the state of the short-circuit contacts.
4
3
2
1
DSB2-P
+24Vext
GNDext
CON1
CON2
Caution: This relay is not designed to be used as a
safety device for the user system.
Refer to the EN 60204/1 norm to make sure
that you are using the right cable section for
the motor wiring.
Connector J7B
41
Connector J16
PH1
PH2
PH3
PH4
1
2
3
4
Example of short-circuit relay used with an emergency stop push-button:
External
supply
24V
Connector J2
12
34
11
+Vext
6
DIN1+
3
GNDext
4
DOUT1+
DSB2-P
PWR
OFF
+24Vext
GNDext
CON1
CON2
Connector J16
1
2
3
4
Feedback for control
Caution: The drive must powe r off i ts po wer br id ge when DIN1 = 0 V. Lik ew ise, for drive error, you mu st
program DOUT1 = 0V (K37=1). See the Operation & software manual to set these parameters.
Phoenix, MSTB 2.5/4-GF-5.08
R
ELAY CONTROL
ETEL Doc. - Hardware manual # DSB2P 904 / Ver. D / 4/11/02
Pin # Signal Function
1 CON1 Control pole 1 of relay auxiliary contact
2 CON2 Control pole 2 of relay auxiliary contact
3 GNDext Separate external supply of the relay coil (0V)
4 +24Vext Separate external supply of the relay coil (+24V)
Page 42
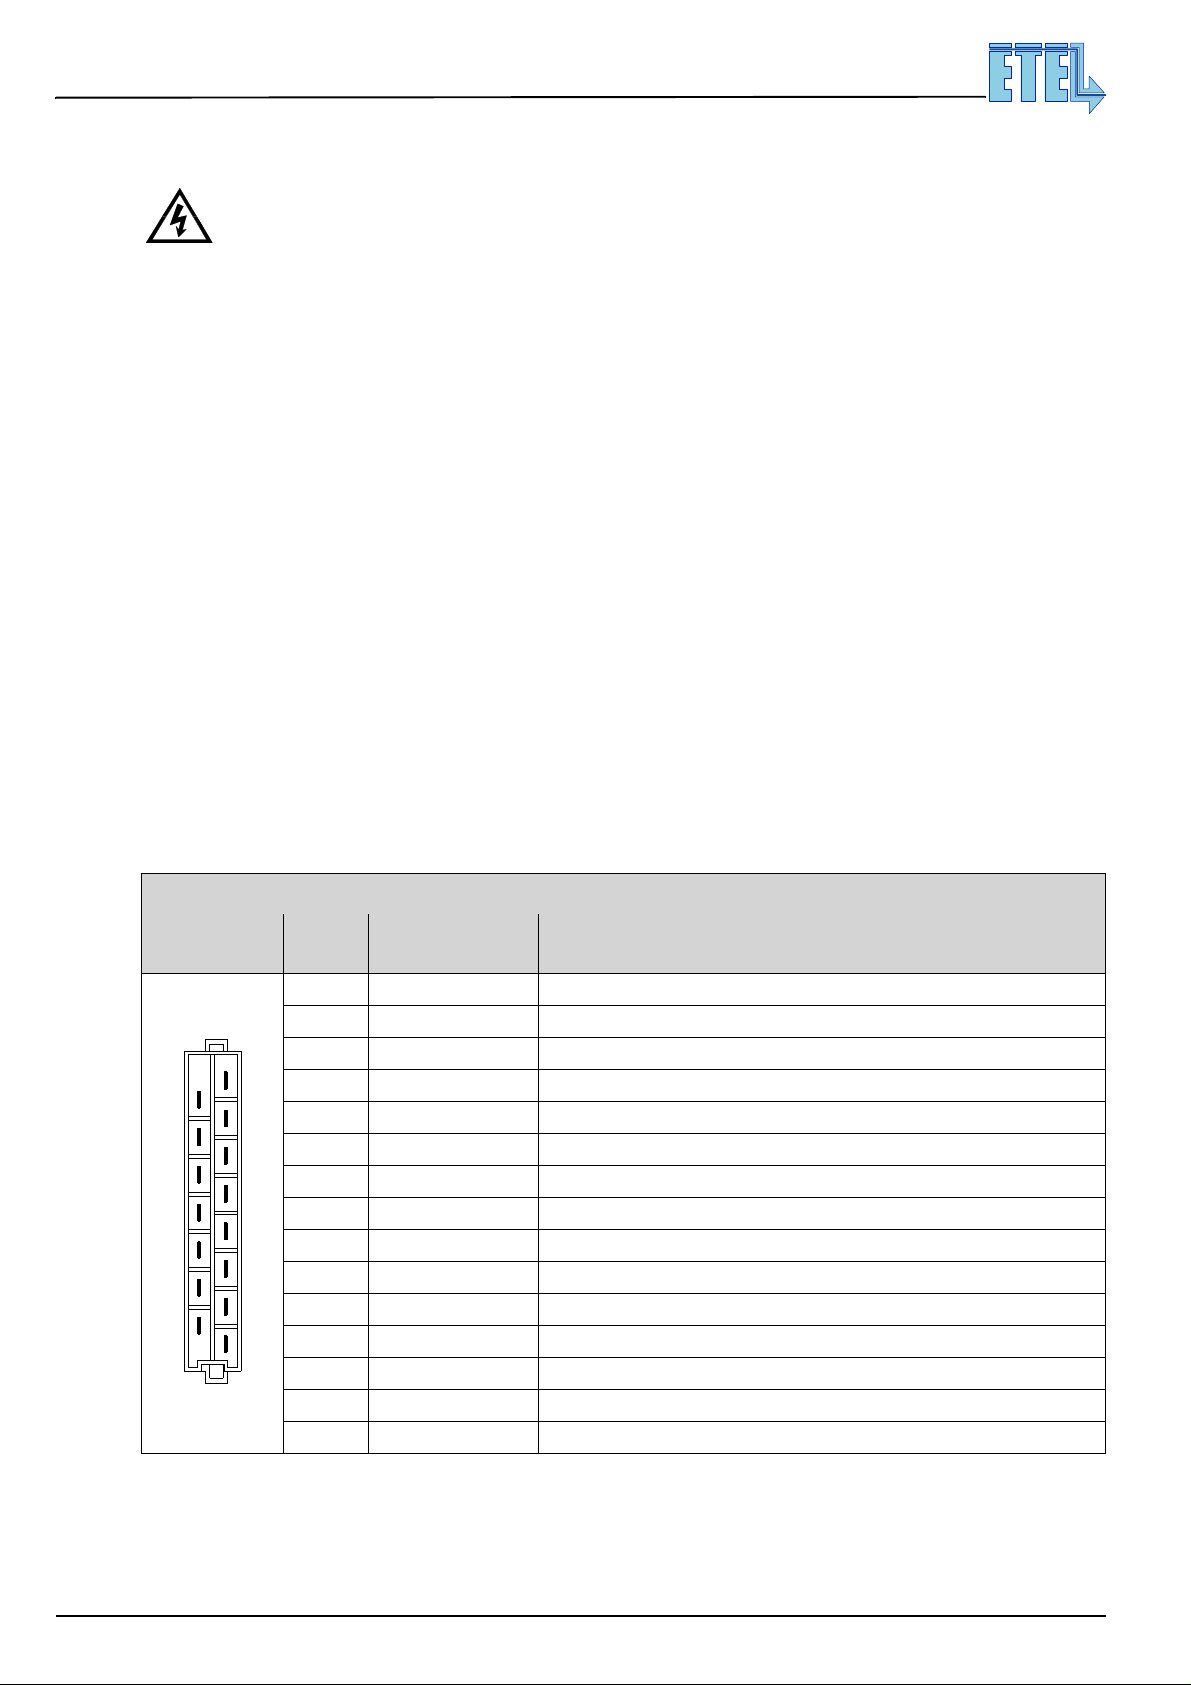
Hardware manual DSB2-P
42
Direct Drives & Systems
3.5 Power connectors
Danger: Before installing or disconnecting the power cables: Turn off all power supplies
and wait 10 minutes to allow the internal DC bus capacitors to discharge.
The power connectors must always be screwed correctly on the drive.
It is also recommended to fasten the cables on the system.
3.5.1 Connector J11: Rack modules power supply input
You have the possibilities to power the rack modules:
3.5.1.1 With an ETEL power supply
If you are using an ETE L power supply (with an ETEL back panel ), all necessary connections ar e already
realized according to the table below. Just plug the rack into the right place.
An inrush measurement is present in the power supply. The signals sent to the drive pin d14 (INR) are:
• +15V (loading): The power supply is delivering current to load the drive DC bus capacitors.
MOTION TECHNOLOGY
• 0V (OK): The power supply has finished to load the drive DC bus capacitors.
Remark: Do not power the motor phases until the DC bus capacitors are loaded.
3.5.1.2 With a power supply from the market
If you are using a power supply from the market, an additional bridge is necessary:
Connect pins d14 (INR) and d18 (GNDpwr) together.
DIN 41612-H15, 15 pins, male
G
ENERAL POWER
SUPPLY
dz
6
10
14
18
22
26
30
Pin # Signal Function
z4 +24V
d6 +15V*
z8 GND24V
4
d10 REGEN
z12 +VAUX Auxiliary supply input, 24 to 55Vdc or 96 to 340Vdc depending on the model
8
d14 INRUSH Inrush input (0V = ok / +15V = loading)
12
z16 GNDpwr Power supply input (0V) -
16
d18 GNDpwr Power supply input (0V) -
20
z20 +VPWR Power supply input, 24 to 340Vdc -
24
d22 +VPWR Power supply input, 24 to 340Vdc -
28
z24 GNDaux Auxiliary supply input (0V)
d26 GNDpwr Power supply input (0V)
32
z28 PE Pr otective earth d30 PE Protective earth z32 PE Pr otective earth -
Do not connect!
Do not connect!
Do not connect!
Do not connect!
Connected to ETEL power supply
Always connect z16 and d18
Always connect z16 and d18
Always connect z20 and d22
Always connect z20 and d22
Must always be connected first for safety!
Must always be connected first for safety!
Must always be connected first for safety!
Danger: High voltage may be present on this connector!
For safety reasons, always connect first the protective earth (PE) to the dedicated pins!
ETEL Doc. - Hardware manual # DSB2P 904 / Ver. D / 4/11/02
Page 43
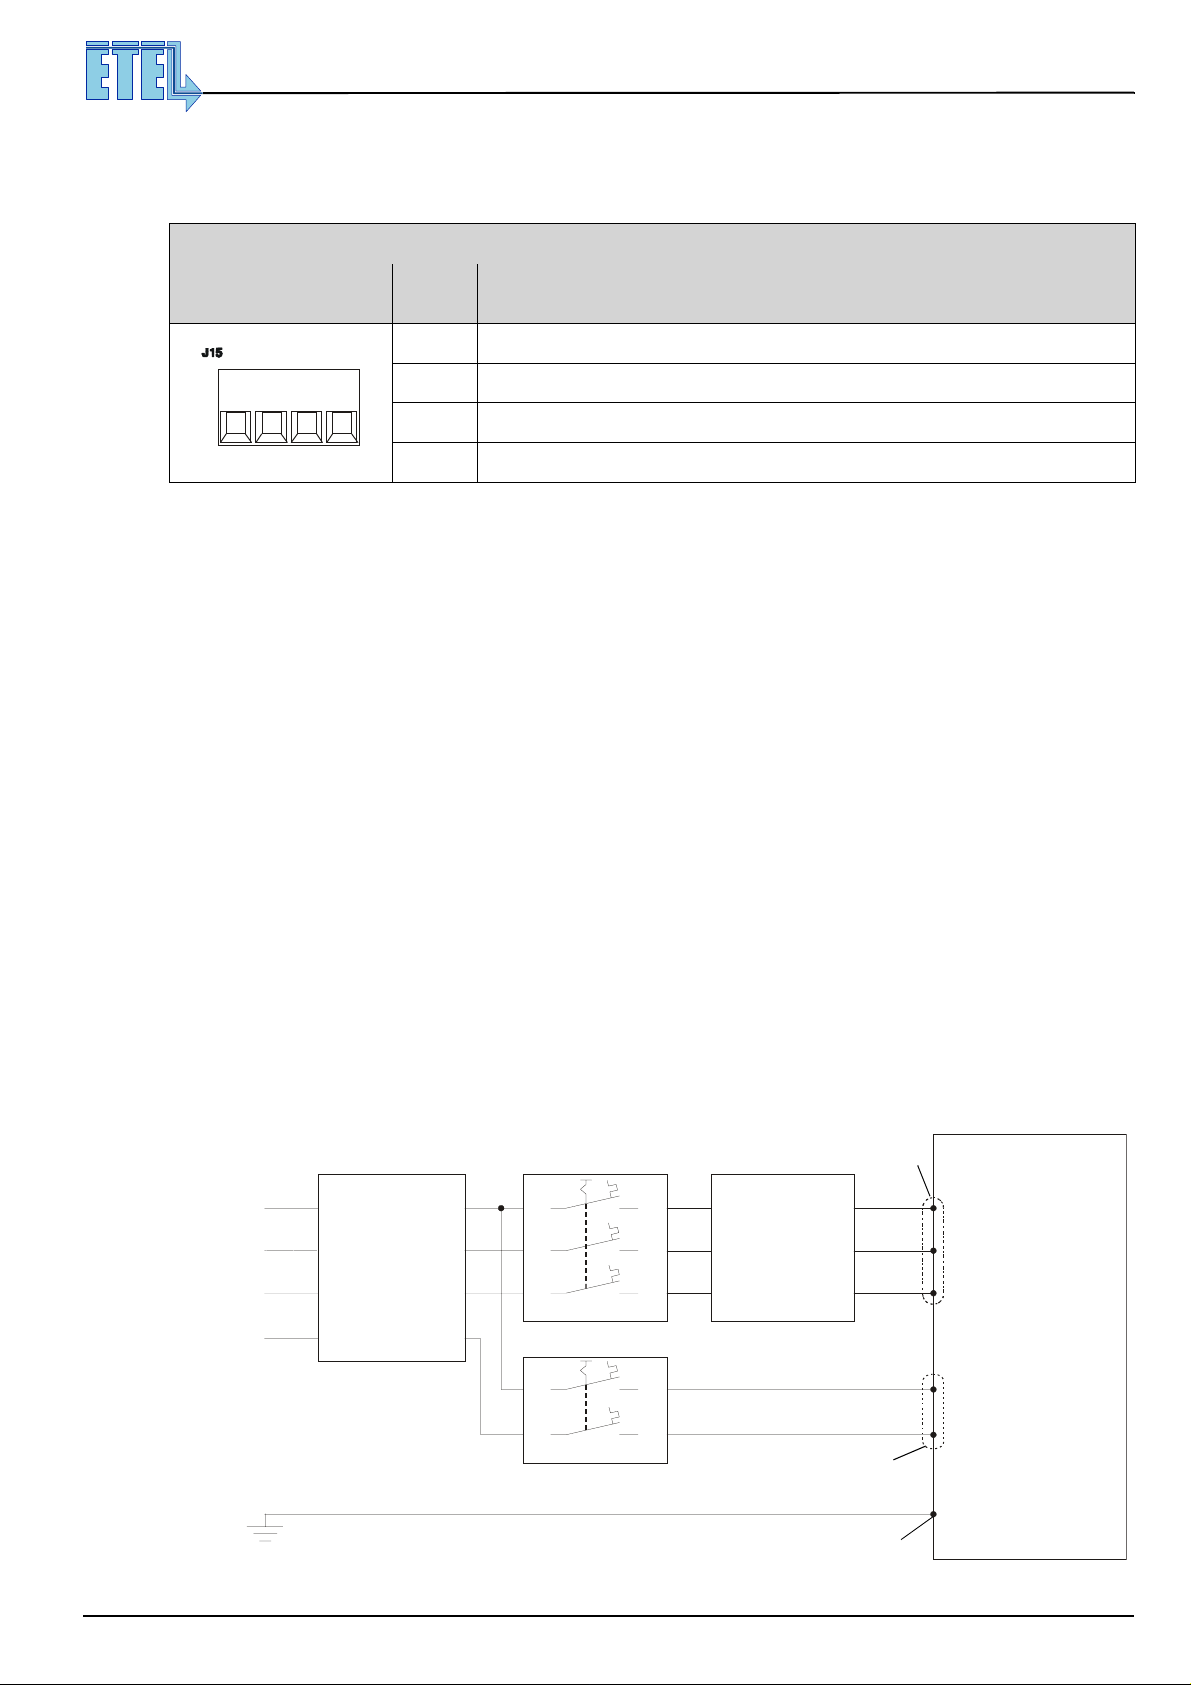
Hardware manual DSB2-P
Direct Drives & Systems
MOTION TECHNOLOGY
3.5.2 Connector J15: Housed module auxiliary and power supply input
This connector is only present on the DSB2Pxx3-xxx module.
Phoenix HDFK 4
43
A
UXILIARY AND POWER INPUT
+VA GNDA +VP
+GNDP
Pin #
Signal
+VA Auxiliary supply input: 96 to 340 Vdc for DSB2Pxx3-x1x or 24 to 55 Vdc for DBS2Pxx3-x2x
GNDA Ground output (0 V)
+VP Power supply input: 24 to 340 Vdc
GNDP Ground output (0 V)
Danger: High voltage may be present on this connector!
For safety reasons, always connect first the protective earth (PE) to the front plate screw!
Warning:
An external RFI filter is necessary to comply with EMC directives.
To avoid current spike at the switching on (capacitor charging), an 'inrush limiter' is necessary.
To reduce transient overvoltage coming from the main, a MOV (varistor) has to be used.
3.5.3 Connector J14: Housed module power supply input
This connector is only present on the DSB2Pxx4-xxx module.
Important: It is recommended to supply the power with an external transformer, whose characteristics
depend on the user’s application and on the mains supply characteristics.
Examples of transformers :
Function
• With European mains: Primary 3 x 380V ∇ - Secondary 3 x 220V Y; the transformer adapts the mains
voltage to the drive and prevents possible disturbances from invading the mains (meet CE norm).
• With US mains: Primary 3 x 220V ∇ - Secondary 3 x 220V Y; the insulation transformer prevents possible
disturbances from invading the mains (meet CE norm).
•As example, a circuit breaker on the Power line (J14) allows the turn-off of the motor (in case of
emergency) without loosing the position reading data. So, a new initialization/indexation process would not
be necessary after an emergency stop.
Mains line
L1
L2
L3
Circuit breaker
FI differential
switch
I = 30 mA
∆∆∆∆
16 A
N
Circuit breaker
2 A
TRANSFORMER
J14
L1
L2
L3
L
N
J13
DSB2-P
Ground
ETEL Doc. - Hardware manual # DSB2P 904 / Ver. D / 4/11/02
Always connect PE
Front panel screw
Page 44
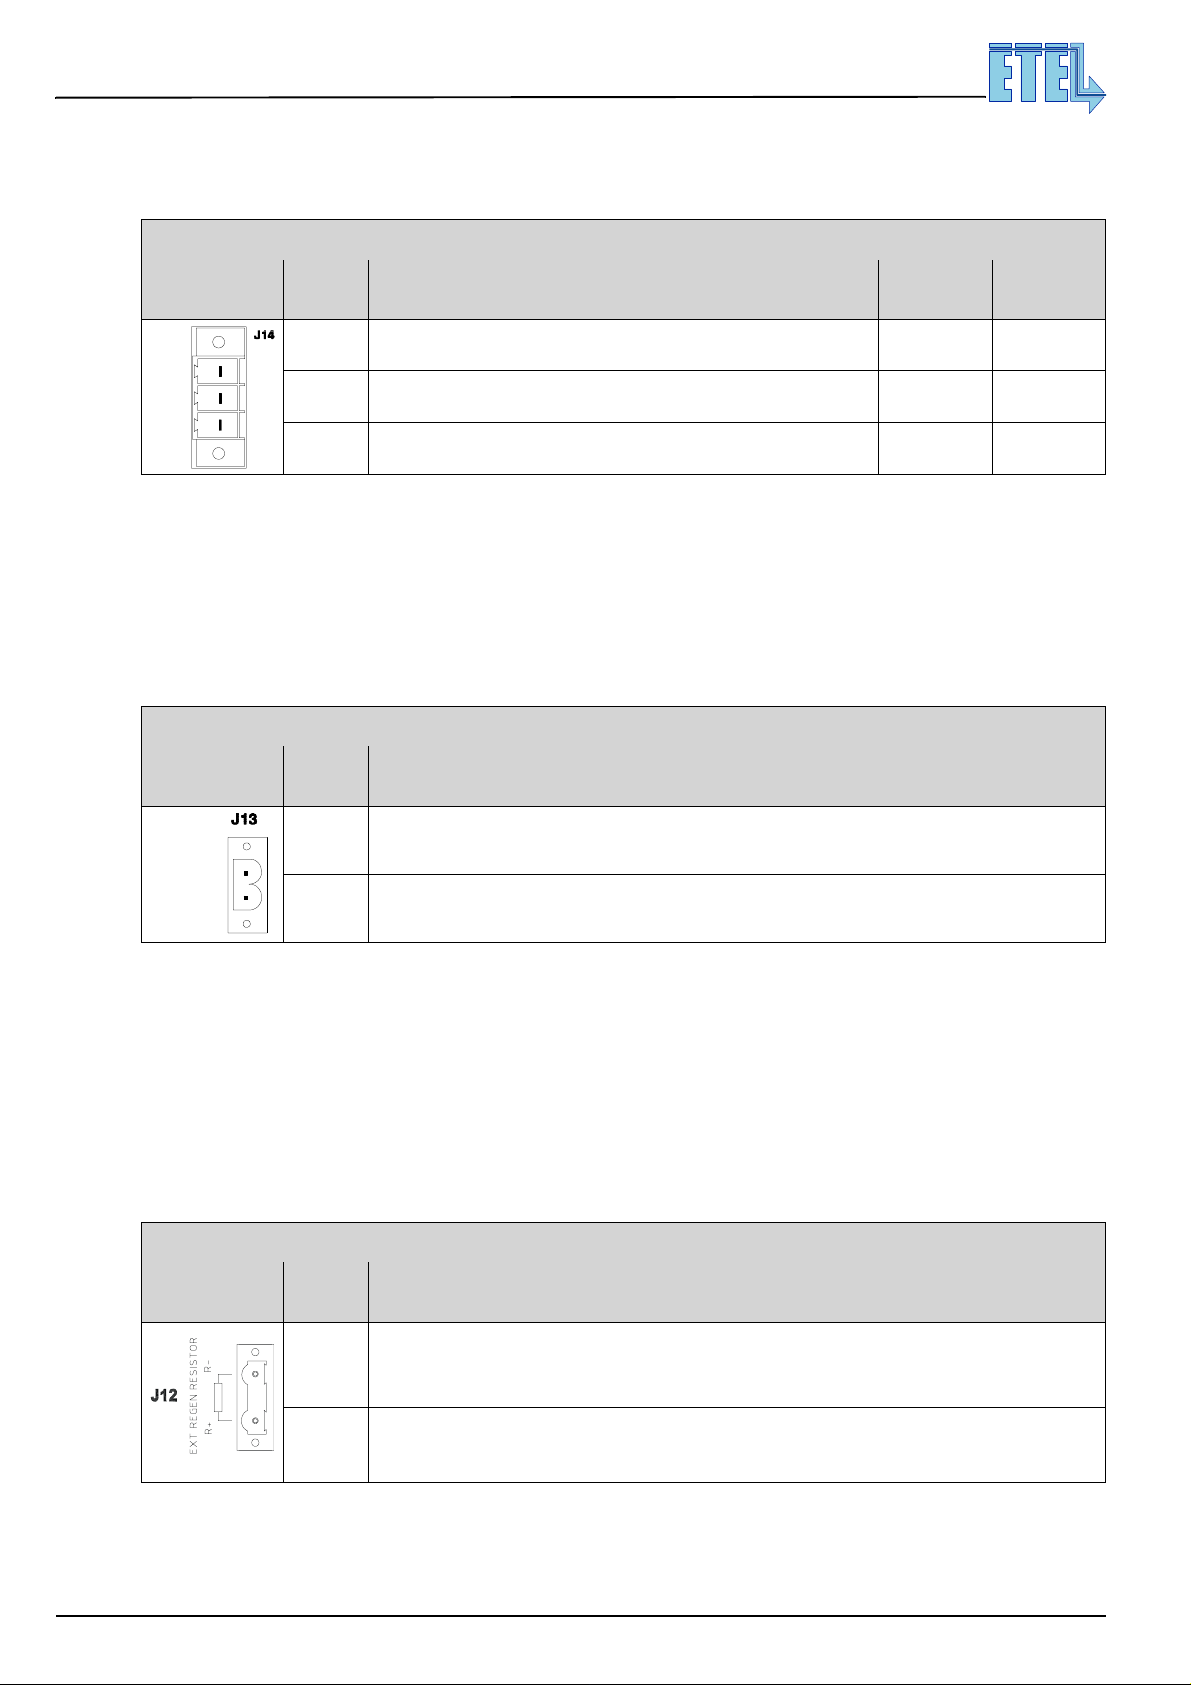
44
Hardware manual DSB2-P
Direct Drives & Systems
MOTION TECHNOLOGY
Remark: This diagram shows a connecting example of the transformer with a three-phase main.
For the motor wiring, refer to the EN 60204/1 norm in order to use the adequate cable
section.
Phoenix PC 4/3-G-7.62
POWER INPUT
3(or 1) x 84 - 240 VAC
L1 L2 L3
P
OWER
I
NPUT
Pin #
Signal
L1 Mains line input for power supply (84 to 240Vac MAX, between L1-L2) Mains L1 Mains Lx
L2 Mains line input for power supply (84 to 240Vac MAX, between L2-L3) Mains L2 Mains N
L3 Mains line input for power supply (84 to 240Vac MAX, between L3-L1) Mains L3
Function
Danger: High voltage may be present on this connector!
For safety reasons, always connect first the protective earth (PE) to the front plate screw!
3.5.4 Connector J13: Housed module auxiliary supply input
This connector is only present on the DSB2Pxx4-xxx module.
Phoenix MSTB 2.5/2-GF-5.08
A
UXILIARY
INPUT
Pin #
Signal
L Mains line input for auxiliary supply (84 to 240 Vac MAX between L-N)
Function
3-phase
mains
1-phase
mains
Do not
connect
L N
84 - 240 VAC
AUXILIARY INPUT
N Mains neutral (return) inp ut for auxiliary supply (84 to 240 Vac MAX between N-L)
Danger: High voltage may be present on this connector!
For safety reasons, always connect first the protective earth (PE) to the front plate screw!
3.5.5 Connector J12: External regeneration resistor
This connector is only present on the DSB2Pxx4-xxx module.
Caution: The resistor minimal value is 39Ω / 3,8kW at 380Vdc to protect the internal regen. transistor.
Phoenix GIC 2.5/2-GF-7.62
EXT
RESISTOR
REGEN
Pin #
Signal
R + Connect + of external regeneration resistor, if necessary
R - Connect + of external regeneration resistor, if necessary
Function
Danger: High voltage may be present on this connector!
ETEL Doc. - Hardware manual # DSB2P 904 / Ver. D / 4/11/02
Page 45
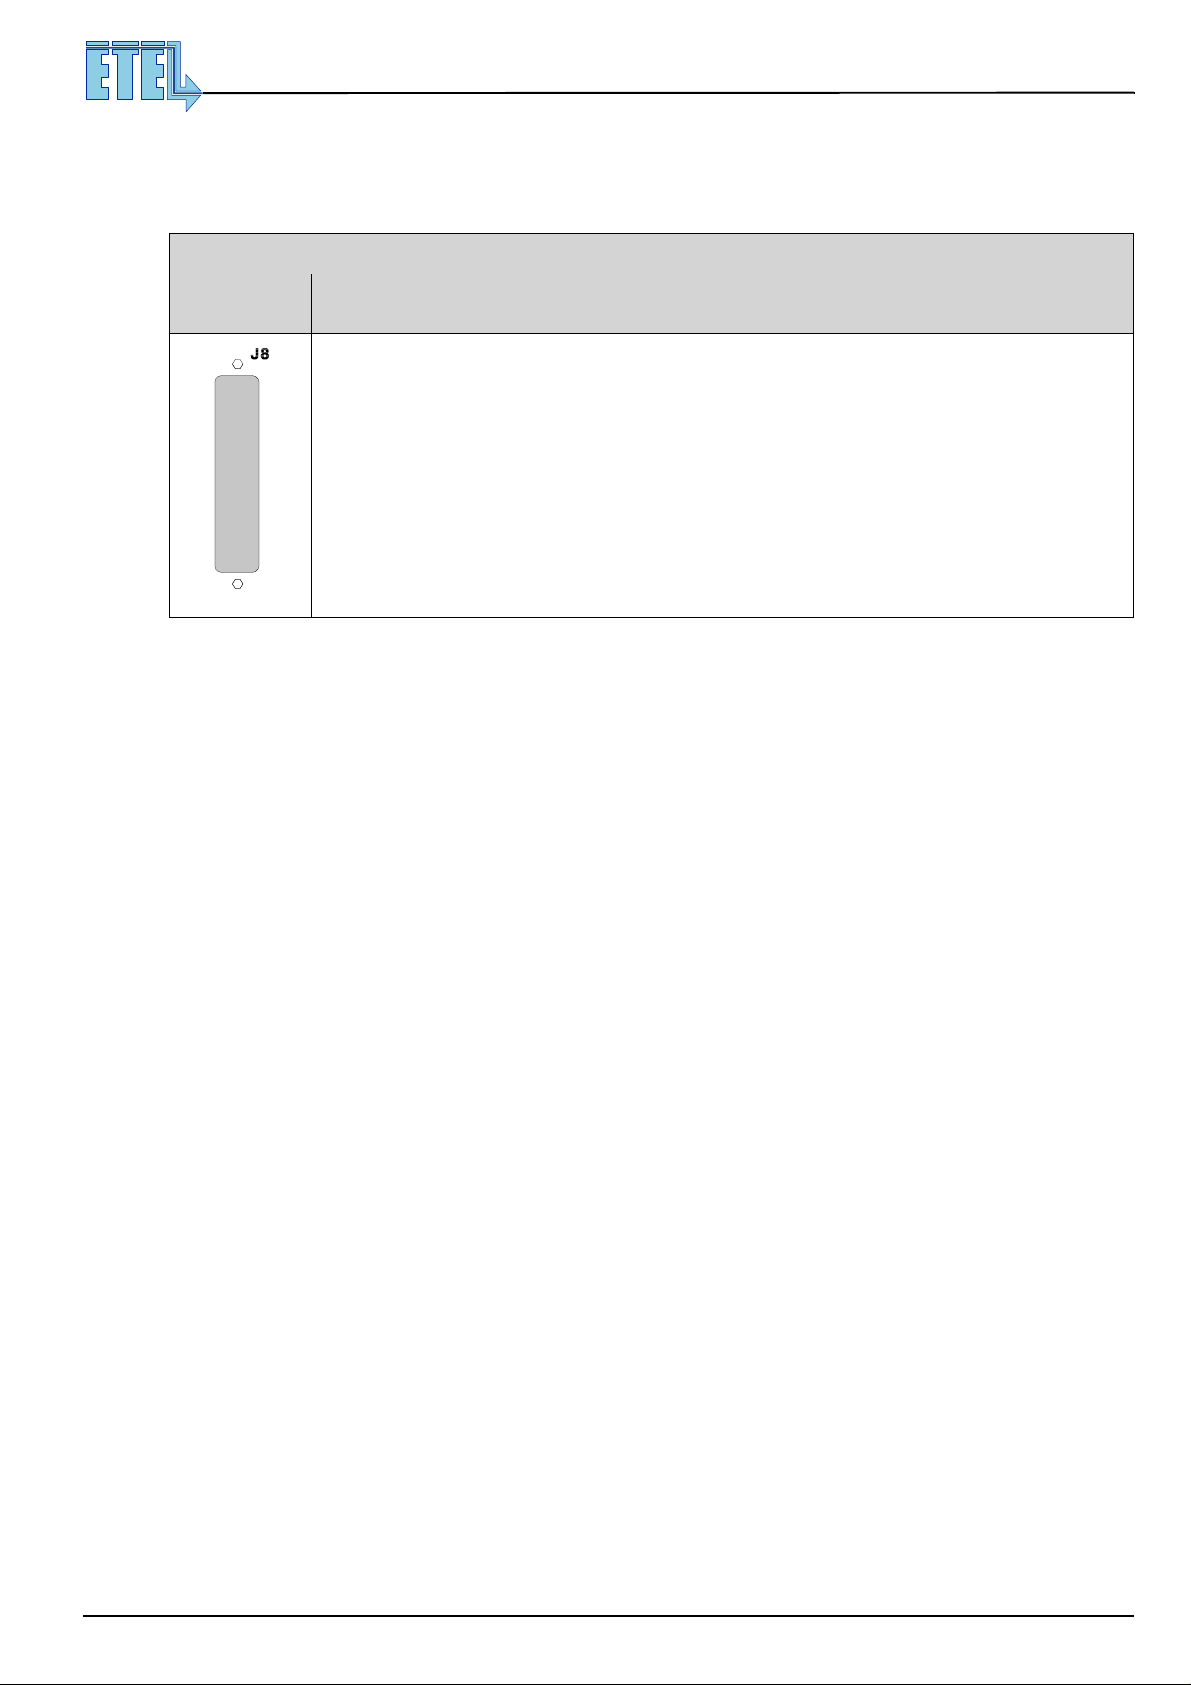
Hardware manual DSB2-P
Direct Drives & Systems
MOTION TECHNOLOGY
3.6 Optional board connector
3.6.1 C onnector J8: Depends on the type of board
Depends on the type of board
O
PTIONAL
BOARD
Refer to the specific documentation if you have an optional board, please.
OPTIONAL BOARD
45
3.7 EMC cables connection
As every voltage choppers, the DSB2-P creates EMI (electromagnetic interferences), which are retained inside
its metal housing. To avoid having EMI disturbing other electronic systems, you must use shielded cables.
The shield must be connected to GND on both cables ends, except if another specification is given by ETEL.
3.7.1
Cables
manufacturing
If you do not use the c ables delivered by ETEL, follow the recommend ations below. Two cables must be
shielded:
• The motor cable to J7.
• The encoder cable to J1 or J9 or J10 (double shield if you are using a 11
Simple shields must be linked to the connector shells on both cable ends.
On a double-shielded cable, the external shield must be linked to the connector shells on both cable ends.
The internal shield must be connected to the electronics GND, on one cable end only.
Use only connectors with full metallic conductive shells.
Shielded cables must be of types ISOCOM CY ®, or ISOCOL CY ®, or equivalent (avoid aluminum foil!).
Connect the shield on both cable ends. The shield must cover entirely all wires. Connecting short ''pig tails'' to
cable shielding is forbidden! (out of EMC directives). Shield contact on 360° with the connector shell and strain
relief grip is necessary.
a analog position encoder).
µµµµ
ETEL Doc. - Hardware manual # DSB2P 904 / Ver. D / 4/11/02
Page 46
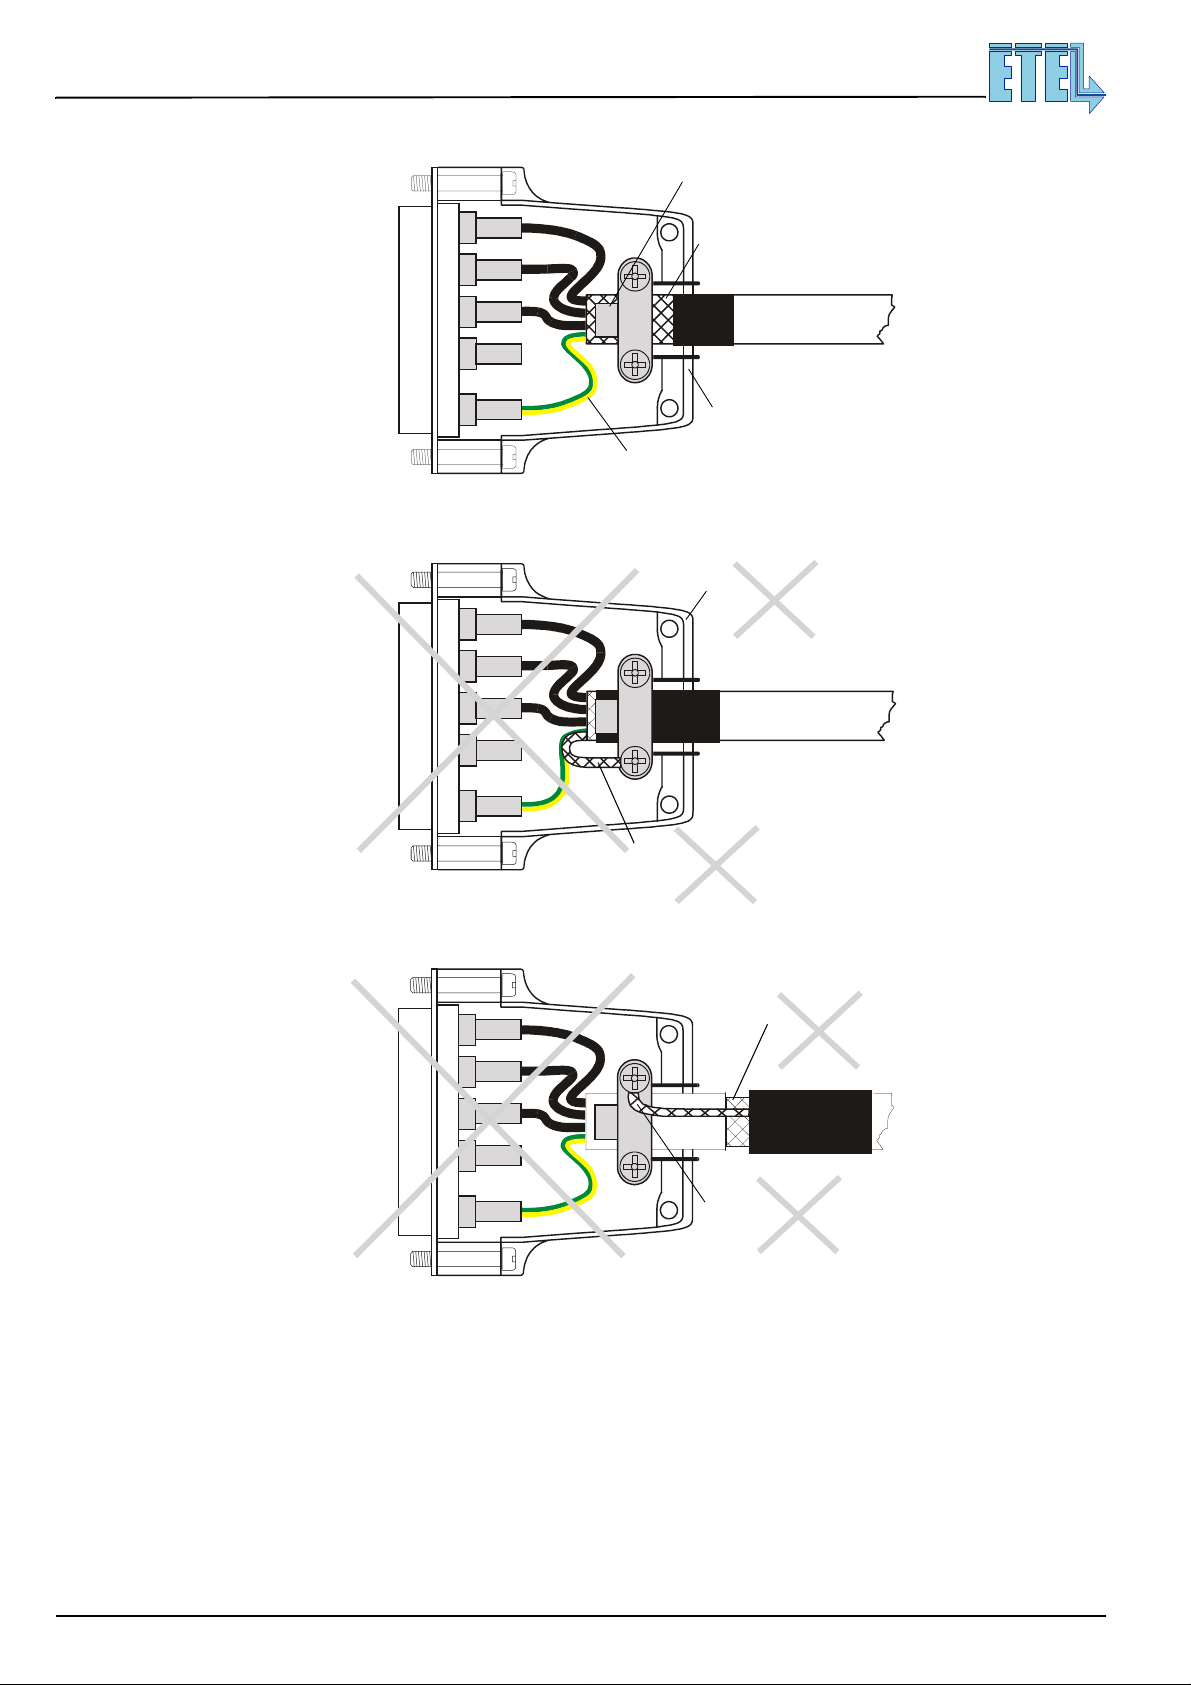
46
Hardware manual DSB2-P
Direct Drives & Systems
MOTION TECHNOLOGY
See the example below:
Shield contact on 360°with
strain relief grip and shell.
Good quality shield
(avoid aluminum foil)
GOOD !
Full metallic shell
Safety ground (PE) connection
(shield is not a safety connection)
Here are two examples of bad shield connections:
Plastic, or metal
covered plastic shell
BAD !
BAD !
Pig tail with the shield
(or soldered wire)
Aluminum foil
shielding
Single point connection
(shield or soldered wire)
ETEL Doc. - Hardware manual # DSB2P 904 / Ver. D / 4/11/02
Page 47
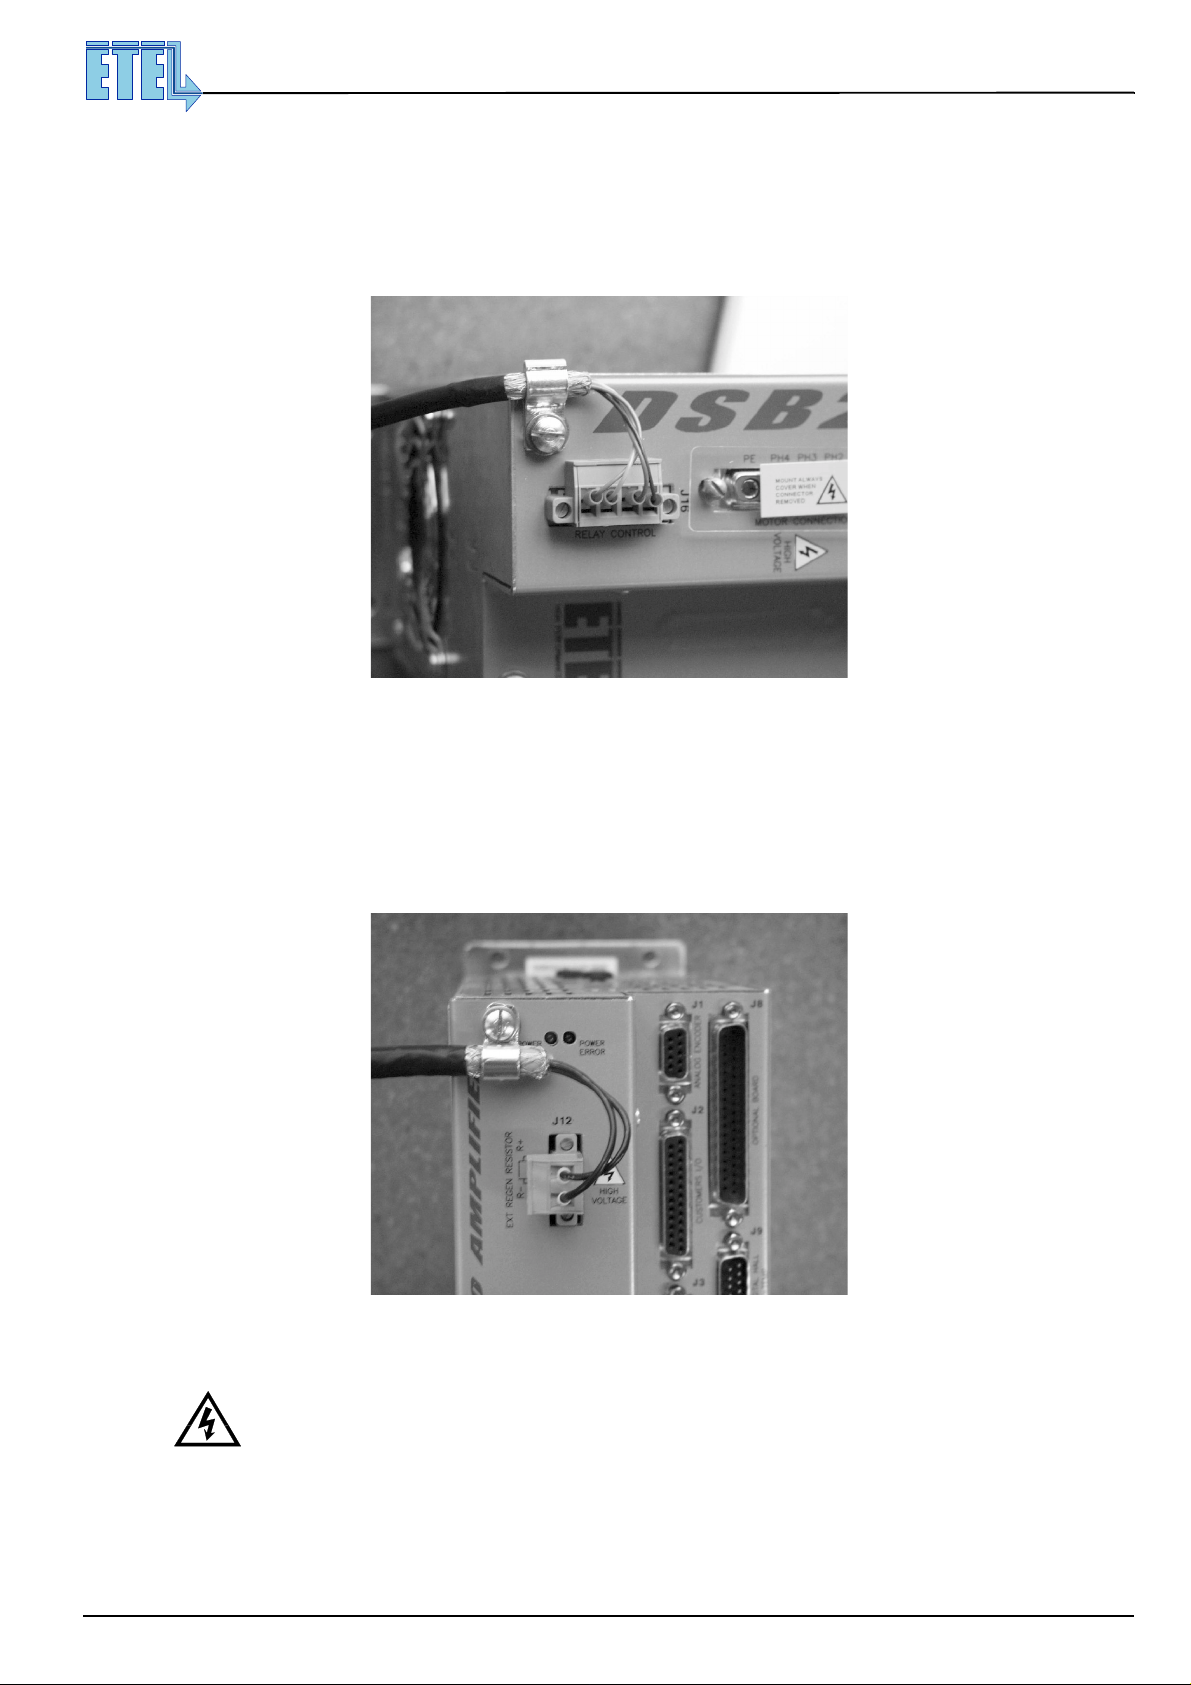
Hardware manual DSB2-P
Direct Drives & Systems
MOTION TECHNOLOGY
3.7.2 Connecting the short-circuit relay power cable's shield (J16)
On the DSB2-P (co nnector J16), it is necessary to add a conductive cable hol der, connected to the metal
housing with the e xisting screw. A contact on 360° between the shield a nd the cable holder is ne eded, as
shown below:
47
3.7.3 Connecting the external regeneration resistor cable's shield (J12)
On the DSB2-P (co nnector J12), it is necessary to add a conductive cable hol der, connected to the metal
housing with the e xisting screw. A contact on 360° between the shield a nd the cable holder is ne eded, as
shown below:
3.7.4 Cables installing
Danger: Before installing or disconnecting the power cables: Turn off all power supplies
and wait 10 minutes to allow the internal DC bus capacitors to discharge.
The power connectors must always be screwed correctly on the drive.
It is also recommended to fasten the cables on the system.
Power cables from/to the DSB2-P should be kept close together and separated from signal cables, if possible.
ETEL Doc. - Hardware manual # DSB2P 904 / Ver. D / 4/11/02
Page 48
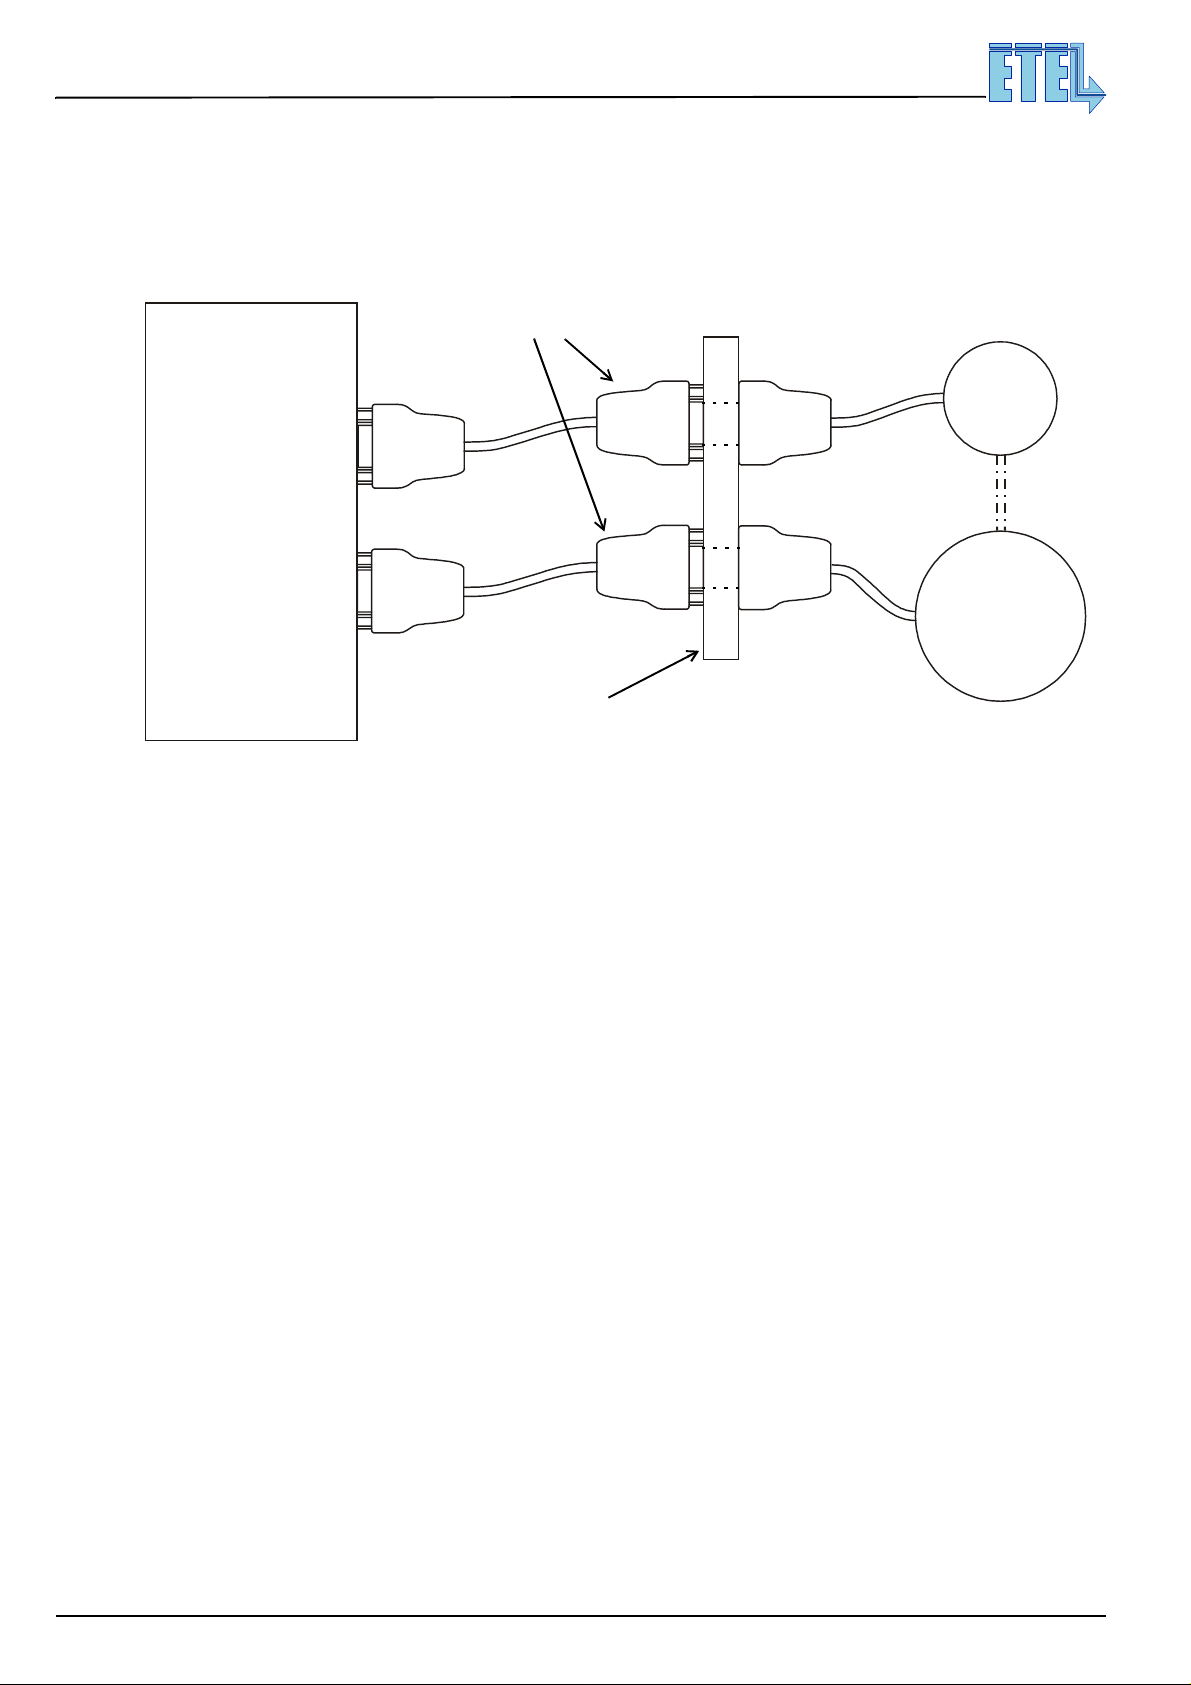
48
Hardware manual DSB2-P
Direct Drives & Systems
MOTION TECHNOLOGY
Remark: If th ere are additio nal connectors a long shielded cables, they must be fast ened and insu lated
so that their shells will not come into contact. This is to avoid having ground loops, where
parasitic currents could circulate.
You should install your cables as outlined below:
Additional connectors
DSB2-P
ENCODER
MOTOR
Insulating plate
Insulating plate
to fasten the connectors
to fasten the connectors
ETEL Doc. - Hardware manual # DSB2P 904 / Ver. D / 4/11/02
 Loading...