

Page 1

TM
User Manual
Revision C
All rights reserved. Product information and specifications subject to change.
Copyright © 2016 Electronic Theatre Controls, Inc.
Part Number:
7063M1220
Released: March 2016
Rev: C
Page 2

Page 3

Table of Contents
Introduction . . . . . . . . . . . . . . . . . . . . . . .1
Basic Assembly . . . . . . . . . . . . . . . . . . . . .2
Install Lens Tube . . . . . . . . . . . . . . . . . . . .3
Adjustments . . . . . . . . . . . . . . . . . . . . . . .3
Adjusting the yoke position . . . . . . . . . . . . 3
Setting the angle with the yoke . . . . . . . 3
Locking the rotation in the canopy
and track-mount variations . . . . . . . . . . . 4
Focusing the beam . . . . . . . . . . . . . . . . . . 4
Shaping the Beam . . . . . . . . . . . . . . . . . . . .4
Pattern Projection. . . . . . . . . . . . . . . . . . .5
Color Frame Holder . . . . . . . . . . . . . . . . . . .5
Adjusting the C-clamp on the Portable . . . 6
Cleaning the Glass Lens . . . . . . . . . . . . . .7
ETC® and Source Four mini™ are trademarks of Electronic Theatre Controls, Inc.
in the United States and other countries.
All other trademarks, both marked and not marked, are the property of their
respective owners.
ETC permits the reproduction of materials in this manual only for noncommercial purposes. All other rights are reserved by ETC.
ETC intends this document, whether printed or electronic, to be provided in its
entirety.
Page 4

Page 5
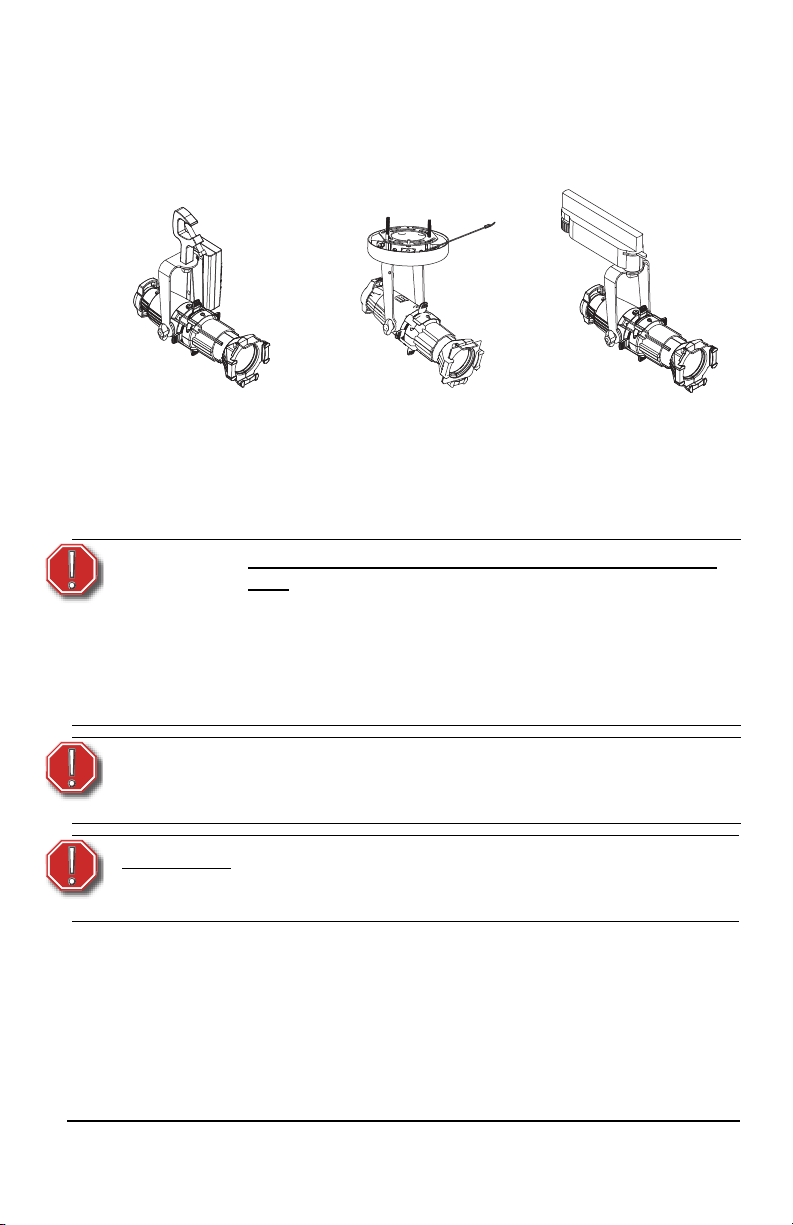
Introduction
Portable TrackCanopy
The Source Four Mini LED has three available mounting options. The portable
version includes a miniature C-clamp and yoke mounted driver. The canopyand track-mount designs both include an integral driver. There are four lens
tube sizes available for each mounting style; 19°, 26°, 36°, and 50°.
This manual covers the common features for all three versions of the Source
Four Mini LED. For information on installing the canopy and track-mount
variations, see the Source Four Mini LED Canopy and Track-Mount Kits
Installation Guide. For information on adjusting the miniature C-clamp on the
portable variation, see Adjusting the C-clamp on the Portable on page 7.
WARNING:
Please note the following safety warnings before
use:
Do not mount the fixture on or near combustible
surfaces.
Do not operate the fixture without a lens installed.
Always hang the fixture with the color frame
retaining clip in the locked position.
WARNING:
AVERTIR:
ETC User Manual 1
To reduce the risk of fire and electric shock, use the
track mount version only with the EUTRAC
system.
Pour éviter le risque d'incendie ou de choc électrique
utiliser seulement avec une alimentation par rail
EUTRAC.
®
track
Page 6
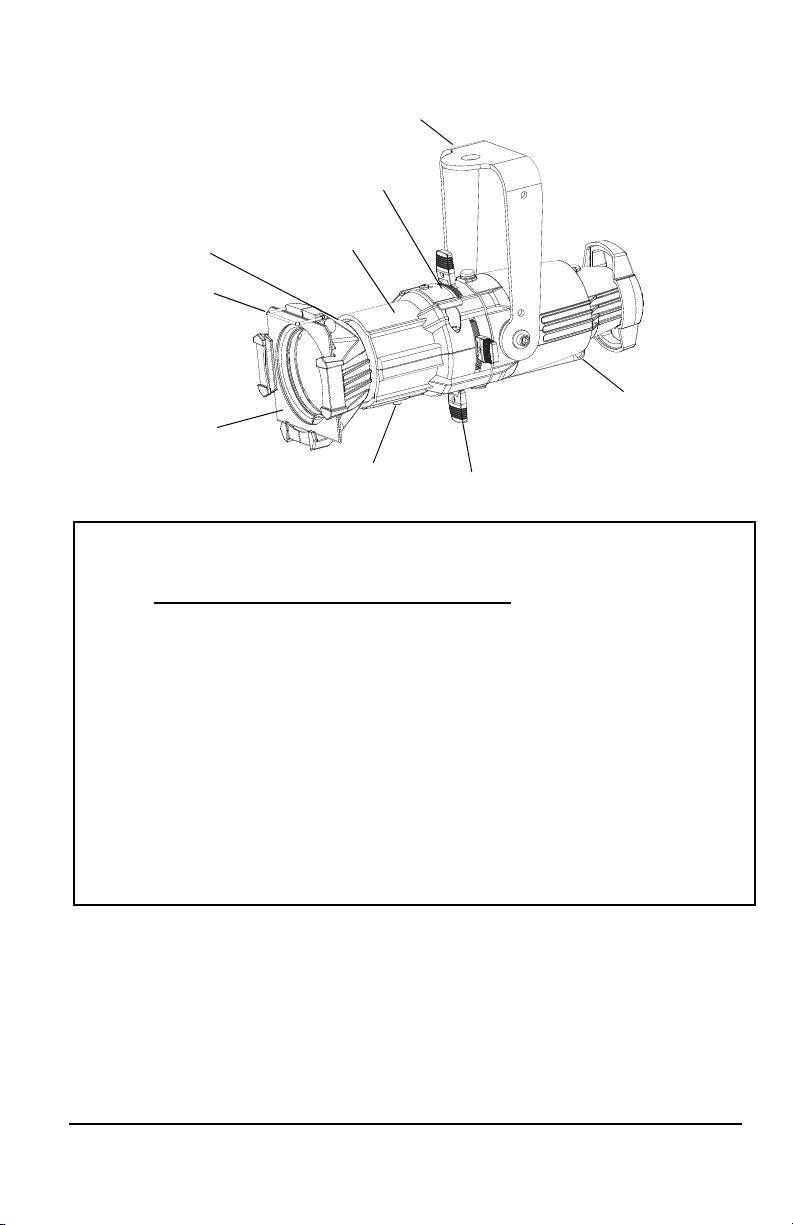
Basic Assembly
Color frame
retainer clip
Yoke
Pattern Holder
Slot
Shutter Barrel
Color frame
Shutters x4
Lens tube
Beam focus
knob
Safety cable
attachment point
INSTRUCTIONS PERTAINING TO A RISK OF FIRE, ELECTRIC SHOCK, EXPOSURE
TO EXCESSIVE UV RADIATION, OR INJURY TO PERSONS
IMPORTANT SAFETY INSTRUCTIONS
WARNING - To reduce the risk of FIRE, ELECTRIC SHOCK, EXPOSURE TO
EXCESSIVE UV RADIATION, OR INJURY TO PERSONS:
1) Do not touch hot lens, guard, or enclosure.
2) Do not remain in light if skin feels warm.
3) Do not look directly at lighted lamp.
4) Keep lamp away from materials that may burn.
5) External temperature after 5 minutes of full-brightness operation 50°C
(122°F)
6) External temperature when steady state is achieved 67°C (152.6°F).
SAVE THESE INSTRUCTIONS
2 Source Four Mini LED User Manual
Page 7
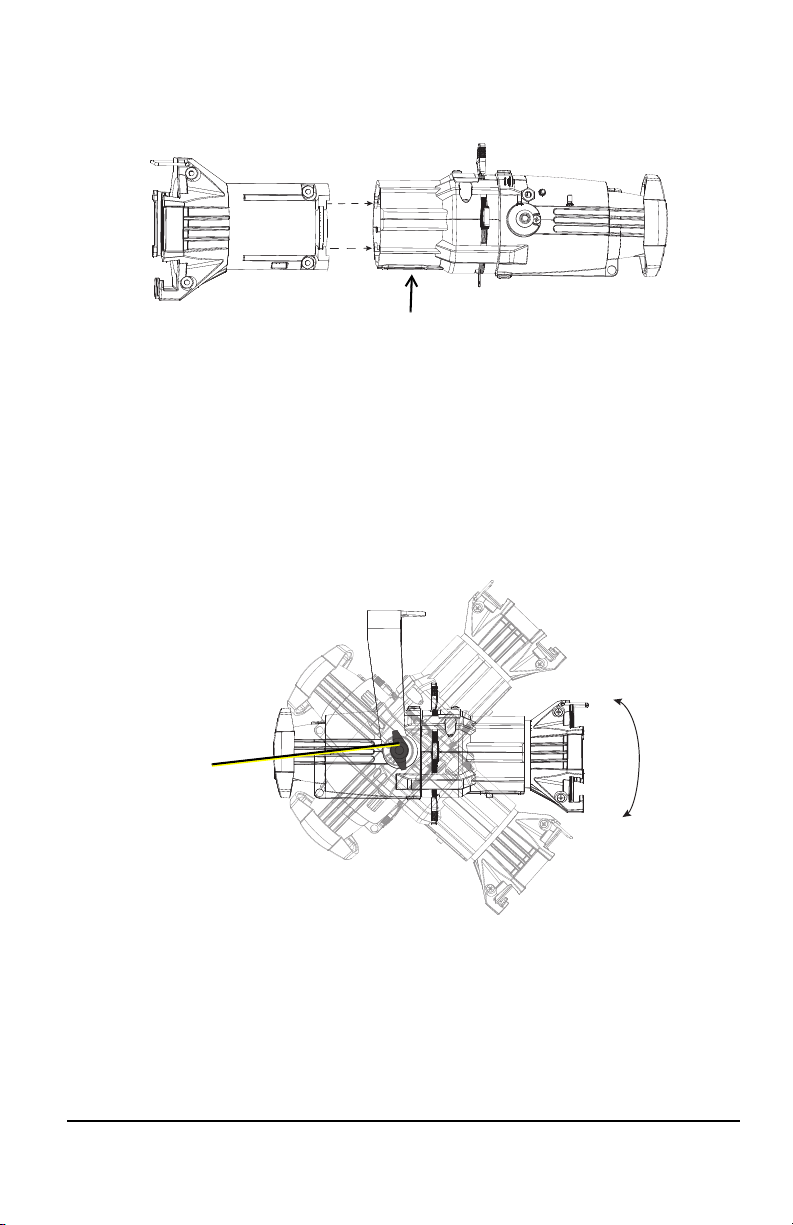
Install Lens Tube
Beam focus knob
Yoke locking
knob
A lens tube must be installed prior to use of the Source Four Mini LED. There
are four lens tube sizes available; 19°, 26°, 36°, and 50°.
Step 1: Unscrew the beam focus knob from the loose lens tube.
Step 2: Slide the lens tube into the shutter barrel.
Step 3: Install the beam focus knob.
Adjustments
Adjusting the yoke position
The Source Four Mini LED provides multi-positioning capabilities within its
yoke for overall fixture angle.
Setting the angle with the yoke
Step 1: Loosen the yoke locking knob. Do not remove the knob.
Step 2: Tilt the fixture to the desired position.
Step 3: Tighten the yoke locking knob to secure position.
ETC User Manual 3
Page 8
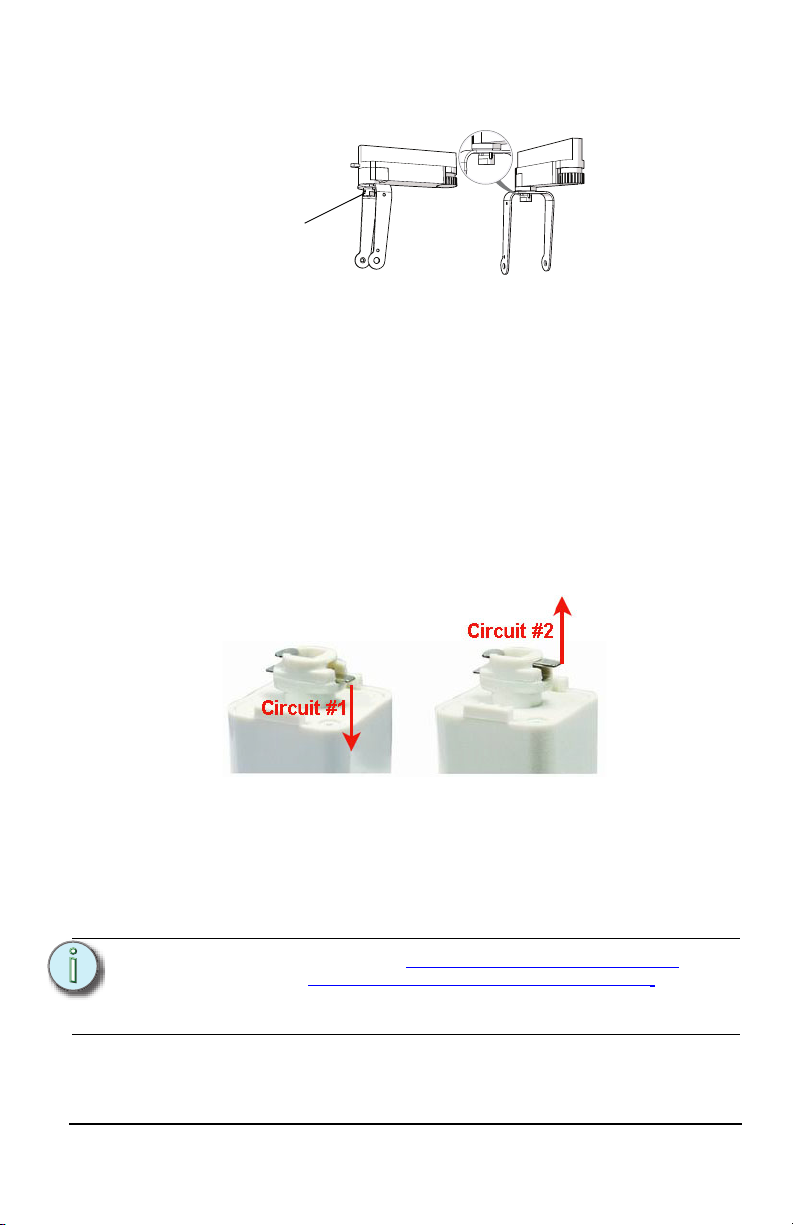
Locking the rotation in the canopy and track-mount
Yoke lock
variations
Step 1: Rotate the fixture into the desired position. Fixture will be prevented
from rotating completely around to protect the wiring.
Step 2: Insert a 1.5mm Allen wrench into the small hole on the yoke lock.
Step 3: Turn wrench to tighten down the yoke lock.
AD1 Track Adapter
ETC offers the option of installing a track mounted fixture with an adapter that
is compatible with Halo Track Systems. Halo Track Systems are not available
from ETC.
Both single and double circuit track can be accommodated with this adapter.
• For single circuit track, push the tab on the adapter to the lower
position.
• For double circuit track, push the tab to the upper position.
To install a fixture with the AD1 adapter:
Step 1: Pull back on the retaining sleeve.
Step 2: Insert the adapter into the track with the gold tabs parallel to the
track.
Step 3: Release the sleeve and rotate until you feel the adapter snap
securely into place.
Note:
4 Source Four Mini LED User Manual
If installing with LSI (http://www.lightingservicesinc.com/) or
Global (http://www.nordicaluminium.fi/en/index.html) track,
please reference the manufacturer's website for installation
instructions.
Page 9
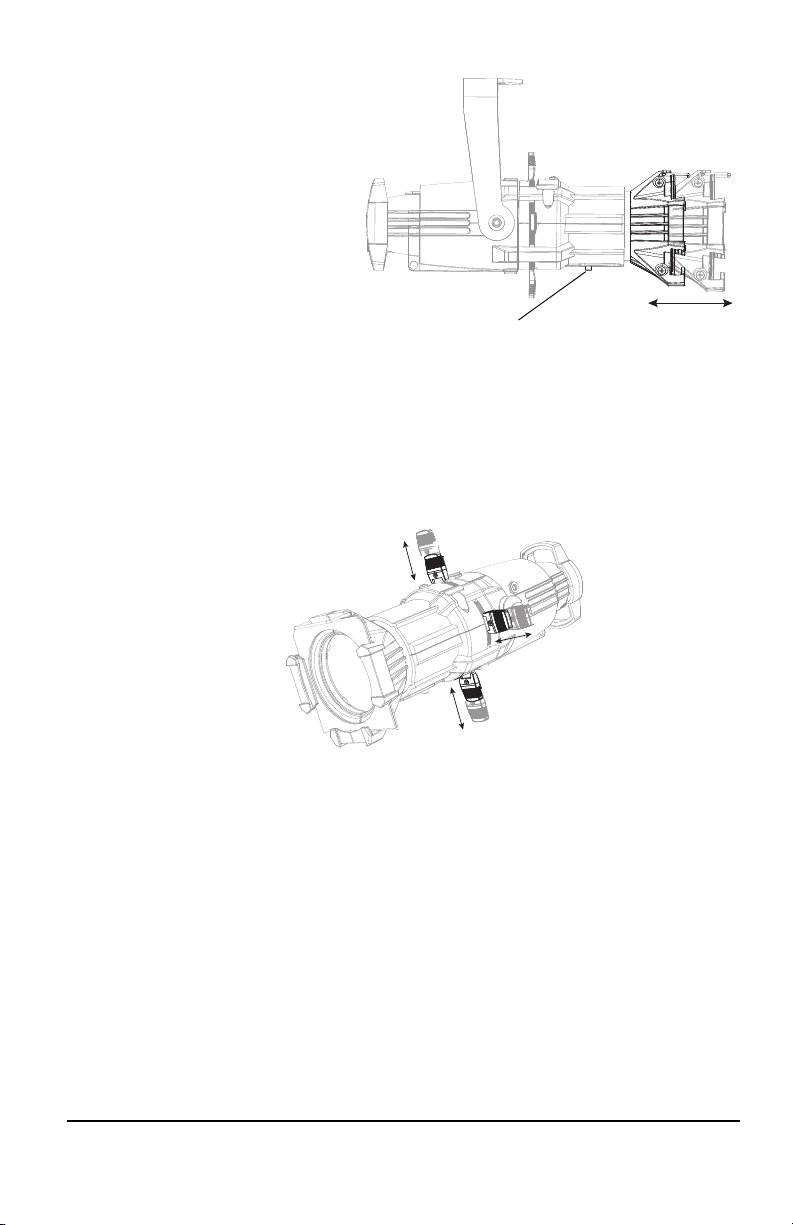
Focusing the beam
Beam focus knob
Step 1: Loosen the
beam focus
knob located
under the
barrel. Do not
remove the
knob.
Step 2: Slide the lens
tube forward or
backward to
achieve the
desired beam
edge.
Step 3: Once the fixture is focused, tighten the beam focus knob.
Shaping the Beam
The beam can be shaped using the four shutters or with a pattern.
The Source Four Mini LED has four shutters: left, right, top, and bottom. Each
shutter can be pulled out or pushed in to create the desired beam shape.
Pattern Projection
The Source Four Mini LED has a pattern holder slot on the top side of the
shutter barrel, in front of the shutter. It accommodates a E-size (37.5mm with
a 25.4mm image area) pattern holder.
Use an optional donut in the color frame holder to enhance pattern
projection.
When the slot is not in use, a small sheet metal cover secured with a Phillips
screw prevents light leakage.
ETC User Manual 5
Page 10
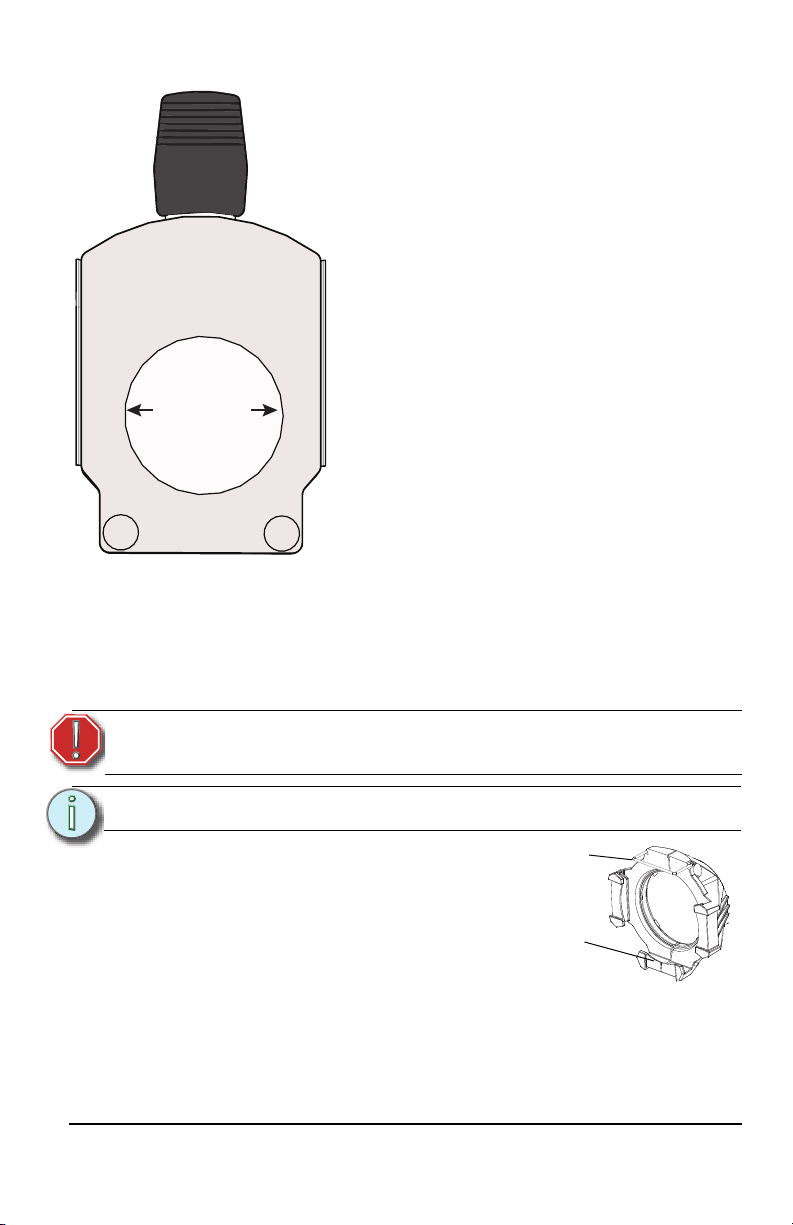
1” Diameter
Step 1: Use a Phillips screwdriver to loosen the
screw on the slot cover. Do not remove the
screw.
Step 2: Slide the cover completely forward to
expose the slot.
Step 3: Insert the pattern holder.
Step 4: Slide the slot cover back toward the
shutters until it meets the pattern handle.
Leave enough space to move the handle.
Step 5: Secure the slot cover by tightening the
screw.
Retaining
clip
Color Frame Holder
Color Frame Holder
The Source Four Mini LED comes equipped with a 2 ¾” or 70mm color frame,
which is a metal frame used to hold color media (often referred to as gel) in
front of the lens. The color frame holder is equipped with a retaining clip that
prevents the color frame from falling out.
WARNING:
Make sure the color frame is locked in position with
the retaining clip.
Note:
The color frame should be inserted open side down.
Step 1: Release the retaining clip by gently
pushing it up.
Step 2: Insert the color frame.
Step 3: Lock the retaining clip by gently
pushing it down.
Additional accessories are available for the Mini
LED that also fit into the color frame holder.
Those accessories are top hat, short top hat, half hat, short half hat, and
donut. When an accessory is used, the color frame should be installed in the
rear slot of the holder.
6 Source Four Mini LED User Manual
Page 11
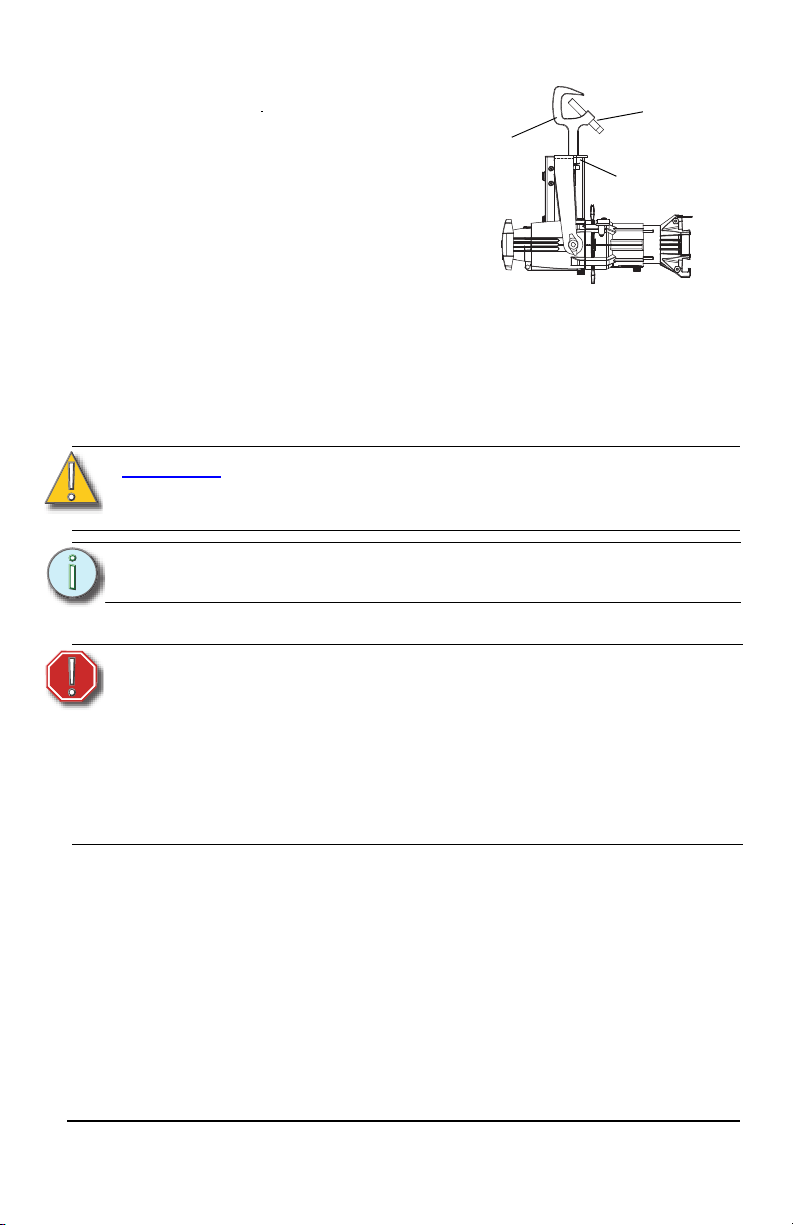
Adjusting the C-clamp on
Yoke bolt
Pipe bolt
C-clamp
the Portable
The C-clamp attaches the fixture to the
mounting pipe and allows you to adjust
the position of the fixture once it is
mounted. The C-clamp will fit a 3/8” to
1” pipe.
Step 1: Tightly fasten the C-clamp to
the yoke with the provided
yoke bolt and lock washer.
Step 2: Place the C-clamp on the mounting pipe, and then tighten the pipe
bolt to secure it.
Step 3: Loosen the C-clamp yoke bolt and rotate the yoke to the desired
position.
Step 4: Tighten the bolt to lock the fixture.
CAUTION:
Tighten the C-clamp pipe bolt to about 18in/lbs.
(Approximately finger tight plus up to one-quarter turn.)
Do not use excessive force.
Note:
The Source Four Mini LED yoke has a C-clamp hole with a .406”
diameter.
Cleaning the Glass Lens
WARNING:
Step 1: Remove the beam focus knob from the barrel.
Step 2: Remove the lens tube from the barrel.
Step 3: Remove dust with a blast of oil-free air or wipe with a clean, lint-free
Step 4: Slide the lens tube back into the barrel with the color frame retainer
Step 5: Reinstall the beam focus knob.
ETC User Manual 7
Do not use ammonia-based or other harsh commercial
cleaners. Clean lens only as directed.
Commercially available glass cleaning agents should
be avoided as they may contain ammonia, other
harsh chemical detergents, or abrasive agents. These
cleaners may damage the glass surface and the AntiReflective coatings. Do not immerse or soak the glass
in any cleaning solution.
cloth. Isopropyl alcohol, distilled water, or a 50%-50% mixture of
each can be used to clean the glass surface.
clip on the top.
Page 12

Corporate Headquarters
Middleton, Wisconsin, USA Tel +608 831 4116
Service: (Americas)
London, UK
Tel +44 (0)20 8896 1000 Service: (UK)
Rome, IT Tel +39 (06) 32 111 683 Service: (UK)
Holzkirchen, DE
Tel +49 (80 24) 47 00-0
Service: (DE)
Hong Kong Tel +852 2799 1220 Service: (Asia)
Web:
www.etcconnect.com Copyright © 2016 ETC. All Rights Reserved.
Product information and specifications subject to change
. ETC intends this document to be provided in its entirety.
7063M1220
Rev C Released 2016-03
 Loading...